Louie da fly
-
Posts
7,990 -
Joined
-
Last visited
Content Type
Profiles
Forums
Gallery
Events
Everything posted by Louie da fly
-
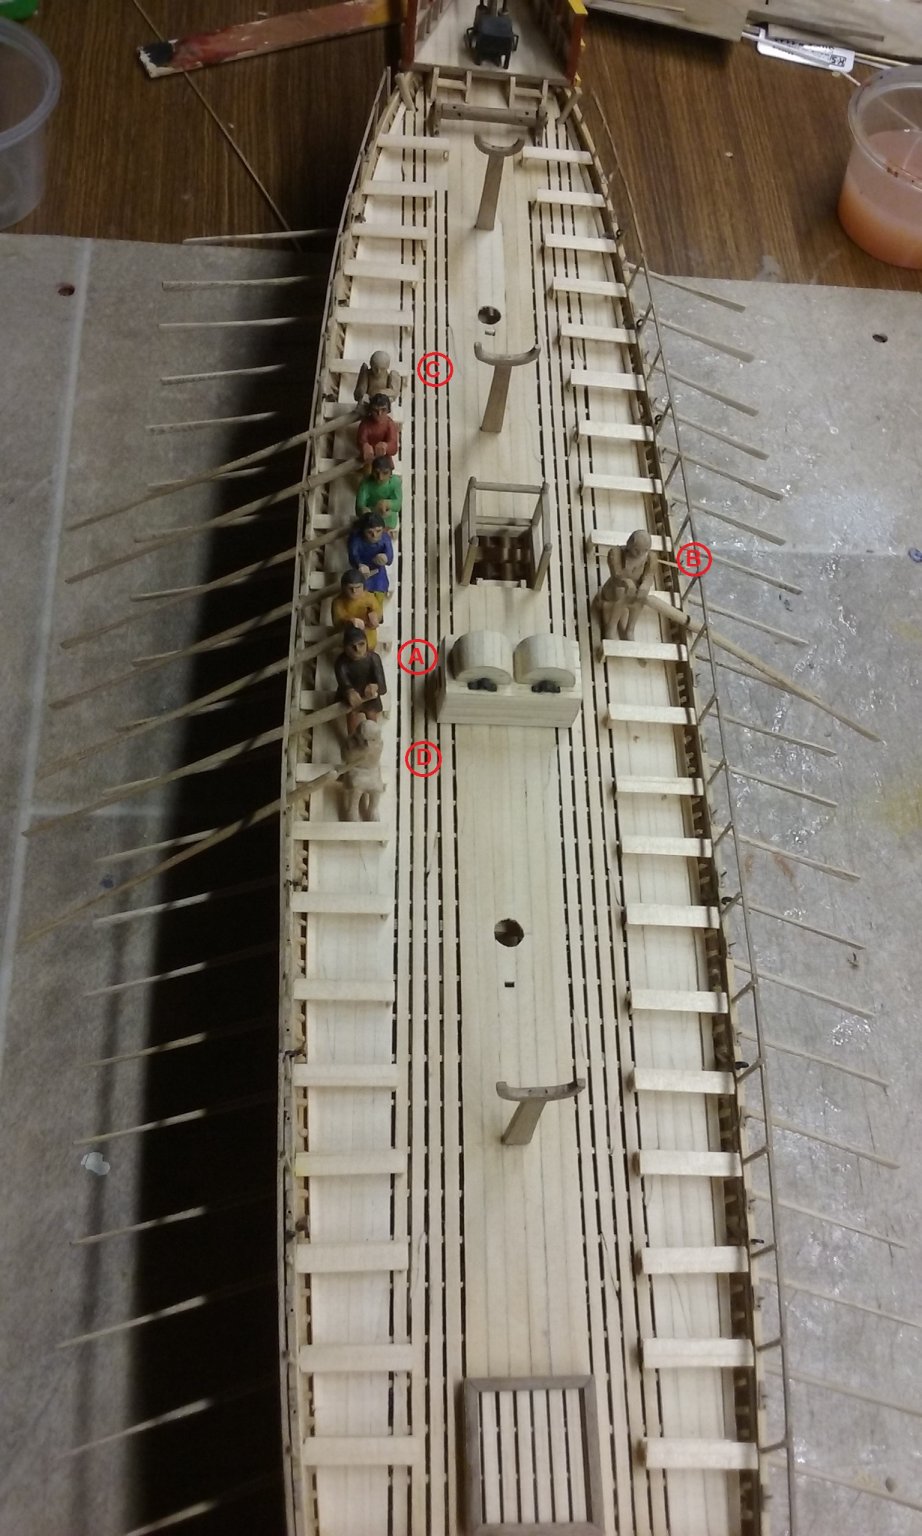
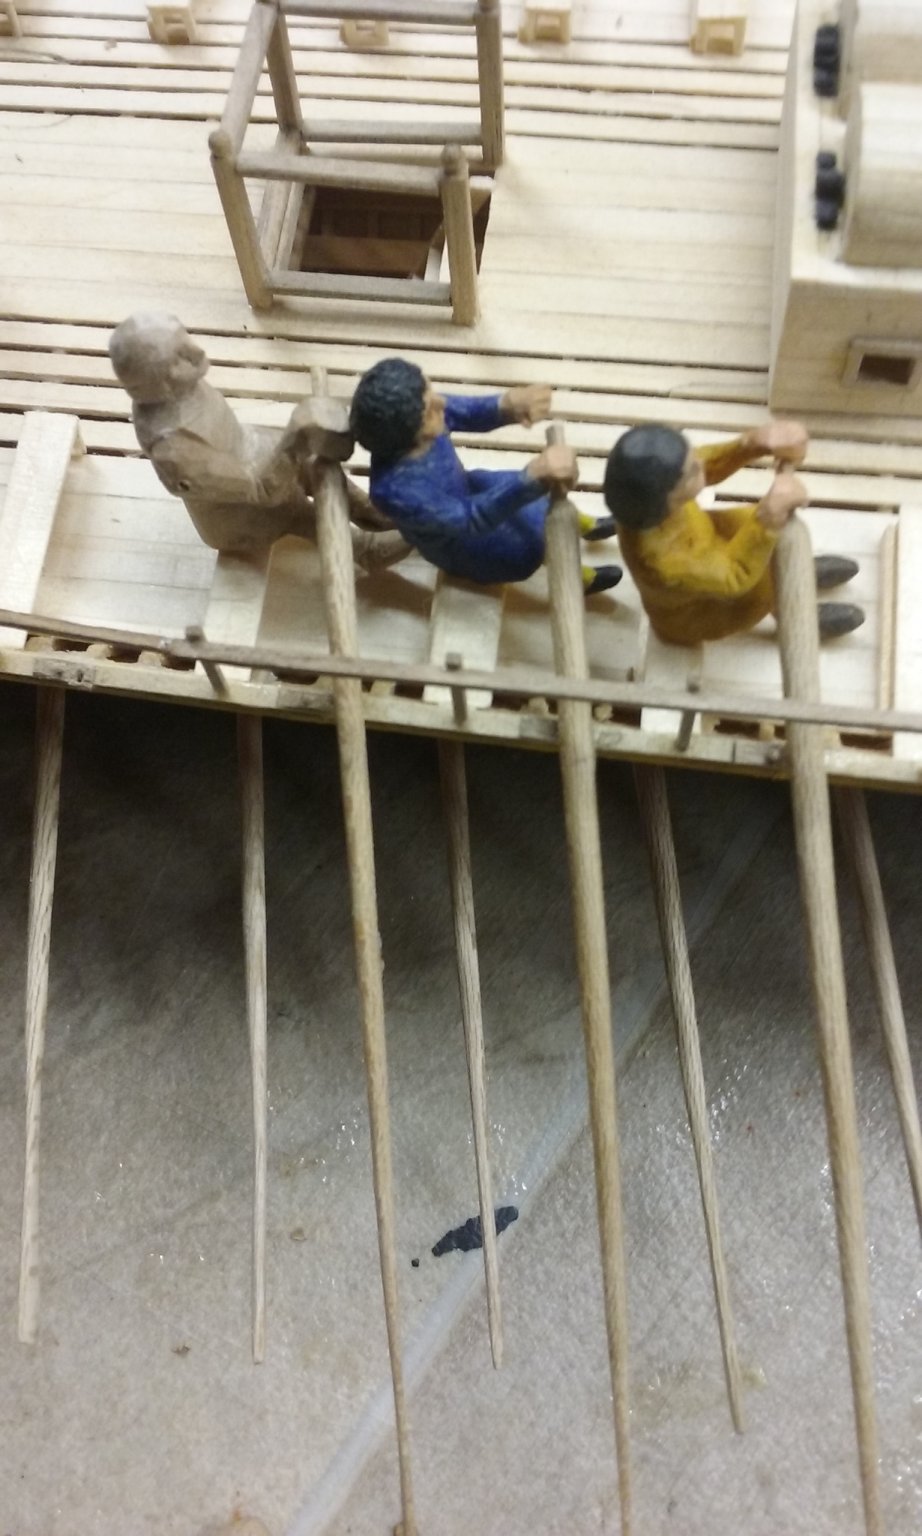
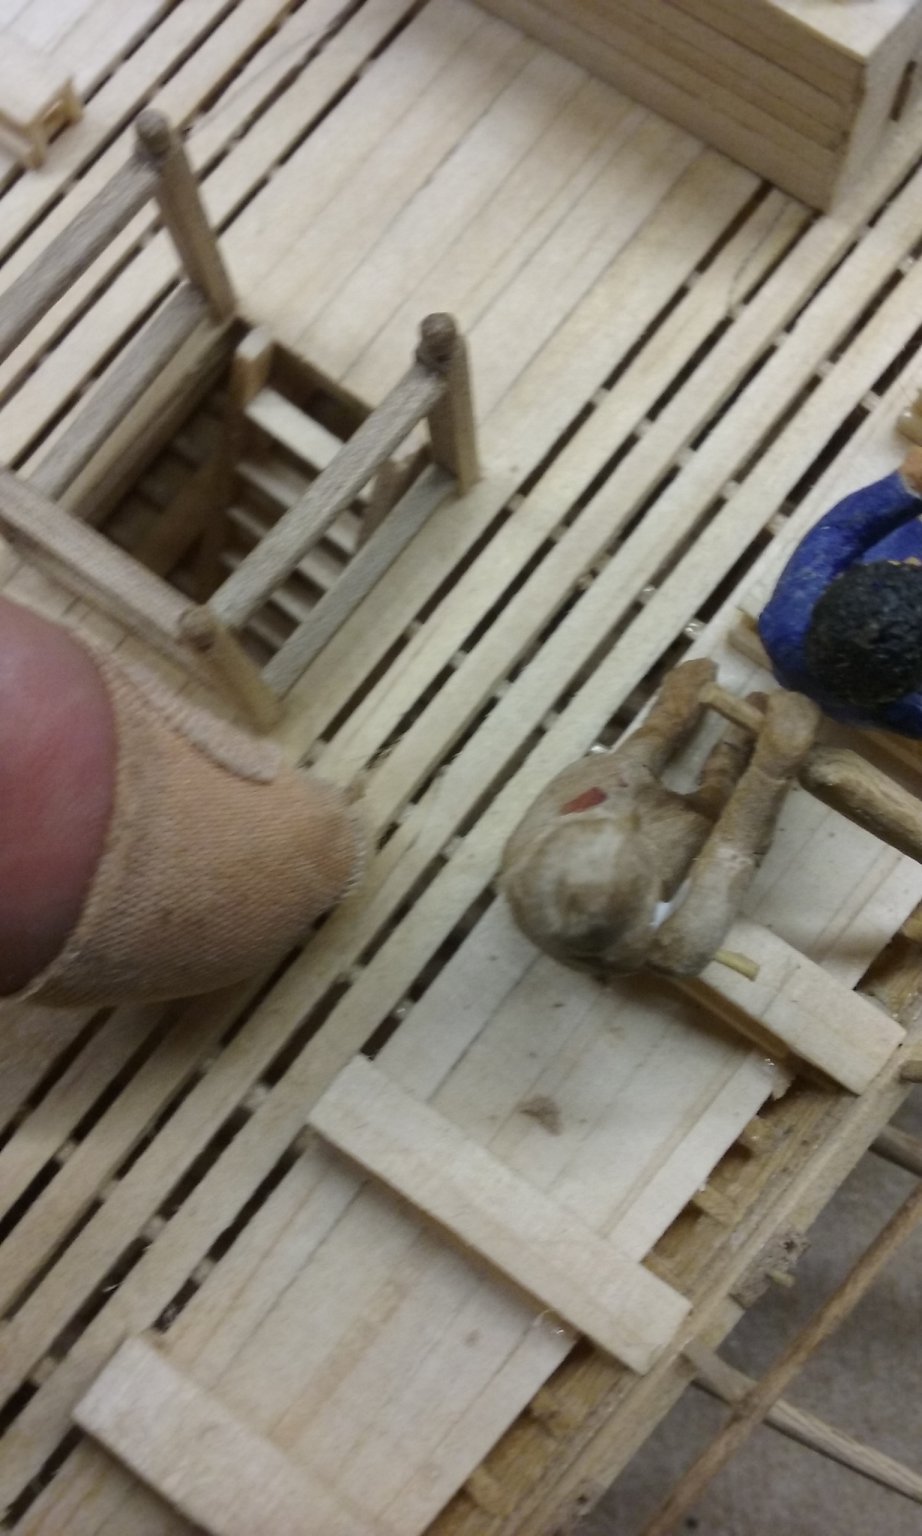
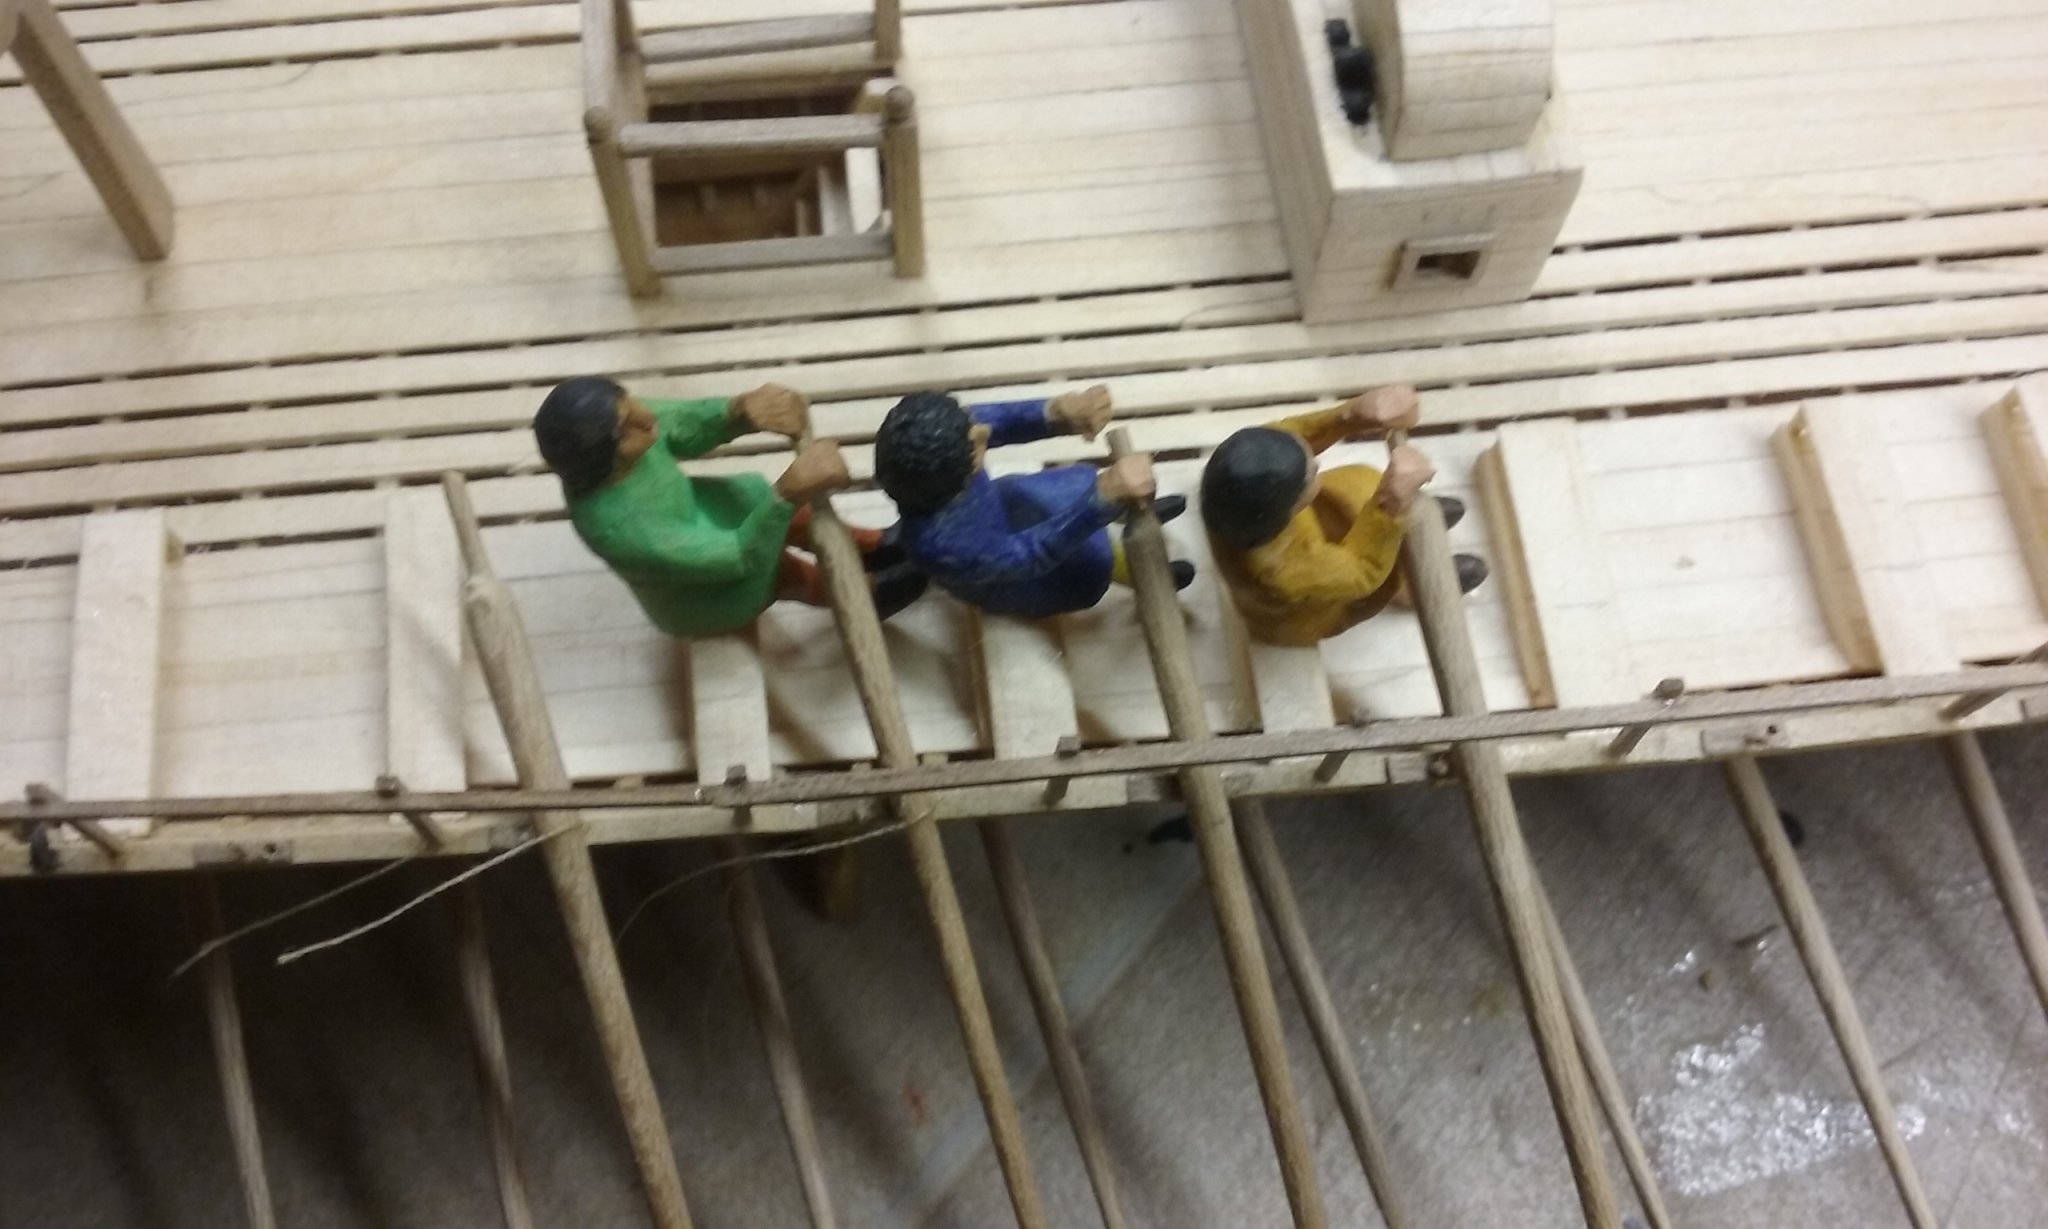
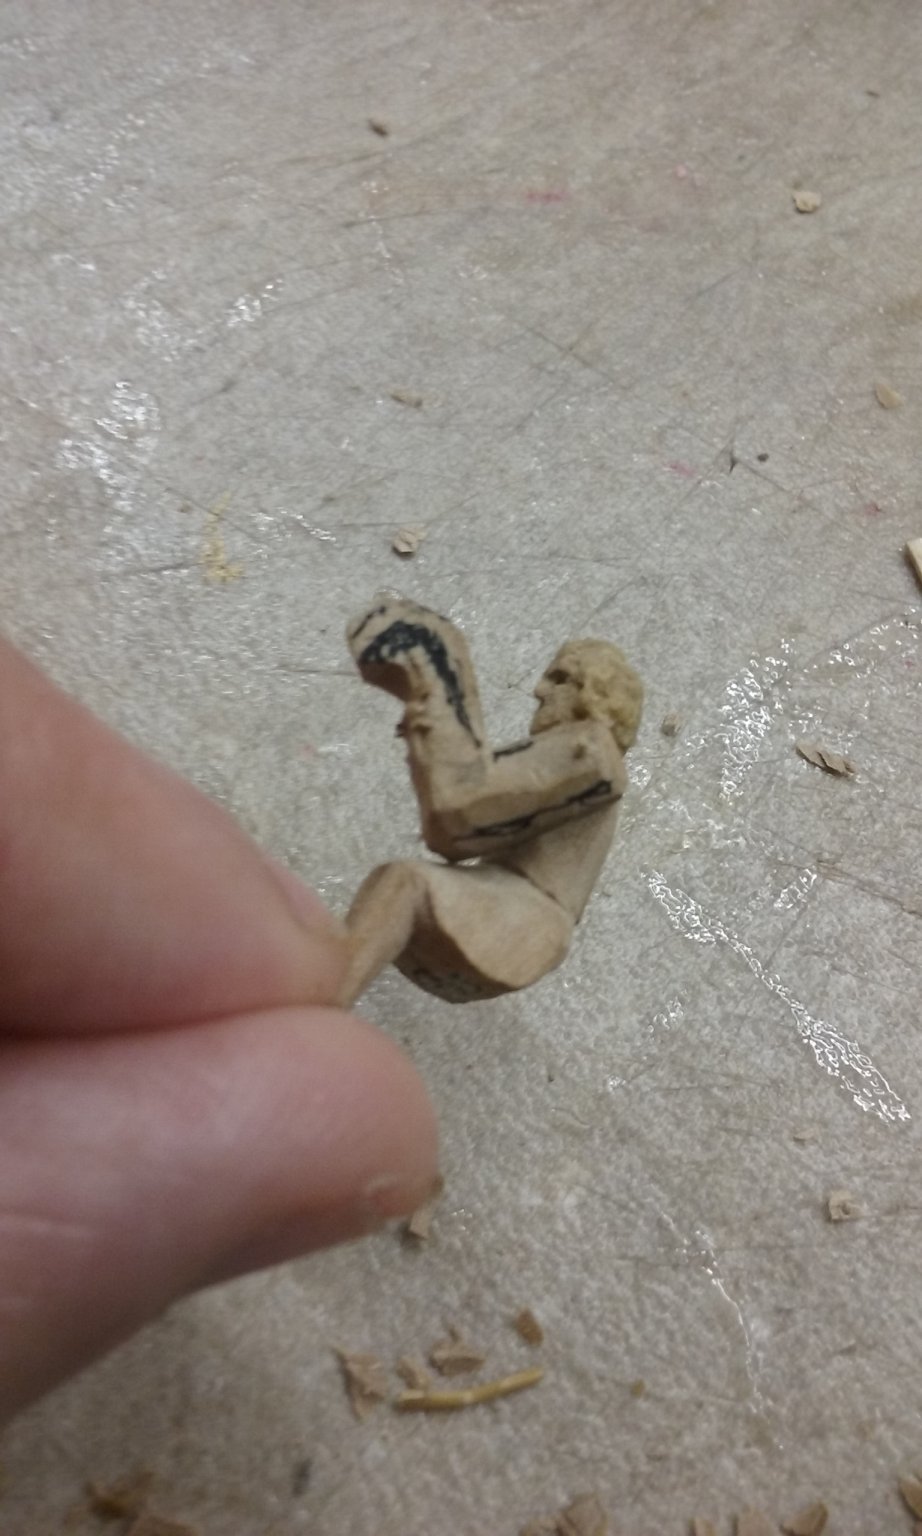
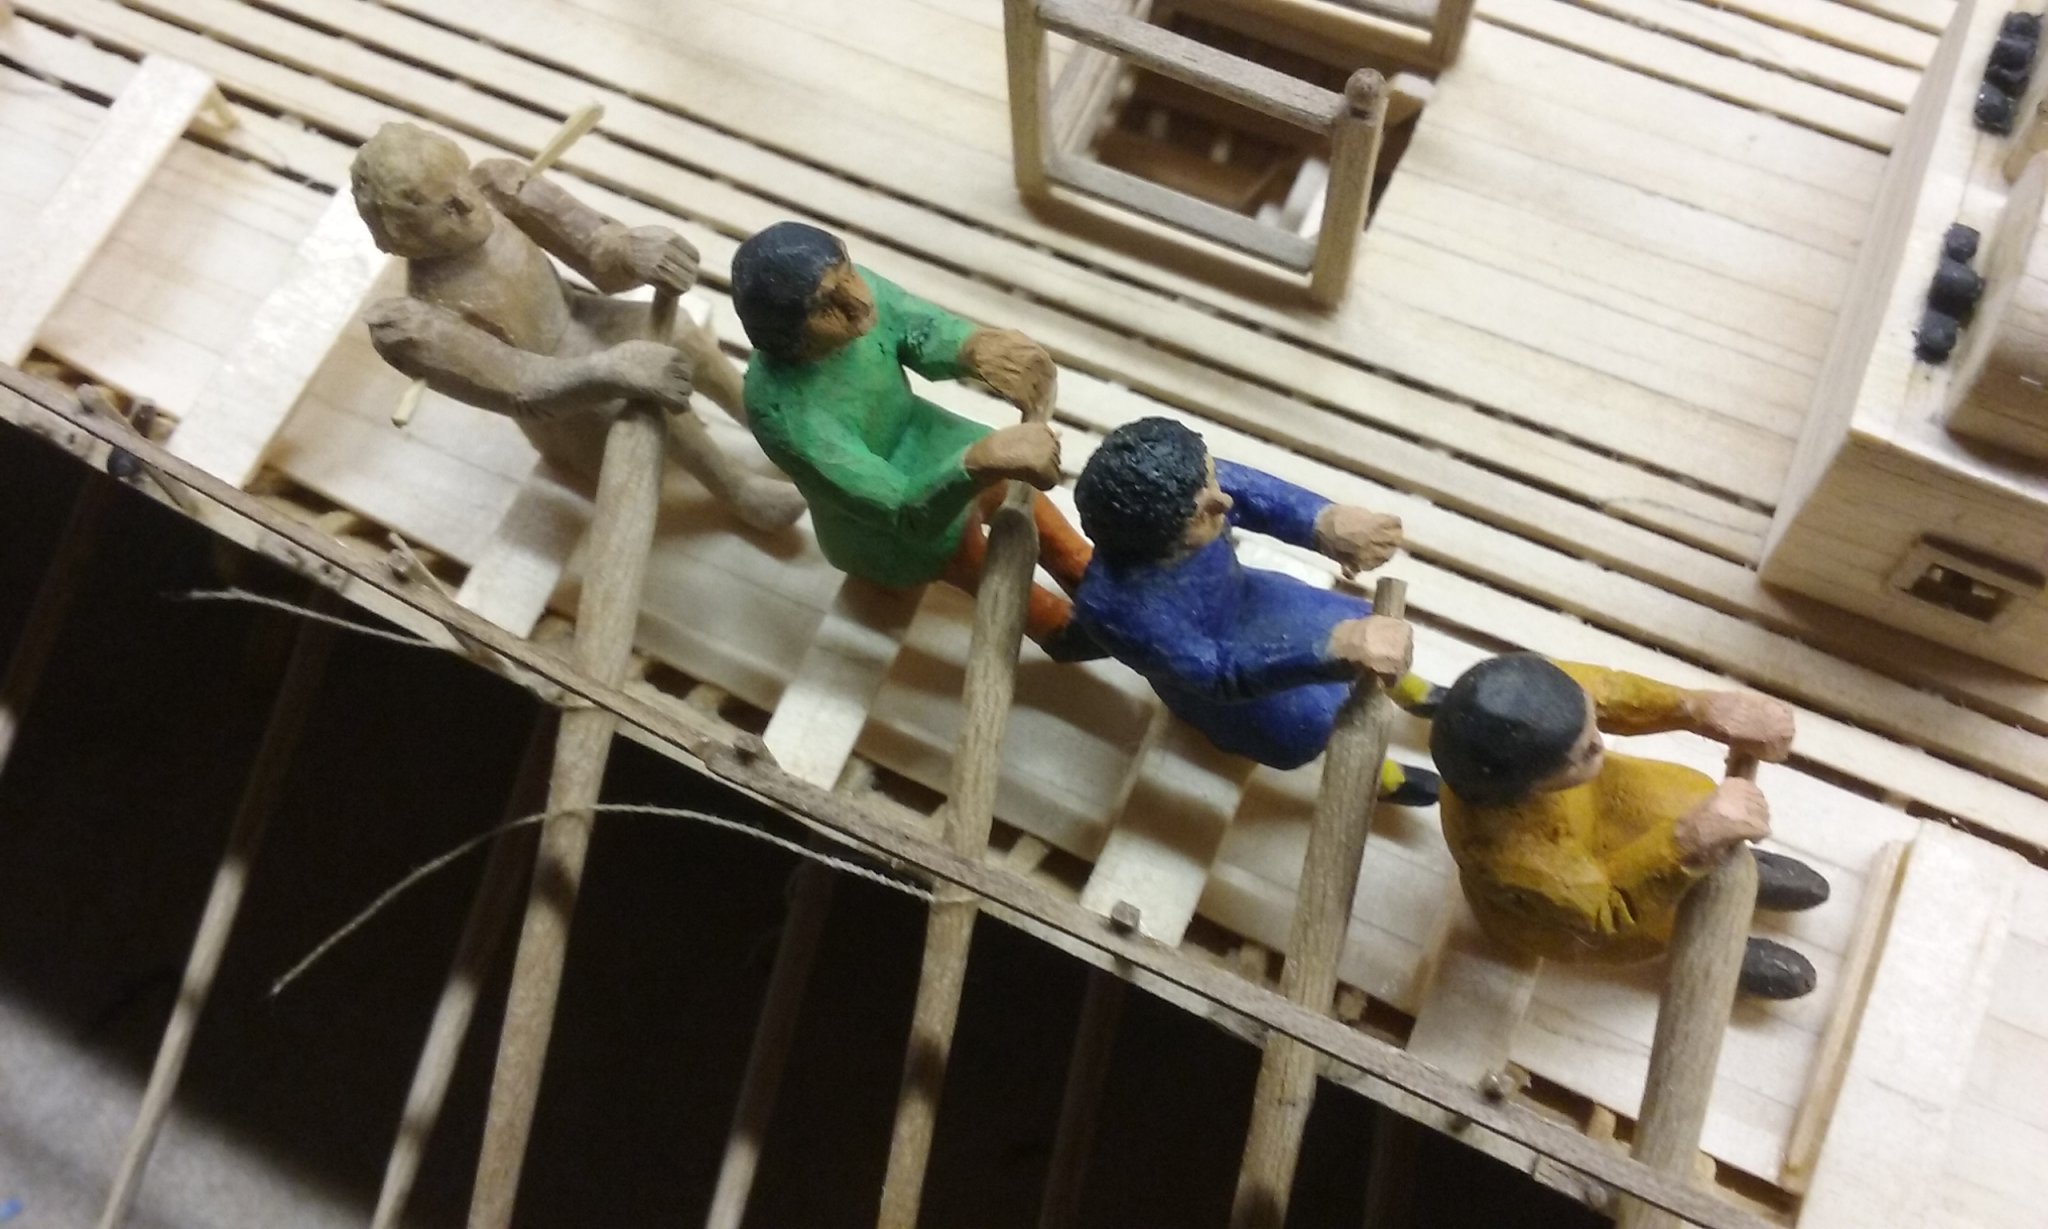
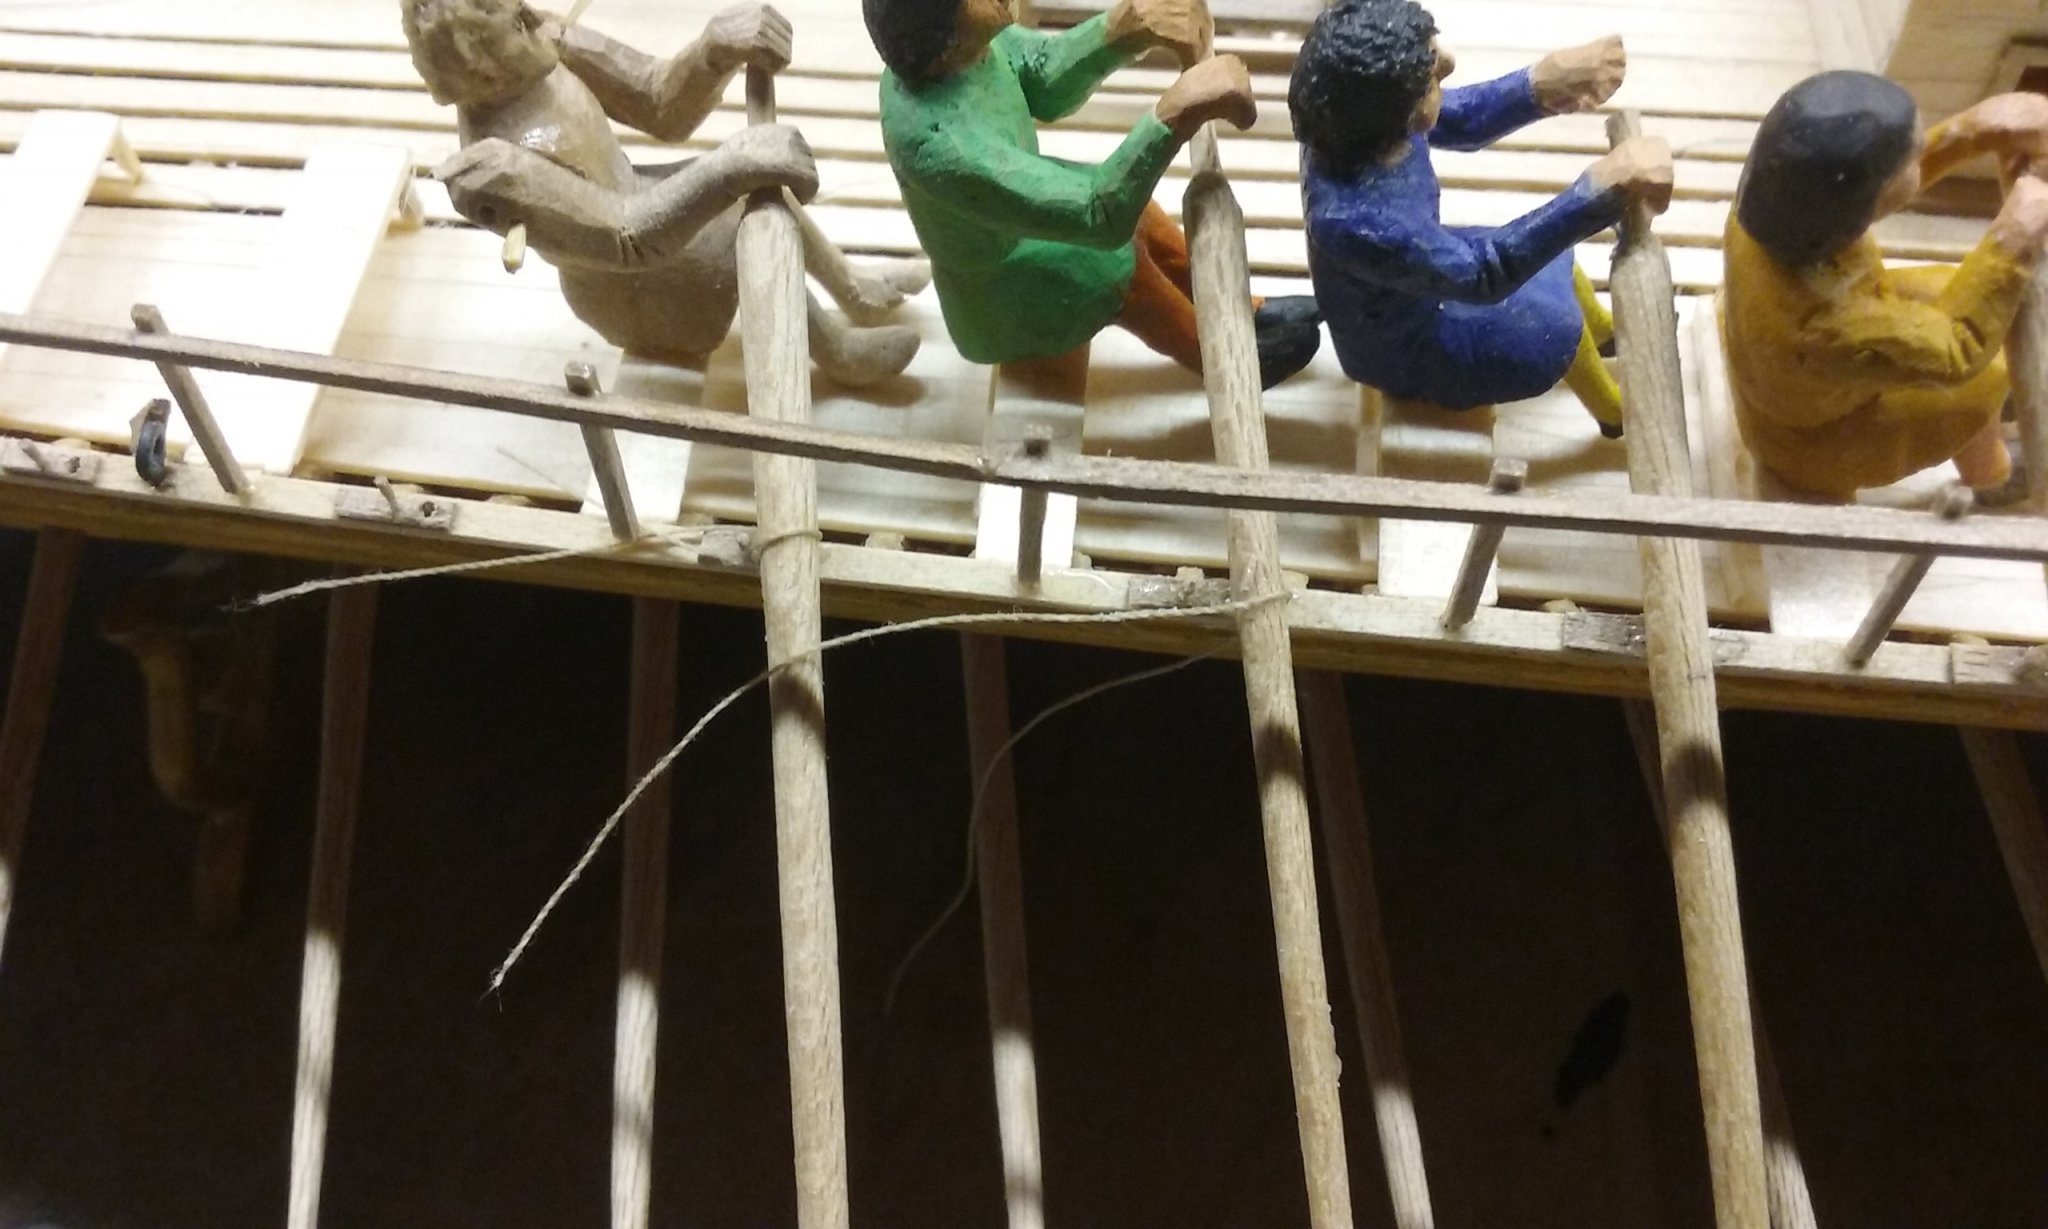
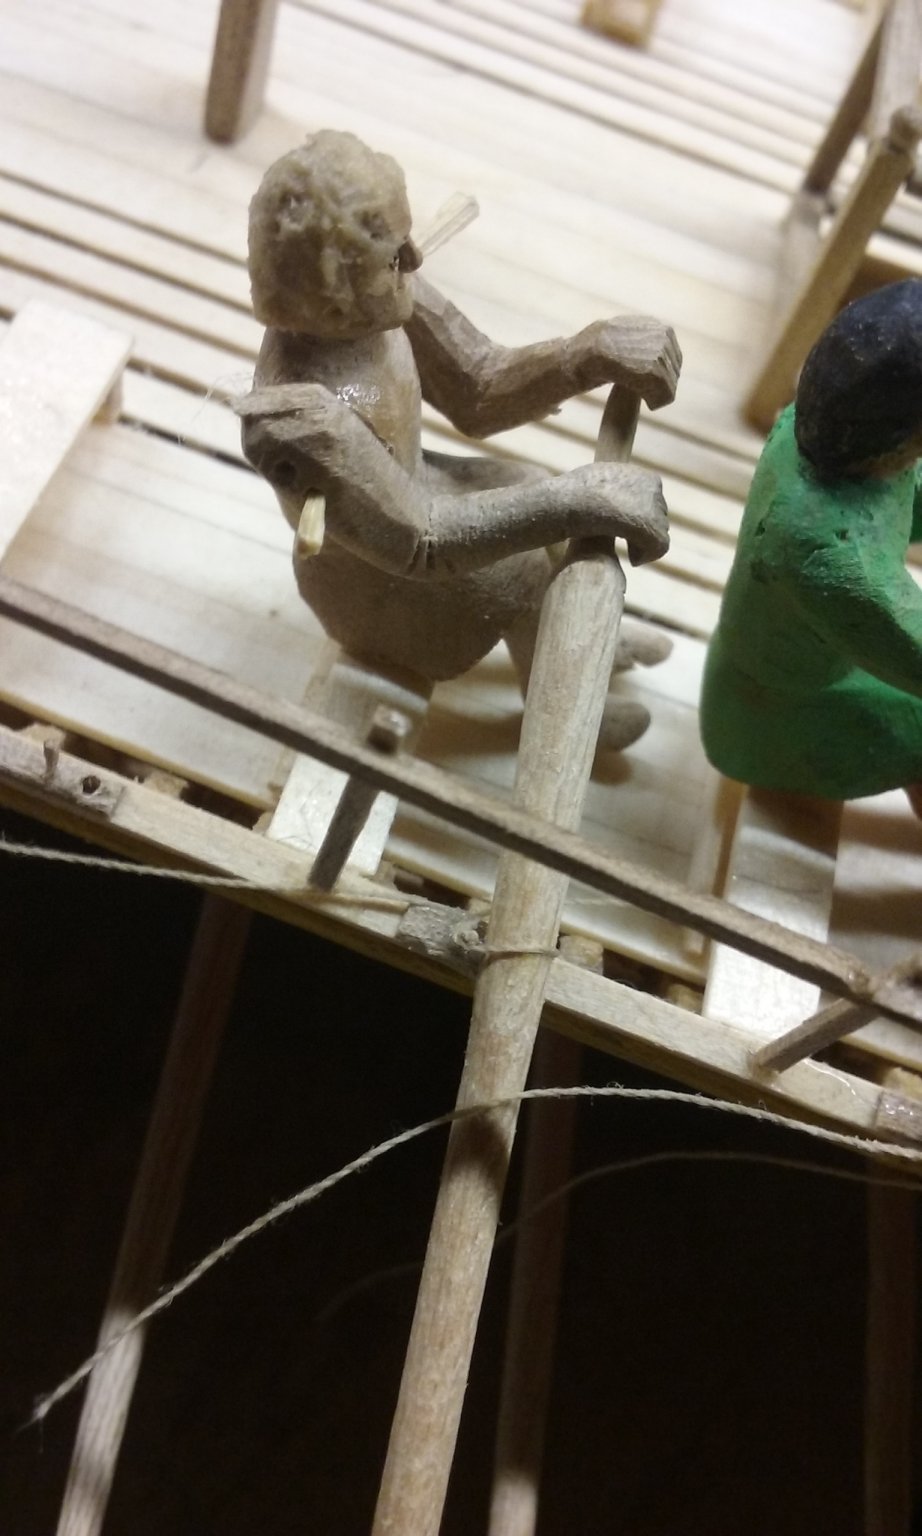
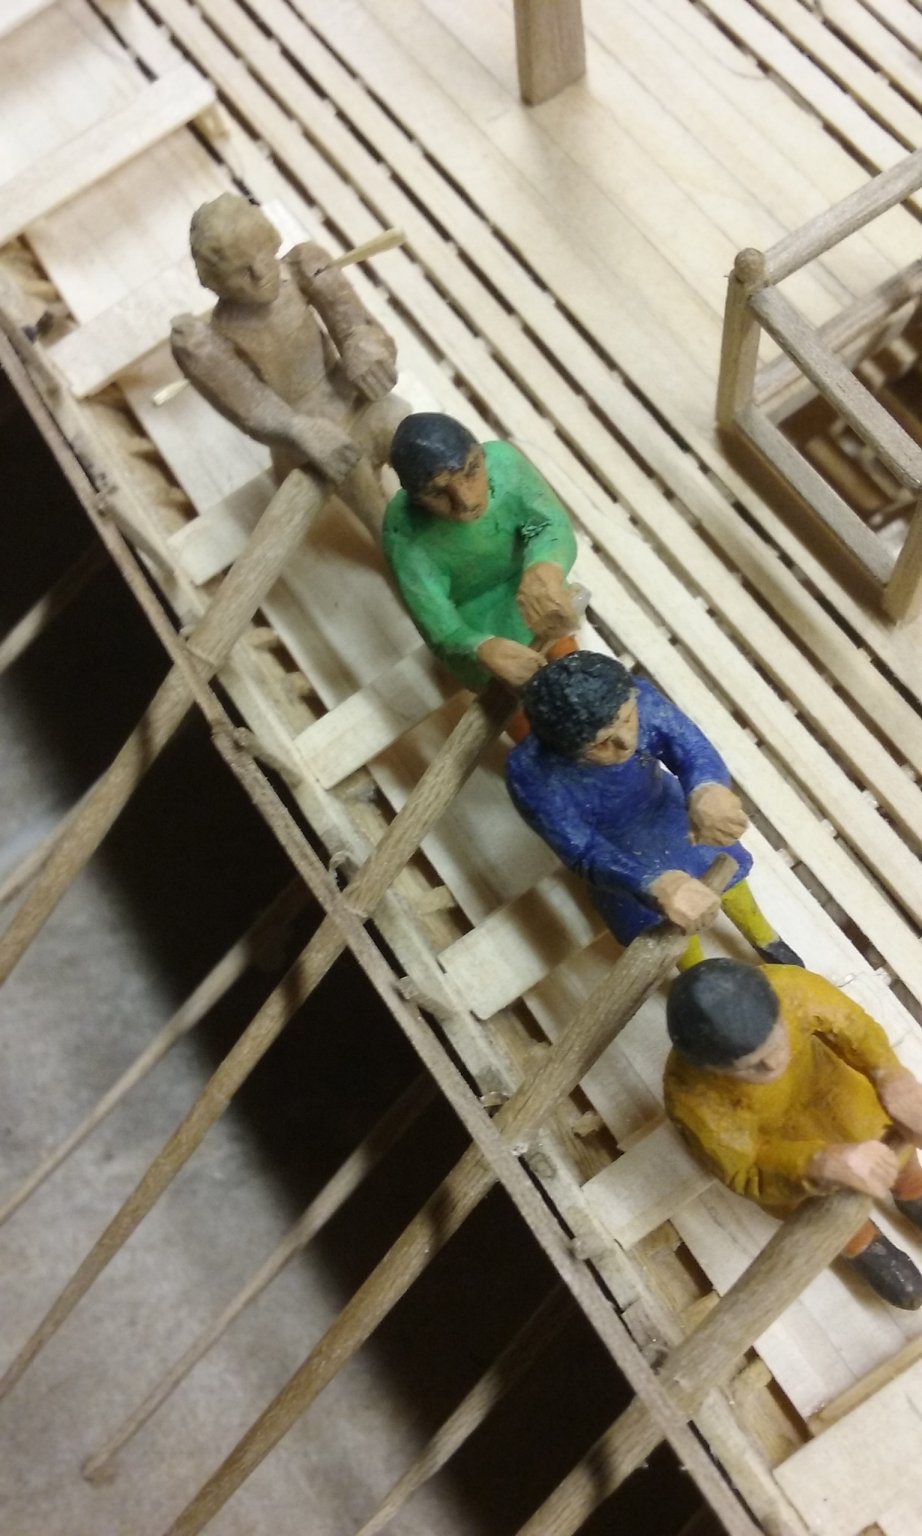
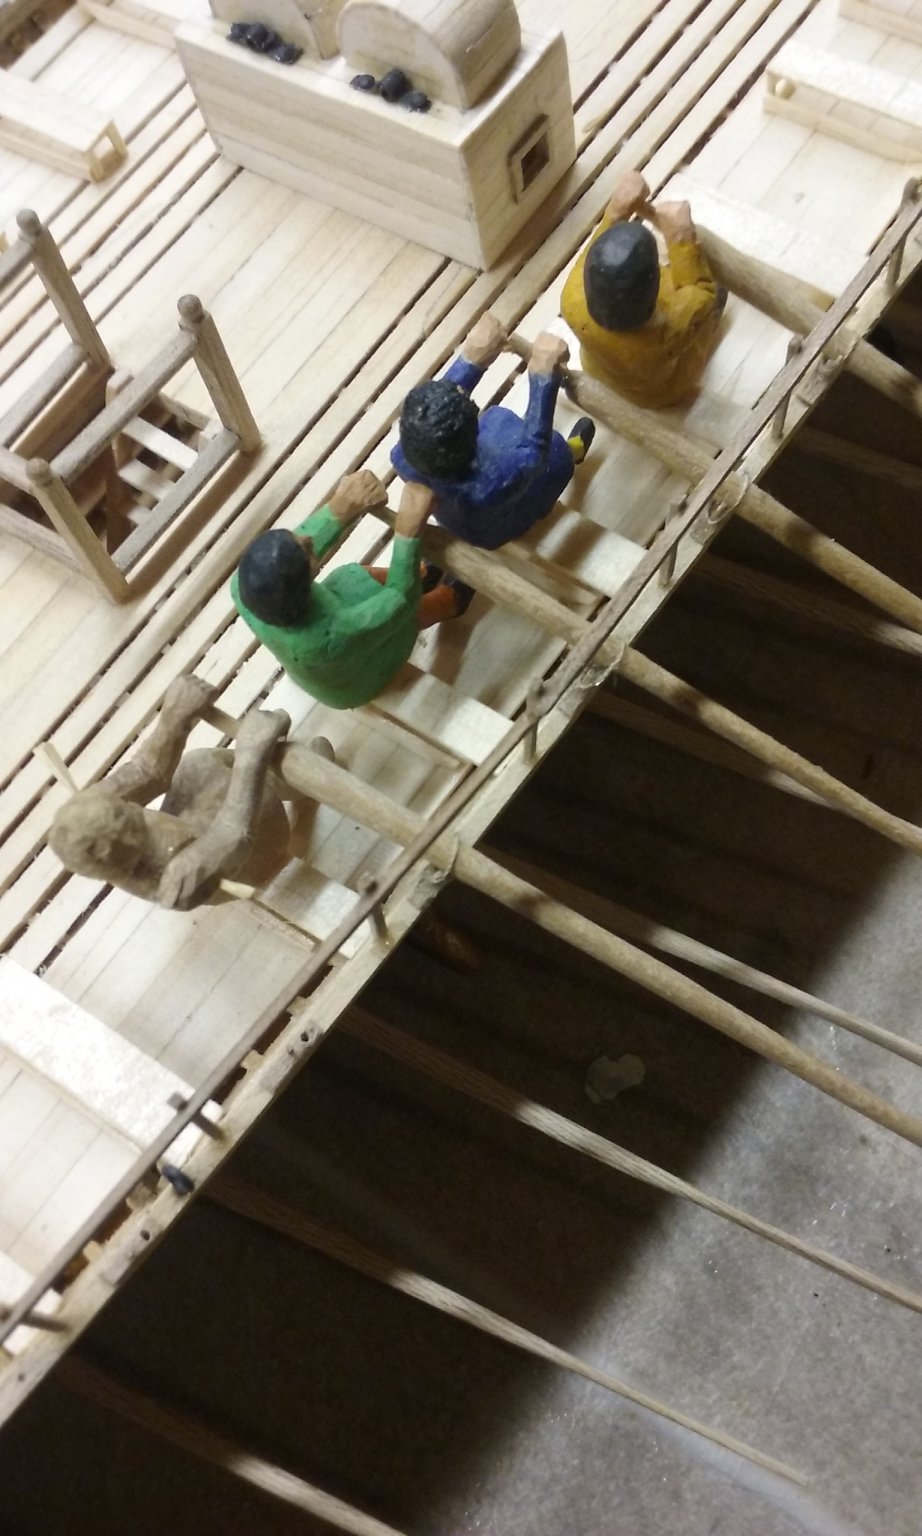
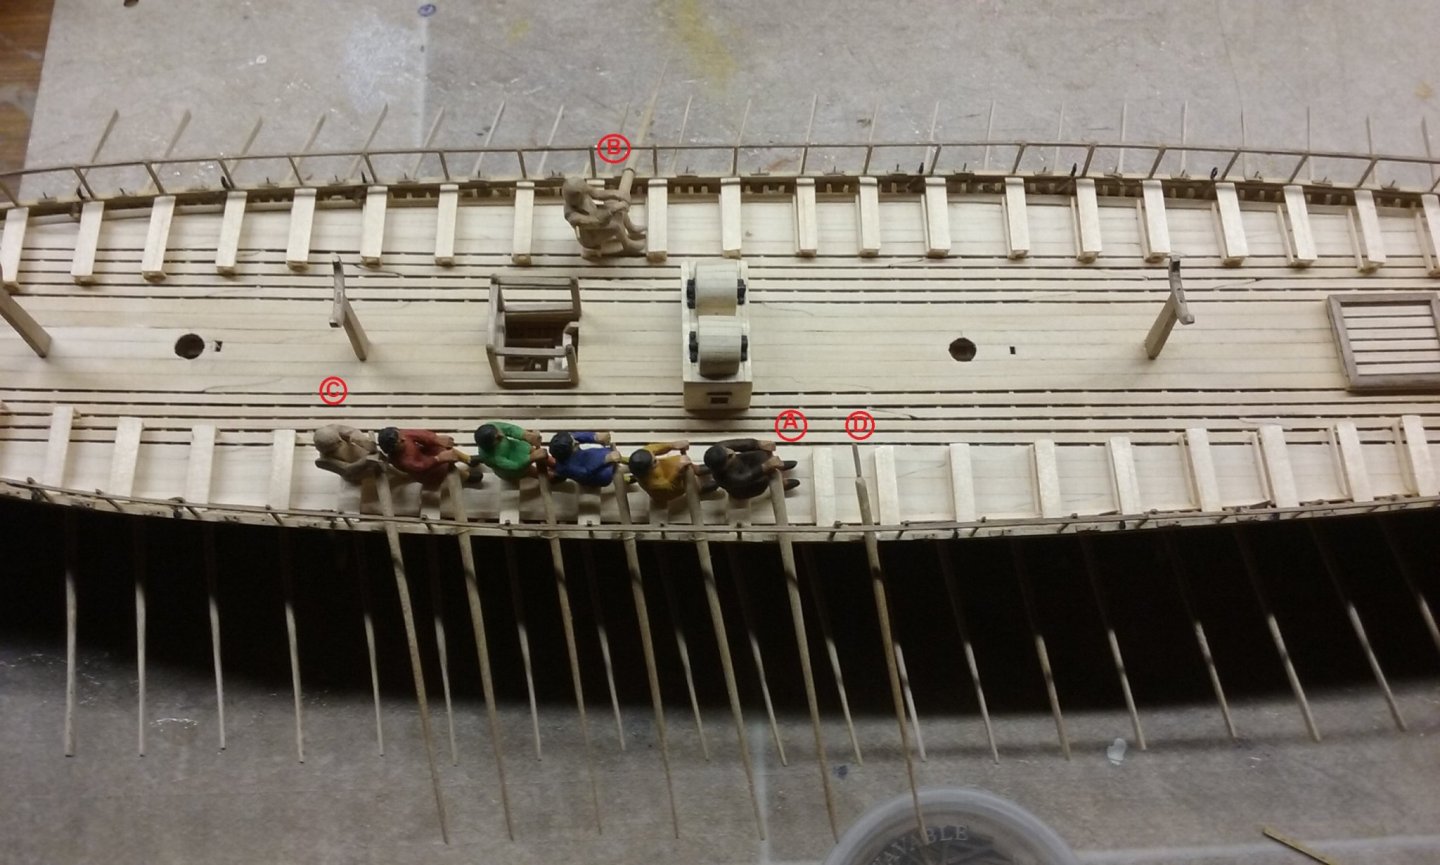
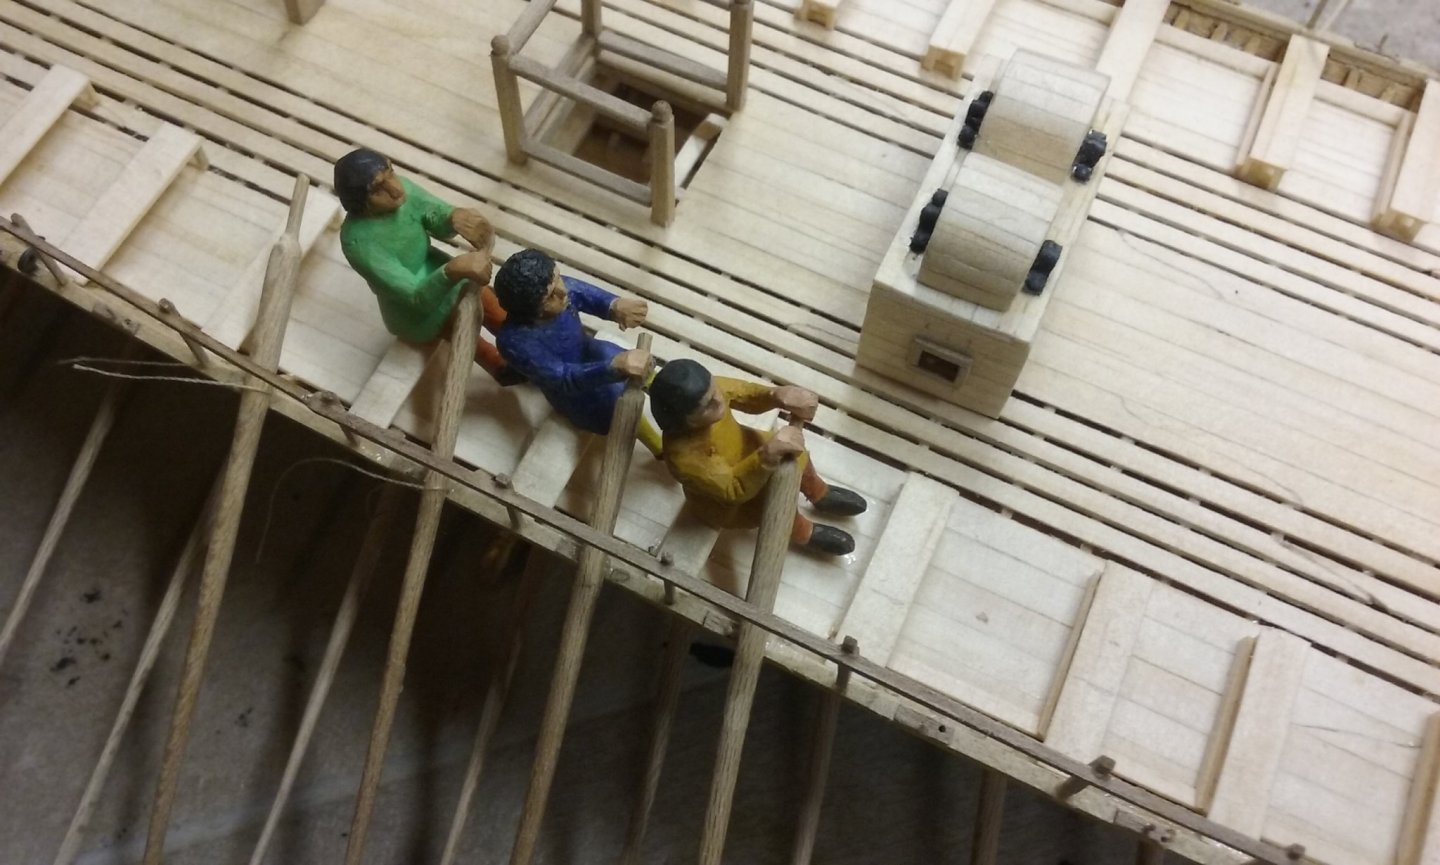
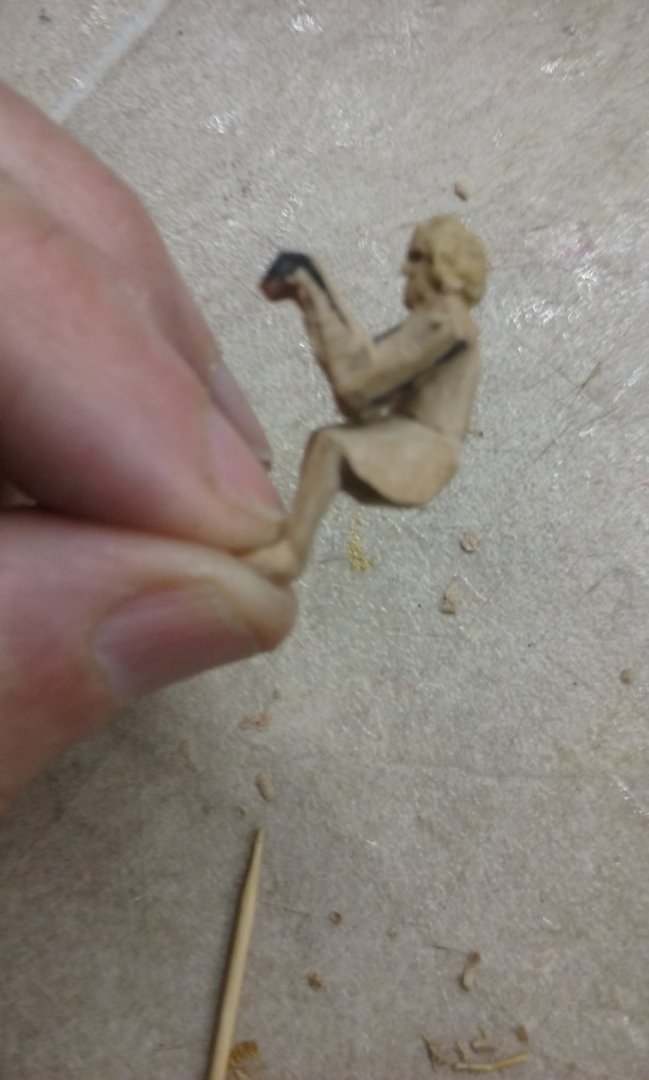
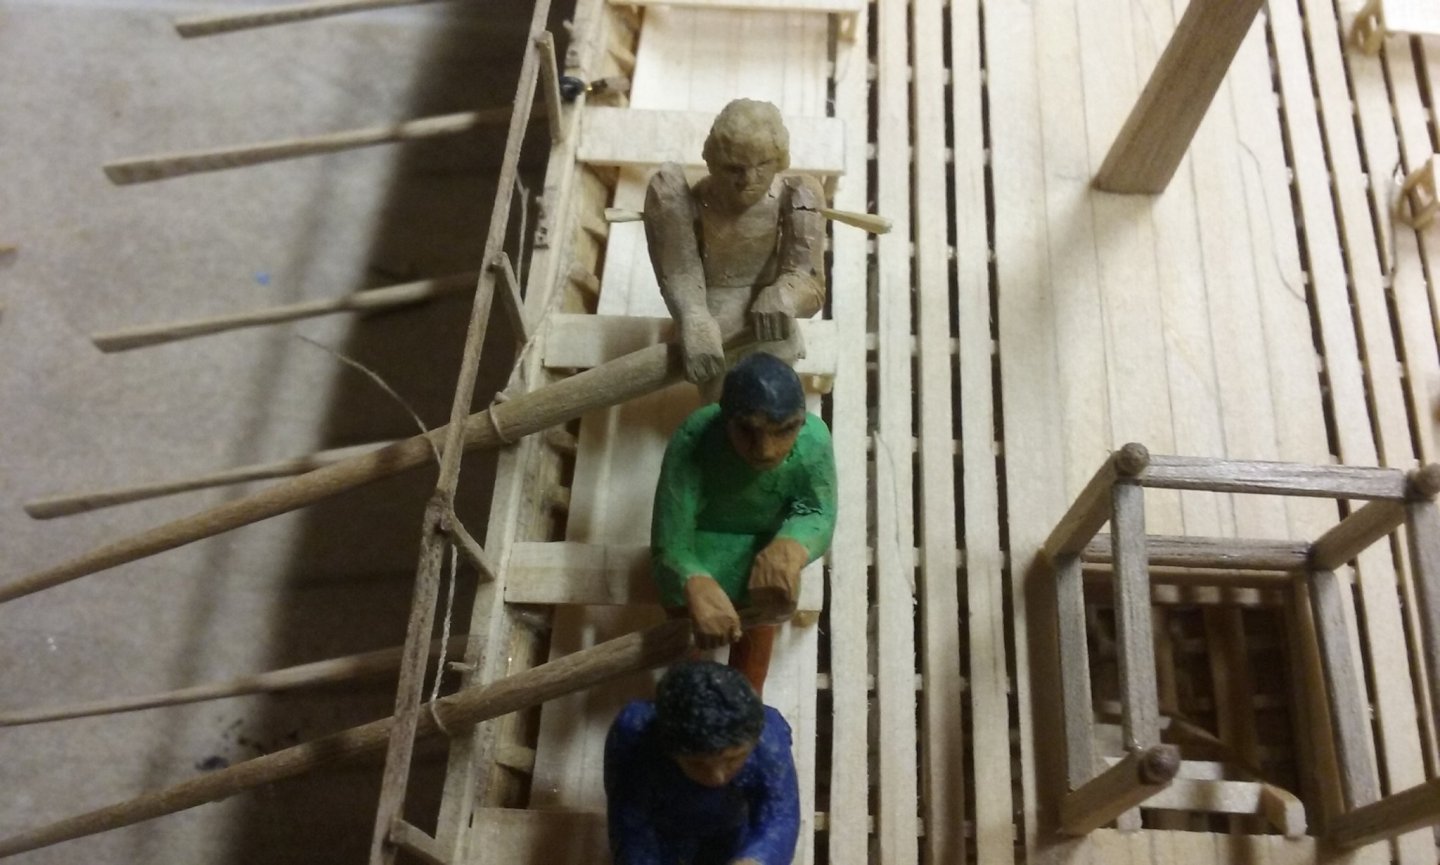
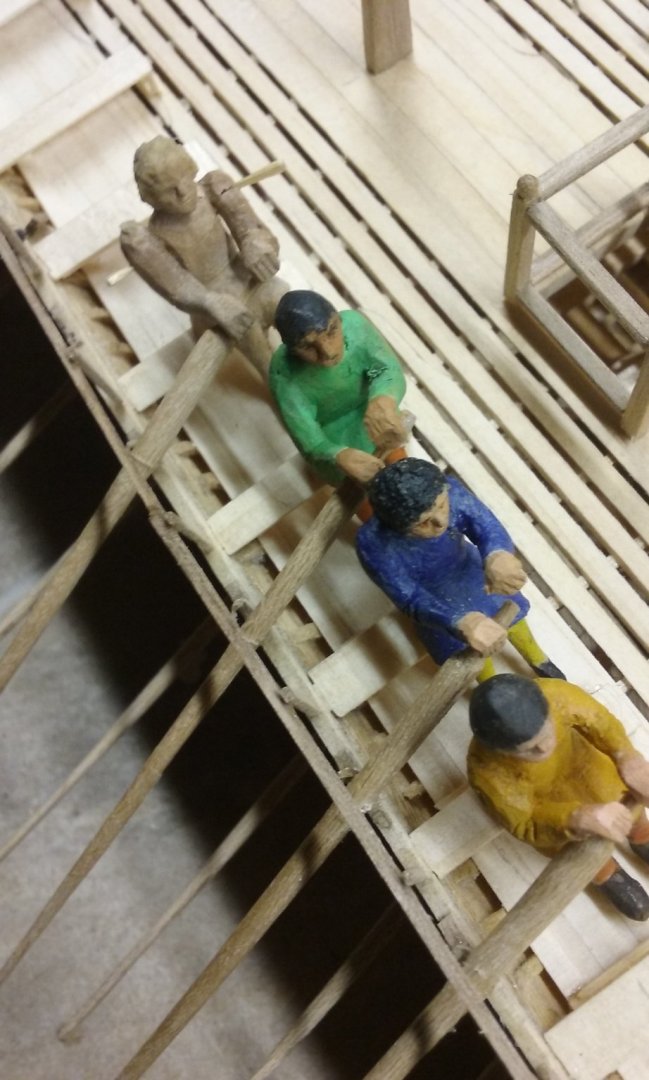
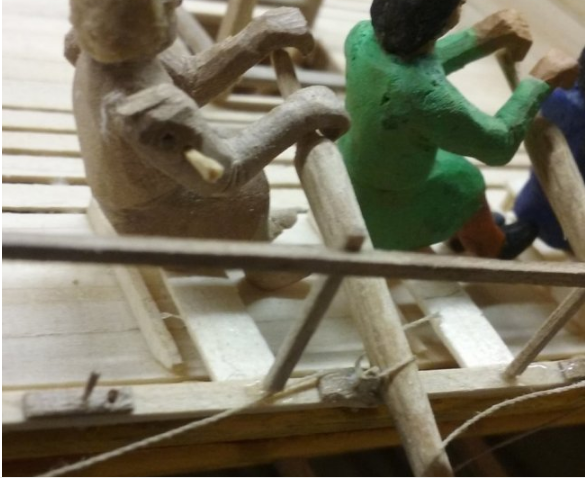
 A step forward. To start with, there were several times in finalising and positioning an oarsman where I had to sit on my hands while I waited for glue to dry between one step and the next, but now I've worked out a way to increase the number I'm working on at any one time, so while I'm waiting for the glue to dry on one, I'm working on another. Unfortunately, there is a limit to how many things I can do at once. For example, although I could glue all the upper oars onto the gunwale at the same time, I don't want to because I could easily undo the work with a careless hand movement. However, once the oarsman is permanently in place the oar is also fixed more permanently -it's glued both to the gunwale and to the hands of the oarsman, who himself is glued to the seat and his feet are glued to the deck. However, as I have now completed several figures I've become able to work on a new figure at each end of the row that's already done. So Figure A has just been completed - he's had his final shaping and sanding, and has been painted and glued in place. Figure B is the first on the starboard side. He's got his arms shaped and glued on, and he's ready to be removed from his seat, and filler put in the gaps between arms and body ready to finish the shaping. Figure C has just had his arms temporarily glued on, ready to be pinned to the body so I can do the hands and roughly shape his arms. This usually takes several tries - I work out where and what shape I think the hands should be in relation to the oar handle, unpin the arm, carve it to the shape I've decided on, then pin the arm back in place. Check to see what still needs to be done, take it off, shape it some more, put it back on again etc till I'm happy with it. Once I've got the arms and hands the way I want them, I glue them permanently in place, as in figure B. Finally, as the figure at A is now complete, that leaves me able to glue the next oar to the gunwale (D). As you can see in the first photo the oarblade is being supported (by a little plastic tub) at the same height as the others till the glue dries. In the second photo I've got a bit ahead of myself - I've placed the next oarsman on the bench, but in fact I don't do this till the glue dries on the oar, as it's fatally easy to dislodge the oar by careless hand movements (don't ask me how I know). Once the starboard figure (B) is permanently in place I'll be able to have four oarsmen in progress at the same time - one at each extreme end of the row on the port side, and the same for the starboard side. I have to keep up the supply of arms, so in between times I'll be cutting out new ones and carving them roughly to shape. Not quite mass-production, but a faster procedure than before.
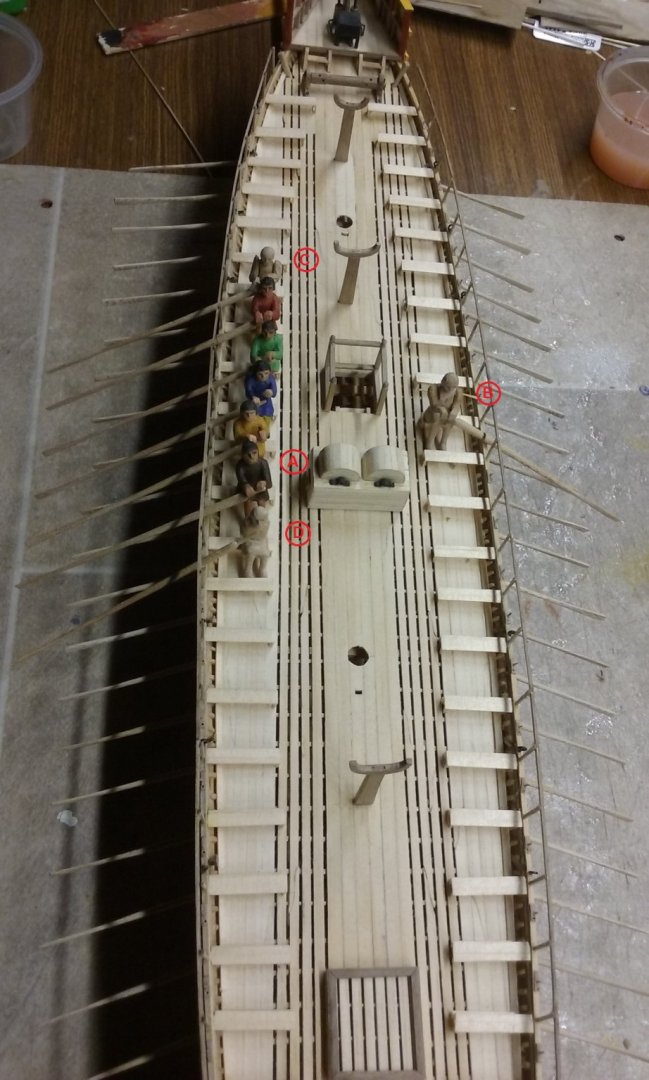
-
Mind if I pull up a chair? Looking forward to watching this one after seeing your Thermopylae build.
-
Waitoa, not laughing at all. Impressed, actually. And I second the idea that you should start a build log.
-
I agree about bamboo. Per http://www.ijstr.org/final-print/nov2015/Comparative-Analysis-Of-The-Tensile-Strength-Of-Bamboo-And-Reinforcement-Steel-Bars-As-Structural-Member-In-Building-Construction.pdf steel is 2 to 3 times stronger than bamboo, but weighs 6 to 8 times as much .Overall the tensile strength of bamboo per unit of weight is 3 to 4 times that of steel. I occcasionally use it in ship modelling. It's very tough and strong.
-
Stick close to your desks and never go to sea, And you all may be rulers of the Queen's Navee! Damn! I derailed my own thread again!
-
Matthias from Berlin, Germany says Hello
Louie da fly replied to victory78's topic in New member Introductions
Beautiful work, Matthias. -
I've seen pictures of the Sutton Hoo lyre reconstruction. As I understand it not all that much of the original survived and the reconstruction was based as much on contemporary pictures as on the artefact itself. I don't remember seeing the lyre when we went to the British Museum to see the Sutton Hoo exhibit. Perhaps I was distracted by the magnificent gold and garnet work and the amazing helmet.
-
Nice crisp work, Gerry. This is a good looking build.
-
Druxey, that's from Hearts of Oak, not G & S. But I agree - no hope at all . . . By the way, I neglected to mention that according to 10th century Byzantine naval manuals (by Nikephoros Ouranos and Emperor Leo VI) the oarsmen doubled as marines, fighting the ship when it went into battle. They recommend that the bravest and strongest crew members serve on the upper bank of oars.
-
Hi Gerry. Good to see yor build log up and going. For planking I'd recommend you have agood look at the tutorials at https://modelshipworld.com/forum/98-planking-downloads-and-tutorials-and-videos/ And also see Chuck's HMS Winchelsea build. Start out with fairing the frames - so the edges of the frames aren't at right angles, they follow the curve of the hull - you can see that in the photo in his post of March 18, 2009 at And for the planking itself, see the sequence starting at August 28, 2019 at Your Occre model has two layers of planking - one to get the shape pretty much right, which can then be tweaked (with wood filler etc) to get all the curves smooth, and a second layer of planking over that to make it all perfect. That makes it a lot easier on the modeller. Small mistakes in the first layer aren't a major disaster, and by the time you get to the second layer you've had a lot of practice and are getting much more accomplished. Anyhow, enough of that. I'm looking forward to seeing how it all goes with your next steps.
-
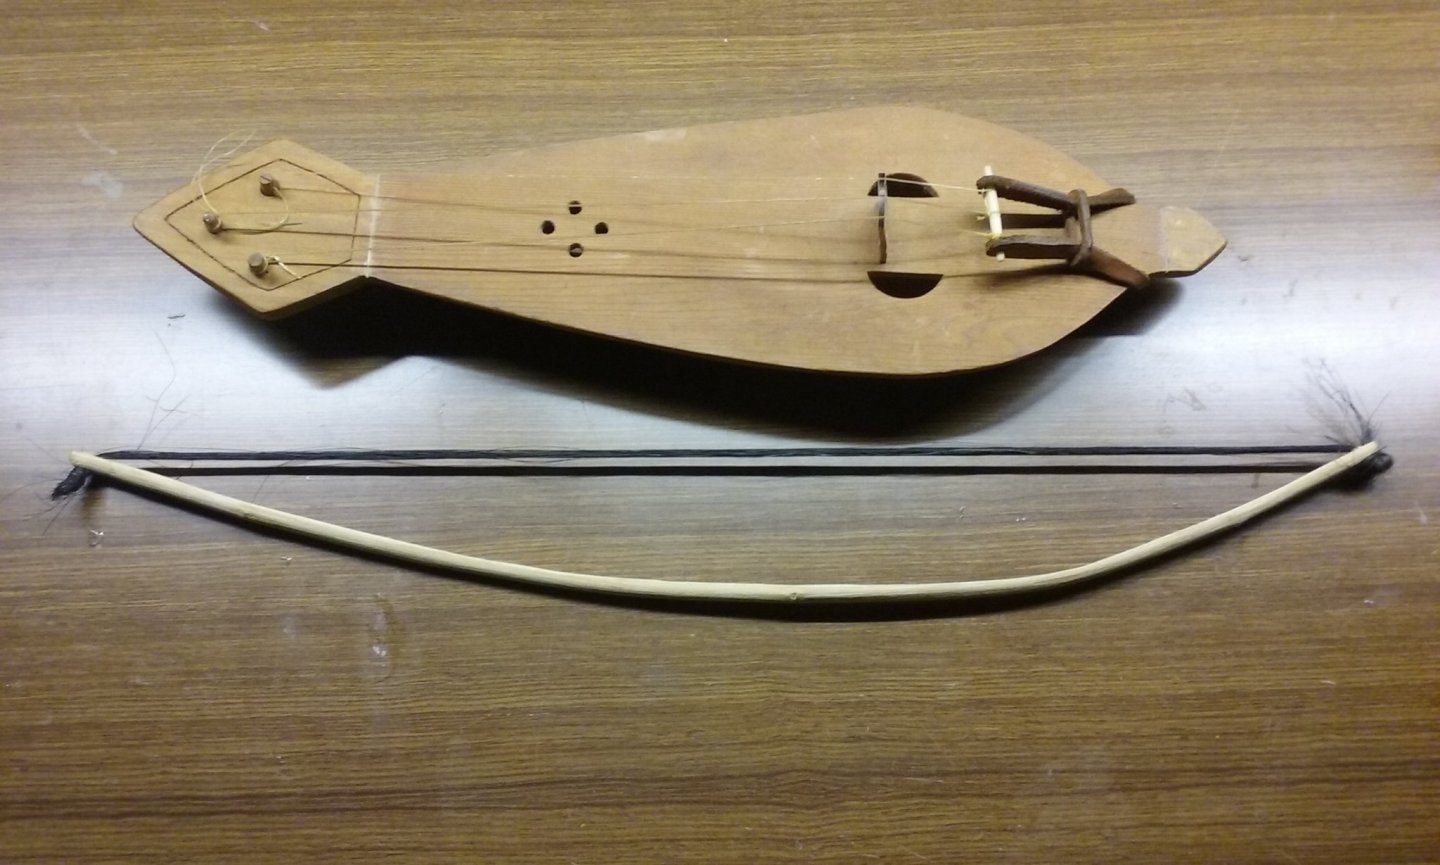
Well, perhaps not a fine instrument, but an interesting one . . . Replica of a mediaeval Russian fiddle called a smyk or gudok, 11th century - I made it almost 30 years ago, when I was into mediaeval re-enactment. It's based on an archaeological find. No sound post, so it's very quiet. To someone used to a modern violin, it's absolute murder to play this thing.
-
Hi Gerry, and welcome. That's a very nice mandolin. I have a violin that belonged to my grandfather with a fiddleback grain on the back like yours. You've done a very nice job. Your bending iron is going to get a fair bit of work - as I recall, the Terror has a particularly blunt bow. Make sure you have a good close look at MSW's planking tutorials - they're invaluable and will help you avoid some of the commoner problems most people encounter with planking. And do start a build log. Nobody will bite, I can assure you. I know it can be a bit daunting putting your stuff up in front of people whose skills are, to put it mildly, amazing. I'm still gobsmacked by some of the builds up on MSW, and even now I feel I'll never approach their skill levels. But everybody was a newbie once, and there are plenty of beginners with build logs here. Your skills as a luthier probably put you in a better position than most people who are just starting out. And don't worry about making mistakes - you're bound to at some point, it's just part of the process, and even the most experienced still do it (though their mistakes are usually much more interesting than mine). But very few mistakes are fatal to the build and just about all of them can be remedied. The members are supportive and encouraging, and very willing to give help and advice. In fact a log is a very good place to ask questions as you progress with your build.
-
Looking forward to seeing your build log
-
Nice retrospective, Richard! She's looking good. That's a very attractive vessel, and you're certainly doing her justice. I like the idea of the dummy deck. I've never seen that done before, and I've made a mental note in case I want to try it myself in a future build.
- 41 replies
-
- 1
-

-
- artesania latina
- dallas
- (and 1 more)
-
New member from Central Scotland
Louie da fly replied to Rik Thistle's topic in New member Introductions
Welcome, Richard! ([Bluebottle voice]Thinks: now I really need to have a look at that build log . . .[/Bluebottle voice])- 16 replies
-
- 1
-
-
- new member
- dallas
- (and 1 more)
-
Matthias from Berlin, Germany says Hello
Louie da fly replied to victory78's topic in New member Introductions
Welcome to MSW, Matthias! I'm not sure - is your fishing boat a model or full sized? Whichever it is, it would be good to see photos! -
Nice crisp work. From personal experience I know how hard these castles can be , so - kudos.
- 179 replies
-
- 3
-
-
- shipyard
- wütender hund
- (and 1 more)
-
Not really - it is after all the Emperor's personal ship. And Byzantine oarsmen (and in fact all oarsmen until the Renaissance) - were free men not slaves (🎶For who are so free as the sons of the waves?🎶) - sorry; couldn't help myself. Oh, and I have a cunning plan which will mean that 8 of the oarbenches won't be manned. But that will involve more work, not less . . . That's all I'm going to say for the moment - I want to keep it as a surprise. But don't forget - you heard it here first!
-
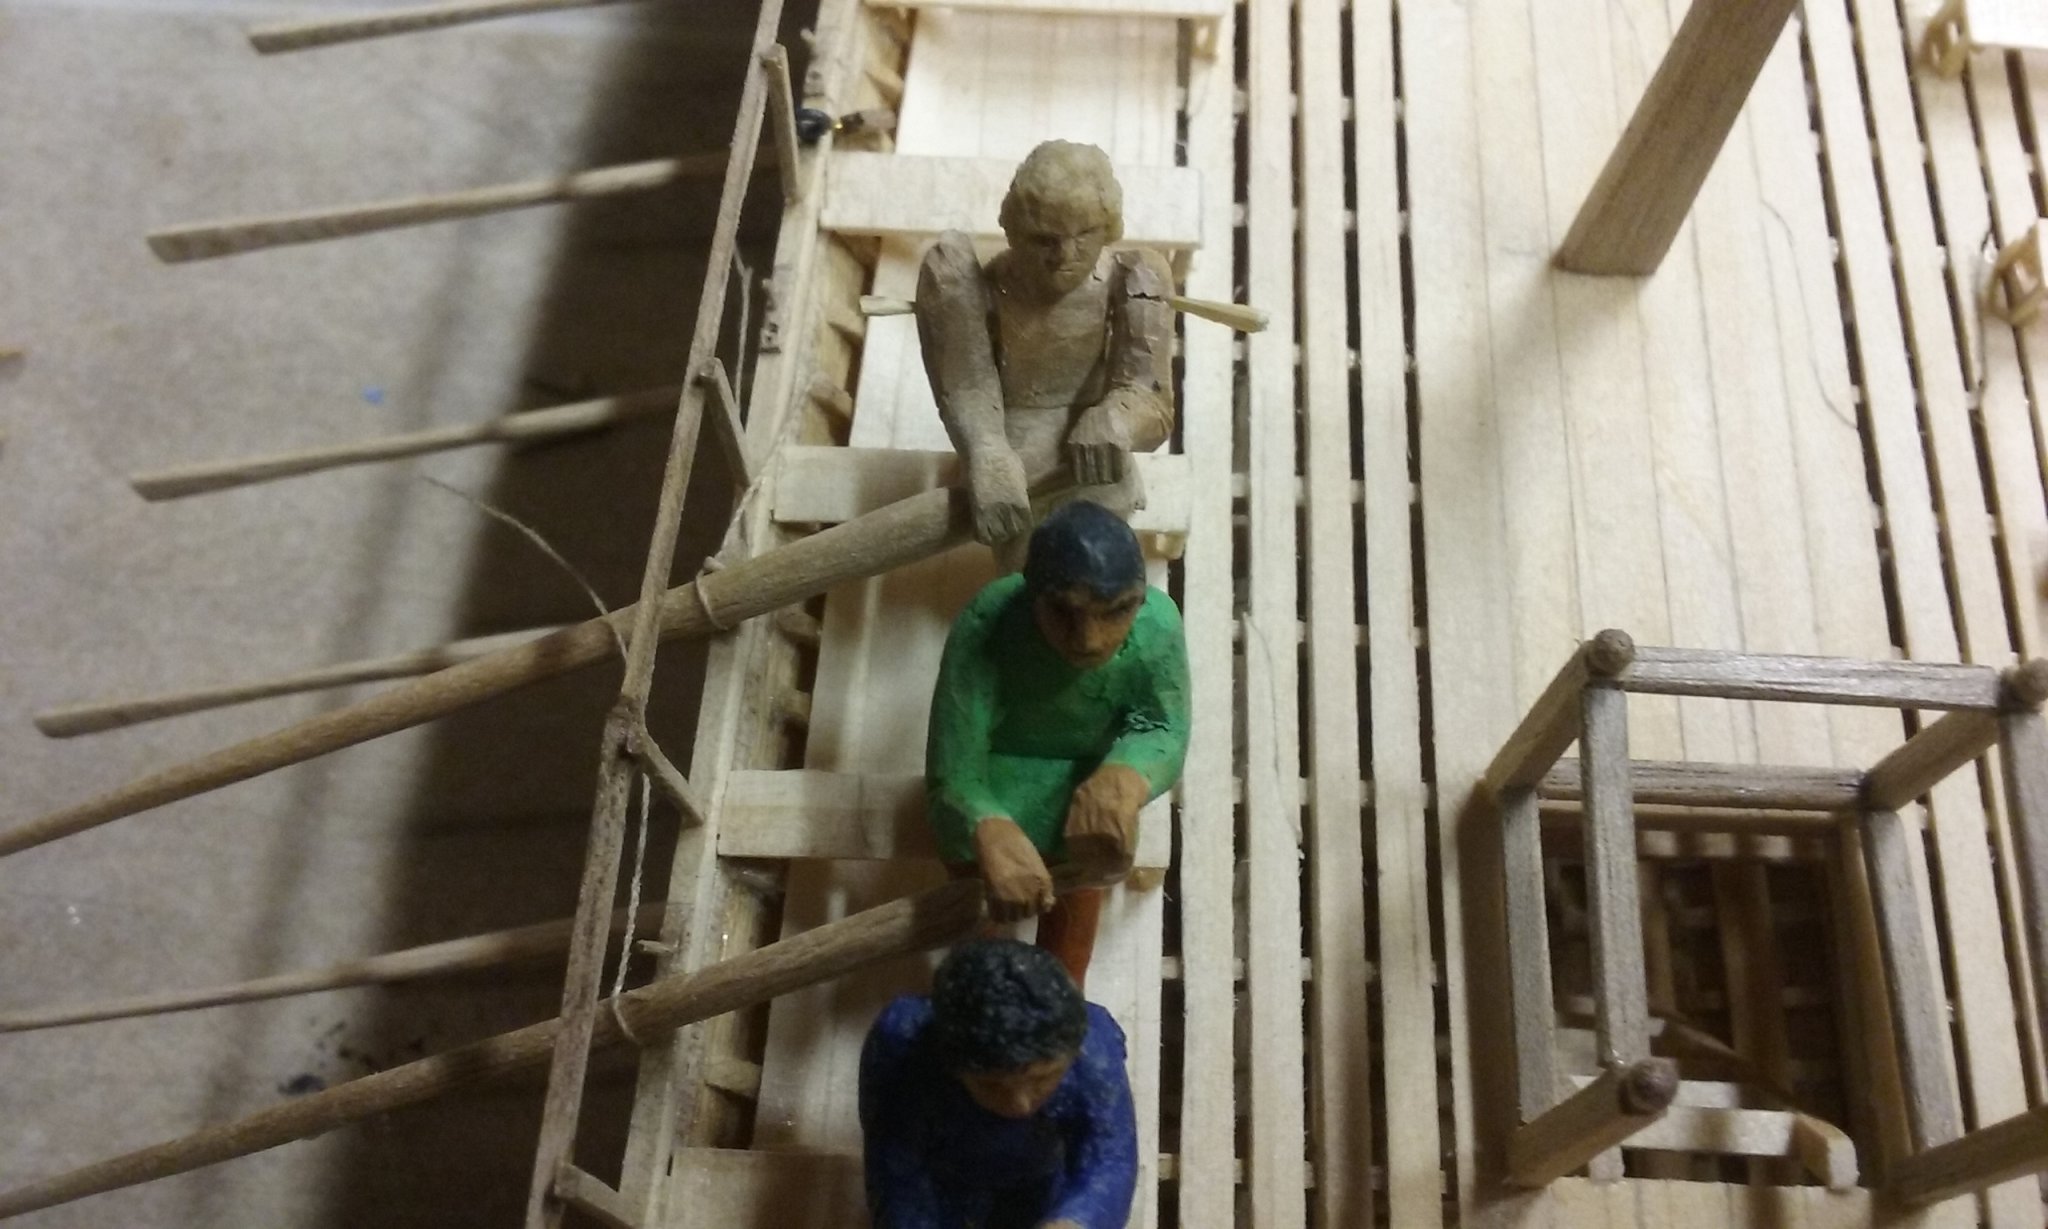
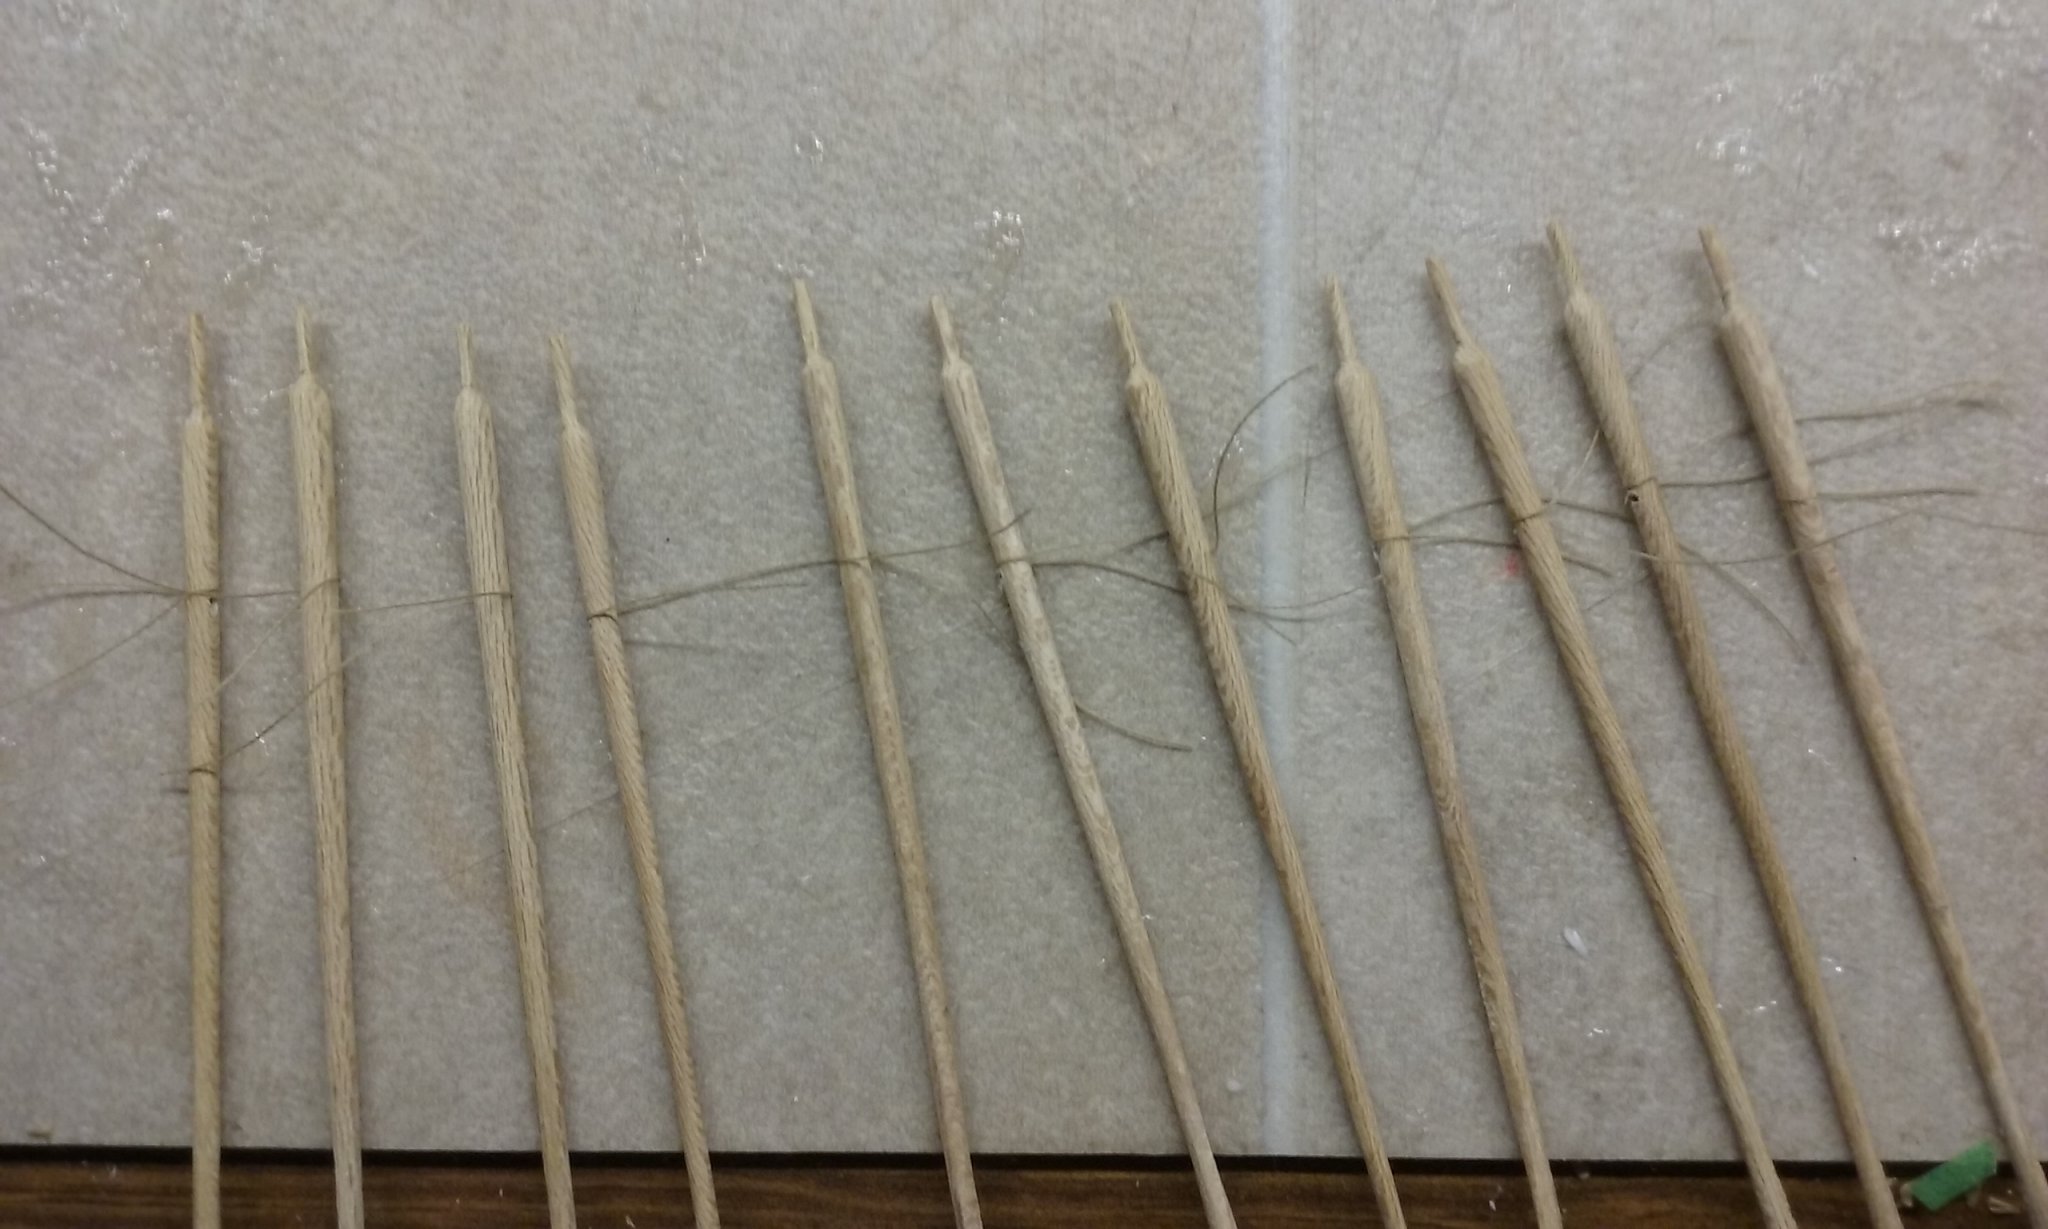
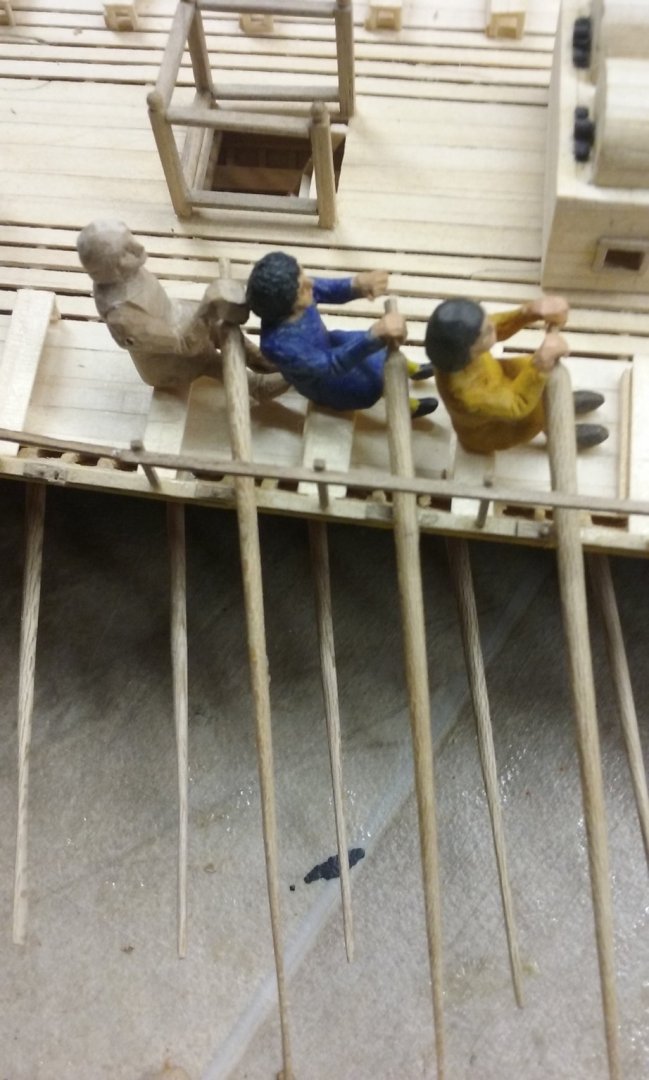
Well, I said it's not a model unless you've bled on it . . . But this time I didn't cut myself with a scalpel blade while carving. Oh, no - I got much more inventive with self-harm. This time I was drilling a hole through the newly carved arm and into the shoulder so I could insert a pivot to join the two together. Unfortunately I drilled a little too far and into the finger that was behind the shoulder . . . Here's the figure with the first arm and pivot in place and here he is with the bloodstain, and the band-aided finger beside it. And finally, with his new arms, all painted and in place. The loose bits of cotton are for the oar-loops - photos further down the page. Here's the fourth oarsman with left arm partly carved and marked for reduction, then carved to that mark: Still more carving to be done to get it looking like an actual arm . . . but here he is with one arm carved to shape and glued in place - the other arm is temporarily positioned, ready for trimming to final shape. First oar-loop part done. Oar-loops around the first two oars (far left) And around the thole. And first, second and third oar-loops completed and trimmed off: I now have both arms of the most recent (unpainted) oarsman carved to shape and glued in place. Next I have to take him back off his seat, add filler where the arms meet the body and carve to final shape. Note in the first of the above three photos how much better this last oarsman's hands are than on the first guy I did (in blue), whose right hand not only has its fingers pointing the wrong way, but isn't even in contact with the oar handle. I might fix that later down the track, or just leave it as evidence of my improvement. I've also drilled the holes in all the upper oars, to take the little brass pins that will keep them in place on the gunwale, plus added cotton for the oarloops. You can only see a couple of the holes because most of the oars are turned the other way. However, after I did the first few oar-loops I decided to take the cotton back off again and glue it on each oar after it is in place - it works better that way.


-
By the way, you might be interested in this: - https://modelshipworld.com/topic/24868-topdrawings-uss-missouri/
-
EARLY SHIPS AND SEAFARING - European Water Transport Author: Professor Sean McGrail Year: 2014 Publisher: Sword and Pen Books Ltd, Barnsley UK ISBN: 978 1 78159 392 9 Pages: 183 pages plus index An interesting book which traces the evolution of vessels from the most primitive to the Middle Ages. It takes a particularly archaeological viewpoint, with an emphasis on construction techniques which though very interesting, is of limited use to the ship modeller (except those really into it - to whom I doff my hat) when what we want to know is what did they look like? What were their lines? How did the rig work? Where were the belaying points? (All right, maybe that's asking a bit much . . .) It covers maritime theory at some length - flotation, propulsion - a little offputting so early in the book, but worthy of careful study. The author deals with two separate regions - the Mediterranean, and Northern Europe - both in the descriptions of the vessels of the time and - very interestingly - the sailing conditions; coastal configuration, weather patterns, currents, prevailing winds etc - which affected both the design of the ships and how they operated - for example why the sailing routes in the Mediterranean tended to be among the islands and coast of the north - they would avoid North Africa because it was a lee shore and almost devoid of landmarks to locate one's position. Pictures are black and white, and one could wish for more of them. Though the book deals very comprehensively with Northern Europe from earliest times to the late 14th century, despite foreshadowing it in the Foreword it doesn't do the same for the Mediterranean. It stops short in Late Roman times and though it covers a few wrecks, misses opportunities it should have taken. Where are the Byzantine period ships? The book was published in 2014 but makes no mention at all of the exciting Byzantine finds from Yenikapi of 2006. Not even the Serce Limani "Glass Wreck" discovered in the 1970s. And no 14th century Mediterranean ships such as the Contarina wreck. It also gives very little attention to the pictorial record - it's very much an archaeological approach, as I mentioned above. I think in this it misses some good opportunities for theoretical reconstructions. All in all, a bit of a "curate's egg" - some parts of it are excellent. Worth a read and it certainly contained information I'm glad of. But it could have been so much better.
-
By the way, you might be interested in this: - https://modelshipworld.com/topic/24868-topdrawings-uss-missouri/
-
Damn! Why didn't I think of styrene? Very nice carvings, mate. I like your technique. I always start with the face for the reasons described on the previous page, but if this works for you (and it obviously does) go for it! And I've found as one gets more experience, the faces get better and better.
- 2,699 replies
-
- 4
-
-
- heller
- soleil royal
- (and 9 more)