


Louie da fly
-
Posts
7,990 -
Joined
-
Last visited
Content Type
Profiles
Forums
Gallery
Events
Everything posted by Louie da fly
-

kit review Kit Review - HMS ENTERPRIZE (1774) by CAF MODELS
Louie da fly replied to kljang's topic in REVIEWS: Model kits
Looks very good. -
Hmm, I can't see the picture. Doesn't work for me. [Edit] Now it does . . .[/Edit]
- 71 replies
-
- 1
-

-
- great harry
- henry grace a dieu
- (and 3 more)
-
Sea Witch 1846 by Zooker - RESTORATION
Louie da fly replied to Zooker's topic in - Build logs for subjects built 1801 - 1850
Hi Zooker, It's a bit of a judgment call. If the rigging and spars are intact, you're probably best to leave them in place. However, anything damaged or messed up is likely to cause you trouble if you do a half-a*sed job of it - in that case it's probably better to strip the damaged stuff down to "square one" to give yourself a free hand with repair - but keep it, and everything that can be put back in place should be - once you've repaired what you need to. I've been restoring the model I made of the Henry Grace a Dieu back when I was a teenager. What I've had to do is far more drastic than what you're up against. I had to strip mine right down. But I kept everything I possibly could and put it back in place whenever possible. I only made new stuff when I absolutely had to, and that includes the rigging. As I said, it's a judgment call. I'd say remove as little as you absolutely have to, but don't hold back if it's really necessary. Trying to fix things on deck by reaching past broken spars and tangled rigging is giving yourself a much more difficult job than you need. This is only my own opinion, and I'd hate to send you off on the wrong track. Perhaps more experienced modellers can weigh in with their own advice. Best wishes with the restoration. Take your time, and put photos up as you go, so others can help with tips and advice. And do start a build log. Though I know you haven't actually taken your first step in restoration, this discussion is past the point where belongs in "New Member Introductions" - it should be in a build log, so others can see it and add helpful suggestions. -
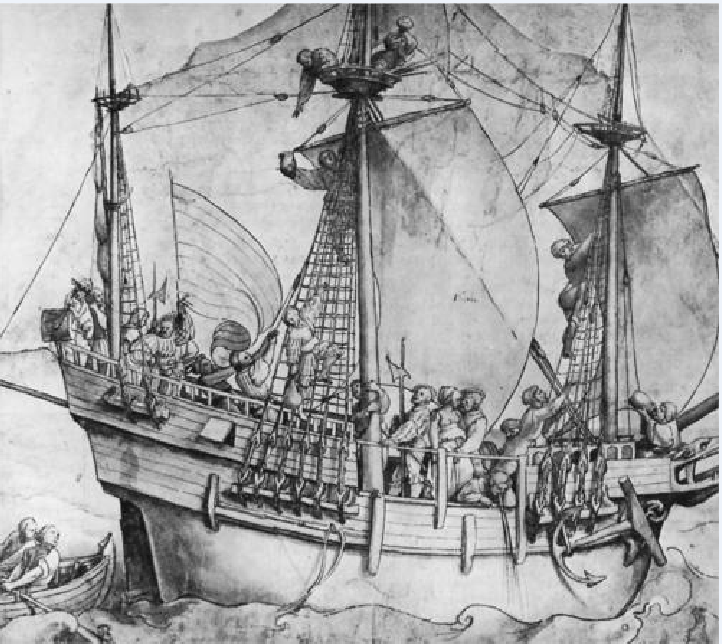
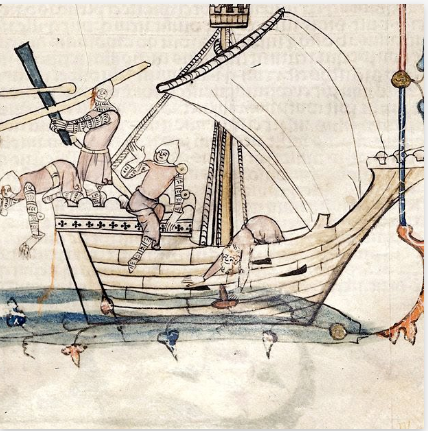
Interesting difference - certainly neither of them are correct with the shrouds passing outside the top. - it would go against all normal practice. Looking at contemporary art, the pictures of the Great Harry in the Anthony Roll and the Embarkation at Dover both show them terminating at the top as you'd expect, but the first doesn't show deadeyes even on the lower shrouds, and the second only shows the lower row of deadeyes for the main shrouds, not the lanyards or the upper row of deadeyes. As far as I can see neither of these are to be relied on, and that goes for almost all contemporary art - they just don't bother to show deadeyes at all.) One exception is a galleon from 1533 by Holbein, which shows them beautifully on the lower shrouds, but not on the topmast ones. What you do about it is another question - yes, it seems incorrect, but if that's the way the model was originally made, perhaps it's best to duplicate it, mistakes and all. I agree, but regarding the number of shrouds and deadeyes, perhaps it would be best to go with what you've got if you can't see any evidence that the other two were ever there. It might just be that one model was made with 5 shrouds per side and the other with 7. The MAAS model does seem a little more sophisticated than the one you have, and may have included more detail right from the start. One last thing - would it be possible to post some photos of the model as it was originally received? I know you have it in a thread in another section of MSW, but it would be good to have the original condition photos to compare with the restoration as it progresses.
- 71 replies
-
- 2
-
-
- great harry
- henry grace a dieu
- (and 3 more)
-
Sea Witch 1846 by Zooker - RESTORATION
Louie da fly replied to Zooker's topic in - Build logs for subjects built 1801 - 1850
Thanks, Zooker. The uprights seem to be relatively ok - it seems to be just the railing itself that is missing or damaged. It seems to have been just glued on top of the uprights, and could probably be replaced with a similar piece of wood, after you've cleaned any excess paint, glue etc from the uprights, and the dirt from the top of the middle rail. That's for that part of the ship. But I'd suggest a very systematic approach to the whole vessel. In my view you'd be best to keep everything you possibly can of the original model and only replace with new when you have to. Repair rather than replace. First, take LOTS of photos, from every conceivable angle, to record how everything is fixed to everything else in its current state. Where each rope goes, what it's fixed to and how etc etc, particularly where damage has occurred. Then, gently and systematically remove damaged parts, ropes etc, keeping track of what belongs where. Perhaps put the ropes, spars etc for each particular mast in its own box or envelope. Some ropes go between two masts - that's a matter for judgment - gently unfix it from one end and keep it attached to the other. Depending on the type of glue was used on the model you have various options to remove it - white glue (PVA) succumbs to rubbing alcohol (isopropyl alcohol or isopropanol), and I'm told CA (superglue) dissolves in nailpolish remover. Try it out on a relatively unseen part and see what results you get. Once all the damaged stuff is removed, what you have left is the hull and the parts that are in good condition, and you're free to start cleaning up. Apparently the best method of cleaning (which is what museum restorers use) is cotton buds (Q-tips) and saliva, replacing the buds as they get dirty. After everything's clean, you can start in on the repairs. What I wouldn't recommend is to (say) glue a broken mast together while it's still got all the ropes attached - at least not have ropes running from the broken mast to somewhere else. They'll impose uneven forces on the spar and it's almost certain to mend crooked. Work on relatively minor parts that aren't glaringly obvious firstly, so if you make a mistake it doesn't show too much. As you gain experience and confidence, move to the more major items. Oh, and often when a mistake occurs (and they will), it's possible to undo it and do over properly. Just take it methodically and don't hurry. One good repair is worth any number of rushed, half-done ones. Eventually it will start looking like a ship. And in the long run you'll have something you'll be proud to put in a display cabinet and show to your admiring friends. Good luck, and have fun with it! -
That makes a lot of sense, Chuck. Without a sense of scale it does appear that the planks are short in comparison to their width, but apparently it's the other way around. (And with planks that wide there would be serious spiling problems if they were any longer.)
- 179 replies
-
- 4
-
-
- shipyard
- wütender hund
- (and 1 more)
-
Oh, that's just magnificent! It just keeps getting better!
- 51 replies
-
- 3
-
-
- miss unlimited
- dumas
- (and 1 more)
-
It's wonderful to see such a painstaking restoration. Thumbs up.
- 71 replies
-
- 1
-
-
- great harry
- henry grace a dieu
- (and 3 more)
-
Welcome to MSW, Wayne! I can't help with card models - never made one - but the link above should be of great help (Chris is far too modest ).
-
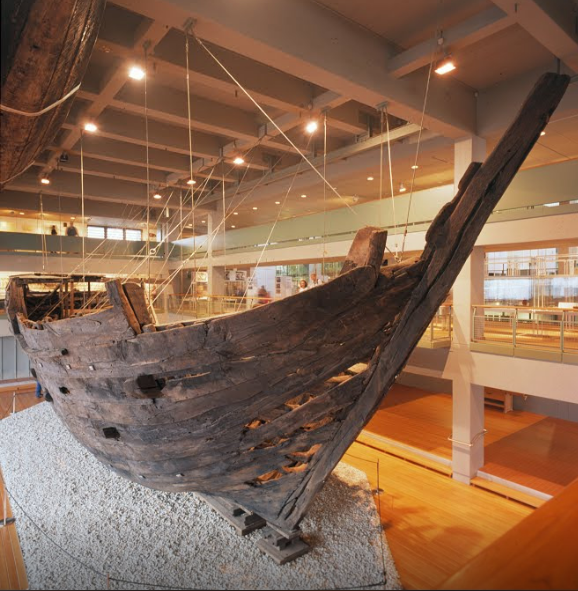
Dunno the answer to that one, either. I know virtually nothing about the construction details of cogs other than what I have learned from working on this kit. Upper works on a wreck are usually the first things to be lost, unless the wreck happens to be lying in a position/inclination that preserves them for us. The Ijsselcog seems to have had had none surviving https://www.academia.edu/40371597/The_IJsselcog_project_from_excavation_to_3D_reconstruction and the Bremen cog also seems to have lost a lot of its upper works - https://www.ipi.uni-hannover.de/fileadmin/ipi/publications/wiggenhagen_04_istanbul.pdf But if we compare the two pictures below (from https://artsandculture.google.com/exhibit/the-so-called-bremen-cog/owKSqVwIBfJGJw ) it looks like the hooked timber for the anchor is still in place, so the top strake must be as well - in which case there seems to have been no cap rail. One thing that really gets me is how short the strakes seem to have been. I wonder if there was a reason for it? Sorry to hear about the speed bump, Chris, but the model is looking very good.
- 179 replies
-
- 10
-
-
- shipyard
- wütender hund
- (and 1 more)
-
Sea Witch 1846 by Zooker - RESTORATION
Louie da fly replied to Zooker's topic in - Build logs for subjects built 1801 - 1850
It's a bit hard to tell from the photos how that railing is made. Is it cast plastic or made out of individual pieces of wood? Can you provide some close-ups with better detail? -
Sea Witch 1846 by Zooker - RESTORATION
Louie da fly replied to Zooker's topic in - Build logs for subjects built 1801 - 1850
Zooker, this could be a very rewarding build, but I'd agree - take your time, record everything as you go, and don't rush into it. You might like to look at the build log for the Great Harry (Henry Grace a Dieu) that the Central Ohio Shipwrights are doing - In my opinion they're doing a very good job, taking their time, cleaning and tidying to a point where they're starting with what amounts to a clean slate, rather than "find a problem - correct it, find another problem - correct it", which can get very messy. But they've done their research, recorded everything and worked out what to do before rushing in (something I'm sorry to say is one of my own faults). To get this model back to its former glory you need to be methodical, step by step. And do some reading on the rigging of this kind of ship so you know what you're aiming at. It's likely to be a big job, but with patience and care you'll end up with something to be really proud of, and a good memorial to your uncle. Oh, and nearly forgot - "PM" = Private message - click on the ikon of two "speech bubbles" at the top right hand side of the page. And if there's a message waiting for you there's normally a white number in a red square (from memory) to let you know. -
That's good news. I think you're on the right track using that as a source, as it reflects the state of knowledge about the time the model was built. Yes, that's one of my "go-to" sources with ships of this period. And as far as I know, none exists. There are some contemporary paintings that show rigging, but I have grave doubts about the maritime knowledge of the artist (for example on the Embarkation at Dover, the mizzen masts have square sails!) Thanks very much for those beautifully clear, detailed photos. It gives a very good idea of the job you have ahead of you. In my opinion your strategy in repairing the model is exactly right.
- 71 replies
-
- 1
-
-
- great harry
- henry grace a dieu
- (and 3 more)
-
A beautiful job, Jamie. You've got good reason to feel proud of it. Looking forward to your next build . . .
- 41 replies
-
- 1
-
-
- thermopylae
- scientific models
- (and 3 more)
-
Thanks for all the likes. Jamie, thanks for the comment. I have to admit I found myself trapped into doing it to a certain degree - If I hadn't carved the other figures (Emperor and his court etc) I wouldn't have felt obliged to carve the oarsmen. A lot more work than I'd anticipated, but now I have the position of the arms under control it's becom enjoyable again instead of a trial. Carl, yes that's what i was thinking. I have thread of different thicknesses, and if my "tan" sewing cotton is too thin I'll be dyeing one of the thicker ones to a worthwhile shade for the strap/loop..
-
That planking has come up magnificently! And the stand is worthy of the model.
- 51 replies
-
- 2
-
-
- miss unlimited
- dumas
- (and 1 more)
-
So many ropes! (That's one reason why I stay away from later vessels. So much simpler in the middle ages!)
- 41 replies
-
- 1
-
-
- thermopylae
- scientific models
- (and 3 more)
-
That's very good, Ekis. Am I right in thinking this building backs onto the external curtain wall? Otherwise I don't know why there'd be a fortified tower to protect the bakery - unless from the villagers!
-
That seems to be the way of it, B-Ram. Apparently the model kit companies are experiencing unprecedented demand - it's probably not how they wanted to increase their profits, but . . . Perhaps you can order it on-line if you can't get it any other way. Unfortunately getting rid of flashing is one of the inevitable issues in plastic modelling. But as with all things, there comes a time when it's all done and you can move on to more interesting things.
-
Very nice. Scrubs up well - much crisper and cleaner but still retains its patina of age. You've managed to balance the two very well - a difficult job. My hat's off to you. By the way, regarding the support for the mizzen lateen, do you have (or have access to) The Rigging of Ships in the Days of the Spritsail Topmast 1600-1720 by R.C. Anderson? On pages 231-241 it has a good explanation of this subject with diagrams, from a time and place considerably closer to the Great Harry than the examples above.
- 71 replies
-
- 2
-
-
- great harry
- henry grace a dieu
- (and 3 more)
-
Sounds like the ideal time to start a log. Planking, particularly of a clinker-built ship, is perhaps the most difficult procedure in ship modelling. Posting photos of your progress will mean that more experienced modellers will have the chance to see how you're going about it and offer assistance with the (inevitable) problems that arise in getting it right.
- 170 replies
-
- 2
-
-
- gokstad
- dusek ship kits
- (and 1 more)
-
Hi from15 nm west of Hamburg / Northern Germany
Louie da fly replied to Oboship's topic in New member Introductions
Uwe, I'm sure everybody would love to see both your completed models and a build log of your present one. I know I would. -
Nelson, you should certainly do a build log. Just as you learnt from Jack's log, others may learn from yours. Even if you're already part way through your build, you could post "catch-up" photos up to the present and then continue from there. Apart from anything else, you may get valuable advice from others watching your build.
- 170 replies
-
- 2
-
-
- gokstad
- dusek ship kits
- (and 1 more)