GuntherMT
-
Posts
2,213 -
Joined
-
Last visited
Content Type
Profiles
Forums
Gallery
Events
Everything posted by GuntherMT
-
HMS Naiad 1797 by albert - FINISHED - 1/48
GuntherMT replied to albert's topic in - Build logs for subjects built 1751 - 1800
Albert - the first three photo's in your post from this morning are showing 'tinypic - image has been moved or deleted' icons. The last picture looks fantastic. -
Great looking longboat. I love the oar display, well done!
- 277 replies
-
- 2
-

-
- model shipways
- 18th century longboat
- (and 1 more)
-
If you can find a place like Ulises suggested, I highly recommend the blocks and line (and well, everything else he makes really) from Syren. What is the issue with buying from Mexico, do they really nail you on the importation of things? What if the package was just mailed from somewhere else in Mexico by someone who was visiting, or is the postal service unreliable? I guess I don't understand what makes it difficult and expensive there. I visit Mexico fairly regularly and am curious as to what the issue is. Thanks,
-
Can you not get them in Mexico?
-
And... now you know why I immediately throw all the kit blocks in the garbage and use whatever size looks correct from Syren. The deck is looking great with all the furniture on it Karl.
- 164 replies
-
- 1
-
-
- Model Shipways
- Finished
- (and 1 more)
-
Don't buy any tools you don't need up front, just get what you need when you need it. Then take the entire cost of the kit and the basic starting materials (under $100 will get you going for a few months easily) plus the cost of the kit, and divide it into the 12-36 months it will take you to build it, and the cost over time is extremely low. Don't make up front costs alone make you miss this experience, as plastic builds tend to be much faster, so the cost of the kits over time will often add up to much more than the costs of wood. Many guys here build masterpieces using only very basic hand tools. It's not necessary to spend a fortune to get into this, or even to continue doing it!
-
That would certainly explain it being soft! I sure wish someone local to me carried boxwood, it would be awesome to be able to just walk into a shop and sort through boxwood for what I wanted.
-
Pretty sure you didn't get boxwood from Hobby Lobby, as (at least here) they only carry basswood, which is much softer than boxwood.
-
They must be under about 1600x1200 in resolution, and 2mb in file size. If you get the resolution down to 1600x1200 the file size is pretty much guaranteed to be small enough, so just use Paint in Window and use the resize option on them.
-
If I may make a suggestion, on the filler blocks between the gunports, just fill those gaps in completely. When you go to cut in your sweep ports, that way you have solid wood all the way through and not a plank/gap/plank sort of a deal. IMO this helps when you are doing your shaping/sanding of the sweep ports to just have a single 'piece' of wood to work with. I completely filled up the spaces between every bulkhead other than the gunports themselves, and I found no downside to that later on as I progressed in the build.
- 231 replies
-
- 2
-
-
- model shipways
- armed virginia sloop
- (and 1 more)
-
Welcome aboard. I would personally recommend that you avoid the paint from Model Expo. Get the same colors in a quality paint like Vallejo (which Model Expo also carries) which doesn't cost any more and is much better quality paint. As far as tools go, I'm in the "you get what you pay for" camp on tools, and 95% of the 'cheapo' tools I started with are no longer in use, but the hobby knife is always useful! Good luck and have fun!
-
You don't need to right-click on it Rich, just click on the #1 and a new window will pop open with the link in it. Highlight the entire thing, copy it (hit "Control+C") and then follow the other instructions for adding the copied link to your signature.
- 1,135 replies
-
- 3
-
-
- model shipways
- syren
- (and 2 more)
-
Bummer grayarea. I never use forceps as a clamp because they don't have any force adjustment at all and clamp very tightly. For stuff like that I'll use the style of tweezers that are normally closed, or small alligator clamps. For the hearts, Model Expo will replace parts free of charge, so don't be afraid to just contact them and ask for more! I replaced the kit hearts completely using the ones from Syren.
- 164 replies
-
- 2
-
-
- model shipways
- armed virginia sloop
- (and 2 more)
-
Interesting, the laser-cut pieces for the waterways in my kit were walnut.
-
True enough, but I want them nice and straight on my models anyway.
-
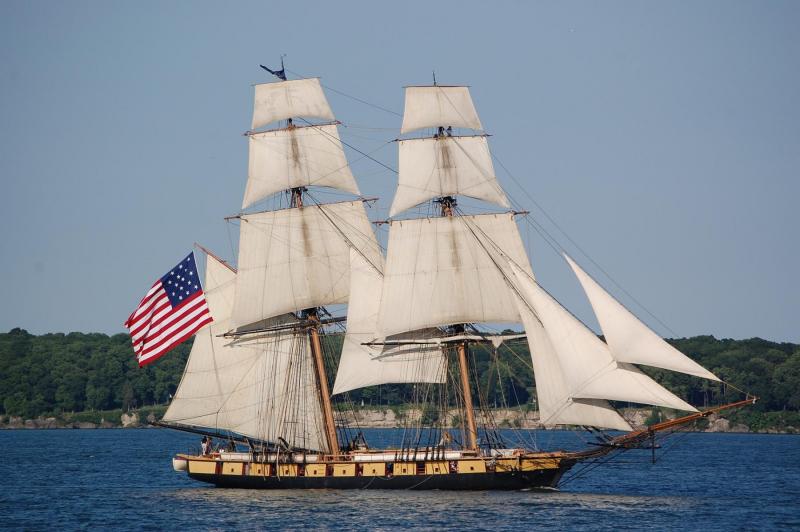
Well... here's the real thing.. The difference in rakes is pretty noticeable even at this less than perfect angle. It's your ship, so it's certainly up to you, but the photo's of the real thing show a fairly significant rake and it's easy to see that the masts are at different angles. Do a quick google image search on 'brig niagara' and you'll have hundreds of photo's to go through to decide what you want to do!
- 648 replies
-
- 4
-
-
- niagara
- model shipways
- (and 1 more)
-
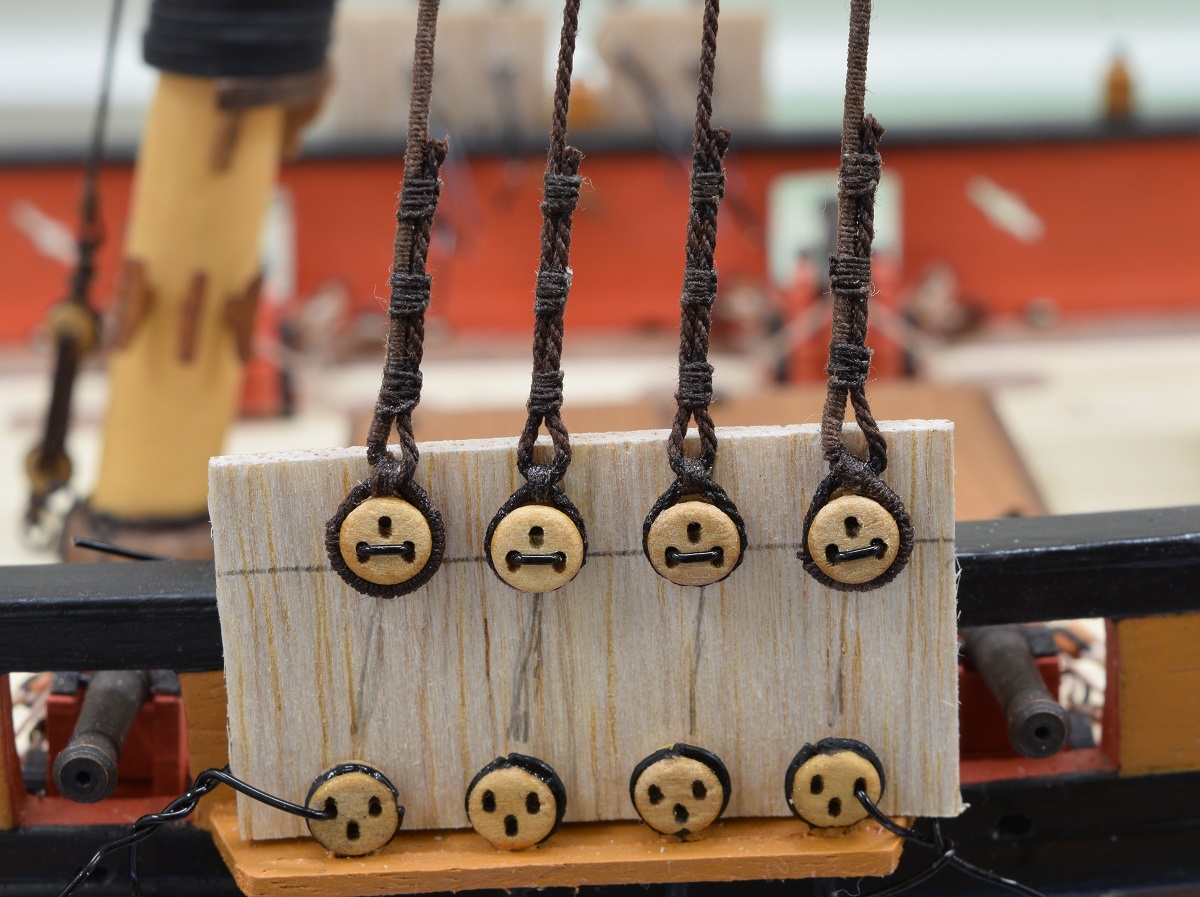
I made a simple board out of some balsa wood (something it's actually useful for!) much like what davec did: I found this to work quite well. I used wire just poked right through the balsa to pin the deadeyes in place, and a couple more wires through the deadeyes at the bottom to hold the wood in position.


- 25 replies
-
- 10
-
-
Looking good grayarea. I had some of the same difficulty that you did in the transition area on the bowsprit, so I feel your pain there. I ended up making 3 bowsprits as I didn't like the dowel, went to a wood from the hardware store (square stock) and then ended up doing the final bowsprit in boxwood that also started as square stock, which makes the octagonal area much easier! Glad you ended up with some Syren line, it's just so much better than that nylon stuff in the kit. That line is probably my biggest 'issue' with MS kits.
- 164 replies
-
- 3
-
-
- model shipways
- armed virginia sloop
- (and 2 more)
-
Interesting approach to the timberheads. Should have more strength than just sitting them in the little notches per the instructions. I pinned mine for extra strength, but you have enough glue-surface that yours should be solid without anything else. Nice.
- 231 replies
-
- 2
-
-
- model shipways
- armed virginia sloop
- (and 1 more)
-
Do them in red & black! Heh.. I painted my trucks red, but then painted the outer circumference black as if they were iron banded. Really it comes down to whatever you like the most appearance wise.
- 310 replies
-
- 5
-
-
- cheerful
- Syren Ship Model Company
- (and 1 more)
-
Eh, in the end, as long as you are happy with how it looks, that's all that matters. It's not as if this is a replica of a specific historical ship anyway.
- 231 replies
-
- 2
-
-
- model shipways
- armed virginia sloop
- (and 1 more)
-
Darrell, Your Niagara is looking great. Just caught up with it from about 2 months back, and your rigging is progressing nicely and looking fantastic! I agree with you that Chuck's rope (and blocks and specialty blocks like the hearts for that matter) are awesome and really make a huge improvement to your model over what the kit provides (i.e. garbage).
- 648 replies
-
- 3
-
-
- niagara
- model shipways
- (and 1 more)
-
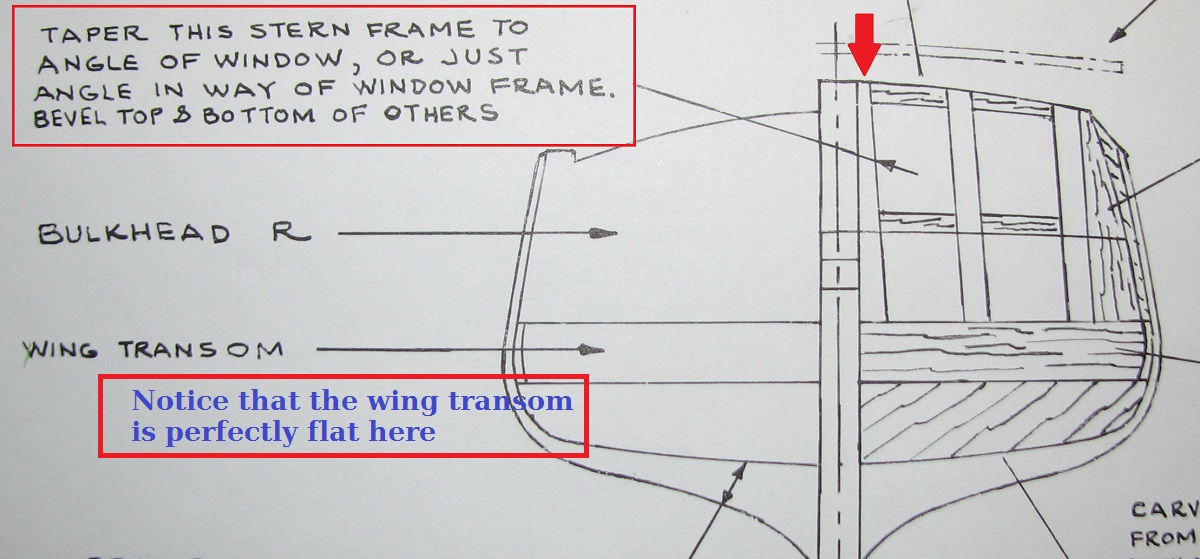
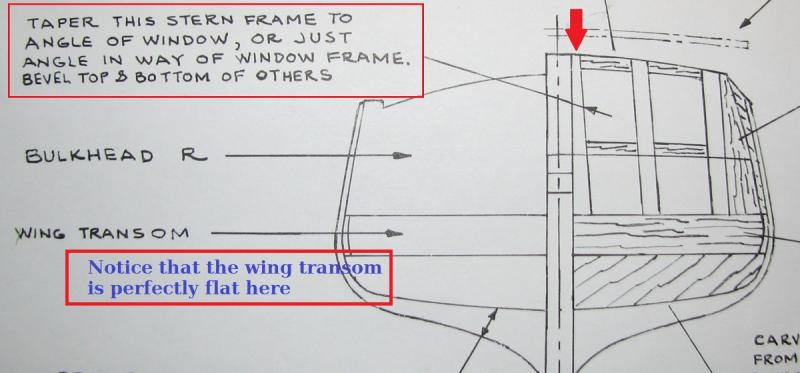
Good looking start, but on the stern frames it looks like you did the same thing as I did. Look at the details of the stern on the plans, and you will see that the center parts #1 need to be beveled/angled in order to cant the windows in slightly. I had to completely re-build my stern when I discovered this a bit later, you might be able to correct it easier if you do it at this point. In my build this is mostly in this post I think - http://modelshipworld.com/index.php/topic/8085-armed-virginia-sloop-by-gunthermt-finished-model-shipways-scale-148/?p=245091 Here is the key plan view, note the part #1 where I added a red arrow pointing to the top, and the red-boxed comment to the left which is on the plans (I added the red box around the comment). Note that this angle means that the bottom and top of both #2 and #3 need to be beveled so that they 'lean in' to match the angle created with #1. Good to see another AVS in the works, I had a lot of fun building it, and overall feel like it was a very decent model, even if I did end up replacing a lot of the kit wood and parts.
- 231 replies
-
- 3
-
-
- model shipways
- armed virginia sloop
- (and 1 more)