HOLIDAY DONATION DRIVE - SUPPORT MSW - DO YOUR PART TO KEEP THIS GREAT FORUM GOING! (Only 20 donations so far - C'mon guys!)
×


GuntherMT
-
Posts
2,213 -
Joined
-
Last visited
Content Type
Profiles
Forums
Gallery
Events
Everything posted by GuntherMT
-
Beautiful work.
-
Excellent work Bob, she looks great. Thanks for sharing with us!
- 348 replies
-
- 5
-

-
- pequot
- cable ship
- (and 1 more)
-
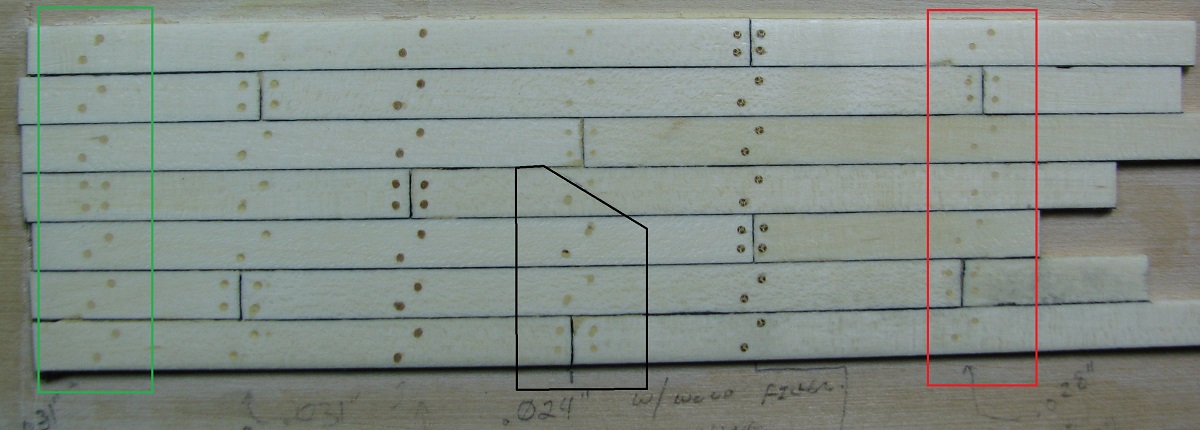
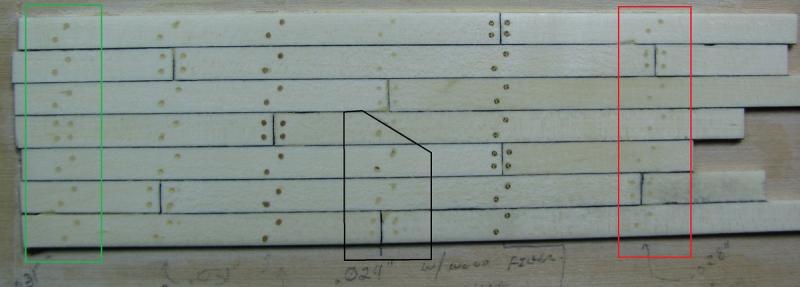
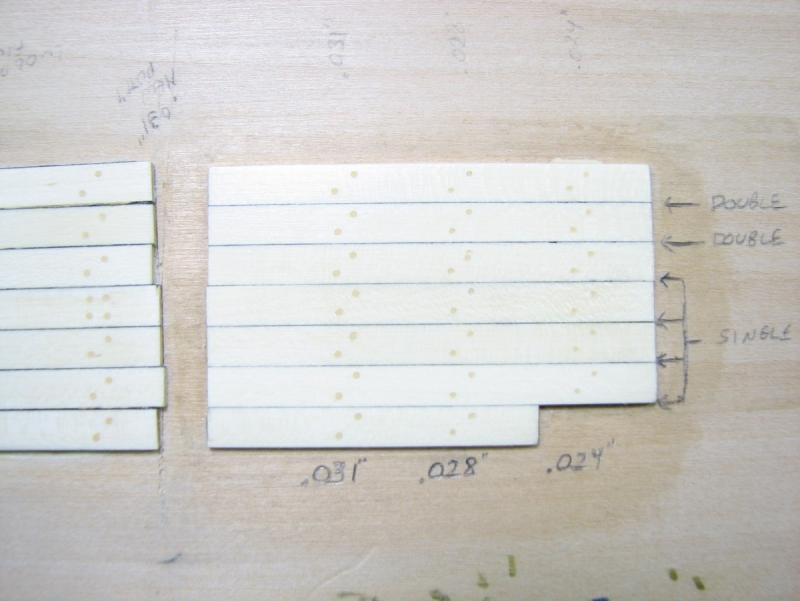
I highly suggest for future models that you make sample deck sections in order to try various tree nailing and/or caulking systems so that you find what you like best before applying it to your model. When I was making the AVS, I built several test deck sections using the exact materials I would be using on the model, and then used different sized holes and colors of fillers to determine what I liked best, that way when I did the model deck, I knew exactly what size of drill to use, how to do the caulking, and what filler I was going to use to fill the holes. Don't forget to apply anything that you intend to use for a final finish also, as that can change the colors. I used Wipe on Poly and applied it to my test decking sections as well. Here was one of several sections of 'test decking' I made to see what the finished deck would look like: Once I had decided on the color of the filler, and how I was going to do the actual caulking, I made another section where I tried different size holes using the final choices for filler. I also tested my caulking (using a 3B pencil on the edge of the planks) with only a single side of the joint colored vs. both sides, that is why some joints are labeled 'single' and some are 'double'. By doing this first, on test sections off of the model, I was fairly certain that I would not end up with a deck that I hated when I was done, and it saved me the pain that you are currently experiencing.
- 42 replies
-
- 17
-
-
I'm not sure I see the rough areas that you are talking about, but I believe that the answer to getting a super smooth surface in most cases where sand-paper doesn't work is high-quality jewelers files. Not the crap you get from MM or a hobby store, I'm talking about Valorbe or other comparable Swiss files which can be purchased in extremely fine tooth cuts and will produce a silky smooth finished surface. If you follow the build log of Frank (Mahuna) in the scratch build section, you'll see that he has files for just about every situation you could come up with. Of course, acquiring a comprehensive set of high-quality files is extremely expensive, so you would want to acquire them as you need them for different situations. For getting into the tiny corners a good triangle file might be useful, and you can get these fine files with teeth only on certain sides so that you can get right up into the corner and only take material from the work-face, and not the edge.
- 45 replies
-
- 14
-
-
The downside to using Titebond III vs. original Titebond, is that if you need to take parts apart (which I have to do all the time), you can do this with just water if you are using Titebond original, but Titebond III is waterproof so you'll need to find out what sort of nasty chemical is needed if you have to de-bond anything.
-
I imagine it depends on the wood. Water doesn't do any favors for ply, as it also delaminates it, but for hardwoods you should be fine if you keep the water to the area you want to de-bond - apply it with Q-tips or a small brush and use rags or paper towels to keep the water away from other areas. I've also used a small syringe to apply small drops of water to a specific spot, and then as it gets soaked up or drys, continue to add more. It can take a good deal of patience as it will take a while for the water to permeate the entire connection that you want to de-bond.
-
Looks very good. I like that the stain makes the color variations in the planks stand out a bit more, really emphasizes that they are actually little wood planks.
- 165 replies
-
- 4
-
-
- finished
- model shipways
- (and 1 more)
-
That technique works well for Bob (and Dave uses something similar), but I completely avoided the use of CA as much as possible in my model, even when doing the first planking layer, as I didn't want to get into 'bad habits' (my personal thing, obviously it works great for some). CA will make bad stains on some woods, so I just wanted to avoid it completely since I intended from the beginning to leave my hull natural, so wouldn't be able to cover up any CA stains with paint. If you find the area where I'm working on planking in my log, I describe my system of using PVA (Titebond original) only, and how I personally believe that it adheres quickly to not need to use CA at all in 99% of the situations I ran into while planking. Quick summary - put a super thin layer of PVA onto both the plank you are attaching, as well as the surface it will be attached to. Because the layer of PVA is so thin, it will dry and tack up almost immediately so that the first piece you apply it to (in my case that was generally the plank itself) will appear to be dry when you've finished applying a thin layer to the target spot. At that point you put the plank into position and apply it with as firm of pressure as you can manage with your fingers for a few seconds, and bam.. it's glued in place. For applying the thin layer, I would run a small bead of glue along the plank, and then use the flat end of a scrap plank to spread it along the plank until there were no spots that were still colored like yellow glue, and instead it was just a super thin clear layer of glue. The key to making this work of course is that you need to get the plank fitting all done prior to using glue. Using heat only, I would get the plank bends to match the location it was going to go (and of course sanding/trimming as needed) as closely as possible so that the plank would not have any stress placed on it once it was tacked in position. Guess it just goes to show you that there are as many ways for gluing planks in position as there are modelers doing it.
-
I don't have the plans handy to check, but I checked the fashion piece that I have running under that point on my model and it does have a very slight bow. It's slight enough that I had to hold a straight edge under it to verify it wasn't actually straight. No idea without going back and looking at the plans whether that's correct or not though. Keep in mind that I built the stern as much as I could based on the plans, against Bob's advice and the practicum, and I also included a fashion piece running along the bottom below the windows which is not part of the plans or the practicum, so mine is a bit unique in that area.
-
I have two suggestions for improvement, and one for future work. 1) Lighter color. They stand out too much, and should be more of a subtle effect (not sure how you can achieve this given that you've already done this unless there is a way to chemically dissolve the filler you use without harming the wood). You could also darken the wood with a stain to reduce the contrast, but no idea how that would look in context with your model. 2) You aren't doing anything to the planks where they cross the frames (imaginary or not) without butt ends. These spots would also be nailed, either with a single nail or double, I've seen them both ways. See this post from another thread for pictures of real ship decks to see what I mean about the plugs existing in the planks where they are not ending. http://modelshipworld.com/index.php/topic/13906-tree-nailing-a-deck-order-of-operations/?p=430408 3) The pattern itself. In general I think a 3 to 5 butt-shift pattern will look much better than the simple alternating 2 butt-shift pattern that you used. Clearly this isn't a solution for this model unless you want to rip the entire deck off and re-do it. Of course if you have actual documentation showing that the ship you are modeling used a 2 butt-shift pattern, then ignore this suggestion completely!
-
I see you stayed busy today after our departure. Very nice work as always, seeing those little chain plates in person was nice, they are much smaller than they seem in the photo, and they are executed very well.
- 649 replies
-
- 6
-
-
- dunbrody
- famine ship
- (and 2 more)
-
Joe, I did use something similar (but not identical) to that plank bender when I started on my first model, and it does work, but I was also using a lot of water (soaking and then using the hot electric bender). Since then I've switched to using the method used by Chuck Passaro with great success - You should be able to find a video in the planking subforum, but basically I bend using nothing but a heat-gun now, no water at all, and I'm quite happy with the results.
-
Well, it would be if I had anything to update other than work and life in general keeping me out of the hobby room (although I did use the room for some non-ship related projects for the house). I'll get back to it one of these days for sure, but no promises on timing, since I don't know myself.
-
It's hard to tell from your picture, but I think you might need to work on the outermost curves of the filler below the wing transom block. It looks like the way it is now the planks flowing into it from the bulkhead would have to 'lift' away from the bulkheads to round the wing transom, which shouldn't be the case. This could just be because of the angle of the photo too. Just make sure that a plank can flow smoothly all the way from the stem to the stern post (or up and into the bottom of the transom where they land there) and you will be good.
-
Based on the scratch built models she has on display in The Miniature Engineering Craftsmanship Museum in Carlsbad, CA... My guess is she is just going to make everything from scratch and make us all drool.
-
If you have the space, I personally think that bigger is better! Space is a very real issue for many though.
-
Quite the night owl. Haha.. Where did you end up sourcing the wood if you don't mind sharing?
-
Doesn't matter, as long as you shape the wing transom properly, the planks can land on it, and worst case you can shim up and fill bulkhead R if you need to. I'm pretty sure that the blocks for the wing transom are oversized also, I remember doing a lot of sanding and shaping to get them right.
-
The Model Shipways AVS comes with the basswood for the filler blocks at the bow and the stern. The Carmen from Constructo had no real filler blocks for the bow, instead having a couple of boards to build up the keel for better rigidity and larger landing place for the planking. It did include some wood for the stern shaping at the top. If you choose to use filler blocks between the other frames for rigidity or backing your planking, then that's on the builder. So it varies by manufacturer, and by kit.
-
Eric, Looks like you are making nice progress, but in your second picture in the post I quoted from October 10th, it looks like the line is not run through the block on the gaff properly. Might be just the angle of the photo, but it doesn't look like the line is coming out of the far side of the block at all, or am I missing something?
-
I'm surprised you didn't get the missing part sheet Mike. I've had two issues with parts from ME, and in both cases the replacement sheet was at my door in about a week. I did all of my communicating with them via their web-form for tech support, or via email.
- 129 replies
-
- 2
-
-
- finished
- model shipways
- (and 1 more)
-
Excellent work Bob. I think you made a fantastic choice in ditching the kit gun carriages, blocks and rigging, they look great.
-
It's taken me a very long time, but I've finally gotten caught up with this log. Thank you for the wonderful job you are doing with the photo's and documentation of this build Ed, it's really great. I hope to someday be in a position to start a Naiad build, but I think a lot of things you show in this log and no doubt the books will be useful for that build also.
- 3,618 replies
-
- 6
-
-
- young america
- clipper
- (and 1 more)