


Cathead
-
Posts
3,558 -
Joined
-
Last visited
Content Type
Profiles
Forums
Gallery
Events
Everything posted by Cathead
-
 Interesting project, Kris. I'm of partial Norwegian descent myself, from a grandfather who was very proud of his heritage (and claimed direct lineage to Erik the Red, though who doesn't?). A proper Viking ship is on my wish list as well and I'll be interested to see how your project goes. I, too, am a "learn it yourself as you go" kind of person and have the mistakes to prove it, so wish you success on this difficult but fascinating choice of build. For what it's worth, MSW has a lot of good tutorial articles in the help section that may answer many of your questions regarding specific aspects of ship modelling.
 -
Very neat project, I'm looking forward to learning from your planking as I've never done clinker before.
-
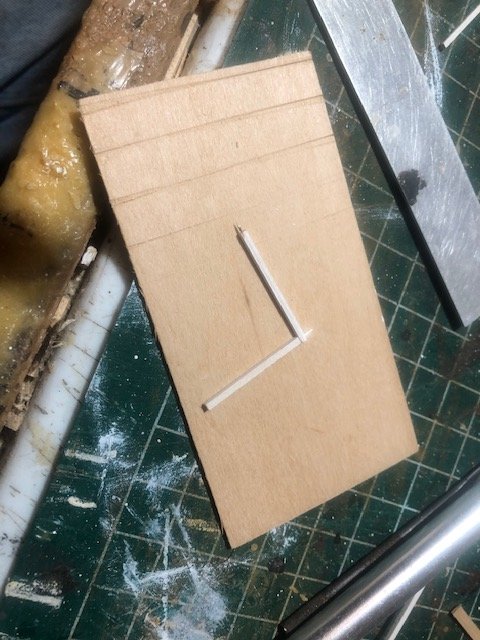
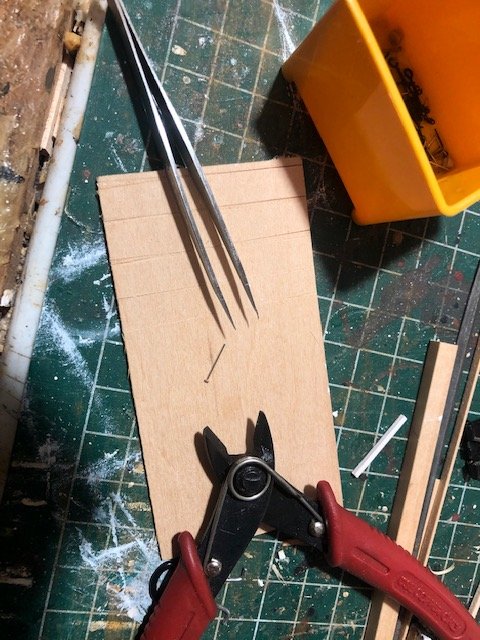
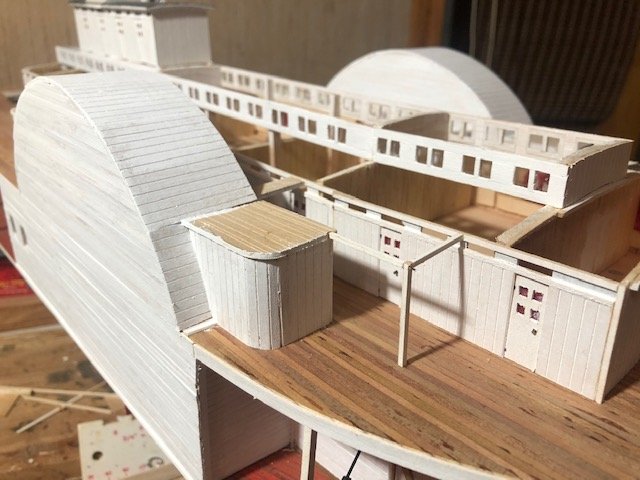
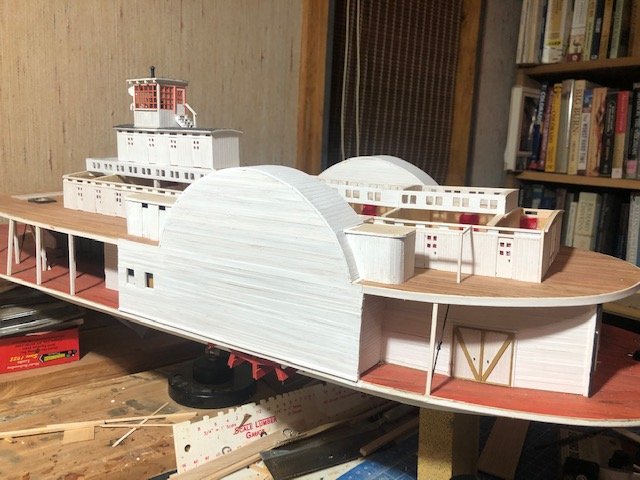
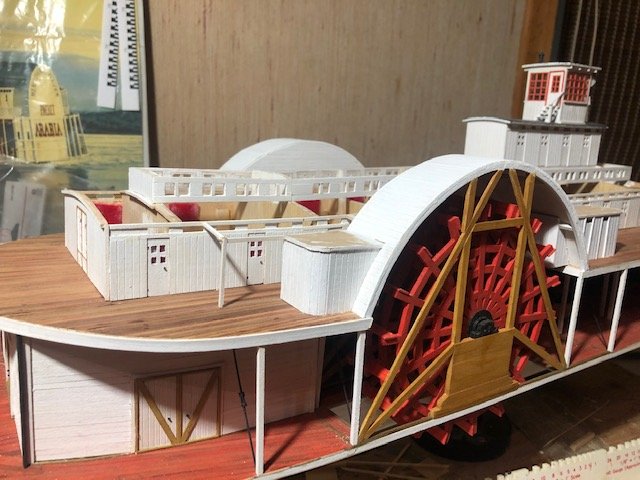
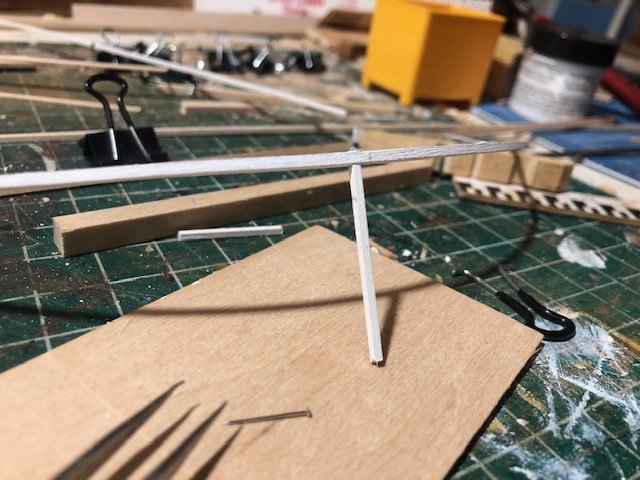
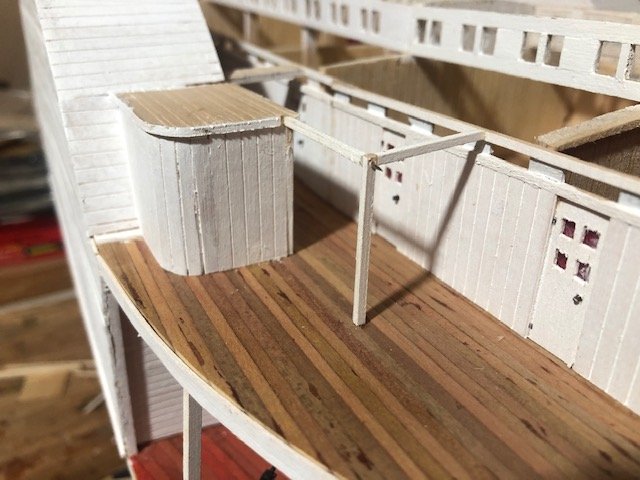
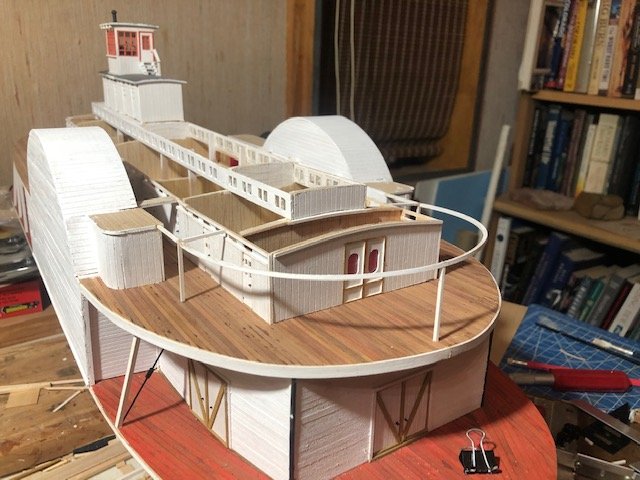
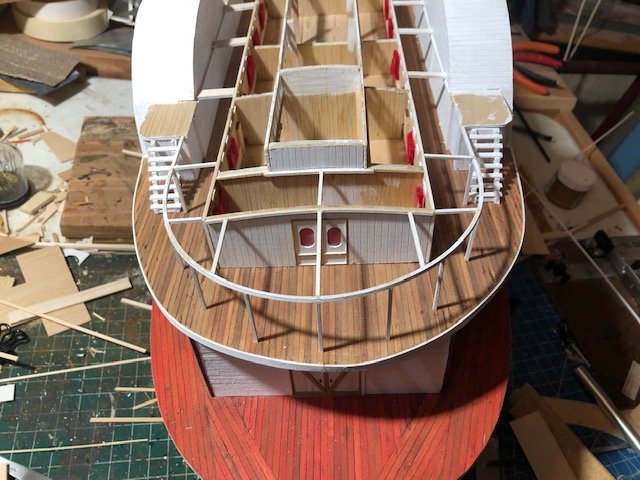
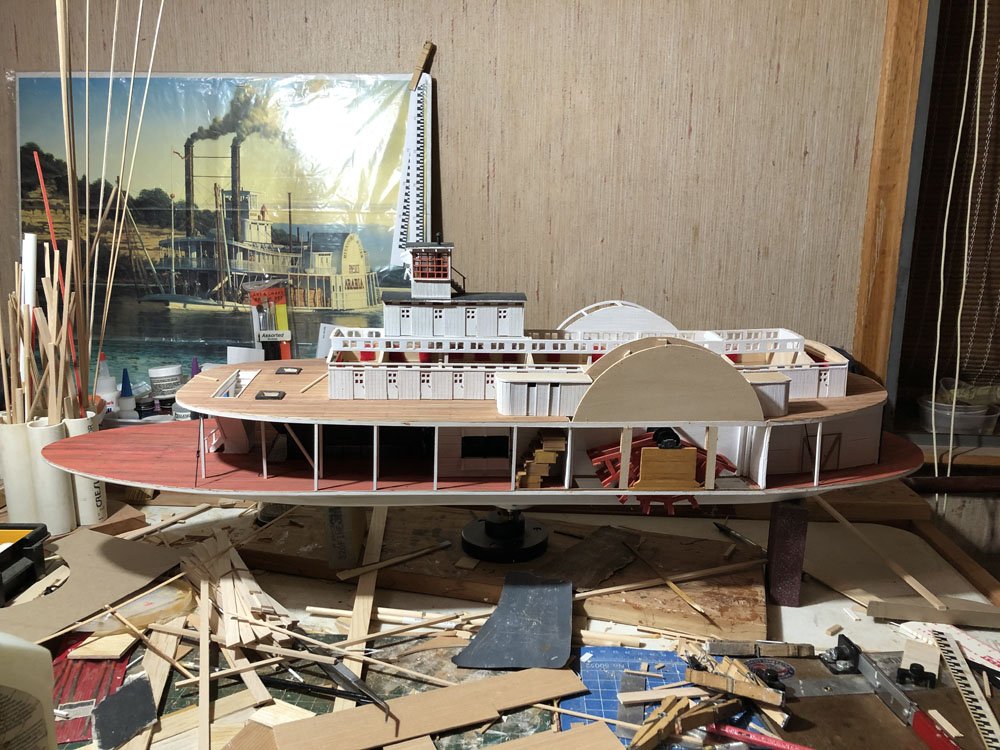
Still plugging away. I filled in the tops of the wheel housings and painted both assemblies: I started building the frames that will support the hurricane deck out over the stern (the roof of the boiler deck). You can see the beginnings of these in the above photos. These will be really delicate, so I gave some thought to how to make them stronger and easier to assemble. The plan I came up with was to insert small pins into many of the joints, using a small drill bit and leftover brass nails from a kit. Above you can see one such joint, with the pin sticking out at upper right and another pin ready for another joint at upper left. I bent a beam in a full 180° curve to form the deck's stern contour, and attached a central supporting beam: Here's that beam installed on the model. Each end fits into a pin in the already-installed framing (see next photo down), with a pin into the deck beneath the stern-most support: More framing. This is now ready for the hurricane deck to go on. I also built the rear staircases between the two decks, using basically the same method I did for the pilot house stairs. These aren't glued in yet, just set in place for appearances. Another view of the hurricane deck framing and stairs: You may notice that I included a bit of an upward curve here toward the stern. I think this adds some style and is similar to other boats of the era. Finally, I started cutting thin sheets of wood to form the base of the hurricane deck. As this will be fully covered in simulated tarpaper (like the pilot house and Texas structures), there was no need to plank it. These aren't attached, just set in place to test the fit. I think I'll use pastels to lightly color the open bottoms of these rather than waste paint (and risk curling the thin sheets). That's where the model stands. Current plan is to work my way forward from here. I started at the stern as I expected it to be simpler, the forward framing will be more complex, so now I have a better idea of the mechanics I want to use. At times this project feels like it'll never end, then I get moments where it seems like it's racing along. Thanks for reading!

- 599 replies
-
- 17
-

-
- sidewheeler
- arabia
- (and 4 more)
-
Can i live without a BYRNES TABLE SAW
Cathead replied to shihawk's topic in Modeling tools and Workshop Equipment
Mine is on its way. Now I just have to make space for it. -
Cog, that's strange. I've run into similar problems every now and then on random websites, where I'll get a notice about security configurations being incorrect so the browser blocks it. My memory says it's usually major government sites (like NASA or NOAA in the US), so I suppose that fits for the Missouri Department of Natural Resources. I've found that using a different browser solves the problem, don't know why it happens in the first place. No idea why Missouri would have it in for the Dutch otherwise. Belgium, maybe, after InBev bought Budweiser, but we don't have any beef with the Netherlands that I'm aware of.
- 599 replies
-
- 5
-
-
- sidewheeler
- arabia
- (and 4 more)
-
Thanks, Gary! As you might expect for a Missouri-based river history buff, I love Mark Twain. I live about 1.5 hours from Mark Twain Birthplace State Historic Site, which is really cool. One thing I love about American river history is how different each major river's culture and development were, including steamboat design. Living near the Missouri River, and being married to a scientist who spent years doing research on the morphology of the river, really makes that my primary interest. I wish Twain had spent more time on "my" river, I'd love to have his perspective. Anyway, I appreciate the comment and am glad you're enjoying this project.
- 599 replies
-
- 5
-
-
- sidewheeler
- arabia
- (and 4 more)
-
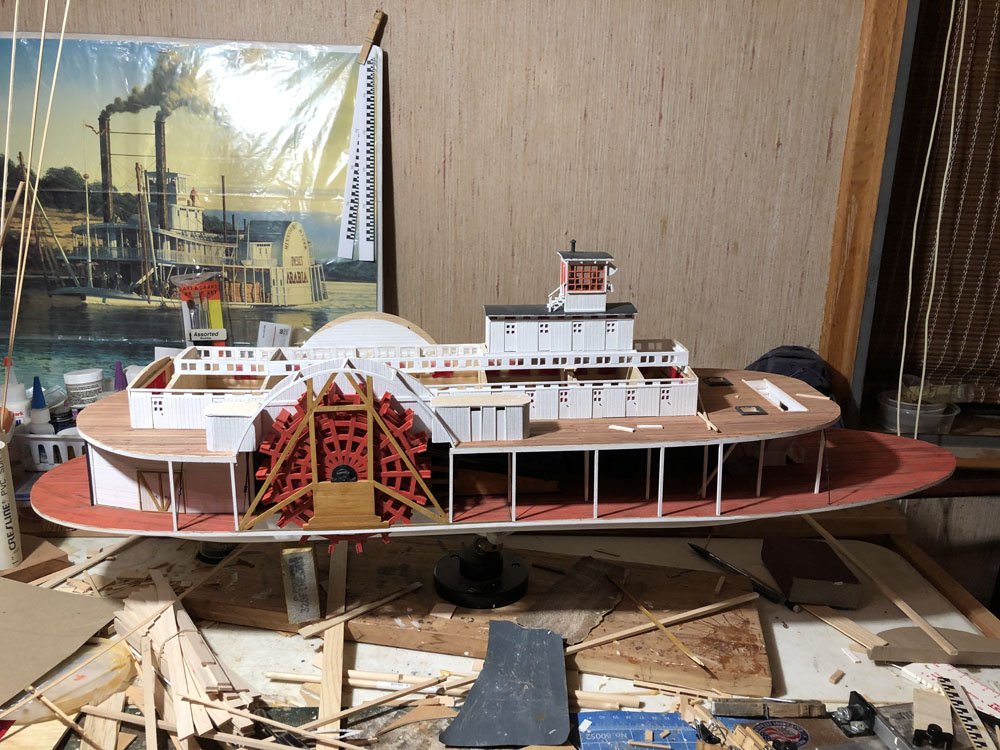
Happy Thanksgiving to all the American readers (and the rest of you)! I'm grateful to have a community like this that makes this hobby so much richer than toiling away in isolation. I've been quietly working away at planking the port wheel housing. I decided to add the two windows shown in the painting; I don't know whether or not they were really there, but you can see similar features on other vessels. I built frames for these and added backing so they'd fit right into the planking (like a window in a model kit). Since you can't really see behind these, this was an easy way to get them installed. I then hung them from the planking and started planking around them. And here's the fully planked port side. There's a fair bit of detail to add here, various vertical ribbing and so on, but it'll come later when the model is closer to being complete. Next I'll start planking in the upper surfaces of both wheel housings. Thanks again for being part of this journey, I wouldn't (and likely couldn't) be doing it without you.

- 599 replies
-
- 16
-
-
- sidewheeler
- arabia
- (and 4 more)
-
Can i live without a BYRNES TABLE SAW
Cathead replied to shihawk's topic in Modeling tools and Workshop Equipment
This is definitely a positive consideration for me. I handle cars the same way; buy a high-quality new one, take care of it, and run it forever. My 13 year old truck has had $100 of non-routine maintenance done on it, a great value in the long run. Thanks for your feedback on this question, it's been helpful. Kurt, thanks also for your feedback. I really like the idea of making my own wood; shipping wood across the country when I'm surrounded by harvestable trees just drives me bonkers! That tool of yours looks good and it does make sense to not have to precisely reset the fence every time. -
2019 NRG Conference Coverage
Cathead replied to TomShipModel's topic in NAUTICAL RESEARCH GUILD - News & Information
I'm 40 but am involved in mostly "retiree" interests like model building, birdwatching, and playing American/Irish/Scottish folk/bluegrass music. I generally stick out like a sore thumb. There is an element of generational change, but it's also true that most people in my age bracket +/- 15 years are deeply involved in some combination of working, saving for retirement, raising kids, etc. and that leaves relatively little time or funds for outside hobbies. I've never attended an NRG conference even though I'd like to because flying across the country for a several-day event is pretty expensive per unit time, especially when I have limited time off and the first priority for that goes to family visits and regular travel interests that usually don't correspond with conference locations or timing. Realistically, there may well be another generation waiting in the wings to take up model shipbuilding once their kids move out, they finish paying off college loans (theirs and/or their kids), and/or they're financially comfortable enough to retire. Keep in mind that, the younger you get, the less likely any of those things are to happen at an equivalent age to older generations, given the changing nature of the job market and the economy, at least in the US. The average 40-year-old now has more debt, less job security, and less-well-off kids than a 40-year-old 20 or 30 years ago, so it'll be harder to draw them in. I don't disagree that there's a potential need to "reach out" somehow and connect with people who might be interested in this hobby if they were exposed to it. I'm not sure social media is really the way to go, but I also avoid it like the plague so I'm biased. I've been thinking about this and don't know the answer; I'm rather unrepresentative of my generation so don't have a good insight into the right approach. A few years ago I tried offering an Intro to Wooden Model Building class through a local adult-education program that has lots of craft-type classes, but it only got two signups and was cancelled for lack of interest. Don't know what else to try. I don't think it helps that people are increasingly disconnected from older modes of transportation that used to be far "sexier", like ships and trains, which are now increasingly bland and standardized (to an amateur eye) and ever more out of sight, out of mind. Most older modellers now still grew up in the passenger train era and with a one-generation memory of the great naval battles of WWII; my generation has almost no direct connection to such things in ways that encourage the urge to recreate. Now I'm just rambling; told you I was an honorary old person! -
Can i live without a BYRNES TABLE SAW
Cathead replied to shihawk's topic in Modeling tools and Workshop Equipment
Kurt, can you clarify what you mean? The only $30 option is listed as "extended rip fence" but doesn't say anything about being adjustable whereas the "miter gage adjustable extension" is $12. Cog, can you clarify whether/why I would need the micrometer stop? Doesn't the saw already have markings to allow one to set cutting width? I should probably clarify a few other factors for me. I've been doing timber management on my land for over a decade, cutting my own lumber and custom-milling planks and beams for both my own use (sheds, barns, furniture) and sale (other peoples' projects including decks, sheds, garden beds, etc.). So the wood I'd like to use for model work is either already bandsaw-milled into planks or billets and stacked, stickered, and cured, or has the ability to become so. I am not a full-time model maker and do not want to go berserk ordering high-end equipment that will get used a few times a year. It seems to me, and please correct me if I'm wrong, that a basic table saw and tabletop bandsaw (which I already have) should be sufficient for an amateur modeler who wants to occasionally reduce some wild-harvested wood to reasonable billets for the Byrnes saw. I don't care about kerf loss because wood is utterly renewable for me and I have a fleet's worth of it already waiting for use. What I want to do is take rough-cut billets and make model-scale planks or beams in various thickness/width combinations from 1/32" to 1/4", with occasional larger pieces. My understanding is that the Byrnes saw allows me to do this; am I correct, or am I misunderstanding what this tool can do? -
Can i live without a BYRNES TABLE SAW
Cathead replied to shihawk's topic in Modeling tools and Workshop Equipment
So I am very strongly considering making this my Christmas purchase as well. However, I find the thought of reading back through a 300+ comment thread impossibly daunting. Does anyone care to provide a reasonably brief summary of the most important points to consider when buying one, especially with reference to all the possible add-ons? I have a budget and cannot just splurge on "all the goodies". I am primarily interested in sawing my own planks and other parts (i.e., frames) as I have a large stock of maple as well as cherry and other fruitwoods harvested on my property that I'd love to start using instead of shipping wood across the country. I also like the idea of making thin pieces for use in other wood artistry. Thanks for any feedback you all want to provide. -
Do you have any specific examples? I'd say many European kits of American riverboats are classic examples, such as AL's King of the Mississippi, which is toylike in its utter disregard for realism; it's the steamboat equivalent of a Playmobile pirate ship. You don't have to be a purist or an expert to see this, five minutes with Google Images should convince anyone that this kit is trash. Can you imagine the howls if an American manufacturer came out with an expensive Victory kit that was equivalently ridiculous? Another is the Corel Ranger, which seems cobbled together from many different actual known examples of topschool schooner revenue cutters but doesn't match any known design. It wouldn't have been much harder for them to just base the model on an actual design rather than inventing their own. You'd still have an attractive model for those who don't care but a much higher-value product for those who do.
-
Welcome from a fellow Missourian! Hope you enjoy this hobby as much as I do.
-
Sounds like a good question for Kurt. I stepped in it deep last time I tried to advise you on rudders! Two certainly seems like the standard that I've seen, but take that with a salt mine.
- 133 replies
-
- 2
-
-
- chaperon
- model shipways
- (and 2 more)
-
druxey, believe me, I thought about various people and clubs in the area, but we honestly didn't have a lot of time and wanted to do things of highest interest to us both (and family). Some other visit home when it's just me, it'd be very tempting! Jack, that's neat! My mother now lives just off the canal in Pittsford and routinely walks/bikes the canalpath. When I was there we rode the canal to the river and then downstream most of the way to downtown. Such a great trail network. The canalpath through Wayne County was quite a bit rougher when I was growing up, but more than once our family all biked all the way to the city from out there in the boonies. Brian, my workbench management is to clean up between stages. It gets messier and messier as I progress, then every few weeks I reach a good transition point and decide to clean up and organize things again, starting the cycle over. I like a clean workspace but also don't mind rooting around in messy scrap piles for just what I need. And the bench is shoehorned into our small living room between the couch and bookshelf, so there isn't a lot of room for fancy storage.
- 599 replies
-
- 3
-
-
- sidewheeler
- arabia
- (and 4 more)
-
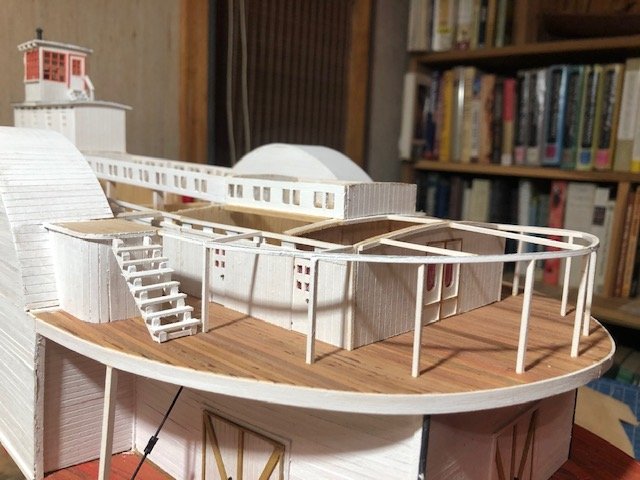
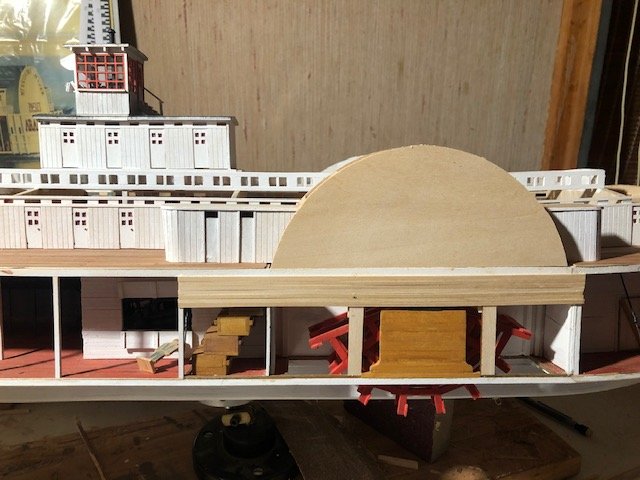
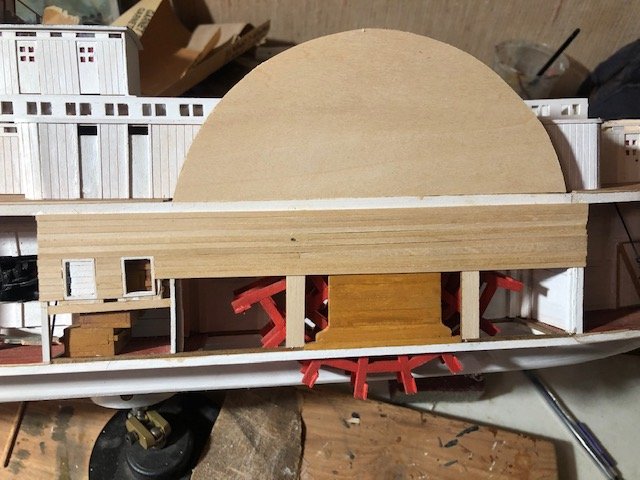
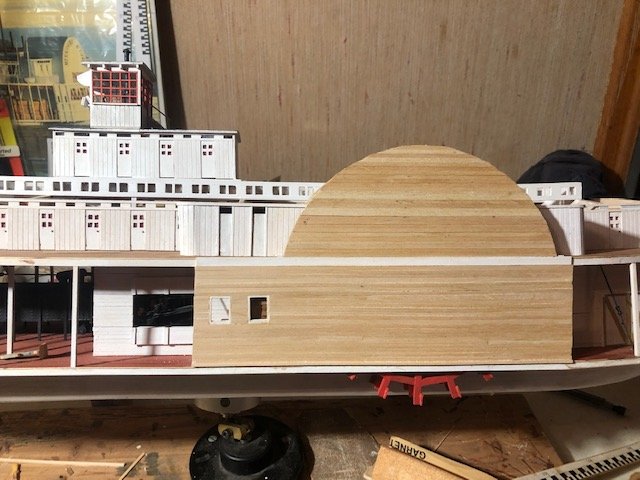
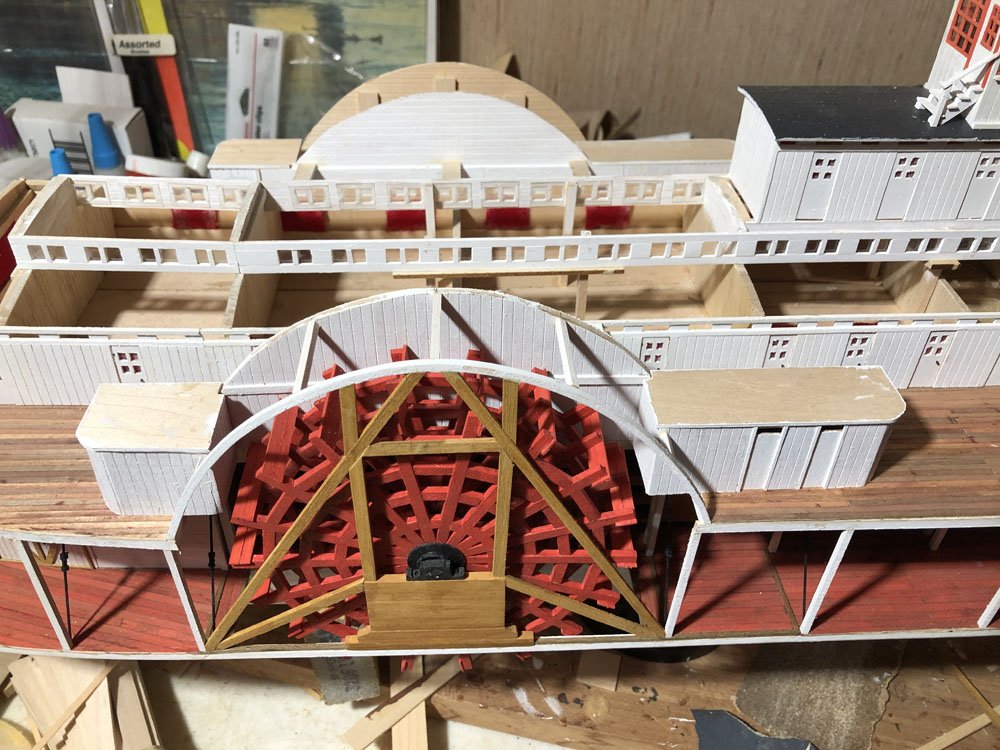
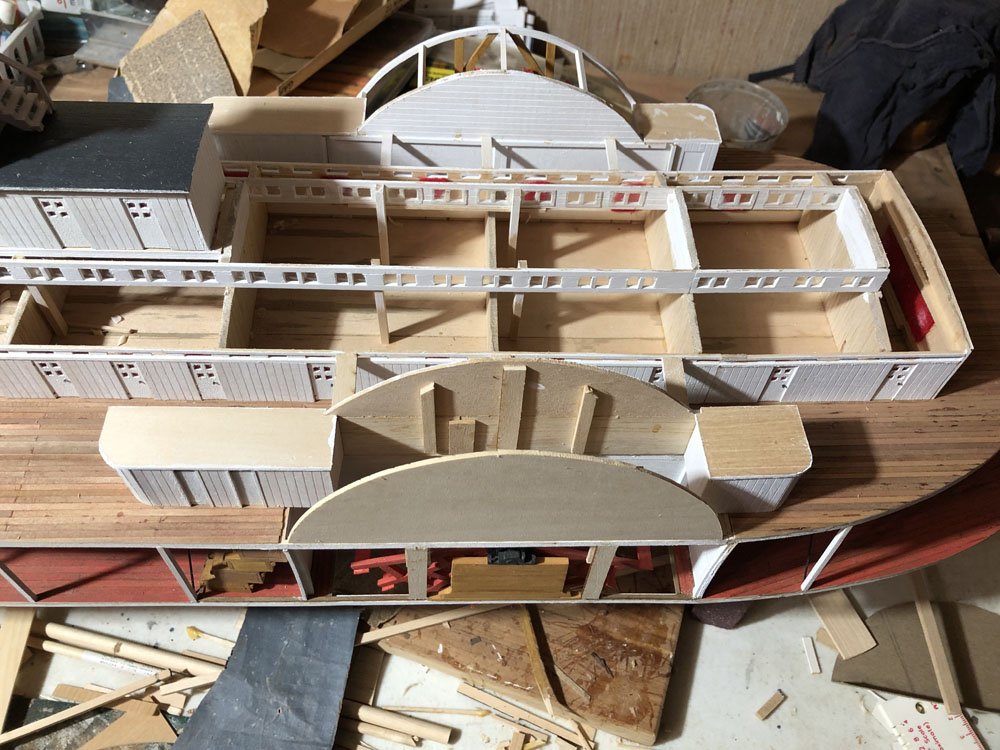
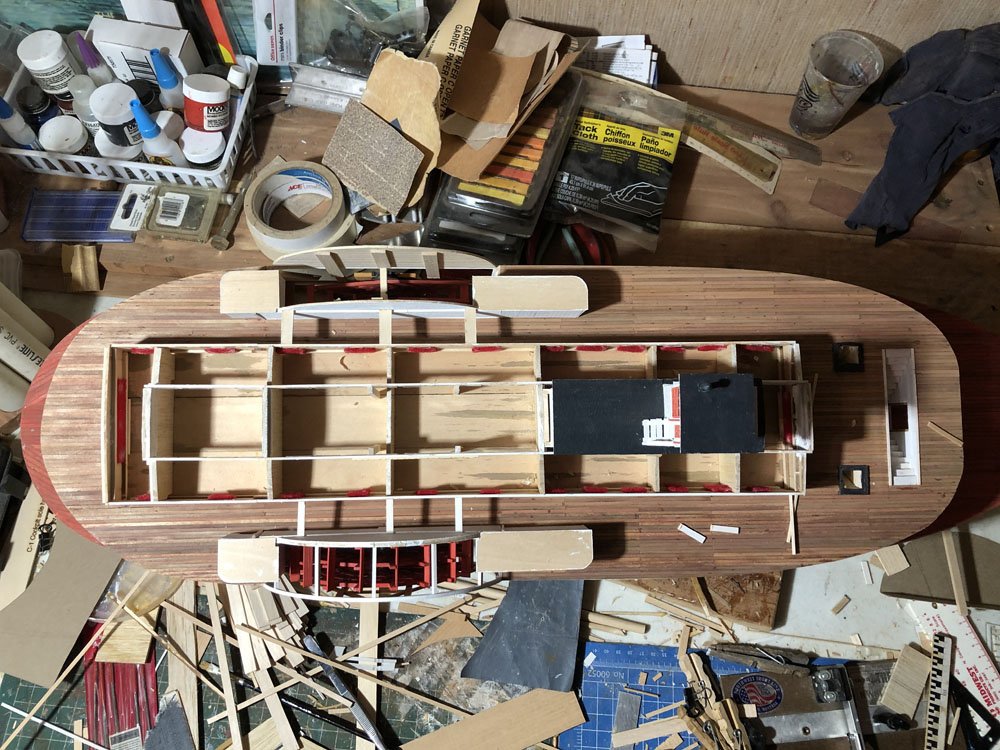
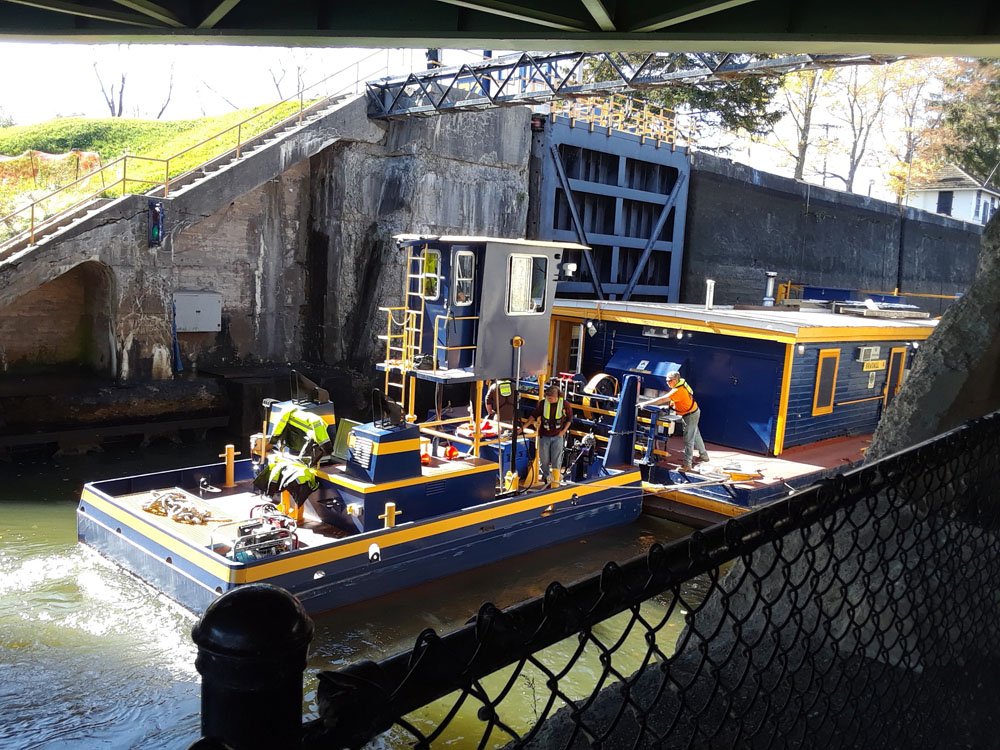
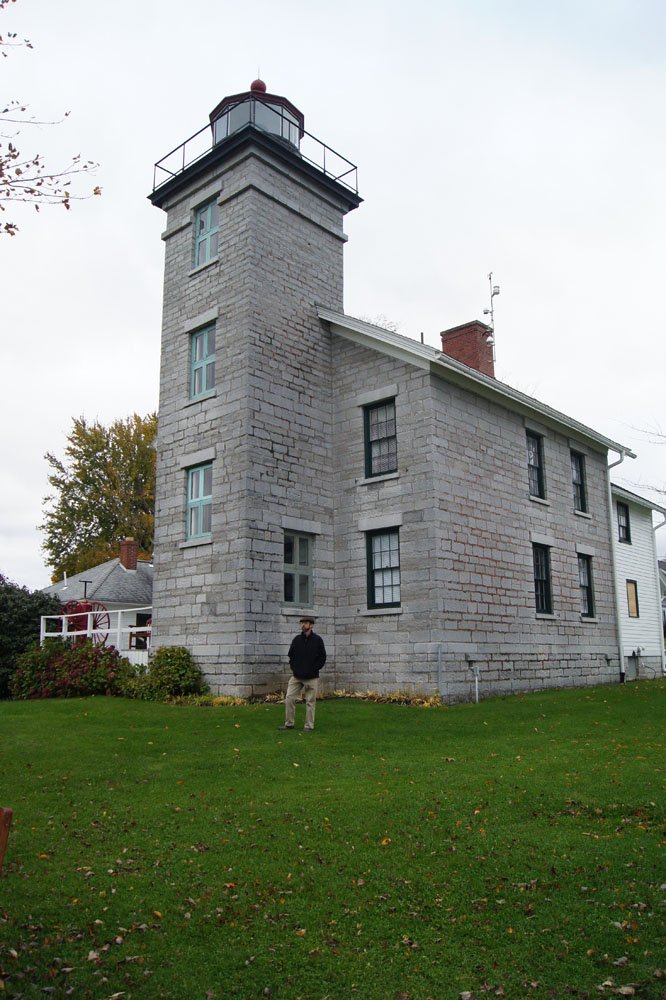
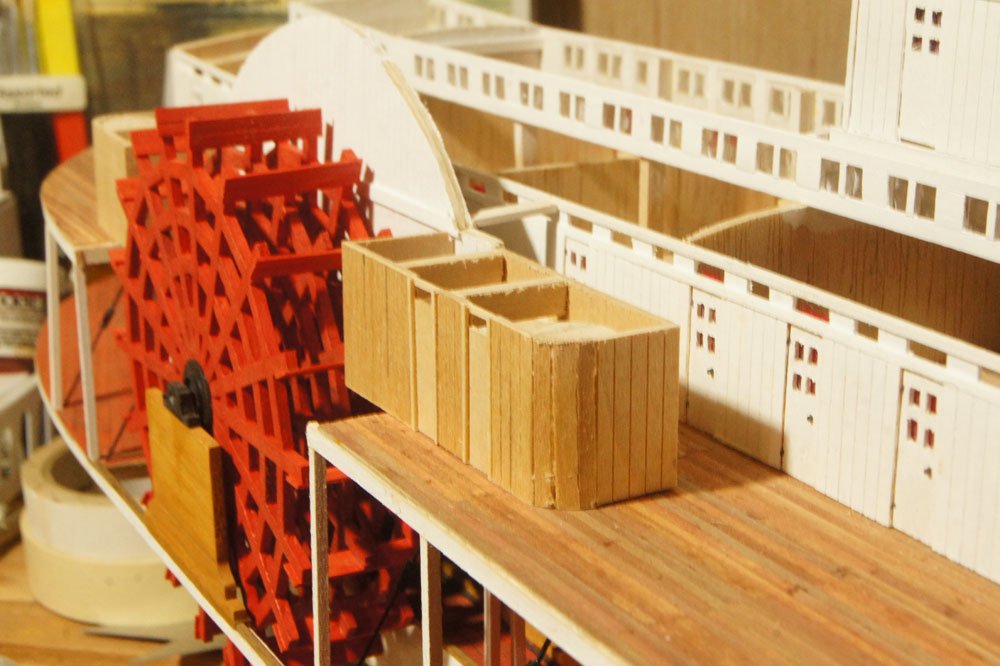
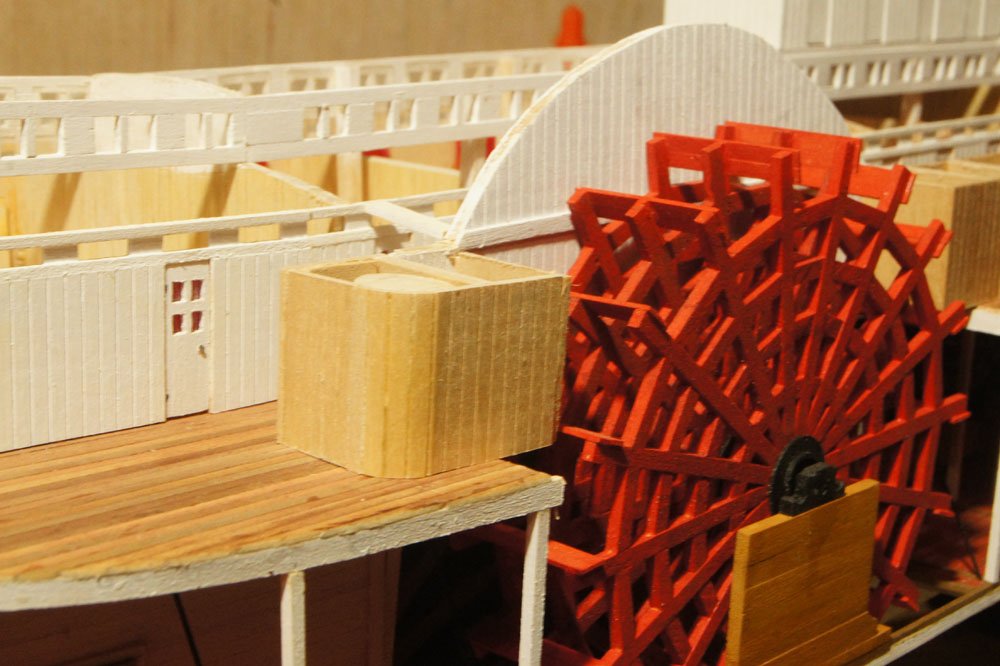
It's been a month, suppose I should update this log. Following a two-week trip to Western New York to visit family in my land of origin, I slowly got back to the model desk. I've pretty much completed the heads and related structures along with the framing of the wheel housings. First, here's the "open" side of the model, the side of which won't be planked over (the top will). I designed the inner framing supporting the arch based on drawings by Alan Bates. And here's the "closed" side. The entire housing and the area in front of the stacked crates will be planked over. Here's a top view. The upper roof surfaces will be covered by the hurricane deck so aren't painted or otherwise finished; I used scrap sheet wood for these, which is why their appearance varies. Fun note, these were taken with my new cell phone, the first one I've ever owned. I have decidedly mixed feelings about this, but the world moves on and it's becoming ever more difficult to operate without one, even for a rural recluse like me. Finally, two photos of maritime interest from our trip. First, me at the Sodus Point lighthouse along Lake Ontario. Growing up, I learned to sail in the bay this lighthouse guards, my mother's second marriage took place here, and I took my high school senior photos here. Second, a work boat and barge entering a lock on the Erie Canal, taken by Mrs. Cathead. She had fun watching a full lock cycle as this little fella went through. Looks like a fun someday model subject, and the canal lock would make a neat diorama. The Erie Canal played a large role in my upbringing as well, and I love returning to it. We also had a good time visiting the Erie Maritime Museum in Pennsylvania (home of the Niagara), Niagara Falls, and lots of very hikeable waterfalls and gorges in the Finger Lakes region. Fun fact, we missed an historic event at Niagara Falls by one day. There's a wrecked scow that's been stranded just above the falls for over 100 years without moving. It moved downriver during a strong storm the day after we were there; would have loved to see that change! Thanks for reading, we'll see if I get back to more regular updates from now on.
- 599 replies
-
- 15
-
-
- sidewheeler
- arabia
- (and 4 more)
-
The top four in the quality poll are evenly split between European and American. Of course there's a certain bias in any country toward kits that can be easily acquired or whose instructions are written in the native language, but it's also true that many of us have experience with various "foreign" brands with terrible instructions or other issues (Ahem, Corel). There are also "foreign" brands that have gotten rave reviews on this site, like Master Korabel and Dusek, that nonetheless are smaller brands and naturally won't match the volume of major players in the American market like Model Shipways. By definition a poll is a collection of responses from the sample set. If you want to know more about a specific brand, look for specific build logs or reviews written on this site. Or write your own review if you think a brand is over/under-rated. But it seems to me that none of the high-ranking results (for either quality or lack thereof) are mistaken based on my own experience and that of reading lots of collected opinions on this site. At most, some brands are under-represented, but that's inevitable. It amazes me how many people get worked up about this.
-
Cool! I'm not familiar with that tubing, is there any chance of it degrading over time like the rubber bands? That was my worry when I used tape for this on the Bertrand, but it's held up great so far.
- 133 replies
-
- 1
-
-
- chaperon
- model shipways
- (and 2 more)
-
Cottages don't have rigging...or rather their sort you remove with a broom or vacuum.
-
Roger, The links for different projects (top bar of any given page) give some information on model destination. For example, the intro page for the Heroine project states: We're thinking about an Oklahoma/Texas road trip next year, and this would definitely be on the agenda. As for the wheel, I definitely see what you mean, but I think that can't be entirely representative of later practice based on photos and drawings from the 1850s onward. Heroine, as an 1832 boat, definitely represents an earlier experimental stage in steamboat design. I don't think a later boat could handle that ratio of wheelhouse to wheel diameter given the known size of wheels. But point well taken, the model certainly shows a precedent for lots of space below the curved wheel housing.
-
Looks real nice. It's been a pleasure to follow along on this.
- 104 replies
-
- 1
-
-
- revenue cutter
- BlueJacket Shipcrafters
- (and 1 more)
-
Niagara yes, unfortunately Toronto is a bit too far off our route though I've quite enjoyed past visits.
- 599 replies
-
- 2
-
-
- sidewheeler
- arabia
- (and 4 more)
-
Only a little progress. I spent a bunch of time playing around with different mockups of the heads and their associated strucures, working out what seemed right to me in the physical model. Here's what I ended up building in wood: These need some finishing work, but I think I'm happy with how they capture the essence of the structures seen on contemporary images. There won't be any more updates for a while, as we're about to leave on vacation, taking a road trip to the lower Great Lakes to visit family and do lots of hiking and exploration. Among other things, we plan to visit the Erie Maritime Museum (home of the Niagara) and a variety of early star forts along Lake Ontario. Once we get back, work and life will be super-busy. Hopefully I can get back to this model by mid-November. Take care and thanks for reading.
- 599 replies
-
- 12
-
-
- sidewheeler
- arabia
- (and 4 more)
-
Nice work! Looks really crisp.