
HOLIDAY DONATION DRIVE - SUPPORT MSW - DO YOUR PART TO KEEP THIS GREAT FORUM GOING! (Only 24 donations so far out of 49,000 members - C'mon guys!)
×


amateur
-
Posts
3,516 -
Joined
-
Last visited
Content Type
Profiles
Forums
Gallery
Events
Everything posted by amateur
-
Rope-Stropped Blocks for Boom Vang
amateur replied to Julie Mo's topic in Masting, rigging and sails
I know that almost al Dutch inland water ships have iron stropping at these blocks. Never seen a pic showing rope-stropping. Jan -
'Potdekselen' is the correct naming 🙂 Jan
-
Caution! When is a model NOT the ship?
amateur replied to The Recusant's topic in Wood ship model kits
Not really new news. Happens quite often that the kit does not show the eal stuff, or just gives some fake history. Jan -
Two remarks on that: These sculptings would need flexible molds, as there is detail on the sides of them, and there are open spaces under the scrollwork. The castings would require severe detailing afterwards. secondly: part of the atmosphere of this model is in the high degree of consistency, but also in the slight variations between the almost equal parts. I guess the model looses some of its charm by using castings. Jan
- 1,035 replies
-
- 8
-

-
- royal katherine
- ship of the line
- (and 1 more)
-
It was one of the difficult parts: the blocks are not heany enough to get the line sag naturally. I did not use the corel-thread, but something else (I think it was Amati), and far thinner than the Corel-line. I started from the bowsprit, next the running part to which the spider blocks are attached (without tying that one off to the stay). Next the 'spider part' working inside out, using clove-hitches to tie them to the stay. next I have attached a small weight (paper clip) to the spider blocks, and have been tweaking endlessly with the running part to get thetension right. As soon as it looked okay, I have more or less fixed the whole thing, by brushing it with a diluted white glue. It took me at least four or five tries to get the thing more or less good, without overtensioning it, and having the stay pulled outward. And yes, I have been rerigging the stay-block to get more tension onthe stay... Both blocks are almost touchi g now, as Ineeded quite a lot of tension in the stay to have the whole looking OK. Problem was also that my spritmast tended to go backward, as I tensioned the lines. Delicate balance indeed. Jan
- 139 replies
-
- 4
-
-
- corel
- prins willem
- (and 1 more)
-
And we'll be here Or anywhere else where your building-activity pops up. Gwen still not asking for Musi? Jan
- 378 replies
-
- 10
-
-
- java
- pacific crossroads
- (and 2 more)
-
Hi Piet, I guess this is the end of your tweaking? Or do you still see room for improvement. Judging by the pics I think you have nailed it: Ship, water, smoke, action. Great model. Jan
- 378 replies
-
- 9
-
-
- java
- pacific crossroads
- (and 2 more)
-
And spme of us happen to know some Dutch, so don't hesitate asking for a translation in the case google translate gives you nonsense
-
I can live with that As it llpks now, she will be up to your usual standard Where do you buy the syringe and needles? Jan
- 193 replies
-
- 4
-
-
- wilhelmina vii
- fishing
- (and 1 more)
-
Hi Piet, the sea is quite good. The larger bow wave does add to the diorama. Ans as the others said: smoke is getring better and better. I wagerly await the end of your further experiments! jan
- 378 replies
-
- 8
-
-
- java
- pacific crossroads
- (and 2 more)
-
Standard practice with deagostini: no kits, only subscriptions, and not all subscriptions available in all countries. (Or at least, not at the same time) I don't know how it is now, but last year Wasa did not ship to theNetherlands. sometimes, ebay is your escape: someone starting the subscription,but dis not start it, and now resells. But as this one is available only in Russia, I don't think your chances are very high...... Jan
-
So do I. I don't always respond to new posts, but I always drop in to see the pics. She is avery convincing model. Guess you van posts video's of the model in the water, and claim it is the full-size orgininal. No one will notice Jan
-
I took some time to read this one. This guy is a wizard with cotton and chicken wire. (Although my guess is that a major part of the wizardry is not in the cotton, but in his setup for the pics) Jan
- 378 replies
-
- 7
-
-
- java
- pacific crossroads
- (and 2 more)
-
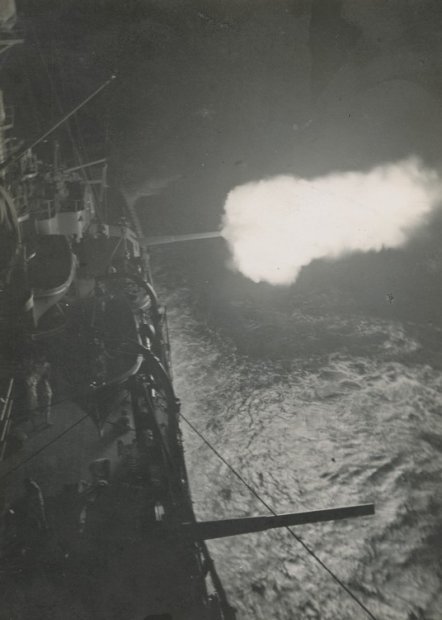
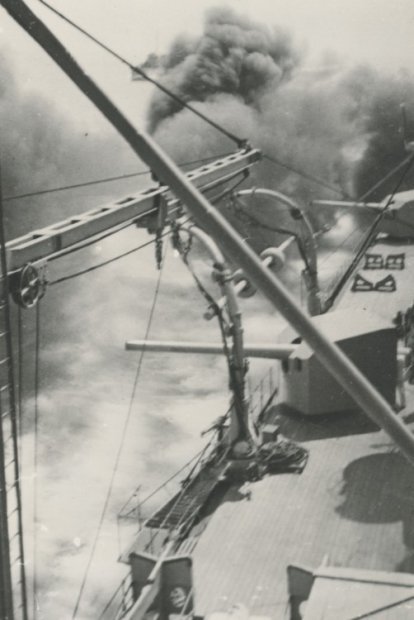
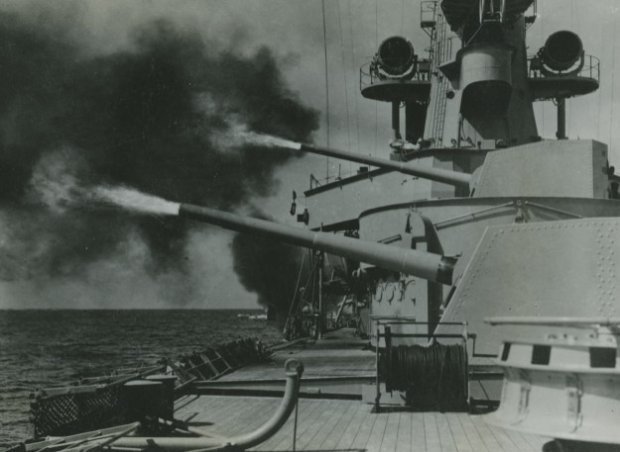
Did some searchin gin the navy foto-archive. Found three pics (Piet without doubt has them on his computer). two of Java firing (one at daytime at full speed, one at night, and looking at the water: without speed at all) and one of De Ruyter showing the burning hot gasses leaving the gun. IN the night-pic I can't discover whether or not we only see the center of the smoke-ball, or the total. IN that case, it is a fairly compact smoke-ball. Comparing it to the other two, I guess we see only the core of the smoke, that is lighter by the hot gasses. Jan
- 378 replies
-
- 11
-
-
- java
- pacific crossroads
- (and 2 more)
-
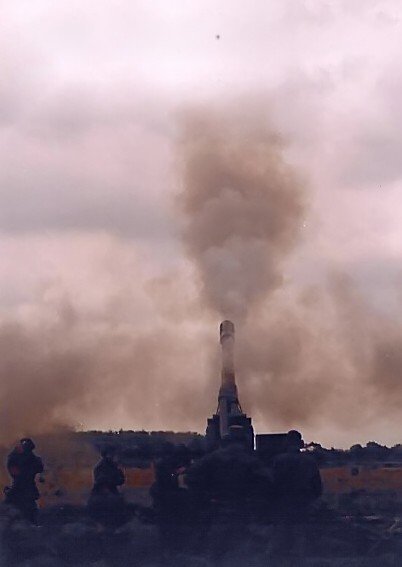
Hi Piet, That is a very nice result. And as you ask: I think the smoke from the stacks is convincing, the smoke from the guns is not. I have three points of doubt: 1. the form: I was in the artillery during my military service (10 guys to man one gun, so I am not too surprised by the number of man standing to one gun). And one thing we learned: The smokeball from the gun has a strange form: once the shell leaves the gun, the first amount of smoke is blown sideways, at the same time the gumn recoils, and the remainder of the smoke trails the shell. It makes the smokeball a bit lengthened, but slightly wider at the point where it leaves the gun, but also: the end of the gun is covered in smoke just after firing. And also: the smoke ball is denser and darker in the middle, and more open at the outside, especially when there is some wind blowing.It is certainly not a round ball-like cloud (and of course: the size of the smokeball depending on quite a lot of factors). 2. the place were it is relative to the guns: as the ship is going full speed, the smoke ball is not in the middle of the gun, but it trails the ship a bit. 3. : when you depict the gun while firing, the last smoke leaving contains burning powder, and is therefore colored different from the remainder of the smokeball. In short: I like the result so far, but I think the gun-smoke needs some tuning..... (below the only pic of a firing gun I have in my archive: A Dutch M114/39 shortly after firing a shell)
- 378 replies
-
- 8
-
-
- java
- pacific crossroads
- (and 2 more)
-
Have a safe trip. and gefeliciteerd met de verjaardag van je moeder! Jan
-
But as you guys all climb the roof, I will take the empty spot just next to his work bench. I need to be close, as my eyesight is not good enough to folow the work from some distance. Hope you don't mind. I'll honestly try not to spill my popcorn crumbs over his freshly painted parts. Jan
- 1,090 replies
-
- 6
-
-
- showcase models
- vendetta
- (and 2 more)
-
Every time I see your model, it becomes more and more clear that Katherine is a very elegant ship in her lines and appearance. I like her very much. Jan
- 1,035 replies
-
- 7
-
-
- royal katherine
- ship of the line
- (and 1 more)
-
Those amazonprices are ridiculous. European bookstores ask more reasonable prices. Perhaps this book is still available in the bookstore Jan
-
Nope, I found by googling on the list of contents. Jan
-
This book shows modern designs, all made by the same designer. These designs are all yaghts based on the old dutch working boats. They are as such not drawings of old shiptypes and working boats. Depends on your goals whether or not this is a usefull book for you. Jan
-
It is this one: https://www.ssrp.nl/publicaties/boeken/platbodemjachten-van-jk-gipon
-
Hi, That will a difficult one. In the seventies, quite a lot of books on these ships were published, all looking more or less the same. (at least: in type of content: a description of the ships, illustrated with some line-plans and general plans, and a lot of fotographic material.) Unless you have a hint of the front cover, or the list of contents, you'll need someone that actually owns the book to get a confirmation.... I don't know the quality of your Dutch, but this site offers a lot of info on these classic dutch ships: https://www.ssrp.nl/stamboek/scheepstypes Jan