-
Posts
9,678 -
Joined
-
Last visited
Content Type
Profiles
Forums
Gallery
Events
Everything posted by Chuck
-
Thanks guys. Yes its just the lighting because of the angle of the transom. The light is directly above so its in shadow. it is good to be working on something other than planking. 😀
- 1,784 replies
-
- winchelsea
- Syren Ship Model Company
-
(and 1 more)
Tagged with:
-
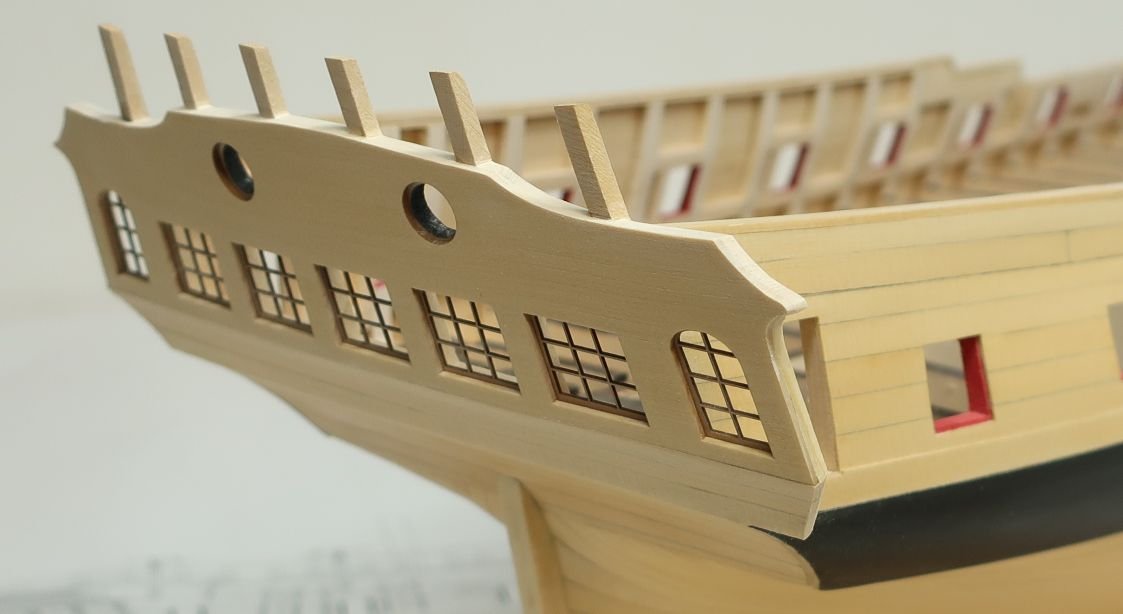
Today I cut a test set of laser cut windows for the stern. They fit perfectly. If you remember on my smaller version, I used laserboard for these. But on this 1/4" scale Winnie, I was able to cut them from .025 boxwood. They are still very fragile but they work great. Now the inside edges do have laser char on them as you might expect. DO NOT try and sand this stuff off. The frames are too fragile for that. If you want to lighten them up on the edges use some weathering powder instead. But be careful. Anyway, these wont be used just yet but I am always making parts before I need them. Thought I would show you guys what it looks like. I tried to make sure they didnt look too heavy while still being not so fragile. The appearance of scale is so important. All of this laser cut stuff will be available in the chapter three installment. Chuck
- 1,784 replies
-
- winchelsea
- Syren Ship Model Company
-
(and 1 more)
Tagged with:
-
Welcome aboard....Dont forget that one of the largest ship model clubs in the US just happens to be in NJ. Check it out.... http://www.shipmodelsocietyofnewjersey.org/ Chuck
-
- 642 replies
-
- winchelsea
- Syren Ship Model Company
-
(and 1 more)
Tagged with:
-
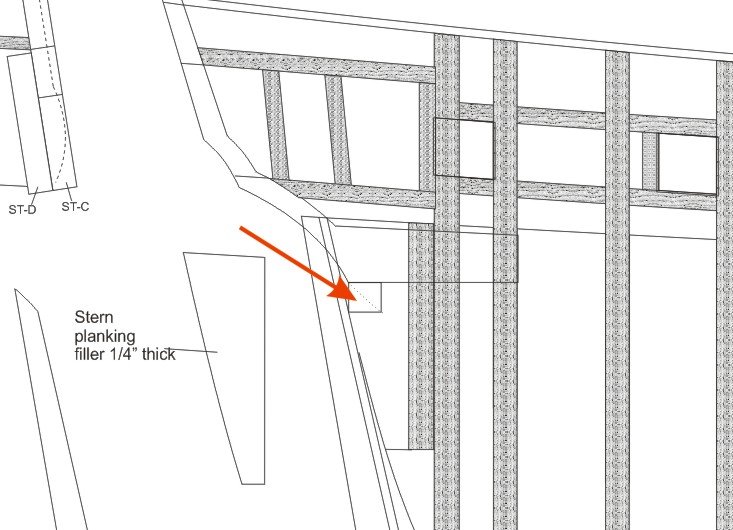
Not sure what you are referring to....the filler pieces? These are just scrap strips glued on the bottom edge of the stern frames and down the rabbet strip. Once faired, you will have a surface to glue your planking too. Imagine the planking and where you would need to glue the ends of each strip. Does this help? I just drew this for you to show the one under the stern frames.
-
I actually git them at lowes or home depot. But only online. They were very cheep. I bought about a dozen.
- 1,784 replies
-
- winchelsea
- Syren Ship Model Company
-
(and 1 more)
Tagged with:
-
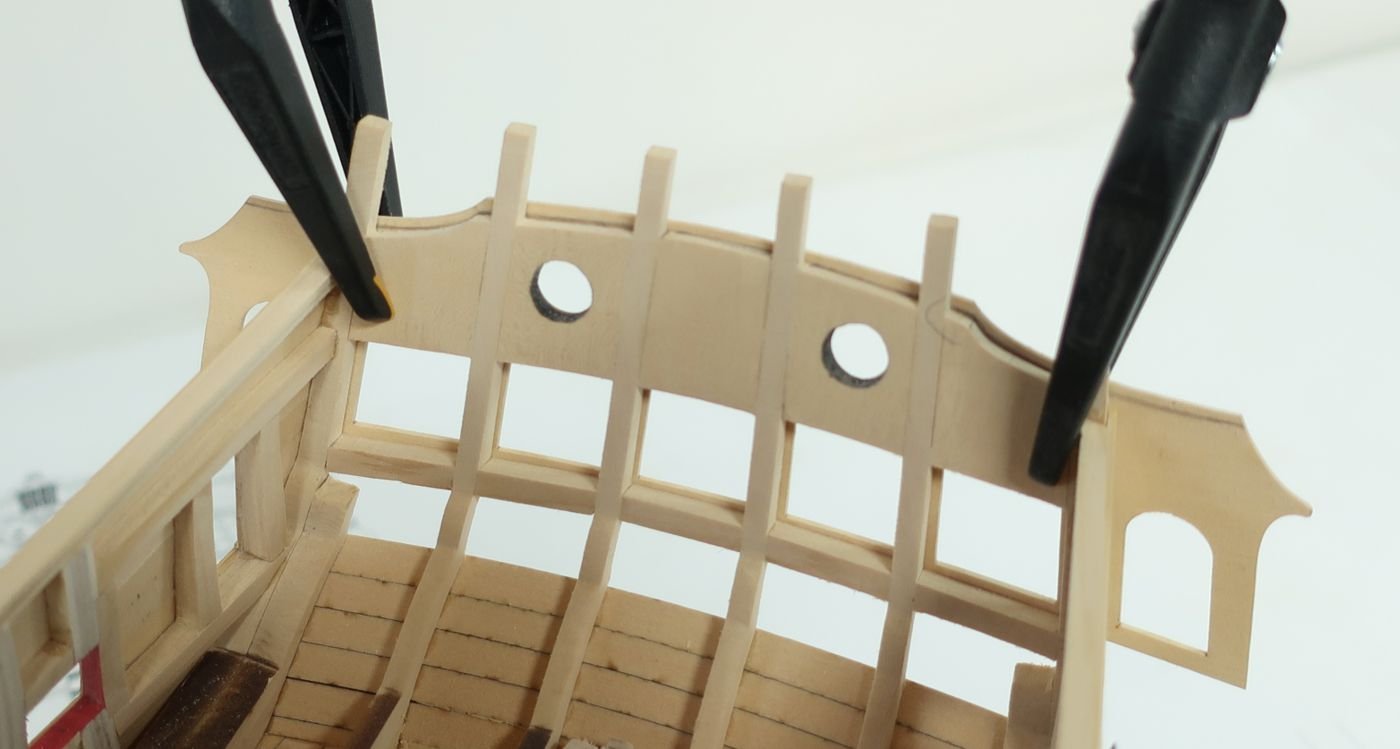
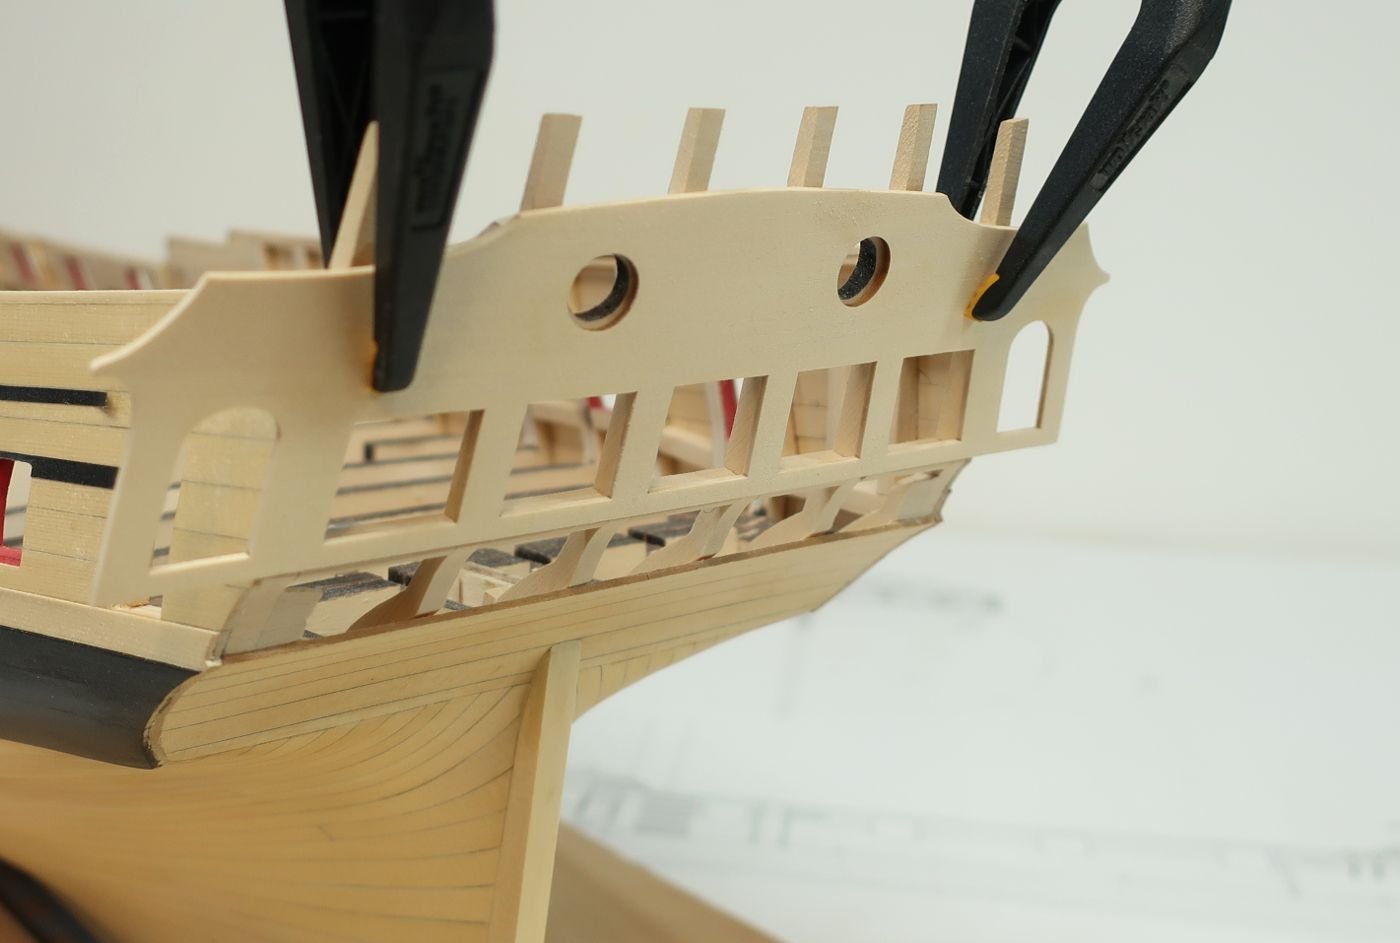
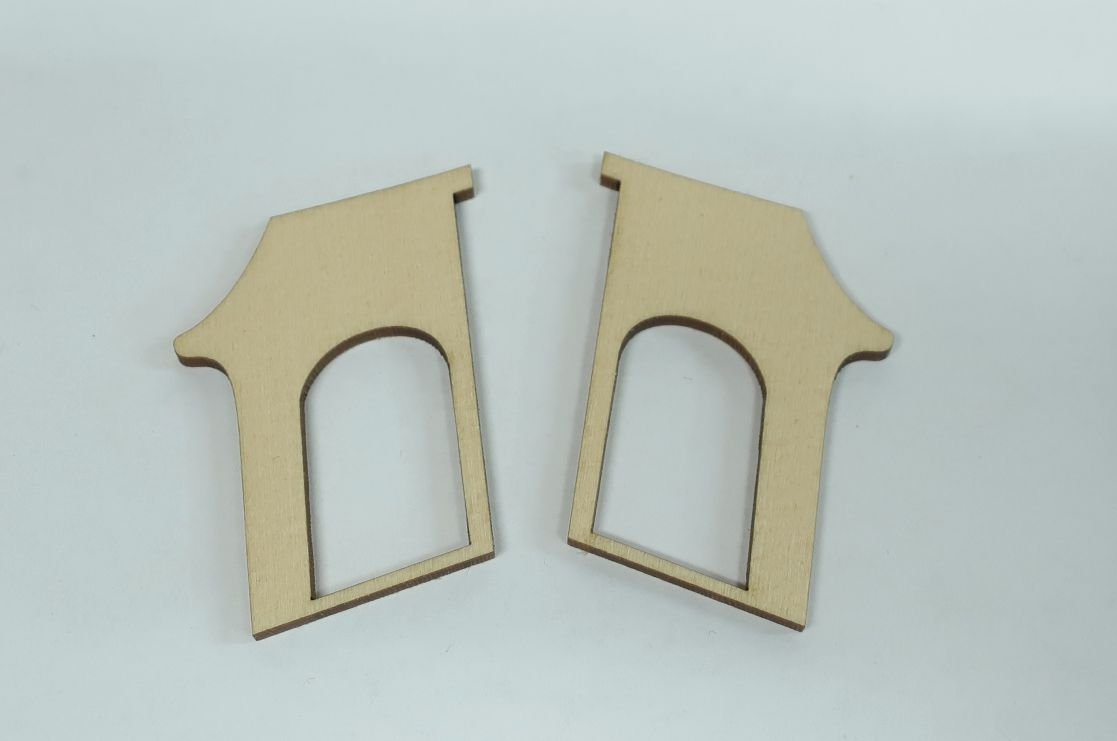
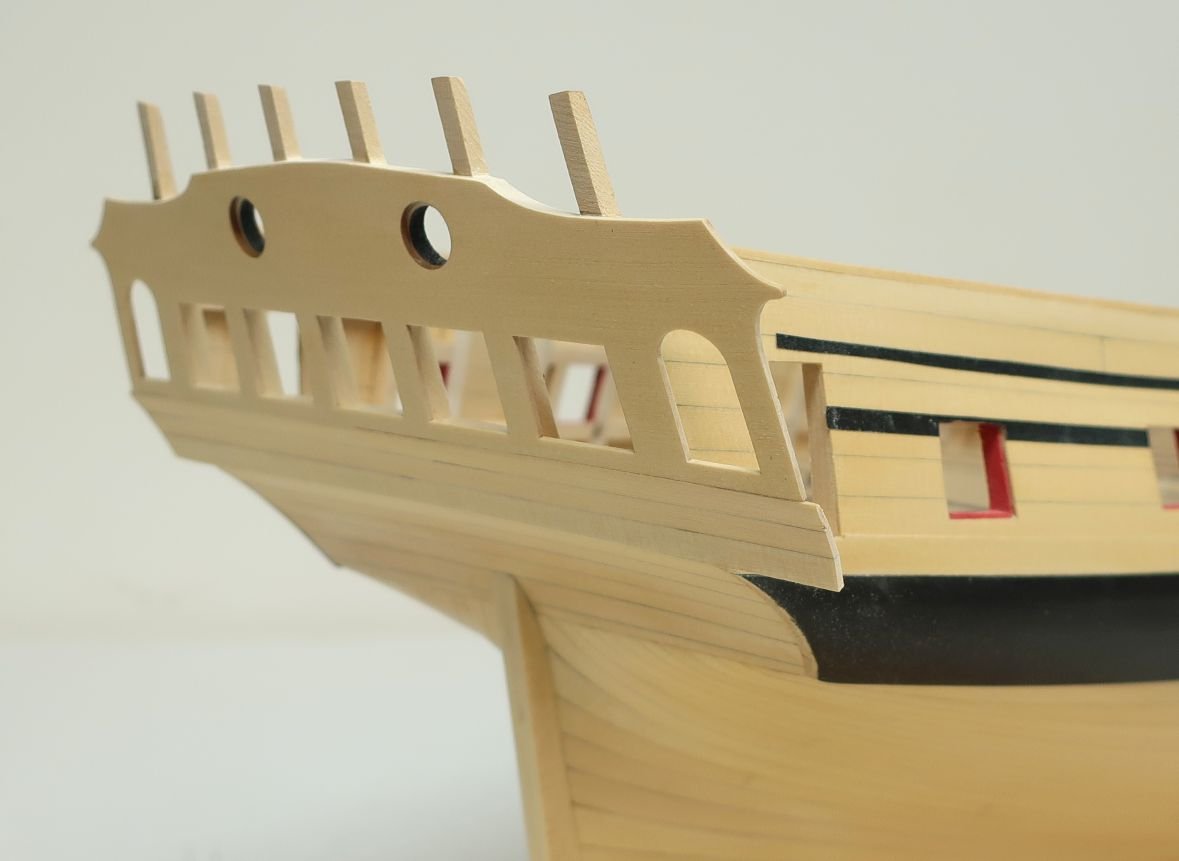
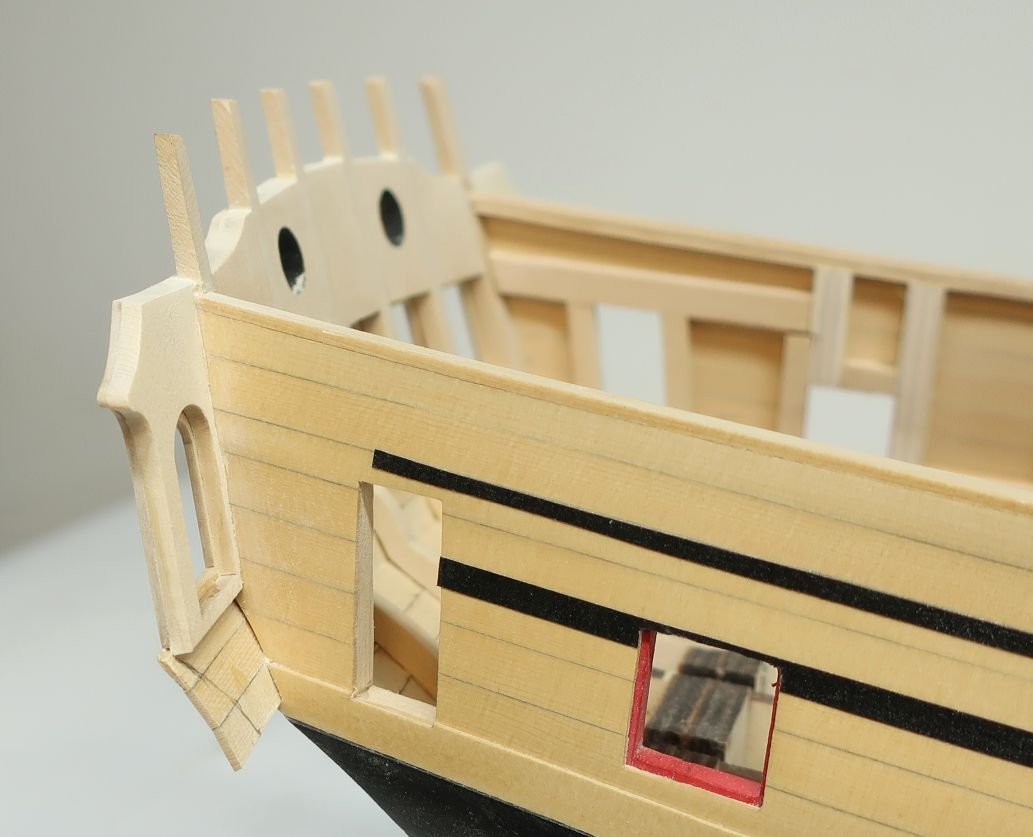
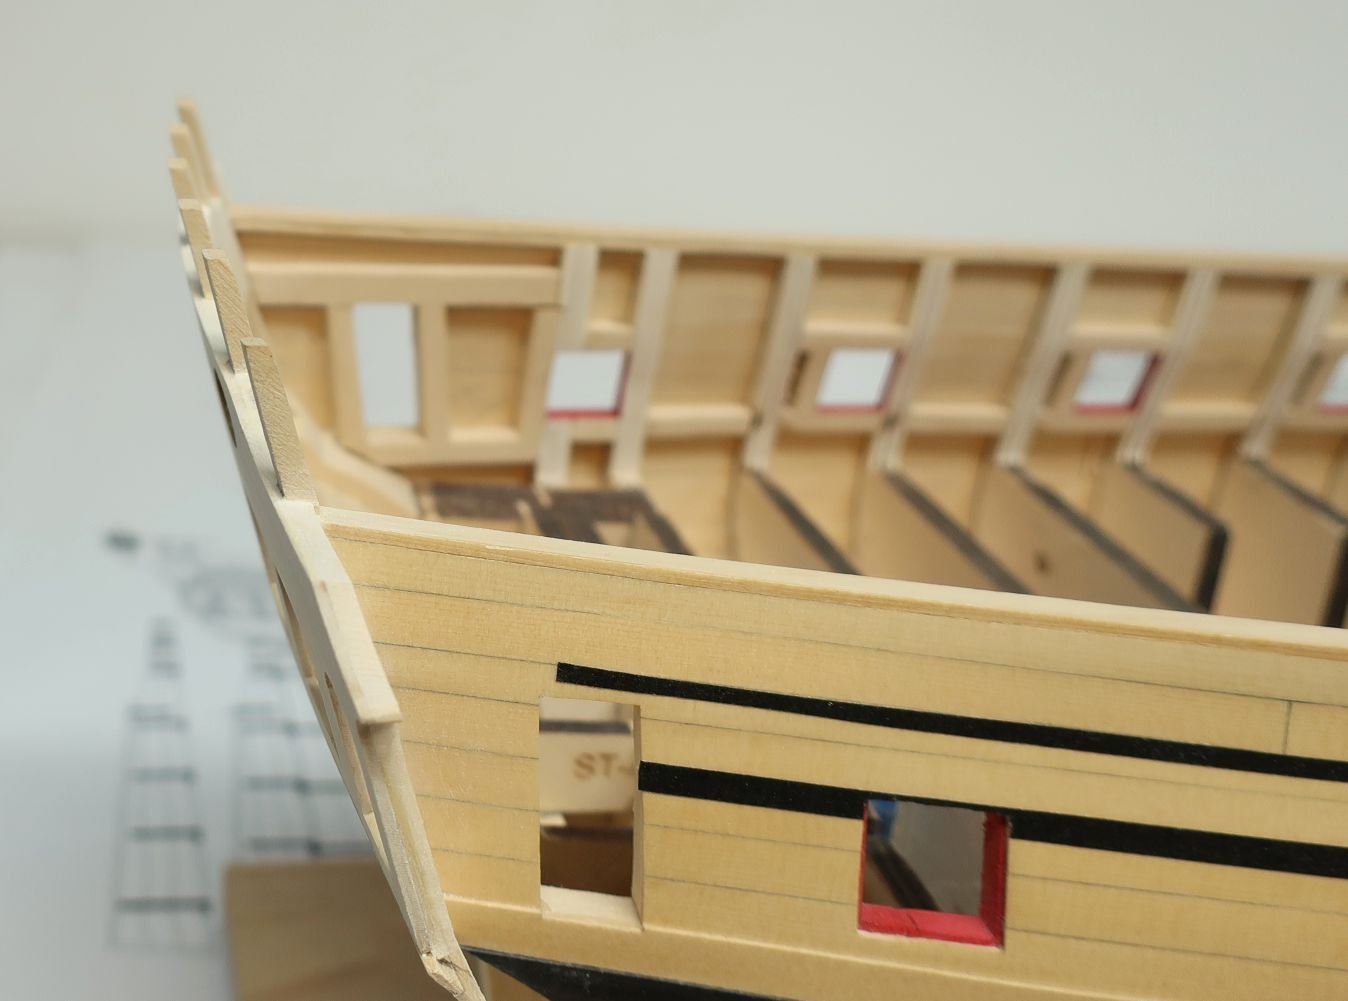
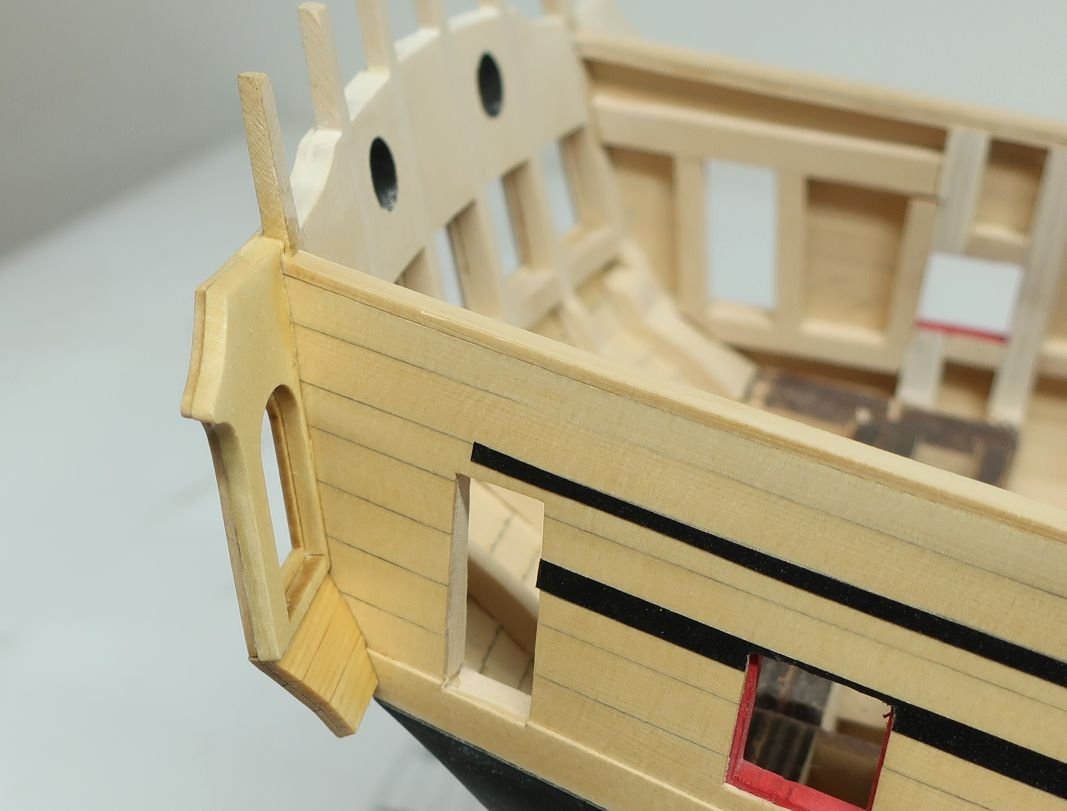
Today I started working on the transom and quarter gallery construction. We are just going to build the foundations here. To begin, I took the 3/64" thick transom and clamped it into position..... Now this laser cut piece was cut a bit taller than needed. This was done on purpose because there will no doubt be some variations. It depends on where you placed those stern frame fillers. The best way to judge the placement of the transom is not the outboard side. You must examine the inboard side carefully. Note the lips around each stern window opening. These will in all likelihood not be very consistent. Thats OK. That is why I designed it this way. You will be able to push the windows into position and move them a bit so they look good from outboard. Basically you will center them in the space. That lip allows you to do that. This is what you should be adjusting placement for. When you have a good orientation where the lips around each stern window are good (examine the plans as this is shown) you will see how the transom is too high. But its not a problem because you can mark the true height with a pencil as I have done and sand the top of transom to fit your model before gluing it into position. I hope that makes sense. The top of the transom should be flush with your stern filler pieces. Runn a pencil along the tops of your filler pieces while its clamped in the final position. Another thing to keep in mind is the quarter gallery window. There will also be a lip around that. Make sure it is consistent on the port and starboard sides. You dont want one side bigger than the other after you glue it on. Dont shift it more to one side than the other. I like to glue the transom on first. Many might find it easier to plank the upper counter first. But because all the window openings are crucial, I thought it best to glue the transom in position first after determining the placement. This will of course leave a nice consistent measurement for your upper counter as shown in that top photo. Once the transom is glued on you can plank the upper counter. I uses 3 strips rather than laser cut these. Again this width will no doubt vary from model to model.....just a wee bit. I used 7/32" x 3/64" strips to plank the upper counter. You will need to bevel the edges against the transom and lower counter. Also pre-bend these because although it is hard to see in the photos, there is a substantial curve to these. Make sure you make these extra long so they extend a bit more beyond the side of the transom. You can see that in the picture above. Then, I took these two 3/32" thick laser cut pieces.... These are glued to the forward side of the transom where the quarter galleries are. But its not that simple. Once again they are slightly over-sized. You must first bevel the side that fits against the hull planking. It will need some careful beveling. You also need to take enough material from that side so it also leaves a consistent lip around the window. This is so we can push those window frames in the opening. This will be tricky!!! Try and sand enough away to give you a decent lip on both sides of this window opening. Then sand the outsides to match the shape of your transom. Eventually the upper counter will be shaped like I show it above. See the pencil line that shows the typical shape. But before we do that, we need to double up the planking thickness on the upper counter (under the 3/32" piece we just added). I used some scrap 1/16" thick strips. It doesnt have to be fancy, this will all be covered up later. But we need to make it thicker. Then you can sand the sides of the upper counter to shape... The sides have been sanded in the photo above. Notice the added thickness. The side of the counter was sanded flush with the transom on the top....but it angles narrower to give you the right shape along the bottom. How will you know how wide to make the bottom of the counter? It should be 7/16" away from the hull. Measure before you sand!!! And draw a line from top to bottom so you have a reference line to follow when sanding the edge to shape. Thats it for the transom for now. Next I will start framing the quarter galleries. Also forgot to mention that the two small round ports on the the top of the stern filler pieces, they can be enlarged to the size as laser cut in the transom. I have yet to do this but maybe I will do it tomorrow. Any questions??? Oh and notice the gentle curve on the transom...it is quite evident now. Things will be a bit messy while we build out the transom and quarter galleries. But once everything is painted and cleaned up it will look lovely.
- 1,784 replies
-
- winchelsea
- Syren Ship Model Company
-
(and 1 more)
Tagged with:
-
Enjoy....I had an extra one.
- 105 replies
-
- winchelsea
- Syren Ship Model Company
-
(and 1 more)
Tagged with:
-
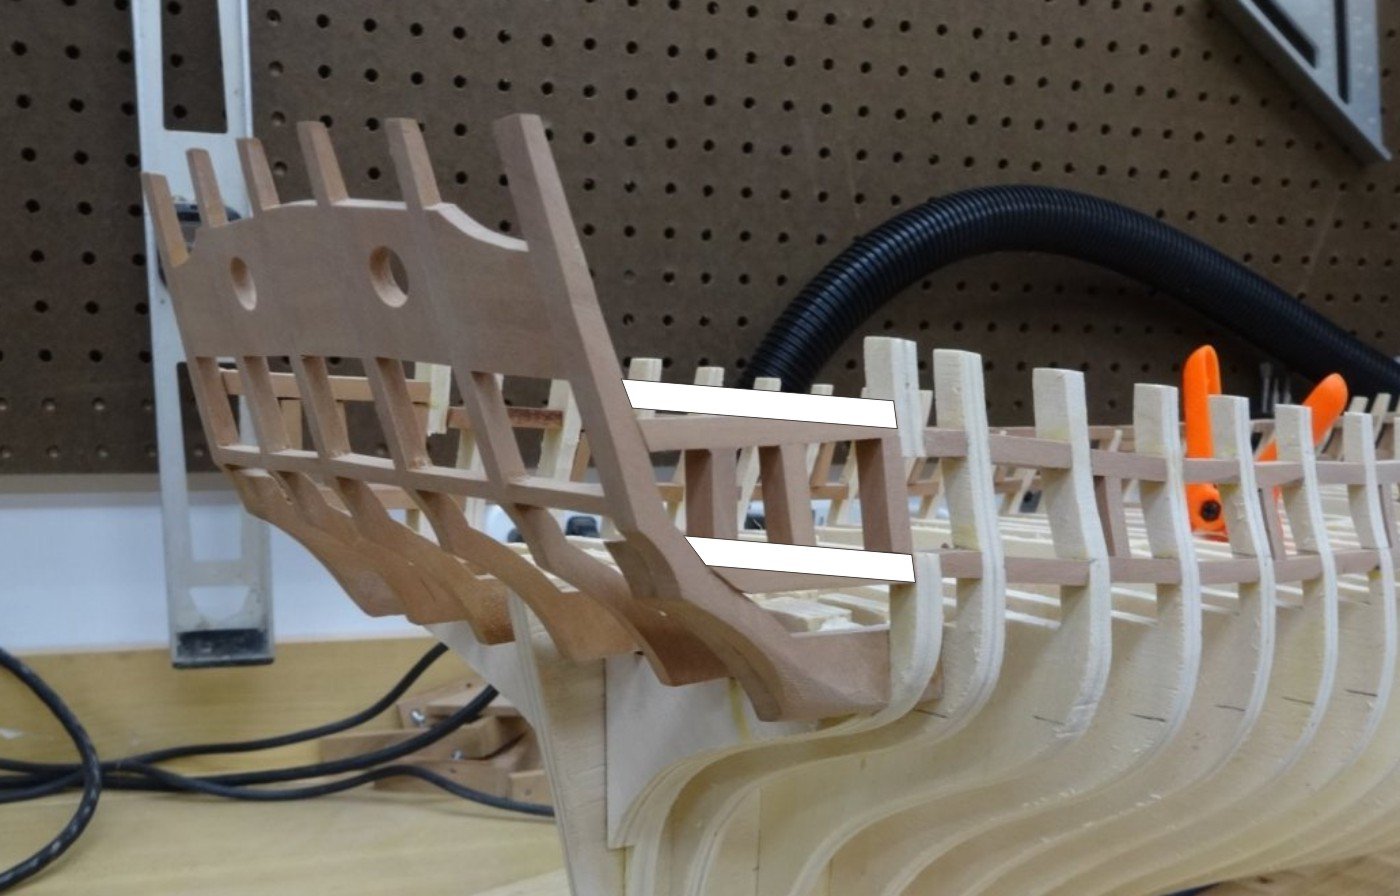
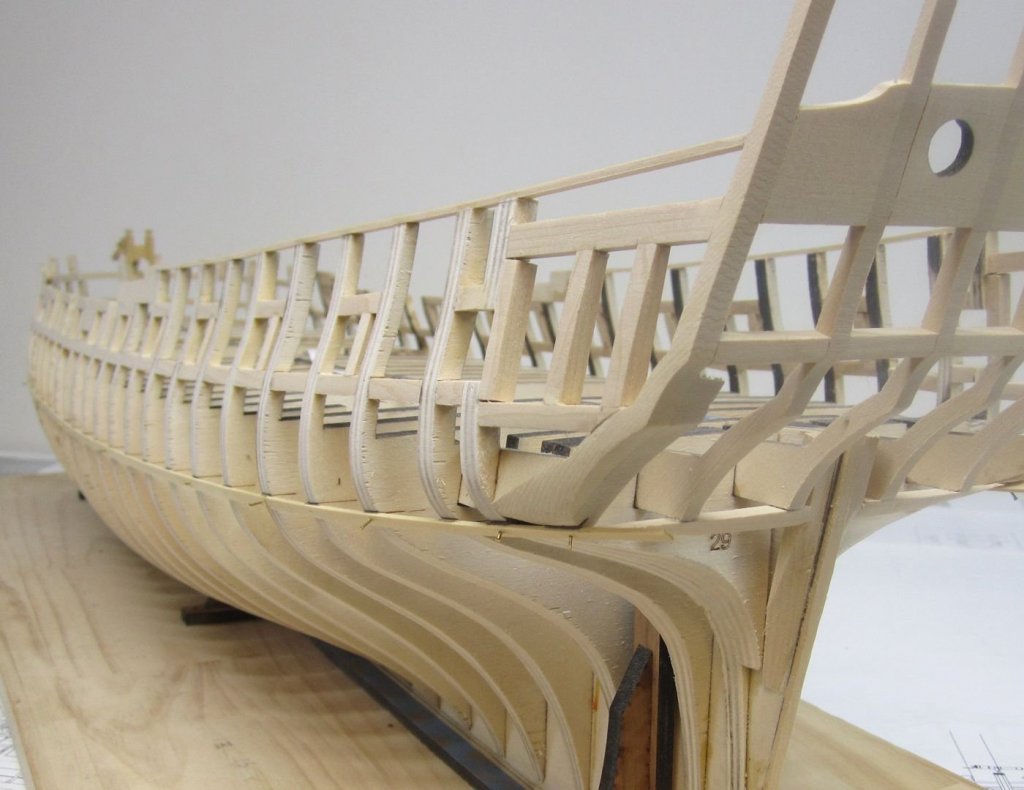
Rusty....Check that quarter gallery framing. I think those timbers are way off. The horizontal timbers where the intersect teh stern frames are incorrect. They are way too low. Check them out in relation to the stern window framing as can be seen below.
- 642 replies
-
- winchelsea
- Syren Ship Model Company
-
(and 1 more)
Tagged with:
-
Beautifully executed!!! That is exactly how it should look at this time. Almost there!!!!
- 607 replies
-
- winchelsea
- Syren Ship Model Company
-
(and 1 more)
Tagged with:
-
Not really but you could bend them into alignment when you glue the bulkheads into position. The bulkheads themselves are what is important. As long as they arent shifting to one side or the other, the bulkhead former tops can bend a bit. It actually happened on my model also in some cases. As long as the bottom of the keel is straight and and the hull isnt twisted you are good to go. those brackets are used for that purpose.
-
Here are some planking videos that may help you. You should line off your hull as well. There are several articles in our database that describe how to do just that.
-
That looks pretty good. The angle looks a little severe but not that much. It should match the curved angle of the hull more or less....its why I laser cut three sets of parts for folks. But it looks pretty good. You might get a gap between your chock and bollards because of the difference in thickness with your plywood. You will need to make some adjustments before you glue them into position. Either make a wider chock....or build up the sides of your plywood filler pieces. My model doesnt have such a severe angle I will try and take a photo for you soon. But have a look at the contemporary model....you can certainly see a decent angle to the bollards. I am not crazy about the shape of the top of these though. Chuck
About us
Modelshipworld - Advancing Ship Modeling through Research
SSL Secured
Your security is important for us so this Website is SSL-Secured
NRG Mailing Address
Nautical Research Guild
237 South Lincoln Street
Westmont IL, 60559-1917
Model Ship World ® and the MSW logo are Registered Trademarks, and belong to the Nautical Research Guild (United States Patent and Trademark Office: No. 6,929,264 & No. 6,929,274, registered Dec. 20, 2022)
Helpful Links
About the NRG
If you enjoy building ship models that are historically accurate as well as beautiful, then The Nautical Research Guild (NRG) is just right for you.
The Guild is a non-profit educational organization whose mission is to “Advance Ship Modeling Through Research”. We provide support to our members in their efforts to raise the quality of their model ships.
The Nautical Research Guild has published our world-renowned quarterly magazine, The Nautical Research Journal, since 1955. The pages of the Journal are full of articles by accomplished ship modelers who show you how they create those exquisite details on their models, and by maritime historians who show you the correct details to build. The Journal is available in both print and digital editions. Go to the NRG web site (www.thenrg.org) to download a complimentary digital copy of the Journal. The NRG also publishes plan sets, books and compilations of back issues of the Journal and the former Ships in Scale and Model Ship Builder magazines.


