HOLIDAY DONATION DRIVE - SUPPORT MSW - DO YOUR PART TO KEEP THIS GREAT FORUM GOING! (Only 75 donations so far out of 49,000 members - C'mon guys!)
×


Chuck
-
Posts
9,674 -
Joined
-
Last visited
Content Type
Profiles
Forums
Gallery
Events
Everything posted by Chuck
-

It is a safe place to sell MODEL SHIPWAYS in Amazon
Chuck replied to Gus M's topic in Wood ship model kits
Gus…honestly only Model Expo can tell you that. They are both selling a legit kit. One is very overpriced. Buy the cheaper one!!! -
Too funny Greg. Yes I saw that too about the treenail. But you didn't catch them all. There was another missing in that same photo. Both have been added and all is now right with the universe.
-
No easy way I suspect. Just go slow and try not to catch the edge of the sandpaper on any frames. There are far better pof builders out there who could prob give you a better answer. Its looking ver good.
- 61 replies
-
- 3
-

-
- ancre
- Santa Caterina
- (and 1 more)
-
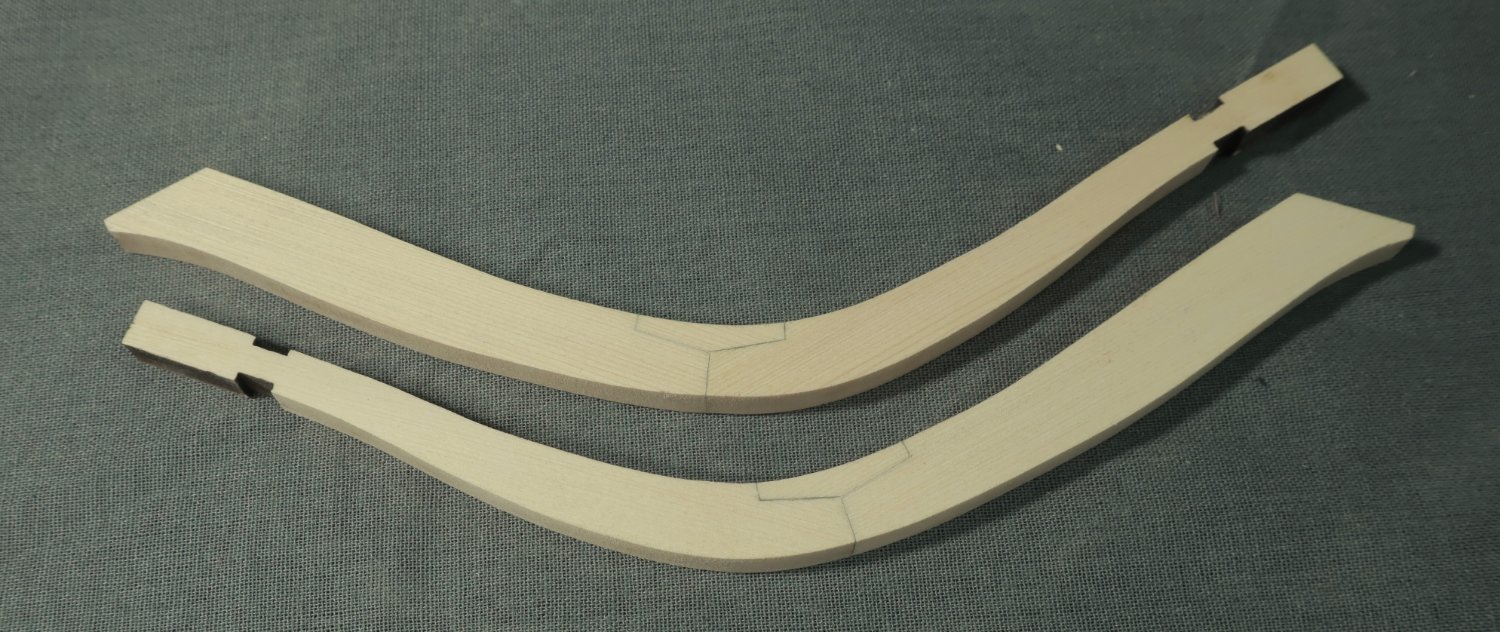
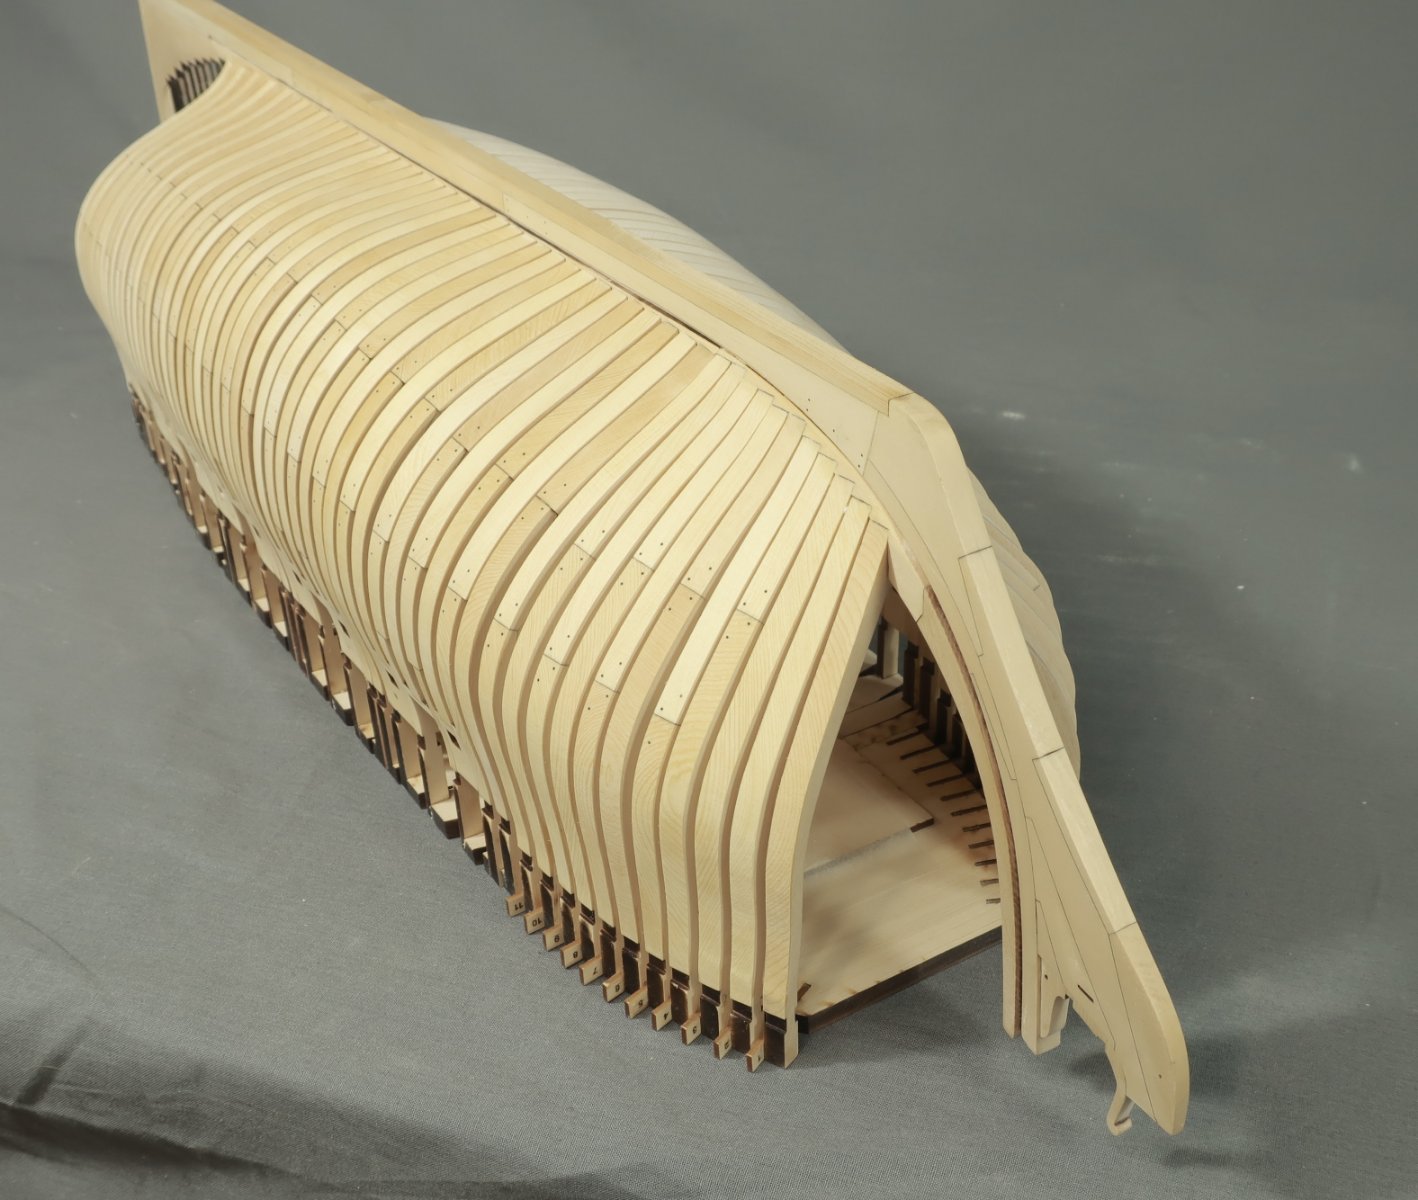
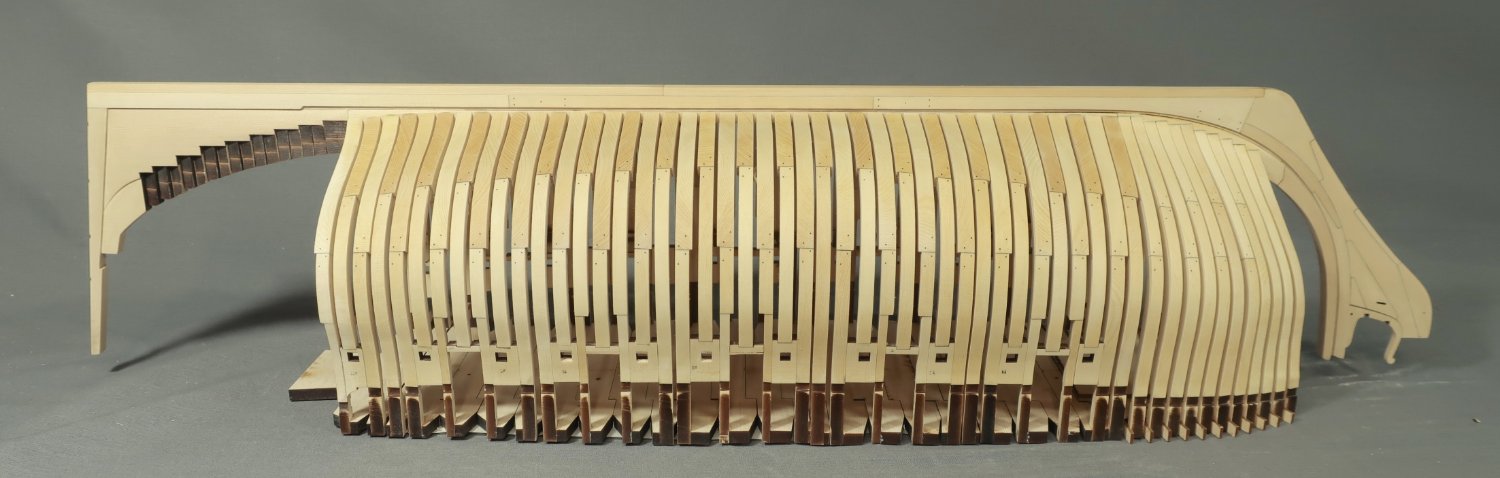
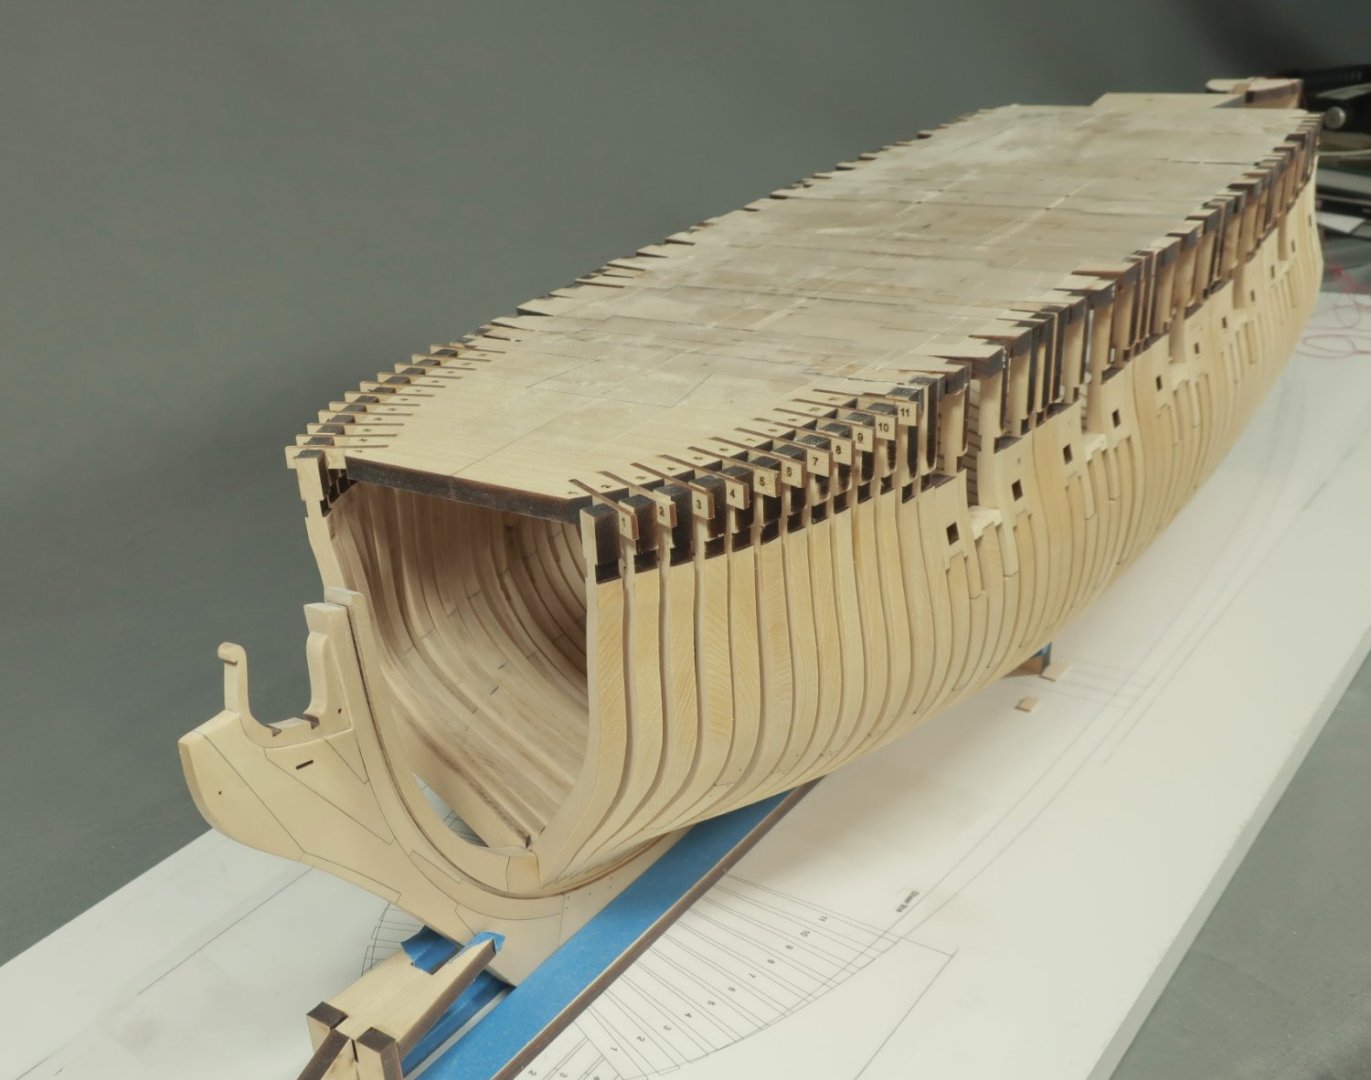
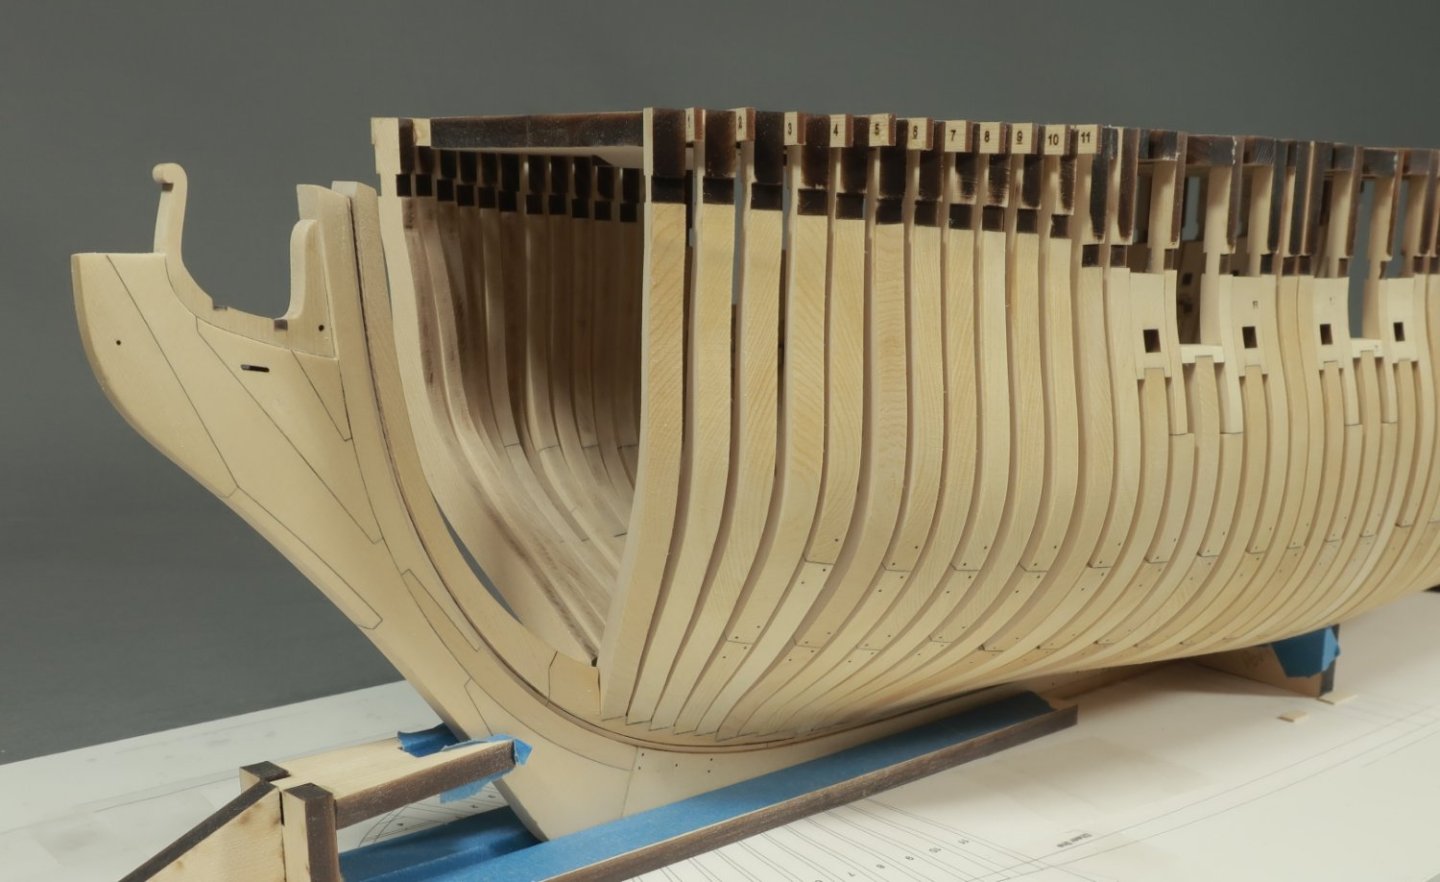
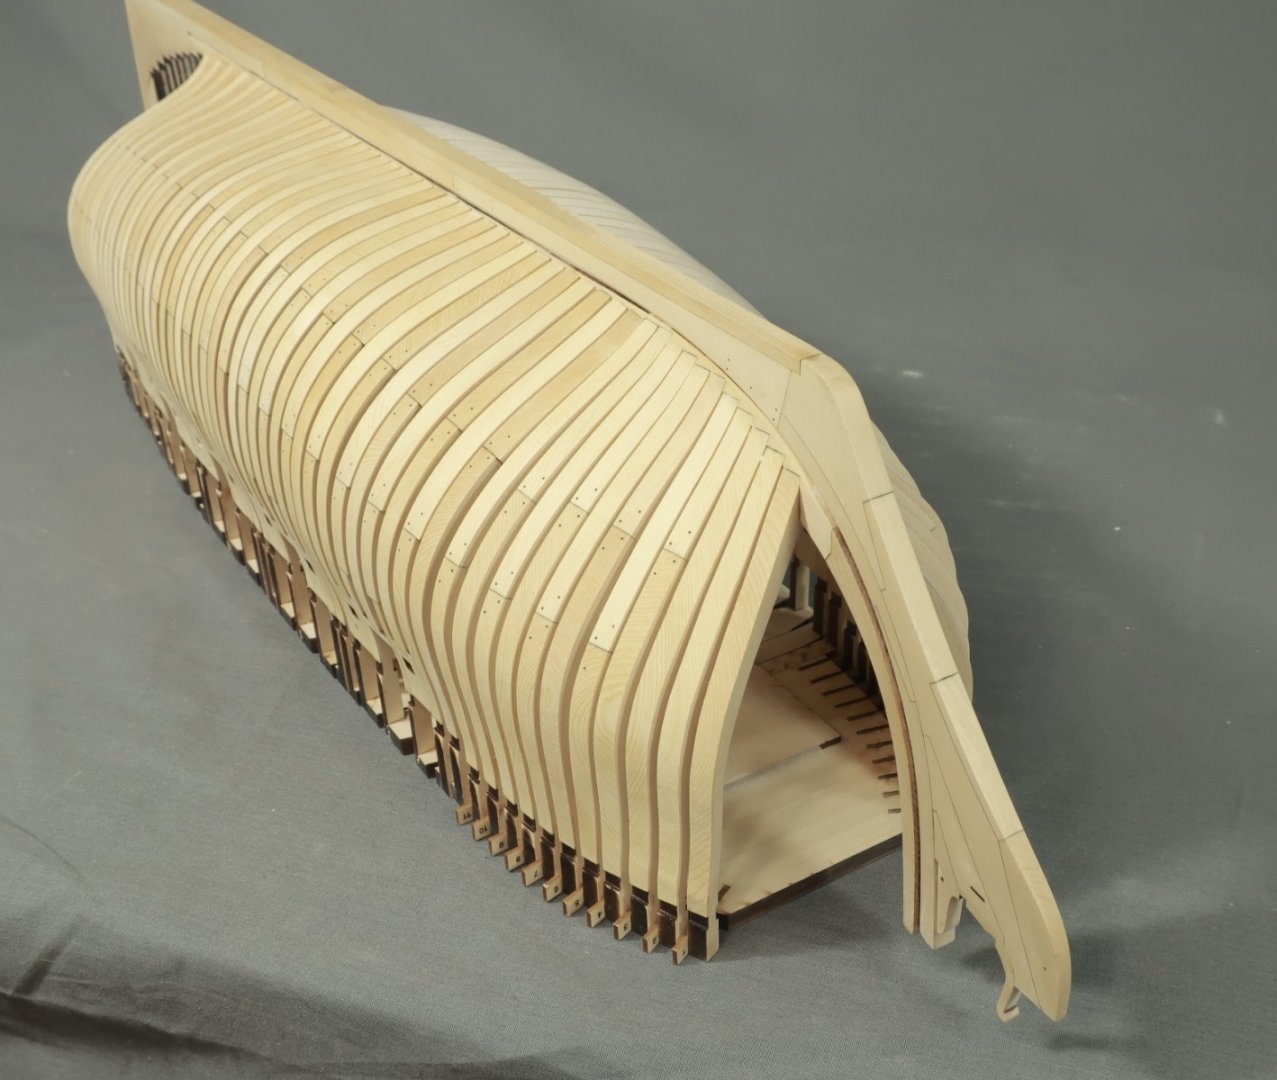
Work continues on the fore cant frames.... The forward 3 cant frames are in one piece. They were sanded and glued in position as mentioned earlier. The remaining 8 cant frames are built up from two pieces as shown. They are all 1/4" thick. But they are the same as assembling the square frames. Just sand the simulated chock joint for a tight fit as before. Then remove the char and glue them in. I proceeded to install them working my aft. All is going well. The outside edge of each cant frame is lined up with a laser etched line on each lettered strip in the jig. As mentioned earlier, the top of each frame is also flush with the top of the strip but this isnt as important. If while putting the two halves of a frame together you over sand the scarf joint, It will become shorter. That is perfectly fine if not excessive. Any small differenced like that will be corrected while fairing the hull. So dont get worried if thats the case. I did not do any progressive fairing of these. I wanted to wait until all of the forward cant frames were installed. In hindsight...after completing all of them, I thought it probably would have been better to work from aft towards the bow. At least after those three "one-piece" cants were added up front. It doesnt matter in the end but getting the last two cant frames in was a bit fussy between the existing square frames. I couldnt get my fingers inside the hull and that far back to position it too easily. It would have been easier to work my way forward towards the first three. But in the end it wasnt too bad. In fact it went pretty quickly. Once they were all added I could do some fairing. This took a while as one would expect. I only finished the port side. I will do the other side this weekend. It came out very well indeed and the bow is shaping up. I am quite happy with the shape these cant frames created. This is a long and narrow hull. It has a very interesting shape. Here is a picture with the hull upside down. You can see how I faired the cant frames as they sat on the apron notches. They were faired carefully into the rabbet. This meant also sanding and fairing the sides of the apron to match the run of the frames into the keel. Treenails were added to the cant frames just like the square frames using the black monofilament. Once I fair the other side, I will start on the bollard and hawse timbers. That will complete the framing at the bow rather than do the aft cant frames first. It will be good to finish up all of the hull framing on the forward half of the hull. Questions and comments are always appreciated.


-
Really nice. That is perfectly executed. Nice and clean.
- 217 replies
-
- 1
-
-
- medway longboat
- Syren Ship Model Company
- (and 1 more)
-
Yes its looking very good indeed. Well done.
-
Looking good so far. Maybe a bit more fairing until all laser char is gone from the bulkheads. That is usually the key and a big help. Chuck
-
At a loss for words Mike....She is a beautiful model. So sweet. And it was fun getting in the trenches with you on it for so many years. Chuck
- 607 replies
-
- 3
-
-
- winchelsea
- Syren Ship Model Company
- (and 1 more)
-
Nicely done. Yes lots of fiddly work to do.
- 642 replies
-
- 2
-
-
- winchelsea
- Syren Ship Model Company
- (and 1 more)
-
Possibly yes. But I am far far away from that. That is a significant investment so it will come much later.
-
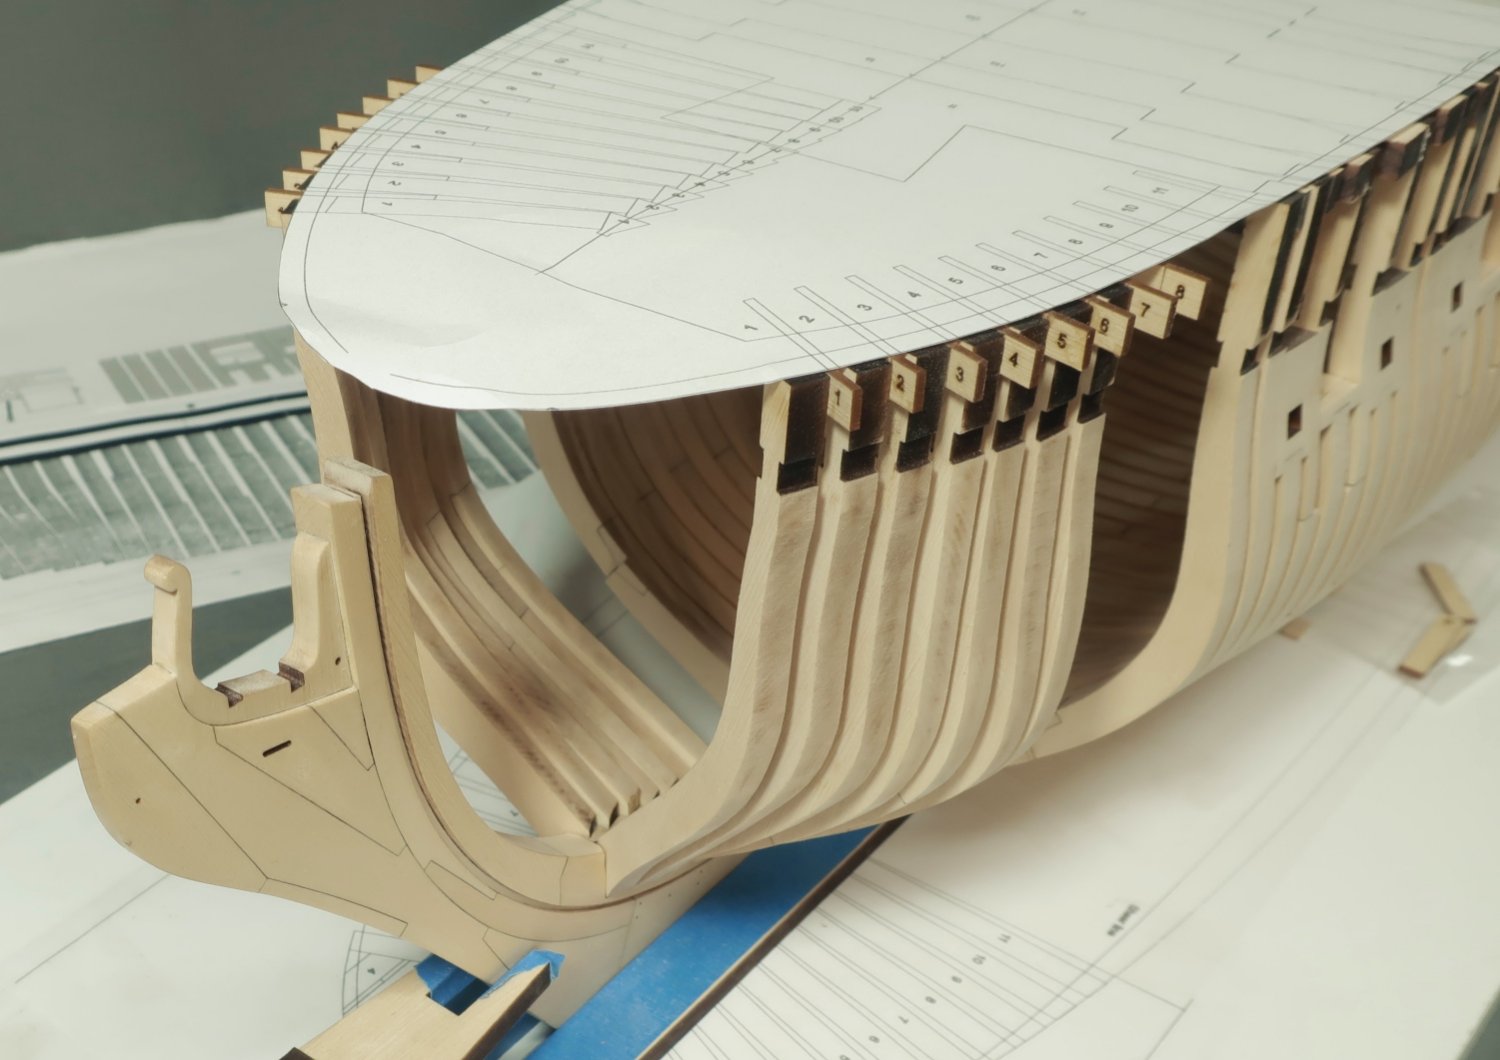
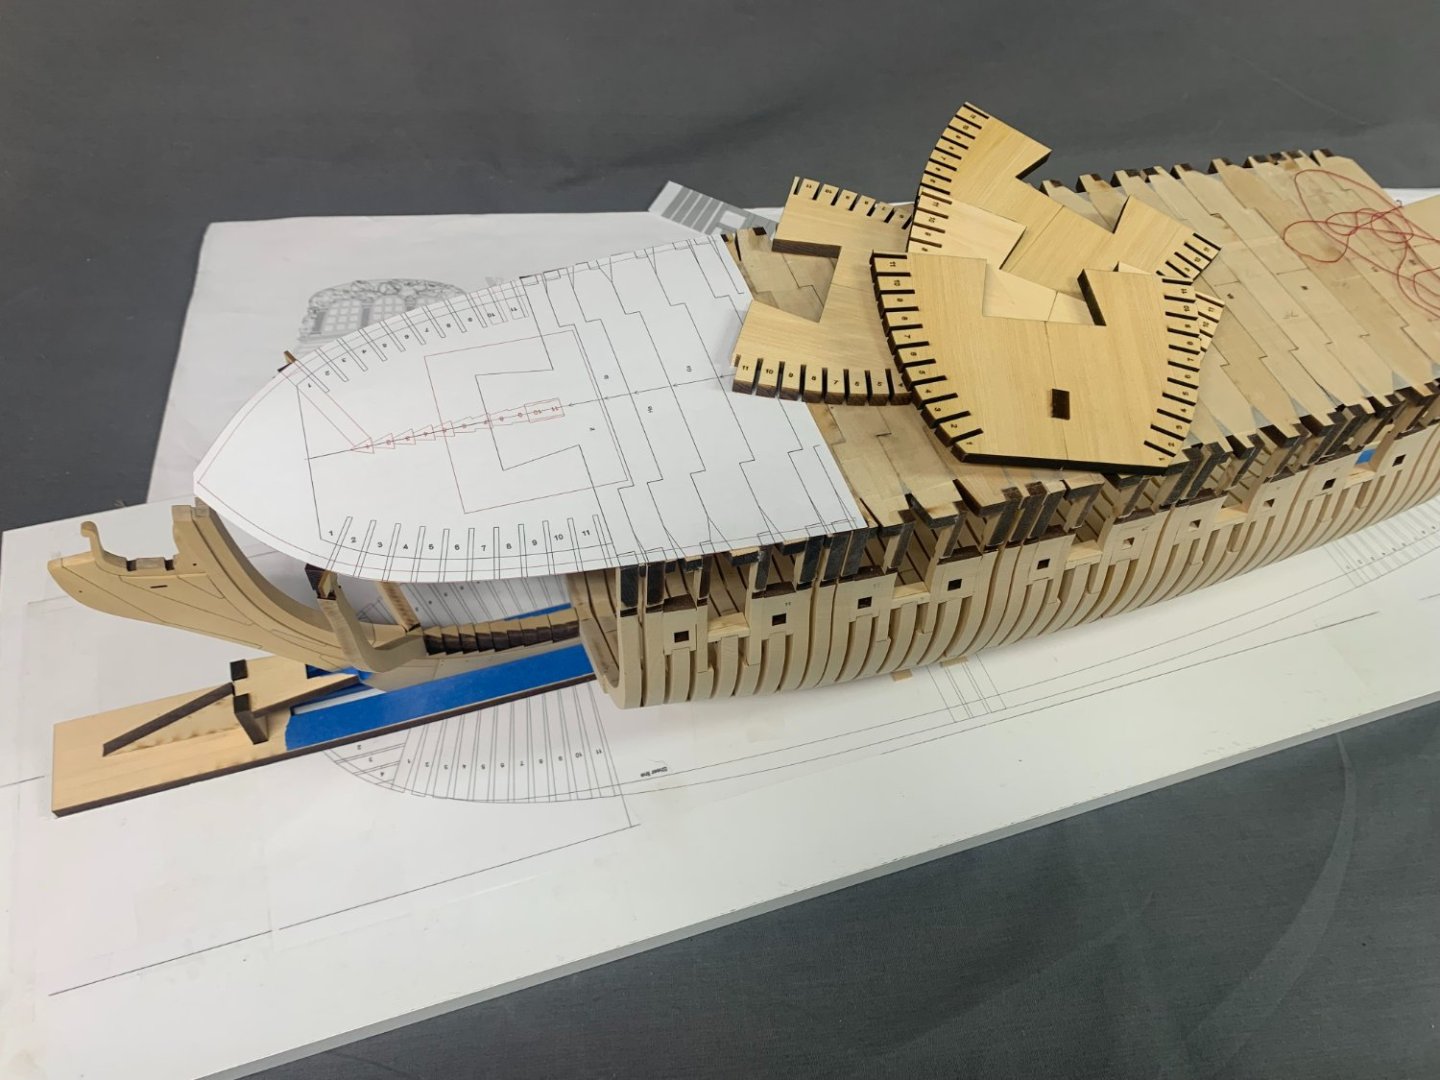
I wanted to show you guys a glimpse into the world of designing a kit. Especially one as complex as a fully framed project like the Speedwell. Its why I get so passionate about other folks just copying plans developed like this. It takes hours and hours to design each element. This forward cant frame jig is no exception. Its not like it ever gets done on the first try. This jig and all of the parts needed for Speedwell up to this point require a level of precision above and beyond a typical POB kit. I actually had to make about nine forward cant frame jigs before I was fully satisfied. Each iteration was tweaked just slightly and laser cut. It was tested and measurements taken from all angles.....then adjustments were marked and redrafted....and repeated. Here are some of the discarded jigs. All of them would have worked. But the last one worked best. Things should progress quickly now until it comes time to make the aft cant frame jig. Using a copy of the plans helps identify issues as well. Here you can see the working plan cut and in position and how it matches up pretty darn close to all the framing. Once drawn, you have to tweak the parts to account for the laser kerf and sanding of char etc.
-
Thank you guys. Its going well so far. You have to take your time to make sure the jig is positioned correctly initially. Measuring against the plan on the baseboard. But once thats in and the first set of cant frames firms up the assembly, it should be pretty easy with the remaining cant frames. I will use the same style of jig at the stern for the aft cant frames. Navarcus… yes I have considered that but what you show is a stylized version of framing. Its pretty but not how it was done on ships. Framing like that would make for an excellent model but also has its challenges. Its not what I would call easier. Its just different. But maybe for a another subject later.
-
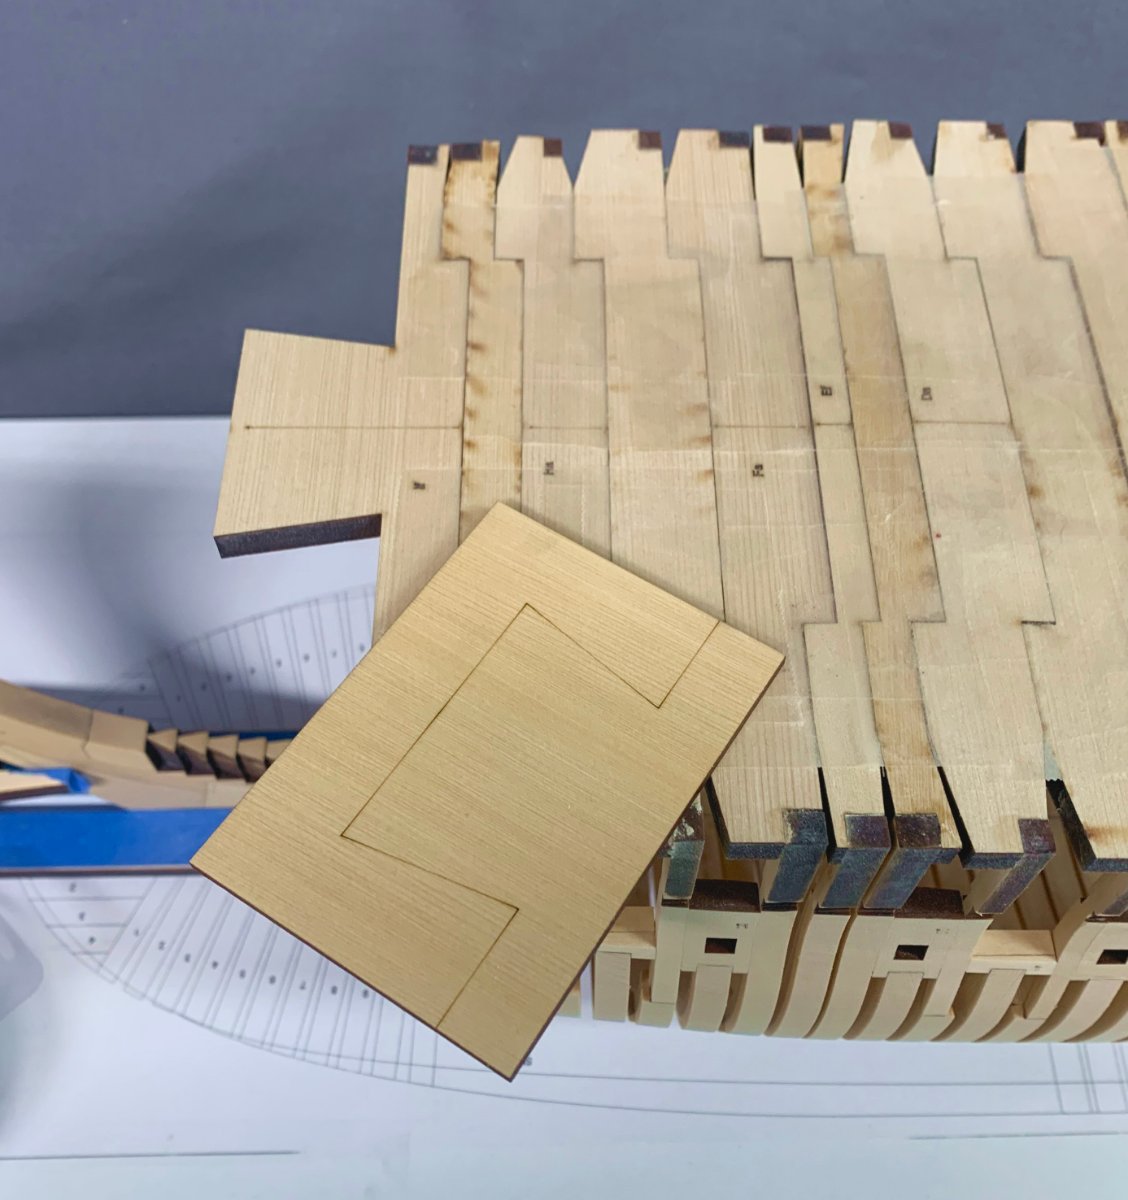
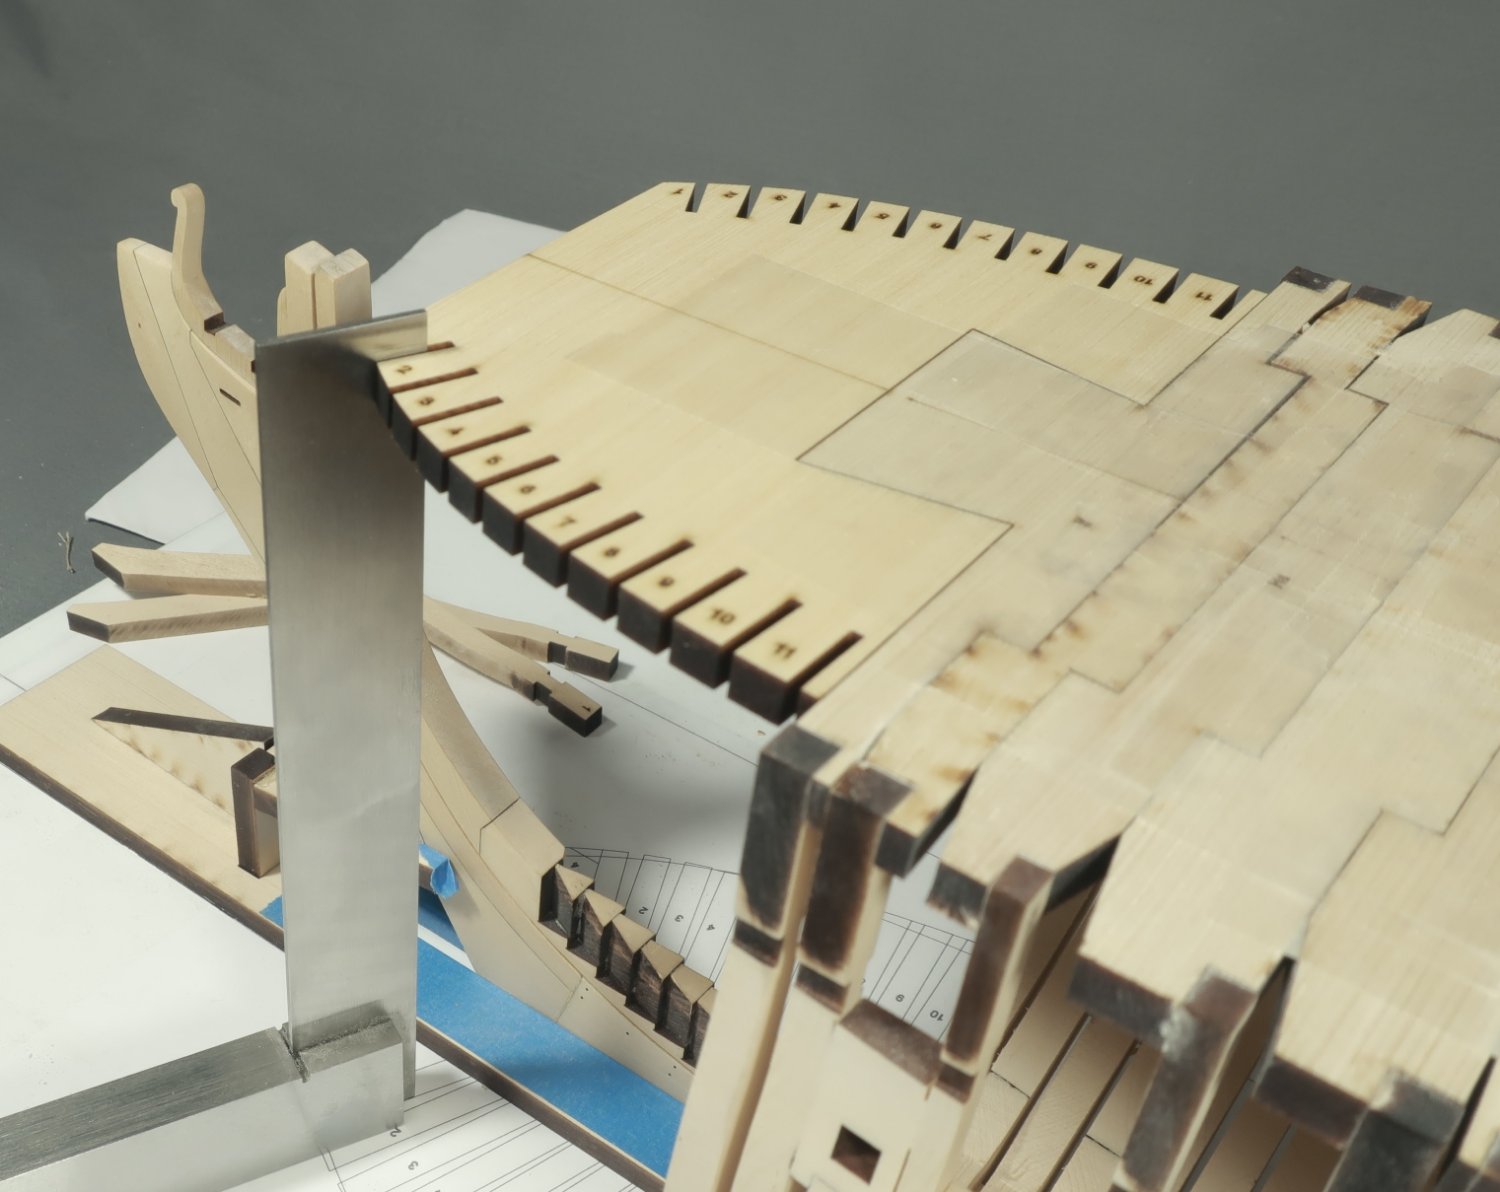
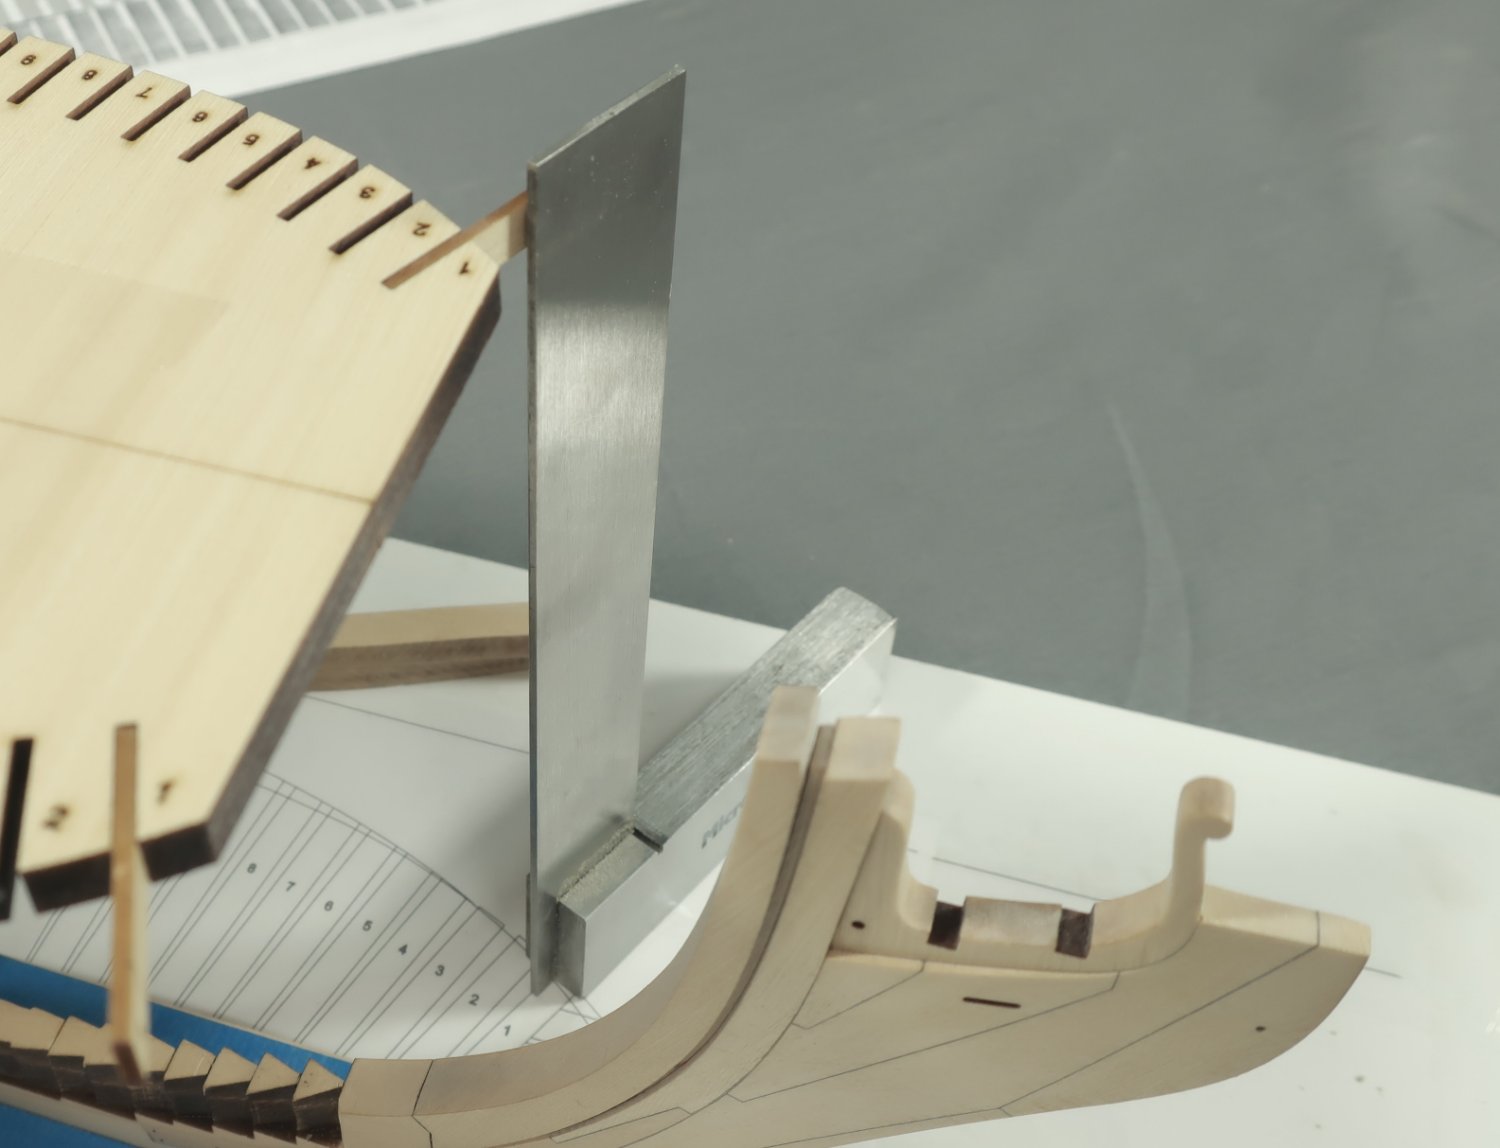
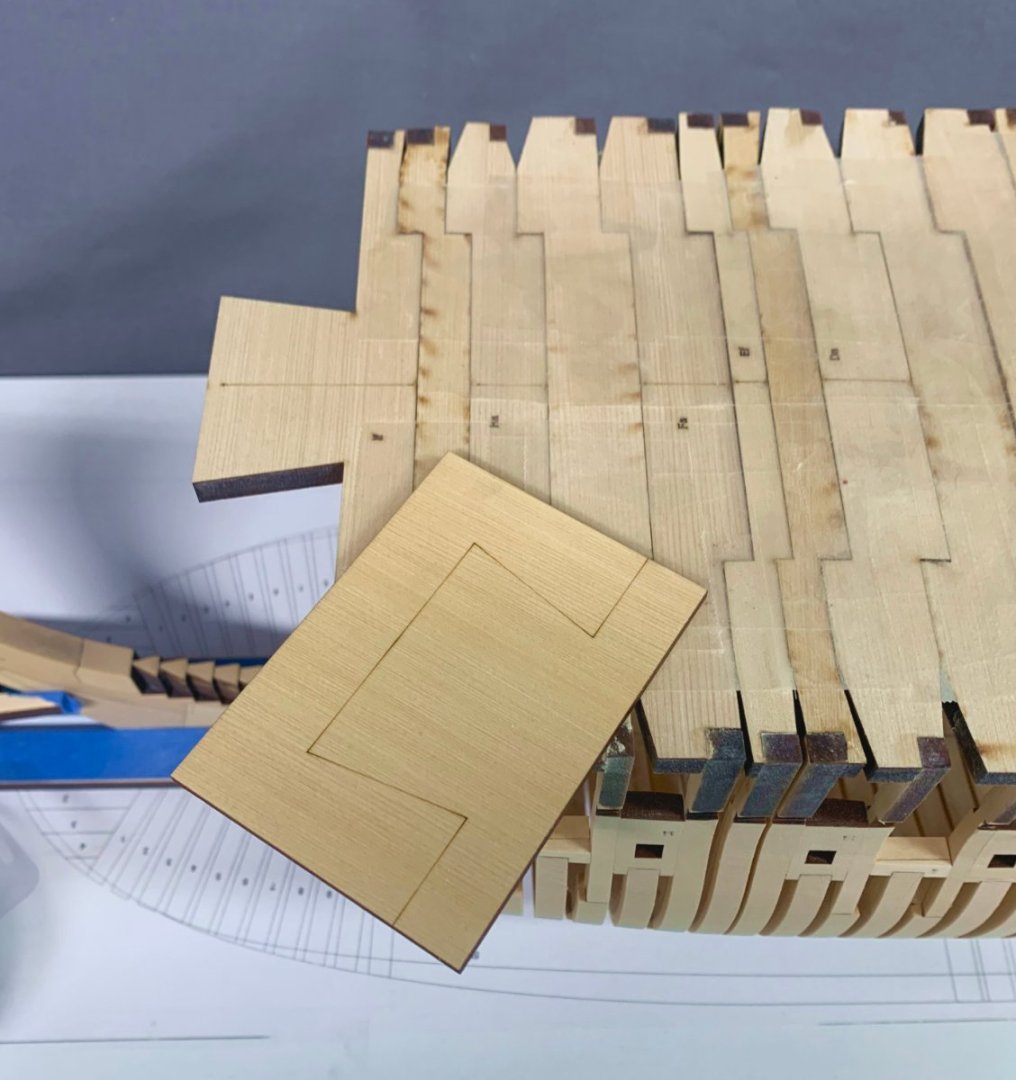
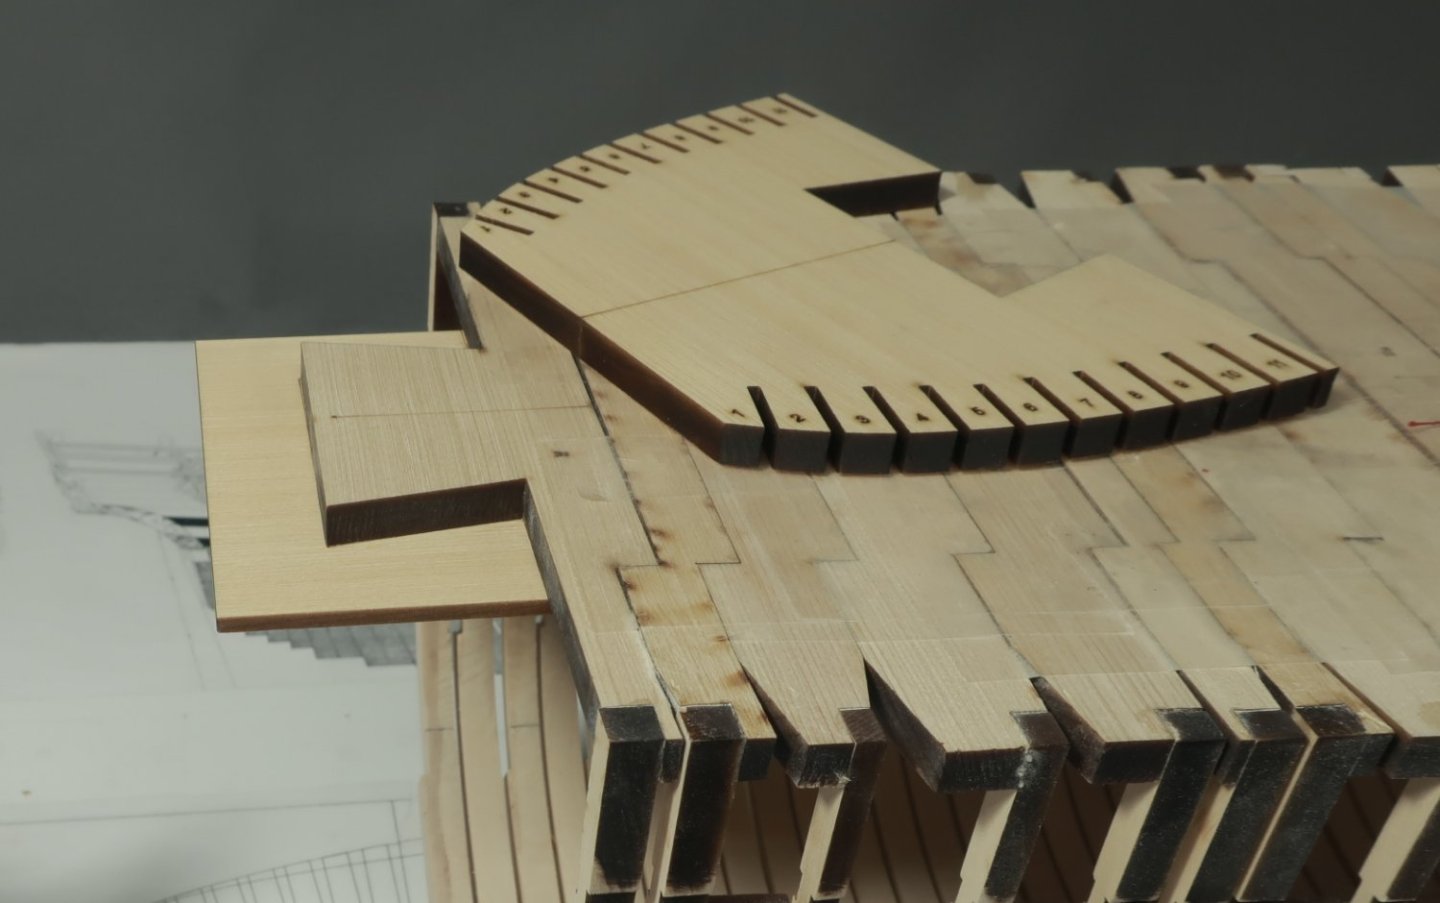
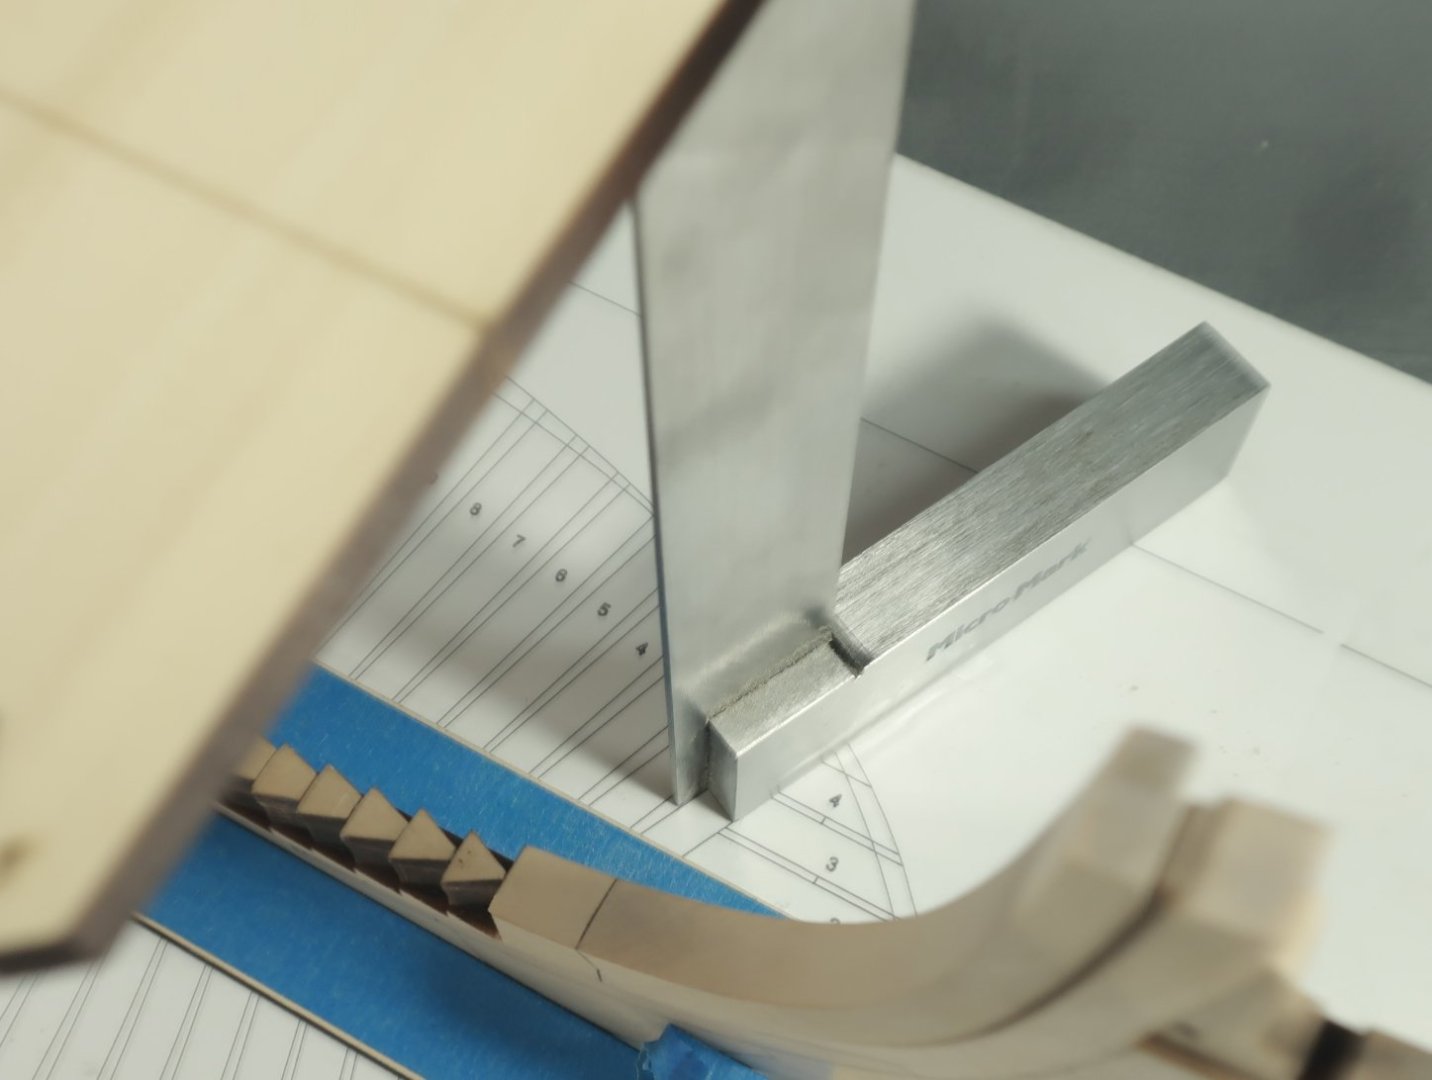
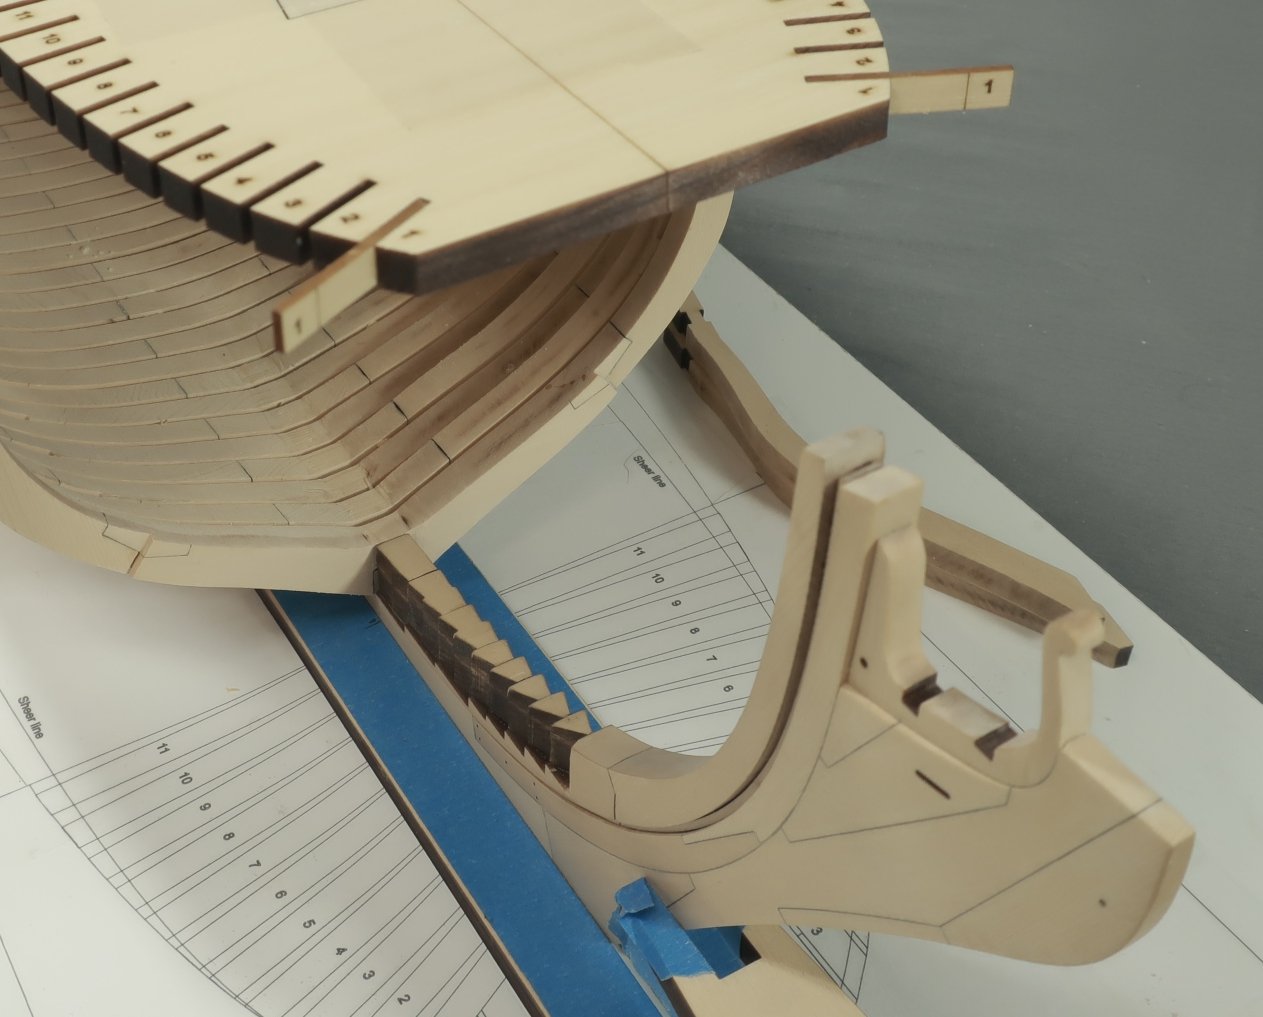
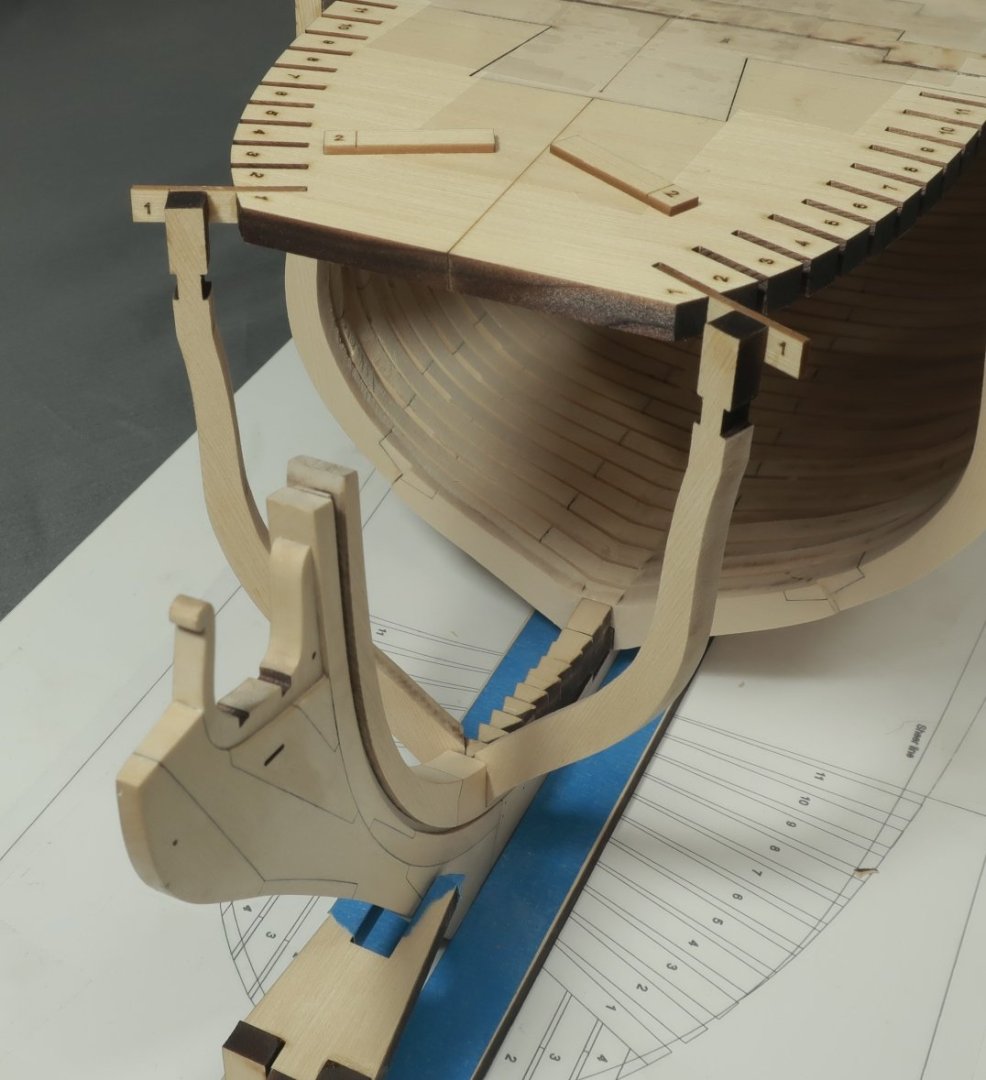
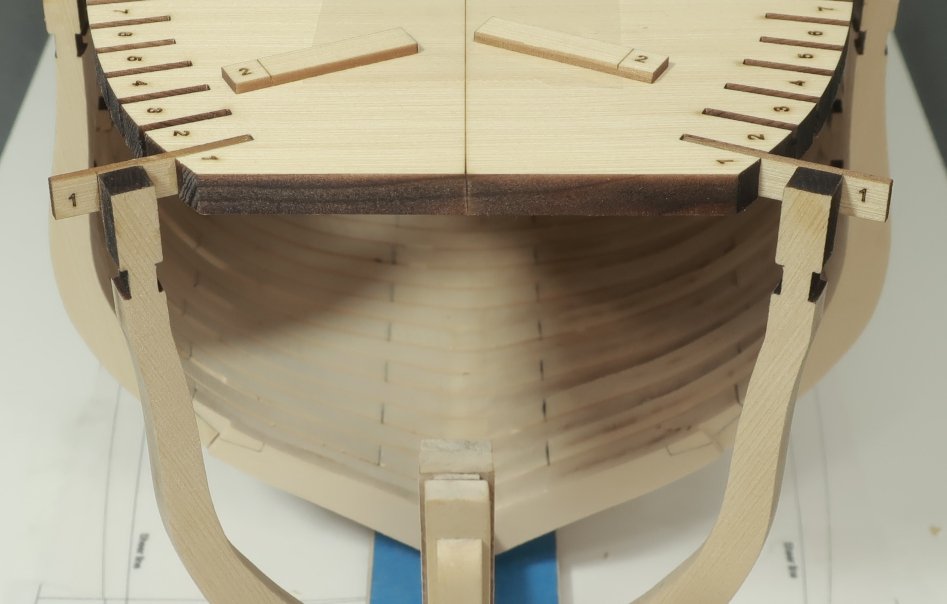
Took a break from restocking inventory to work on the model. Forward cant frames.... The jig is first. BUT before you do anything, make sure the hull is positioned correctly on your build board. Line up the forward face of the last square frame with the corresponding lines on your baseboard. Slide it forward or aft if needed because you will be lining up the cant frame jig with your baseboard plan. Take the laser cut square shown below and glue it to the underside of the last square frame cross piece. The laser etched guide on the square should help you with positioning it. It will look like this. The fore cant frame jig is resting on top which will be added next. Place the cant frame jig in position. The "puzzle piece" connection was left a little loose on purpose to give you some room to adjust it. Not a lot...its not a sloppy fit. But there is just enough room to adjust it side to side based on what we will do next. This next step is super important.... Use your square to check that the notches in the top of the jig match the cant frames as drawn on the baseboard. The machine square I have actually fits right into the slots making this pretty easy. I got these from MicroMark. They are pretty common and if you have one this works perfectly. There is also a laser etched line down the center of the jig to help with alignment. The forward edge of each slot....should line up with the aft edge of the cant frames as drawn on the baseboard. This is important. Its worth mentioning it again. The forward edge of each slot....should line up with the aft edge of the cant frames as drawn on the baseboard. See below. Check this on both sides of the hull obviously. Try and get it as close as you can. Then tape the cant frame jig to the first square frame cross piece. Remember, there is some wiggle room so you can adjust as needed to get your slots lining up as close as possible. But dont be upset if they are off by a hair. Just get them as close as you can. Next up, and you will do this for every cant frame....take the two strips laser cut and marked "1", and glue them into the forward slots. Make sure the numbers face forward. Slide them all the way into the slots. This is also important. The top of these strips should be flush with the top of the jig. Note the laser etched line on the forward side. This line references the outboard edge of each cant frame. We are starting with the most forward pair for a few reasons. The most important being to help firm up the cant frame jig at the correct height and "lock" it into position. Every cant frame after this first pair will also have a corresponding numbered strip. You will be progressing aft with one cant frame pair at a time. Just like this. You can see below how this jig will work. I have placed the square against the strip. Note how it rests against the forward edge of the strip and at the same time...The bottom of the square shows it lining up with the cant frame drawing on the baseboard. The angles match. We are talking about the aft edge of the cant frame. The cant frames will all sit against the forward edge of those numbered strips. Below you can see the forward pair of cant frames glued into position. I of course sanded the char off the edges first. But dont sand the heel of the cant frame. Only remove the char from the inboard and outboard edges. These frames are cut to length with tight tolerances so dont sand the heel end that gets glued to the angled wedge on the apron. Note how the outside edge of the cant frame lines up with that laser etched reference line that was on the numbered strip. Also note that the top of the cant frame is flush with the top of the numbered strip. This first cant frame is important because it locks the jig in at the correct height as well and stiffens it all up. One down and ten to go. Repeat this process working aft with the remaining cant frames. Remember to just work on one cant frame pair at a time. Some of these forward cant frames are made in two pieces with a simulated chock like the frames. We shall discuss this when I get that far. Next up will be cant frame "2". You can see the numbered strips sitting on top ready to go. But now that the jig is in position its pretty easy and should go quickly. No need to sand the bevels into the heels of each cant frame. All you really have to do with each cant frame is sand off most of the laser char on the inboard and outboard edges and glue it into position. The apron has all the correct angles in for each cant frame already. Let me know if you have any questions.


-
Its looking really good. That is a good decision...just follow the instructions and you will have a smooth run of it.
- 389 replies
-
- 2
-
-
- winchelsea
- Syren Ship Model Company
- (and 1 more)
-
Looking great!!😊
-
Be careful.....that could be deadly!!!
-
Its looking good…dont be afraid to sand the hell out of it. It will look fantastic.
-
Nice progress.
-
Yes its crazy….if I really push it and do a 12 hour day I could prob make about 2000…..of the smaller sizes. But its not fun work. So 1000 or even 1500 will have to do. I have tweaked my process as I learn the technologies. I am sure other mfg’s can make them quicker but I think I now have a solid technique and process. it does mean however that I must redo the cad files I use for the blocks which takes forever, but I only need to do that once for each size. Each size also needs its own jig and hold down device…designed…laser cut and built. But again, I only have to do this once and then its pretty routine. The new process is quicker and produces a cleaner well shaped block. Believe it or not, the idea came to me one night around 3am when I couldnt fall asleep. I sprung out of bed and made some notes…worked on it the next day. And to my surprise it works a treat and makes it easier for me once the initial setup is completed. The craziest stuff pops into my brain in the wee hours of the morning. Its nuts.
-
That looks very good indeed. I cant wait to see them on the model.