


gak1965
-
Posts
597 -
Joined
-
Last visited
Content Type
Profiles
Forums
Gallery
Events
Posts posted by gak1965
-
-
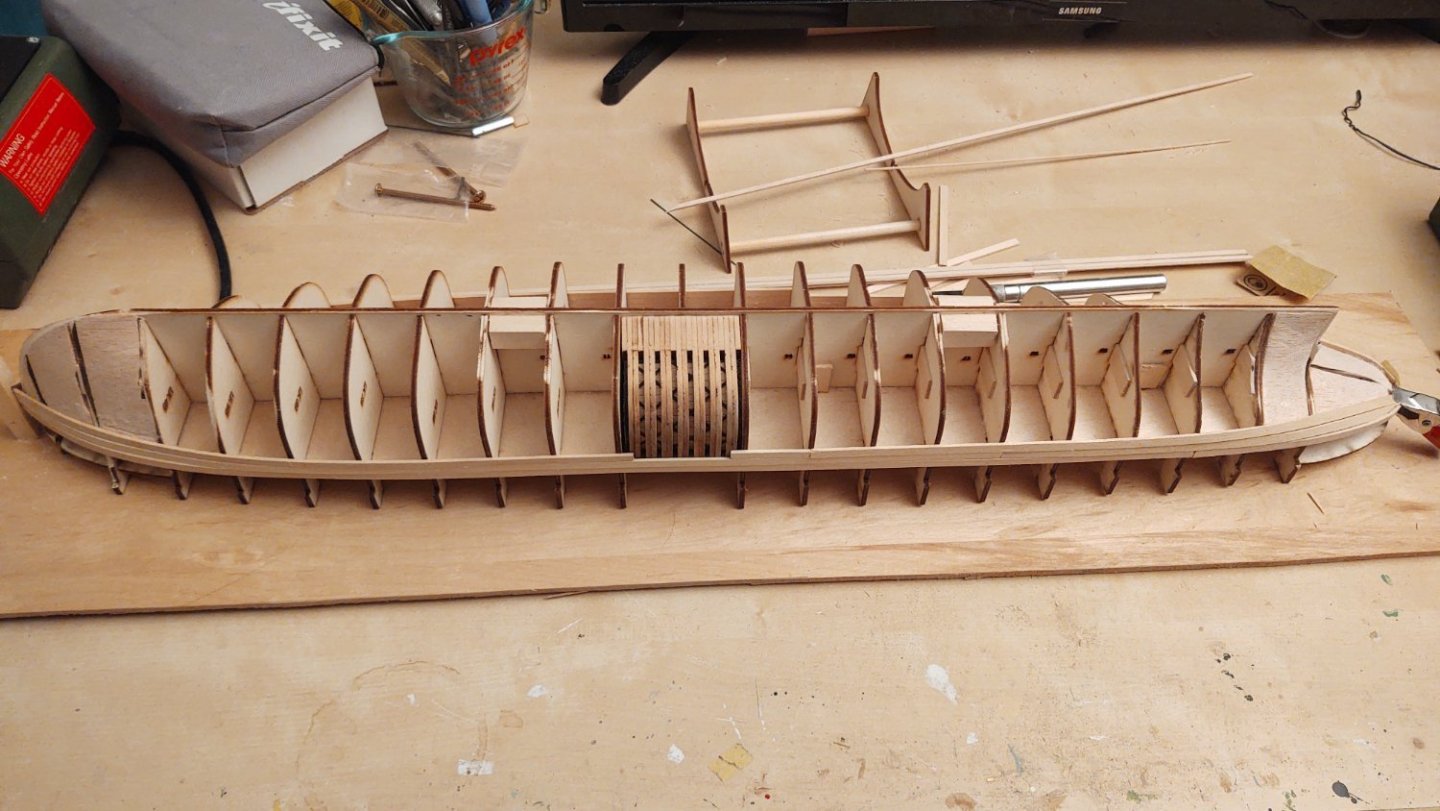
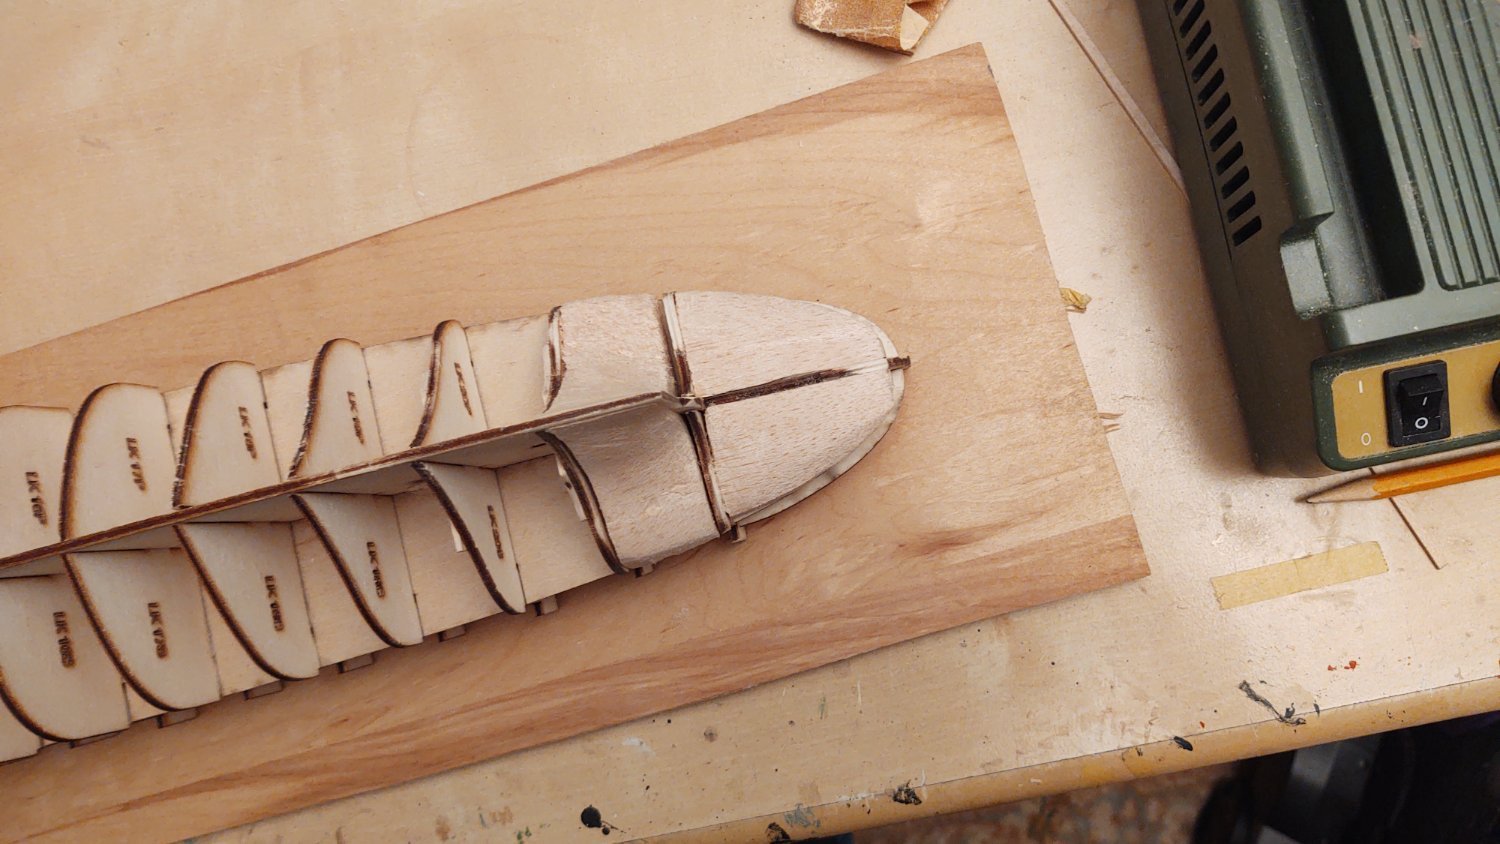
Well, this feels like a bit of a milestone. Center keel cut. I drew lines to split it into two, but I was able to do it as one piece by cutting a bit of the center with a razor saw and some 80 grit sandpaper. So here is the keel with the pattern still attached:
Here are two views of the bulkheads, from the top and side, dry fitted into the center keel:


They still need to be trimmed and faired, some of slots lengthened and maybe one shortened, the bearding line needs to be put in, frame 3 has to be thinned above the main deck so that the forecastle will be properly aligned, filler blocks are needed fore and aftand I still have to cut out the keel. But, the thing is starting to look like a ship. Not radically different looking than the Flying Fish at a similar point in the journey:

In any case, thanks for looking in and for the advice!
Regards,
George
-
9 hours ago, Roger Pellett said:
Coal firing was a messy business. With soot from the stacks the deck was likely to get black anyhow.
Heck oil firing can be messy. My recollection is that the reason most US naval vessels had black masts and funnel/uptake vent tops until the '90s was that they would get that color anyway.
-
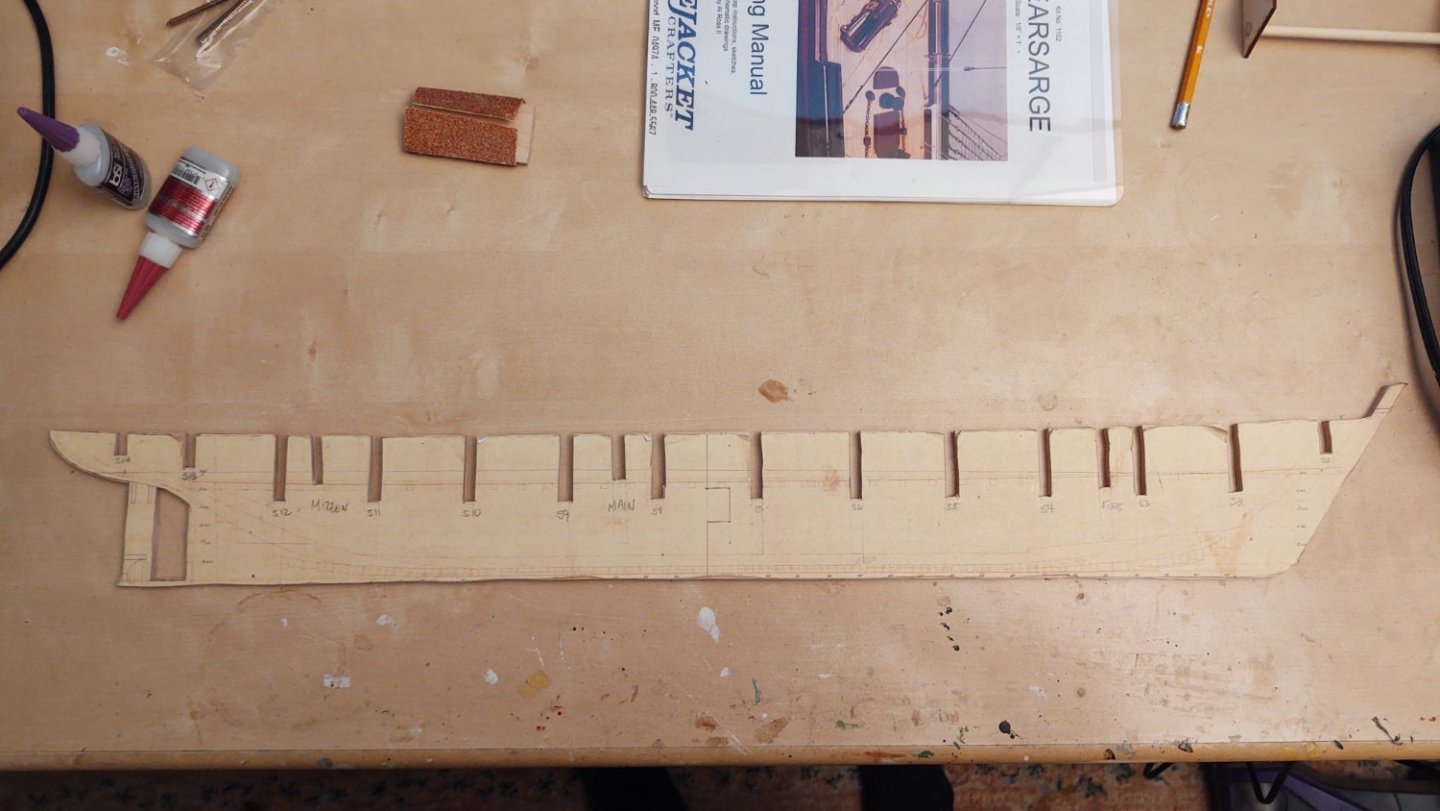
Well, a brief check in. I did get my saw set up better, proper tension on the blade in particular. I also learned that I was breaking the blades when I was making straight cuts removing pieces from that large piece of ply, and realized I was pushing harder on the blade. I'm using a very fine blade (34 teeth per inch) and I think it just needed to go slower. When I am cutting out the pieces, I'm much slower to make sure that I don't over cut - and so once I realized that my blade problem more or less went away.
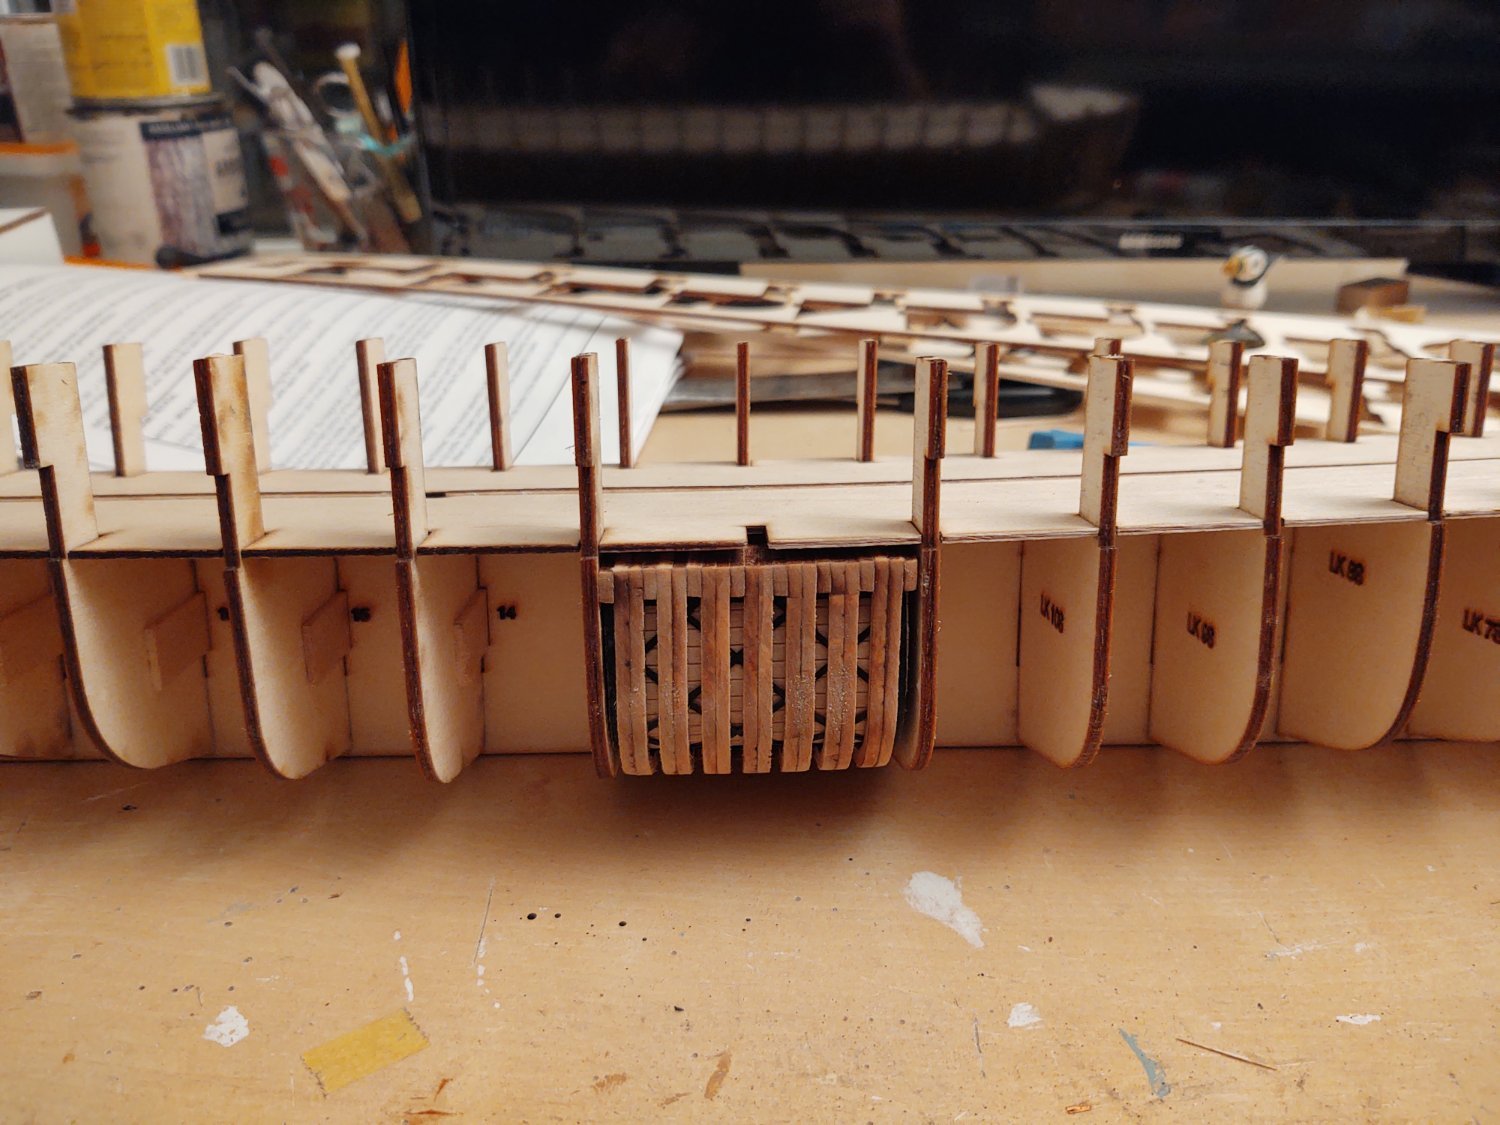
Here are the bulkheads as of today (no real smoothing or fairing). I thought I had all 14, but then I realized that I made 12 unique bulkheads, 2 of bulkhead 12 and none of bulkhead 11. So, one more to go before cutting out the center keel. I did take the cut out bulkheads and put them into the paper pattern for the center keel and they seem to fit properly, although several of them will require a non-zero bit of fairing due to their thickness. But that's okay - cutting them wrong would have been more of an issue. So here they are (I haven't cut out the forecastle yet. Debating at this point as it turns out that the Discovery forecastle was closed off in 1901 (the doors are on the plans). Probably going to leave them solid - no reason to model something you won't be able to see, and I know on my Flying Fish that those beams are fragile, and by the time I close it off would likely be about 90% glue. Probably better to keep them closed and model the doors closed.
It's also clear in addition to the filler blocks I was planning for the stern, I'm going to need them at the stem as well. Fortunately, the USS Kearsarge I'm (probably stupidly) building along with this came with a giant block of balsa for filler and after finishing the filler portion I have a ton leftover that I suspect is going to find its way to Discovery.
Thanks for looking in!
Regards,
George
- KeithAug, John Fox III, barkeater and 6 others
-
 9
9
-
On 1/26/2024 at 2:41 PM, Rick310 said:
Looks good George!! I can’t imagine 2 uilds simultaneously. WOW!
Thanks Rick. Just means everything will take twice as long...
Brief update. Started planking. I wound up replacing some of the kit supplied 1/4 x 1/16 with some 3/16 x 1/16 bass I had in a stash from old kits. It was a lot easier to bend as I was putting the sheer strake in. The sheer strake around the stern involved soaking in boiling water, pre-bending, letting it dry and then tacking in place.
I'm going to put 4 strakes in with the 3/16 x 1/16 (the equivalent of three 1/4 x 1/16 strakes) and then switch to the kit supplied wood (the bends shouldn't be as big of an issue at that point, and they are going to be covered with copper plates so the out of scale planks won't bother me. Everything is going to have putty and paint, but I like having a bit of plank texture underneath the paint. So 3 strakes stem to stern on the starboard side, 3 strakes, but not yet to the stern on the port.
Thanks for looking in!
Regards,
George
-
9 hours ago, KeithAug said:
George - Roger is correct. Scroll saw blades don't usually break a lot. you should have a look at your set up.
I now have some new blades and will take a look at my setup, particularly on the blade tension.
- mtaylor and Keith Black
-
2
-
5 hours ago, allanyed said:
Just a thought based on experience...... I hope 14 bulkheads are enough to allow a smooth run of planking. With an overall length of 172 feet, the bulkheads at 1:72 will be about 2 inches apart so you will have huge gaps between each bulkhead. If you decide to go with more (28?) bulkheads the body plan with the station lines will be a great guide to drafting the additional pieces.
That's definitely a concern, and you are correct, the stations (except for 14) are all 1-7/8" apart (versus about 1-1/8" for the Kearsarge kit I'm also building). From station 3 until 10, there is very little variation in the shape - the real question will be from the knightheads to station 3 and from 10-13. Aft of station 13 I'm going to be putting a filler in place to create the stern - basically a suitably shaped variant of the Flying Fish kit stern filler block. For 1-3, my thought was that if it was looking problematic that I'd just drop a bit of balsa filler in to ensure an even flow.
FWIW, I had spoken to Vlad Wairoa about his Glory of the Seas which used 18 bulkheads for a 101 cm false keel, 6 of which were closely spaced at the stem and stern for the exact reason you describe. Hopefully it will turn out okay, and I'll only have to add a little balsa or a couple of extra bulkheads rather than adding another 13 more to fill the gaps.
Regards,
George
- allanyed, mtaylor and Keith Black
-
3
-
On 1/17/2024 at 9:55 AM, Rick310 said:
Really coming along George. I’m enjoying following your build just as I did with the Flying Fish!
Rick
Thanks Rick!
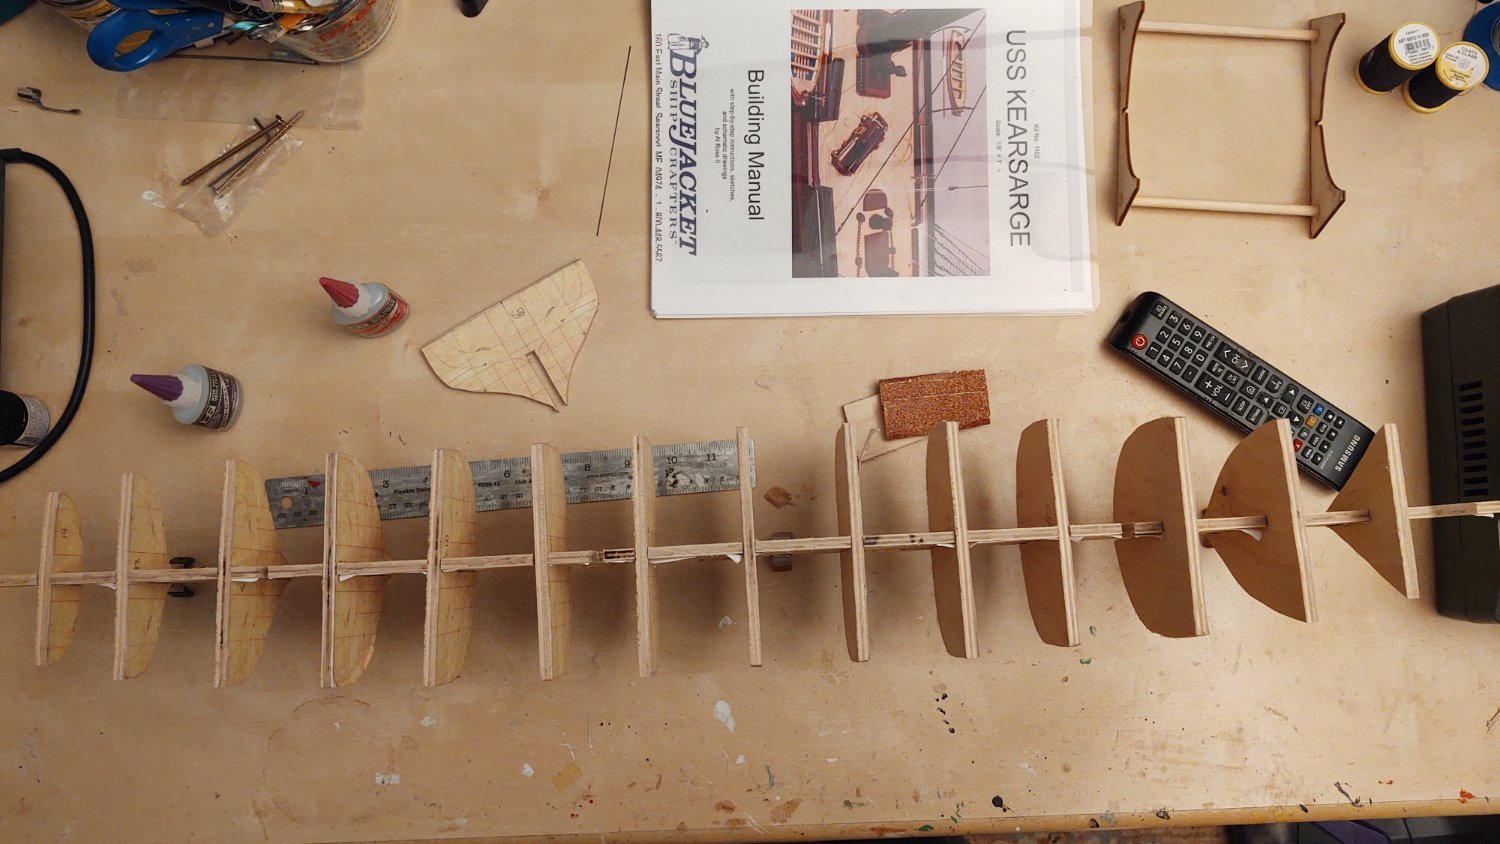
I'm temporarily stopped in my Discovery build (broke all of my scroll saw blades, more on the way) so I had some time to work on Kearsarge. Finished the balsa filler blocks, sanded everything down, and installed the 3/8x1/2 inch boxwood fillers, and mounted her on a build board. Looks like she's ready to start planking. So, some photos.
Bow:
Stern from above and along side:

And the ship as a whole:

Build board, BTW, came from a piece of thin oak "driftwood" that had been paneling around a built in Sub-Zero refrigerator that was here when we bought the house. What a piece of junk that thing was. Replacing with another built in would have been such a hassle that we had a contractor remove it and leave us with a nice conventional refrigerator slot. The extra paneling has been slowly but surely been turned into a wide range of components, this from a bit of leftover from something else.
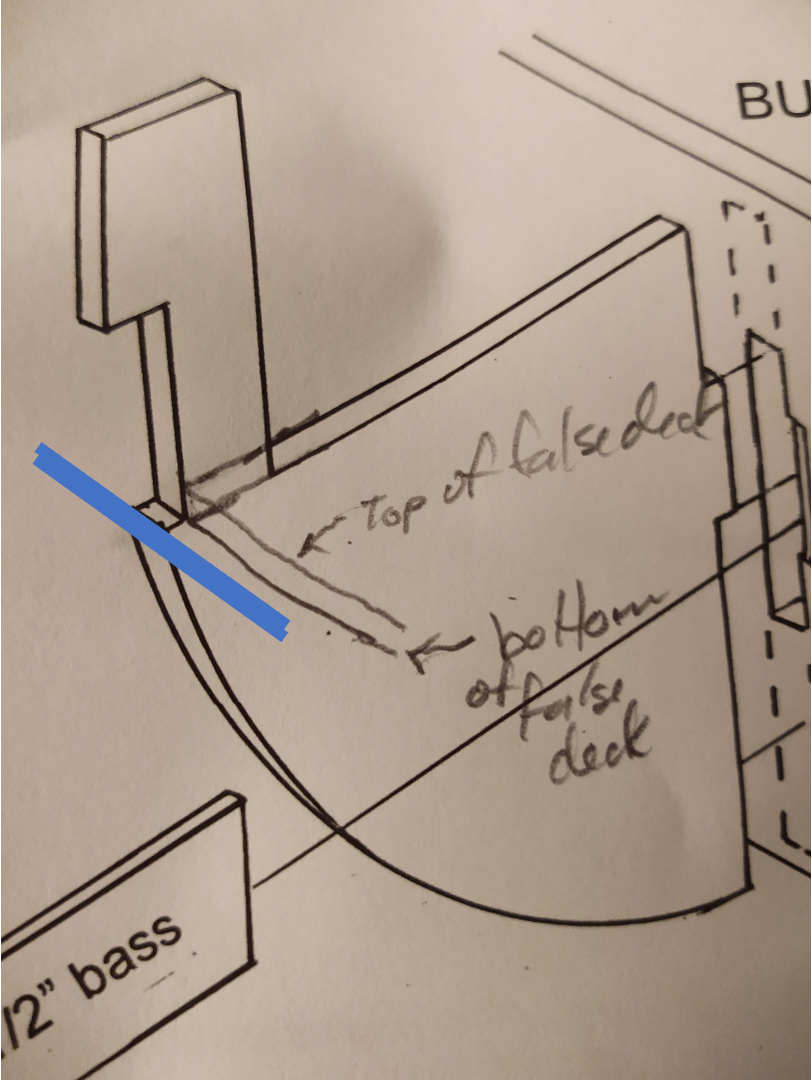
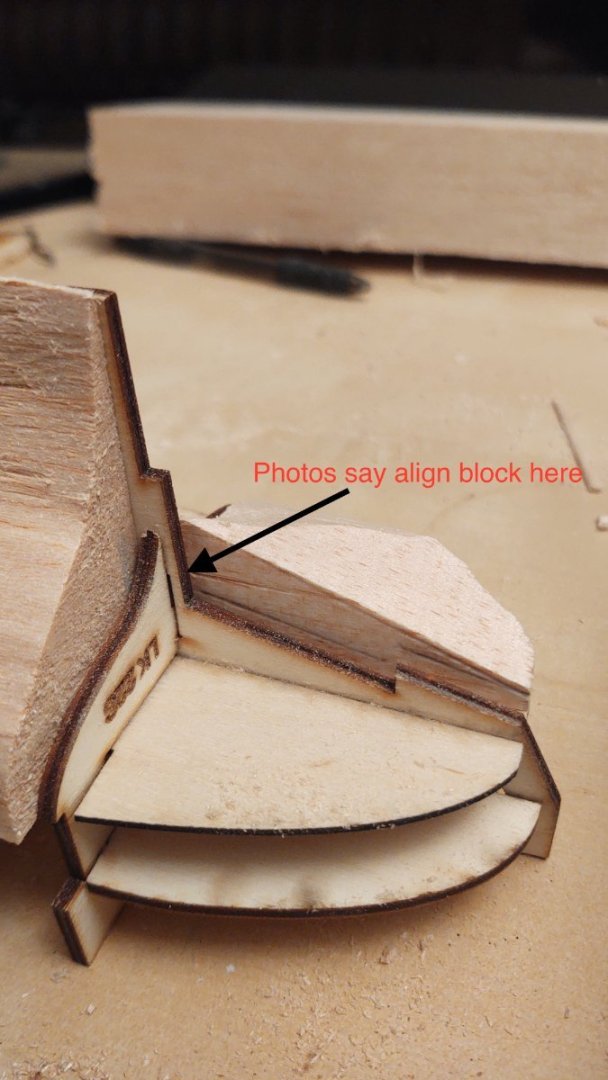
Just validating with @MrBlueJacket that the upper end of the sheer plank (well the bottom with the ship upside down) should align with the edge of the ledge that is formed by the notch. That is, if the blue lines in the picture below are the sheer strake they would go where shown, and the laser cut inner bulkhead core would go into the notch.
As always, thanks for looking in and for the encouragement and likes!
Regards,
George

- Canute, mtaylor, Keith Black and 2 others
-
5
-
19 hours ago, Rick310 said:
How did you do your mast bands? Are they brass or copper? Soldered?
Thanks,
Rick
Hi Rick. The mast bands are brass strip (1/32 x 1/64) that came with the kit, glued onto the built masts. I don't have bands on the mizzen. I didn't worry much about them not staying on because there is a continuous layer of paint that they are under. The yard bands by contrast are mostly copper tape, using the existing adhesive and then painted over. BTW, I'm pretty sure I had Model Expo send me some extra brass strip of that size, as I didn't have enough for everything (and that was with nothing on the mizzen). They sent me more with no trouble. FWIW, last time I looked K&S metals had stopped selling the really thin brass strip, which is unfortunate.
14 hours ago, Bruma said:Congratulations on this great achievement! She is really a beauty!How do you feel now after working for so long on her?Thank you. When I actually finished it was a bit anticlimactic, but it's been growing on me.
Your Cutty Sark is really awesome - I can't even imagine having to tackle sails on this or any other ship bigger than a lobster smack or maybe a skipjack. You've done an amazing job on her.
Regards,
George
-
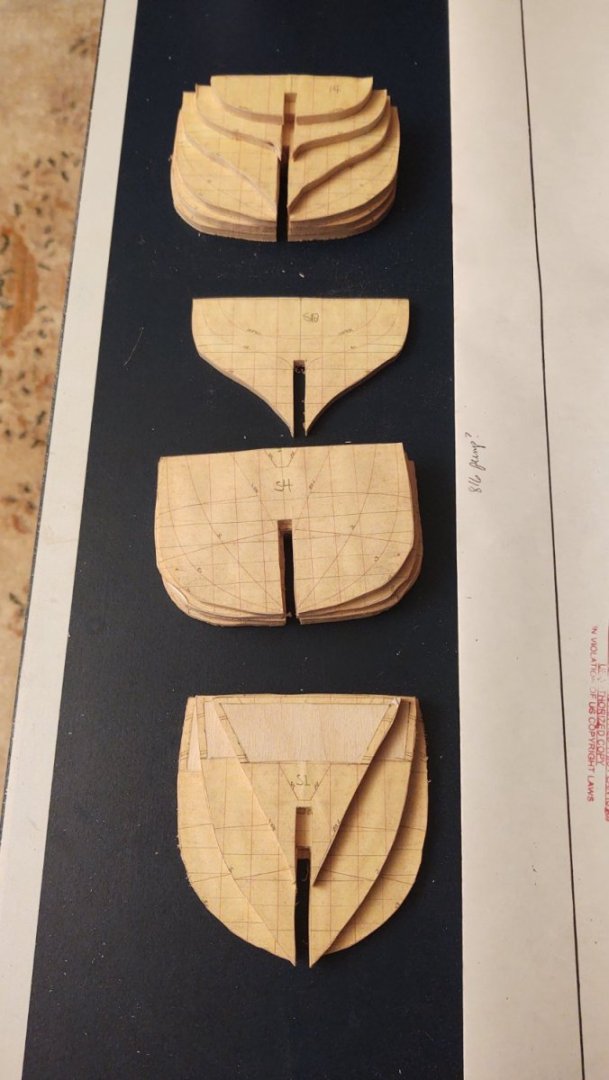
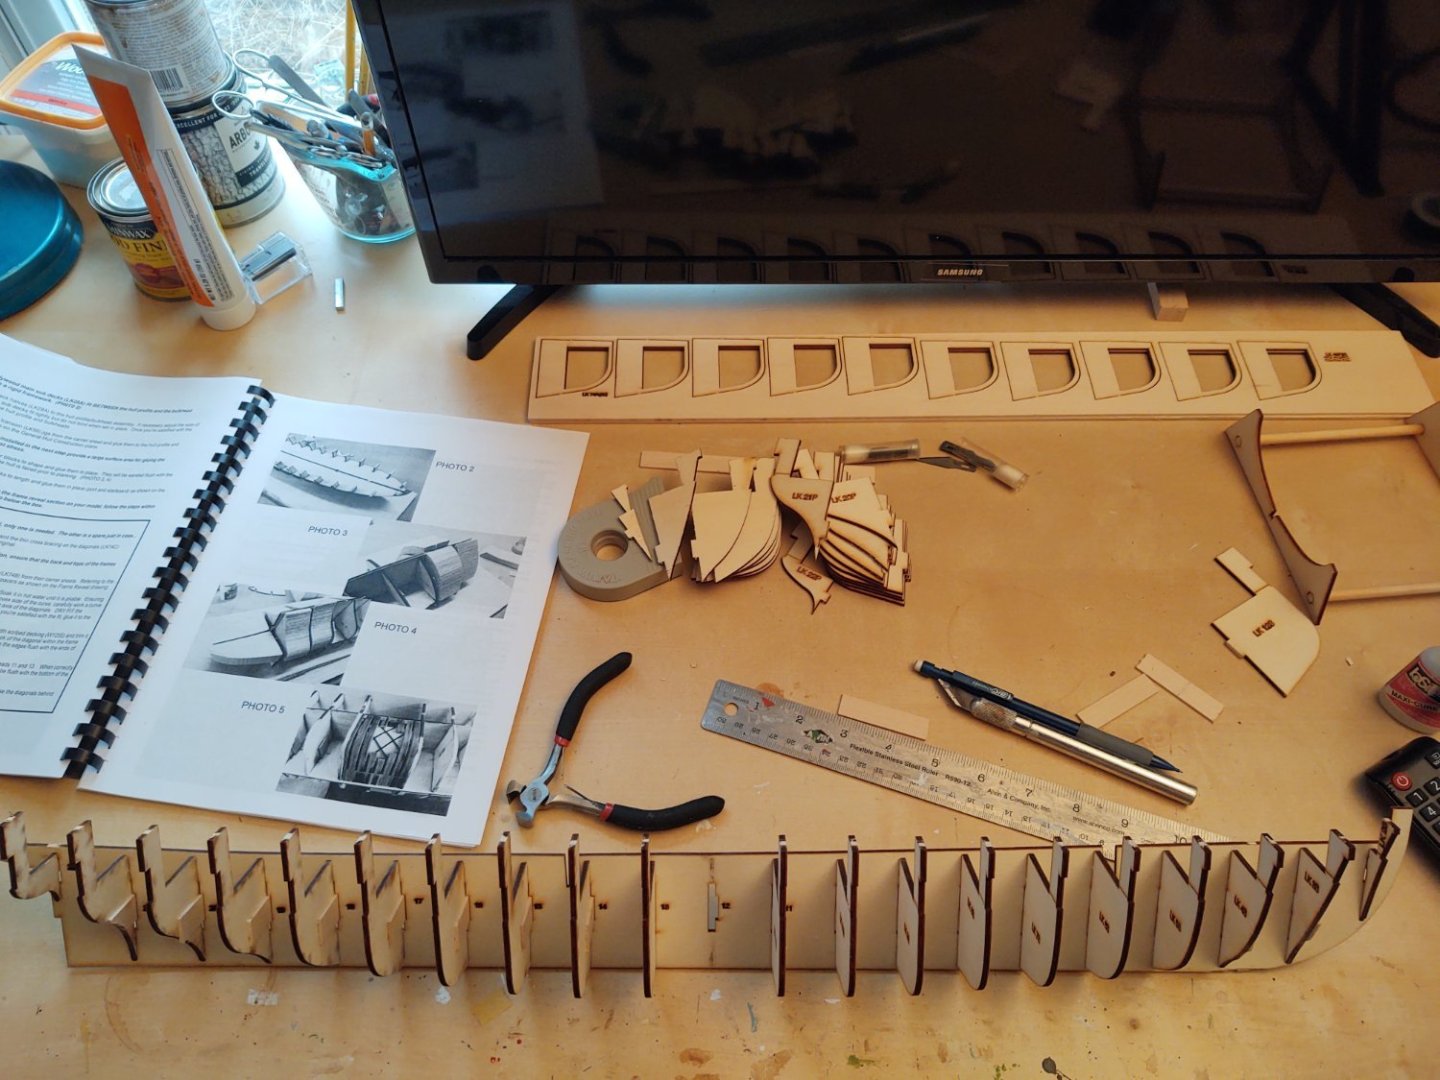
Well, a little progress. Cutting out the bulkheads is proceeding, but I'm at a pause as I have now broken all of my scroll saw blades. New ones en route, so some time to work on the Kearsarge while I wait. Here is what is done. Stacked in the first image, laid out on the next two.

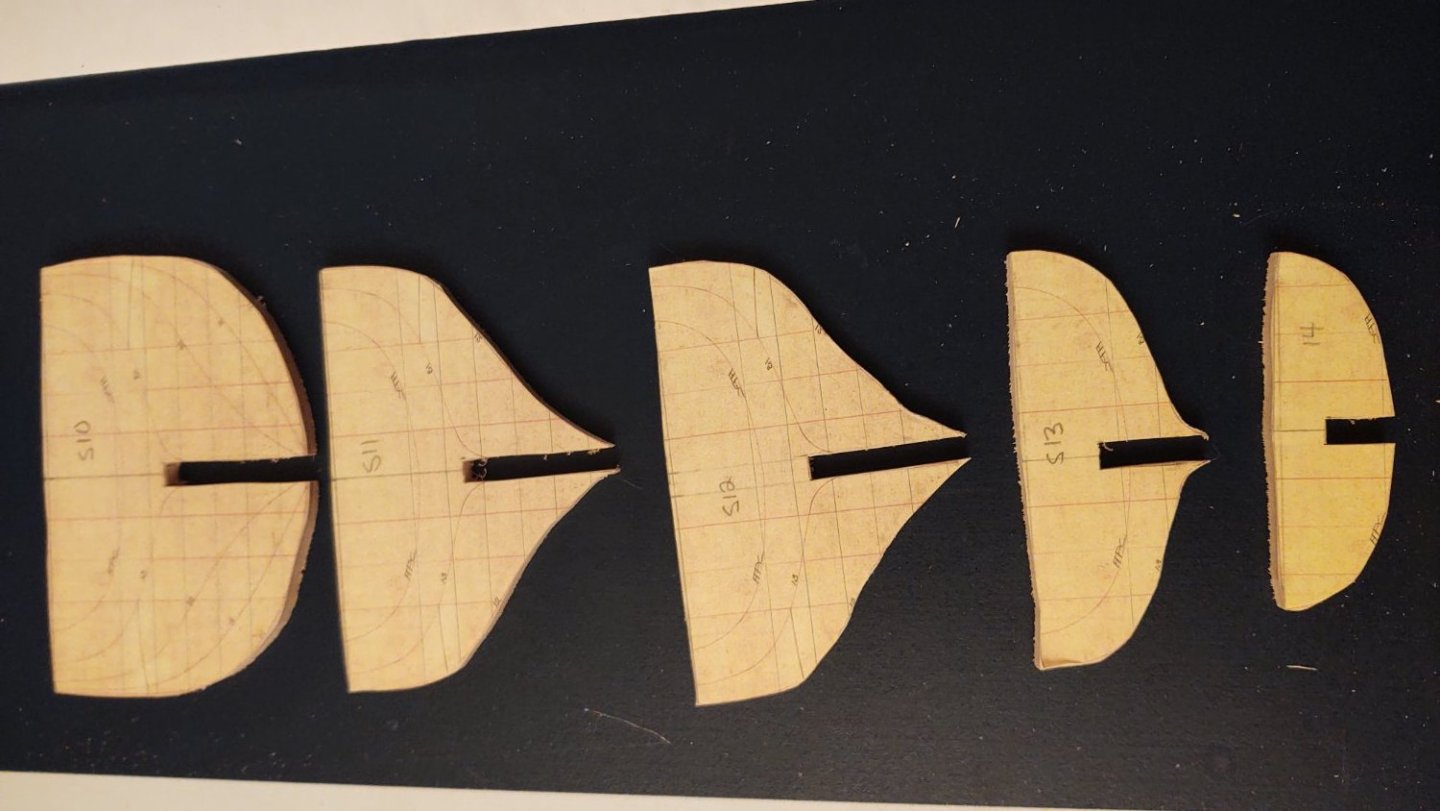
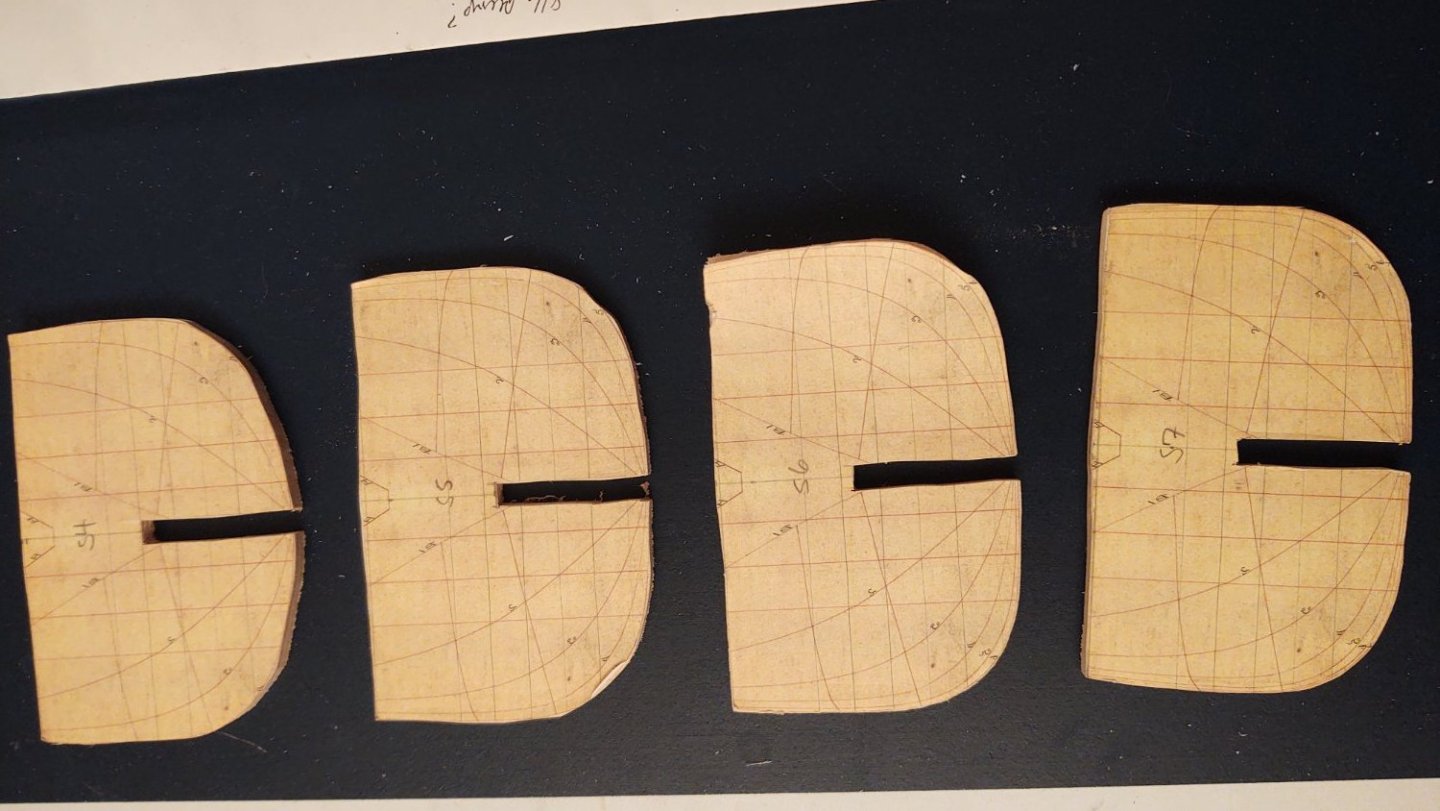
they will need a bit of smoothing, but otherwise seem fine. 9 down, 5 to go, and then the center keel. That's when we find out how straight I can cut the slits and how much file/sanding is going to be needed.
Thanks for looking in!
Regards,
George
- Valeriy V, mtaylor, Keith Black and 4 others
-
7
-
-
Good luck. Hope that you continue on the mend rapidly.
-
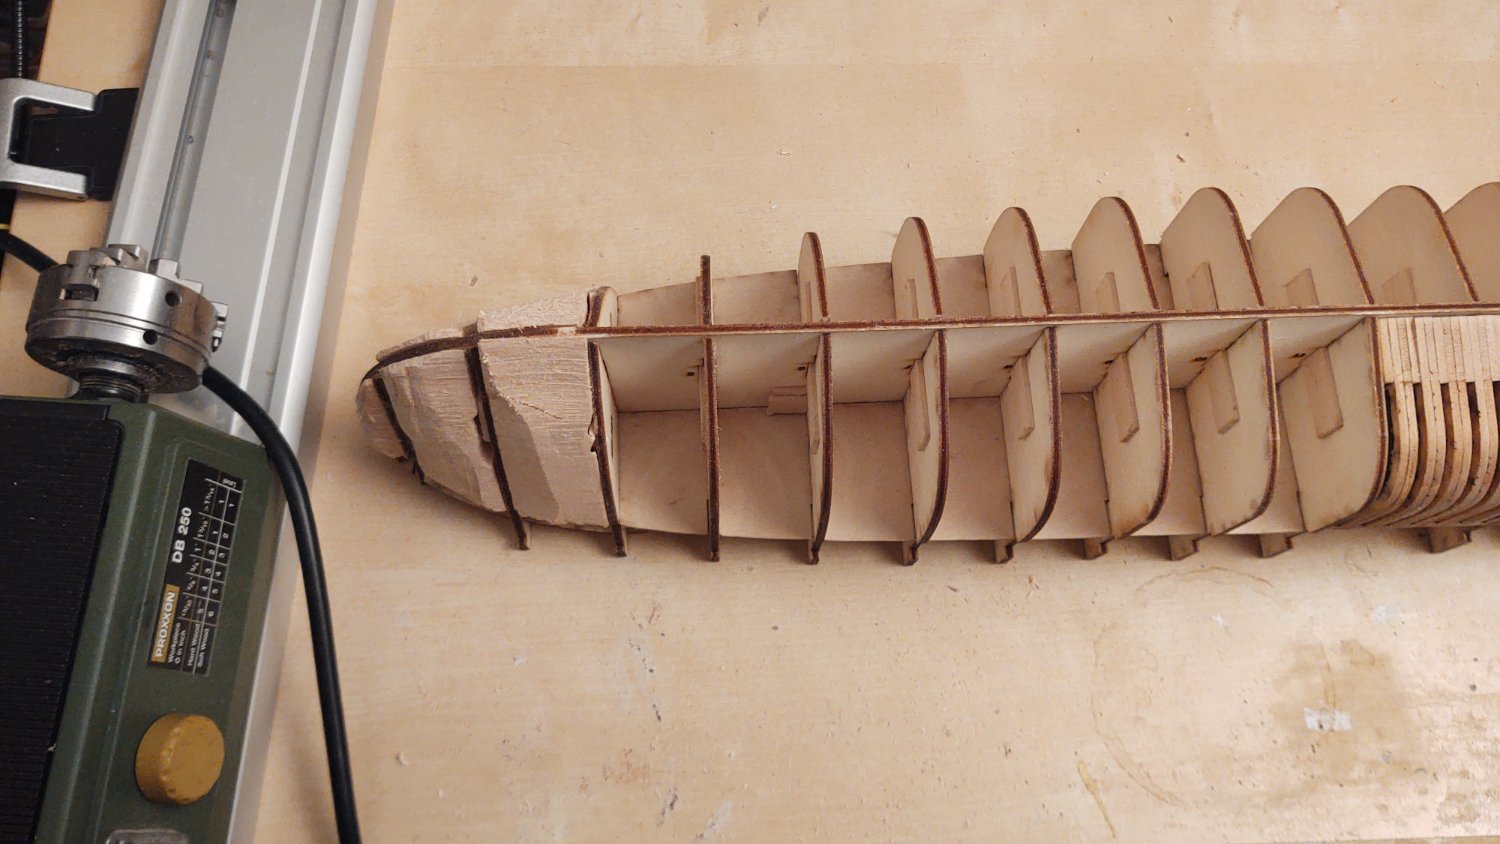
Brief update. I've roughed in the balsa fillers, although not glued them in, because I want to shape them more before they go in.
Given the size, I understand why balsa, but when I've made (smaller) filler blocks for other models I've found that the basswood was a lot easier to shape.
So a couple of photos. The bow is pretty straightforward. I'll shape a little bit more and then fair them with the tool that comes with the kit.

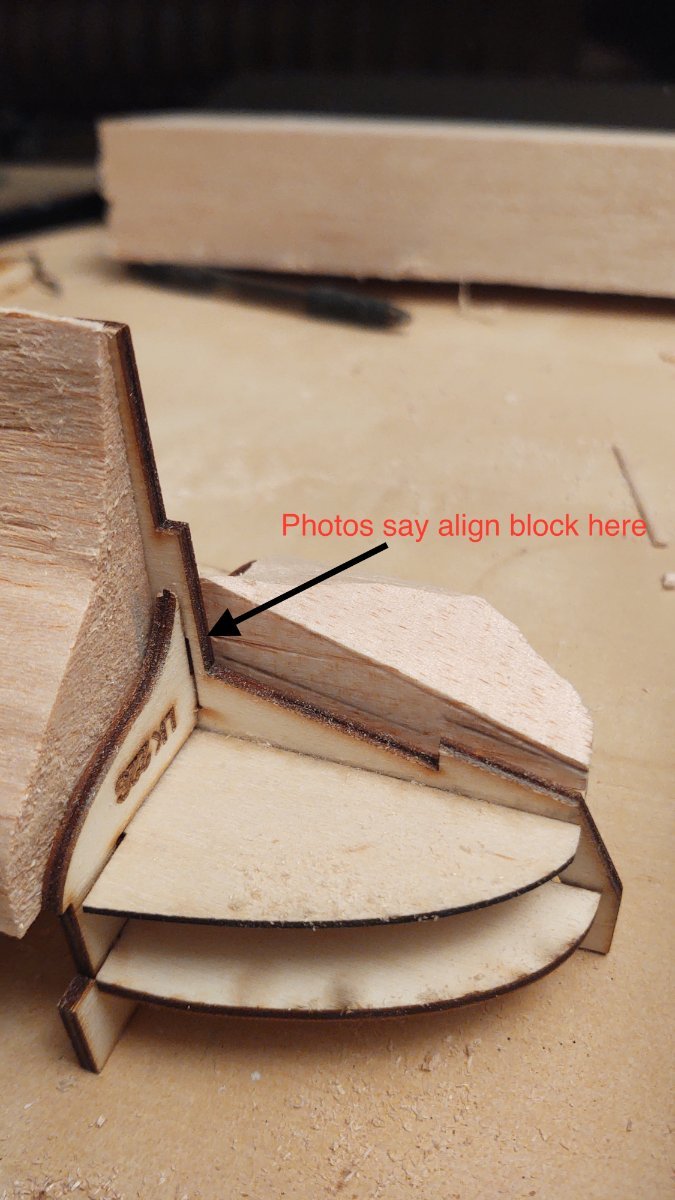
Stern is a bit more complicated:
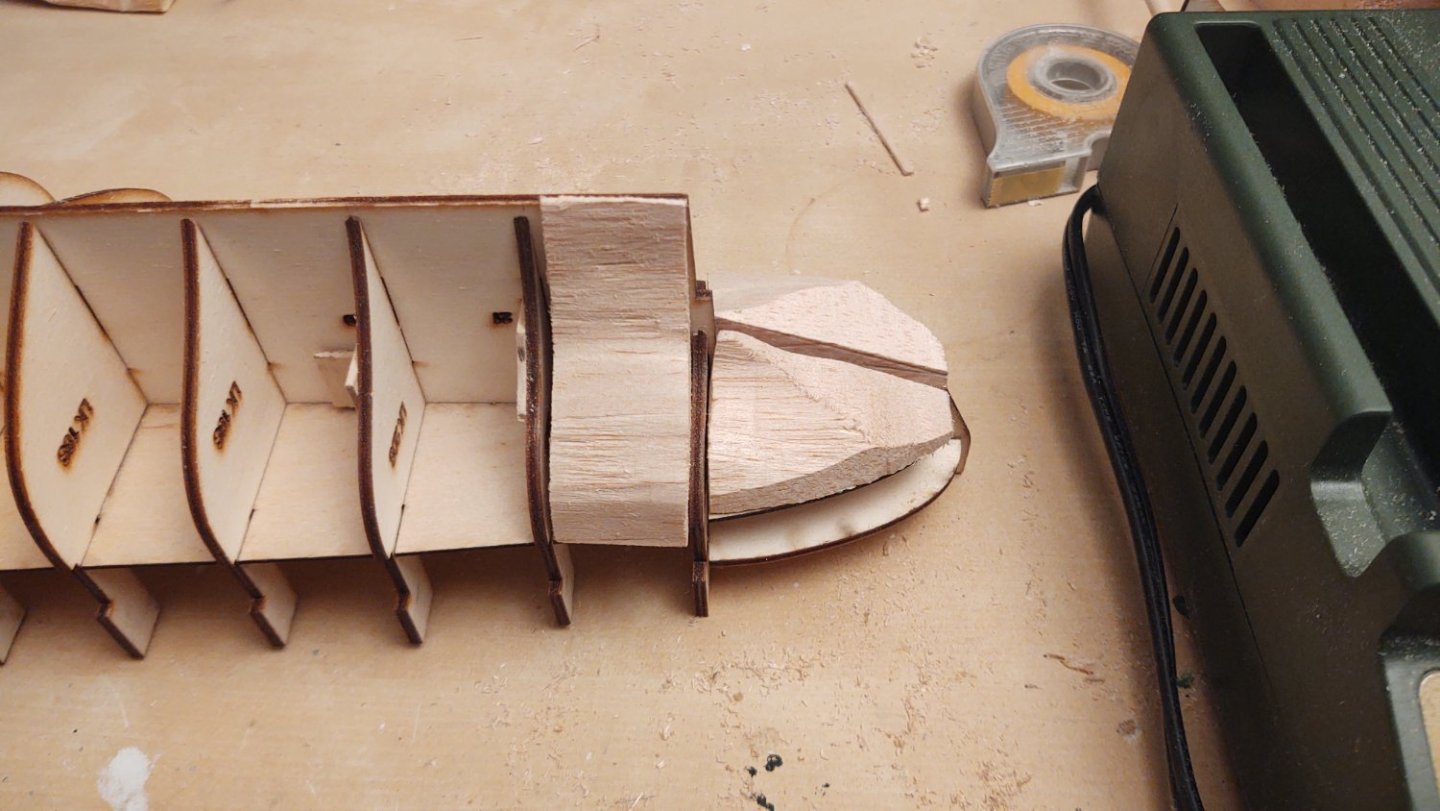
Instinct tells me that the left (forward) side of the stern filler blocks should match the prior bulkhead bulkhead. The photos show them following the faslse keel that terminates well short of the final bulkhead as in the photo below:
I'm going to follow the photos, I guess, but it's a bit odd, at least to me.
As always, thanks for looking in.
Regards,
George
- Keith Black, Canute, GrandpaPhil and 1 other
-
4
-
5 minutes ago, Ikcdab said:
Hi George, what did you decide on to stick the templates to the wood? I am at a similar stage to you on my build and am thinking prittstick.
Ian
Hi Ian,
I was going to use the spray glue, but my (probably quite ancient) can was not spraying. I would up using a bit of CA (it was there). Worked a charm.
Regards,
George
- Keith Black and mtaylor
-
2
-
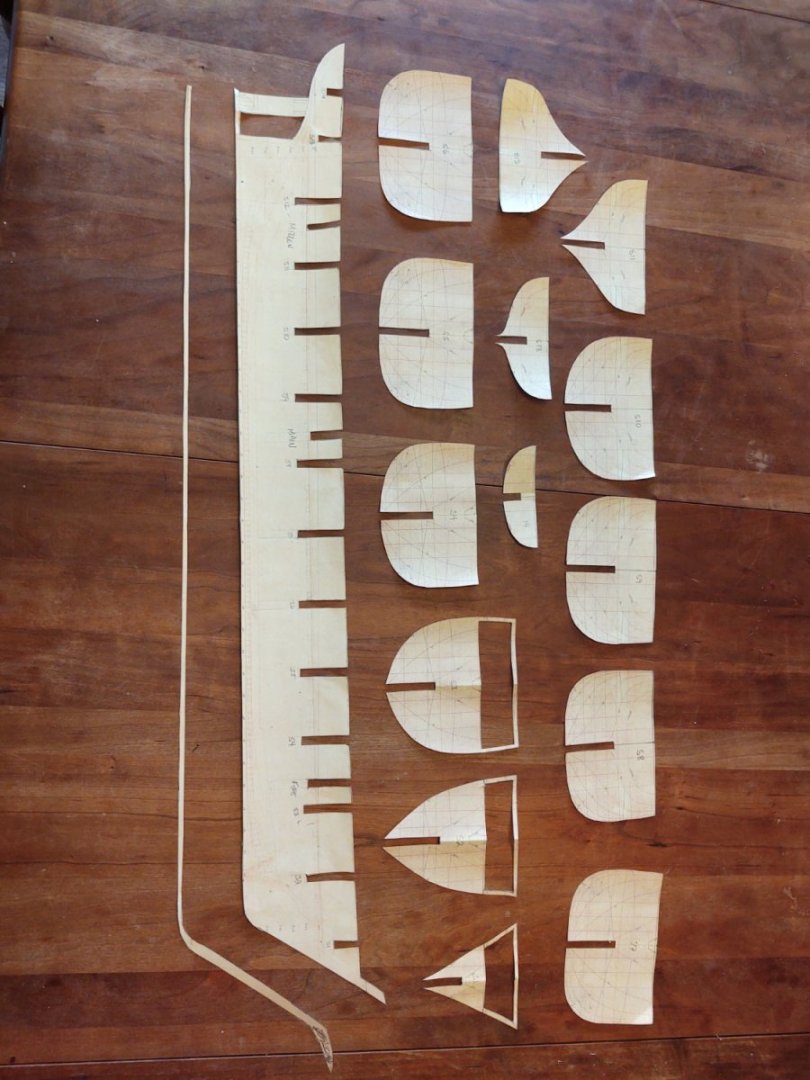
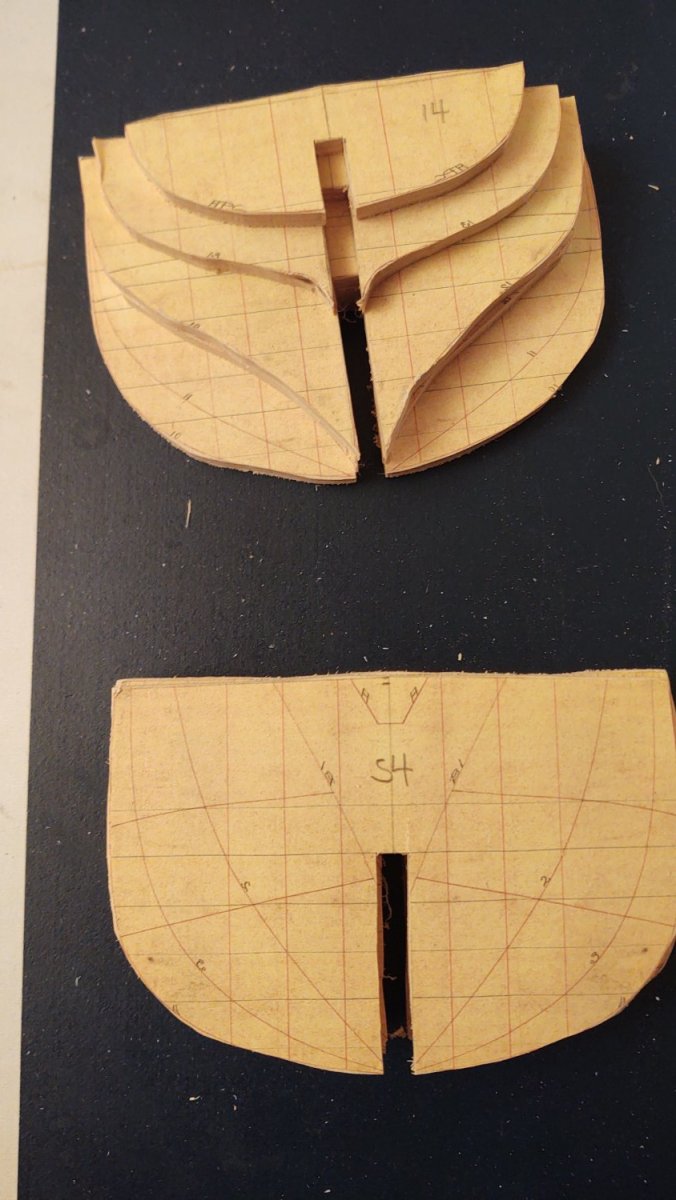
Well, some real progress. First, here are the relevant pieces to make the frame of the ship, in paper, cut out and ready to go.
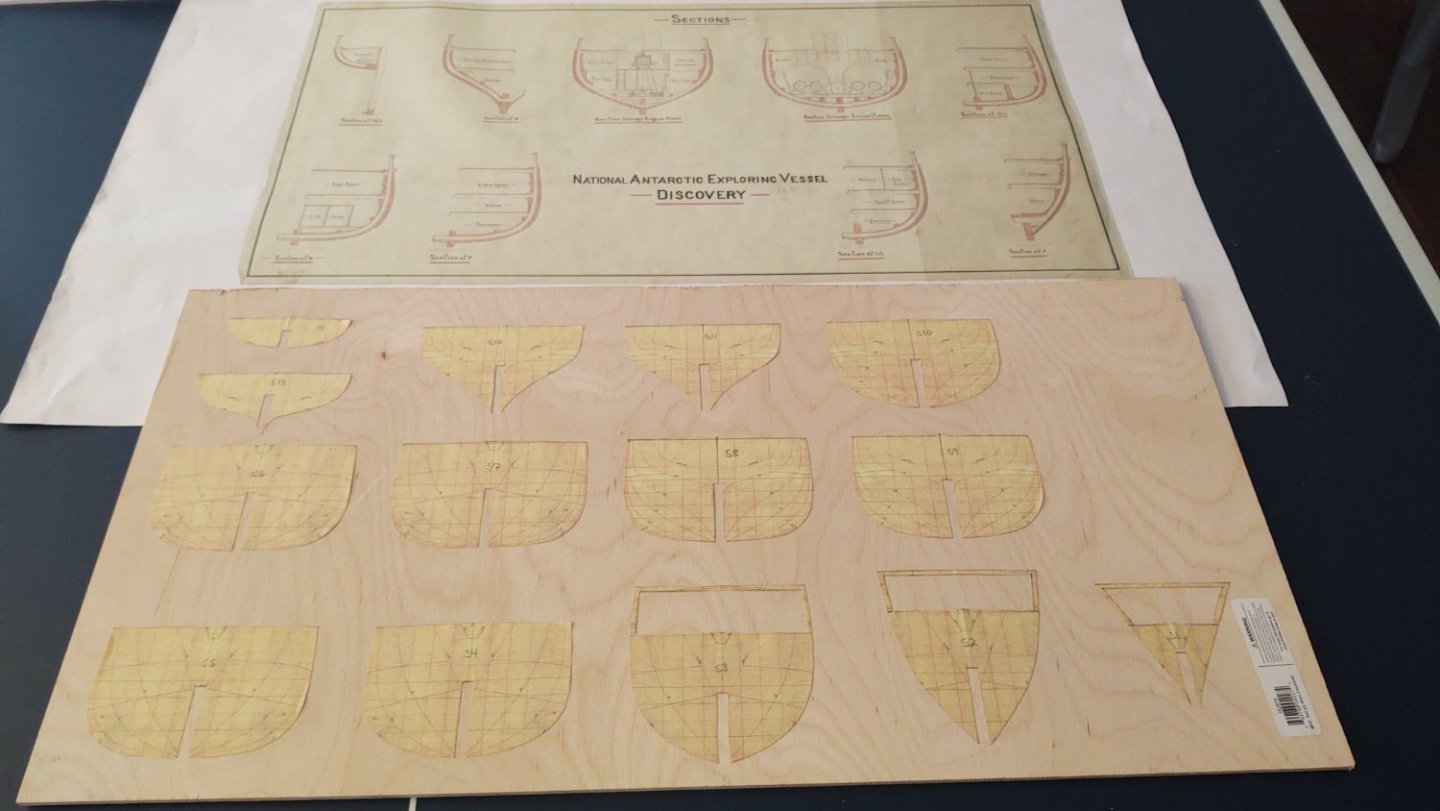
Now, attached to the birch plywood, with some sections (not the same ones - the draftsmen chose ones with some significance to the constructors) from the original plans from the NMM.
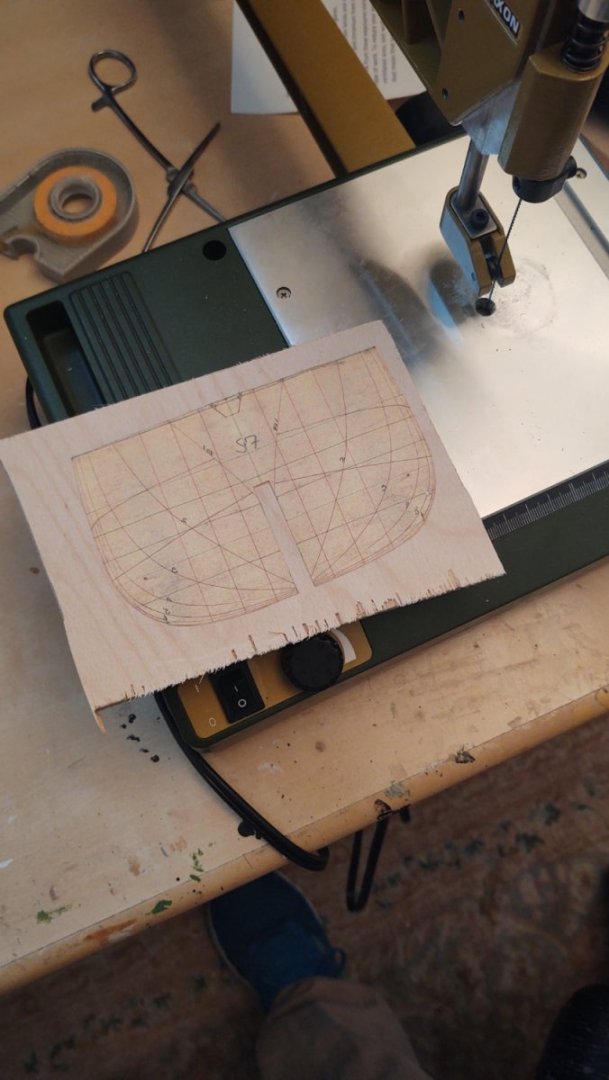
Next, bulkhead 7 (the widest, flattest) cut out of the big sheet, and ready to go on the scroll saw:
And the first two bulkheads (6 and 7) having been cut from the scroll saw and "ready to go".
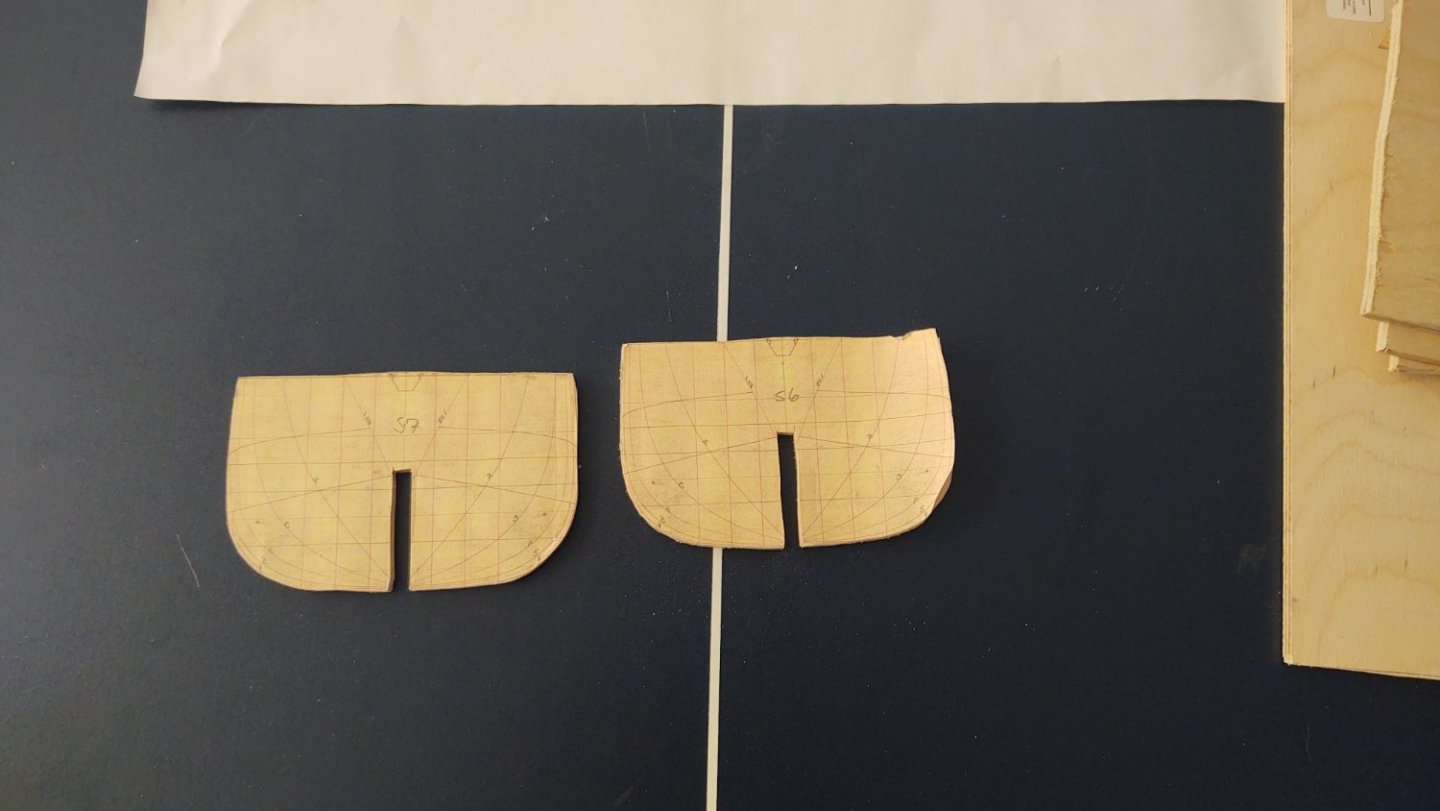
I have plenty of wood and may wind up making one or both of them a second time. I realized a bunch of things about using my saw effectively, particularly where the deck is going to lay, although I can probably fix that issue by sanding it flat and putting in a small piece of 1 mm wood and sanding the curve in, so we shall see. In any case, I'm going to do all of the "solid" bulkheads before attempting the three with cutouts, and the very last thing I'm going to do is the false keel. I figure by that time I'll have developed more of the skills necessary to cut out a solid center keel and false keel.
However, seeing as there has been sawdust on this project, I'm changing its status in my signature to 'current build'.
As always, thanks for looking in and the likes.
Regards,
George
- mtaylor, Keith Black, Valeriy V and 4 others
-
7
-
Well, I wound up adjusting the upper edge of the false keel to account for the deck camber, and added a small extension at the stem. And all of the bulwark patterns are cut out and ready to mount in the wood. Next step is to cut out the false keel pattern and it's off to making sawdust.
I was thinking of mounting them on the plywood using the spray glue that is usually used to mount photos on poster board. Has anyone tried that, is it sturdy enough, or do I need a stronger adhesive?
Thanks for looking in!
Regards,
George
- mtaylor, Keith Black, barkeater and 1 other
-
4
-
Hi John,
I tend not to weigh in on these sorts of questions - there is only one person whose opinion matters a whit, and that is you. I will say a couple of things here though. First, sorry to hear about your health issues. I hope they improve, or at least don't get worse. Second, I'm with Roger here, these things take so long that I can't imagine wasting any time building a model that doesn't interest you. And, FWIW, it seems to me that the Golden Hind will be as fiddly than the Fish, although in a different way. The thing has a lot of sheer, complicated decoration, and lot of unpainted wood. Most of the Fish is painted (and a rather simple scheme at that) and it hides a multitude of sins. The Hind is at a larger scale, but still three masts in about half the length. Something to think about.
And there is no question of "letting us down", we are just here to share what we are doing and help each other along. Whatever you decide is the right move, mate.
Regards,
George
-
I didn't have a lot of time to work on the ship during the holidays, as my children were visiting. Because of their jobs (one is a reporter and the other works at an inpatient facility for women and girls with eating disorders) they generally need to work some holidays, and this year their schedules wound up conflicting, so they were here sequentially, not in parallel as it were. It was wonderful seeing them, although a shame that they couldn't be here at the same time.
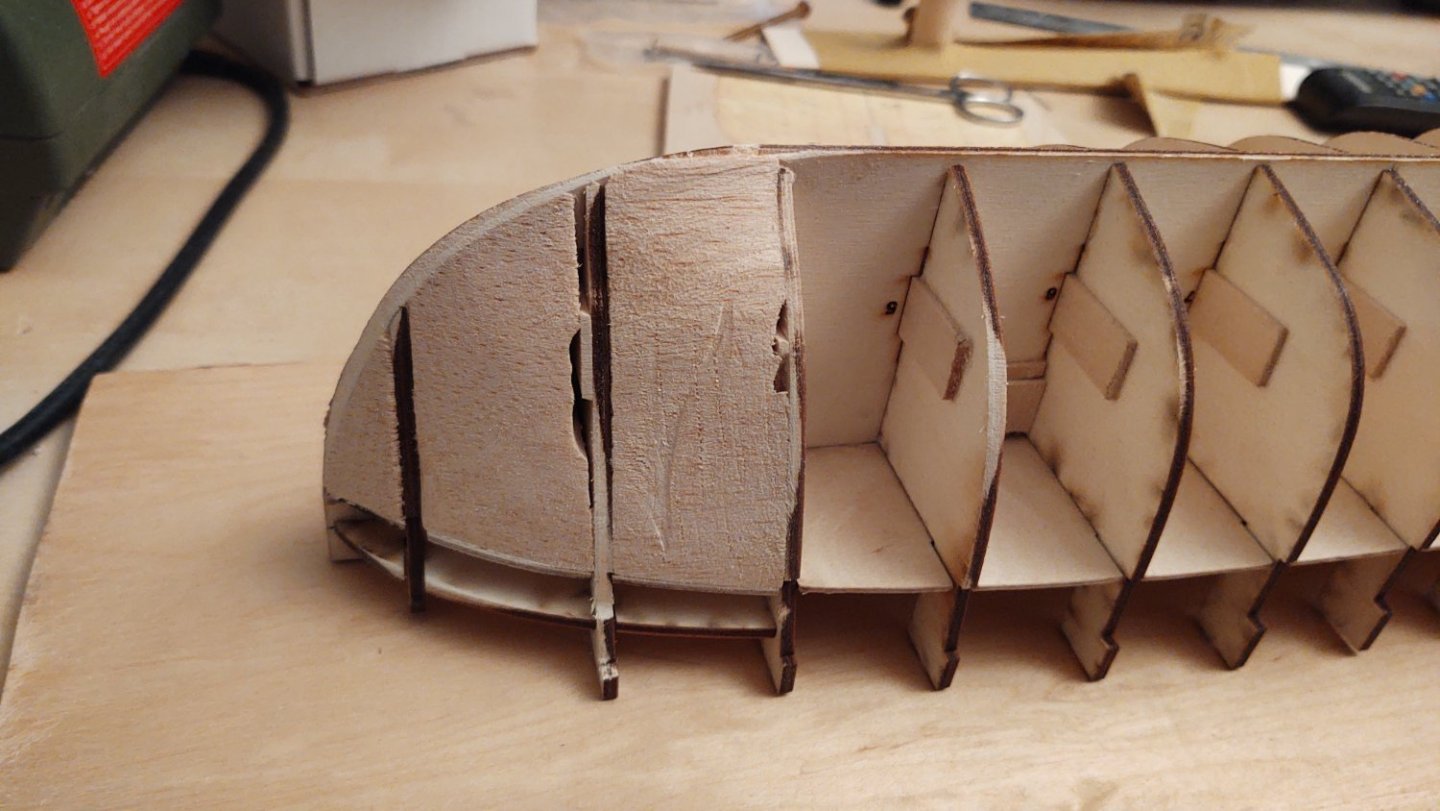
Anyway, where we stand. Although it is a little out of order, the frame reveal is completed and mounted. Rather than have some of the frames 'broken' for better visibility, I just decided to leave them all in place. The backing and "ironwork" were soaked in hot water, formed, and then glued in place when dry. The whole thing added below the subdeck, aligned with the bulkheads.

The other subdeck has been added. Having read the instructions enough, I think I understand the goal, to provide the necessary shape for the bulwarks, with the pieces over the subdeck being removed once the inner bulwark is in place. It needed a bit of sanding to make the edges match the bulkheads.
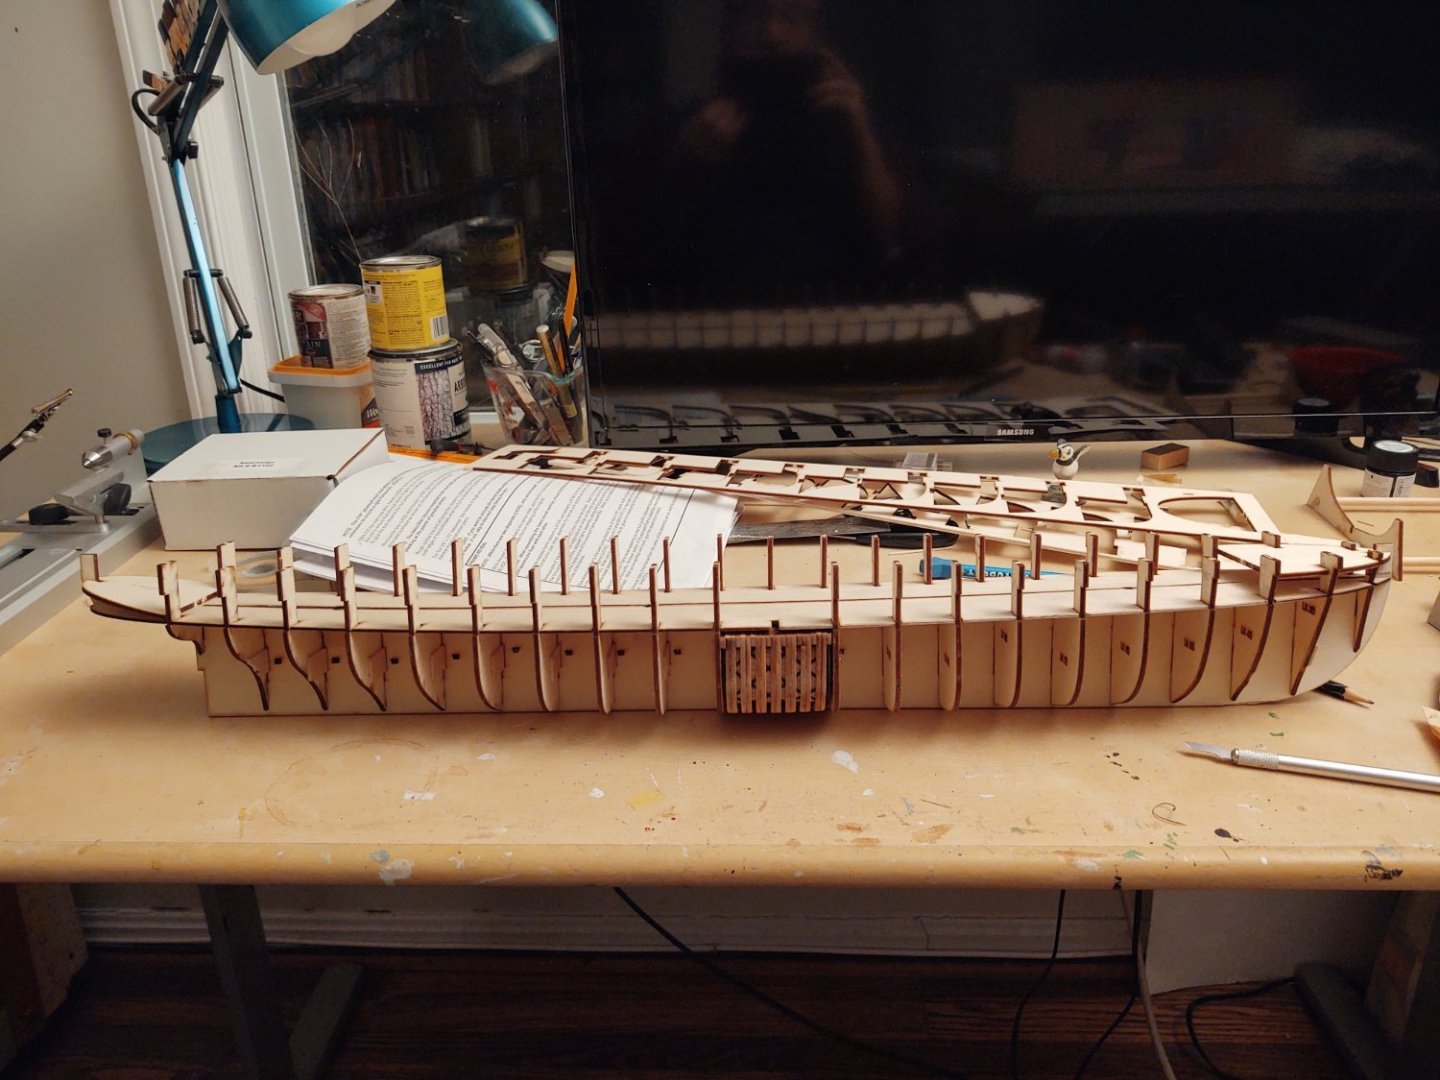
I've dry fitted the formers for the stem and stern as well, but not yet glued. Again, my read now is that this is going to be removed once fully build the bulwark. I presume that means that I need to be careful about where I actually glue this in place.

So, that's current status. Next up is going to be the balsa fillers.
As always, thanks for looking in and the likes!
Regards,
George
- GrandpaPhil, Canute, ccoyle and 2 others
-
5
-
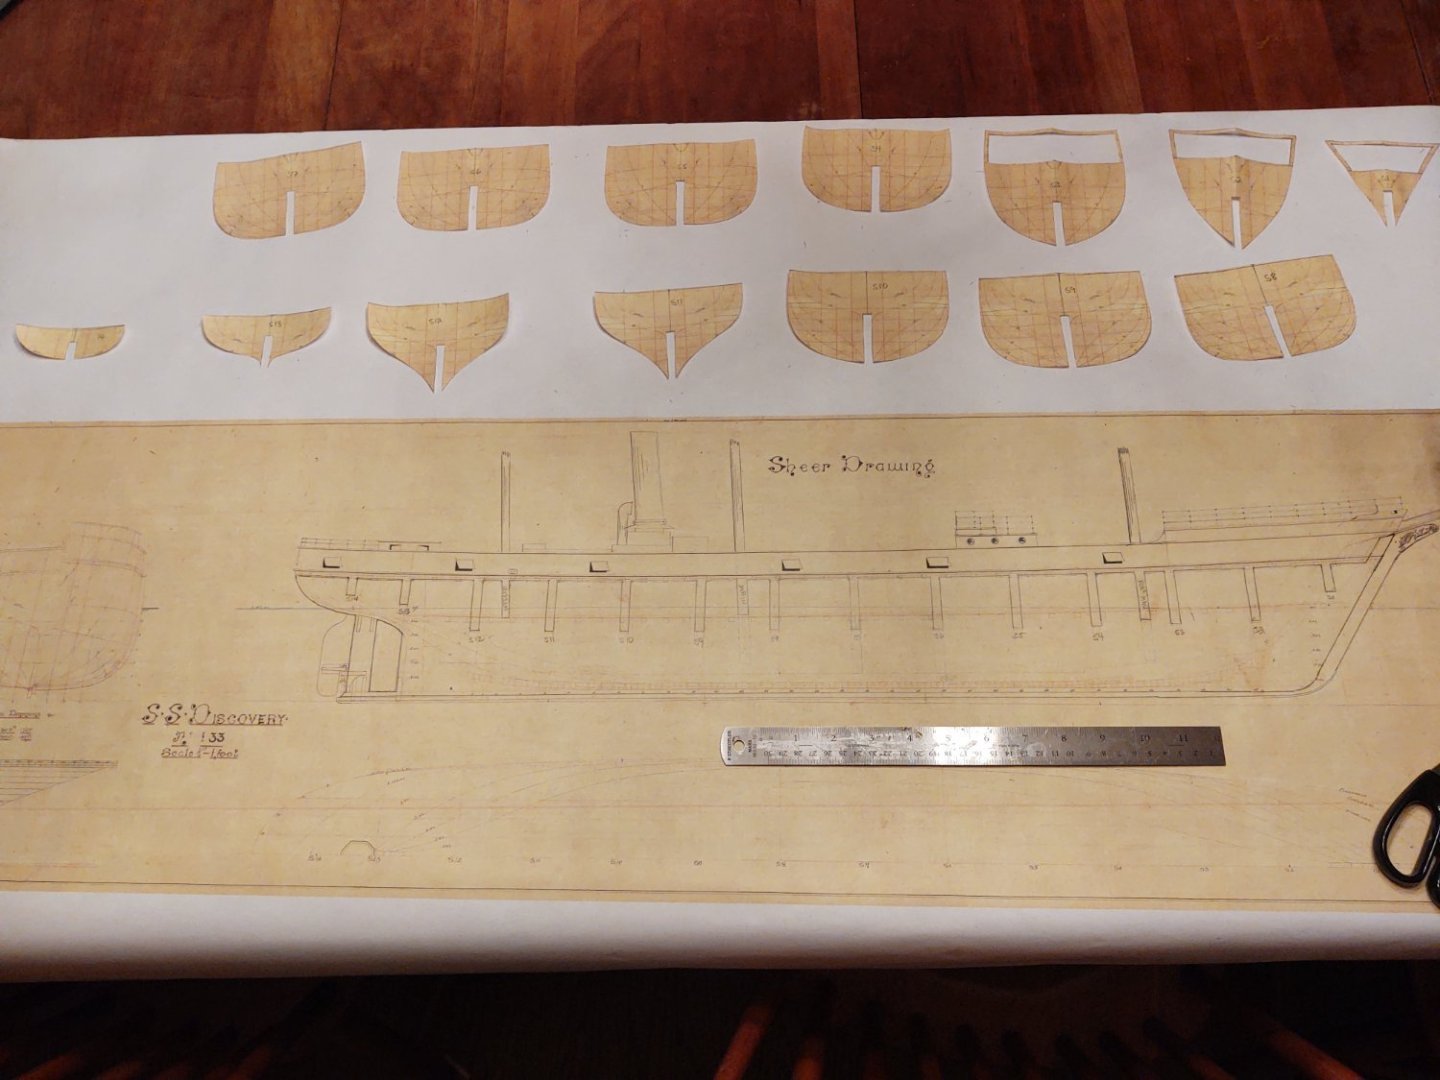
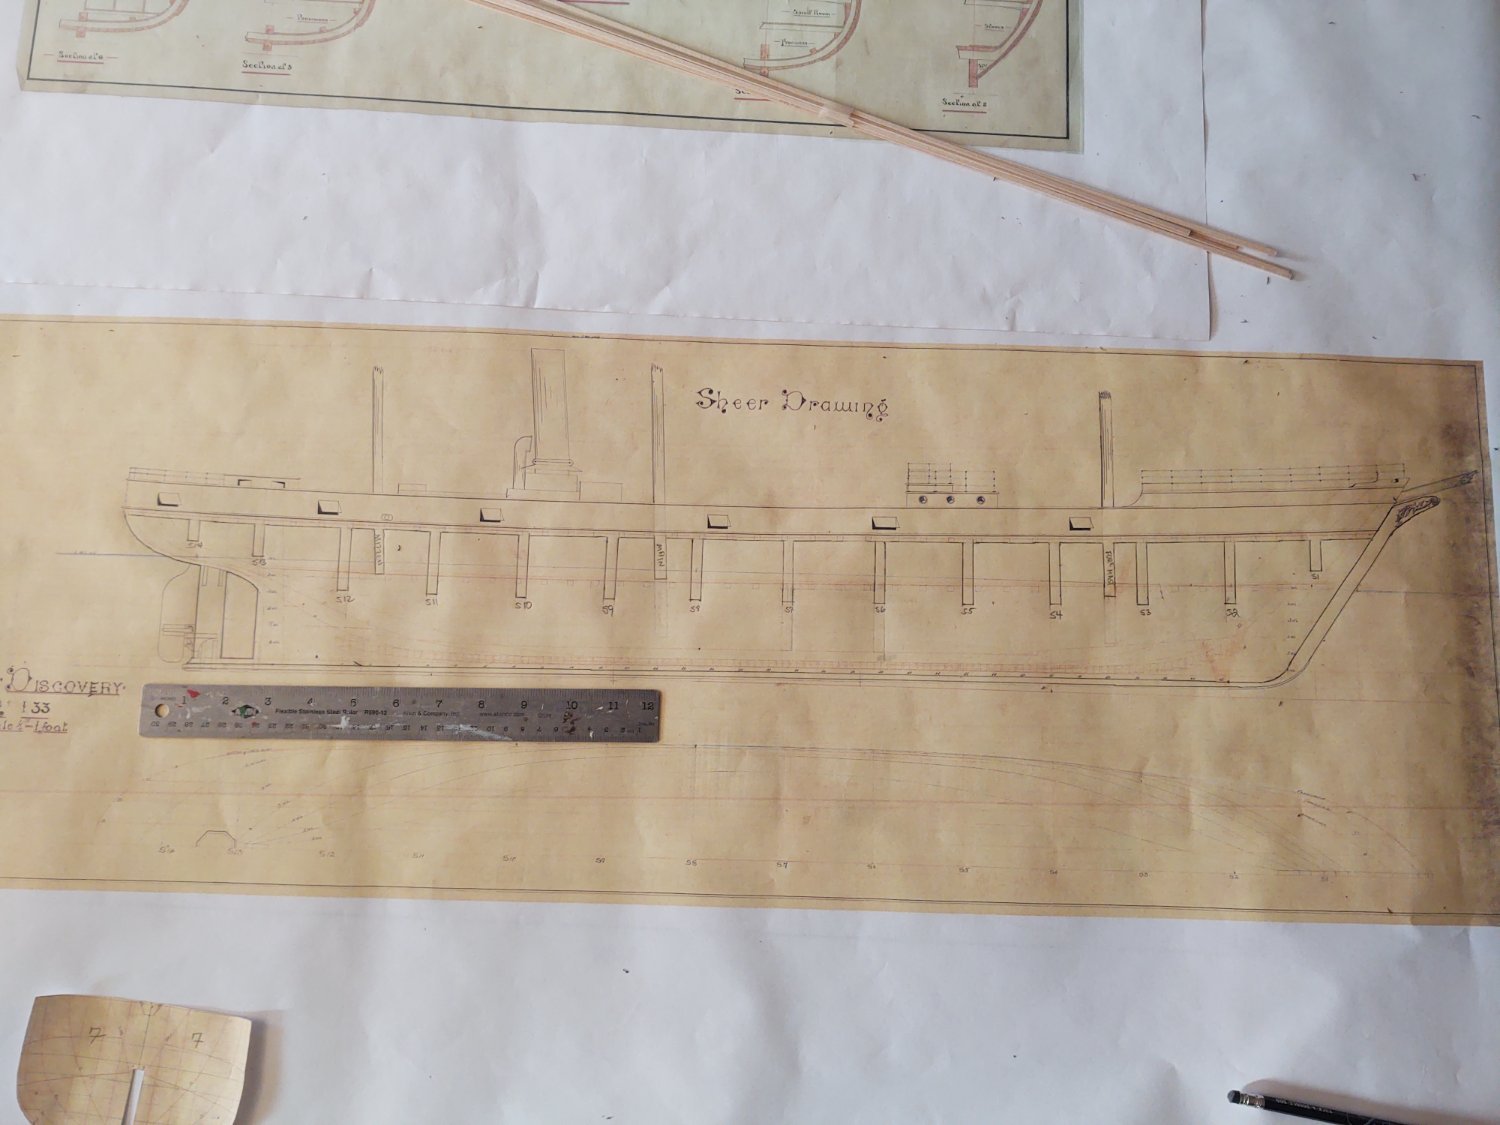
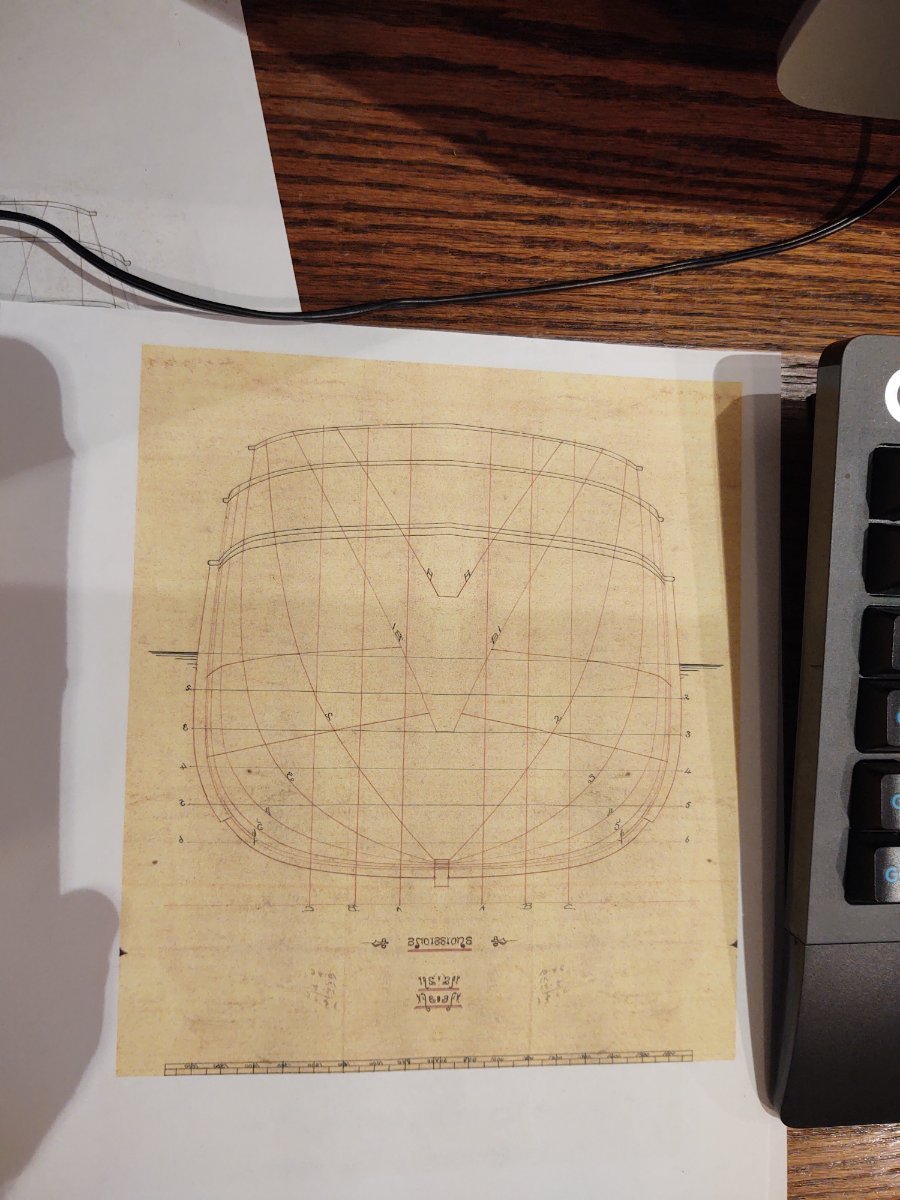
Bit of an update. I didn't have a ton of time to work on any of this during the holidays for a variety of reasons, the biggest being that my kids came to visit in sequence rather than parallel as it were. Great seeing them, although it would have been nice for both to be in town at the same time, but those are sometimes the breaks, since they both have jobs that still need doing even when the rest of us are on vacation (one is a reporter, the other works with inpatients with eating disorders). Anyway, where we stand. I got the big plans back from Staples, and it was nice to see the whole thing printed out, even at the reduced 1:72 scale (part of the sections drawings at the same scale above).
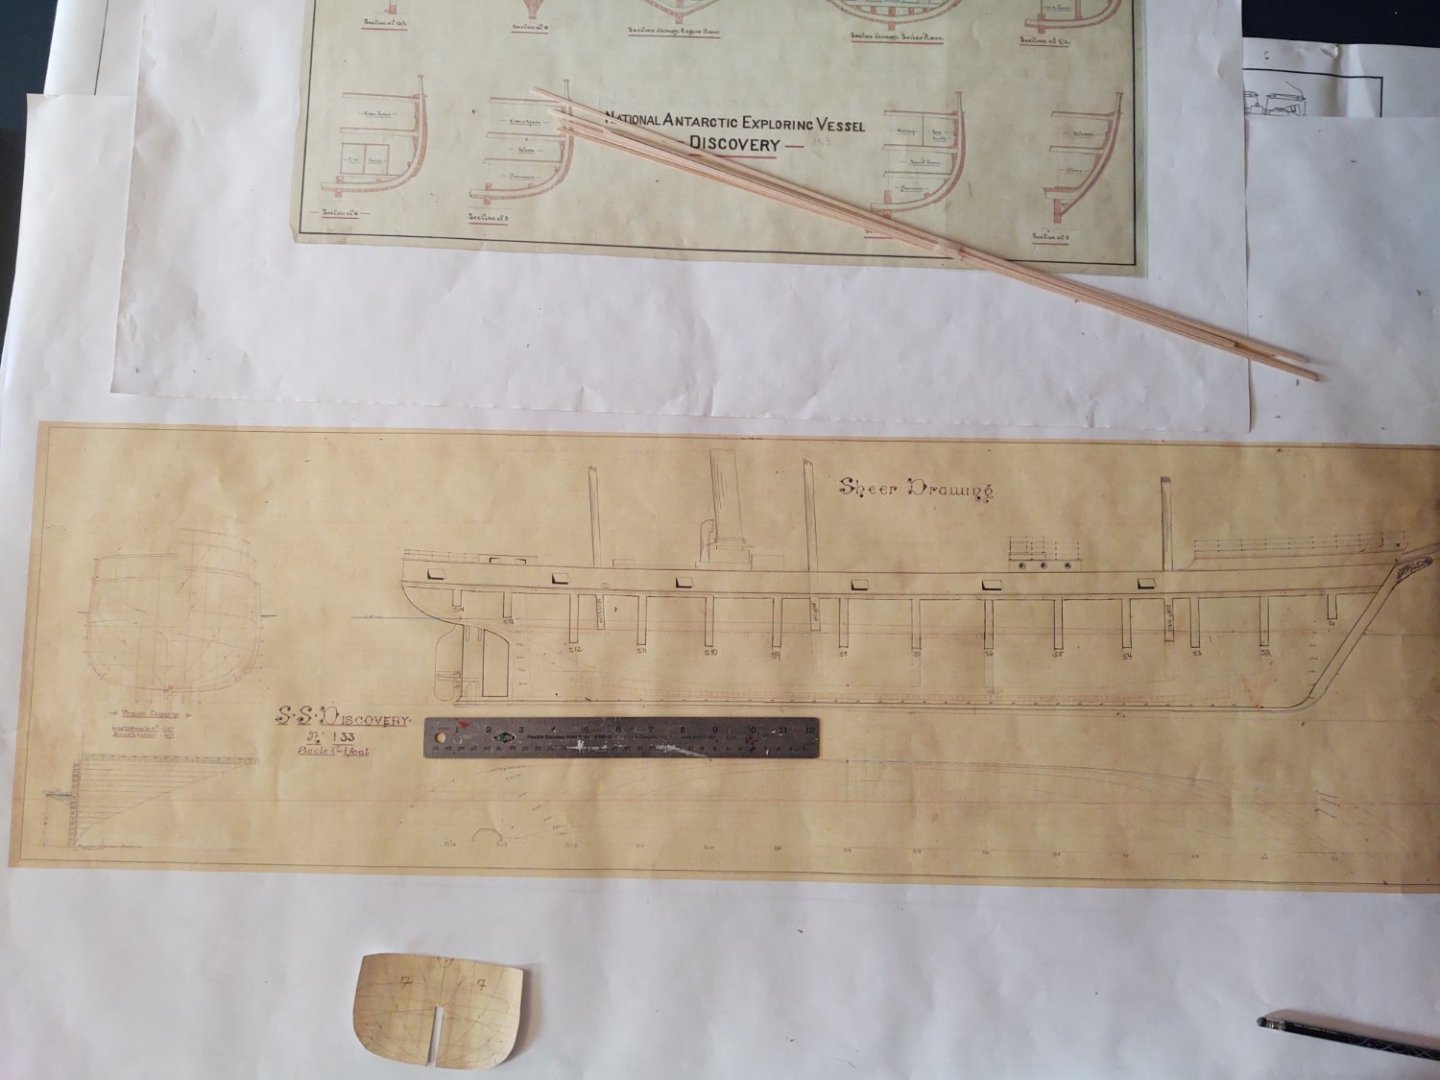
Here is a close up of the sheer drawing. As you can see, I've superimposed the center and false keel over the sheer diagram. Everything I've outlined here is going to be made from a sheet of 1/4 inch birch ply a bought last week, so the slots are 1/4 inch. They are centered on the station only for station 7, the remainder are centered with the stern facing portion of the slot aligned to the station (1-6), or the forward facing section aligned to the station (8-14). The logic being that they will be faired forward for the 1-6 and aft for 8-14. FWIW, I've decided to include the sternpost. I'll remove the section where the prop sits but keep the core in one large piece.
And finally you can see the first of the bulkheads cut out of paper and ready to be applied for cutting.

Progress, even if I have 13 more bulkheads to cut before we see sawdust.
Regards,
George

-
Looking great. Let the rigging begin!
-
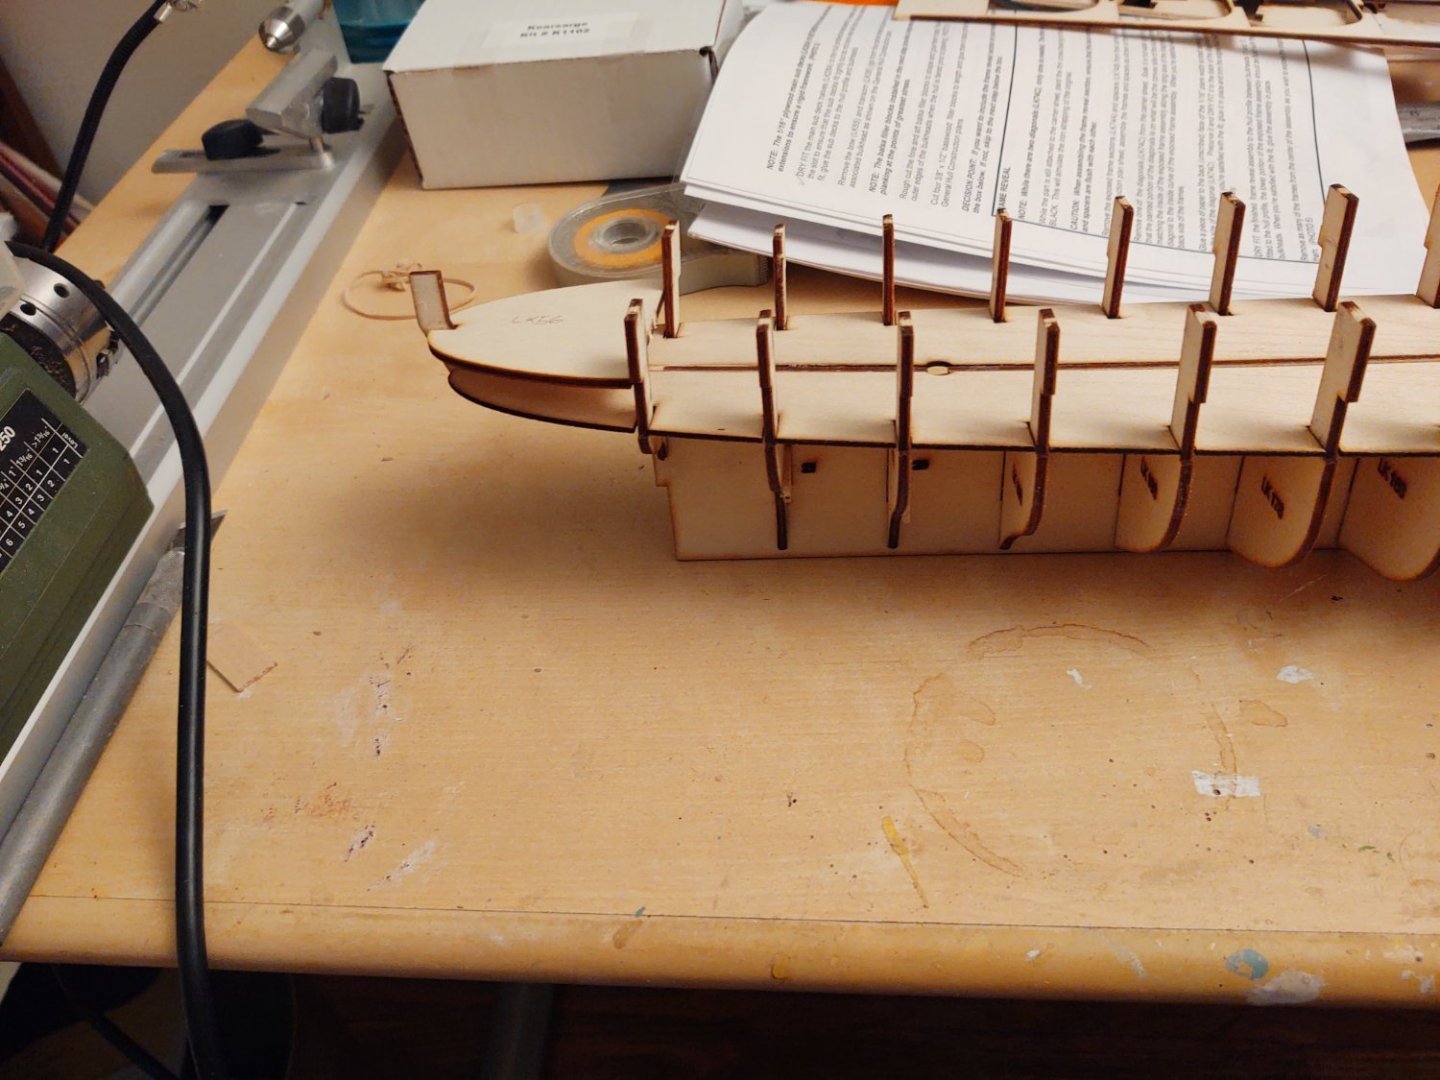
Well, progress being made. Here she is with the false keel and the port side bulkheads in place. Bulkhead 12 not installed for the reveal.
And here with all of the bulkheads and the sub-deck dry fitted.
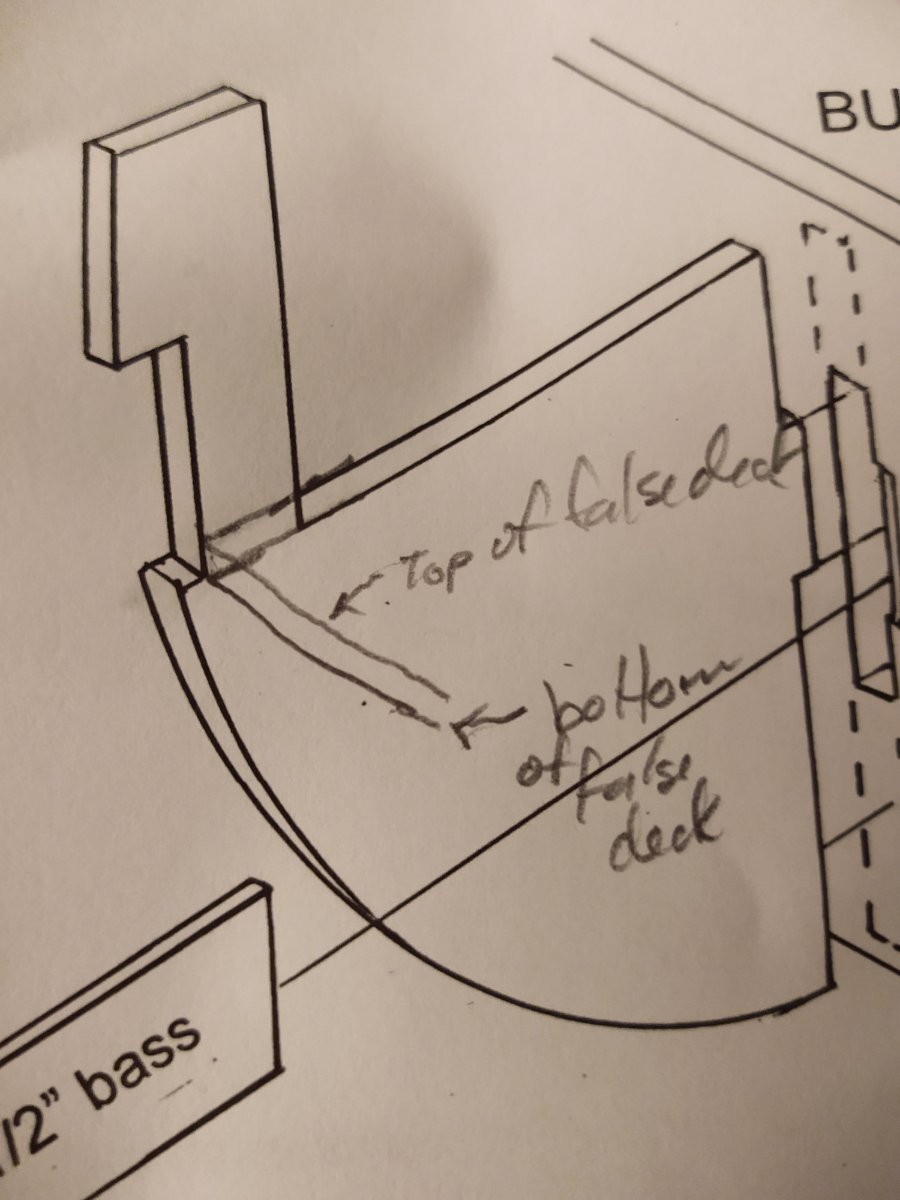
I have one question regarding the installation of the sub-deck. I understand that it fits between the false keel and the bulkhead extensions, and that eventually I'm going to break the bulkhead extensions off. The question is how far out the sub deck is supposed to extend. Does it extend to edge of the slot in the bulkhead extension or out to the bulkhead? I.e. does it look like this:
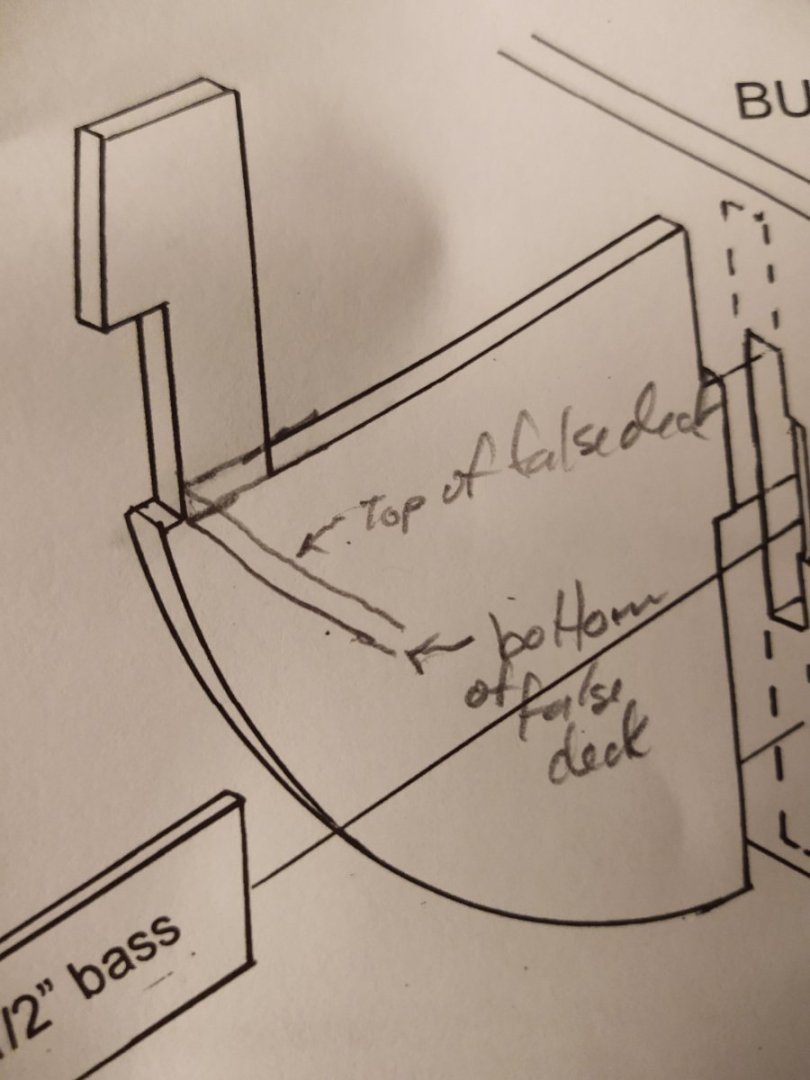
or extend the remaining 1/16 of an inch?
If I understand the next steps (well not immediate next steps, but near term), the top of the sheer strake gets aligned with the bottom of the slot (since this is planked upside down it will actually be reversed, but relative to this diagram the description is accurate). Eventually the inner bulwark pieces attach to the top of the bulkheads, a tiny fraction of the extensions that are below the break score, and the edge of the sub deck. Is that right? Any assistance from someone that has built the ship or similar designs would be appreciated.
Thanks for looking in!
Regards,
George

-
Well, I'm still waiting on the full sized plans from Staples. Hopefully they will be finished soon and we can continue.
In the meantime, I've put together the following, which are going to be the start of the patterns of the bulkheads.

.thumb.jpg.8a251eff1e025fe820d3cc1d12be136d.jpg)
The big plans have the profile I need for the false keel and the sections so that I know where to cut off the top of the bulkhead so that the waterways will fit properly.
Regards,
George
- mtaylor, Keith Black, Harvey Golden and 6 others
-
9
-
6 hours ago, Jaager said:
For the model in question, you should either stub the masts and repair the deck/hull yourself or give it a Viking funeral.
I don't think a repair is likely to resolve anything. It won't be yours, and it won't really resolve any of the underlying injury if you know what I mean.
Stubbing out the masts seems like a good idea. It's still your work at that point, and that is a perfectly normal model category, suitable for display. And if you later want to repair it, well, you've cleared out the broken pieces and can begin anew.
Regards,
George
-
Looking spectacular Vlad! An amazing achievement!
Regards,
George
-
11 minutes ago, Roger Pellett said:
f your RRS Discovery only has to wait a month while you build this model I’d be surprised. Or maybe you work on the US Navy System: “ If you can’t get your work done in the 24 hr day, work nights!”😆
To be sure 😀.
Right now all the work on Discovery involves turning drawings of one kind into drawings of another kind, and I like the idea of splitting my hobby time into tactile work (Kearsarge) and more intellectual work (Discovery - e.g. where should I put the top of the bulkhead given the need to put in a waterway, have the planksheer come to the right place, etc., etc.). I've often found that I would be in a place during a build where something would need time to dry or set, and that is a great time to do other things. No doubt it will slow both ships, and it may not work at all, but that's okay - I'll adapt as needed.
There is another factor here, which is that I need a scroll saw to cut out the pieces for Discovery in an efficient way (My coping saw isn't going to cut it - well it could, but it would take forever). The Admiral and my (adult) children have made it clear that such a purchase prior to Christmas and my birthday, which is shortly after, would yield, ah, extremely negative results in the home department, so even in the best circumstances sawdust on Discovery was going to be waiting until 1Q24.
Regards,
George
- Roger Pellett, Canute, Ryland Craze and 1 other
-
4


.jpg.5b3016775dd6c30354471e769df481f2.jpg)
Suggestions for new BlueJacket Shipcrafters kits, please.
in Traders, Dealers, Buying or Selling anything? - Discuss New Products and Ship Model Goodies here as well!!
Posted
Any of the Brunel designed ships. Great Eastern, Great Western, or Great Britain would be cool.
And a plea for that humble Cold War workhorse, the Spruance class. I'm partial to Peterson (969), but any member would be fine. It would joun your other USN DDs and you could make 2 variants, pre VLS and post VLS mods. And heck, build a Ticonderoga from the same hull, and several of the later (VLS variant) Ticos were built in Bath.
George