CDW
-
Posts
7,755 -
Joined
-
Last visited
Content Type
Profiles
Forums
Gallery
Events
Everything posted by CDW
-

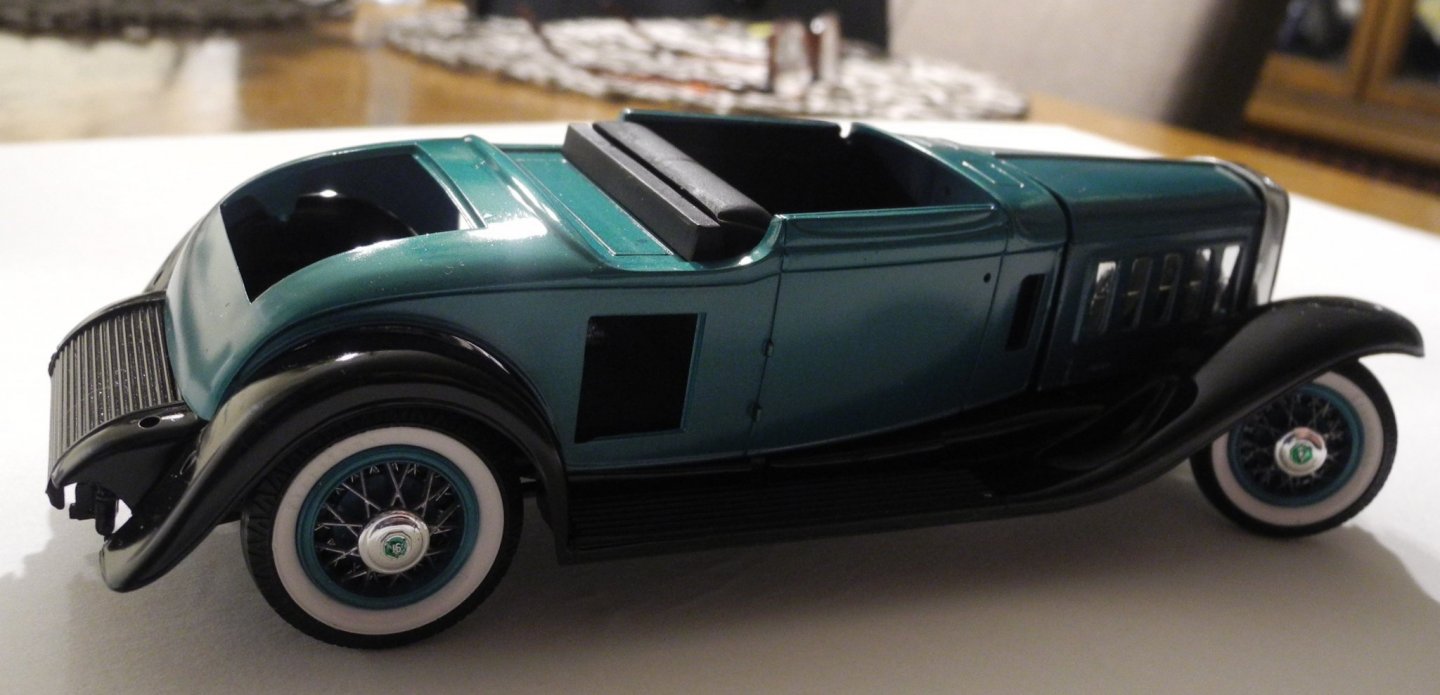
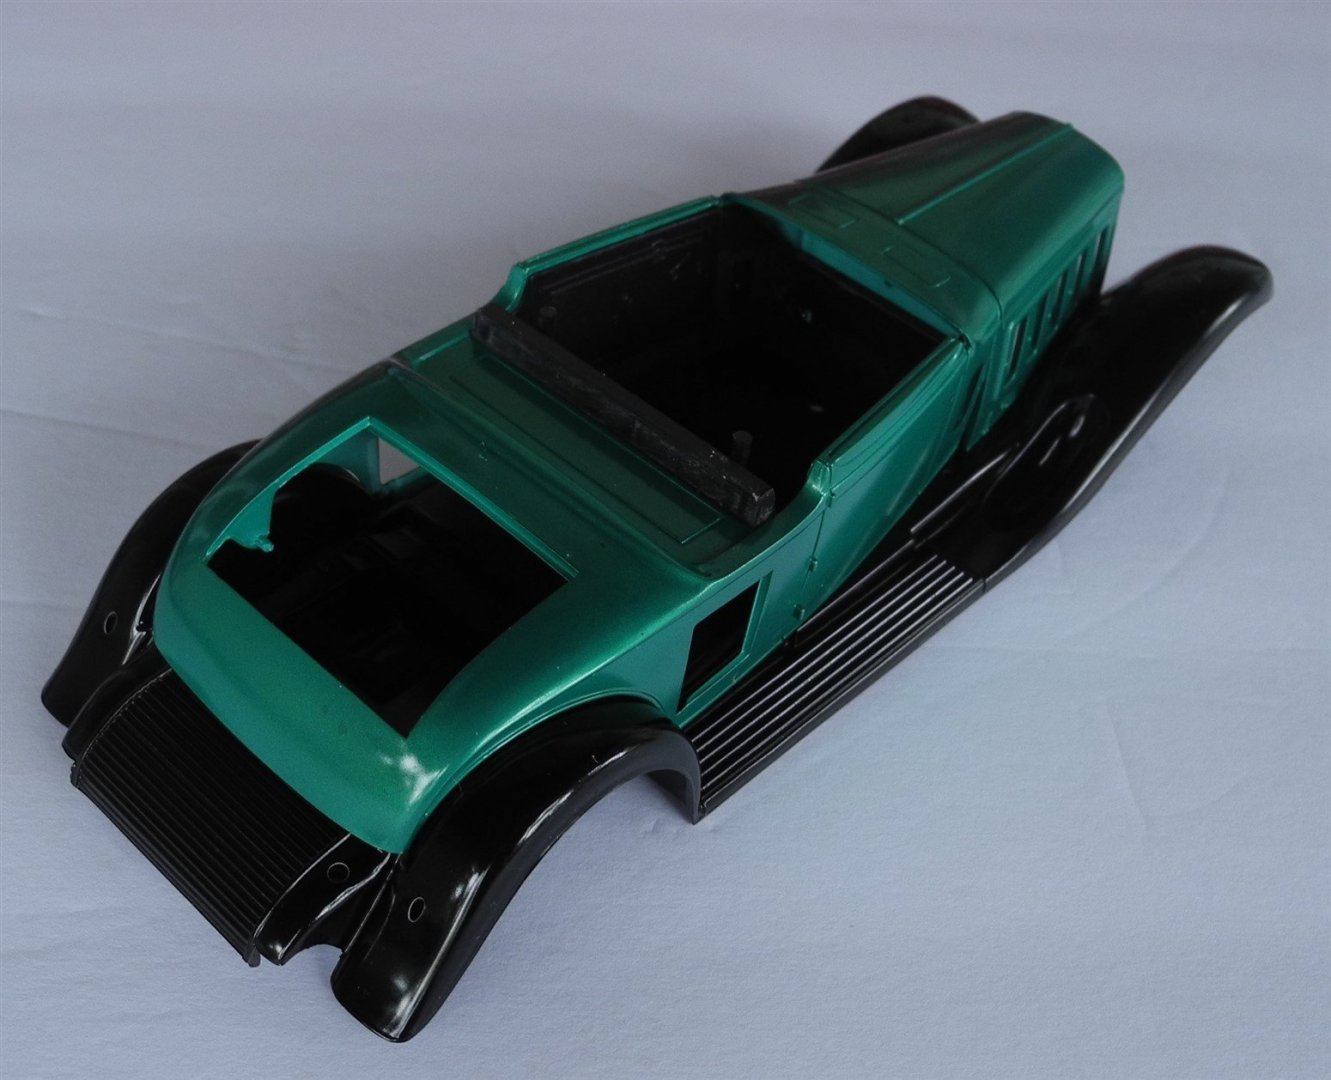
1931 Cadillac by CDW - FINISHED - JoHan - 1:25 Scale - PLASTIC
CDW replied to CDW's topic in Non-ship/categorised builds
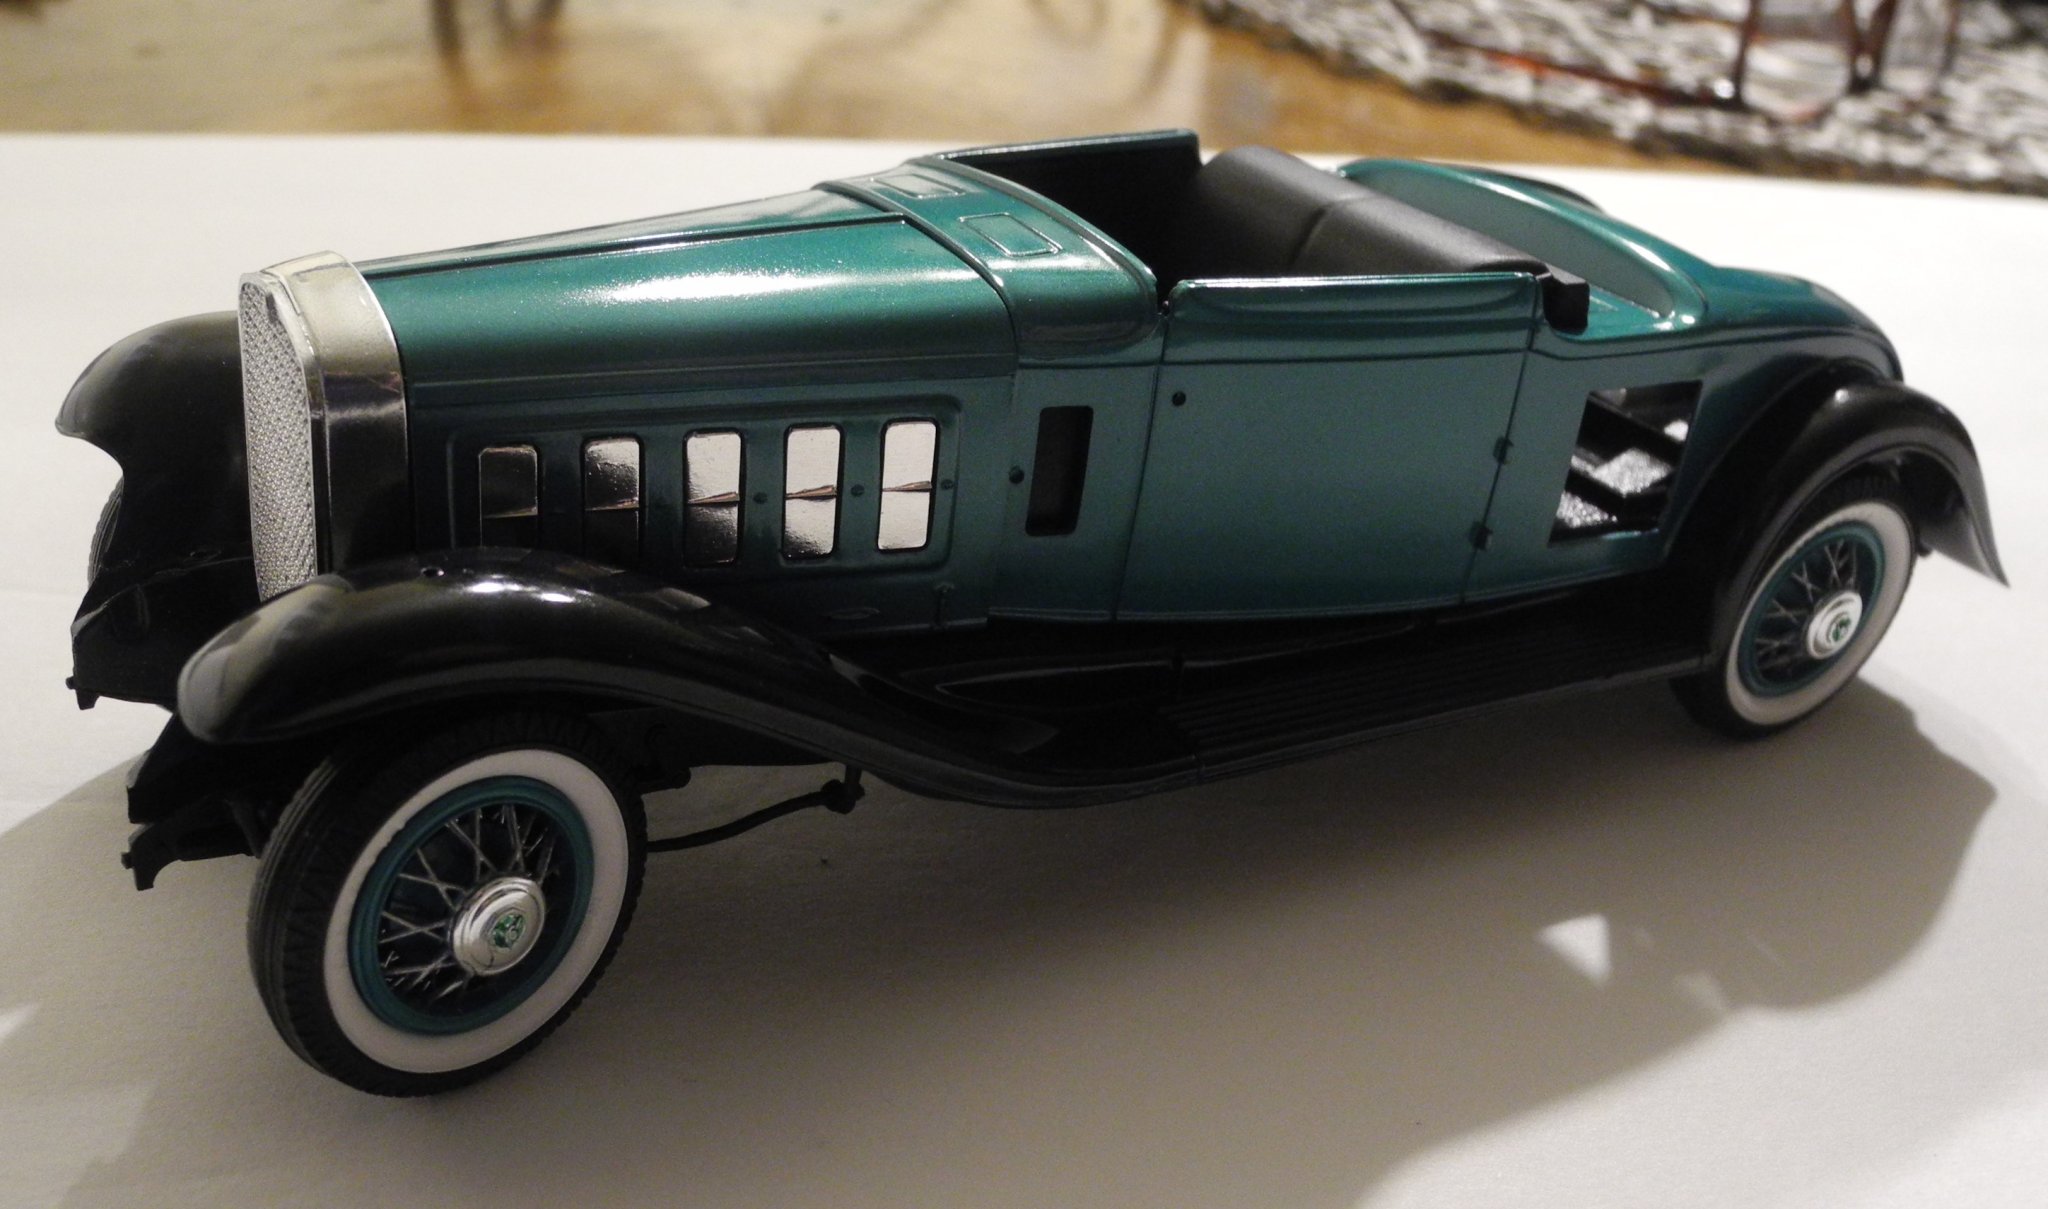
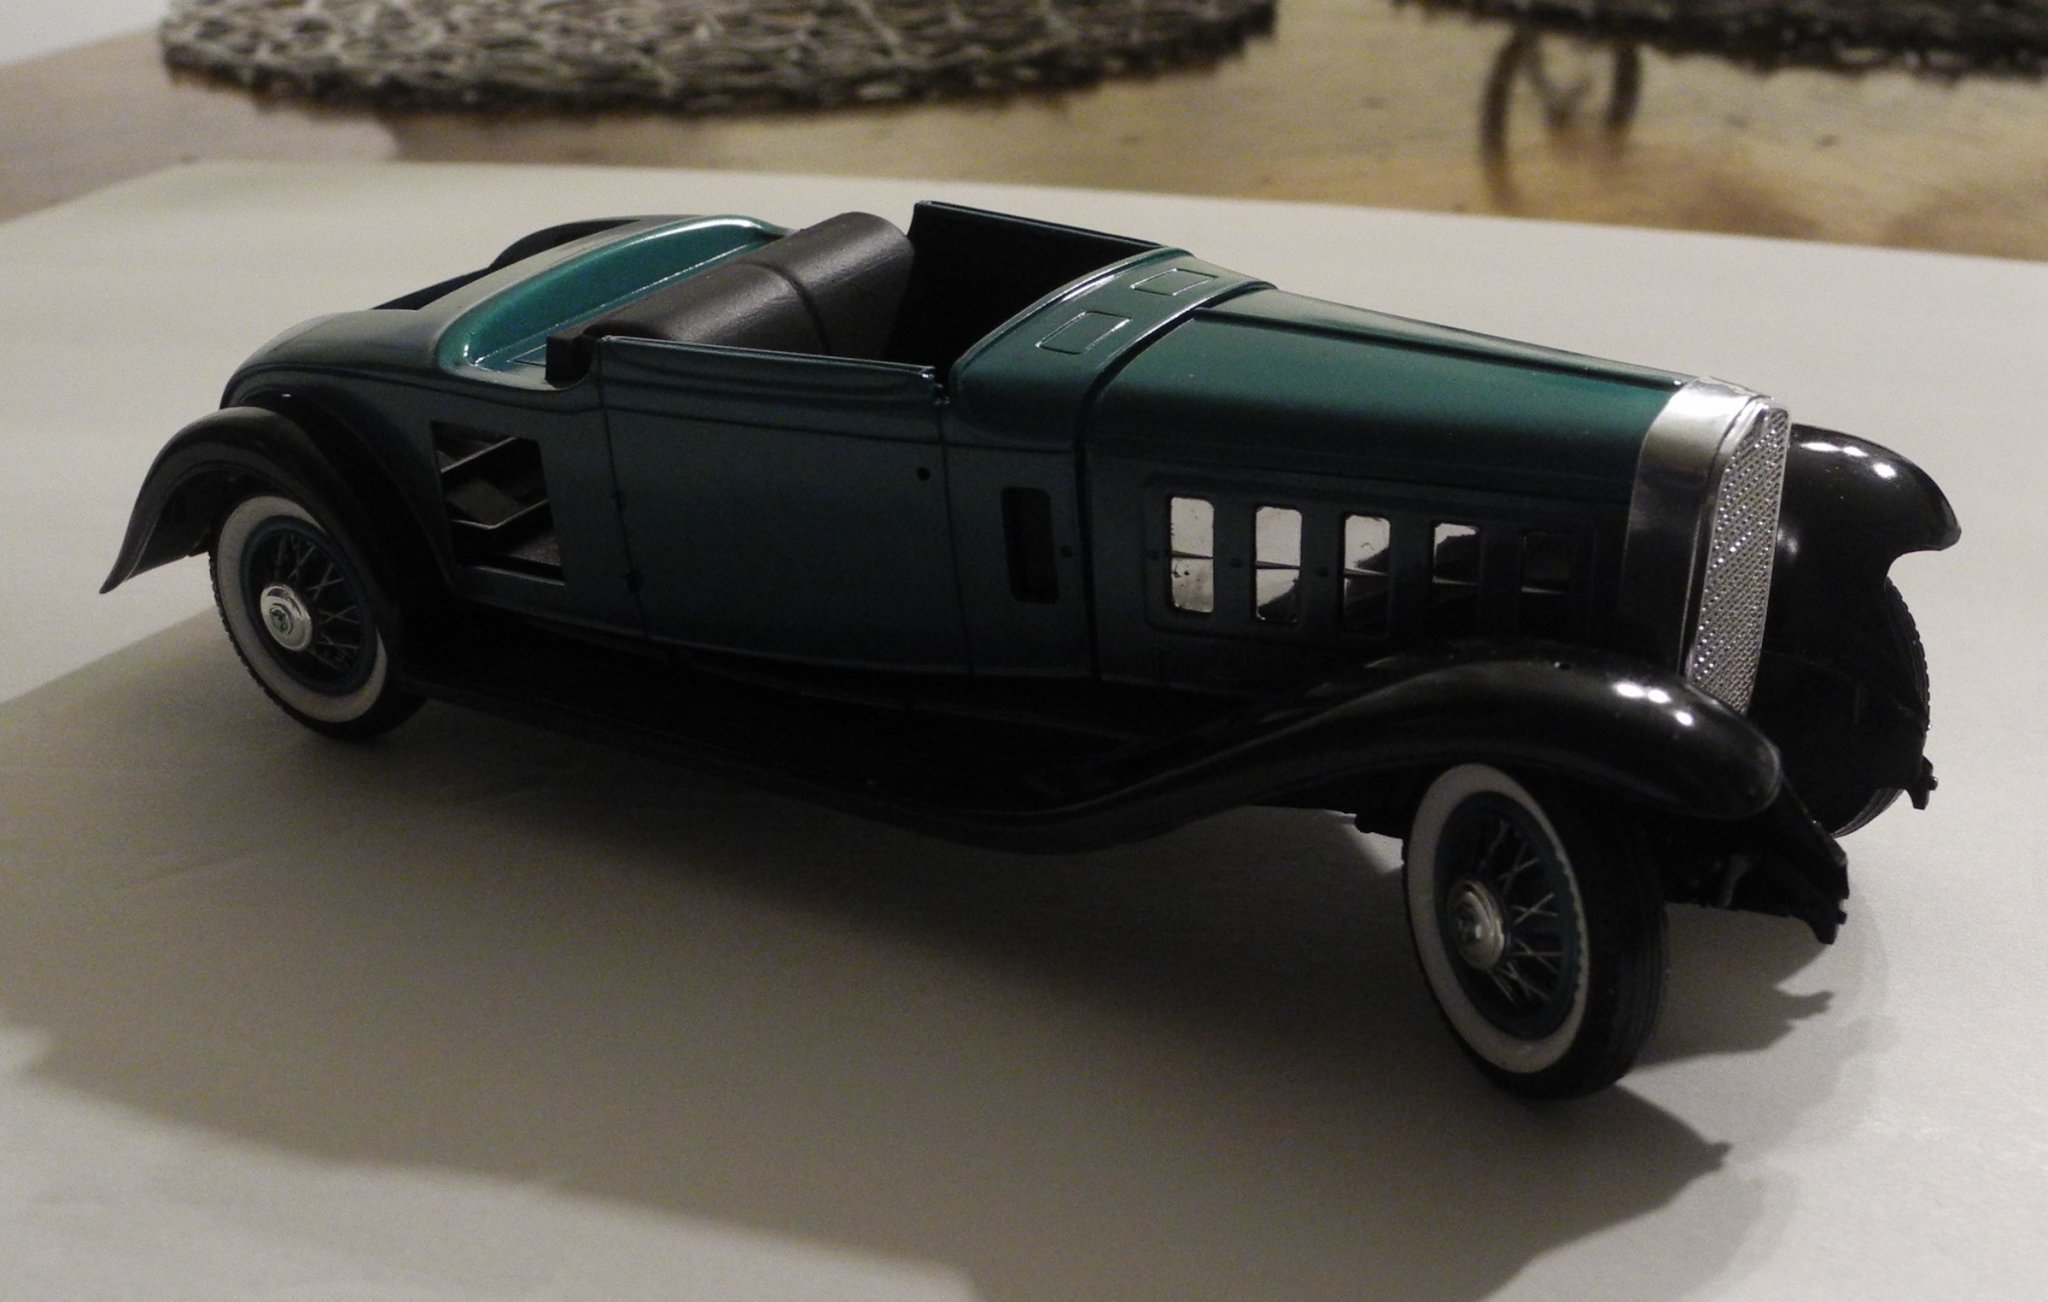
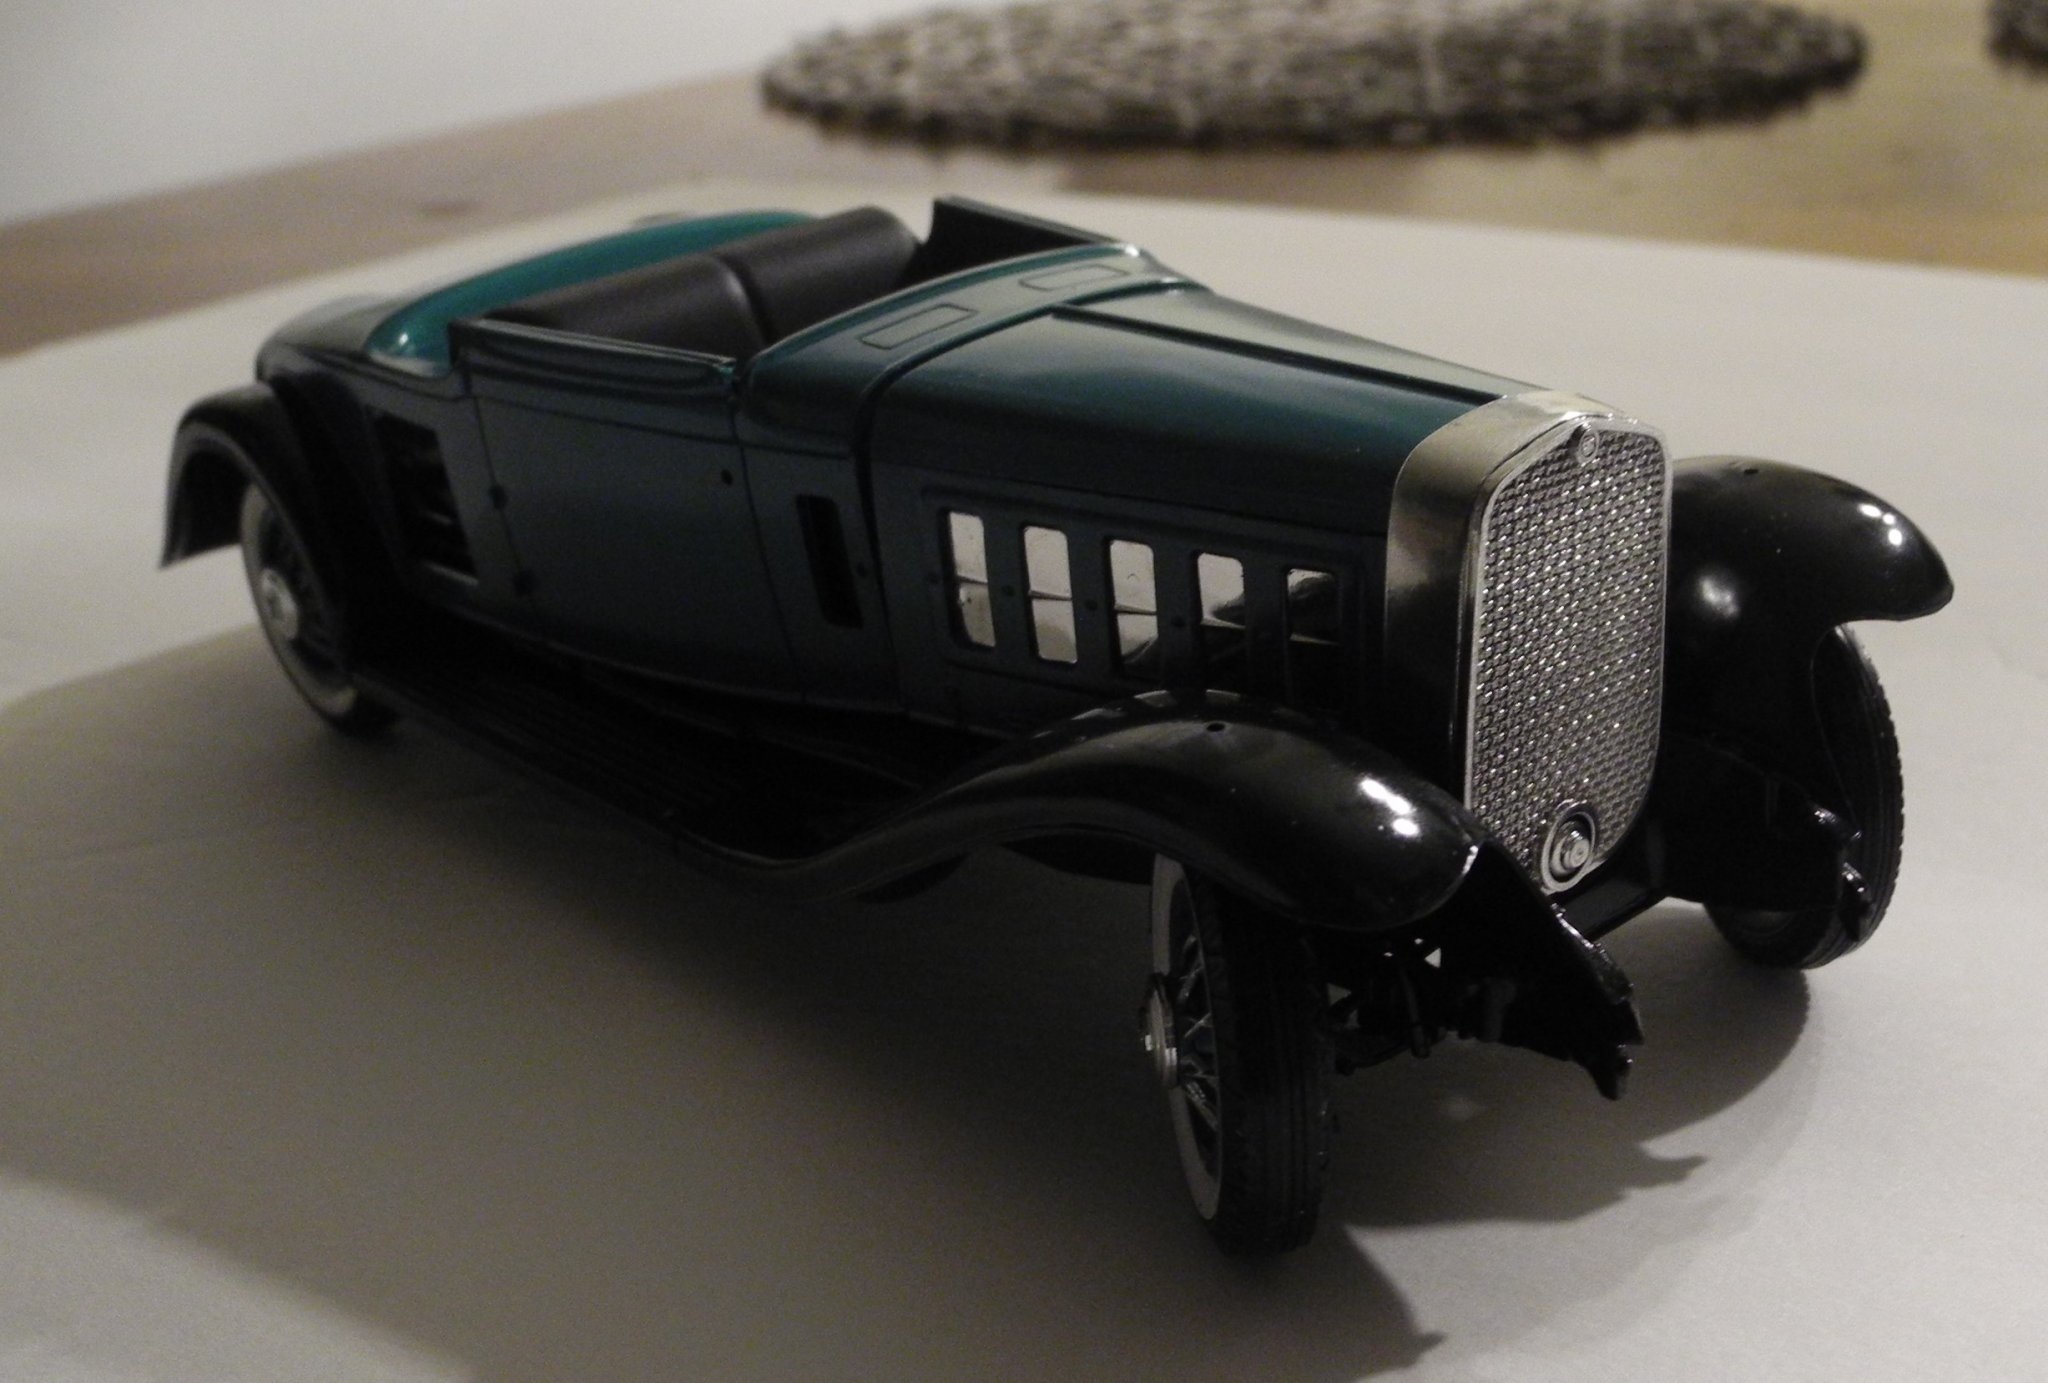
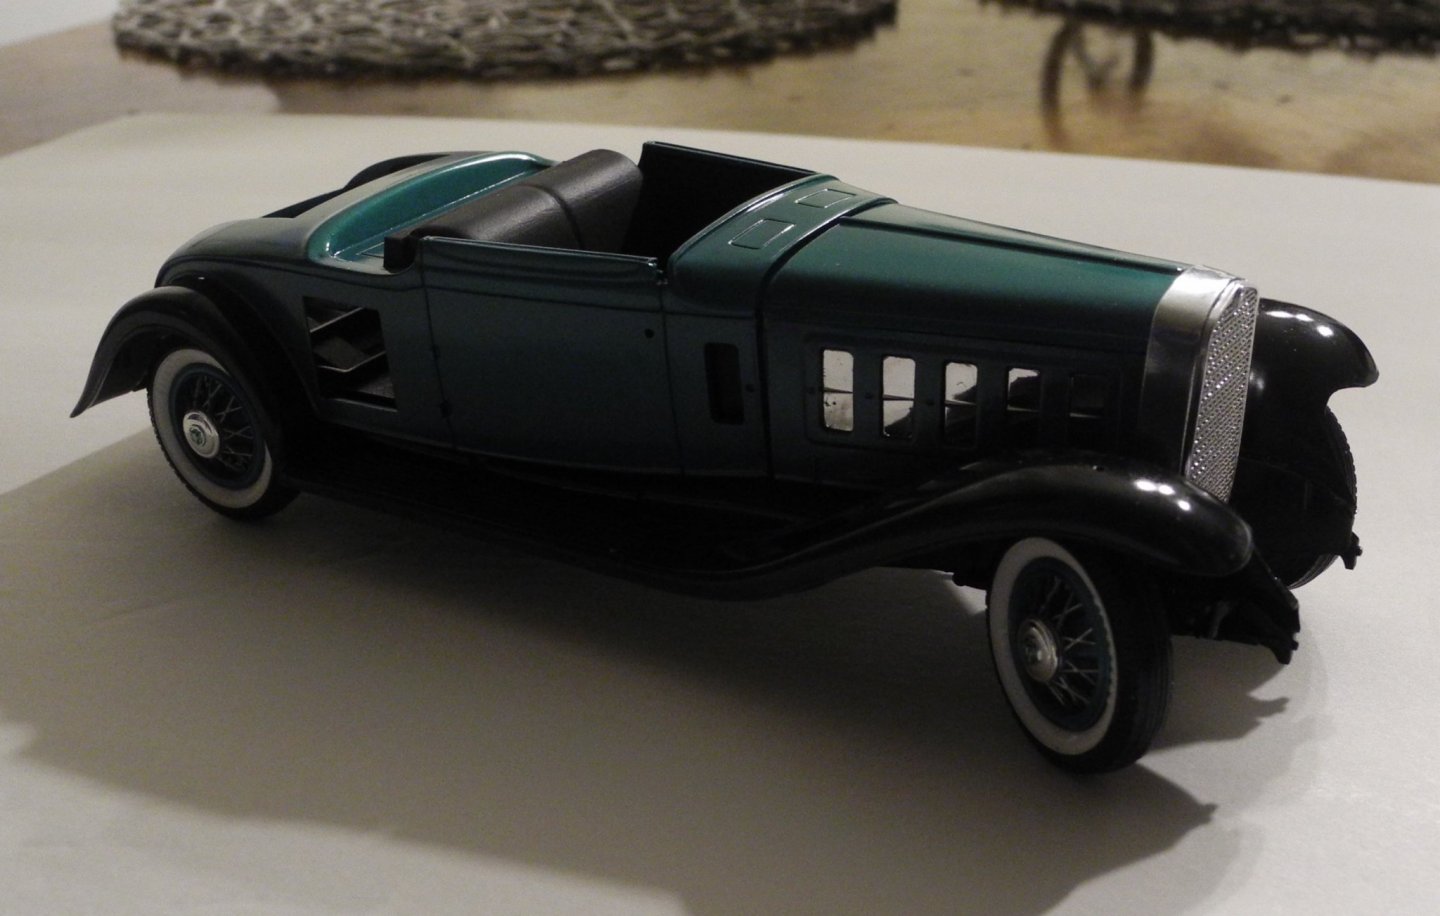
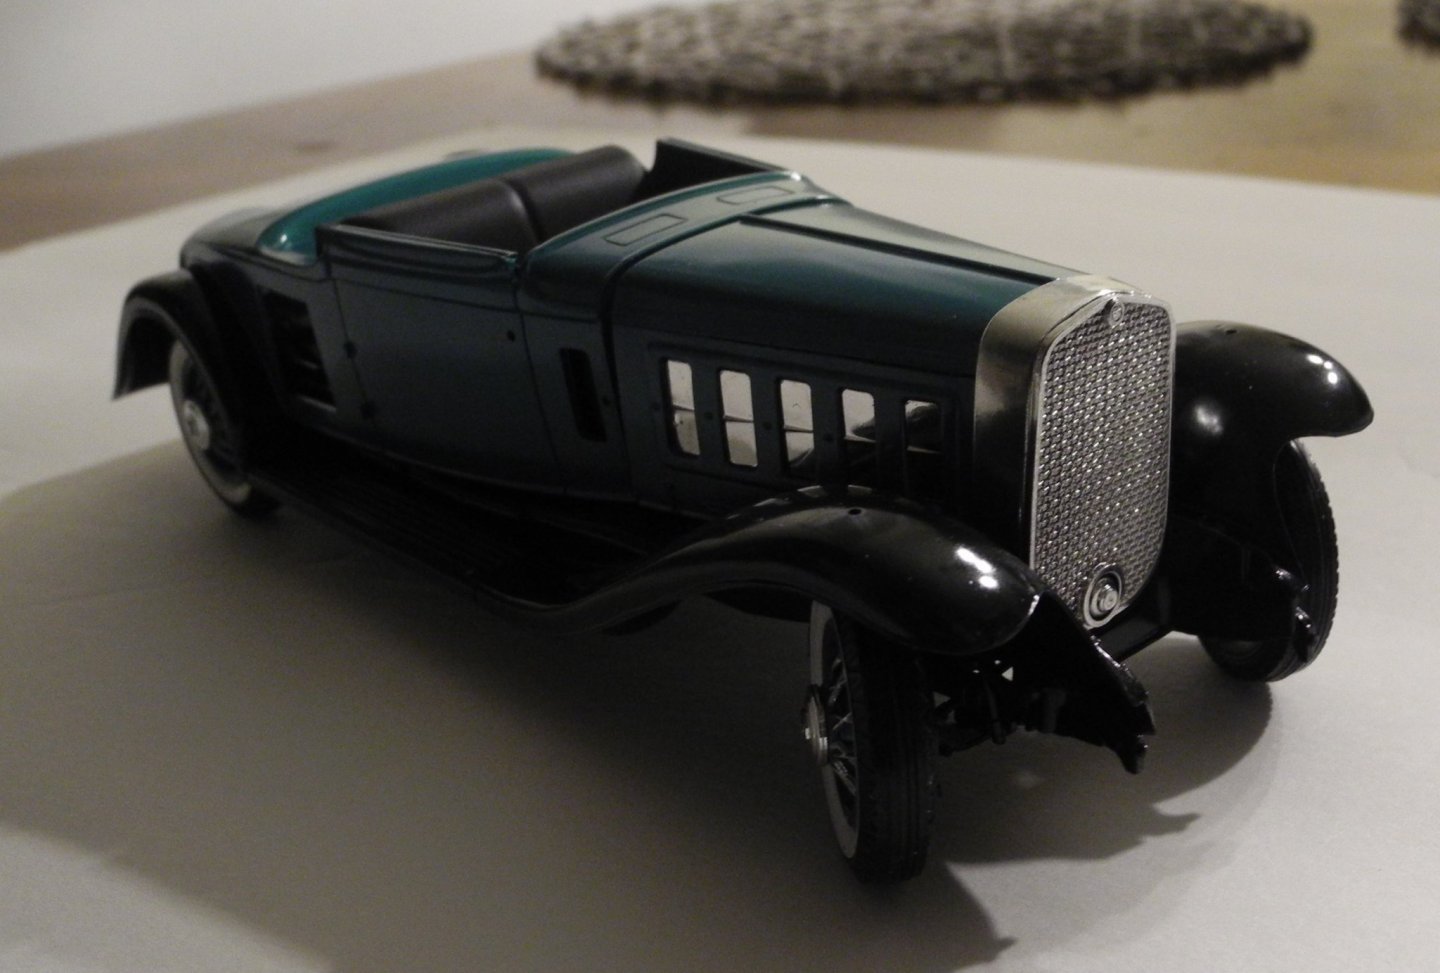
Thanks OC. Appreciate the encouragement. I should have noted, the radiator grill was stripped of the chrome plating because it had unsightly blemishes. It was then primed with Mr. Color gloss black before shooting it with AK Xtreme Metal chrome silver paint. It turned out fairly convincing for a chrome plating substitute. -
1931 Cadillac by CDW - FINISHED - JoHan - 1:25 Scale - PLASTIC
CDW replied to CDW's topic in Non-ship/categorised builds
Slowly but surely. Still lots to do.
- 175 replies
-
- 13
-

-
1931 Cadillac by CDW - FINISHED - JoHan - 1:25 Scale - PLASTIC
CDW replied to CDW's topic in Non-ship/categorised builds
Thanks OC. I have several irons in the fire right now. Not as much time for modeling at the moment. -
1931 Cadillac by CDW - FINISHED - JoHan - 1:25 Scale - PLASTIC
CDW replied to CDW's topic in Non-ship/categorised builds
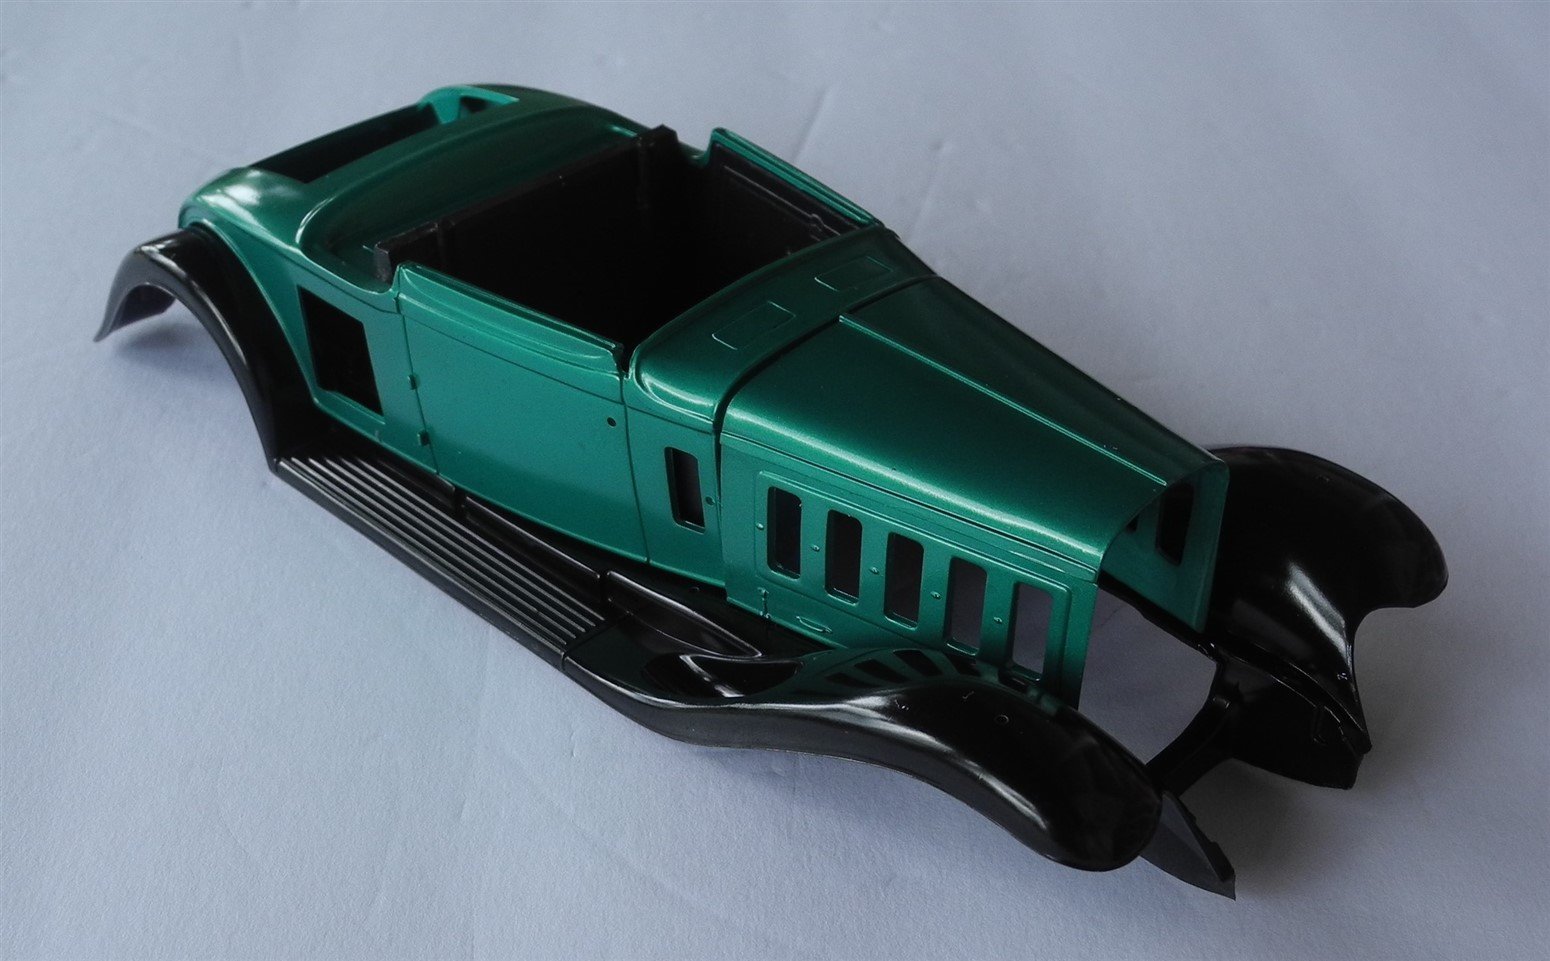
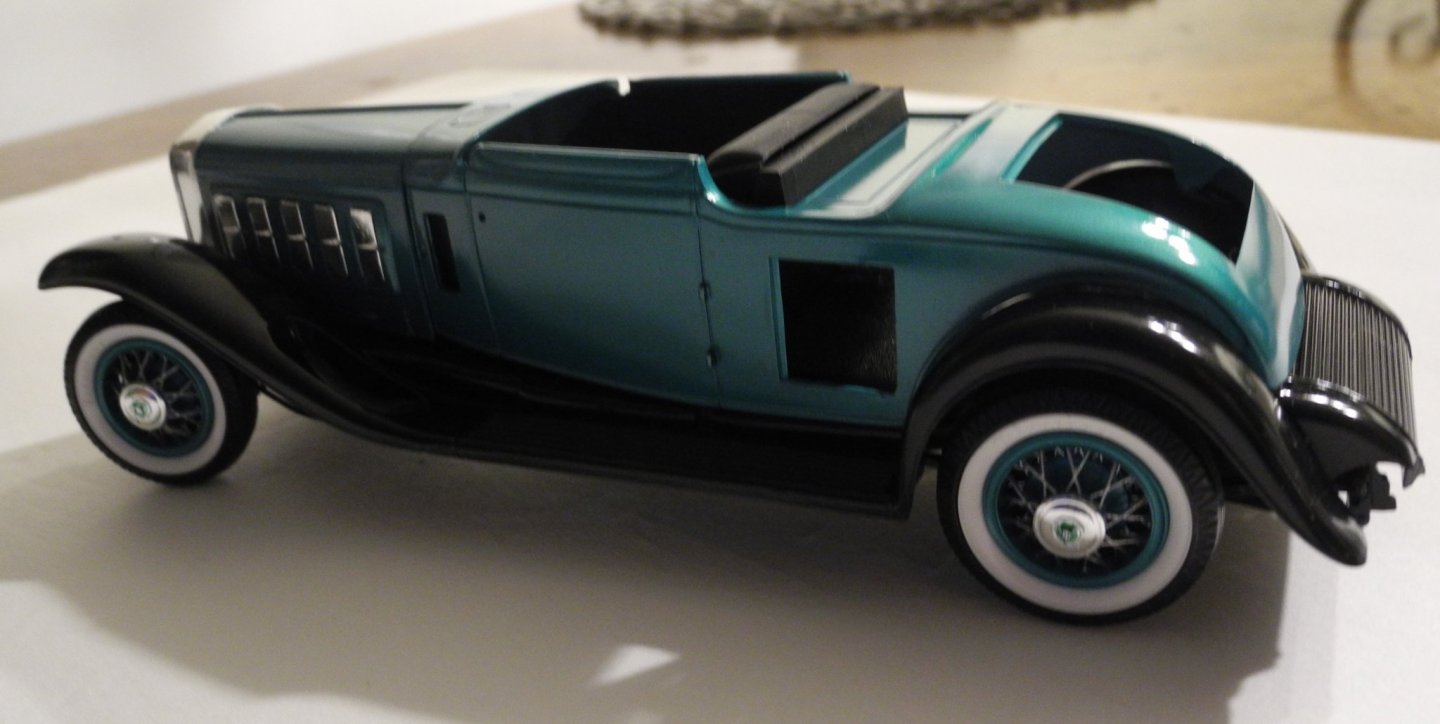
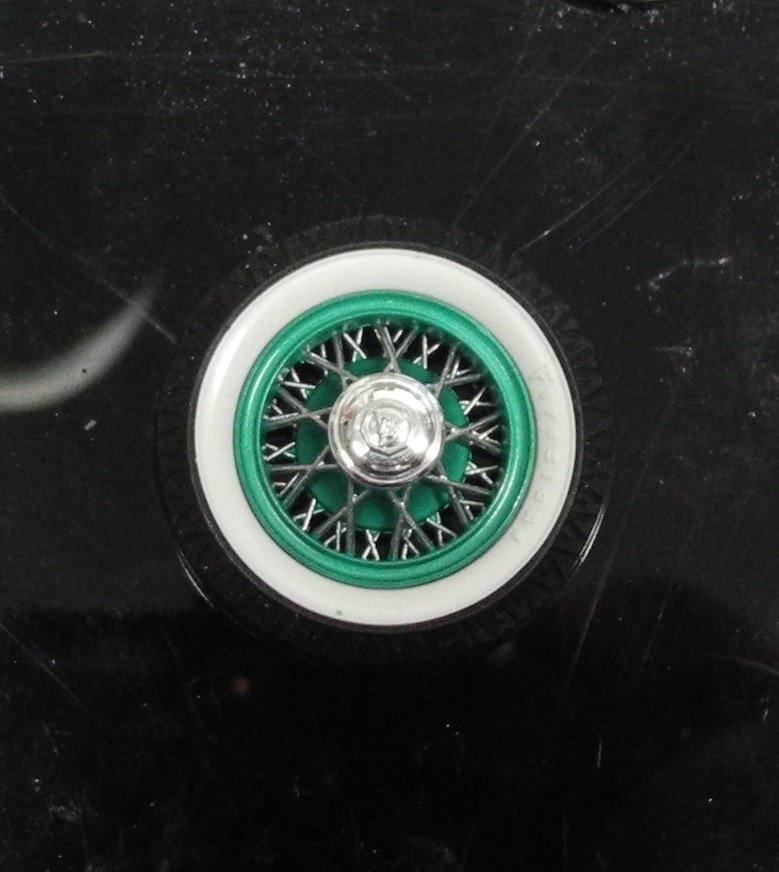
To solve my missing whitewall problem, I bought a salvaged Cadillac kit on Ebay. It turned out the salvaged kit I received was an earlier release than mine and as a consequence, the molded parts were much better than those found in my kit. Because the wheels were so much better, I decided to paint them in a factory color scheme and forego lacing my own wire wheels.
- 175 replies
-
- 16
-
-
Looks to me like all the parts bags are still sealed.
-
Just ask the seller for some photos of the contents. If you're not sure if it's complete, just ask some of us on the forum. I guarantee that someone here can tell you from the photos whether it's complete or not, provided the photos are clear.
-
Very well done. Love the subject material and the scratch building/details.
-
Great looking tractor. Molds look fantastic.
-
1931 Cadillac by CDW - FINISHED - JoHan - 1:25 Scale - PLASTIC
CDW replied to CDW's topic in Non-ship/categorised builds
And a lot depends on how well cured the paint. Well cured paint is much more resistant to removal vs: freshly painted plastic. If I screw up a paint job and strip it within a few days after laying down the paint, it comes off with relative ease. Old models that have been painted for years can take days (soaking) to strip the paint. As you mentioned alcohol will remove Tamiya paint for sure. -
Great kit, great photos. The Skysweeper brings back lots of good memories. Renwal kits were way ahead of their time in terms of detail, though they were complicated for younger modelers back then. Didn't Renwal also do a model of the M-8 sold separately? Some did, because I remember building it.
-
1931 Cadillac by CDW - FINISHED - JoHan - 1:25 Scale - PLASTIC
CDW replied to CDW's topic in Non-ship/categorised builds
Thanks Kevin. I first used several coats of Tamiya white primer thinned with Mr. Color leveling thinner at a ratio of 1 part primer to 3 parts thinner, wet sanding between coats. Then the color, then the clear coat. Clear coat gets mixed in a ratio similar to the primer, 1 part paint to 3 parts thinner. -
1931 Cadillac by CDW - FINISHED - JoHan - 1:25 Scale - PLASTIC
CDW replied to CDW's topic in Non-ship/categorised builds
Maybe one of us should test whether liquid chlorine might work safely on chromed plastic. I always have liquid chlorine on hand for our swimming pool. Over the next few days, will make it a point to try that on some scrap chrome pieces to test it out. Liquid chlorine is an undiluted version of bleach but one has to be extra careful with it as it can create quite strong fumes. -
1931 Cadillac by CDW - FINISHED - JoHan - 1:25 Scale - PLASTIC
CDW replied to CDW's topic in Non-ship/categorised builds
Nick I use a product called "Super Clean" to strip chrome parts. In the USA, it can be found in the automotive section of WalMart stores, sold in one gallon containers. Super Clean is a cleaner/degreaser and I believe it is citrus based. I don't know whether this product or an equivalent is available in Europe. When I am doing small chrome parts and not using an airbrush, I use a Molotow chrome marking pen. They come in 1mm, 2mm, and 4mm tip sizes. Makes a very nice chrome finish and the pen makes it very convenient. For larger parts, there are various spray cans of chrome paint that do a decent finish. https://www.amazon.com/Molotow-Liquid-Chrome-Marker-Set/dp/B074JJ1YMY -
1931 Cadillac by CDW - FINISHED - JoHan - 1:25 Scale - PLASTIC
CDW replied to CDW's topic in Non-ship/categorised builds
Next will begin working on the interior. I have some photo etch door handles and window cranks, as well as photo etch and printed instruments/instrument cluster panels. These should be far better than the molded on details which are rather soft on detail. To show it all off, will probably use the top down feature rather than top up. In the meantime, will begin stripping all the chrome from all the detail parts and begin the task of painting them. -
1931 Cadillac by CDW - FINISHED - JoHan - 1:25 Scale - PLASTIC
CDW replied to CDW's topic in Non-ship/categorised builds
Thanks Edward. Outdoor lighting gives a much better rendition of the actual color of the model. When I went to mix my clear coat system, I found out my bottle of hardener had actually solidified completely, making it unusable. Now I know this stuff has a shelf life. I had used the 2K clear coat system on a few different models over the course of the past year, but by now, it had perished. In lieu of the 2K clear coat system, I used Mr Color gloss clear for the clear coat finish observed on the model as it stands now.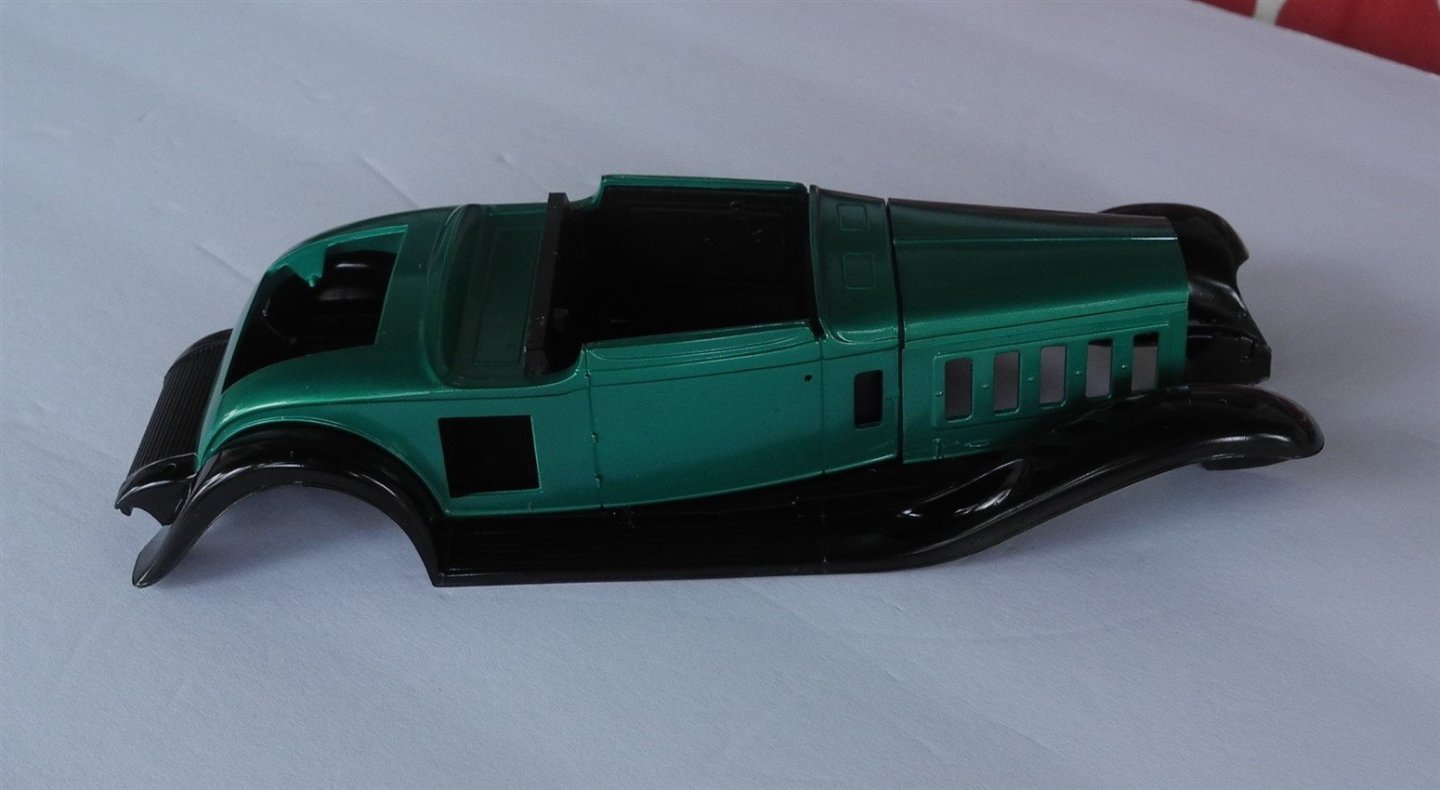

- 175 replies
-
- 19
-
-
1931 Cadillac by CDW - FINISHED - JoHan - 1:25 Scale - PLASTIC
CDW replied to CDW's topic in Non-ship/categorised builds
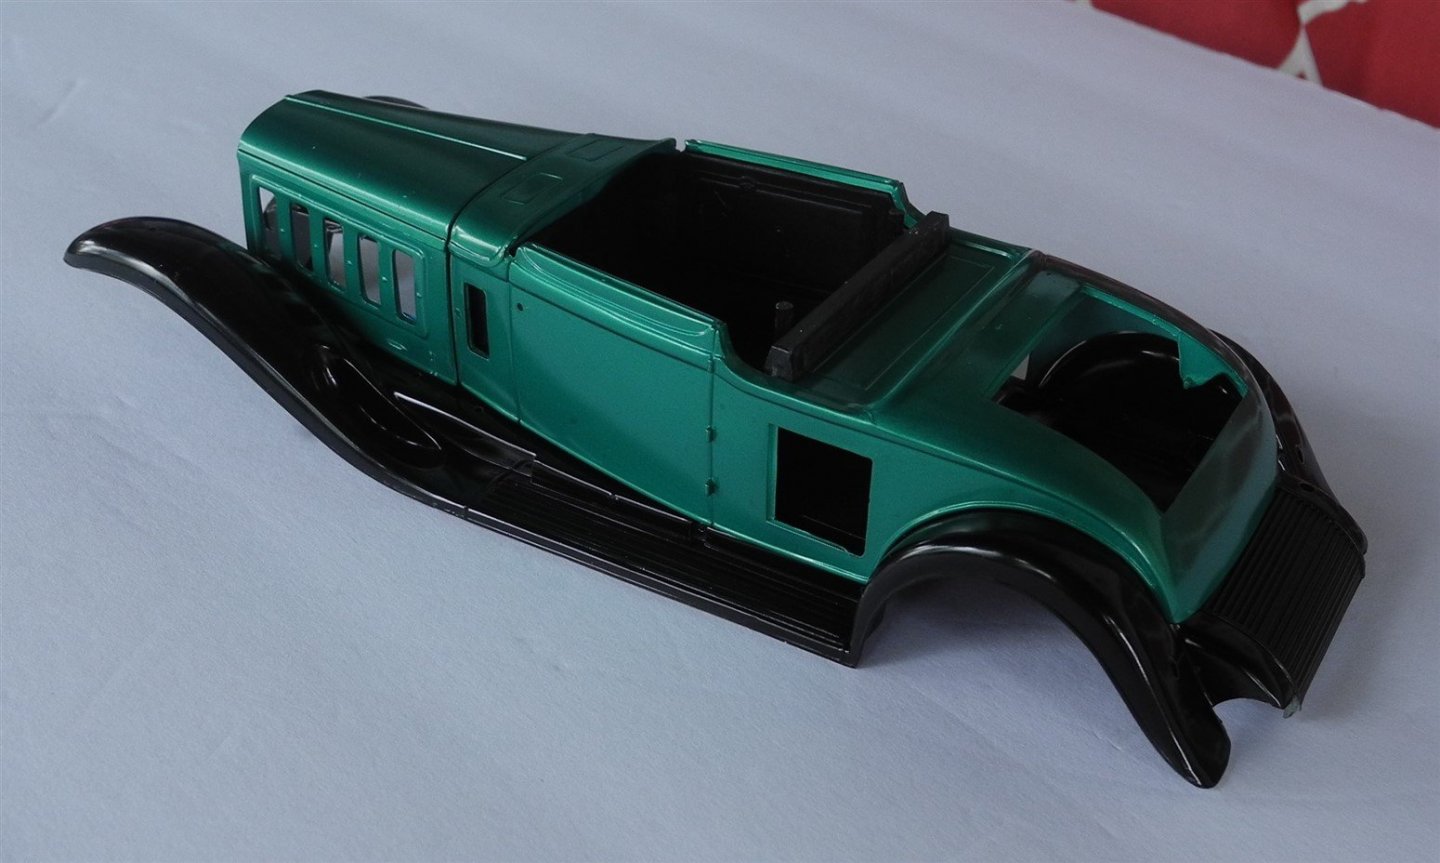
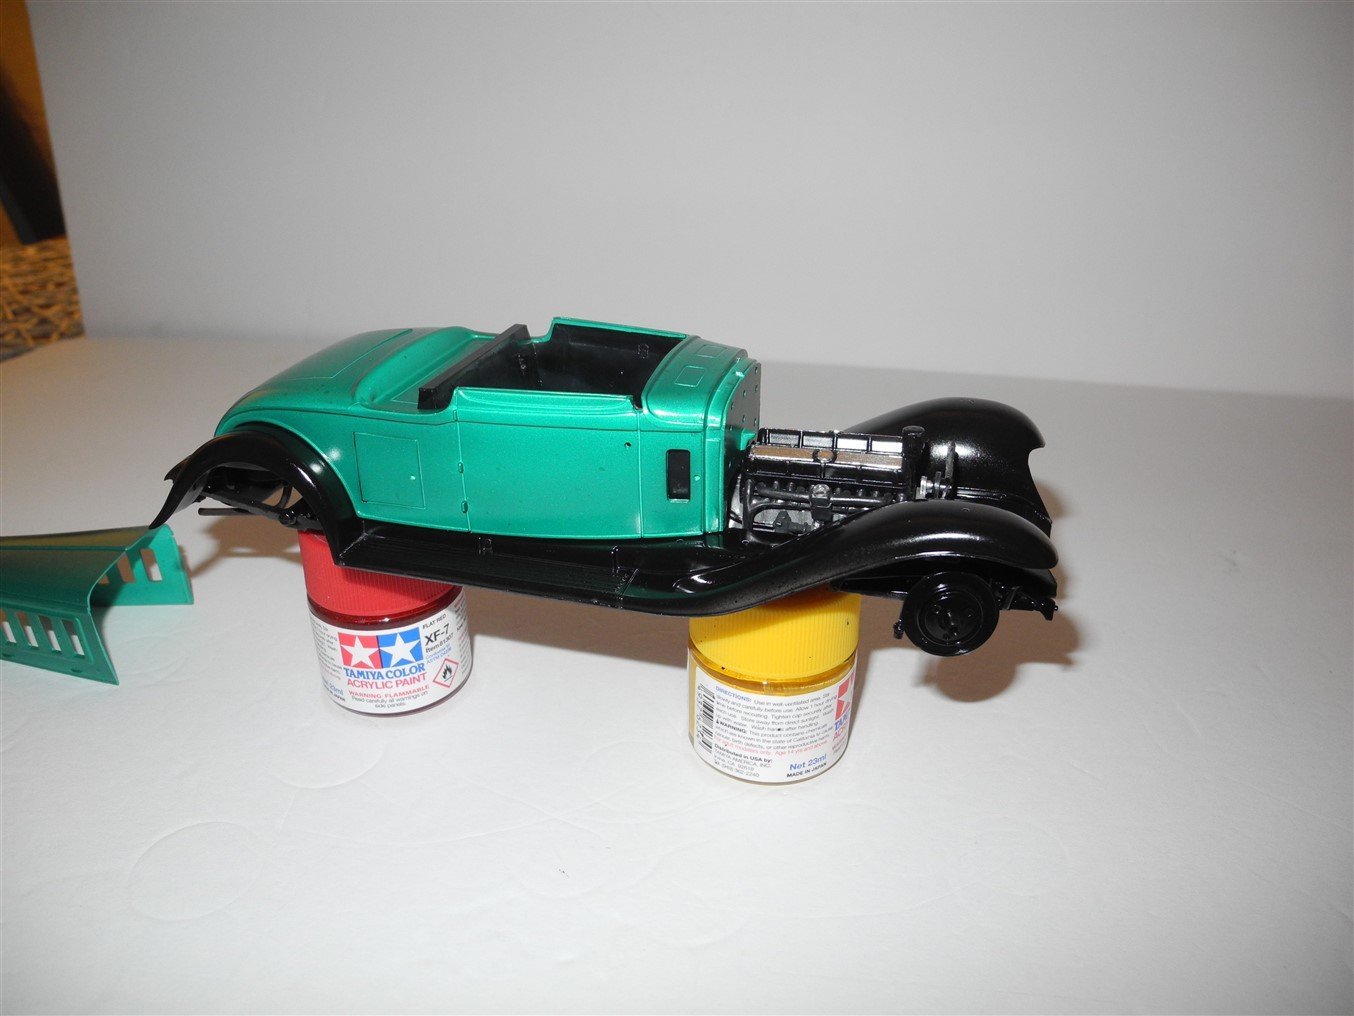
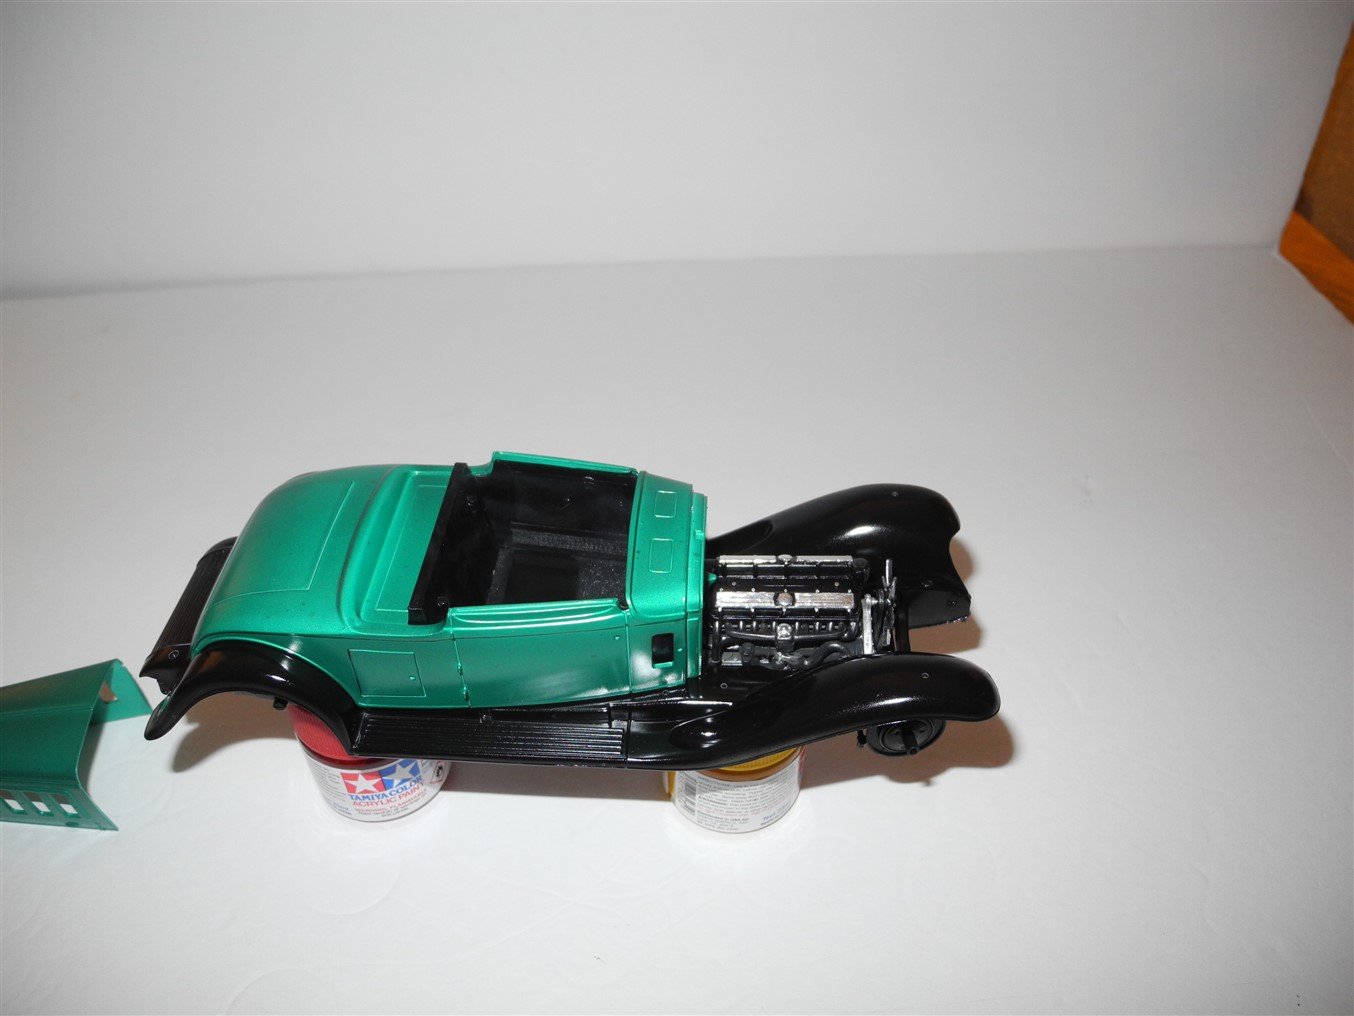
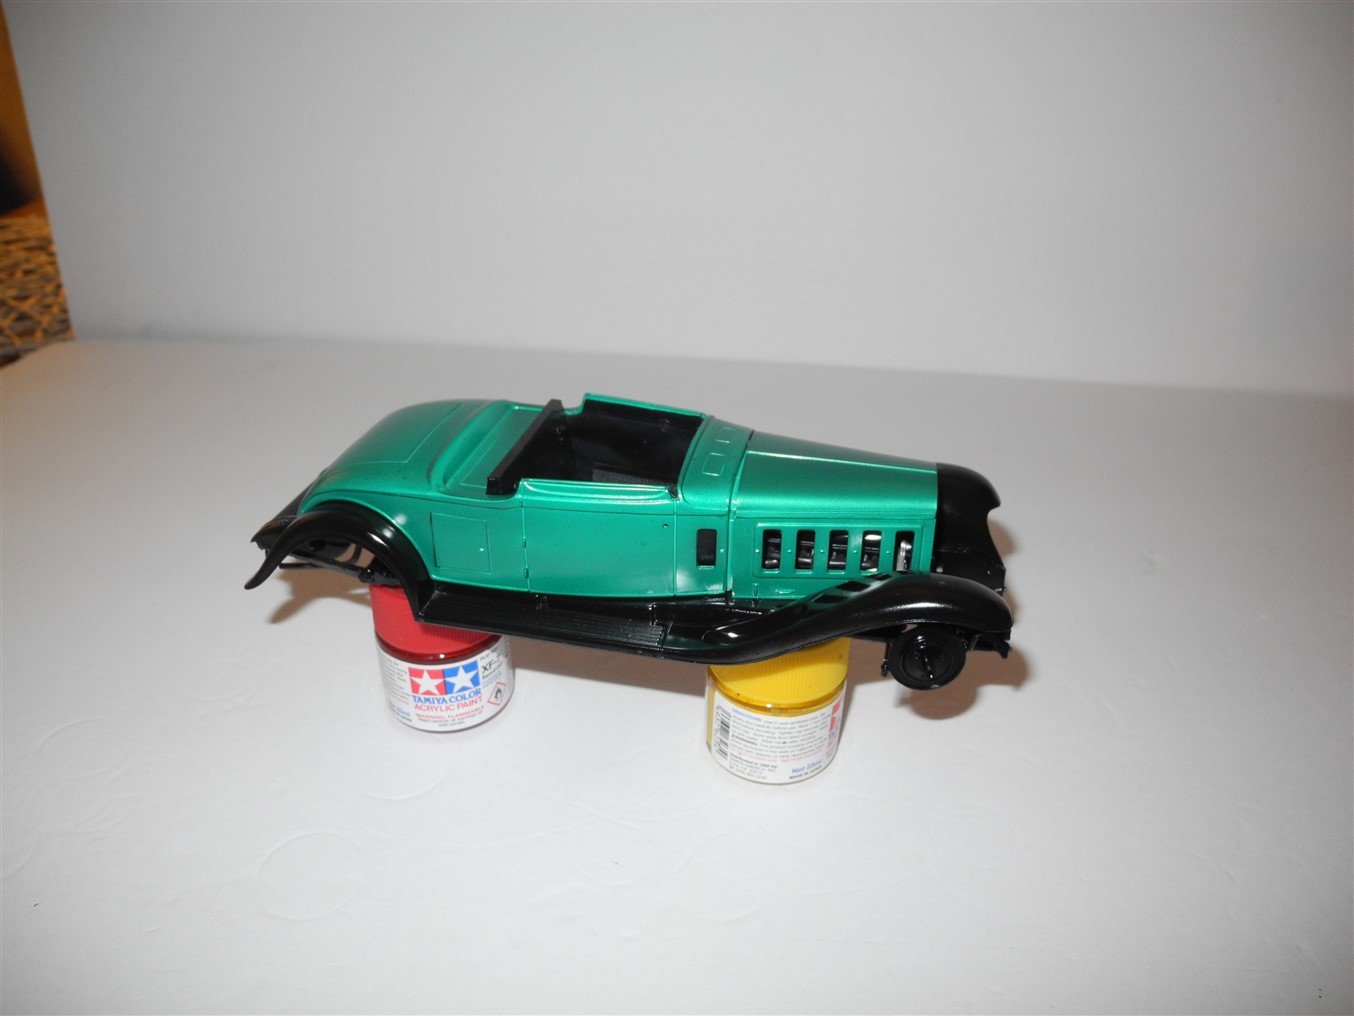
Thanks OC. It's somewhat washed out due to using the camera flash mode. The photos were taken late in the afternoon while the sky was very cloudy. As a result, there was little to no natural light. In natural light, the color is a little darker, more like a light metallic emerald green. -
1931 Cadillac by CDW - FINISHED - JoHan - 1:25 Scale - PLASTIC
CDW replied to CDW's topic in Non-ship/categorised builds
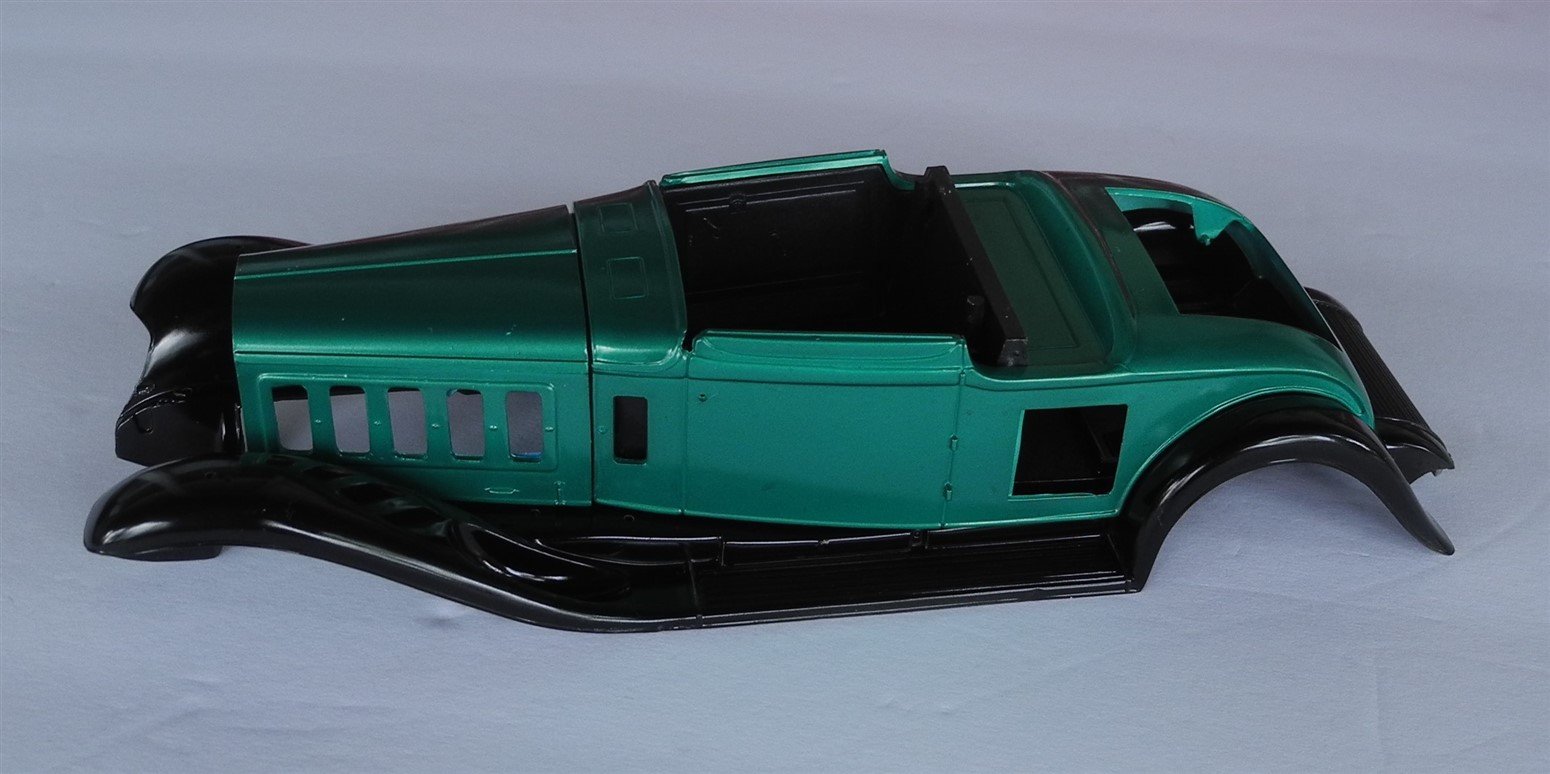
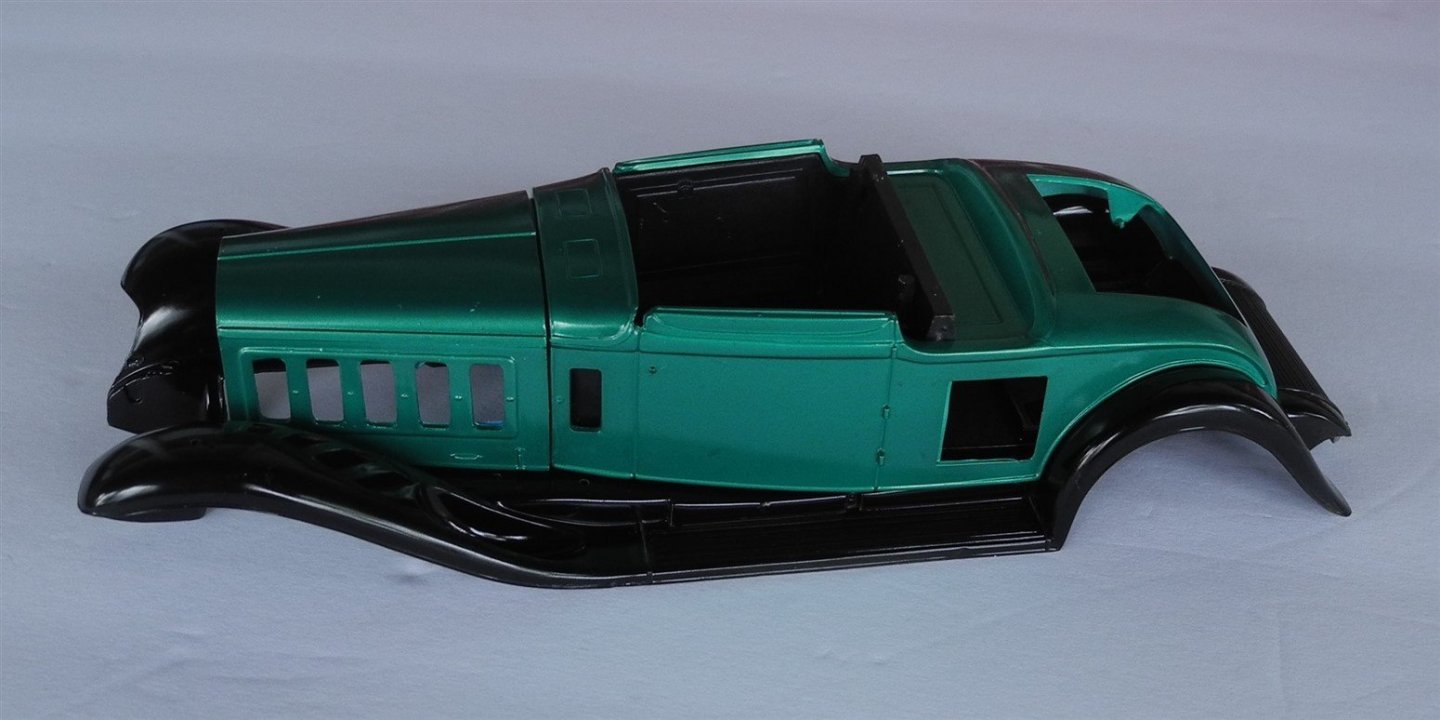
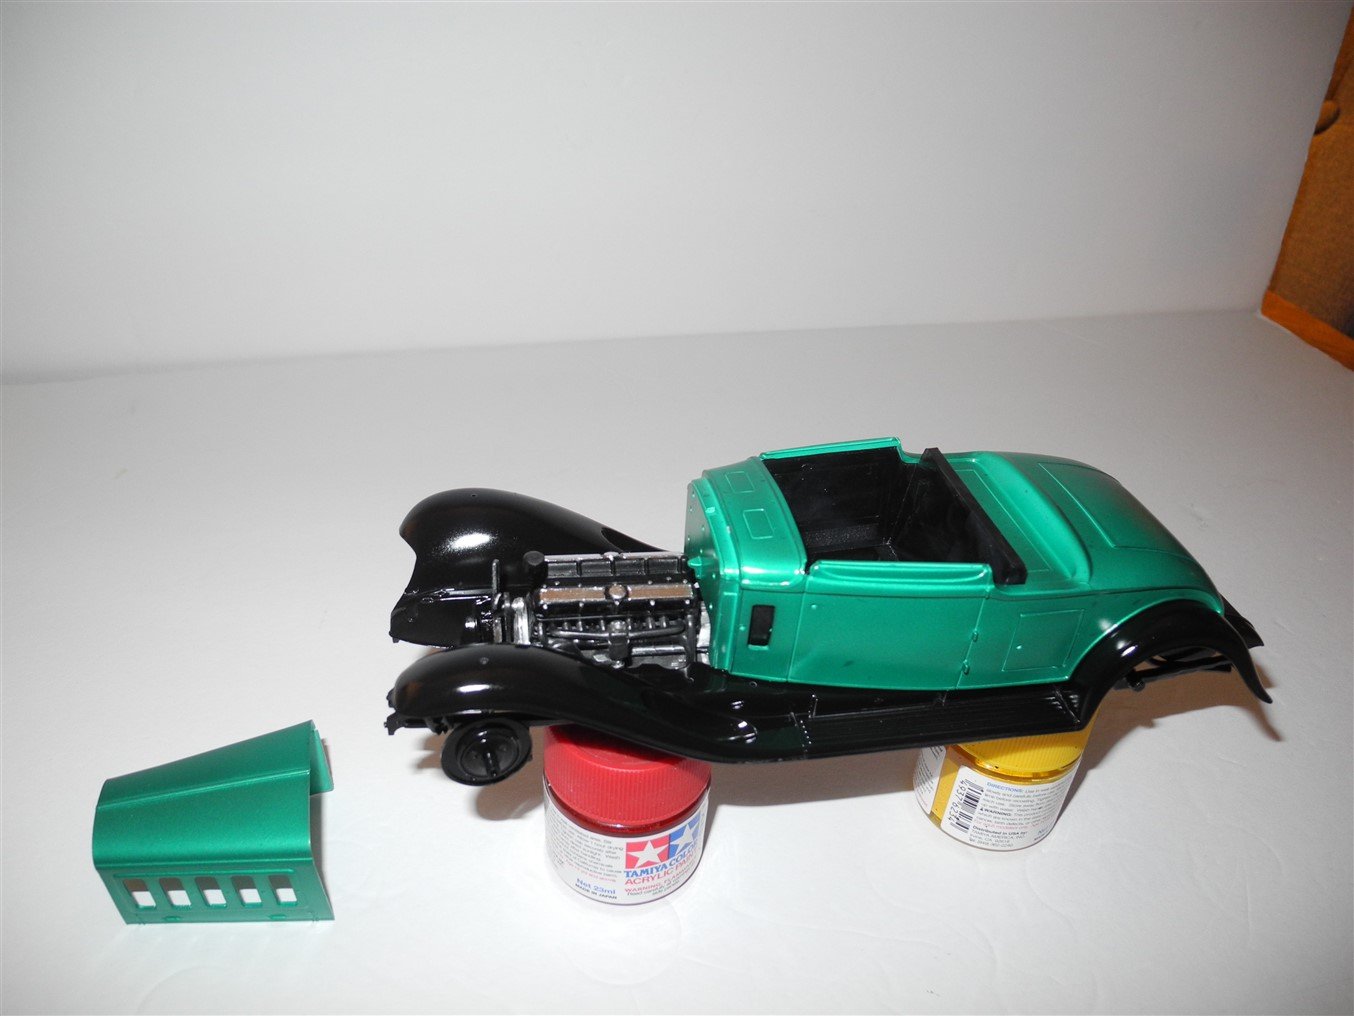
I finally put some paint on this thing. Almost all chrome will be stripped away then repainted with a chrome finish. Just not too thrilled with the kit chrome. Down side is, stripping and repainting all the little chrome parts will be time consuming. Hopefully it will pay off at the end.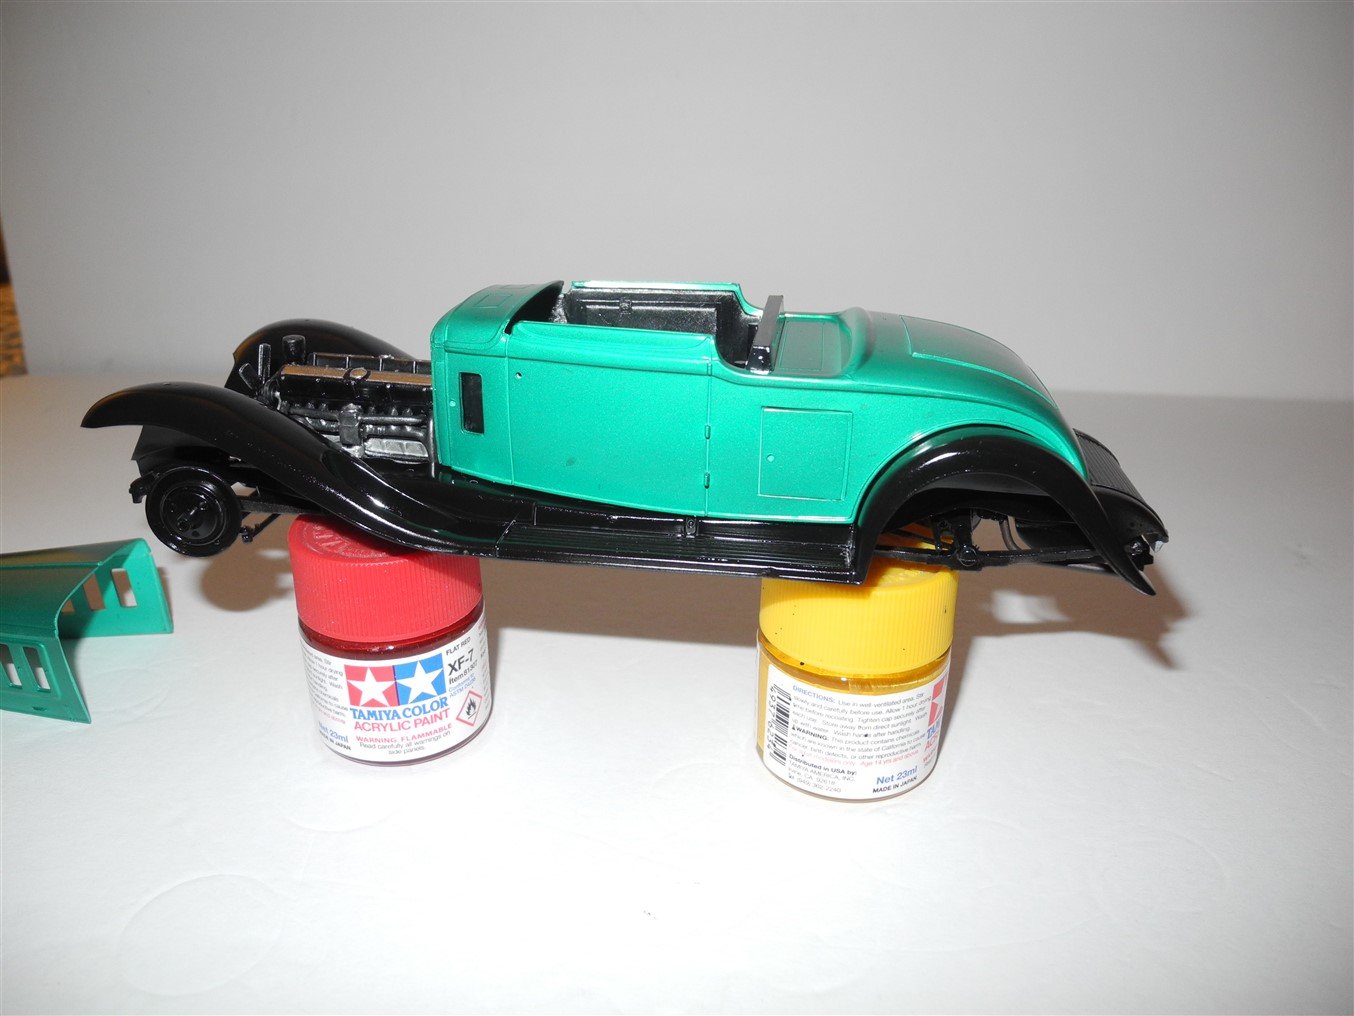
- 175 replies
-
- 16
-
-
You open your window up north so I can get some of your cool weather. I'll open mine so you can get some of the heat (from Florida) that will rise to the north. It was HOT today here.
-
They flew S-199's. License built Messerschmitts. Made by the Czechs.
-
Hi Jack Love your modeling subject, the M4A3 Sherman. I recently picked up a copy of the M-50 Isherman, an Israeli adaptation of the venerable Sherman chassis that served well during early middle eastern conflicts in the 1960's. Back some years ago when we had a strong local IPMS modeling club, a number of por members were huge armor fans, and I always enjoyed seeing their amazing work with WW2 armor. The Sherman was always a favorite modeling subject due to the many significant variations it took on during WW2. Here is a good, short, 5 minute video of the various Sherman tanks to serve in WW2.
-
Coming along beautifully OC. I just found your build thread, by the way. I wonder if the exhausts are from Moskit. The company used to make hollowed metal exhausts just like those, for a number of different aircraft.
-
Looks great!
-
Long ago, I made the mistake of using it as a degreaser on a 1:1 automobile engine bay. In addition to degreasing the engine it stripped the paint. Not advisable to let it contact any polished aluminum parts as it mars the finish. A very potent product but it's supposed to be environmentally friendly.
-
Indeed, Super Clean strips paint. Done it many times. Will not harm or fog clear parts. Just don't put your bare hands in the stuff. Use latex gloves.
-
SBD-3 Dauntless 1:48 Hasegawa - Edwardkenway-FINISHED
CDW replied to Edwardkenway's topic in Non-ship/categorised builds
OC Trumpeter does the Bear in 1:72, but the kit is a pig. It can be done to look quite well, but it takes a lot of work to get it there. Poorly fitting and lacks important detail. Then there is an old DML kit of it in 1:144. Don't know how good or bad that kit might be. Do a Youtube search for Flory Models where he does the 1:72 Trumpeter kit. His video might be there. I have seen it on his paid subscriber site, but it may be available for free on YT.