HOLIDAY DONATION DRIVE - SUPPORT MSW - DO YOUR PART TO KEEP THIS GREAT FORUM GOING! (83 donations so far out of 49,000 members - C'mon guys!)
×


tkay11
-
Posts
1,829 -
Joined
-
Last visited
Content Type
Profiles
Forums
Gallery
Events
Everything posted by tkay11
-
 You just need acetone to debond CA. It's much cheaper than commercial debonders. You'll find your planking much easier without stem, keel and sternpost as you can sand and edge with greater freedom. If you haven't already done so, it's really worth studying the planking tutorials provided on this site in the articles database before you start on that. The first layer is not critical, but provides good practice for the second layer. You can always make mistakes less obvious if you're going to paint the hull -- so that's always a good escape clause. Because the Lady Nelson is so similar to the Sherbourne kit, it's also useful to look at those builds to pick up hints and tips on overcoming problems, discussion about historical accuracy and when to overlook the sequence of steps suggested in the instructions. The builds by Dubz, Stockholm Tar and Gregor are especially useful in this regard. I haven't built the Lady Nelson myself, so don't know whether the second layer of planking is 1mm thick, but you might like to use thinner (0.5mm) planks than those provided in the kit. This makes it easier to bend and to fit in the space between the bulwarks and the stem, keel and sternpost. Tony
 -
You might find that it's useful to protect the stem, keel and sternpost using masking tape as you've put them on before planking. As a result you'll be doing a lot of sanding and gluing which might damage these parts. Tony
-
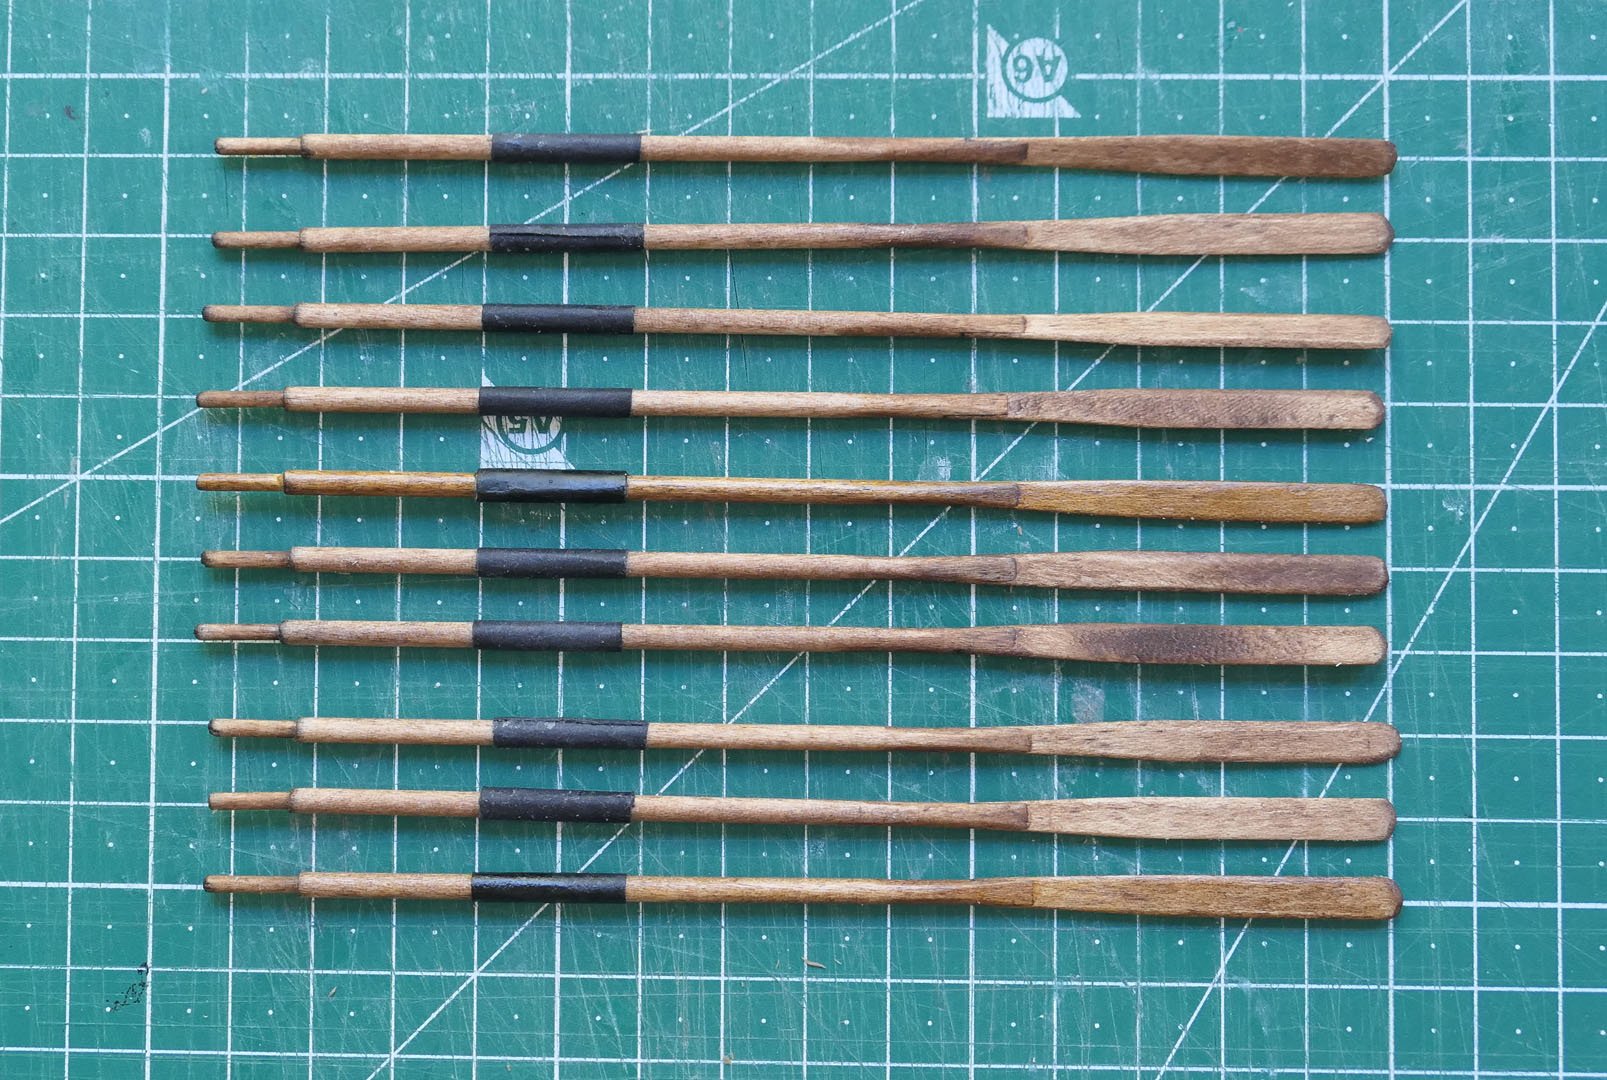
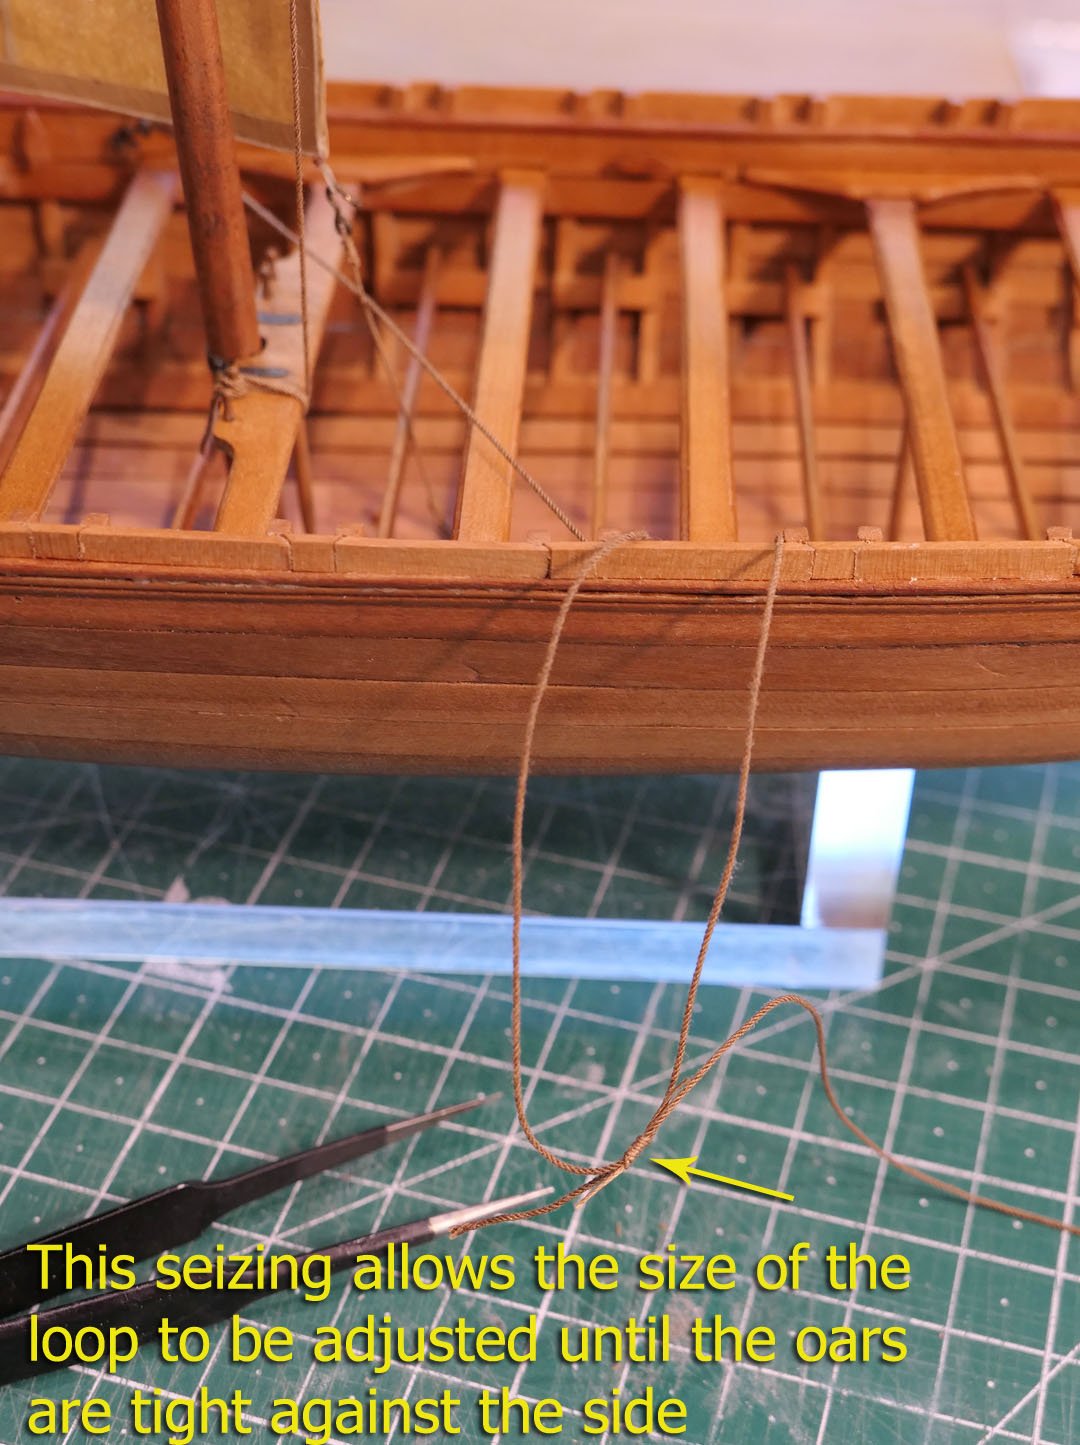
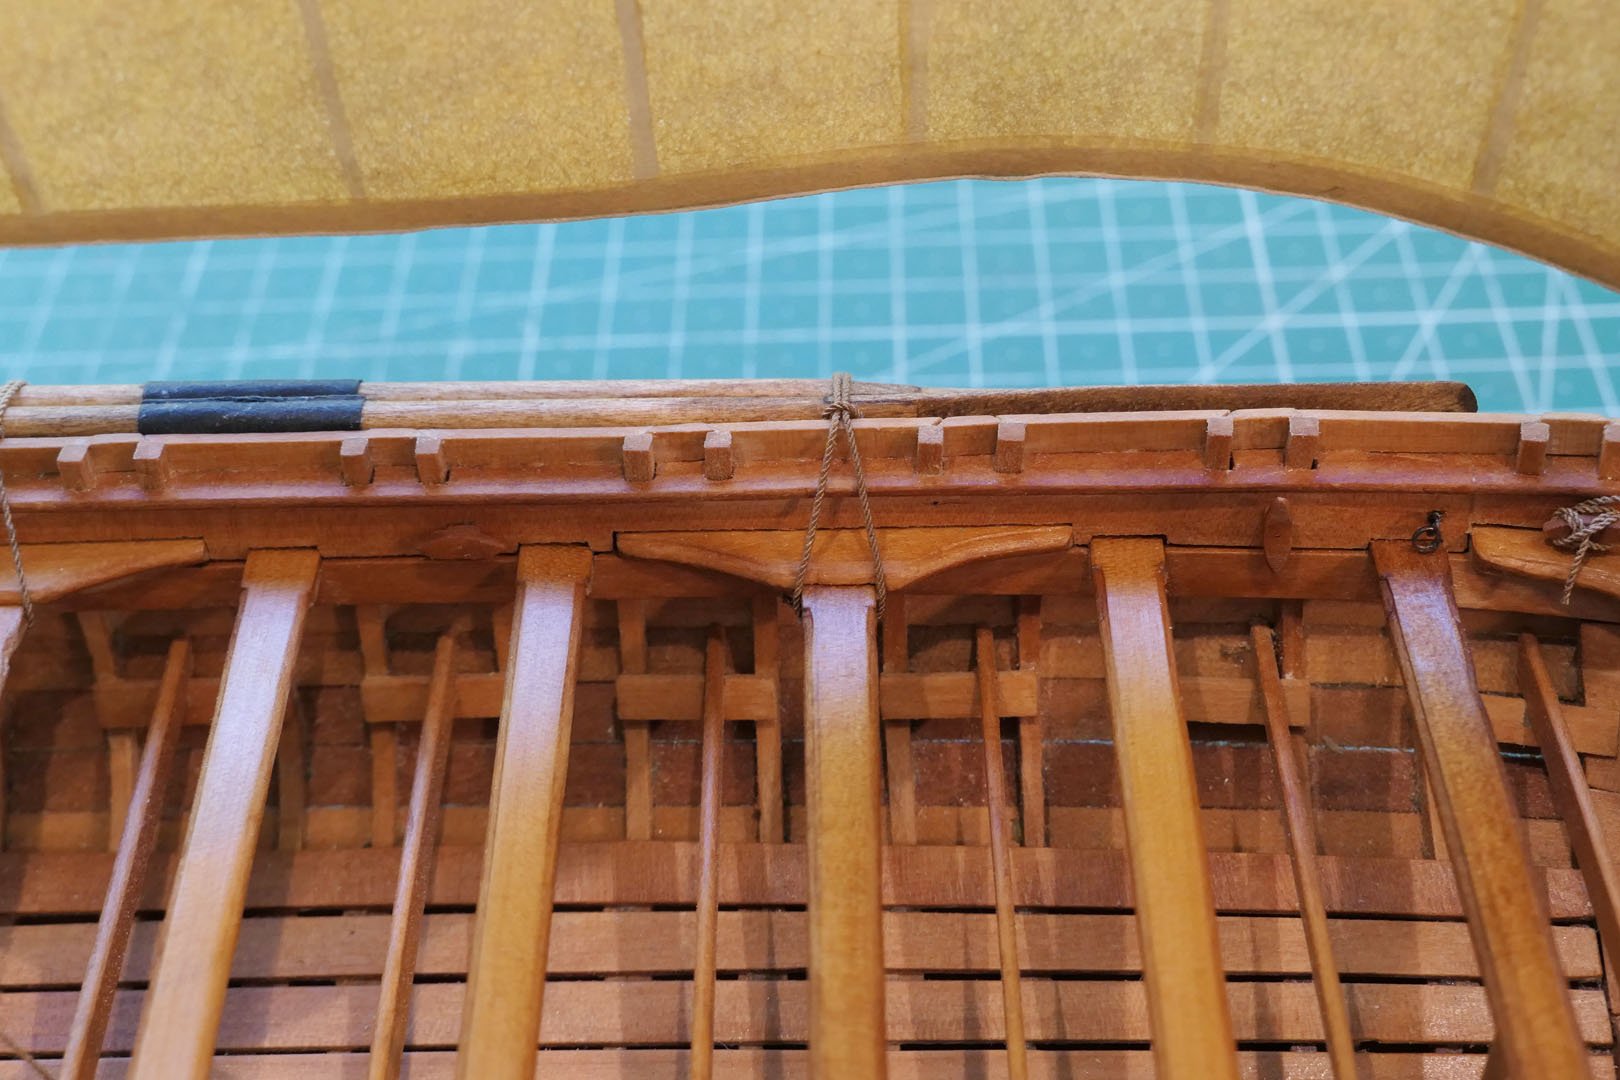
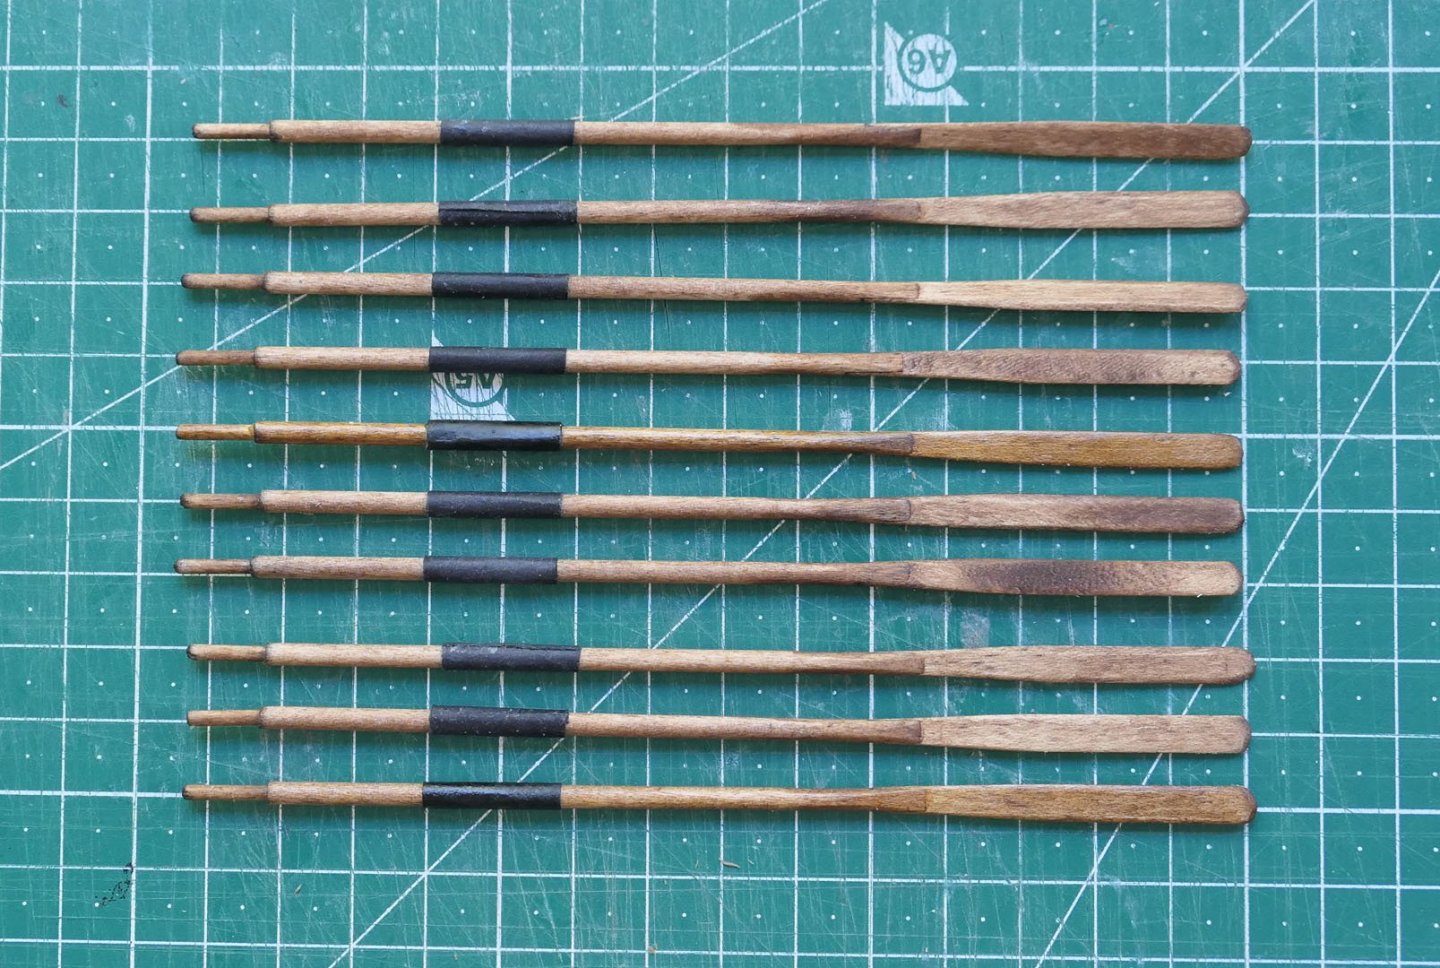
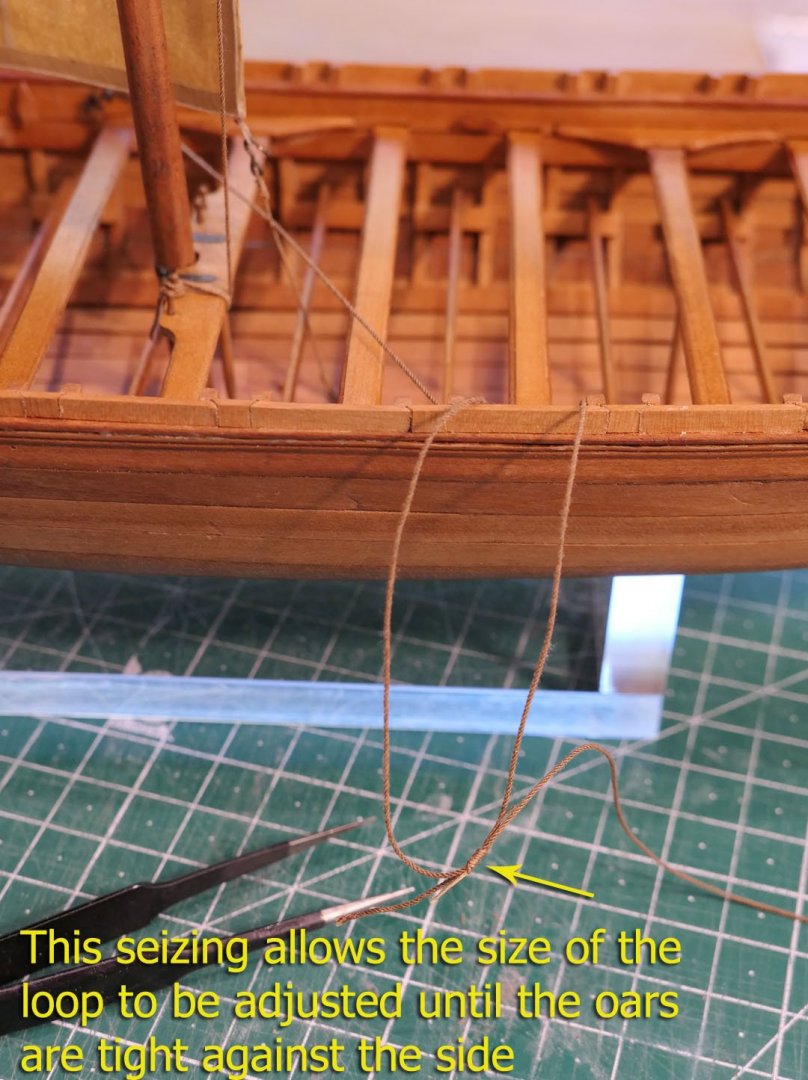
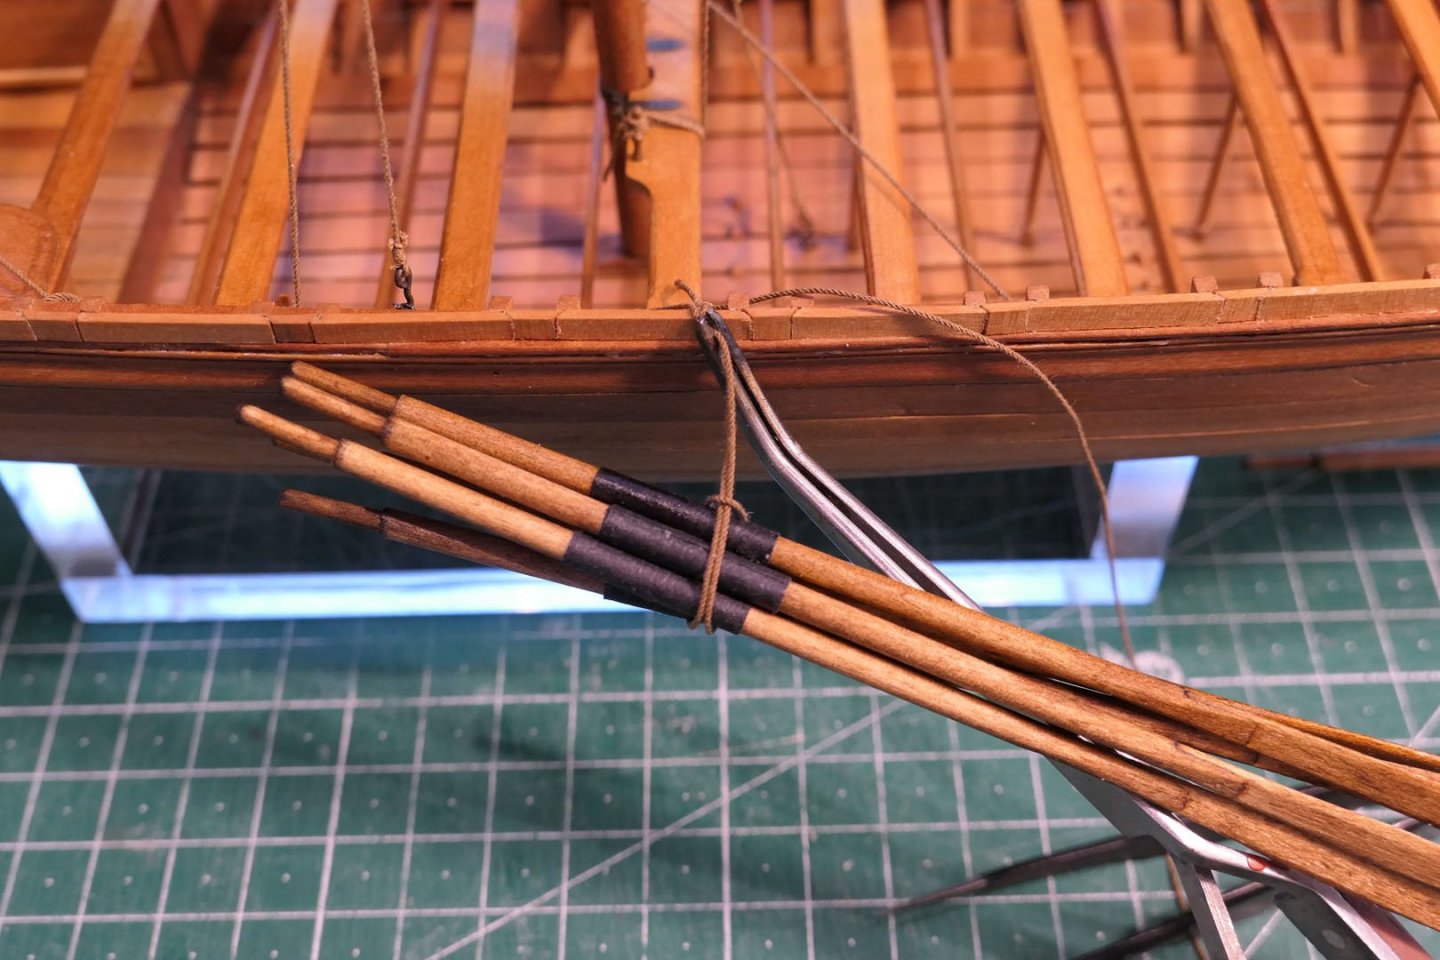
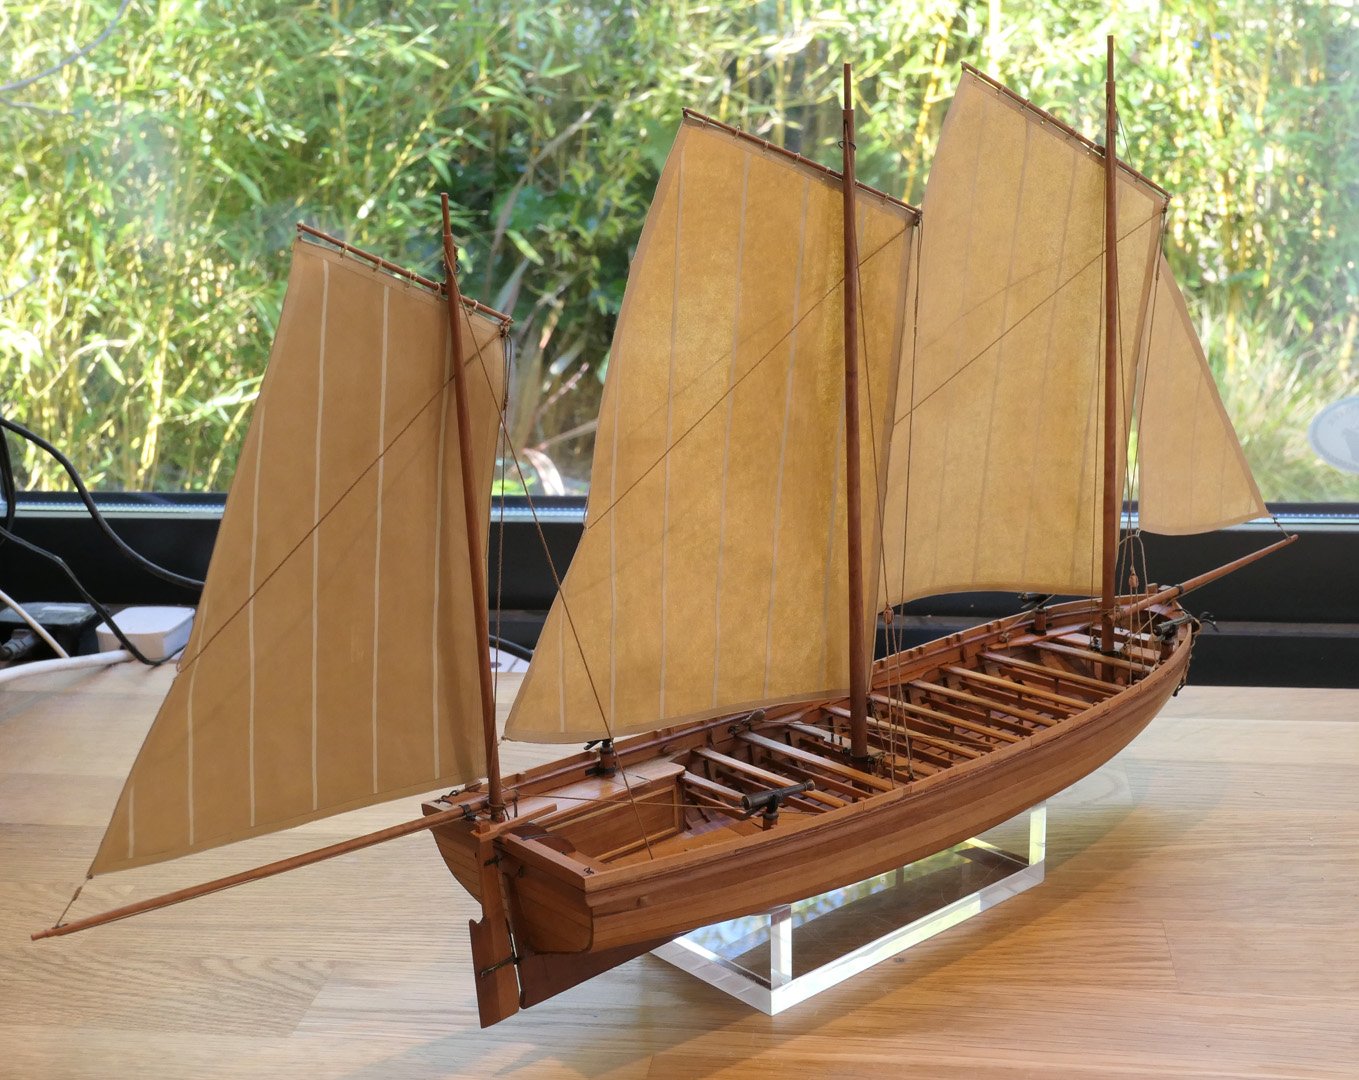
Oars As indicated in the recent posting, I made the oars from three pieces. I only made 10, rather than the 20 that it would normally have, partly because of having to stow them all and partly because I reckoned that with the sails up there would only be effective room for 10 oarsmen. The oars were stained using my own mix of walnut crystals diluted 1:30 in water. As you can see, this ended up with them being rather blotchy. The sleeves were made of black card 0.2mm thick. The problem was where to place them on the boat, and then how to fix them. There were three possibilities: along the centre, on either side of the foremast, or held over the sides. I went with them being held over the sides as being the most efficient use of space. So how to fit them to the sides? Naturally this should be based on a loop, but I needed to be able to adjust the loop so that the oars would hang exactly at the gunwale, and also ensure that there would be no unsightly knots visible. The solution was a simple one of seizing together the two ends of a loop that had already been strung round a thwart in a way that would allow easy adjustment. So now I have to think about how to make a barrel, a boathook, a chest and a binnacle. I may well fail! [By the way, for those who look at the rake of the mizzen mast, it is at the prescribed angle. The main and fore masts are almost vertical.] Tony


- 124 replies
-
- 16
-

-
- longboat
- Chaloupe Armee En Guerre
- (and 1 more)
-
I think he meant 'build log'. See my recommendations for dictionaries etc in your posting as a new member. Tony
-
There are several late 18th and early 19th century French-English and English-French vocabularies, glossaries and treatises on naval architecture from French and English Authors available on the web for free download, mostly via Google Books. These are all in pdf format and of course have the typography and spelling of the time, along with some variable quality of photocopying. The ones I have used most for translation work are Dictionnaire de la Marine Anglaise by ROMME 1804 Vocabulaire des termes de marine anglais et francais, (mostly parts 2-3) by LESCALLIER 1797 William Falconer's Dictionary of the Marine with French-English Dictionary Annex 1780 (also available for searching online at http://southseas.nla.gov.au/refs/falc/contents.html) There is also the excellent printed book from ANCRE publications 'Vocabulaire de Marine Bilingue Anglais-Français' by David Roberts for €38 which provides direct translations, although without any of the discussion or description that the other old dictionaries have. Then there are the fully searchable technical dictionaries such as TechDico, the Centre National de Ressources Textuelles et Lexicales Finally there's the semi-technical Tureng, in addition to the variety of bilingual modern dictionaries such as Linguée and SYSTRAN. I have been developing my own searchable bilingual English-French dictionary in Word format, but it is not ready for distribution. Tony
-
This site is very similar in functioning to Marine et Modélisme d'Arsenal, so you only have to follow the same procedures. You are certainly making a beautiful model, but I think you'll reach more people if you start a build log here following the advice given in the section 'Questions/instructions on how to use and post to this forum/Site Problems or suggestions'. You've gone a long way already, so it will be hard work to translate all the early stages of your build and post them here, but you could just post the pictures with a word of explanation at crucial stages. It is always nice to see examples of good craftmanship, but what really interests a lot of members of this site (especially those of us who are just starting building from plans) is not just the pretty pictures, but discussions (a) of methods and techniques used, (b) problems encountered and how to overcome them, (c) discussions of matters of historical interest, particularly if you choose to modify the plans or suggestions of the monograph. You have already raised many issues on the French site with your discussions with other members (e.g. the cuts you made in the gunwale for the shrouds and the alignment of the gunports, or the discussion about the 3D modelling of the prow), and the various suggestions that have been made, so it may be worthwhile to bring some of those discussions to this site as they are interesting and will help others avoid making mistakes. There are quite a few modellers who use this site who are not familiar with French, and in particular the detailed names of parts that are not available in modern French dictionaries, so translation would be very important if you'd like your work to be more fully appreciated - even though it is clear that a lot of work would be needed to do this. Amicalement, Tony
-
You must be joking, Hellmuht -- unless you mean that mine is nothing compared to yours! I find your finish far more professional and elegant! As always, I'm way behind in finishing technique - partly because I have very little faith in others showing interest (apart from members of MSW). Your planking is also excellent. Also partly because I see these builds simply as an apprenticeship in learning how to model and I see the finishing as something that will come gradually. Look at my deliberate keeping of that ugly mizzen sail. The bottom line is that this Chaloupe Armée is a great model to get into building from plans, as well as learning how to use a mould. All the builds I've seen of this show the great pride in achievement that the modellers express - and that's what counts most. As you've probably realised, I've been following your build of the St. Caterina with much interest and enjoyment. You might like to know that I have the Ancre monograph of the Allège d'Arles, so I may well be following your own train of thought as to the next model. I've also been thinking of making the card model of the Allège d'Arles by WAK in Poland, after seeing the wonderful log by Kondzik on this site. Tony
- 124 replies
-
- 1
-
-
- longboat
- Chaloupe Armee En Guerre
- (and 1 more)
-
Thanks for the nice comments and likes. It's always rewarding to know that others share the same interest and pleasure in this process and its various outcomes. The criticisms and questions are equally useful. @G.L.: Yes. You can see from earlier posts that I had first used a card stand temporarily. It was made using the frame outlines at +3 and -3 to cut the outlines for the supports. I thought that this would work fine. So I just bought a small block of 10mm thick clear acrylic (A6 size = 148 x 105mm) from eBay for £3. This was sufficient for the base rectangle and the two support rectangles. I then used my bench saw to cut it into those three blocks. I cut the outlines for the supports using a scroll saw, finessing with a jeweller's saw. The rough edges were then polished using progressively fine micromesh polishing cloths from 1500 to 12000 grade. The supports were then cemented to the base with Model Z Pro Plastic Weld, which is probably based on methyl melacrylate (MMA) monomer. I have used this before and found it very useful and easy. Apparently you can make this by dissolving acrylic chips in acetone. I applied it with a fine paintbrush run along the edges of the joints. Quick and simple! The polishing of the rough edges took the longest - maybe an hour all told I had taken considerably longer to research the various ways suggested to cement acrylic - although I ended up using the same product I had used for the Sherbourne base. Two videos I found particularly useful were: Tony
- 124 replies
-
- 3
-
-
- longboat
- Chaloupe Armee En Guerre
- (and 1 more)
-
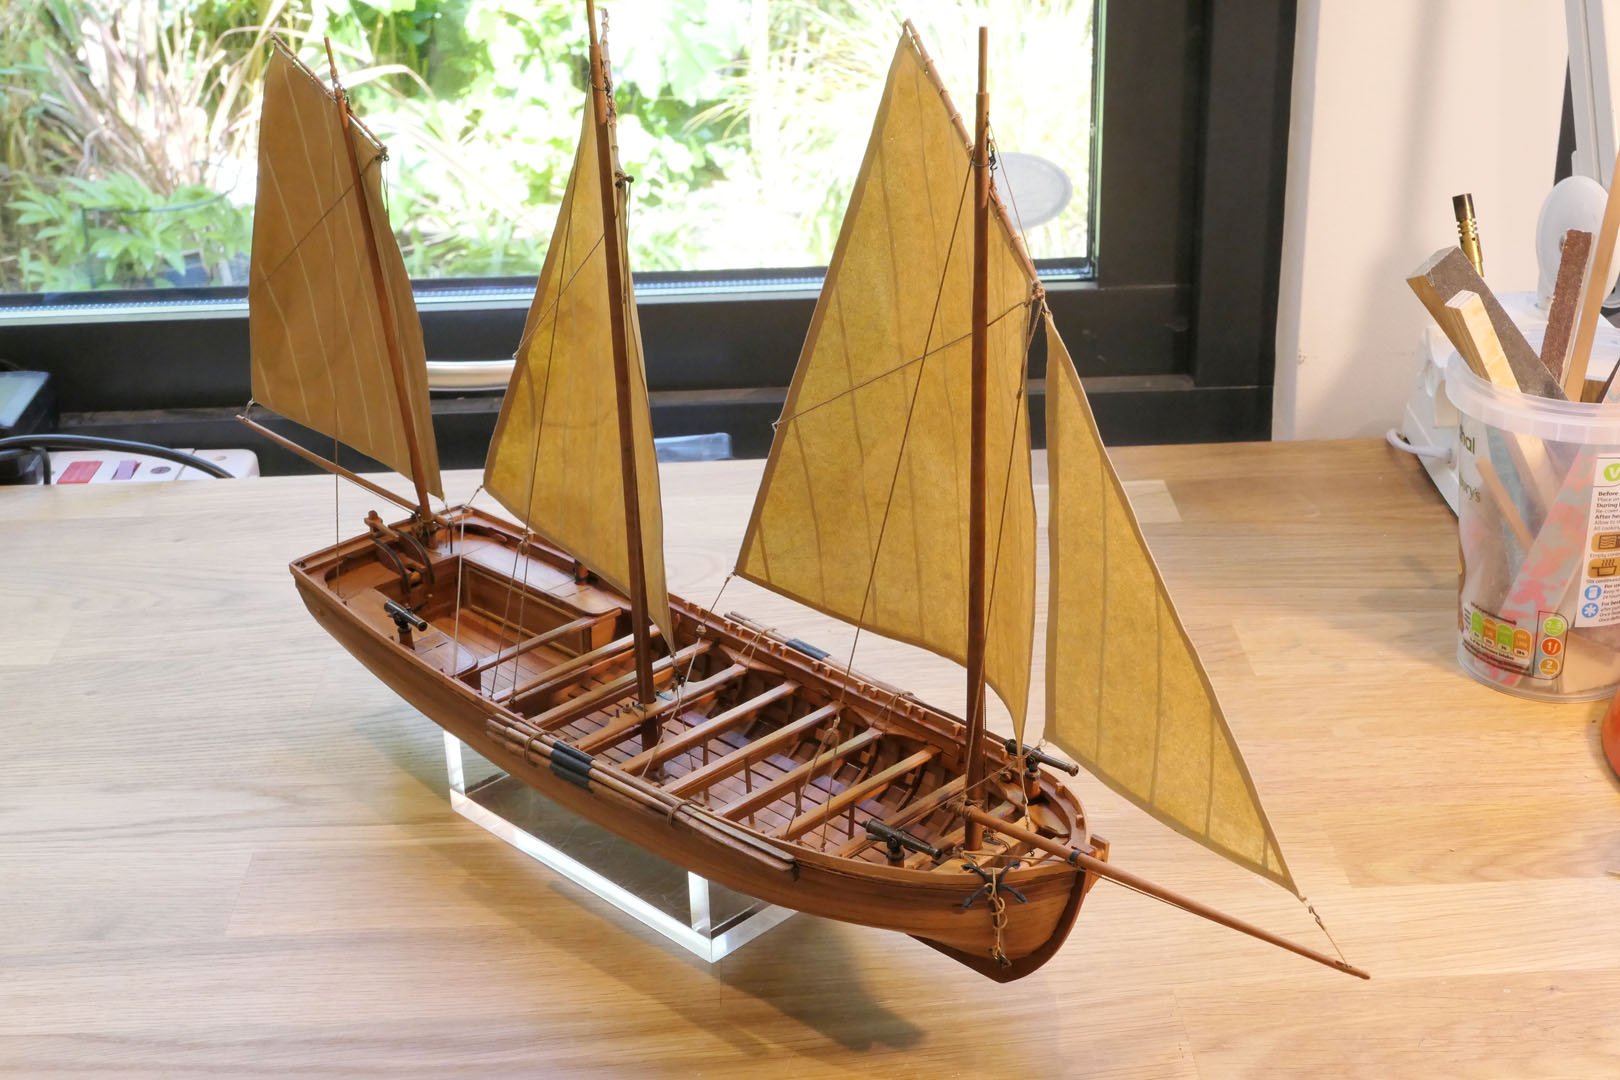
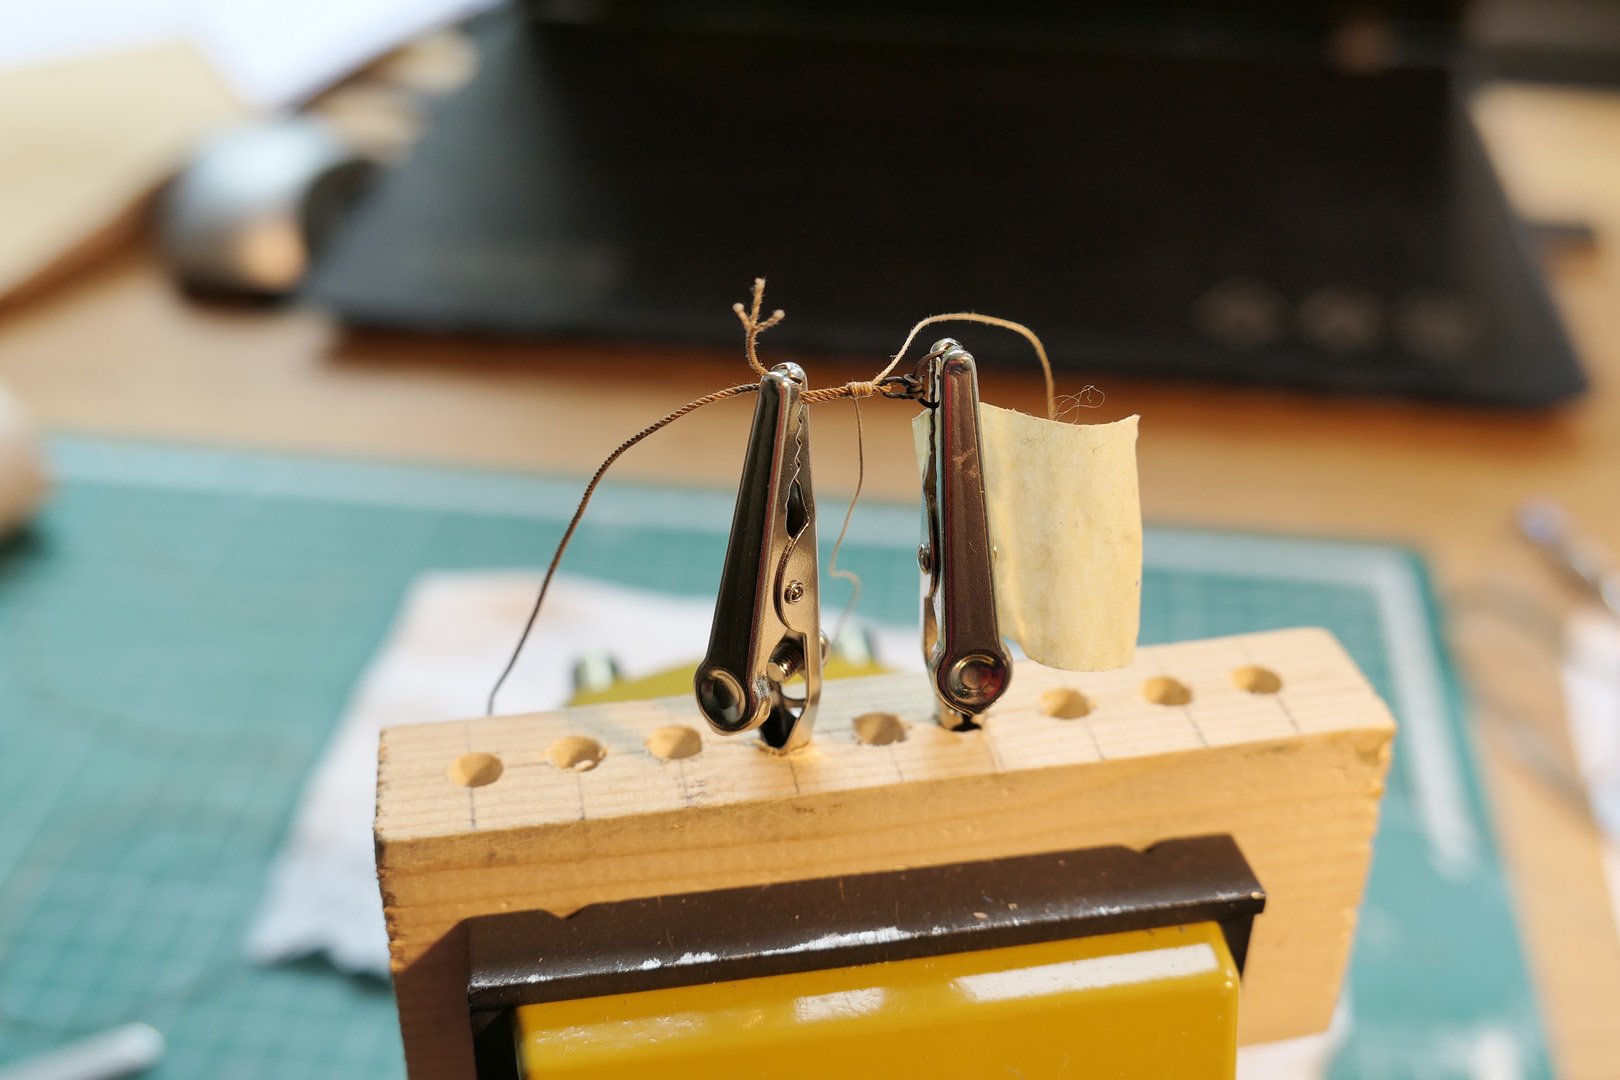
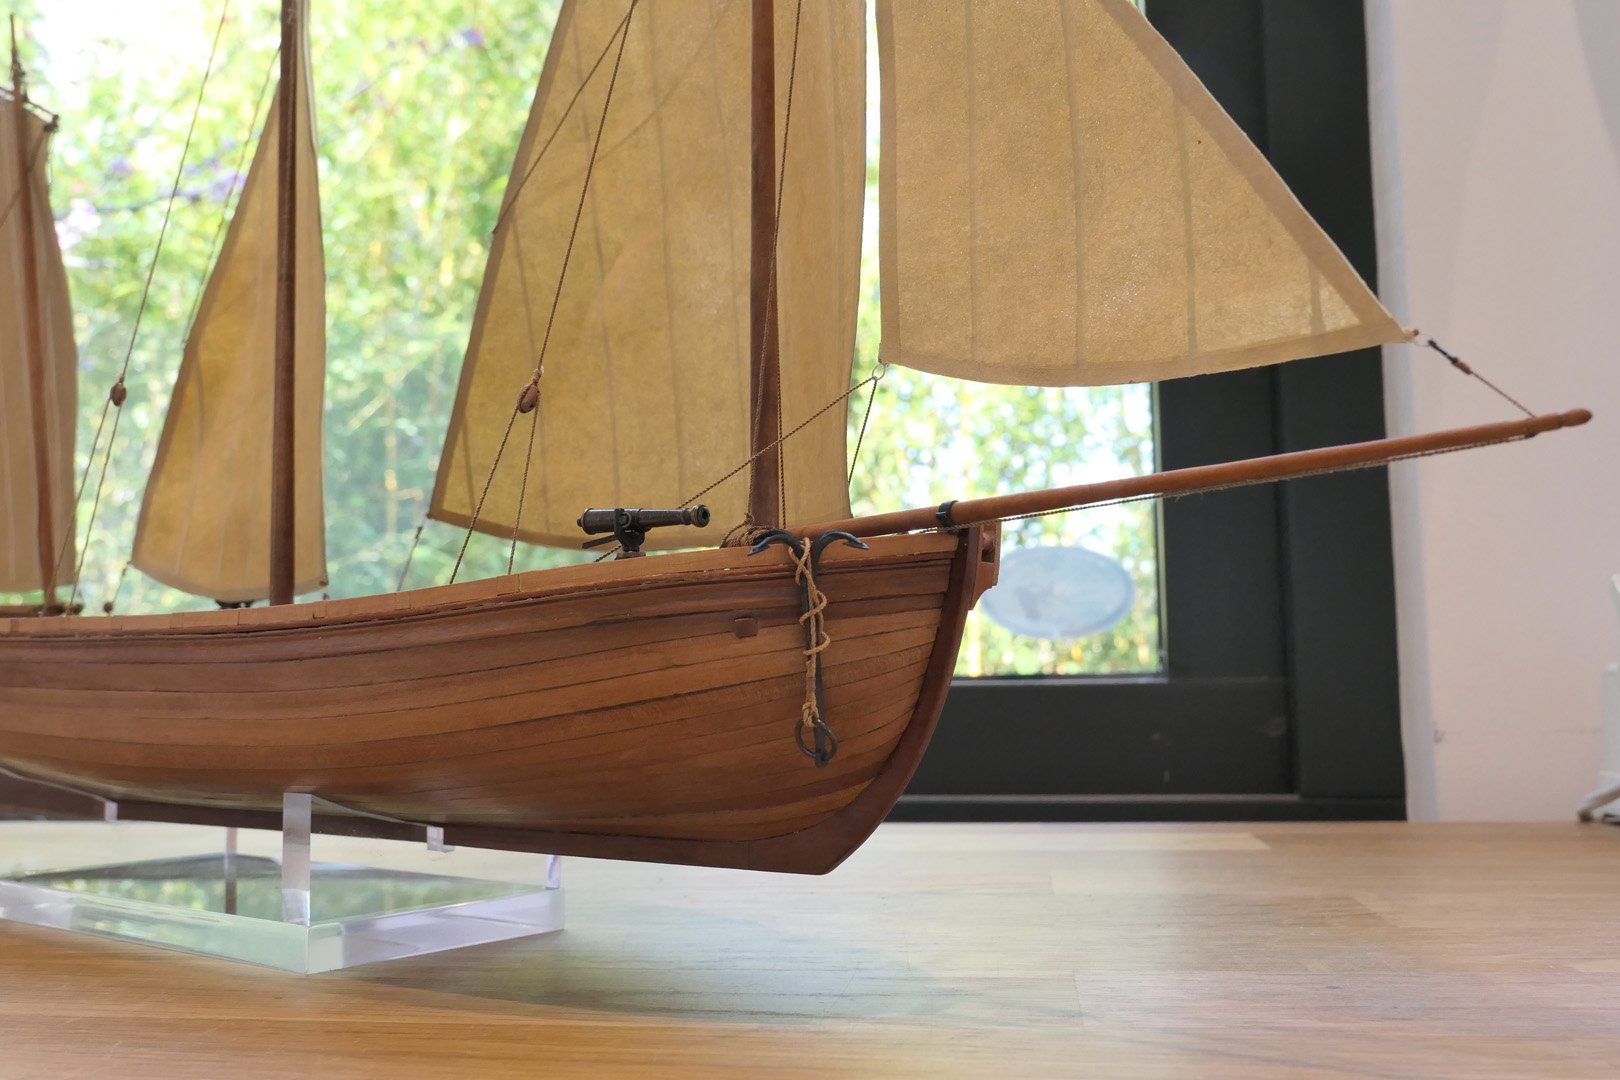
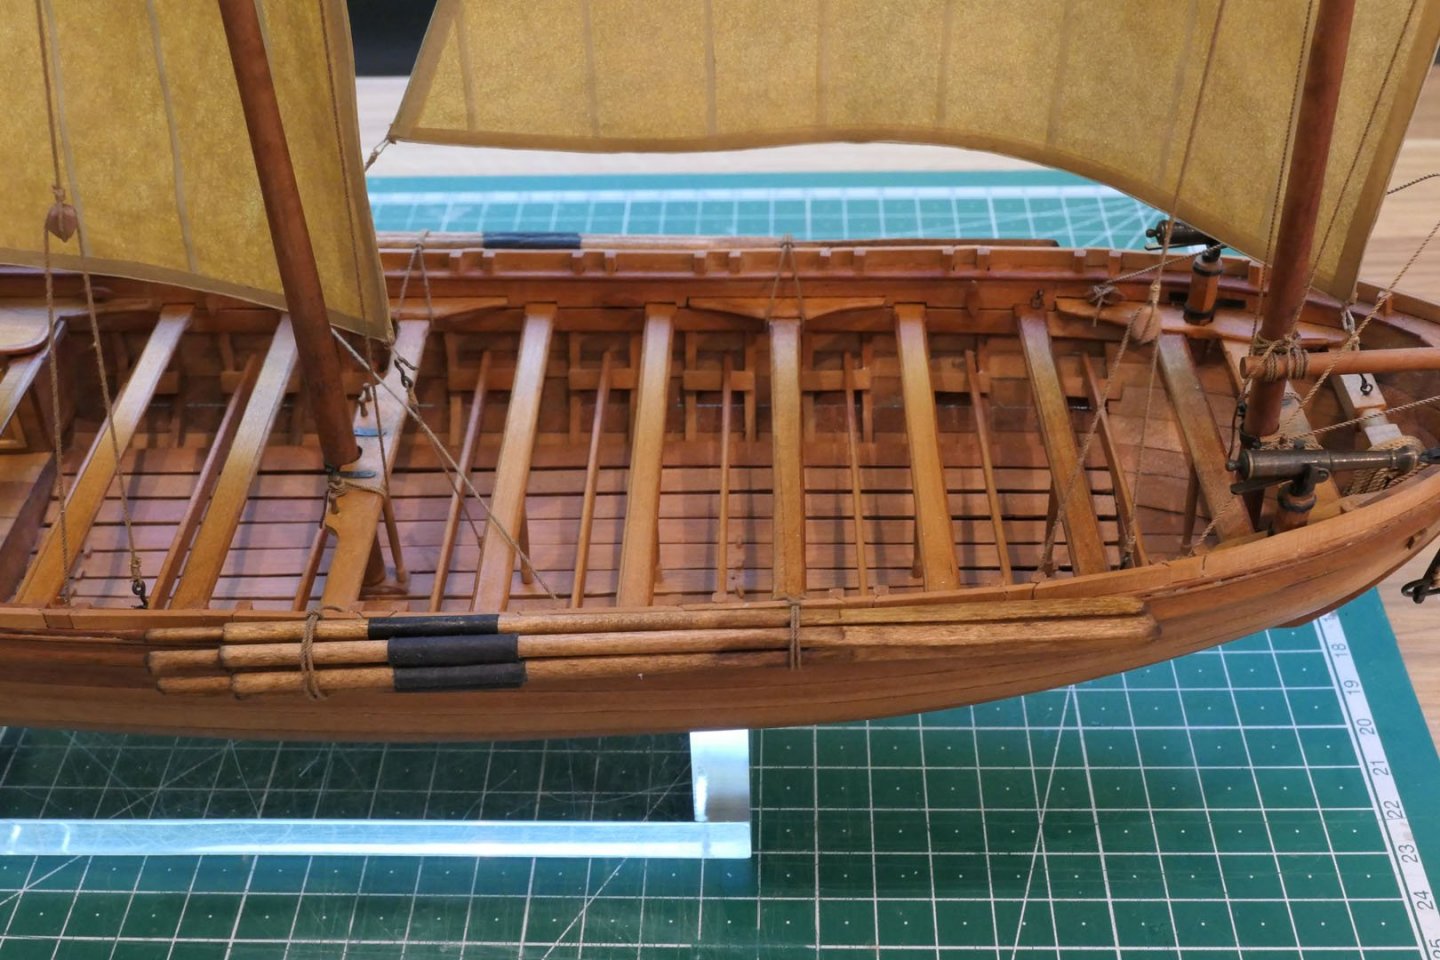
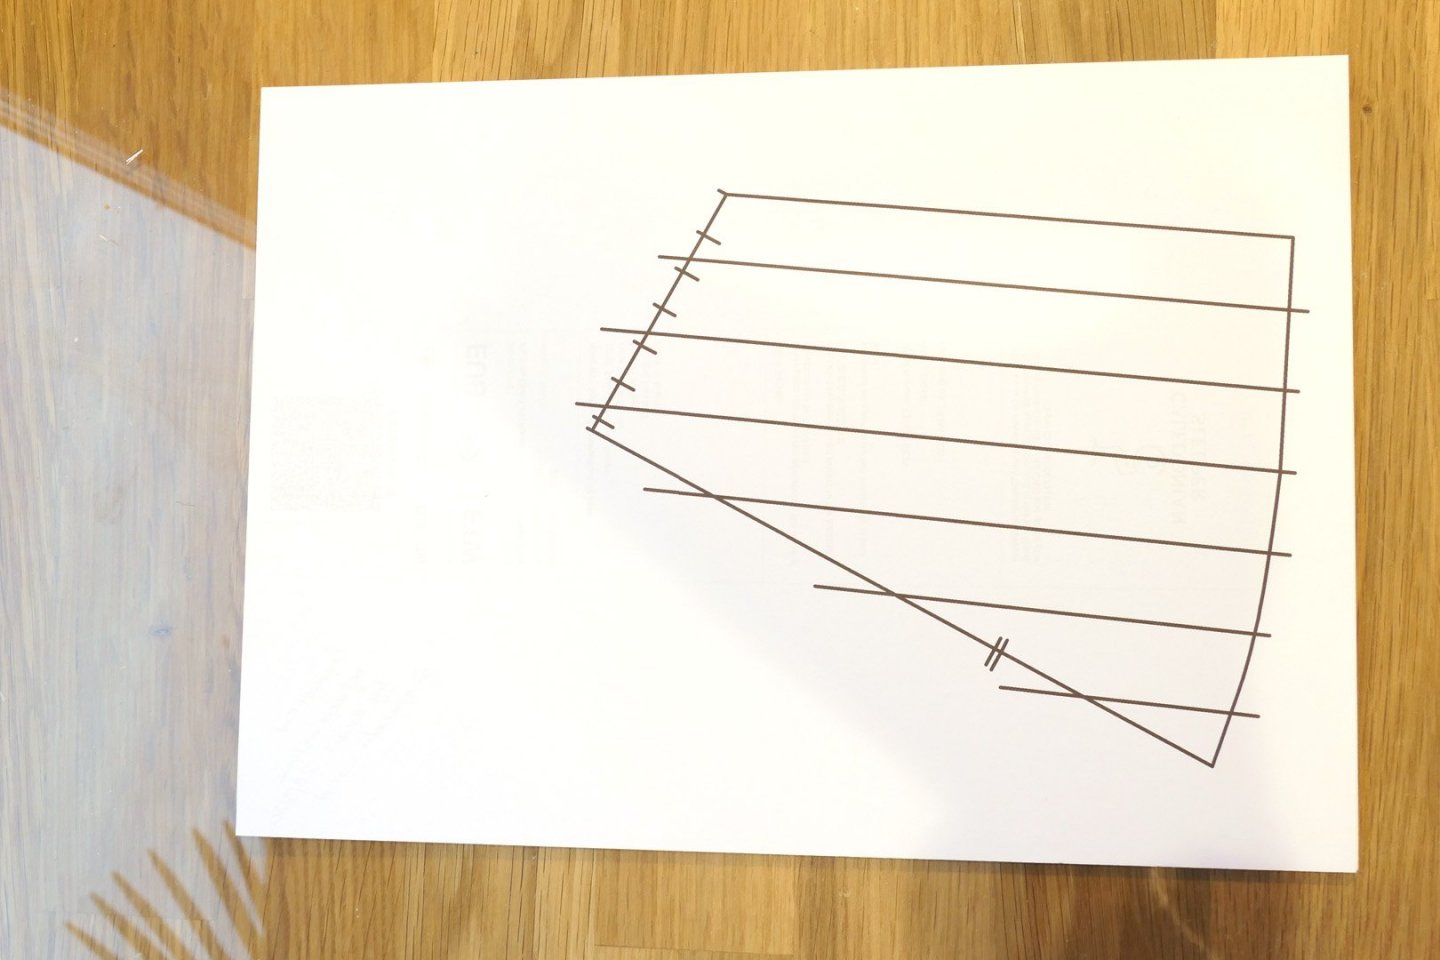
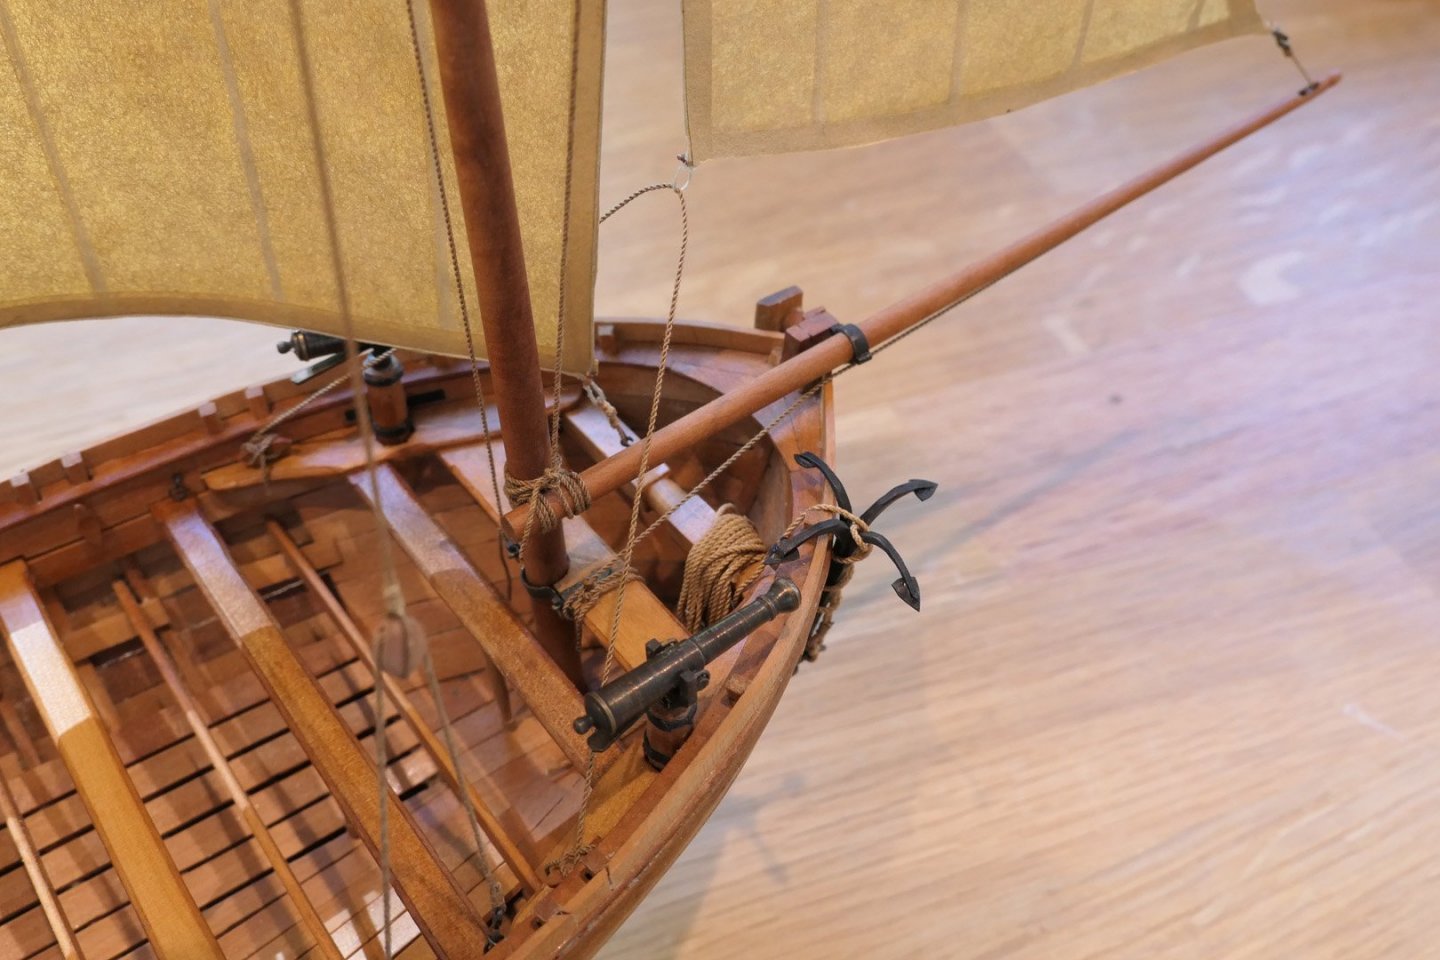
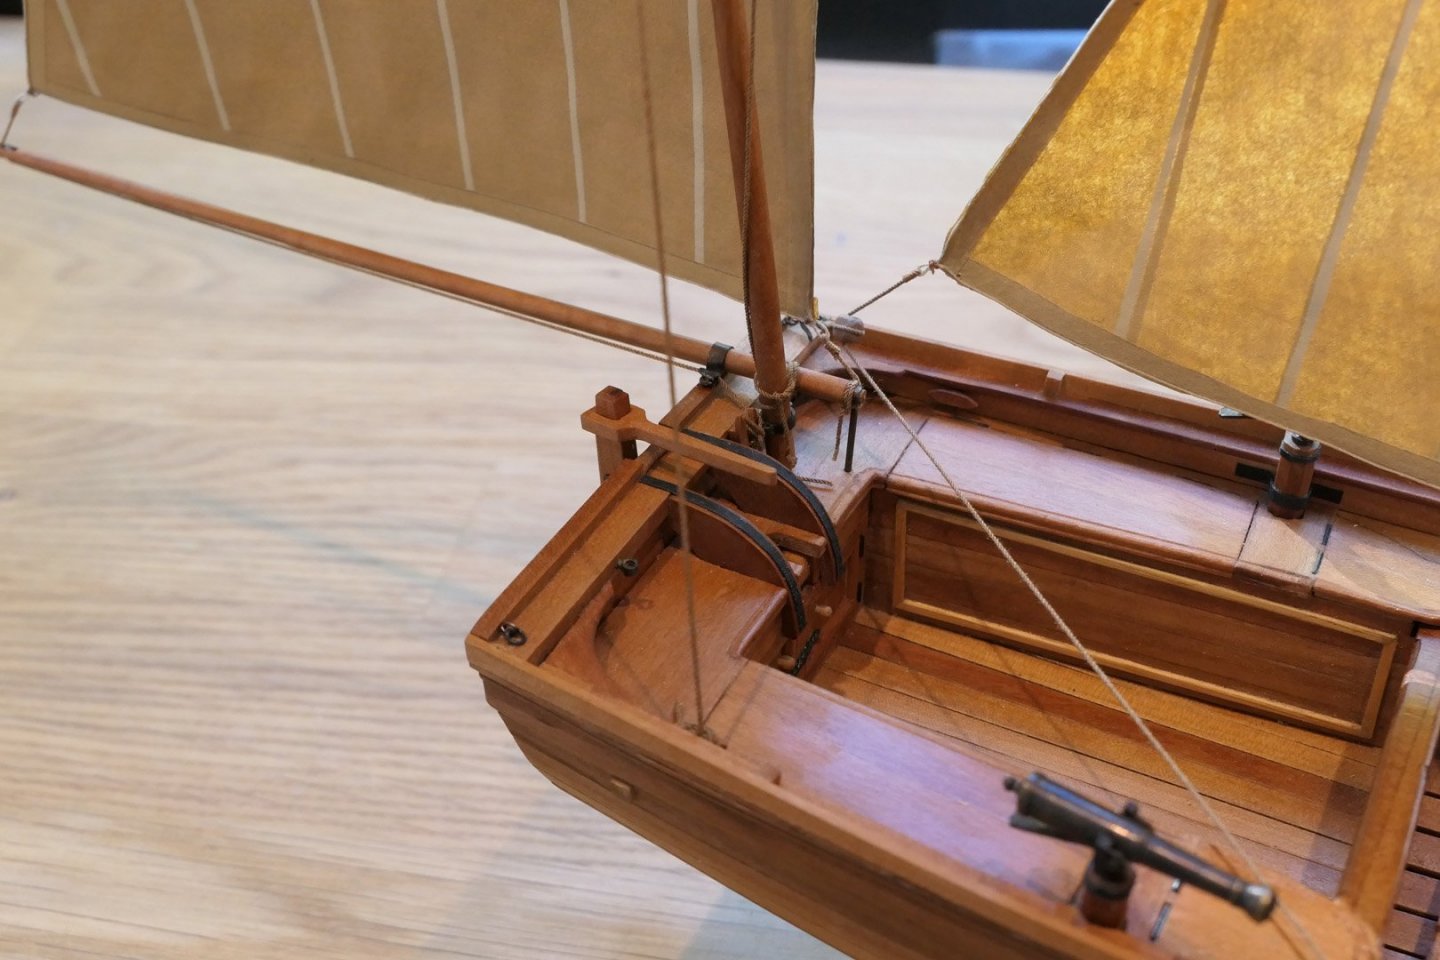
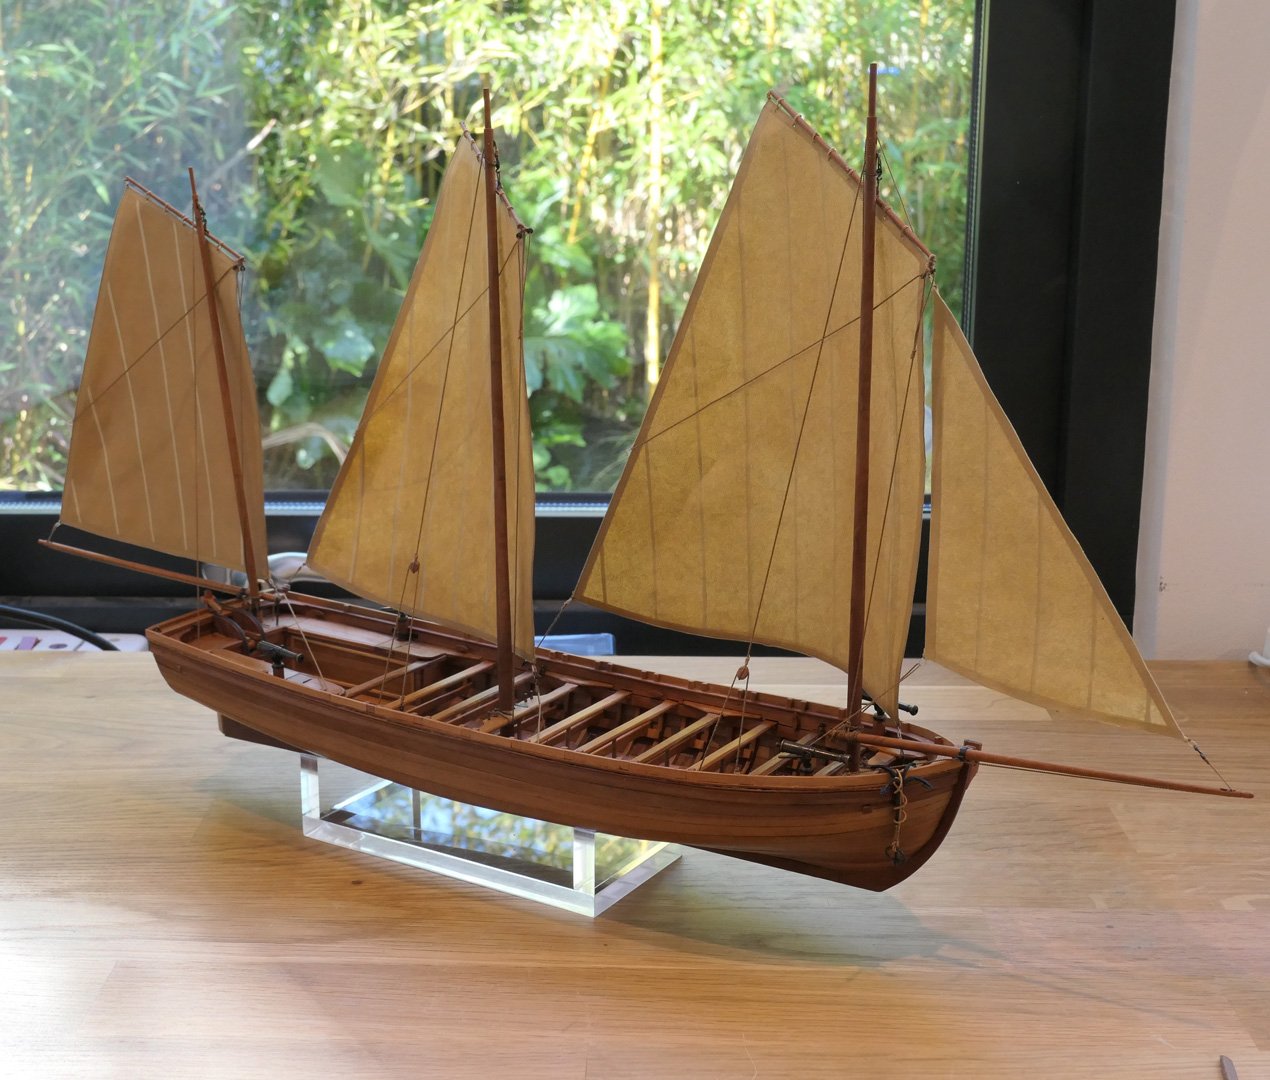
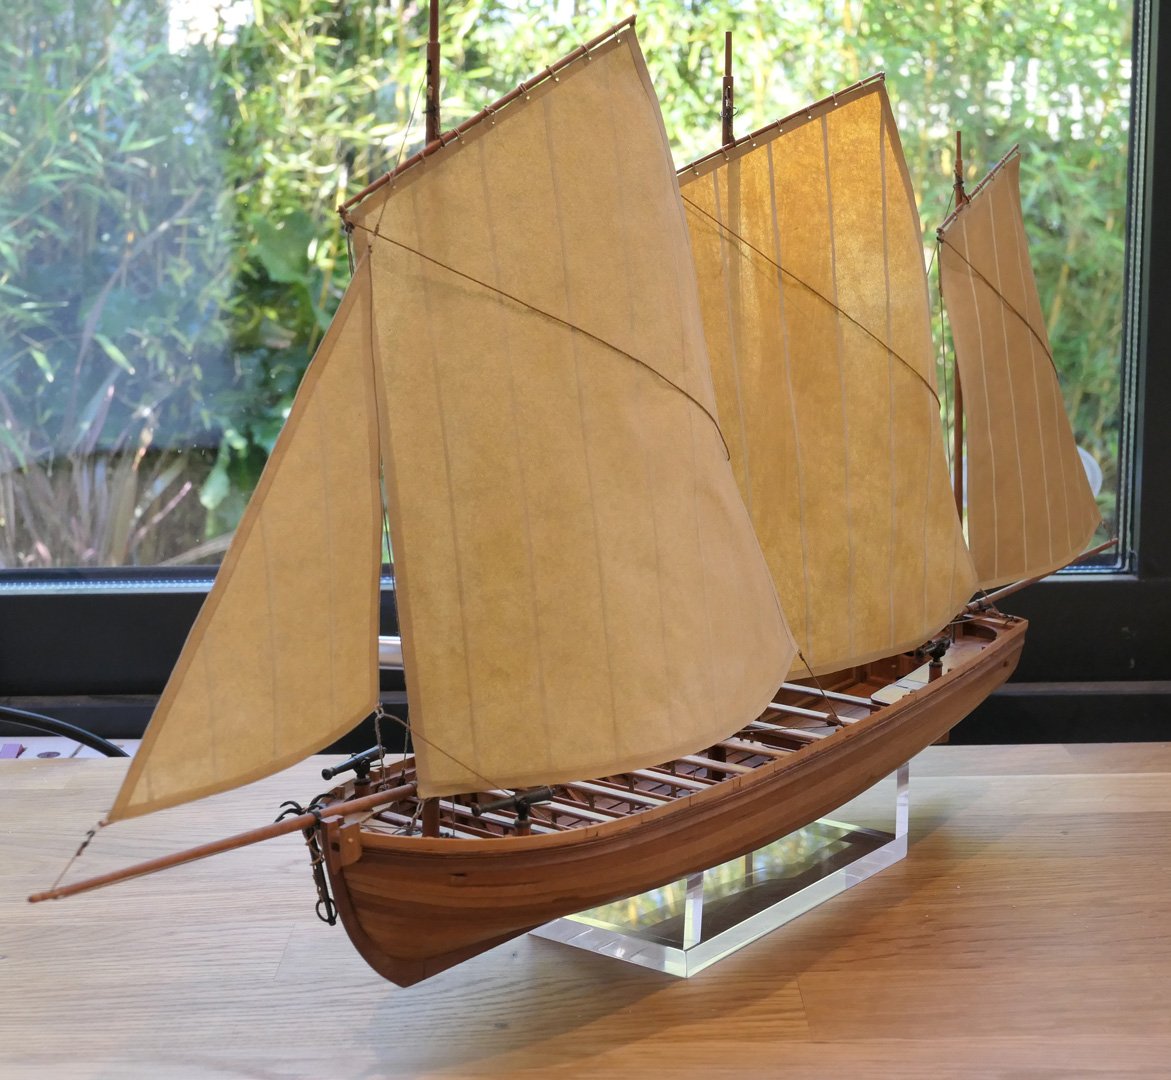
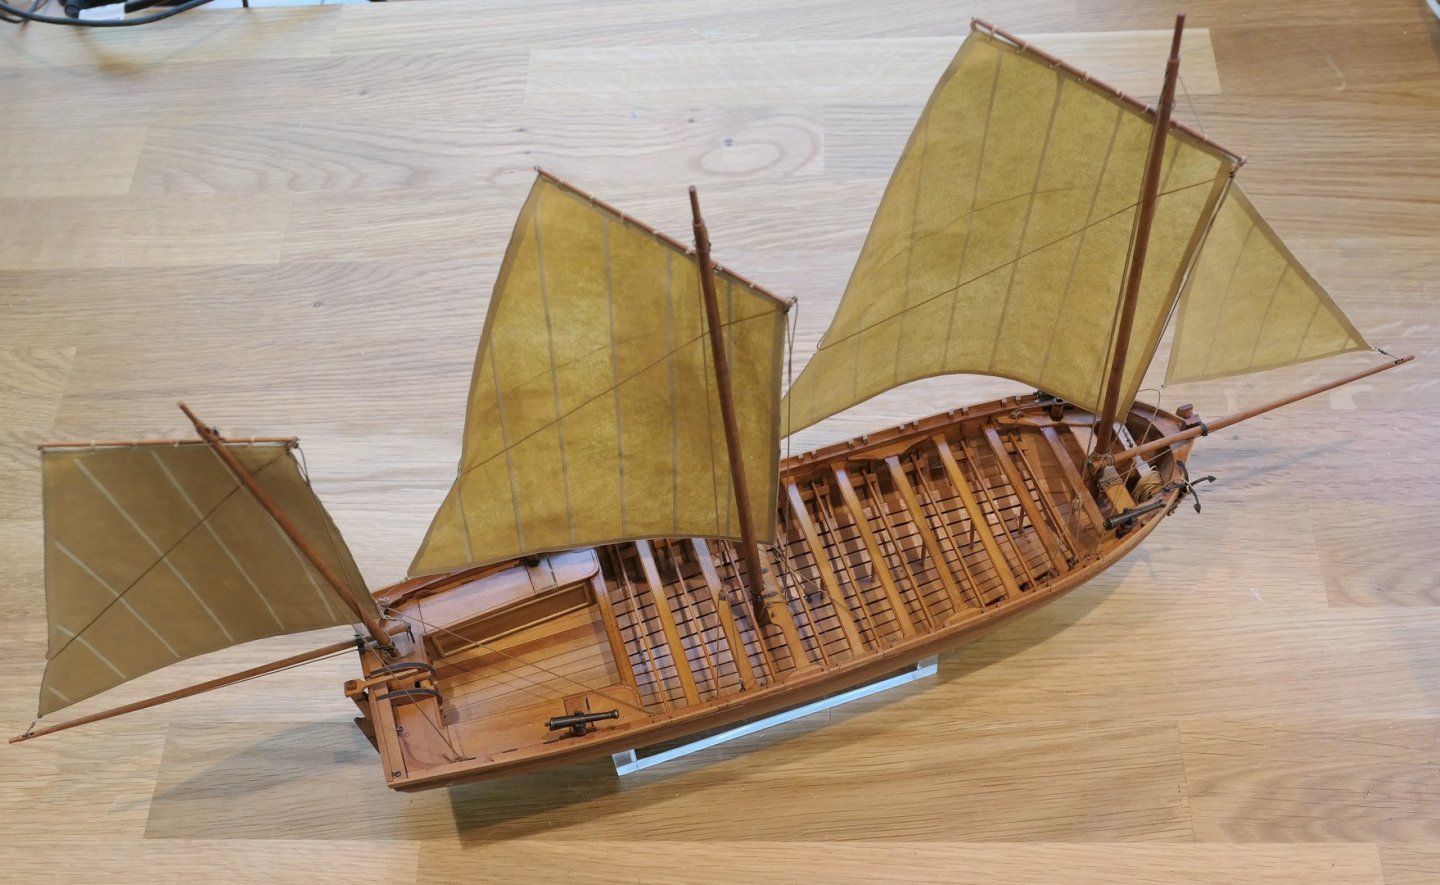
Sails I made the sails in the same way as I did those on the Sherbourne, using Modelspan (the same as Silkspan) and following the steps suggested by David Antscherl. (See page 9 of my build log, entry #226 Making sails.) The only difference was that this time, instead of tracing the outline of the sail, I placed the main sail lines on card and drew around the card to establish the outline on the Modelspan. This allowed me to place the holes and the seam lines accurately. The one thing I regret is that for each sail I made a new mix of the acrylic paints, so colouring between the sails was inconsistent. Erm, sorry, make that two regrets: as you will see, when it came to painting the seams I did not dilute the paint sufficiently for the mizzen sail, making the seams on that sail stand out excessively. Still, I left the mizzen as it was as I have treated this build as another in my learning exercises, and no one else will be looking at it other than family and myself. It’s a useful way of chiding myself! Rigging The rigging diagram with the monograph was very helpful. I also turned to the discussion and plans in the excellent Ancre monograph on The Ship’s Longboat which shows the variety of possibilities. Both sets of plans show the tacks and sheets simply held in the clews by a knot at the end of the rope, but I cheated here and simply seized them to the clews – and occasionally added a hook. The monograph notes that the jib was rarely used, and that in fact the boat would often be sailed with the foresail alone. I decided to put all the sails up, mainly to see what it would look like. As with my other models, I used the following simple jig to seize ropes to hooks and blocks. I found that the anchor needed something like 65 metres of rope, equivalent to 1.8metres at 1:36, but I decided to save on my 7mm rope and just cut one metre for it. As you can see, it is lashed to the bow and held on the main davit. Actually the anchor rope is in two pieces: a short piece that goes around the anchor and is lashed to the davit, and the metre of coiled rope that is laid over it on the davit to give the impression of a single piece. Current state of the model It isn’t exactly pretty, but I’ve had a lot of pleasure and satisfaction in putting in the rigging and sails. It was a good learning exercise to understand this way of rigging a longboat – a way that allows everything to be taken down very quickly. In the same spirit, I didn’t glue any of the masts to the boat, nor spars to masts. Everything can be dismantled in the required way. I certainly don’t miss the presence of the enormous cannon! The brail lines made the sails curve, but I ensured they were as smooth as possible by applying a very dilute PVA paste to the sails and blowing them dry with a hair dryer. You’ll note the base I’ve made from 10mm thick plain acrylic. Not the most elegant of designs, but functional. The remaining pictures show the boat in its current state. I’ll do some oars, and am still thinking about adding a portable binnacle, a landing hook, some barrels and a chest. Then the model will be as complete as I want it to be. Tony


- 124 replies
-
- 18
-
-
- longboat
- Chaloupe Armee En Guerre
- (and 1 more)
-
Wow! That's fantastically helpful! Thanks very, very much! Tony
- 35 replies
-
- 1
-
-
- allege darles
- wak
- (and 2 more)
-
ancre La Jacinthe 1823 by guraus - Scale 1:48
tkay11 replied to guraus's topic in - Build logs for subjects built 1801 - 1850
Congratulations on a really beautiful build! Tony -
Thanks very much. I thought it was modelspan -- I couldn't quite believe they were kit sails! I use the same kind of paper myself, also using the suggestions from this forum. As to the further questions, I was wondering: 1. whether you treated your card stock before and after cutting, and with what type of treatment; 2. whether you spray paint or use brushes; 3. your technique for achieving square edges; 4. and finally, whether you used the additional packs for this card model such as the laser cut parts. Tony
-
Newcomer looking for help with Cutty Sark rigging
tkay11 replied to Ann's topic in Masting, rigging and sails
Ann, the Cutty Sark sail and rigging plans with names are available from the Royal Museums Greenwich for £8 each. There are lots of websites that will provide names of sails, parts of sails and rigging. In addition to the advice you can obtain on this forum, there are lots of books that you can buy used from eBay and AbeBooks giving guidance on everything related to ship models. I found particularly useful zu Mondfeld's book on Historic Ship Models. Another thing is to look at the build logs for the Artesania Latina models of the Cutty Sark of which there are many -- on this site as well as videos on You Tube and other sites. Tony -
Very nice work as usual. Just one question: are the sails those from the kit, or have they been made using modelplan/silkspan paper (or something else)? Actually, I have a ton of questions about the techniques you use to build a card model to this degree of perfection, but I know that would be asking too much! Tony
-
Good progress with the planking. You may want to protect the keel and stem with tape before going any further as it looks as though they're already suffering some damage. Tony
- 50 replies
-
- 1
-
-
- lady nelson
- victory models
- (and 2 more)
-
One thing that has puzzled me about stiffening card with CA is the type of glue you then use to stick the stiffened card to another piece, especially if that piece has been stiffened by CA. Do you use more CA, or do you use a type of paper contact cement such as Elmers or UHU, or do you use PVA as the glue of choice? I've not had much success with gluing stiffened card, so I thought I'd better check in case it's my lack of technique or simply the wrong adhesive. The other thing is that card seems to soak up a lot of the thin CA. Is there any way of doing this that is more economical? Thanks Tony
- 175 replies
-
- 4
-
-
- hanse kogge
- shipyard
- (and 1 more)
-
I'm not clear whether you mean you're only subdividing and marking the centre bulkhead only. Ideally once you've measured the central bulkhead you also subdivide the other bulkheads so the same number of strakes occur along the full length. Of course it's possible that this means you have to let a stealer in or have a dropped plank, but the aim is to have as few as possible. Let's say it's 20 strakes with 4mm width planks at the central bulkhead, then every other bulkhead is subdivided into 20 strakes and that provides the measurement for the thickness of the planks at that point. Of course, the garboard is excluded from this as it will be wider than the other planks. I apologise if you've already figured this out! Tony
- 50 replies
-
- 3
-
-
- lady nelson
- victory models
- (and 2 more)
-
Thanks for the link to the video, Bob. The whole project is really worth a visit to see the progress from start in Dec 2017 to the present. Very impressive! Tony
-
Mini Table Saw recommendations
tkay11 replied to captainscott's topic in Modeling tools and Workshop Equipment
Well, I did order two HSS blades from Micromark in the US (a 168 tooth 80 x 0.8mm and a 230 tooth 80 x 0.5mm), together with an adapter for the Proxxon, so that I could have variable widths for things such as gratings, but in reality I found that I've rarely used them. I have almost entirely used the standard Proxxon blades which I have bought in the UK - including a very useful one for cutting acrylic. The ones I use most are the tungsten carbide 80mm x 1.5 and the excellent 50 x 0.56mm. I can't find any reference to this latter 50mm blade in current catalogues, so I presume it's been replaced by the 50 x 0.5mm 100 tooth HSS blade (cat no 28 020). The problem with the Proxxon blades is that they have a 10mm bore. So any other blades have to have an adapter to fit. You could machine such an adapter on a lathe. The one from Micromark (cat no 83515) converts 1/2" hole blades to the 10mm required for the Proxxon and costs $7.95 before shipping. So if you can find 85mm blades or less in Europe, this may be worth buying. Tony -
Mini Table Saw recommendations
tkay11 replied to captainscott's topic in Modeling tools and Workshop Equipment
I have a Proxxon FET table saw and, after working out how to work with it, have not come across anything that would want me to buy a different saw. I can cut quite accurately down to a tolerance of 0.1mm, and I use the appropriate blades for the job in hand. However, it did take quite some time before I understood its construction well enough and I have to spend time setting it up in conjunction with a digital vernier caliper to achieve this. I also had to read all the tips about the use of saws, as pointed out by Mark. European modellers who have far greater skills than I have seem to be able to produce wonderful models with this saw (in addition, of course, to their considerable talent and a few other tools). Jascha Heifetz, the renowned violinist, was once approached at the end of a concert by an enthusiastic woman who said "That violin has a wonderful sound". Heifetz looked puzzled, shook the violin about, and said "That's funny, I can't hear a thing". Of course, better machines make it all easier, but it's also fun learning to make do. Tony -
How about a table saw to its maximum height? You could probably do at least 25mm, and build up the blocks on top of one another -- although you wouldn't need to do it in heights that big. Tony
-
The best way is to study the planking tutorials in the articles database which you can find by clicking on the button at the top of the page. They are excellent. The first layer of planking is not too sensitive as you can use filler and sanding with gusto to smooth it all down since it won't be seen. However the second layer of planking is much easier if you buy 0.5mm thick strips of wood (cherry is good) including 2 x 10mm wide strips for the garboard planks. When you do your calculations for the number of strips needed you may find that 5mm wide is suitable. Tony
- 50 replies
-
- 2
-
-
- lady nelson
- victory models
- (and 2 more)
-
You can check the squareness of the bulkheads using square blocks (such as Lego) or a set square. It's worth the extra effort. Tony
- 50 replies
-
- 1
-
-
- lady nelson
- victory models
- (and 2 more)
-
Thanks. This should turn out nicely -- good idea about the modelling clay! Tony
-
This is a very interesting boat to build. Could you say what your plastic-based filler is? Others have been using a variety of fillers for their card models. Ab Hoving, for example, is using what looks like a standard non-shrinking wood filler. Tony
- 54 replies
-
- 1
-
-
- allege darles
- wak
- (and 1 more)