HOLIDAY DONATION DRIVE - SUPPORT MSW - DO YOUR PART TO KEEP THIS GREAT FORUM GOING! (83 donations so far out of 49,000 members - C'mon guys!)
×


tkay11
-
Posts
1,829 -
Joined
-
Last visited
Content Type
Profiles
Forums
Gallery
Events
Everything posted by tkay11
-
 Generally people prefer to do the planking before attaching the stem, keel and sternpost. This keeps them protected from sanding and allows you to plank very accurately to their edges. If you study the build logs, you'll see how others have managed the double planking. Some, including myself, bought 0.5mm thick strips to do the second layer, including wider strips to ensure the garboard plank fits well. There are good planking tutorials on this site which can be found in the articles database (click on the link at the top of the menus). Tony
- 50 replies
-
- 1
-

-
- lady nelson
- victory models
- (and 2 more)
-
The Sherbourne is a good example of this type of cutter, and there are lots of excellent builds of that on this forum. In particular have a look at those by Dubz, Gregor and Stockholm Tar. In these, in addition to the details of the build, are some useful discussions of the historical aspects with reference to original plans and drawings. Tony
- 50 replies
-
- 2
-
-
- lady nelson
- victory models
- (and 2 more)
-
Thanks, Ab. I'll get the internet to do my bell ringing. Tony
- 65 replies
-
- 1
-
-
- fish hooker
- fishing
- (and 2 more)
-
Thanks, Ab. It looks as though this is a water-based wood filler which can be used immediately (i.e. not mixed from two components, like a resin) and which can also be bought as a powder for mixing with water. Perhaps cellulose-based. Would that be a fair analysis? If so we have plenty of similar products in the UK which would fit the purpose, such as Polycell. Tony
- 65 replies
-
- 1
-
-
- fish hooker
- fishing
- (and 2 more)
-
Thanks, Dane. That's a neat small model. What is interesting is that you meet different types of challenge when you do card modelling in contrast to those in wood modelling. In this particular instance, with the longboat, I was intrigued to see how you could approach such a boat and at such a small scale using the frame cut-away method in card. I thought your design looked innovative and clever. It certainly was a good learning experience for me, and made me appreciate the fantastic skills you have in Eastern Europe with card modelling. I'll definitely be trying more! Tony
- 124 replies
-
- 1
-
-
- longboat
- Chaloupe Armee En Guerre
- (and 1 more)
-
Ab, I've been wondering about the type of putty you use as filler. Could you make some suggestions? Thanks Tony
- 65 replies
-
- 4
-
-
- fish hooker
- fishing
- (and 2 more)
-
@Dane: Your card kit of the 18th Century longboat has been a great inspiration, and I hope you don't mind that I deliberately left it uncompleted in order to focus on this model! Thanks very much for the tips on the metal work. It's much appreciated. @Roger Pellett: Thanks. I really like these small boats. I'll be concentrating more on them once I've finished the Chaloupe, although I will continue my apprenticeship with a Plank-on-Bulkhead model first, just to improve my experience and skills. @VTHokiEE: Thanks for the kind words. I use the term 'novice' because I see each of the models I have made (this is my fourth if I include the partial build of Dane's longboat card kit) as a different area of learning. So first was a kit (Sherbourne) which rapidly became a 'bashed' kit, then the Triton cross-section to learn working from plans, then Dane's kit to learn something about card modelling, and now the Chaloupe in order to understand the 'mould' method of construction. Hence it really is a continuing apprenticeship (perhaps apprentice ship). It looks as though your experience with all those builds of yours will more than equip you to build the Chaloupe. As you can see, it's an excellent model with great plans and, in addition, has a lot of elegance about it. As to the equipment, I can't say you need much. Although I did purchase a metal-working lathe, my inexpensive Proxxon wood-working lathe would have been more than sufficient and in fact I could have done all the 'lathe' parts with a simple electric drill (which I used as a lathe before I bought one). The other main piece of equipment has been my very inexpensive Proxxon Micromot 50 drill with its equally inexpensive pillar (which I modified into a mill at very low cost). The only costly item that I would really recommend is a table saw. The ironwork was done with a simple butane torch and a tube of silver solder with flux built in. Of course you still have to buy the wood and all the other bits and pieces such as drill bits, sanding paper, files, glues etc. However doing so is still, in the long run, cheaper than buying kits -- especially if you find (as many do) that building a kit often involves you in buying extra wood and discarding many of the parts provided in favour of your own parts. So I really would recommend your just jumping in and trying it out. That's what I did. It's a great exercise and you'll feel great at every new step you learn and complete -- a bit like attaining levels in a computer game. Tony
- 124 replies
-
- 3
-
-
- longboat
- Chaloupe Armee En Guerre
- (and 1 more)
-
What a nice project! I look forward to its evolution. Tony
-
Help with building keel
tkay11 replied to Riotvan88's topic in Building, Framing, Planking and plating a ships hull and deck
Yes, the instructions that come with the kit are sparse and not very good. The build logs are a far better way of doing it. That's how I did mine. Tony -
Help with building keel
tkay11 replied to Riotvan88's topic in Building, Framing, Planking and plating a ships hull and deck
Great to see another Sherbourne build. Welcome! You may not have noticed in many of the other Sherbourne builds that it can help to do the planking first. This avoids the problem of damaging these parts as you sand the planking. This in turn allows centring of the keel and stem on the thinner longitudinal bulkhead. If you haven't read the other Sherbourne builds, do have a look as they will guide you through the process. In particular try Dirk's (dubz), Kester (Stockholm Tar) and Gregor as they have a lot of discussion about the historical details. You can find all these and others if you do a search for 'Sherbourne' and tick the box 'Content titles only'. This search will also reveal useful discussions about the Sherbourne. Of course, if you have particular questions, don't hesitate to put them up on your log, or as specific questions in other parts of the forum. You'll find people really friendly and supportive here as they have all been through the same processes and mistakes. There are no stupid questions! Tony -
If you look at Wikipedia under 'gunboat' one answer might be 'decked gun yawl'. See the picture of a similar boat on the right. Tony
- 216 replies
-
- 3
-
-
- masterkorabel
- ships
- (and 3 more)
-
Thanks, Edward, Michael and G.L. for the comments and to all the 'likers'. And I apologise for the large number of posts that I put up together -- this was the result of my being unaware of the passing of time and of thinking that each step was such a small one that it wasn't worth posting about! I still have the same aims in mind, though: (1) to stimulate interest in this lovely model which I want to show is manageable by novices such as myself. (2) for all us novices to show that it can be done by taking each small step one at a time, rather than being worried by the apparent enormity and complexity of the build at the outset. This means I try to show each of the steps in reasonable detail, together with the mistakes, rather than try to present a series of nice photos. I find that as I take each individual step I become totally absorbed by it, and enjoy it as much as making an entire model. Tony
- 124 replies
-
- 8
-
-
- longboat
- Chaloupe Armee En Guerre
- (and 1 more)
-
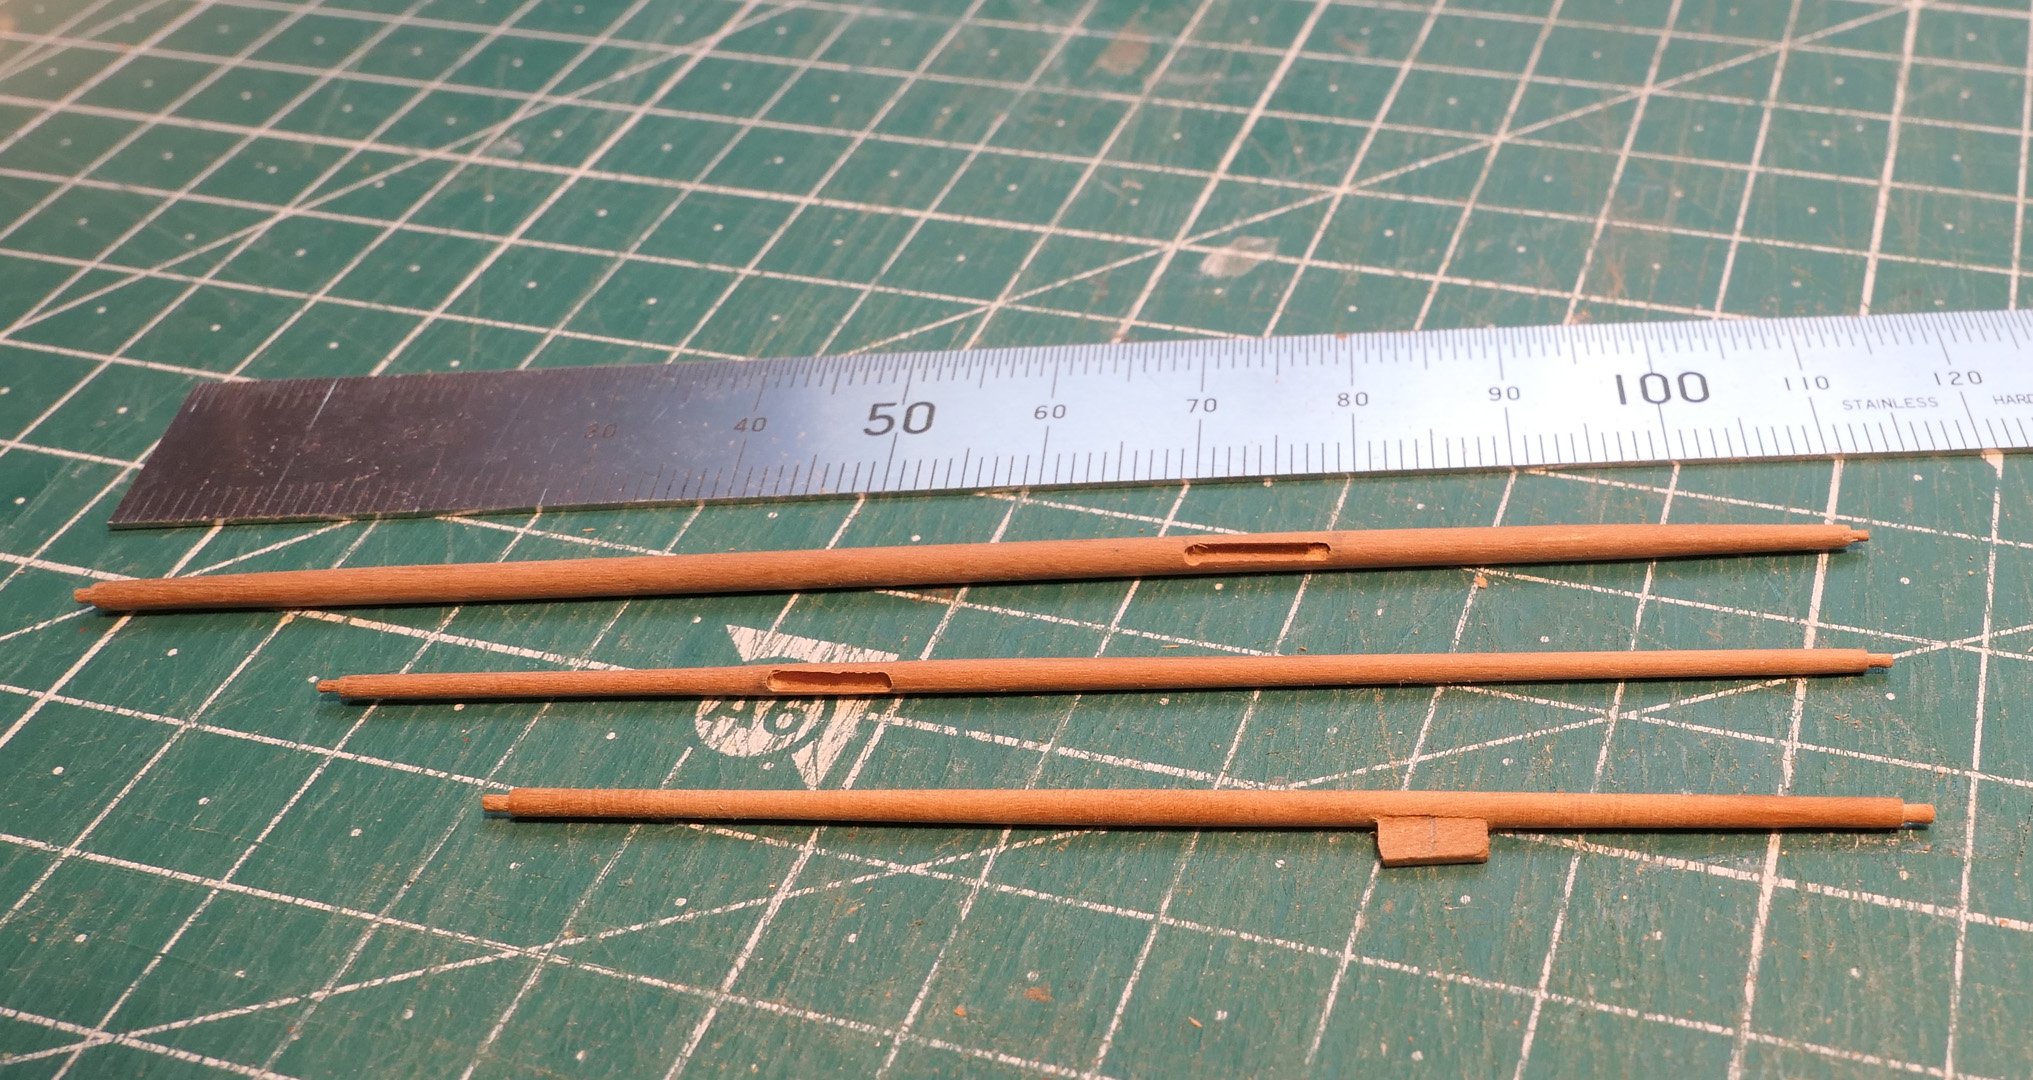
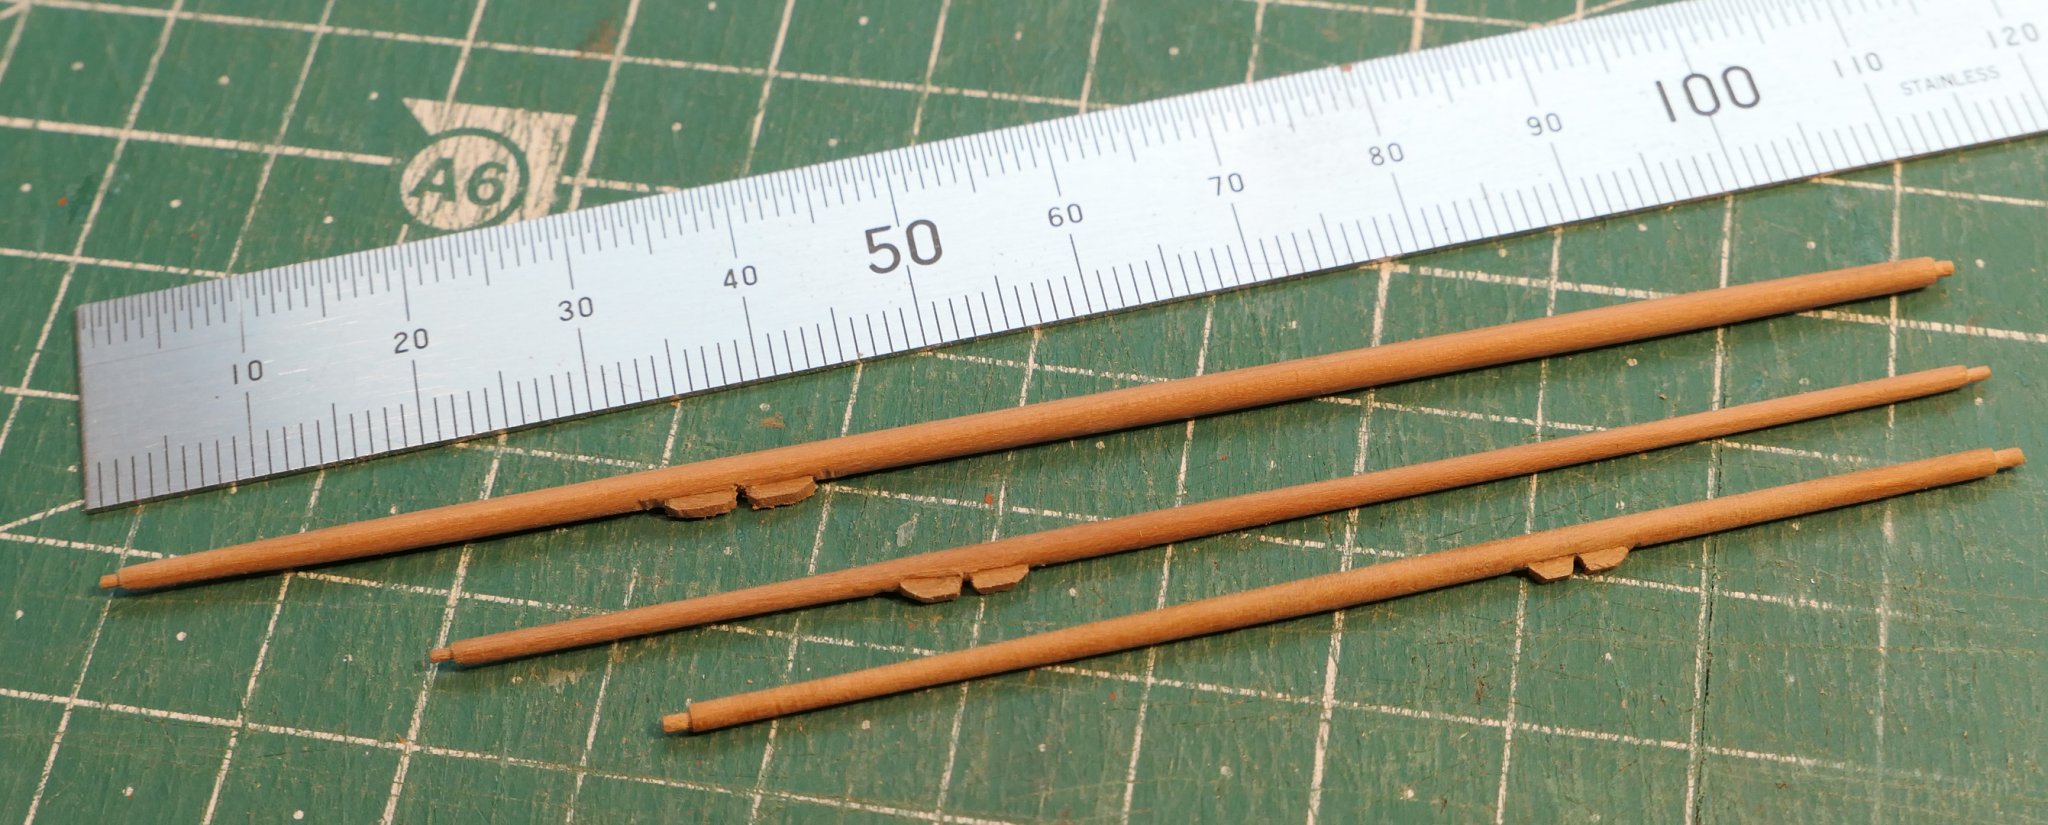
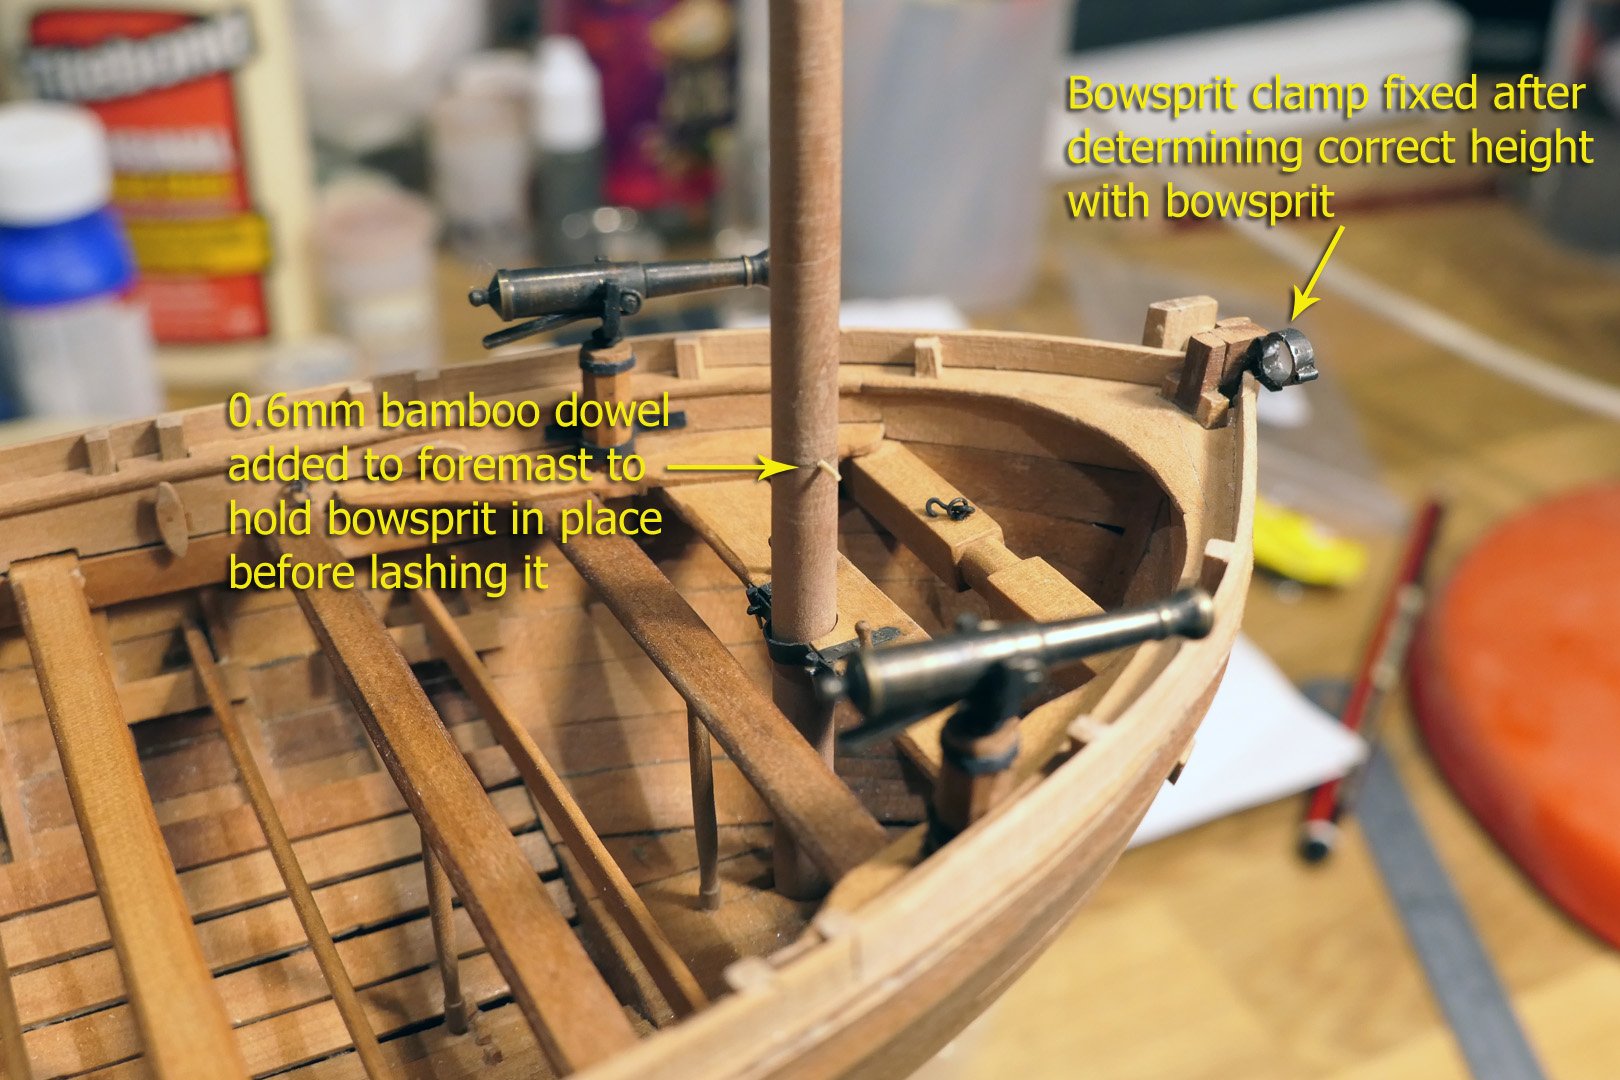
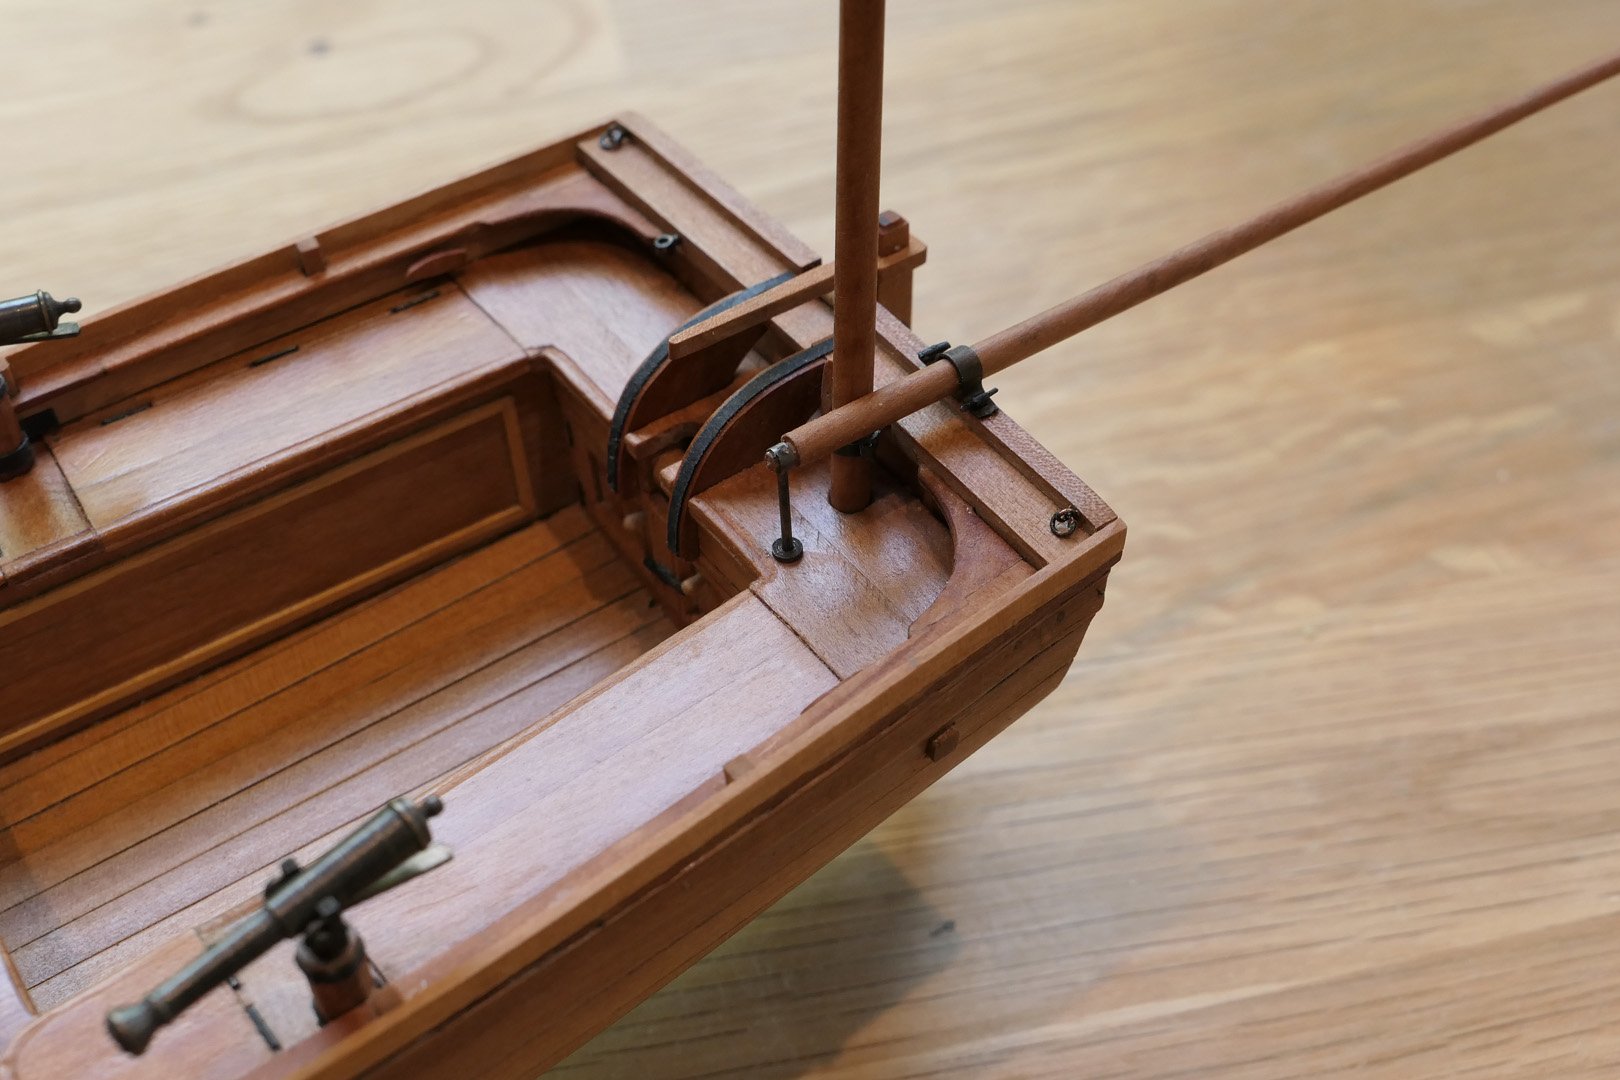
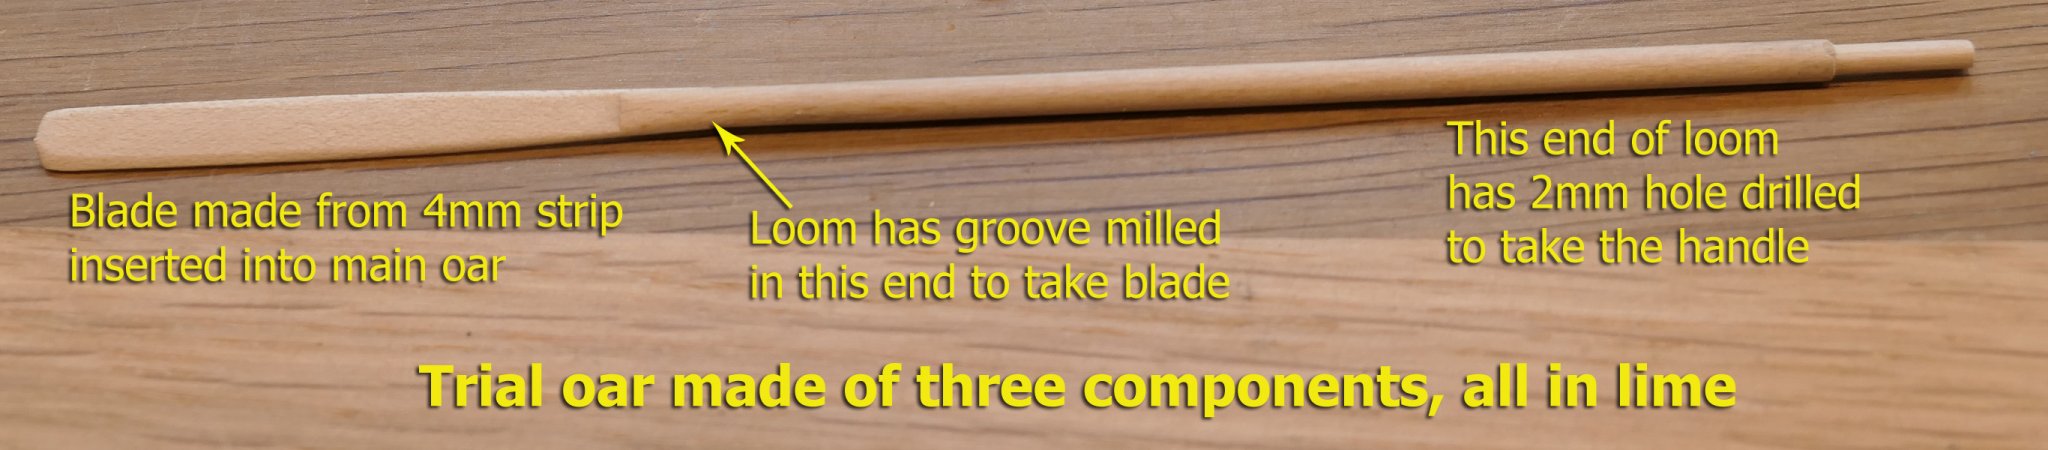
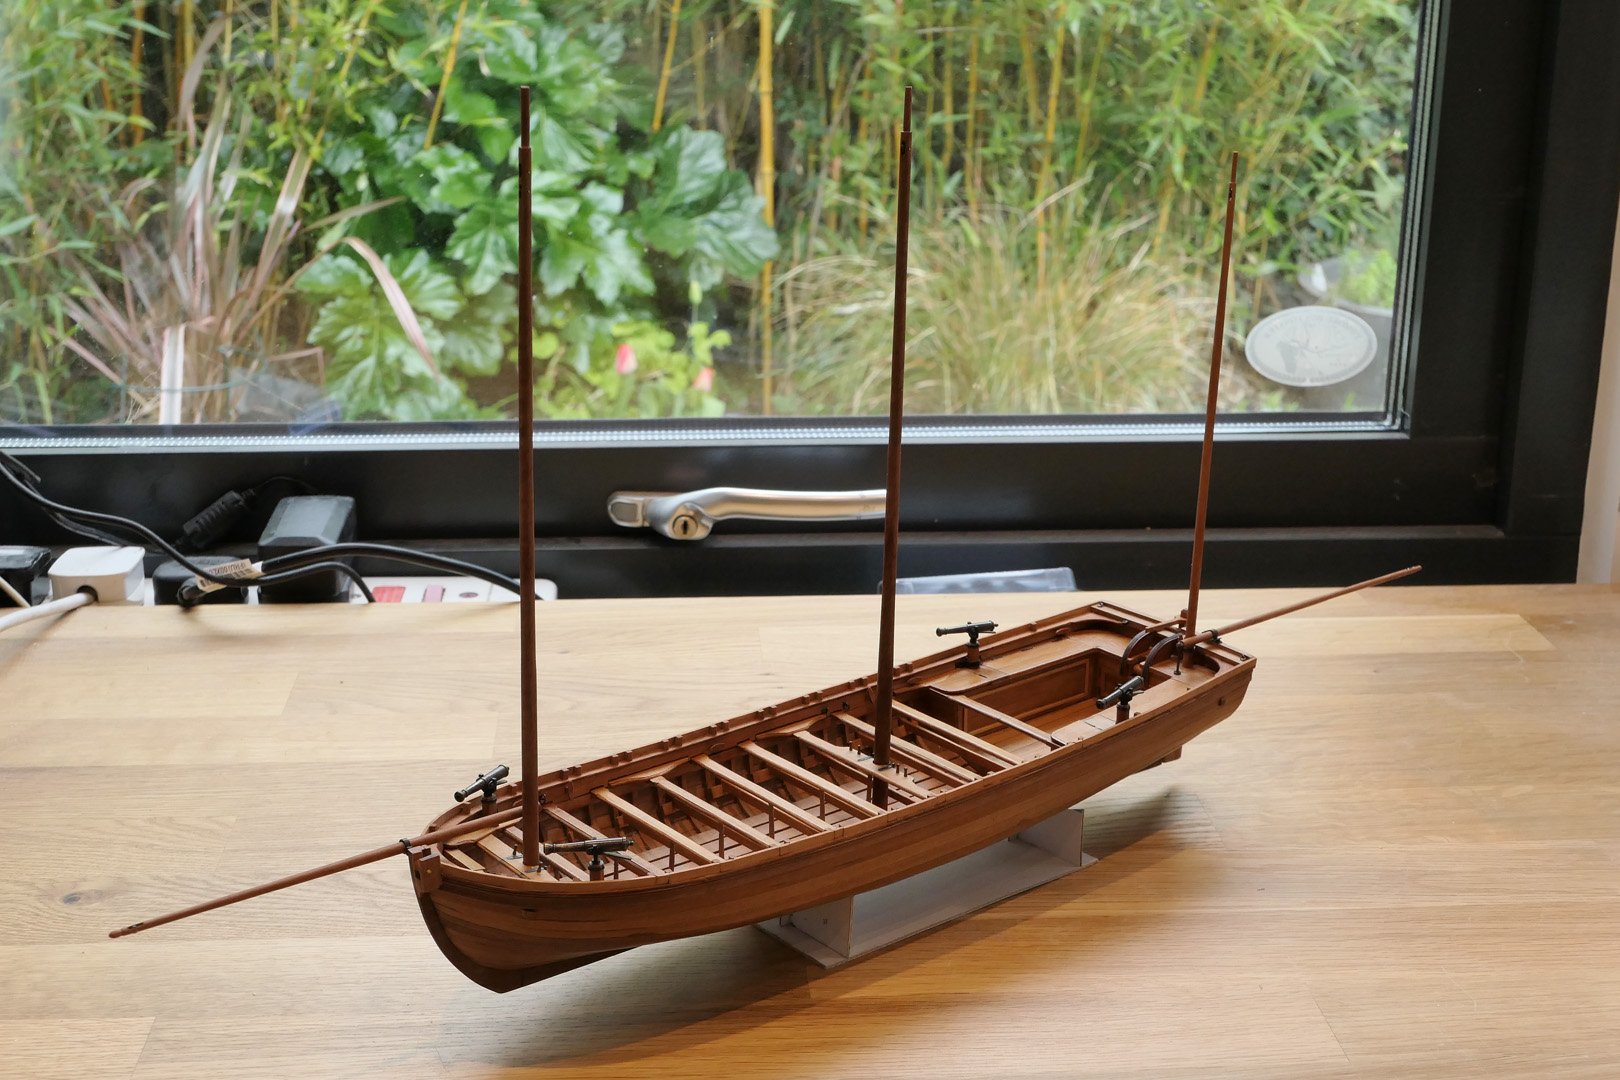
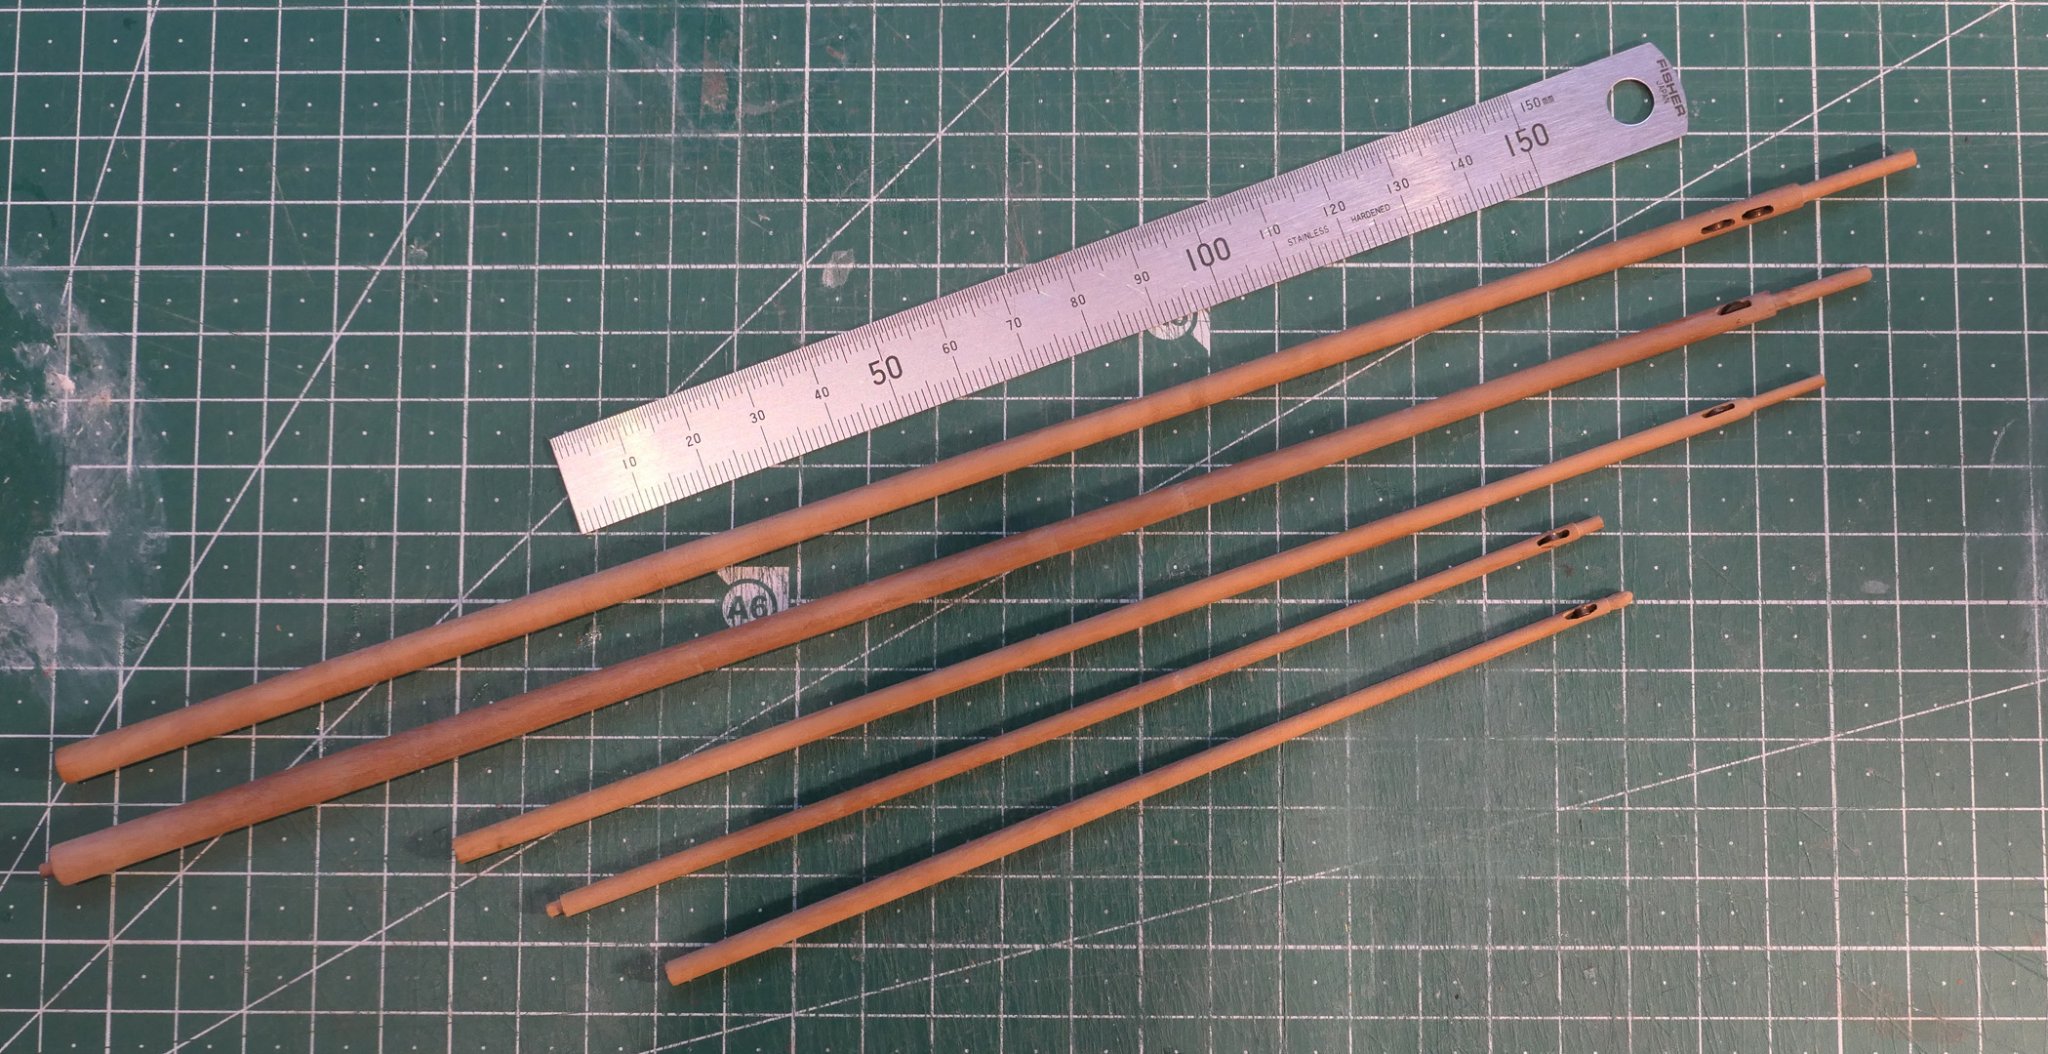
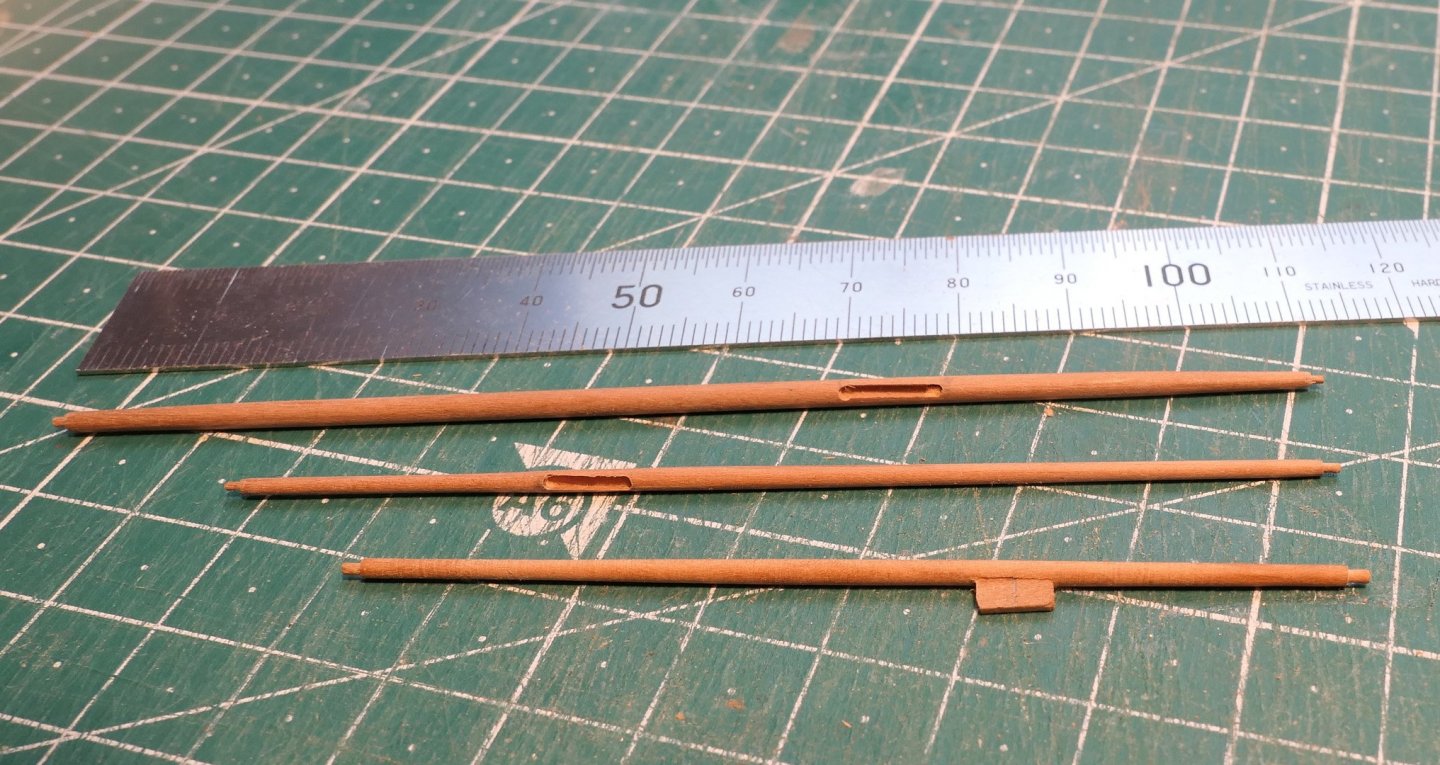
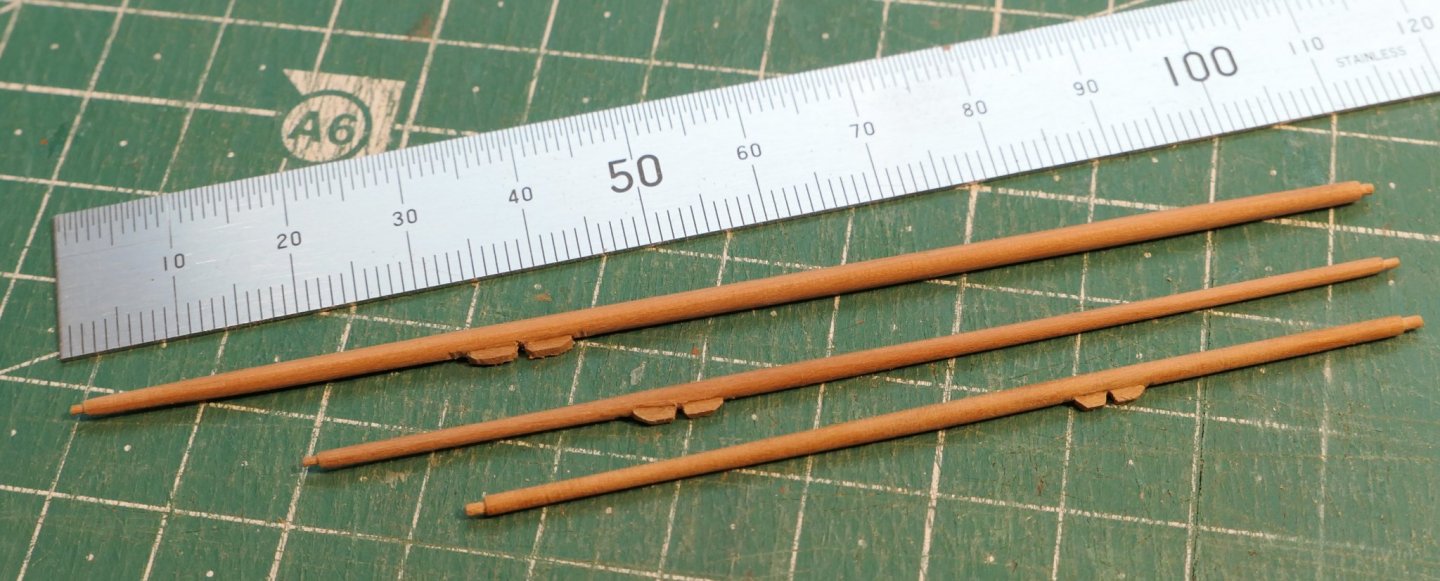
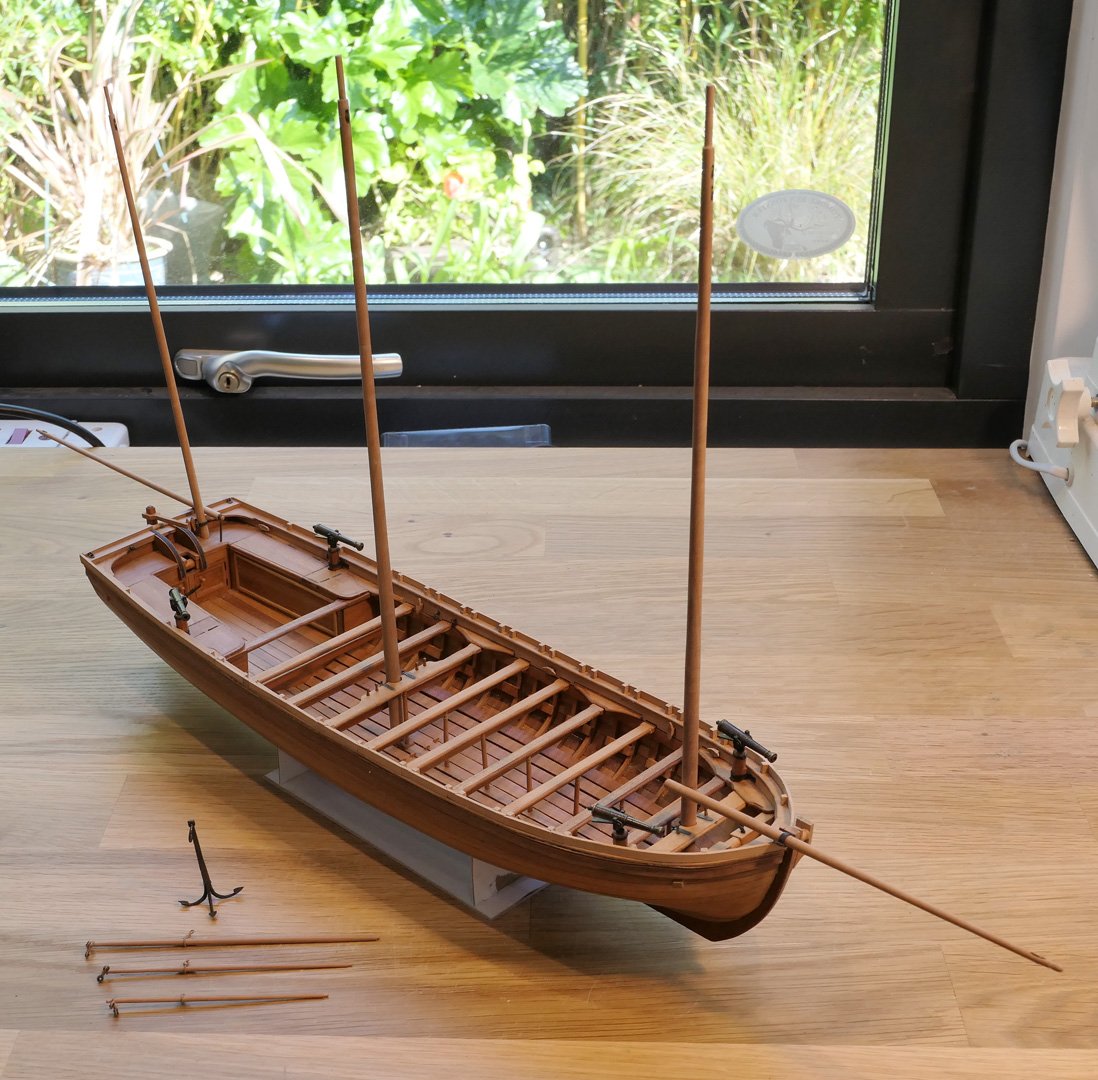
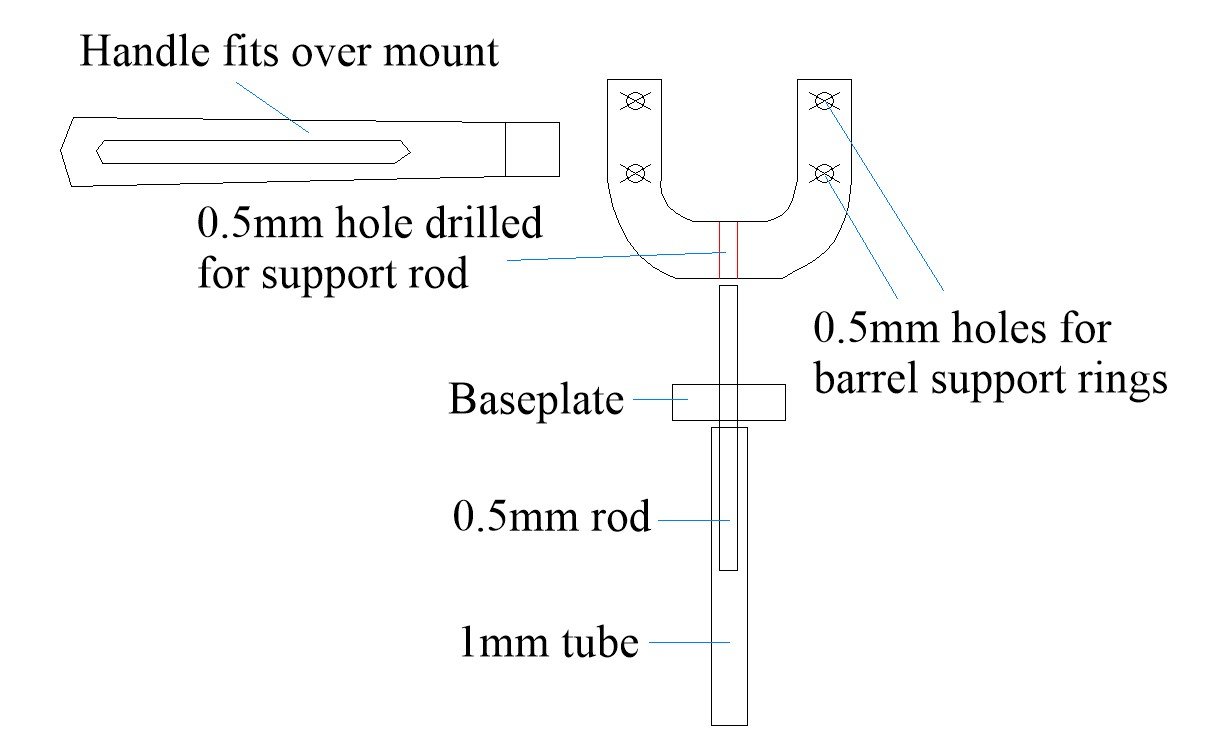
Yards After fashioning the yards, I cut grooves for the cleats, added a strip of wood and then filed the strip to mimic two cleats. The yards were then fitted with their slings and the grommets for the brails. Bowsprit & Mizzen boom The bowsprit was fixed as shown in the pictures: The components for the holders of the mizzen boom are shown in the following picture: Masts in place An initial assembly of the masts and boom: Oars I’ve just started experimenting with making the oars. My first attempt is using lime wood, making the oar in three sections as follows (I’m happy with the method, but still don’t know whether to dye them or paint them. I also have to add the leather protective sleeve): The next steps are (1) making the sails; (2) adding extras, such as barrels, portable binnacle and the oars; (3) making a stand. I'll be working on these over the next week or so and hope to have postings in that time frame! Tony


- 124 replies
-
- 25
-
-
- longboat
- Chaloupe Armee En Guerre
- (and 1 more)
-
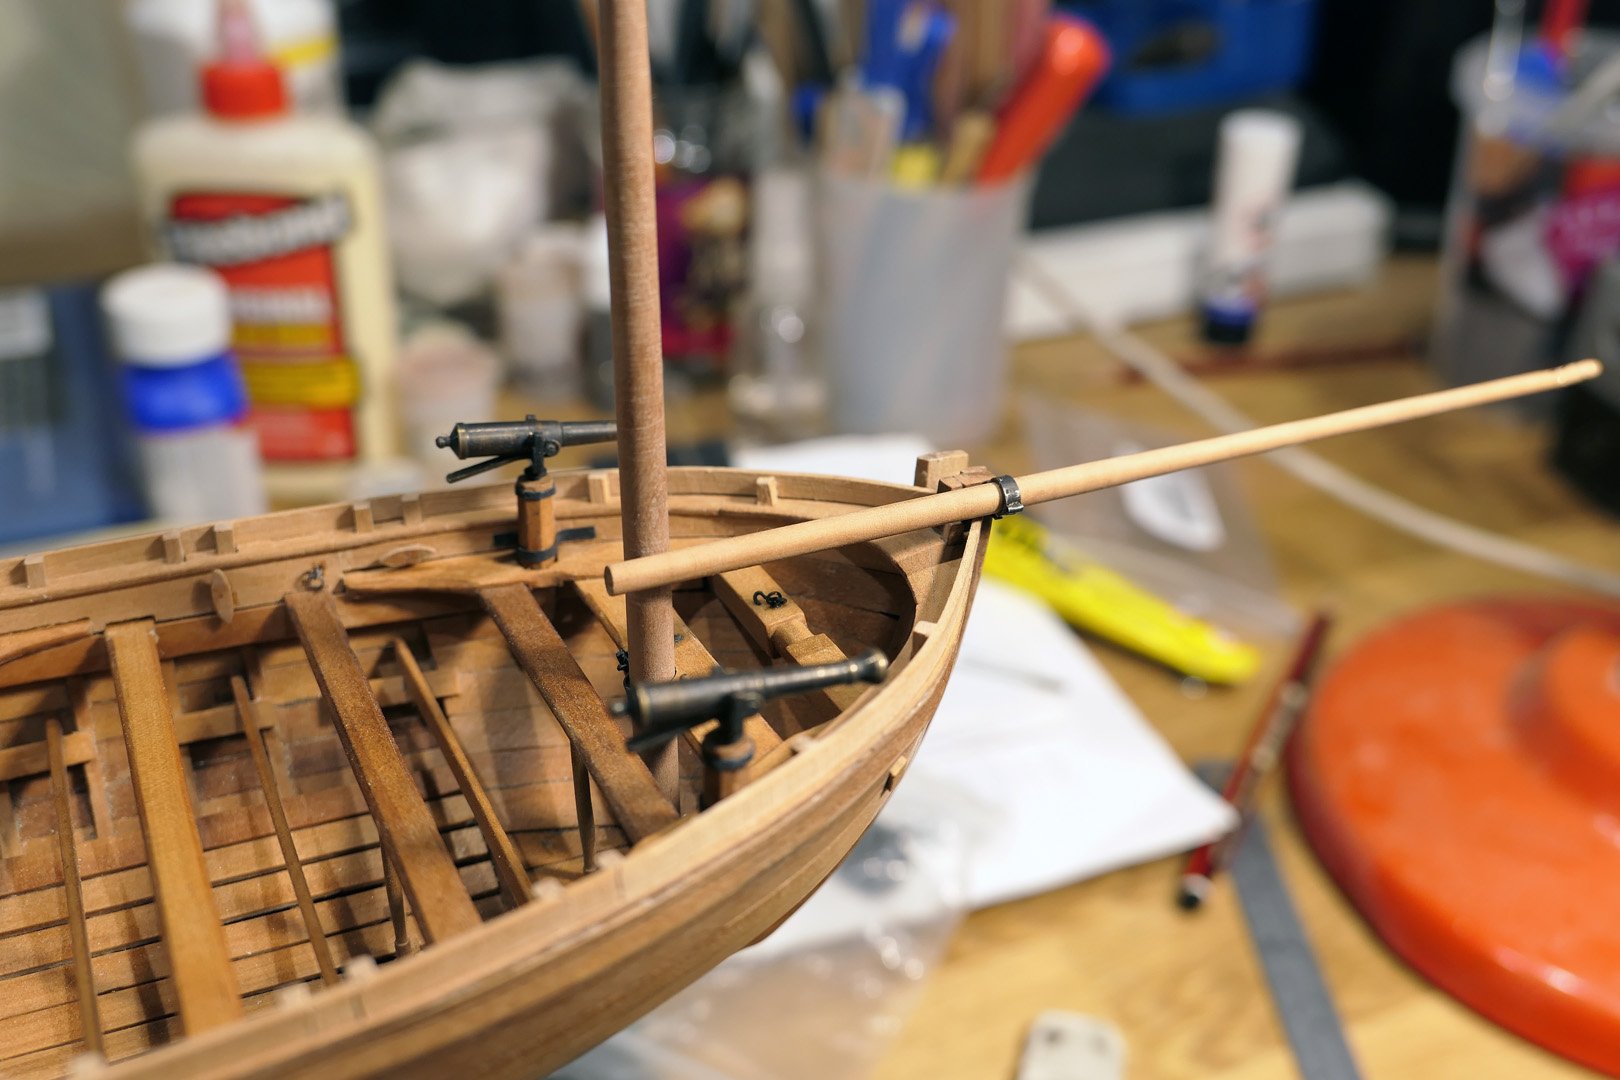
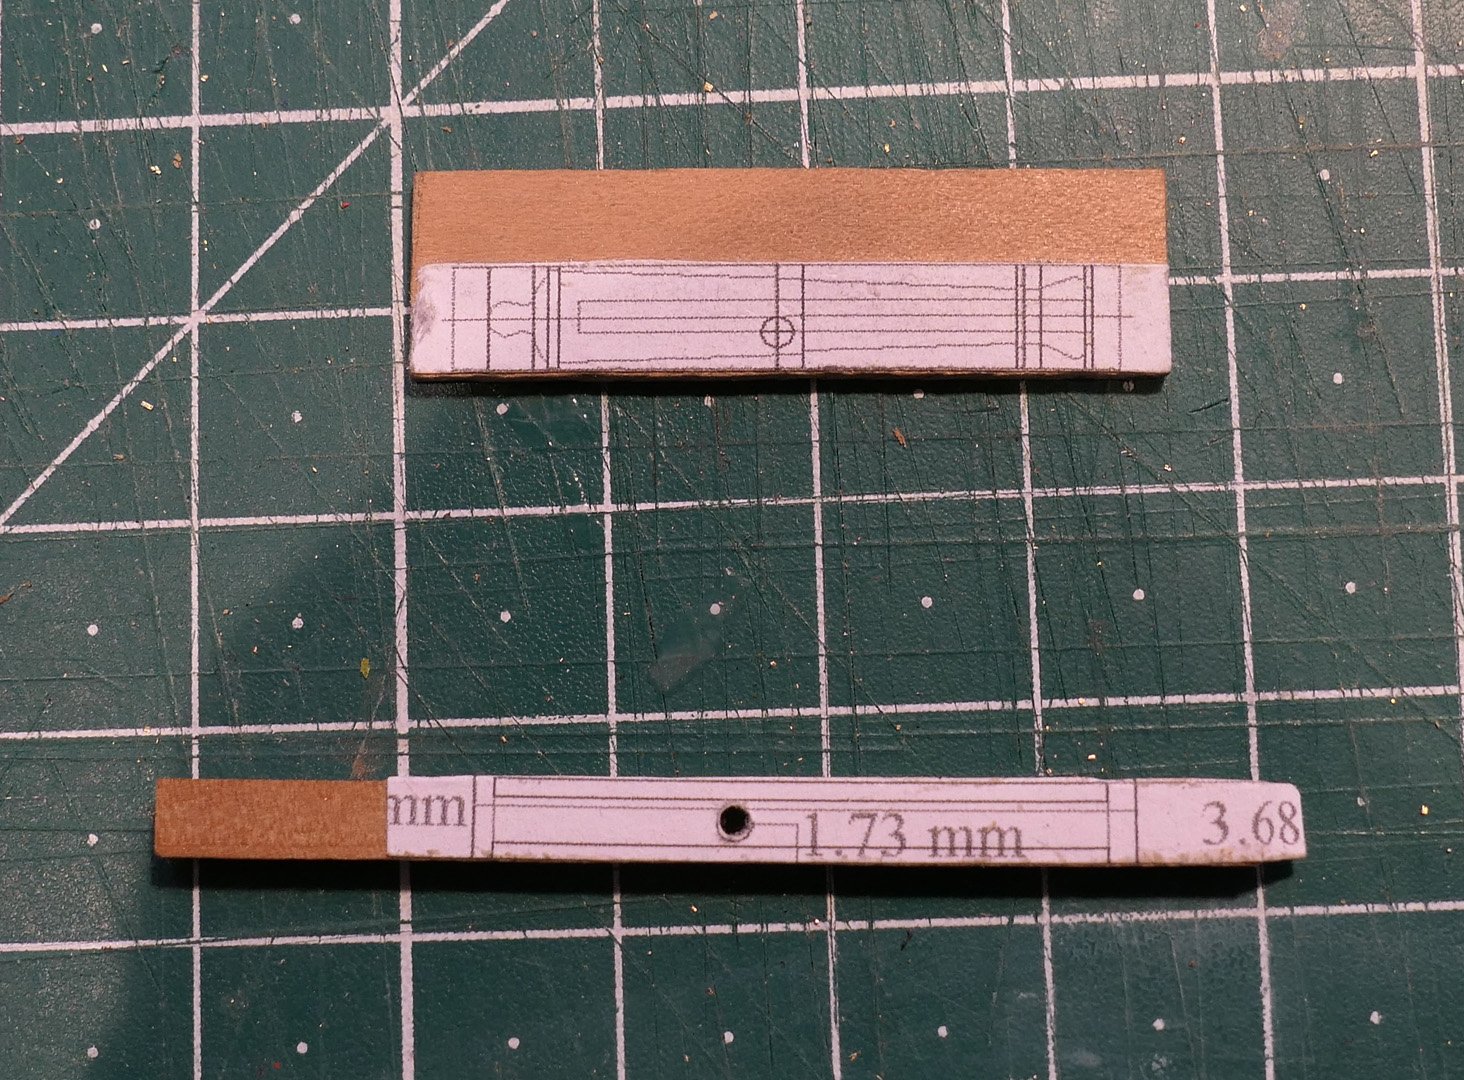
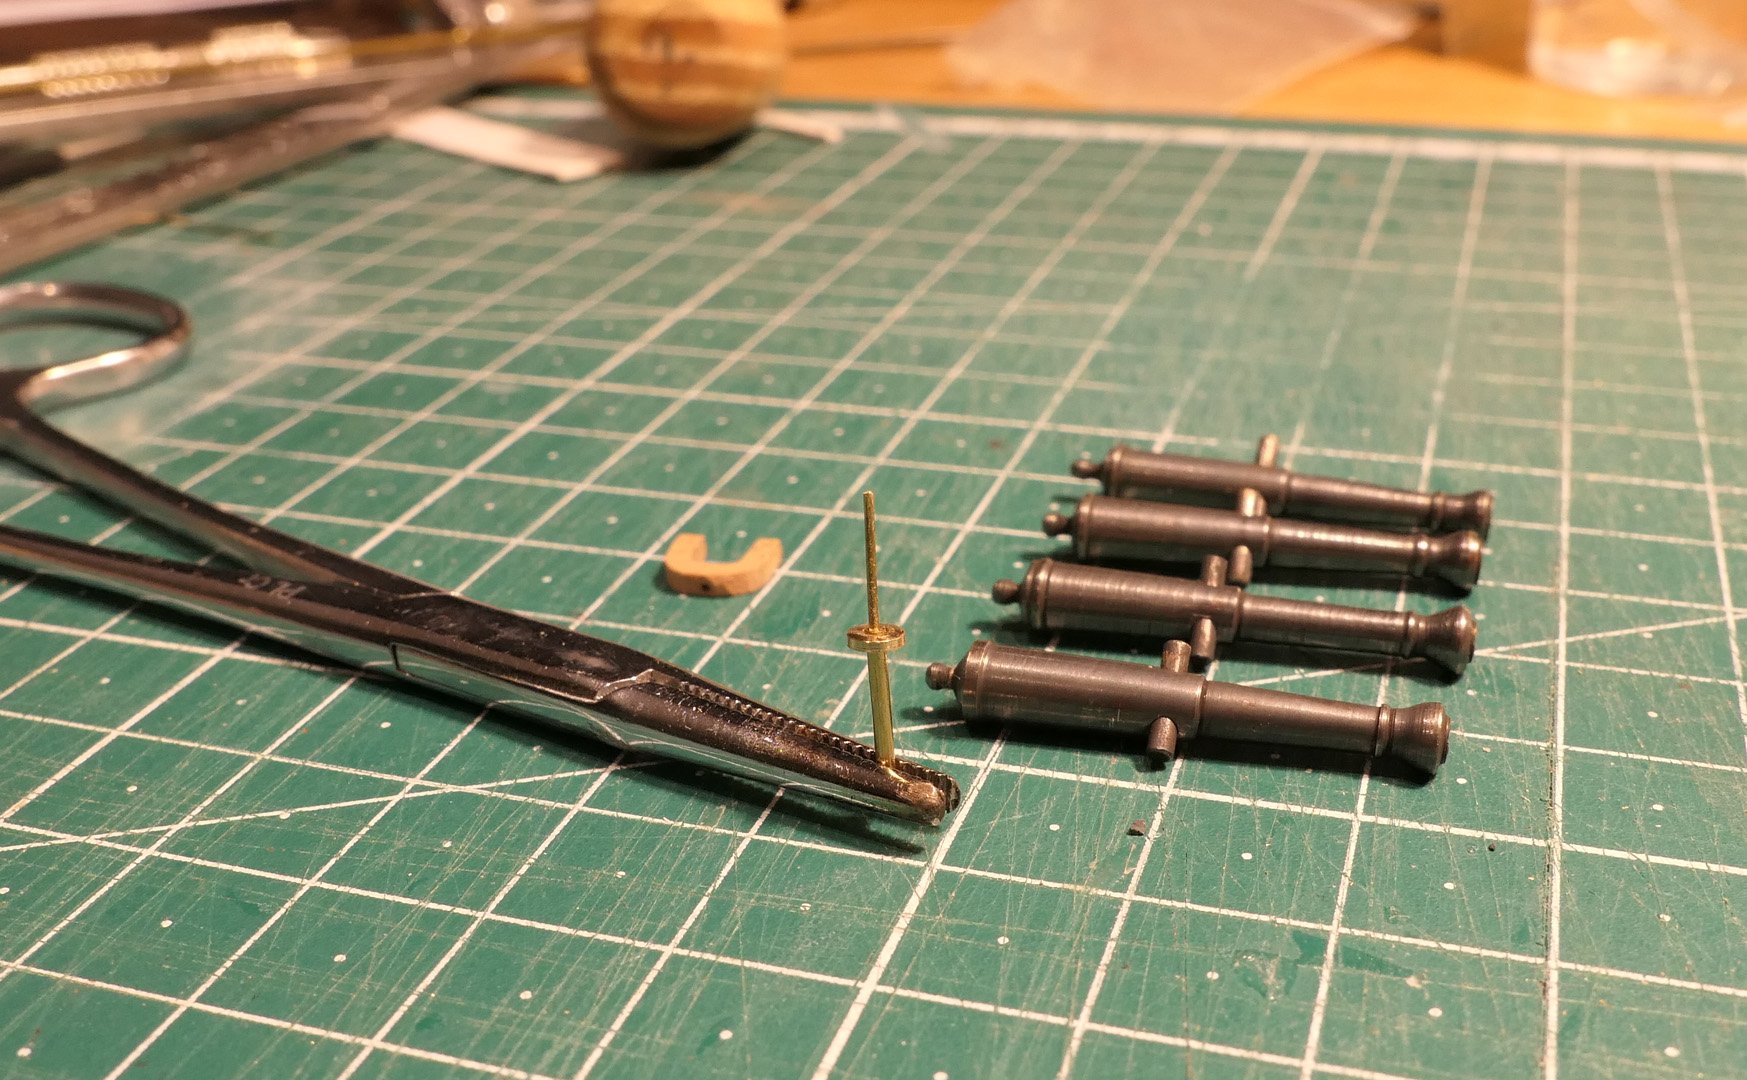
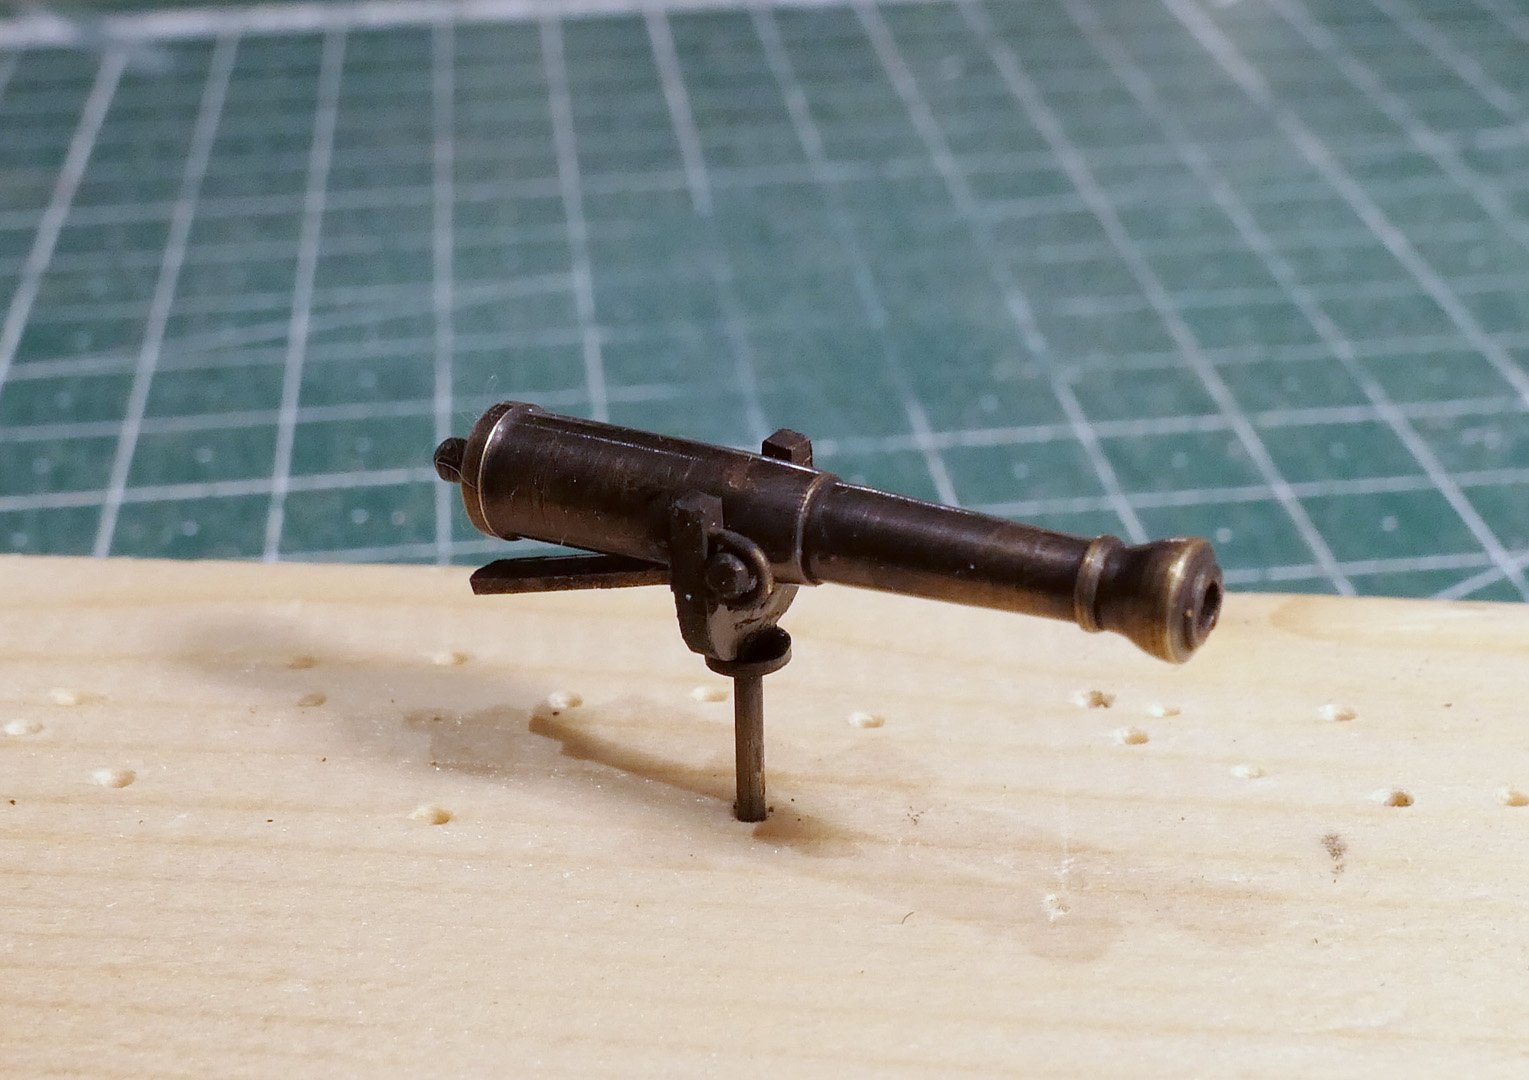
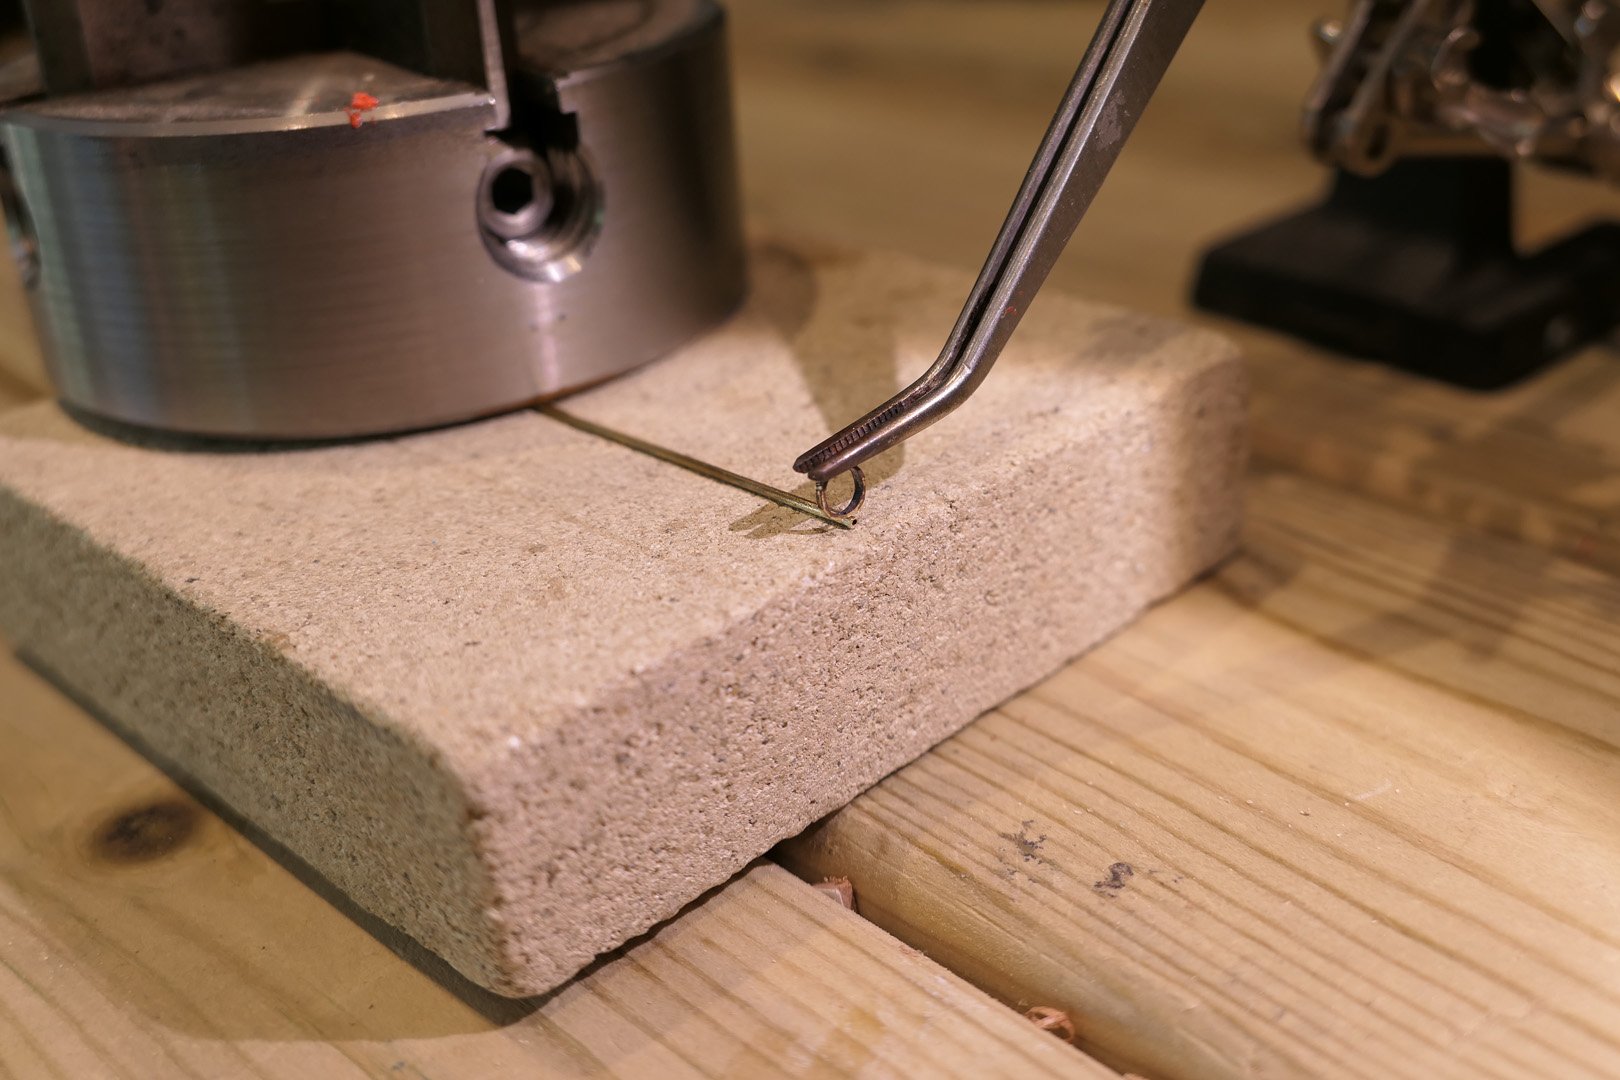
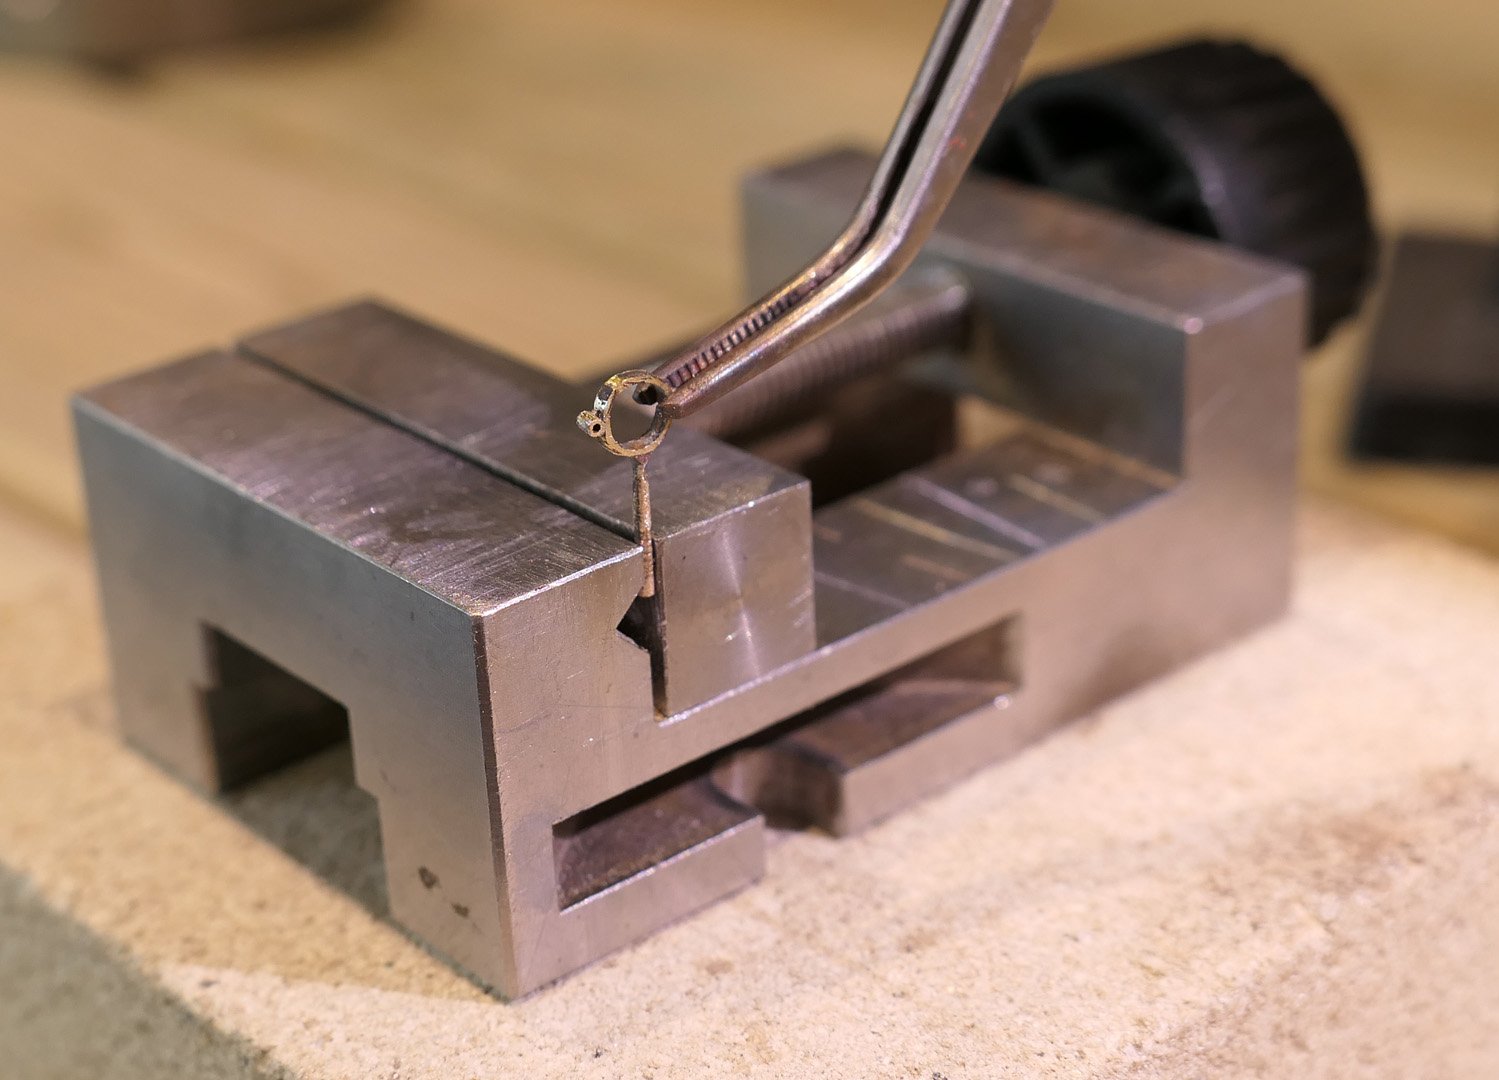
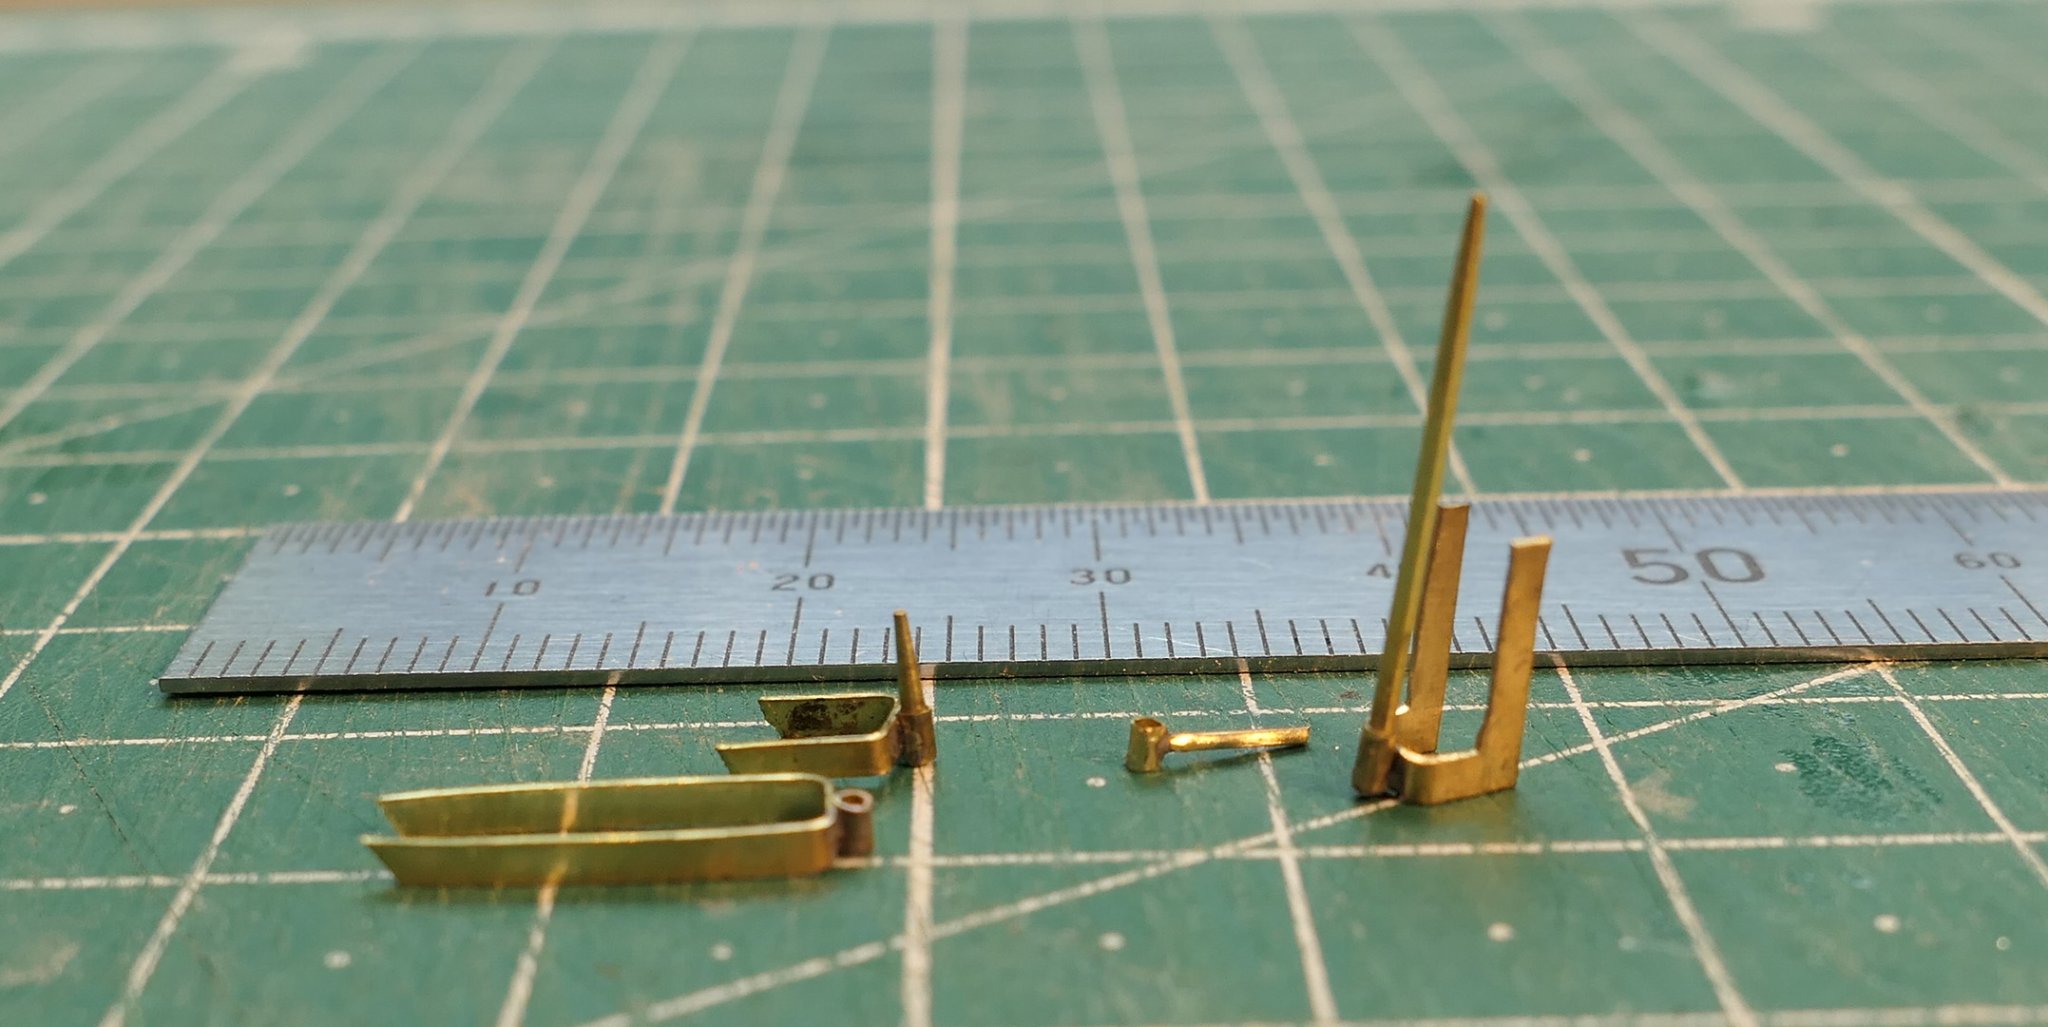
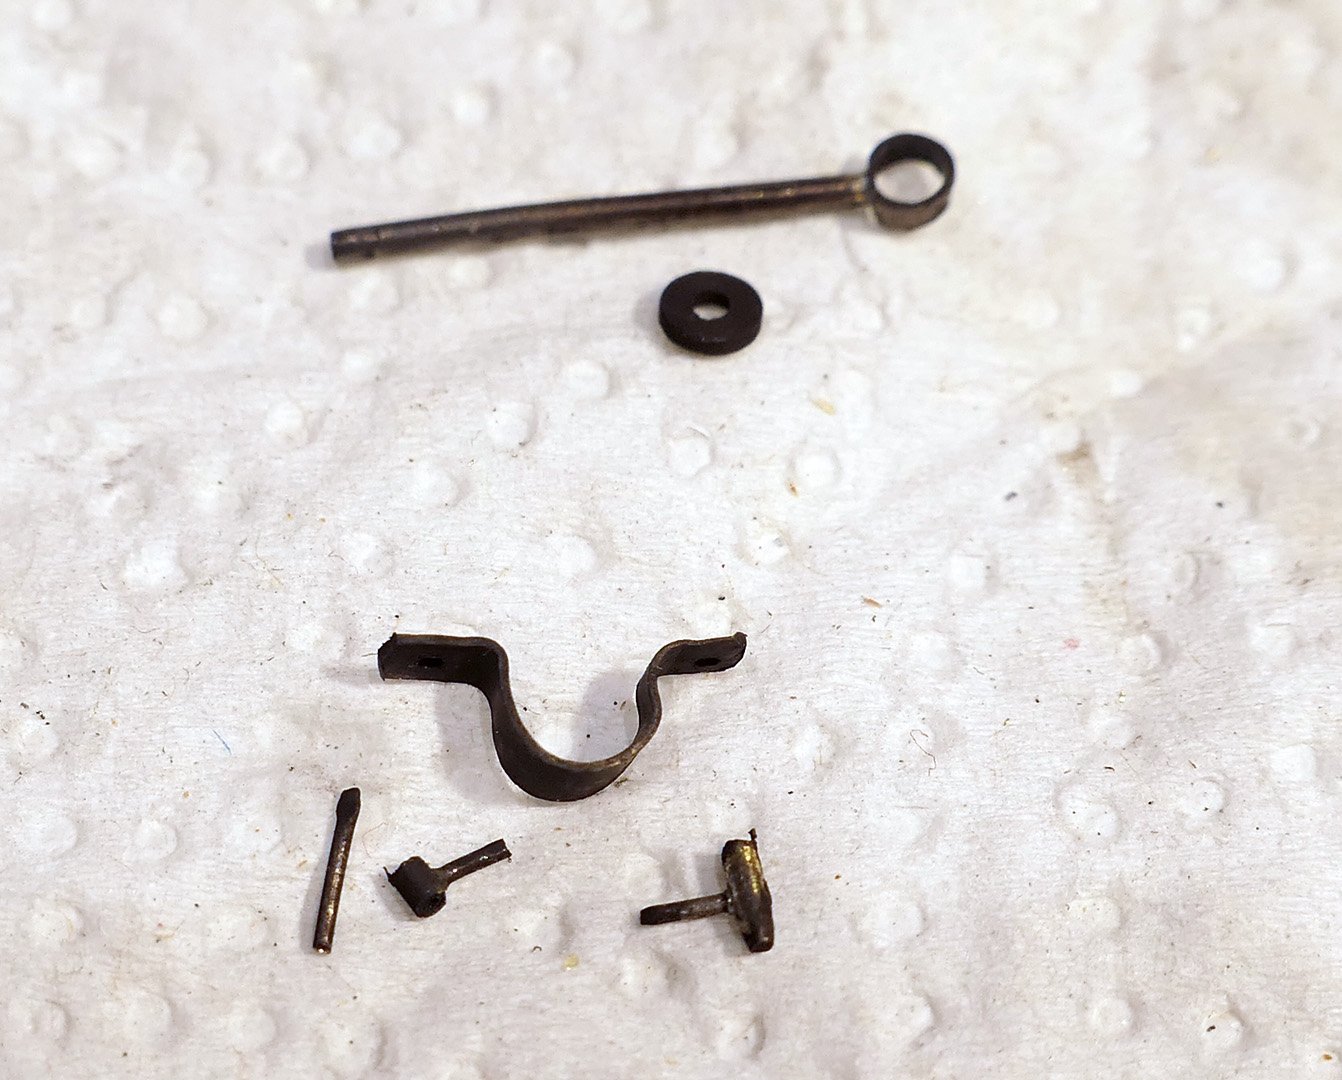
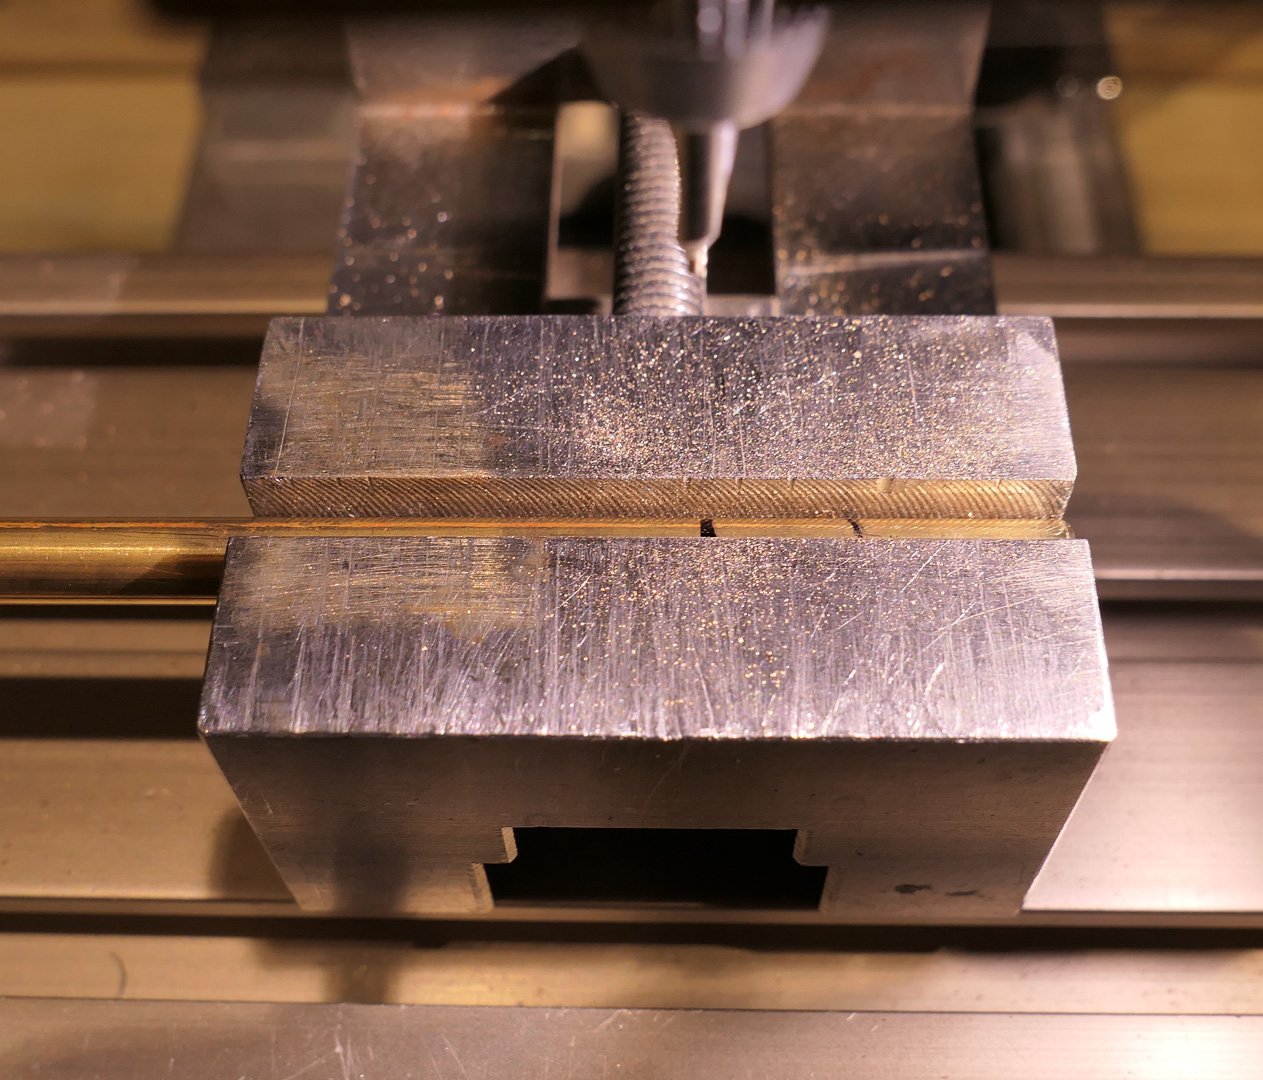
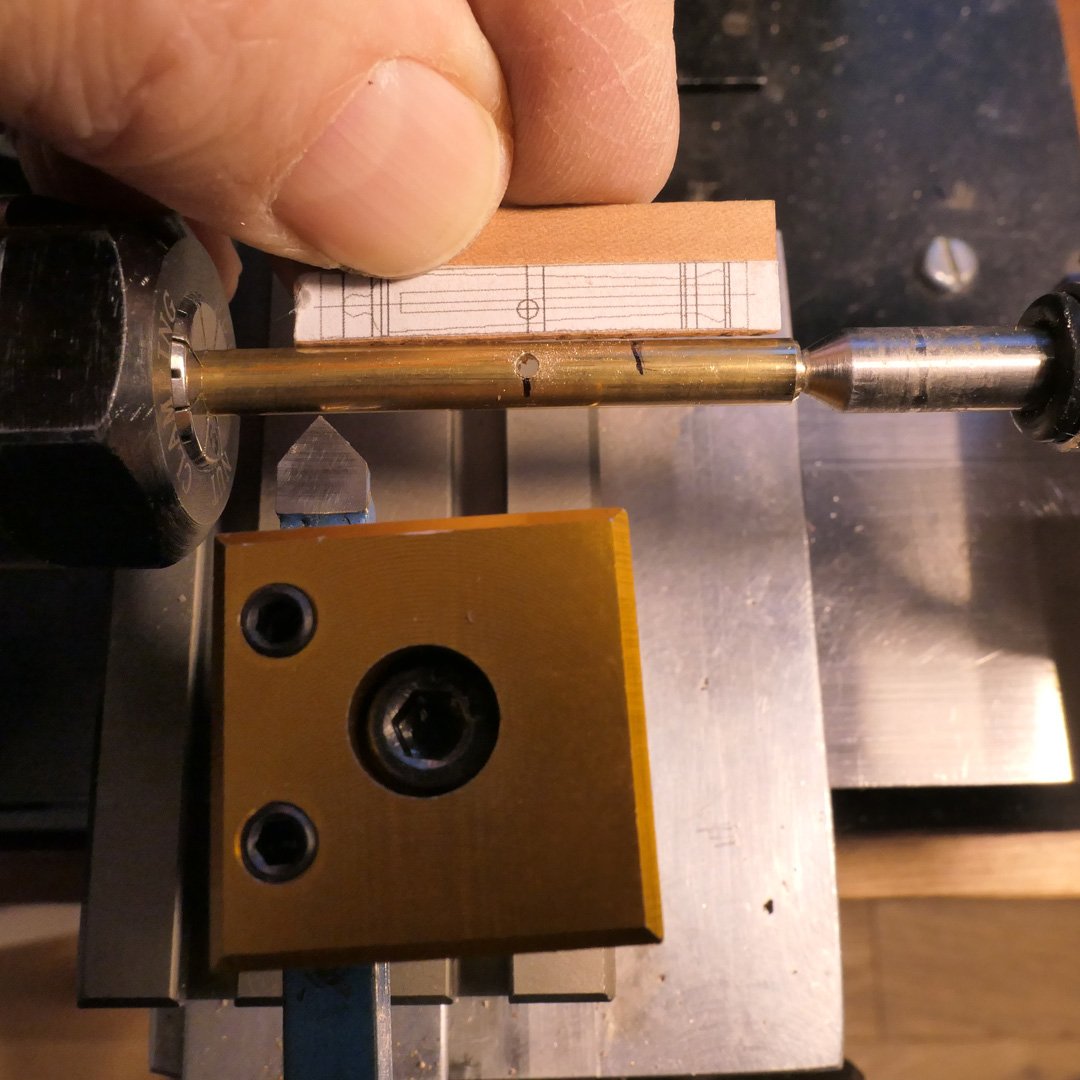
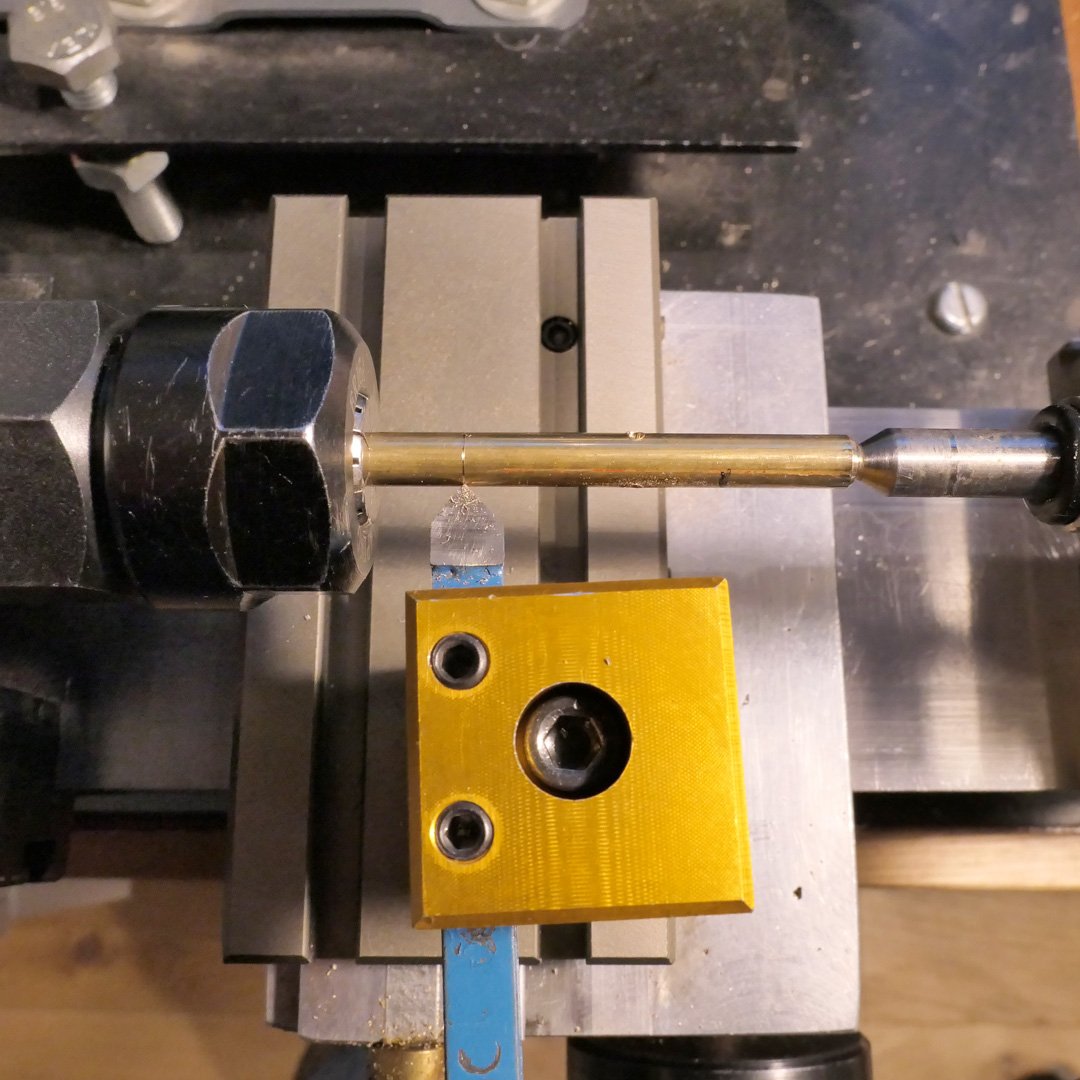
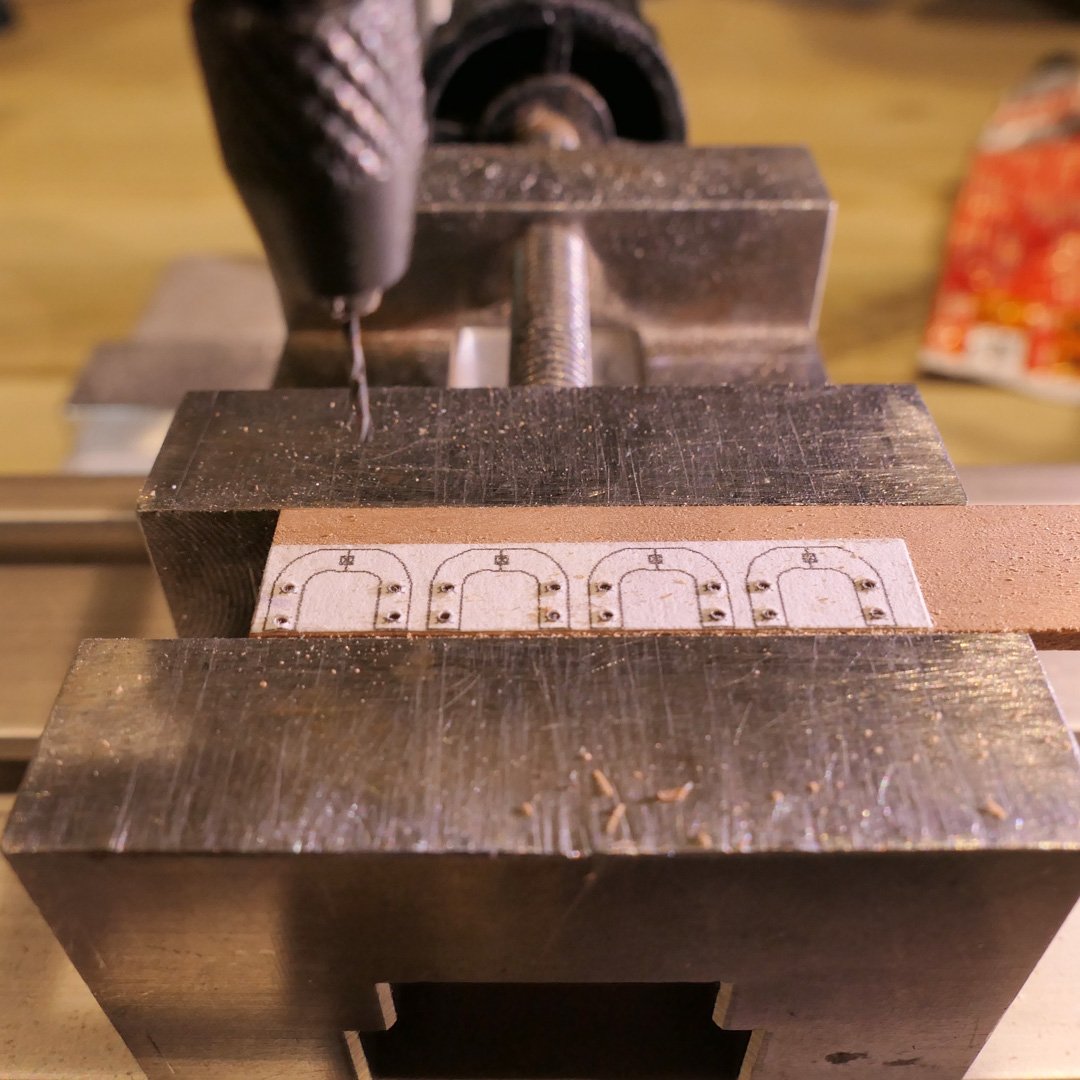
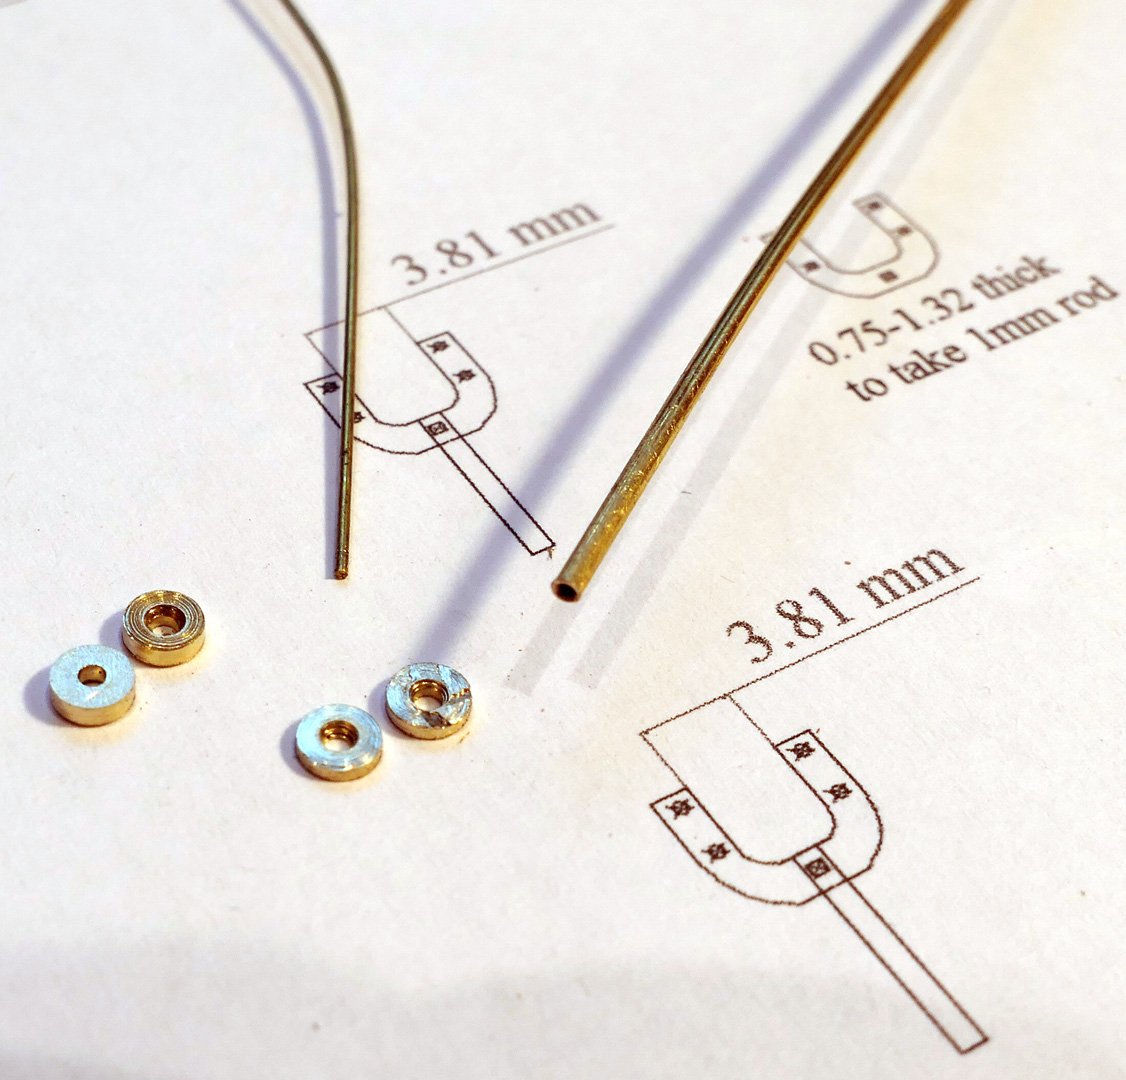
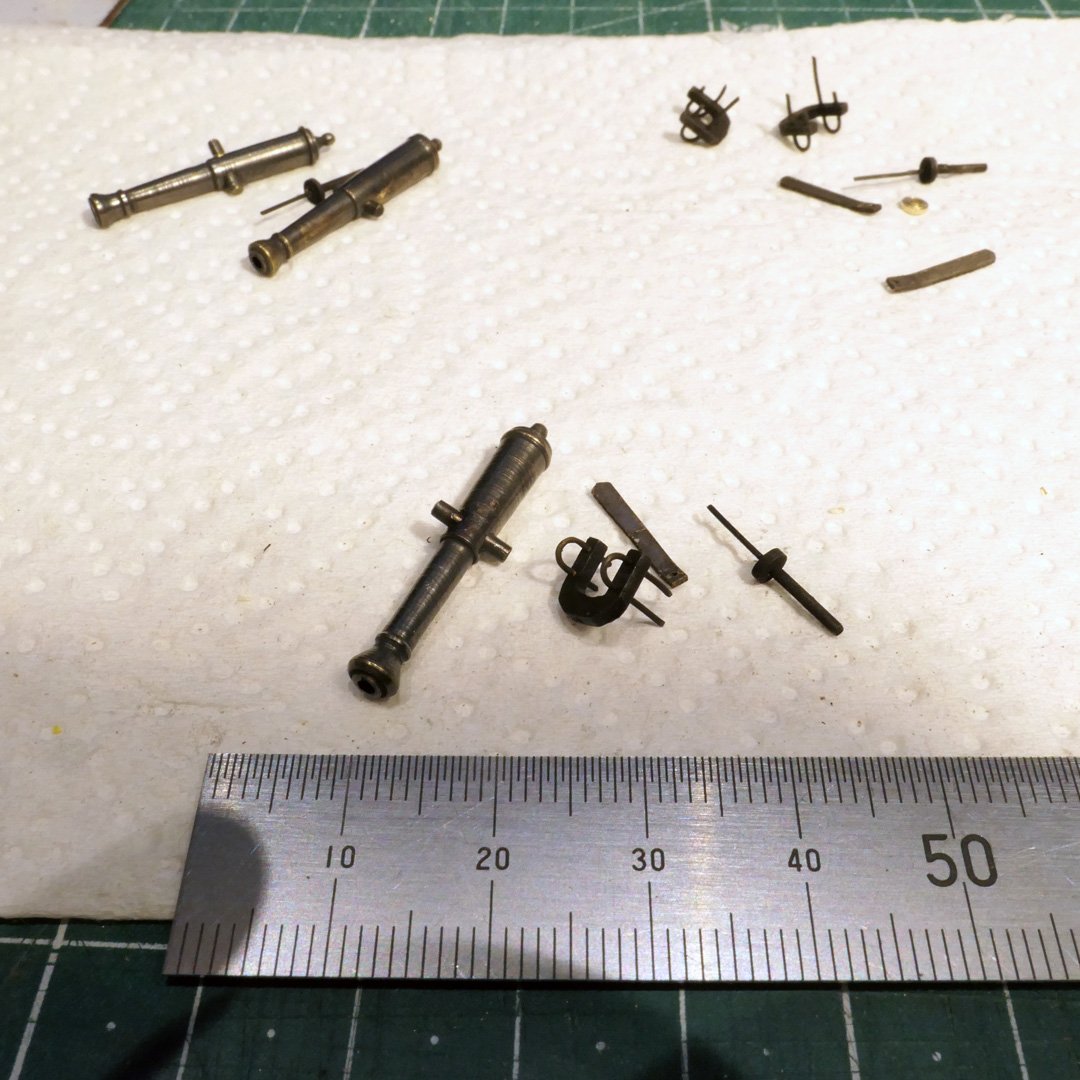
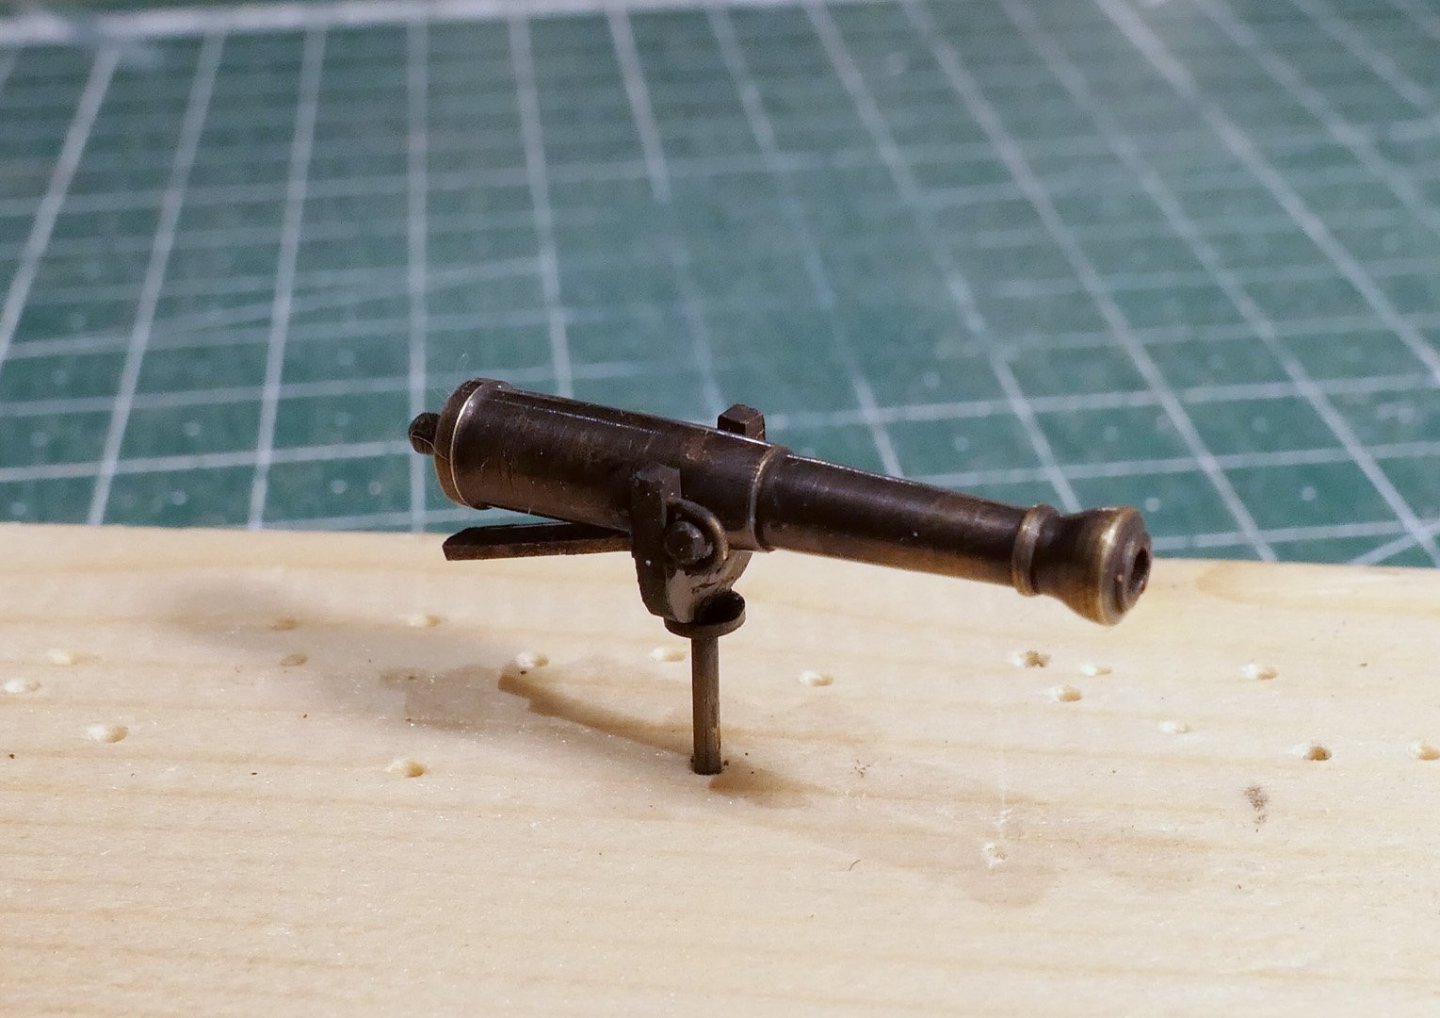
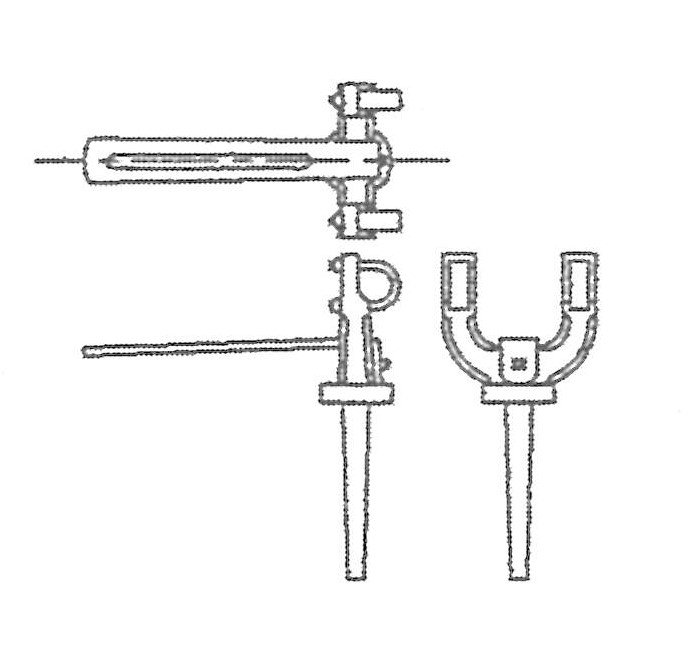
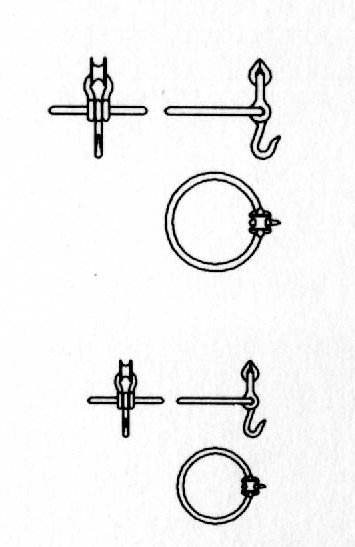
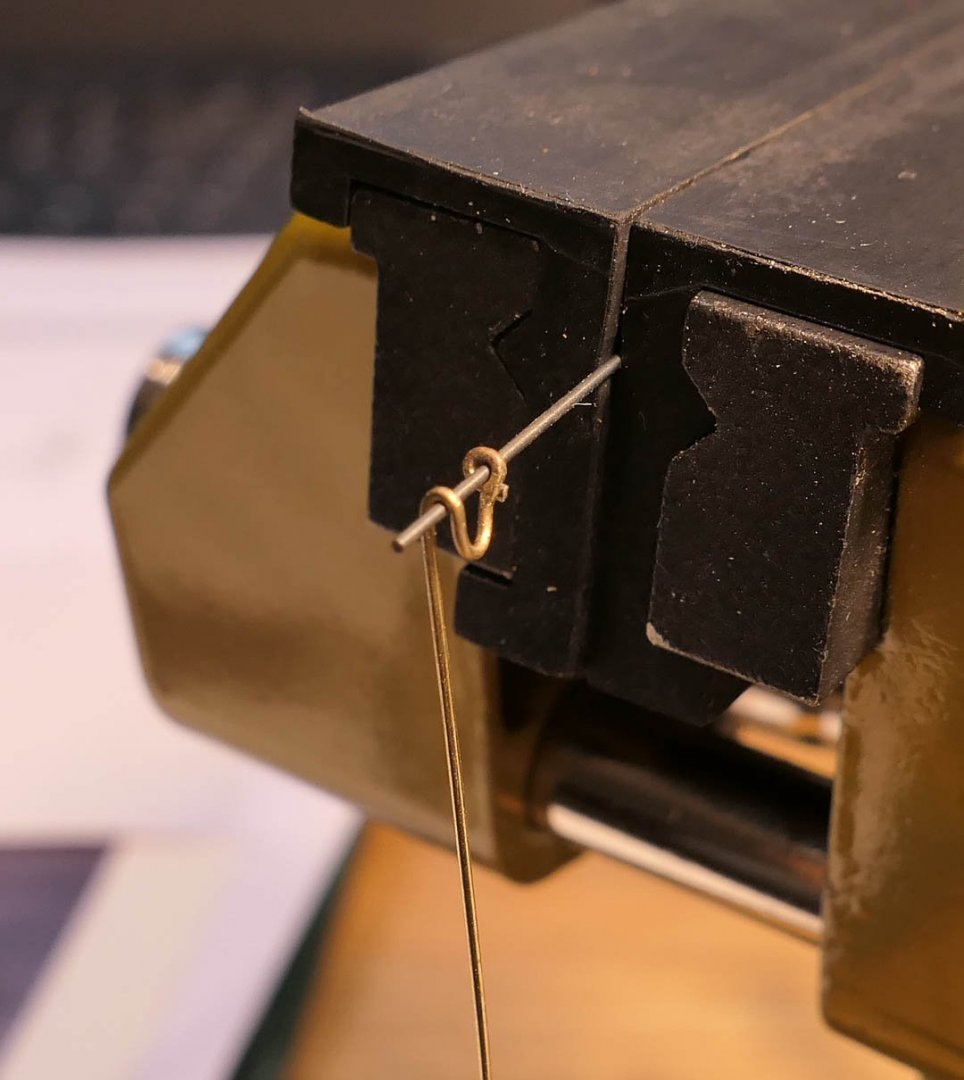
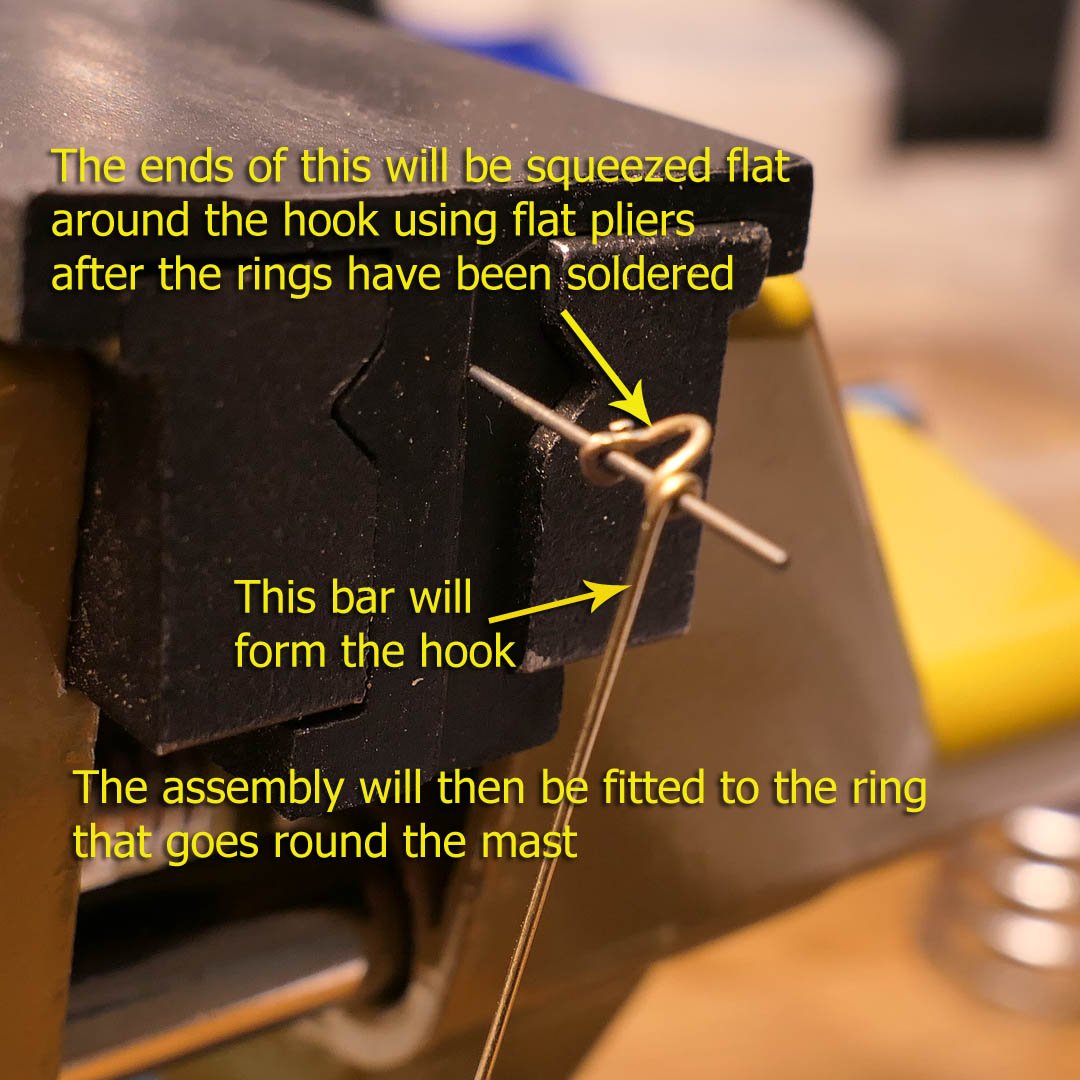
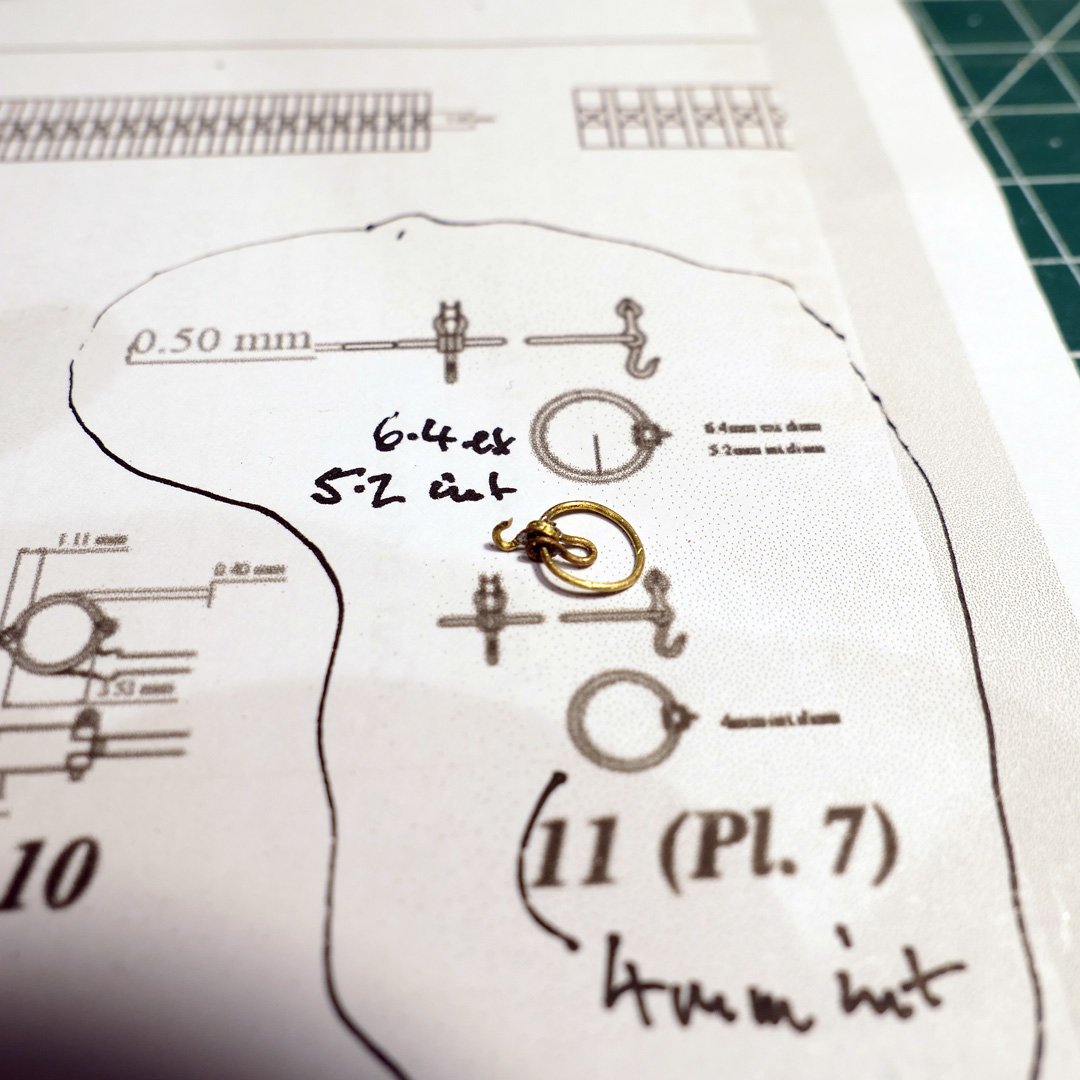
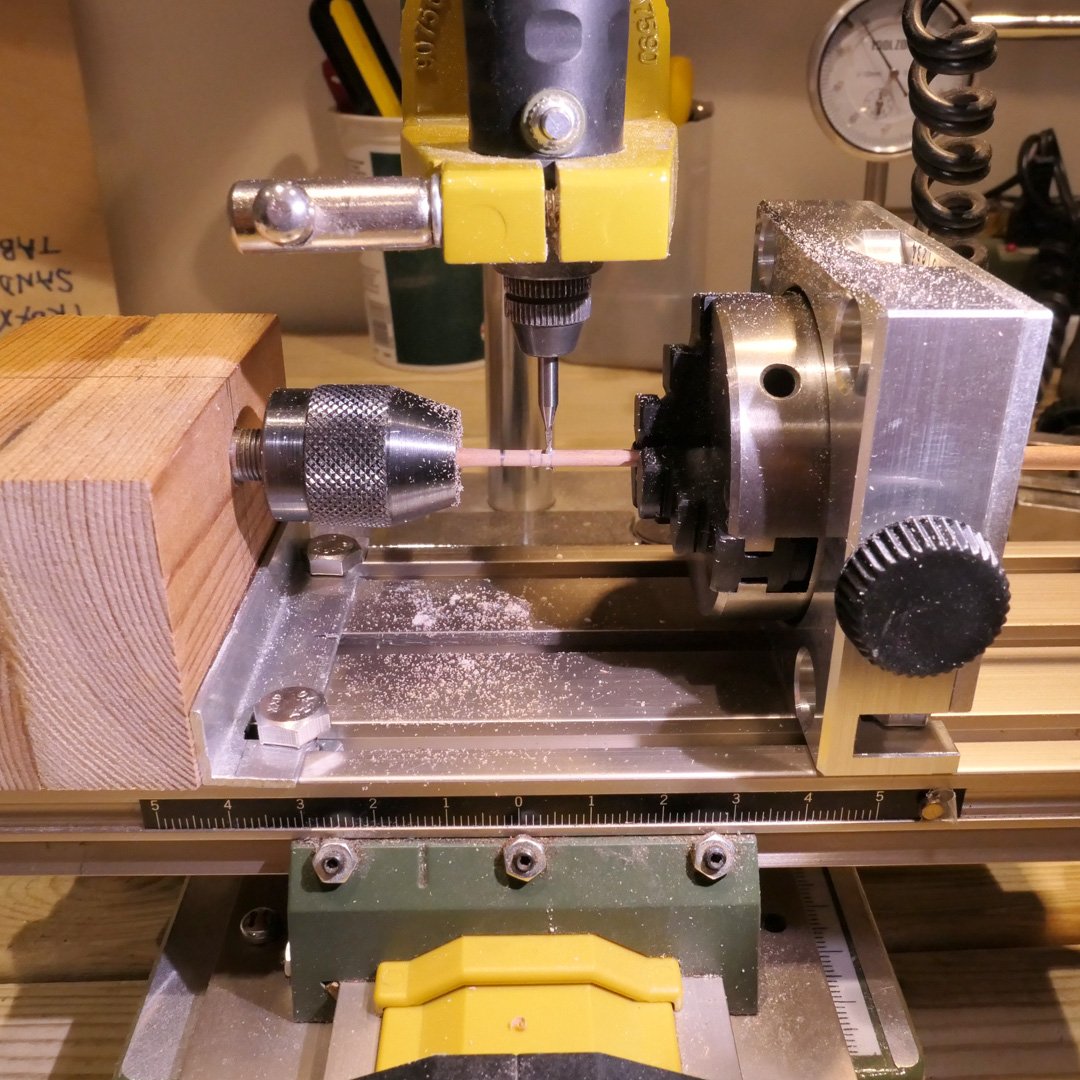
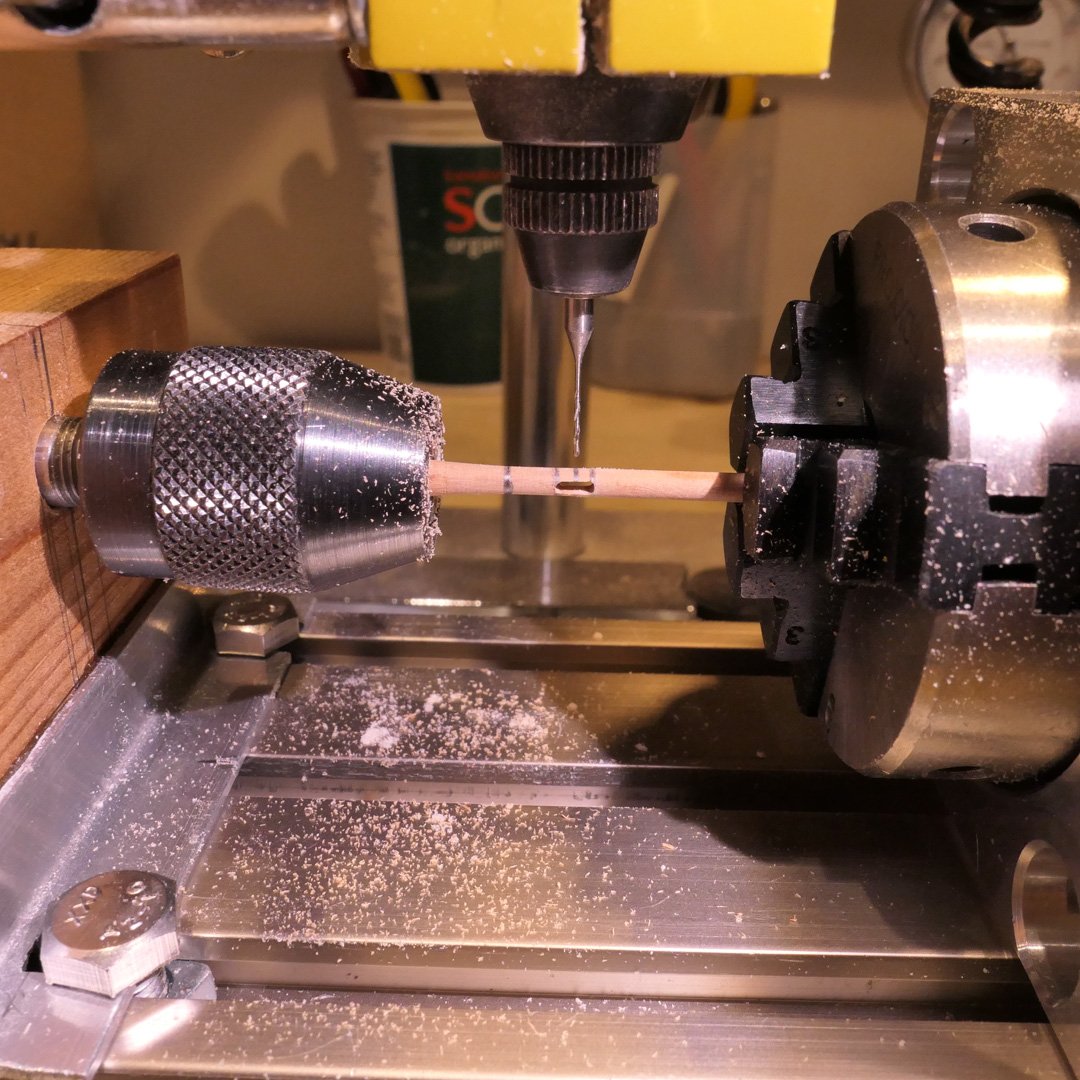
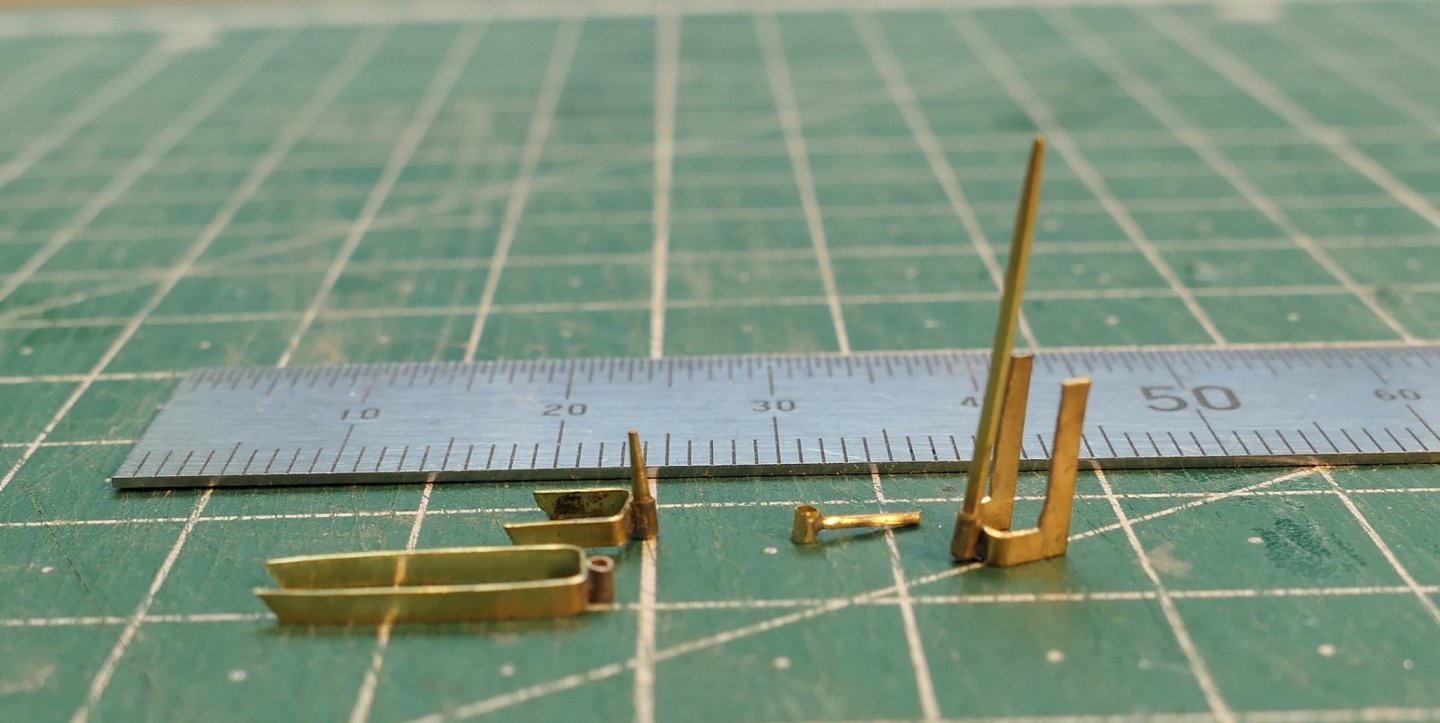
Swivel guns There were two types of swivel gun used in the period of the Chaloupe. One was the breech-loading type, the other the muzzle-loading type. It is the latter that is shown in the plans, so I built the 4 swivel guns following the plans. I started by boring the holes for the trunnions. This was done first by pasting the plan to a block of wood, then clamping a brass rod into a vice. The block of wood was then trimmed to fit the remaining opening in the vice by using the non-grooved edge of the vice jaw as a reference point. It was then a simple matter of drilling the hole using the plan. The brass rod could then be turned in the lathe as normal, using the set of gravers that I had made for my previous build (Triton cross-section). A trick I learned from Herault’s build of the Chaloupe was to use a scribed reference point on the turned bar using the sharp tool. This then allows exact placing for the various steps in diameter of the barrel. The swivel gun mounts have good detailed plans in the monograph: Initially I thought I would make the basic barrel holder out of wood, but that proved far too fragile, so I ended up making them out of copper plate. The picture shows the process I used, but on the wood prototypes. It’s probably easier to show the different components in the following diagram, rather than attempt an explanation. Next up: Yards. bowsprit, mizzen boom Tony


- 124 replies
-
- 20
-
-
- longboat
- Chaloupe Armee En Guerre
- (and 1 more)
-
Bow davit I then went on to make the davit at the bow. First thing was to get the outline right, which I did with a piece of masking tape. The davit itself was then fairly straightforward to make. You can probably make out the different pieces used in the following photo. Mast travellers for the yards Plan 9 shows the travellers as follows: The following pictures should illustrate the sequence of making these: Mast sheaves All the masts and boom have sheaves at their ends. I started the process of making these by milling out spaces for the sheaves using a setup consisting of my modified Proxxon drill stand, a Proxxon dividing head and a spare Jacob’s chuck from my Proxxon wood lathe. The dividing head allowed me to rotate the mast by 90 degrees to drill the hole for the sheave spindle. The sheaves themselves were then turned on a lathe after having their centres drilled through for the spindles. Next up: Swivel guns Tony


- 124 replies
-
- 18
-
-
- longboat
- Chaloupe Armee En Guerre
- (and 1 more)
-
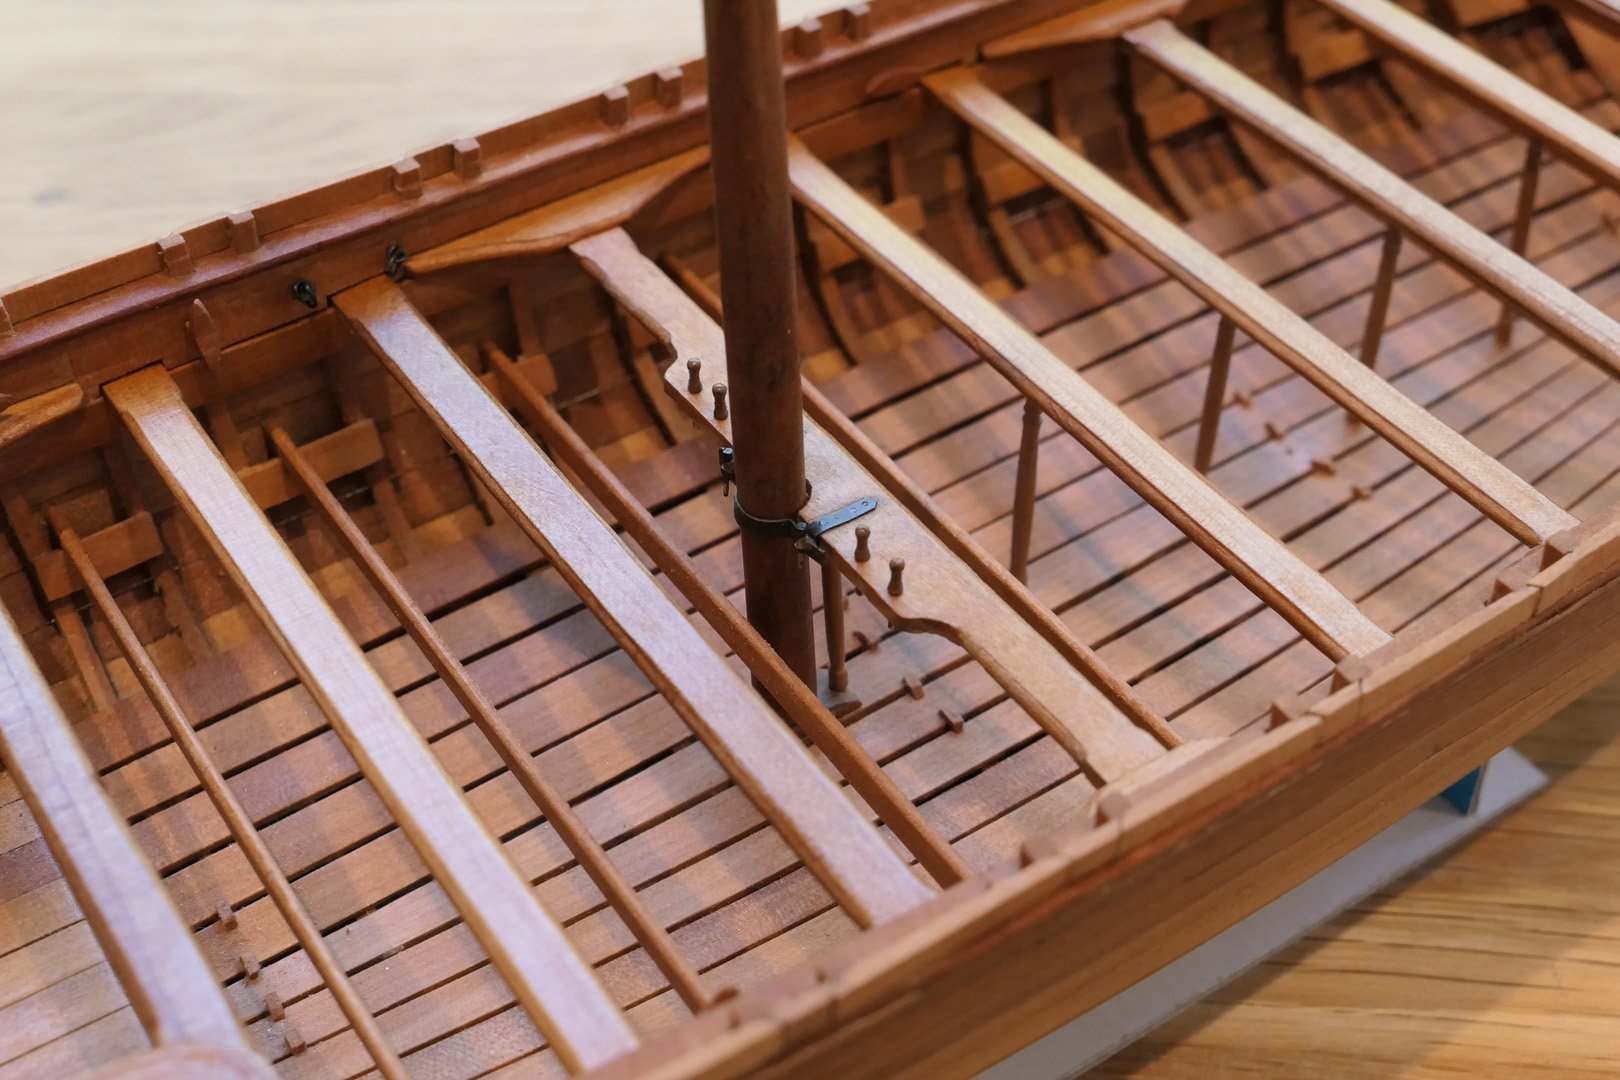
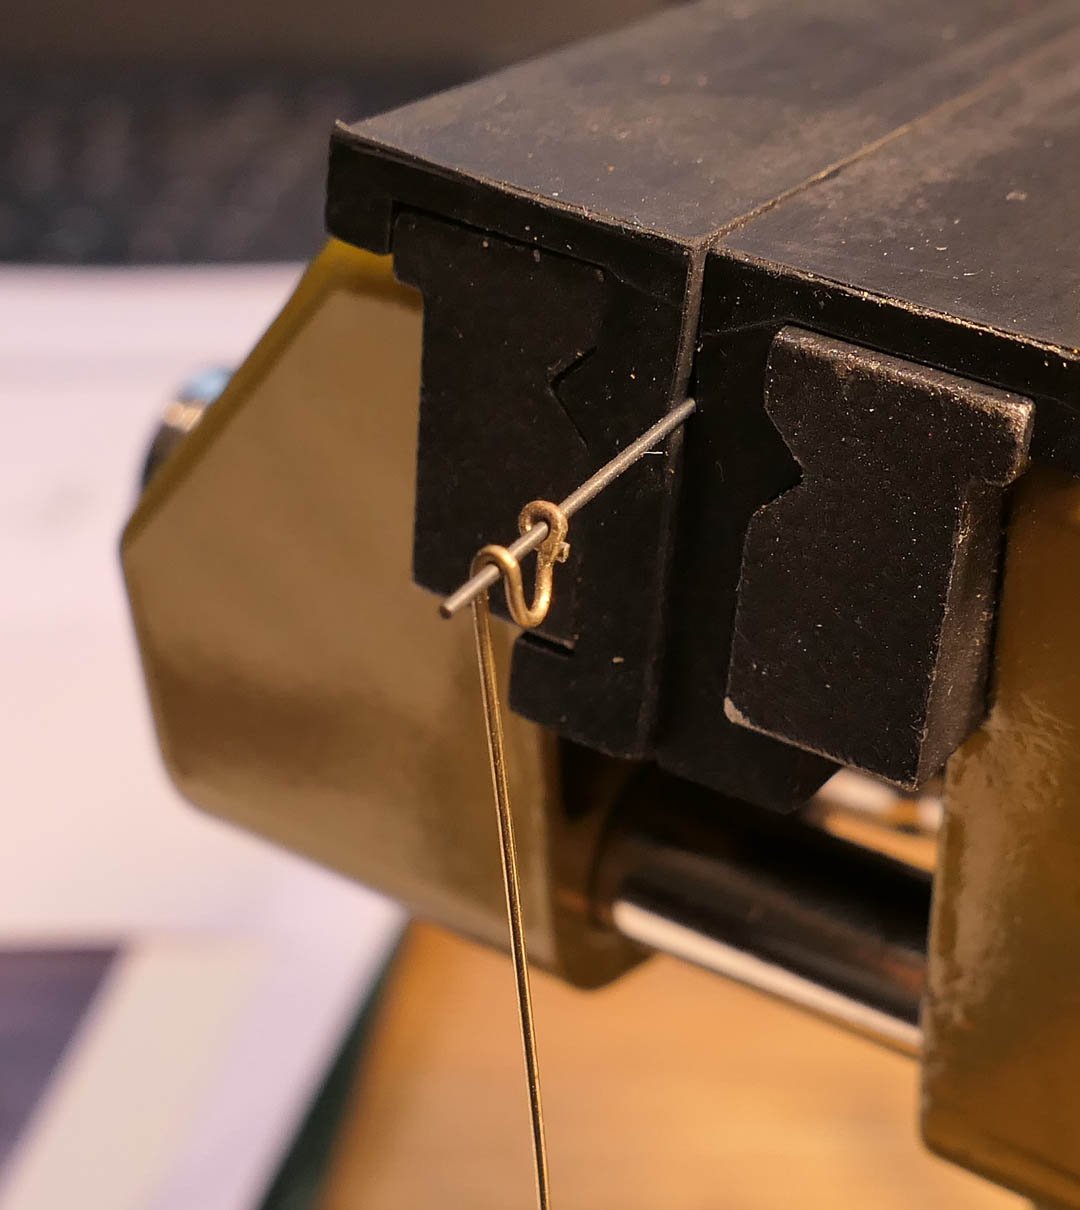
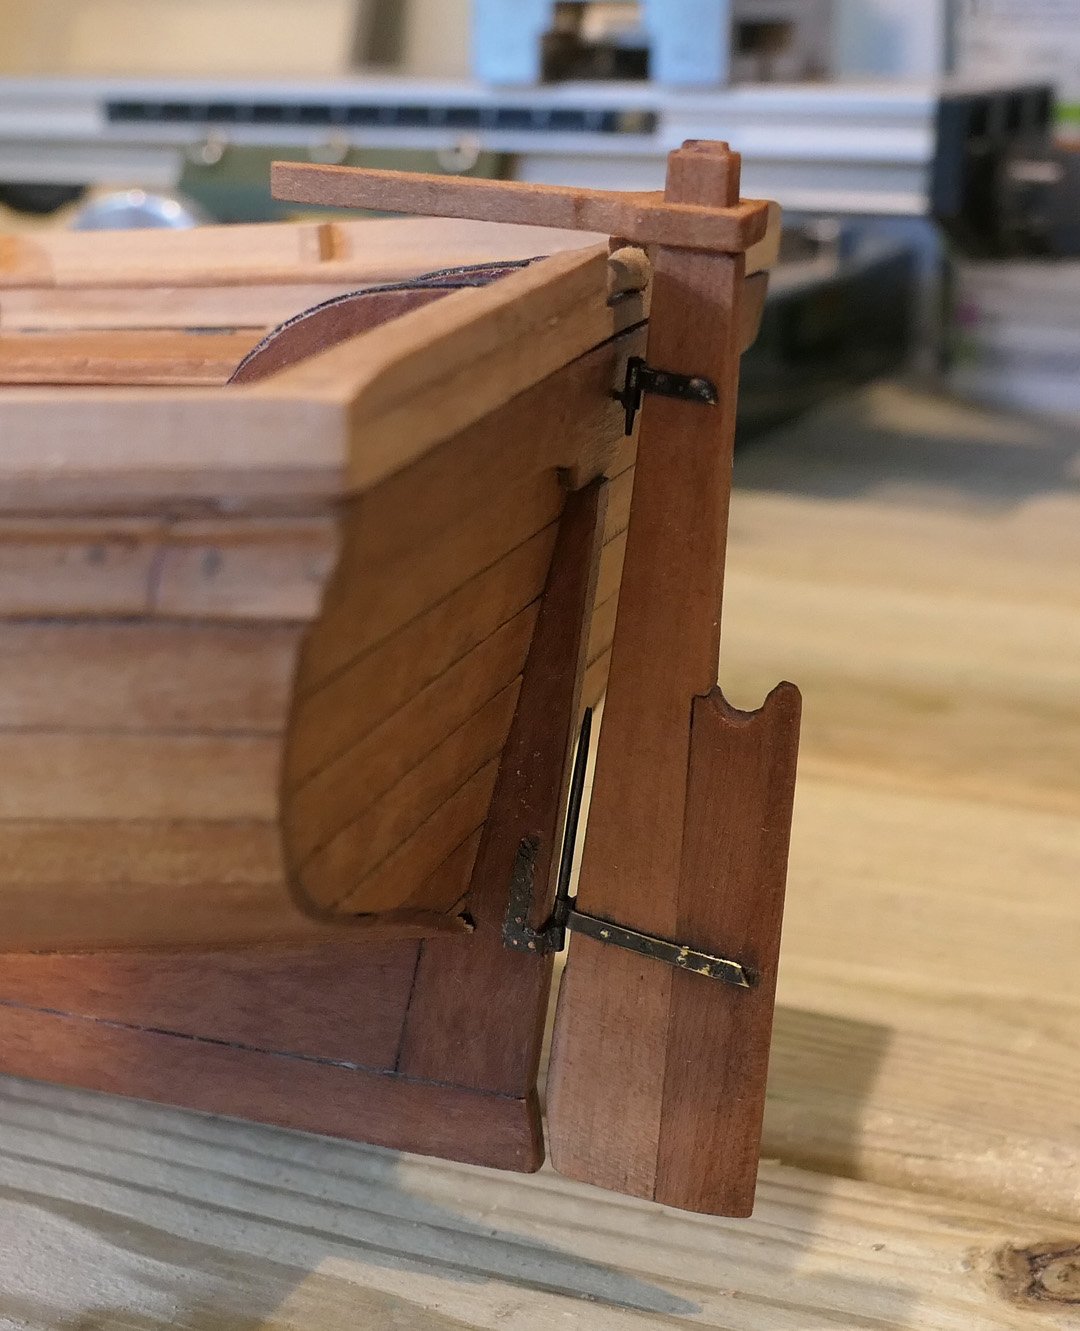
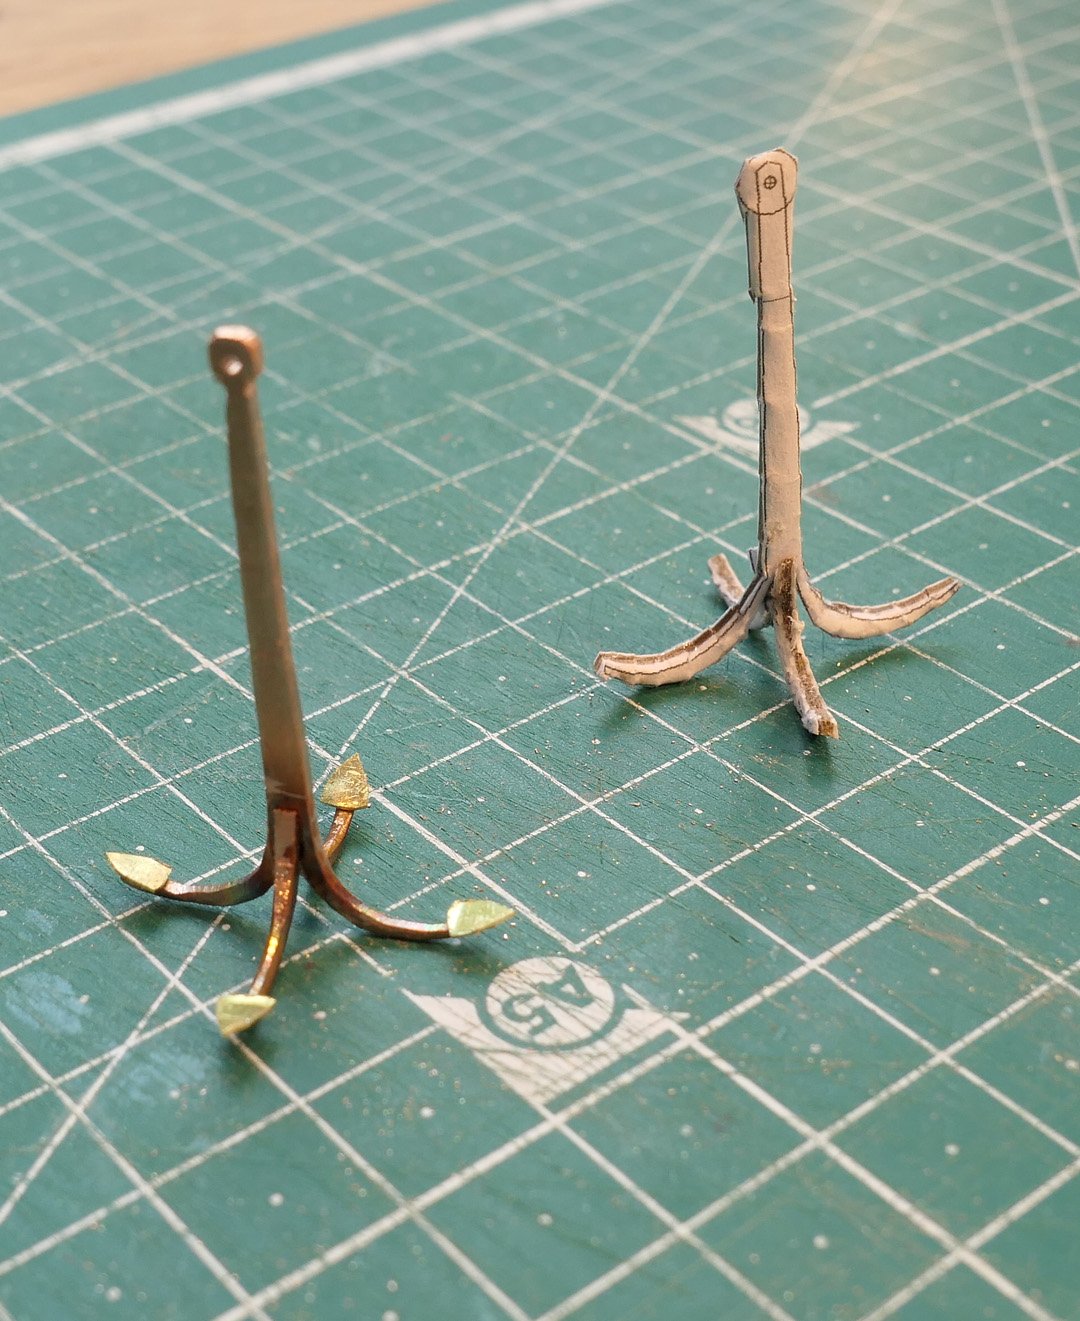
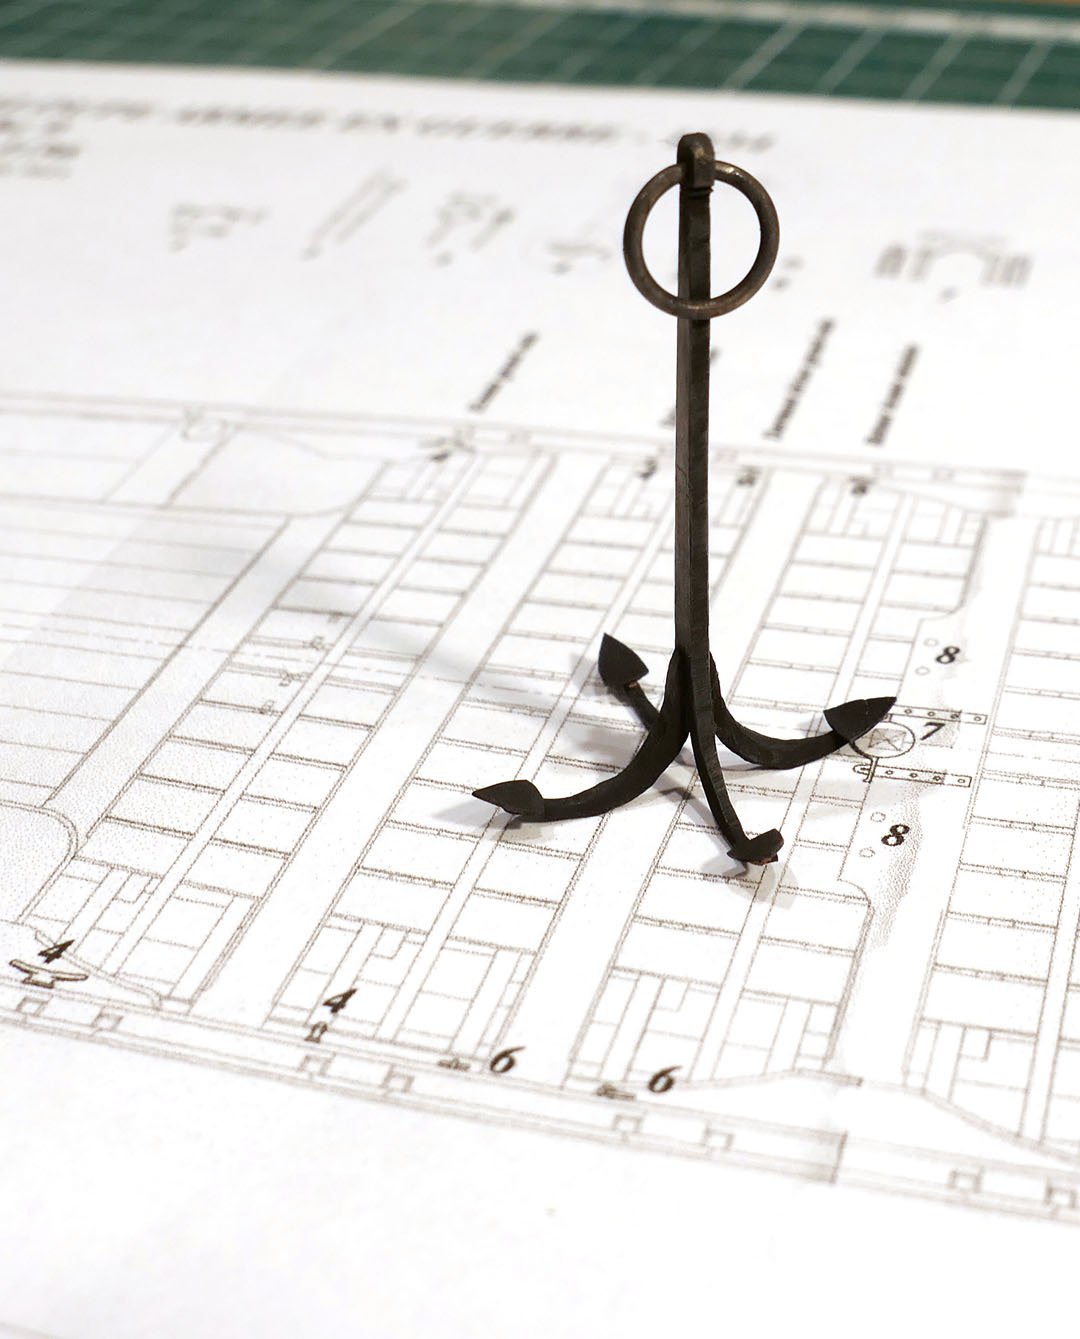
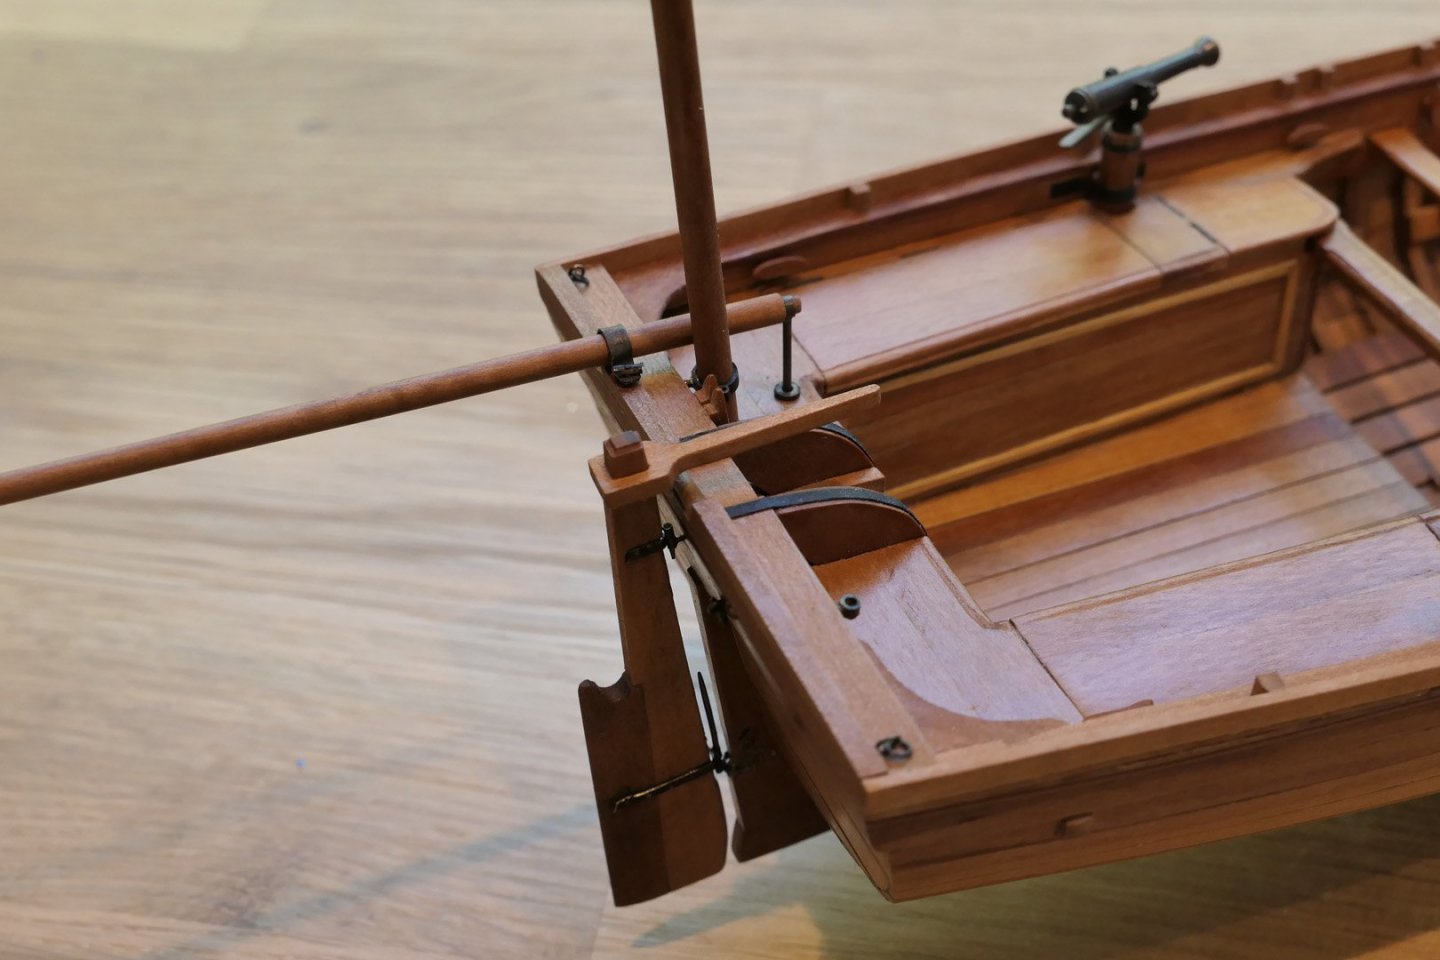
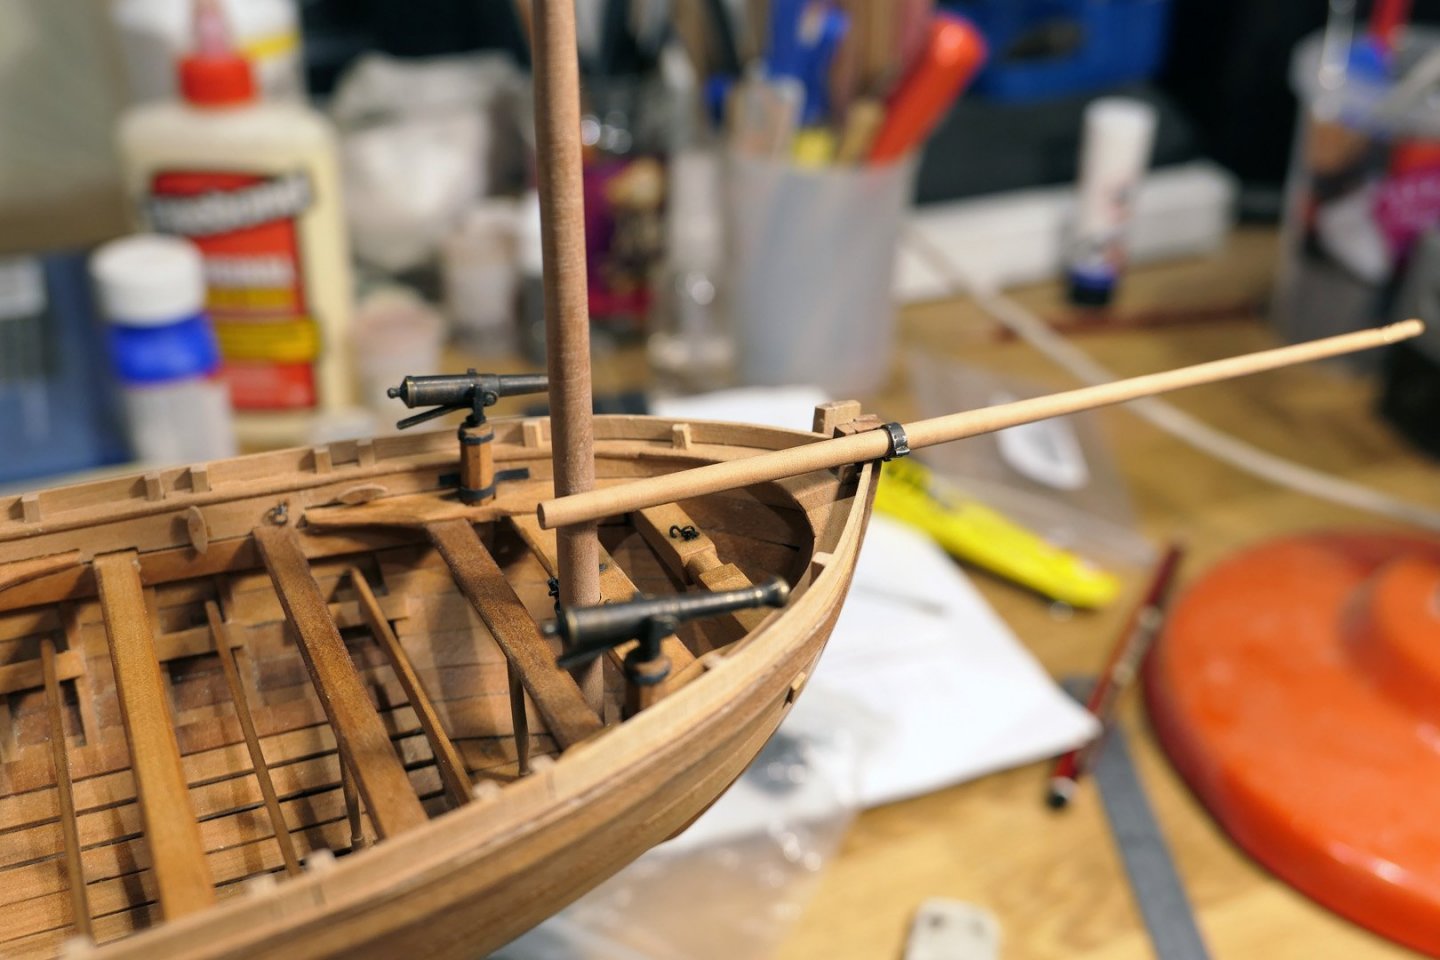
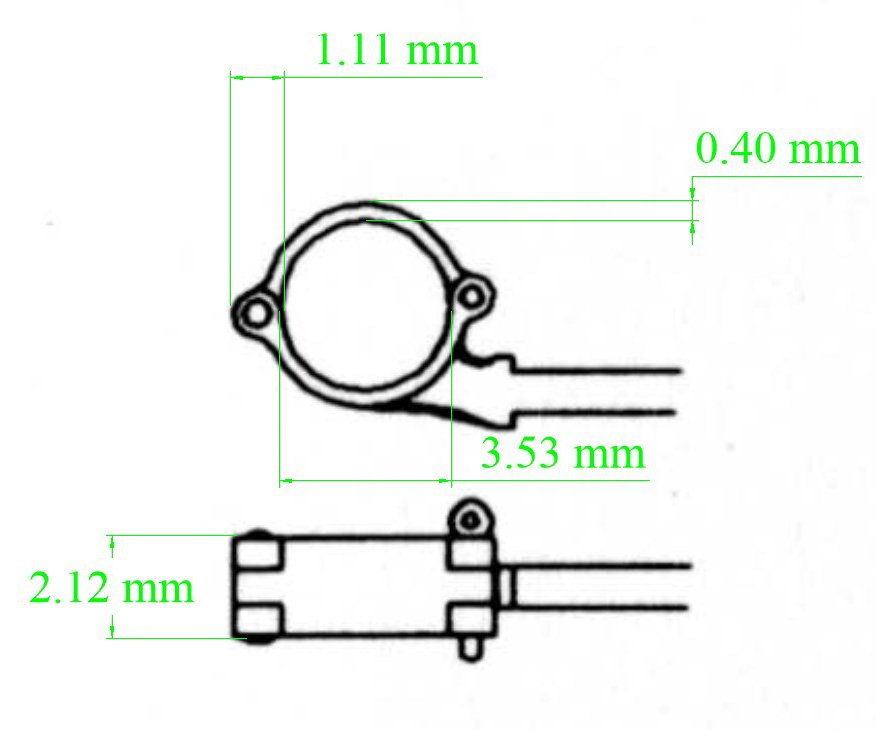
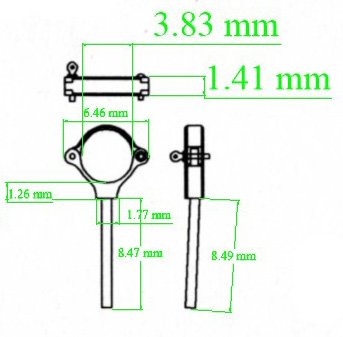
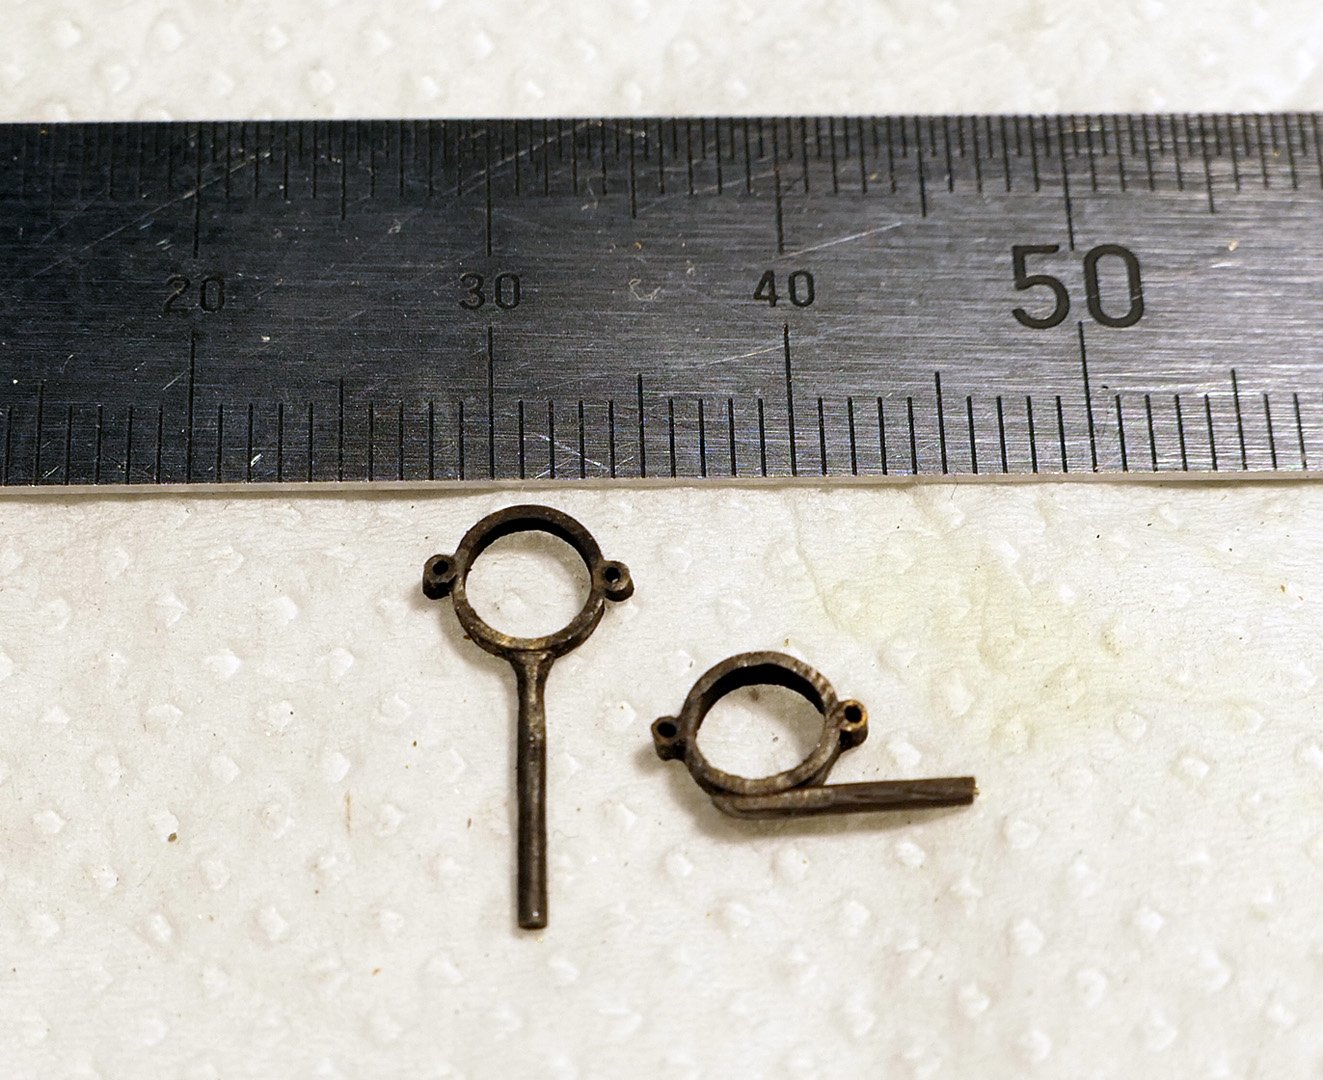
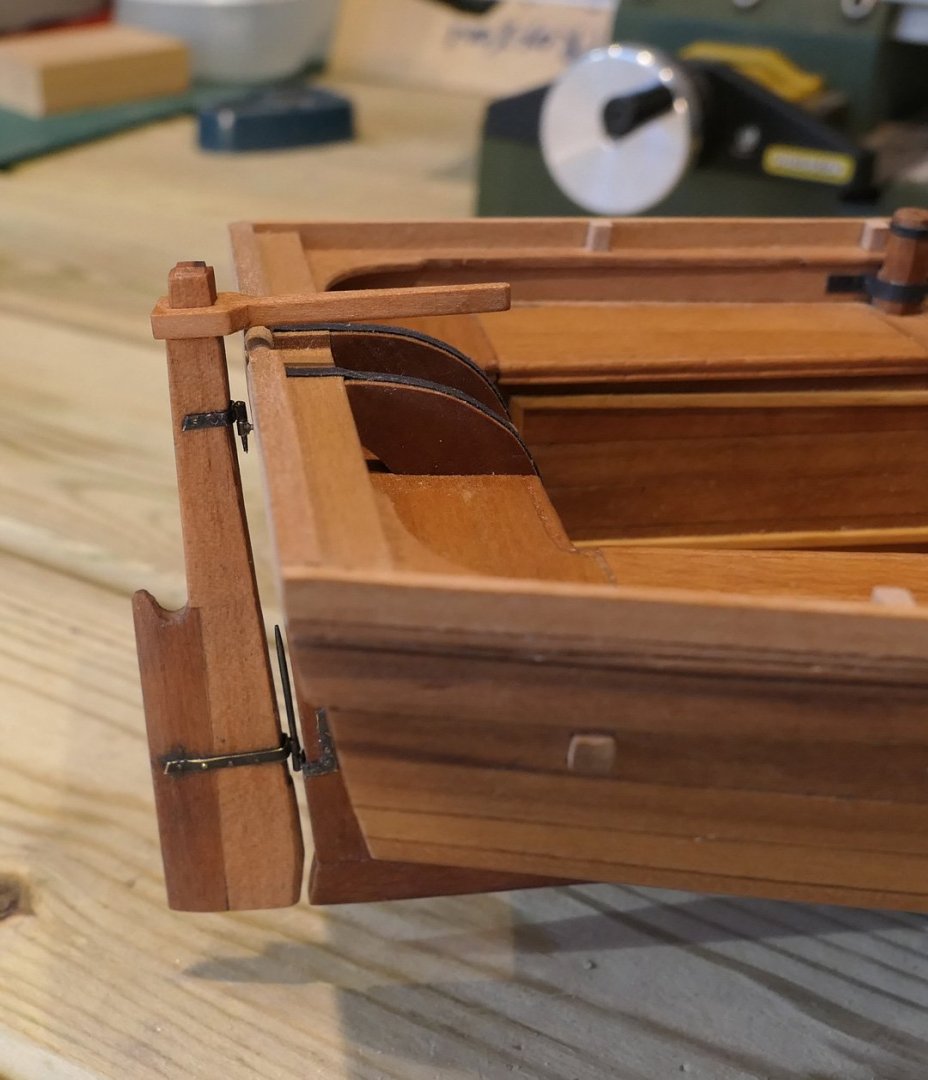
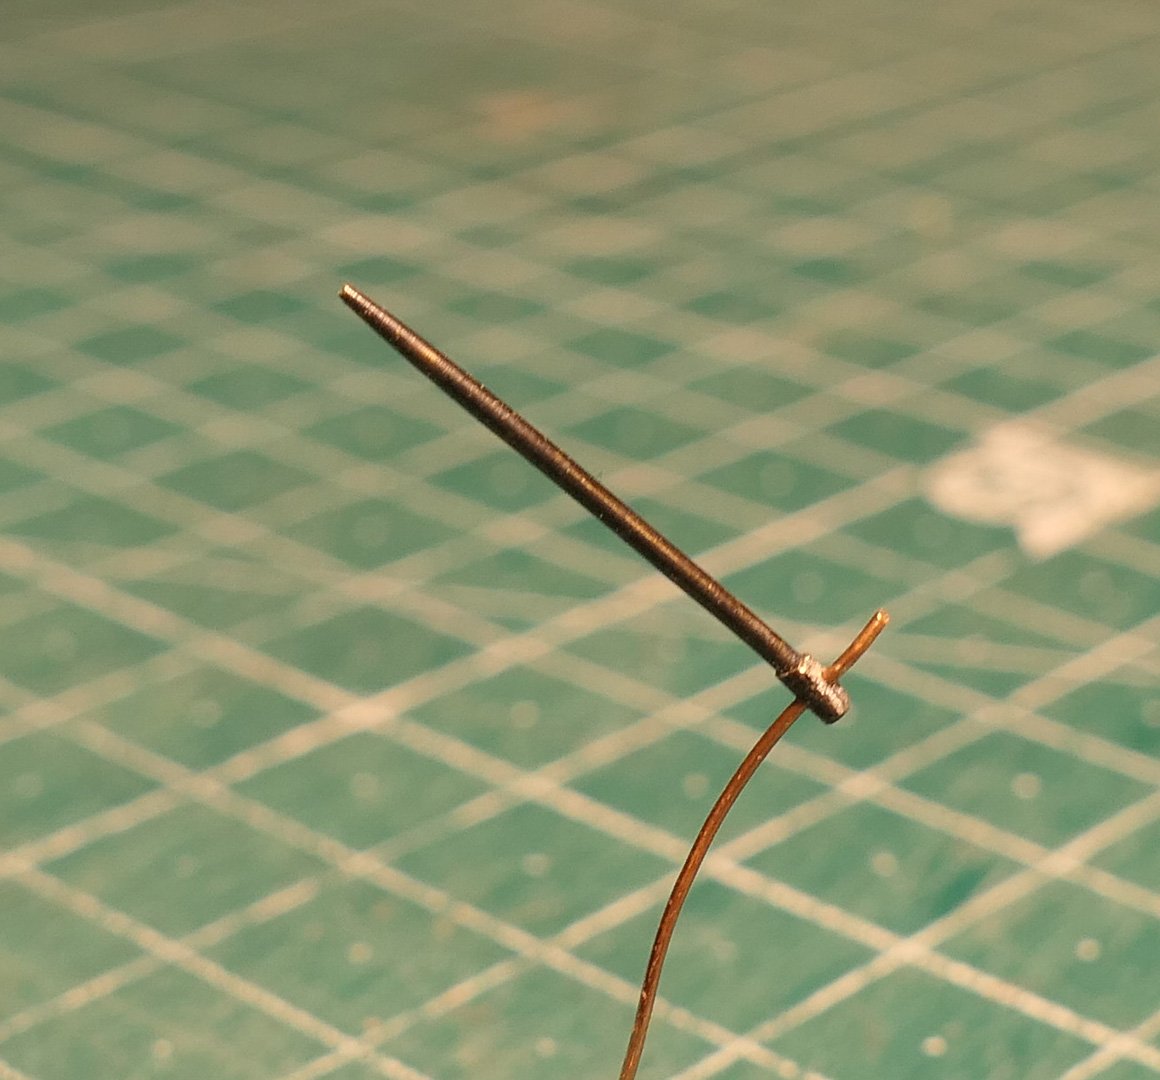
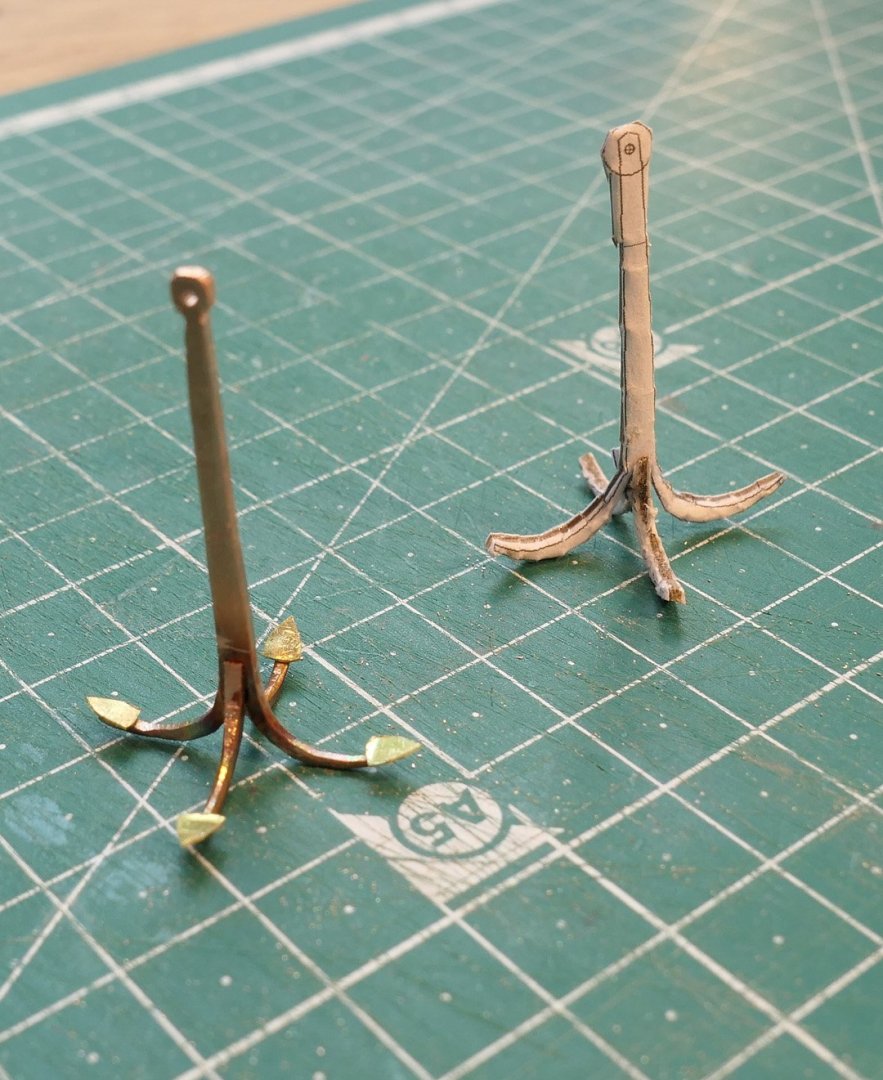
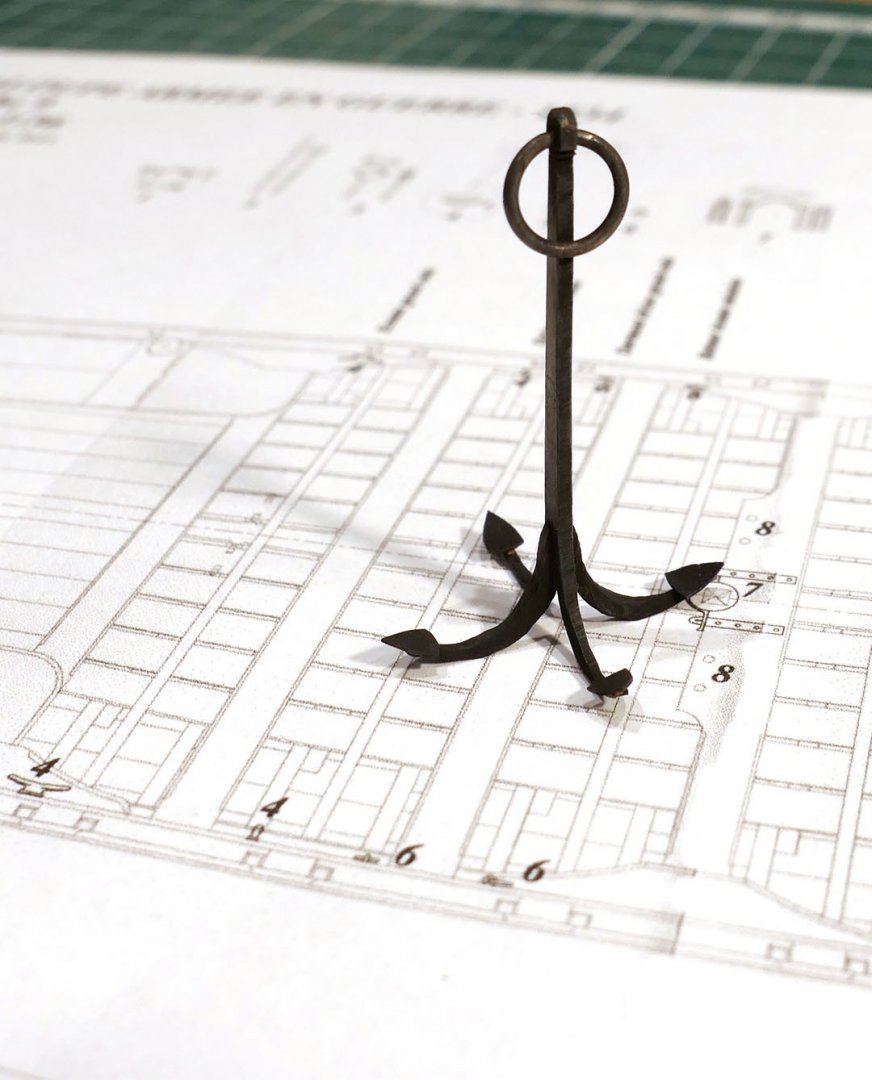
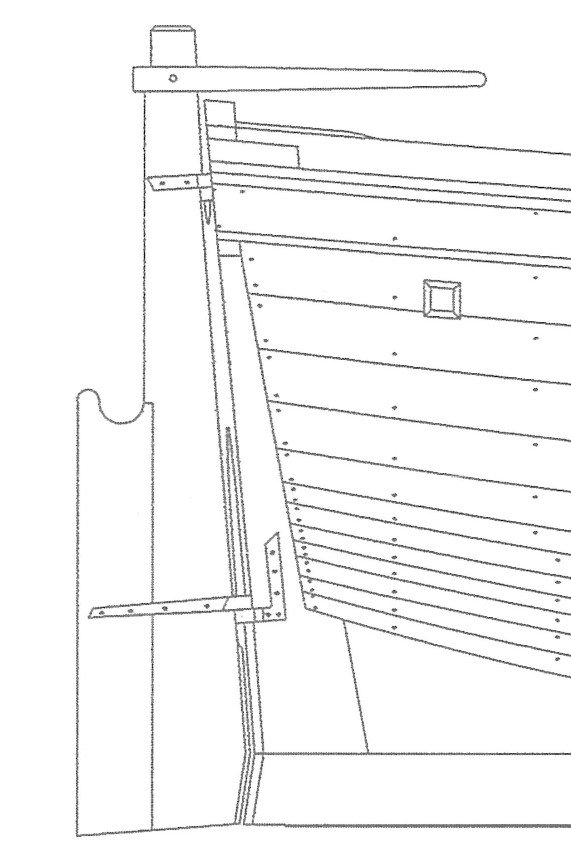
Ironwork I finished my work on translations in February and took up work on the Chaloupe again. I haven’t been noticing the time fly by since then, so there’s quite a lot to cover. The main decision is, as I had hoped at the start, to build the fully rigged model with sails. This meant that there’ll be no big cannon sitting in the middle of the boat. I’d left the option open of leaving the swivel guns on, and that’s what I decided to do. I’ll start with some of the ironwork. First off are the clamps or holders for the bowsprit and the mizzen boom. The plan for the clamps shows the following: I don’t have the skills to make them opening, so I went in for a simulation. I soldered 1mm brass tubing to either side for both clamps: Pintles & Gudgeons Plan 6 shows the rudder as follows: I started work on the pintles by tapering lengths of 1mm rod then fitting them into sections of brass tubing which were soldered to a strap (for the bottom pintle) and a rod (for the top one): Unfortunately my first attempt at the lower pintle showed that the soldering joint between the strap and the pintle was not strong enough to take the strain when the rudder was fitted, and it snapped off. So I had to strengthen the join by linking the pintle to the strap with a 0.5mm rod as shown in the picture below. The completed gudgeons and pintles then followed the normal type of construction. You’ll note I still haven’t mastered the art of aligning the bolts in the straps correctly, nor have I mastered the art of blackening. The dark patch around the lower strap is where I tried painting a bit more of the blackening solution on to the strap: Grapnel anchor I also started to think about the various accessories that are needed on the boat. Although no plans for an anchor in the book, I found plans in the paper model of the 18th Century French Longboat that I had partially completed (see https://modelshipworld.com/topic/21175-french-longboat-18th-century-by-tkay11-148-card-review-partial-build/). I scaled the plans up to 1:36 and made the paper version. This gave me the experience to do one in copper. This led to a discussion as to where the anchor will be stowed. Eventually it was decided that it should go over the bulwarks at the bow, and be fastened to the main cross beam there. Next up: Bow davits, yards and mast sheaves. Tony


- 124 replies
-
- 14
-
-
- longboat
- Chaloupe Armee En Guerre
- (and 1 more)
-
tool review Perma-Grit tools
tkay11 replied to James H's topic in REVIEWS: Model Shipwrighting Tools, Parts and fittings
Yes, I totally agree with wefalck. I bought a pack of what were said to be the finest files a few years ago at the London Model Engineering Exhibition. I found they could only be used for the very coarsest of jobs with small pieces, and since then I have hardly ever used them. In fact I can't remember the last time I used them. Tony- 17 replies
-
- 3
-
-
- permagrit
- perma-grit
- (and 3 more)
-
It was the fit between the rotating head and the body that was out in my case, in addition to the fact that the support in these Proxxon stands is a bit flimsy. I'd be intrigued to know how accurate the MF70 mill is in terms of verticality, feed and consistency. At the moment I get by with the modifications I've made but I keep wondering whether it would be worth the expense to buy the MF70. Tony
-
Nice adaptation, Kris. Far more elegant than my own modification of the cheaper Proxxon MB140 stand. How accurate is the vertical feed on this stand? My stand had something like a 1 degree inaccuracy which I had to compensate for with shims. Tony
-
Very nice, druxey. You can certainly be trusted to dig out interesting sites. Did you happen on this site as a result of more time spent browsing, or have you been a regular visitor? It's a part of London I hardly know, but having enjoyed Pepys' diaries and a good biography, I hope to visit this church once the restrictions are over. Tony
-
I got my sail plan from Steel’s Elements and Practice of Rigging, along with Marquardt’s book on 18th Century Rigs and Rigging so that I could understand the structure and making of the various sails. The Steel is available at low cost from Cambridge University Press and Marquardt can often be found on eBay. You can see the results for my Sherbourne (a very similar cutter to Lady Nelson) on page 8 of my build log under the title 'Making Sails'. Tony
- 7 replies
-
- 1
-
-
- lady nelson
- victory models
- (and 1 more)
-
Just a note on the glue stick: I used to use Pritt (a water-based glue stick) but discovered that Uhu (a solvent based glue in a tube) which is used by card modellers is much better. The Pritt caused problems by causing warping of the paper and in removal after cutting -- since I found I had to dampen it in order to remove it easily. This itself caused slight warping of the wood on very thin parts. The Uhu doesn't have either of those problems. I just used acetone to remove it, which it does very quickly and without any obvious effect on the wood. Tony
-
Latin 'pons' = bridge. This has many ramifications in Europe including, interestingly, 'pontificate' which came from 'pontifex' which itself was made up from the words meaning 'make' and 'bridge'. But to 'pontificate' now means 'acting like a pope' and has entirely lost its inherent suggestion of 'making a bridge between people'. That's me done pontificating for the morning. Tony
- 77 replies
-
- 2
-
-
- point berlin
- diorama
- (and 1 more)
-
Is there any progress on the Hudson River Sloop "First Effort" (a good name for a novice scratch builder)? Tony
-
Yes indeed, Bruce. I've already found that out with the scroll saw! I use beeswax on the table saw blade, though, and on my coping saw blade for brass.