EJ_L
-
Posts
2,246 -
Joined
-
Last visited
Content Type
Profiles
Forums
Gallery
Events
Everything posted by EJ_L
-
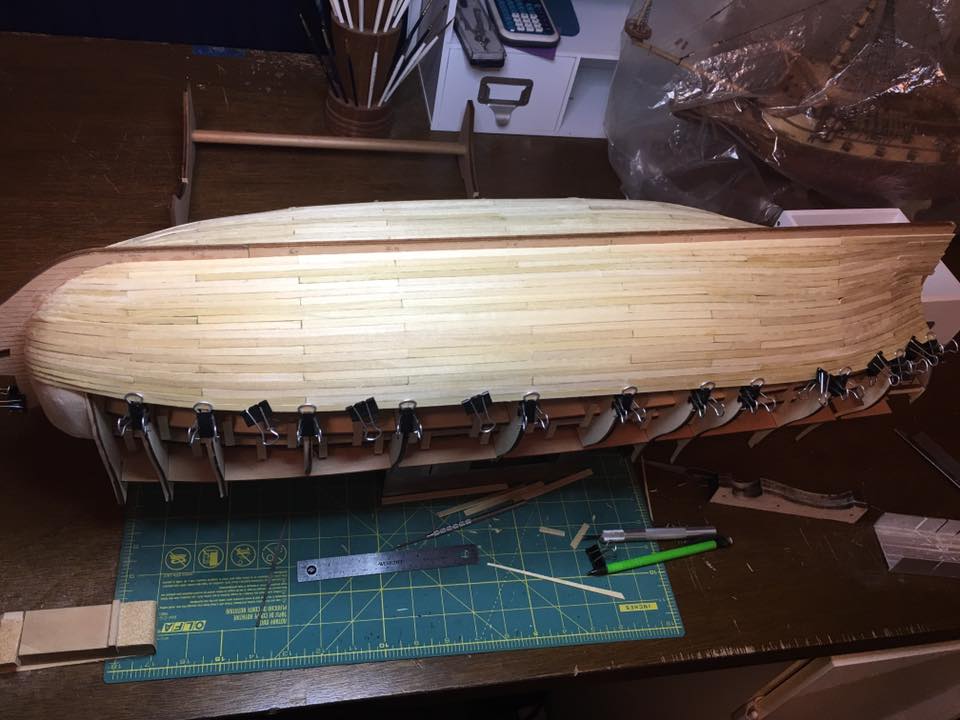
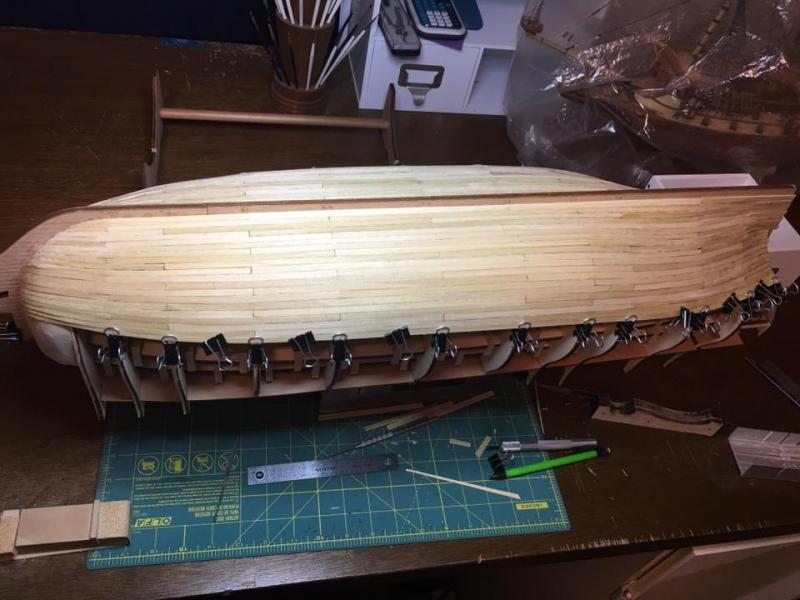
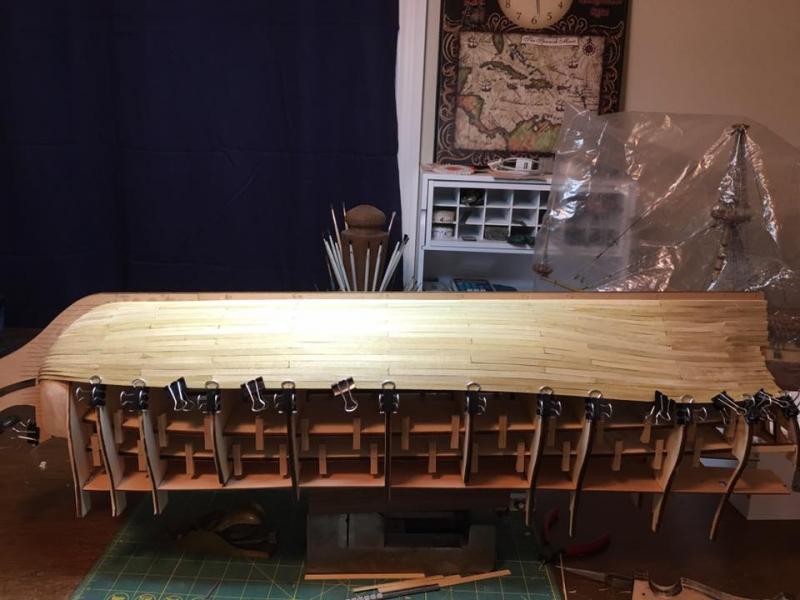
 Michael, after looking at the model and the picture, I'm not completely sure what is going on and what is correct or incorrect! The shape of the hull on this ship at the stern has admittedly been somewhat of a challenge. Her stern is a wonky combination of the narrow sterns found in smaller ships and the wide, flat sterns typical to ships of this era. To make matters worse, I do not have any clear pictures of the stern on the plan sheets. I do have lots of pictures of paintings and "fictionalized" images or guess work but those focus more on the decorative elements and less on the hull shape itself. As to the break you are referring to, I am guessing it is a combination of bad fairing, a miscalculation of the bend of the planks when planking and false imaging in the picture. I know I make mistakes so I will not rule that out and this area was tough to fair due to the extreme curve in the framing but it does look a lot better in person than it does in the picture. However, I am going to keep looking at it and may re-plank that area if needed. One thing I like about pictures is that it can take something that while in person looks great but when seen in a picture with a different perspective and lighting, can show the bad areas clearer. I have not had much time to work this week due to the new puppy but I have been getting a lot of research and reading done as that I can do with one hand while playing with the pup with the other. I hope to get in some good build time this weekend and get the planking up a little higher. We shall see what reality allows but that is the plan. P.S. Well done to the Admin team on the upgrade going smoothly. I like the new layout and design in so far as what I have seen. More user friendly when I get on it on my phone too.
 -
Welcome to MSW John! I too am a model railroader in addition to building model ships and many other things... It is great to have you with us and I know you will find this a great place to help you learn all those new skills and building practices that come with model ships. The Phantom makes a nice kit to learn with and there are some good build logs on here that I would recommend looking at to give you a preview and perhaps a better understanding of some of the work that will be needed. Best of luck to you on your first build and I look forward to seeing your work!
-
Welcome to MSW Blaine! Good to have you with us and best of luck to you on your Syren build!
-
Well done! She looks like that with just a few tugs on some rope the sail sill be set and she will be under way. Must mean you did it right!
- 481 replies
-
- 1
-

-
- rattlesnake
- model shipways
- (and 1 more)
-
I just read that as well as I received my copy of that book on Friday and have been reading through it over the weekend. It is much easier to read and play with the new puppy then it is to try to plank when she is awake and full of energy. Yes, I will be doing extensive sanding and patching/fill work before the second layer of planks go down. I am not completely sure what happened in that spot or more accurately, what I was thinking when I bent the planks the way I did. With plank on bulkhead builds I am glad for the double layer of planking as it allows me to cover up the bad spots on the hull. While I try to run the planks as they should be, due to the spacing of the bulkheads that can be difficult. I could always run them as one long plank as they would be covered up but I like doing it piecemeal as that gives me more practice and makes me think more on what is going wrong and what I need to fix to make sure the second planking is better. This is especially important to me so I can see of the shape of the hull affects the wood as it bends and twists to make the shape. Where does it widen, narrow and what illusions are created that can throw off my perspective on alignment. If you look on my La Couronne build, I ran the first layer of planking in the same manner and had bad spots in it. After fill and sand I was able to lay down the second layer to look very good. While not perfect, I am very happy with the overall outcome. I hope to do even better on S.R..
-
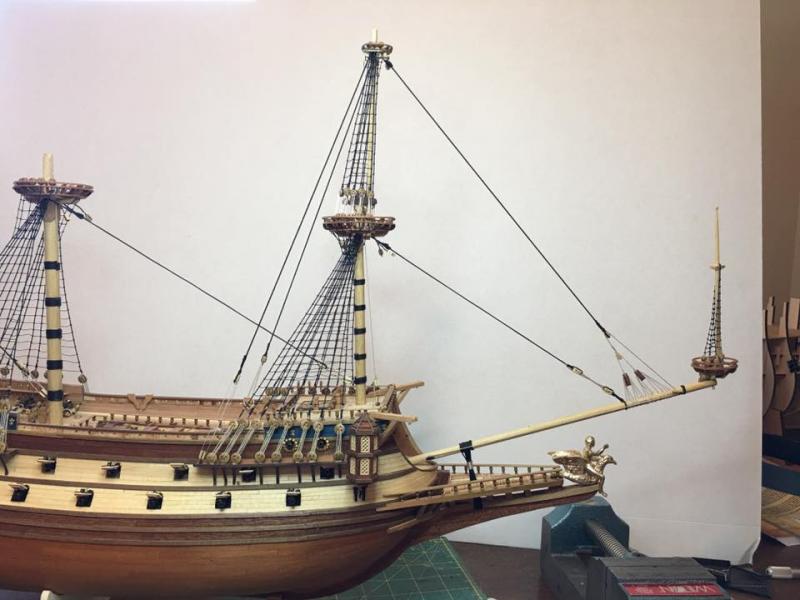
Hello! I have not been completely idol on my build but with finishing the fore top mast on La Couronne and especially training my new mate (new 2 month old puppy), my build time has been severely limited. Still, I did manage to complete the next 10 strakes on the starboard side this weekend and I have started the next 10 on the port side. When done I will have 20 strakes completed on both sides and still will not have reached the lower gun deck. It is really a wonder when one stops to think about the sheer quantity of lumber that would have gone into building these massive ships. Just the planking alone would be a small forest and then you still have the framing, blocks, misc. bits and pieces and decorations. Not to mention what would have been needed for the fires to make the iron works. It is no surprise that Europe's forests were severely wiped out during the 17th and 18th centuries. Anyway, enjoy the update and hopefully, puppy willing, I can get some more done this week!
- 961 replies
-
- 10
-
-
Welcome to MSW Bjønar! Good to have you with us and active! You will enjoy this side of the group even more than just looking. Best of luck to you on both your projects and I look forward to seeing pictures of them when you get a chance.
-
Introducing myself and already seeking advice
EJ_L replied to kdm's topic in New member Introductions
Welcome to MSW Keith! Good to have you with us. I know you are looking at keeping both sand dust and costs down so you can always hand sand things. Working with wood will mean that you will have sanding and sawdust unfortunately. I would recommend getting a small vacuum to help keep the dust under control. If you get one with a long enough hose you can always rig it, (use tape to hold it to the table) so that it acts as a dust collector when sanding. If you think this may be something you really want to get into, I would recommend spending the money on a Dremmel. No need to buy the expensive sets with hundreds of bits, just get the basic drill with a couple of sanding drums to start off. If money is tight even for that, there is nothing wrong with hand sanding. The paper is cheap and you can easily make sanding blocks out of scrap wood or buy cheap ones if you prefer that. Honestly, even with al the power tools I have, the majority of my sanding on a model ship is still done by hand either with a block or free form. Both of the models you are looking at are great starters. There are many logs for both and they will give you a good fundamental of the basics. Good luck to you on your maiden voyage into this great hobby! I look forward to seeing what you decide to start with and sharing this adventure with you! -
You may have already answered this but are you modeling her with the quarter galleys having open balconies or closed? I have been leaning towards open as that is how I am seeing her when looking at renderings viewed from the rear but when seen from the side, harder to tell. If you are building with open balconies then your window alignment would be easier to accomplish as the bottom edge of the window would most likely be below the top edge of the balcony rail. This would allow the windows to line up on both the stern and side but you would not necessarily be able to see this due to the balcony rail. If you are modeling them closed then it may be the rounded shape of the galleys that is making things look off in the drawings. Curves are hard to get a proper perspective when drawing and viewing in 2 dimensional space. When I look at architectural drawings at work and they have curved features, the various items on that feature always look distorted and not right due to the flattening of the curve or the perspective from where it is drawn. This can easily distort layout and size. To double check what you are doing will look good to you when modeled, I would suggest making a simplistic paper model of your drawing. This would be inexpensive and might put things into better perspective while allowing you to make easy changes when needed or wanted. If you are going to go through all this work and effort may as well go a step further!
- 2,699 replies
-
- 4
-
-
- heller
- soleil royal
- (and 9 more)
-
la Couronne by francisb - Corel
EJ_L replied to francisb's topic in - Kit build logs for subjects built from 1501 - 1750
Mine also came stained for me but thanks you for sharing that paint mixture to try out. I have been looking at different shades of blue to use for my S.R. build. I like the look of the stained wood that came in my Couronne build and was trying to think of how to match it. That will be worth giving a try! Also, yes! Please update your log! I have been wondering how you were coming along on it and hoping you had not given up. Looking forward to those new pictures! -
Most of my friends, especially the ones here in Kansas would say boat. My Navy friends and family from Louisiana would get it right though! It will be a very nice talking point in my house once done and displayed. Still working out where it will be displayed... I have a plan just have to get the Admiral's approval...
- 608 replies
-
- 2
-
-
- la couronne
- corel
- (and 1 more)
-
San Martin by augustus
EJ_L replied to augustus's topic in - Build logs for subjects built 1501 - 1750
Those launches look fantastic. Well done! A fine addition to your build. -
Dan, You really should start up a build log under the model ship kits section here. It helps to keep all the logs in the same place and you will get better answers to your questions in there. When you get it going we will follow. There is a post at the very top of the page that gives instructions for setting up your log. While you are here though I will say that that Dremel and a bottle of wood filler will become your friends along with lots of sand paper. The effort is worth the pain though so hang in there and push through. One of our members, Elijah, is almost done with his Phantom. He had similar problems when he started his too, so you might want to take a look at his log and see what he did or even just ask him as he has recent first hand experience with it. His log is here.
-
I'm rather surprised they provided metal launches instead of wood or plastic. Other than the shiny metal interiors they came out good. If you want to attempt a rebuild, try to scuff them down with a Brillo pad or 100 grit sand paper, wipe with a tack cloth and then use a spray paint primer. With most cast metal components I have painted that is typically the method I use and the paint has not been a problem. If you do not want to rebuild them but still don't like the look, you could create tarps for them to cover the interiors up. I have done that on a couple of projects to hide mistakes. Then there is my personal favorite of just saying, well, that is annoying but live and learn and make the next one better! If I removed all the mistakes from my build there would be nothing left to hold the ship together!
-
I understand the question of where to put a large model as that seems to be about the average size of most of mine. On the plus side, the large size will allow for lots of great detail work! Looking forward to sharing in this journey with you. Best of luck!
- 55 replies
-
- 1
-
-
- cutty sark
- sergal
- (and 2 more)
-
She looks fantastic in her new home. You have a model to be proud of for sure! See you on the Cutty Sark.
-
Welcome to MSW Daniele! Good to have you with us. I'm sure you have already discovered that this place is full of great information and friendly people if you have been hanging around for a while. I look forward to seeing your work and I wish you the best of luck on your Constitution build.
-
Welcome to MSW Dan! Great choice to go with the Phantom. That model will give you opportunity to learn many of the basic skills and set you up well to move onto bigger and more complicated builds. Best of luck to you on your first wooden ship build. I look forward to seeing your work!
-
Thanks for that link. There are some very nice deals on there for several of the books I have been looking for. I may be able to expand that library a little faster now...
- 608 replies
-
- 2
-
-
- la couronne
- corel
- (and 1 more)
-
The majority of my ship modeling books have come from either Amazon or Barnes & Noble. I have a couple that are on my wish list with Ancre too. Most of them I have found new but a few have been used. I just keep my eyes open for them and when buying used I try to stick with third party sellers affiliated with reputable websites like Amazon or Barnes & Noble as they tend to keep the third party people more accountable to what they are selling. Shop around when looking. I was looking up the pricing for Masting and Rigging of English Ships of War 1625-1860 last night and I found it ranging anywhere from $899 all the way down to $70. Best I could tell the book was out of print and when that happens you get a lot of price gouging. I have seen this with many other books as well. Just keep a wishlist and check up on it periodically and you can usually find one in an affordable range.
- 608 replies
-
- 5
-
-
- la couronne
- corel
- (and 1 more)
-
I agree and fortunately so does the Admiral! We are both huge readers which means I usually have no opposition to buying more books.
- 608 replies
-
- 4
-
-
- la couronne
- corel
- (and 1 more)
-
That one has also been on my wish list. I'm slowly collecting them and I'm sure I will have a very full library one day soon!
- 608 replies
-
- 2
-
-
- la couronne
- corel
- (and 1 more)
-
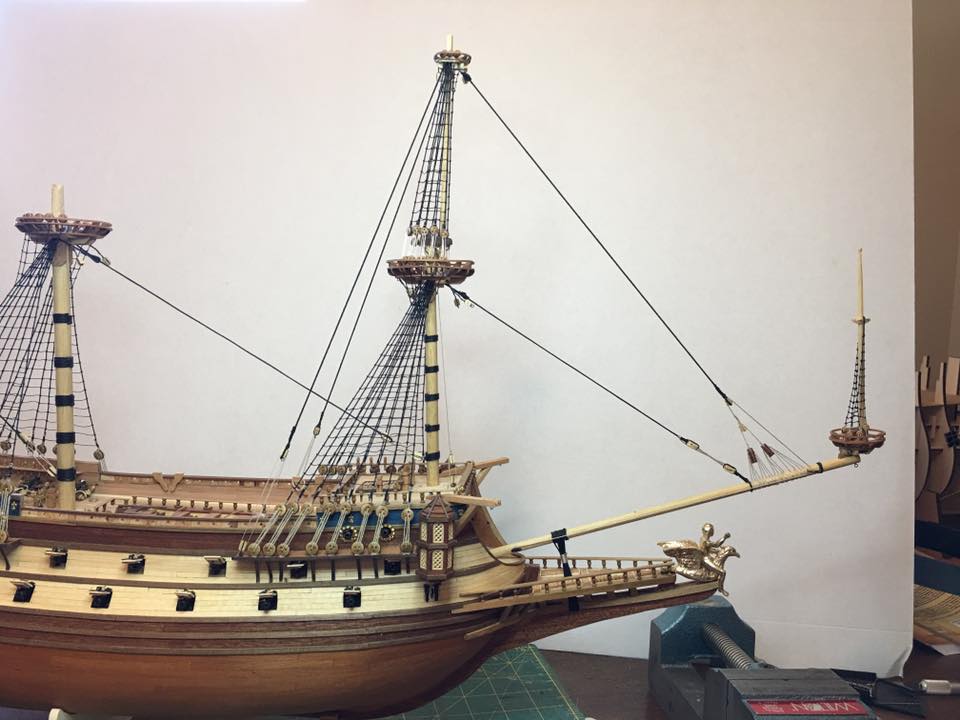
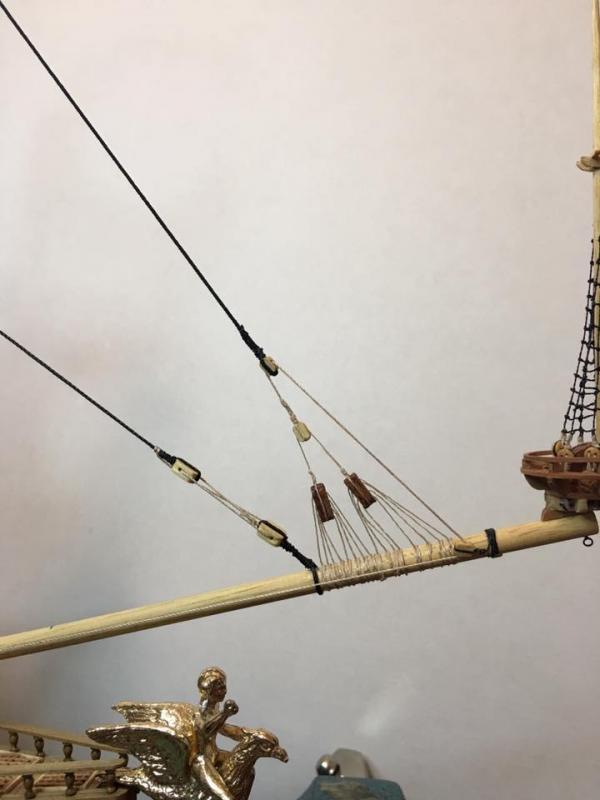
Good morning! The weather is quickly becoming very beautiful here today so I wanted to get my ship building in this morning so I can spend the afternoon out in the wood shop working on some furniture. So I have been hard at work on the crow's feet for my fore stay. I did manage to finish it but I am still unsure if I am completely happy with the results. Overall I am satisfied but there is one area that is bothering me with the slack in the forward crows foot. I have already redone it twice as the first time was awful and the second I only had to redo two of the lines. Now I have to step back for a few hours or maybe longer and then decide what I want to do. May let it sit while I work on S.R. for a while. Anyway, enjoy the pictures and suggestions are always welcome!
- 608 replies
-
- 7
-
-
- la couronne
- corel
- (and 1 more)
-
I may look into getting that one as well. I have leaned heavily on the Vasa and it's research in building La Couronne. The French did use a lot of Dutch influence in the early 17th and from hat I have been seeing, there are many very similar practices common in the two ships. Plus I am sure that one day I will get around to build the Vasa as it is a must have for the time period.
- 2,699 replies
-
- 2
-
-
- heller
- soleil royal
- (and 9 more)
-
Studying up on how to rig crows feet and euphroe blocks tonight. So far I have learned that they are complicated pains in the ***es that took a century for people to realize there was a better way to rig things. But they do look cool! By the way, this would be a nice thing if the prints actually showed how the lines were ran or even showed the euphroe blocks to help one figure this out. My plans make a person think that all of those lines simply run through a single block and somehow magically separate into 8 individual strands. So, after a couple of hours I now know what I have to do. Now to figure out how to do it. Keeping tension on the lines and keeping it in the proper places on those lines is going to be tricky. That may be a weekend project more than an after work one. Luckily the weekend is almost here! A huge thanks to mar3kl and his wonderful Vasa build for helping me to see how those crows feet actually work and how to tie them off. His build is truly inspirational and his photos clearly show many of those little details that are not well explained. While the rigging is not identical to La Couronne, the basics are close enough that I can adapt them to the patterns needed for her rig.
- 608 replies
-
- 4
-
-
- la couronne
- corel
- (and 1 more)