


Brucealanevans
-
Posts
450 -
Joined
-
Last visited
Content Type
Profiles
Forums
Gallery
Events
Posts posted by Brucealanevans
-
-
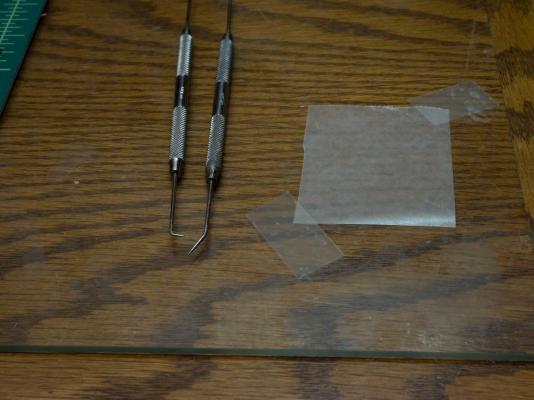
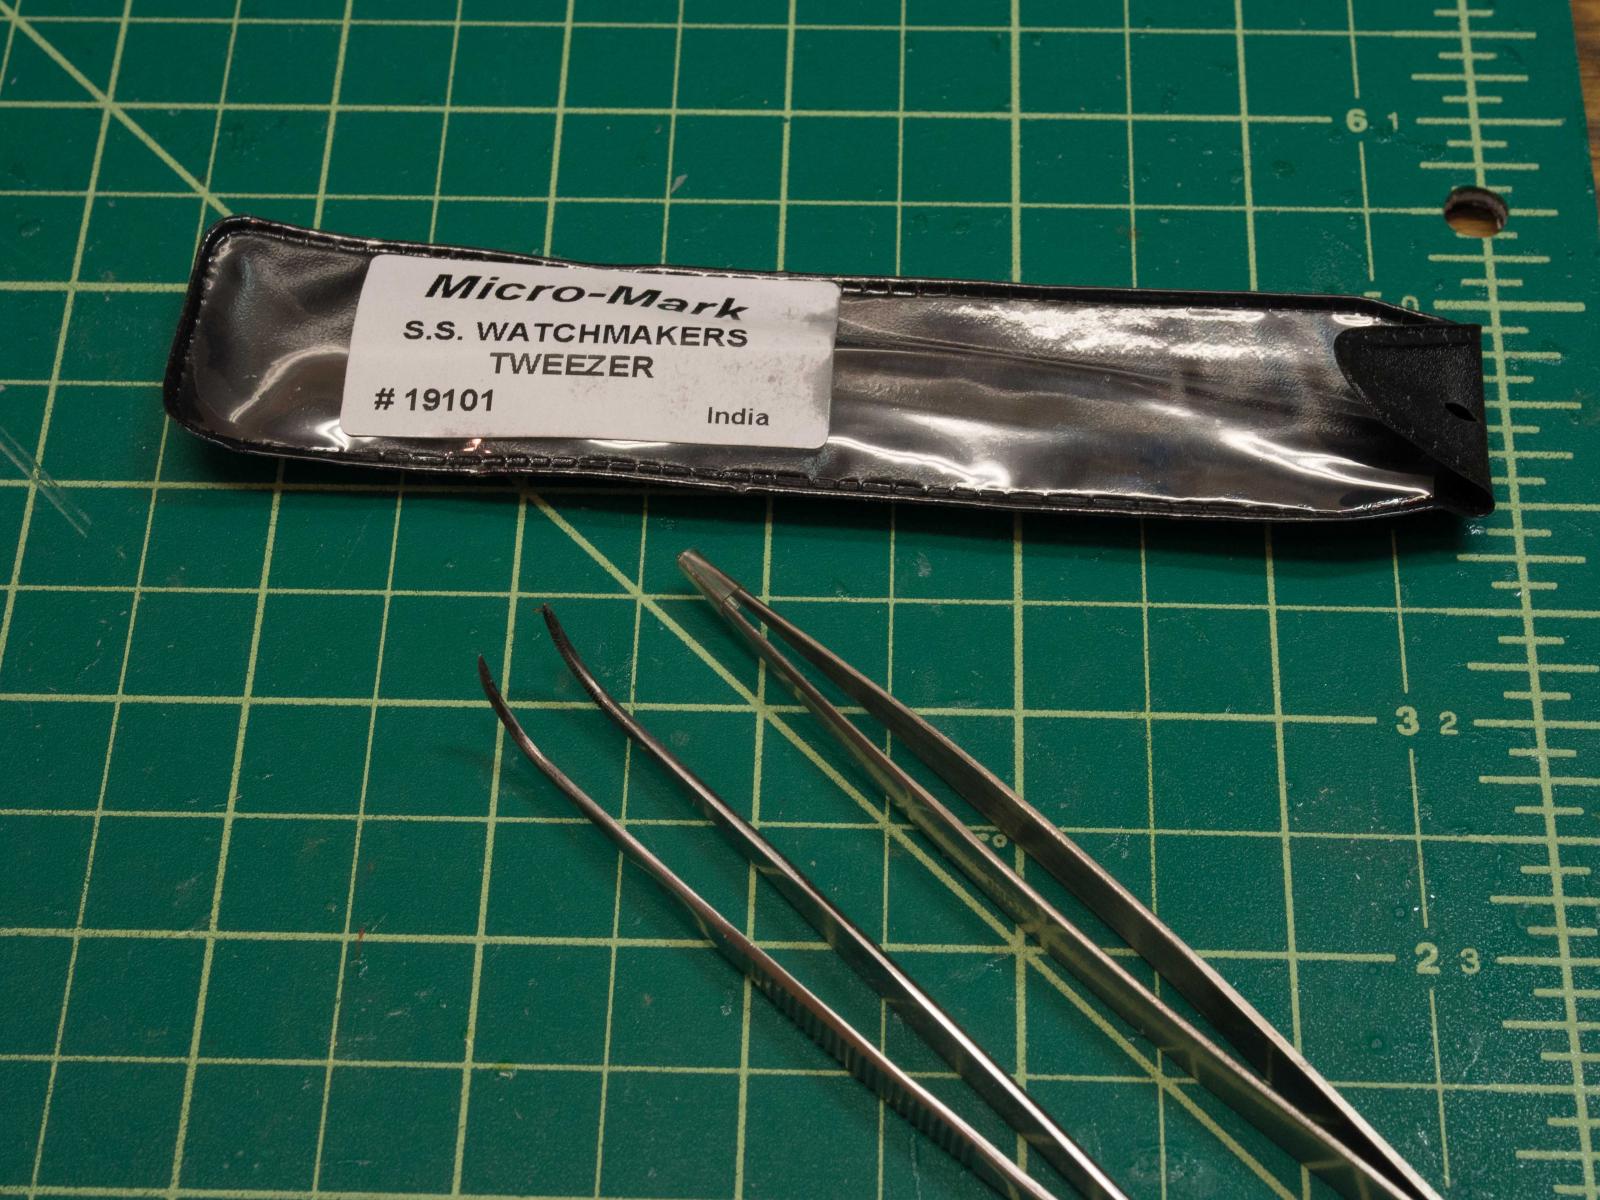
It is worth investing in at least one very good tweezer, that is kept carefully away from potential damaging gunk when a cheap workhorse tweezer (on the left) will to for holding or placing pieces. Watchmaker type tweezers work great; I have two - this (on the right, protective case above) - is one of them.
I will say that as an old guy, putting one small thing inside another small thing is sometimes a real challenge. For instance, for the small anchor fastening chain, I had to get a small cross bar (steel wire fine gauge) into and through one link in the smallest guage chain in the kit.
Could not have done it without a piece of equipment I would never buy, but that fell into my lap.
My wife is a surgeon and had an old set of surgical loupes (glasses with two magnifiers built in, one on each lens) that she had to replace. It turned out our interpupillary distances are close enough to identical to allow me to use these for very, very close work when reading glasses alone won't work.

-
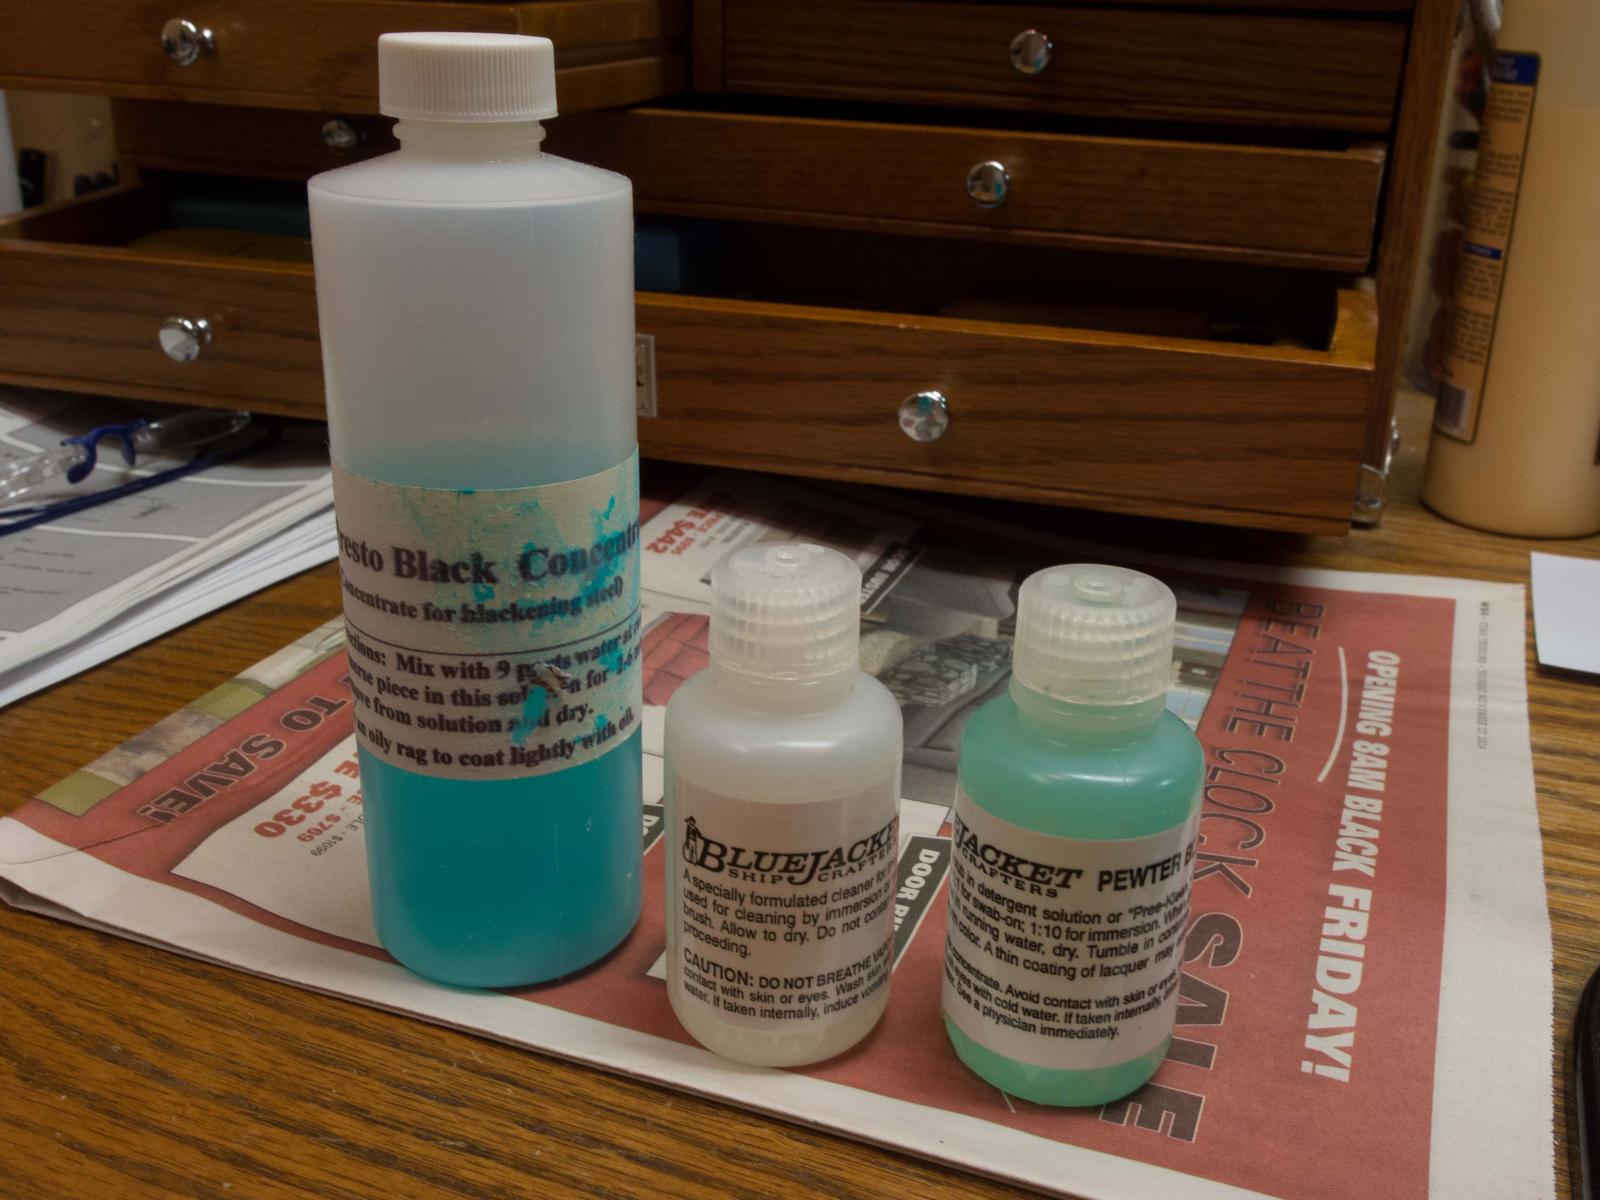
This, my third wood model, was the one in which I vowed no brass would be visible if the piece wasn't supposed to be brass.
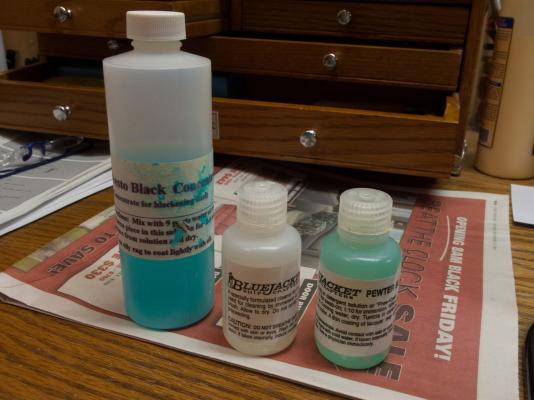
I used and was satisfied with Blacken-It, but that has become unavailable.
Casey's Brass Blackener works, but seems to rub off a bit to easily and I ended up touching up with black paint a lot.
These products are what I'm using currently.
The cleaner to soak pieces to remove grease and finger prints, then into the appropriate solution to blacken.
The pewter blackener works well on brittania metal (I used it for my anchors for example). Both from Blue Jacket.
The other "steel" blackening solution (Presto Black Concentrate) I found on the Internet, and is diluted 1:10 for use. Works well on steel (I have used some steel wire in the model) and brass (as long as it's not coated like much of the brass or copper wire for jewelry is). Once VERY dry, I coat with a matt acrylic.
- SkerryAmp, texxn5 and Landlubber Mike
-
 3
3
-
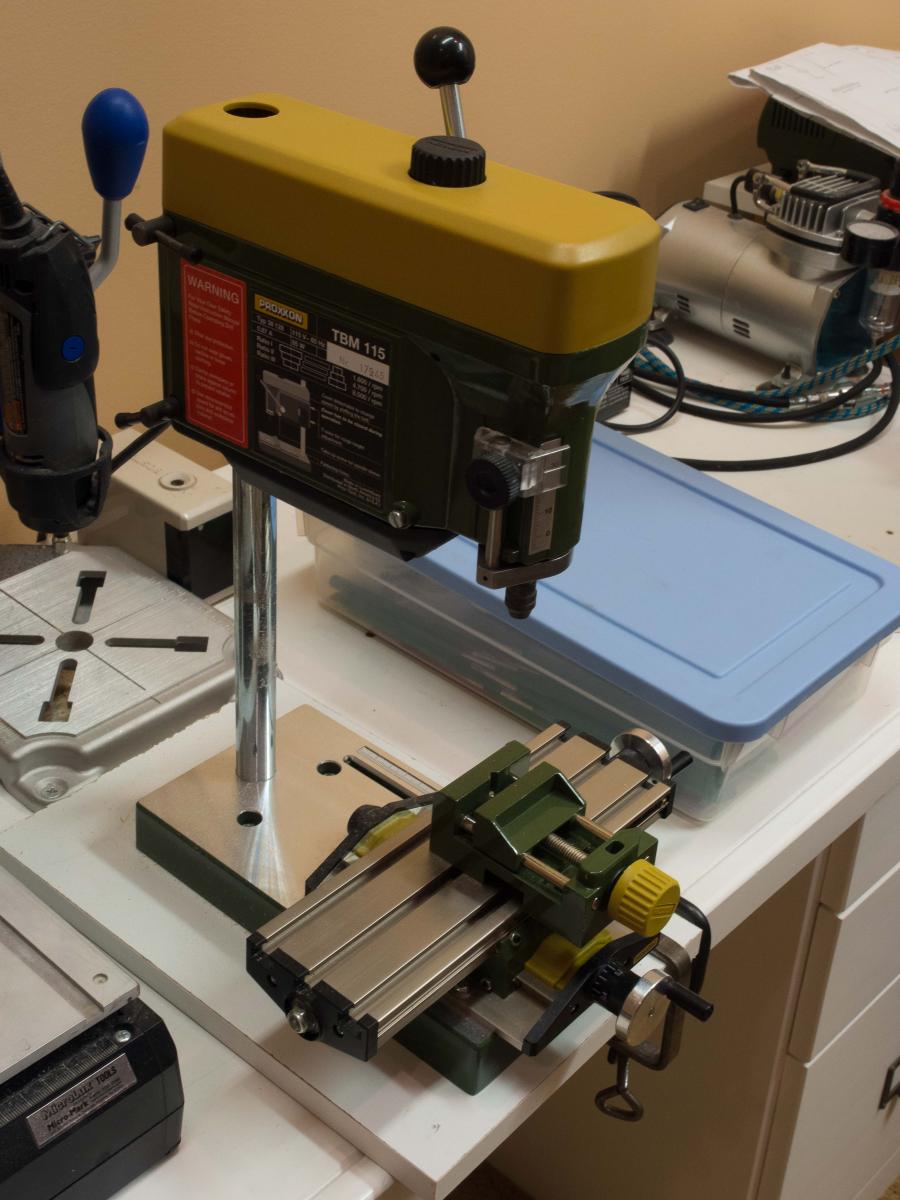
OK, this was an extravagance that I indulged for my 66th birthday;
A Proxxon drill press and a x-y micrometer adjustment table.
Usefull for precisely drilling spaced and straight lines of holes. (You have to spend some time with right angles to precisely mount the table onto the press' work surface)
Can be used to mill (in 2 dimensions) with milling bits, but that is somewhat hard with the soft and easily split along the grain basswood of the Morgan kit.
If I were starting again, I would buy something harder and closer grained for some pieces -
Definitely the slats for the skylight - even with the tool I could not drill the number of holes/cm that were required for the full complement of horizontal rods without the slat splitting. I had to reduce the number of rods to complete the piece.

-
I bought a set of dental picks, and the main use has been applying glue.
It is easy to get glue just where you want it - along an edge, in a hole, etc.
Also immediately useful to remove any excess glue squeezed out and potentially visible.
I always have a small square of waxed paper taped to my glass work surface, and on that a large drop of CA will stay useable for hours.
(note, no kids in my house
 )
)For wood glue, I put some on a 3 x 5 card - useable for 5-10 minutes only.
- texxn5, Blue Ensign and SkerryAmp
-
3
-
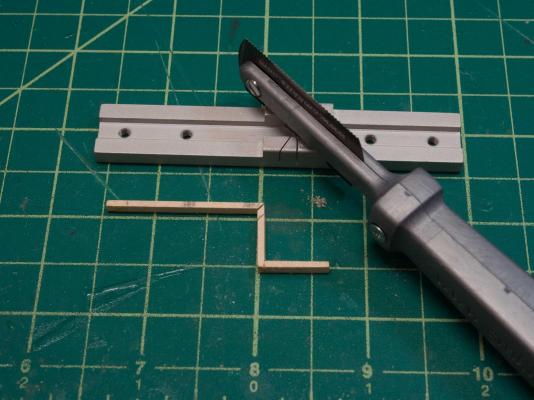
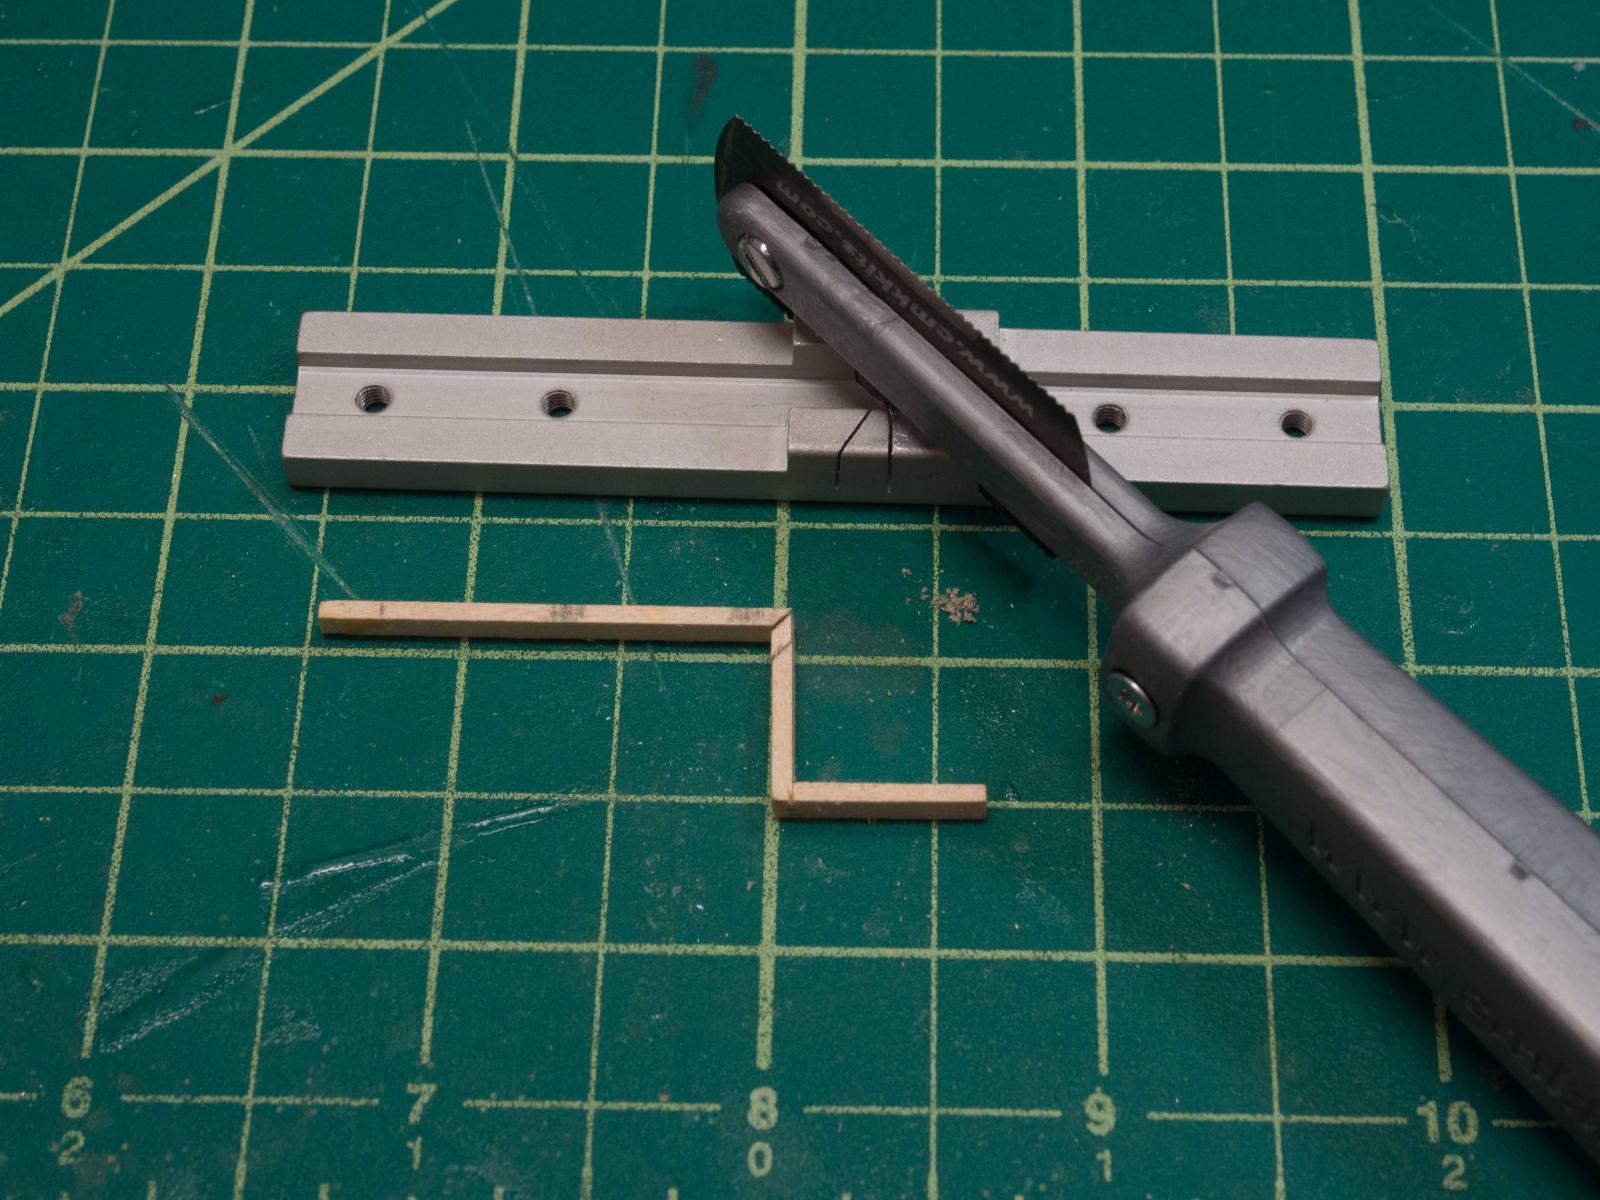
For coamings, bases of deck houses, edge trim (like on the shelter top) mitered corners look great.
This micro miter box (Micro-Mark again) does a great job creating mitered corners for small pieces of wood.
We all (or at least I) are gear crazy and buy more tools than are good for us, but this one is definitely a keeper with a model like the Morgan, which once the bulkheads and keel are assembled, is basically a scratch built kit aside from the metal castings and a few laser cut wood pieces.
-
Secondly, double-sided tape is your friend.
I regularly put a couple of pieces down on the cutting mat to keep things from moving when trimming wood sheets, etc.
Also useful for holding wood in alignment when gluing side to edge (constructing deck houses) or end to end (as for coamings).
In either case, some heavy right angle irons, together with the visible lines on the cutting mat, keep the vertical alignment in place.
These angle irons were from Micro-Mark.

- Landlubber Mike, SkerryAmp and texxn5
-
3
-
As I finish the hull, I thought I'd pass along some helpful things I learned. No claim of originiality; I picked these up here and there, including some from posts on this site.
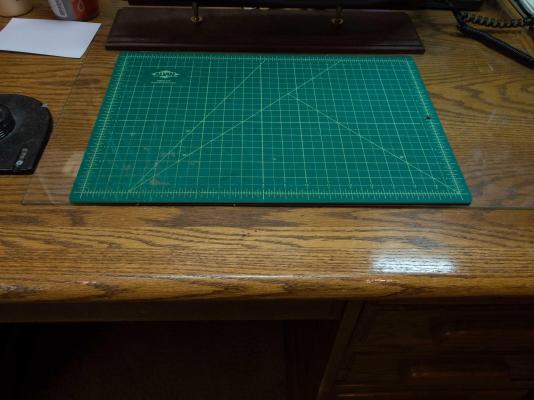
Firstly regarding work area: a large piece of tempered glass on the work surface is very helpful - keeps things flat, paint and glue can be easily cleaned off with a single edge razor blade, CA glued pieces don't stick well.
I use a cutting mat on top of it, offset so I can use the most appropriate surface without a lot of shifting around.
- texxn5, Landlubber Mike and justsayrow
-
3
-
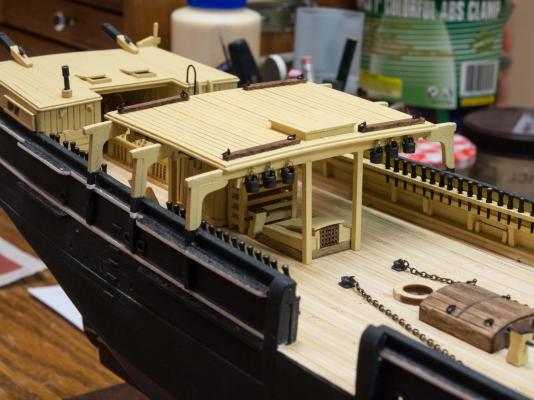
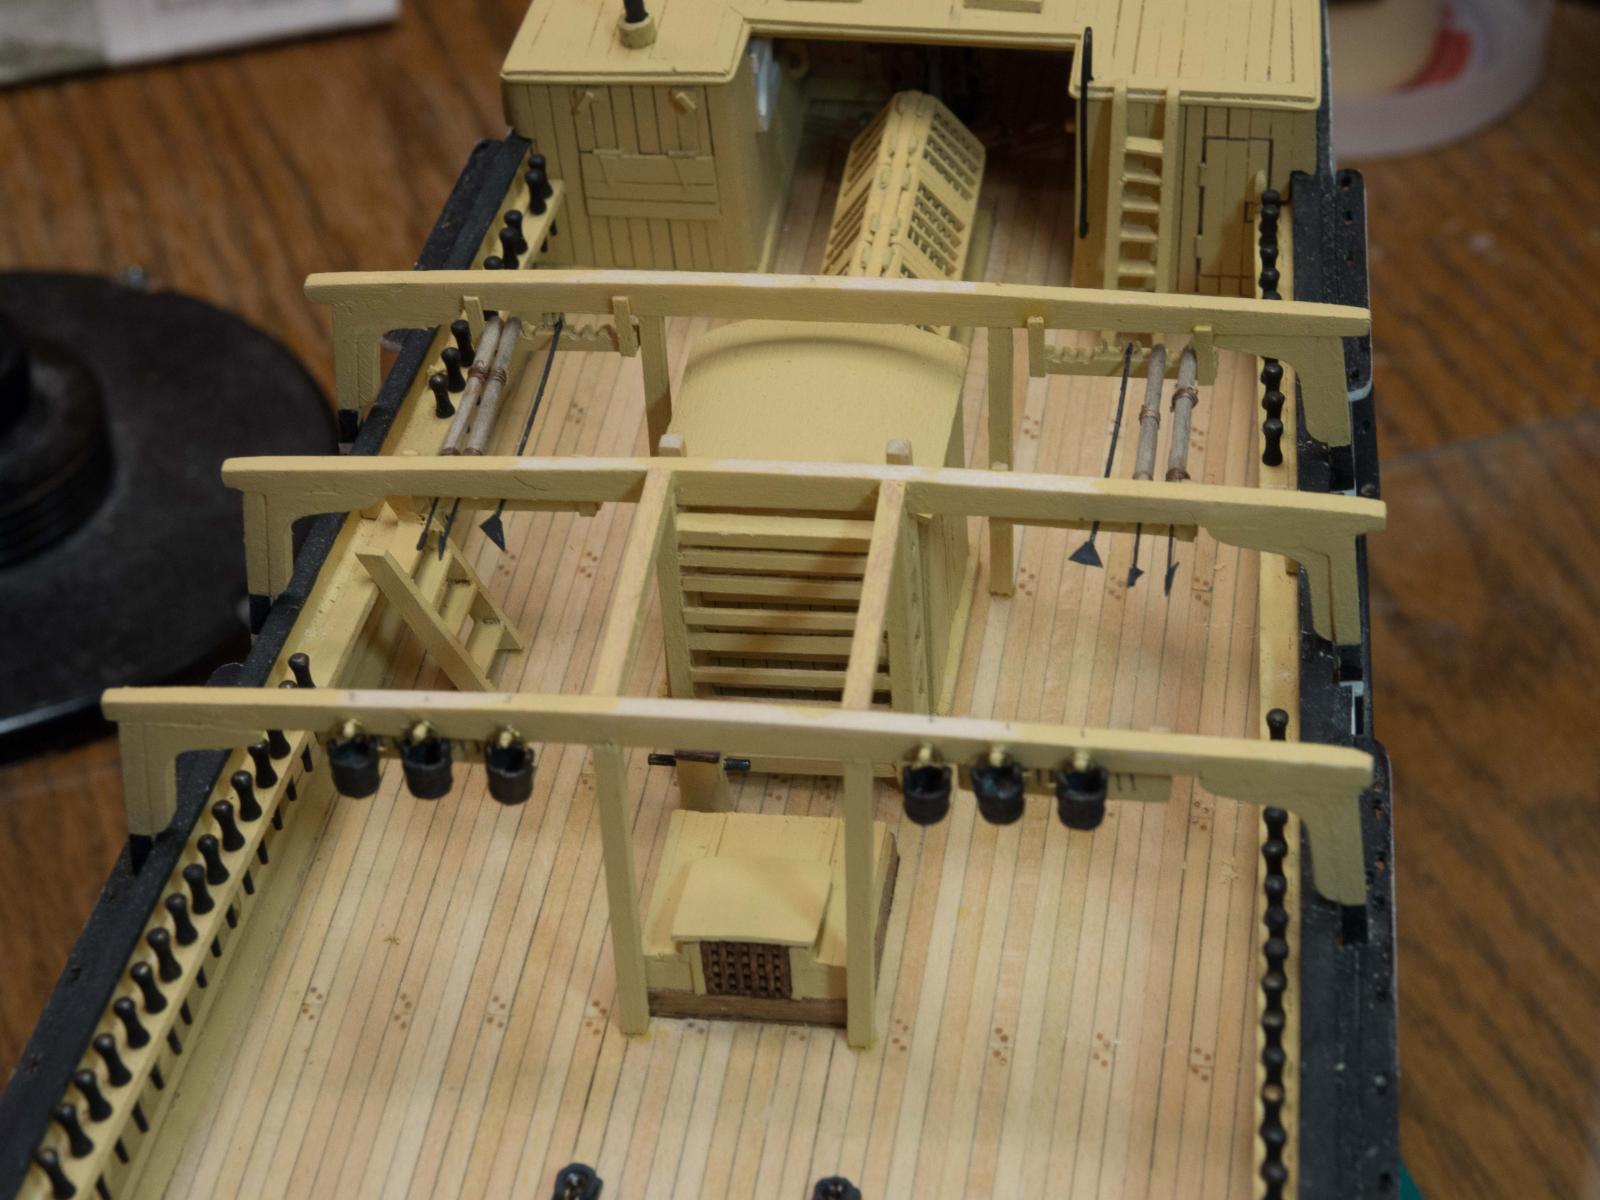
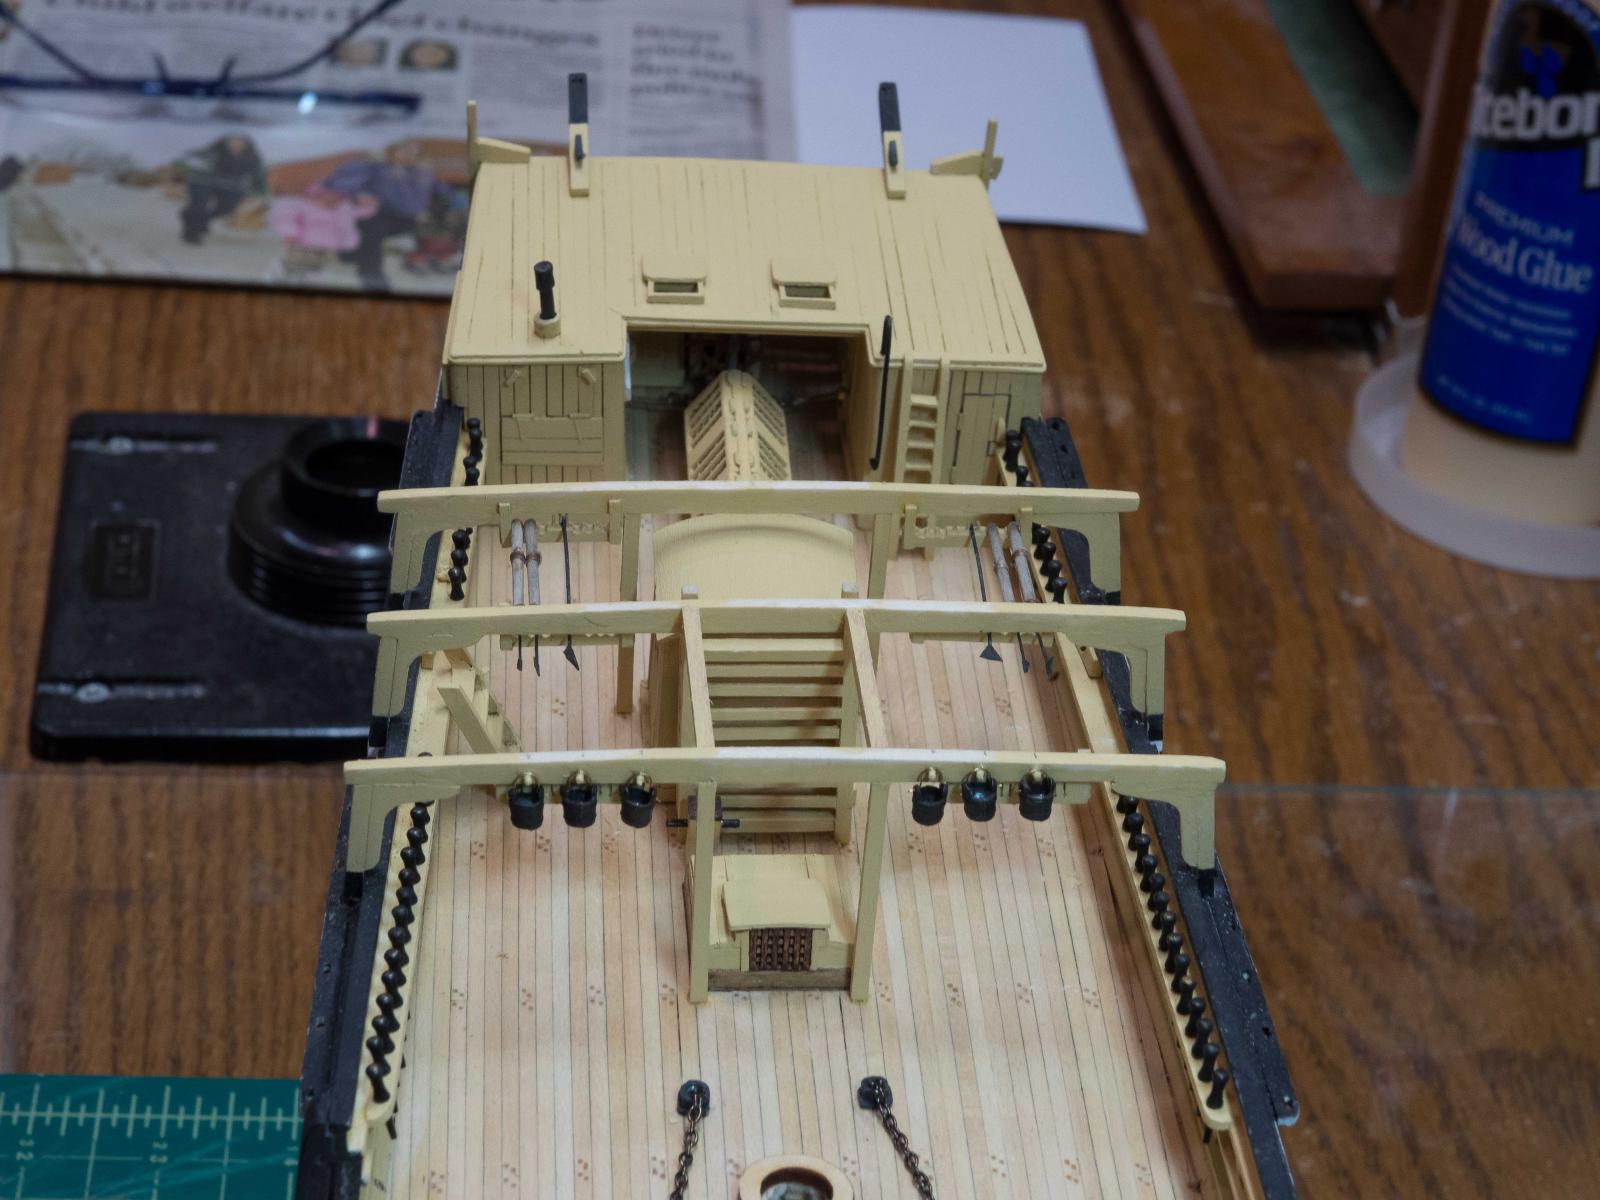
After more than 1 1/2 years at this, I'm approaching being done with the hull.
Put on the shelter roof last night.
Next is the rail/pump area around the mainmast, and then a few random things like the grinding wheel, some barrels, and a careful review of the plan sheet to make certain all of the deck eyebolts, cleats, etc. are in place.
Likely will need to take a break before beginning rigging/masts as real life intrudes again.
Oh well, by this time next year I'll be retired or, at the worst, part time; more time to play either way!

-
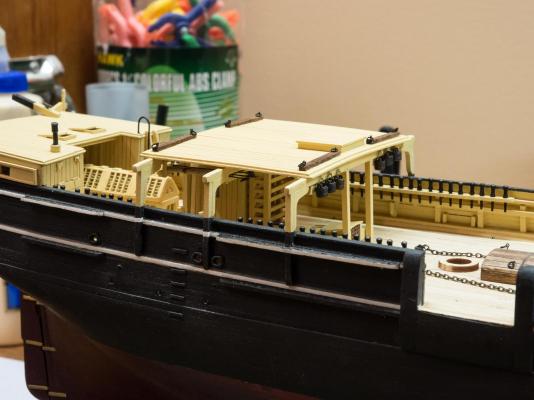
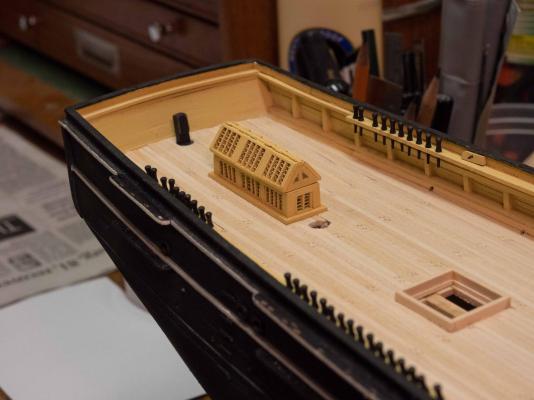
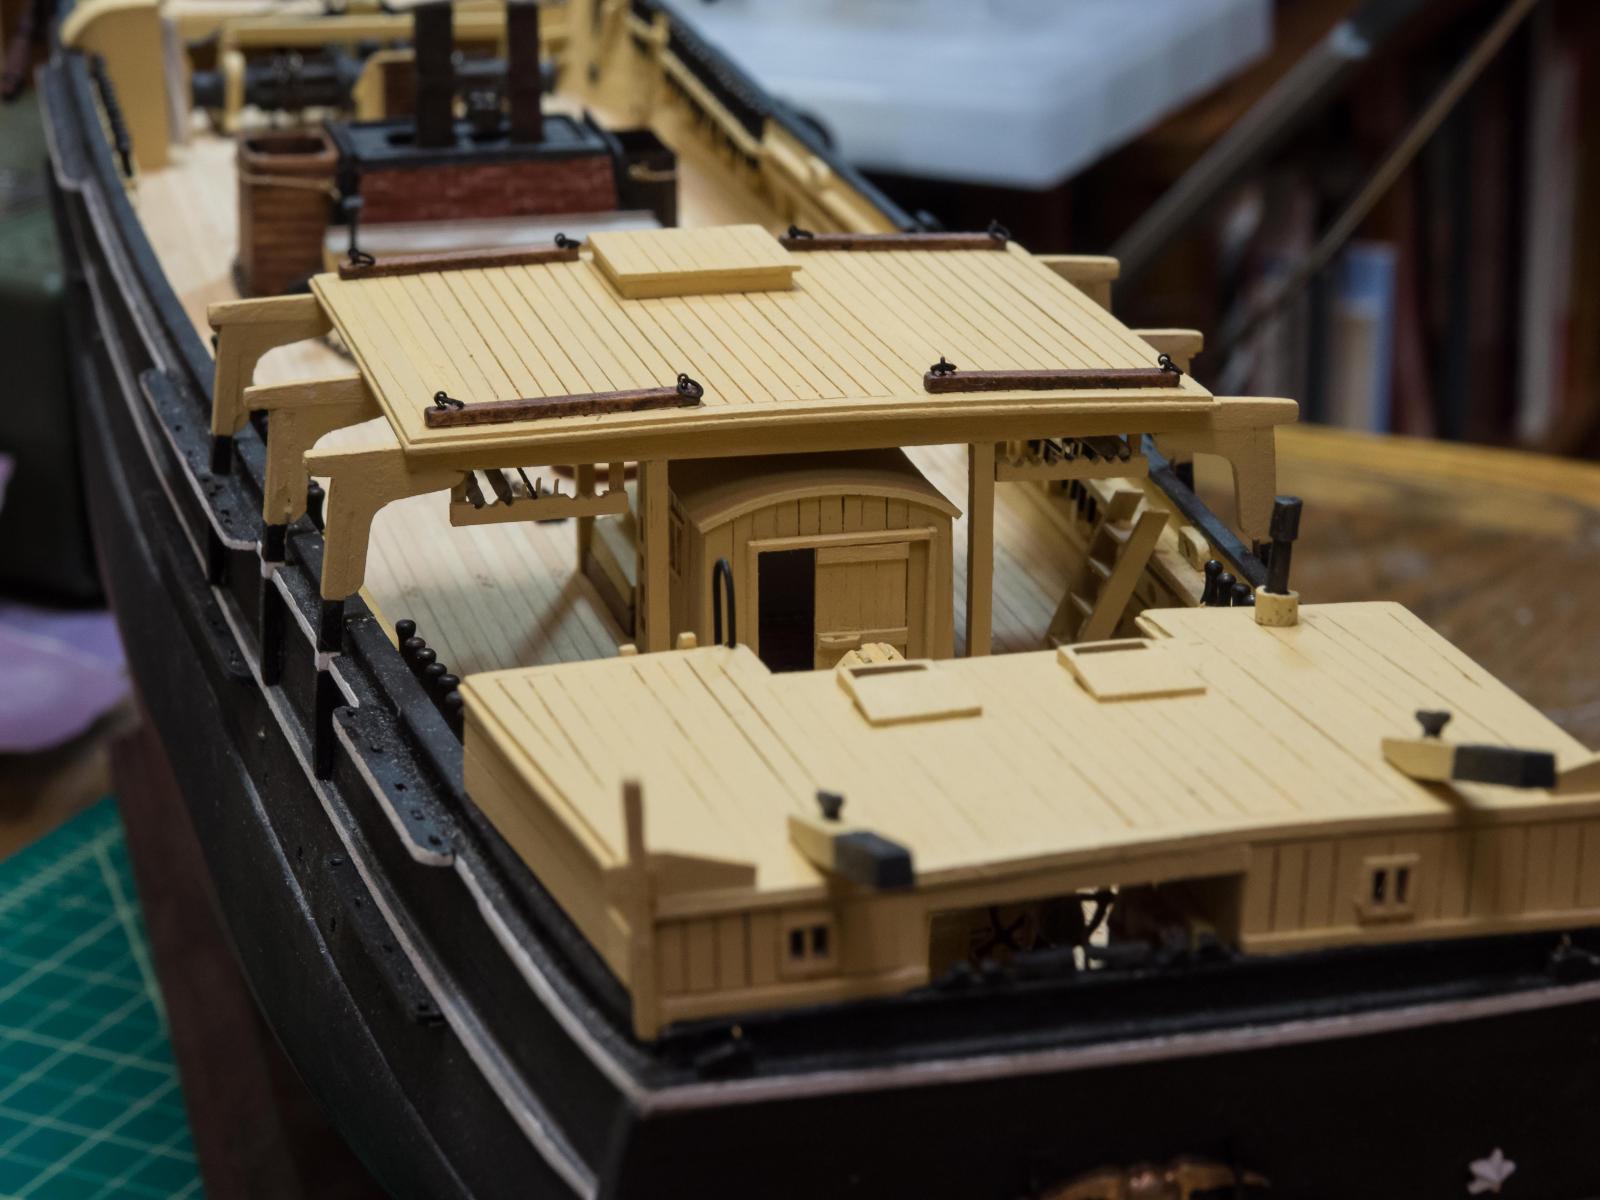
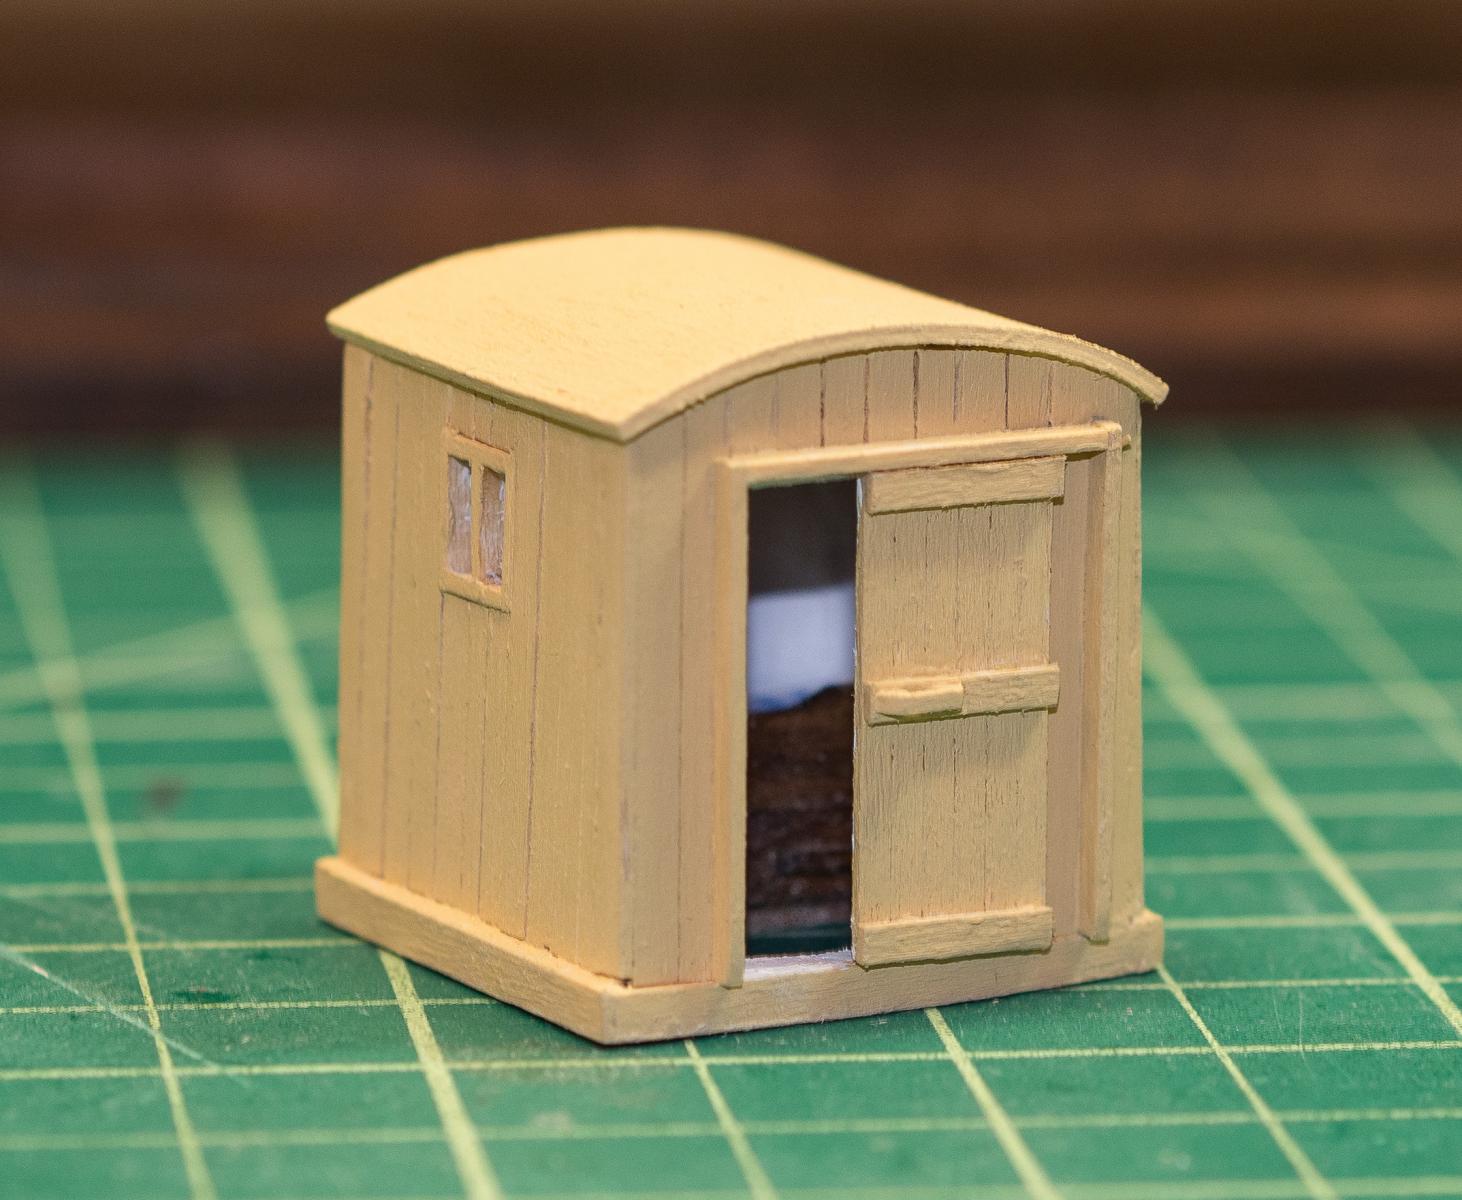
Finished the shelter/boat bearer except for the roof.
I put some tools in the racks although they'll be hard to see once the roof is on - tried to keep them in scale.

- SkerryAmp, boatntrain, jwvolz and 3 others
-
6
-
Deck House -
Left the door open partially, and put the berth inside (with gingham sheet!)
Really can't see it unless you peer in very closely, but was fun.
Decided not to plank the roof, since it will be covered by the boat bearing platform.
Which is the next job.

-
Just back from a trip to Mystic to visit the Morgan.
Took a ton of pictures.
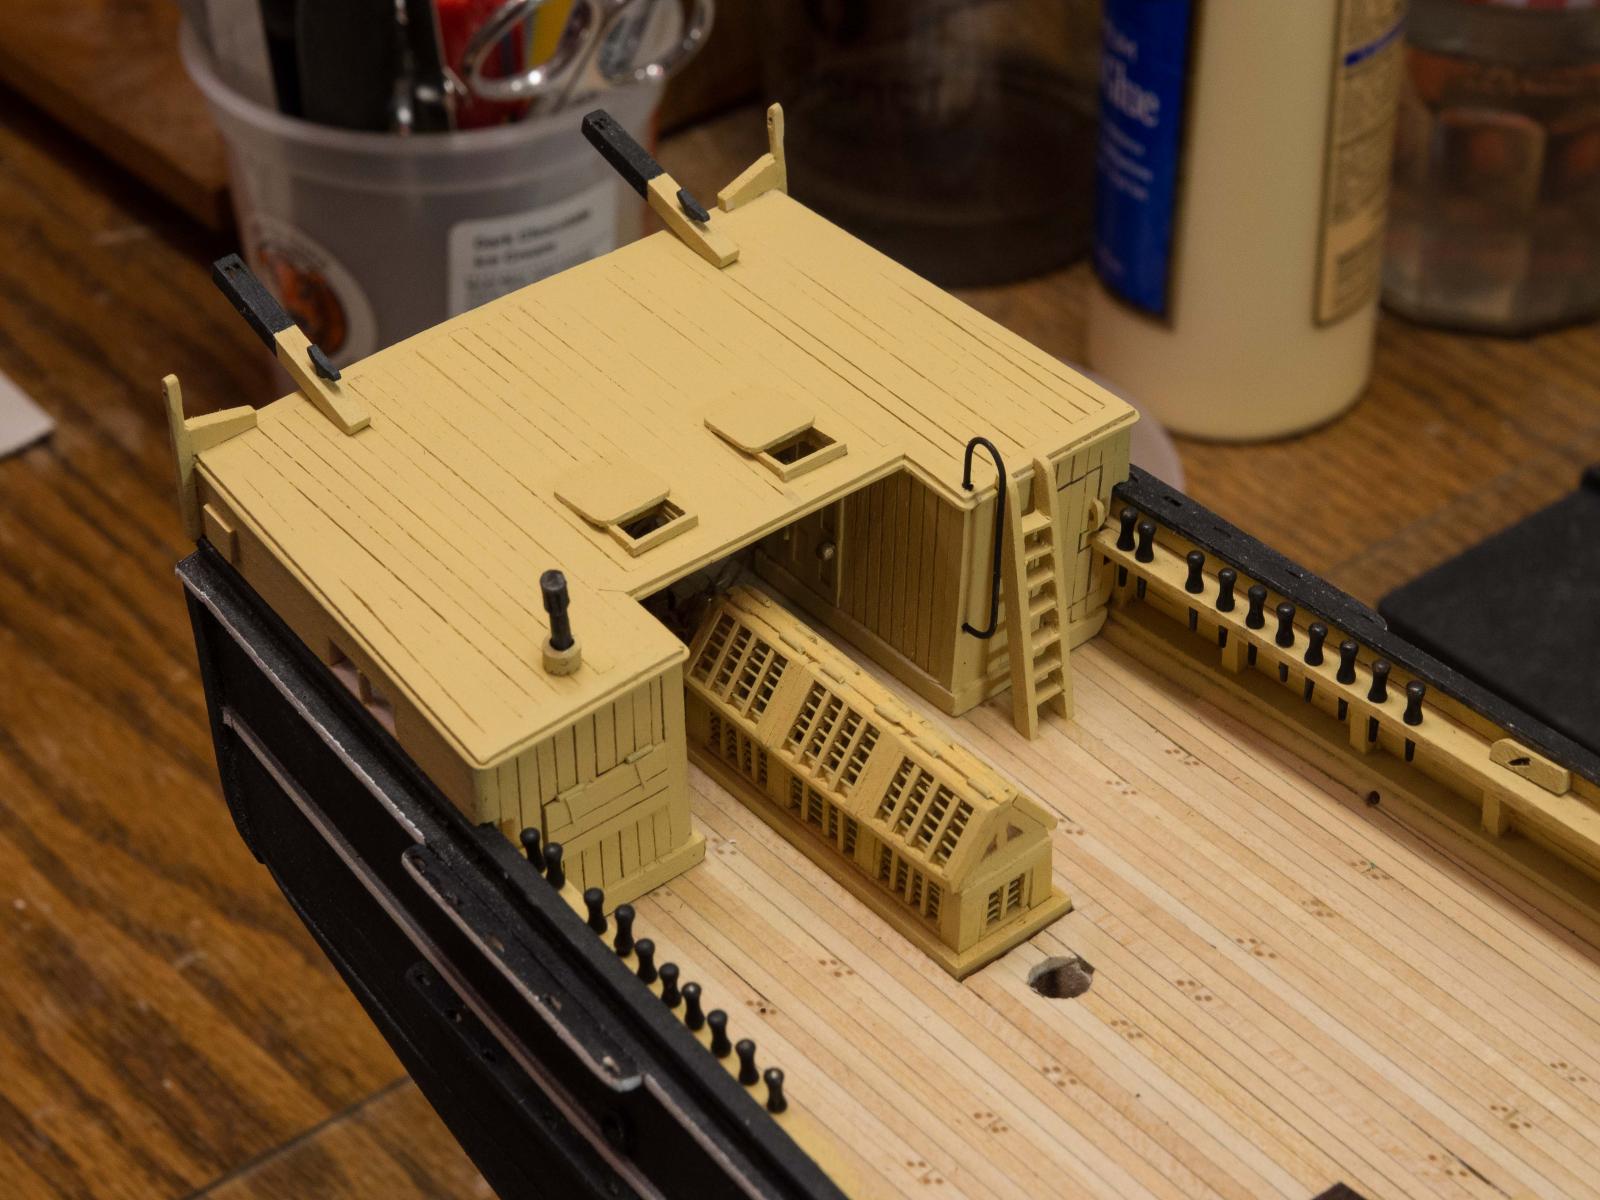
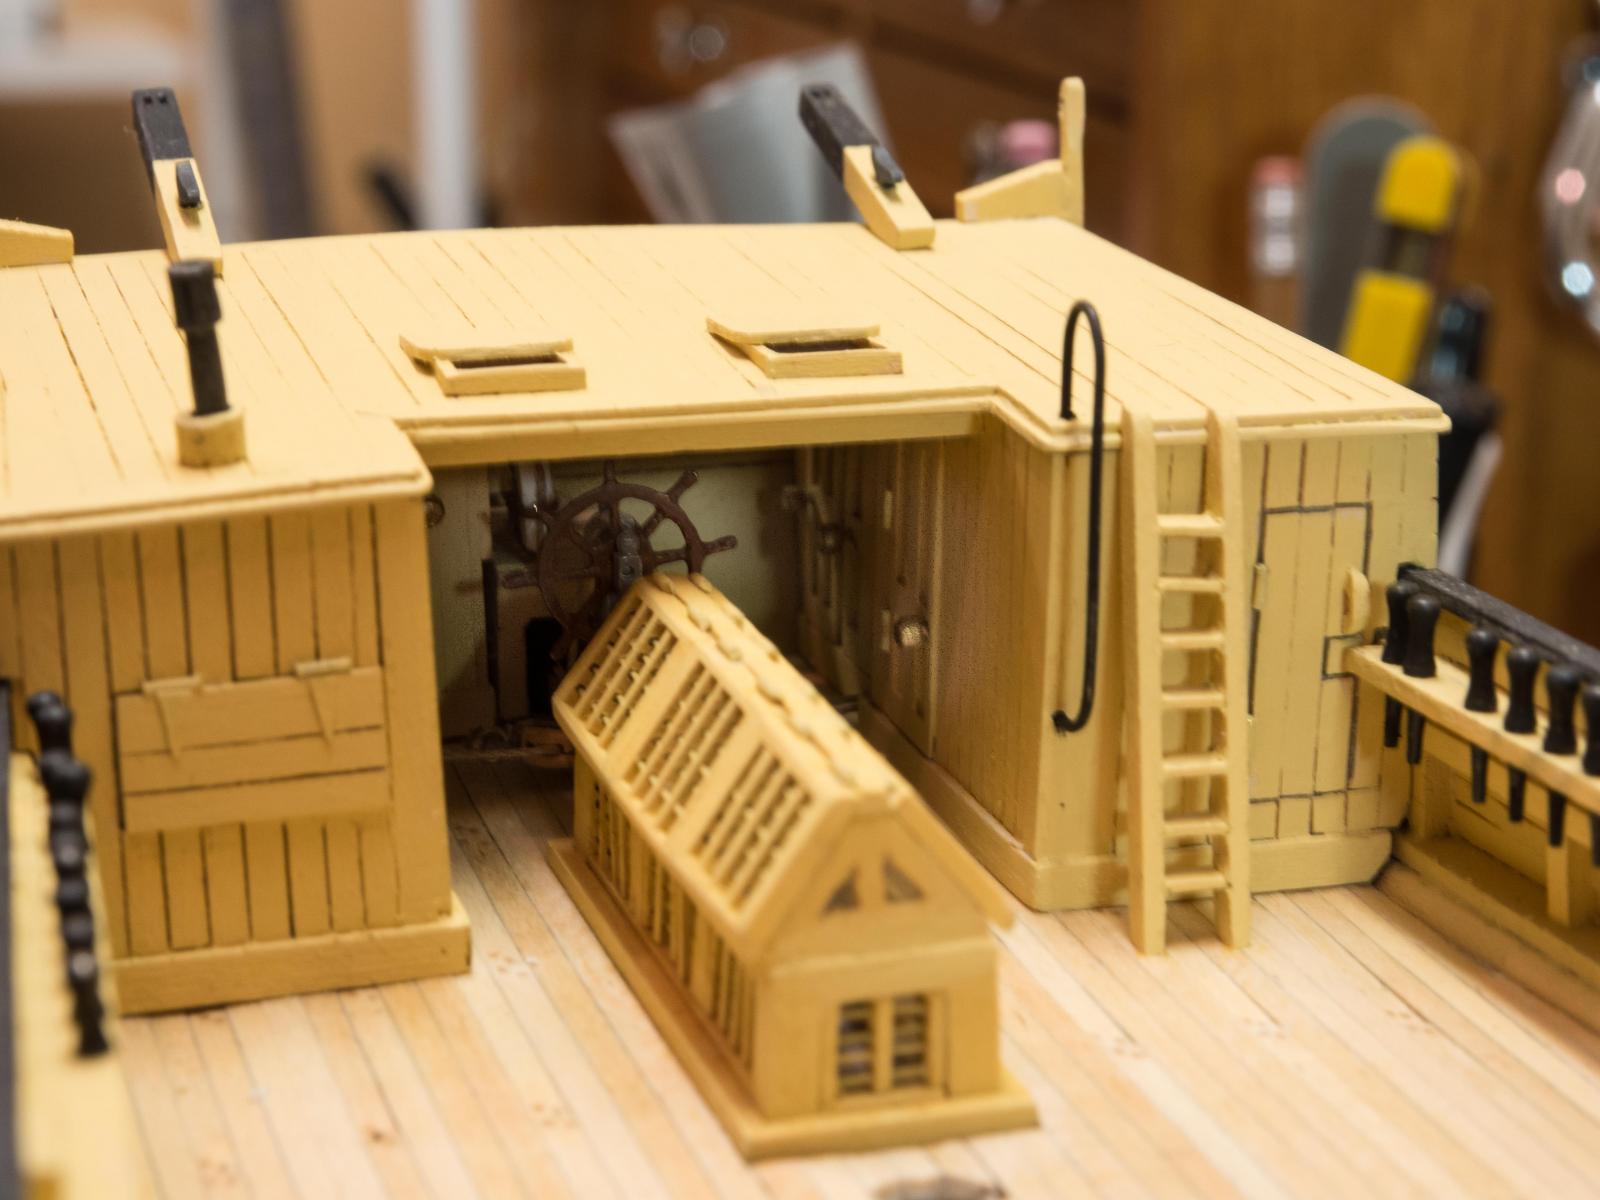
Going to add a few details to the Hurricane House before I move on -
Sliding wood shutter for the starboard window into the galley
Latches for the Galley forward serving hatch.
- Landlubber Mike and texxn5
-
2
-
-
Well, John, after following your build log site, I'm now concerned - in advance - about successfully seizing the entirety of the shroud stays.
I do have the machine, but the task seems daunting.
However, I don't expect to be worrying about that for at least a month or two. Will be asking for advice. Your work on the rigging is truly impressive.
Hope to see the Morgan in person later this month, camera in hand.
Bruce
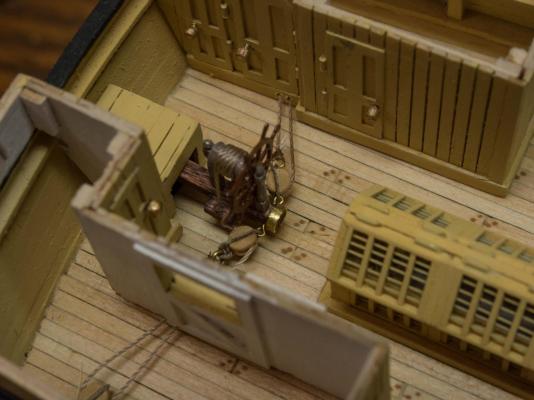
-
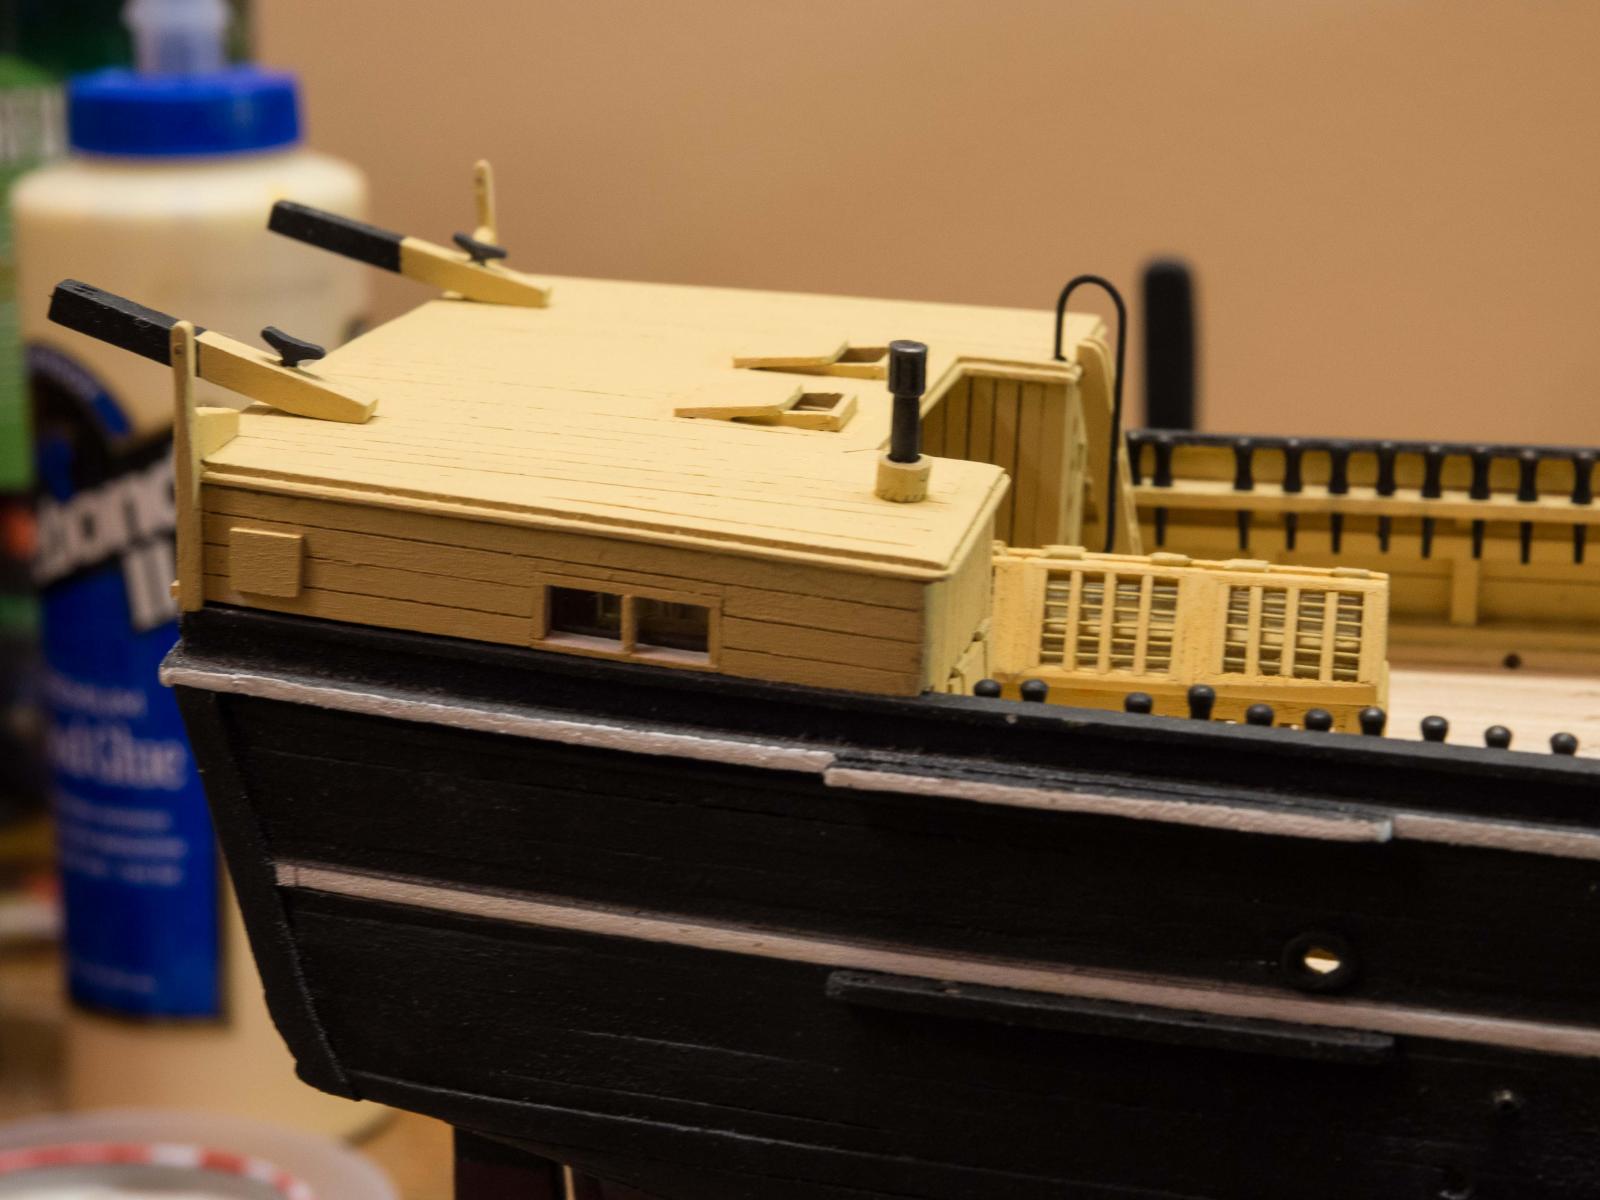
Added the steering wheel gear and fabricated the aft deck houses. I found it easiest to build the houses from 1/32nd thick sheet section by section, and plank them over with a bit of spacing between planks to get the proper look.


- Blue Ensign, Azzoun, dgbot and 2 others
-
5
-
Time for another update.
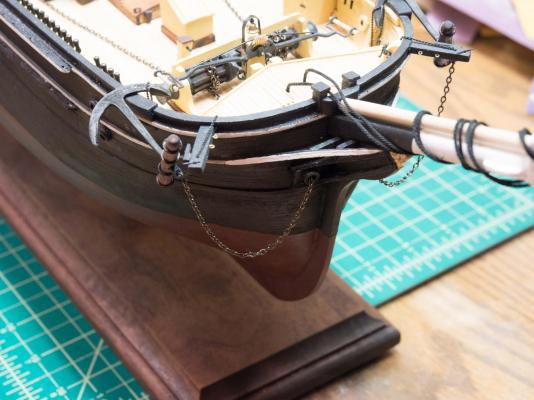
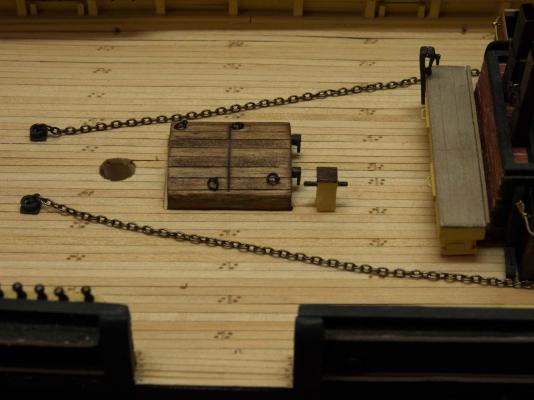
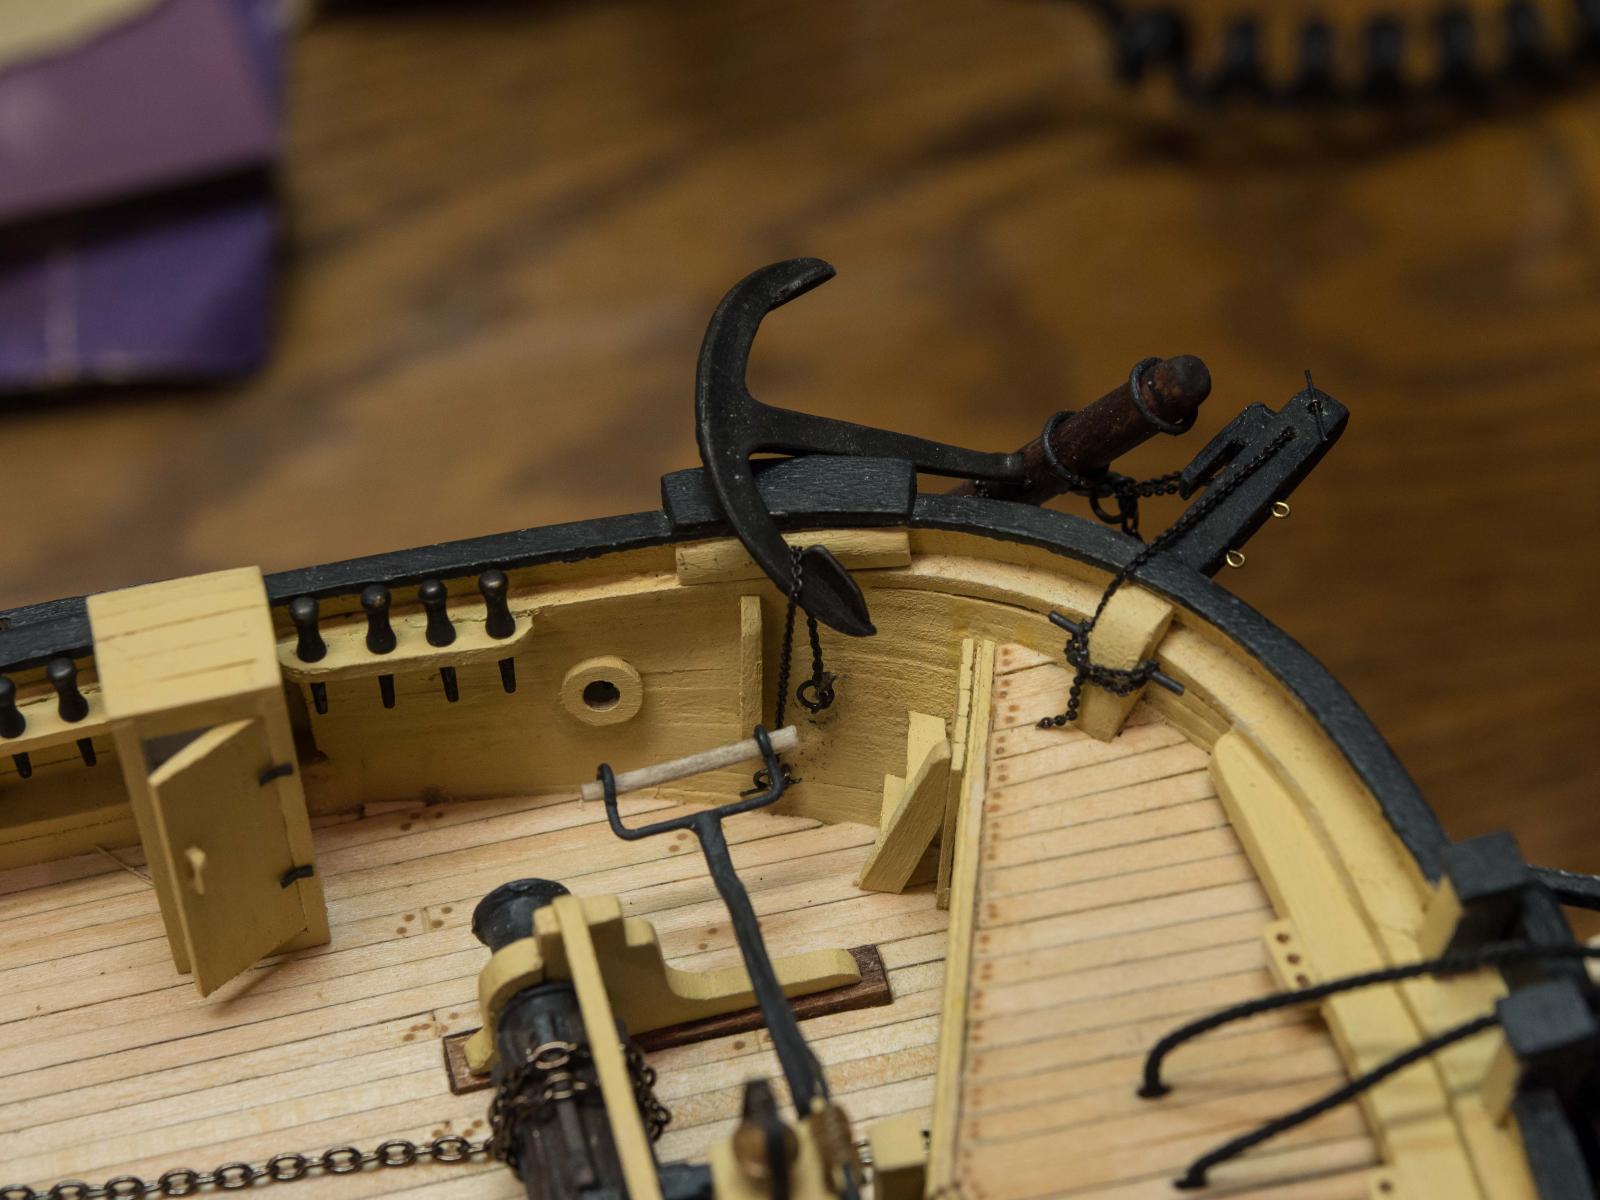
When drilling out the anchor chain pipes to the deck, I came across a nice chain in the proper scale and decided to add the whole anchor chain. Which meant building the anchors.
Bluejacket has a nice blackening solution that's branded for pewter but works well on Brittania metal - used that for the anchors; replaced the metal kit crossbar with a fabricated wood one.
The tie-down chain is very small - I had quite a time getting a thread through one to the links to fasten them down, and to pass a small metal bar through the opposite end end link to hold the chain at a hole (cathead) or eyebolt (bulkhead tiedown at the anchor pad). My wife's old surgical loupes to the rescue once again.

- schooner, SkerryAmp, Blue Ensign and 2 others
-
5
-
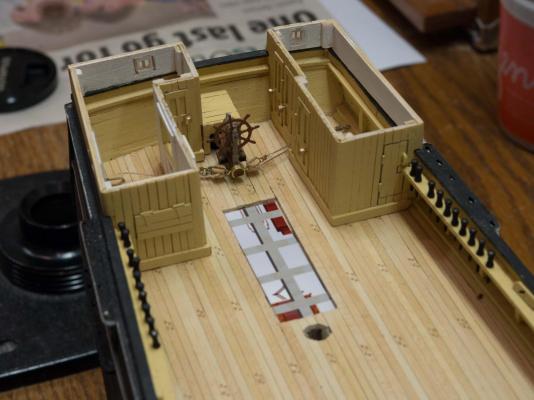
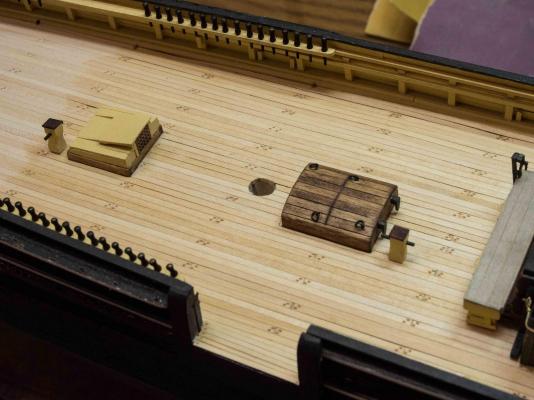
I was just going to glue down what I had finished, but ended up doing substantial work on the forward deck to make sure everything fit appropriately.
This involved fitting the bowsprit so I could locate the bowsprit bitts and make sure there was clearance for the windlass and associated structures. I decided to go ahead and put in the anchor deck frame and ladders for the same reason. Once that was done I couldn't stop myself, so I planked the anchor deck - which meant I had to finish and paint the bowsprit - , added the bowsprit boom chock and the breasthook. After gluing in the forward companionway, hatch, and tryworks, I finished the aft hatch and companionway, and the 3 bitts for the cutting in tackle.
You can see in the whole deck view that most of the deck is finished with a satin poly; I like the look.
The skylight is just sitting in place - I won't glue that until the aft structues are done.
Next is the steering gear, and then the hurricane house.

-
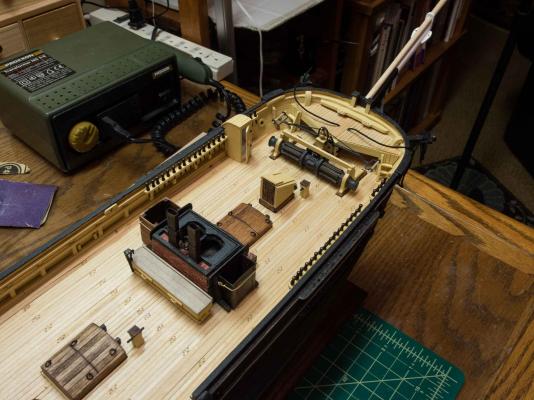
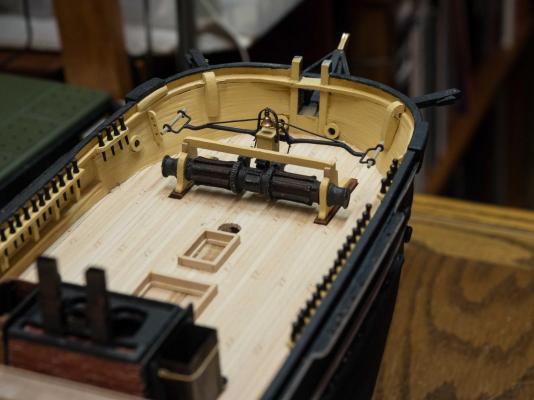
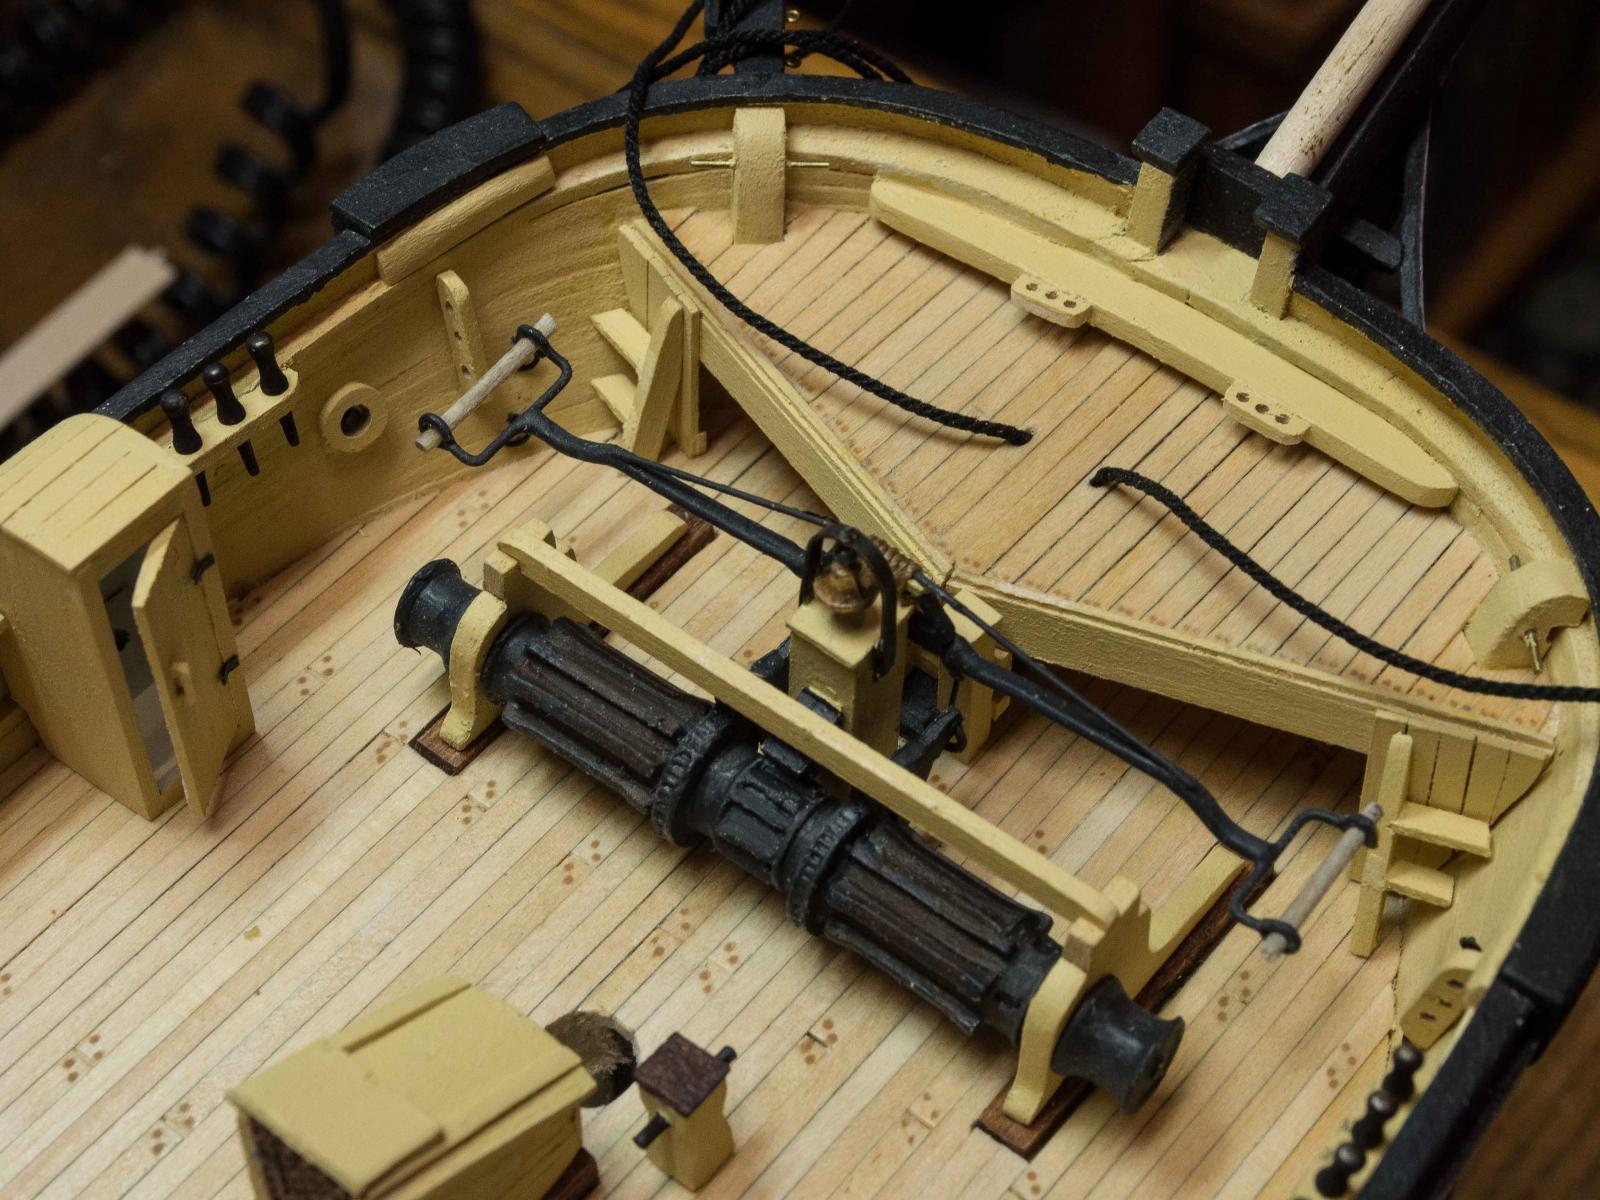
Windlass finished, placed but not cemented.
After I finish the rest of the hatch covers, companionways, etc. and check that I've drilled holes for all of the eyebolts and so on where I need clearance for the drill, I'm going to put a clear matte coat on the deck and glue all this stuff in place.
- dafi, Blue Ensign, Landlubber Mike and 2 others
-
5
-
Going to visit in April - camera at the ready!
-
Chuck
I used short pieces, usually spanning 5 bulwarks, and offset by one Bulwark from the previous line.
As suggested in the instructions. Much easier to spile smaller pieces.
-
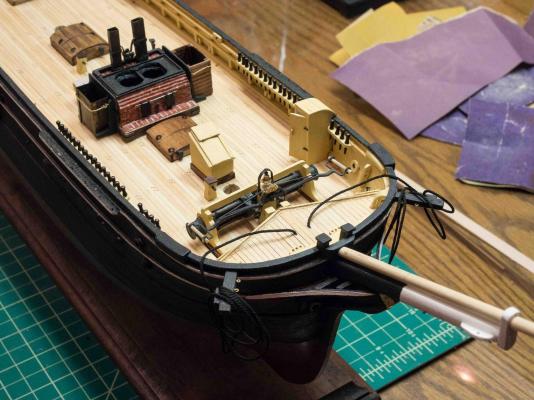
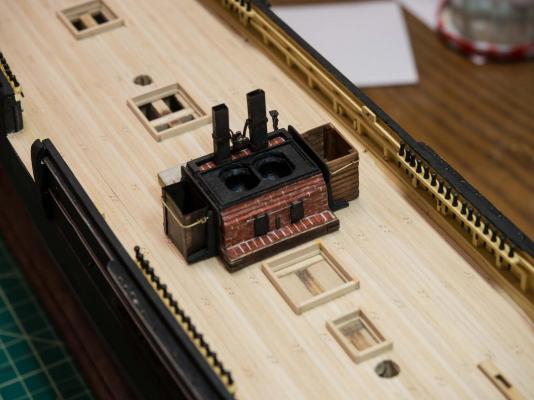
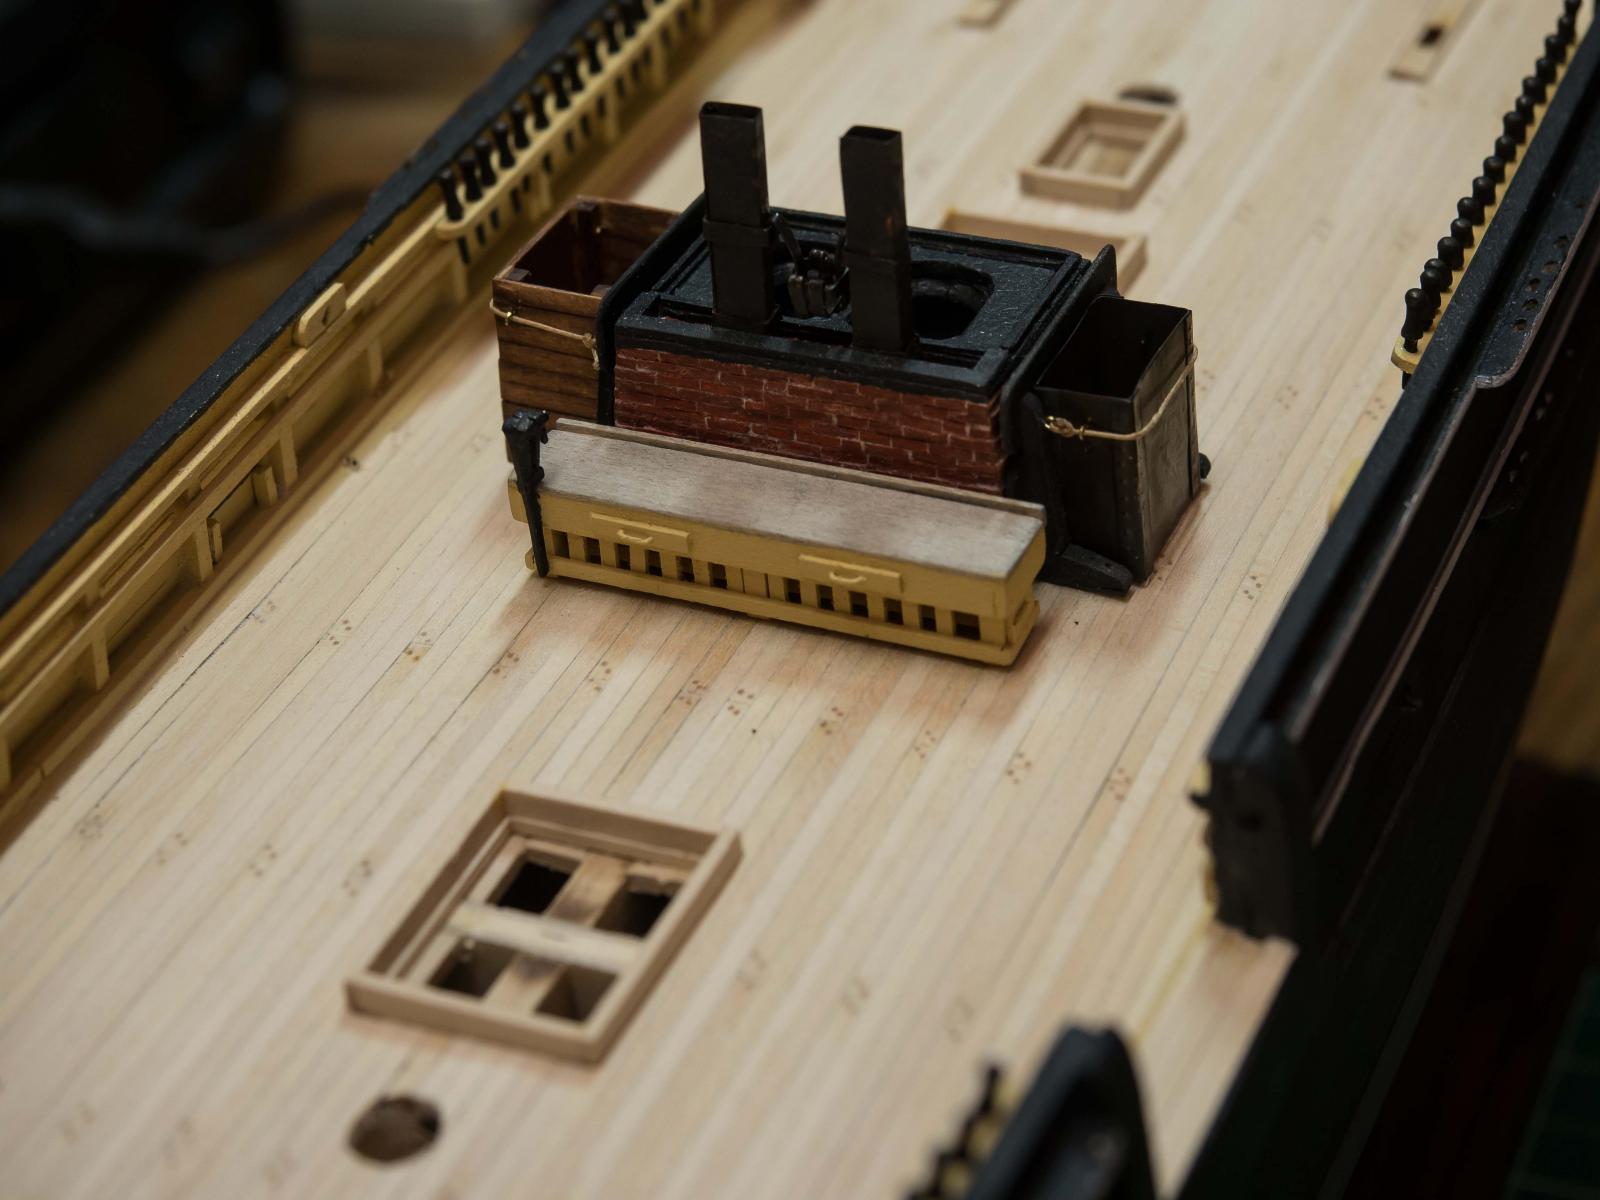
Here's the finished tryworks sitting but not cemented to the deck.
The chicken coop is a bit clunky, but overall I'm fairly pleased.


-
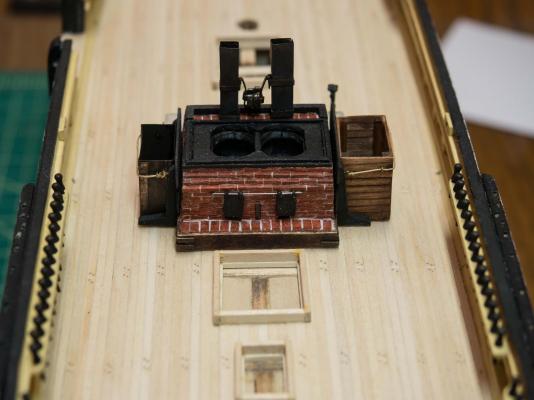
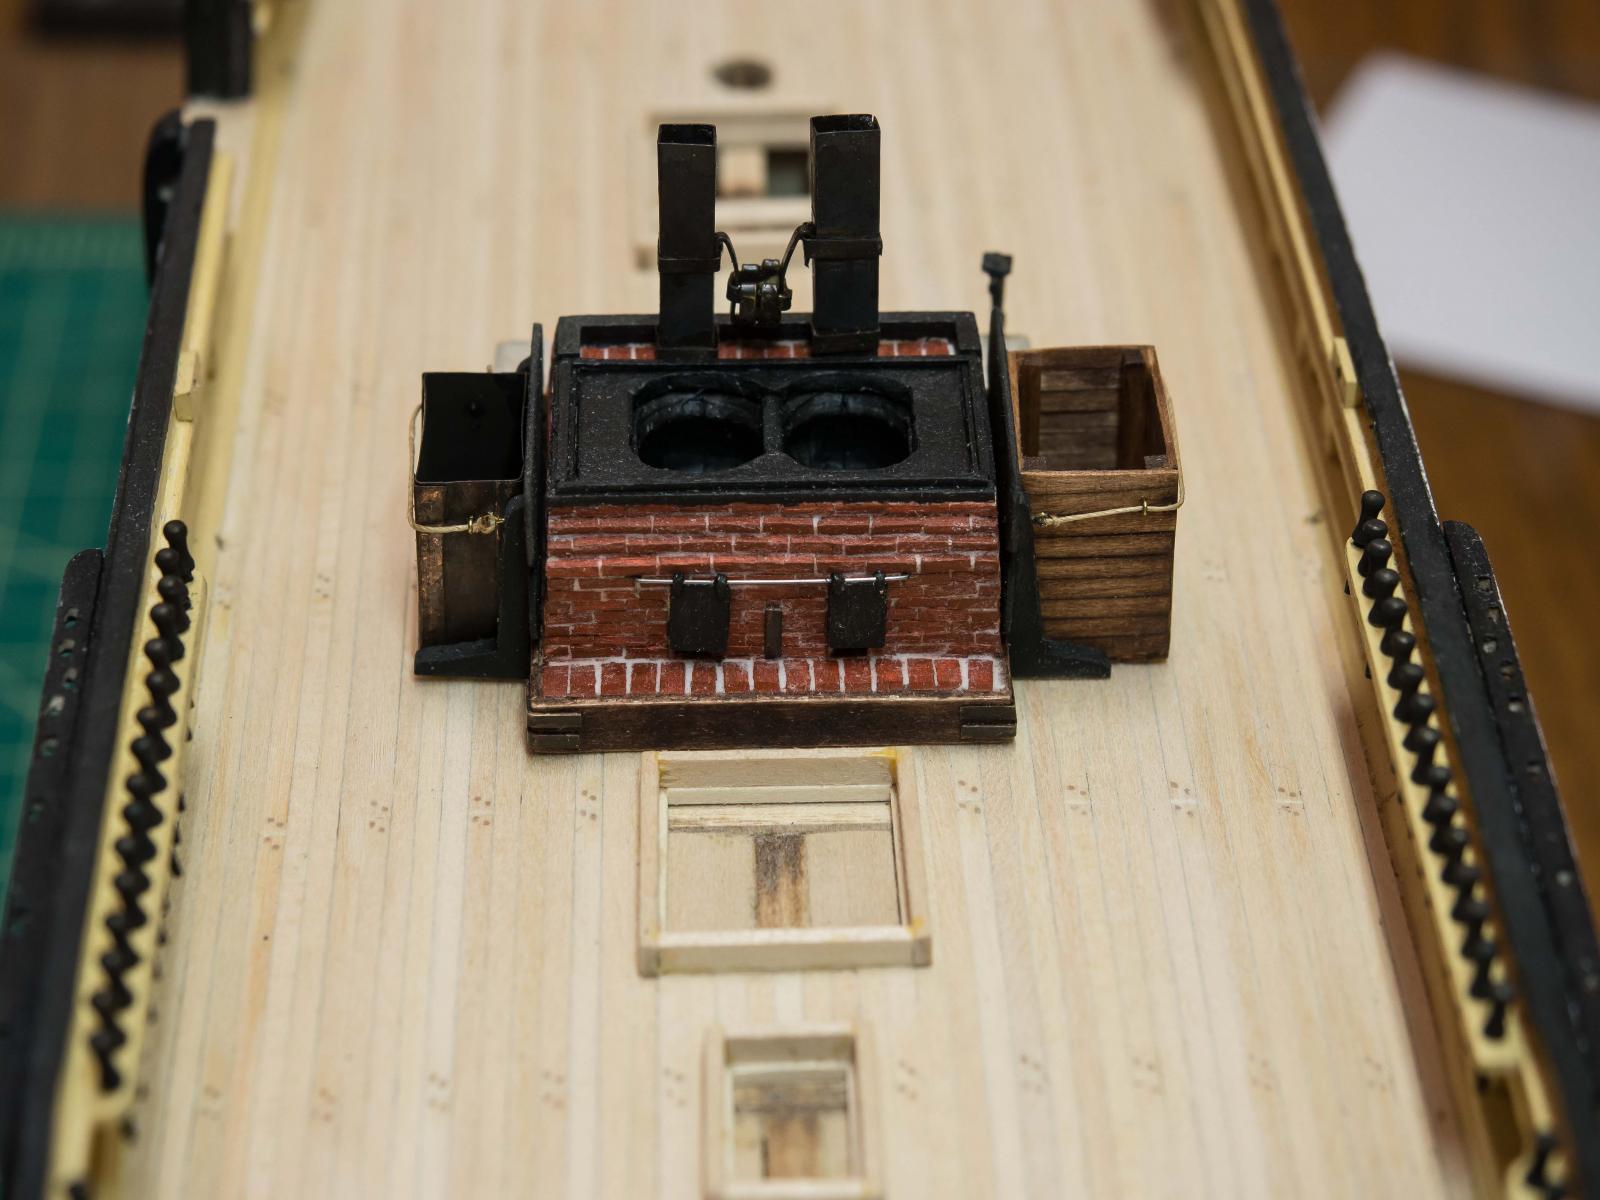
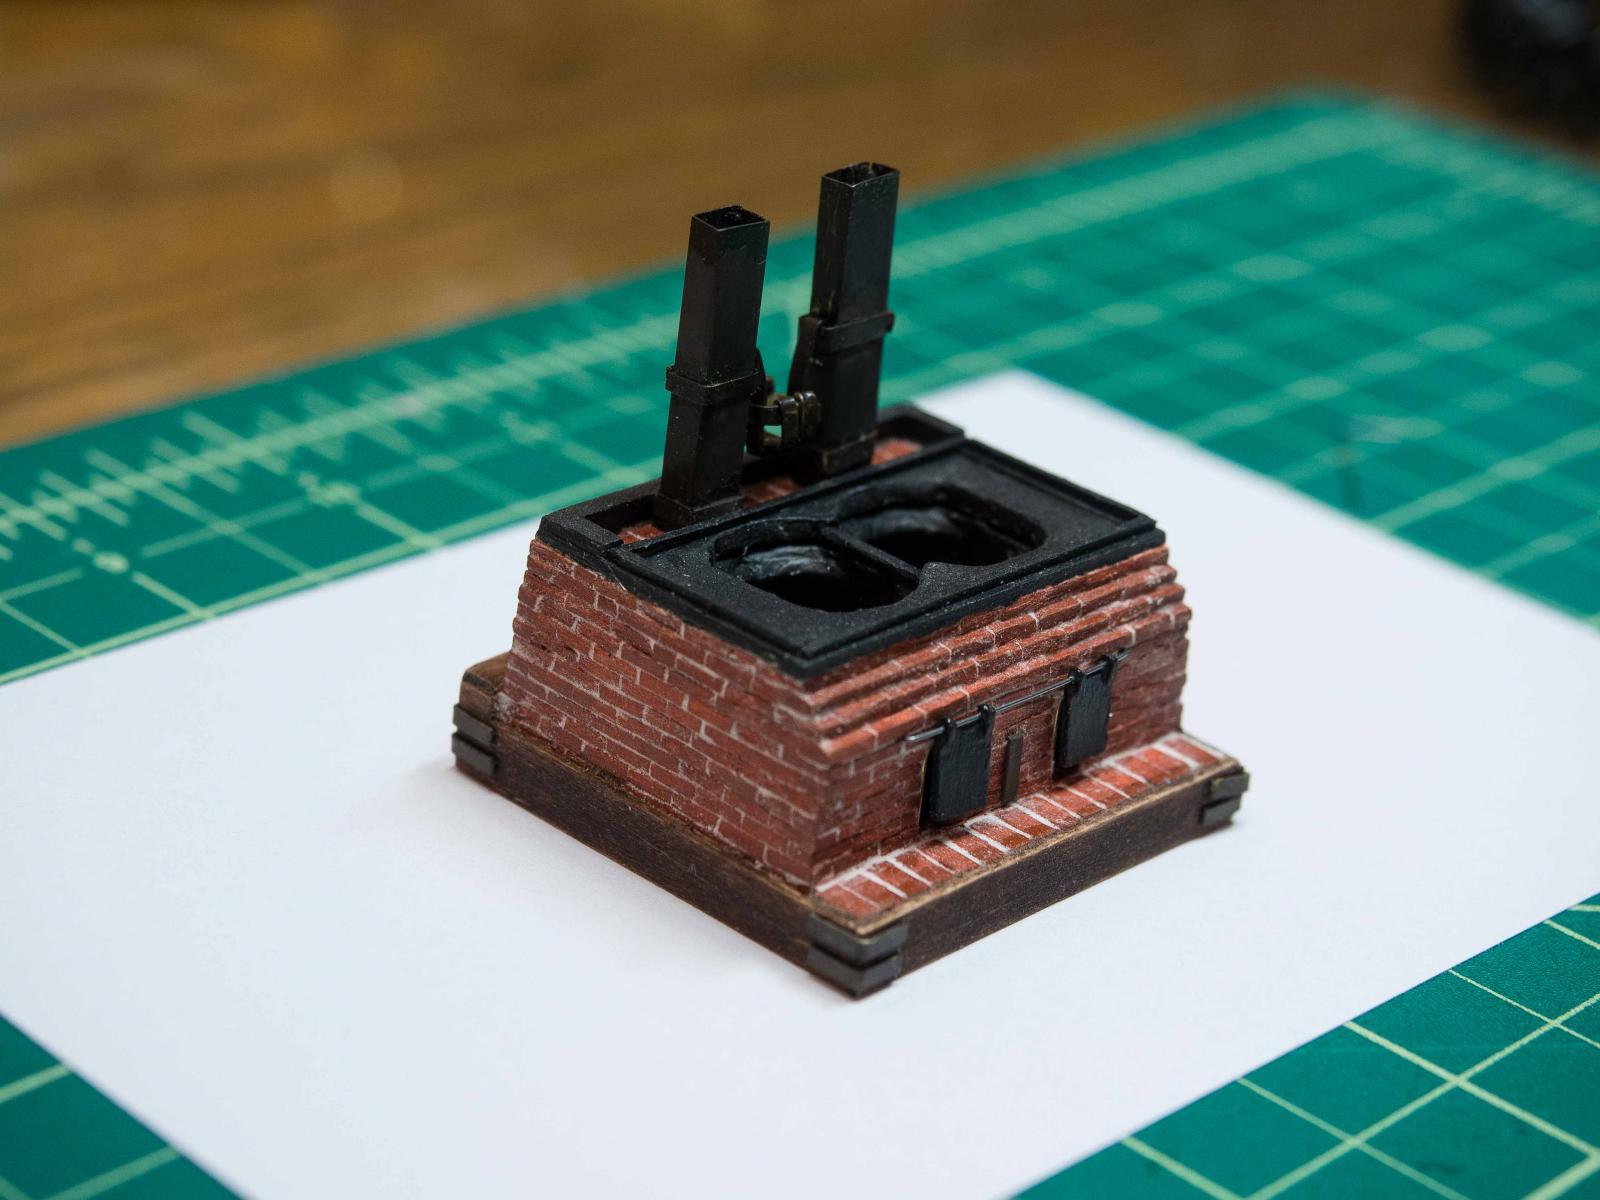
Update.
Here's the tryworks. I haven't put the side braces and wood sheathing on yet.
This took time but was not really hard. Took some time mixing paint to get a good brick color that wasn't too red - the admiral didn't like the color on my test wall of bricks.
Almost 500 bricks!
I'm relatively pleased, although the eye goes immediately to the "errors". One chimney is a bit wider, and the walls sloped in enough that I had to mount the cauldrons below the top rather than having the room to drop them through the top.
However, I like the overall effort as my modeling skills improve (3rd wooden ship build).
After the supports/sheathing, probably will make the tank and scrap box before moving on to the next most fiddly bit - the winch. I'll have to dry fit the bowsprit and put the bowsprit bitt in place first, I think, and likely the framing for the anchor deck.

- jwvolz, texxn5, jablackwell and 9 others
-
12
-
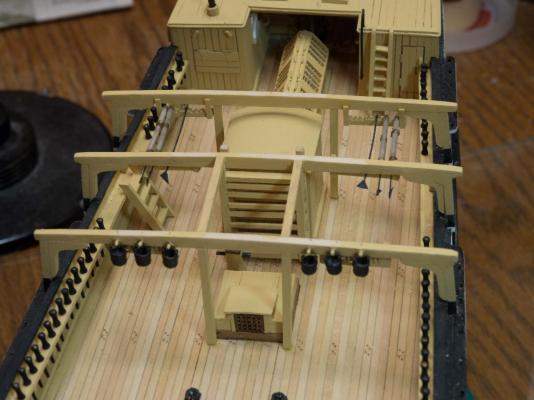
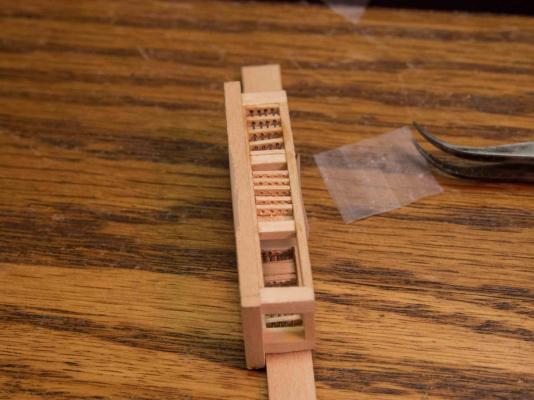
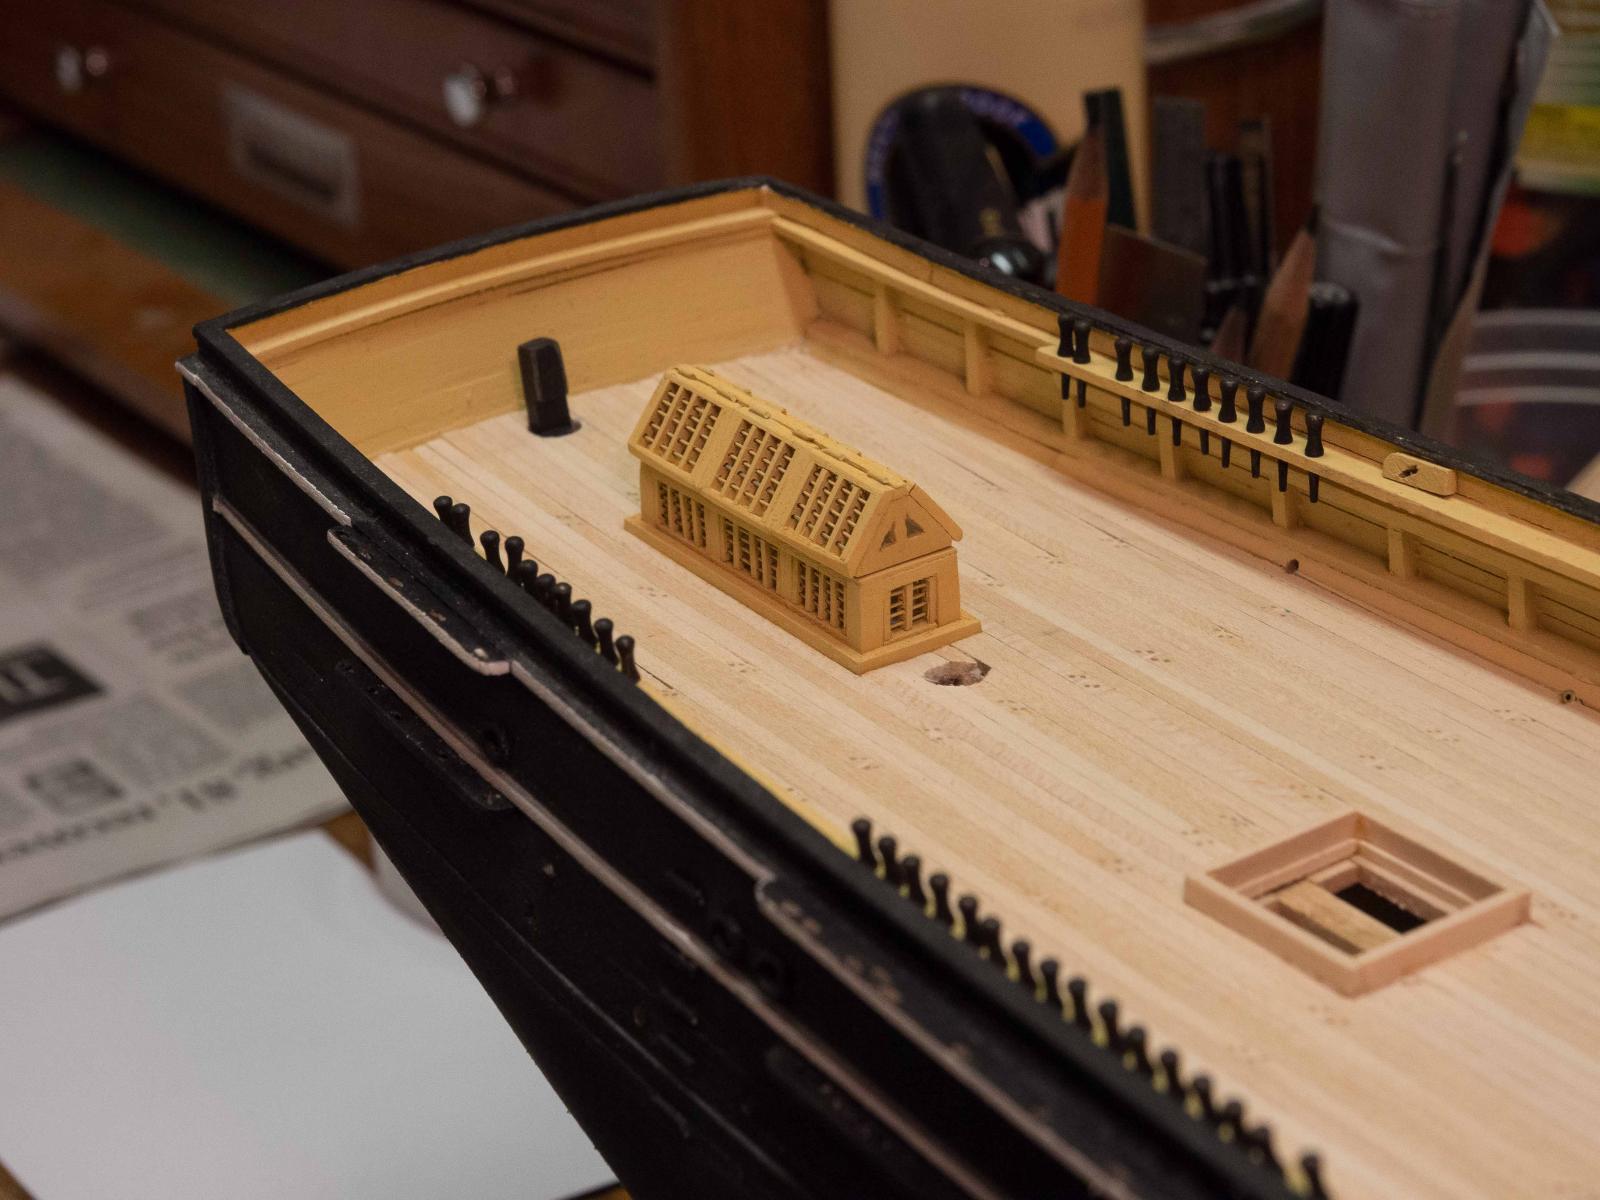
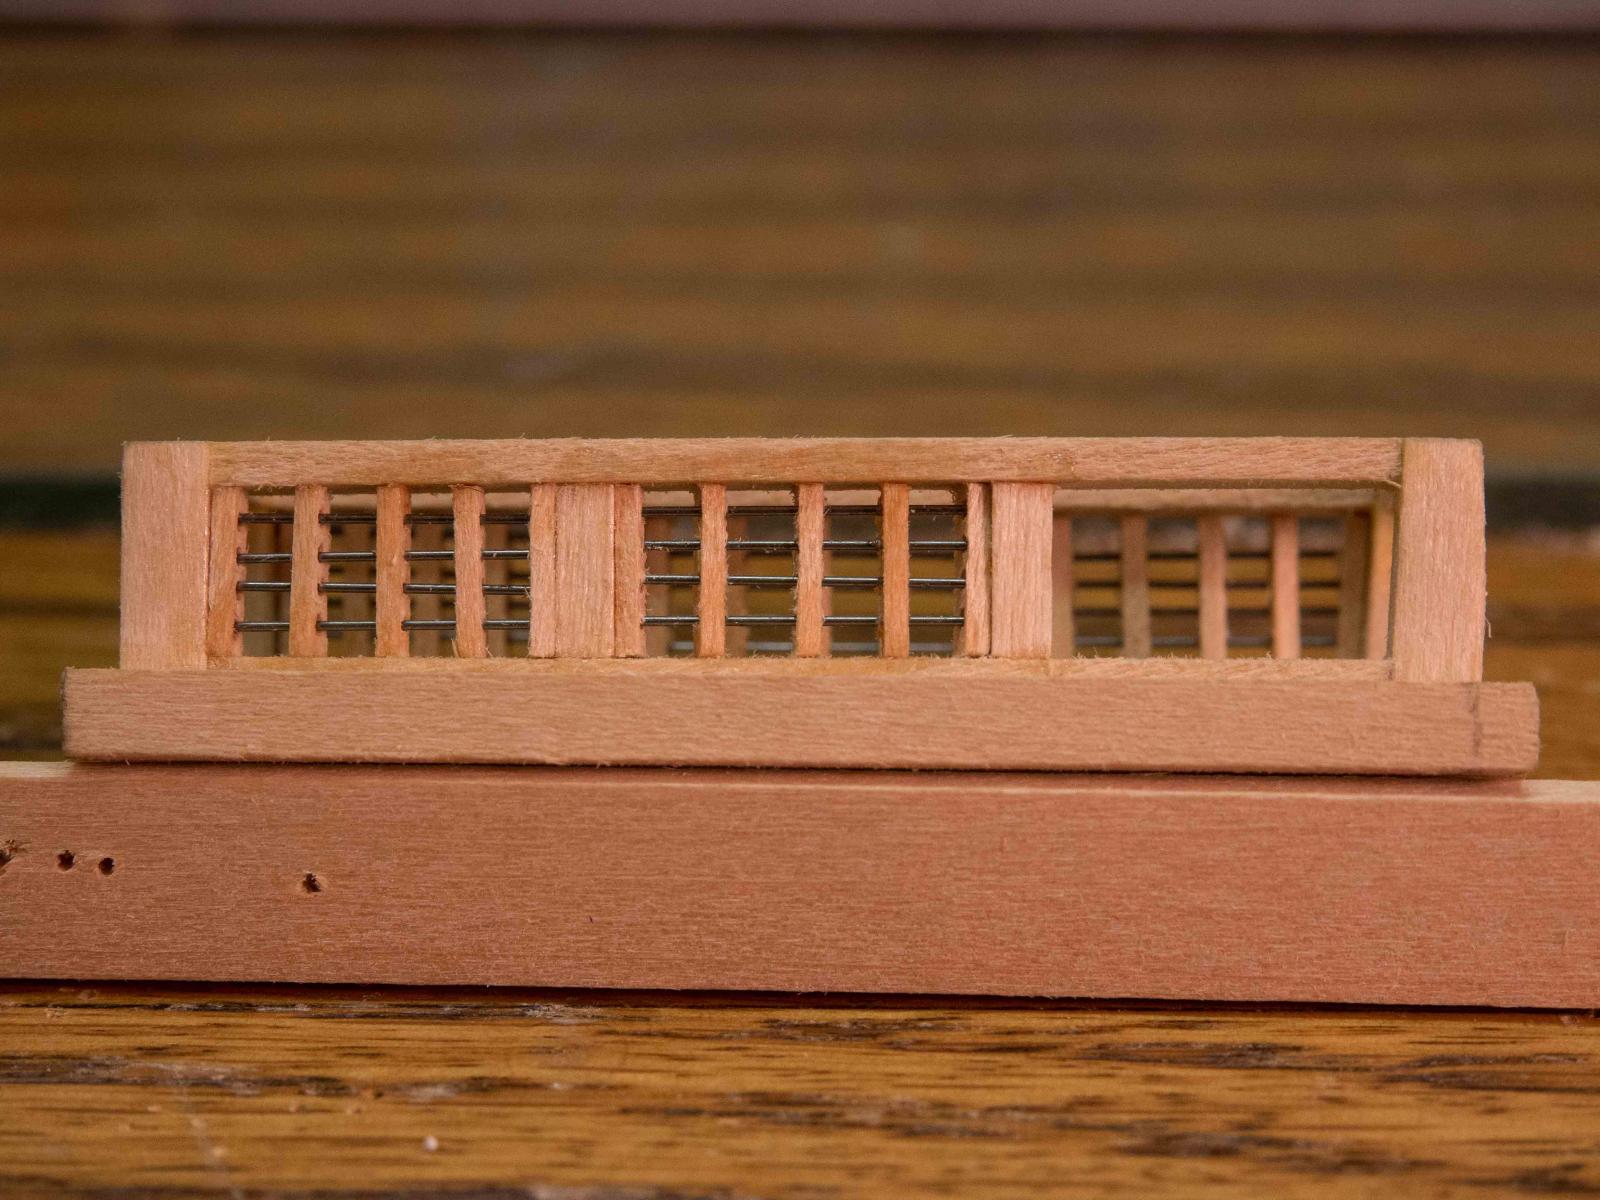
So, here is the skylight in place.
I'm relatively pleased with the result, although there's too much overhang of the top window panes - the coaming I put in place was thicker than it should have been so the base part was slightly smaller, and I didn't allow for that when I built the top from the plans.
Overall tho, pleased with the result. 2 weeks of intermittent work.
Next on to the next most fiddly bit - the tryworks. After a break.

-
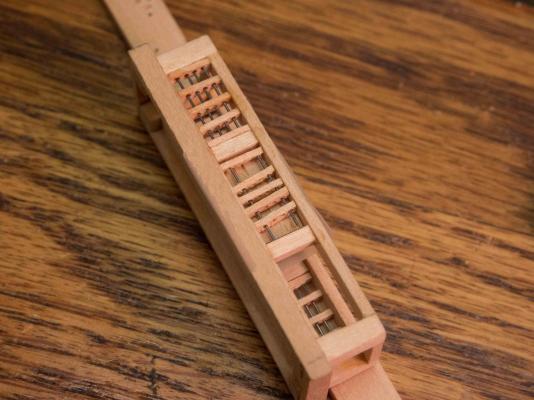
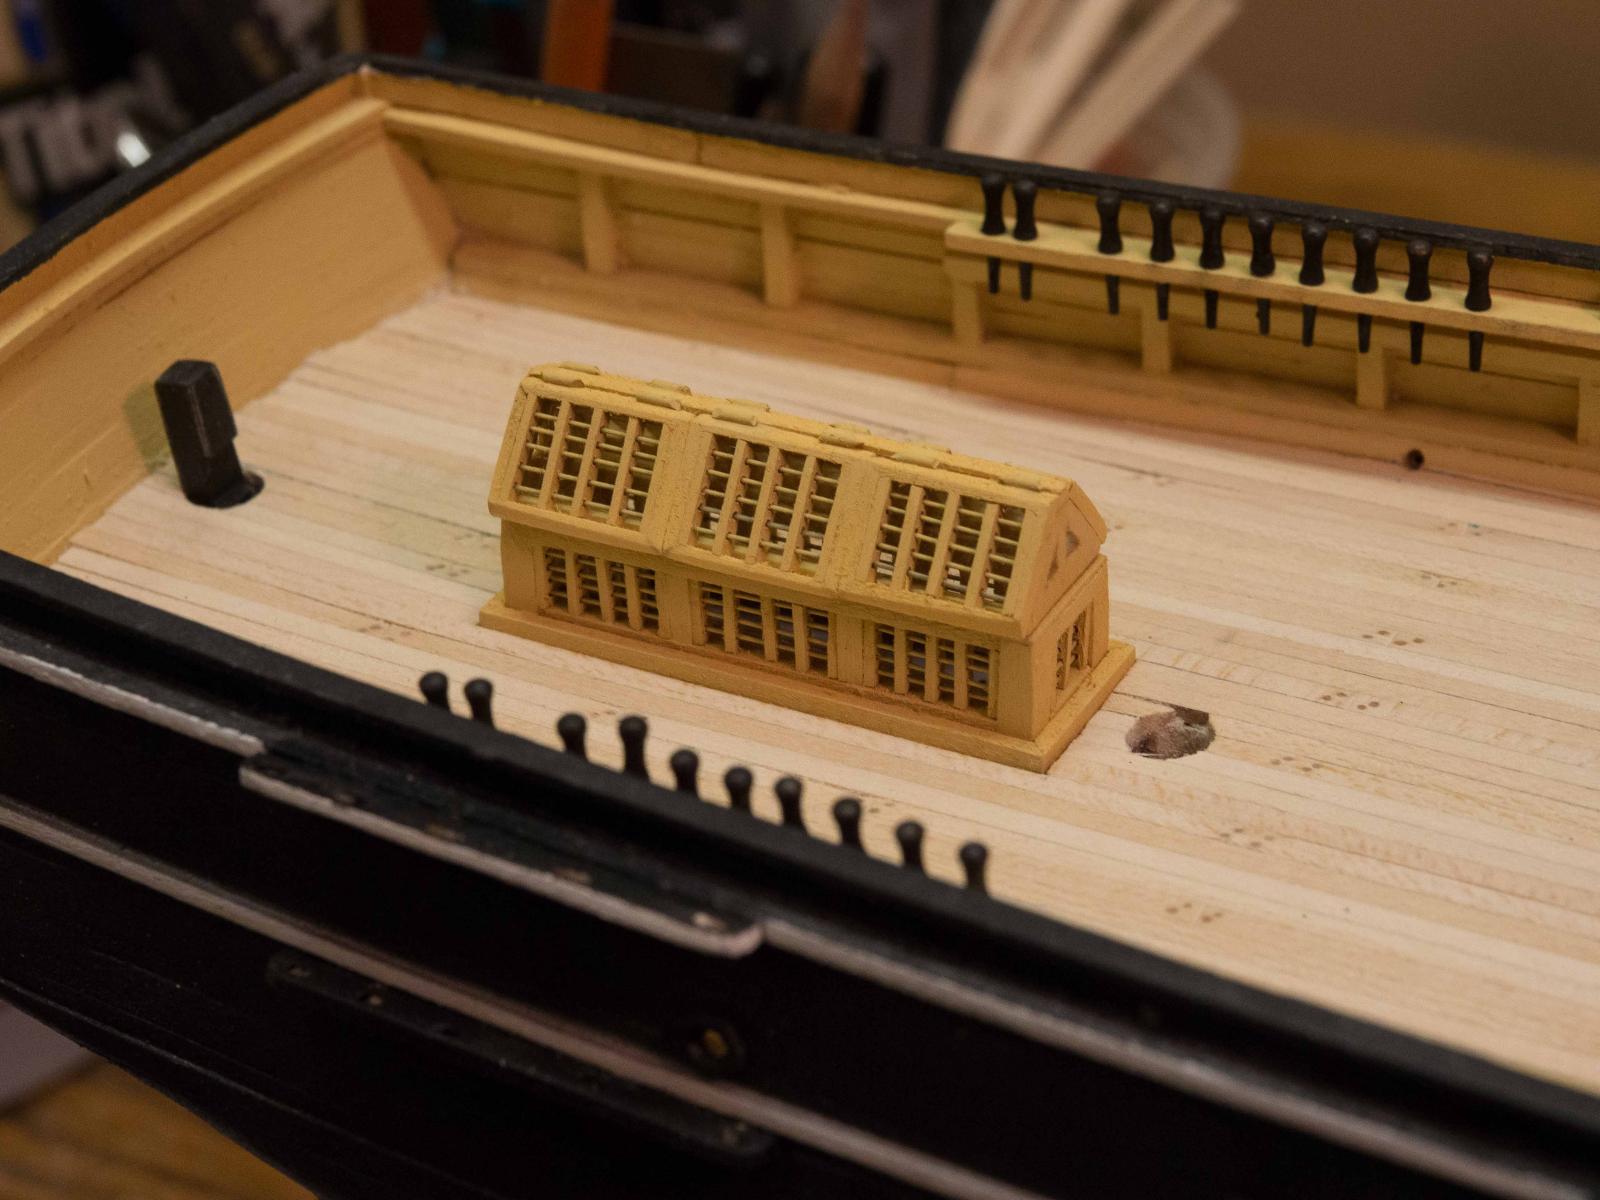
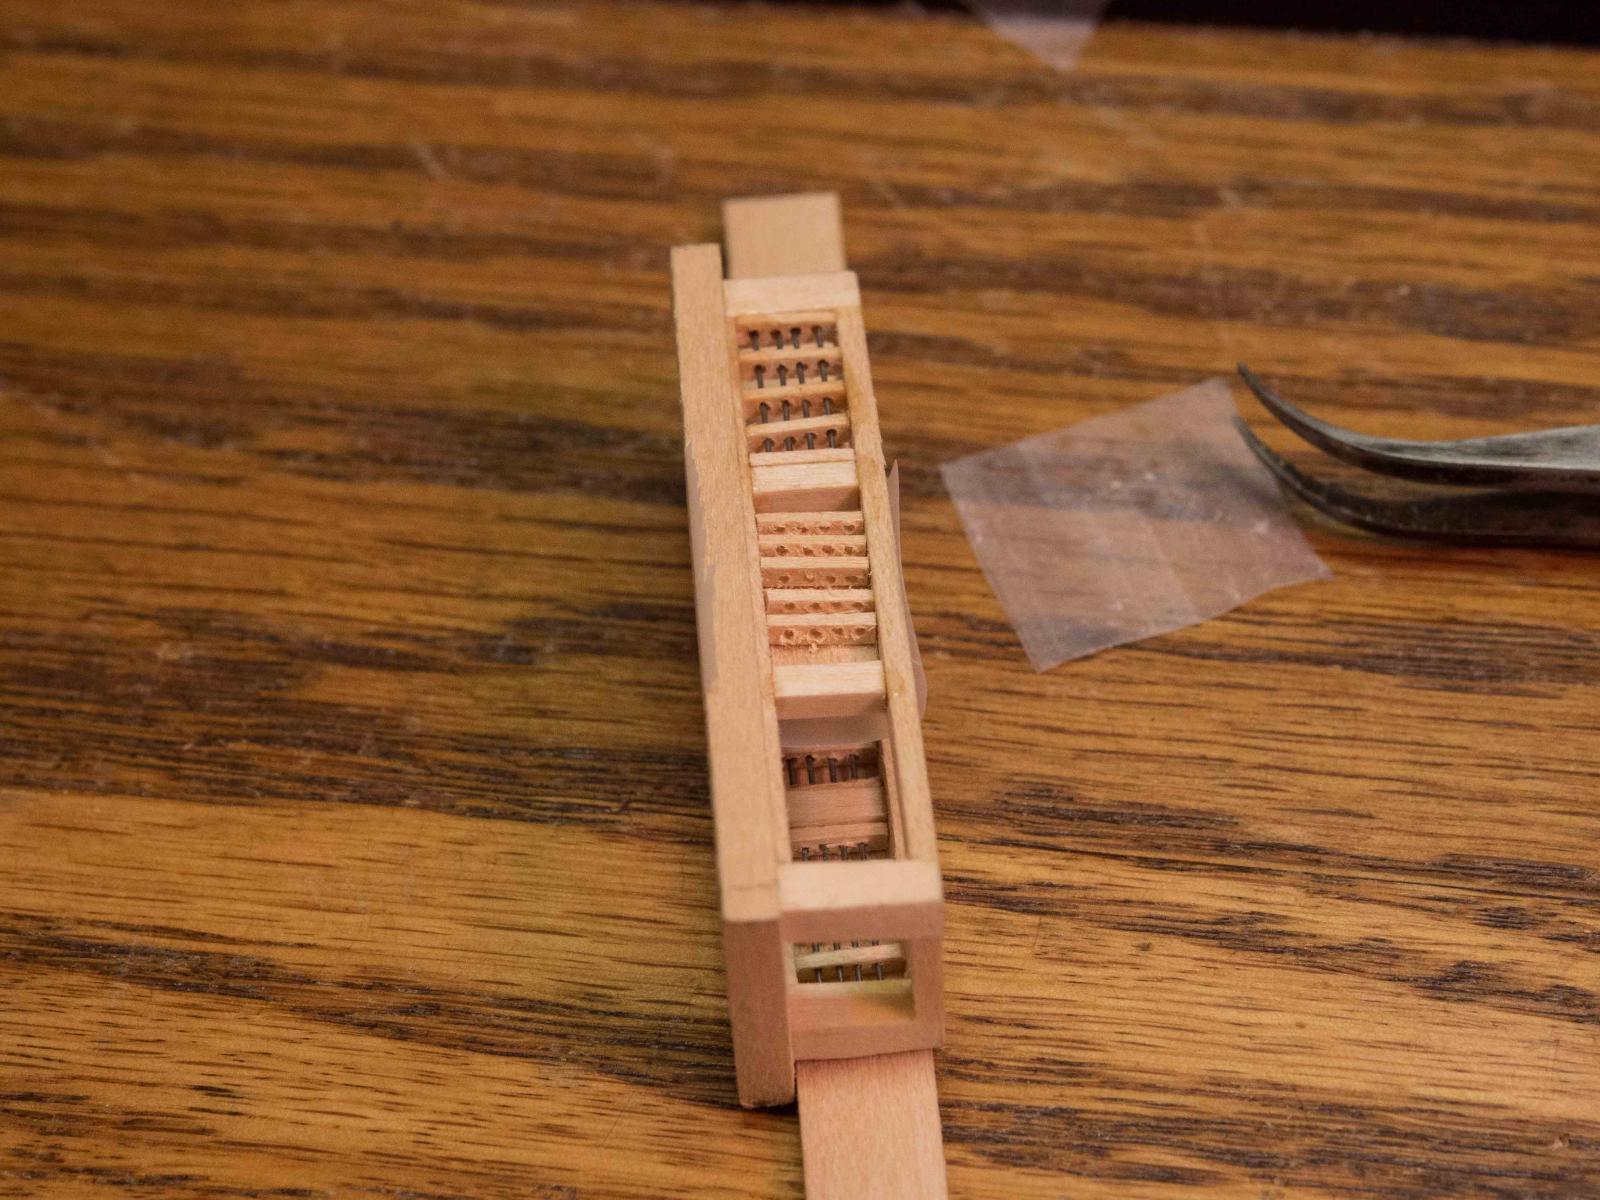
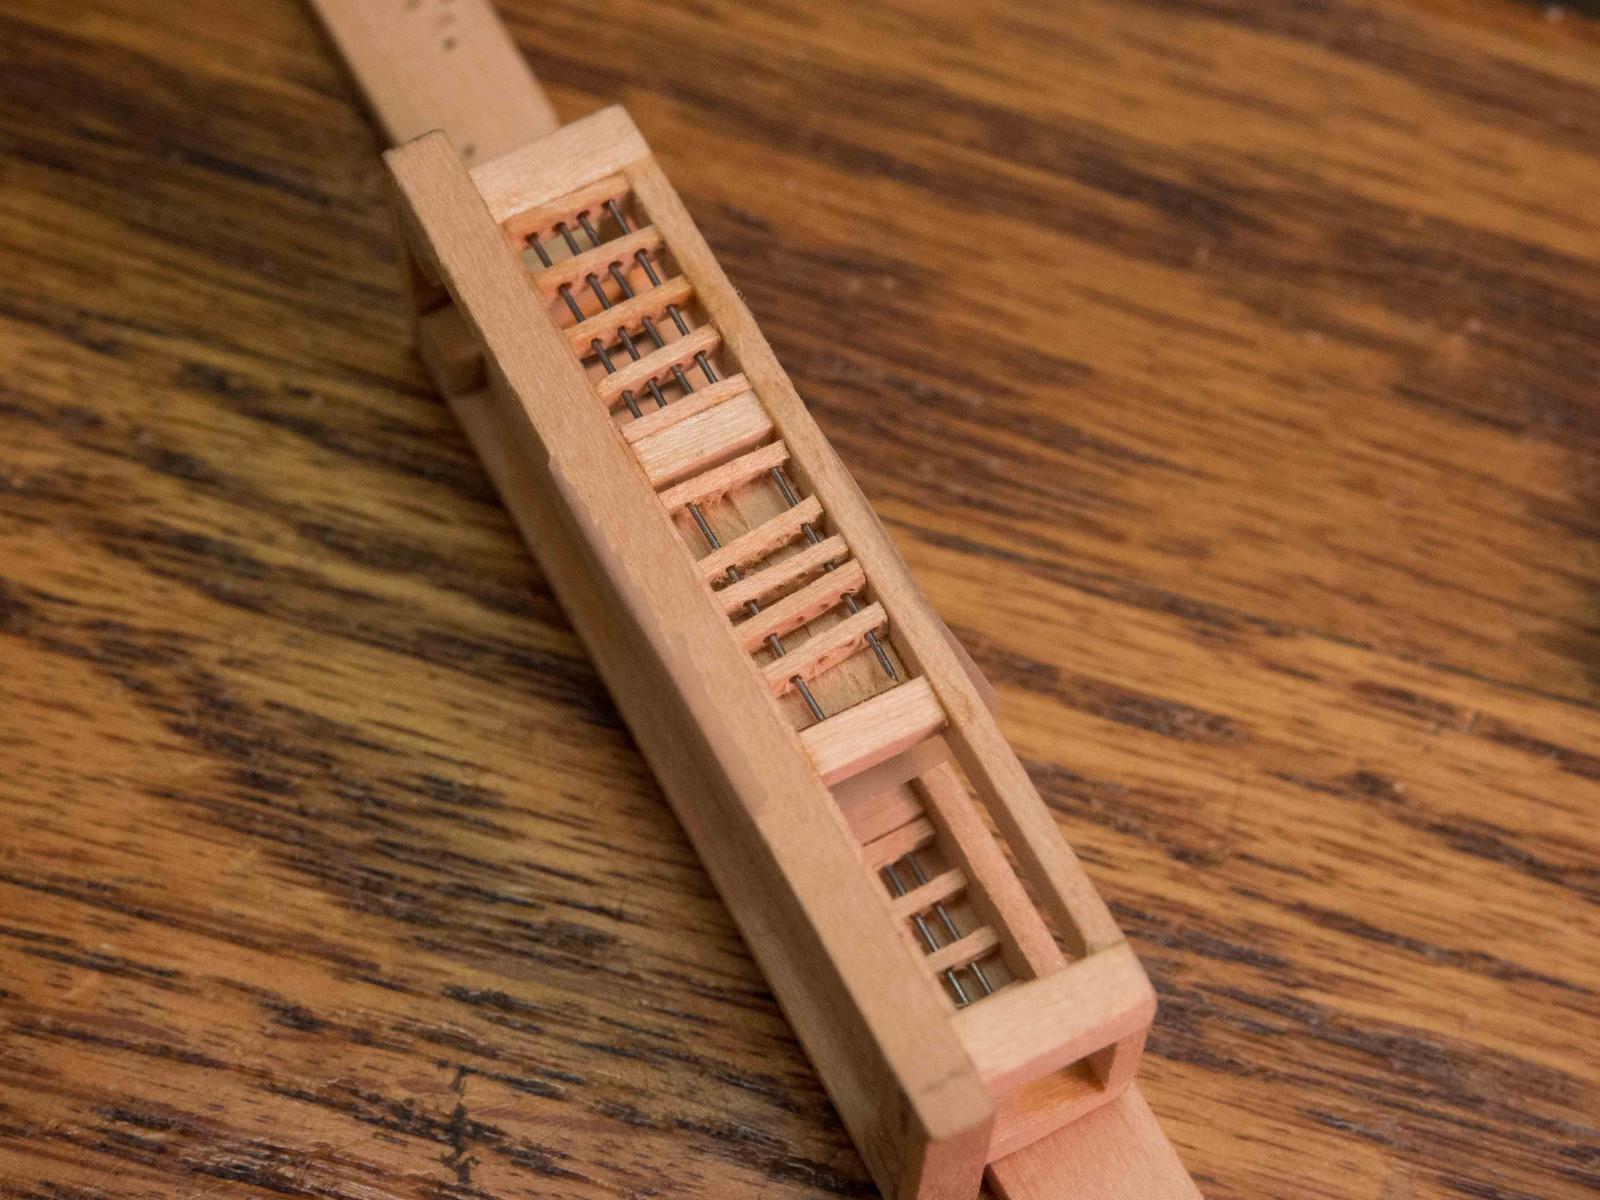
Once all the rods were in, gluing the end slats to the pillars fixes everything in place. After adjusting the position of the other slats, I fixed them in place with a drop of thin Zap at each joint.
One more side window, and then the two small end windows to go. All the windows for the top are already done.
Looking forward to painting, adding the "glass" and assembly this weekend, perhaps.
This thing has been a real challenge to make - everything is so darn small!
I hope with some sanding and a good paint job it will look the way I wanted it to.


-
I put a piece of wood into the window to hold the work while I was adjusting. It had rapidly become clear that otherwise slats or rods would squirrel out and I couldn't finish one until I came up with this. Not necessary on the single panes for the top since those could rest on the table during construction.
Then I lined up the slats, being careful to retain the orientation from the drilling in the jig.
I decided to use very small diameter steel rod/wire rather than copper, because it was smaller, and wouldn't bend during adjustment. The perfectly straight rods give a better look, in my opinion.
After cutting a piece slightly smaller than the distance between the pillars, I then would ease the rod through the same hole in successive slats. Trying to put all the rods through the holes and then dropping the assembly into place seemed like a better method, but it didn't work for me. The holes in the slats (smallest drill bit that my drill press would handle) didn't "hold" the rods, and they would inevitably slide out during the manuvering. After multiple tries I had to go to this method, which is maddenly tedious but I was usually able to succeed in one or two tries. Magnification helped to align the rods and the holes in successive slats.
Very difficult, especially for someone who has an espresso addiction and two espresso machines in the kitchen.
The slats could be moved around to allow a fine tweezer access to guide the rod to the next slat hole. One twitch and the whole thing flies out to begin again. It worked best to put the first and last rods in. Once they were all the way in and the rods could drop between the pillars, things were more stable for the following rods.


Charles W Morgan by Brucealanevans - FINISHED - Model Shipways
in - Kit build logs for subjects built from 1801 - 1850
Posted · Edited by Bruce Evans
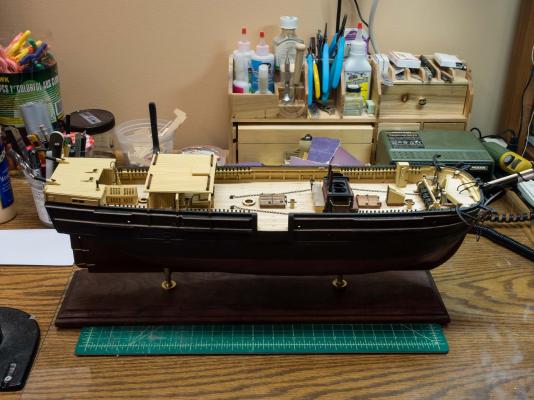
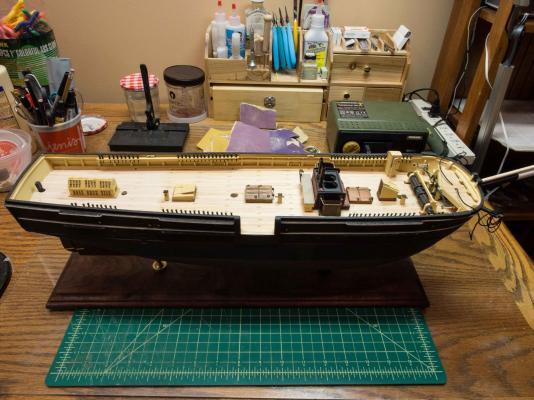
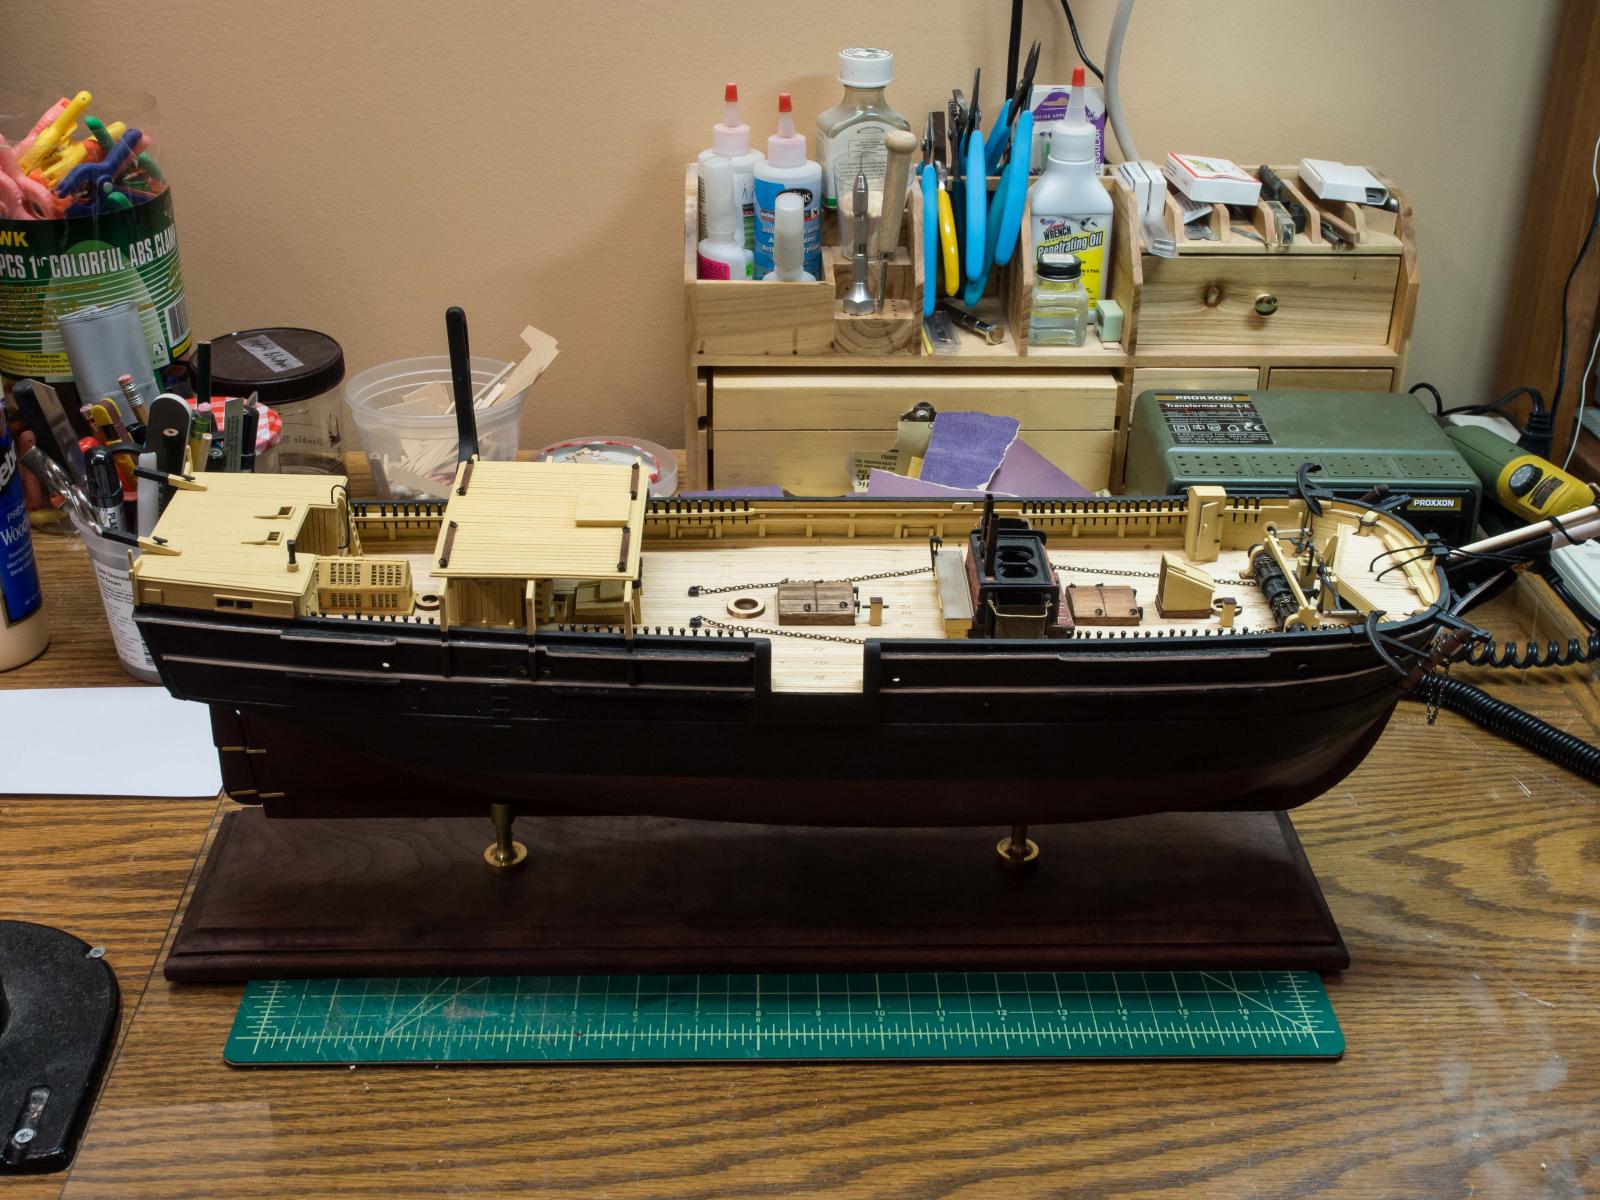
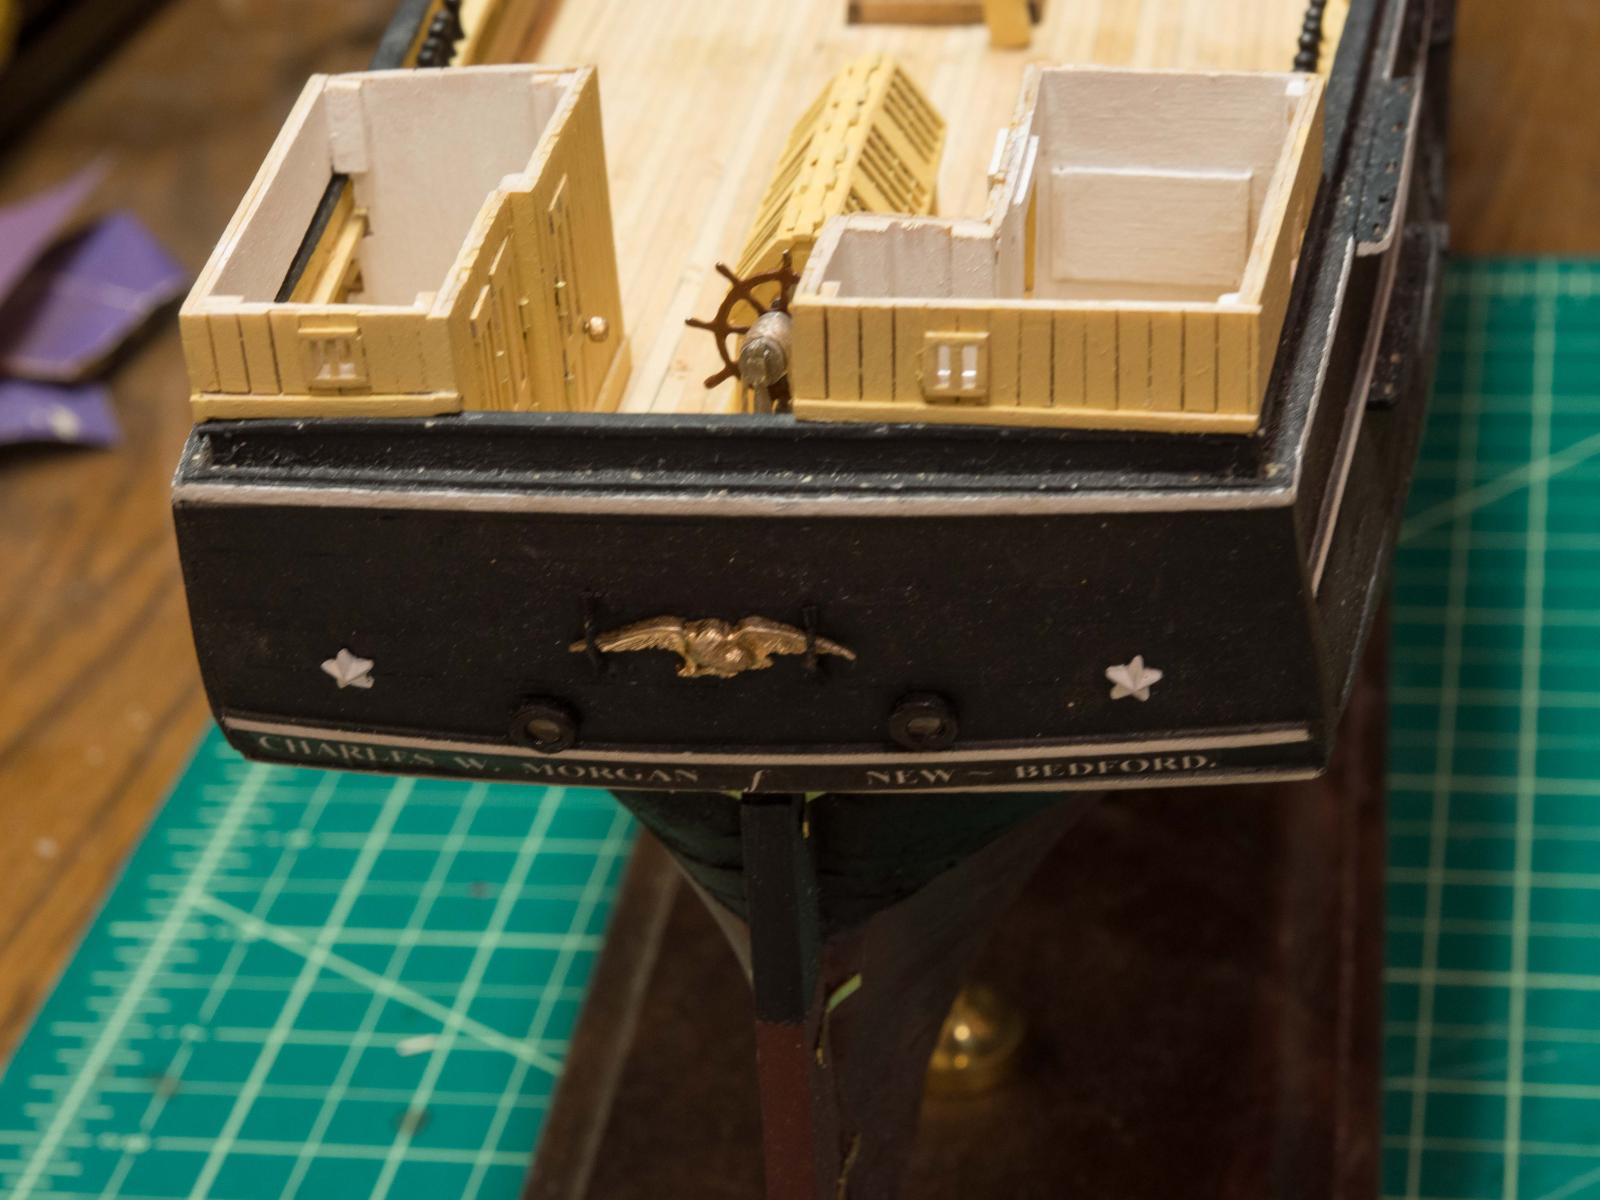
Finished the Hull today - a real landmark.
Further work will have to wait.
Closing the shipyard due to numerous responsibilities which have been piling up. Need to wrap up several projects before retiring, and have to prepare for an take a subspecialty exam in Clinical Informatics in October.
Probably will open back up after I take the exam in October, beginning with deadeyes, chainplate, etc.
Here are summary pictures of where things are now.