

bruce d
-
Posts
3,030 -
Joined
-
Last visited
Content Type
Profiles
Forums
Gallery
Events
Everything posted by bruce d
-
 That did it: I am resurrecting my CAF longboat build. It's small but it is CAF and I now realise how much I want to see it displayed on a shelf in a glass case.
 -
You might find the previous incarnations of the same kits are also available. See here for a searchable database: C-3 Freighter Hawaiian Pilot, Revell 05236 (2005) (scalemates.com) HTH, Bruce
-
Hello halituzun and welcome to MSW from the UK. Those are very nice models and it is great to see the beautiful horse drawn subjects. I look forward to seeing more. Regards, Bruce
-
Grinding your own lathe tools?
bruce d replied to CPDDET's topic in Modeling tools and Workshop Equipment
Dave, what Bob says is right. However, to answer your specific question, you can make a cutter out of brass which may suit the occasional odd job. It will not keep an edge and sharpening will probably change any profile you previously had. So, I reccomend sticking with HSS or carbide cutters. It's very rewarding to grind your own cutters and not difficult. HTH Bruce -
Hello from Minnesota, a few modeling questions
bruce d replied to Scratchie's topic in New member Introductions
Hello Scratchie, welcome to MSW from the UK! -
Looking forward to seeing the next moves, but take care of yourself first. We'll wait.
- 505 replies
-
- 7
-

-
- vanguard models
- Sphinx
- (and 1 more)
-
Now I know how I will make my rails and volutes. Thank you.
-
Seats of Ease
bruce d replied to stuglo's topic in Discussion for a Ship's Deck Furniture, Guns, boats and other Fittings
I would be interested in this paper if that is possible. -
I cannot see them.
-
I have encountered this a few times when trying to repair/restore picture frames. Never found any rhyme or reason, even found one frame where two pieces shrank and the other two didn't. No solution but.... you are not alone. I will be interested if anyone can shed light on this.
-
Model Engineer, May 7 1953:
-
Hello Ross and a warm welcome to MSW from the UK. Your Beagle looks good, why not consider a build log for her? There is no rule that says you have to start at the beginning! Regards, Bruce
-
Any Delftship users here?
bruce d replied to Patrick Matthews's topic in CAD and 3D Modelling/Drafting Plans with Software
Pat, I will be interested to see if what comes of this. Are you aware of the Delftship tutorial elsewhere in this site? Search 'DELFTSHIP', using filter 'in titles only' and you will find a number of threads. Apologies if you already know this 🤐 -
Haven't visited them in a while but these people are long-time specialists (and five minutes away from Cuty Sark!): About Us (navalandmaritimebooks.com) HTH. Bruce
-
Hello Bruce, and a warm welcome to MSW from the UK.
-
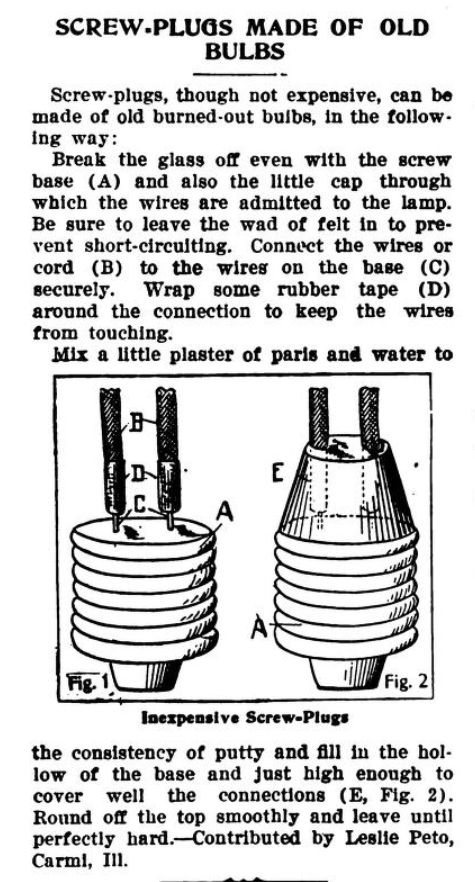
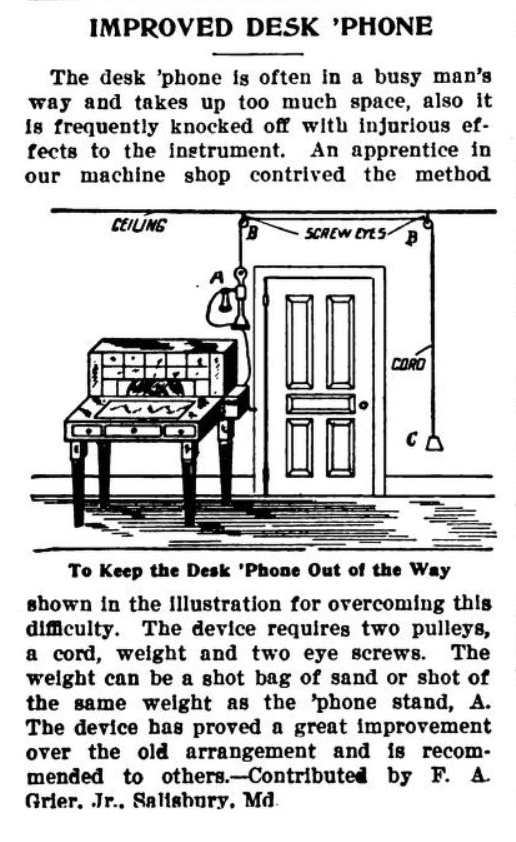
How they used to make power extension leads: what could go wrong? (Same edition of Popular Mechanics Shop Notes)
-
Popular Mechanics Shop Notes Special, 1918:
-
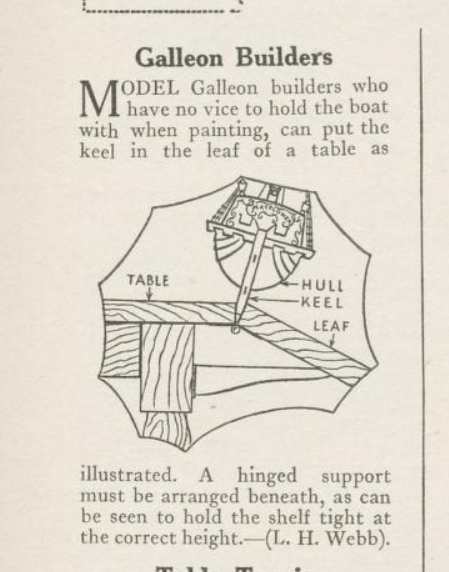
Perplexed by which keel clamp to buy? Problem solved! 4 From HOBBIES WEEKLY magazine, May 29, 1937
- 227 replies
-
- 12
-

-
-
You will do just fine. That is the type of problem solving that keeps the model-making fires burning.
-
Another two cents worth: You can make a collar and/or a saddle out of wood that fits the drill body and has a flat bottom surface. Once satisfied, epoxy them to the drill body and now think of this whole assembly as your headstock. This should be easy to fettle into alignment. I suggest hardwood for these pieces. The lathe I described in my earlier post was made this way. The old geezer who made it was full of tricks. To achieve alignment, he made the collar and saddle deliberately loose fitting and secured them to the base plate. He then mixed a wad of Milliput (a two part modelling putty) and packed it into the area where the drill would be clamped by the collar and sat on the saddle. Then he carried out his alignment procedure and left it to finish curing. Afterwards he added some bracing to keep the now perfectly aligned headstock stable. This is one solution. Lots of drill-lathes are out there that don't have Milliput in their components so obviously it a wide open subject. Permatex or Evo-Stick Hard Metal Epoxy would probably be a better 21st century alternative but I have not used them with wood. Keep us posted please, it's a good project. Bruce
-
Fitting of combined lift and sheet blocks to the yard.
bruce d replied to DaveBaxt's topic in Masting, rigging and sails
... and for a moment I thought I had dozed off again! -
Fitting of combined lift and sheet blocks to the yard.
bruce d replied to DaveBaxt's topic in Masting, rigging and sails
Wise words! -
Capella, I agree with the comments of wefalk above. It will be up to you, of course, but the question of what exactly you need from the tool is important. Having said that, I can also say that I have seen a couple of quite successful drill-powered lathes over the years. My two cents worth: if you go for a drill-powered machine, there will be a trial and error process and then it will work. I make this rosey-tinted prediction because it is clear that you have a good idea of what you want to achieve and are willing to solve problems. So, with apologies if you already are addressing this, the one thing I will steer you toward in your deliberations is this: if the lathe does not run true, ie concentrically, it will be very difficult to get any good results. The key to this is ensure the headstock (your drill) is aligned perfectly with the tailstock and stays that way. Since you are using wood as a building material it will be very easy to be caught out on this point. Wood reacts to changing environment. Just a few thou mis-alignment may give you a headache when making the small stuff we need for our scale models. The good news is that the solution (imho) lies in the design and choice of materials. So, my suggestion, which is based one particular successful homemade lathe I saw a long time ago: Use a stable board with a smooth laminated face as the base-plate/bed. Make your tailstock with parallel sides and a smooth bottom that will slide easily along this bed. Make a ‘trough’ for the tailstock to travel back-and-forth in. This can be simply two battens, preferably smooth laminated stuff again, fixed to the bed and perfectly parallel. They should maintain the tailstock alignment for the whole length of travel. Feel free to take a long time ensuring the parallelism of these two battens. A means of locking the tailstock in place without twisting is important. After the trough is in place, chuck a long dowel or bar in the chuck of your drill and use whatever tricks you know to line it up parallel to the bed and battens. Then lock the drill in place. Now you can centre the tailstock. The battens forming the trough can be used for mounting a tool rest, positioning a tool holder, mounting a steady or a duplicator. The lathe design in the video posted by David is a good guide and the flexibility of some of his features is a good idea. Having an off-set facility in the tailstock without disturbing the basic alignment is a good thing especially if you plan on doing spars and masts. This should be straight-forward by dropping a custom made off-centre steady into the ‘trough’ (there has to be a better word 🤐). I hope this is useful and doesn’t seem as if I am saying there is only one right way to do the job. The lathe I described above was made by an engineer and was used for making both drumsticks and chess pieces. He also made a duplicator and a dividing attachment which worked perfectly on even the smallest of work-pieces. One last point. I am sure you will make sure your chuck is ok before investing a lot of time 😁. Best of luck, I am sure a few people here will be interested to see how this progresses.
-
Well done Eberhard! Here is some more information on the records in their archives. As you can see, there are other drawings of the same subject, including the ship's boat. One of the drawings listed is ...