rdsaplala
-
Posts
602 -
Joined
-
Last visited
Content Type
Profiles
Forums
Gallery
Events
Everything posted by rdsaplala
-
 I'm speechless, Danny, amazing detail work on those chainpumps, I could almost imagine some exhausted sailors turning those shafts Even more amazing is your precise wood details on the capstans, it's amazing how you make such intricate parts using tough ebony wood
 -
Very nice insights, Micheal and Joe, I think kits would indeed benefit from using better quality wood, however, as stated, this would entail a higher price. I think an excellent solution to this is the move made by Chris Watton's Online-Hobbies in the past, where in they sold some of their Victory Models' line of kits in packages that contain only the precut timber and fittings. These packages were cheaper than the regular kits as they didn't have any planking timber and left the choice of wood to the builder. If I remember correctly, they sold fairly well and my last visit to their site showed that all these packages were already out of stock. I wish more manufacturers would try out this strategy.
-
Ah yes, the capstan step, excellent upgrade, Peter, this is also what is shown on TFFM, keep up the excellent work
-
Thanks very much, Dave, for that very informative discussion, I'm currently just learning the ropes on choosing what wood I should use to replace my kit's stock timber, as well as for my first scratchbuild. The valuable details and insights you've provided are a big help and I will keep them in mind when I choose my timber
-
Hi SketchupModeler, Splendid work on the Pandora, thanks very much for the tutorial I've long been itching to try out building this particular ship and draw my own bulkheads by re-scaling the AOTS plans to 1/64 and offsetting each station by 1.5mm inward to make up for planking thickness, sketch-up seems to be a fairly nice and economical option for me to try out my plan. I will be watching your build with great interest
-
Hi Grant, Beautiful detail-work on those spars, they're a real treat I apologize for the late message as I've learned about your recent surgeries just now, I am pleased to know that you're on the mend, my friend, I can completely empathize with you on the tonsillectomy as I also underwent the same procedure a couple of years ago. Look on the bright side, at least you get to eat ice cream to your heart's content, oh and by the way, my ENT friend agrees that intake of alcohol serves as a great disinfectant for throat wounds.... you know what I mean Take your time with the Vic my friend, we'll be patiently waiting for your return to the shipyard
-
Half Moon is coming along beautifully, Anja, and please allow me to echo the others in saying: Congratulations Madame Moderator, I have no doubt you will accomplish this new endeavor with flying colors
-
Thanks for the info Druxey, I'll try out Castello and of course, follow your advise on taking extra care. I figure it's high time I do some serious 5s and take out the clutter of tools and other obstacles from the work table
-
Splendid work on the Capstan Peter, and those scuppers really look a treat, thanks very much for sharing your technique, I think I'll stop by our local hardware and bug the owner for some of those neat little tubes
-
Hi Sjors, thanks for dropping by my log my friend Wow! Le Mirage looks great fully armed and fitted out. Ah yes, masting and rigging, starting with three masts and a couple thousand ratlines, yup, fun fun and more fun
-
Thanks Augie, that's a very neat tip, perfect for those nooks and crannies otherwise unreachable by sandpaper
-
Hi guys, When using Swiss Pear, I noticed that it easily develops nicks/dings when I hit it against the table or other things during planking (Yup, I'm quite clumsy at handling fragile objects ). Is Castello Boxwood any tougher/more resistant to damage? Thanks very much.
-
Hi Walter, Welcome to this wonderful site I've found it very helpful to soak the bulwarks in hot water for a couple of minutes, gently bend them, soak some more if needed then test fit again. Never force bend the bulwarks as this runs the risk of breaking them. As the others suggested, you may want to start a log of your build, you will get a lot of help here. You may also want to remove your email address from your post so as to prevent spam websites from infesting your email. Good luck and don't hesitate to ask if anything is unclear, there are plenty of helpful members here
-
Hi Mario, Thanks very much for the prompt reply my friend, I will follow your recommendations
-
Hi guys, Just a small query for those with experience using these two products. I am contemplating on treating my wooden fittings/ railings/ mouldings with either of these products prior to gluing them to my ship's hull but would first like to inquire if this carries the risk of producing a weaker bond between the glued parts. I am using PVA and CA glues. Thanks in advance for the help
-
Hi to all, I'd like to inquire for some feedback on the hardness of Castello Boxwood compared to True European Boxwood, Walnut and Swiss Pear. If you were to score each from 1 to 10, with 1 being the softest and 10 being the hardest, what score would you give to each? Thanks in advance for the help.
-
Thanks, Peter, Frank, Robert, M. (B.E.), Mobbsie, Augie, Sjors, Anja, Grant, Steve,Mark, SketchupModeller, Eric, Patrick, Arthur and Wim, your kind words are much appreciated @ Peter: I appreciate your vote of confidence with regards to real windows and interior details for the great cabin, I'll consider them among my options @Sjors and Anja: Have fun on your visit to England my friends, give my regards to Mobssie and his Admiral @M., Arthur and Grant: thanks for the good word on the bitts with sheaves guys, I am indeed tempted to use them, but recent pictures provided by Dr. Greg Herbert in the link below has given me an excuse to forego the sheaves: http://modelshipworld.com/index.php?/topic/1533-swan-class-model-no43-usna-museum/?hl=%2Bnaval+%2Bacademy I am referring to this particular picture, which shows no sheaves on the bitts in question (thanks very much, Greg, for sharing those pics). B.E. aptly refers to it as my my "get out of jail card" :
-
Very nice work, thanks for sharing
-
Thanks for the kind words, Pete, Mark, Daniel, Grant, Christian and Guy, I appreciate it Mark, thanks for the tips on how to minimize wood wastage, I'll give them a try Daniel, thanks for those tips on marking the different keel parts with a knife and pencil, it'll come in really handy Just a bit of update guys, I'm finally done cutting the keel pieces. It's a very simplified version with only a few pieces (5 to be exact)... a testament to my laziness I made the keel slightly longer than recommended so as to allow some room for tweaking, if needed later on I was pretty surprised to see just how big this ship really is.... at 1/96 scale, she's almost as long as my 1/64 Swan Class Sloop so I could imagine just how big she would be if I made her in 1/64 scale Well, that's it for now, time to drop a line at the "access request page" so I can start cracking on those bulkheads


-
Hi Pete, Just catching up with your excellent build, beautiful and precise work on those frames Sir, your ship is coming along beautifully
-
Hi Guy, You've done a remarkable work on your Druid and your Triton is coming along beautifully, very neat work on those scarph joints
-
Hi Daniel, Just caught up with your log, you're doing some very precise and beautiful work on your ship Sir, I'll be following your build with great interest
-
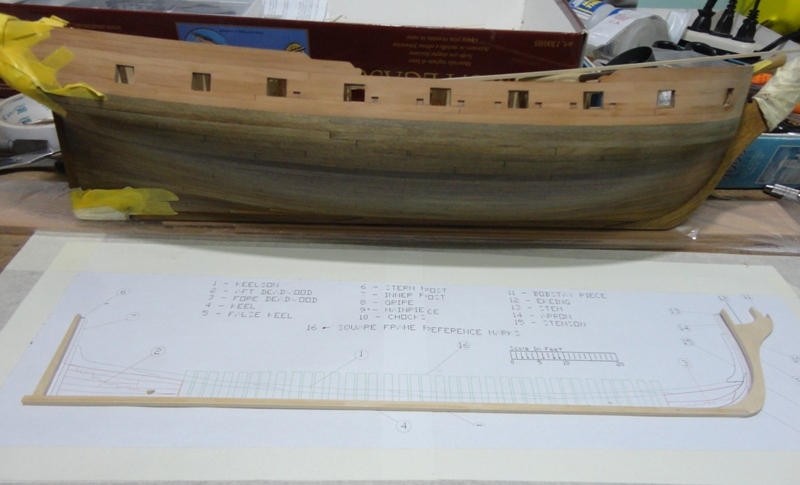
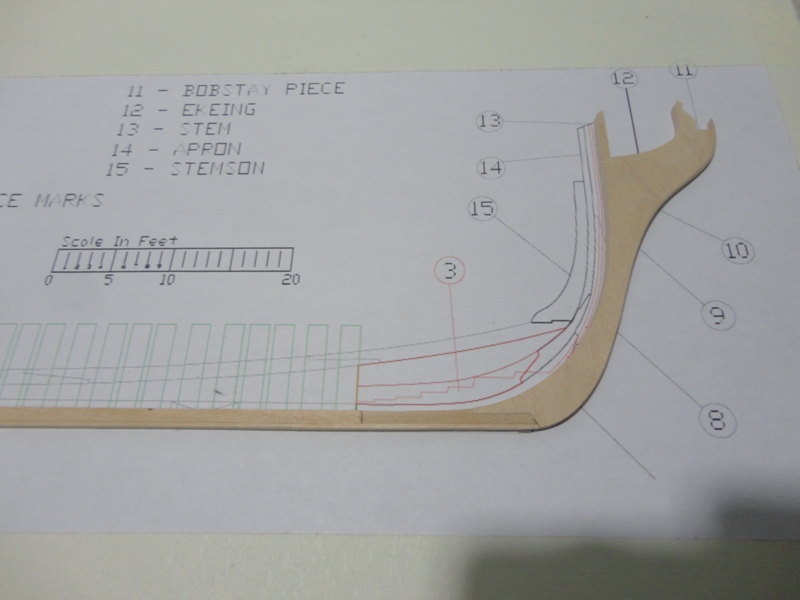
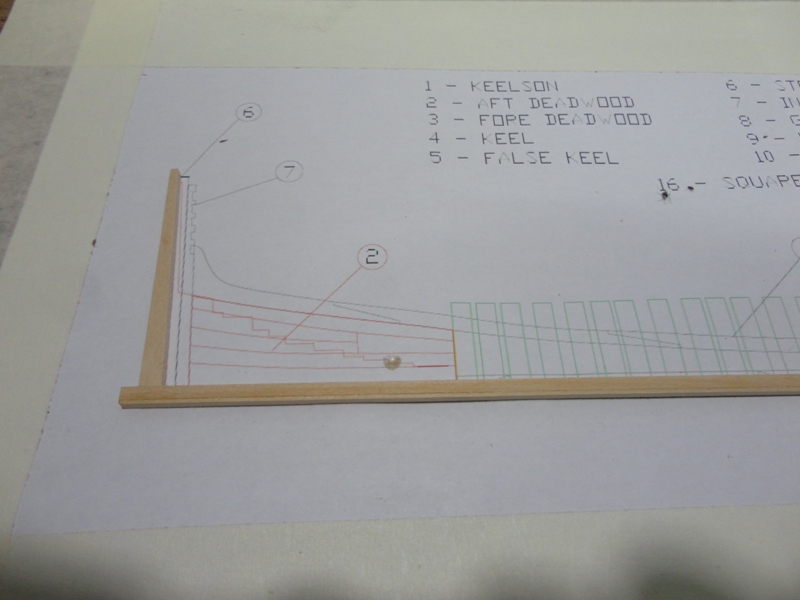
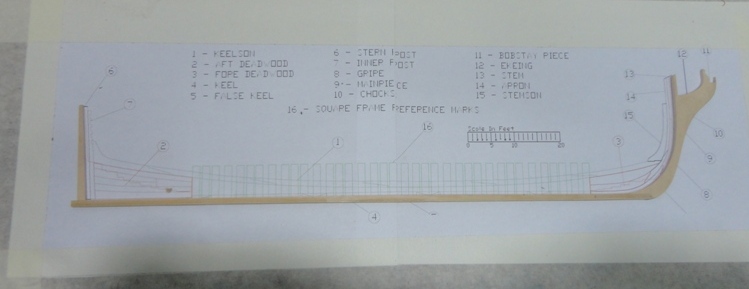
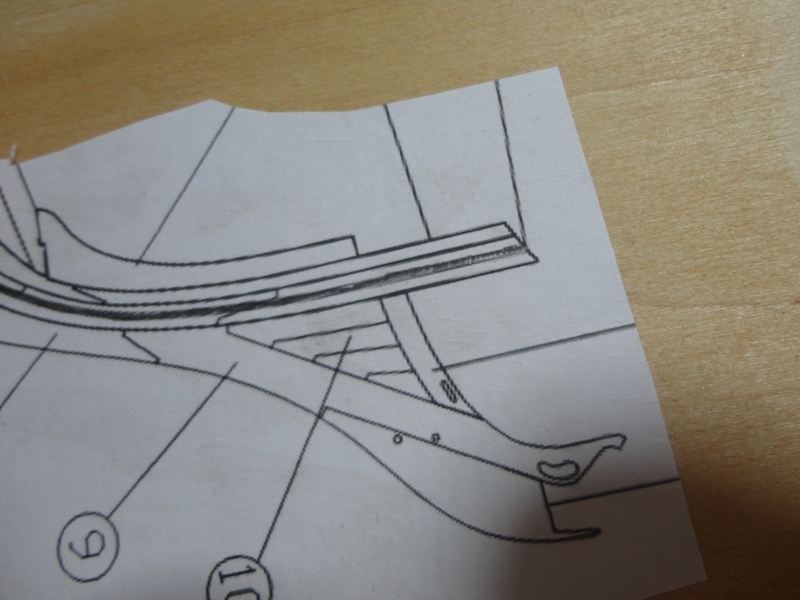
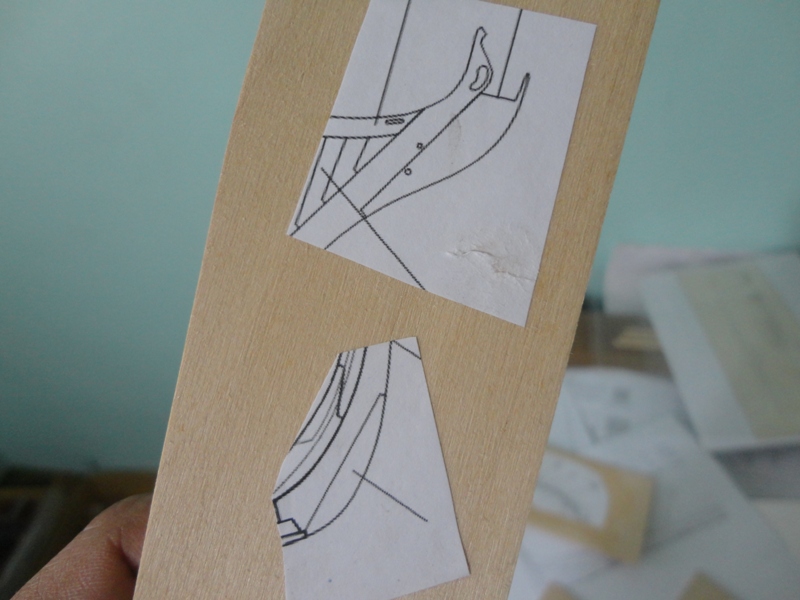
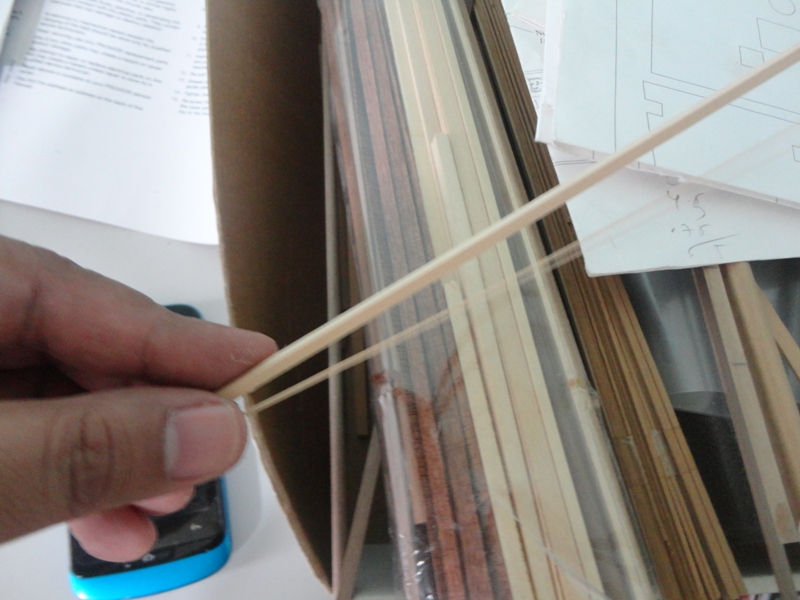
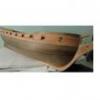
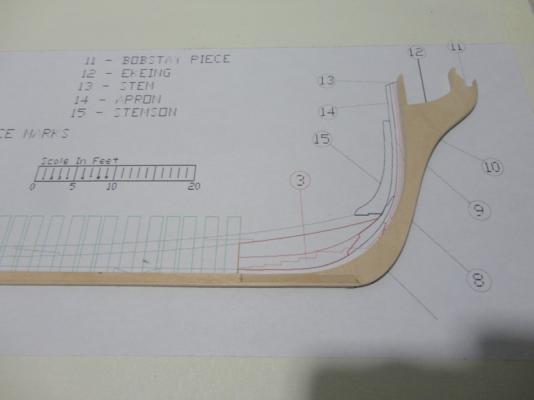
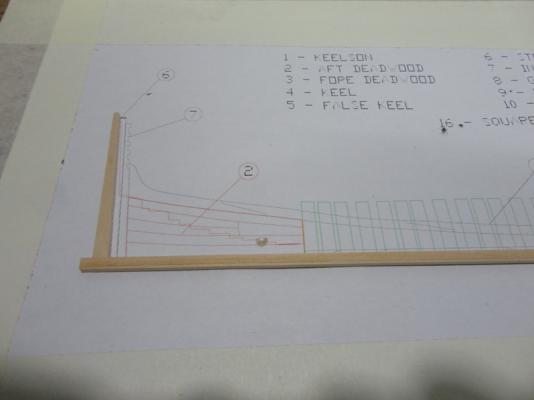
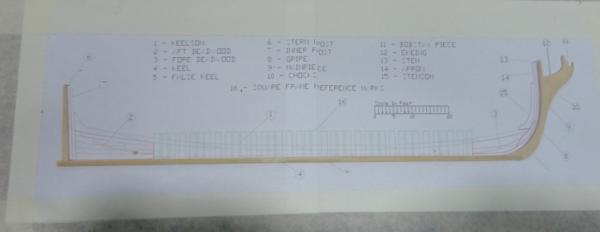
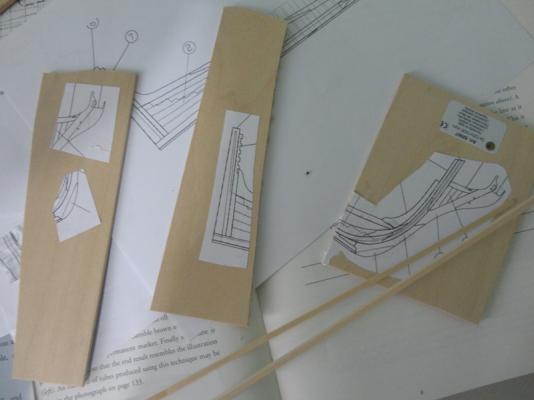
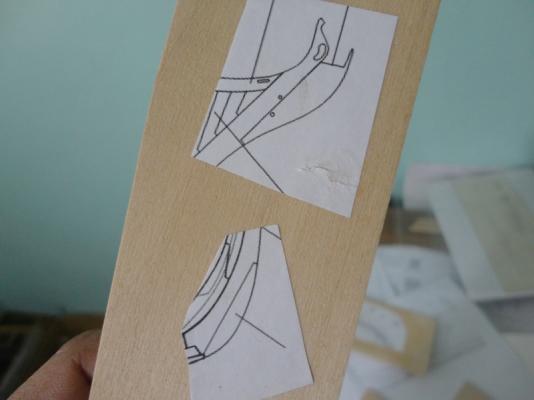
Hi to all, Newbie here, respectfully requesting permission to join this elite group of HMS Triton builders, Sir! This is my first attempt at doing a scratchbuild so I hope you guys would bare with my insufficient knowledge on nautical stuff Having very limited experience in wooden ships, I will opt for a POB build and will probably simplify most of the details as much as possible. For now, I will settle for a 1/96 scale project, using lime as my timber to minimize expense and wood wastage Starting with the stem pieces, I will follow the path taken by most kit manufacturers, representing this as a single piece (well perhaps I could make the gripe and bobstay piece as separate parts if my tools and skills will allow). I will use these two strips of lime to represent the single lengths of the keel and false keel. I know this approach may make some cringe, but, like I said, it's a simplified build I plan to cut the stem and stern post at the level of the rabet (pencilled area), then add a "rabbet strip" later to allow easier planking: All is set and it's time to start cutting: That's it for now, comments and advice are very much welcome. This is my first scratchbuild attempt and I will need all the help I can get EDIT: I now realize after seeing the complete set of plans that 1/96 scale would result to about 1mm thickness of the frames/bulkhead extensions Due to this, I've decided to enlarge my scale to 1/64


-
Nice to see your Crabbing Skiff log resurrected Mario, she's looking great my friend, looking forward to more updates
-
Ingenious Special Tools you have there, Mark Excellent work on those deck fittings and planking Sir, it's amazing how much amount of detail you've added given the smaller scale you're working on