Hubac's Historian
-
Posts
2,960 -
Joined
-
Last visited
Content Type
Profiles
Forums
Gallery
Events
Everything posted by Hubac's Historian
-
 Hi John, On the SP, there is no forecastle deck to provide cover, so the stoves would need to be placed on the middle deck. For SR, it makes sense to place the stoves in the center of the main deck because there would be forecastle guns above where the vents need to be. Also, from a practical standpoint, this heavy counterweight is better managed - if it does need to be higher up on the main deck - along the ship’s centerline, as opposed to the ship sides, which are already balancing the weight of the guns. The other practical problem with placing the stoves between the guns is that it would make working the guns in that area that much more cramped and difficult. I’m really relying in the English dockyard models as evidentiary proof that the stoves on a French First-Rate, with a forecastle, should be placed centerline, beneath the forecastle deck.
- 2,444 replies
-
- 3
-

-
- heller
- soleil royal
- (and 9 more)
-
I am definitely interested in a POF model, but it isn’t something I would take on any time in the next five years, or so.
- 1,784 replies
-
- 2
-
-
- winchelsea
- Syren Ship Model Company
- (and 1 more)
-
Few people are, and at best - I’m making an educated guess, here.
- 2,444 replies
-
- 3
-
-
- heller
- soleil royal
- (and 9 more)
-
Very nicely done! I appreciate your fail-safe approach to glueing. I am similarly inclined.
-
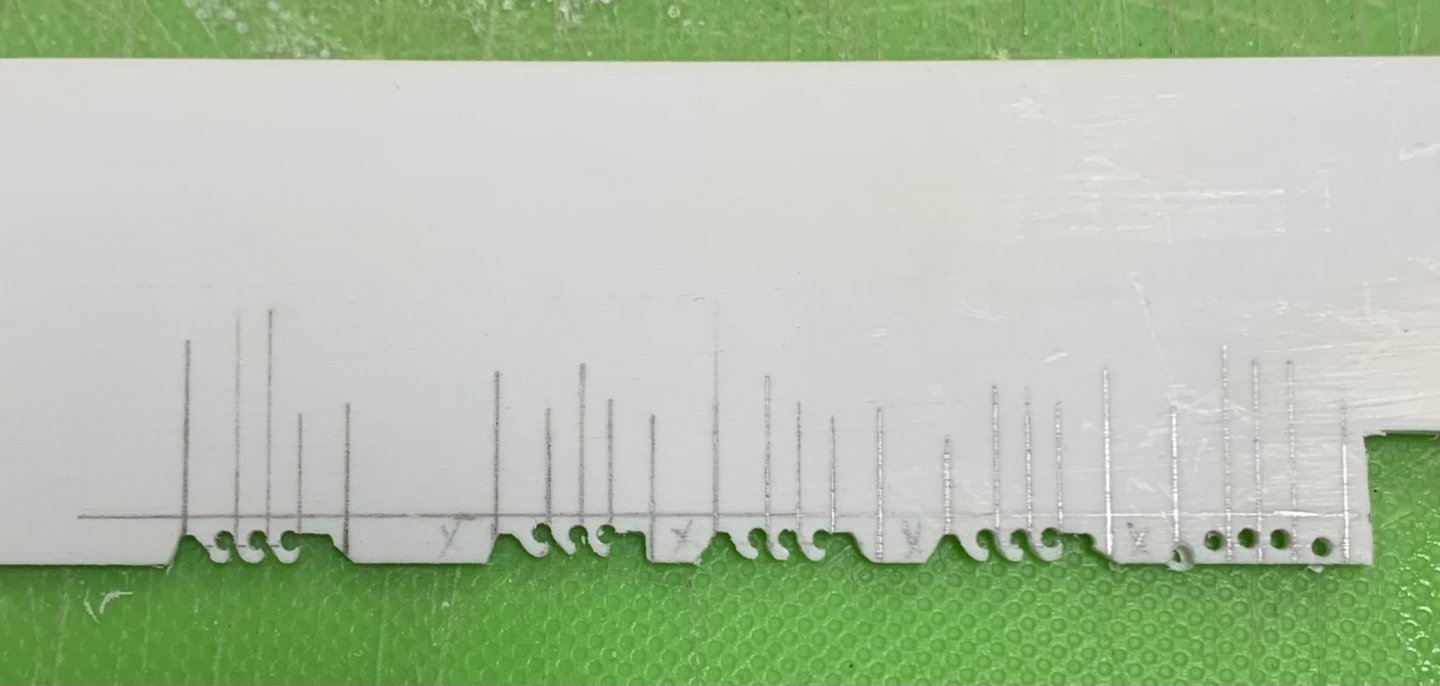
Thank you, Mark. As best I understand the time, the stove would have had metal sheathing on the deck. The sleepers provide some extra separation from the stove box, and the box would be packed with sand, then a brick layer, and finally the bricks would be cloaked in these iron plates.
- 2,444 replies
-
- 4
-
-
- heller
- soleil royal
- (and 9 more)
-
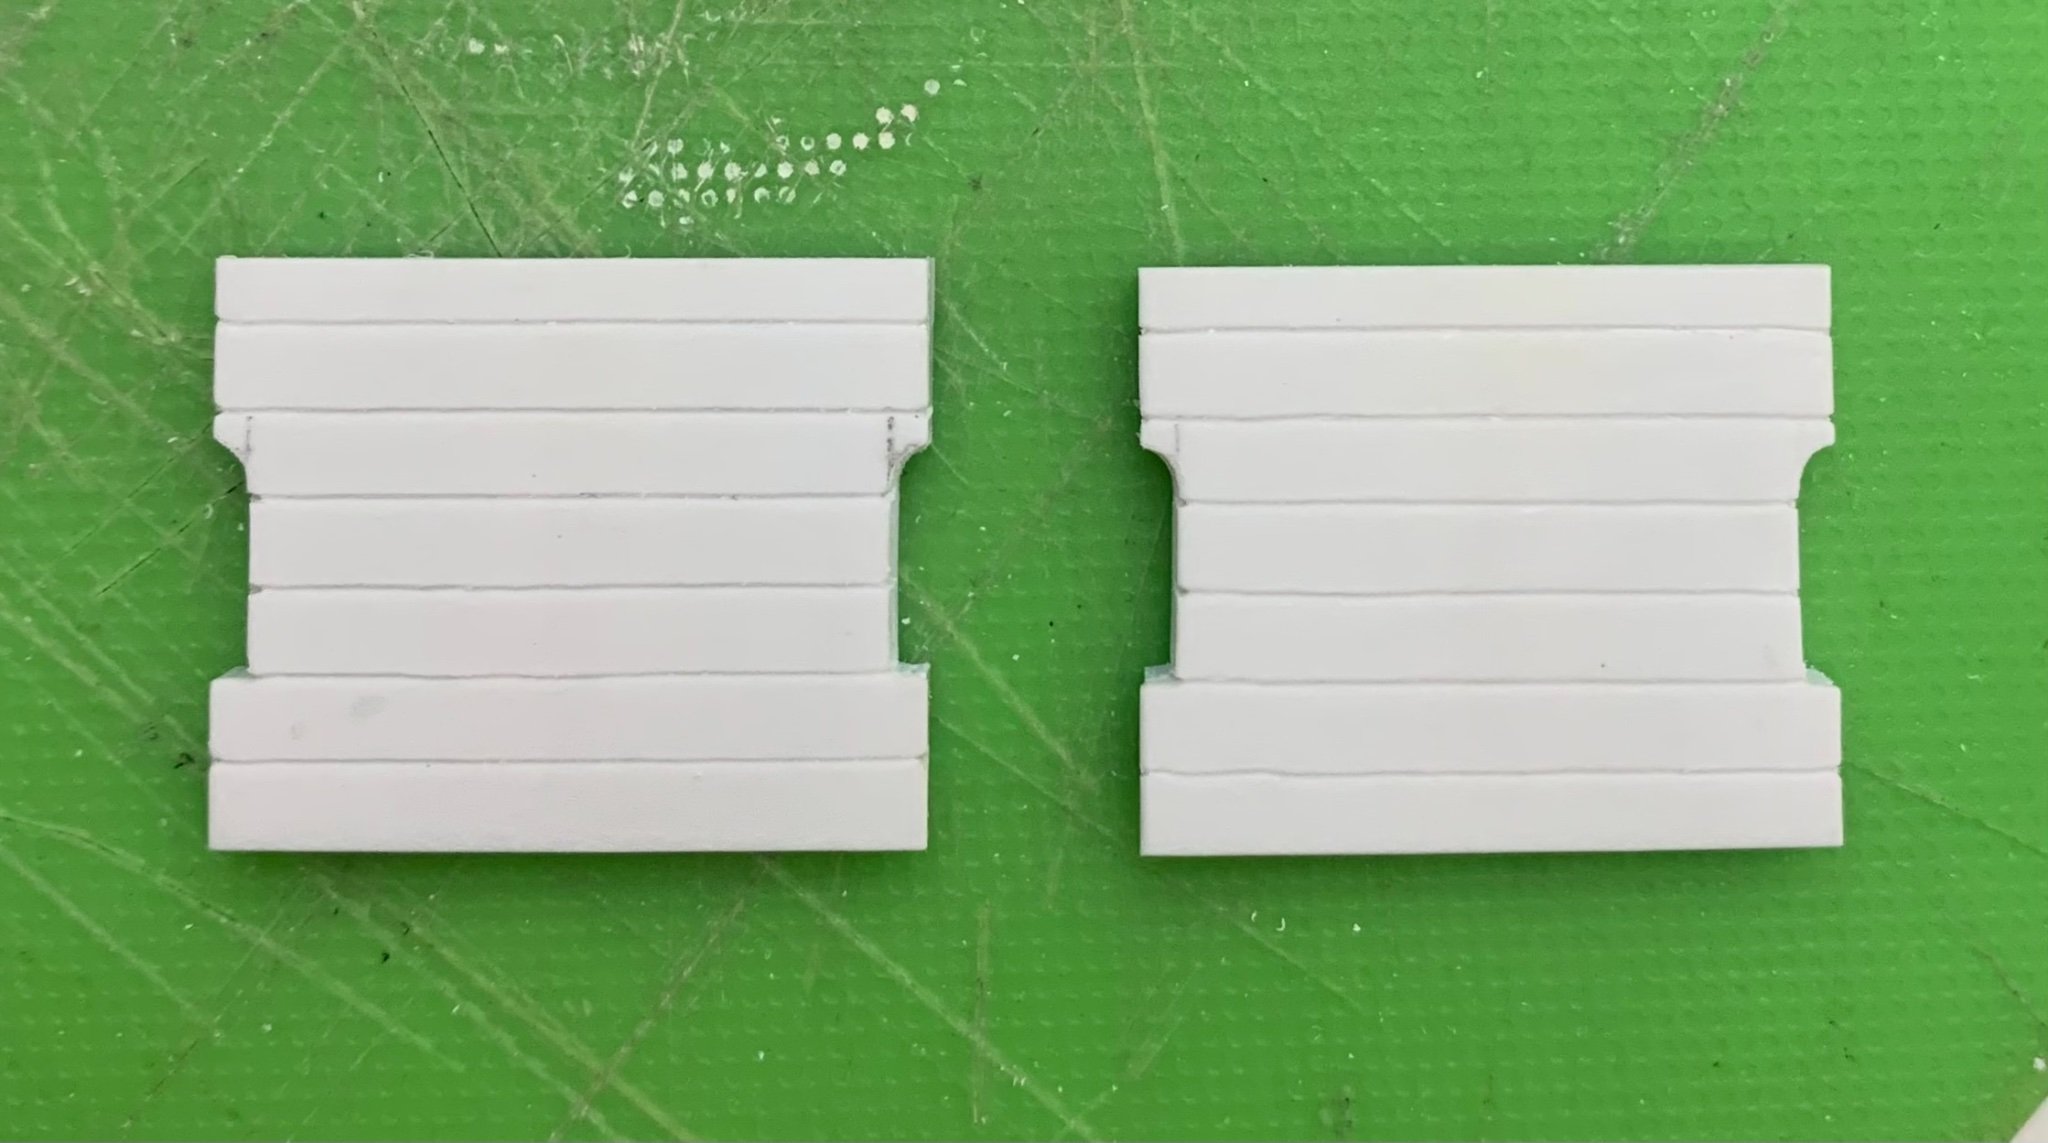
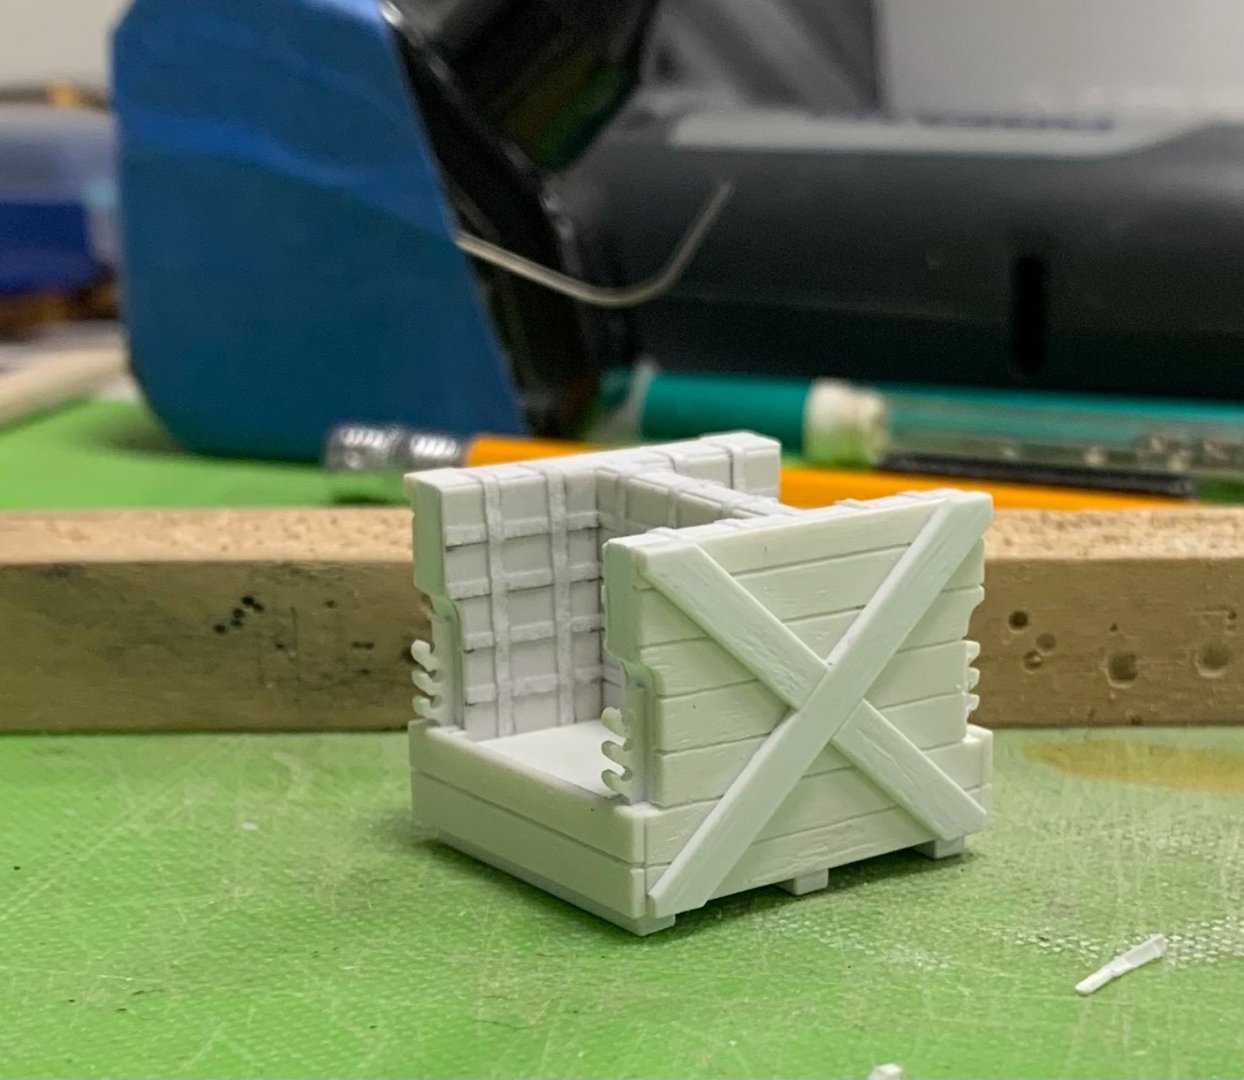
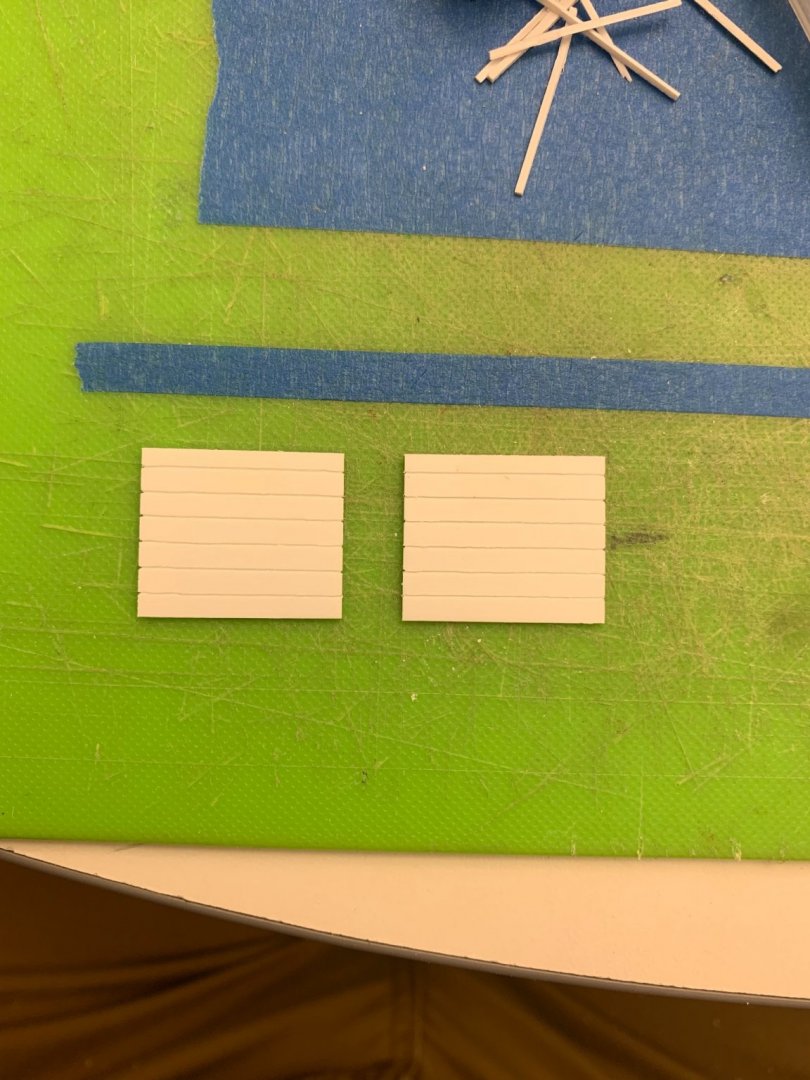
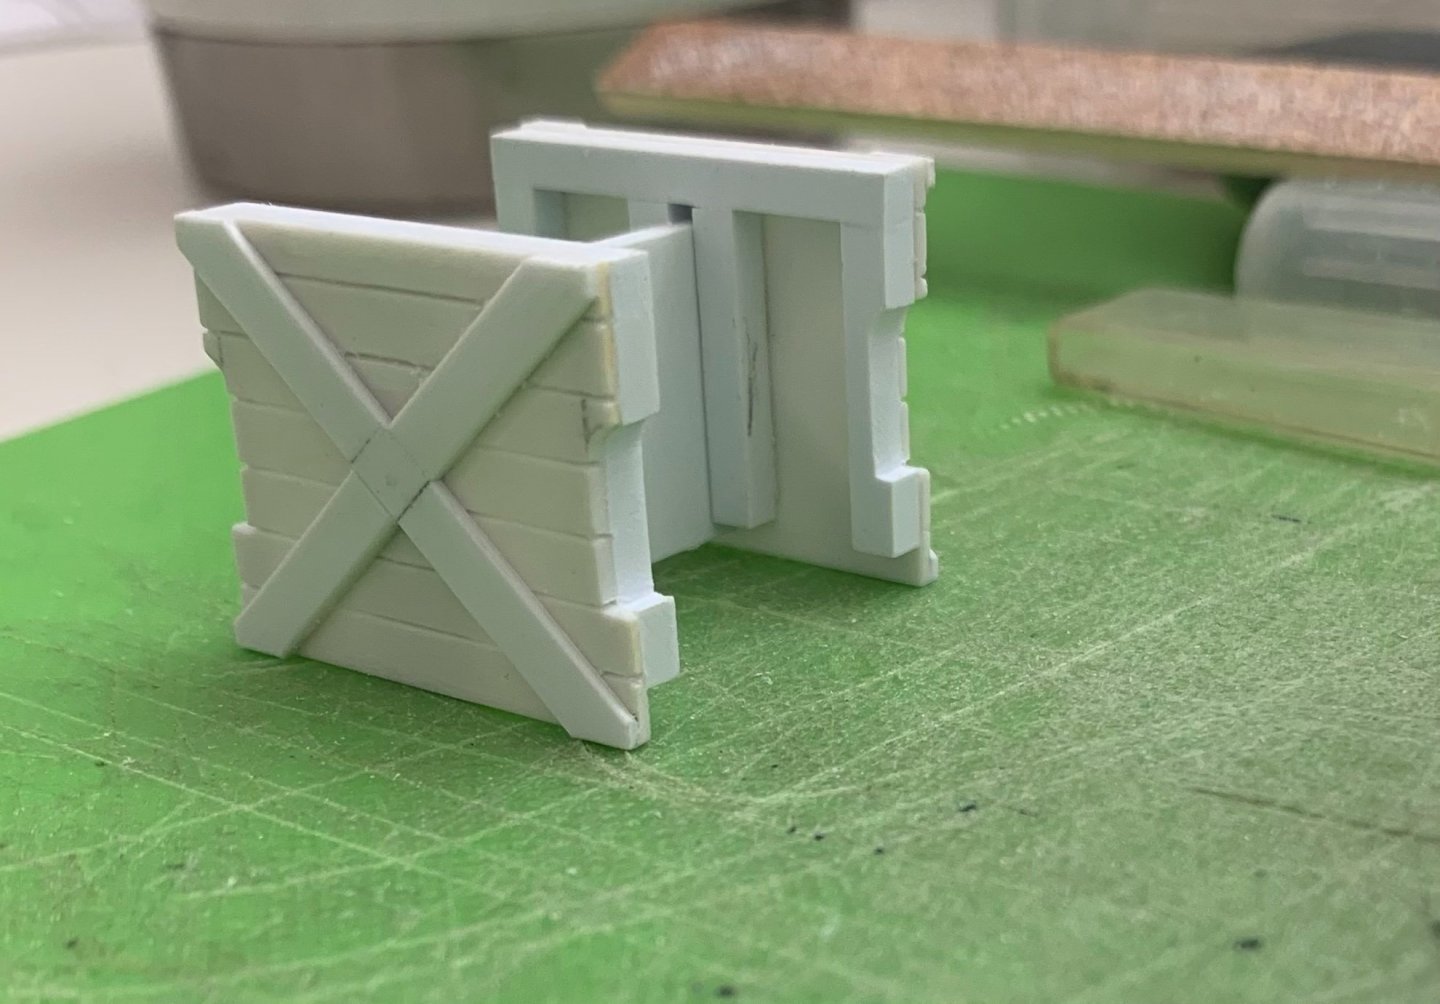
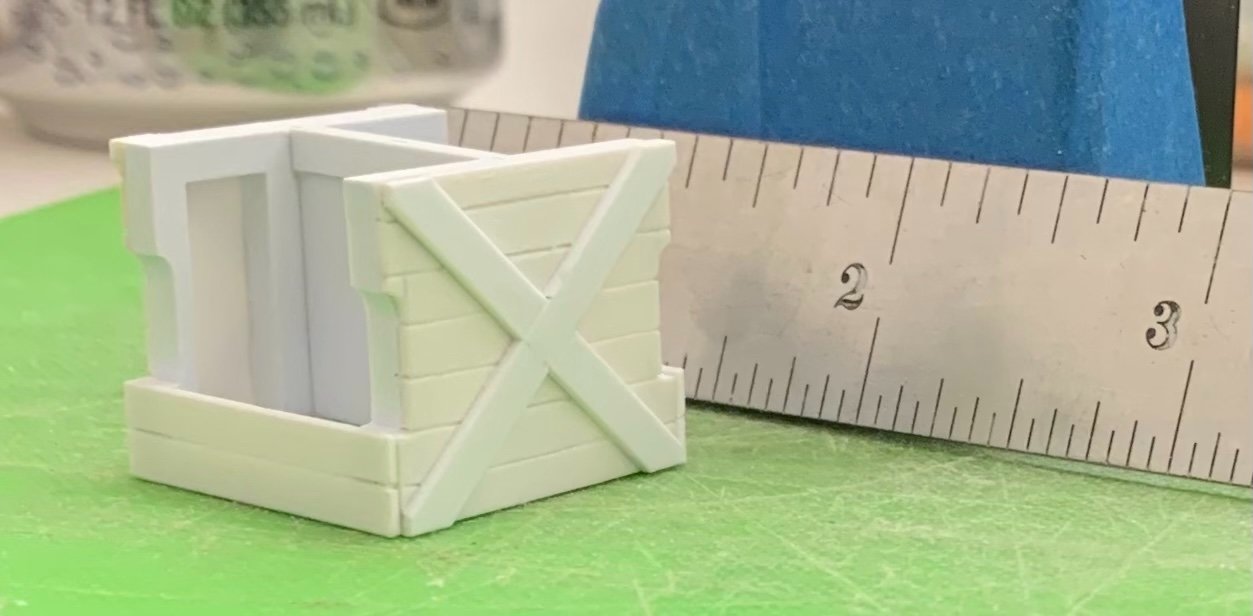
The stove is ready for paint: The best scale effect for the lining plate lattices was pedestrian typing paper cut into narrow strips and CA’d in-place. I sanded coarse scratches into the planking, so that the exterior will pick up the Van Dyke Brown distressing well. I still need to make the “metal” deck sheathing that goes beneath the stove sleepers, but that is a simple thing. I’m close to being ready for paint on the aft, starboard bulwark. I took even greater care in fitting this last piece because I did not want to deal with any putty at all, on the outside seam. Paint touch-up was a real pain for the three bulwarks prior. More to come! Thank you for your interest and for stopping by.

- 2,444 replies
-
- 15
-
-
- heller
- soleil royal
- (and 9 more)
-
Wow - what a collection!
-
You are, by far, your own worst critic. This all looks wonderfully crisp and clean. Forge ahead with confidence, Mark!
-
Captain Park’s imaginary adventure game sounds tailor-made for cocktails with friends! The paint technique you describe is essentially what I do with my acrylics. It’s a little tedious, but I have zero brush marks.
-
I found this super clear photographic essay of the Winnie, on YT. Maybe most of you have seen this already, but it’s worth a look if you haven’t: That channel is an excellent one to subscribe to, as it does similarly excellent photo essays of a wide range of dockyard models.
- 1,784 replies
-
- 10
-
-

-
- winchelsea
- Syren Ship Model Company
- (and 1 more)
-
What about “hack,” as in a quick and easy hack to do so and so? I am already making use of your tips. The mirror chisel trick is really good when trying to square the ends of very small stock, like 1/8” square stock. So, thanks for that! Eric, thank you also for plugging my build! The check’s in the mail 😉 I appreciate the kind words, Keith! I also like to do that sort of cross-pollination of other builders’ work, and have often been delightfully surprised by someone else’s suggestion.
-
This looks awesome, Eric! It is interesting to note that craft acrylics can be airbrushed. I have found that I have to significantly thin my Testors ModelMaster acrylics to get them to airbrush well.
-
This is a very clever method for stropping that I will be adopting, myself. Is there a particular CA, or other adhesive that you like for closing the strop ends?
-
I am glad to be reminded of one of my all-time favorite models. Drazen, I hope you are well, and that we may soon see your latest progress. All the best, Marc
- 487 replies
-
- 2
-
-
- ship of the line
- 80 guns
- (and 1 more)
-
Success! Nice save, Eric!
-
Congrats on your 5-month anniversary, Bill. Your progress, in that span has been nothing short of remarkable! She’s looking spectacular. The deck weathering shows particularly well.
-
She’s looking really good EJ!
-
I agree with this 100%. Think it through. Come up with a plan, and proceed with caution.
-
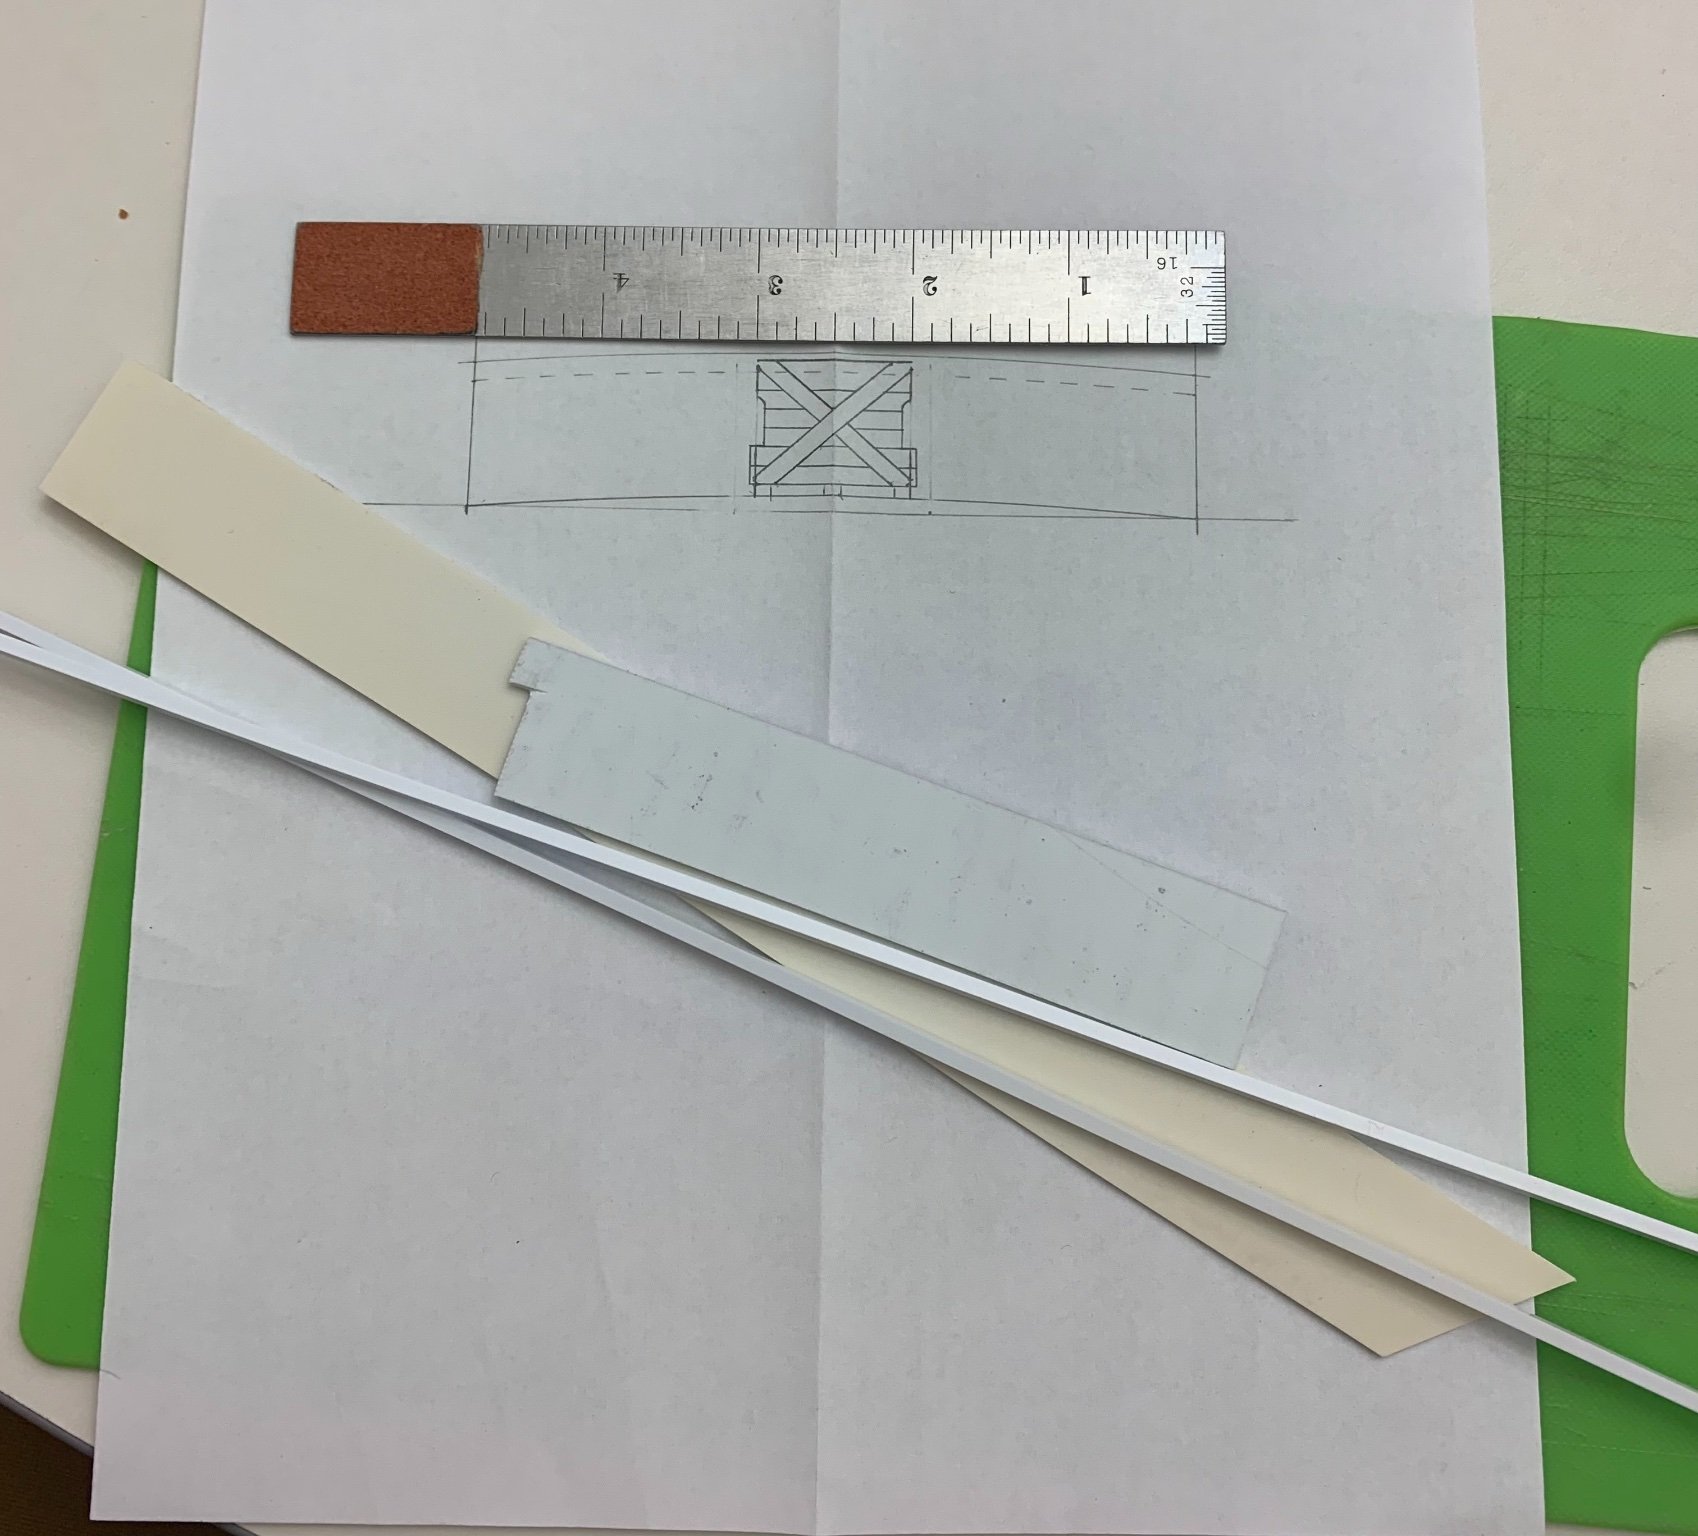
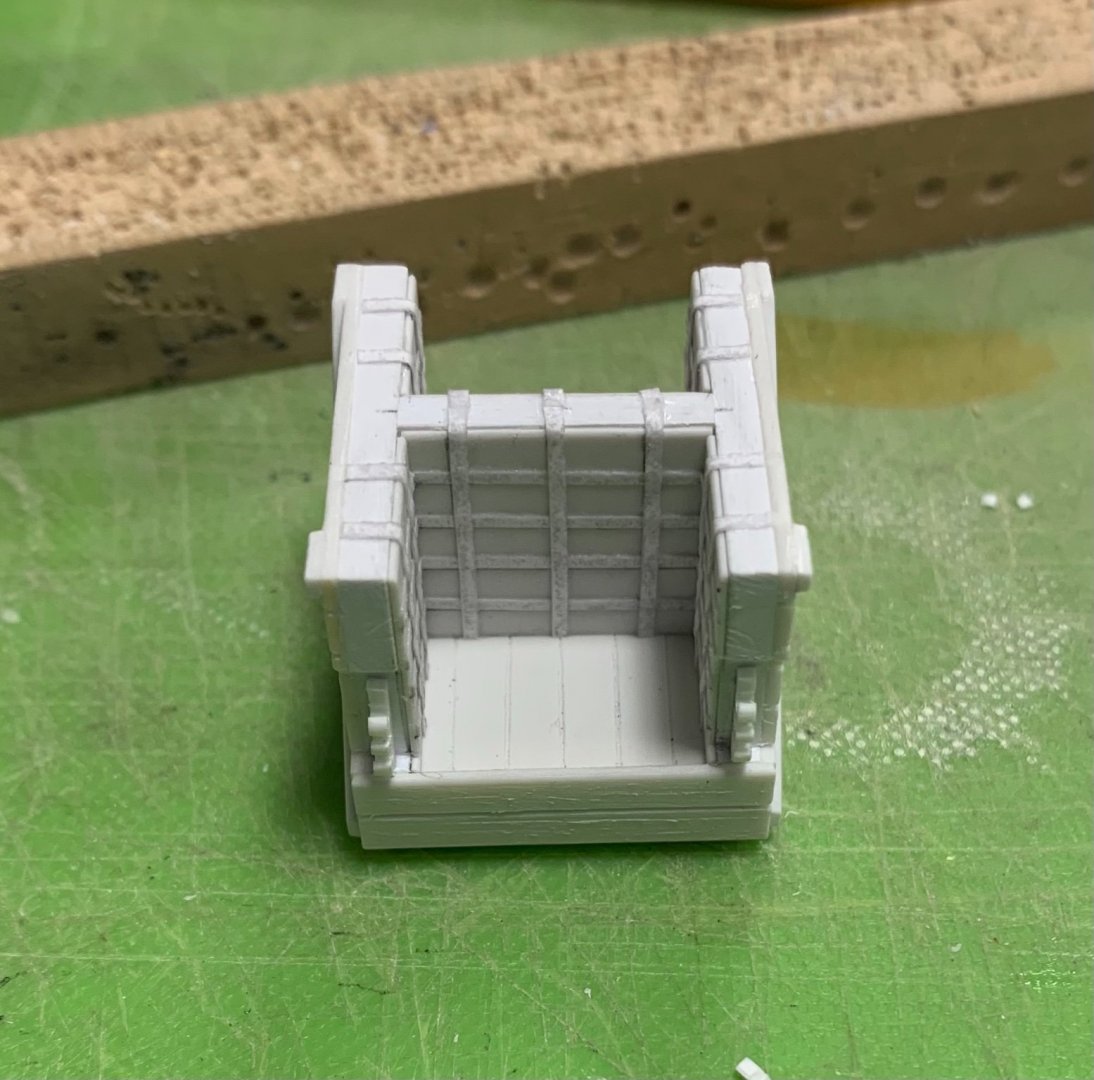
The stove is taking shape nicely. I still have to build out the interior, which is clad in iron plating. I’m toying with representing the brick work, on the top edge, but it will not be visible at all. I have to also attach the three skids that the stove sits upon, on the deck: This is a fun little scratch project. There are also rings and other small bits of hardware that will be attached. Thanks for looking in!


- 2,444 replies
-
- 16
-
-
- heller
- soleil royal
- (and 9 more)
-
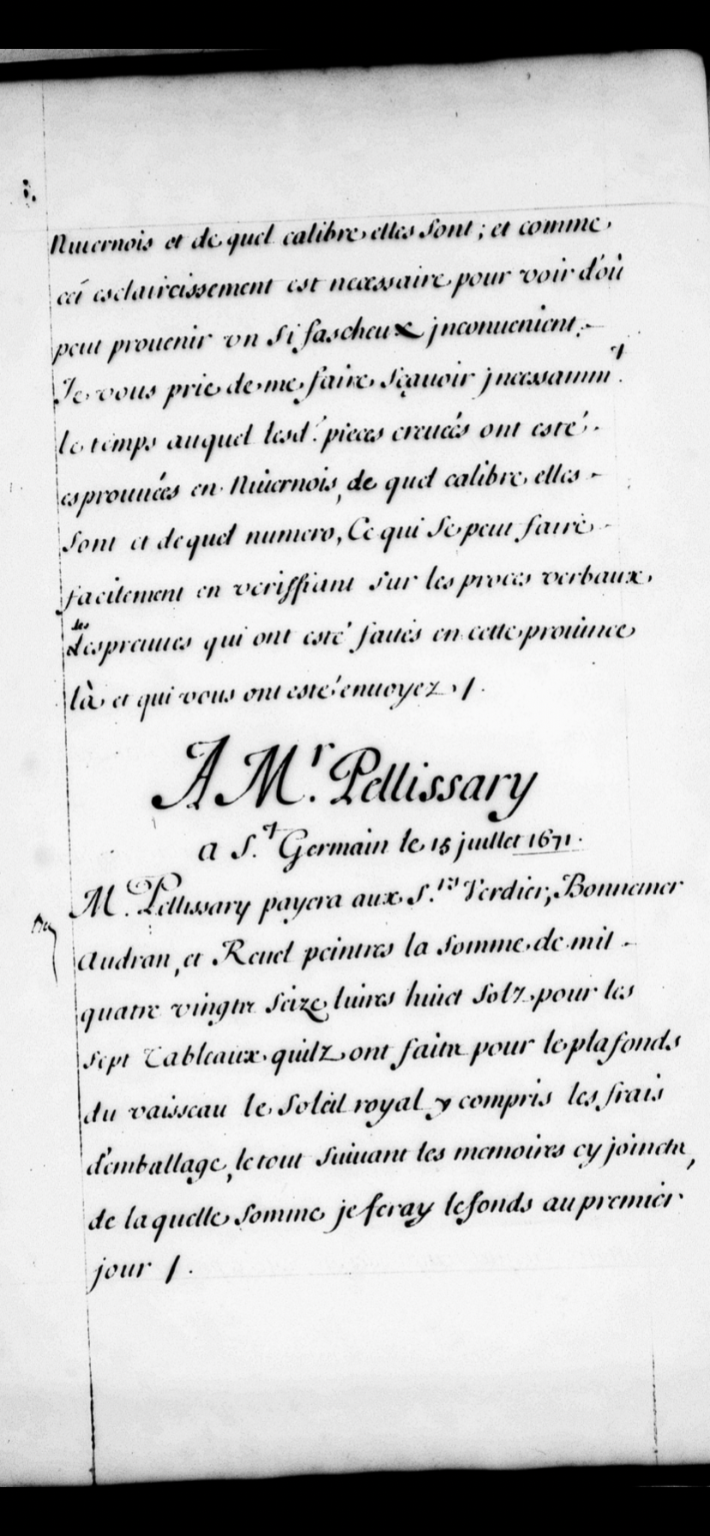
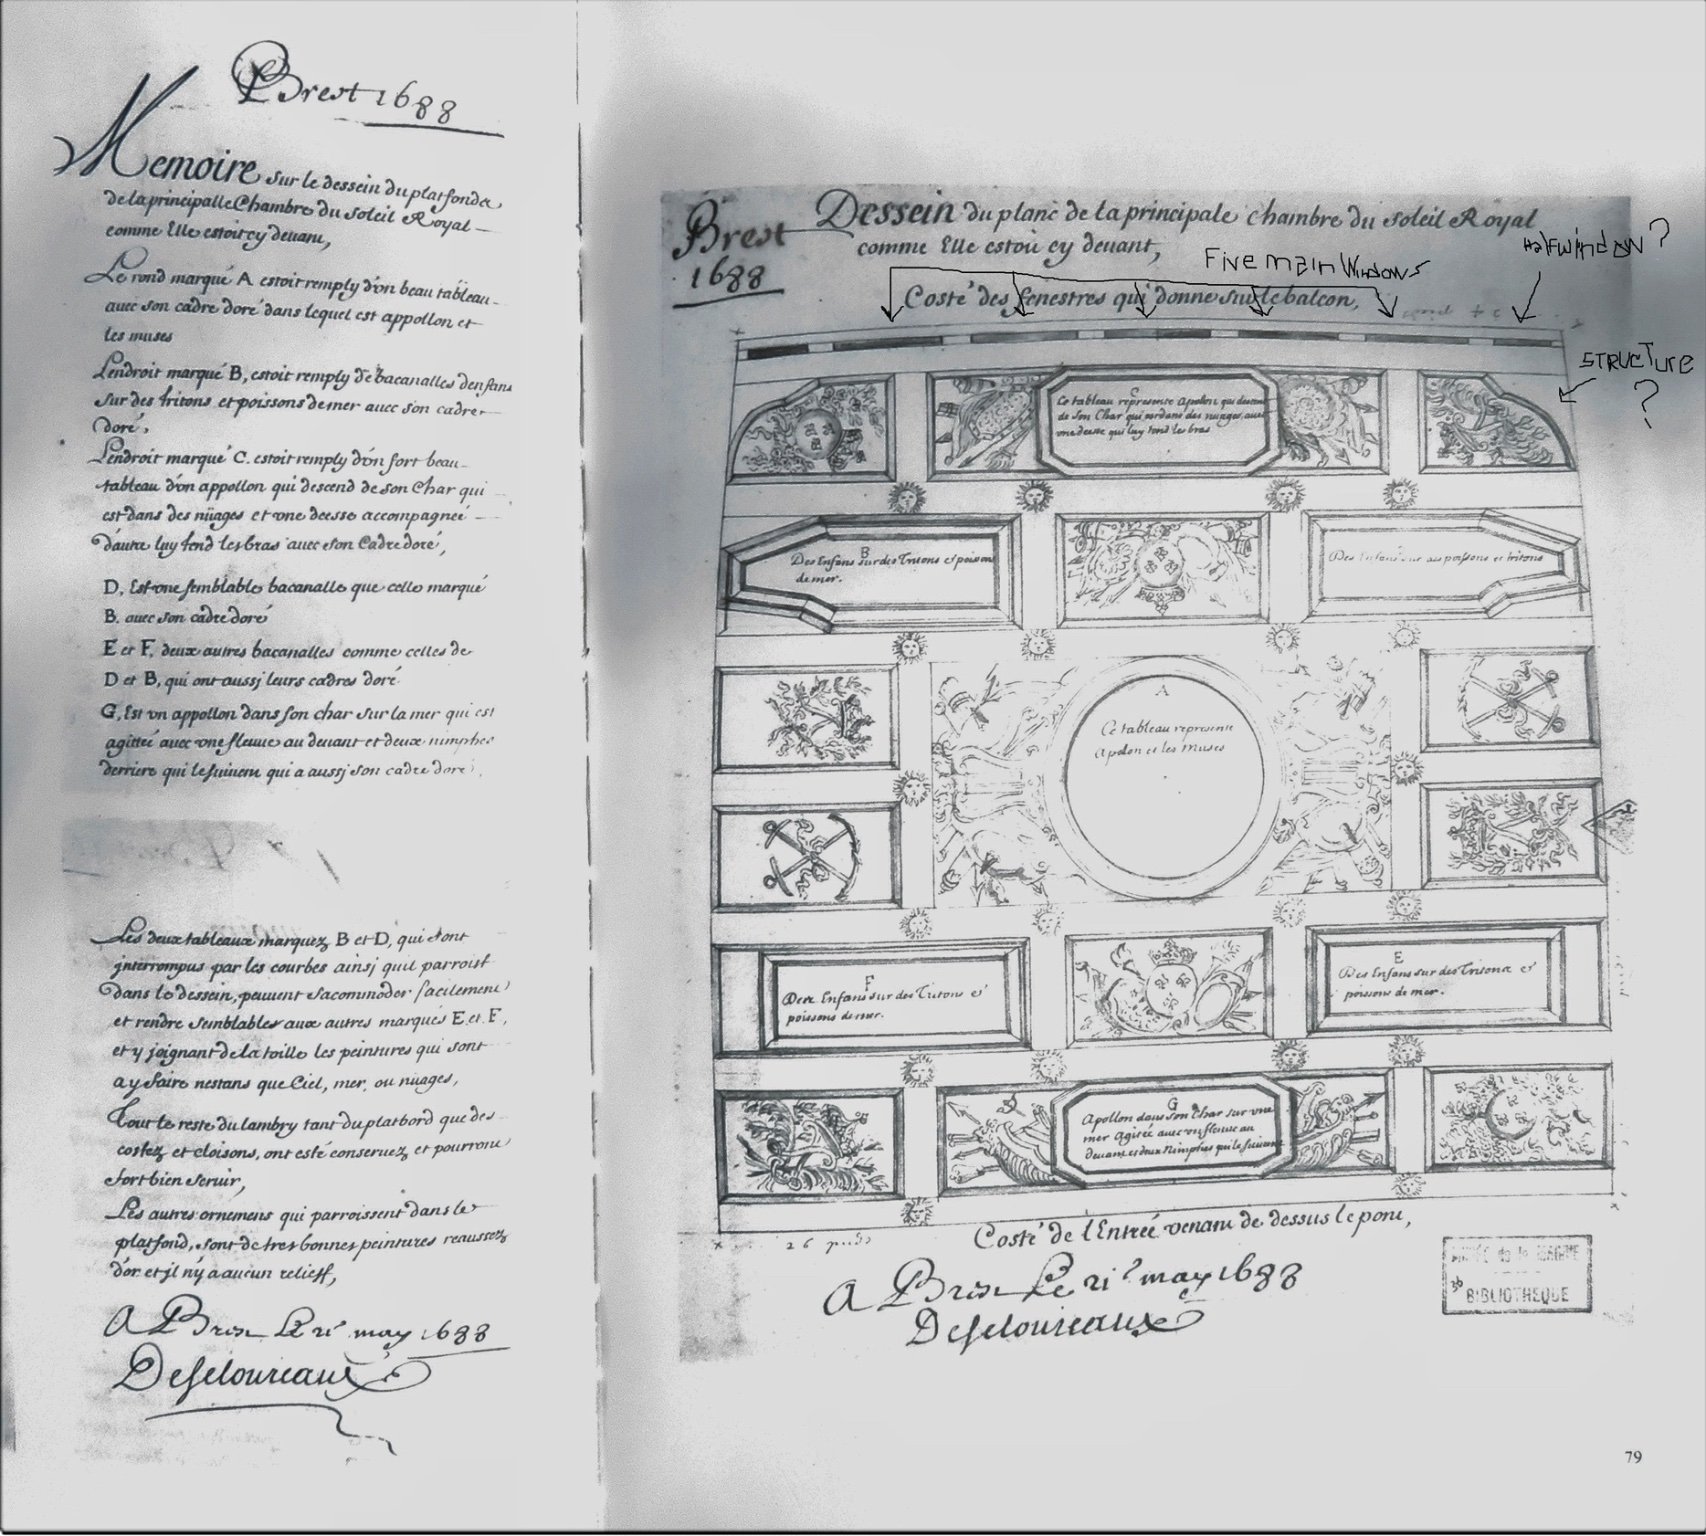
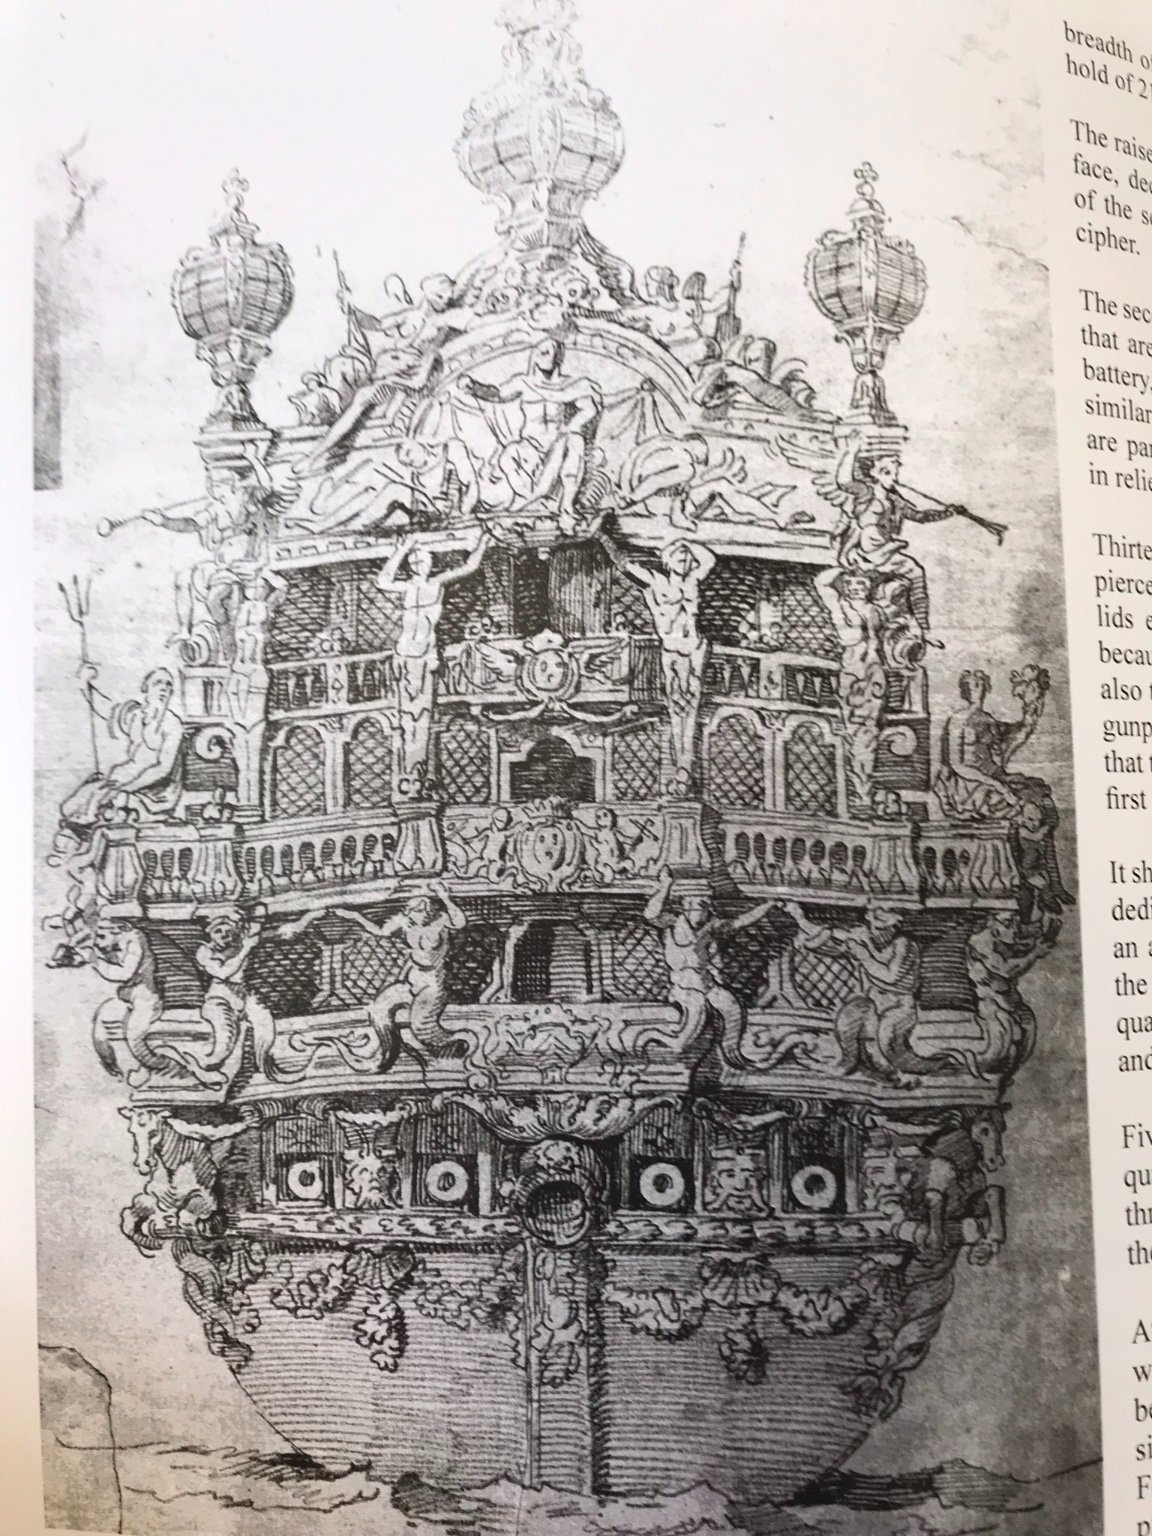
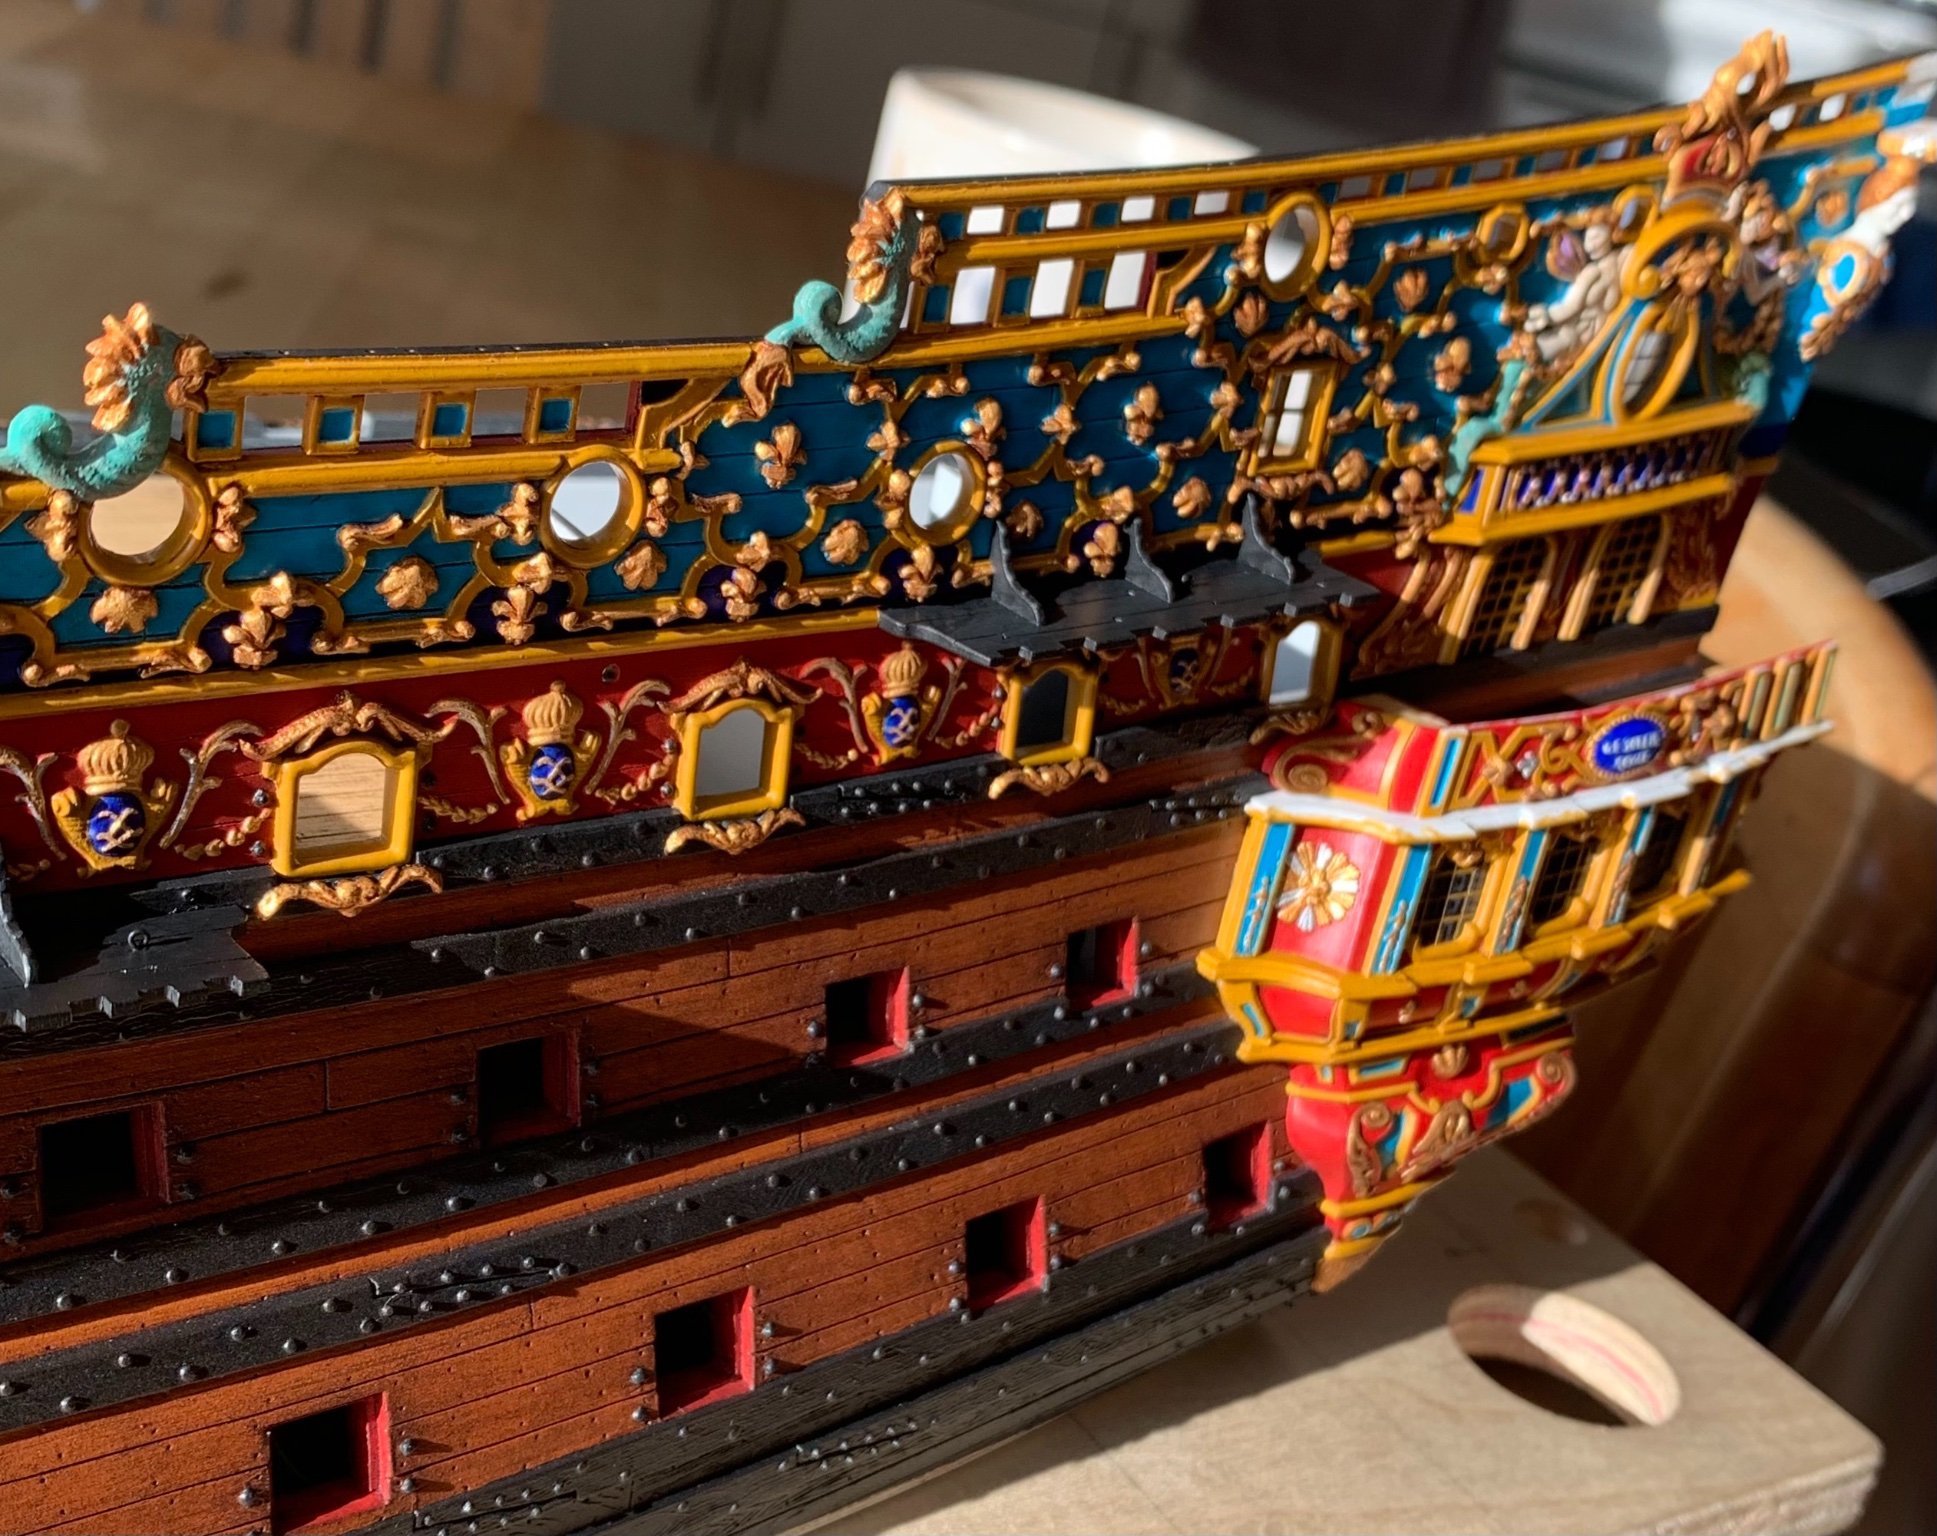
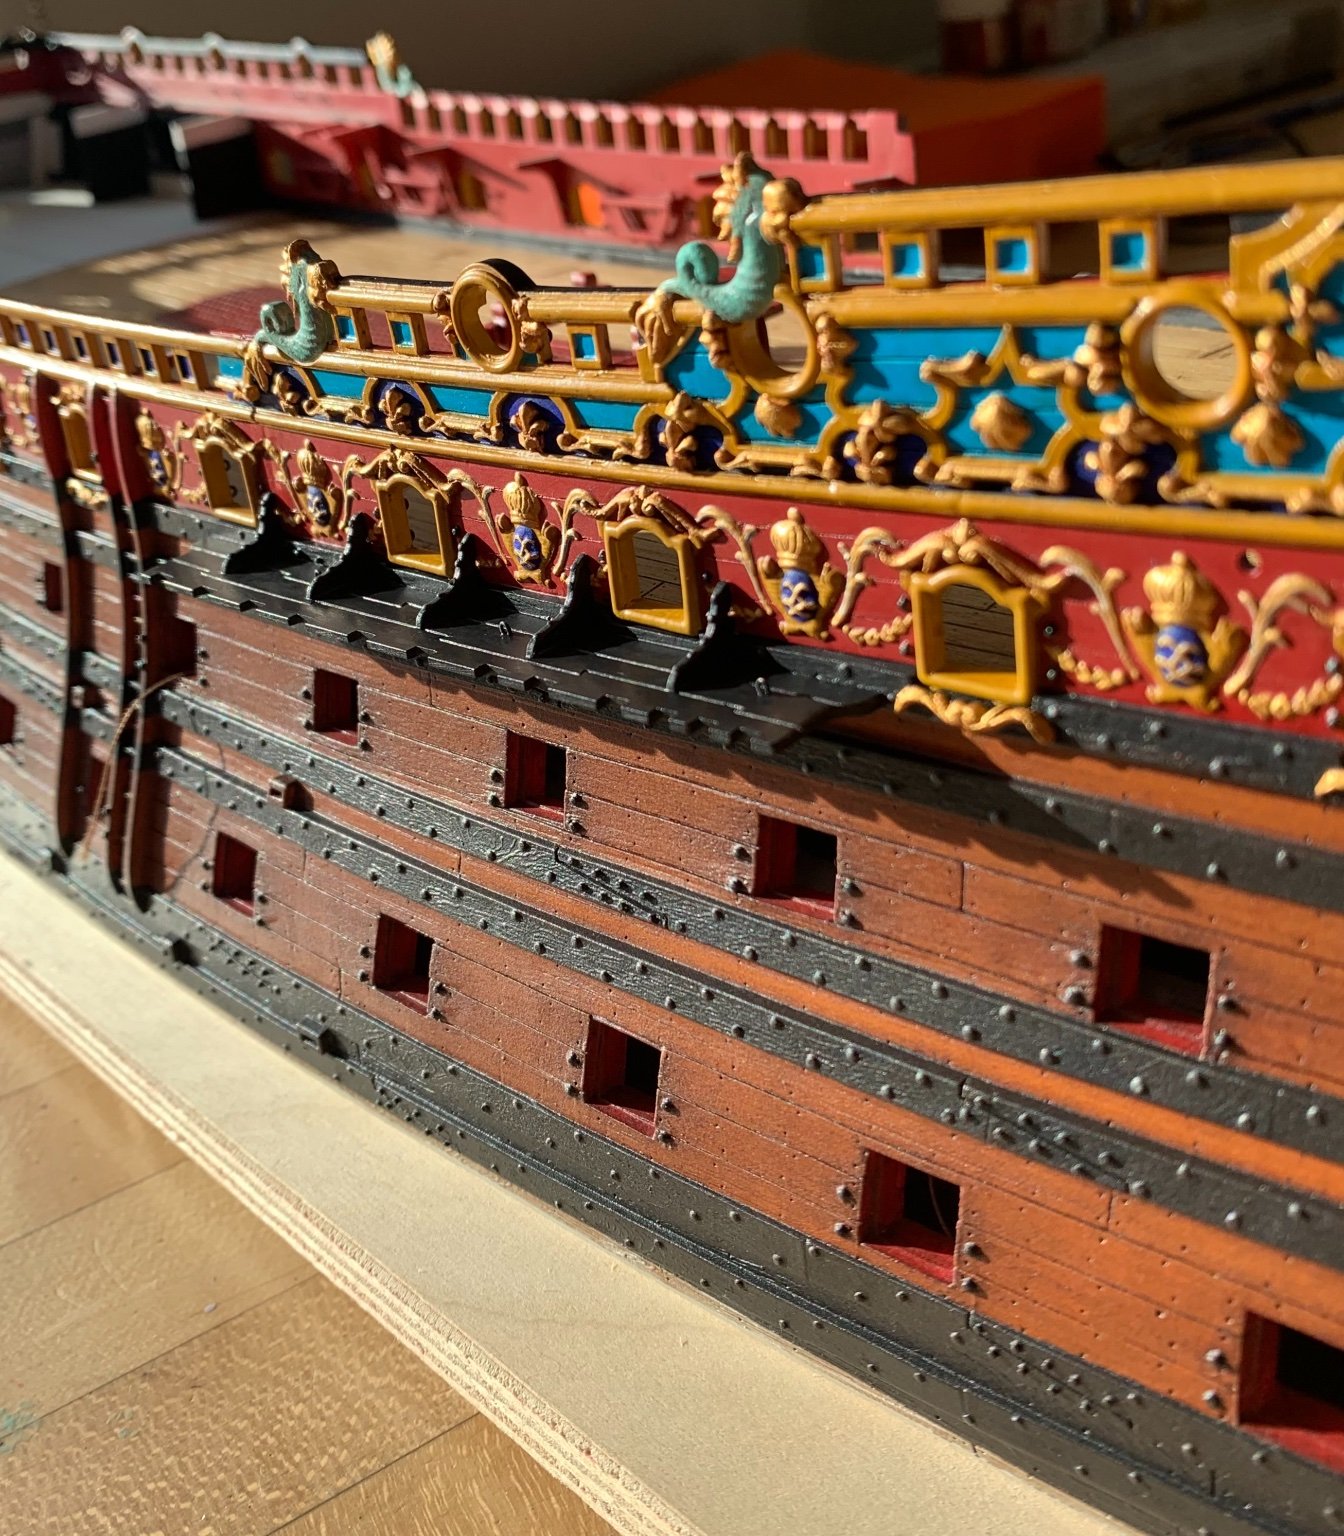
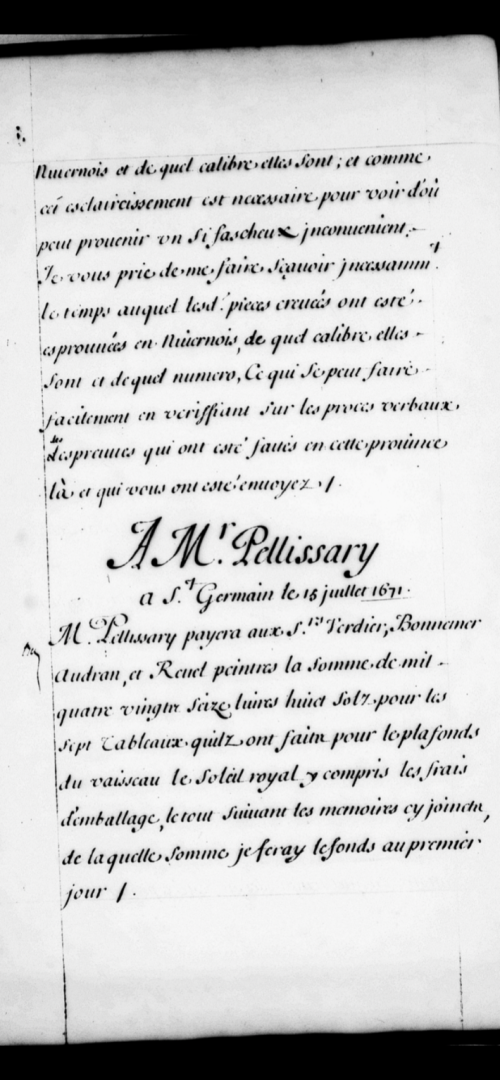
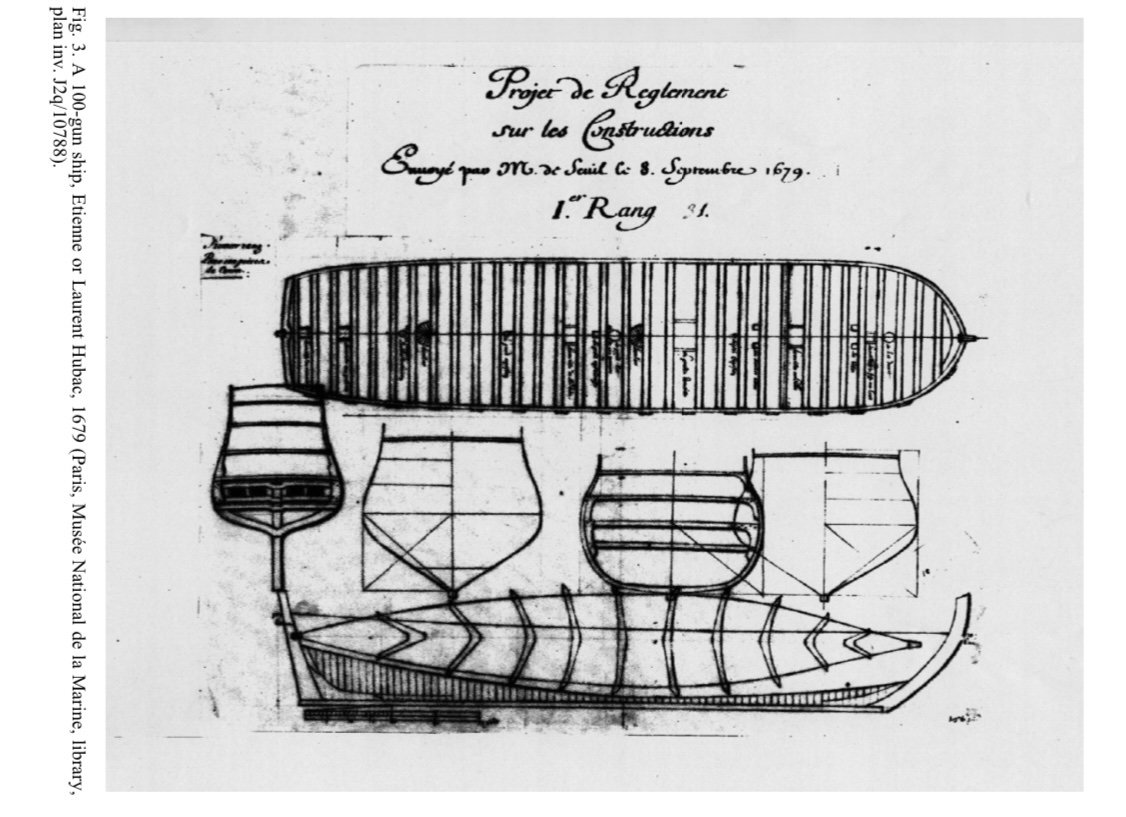
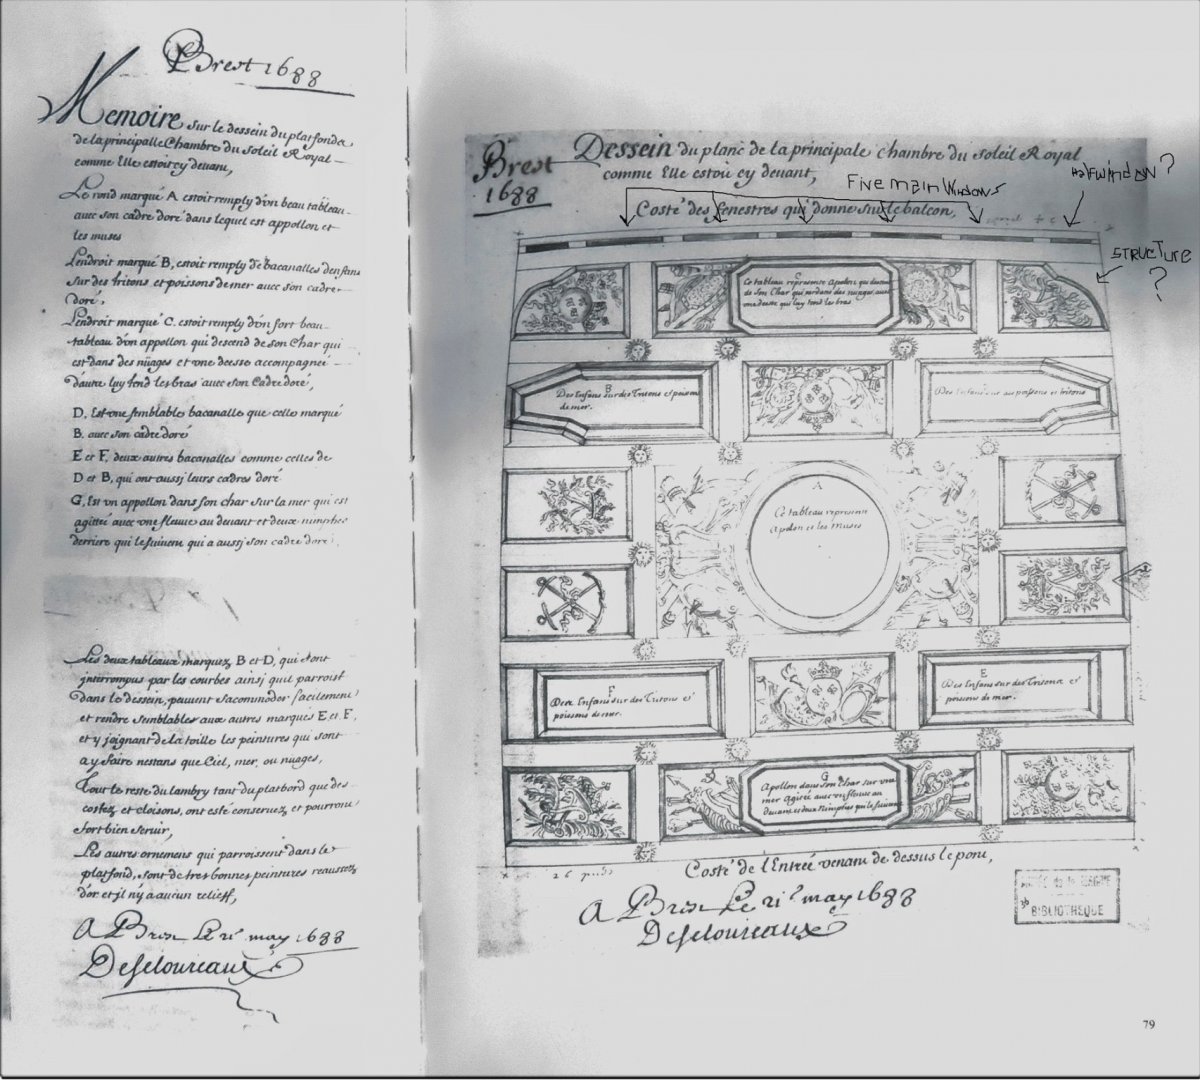
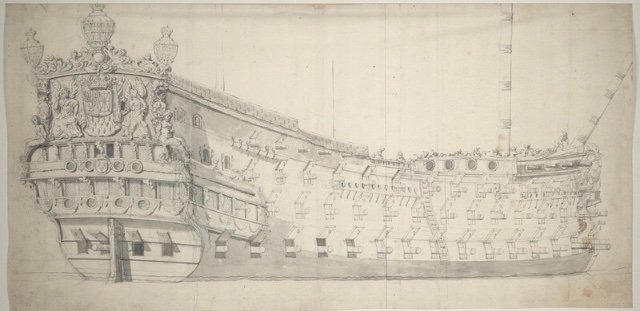
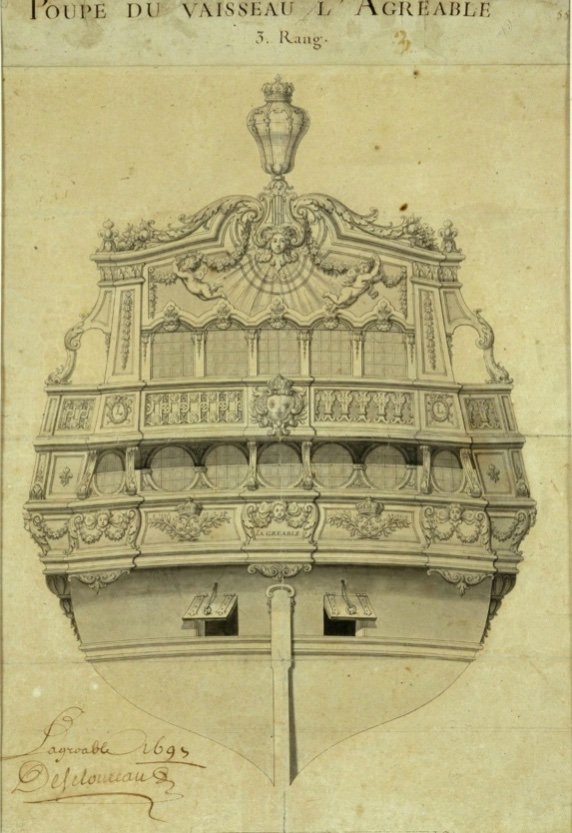
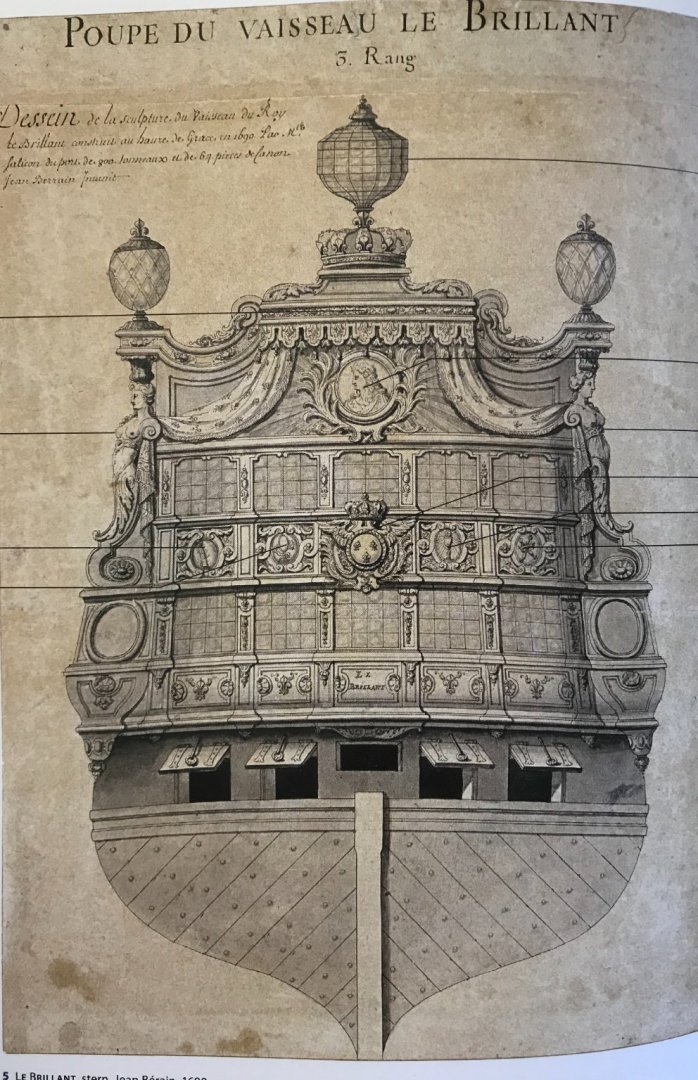
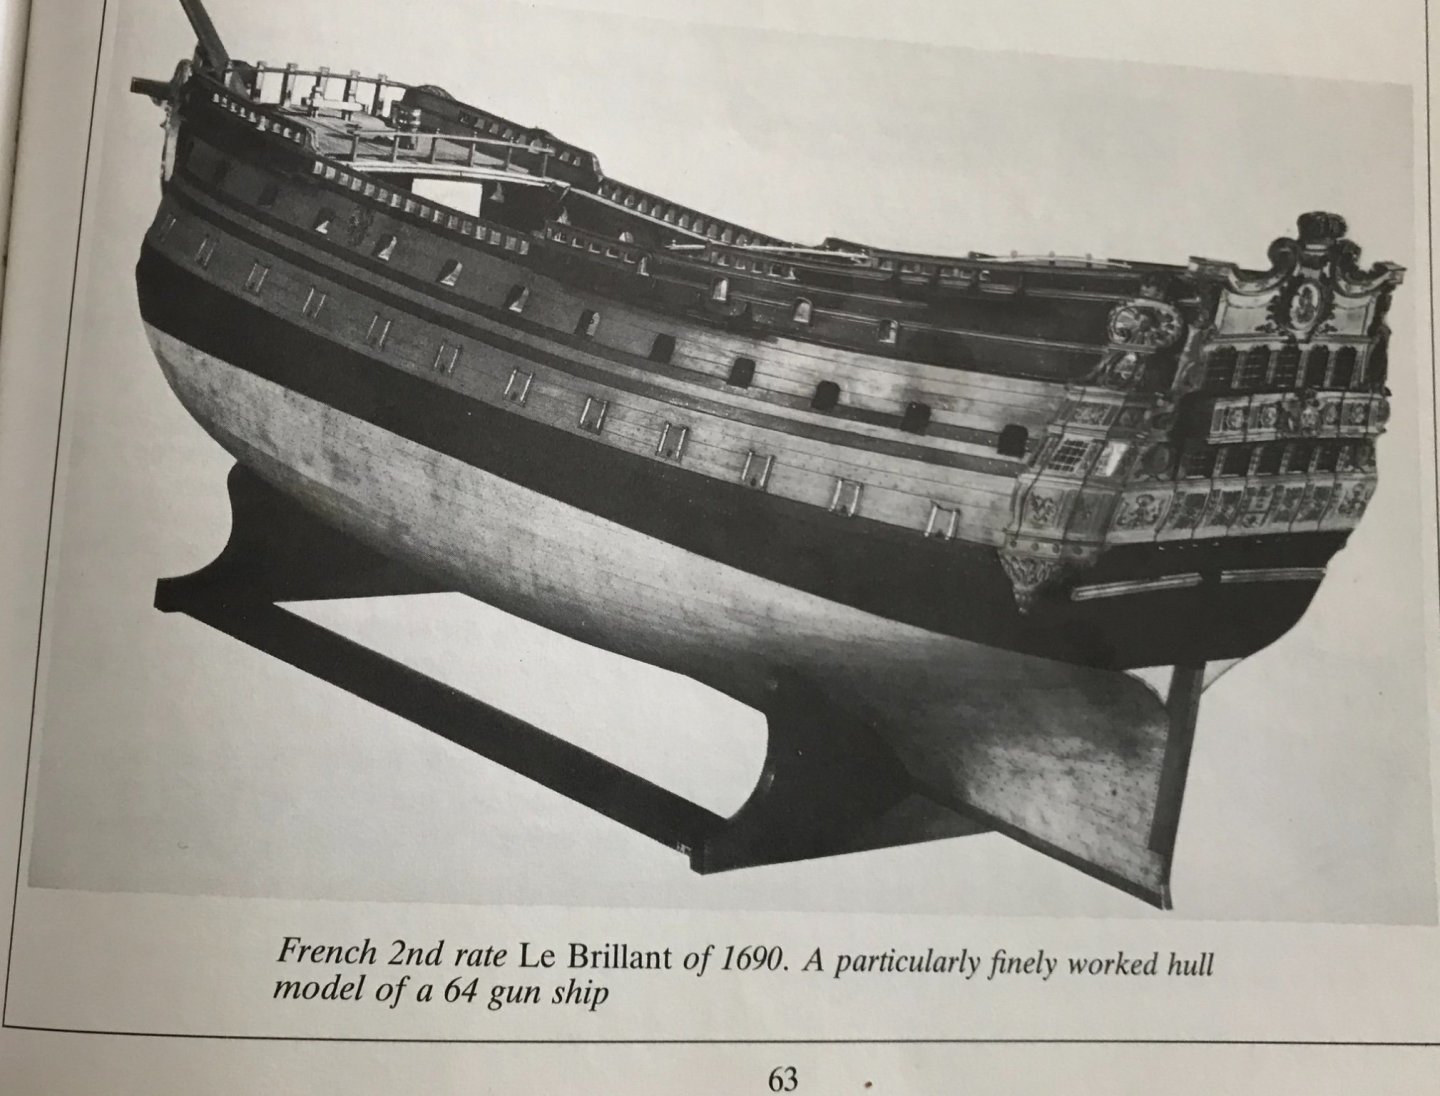
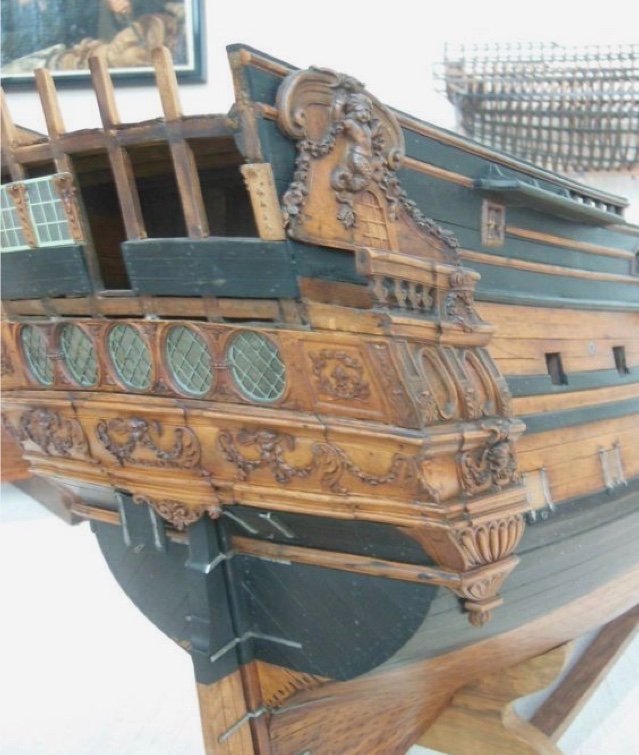
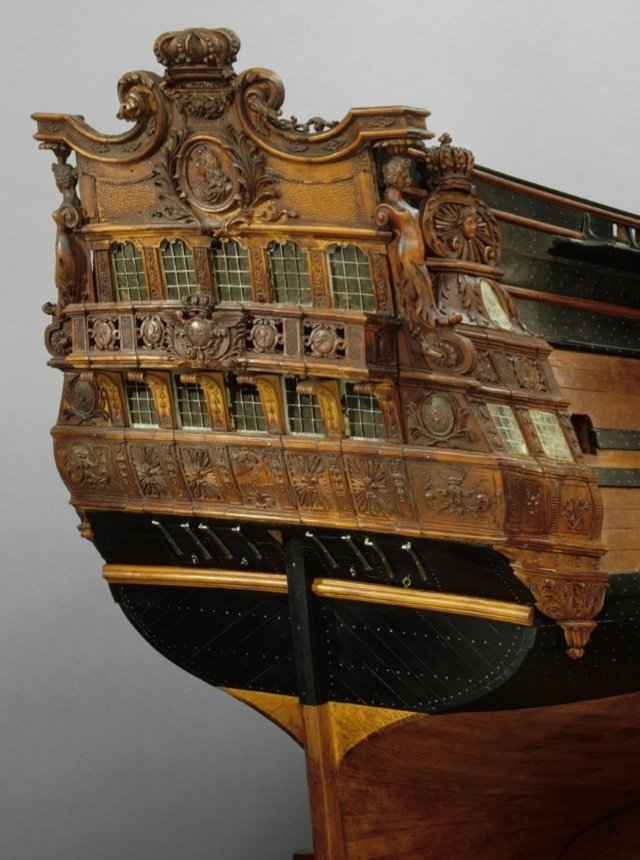
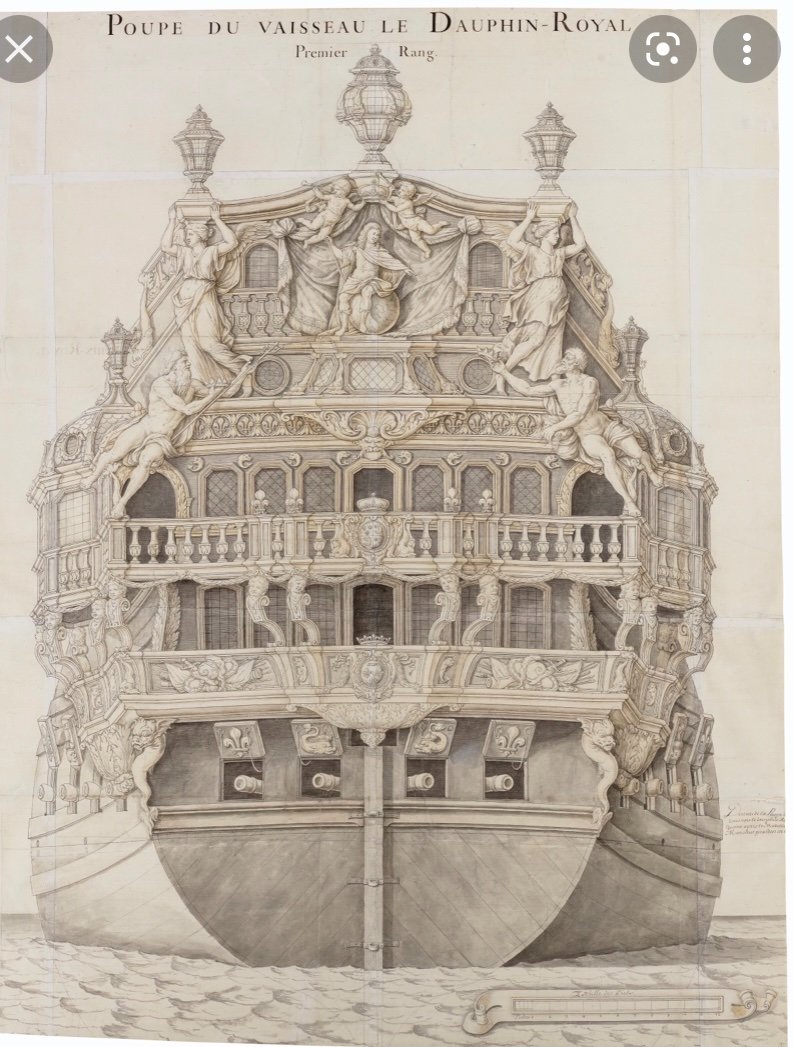
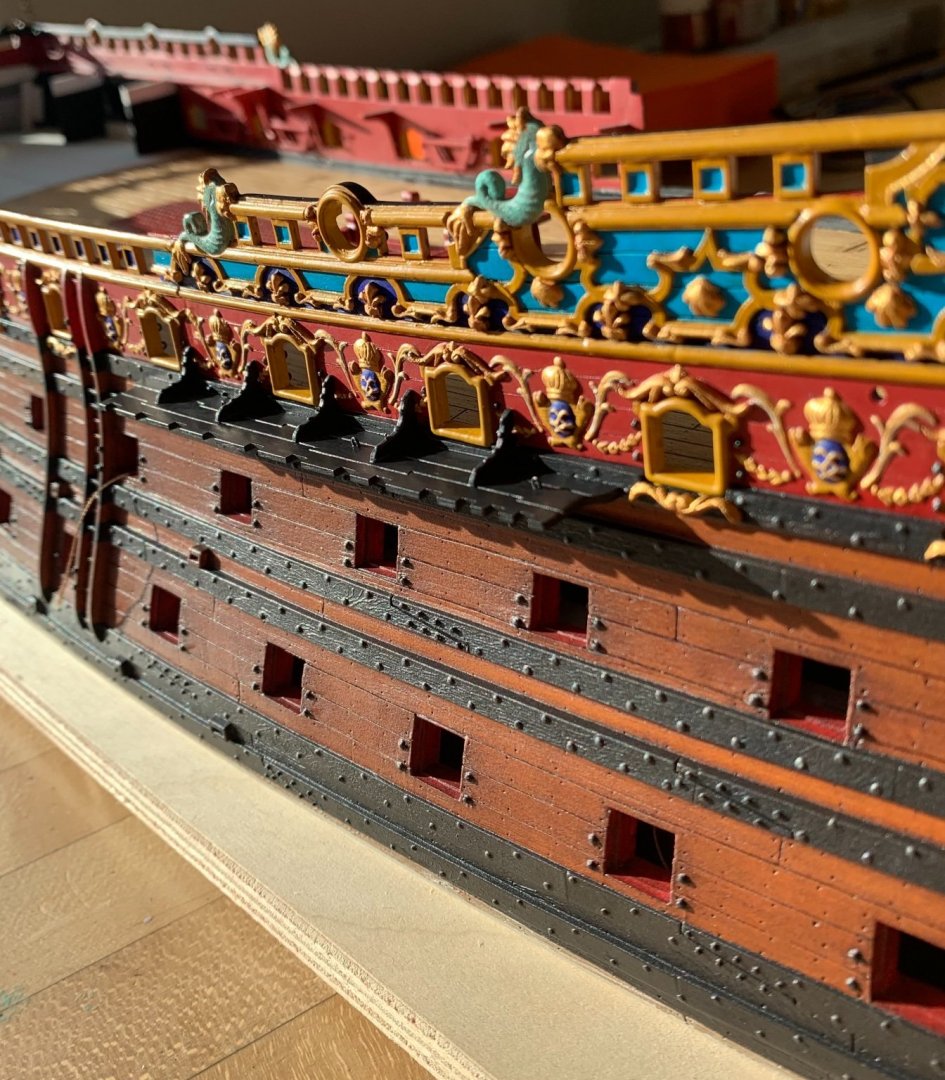
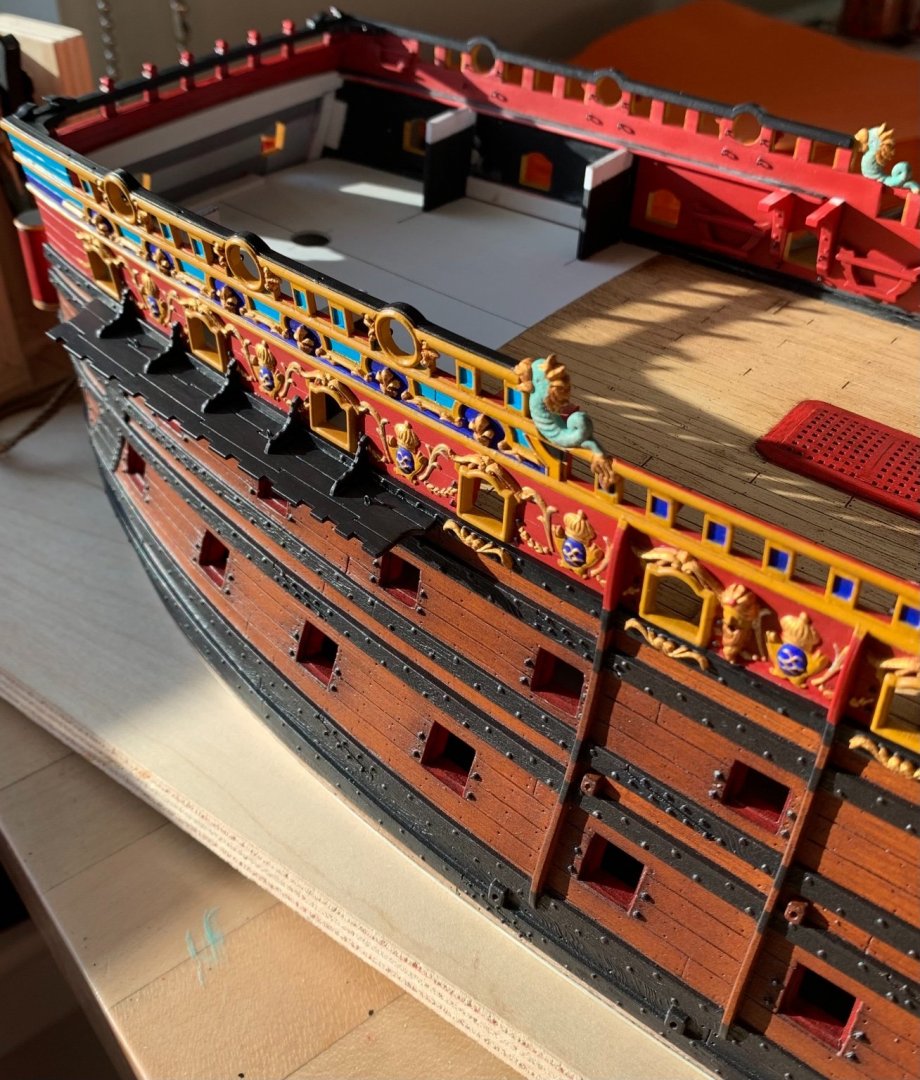
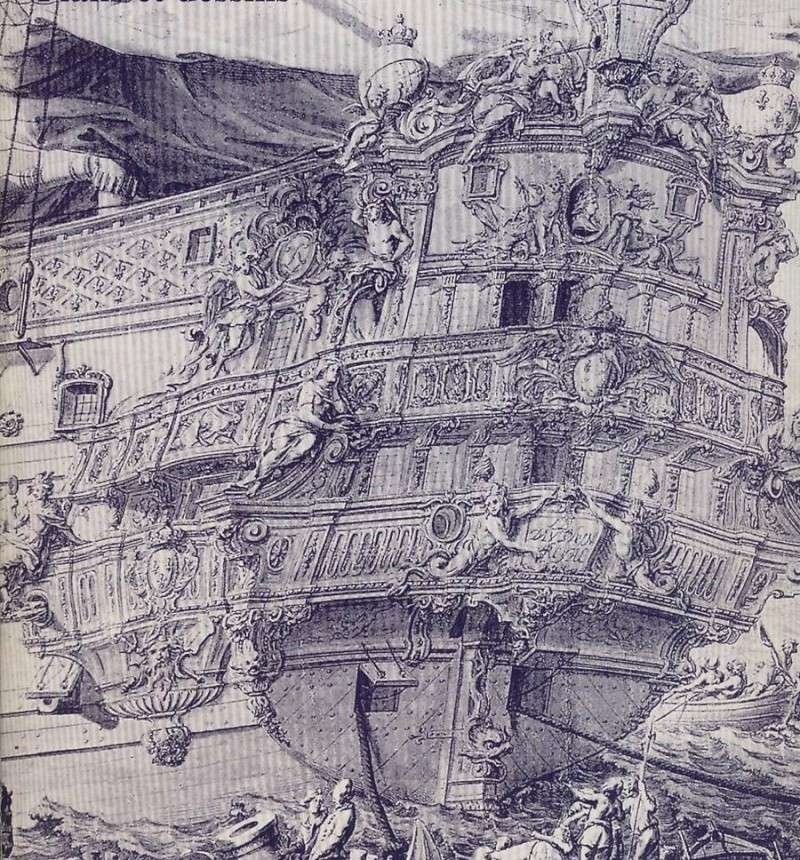
Thank you T_C and Eric! Well, it is interesting to attach names of artists to the one aspect of the original ship’s ornamental appearance that was well documented: the great cabin ceiling. Below, is the correspondence that details which artists were to be paid, and in what sum for the seven painted panels of this elaborate coffered ceiling: The survey of 1688 details precisely what these paintings were composed of: There are a couple of things about the ceiling drawing, apart from the artwork, that interest me. First is the aft-ward taper of the ceiling, culminating in the round-up of the stern. I have learned, over time, that this kind of drawing is often very precise and reflective of the true shape and reality of the thing in question. The other main example of this is Berain’s stern drawing which reflects the pre-1673 reality of SR’s wing-transom. That being so, it is really fascinating to me how closely the shape of the ceiling mirrors the aft portion of this drawing from 1679, by Etienne Hubac, which illustrates the ideal proportions of a first-rate ship: Unlike SR, though, the wing transom in Etienne’s drawing is shown below the stern chase ports, in accordance with the Reglements of 1673. Getting back to the ceiling, though, it’s shape is significant because the ceiling was preserved, during the re-build and then re-installed on the ship. This suggests that the framing of the ship, and her shape would not have changed much - beyond the reduction of her sheer-line - even if much of the so-called dead-works (above the waterline) was horribly rotten and had to be replaced. The other interesting detail of the ceiling drawing is the space and pilaster arrangement of the stern windows. There are five full openings and two half-openings at the ends. My Quebecois friend, Guy, believes that this may be why the Tanneron model only shows five stern windows, within the QGs. Given my position that Tanneron’s model is a hybrid between what SR 1670 may have looked like, and what SR 1693 probably looked like - that makes some kind of sense. Remember, though, that this ceiling drawing was made before the ship was taken to pieces. Personally, I believe those half-lights, at the extremities, were likely false-windows that appeared whole from the exterior; their framing would simply overlay the timbering structure of the ship’s sides. What this means is that the ship would appear to have 7 stern lights, between the open-walk quarter galleries. The early constructions of the First-Marine seemed to favor a profusion of stern windows, or at least the appearance of such. Along those lines, SR’s near-sister La Reyne, as drawn by the VdVlds in 1673 with 8 stern lights: Consider, also, this drawing if the DR of 1668, showing 7 stern lights: And the RL - also with 7 stern lights: As for Tanneron, as I have mentioned before, he seems to have consciously departed from the Berain drawings of Le Brillant and L’Agreable, when making his models of those ships. Very pertinent to this ceiling discussion is the Berain drawing of L’Agreable from 1697, which shows 7 stern lights within the QGs: Tanneron chose to model 5 lights: Similarly, Berain’s drawing of the coronation of Le Brillant’s stern is notably different than what Tanneron chose to model: Where is the lambrequin carving that should be beneath the central crown, and from which the swagged draperies hang down and frame Louis’ cameo relief? Why Tanneron chose these departures, I cannot say.

- 2,444 replies
-
- 10
-
-
- heller
- soleil royal
- (and 9 more)
-
I appreciate the thoughts there, guys. Thank you very much.
- 2,444 replies
-
- 4
-
-
- heller
- soleil royal
- (and 9 more)
-
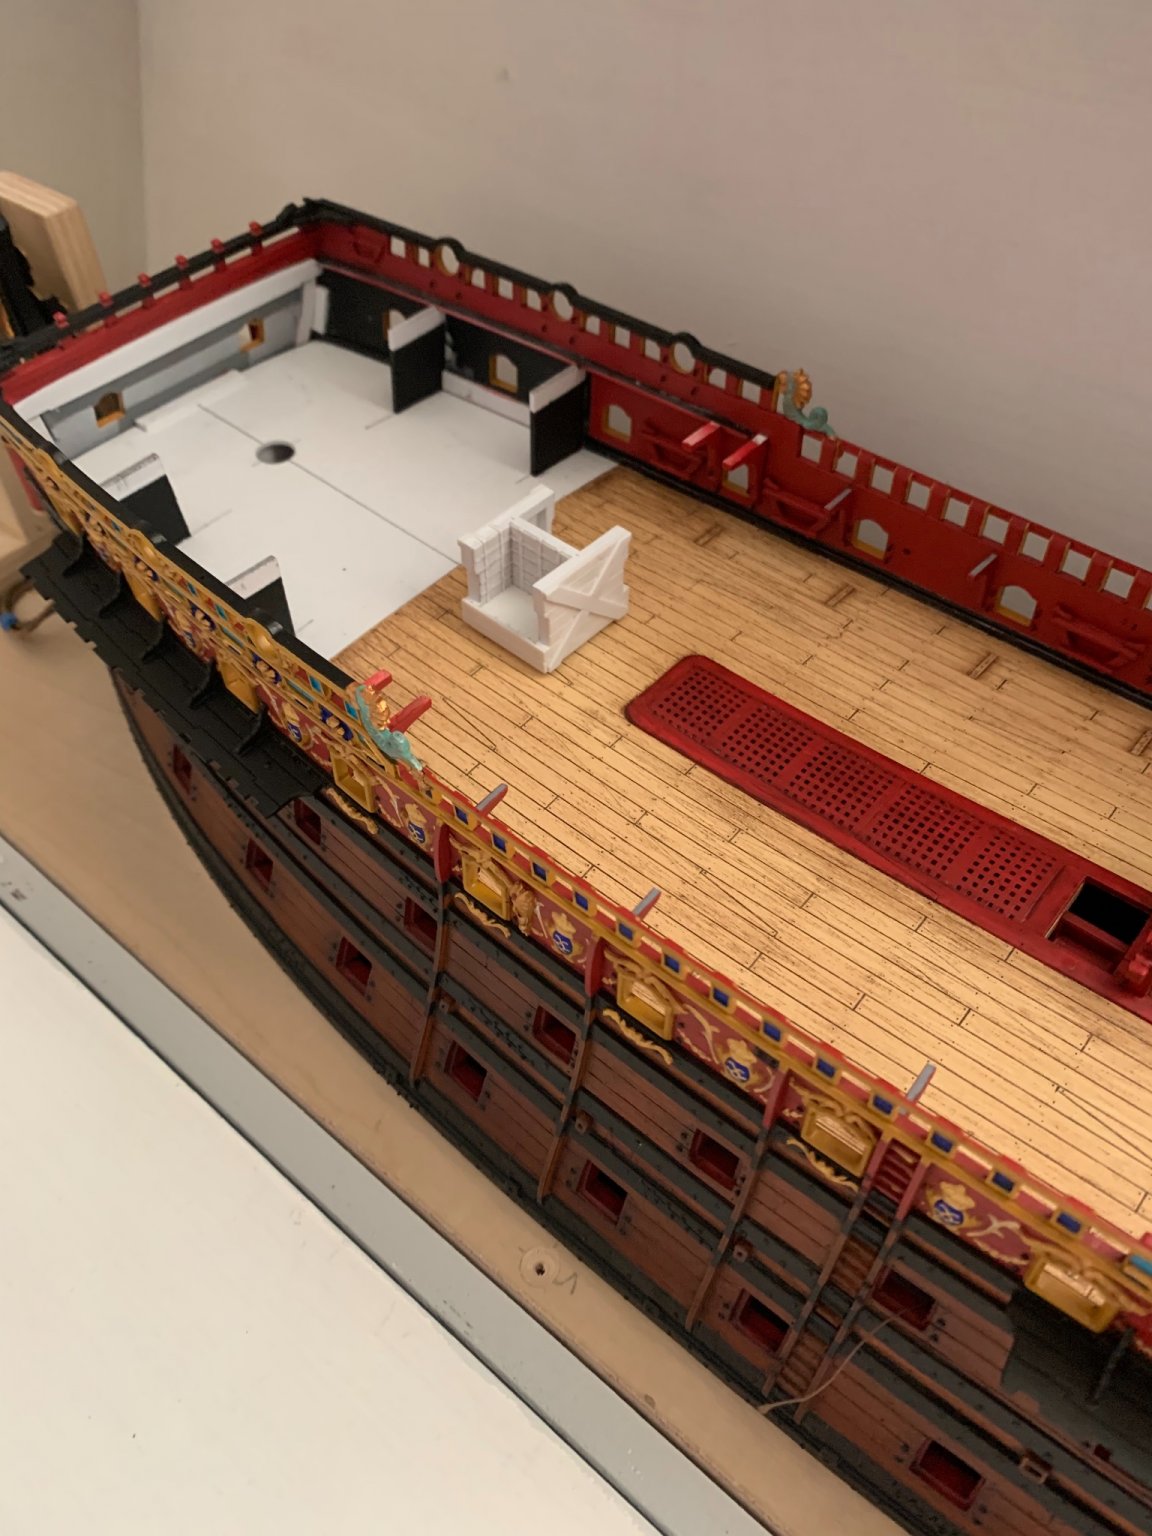
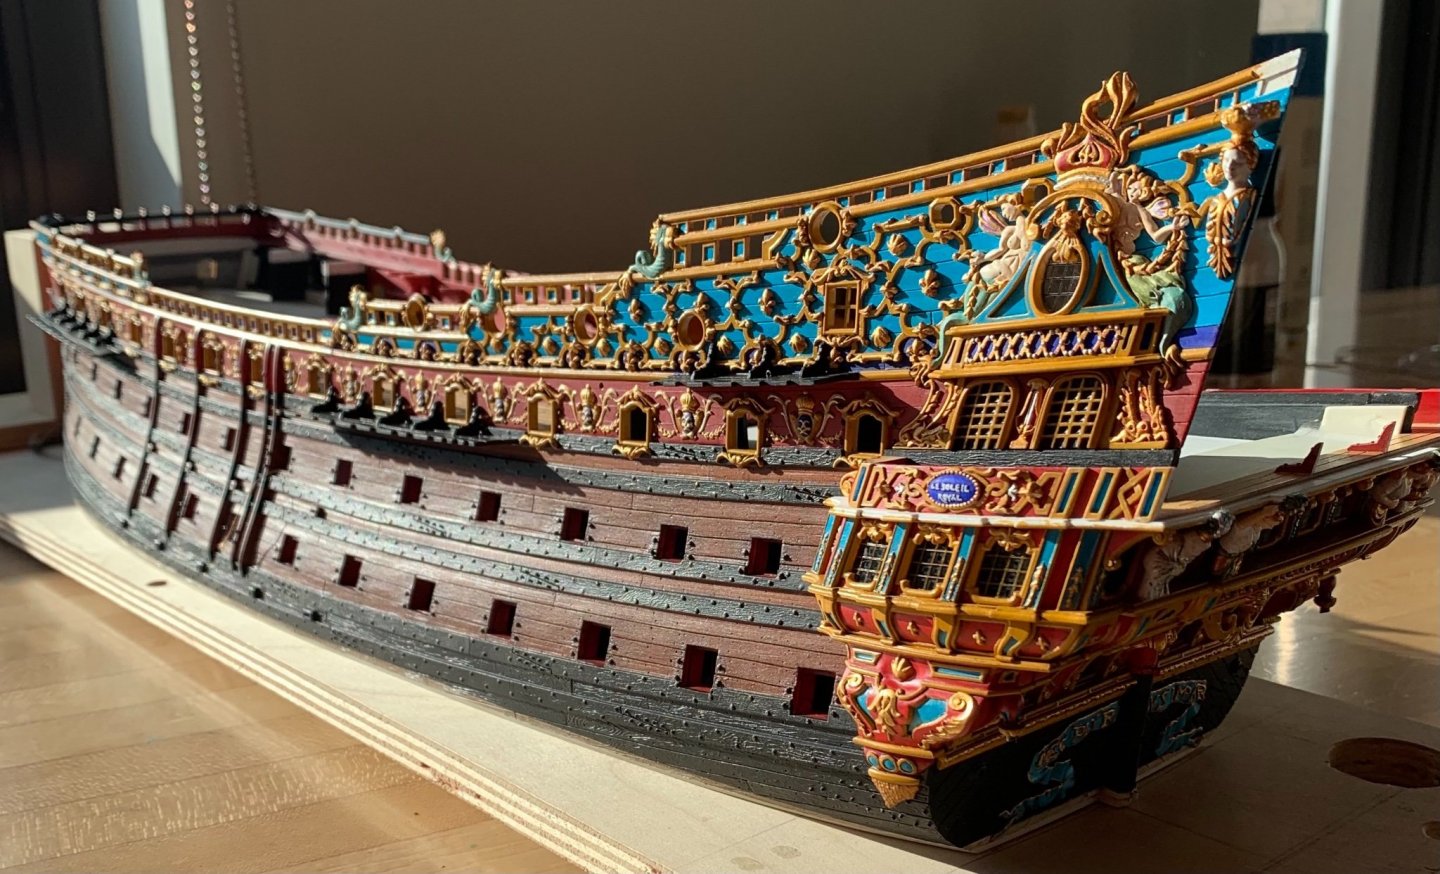
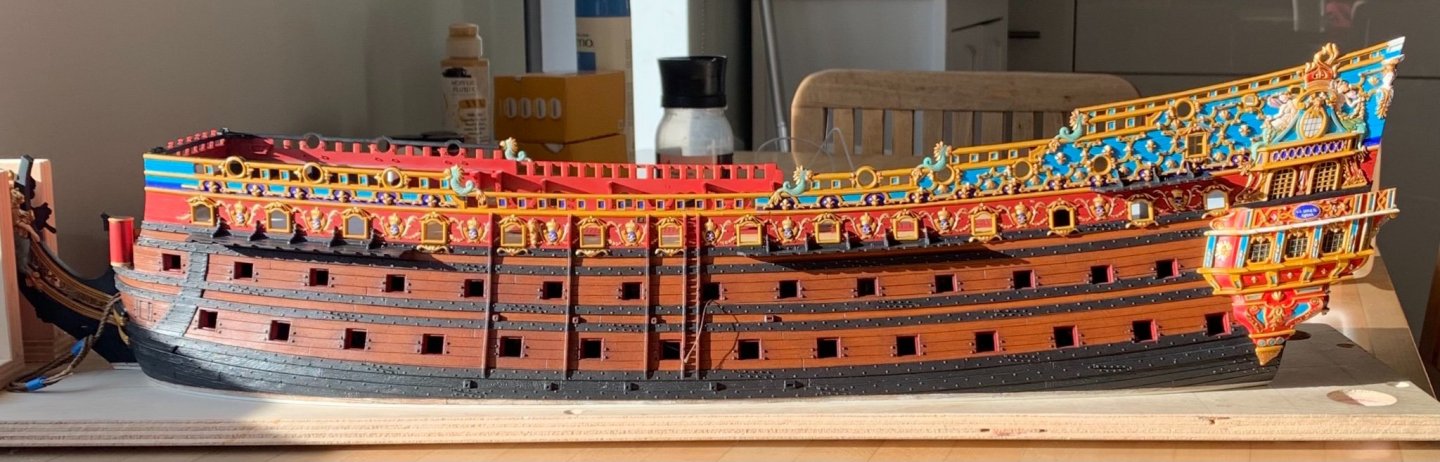
From a life standpoint, my sister and I have made tremendous strides in sorting out our father’s affairs, and our current biggest hurdle is getting approval from his long-term care insurer for assisted living. Steadily, we are getting there, and I appreciate those who have asked, just as I appreciate everyone who comes to visit me here. I have managed to sneak-in a few hours, here and there, and I have completed all of the port side buttressing knees of the channels, and I got everything nicely re-painted and pretty. In general, lowering the channels pretty dramatically changes the whole aspect of the model, and the difference is pleasing to me: The mizzen channel knees were challenging to cope over mouldings and around the fleurs, but I am happy to have lowered them to here, where there is less interference with the frieze: I am using this portrait of the DR, circa 1680, as justification for this placement: I continue to comb through the archives, but I have yet to find anything vividly descriptive about the ship’s pre-refit external appearance. Despite the beautifully florid cursive, I’ve come to realize the hard truth that the letter writers and record keepers of 17th C. France were basically clerks. Mostly their correspondence has to do with SR’s comings and goings; armaments and dis-armements; payments made/owed to painters and sculptors; cost estimates relating to her refit, etc. It is all fascinating, and it will all get its due mention in my book, but it does not help me paint the picture of the ship. Where are the artists sharing their wonderfully descriptive observations, when you need them?! What I’m hoping to find is something along the lines of this: ”The morning fires shone brightly upon the gilded ornaments of Soleil Royal and her heights rose up and became one with the azure sky. The warrior of the Americas clung resolutely to the port side, while that of Africa peered off in the middle-distance - daring his lesser adversaries to emerge from the morning mist. Presiding above, with shimmering rays of gold and silver gilt bursting past his golden chariot is the Sun King, himself…” And, so forth. It must be out there, somewhere, right? Anyway, I can now get busy with fitting and prepping the starboard upper bulwark for paint. I can also go ahead and design my stove - that will make a nice little side project. Before long, I can design and make the next tier of stern lights, which will enable me to finish off the wrapping stern walk. As always, thank you for your likes, comments and for looking-in. More to come!

- 2,444 replies
-
- 27
-
-

-
- heller
- soleil royal
- (and 9 more)