Keith Black
-
Posts
6,766 -
Joined
-
Last visited
Content Type
Profiles
Forums
Gallery
Events
Everything posted by Keith Black
-
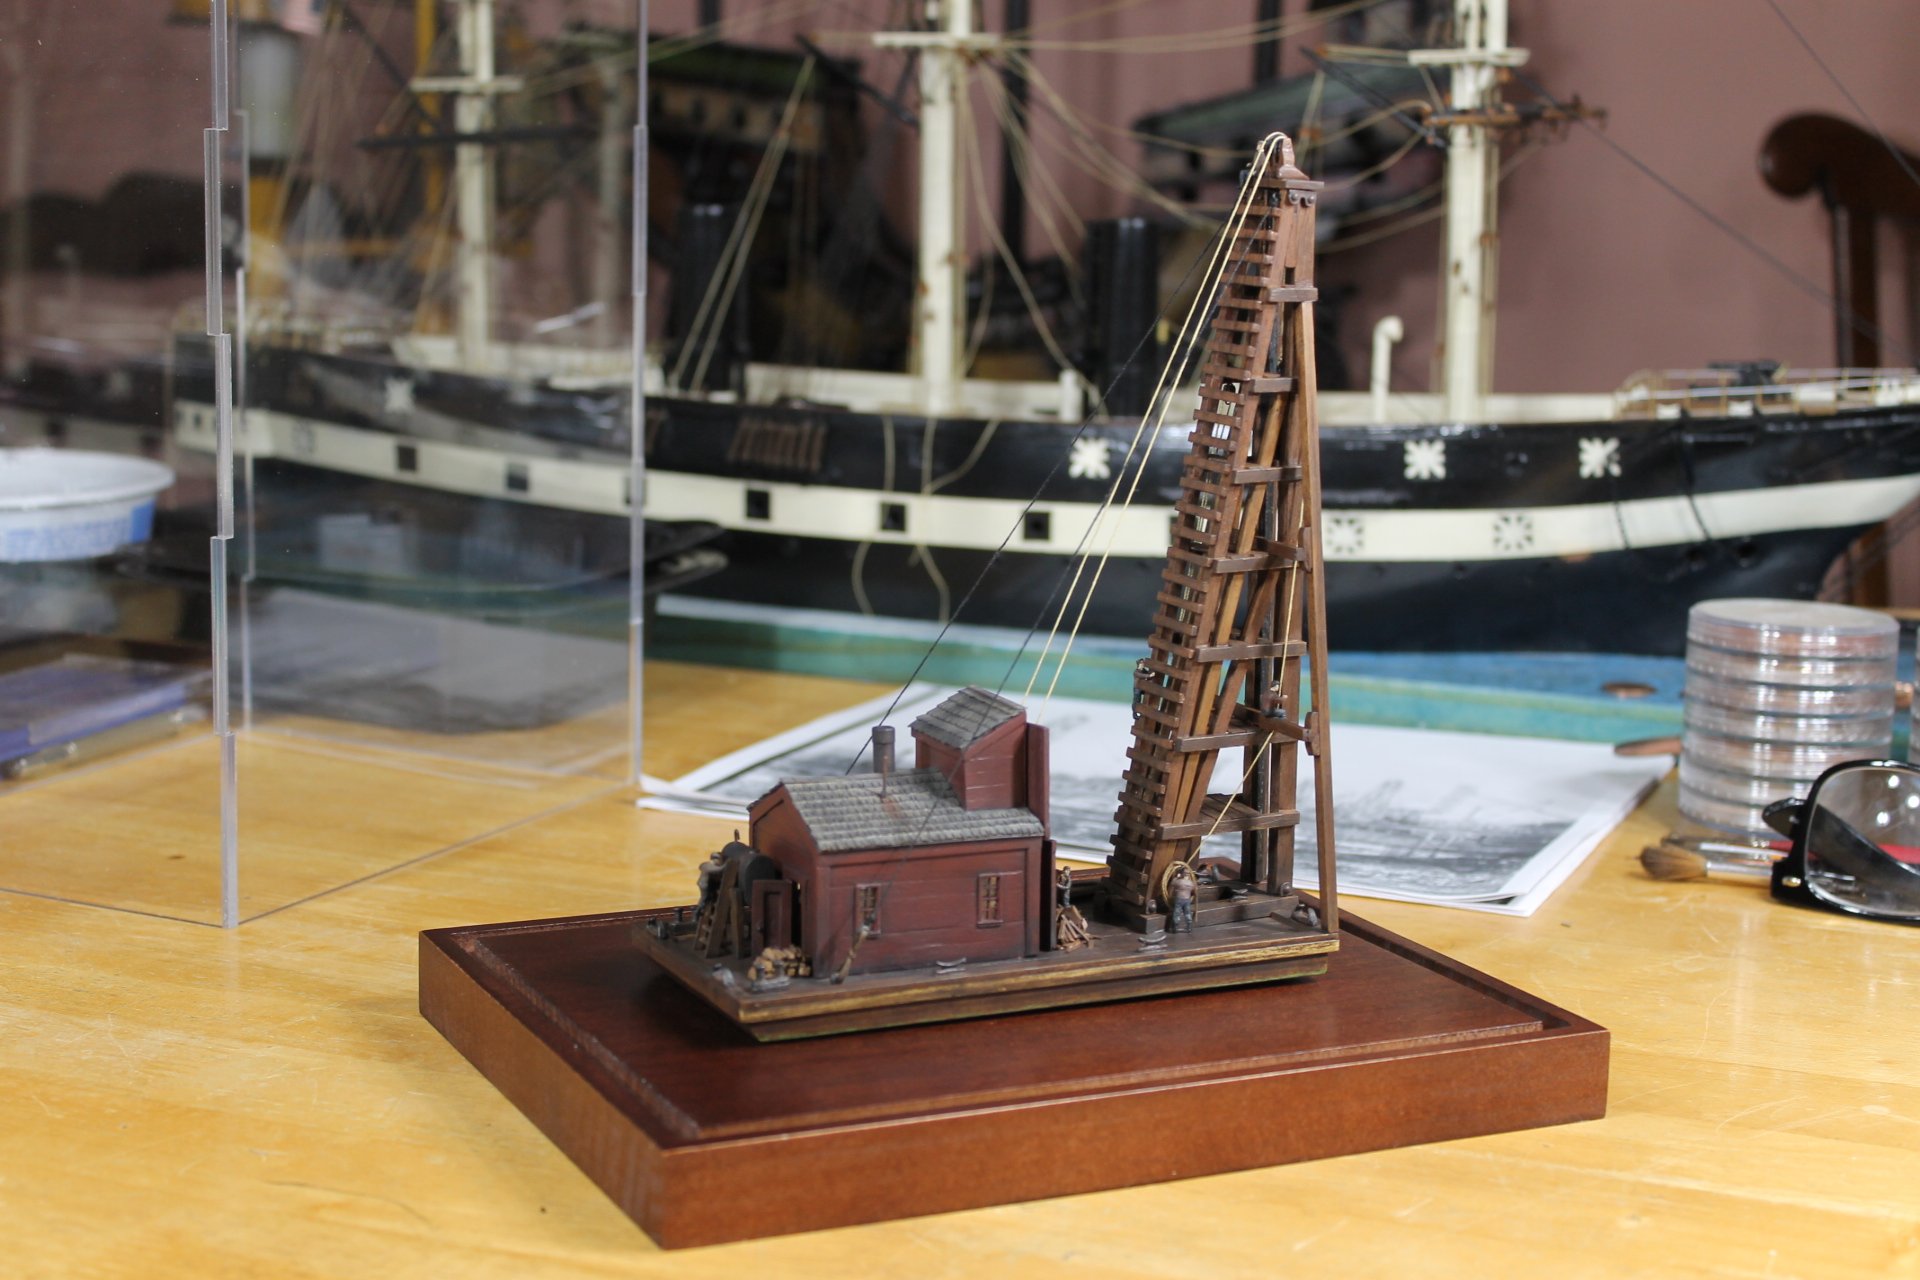
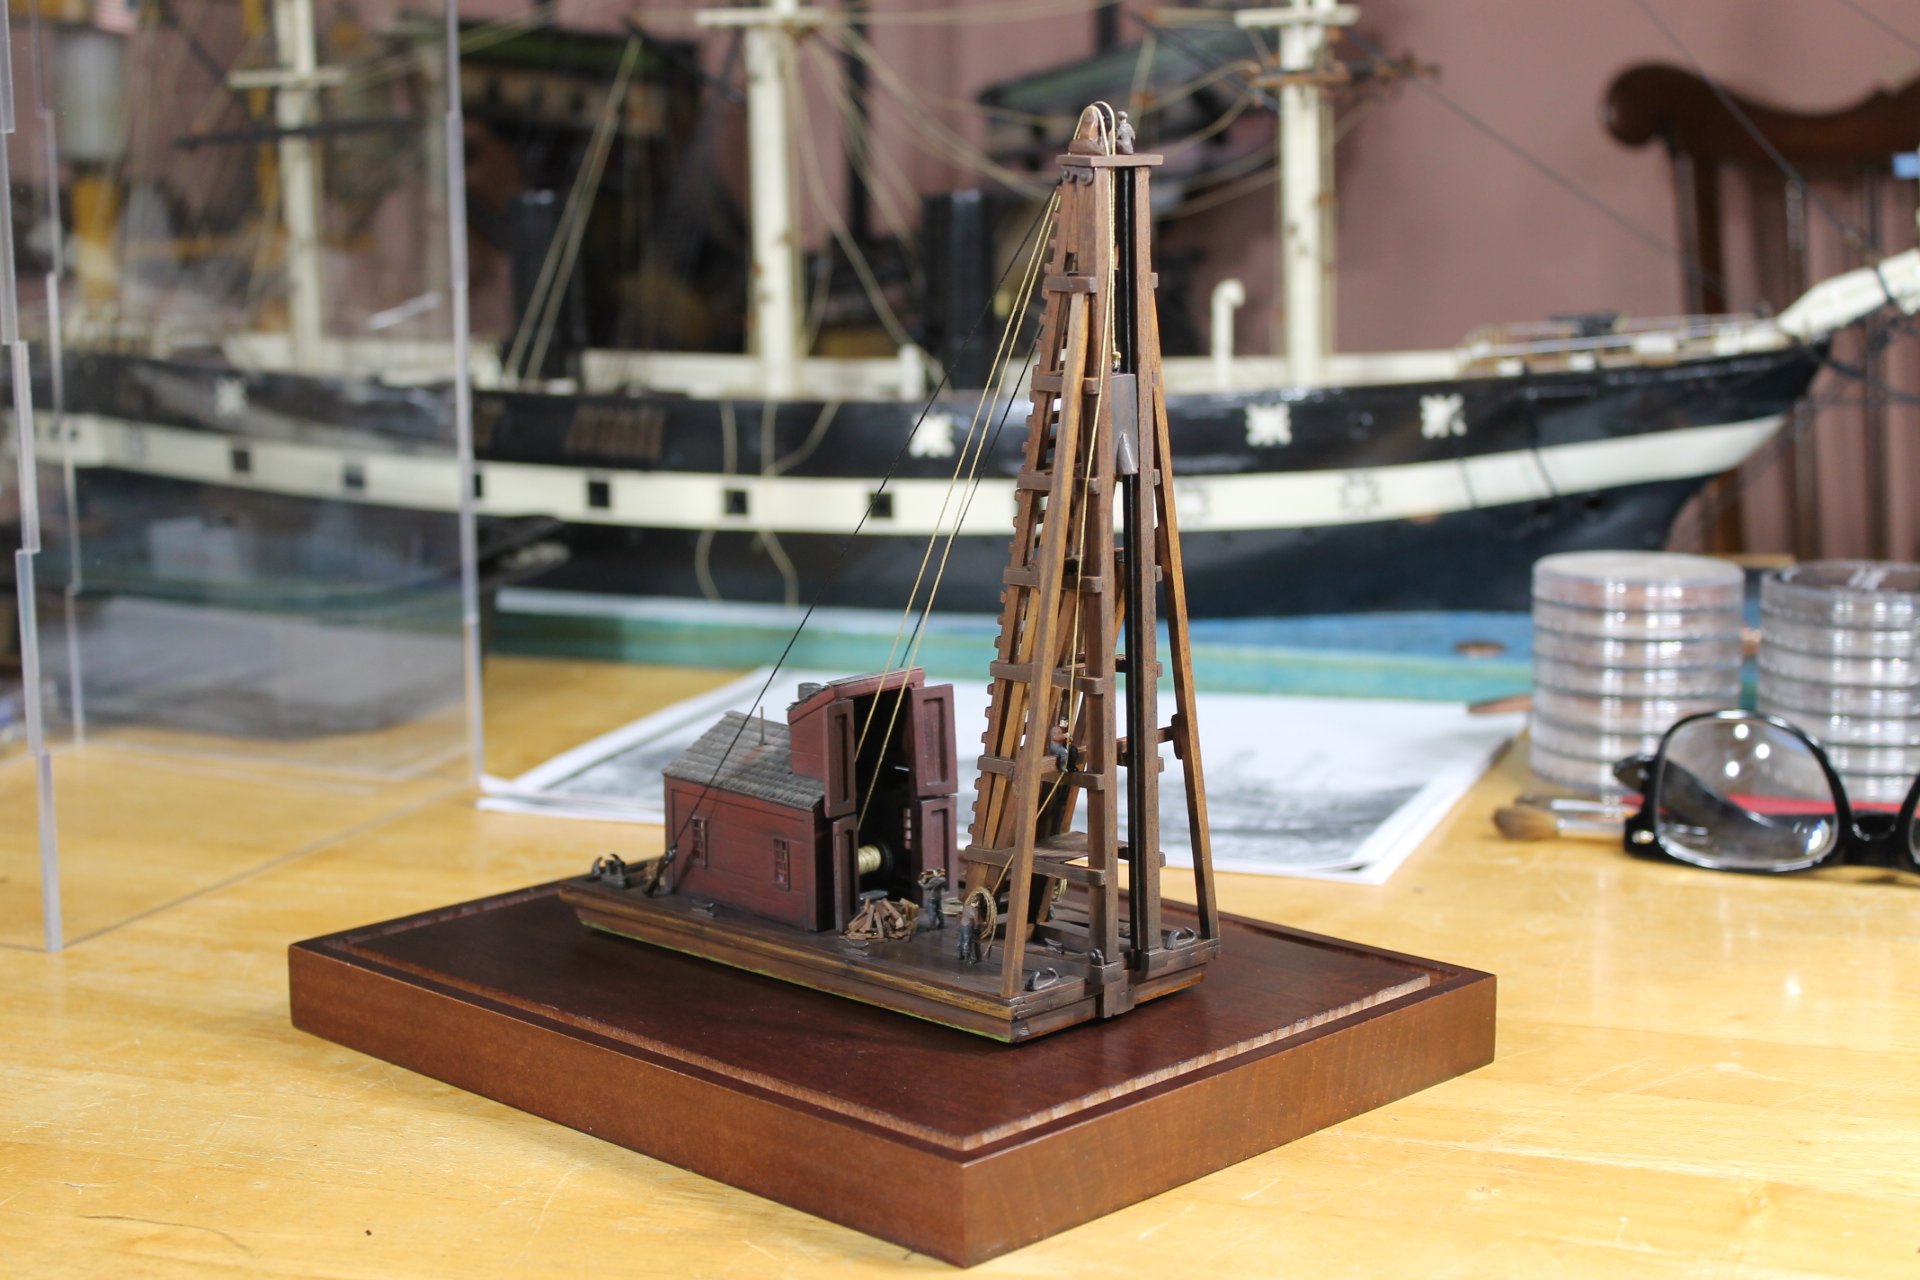
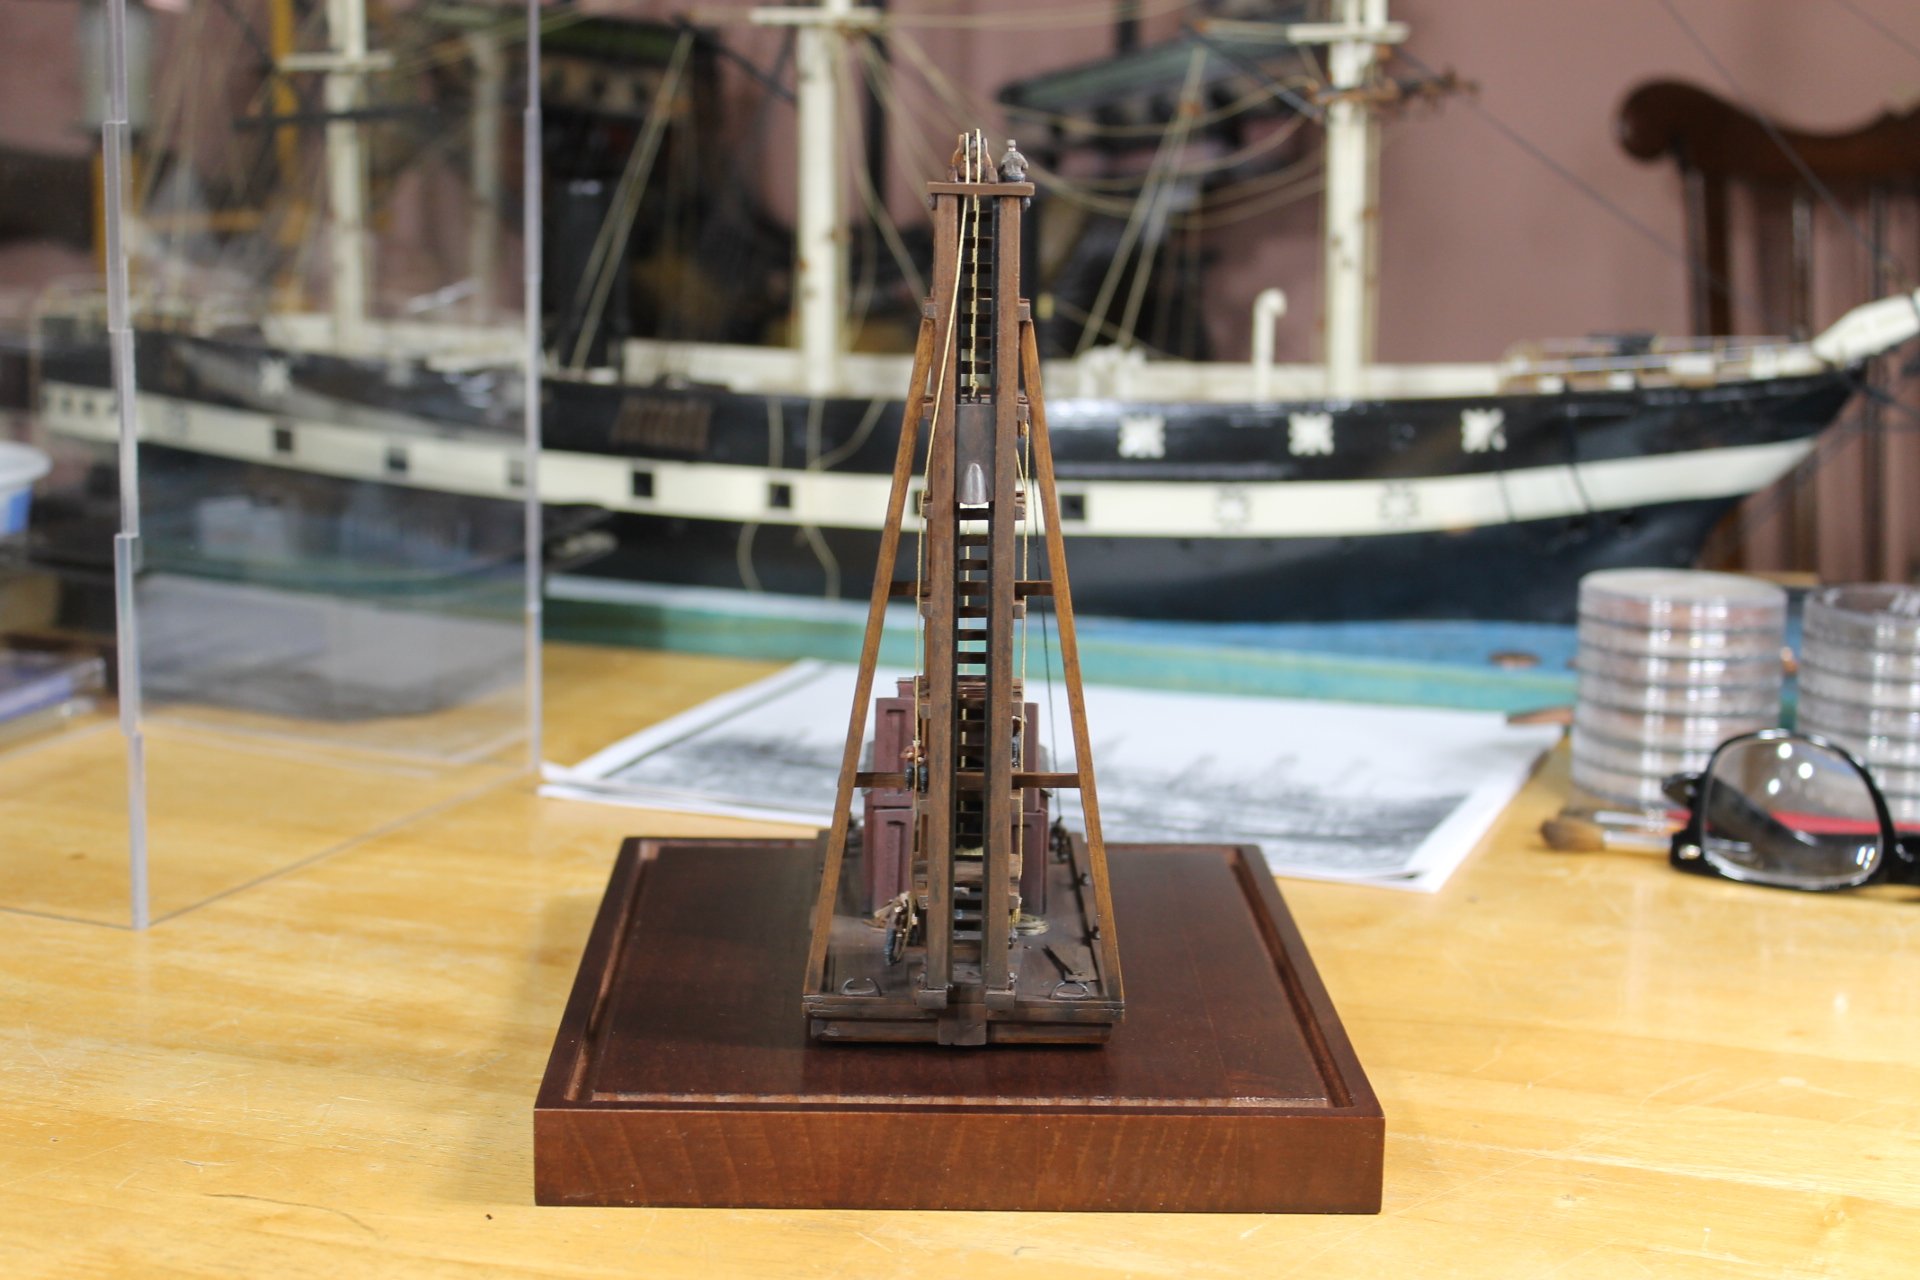
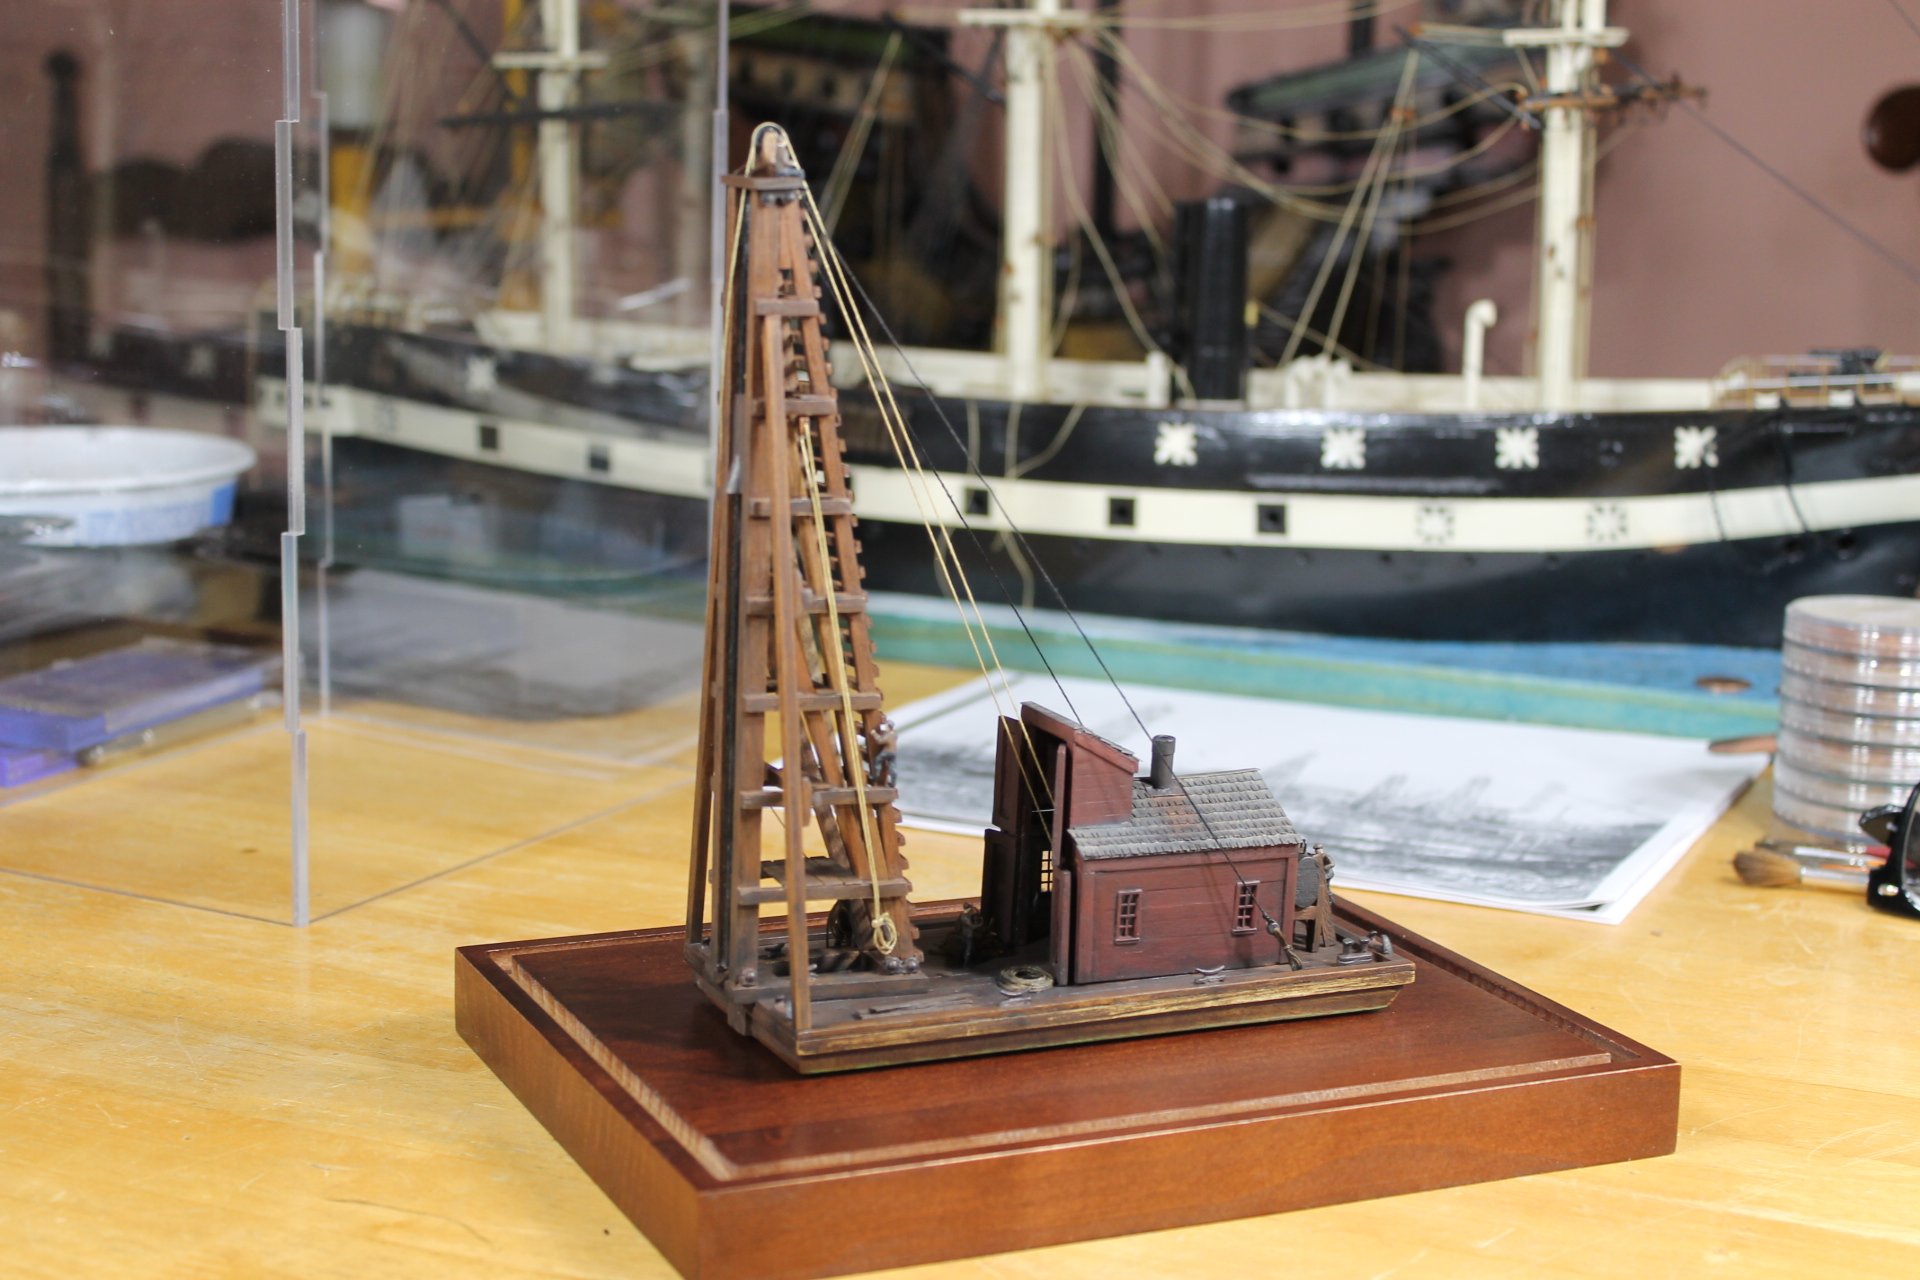
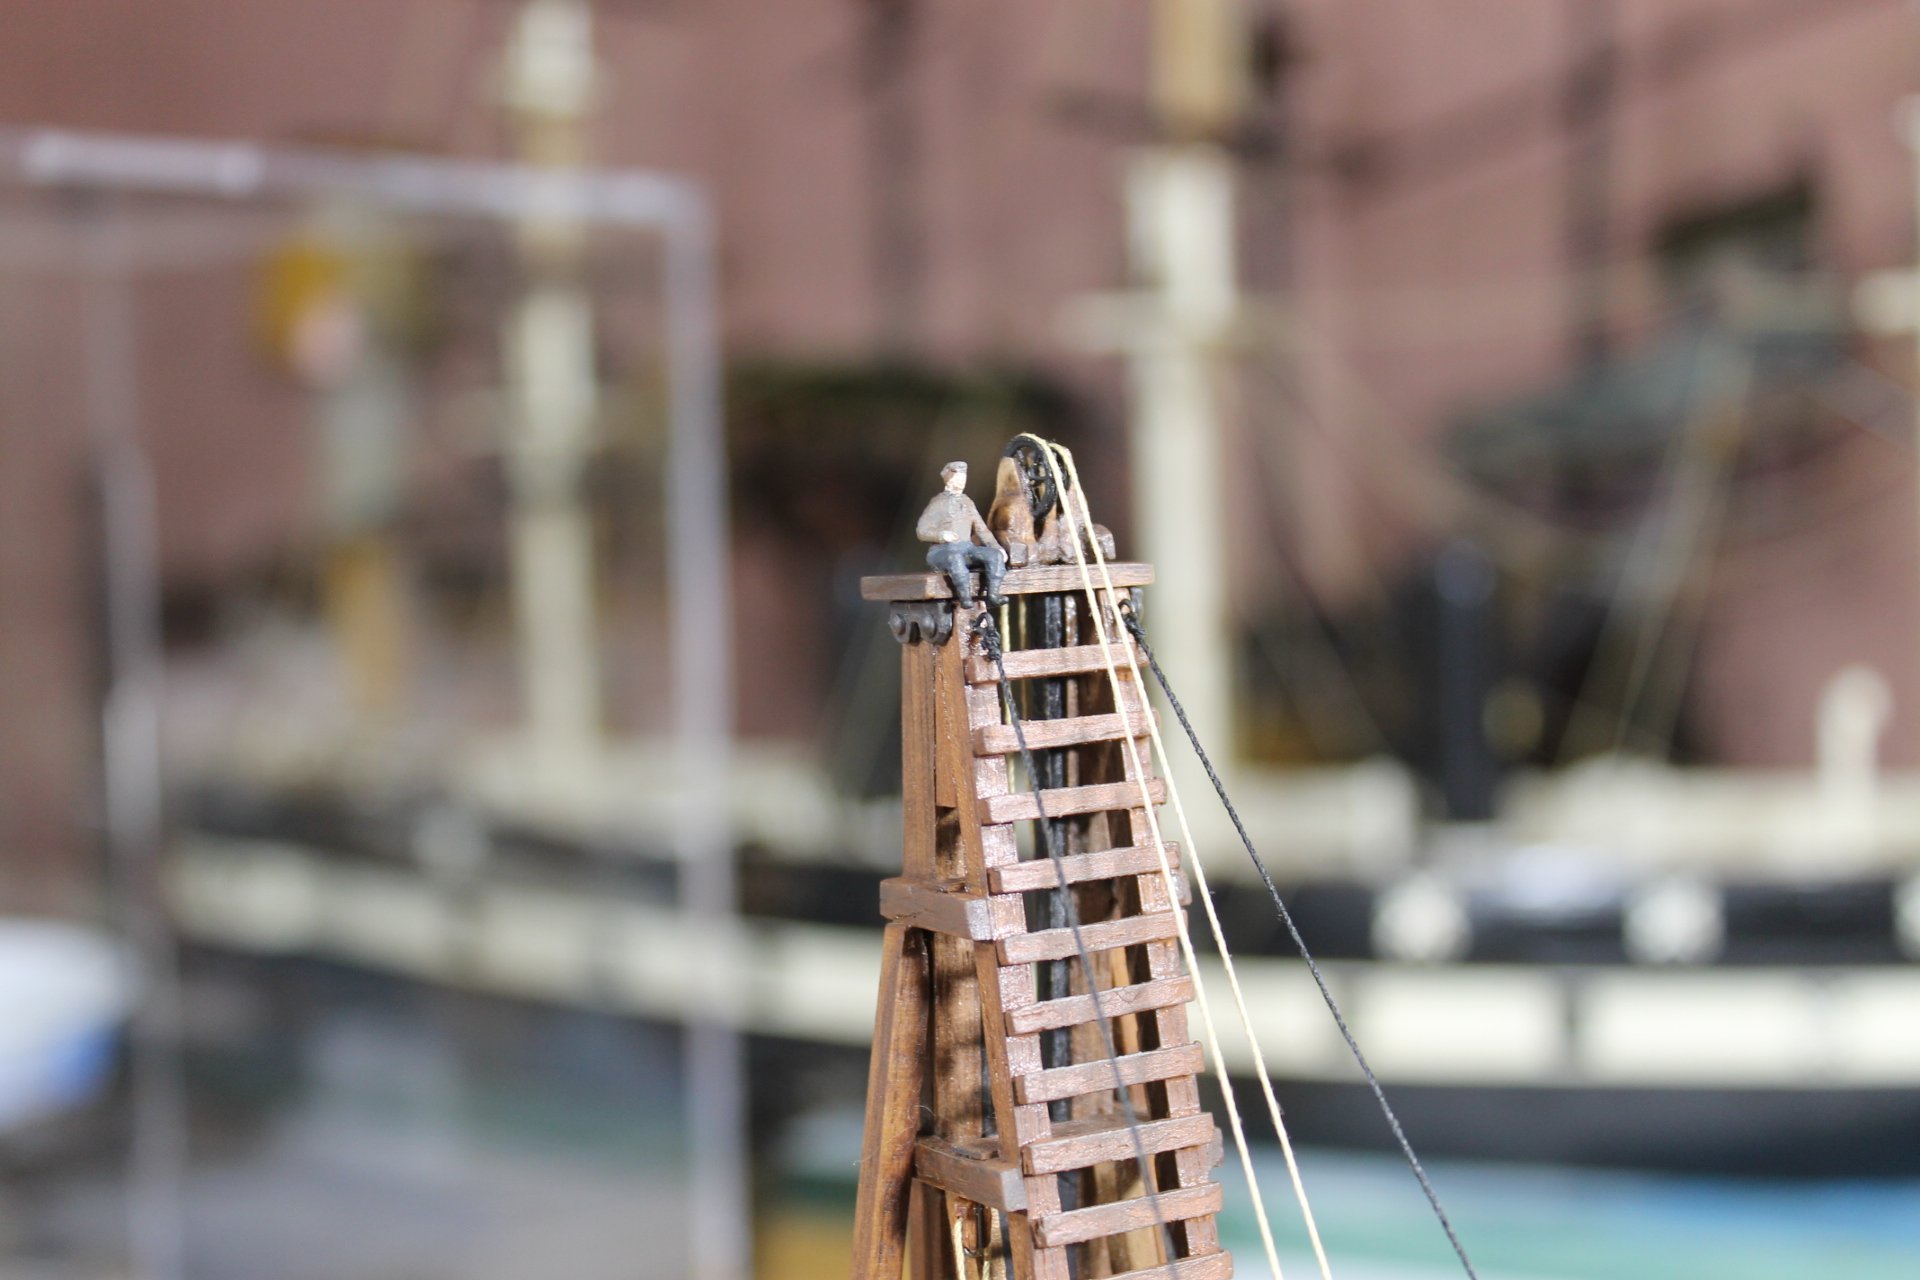
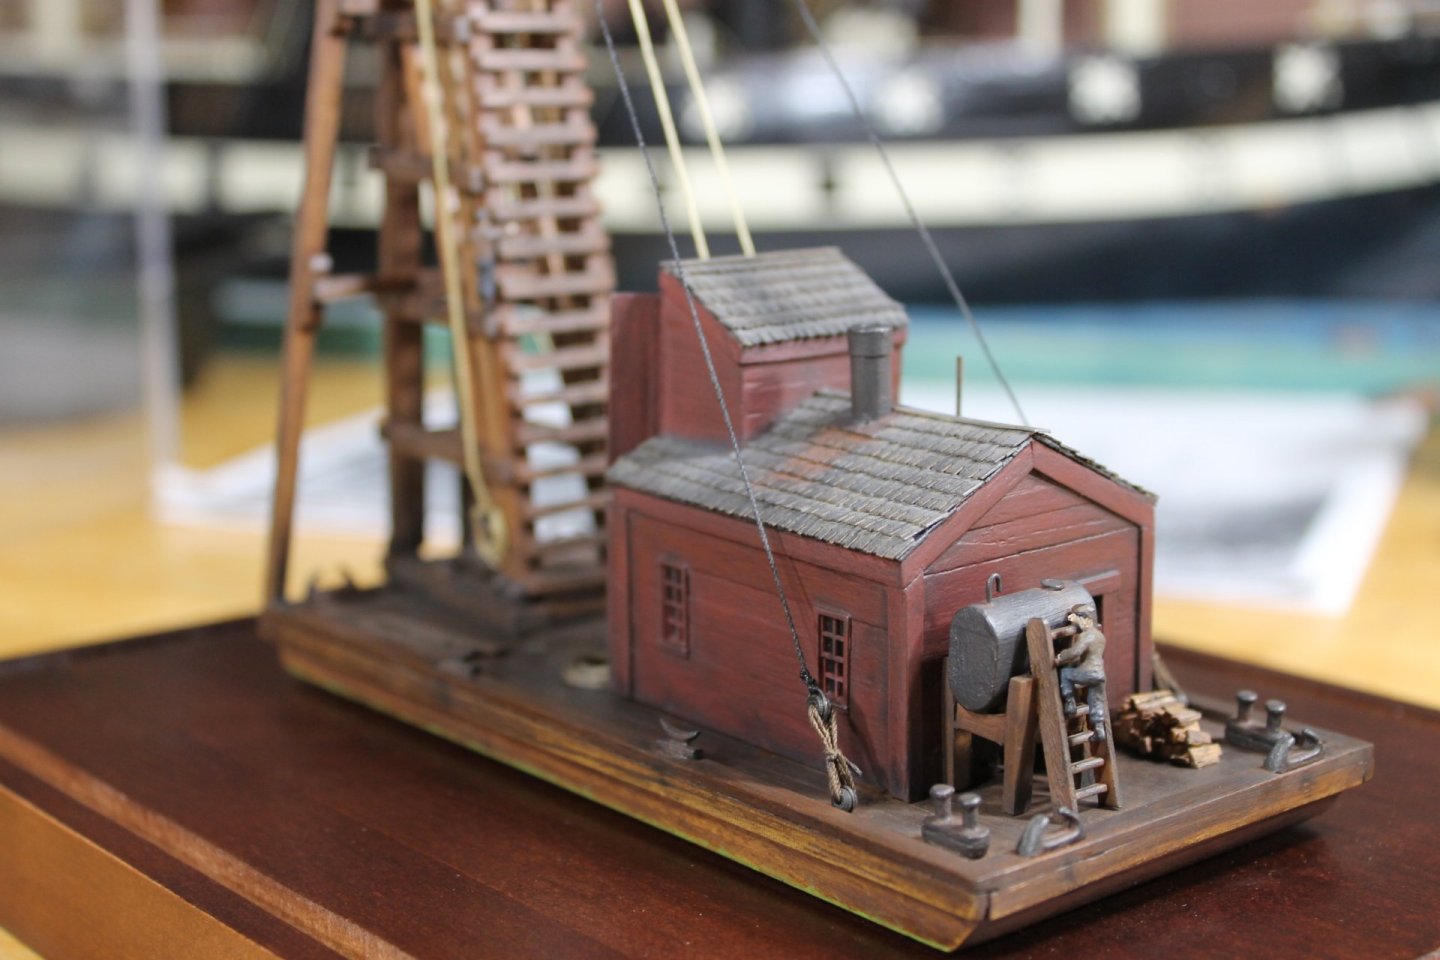
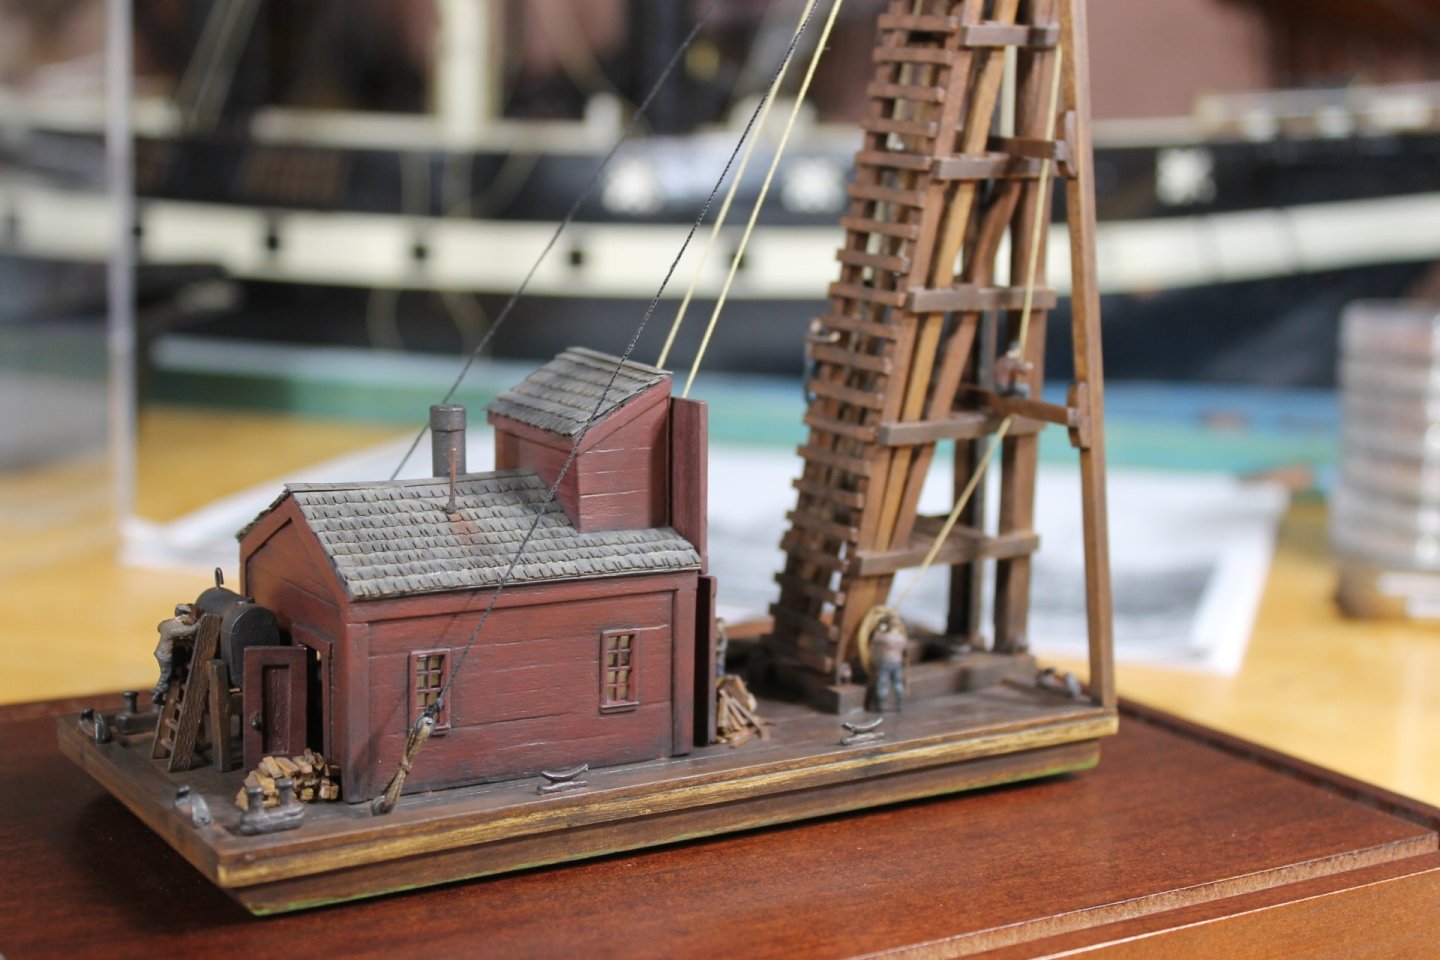
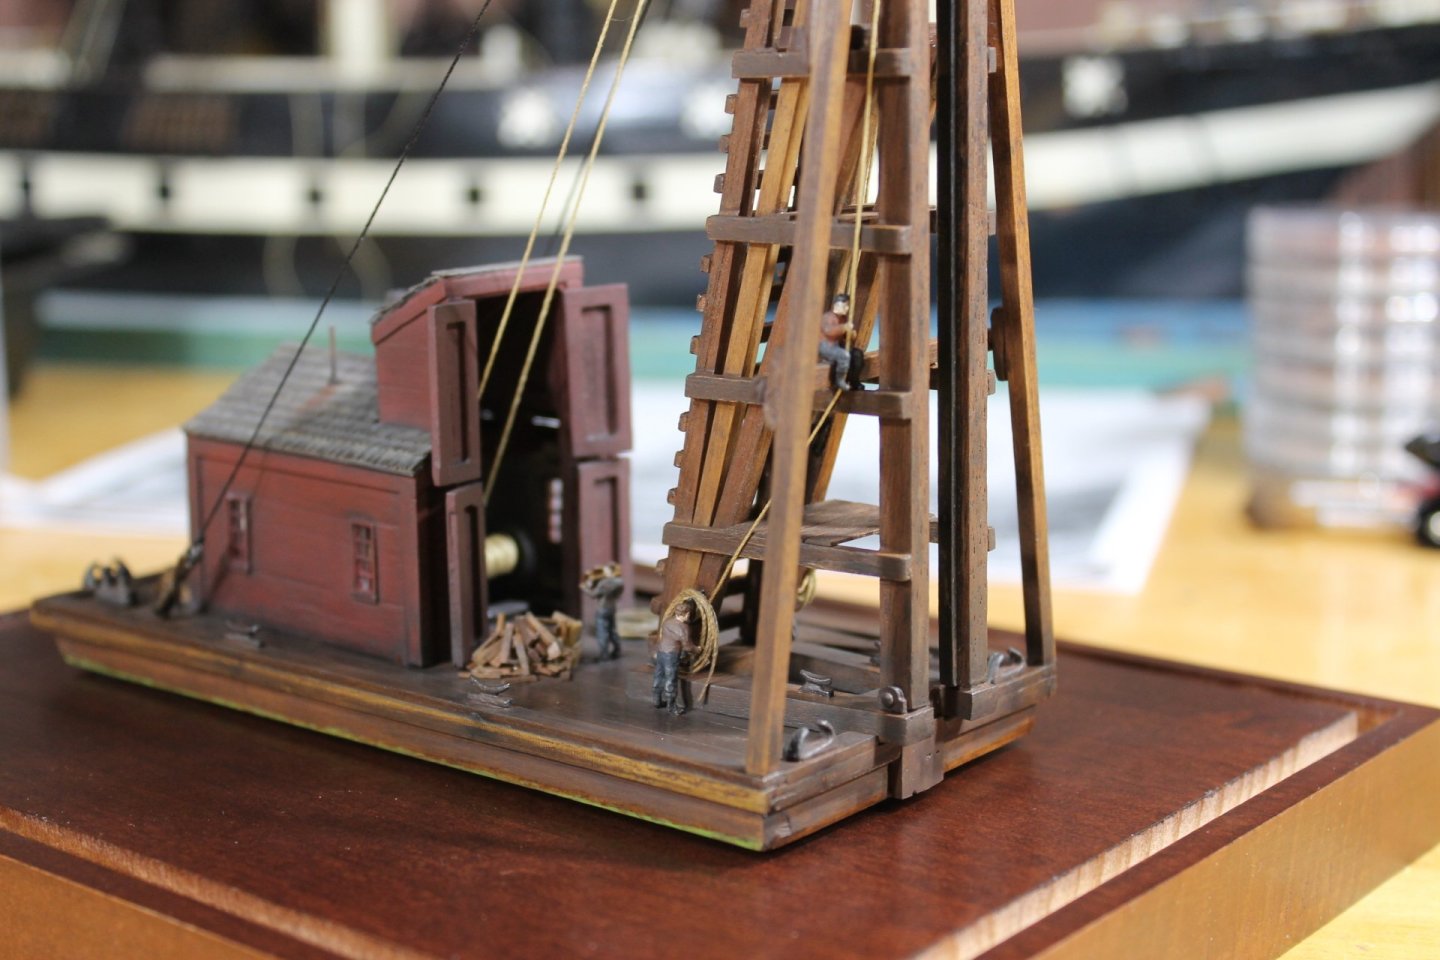
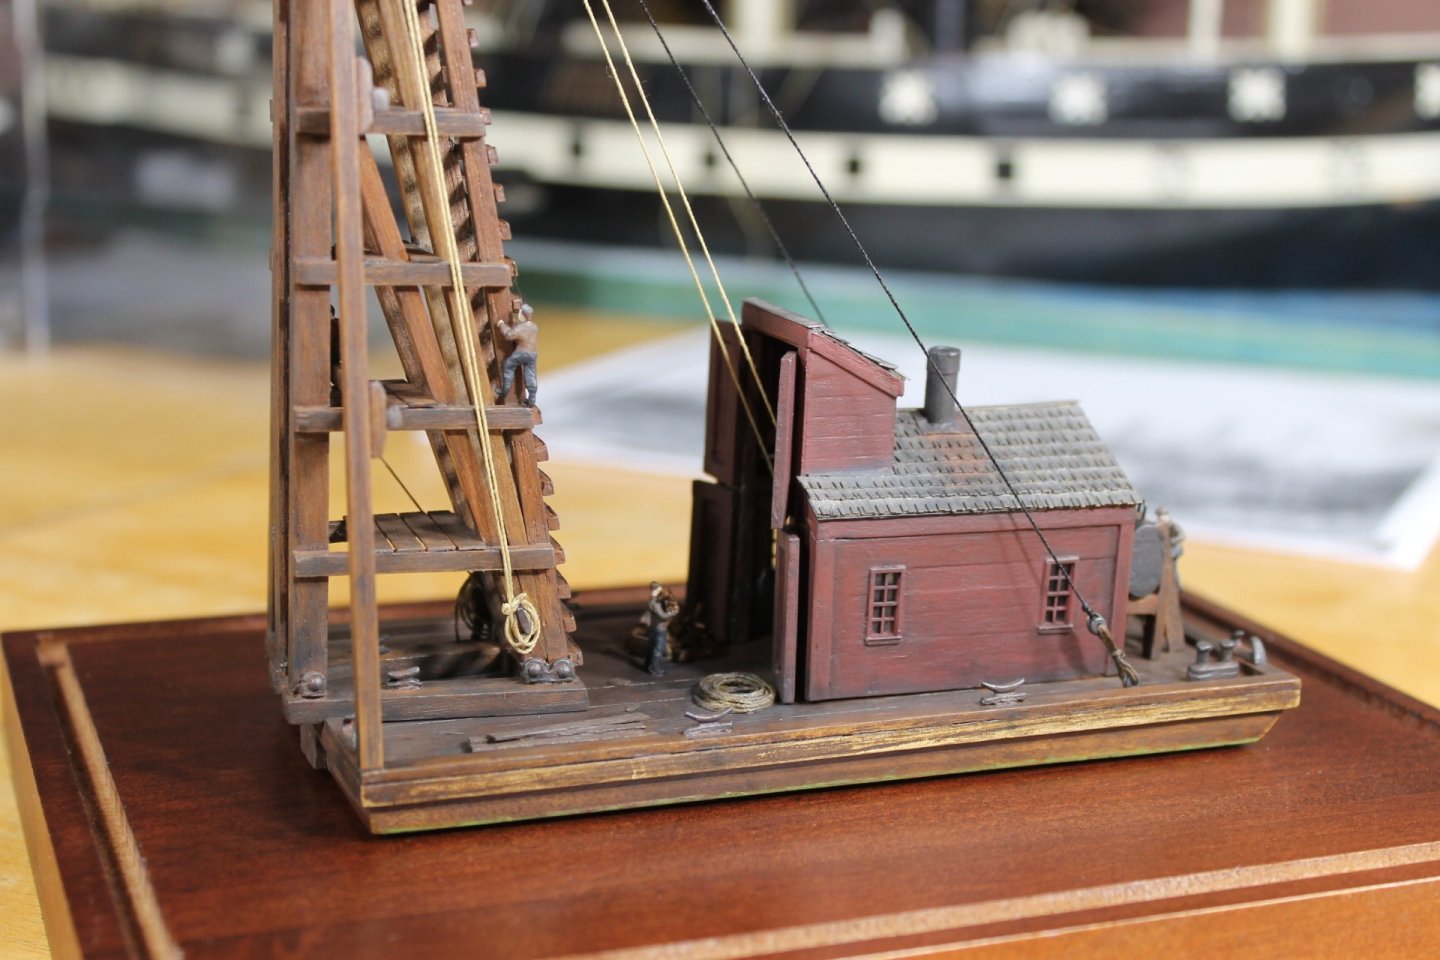
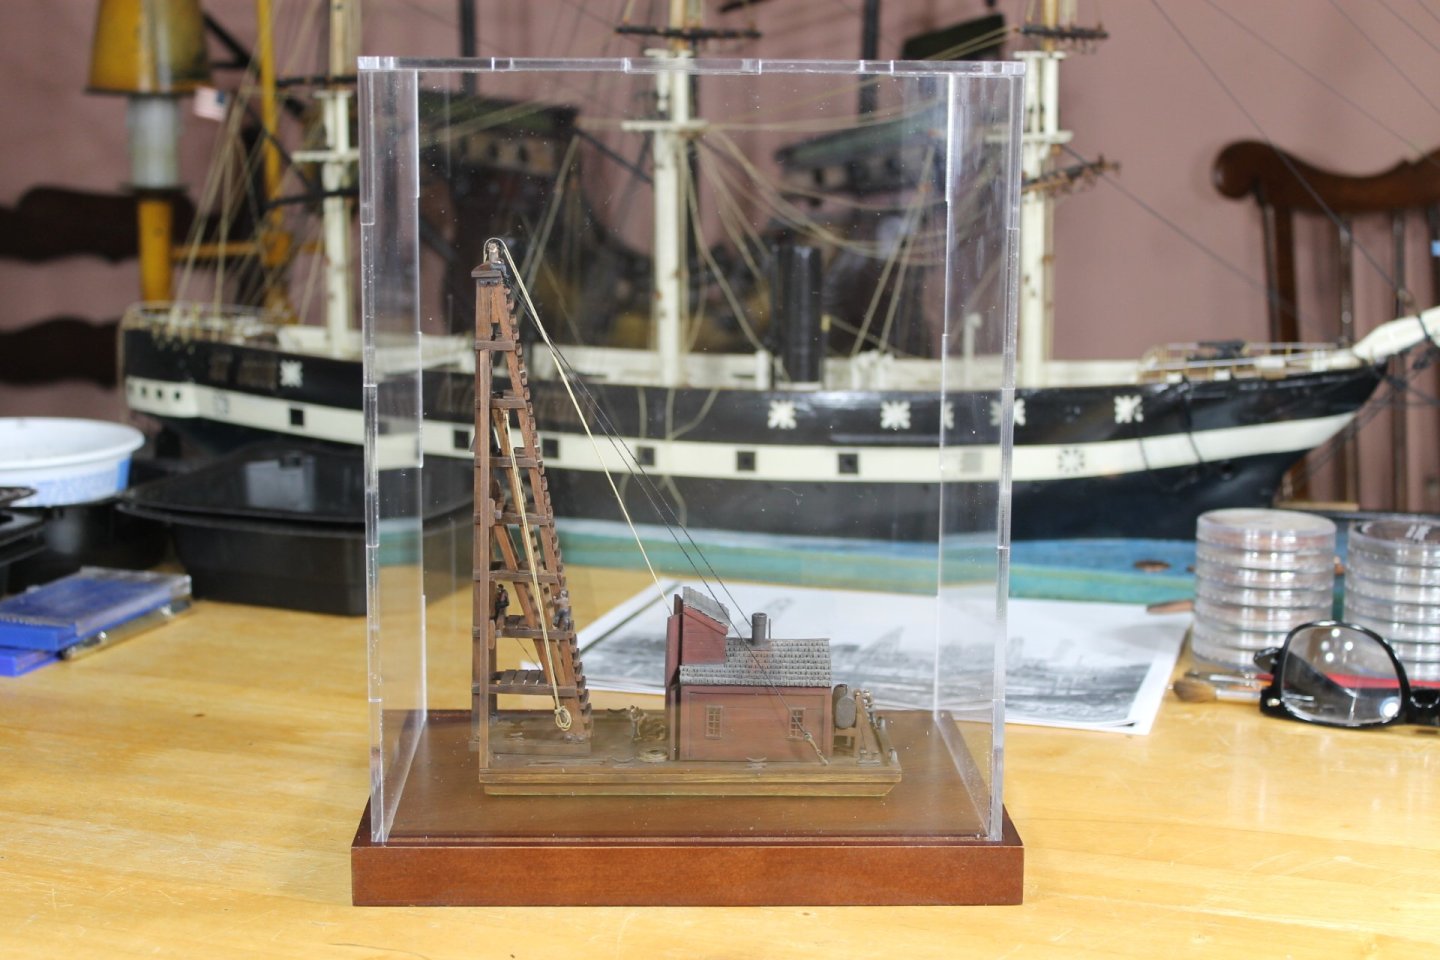
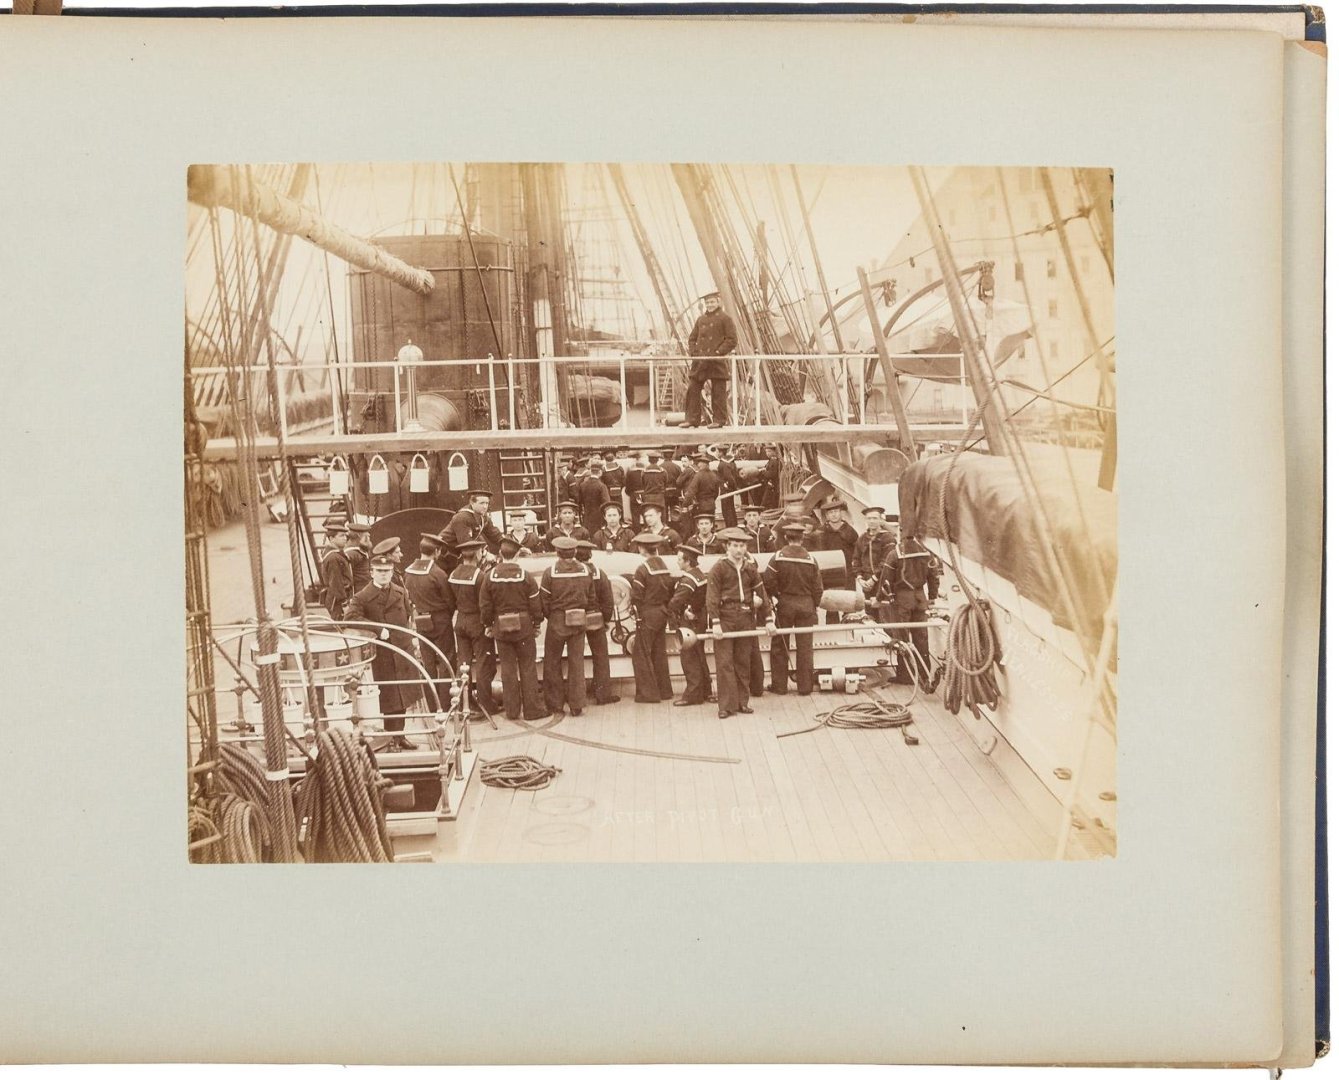
 Thank you, Grateful. By chance is there a 63 Chevy parked inside your garage? The reason I ask is the 409 in your screen name. Gentleman, this project is completed. I want to say a special "thank you" to, Dan Kimmer, @Daniel Kimmer for providing me with the wood and the push that started this project, to Gary, @FriedClams for providing the sheave wheels that sit atop the pile driver, and to mcb, @mcb for providing the invaluable historical pile driver photos I so heavily relied upon. And I want to say thank you to everyone who followed this Wonky Donkey journey, your supporting comments and likes has been absolutely amazing! Thank you so very much. I added the six pile buck figures completing the seven man crew including the donkeyman. As they were originally navy figures I had to carve away their uniforms. There were times when the #11 blade was used with tad too much force and a head broke off and an arm plus one guy lost both hands. I didn't add the ladder, maybe another time. I consider the project a success as I think I was able to build a fairly accurate portrait of a floating pile driver. The story I'm trying to tell with the figures is... Lula is in route with pilling and during the downtime the crew is making sure everything is up to snuff before Lula's arrival. Climbing up to check the boiler water level. Carrying in firewood for the steam boiler and checking the friction drum line for potentially dangerous wear. Climbing up to inspect the tower ensuring all's well. Elliot (the donkeyman) set this young man up to the headlog to inspect the sheaves and pillow blocks. I bought a super cheap case off Amazon ($28.00) to help keep things tidy. And that's it guys. Again, thank you so very much for your support during this build. Keith
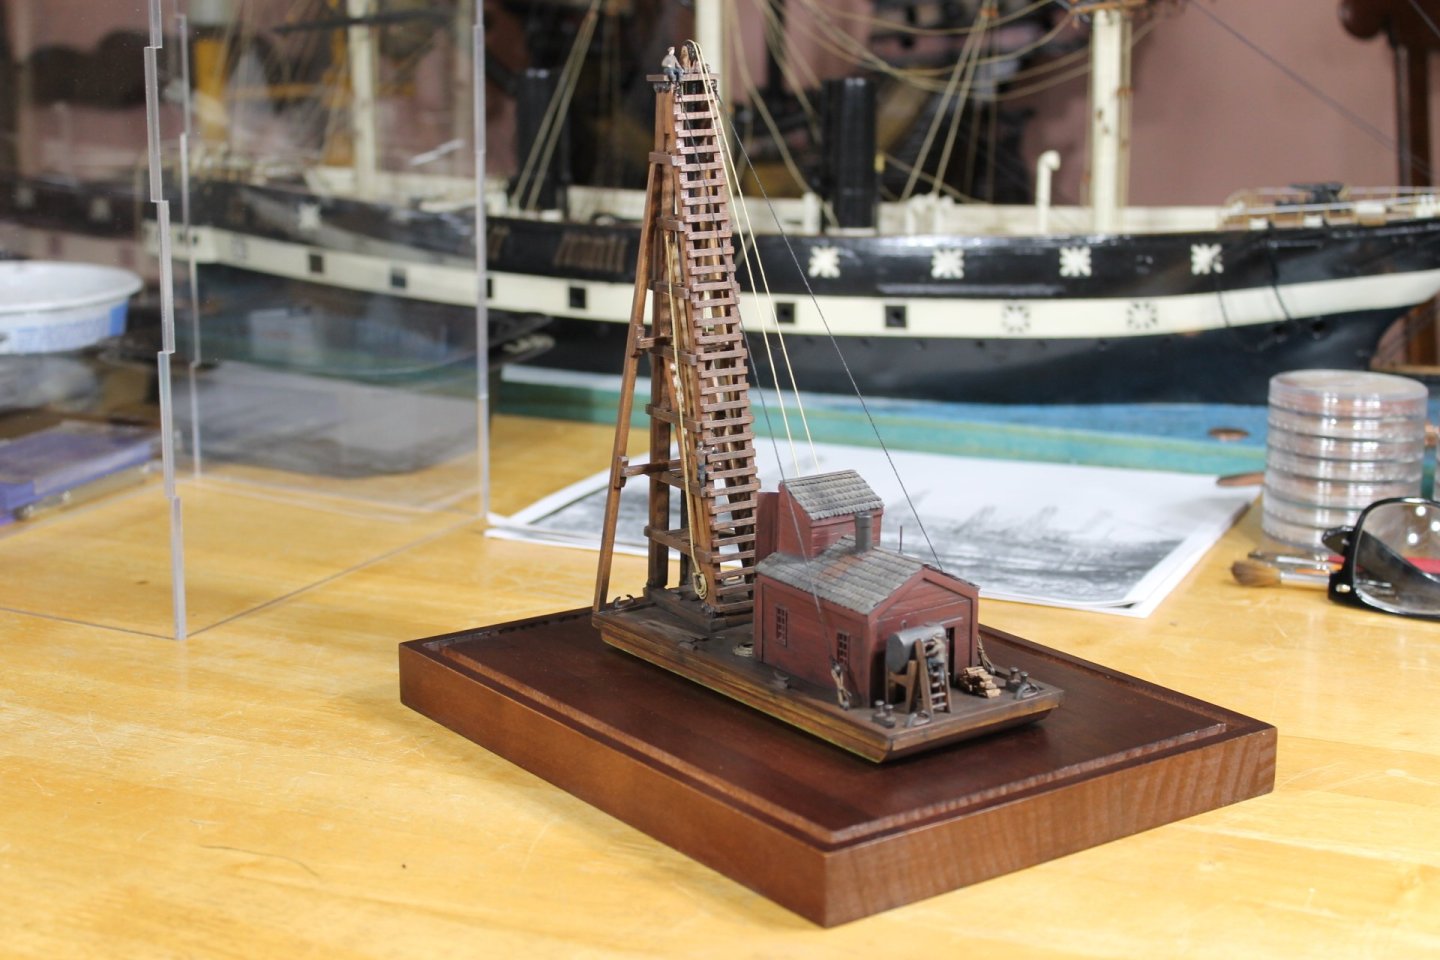


-
That's great news, thank you. Supporting the NRG by becoming a member helps keep our beloved MSW afloat.
-
You're not that far away. We'll have to get together sometime.
-
You must live in Michigan, where bouts? The pile driver is unique.
-
Welcome to MSW. Glad to have you aboard.
-
This post contains those sites I've come across during my researching for the Lula build that I felt were well worth mentioning. Hopefully they'll be of use to others. Keith https://collection.sciencemuseumgroup.org.uk/search/categories/marine engines?page[size]=50&page[type]=search&page[sort]=default https://www.hrmm.org/history-blog/previous/21 http://www.islandnet.com/~westisle/History/horizeng.html https://www.naval-history.net/WW0Book-Sennett-MarineSteamEngine.htm https://www.shippingwondersoftheworld.com/marine_engines.html#Elizabeth https://www.shippingwondersoftheworld.com/modern_boilers.html
- 732 replies
-
- 10
-

-

-
- Lula
- sternwheeler
- (and 1 more)
-
Thank you for looking in, Brian. I'm using the 1930's Lula the ferry in the photo as only a reference image for what I want Lula the 1870's supply boat to look like. Obviously there won't be Model A's on deck, where the cars are parked is where the boiler will be. Lula the supply boat will be steam powered so the chain drive disappears. Due to the need for power and space Lula the supply boat gets lengthened to approximately a 100 feet.
- 732 replies
-
- 7
-
-

-
- Lula
- sternwheeler
- (and 1 more)
-
Thank you to everyone for the likes and for the support. Thank you, Mark. Last night while doing research for Lula I came across this great photo. What a project! Thank you to all for following along. Keith
-
Thank you to everyone for the likes and for following along. Thank you, Pat. I'm assuming that the supply boats would have taken on water fit for boiler use at one of the piers in the New York harbor area. In a modest 10,500 (20' x 35' x 2') gallon water tank, the water alone would have weighed almost 44 tons. I say modest because the supply boat needed water for her boiler plus the daily water needs for the pile drivers she would have supported. When researching floating pile drivers I had determined that water fit for boiler use and the water's weight was the most critical element in the dock building scheme. Researching supply boats has only emphasized my thoughts on the water issue. Is that much water weight plus all the other weight (boiler, coal, stem engine, and empty build weight) have been doable on a sternwheeler with hull proportions of 25' x 100'? If someone says "absolutely" I'm ready to move forward. Thank you and welcome, Eberhard. I envisioned the wheelhouse being above the steam engine with the boiler forward of both. Thank you for suggesting the boiler type. All insights are most welcome. Thank you to everyone for the support. Keith
- 732 replies
-
- 8
-
-
- Lula
- sternwheeler
- (and 1 more)
-
A week in and all I have to show for myself is words, certainly no wood, not even pencil to paper. Going through Eric's Peerless build last night a realization took me by surprise. In the floating pile driver build we discussed the necessity for Lula to provide boiler water. The thought that hit me was, Lula also needed freshwater for her boiler! She wouldn't have been able to pull freshwater from the Hudson till 153 miles up river near Troy. This means Lula would have required a water tank large enough to supply her needs as well as the needs of the various pile drivers she would have catered to. I envision the need for a huge water tank. How large and where would it have been placed? I swear, the more I research the more questions I have. Freshwater requirements may well be a game changer.
- 732 replies
-
- 10
-
-
- Lula
- sternwheeler
- (and 1 more)
-
How about using a ballon? Place a ballon in the bottle, blow it up to desired size, pour catalyst around the ballon and once set deflate the ballon. You could put lead weights inside the ballon before blowing it up to keep it from lifting.
- 185 replies
-
- 6
-
-
- Flying Dutchman
- Black pearl
- (and 2 more)
-
Tanguy, welcome to MSW. Glad to have you aboard.
-
I went back to the photos of the model before you started the restoration work, John. What an impressive improvement.
-
I currently know so little (I stress the word little) about sternwheelers. I'm trying to do at least an hour's worth of research a day or more if I have the time. I suppose I could try and stupid build Lula but that seems like a recipe for disaster plus it doesn't make me a bit smarter and runs counter to the NRG motto. I plan on the boiler being somewhat exposed and I assume boilers were specific to the type of steam engine they were powering. Lula was an inlet vessel, not a river boat. How different were the engines on a inlet craft verses a river craft? The type of engine available during the mid 1870's that a small operator could afford? I need to know the engine size for accurate engine room dimensions. Engine and boiler size will be a determining factor in Lula's overall length. I'm getting there with the help of Mr Google. He's very smart, the trick is asking the correct question.
- 732 replies
-
- 12
-
-
- Lula
- sternwheeler
- (and 1 more)
-
Roel, what is the model's length?
-
Steve Covered ship's boats are hung from the davits with straps. You'll have to enlarge the photo below. Keith
-
Greetings from a clueless Patrick O'Brian fan
Keith Black replied to Galkar's topic in New member Introductions
The link to Tom's Sophie build log. -
Looks very nice, Tom. Good to see a Sophie update.
- 347 replies
-
- 3
-
-
- Sophie
- Vanguard Models
- (and 1 more)
-
I looked for N scale as well without success.
-
Thank you, Tom. Please look a bit closer. Eberhard, are suggesting adding or asking what the unidentified objects are in the photo? If it's adding tools I searched for TT scale tools and what's supposed to be 1:120 is actually 1;87 or some other such. That leaves making them myself and I'd rather leave them off than offer up a dog's lunch effort.
-
Greetings from a clueless Patrick O'Brian fan
Keith Black replied to Galkar's topic in New member Introductions
Galkar, welcome to MSW. Glad to have you aboard. -
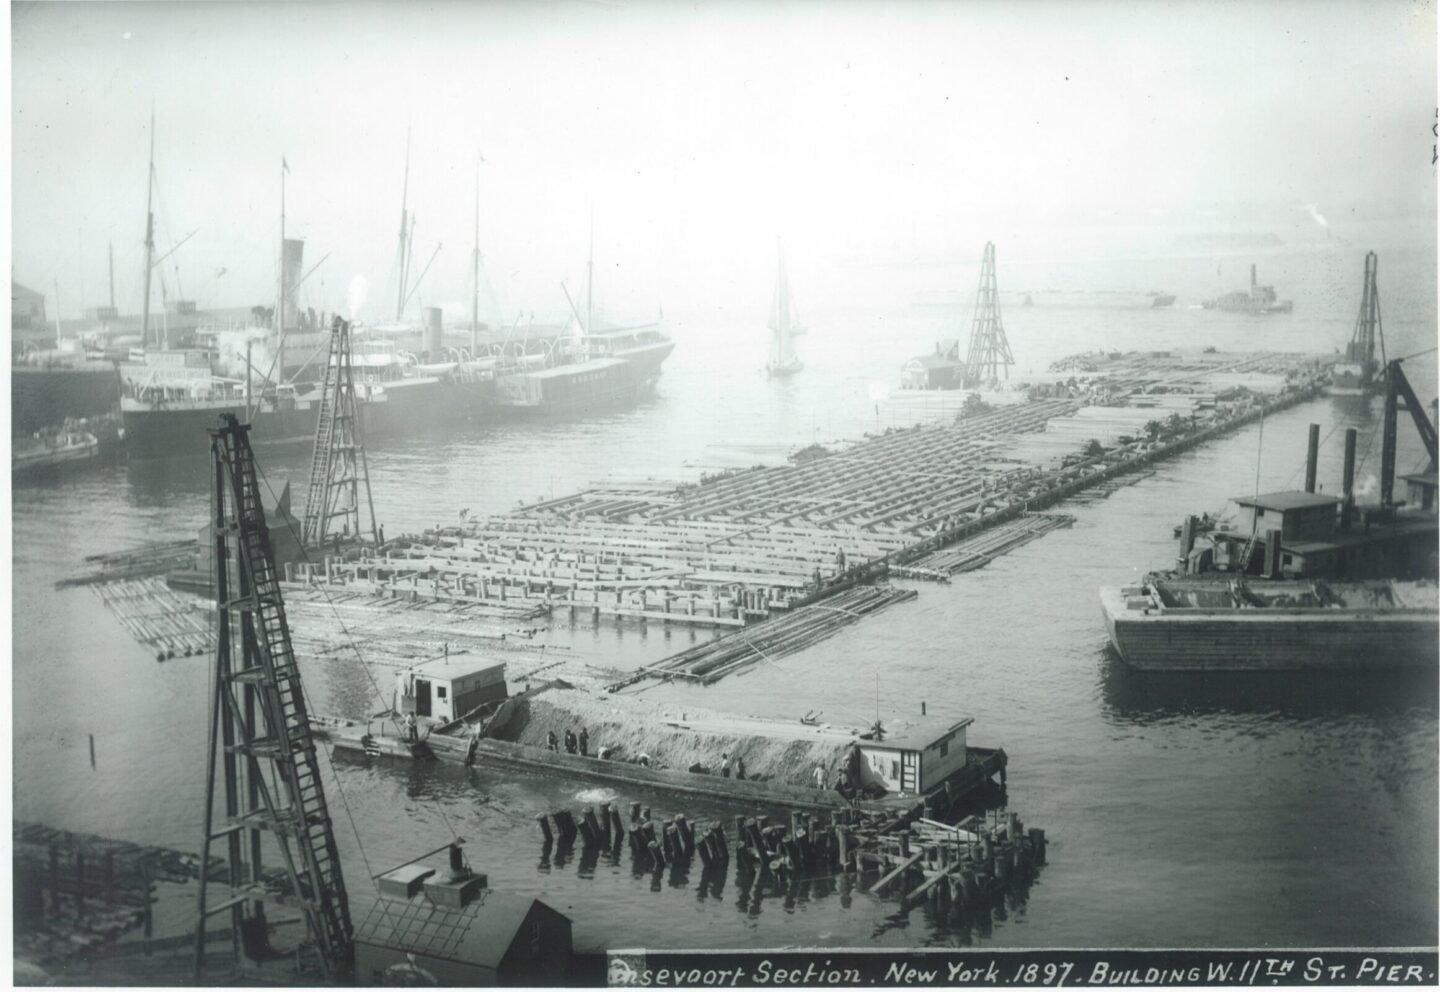
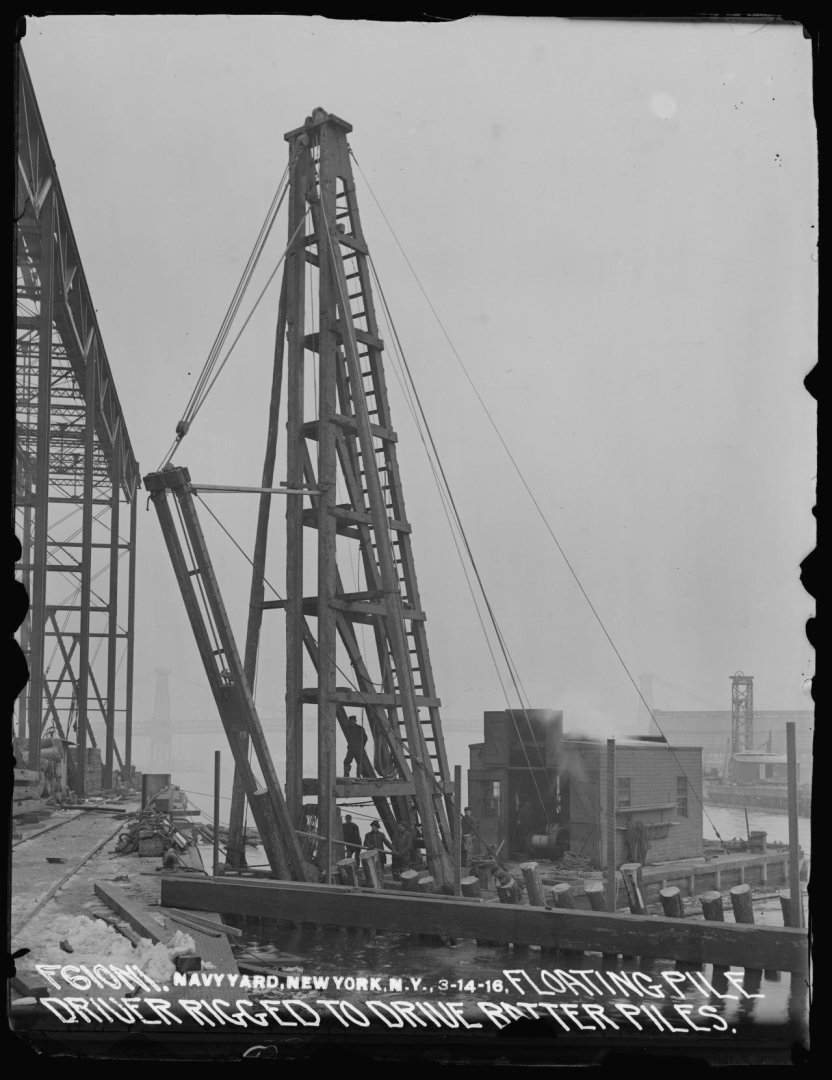
yada yada Thank you, Glen. Thank you, Brian. Thank you, Keith Thank you, Eberhard. Gentleman, I've tried as best I could to make the model look like a brief moment in time using the below photo as a templet. Unfortunately there are things on the deck I don't recognize. From the photos mcb provided, the pictured driver is pretty exemplary of the floating pile drivers of the era. Keith
-
The Erebus deck looks lovely, Keith. Four months, wow. Time does pass quickly. I envy your ride on train, coal smoke and all.