HOLIDAY DONATION DRIVE - SUPPORT MSW - DO YOUR PART TO KEEP THIS GREAT FORUM GOING! (Only 13 donations so far - C'mon guys!)
×
Bossman
-
Posts
283 -
Joined
-
Last visited
Content Type
Profiles
Forums
Gallery
Events
Everything posted by Bossman
-
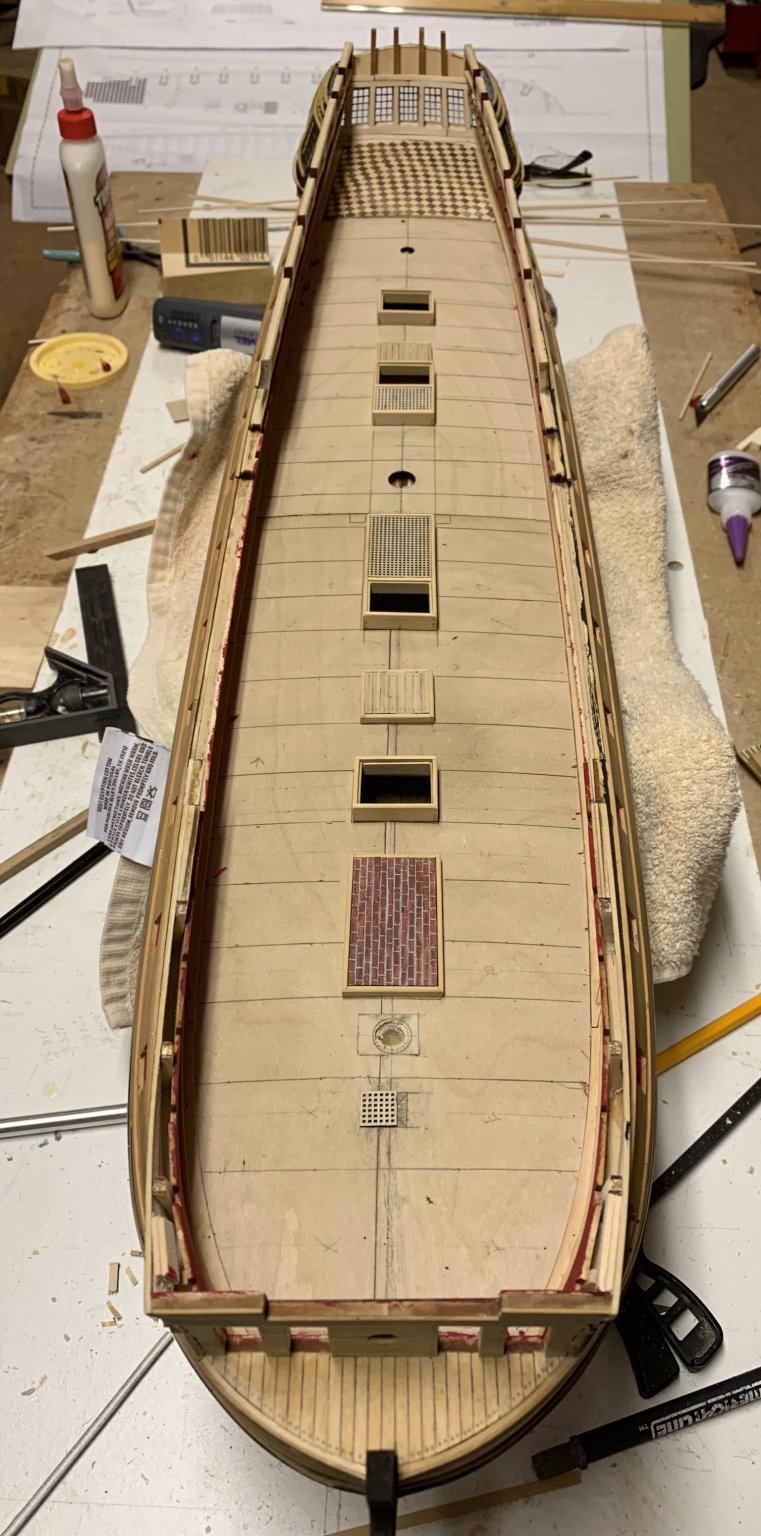
 Wow! I just realized it’s been almost a month since I last reported for duty. Thanks for the likes gents. It is much appreciated. While planking the deck I kept thinking about treenails. No, too much. Sure would look nice. Back and forth. Well I finally took the plunge. Can’t go back now. They are simulated using the method in the instructions. Drill a hole, twirl a pencil in the hole, fill with wood filler. Sometimes I get the caulking ring effect, sometimes not. Since they are virtually invisible at 2’ distance, what the hey.
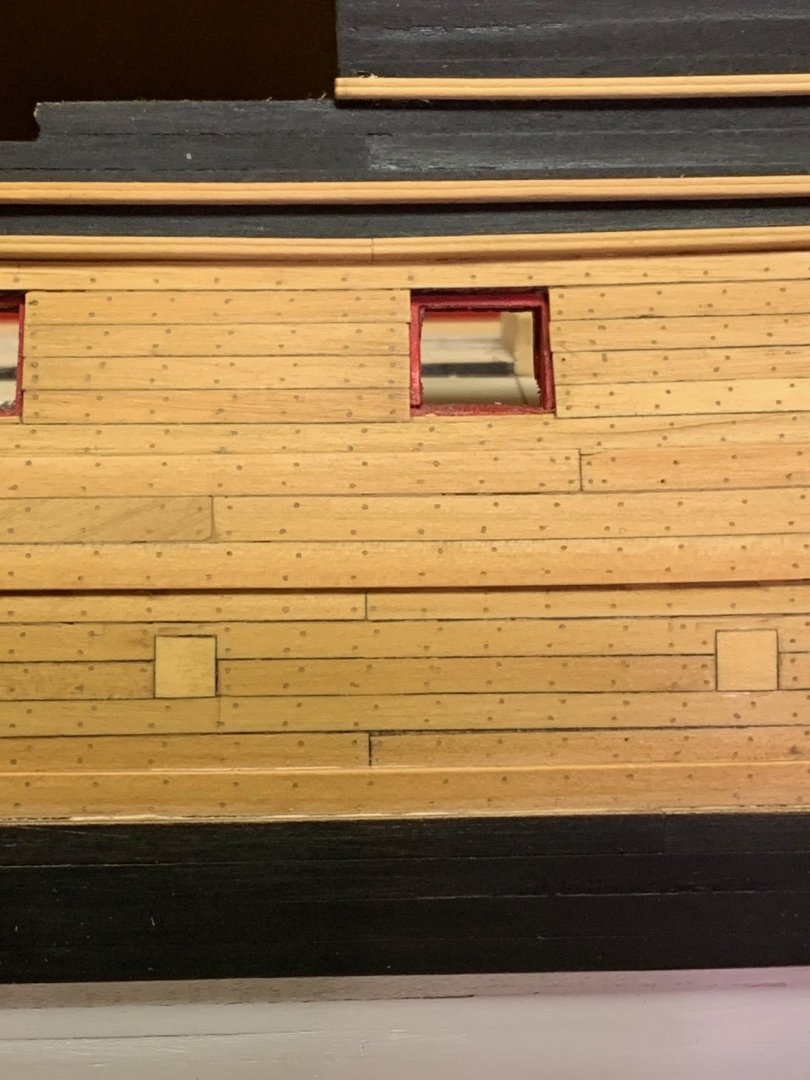
- 127 replies
-
- 10
-

-
- confederacy
- model shipways
- (and 1 more)
-
Justin, a truly awesome job Sir! Very, very well done.
- 66 replies
-
- 1
-
-
- Finished
- Model Shipways
- (and 1 more)
-
Welcome Glen, you’re at the right place.
-
new modeler from Barcelona and some Albatros photos
Bossman replied to Geowolf's topic in New member Introductions
Geowolf, welcome aboard. Your 1st model is very well done! Very nice. -
I think you have it in the short rows Peter. She looks great.
-
Ciciak, she is looking very good! Nice work
- 108 replies
-
- 1
-
-
- armed virginia sloop
- model shipways
- (and 1 more)
-
Thank you all for the likes gent! She’s all ready for deck planking. Looking at the picture I realize that the forward scuttle hatch is on the wrong centerline! Good thing there is a spare in case I Screw this one up getting it off.

- 127 replies
-
- 11
-
-
- confederacy
- model shipways
- (and 1 more)
-
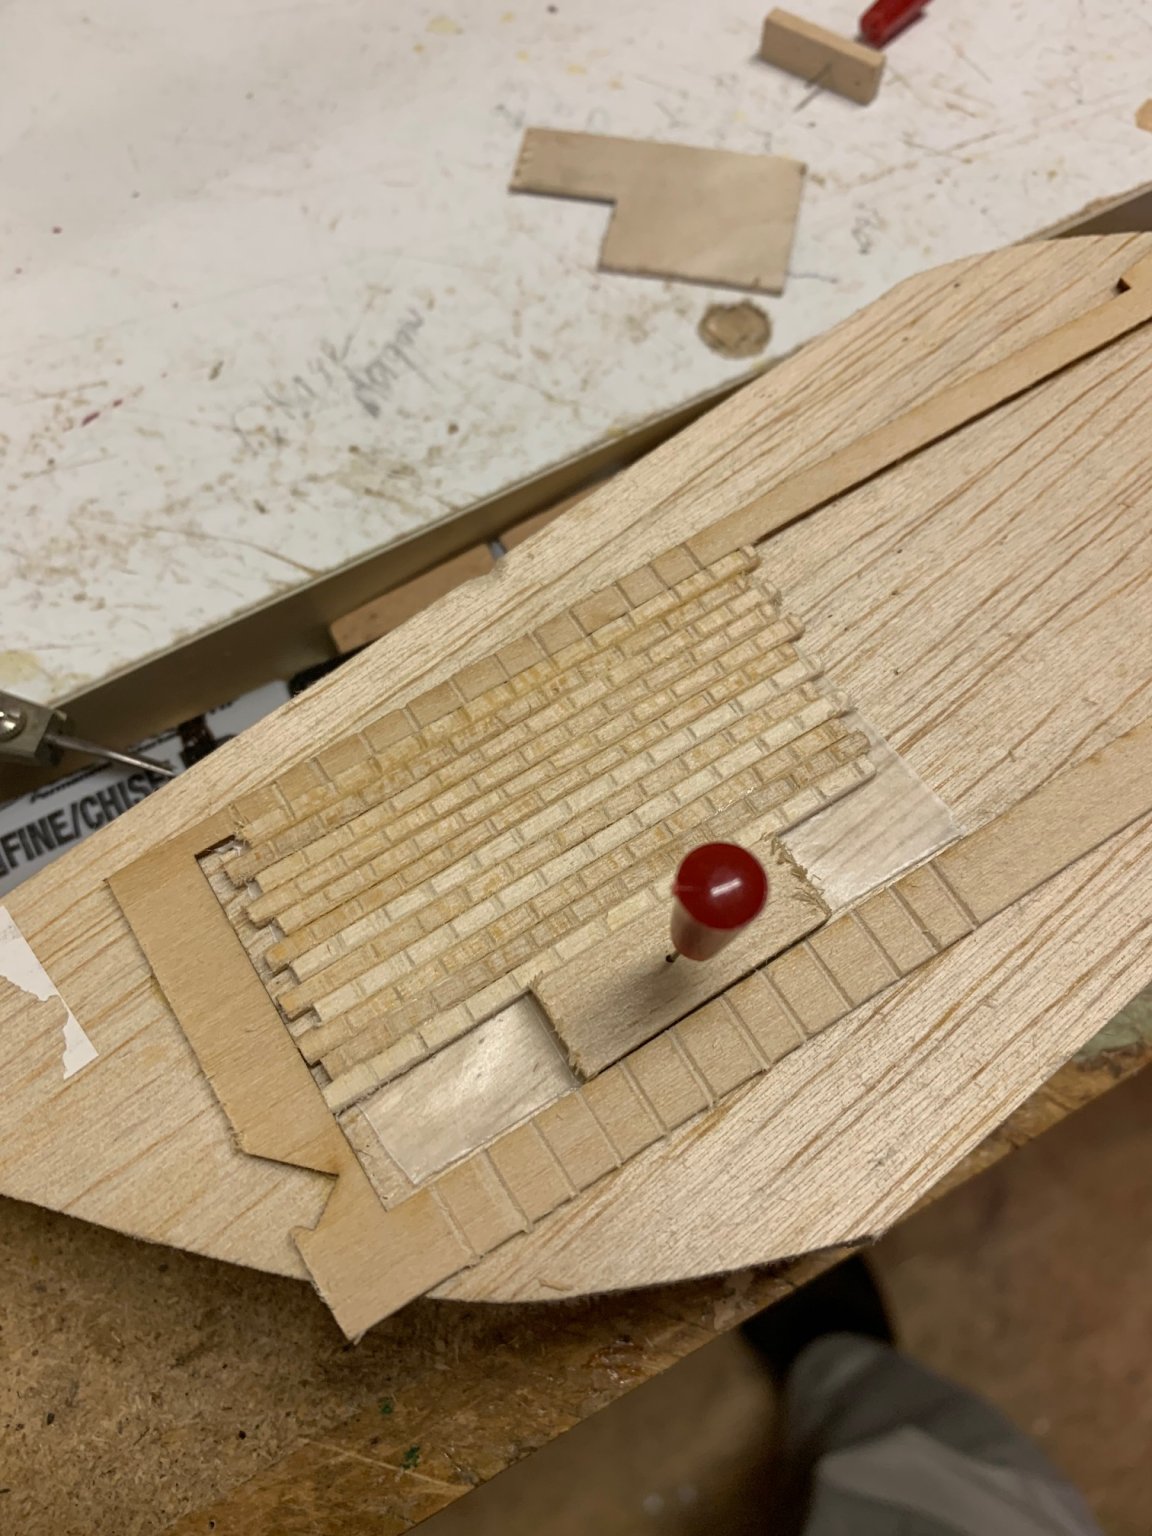
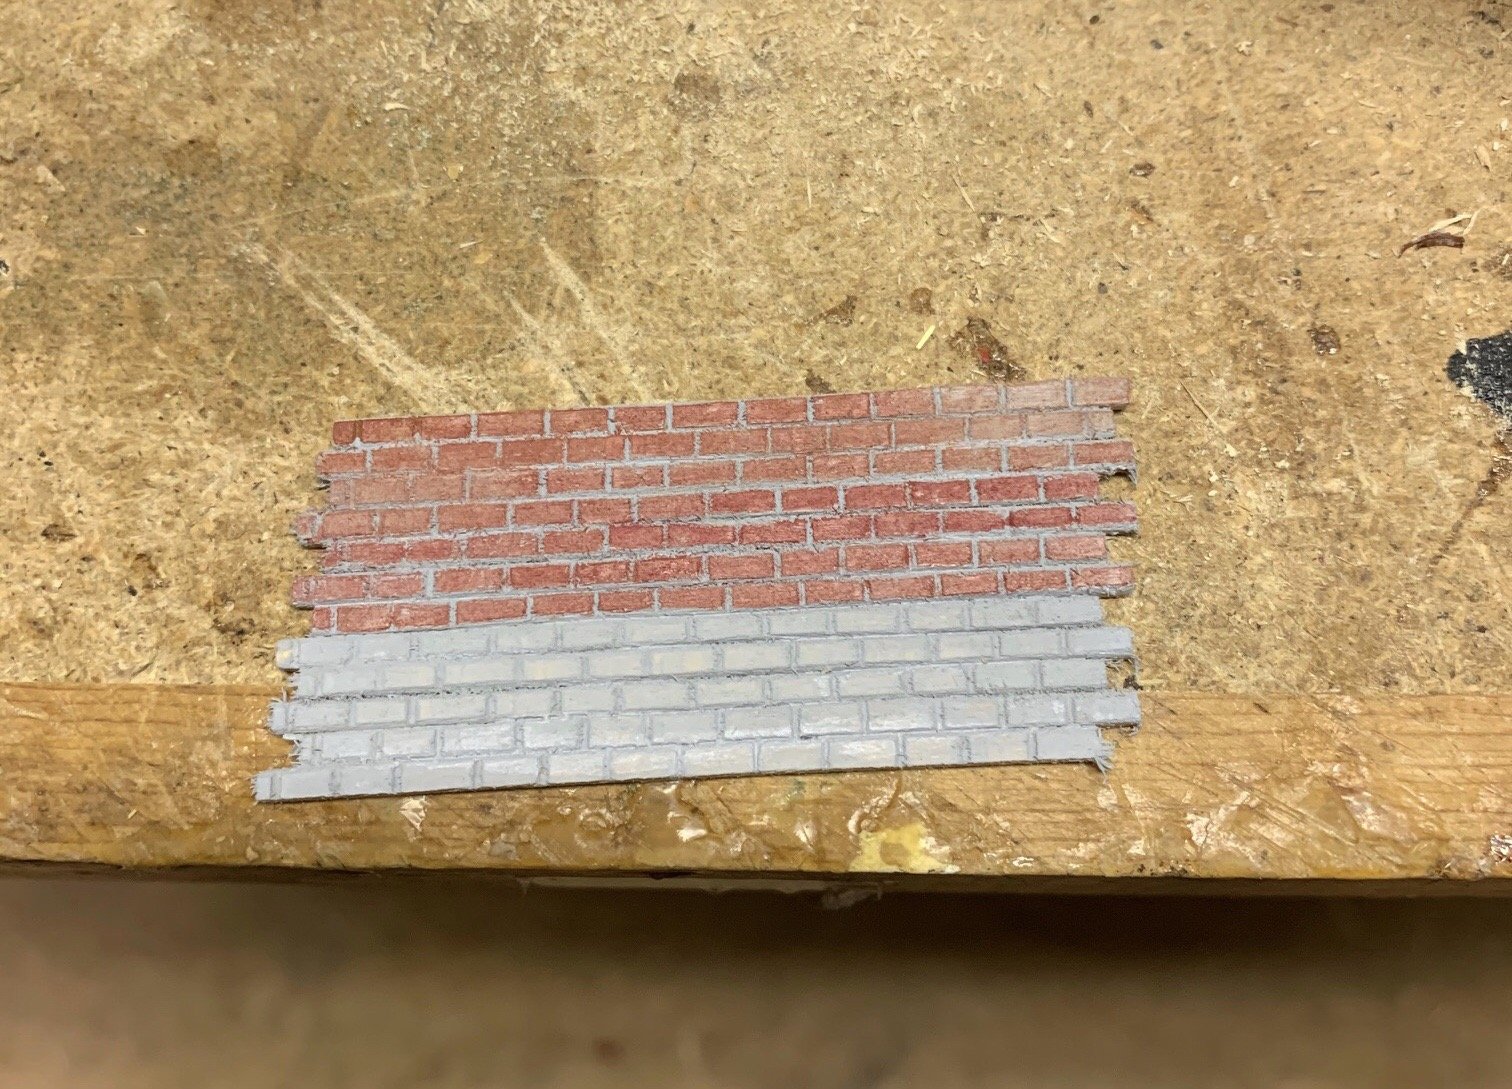
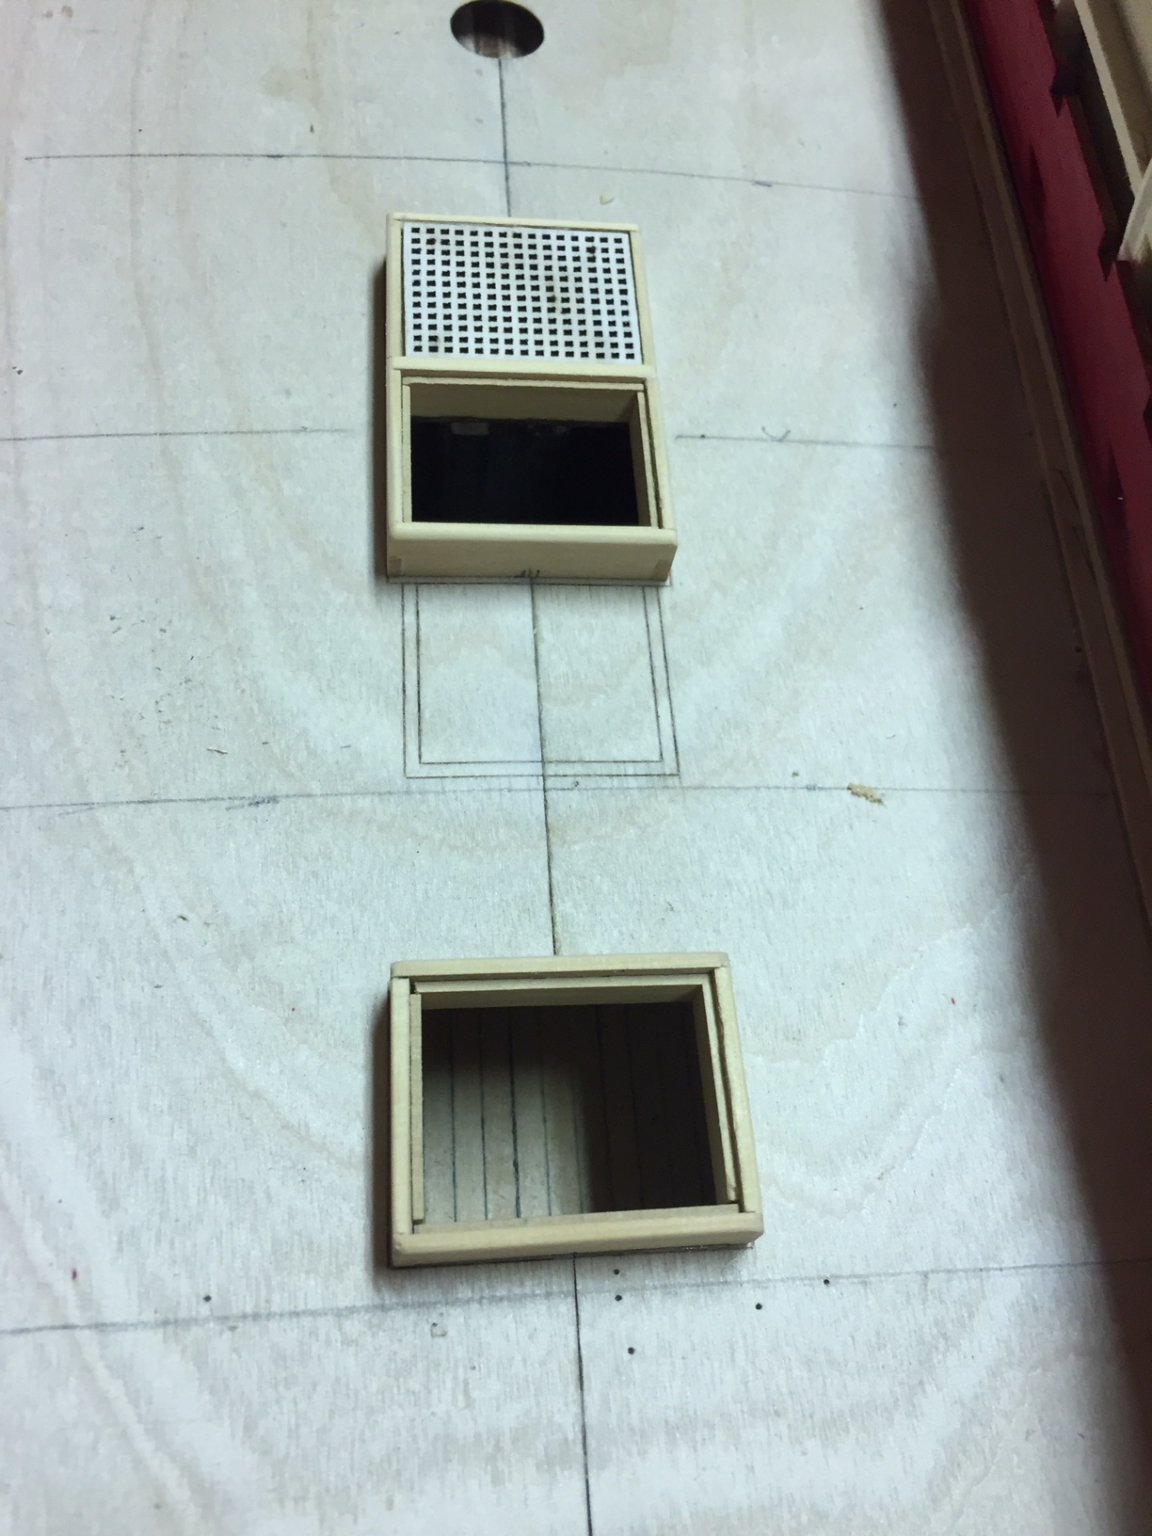
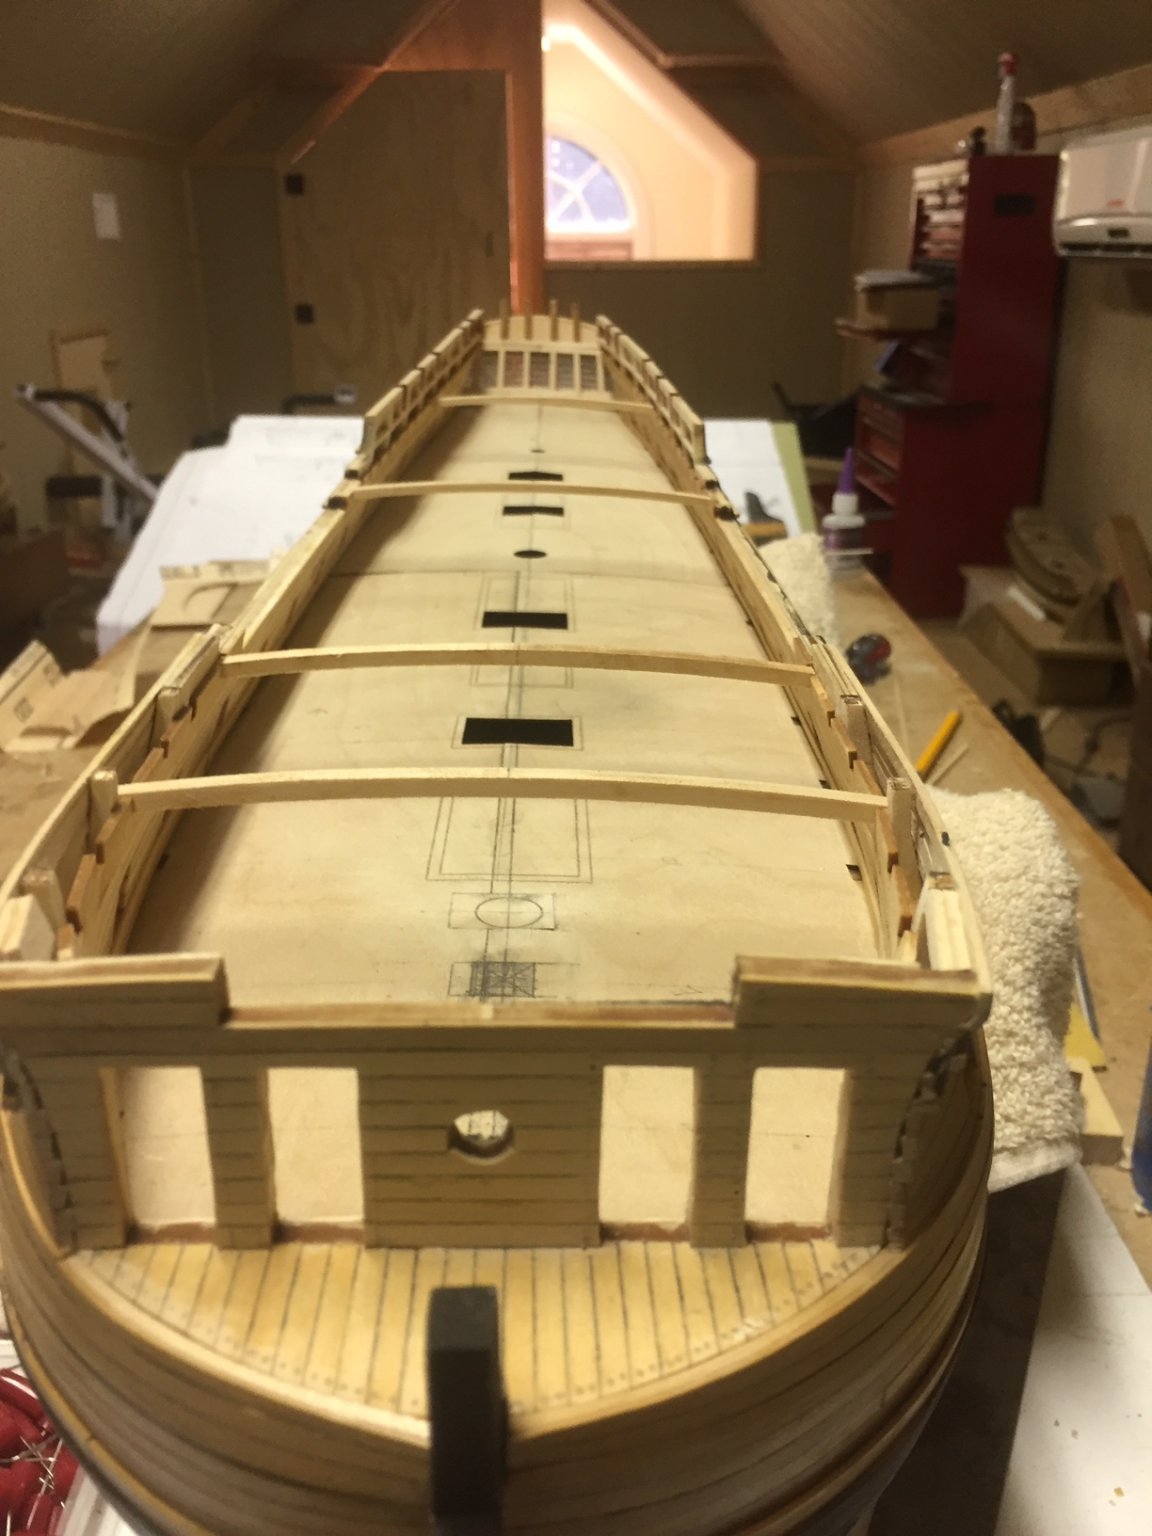
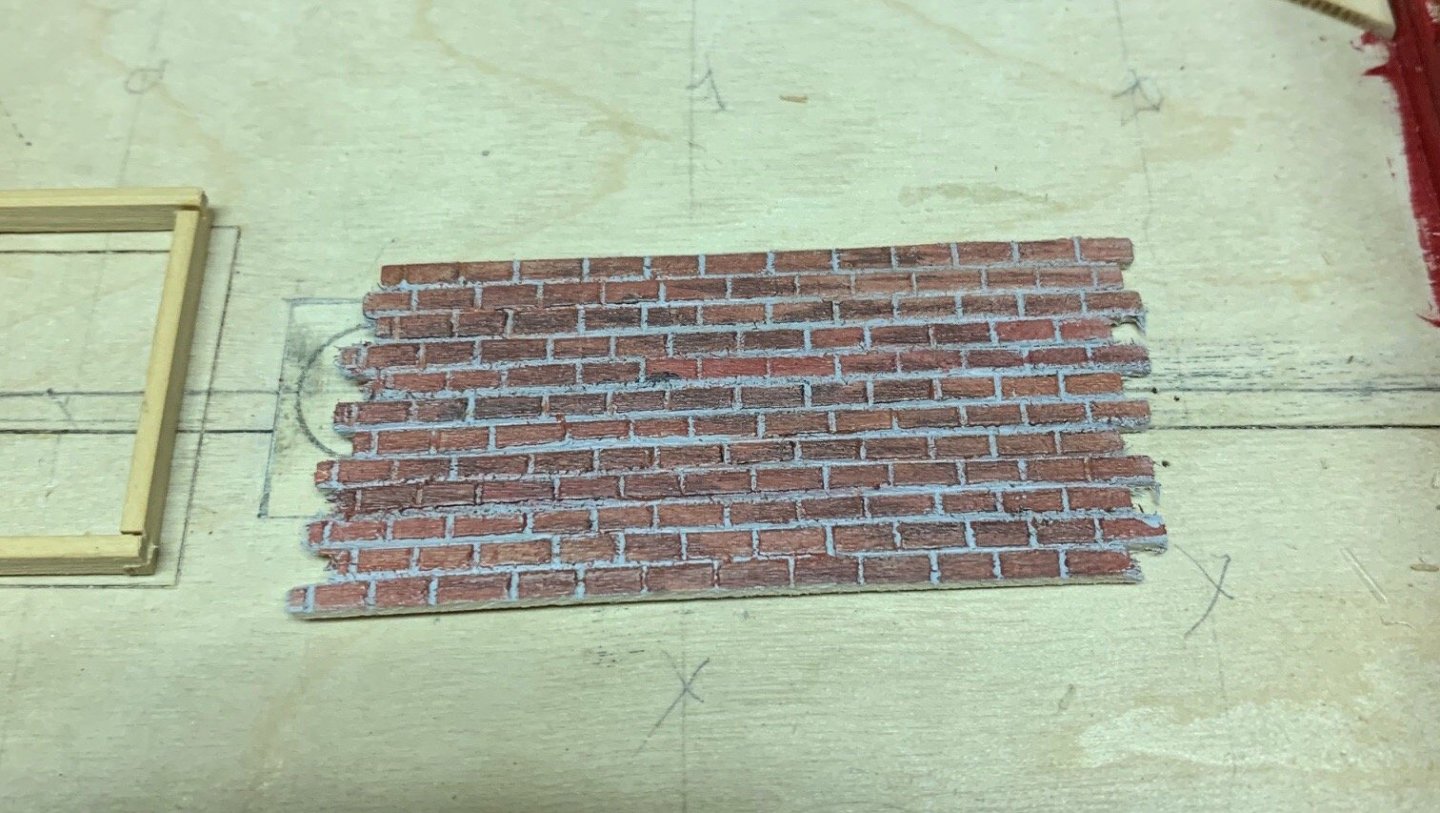
Good day folks. A little more work on the hatch combings. Here I have made the bricks for the galley I used the same jig I used for making the hatch combings. After setting the individual strips in I filed the grooves for the mortar joints. You can see my original file marks on the jig itself. Then I staggered them and edge glued together. In the second picture you can see the grey primed piece with half of it painted with a coat of base acrylic. I mixed red, brown and white until it looked right using a dry brush technique to lay it on. After this I mixed a little more brown and then black doing the same thing. I liked the result.


- 127 replies
-
- 15
-
-
- confederacy
- model shipways
- (and 1 more)
-
New Young Model Builder from Minnesota LOOKING FOR ADVICE
Bossman replied to Kenna's topic in New member Introductions
Kenna, I wish you and your dad all the luck in the world on completing your project! Go for it and as .edward says, have fun. -
Keith, you do very nice work Sir! She is a lovely model.
-
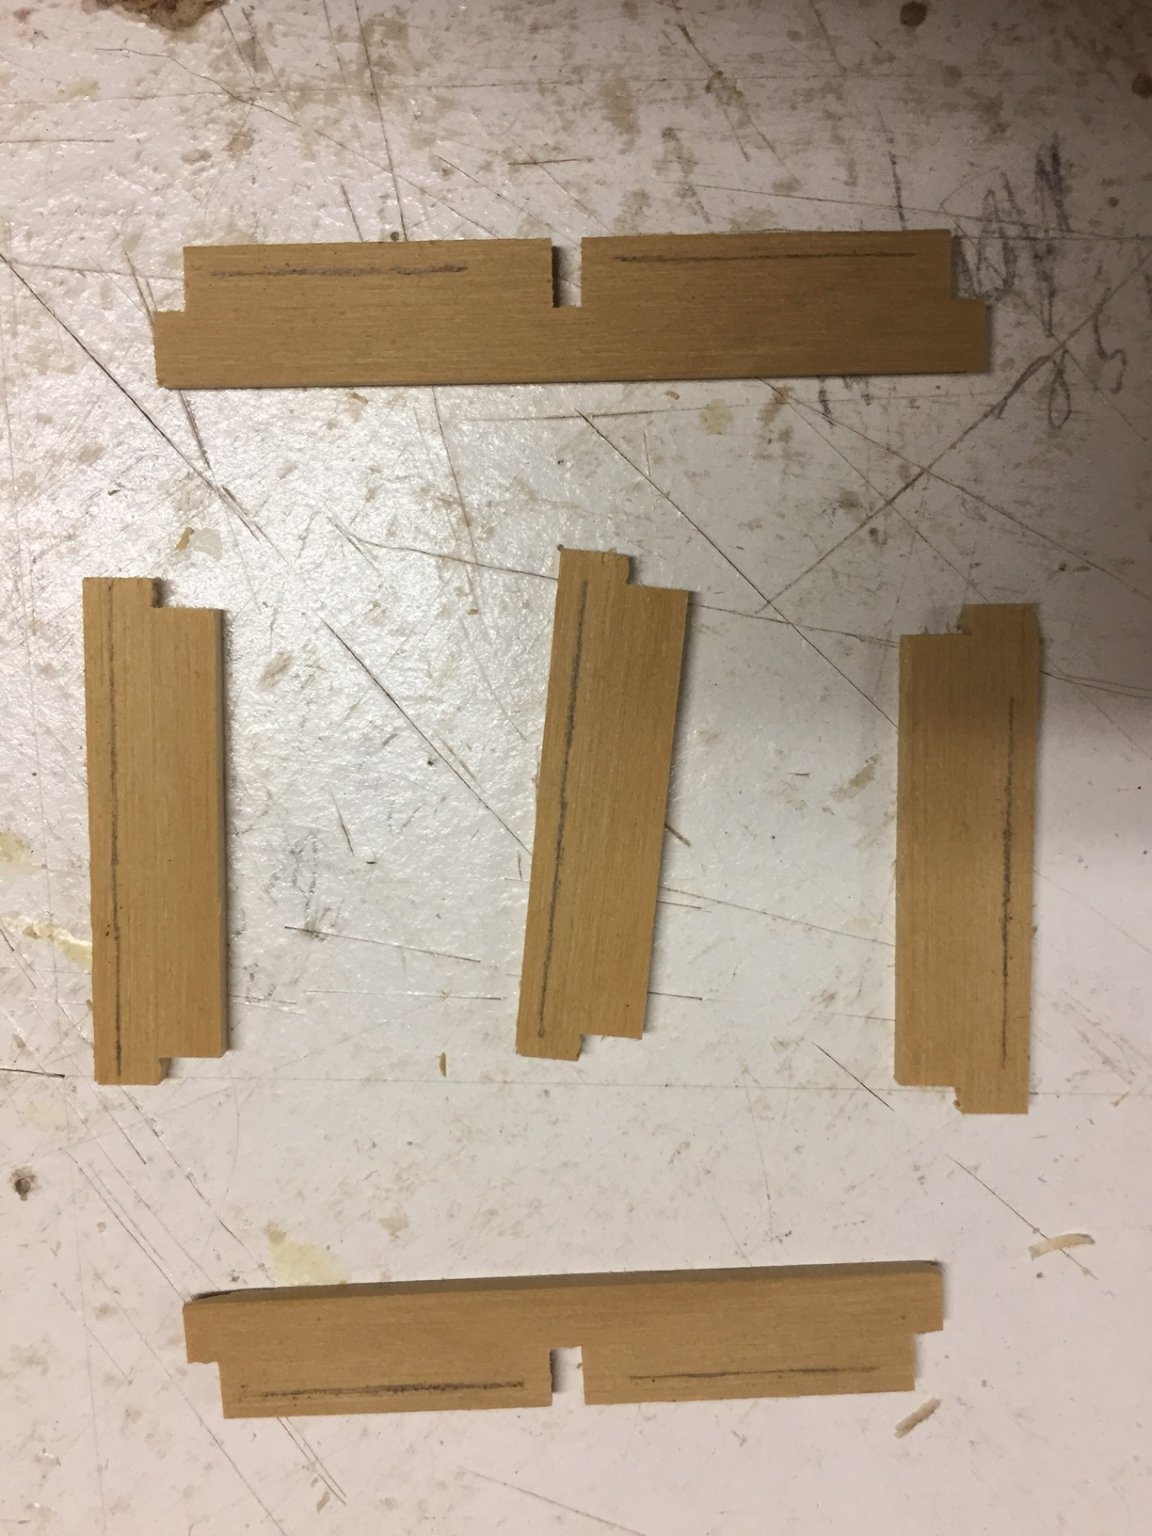
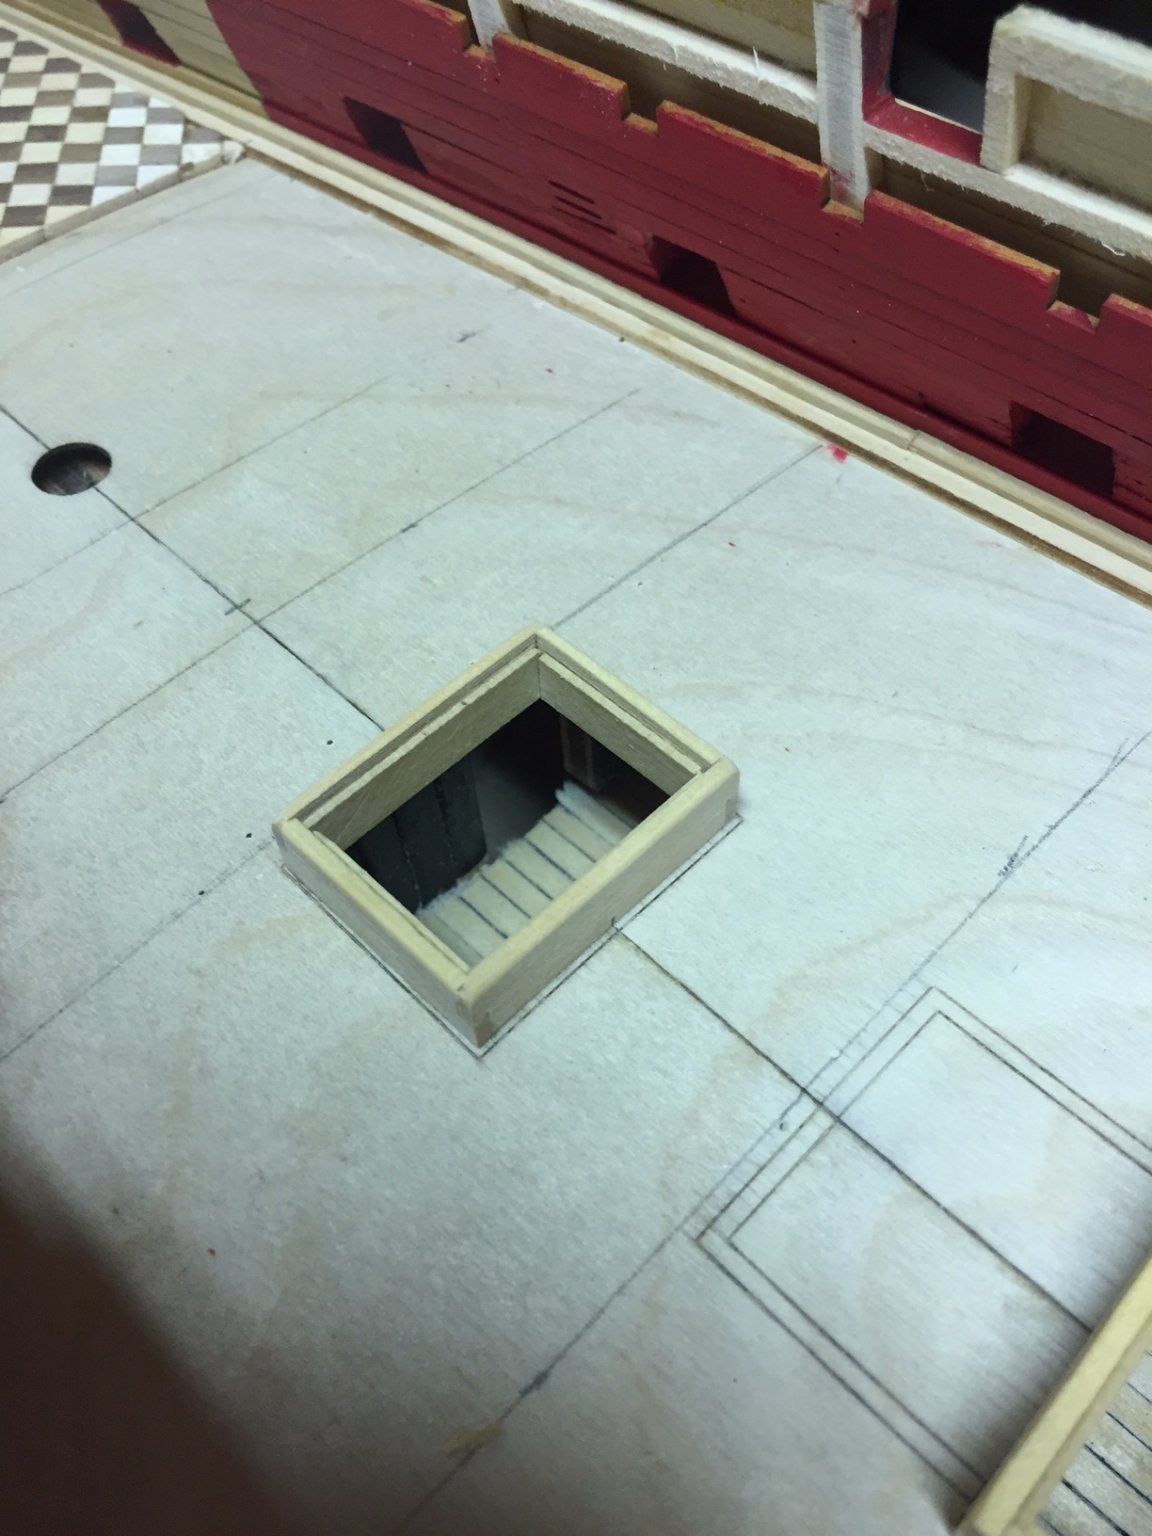
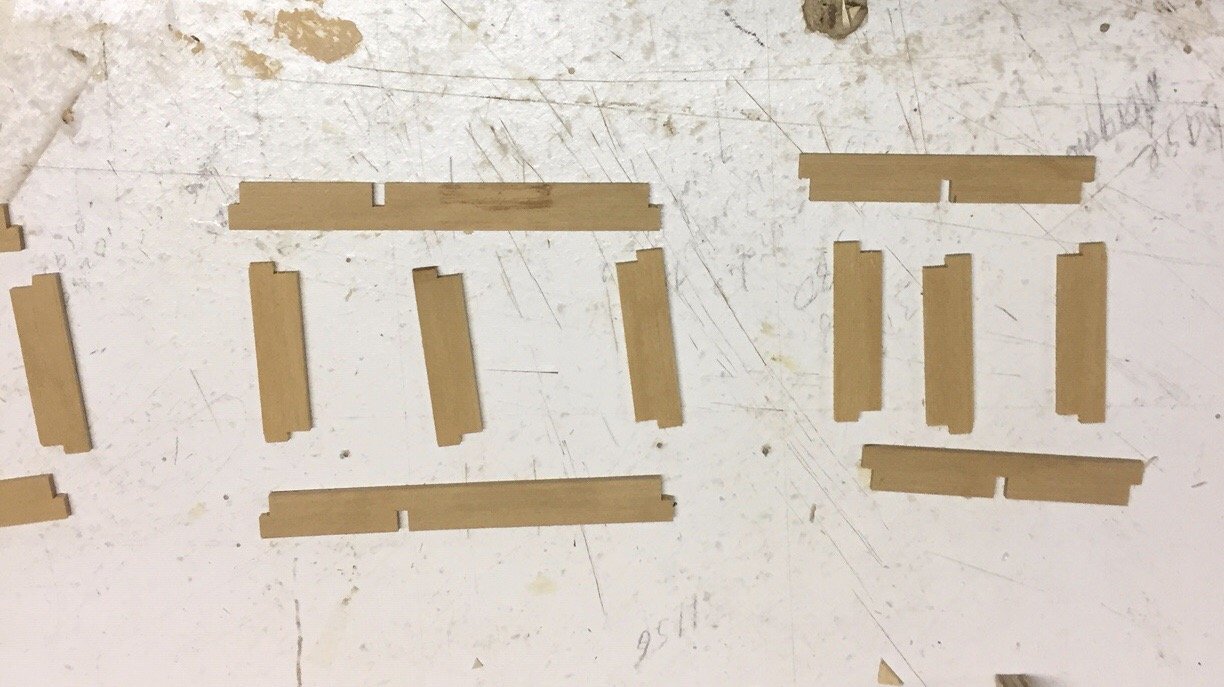
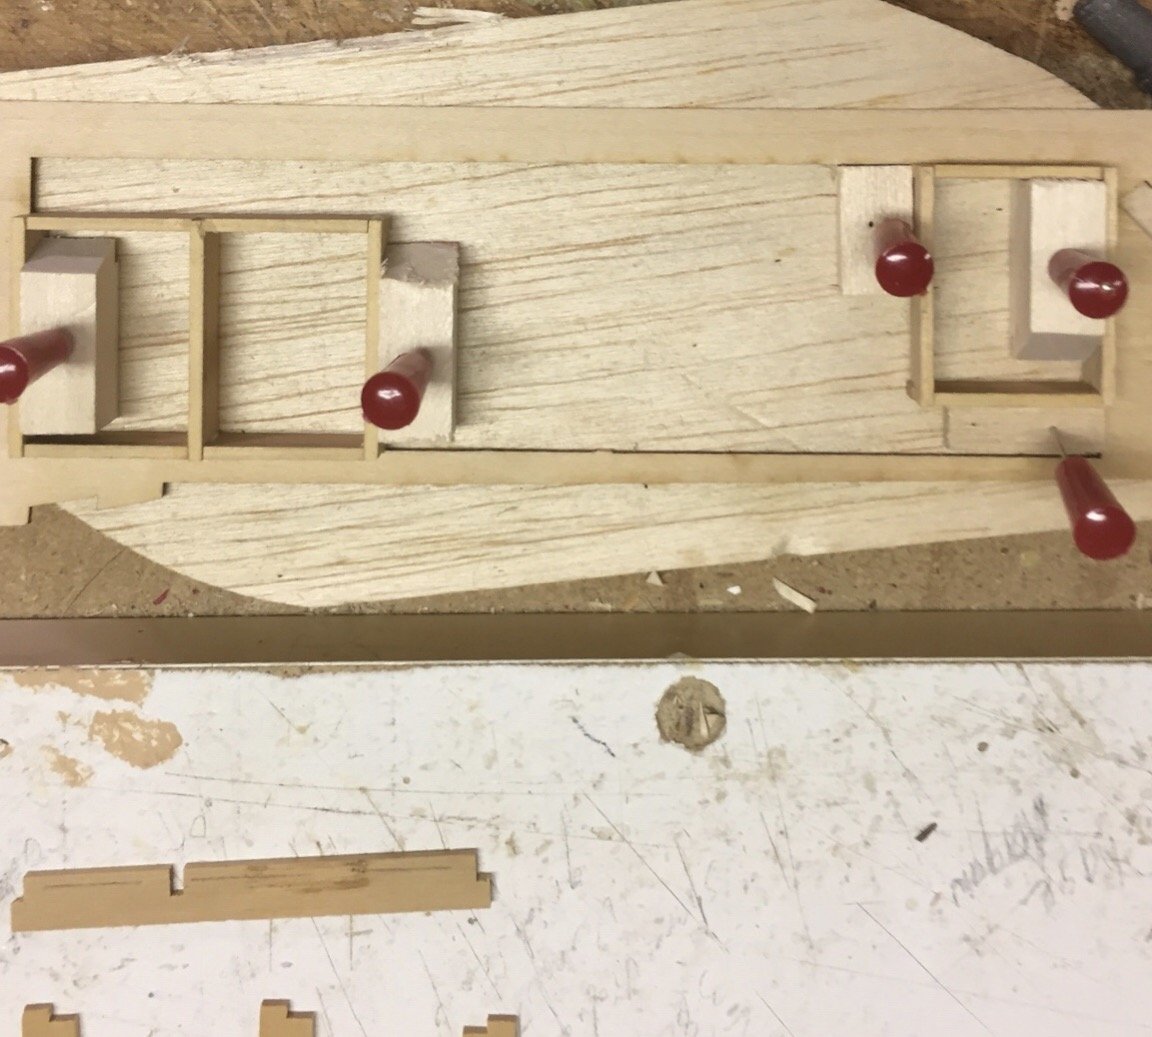
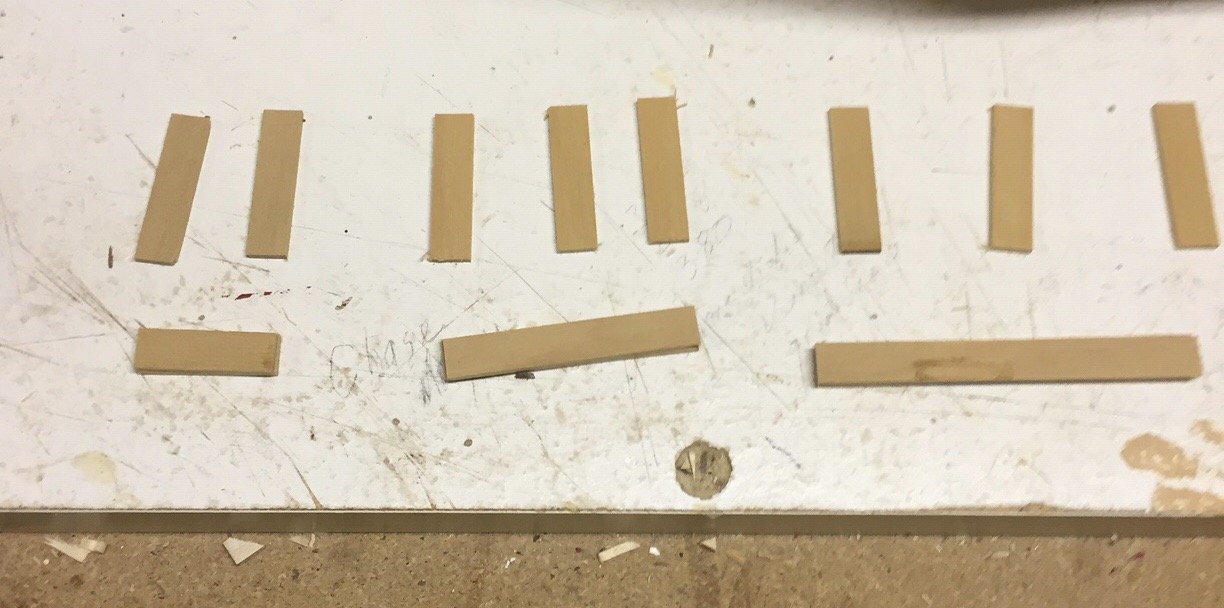
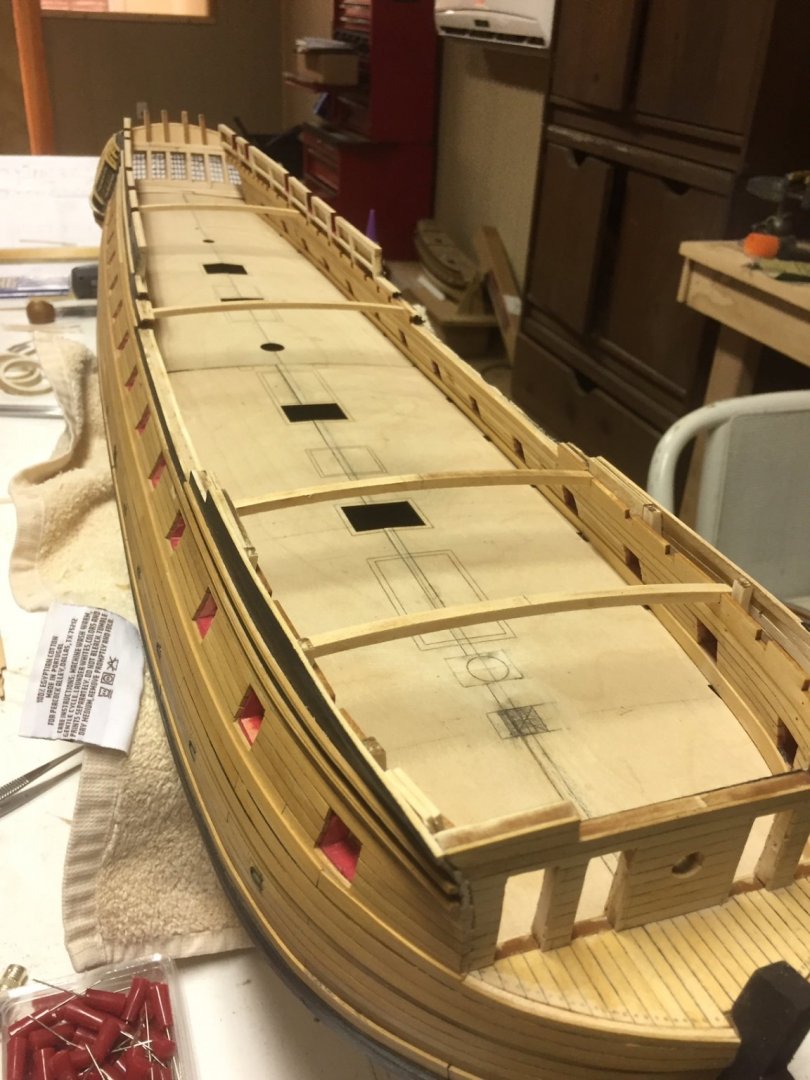
We on now to my favorite part of ship modelling. The deck and all it’s part. Hull planking starts out fun but before it finished I’m ready to pull my hair out. Once your on the deck, it’s something different every week. Sometimes every day! I started with the hatch combings. I’ve never been much of an assembly line modeler but there is a ton of time to be saved if you employ it when you can. In the pics below. I cut out all the for and aft pieces. 1 setting on the saw. After that I cut out each of the corresponding broadside pieces. 4 saw settings. After that I cut the laps for each piece keeping them in the correct orientation. 1 saw setting. Then I cut the slot for the two dividers. Again, 1 saw setting. Beats the dickens out of building 1 then going to another. I then used a scrap piece of balsa, a piece of used laser cut sheet with a nice rectangle and some scrap basswood and push pins for a jig. Once assembled I lined the inside to form the rabbet for the gratings. The final step was to use a handmade sanding block with the curvature of the hull so they would sit nice and flat. Boy did I have fun today!


- 127 replies
-
- 12
-
-
- confederacy
- model shipways
- (and 1 more)
-
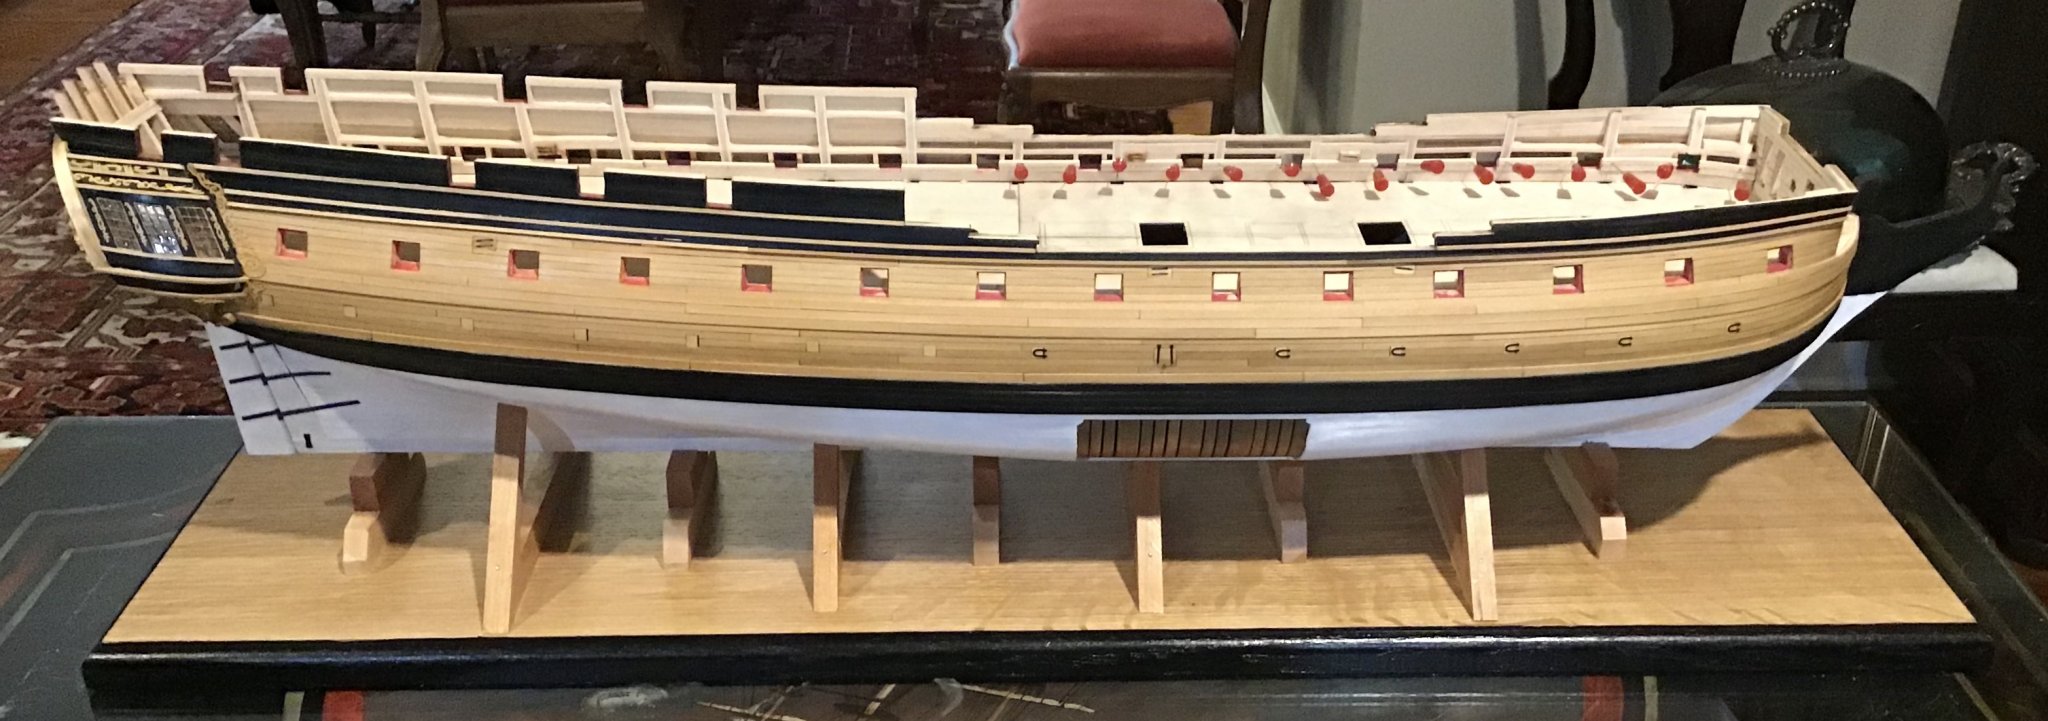
Frank, thank you so much for the kind words. Yep, the stern is a head scratcher. Those “crazy clamps”, good name for them by the way, are PVC pipe. Take any diameter of pvc and cut it into 1/4” widths. Make a through cut and you have a clamp. A little felt or some protection on the clamping ends works for finish work. The clamp in the above picture is just 3/8 basswood cut for purpose with a push pin. I heard this somewhere, but when someone ever looks at one of my models and says, “you have a lot of patience!” My answer is “patience is waiting for something to happen, you have to have dedication to build a model ship.” I find myself putting off a difficult task, such as the stern, and think of that quote. It helps motivate me.
- 127 replies
-
- 2
-
-
- confederacy
- model shipways
- (and 1 more)
-
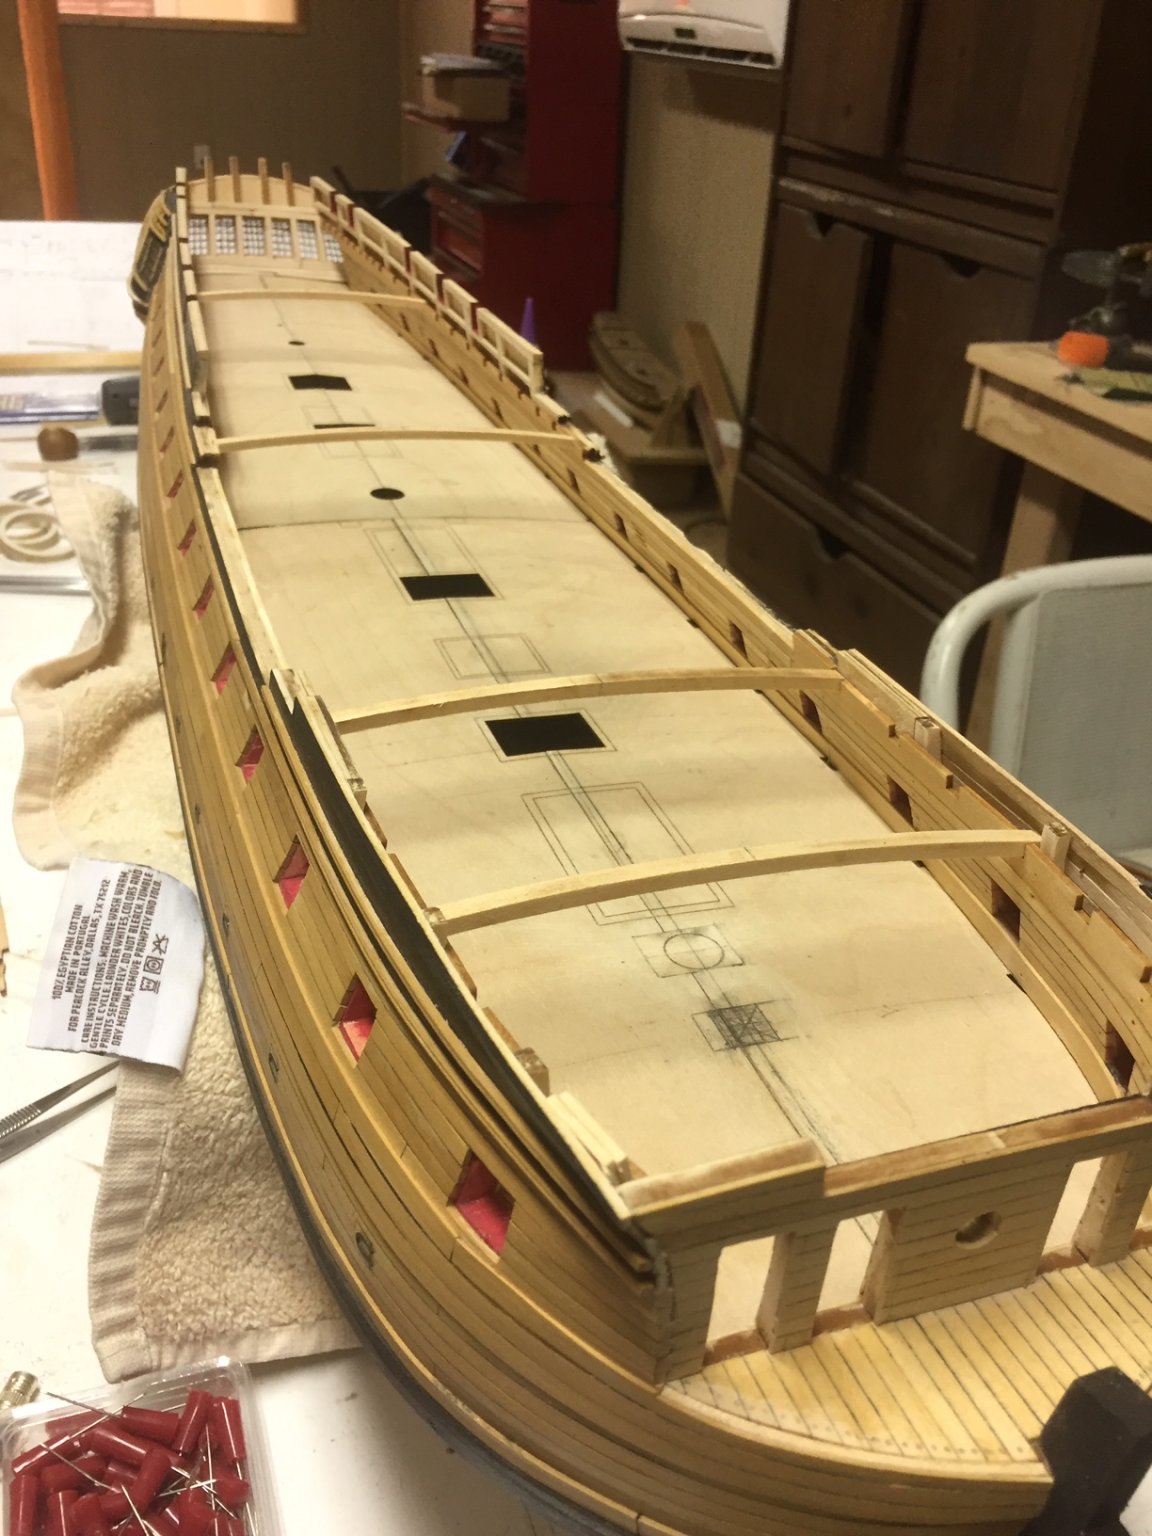
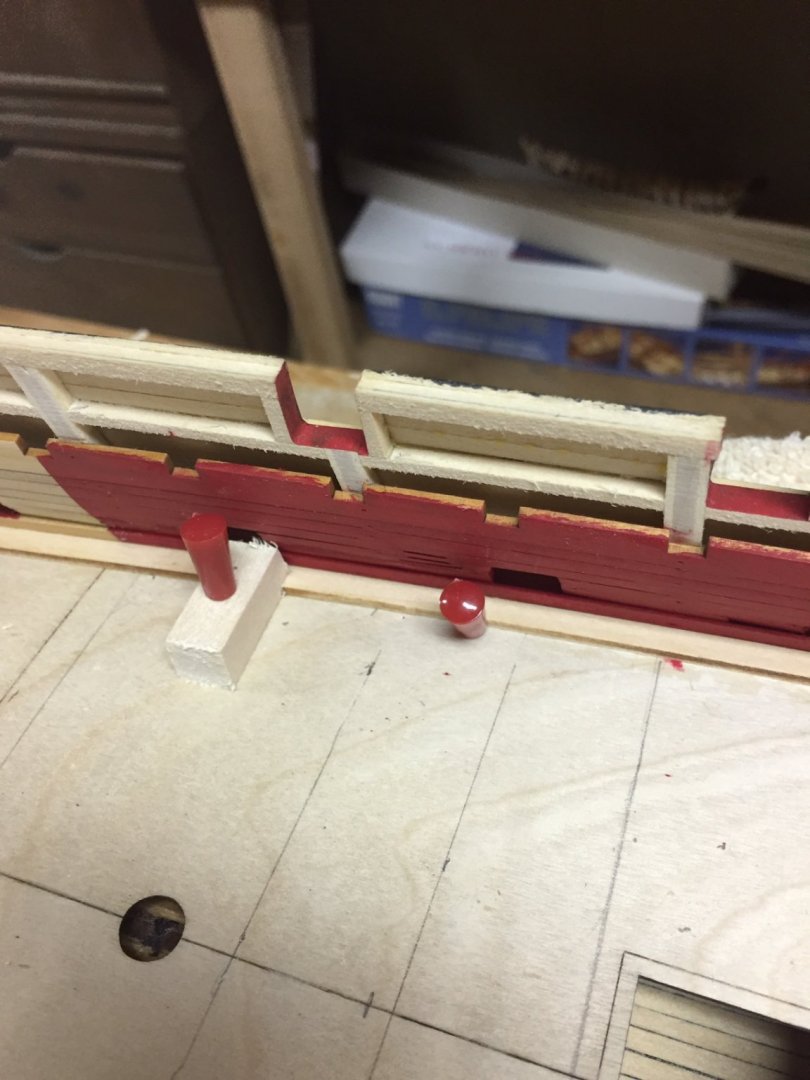
Work on the margin planks this morning. This went fast once I figured out how to clamp them. Made a few from scrap wood and push pins. The angle of the pic makes it look like the gunports are way short. They are not. It’s just an optical confusion. Thank you all for the likes!
- 127 replies
-
- 10
-
-
- confederacy
- model shipways
- (and 1 more)
-
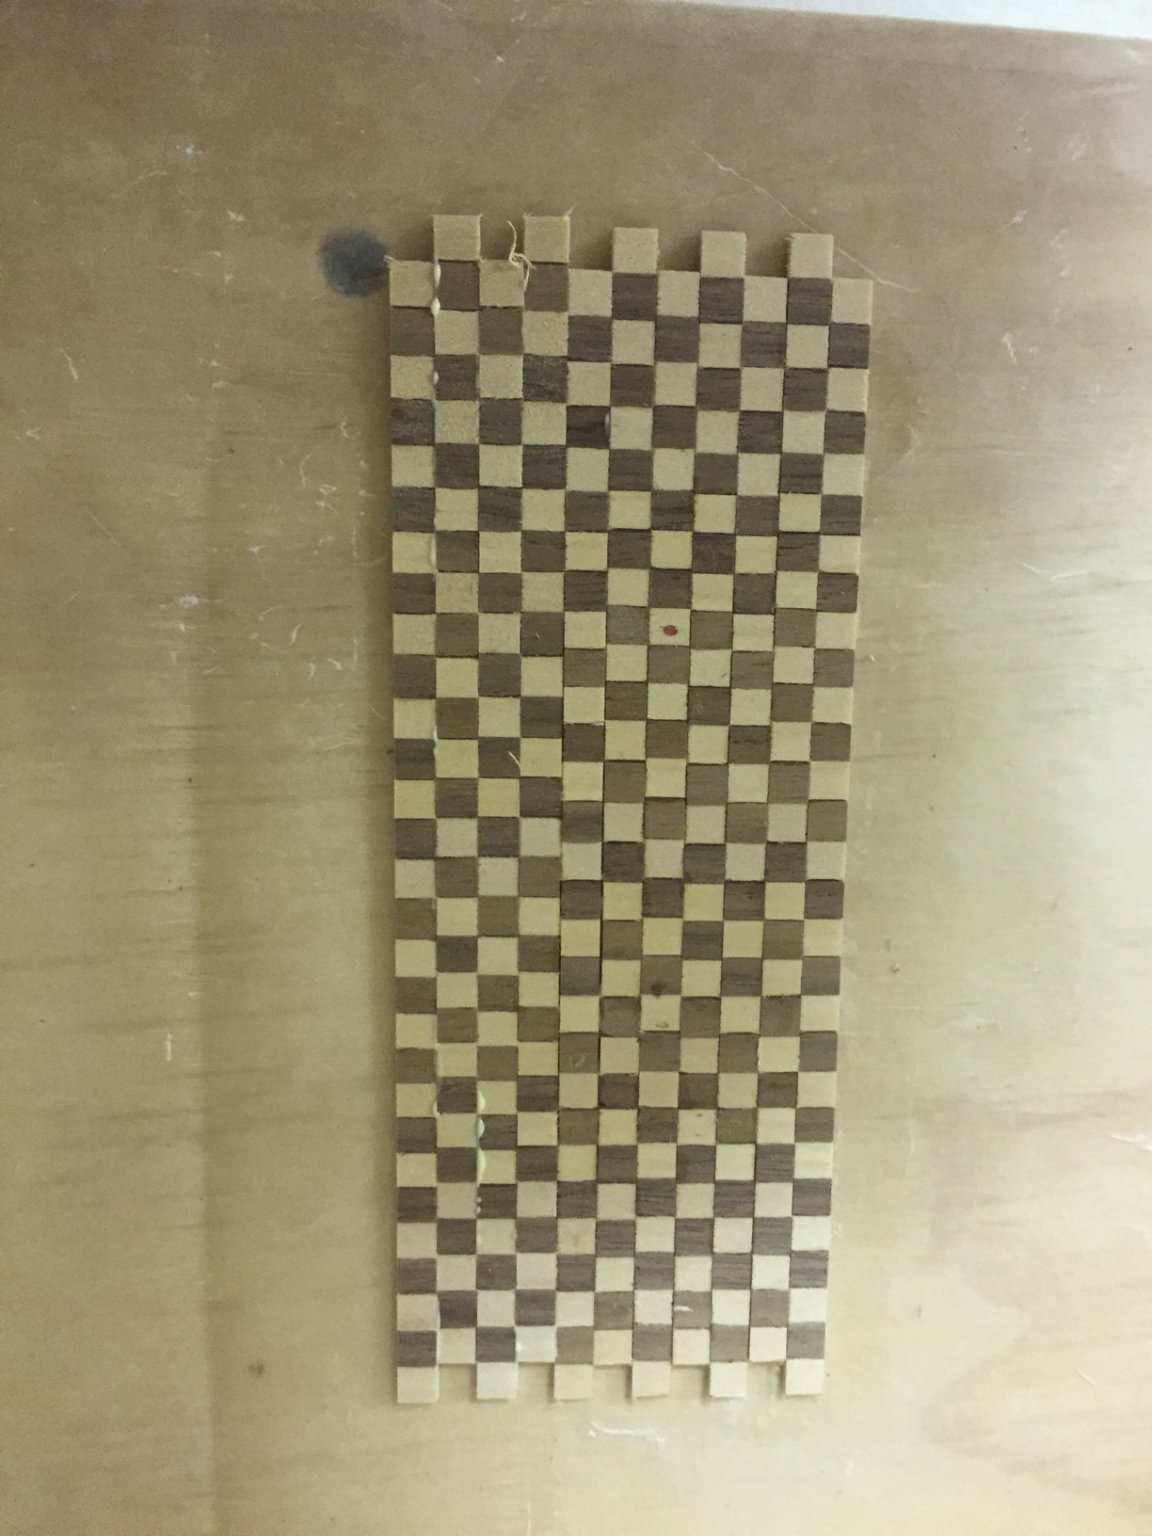
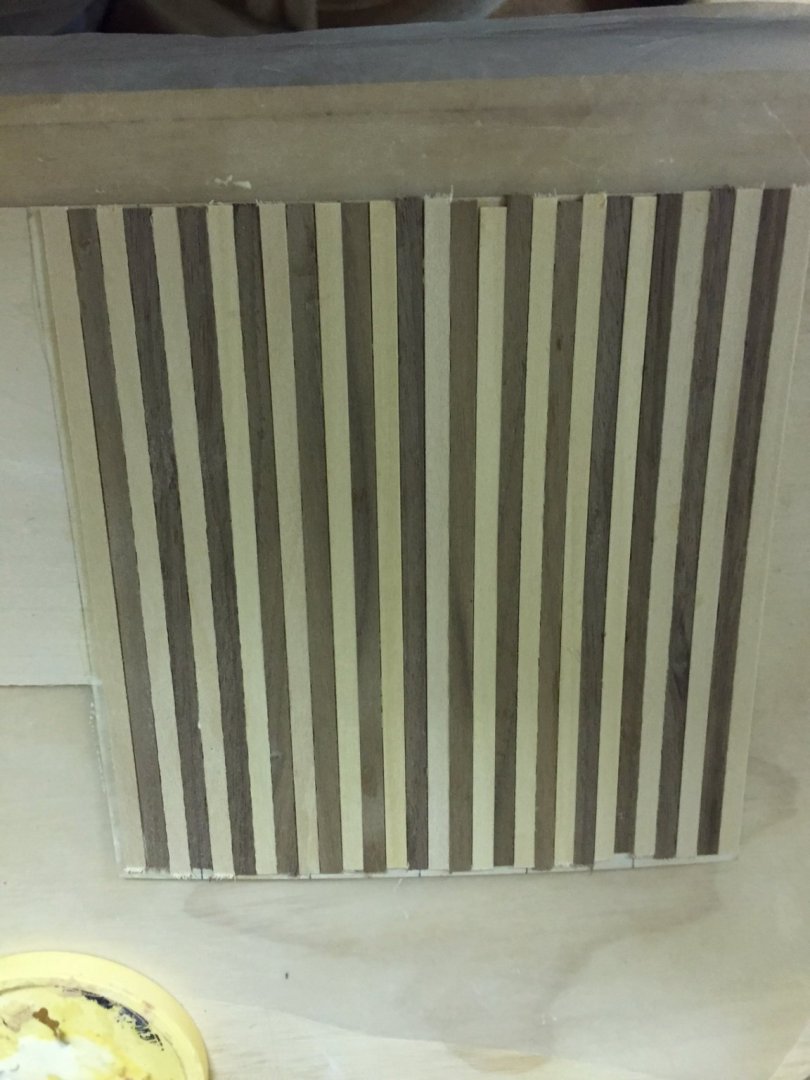
Thanks you all for the likes folks. I have been working on the checkerboard deck for the captains quarters. It all went smooth following the directions. I did have a few of the walnut squares to pop out while sawing but were easily replaced. I wondered why only walnut squares did not glue good? I have a few more to go. I purposely left my DNA signature on the finished product. I also completed the inside bulwarks and deck clamps. I had one hiccup here. The f’castle went fine. If you follow Chucks directions and take your time it all works out. When I got to the quarterdeck, the deck lamp at the waist went in perfect. When I went to put the second deck clamp piece from there to the stern, it was a bit too long. The directions say it is a bit long so you can trim to fit but I was going to have to cut into the last deck beam notch to make it fit. After measuring, cussing, walking away and coming back I finally figured out I did not fair the stern frames enough. After a cup of coffee, discussions with the admiralty and getting a signed change order I decided that it would be better to move the last small deck beam 1/8” forward instead of redoing the whole stern.


- 127 replies
-
- 9
-
-
- confederacy
- model shipways
- (and 1 more)
-
Newbie Keel Problem
Bossman replied to Jim in KC's topic in Building, Framing, Planking and plating a ships hull and deck
Jim, similar to what Dave is talking about. Once the bulkheads are in place and the wales glued on you are good to go. The angle brackets had been removed when this pic was taken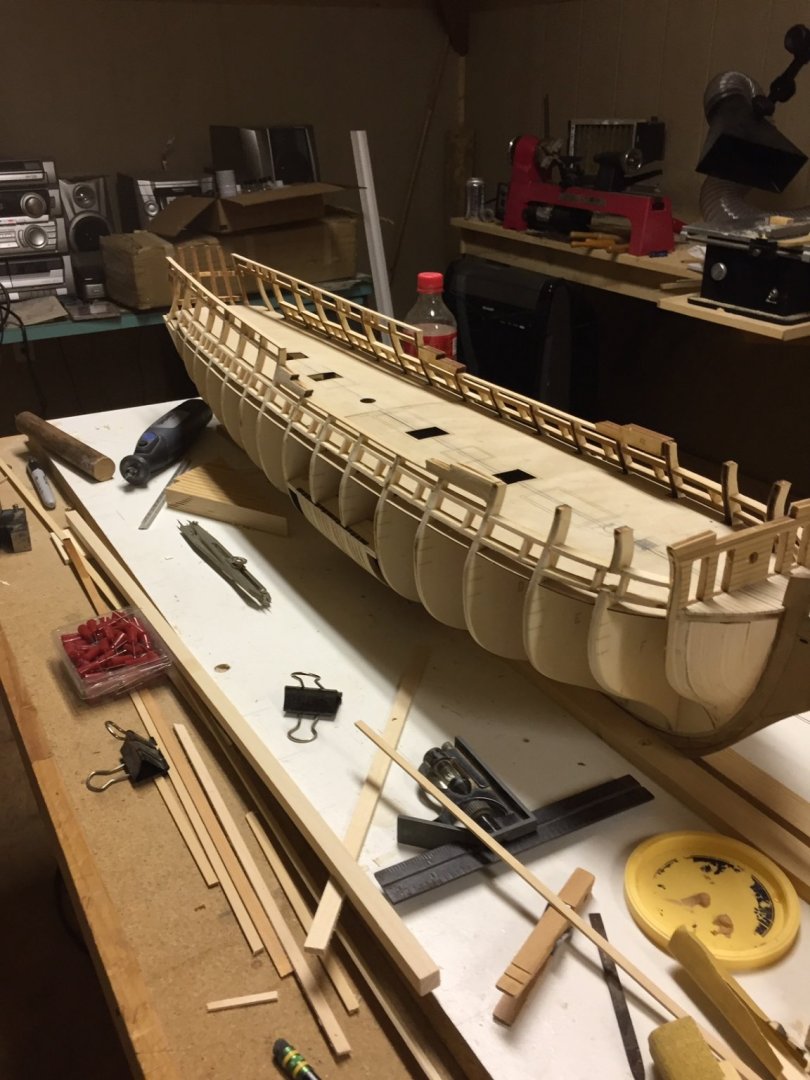
-
Brian, the jolly boat looks great. Welcome aboard.
-
Good day ladies and gents. I have finished the permanent birth for this lady. As she is somewhat of an admiralty style model I wanted the stand to be somewhat of an “in the slip” look. This is the final result. The main board is made of tiger stripped oak with the routered edge painted black. The slip is made of cherry. Thank you all for the likes. It keeps me motivated.

- 127 replies
-
- 12
-
-
- confederacy
- model shipways
- (and 1 more)
-
Glenn, looks like a fine start. I received the Cheerful a few weeks back as my next project so will be following your build. You can’t have too much info. By the way, I love your shipyard!
- 778 replies
-
- 4
-
-
- cheerful
- Syren Ship Model Company
- (and 1 more)
-
Nicely done Sir! The planking looks great.
-
Mark, she’s looking nice!
-
Script and Captain, thank you both very much! Cheers from one’s peers means a lot. Eric, I wish I could take credit for that little idea but I cannot. I don’t even remember where I saw it. The ones I have are going on 20 years old.
- 127 replies
-
- 2
-
-
- confederacy
- model shipways
- (and 1 more)
-
Congratulations on your completed model Eric. She is very nice.
- 155 replies
-
- 1
-
-
- opium smuggler
- Authentic Models
- (and 1 more)
-
She’s looking very nice Phil. Great work.