Osmosis
-
Posts
626 -
Joined
-
Last visited
Content Type
Profiles
Forums
Gallery
Events
Everything posted by Osmosis
-
Thanks for all the great advice. I guess I should have made it a little bit more clear. The seller is local so I will be seeing the kit before actually purchasing it. And she did send a picture of the kit contents. Regards
-
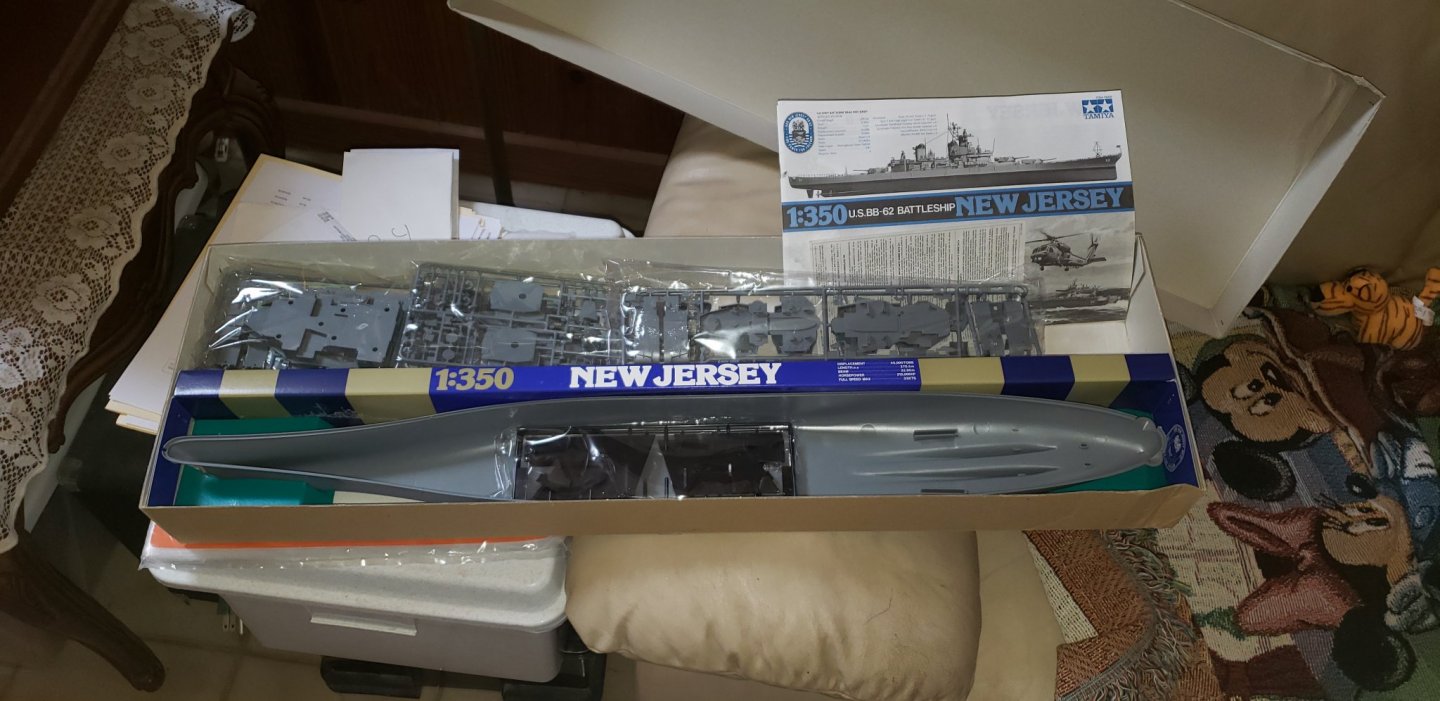
OK I feel like I am being a traitor to all my wood loving ancestors but here goes. I have a chance to buy a Tamiya 1/350 BB-62 A kit that I have wanted to build since I was a kid growing up in New Jersey. Someone has it listed on one of the sites for $20.00. A quick google search tells me that is an excellent deal. Being the pessimist that I am I know it is to good to be true. Is there anything I should look for as far as the completeness of the kit goes should there be anything special in the box other than a hull and some sprues full of parts. I am meeting the seller at 4 tomorrow and would like to have an idea what to look for. Once I have the kit that's when the real challenge begins for all of you plastic scrapers. I will need lots of hand holding to get through this one. Ok I have to go roll around in some saw dust now. Regards
-
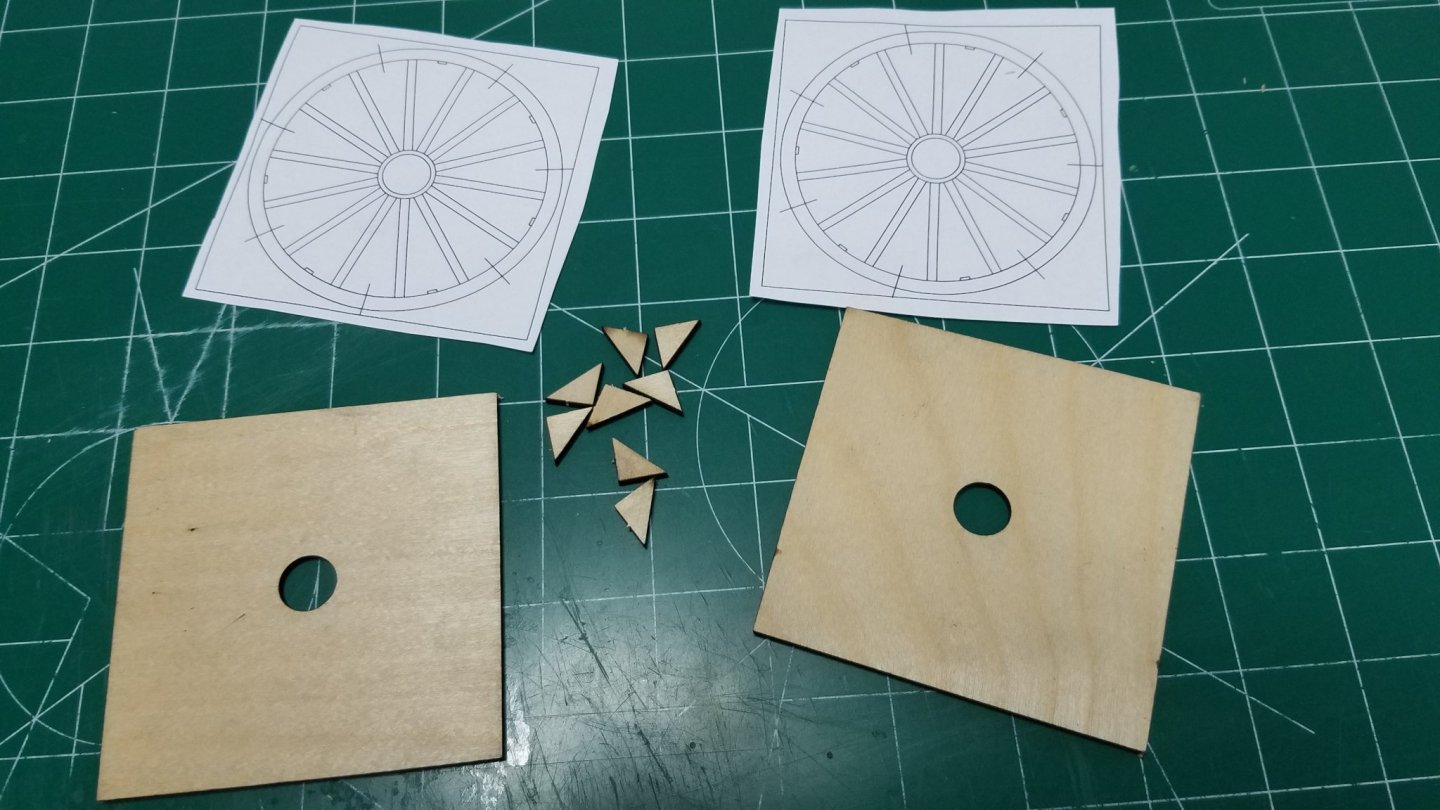
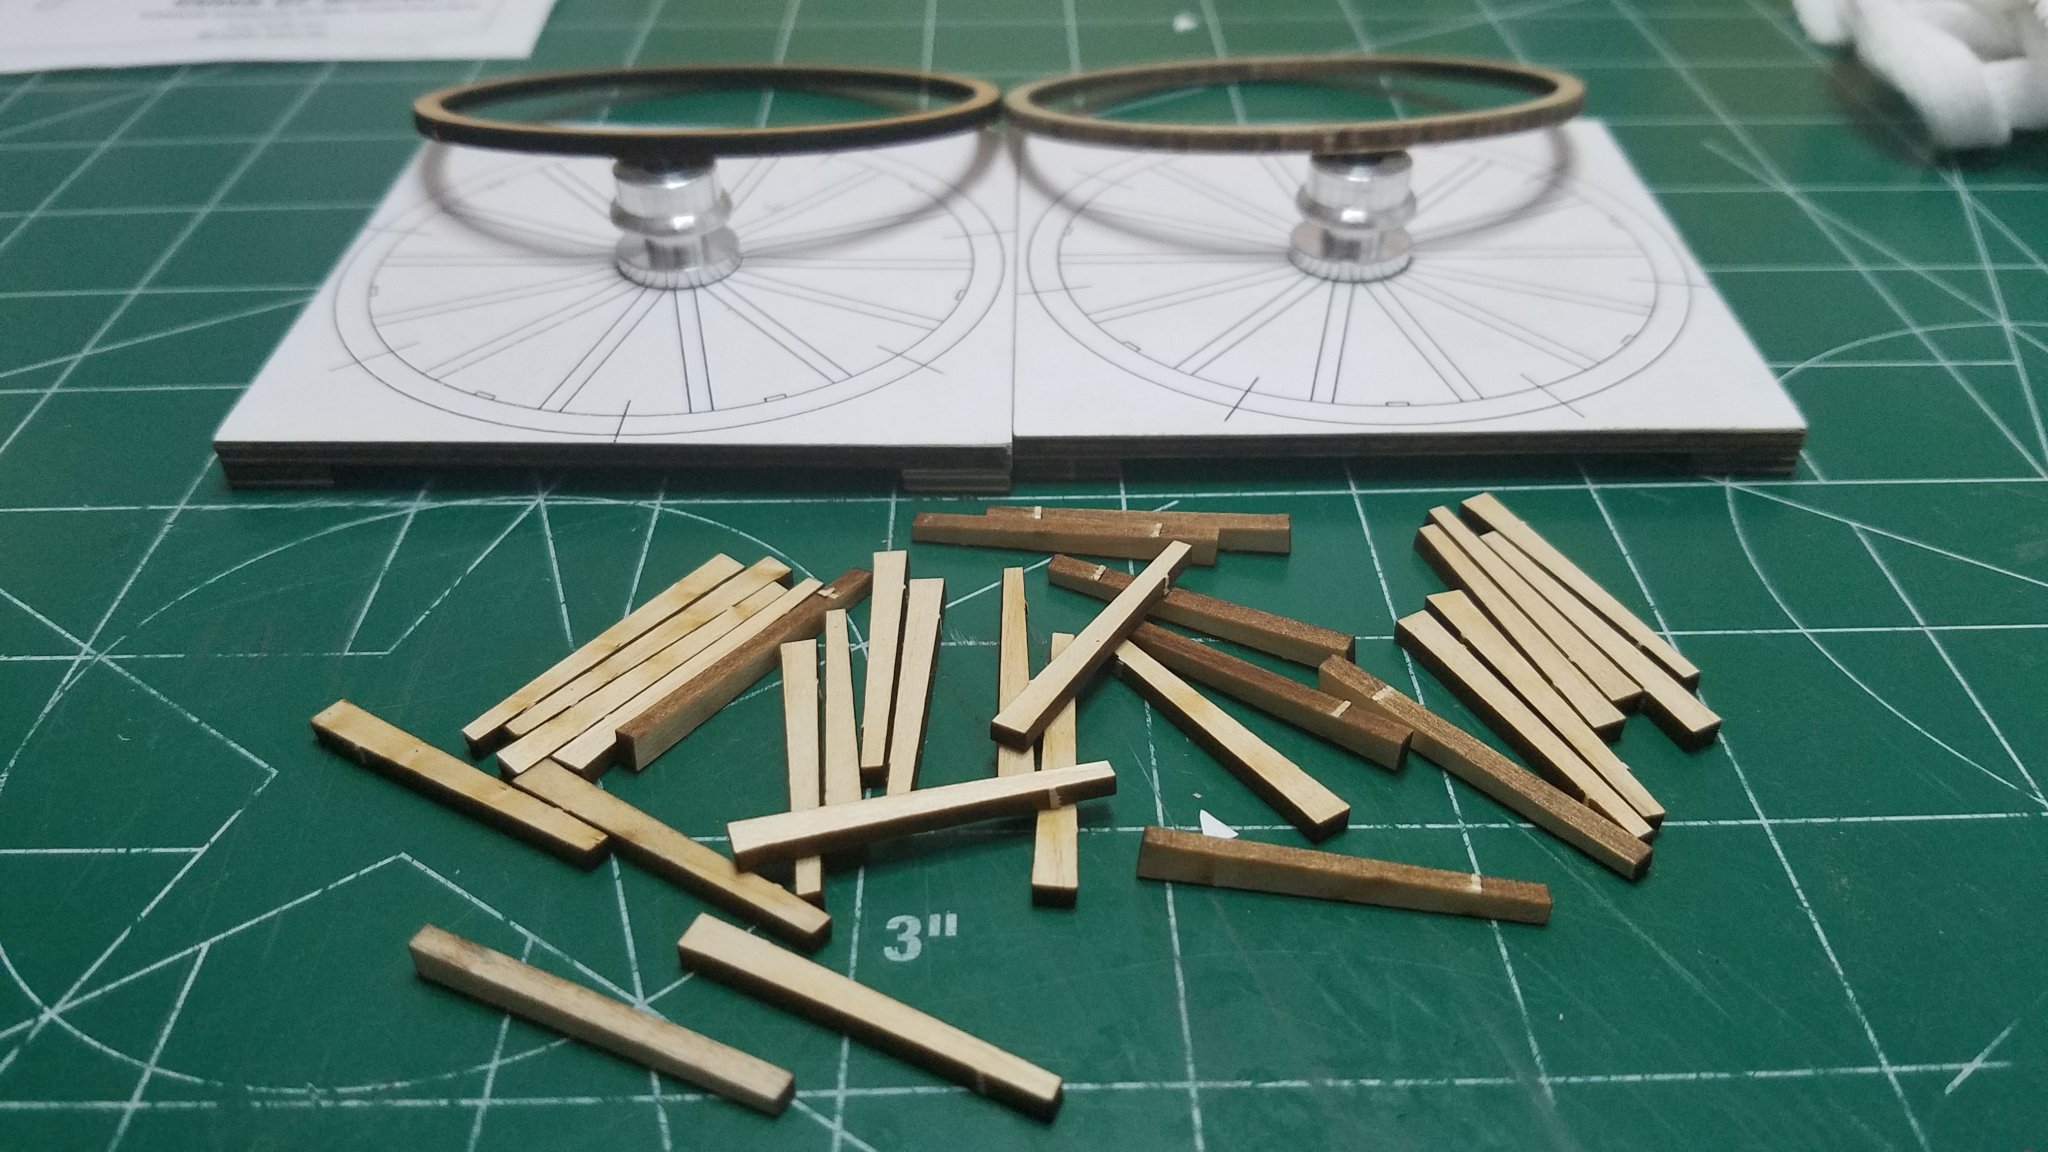
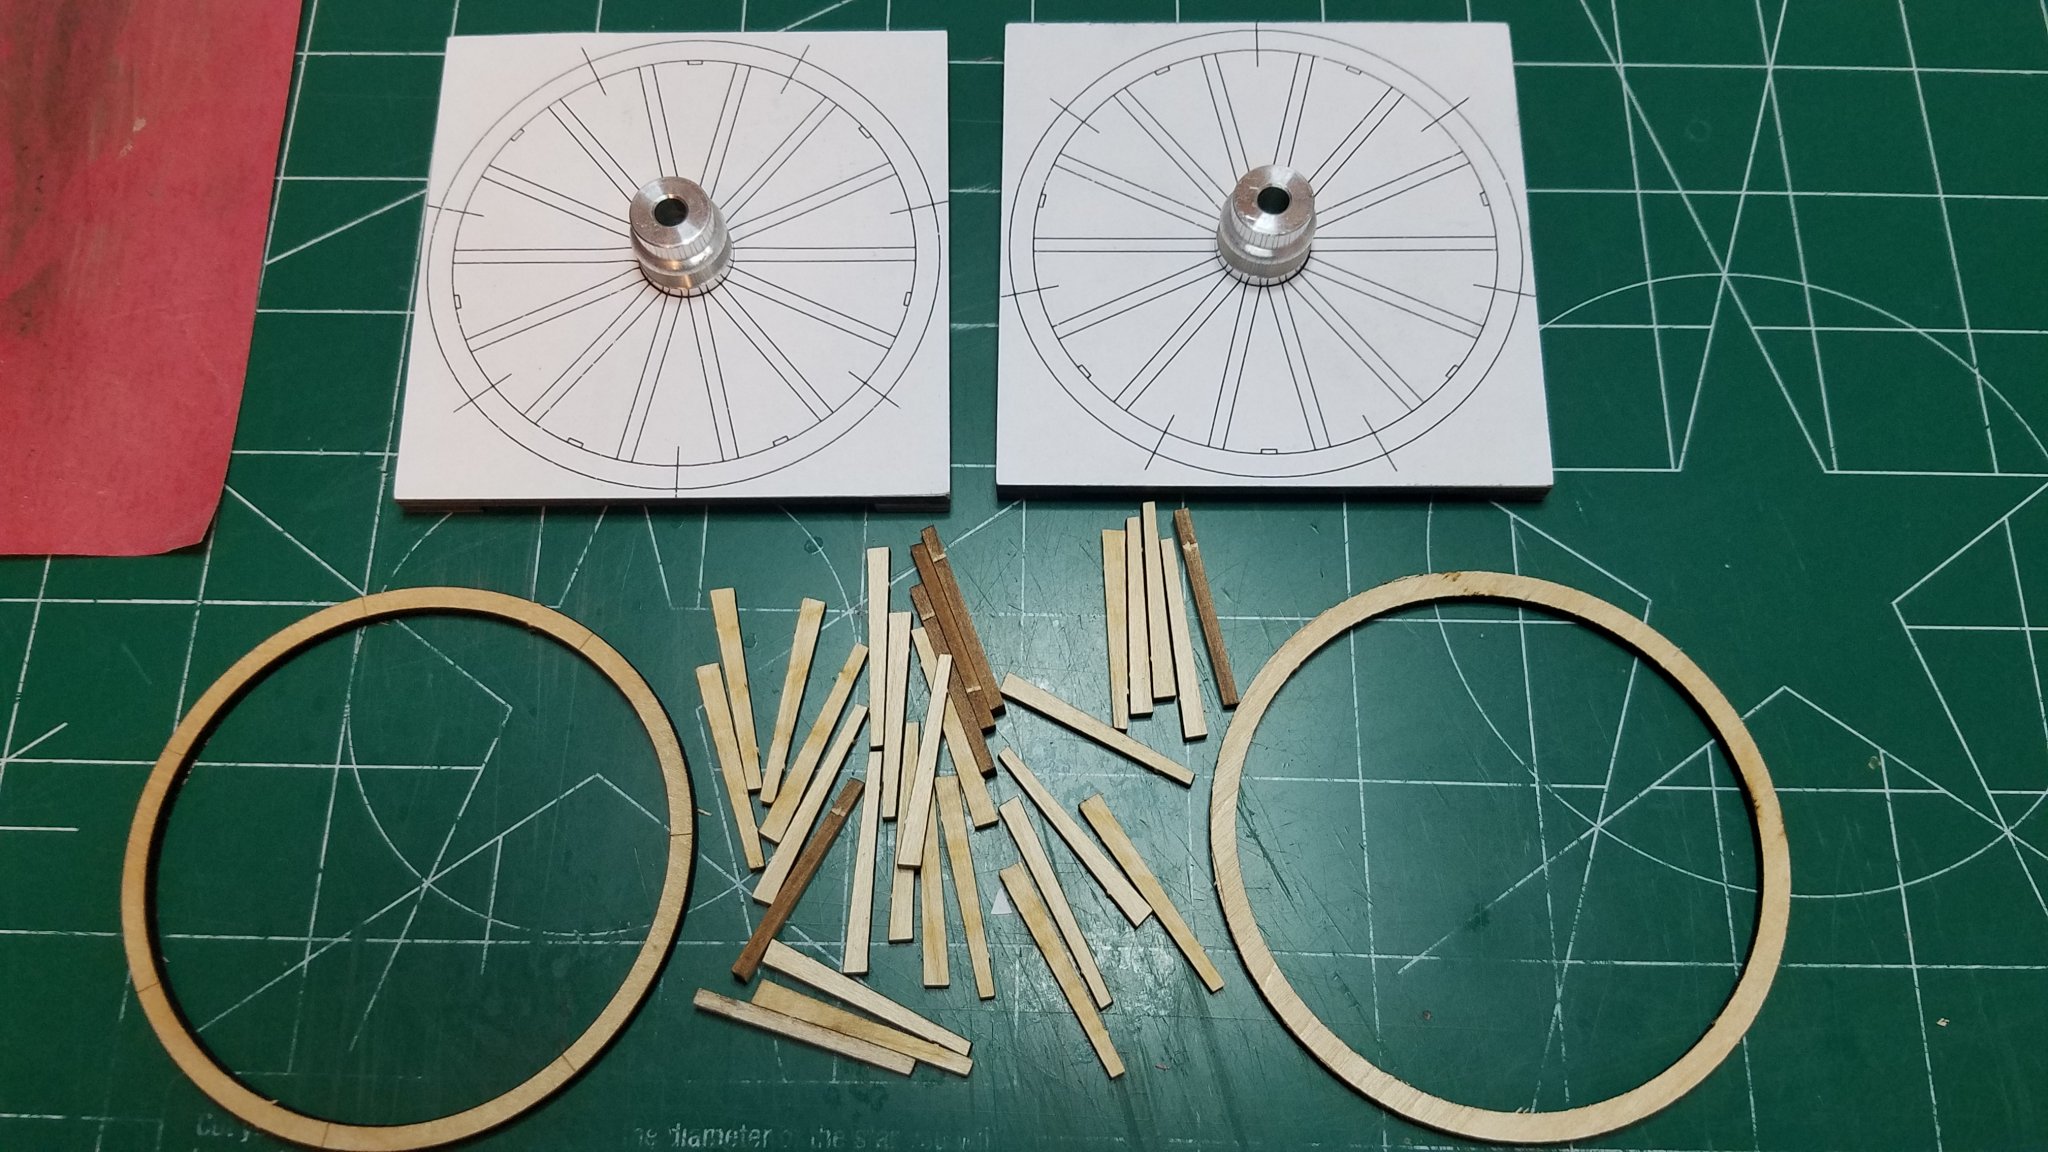
 I emailed the above picture and explanation to John at Model Expo. It turns out a couple of these kits were indeed shipped out with the wrong spokes. Guess who the lucky recipient was. As always they were very upfront and helpful and my new spokes are on the way as I write this. These guys are the best!
 -
WOW! I have not checked in in a while. What a difference a couple of days make. Amazing. Those seats are great! I will have to look in more often.
- 69 replies
-
- 1
-

-
- canoe
- restoration
- (and 1 more)
-
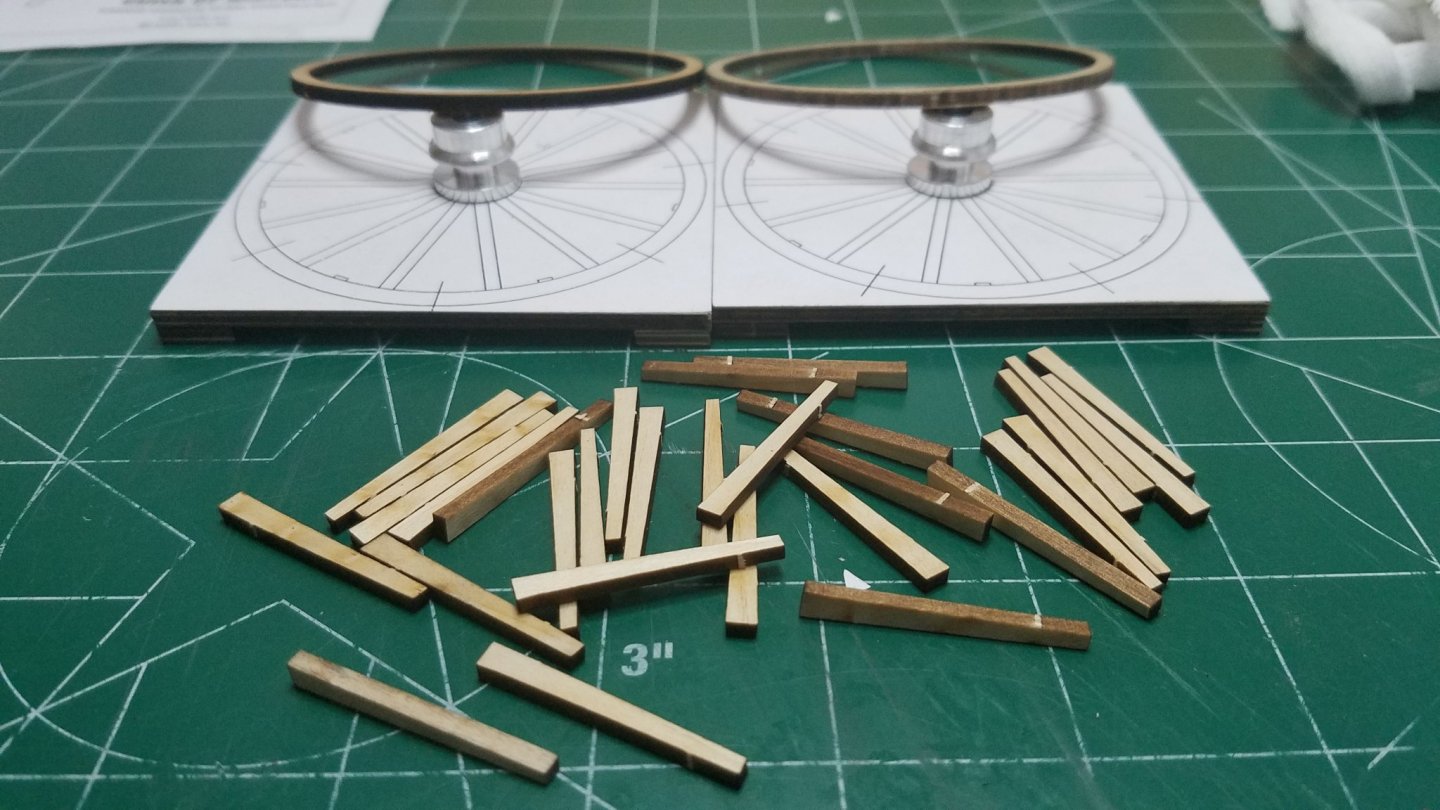
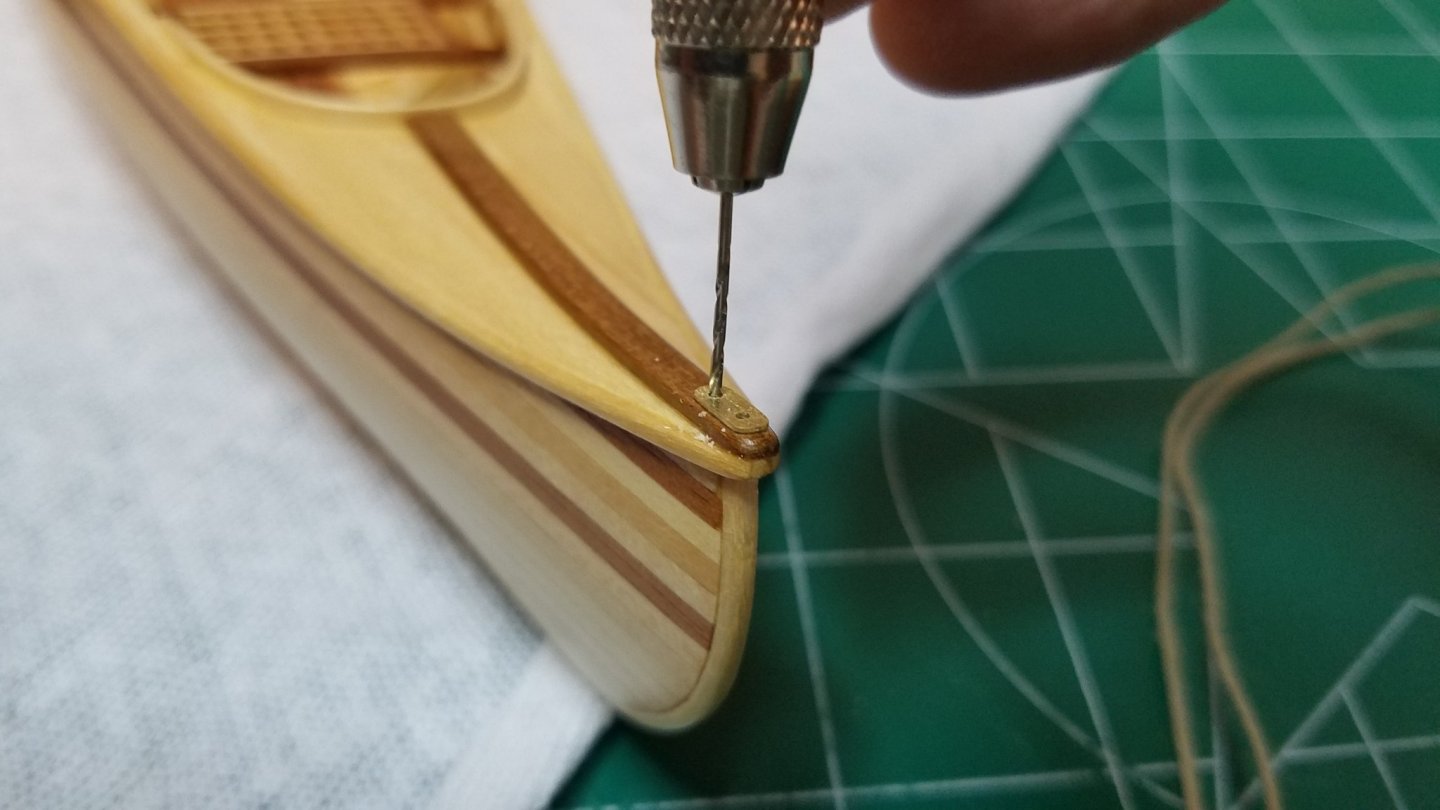
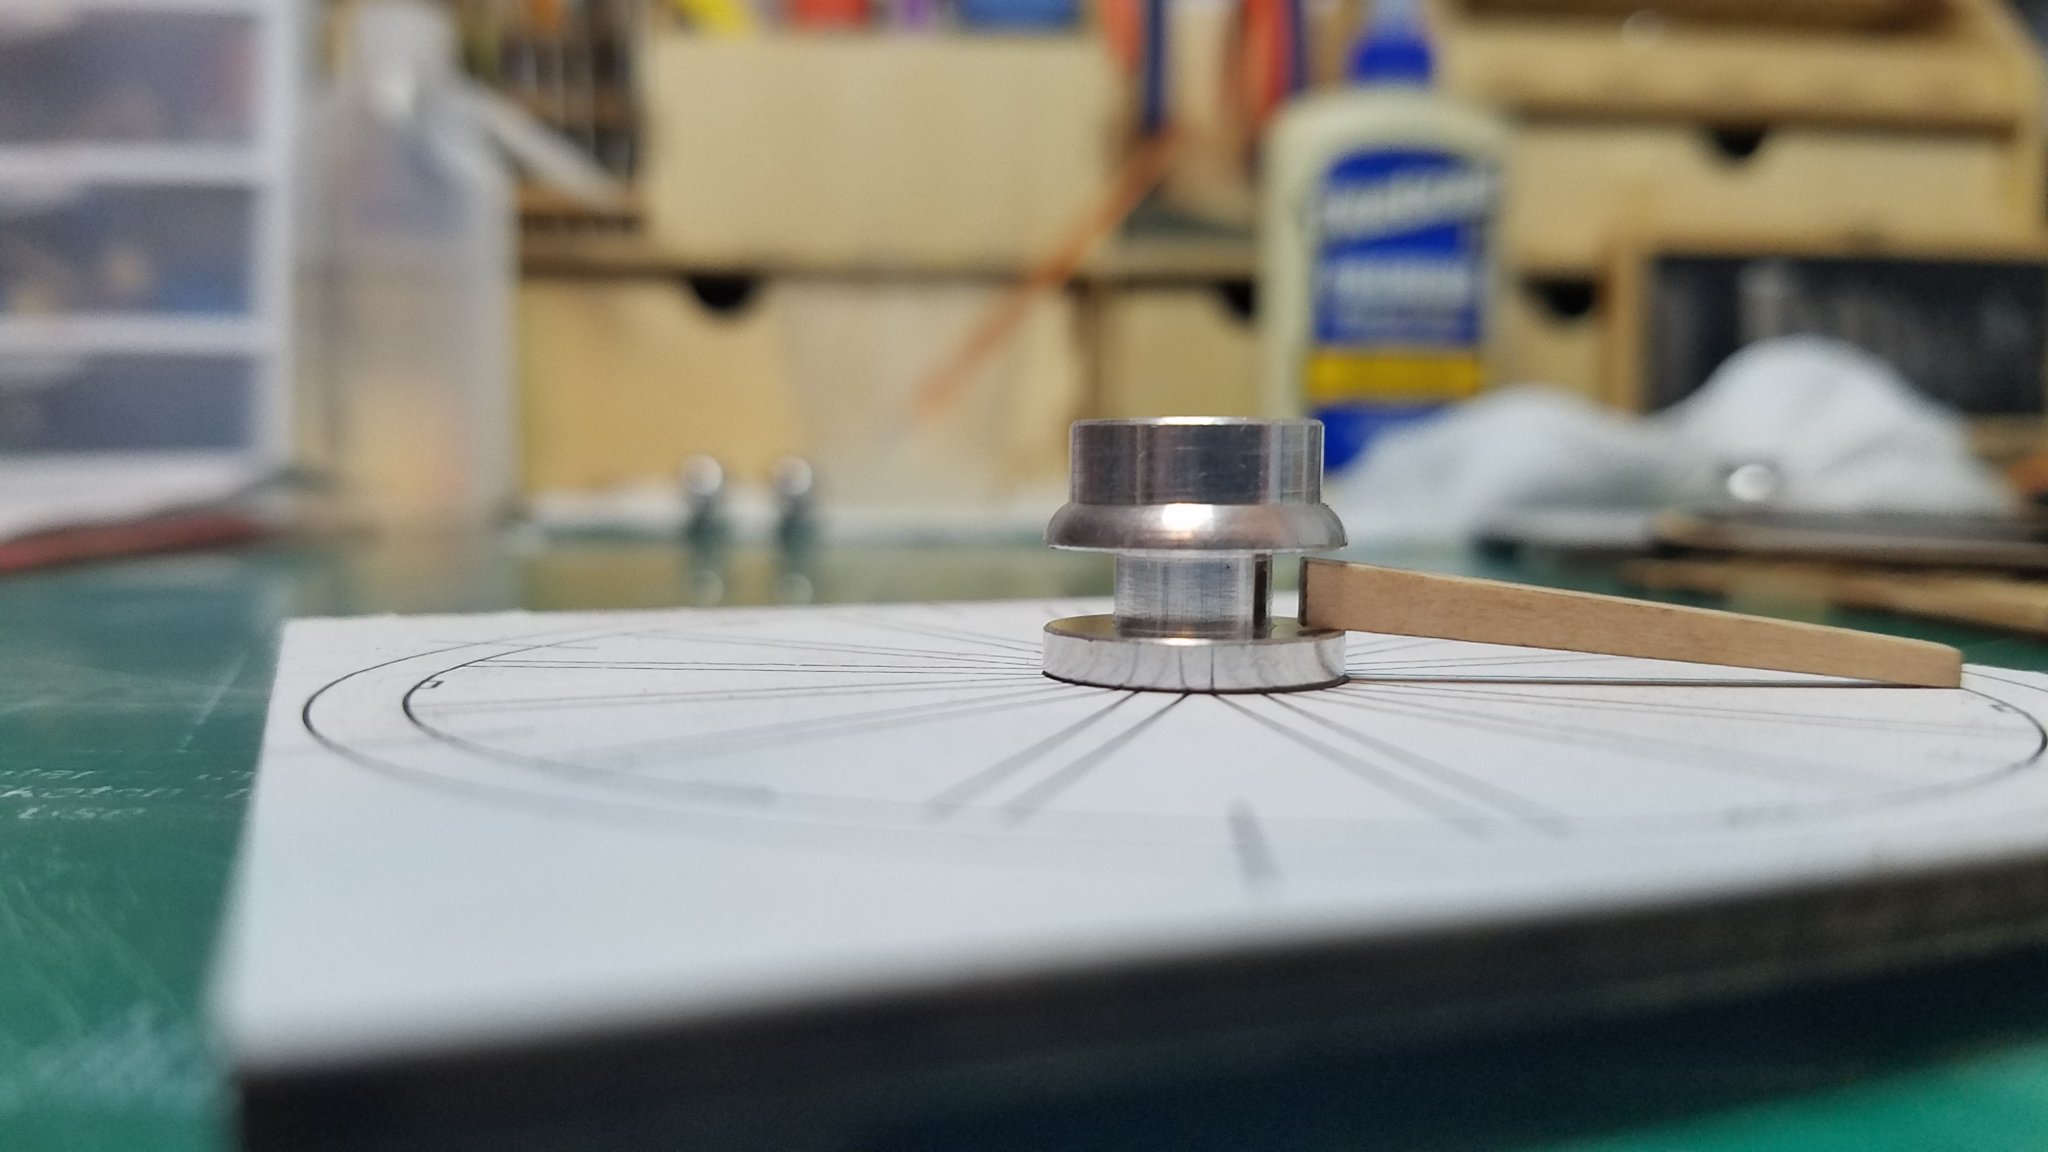
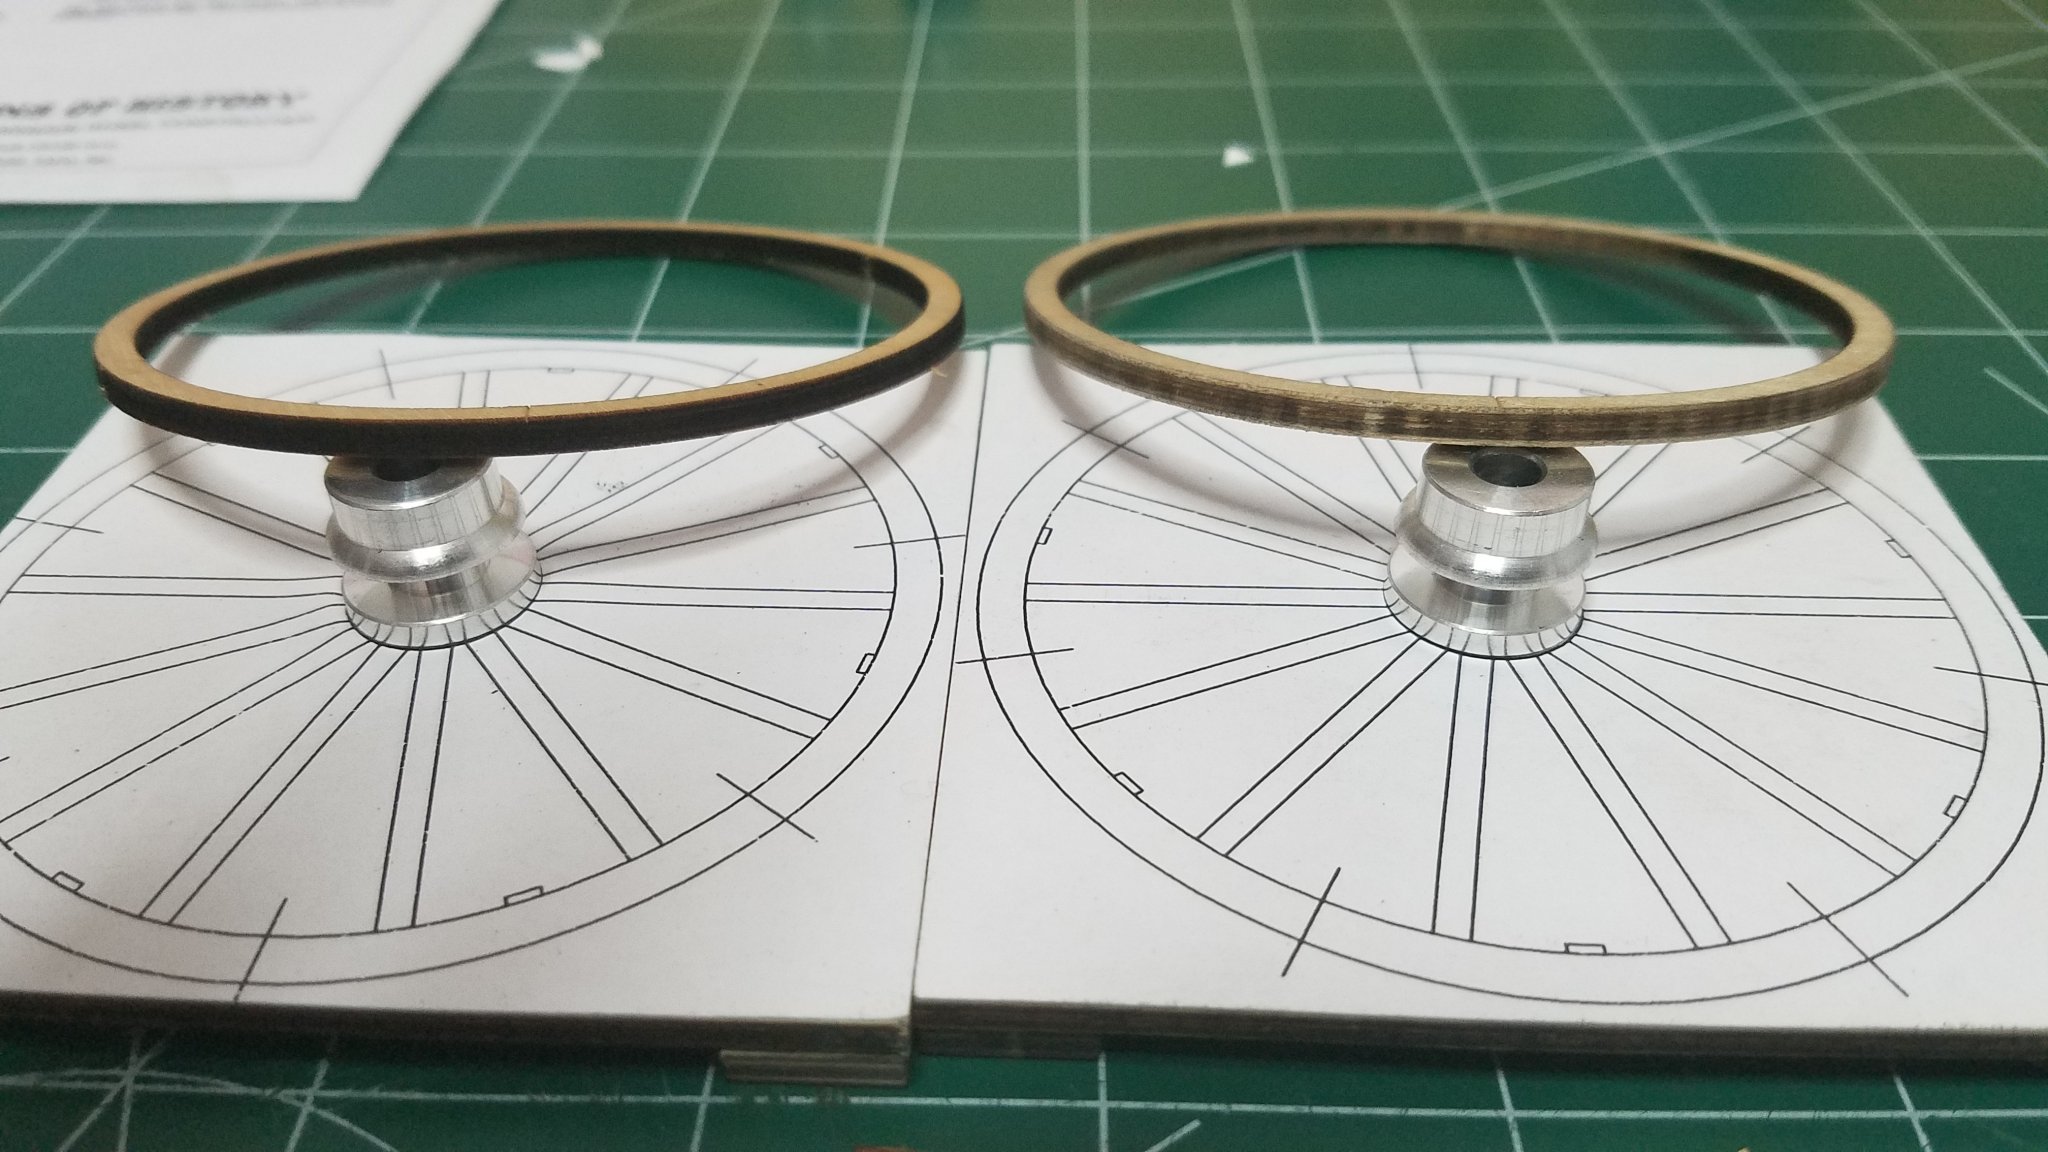
Well it is not that I have not been working. Just that it is kind of boring work removing char. Especially when there is so much of it. But I am getting ahead of my self. First I had to build the jigs for building the wheels. Pretty simple glue on the feet then align trim and glue on the templates. I love elmer's glue stick. Next I punched out all the pieces for one set of wheels. The spokes are not so bad and fairly easy since they are all flat surfaces. But...... I worked for close to a half hour on the rim on the right and am still no where near done removing the char. Will someone please tell me the secret! I got a little ahead of myself and wanted to see how things went together. As you can see there is a lot of slop in the fit of the spokes to the hub. The plans do indicate that the spokes do not bottom out in the hubs but they even indicate that you may need to remove some material to fit them in the groove. I need to add about a 1/16 of an inch just to get them to touch both sides. I think I will send these pics to Model Expo and see if they have a fix. In the mean time I have lots of char to remove. Best Regards
.thumb.jpg.0d91ea7a694e3f4e76d828ed2f80164e.jpg)


- 11 replies
-
- 12
-
-
Hello an Welcome Aboard. I can appreciate the whole keeping proper separation of the Admiral and crew thing. Ditto on the build log. Enjoy and stay safe
-
Is this going to be a log of your restoration. Cause you know I'm in.
-
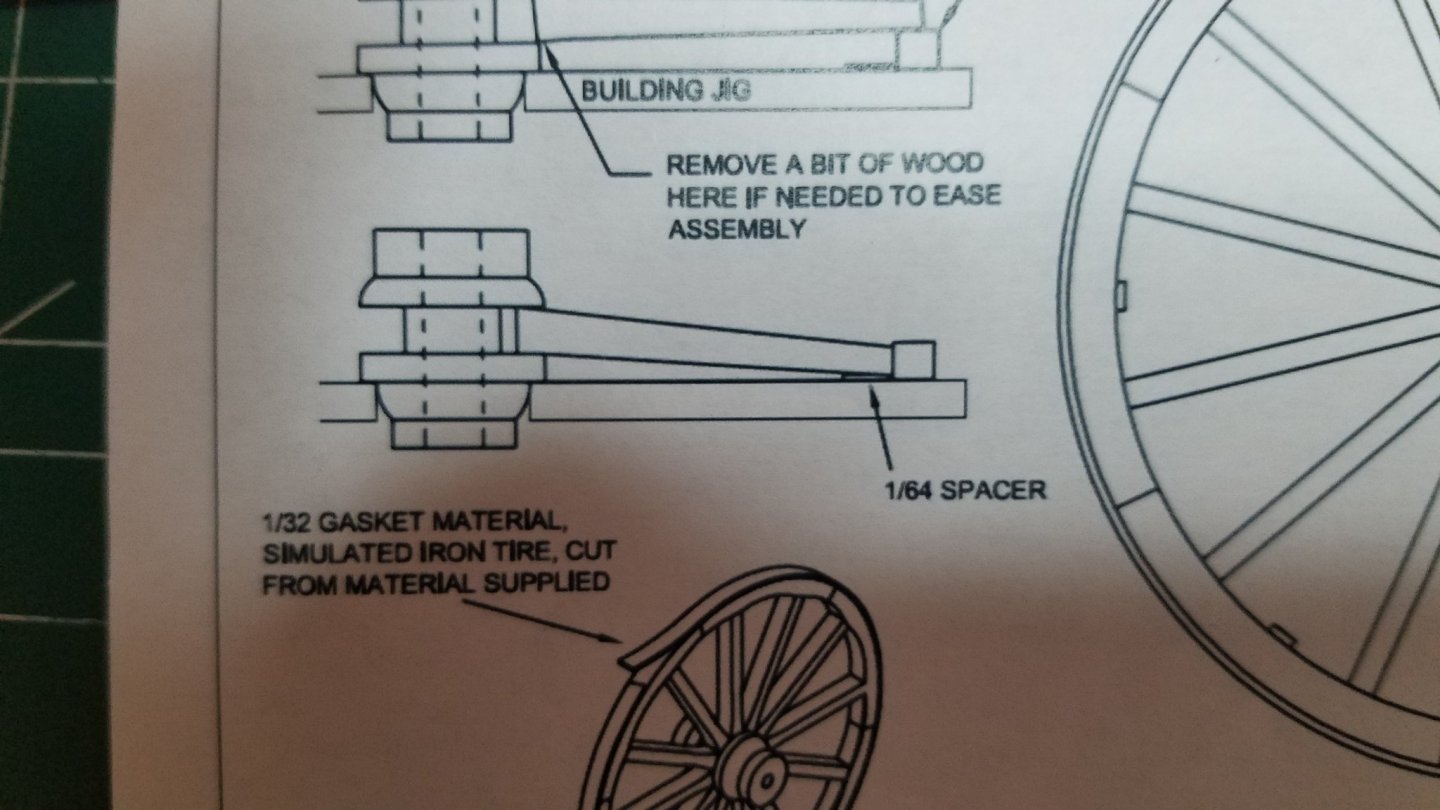
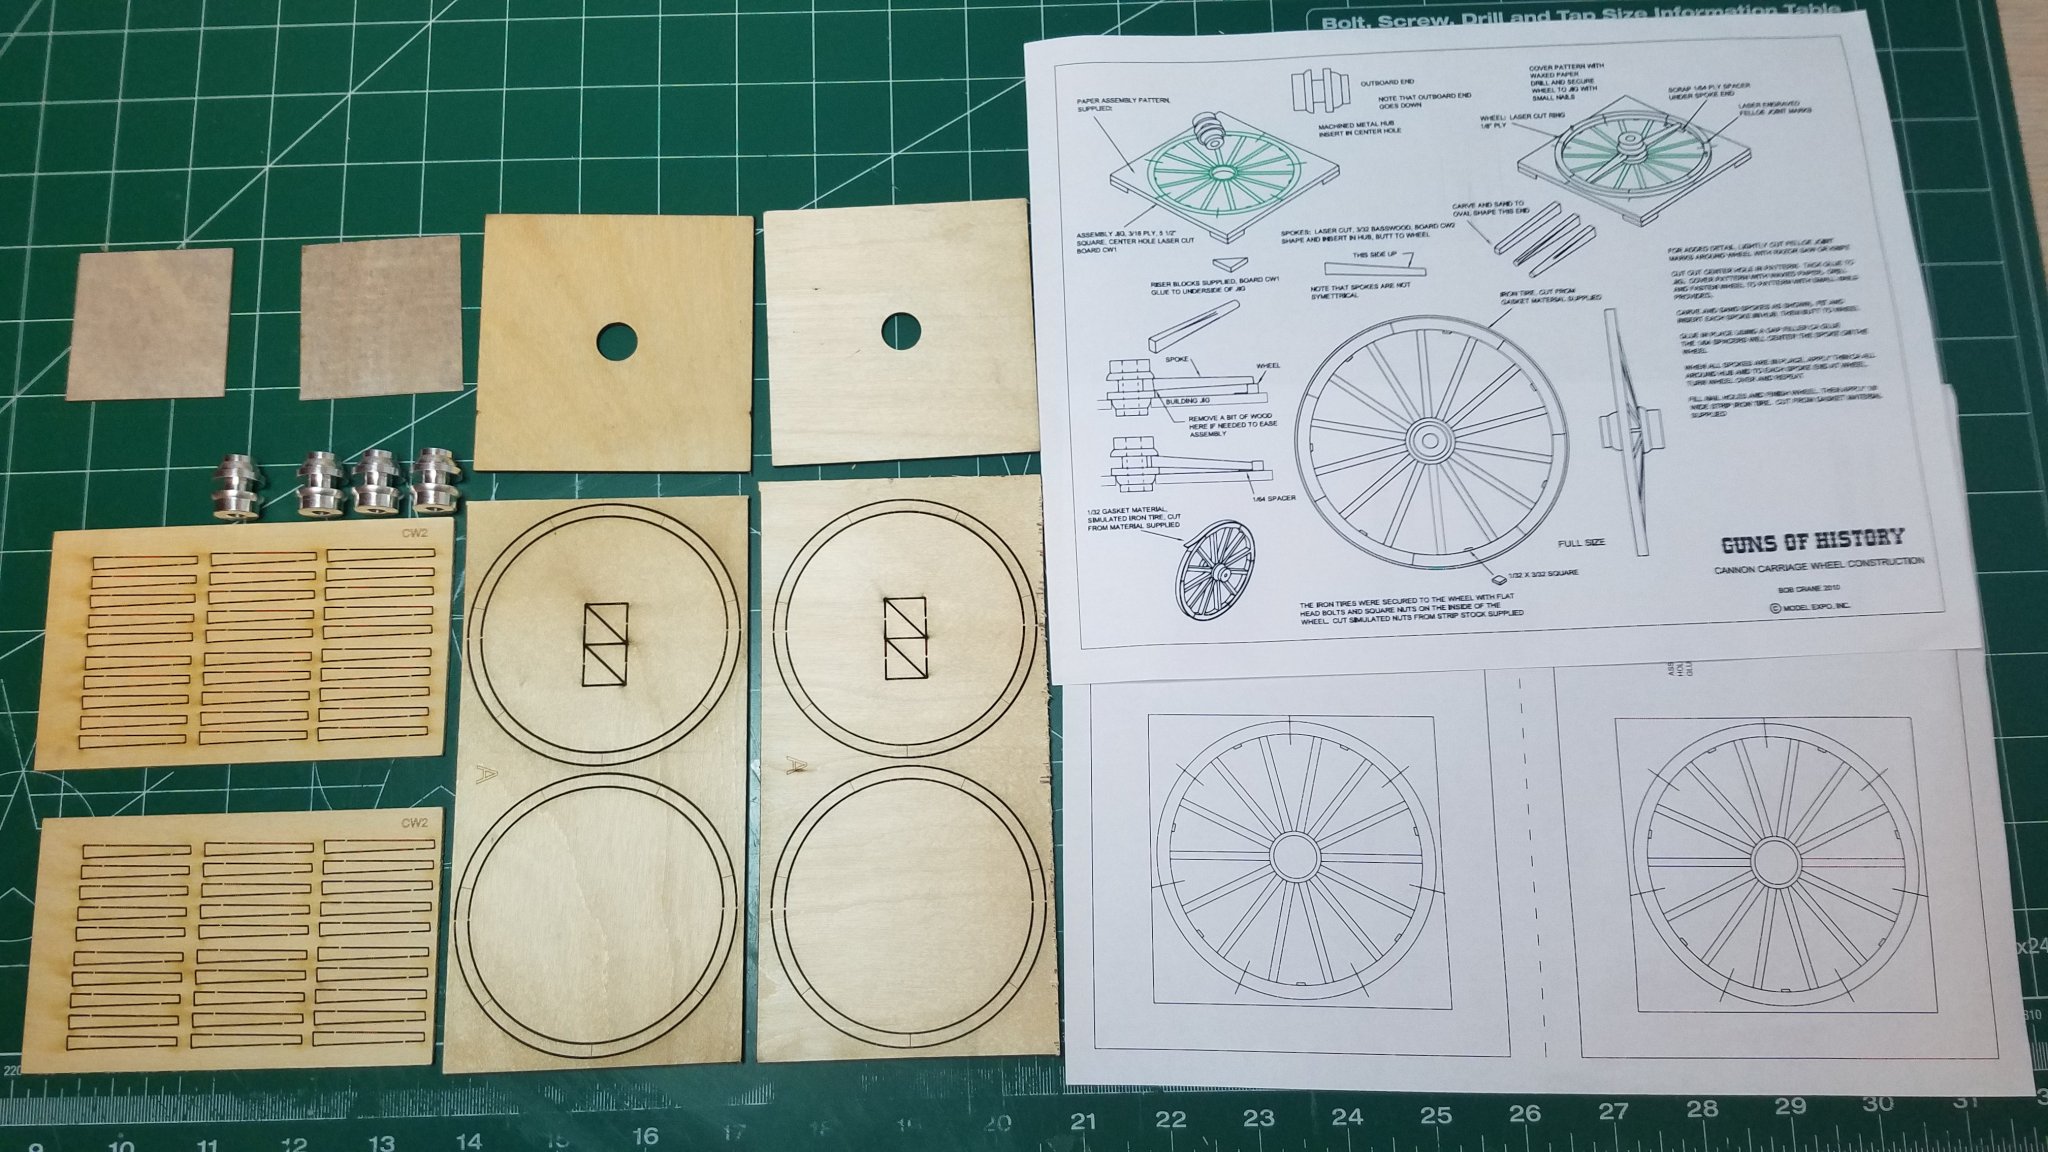
I started out tonightby reading all of the various instructions and inventorying all of the parts. Wow. The included instructions were written for the original version of the two kits which as I said were virtually made all from cast metal parts. These sheets provide the general assembly order and a very rough exploded view of each. Then there are "Updates" for both sets of instructions which when you can't find a part called out in the old instructions you need to refer to to see how to make it out of wood. Sounds confusing and it was on the first read through but once I figured out what was going on it sort of made sense. I think the best way to tackle it will be to make all the wooden parts from the updates and then proceed as normal through the original assembly instructions. Since the wheels are pretty straight forward I decided to start there. As you can see they did provide two complete wheel kits. Including building jigs so I will be able to build them in pairs. That should speed things up a bit. My fingers and hands are already starting to ache just looking at those 60 spokes all of which need to sanded and shaped. That should keep me busy till the weekend which is fine because Amazon is so backed up my Aluminum Black for the hubs will not be here until Saturday anyway. I am going to take the templates into work tomorrow and make copies before I get started with any assembly. That's it for now. Best Regards and stay safe.

- 11 replies
-
- 10
-
-
Great looking start. Heck I used my building slip for my San Francisco Cross Section and it only has 4 frames. I will take all the extra hands I can get every time. Especially when it is just sitting there leaning up against the wall.
- 66 replies
-
- 1
-
-
- Finished
- Model Shipways
- (and 1 more)
-
Thank you to whom ever mark this finished. I forgot, my apologies.
-
I just found and read your build so far. What wonderful work you have done so far. I also read you first build log and after that I can't wait to see where you take this one. Consider me along for the ride.
-
Thanks for the comments and all the likes. Aluminum black is on order from amazon. Ron, the cast metal parts are white metal/britannia the wheel hubs however are machined aluminum. Regards
-
Count me in. I'm sure you know this already but Model Expo will replace those parts at no charge.
- 66 replies
-
- 1
-
-
- Finished
- Model Shipways
- (and 1 more)
-
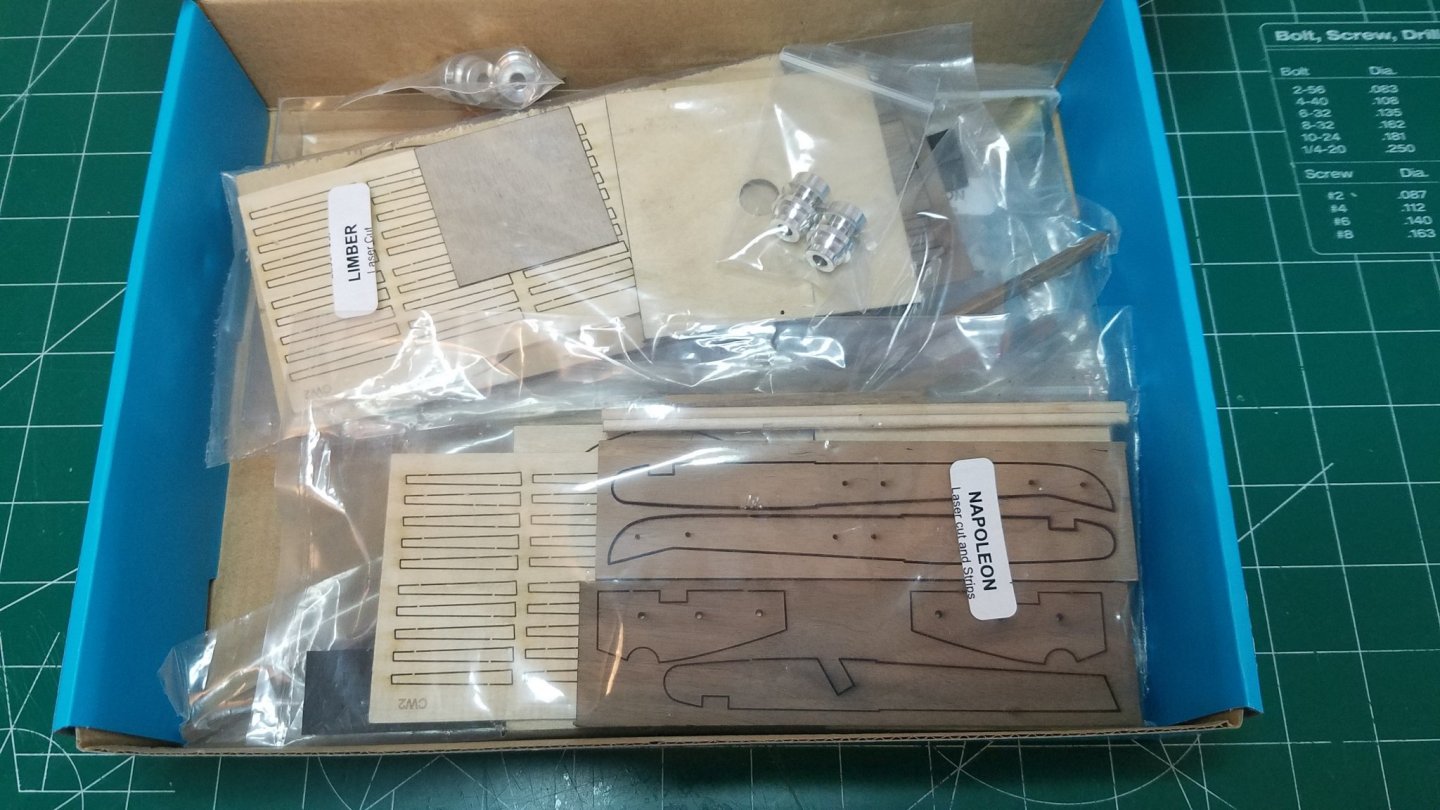
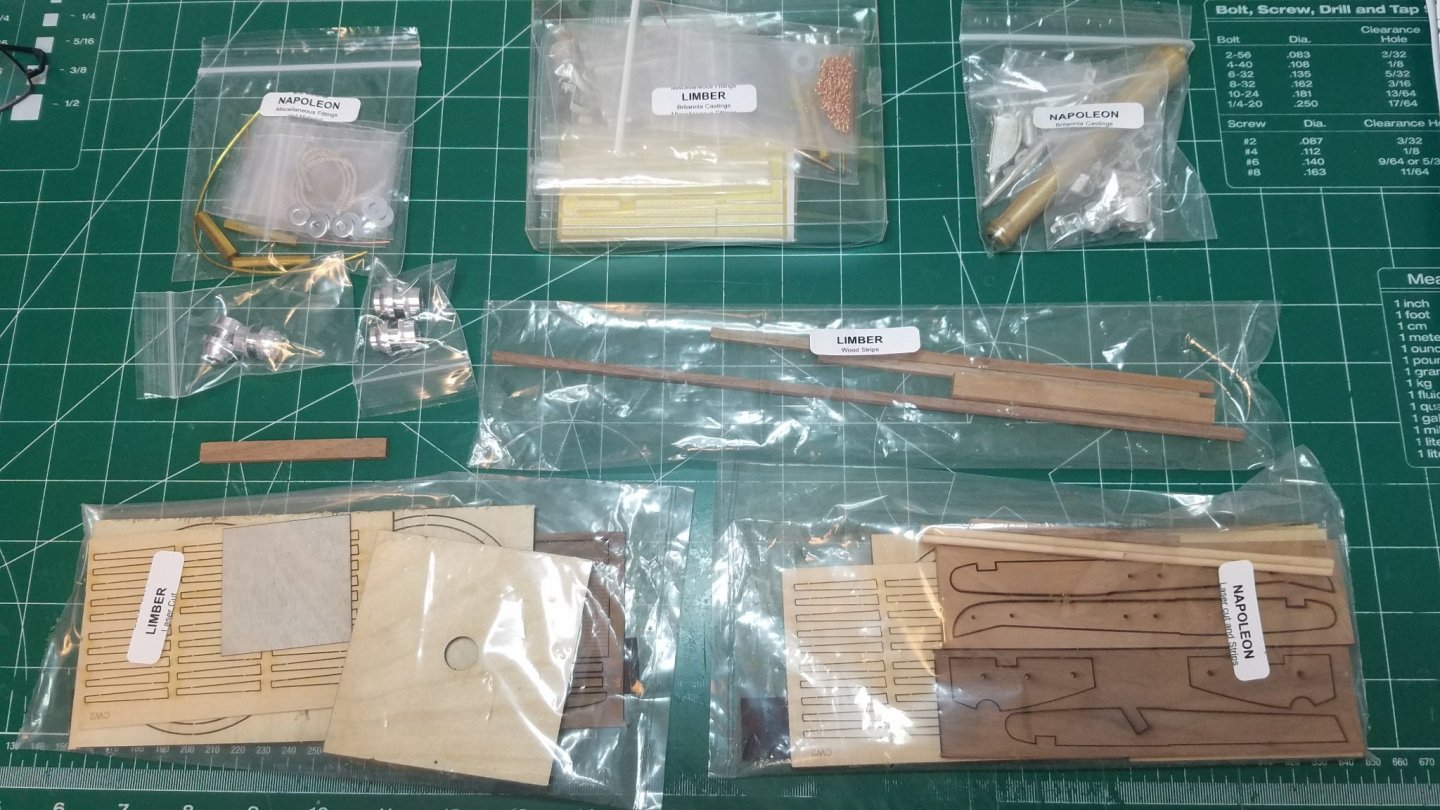
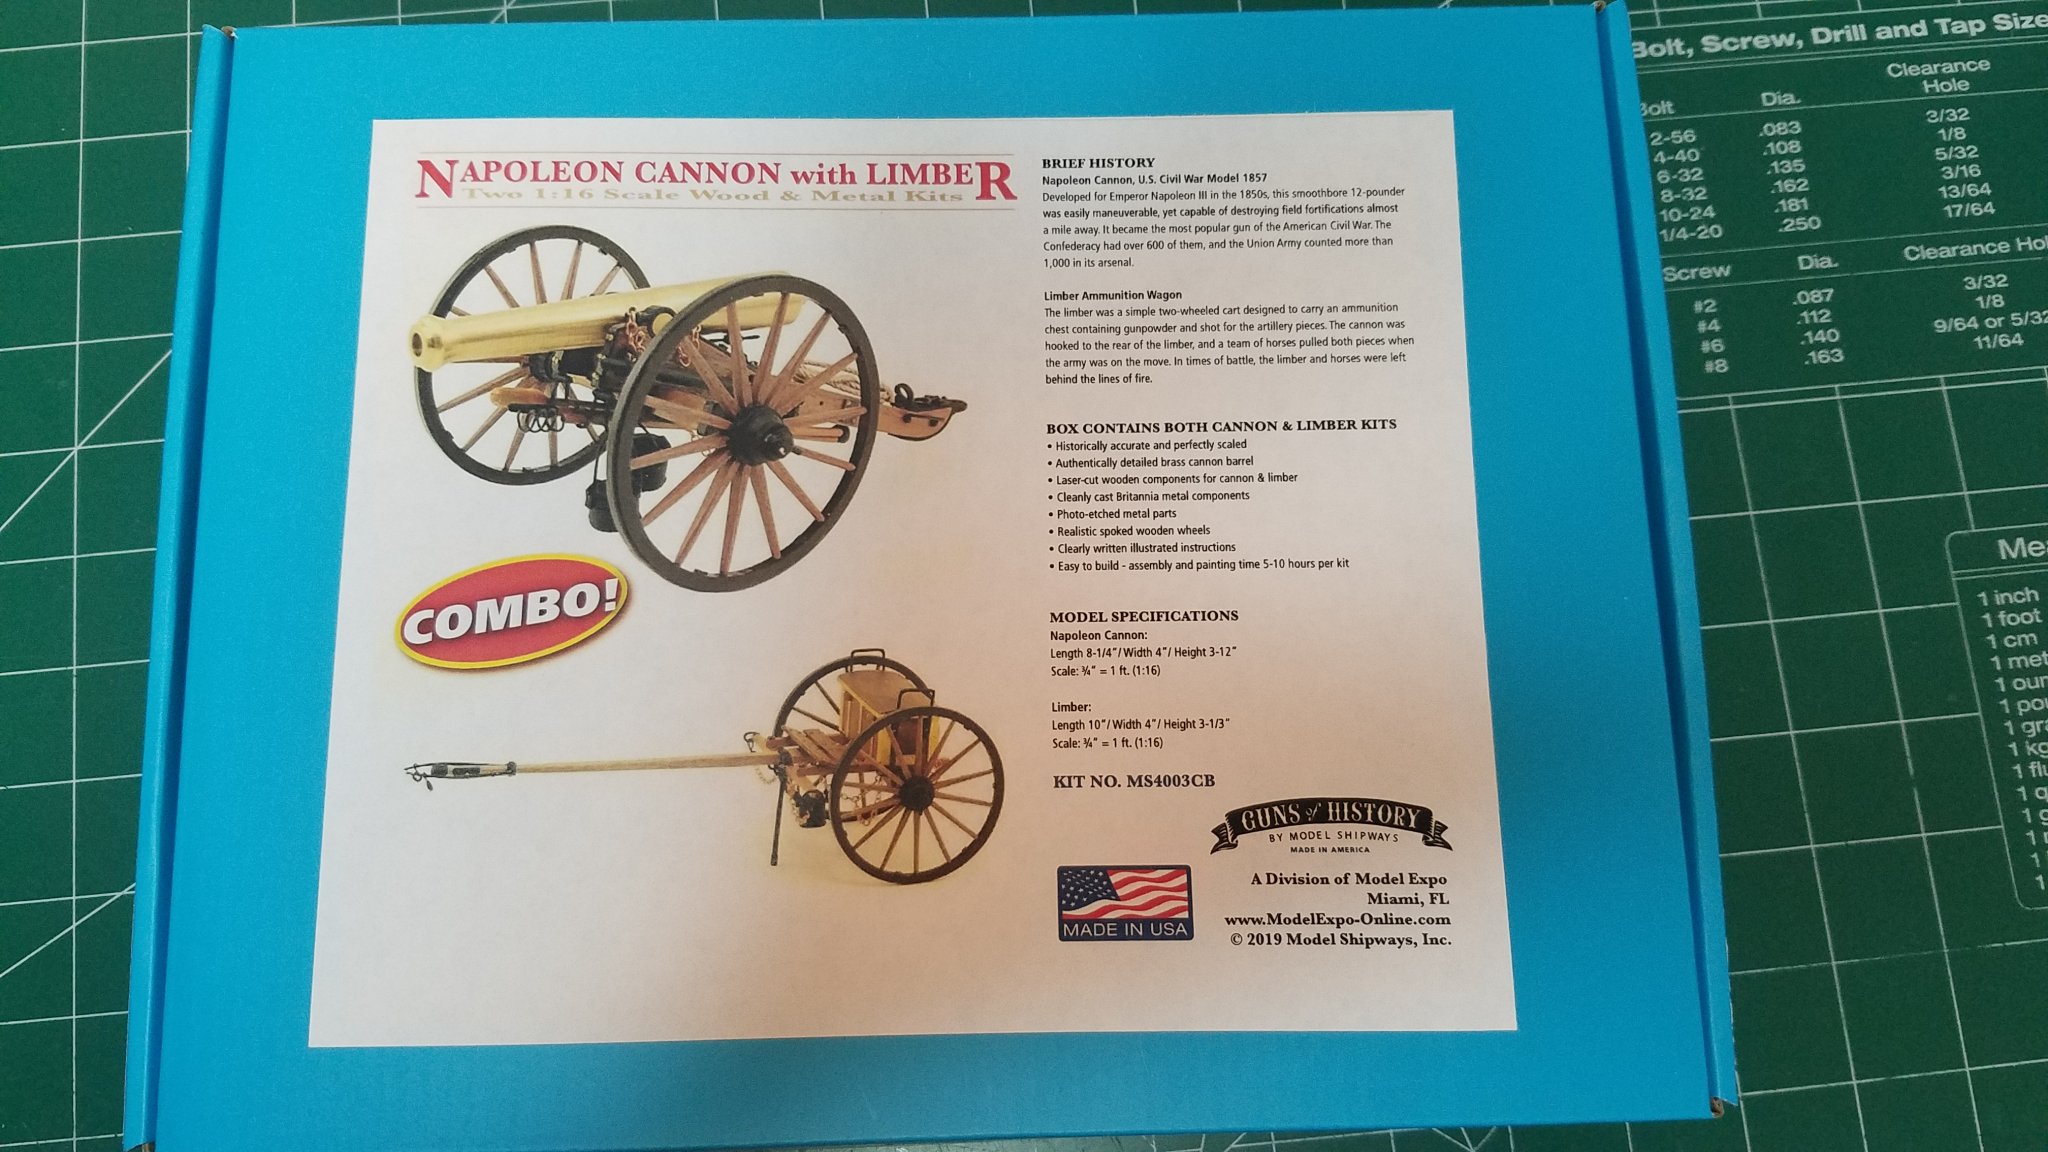
I picked this up sometime before last Christmas and having just finished my Midwest Canoe I feel like this will be a nice change of pace. I got this at the introductory price when it first became available which turned out to be a pretty good deal. The packaging is nice as are all Model Expo kits. There are lots of instruction sheets and parts lists and other documentation. This is one area in my opinion they could do a little better. I found the same thing with the Naval Smooth Bore kit the instructions were more generalized guideline than specific instructions and can be confusing in some spots. The parts are all individually packaged and labeled The laser cut parts are all nicely cut and sorted. One thing that stands out in this Model Expo kit is the limited use of white metal parts. I don't mean to say that there are not many, because there are quite a few. The difference is that there is no imitation wood parts cast from metal with wood grain cast on them. On most of their kits even the wheels and carriage parts are cast metal. In this kit however all the parts that were wood on the real thing are wood and all the metal parts are metal. Speaking of wood all of the sheets are solid wood free from any defects I can see. The only plywood in the kit seems to be the building jig for the wheels. There is also a very nicely turned brass cannon barrel. I will start working on this one in earnest tomorrow night. For now my first question is how to blacken the machined aluminum wheel hubs. Will gun bluing work on aluminum? Best Regards and stay safe.


- 11 replies
-
- 14
-
-
Never Mind I Figured It Out. I am having trouble creating an album. When I select "gallery/completed kits/add images/create new album". It asks me to enter the URL for my pictures? My pictures are from my hard drive and my build log. Not sure what to do from here. Thanks in advance
-
This build was so enjoyable I have actually given thought to scaling up the plans and building a 1/6 scale version. In the mean time I have a Model Expo cannon and limber combo I picked up when they first became available or I might start my AL King of the Mississippi. Or I might try to track down another Midwest Kit.
- 84 replies
-
- 1
-
-
- peterboro canoe
- Finished
- (and 1 more)
-
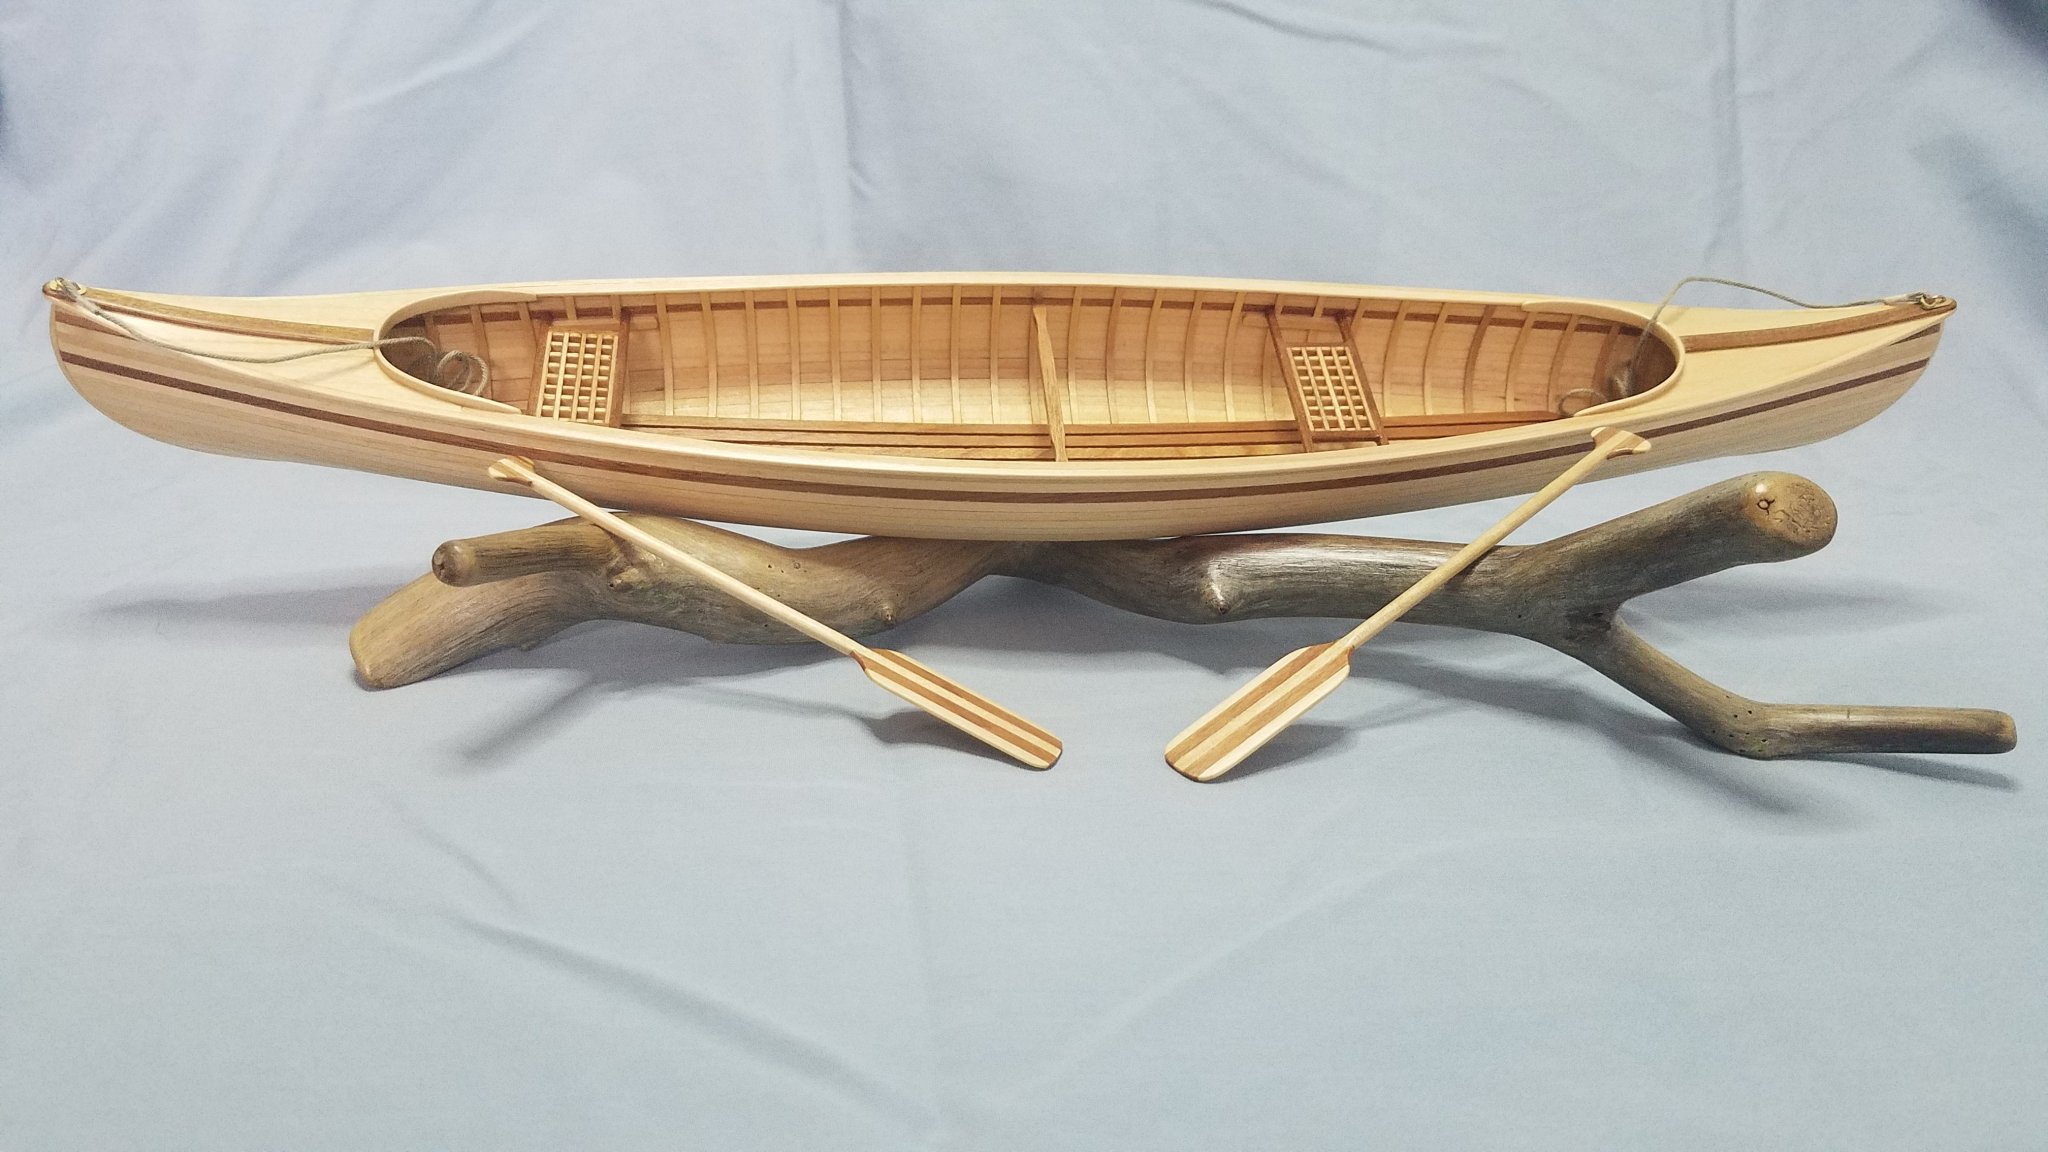
Well done and by golly done. I tried to take some shots with the only neutral background I had. I thought I might post them in the gallery. But as you can plainly see I am no better at photography than I am at playing concert violin. Here is the base with 3 coats of wipe on poly. And a couple of parting shots. Since I took them I might just as well post them. Thanks again to all. On to the next thing. Regards and stay safe.


- 84 replies
-
- 13
-
-
- peterboro canoe
- Finished
- (and 1 more)
-
Thanks Bob, I agree the base is just a "supporting" character in the overall story. Some stories however require more "support" than others and in some cases the base while still short of being a complete diorama can still steal a scene now and then. Wow, I think I was channeling Siskel and Ebert there for a moment.
- 84 replies
-
- 1
-
-
- peterboro canoe
- Finished
- (and 1 more)
-
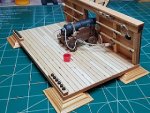
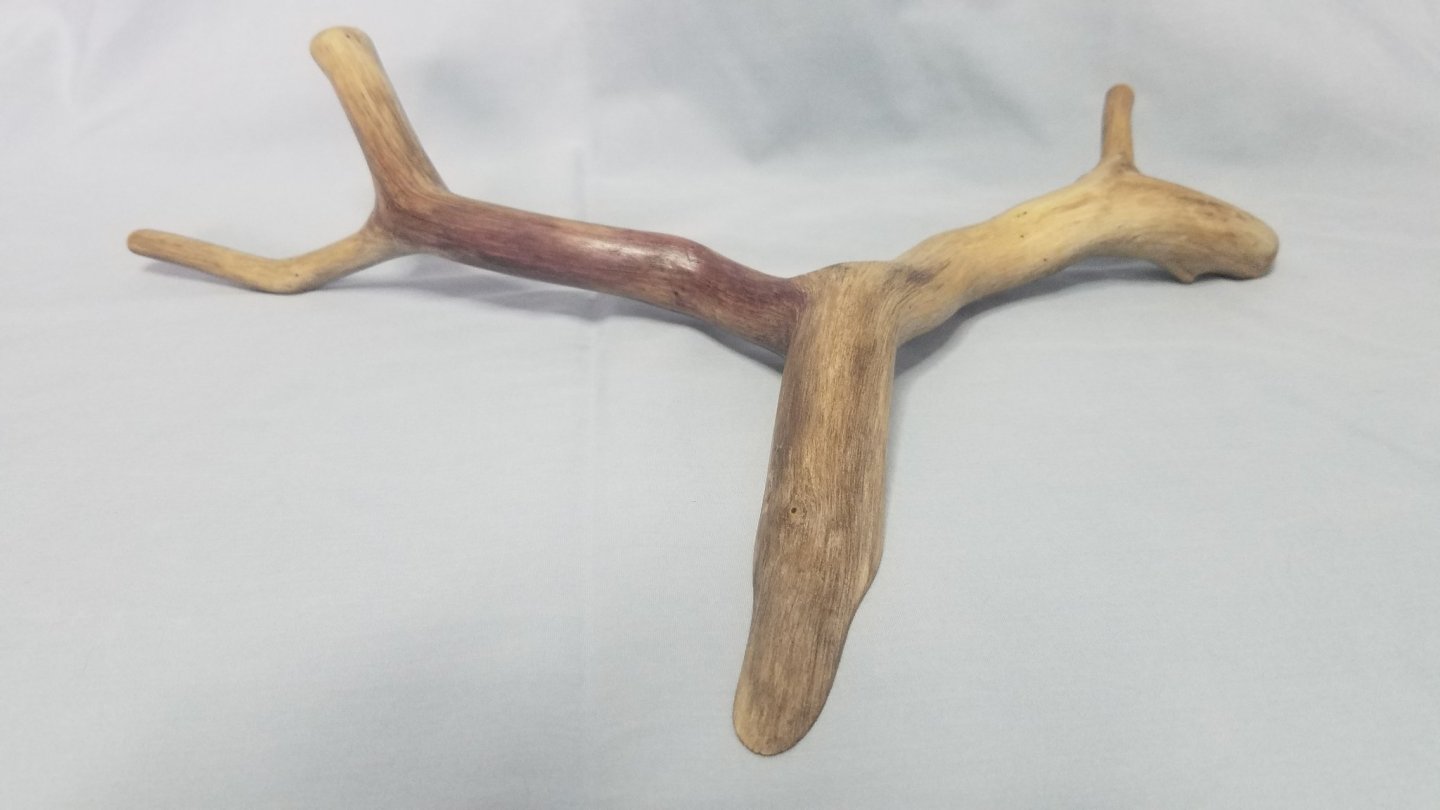
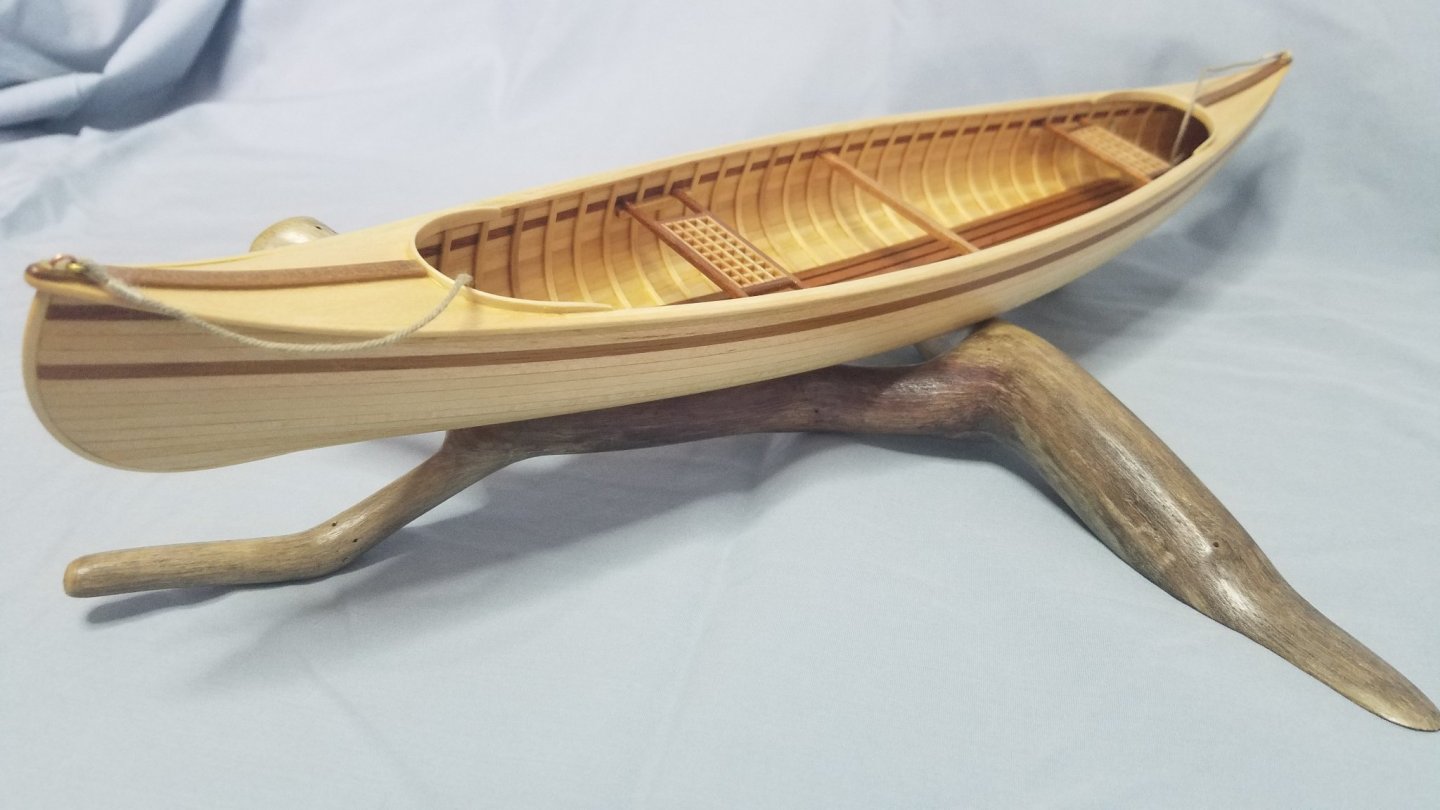
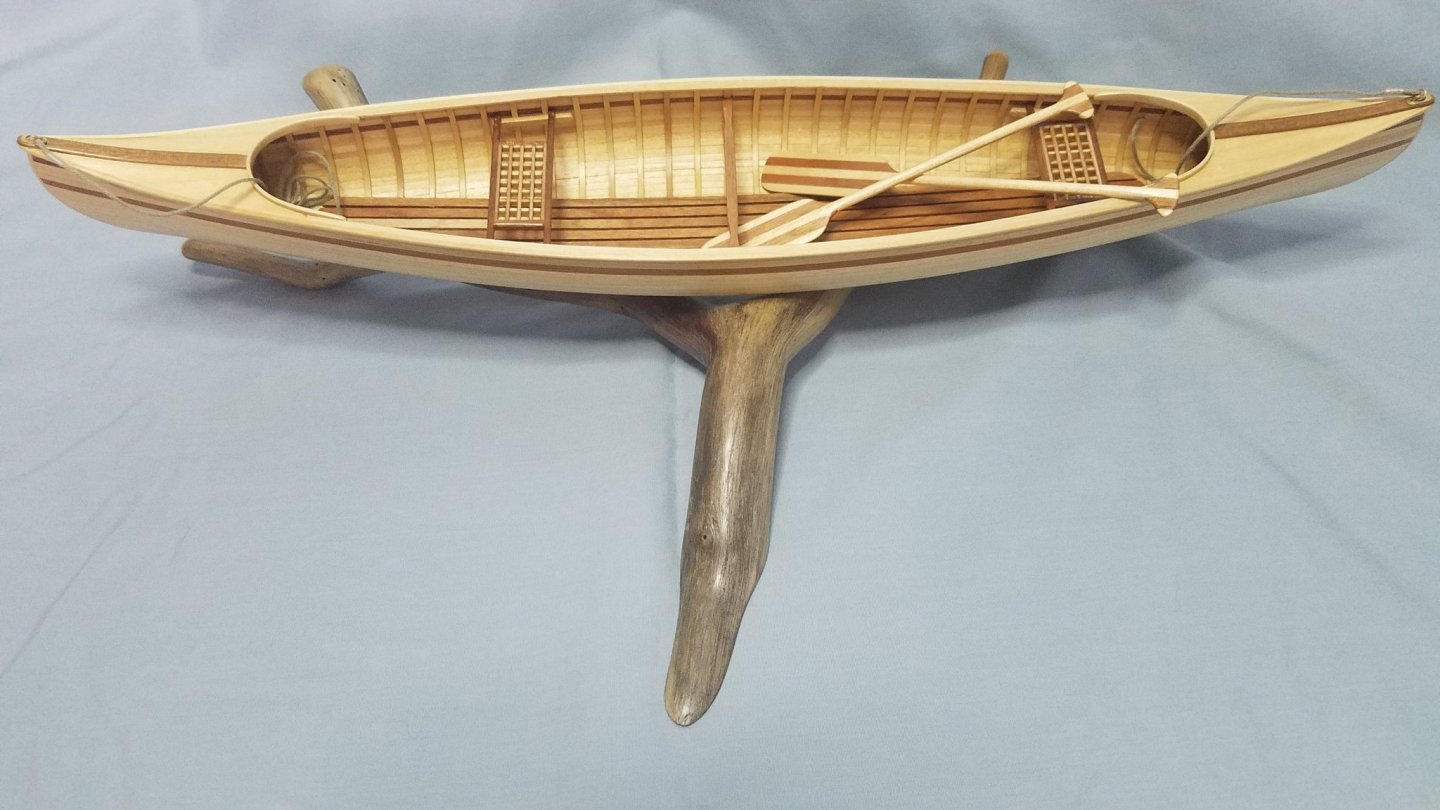
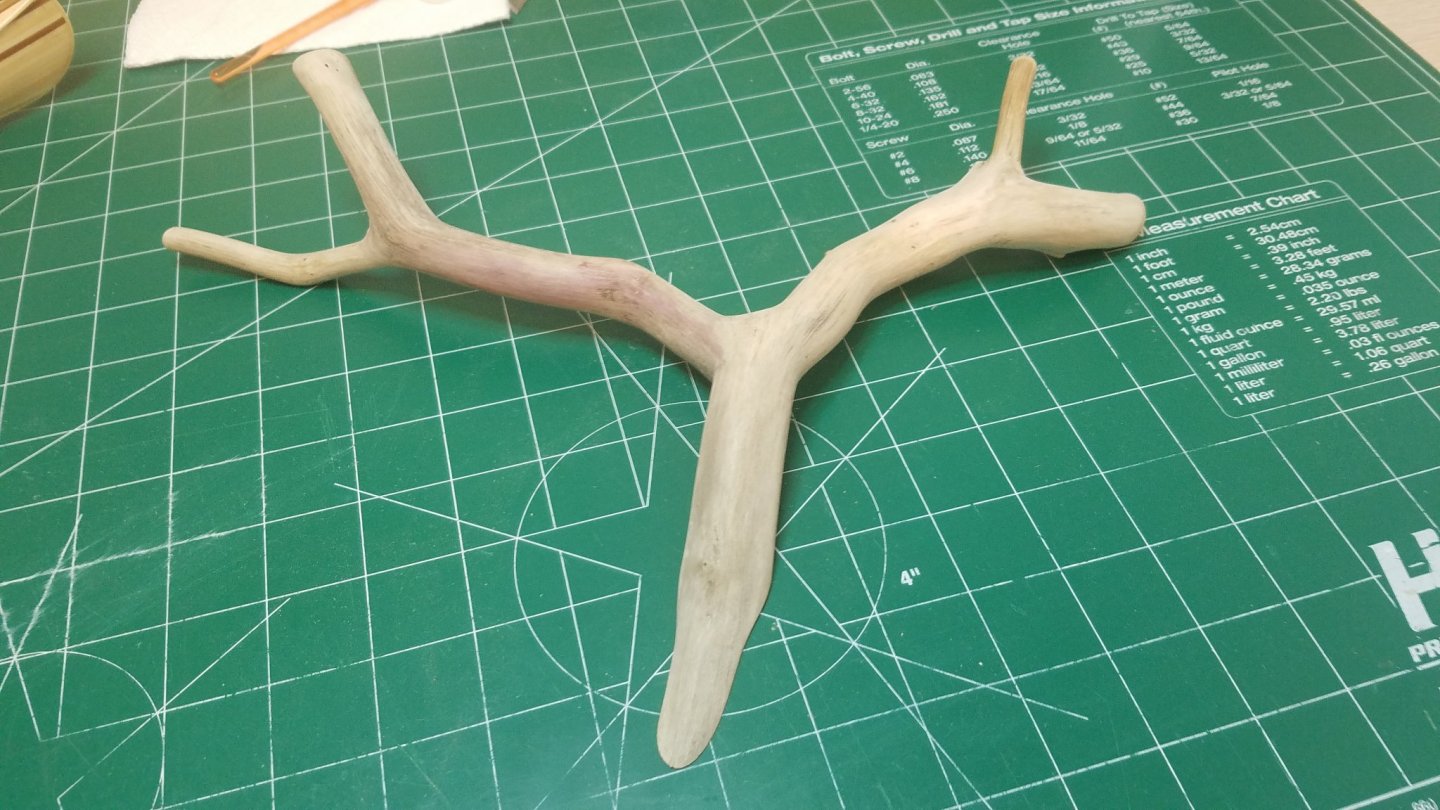
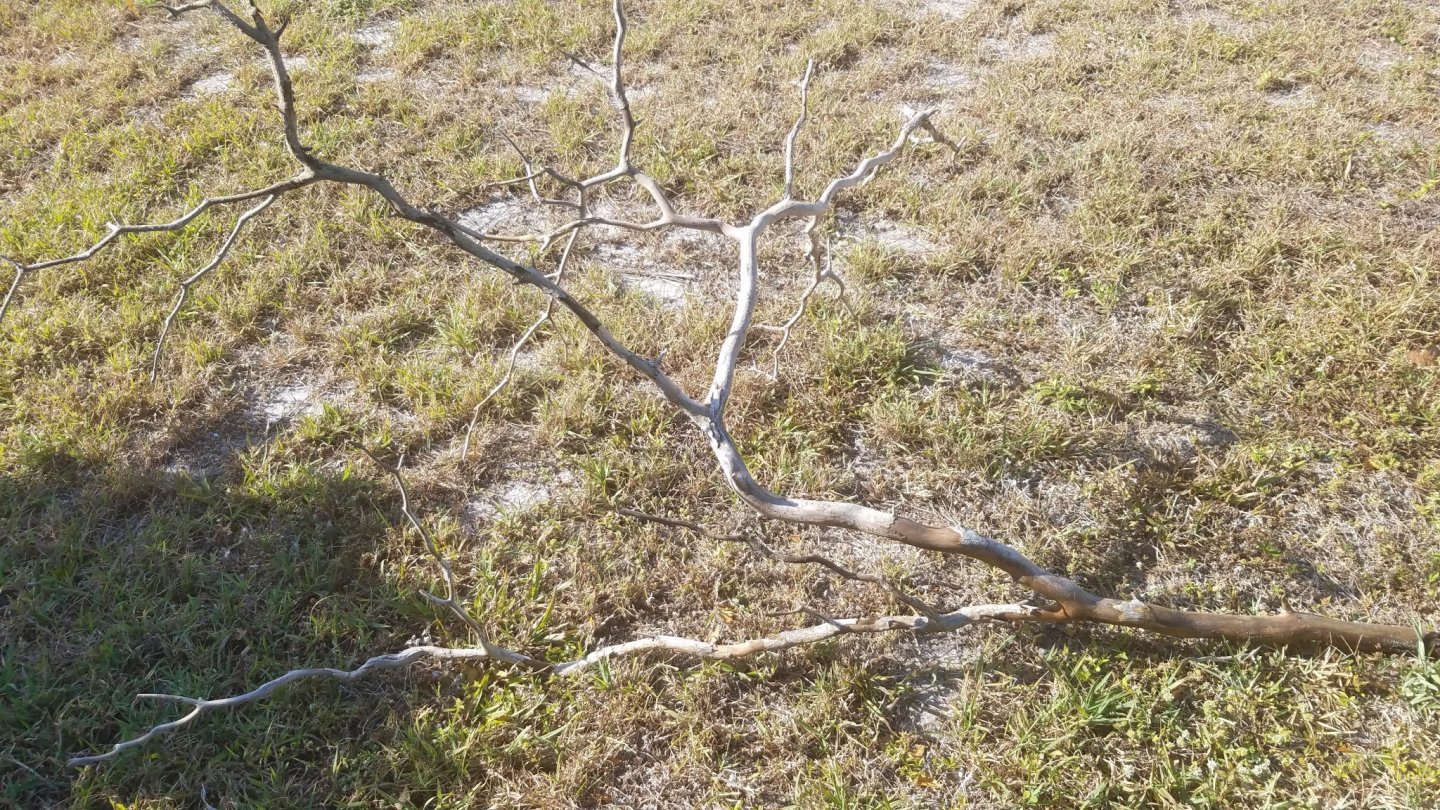
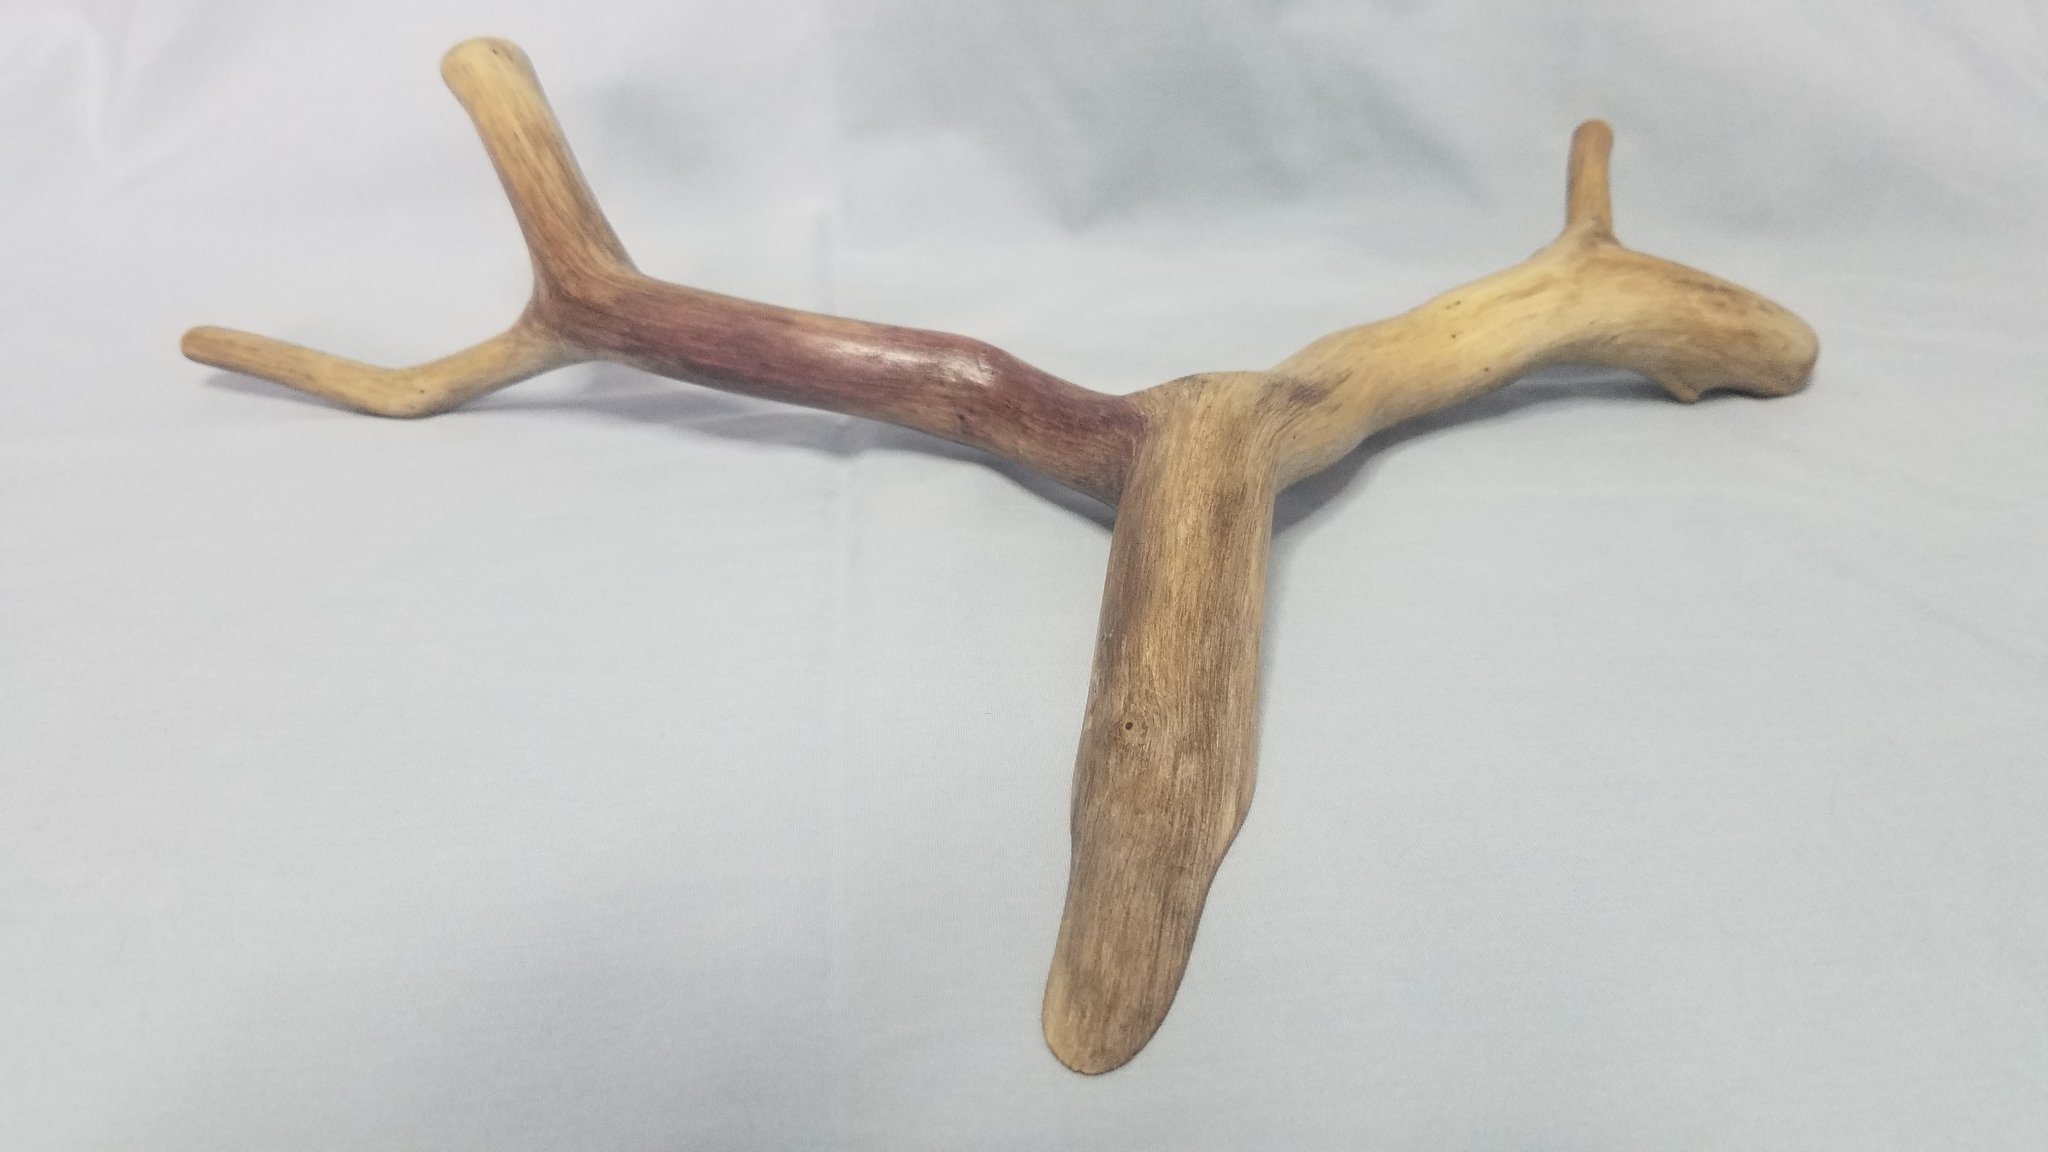
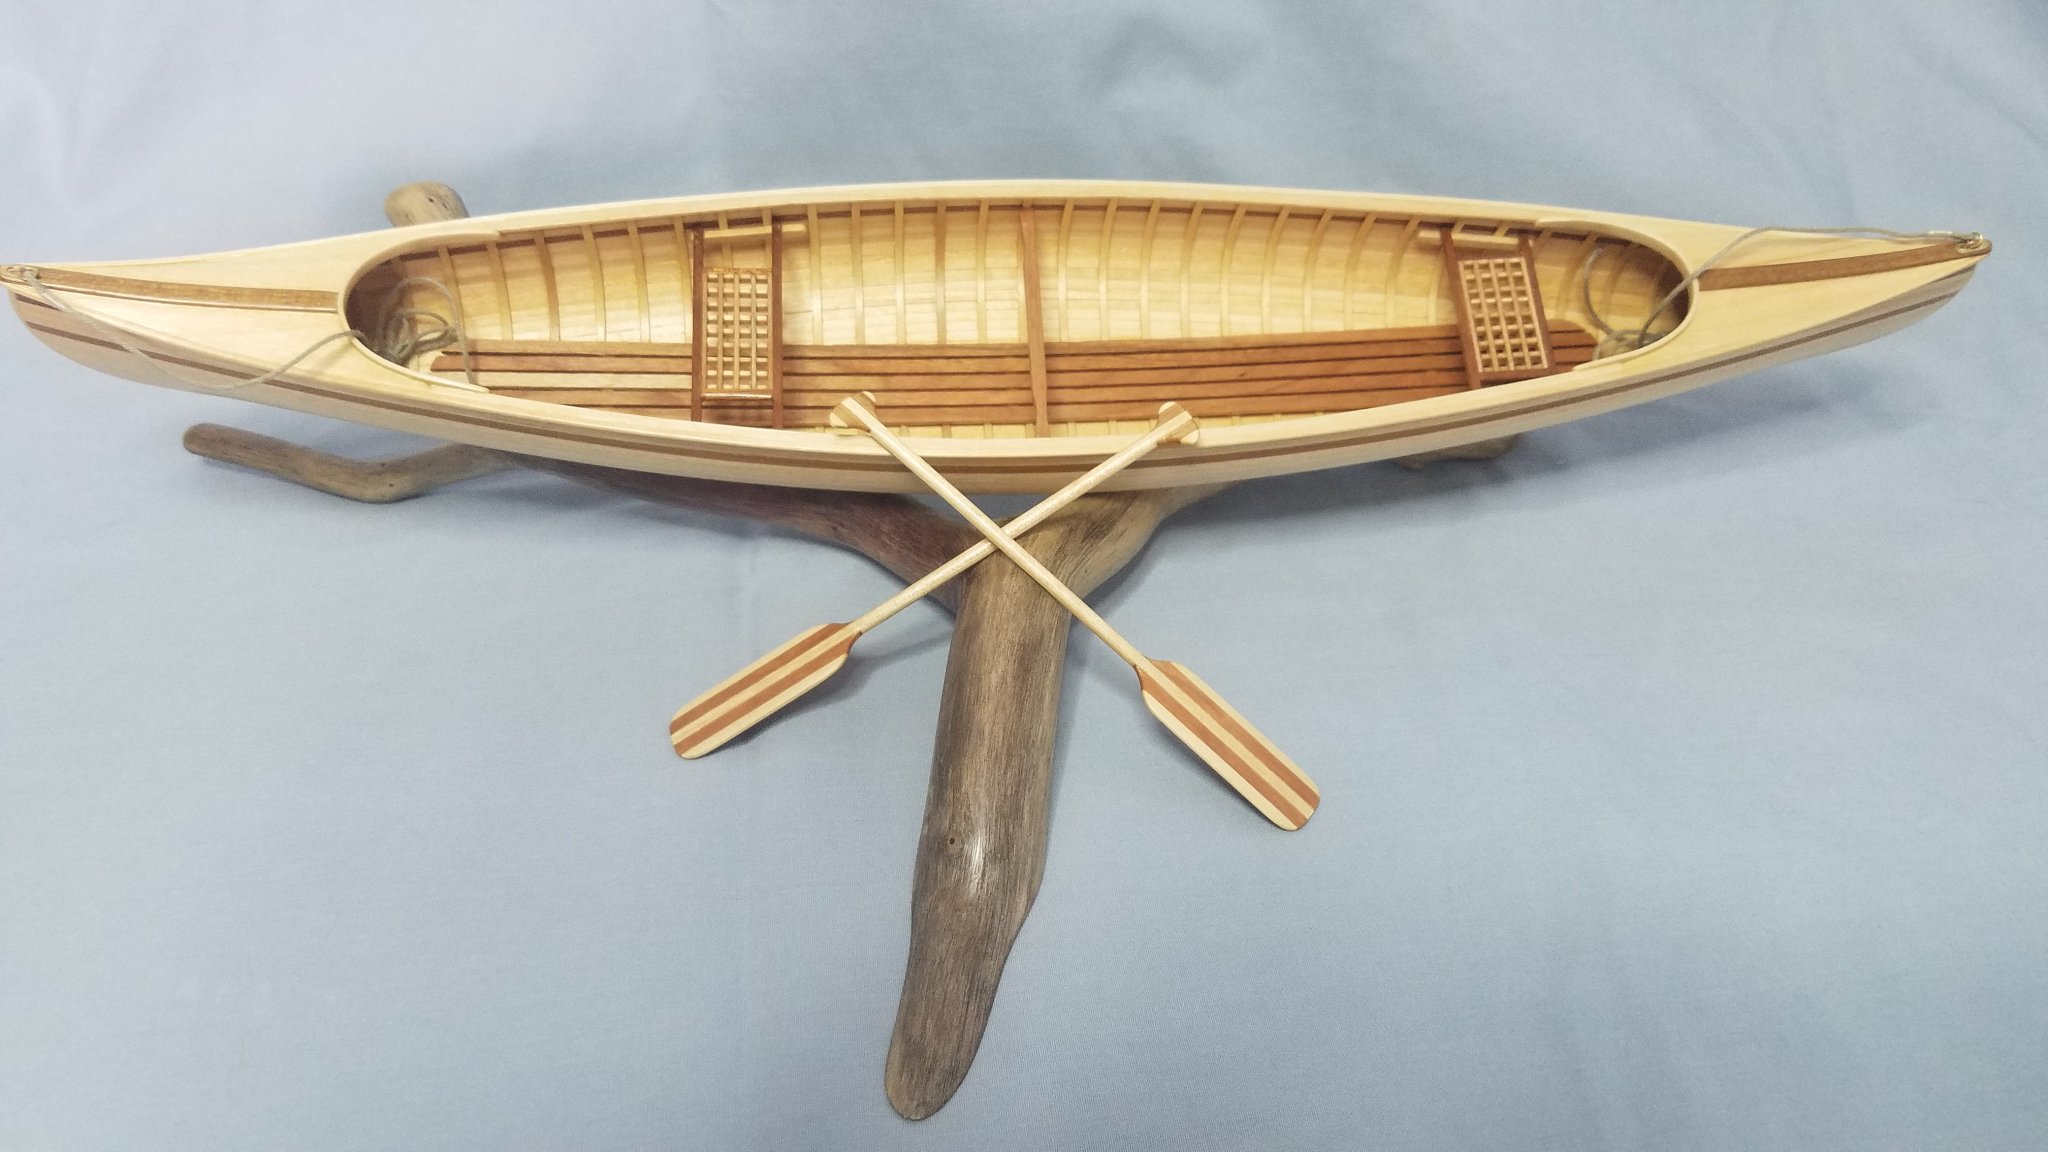
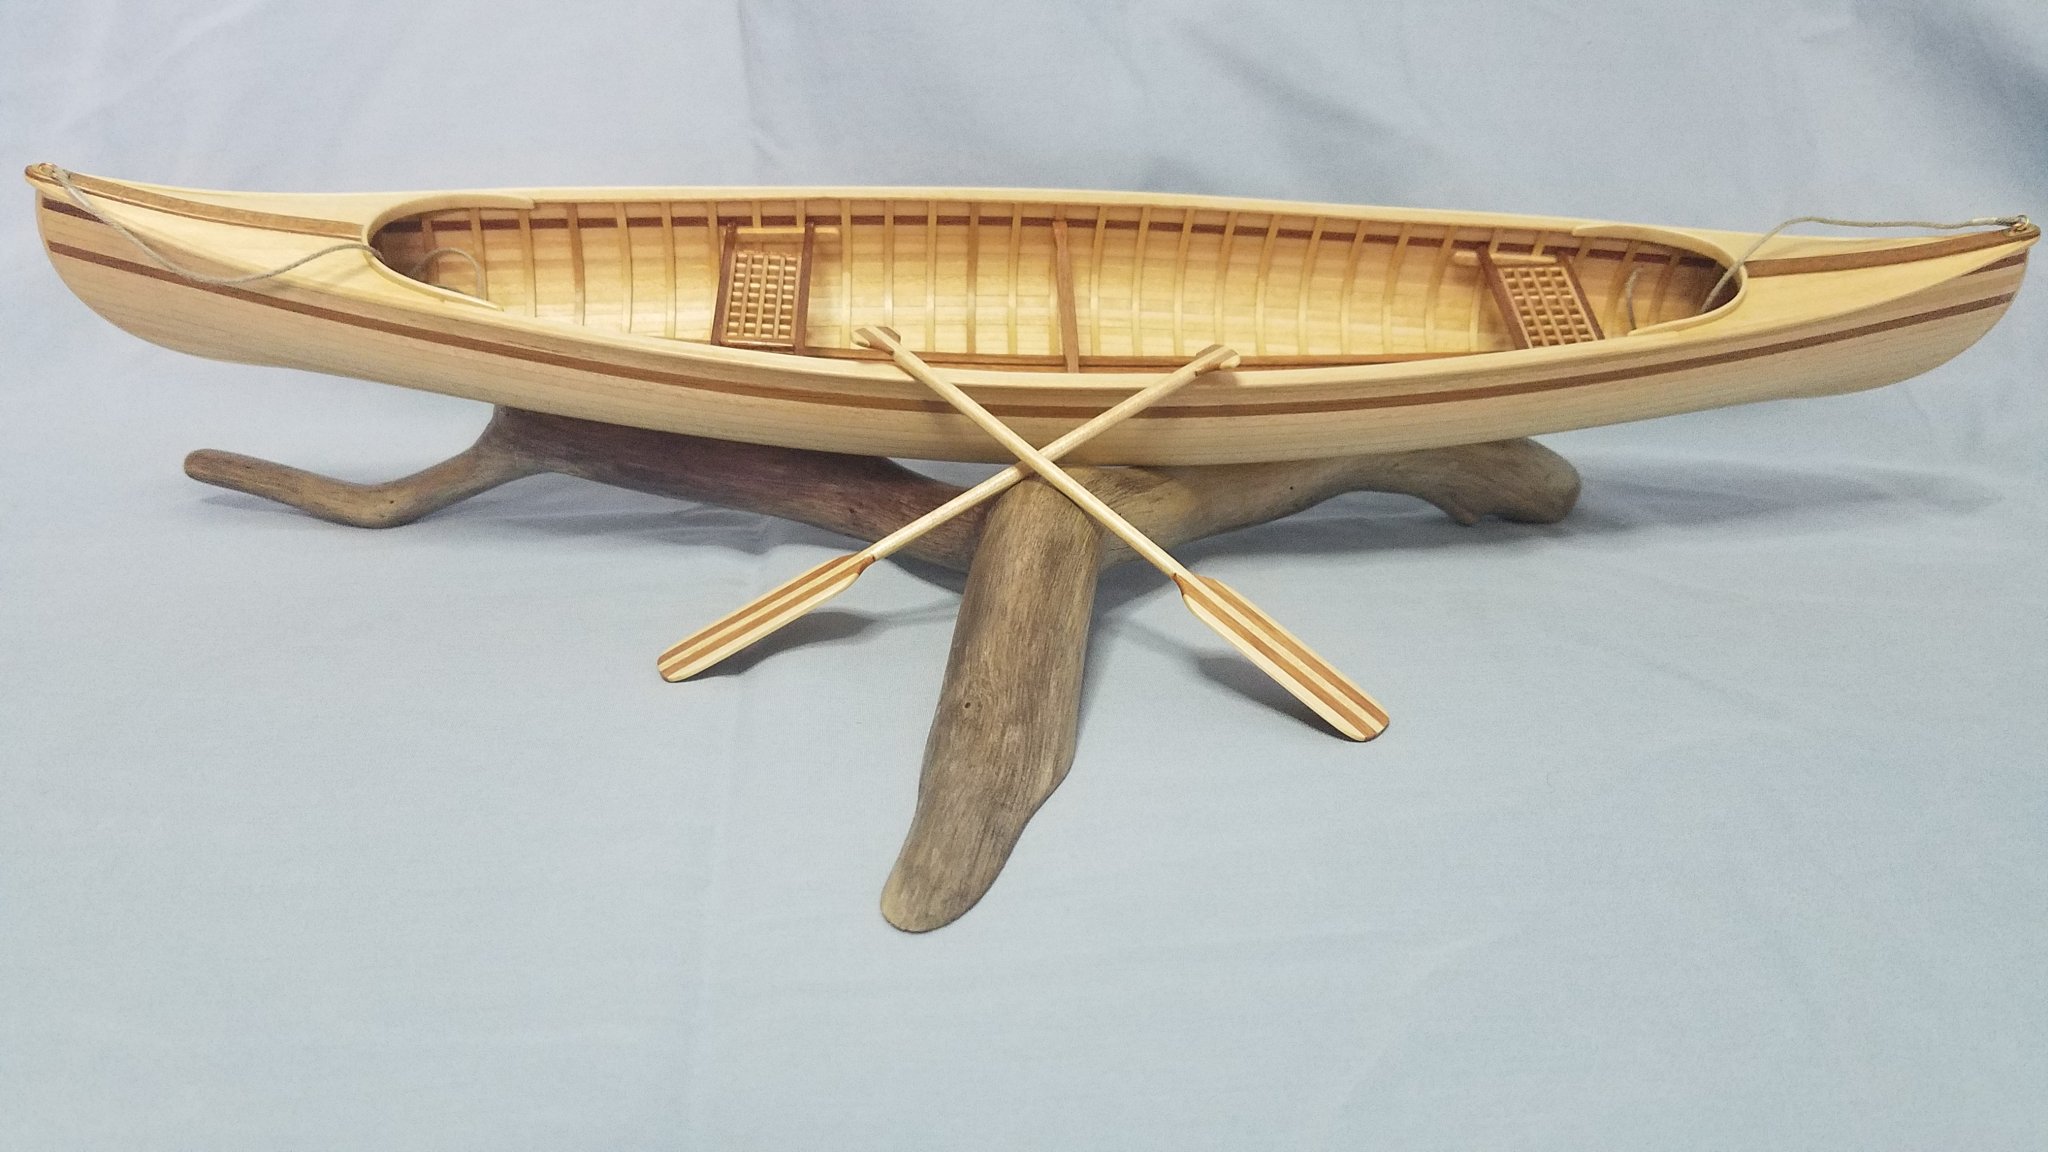
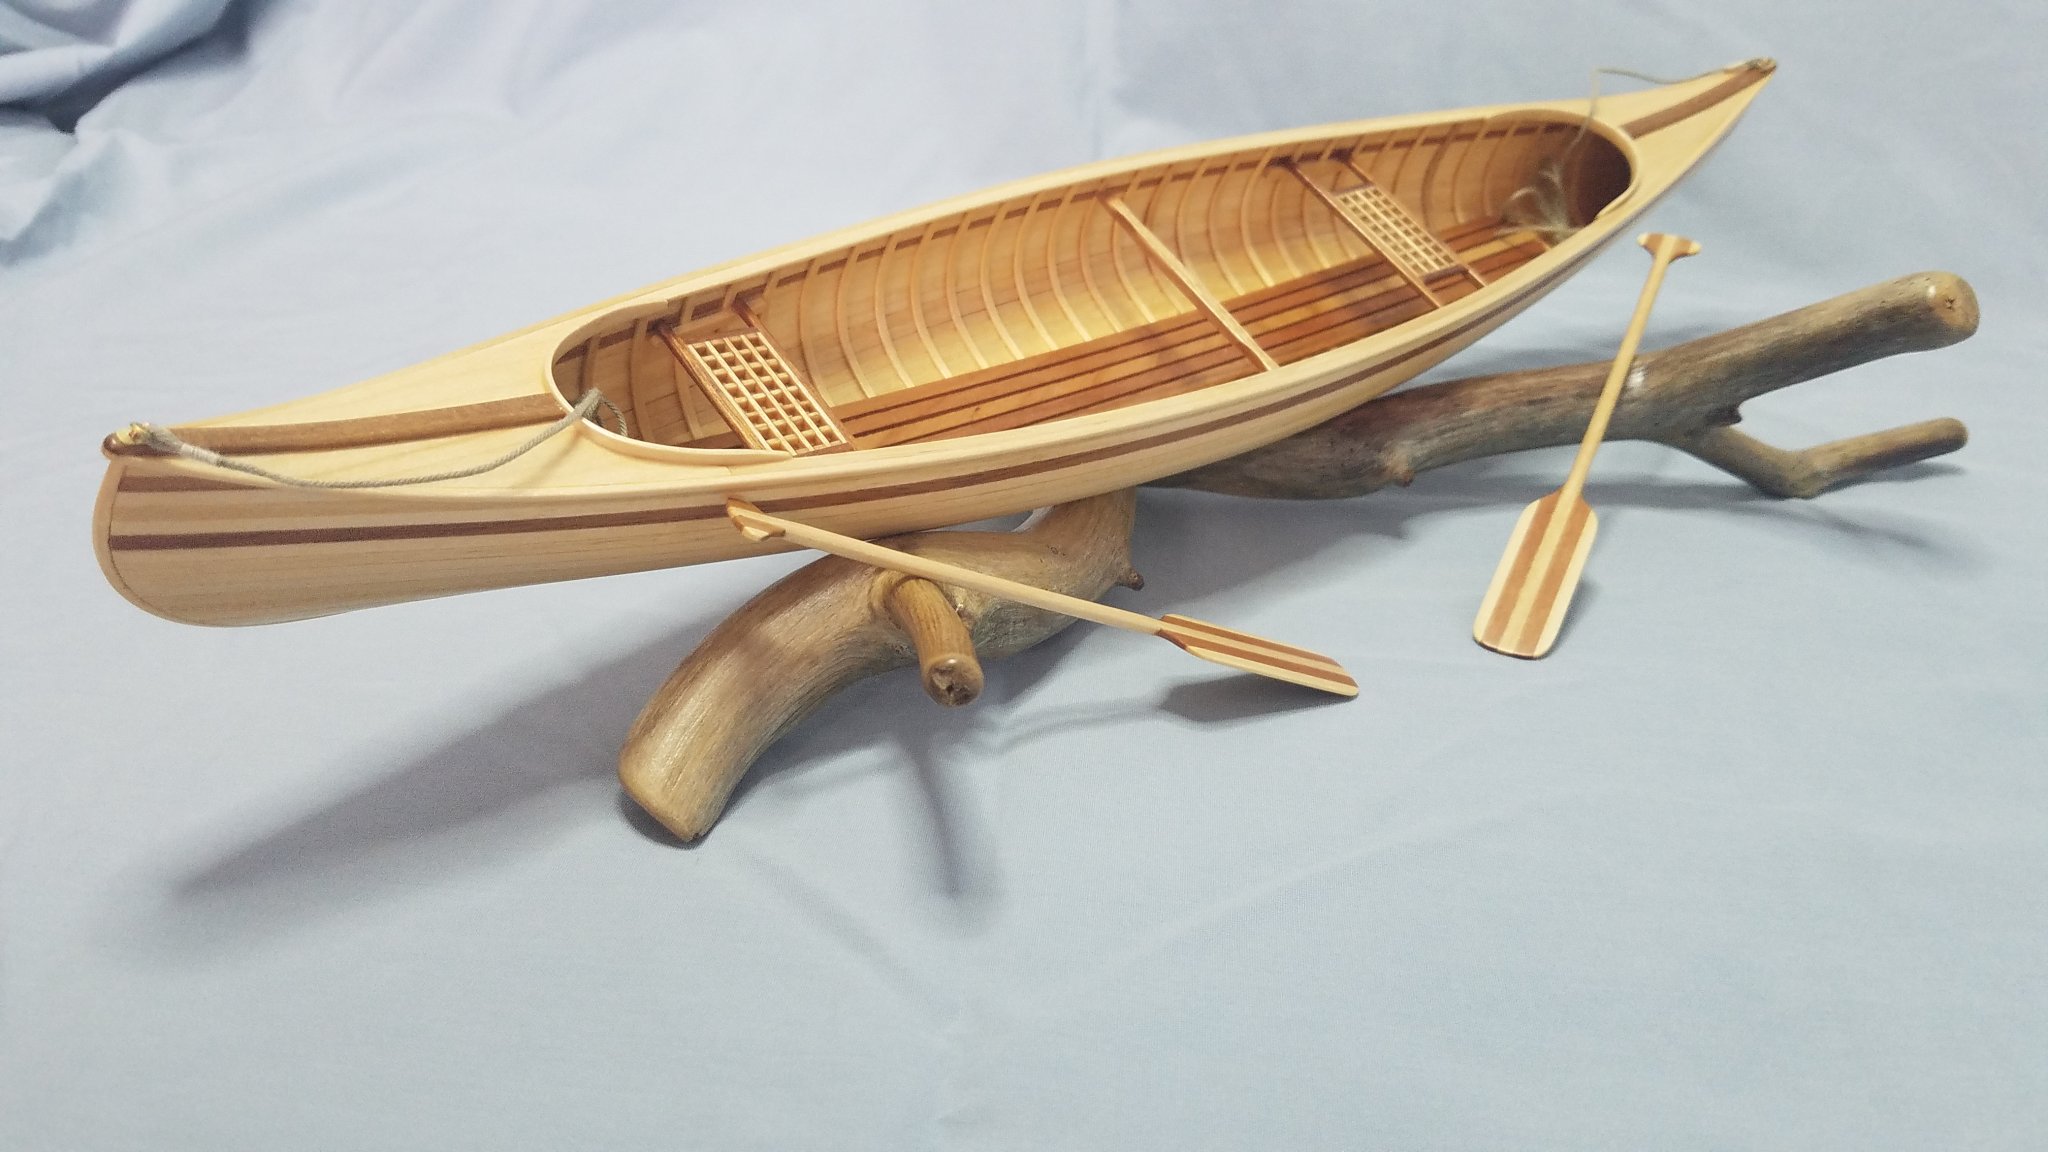
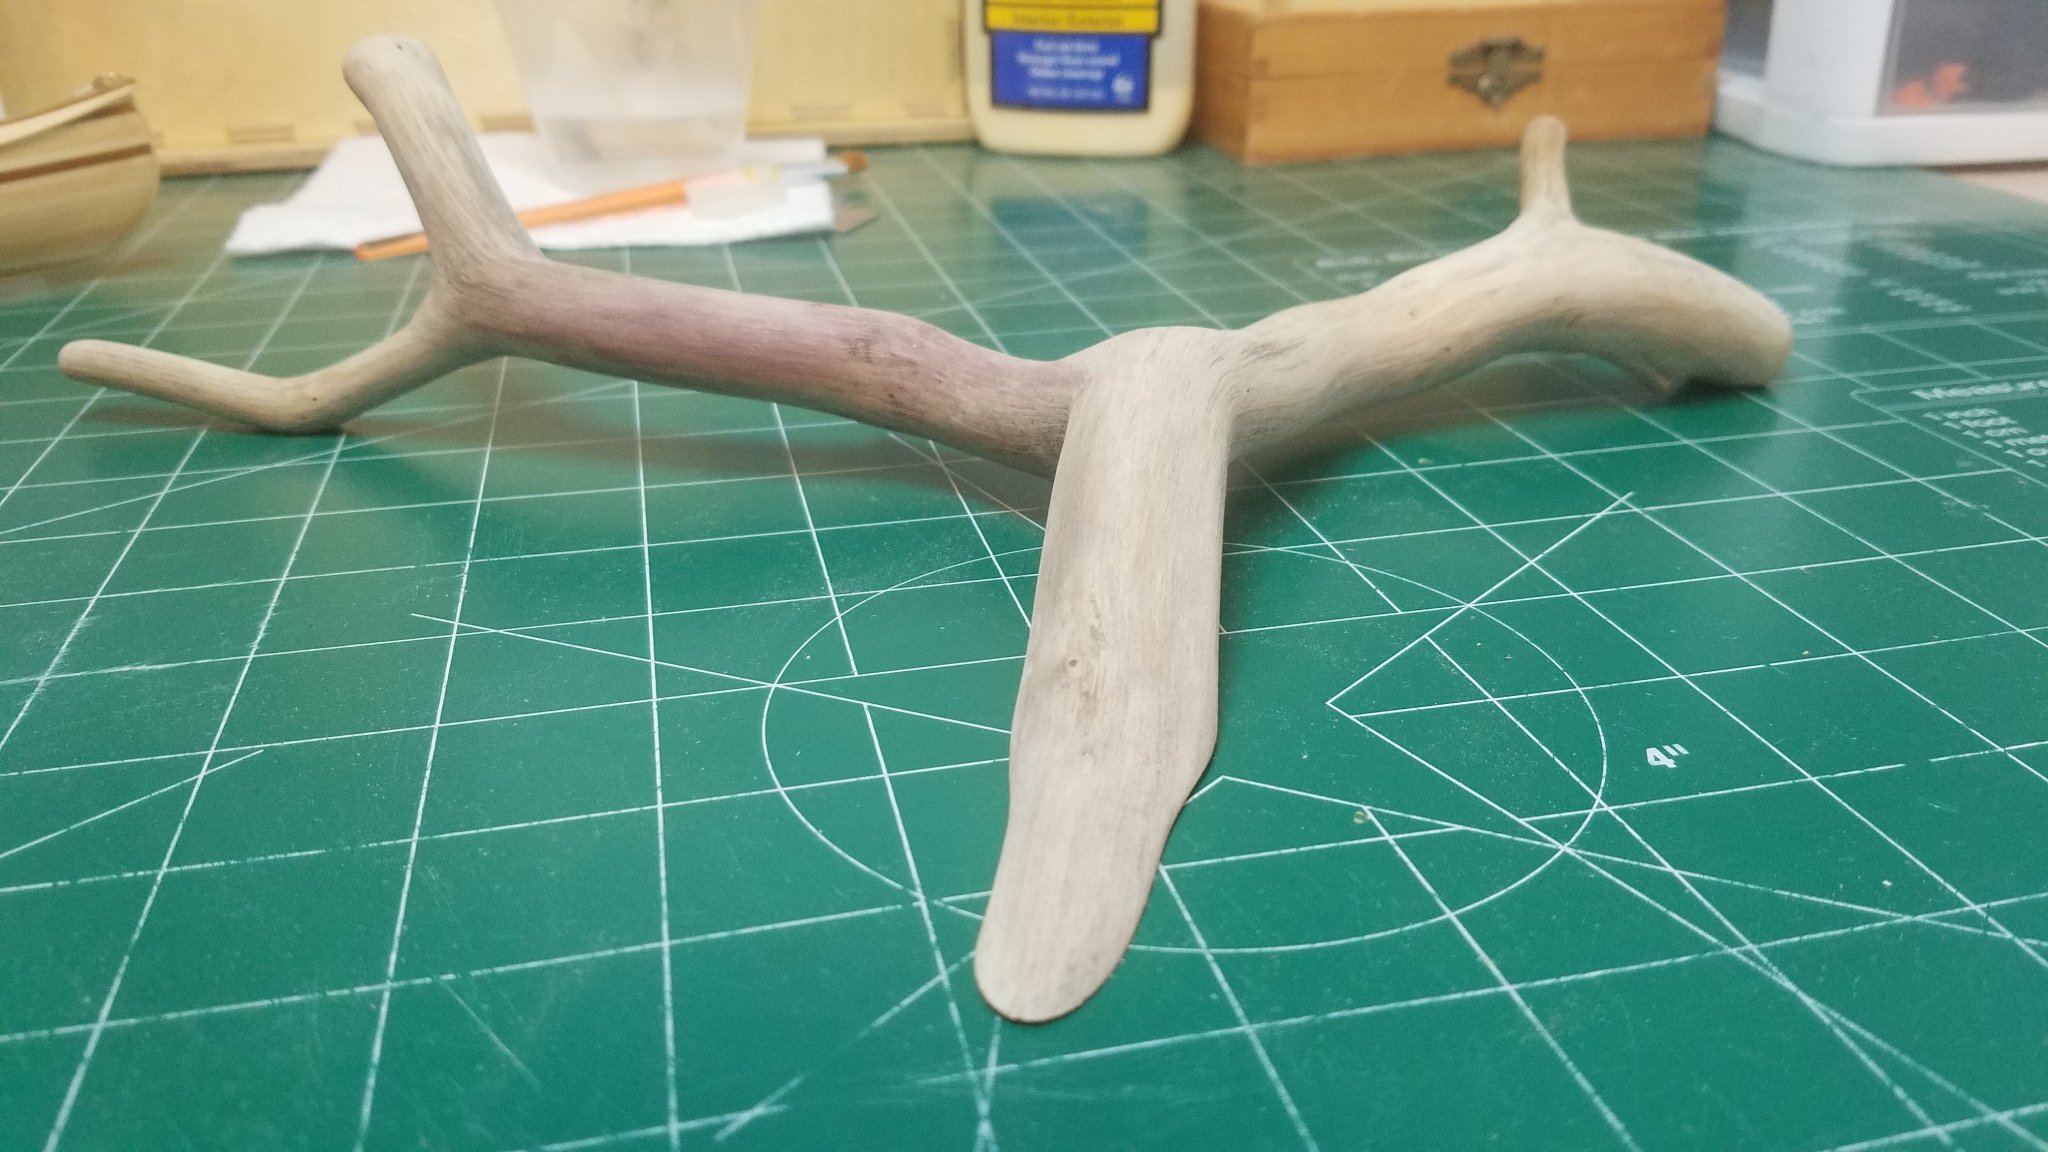
Bob, Just a wild guess but is that a piano key board lid your canoe is sitting on? I will have to come up with a decent back drop and get some quality pics of this once it is complete. Well after staring at this thing for half the morning and then a lot of snipping and cutting and sanding it went from this. To this. Since it was submerged for so long I am going to let it dry for a good long time as I am afraid some of the darker spots are mold or mildew. I might even bake it in the oven for a while. Here it is with the canoe on it. I tried to leave the front "leg" so that it kind of looks like it is still partially submerged in the lake. Once I am sure it is good and dried out I will wipe on a couple coats of poly. That's it for now. Best Regards


- 84 replies
-
- 10
-
-
- peterboro canoe
- Finished
- (and 1 more)
-
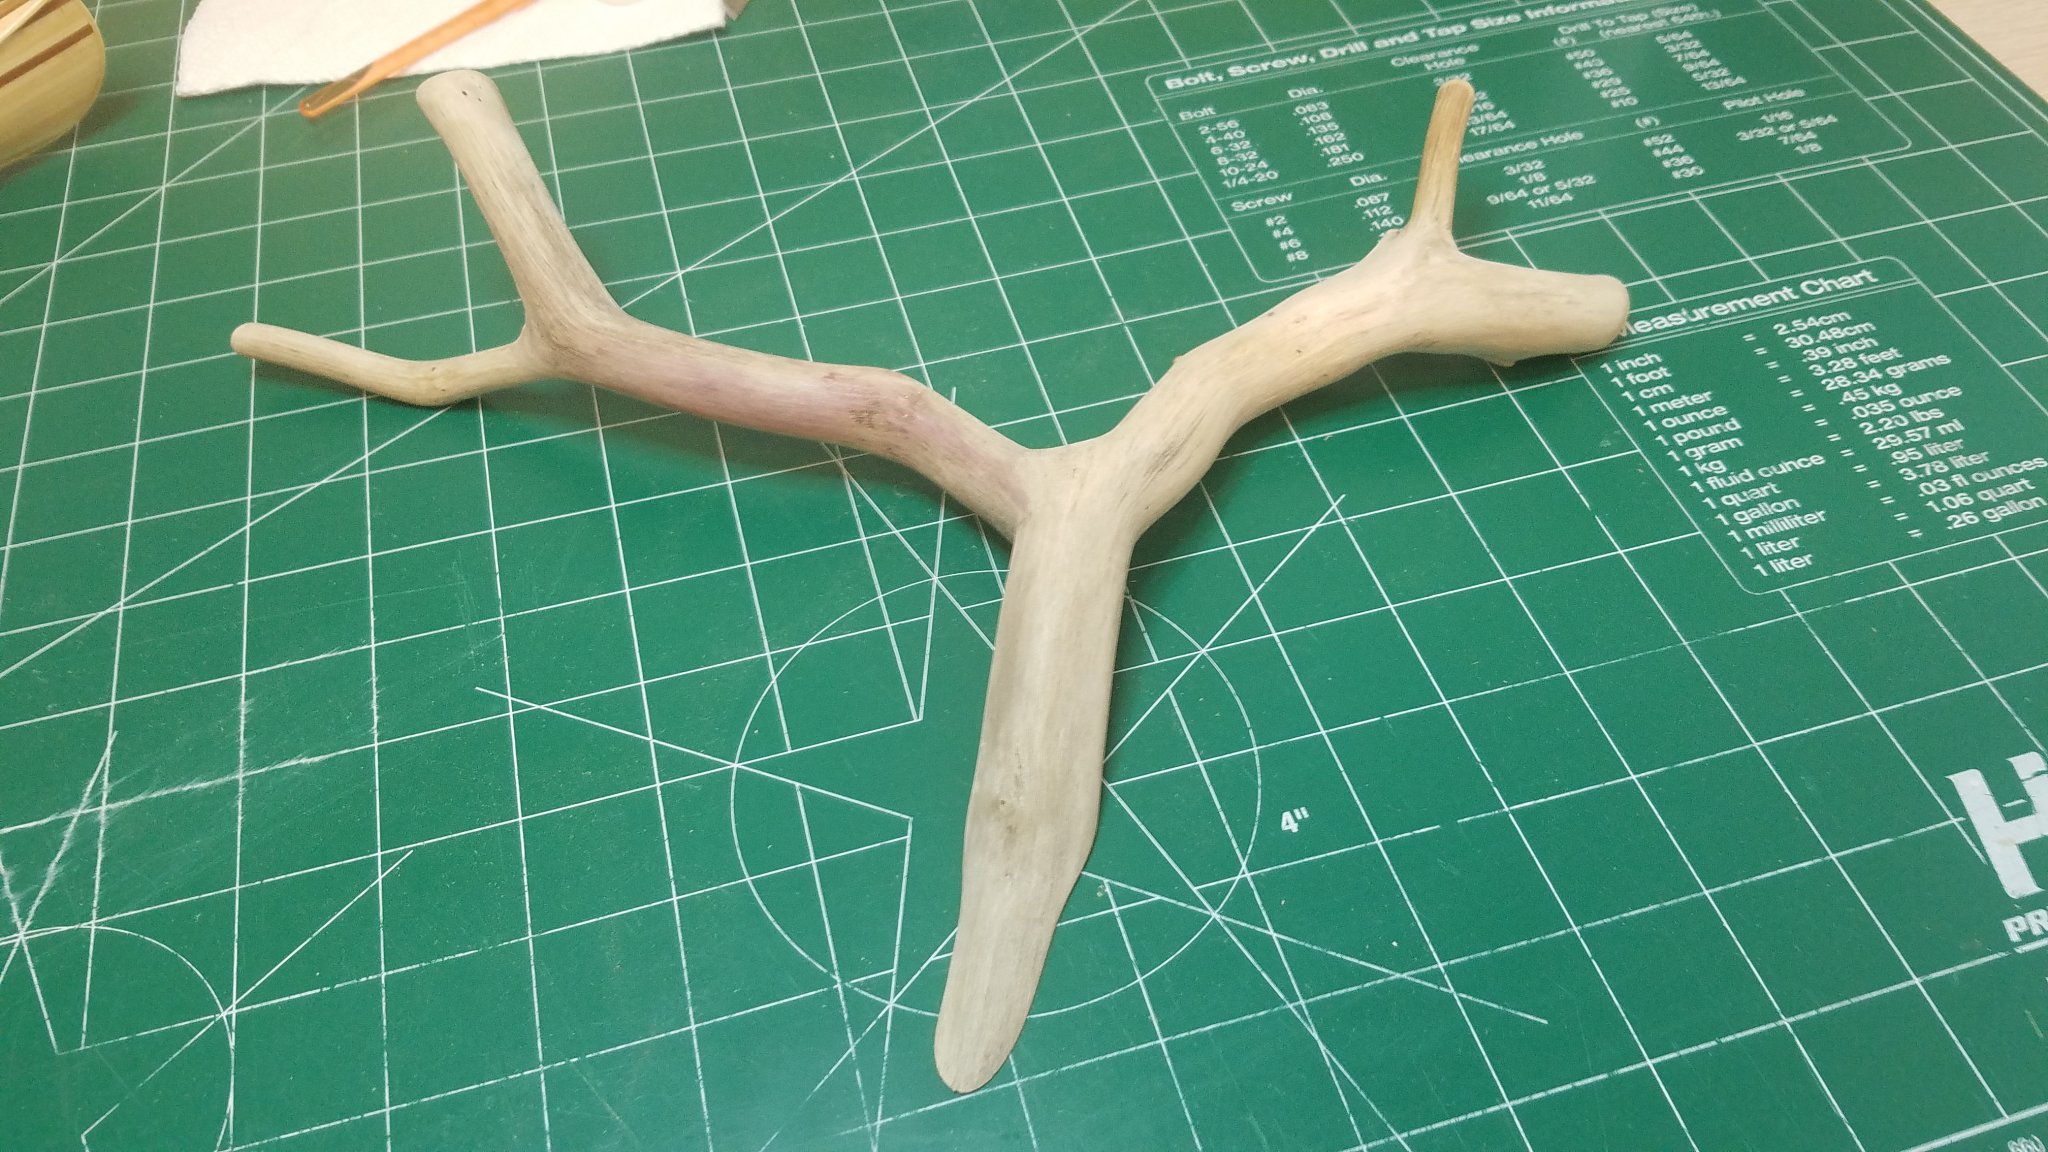
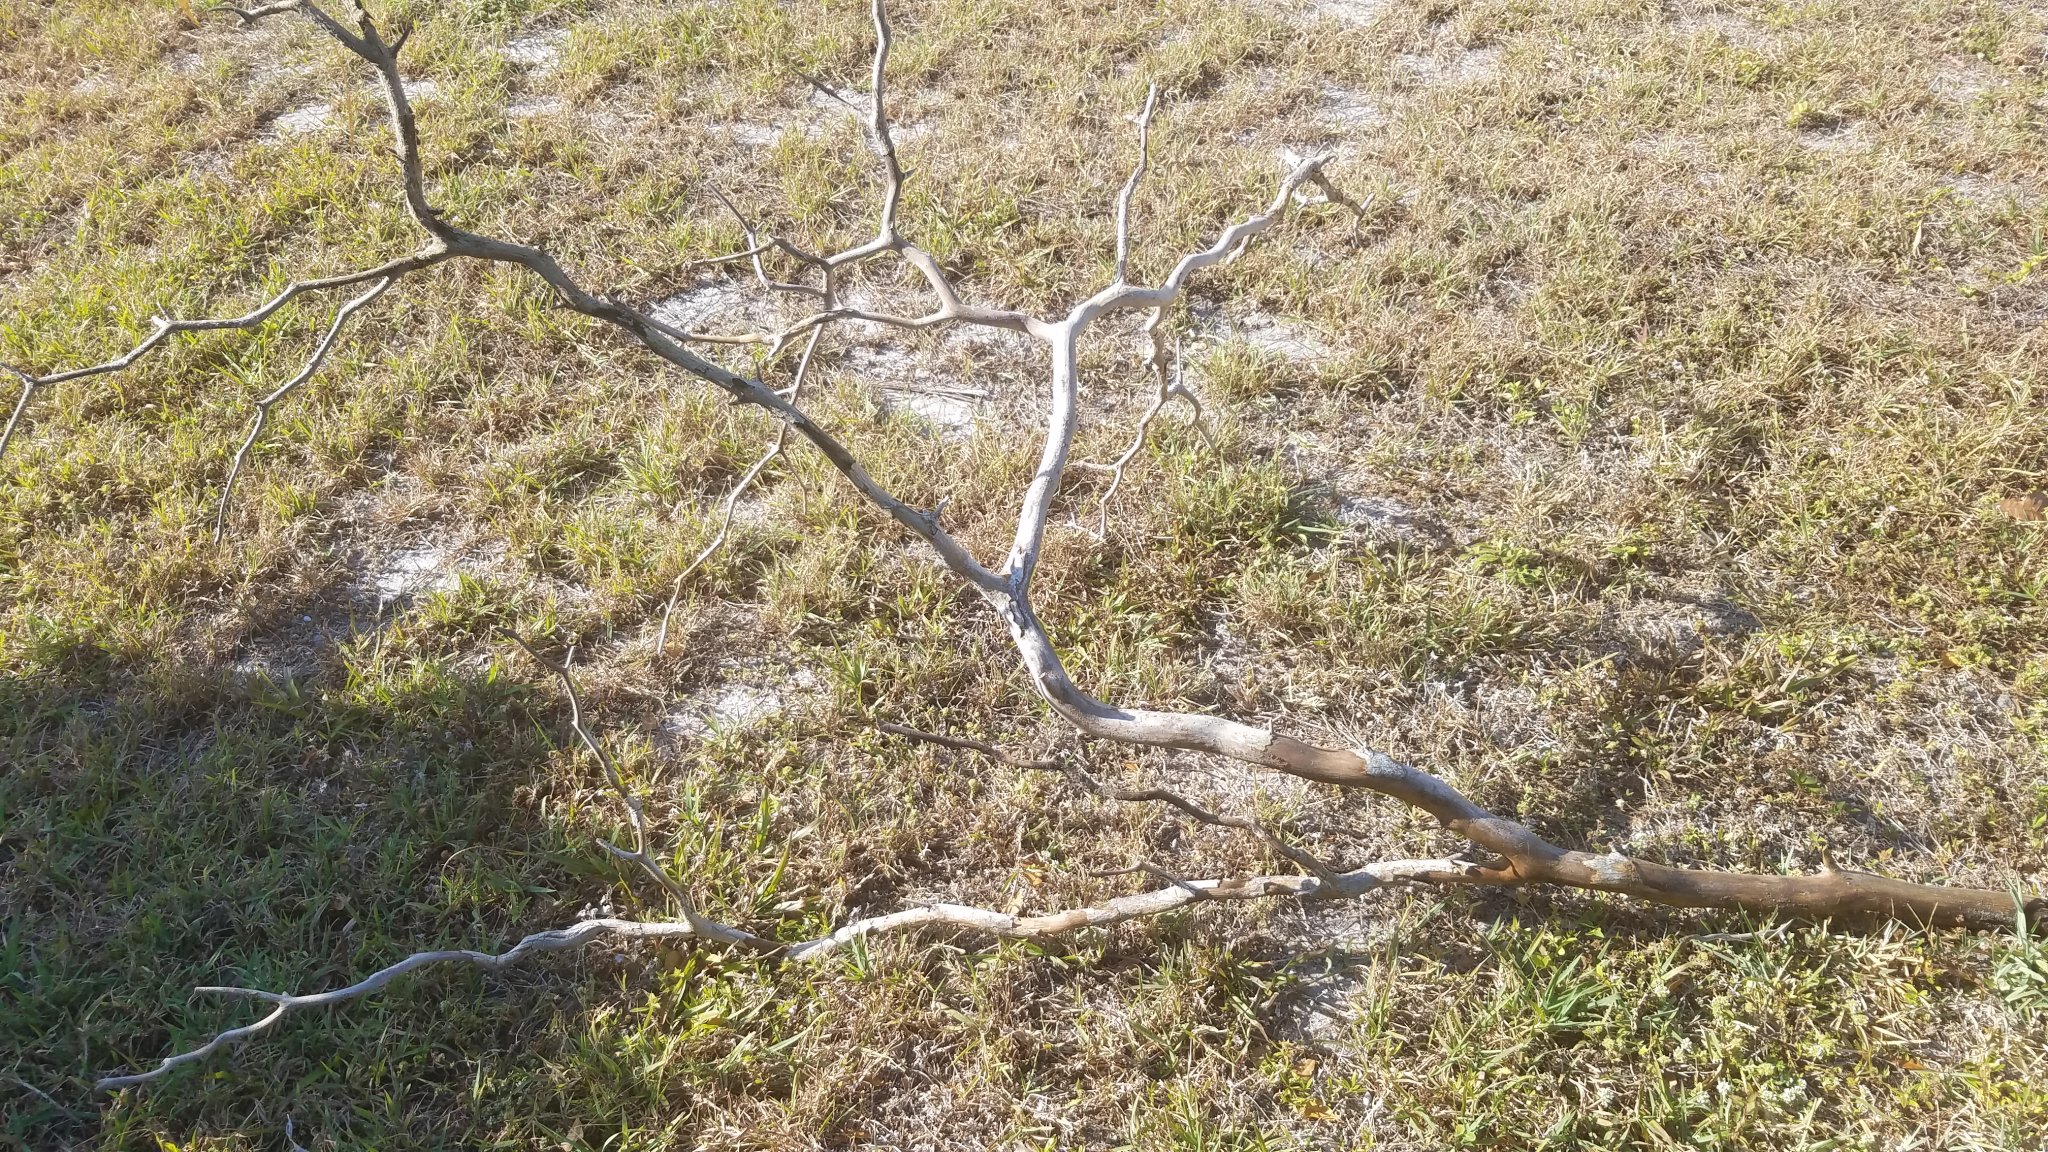
Thanks for all the kind words and likes. Chris, I agree it is a real shame. Sadly I discovered the hobby too late and now they cost an arm and a leg when they come up on e-bay. Also it would seem that Dave (Duanelaker) was well ahead of everyone else and started hoarding them instead of TP. Lol! I was out walking the dogs this morning and decided to go around the lake across the street and found that the level has dropped quite a bit in the last couple of days. Not unusual around here to see level fluctuations of a couple of feet in just a week or so. The drop had exposed a few weathered tree limbs that were now just sitting there. I grabbed this one thinking that with a few well placed cuts there may be a base for my canoe in there somewhere. I am shamelessly stealing this idea from Bob G. who posted a pic of his Indian Girl Canoe displayed on a piece of tree limb in duanelakers build thread. Thanks Bob! Of course the admiral was very pleased (NOT) to see me returning from our walk dragging an old tree limb up the driveway. I am going to leave it out in the sun to make sure it is completely dry before I start cutting. Regards
- 84 replies
-
- 5
-
-
- peterboro canoe
- Finished
- (and 1 more)
-
Wonderful job. These MW kits make great little boats. I am going to try to build as many as I can lay my hands on,
-
Until you throw us a wide perspective shot like this one would think this model was 3 feet long. With all the detail you put into these things how do you manage to keep it all in scale so well? The result is very believable and very pleasing to the eye. Well done sir.
-
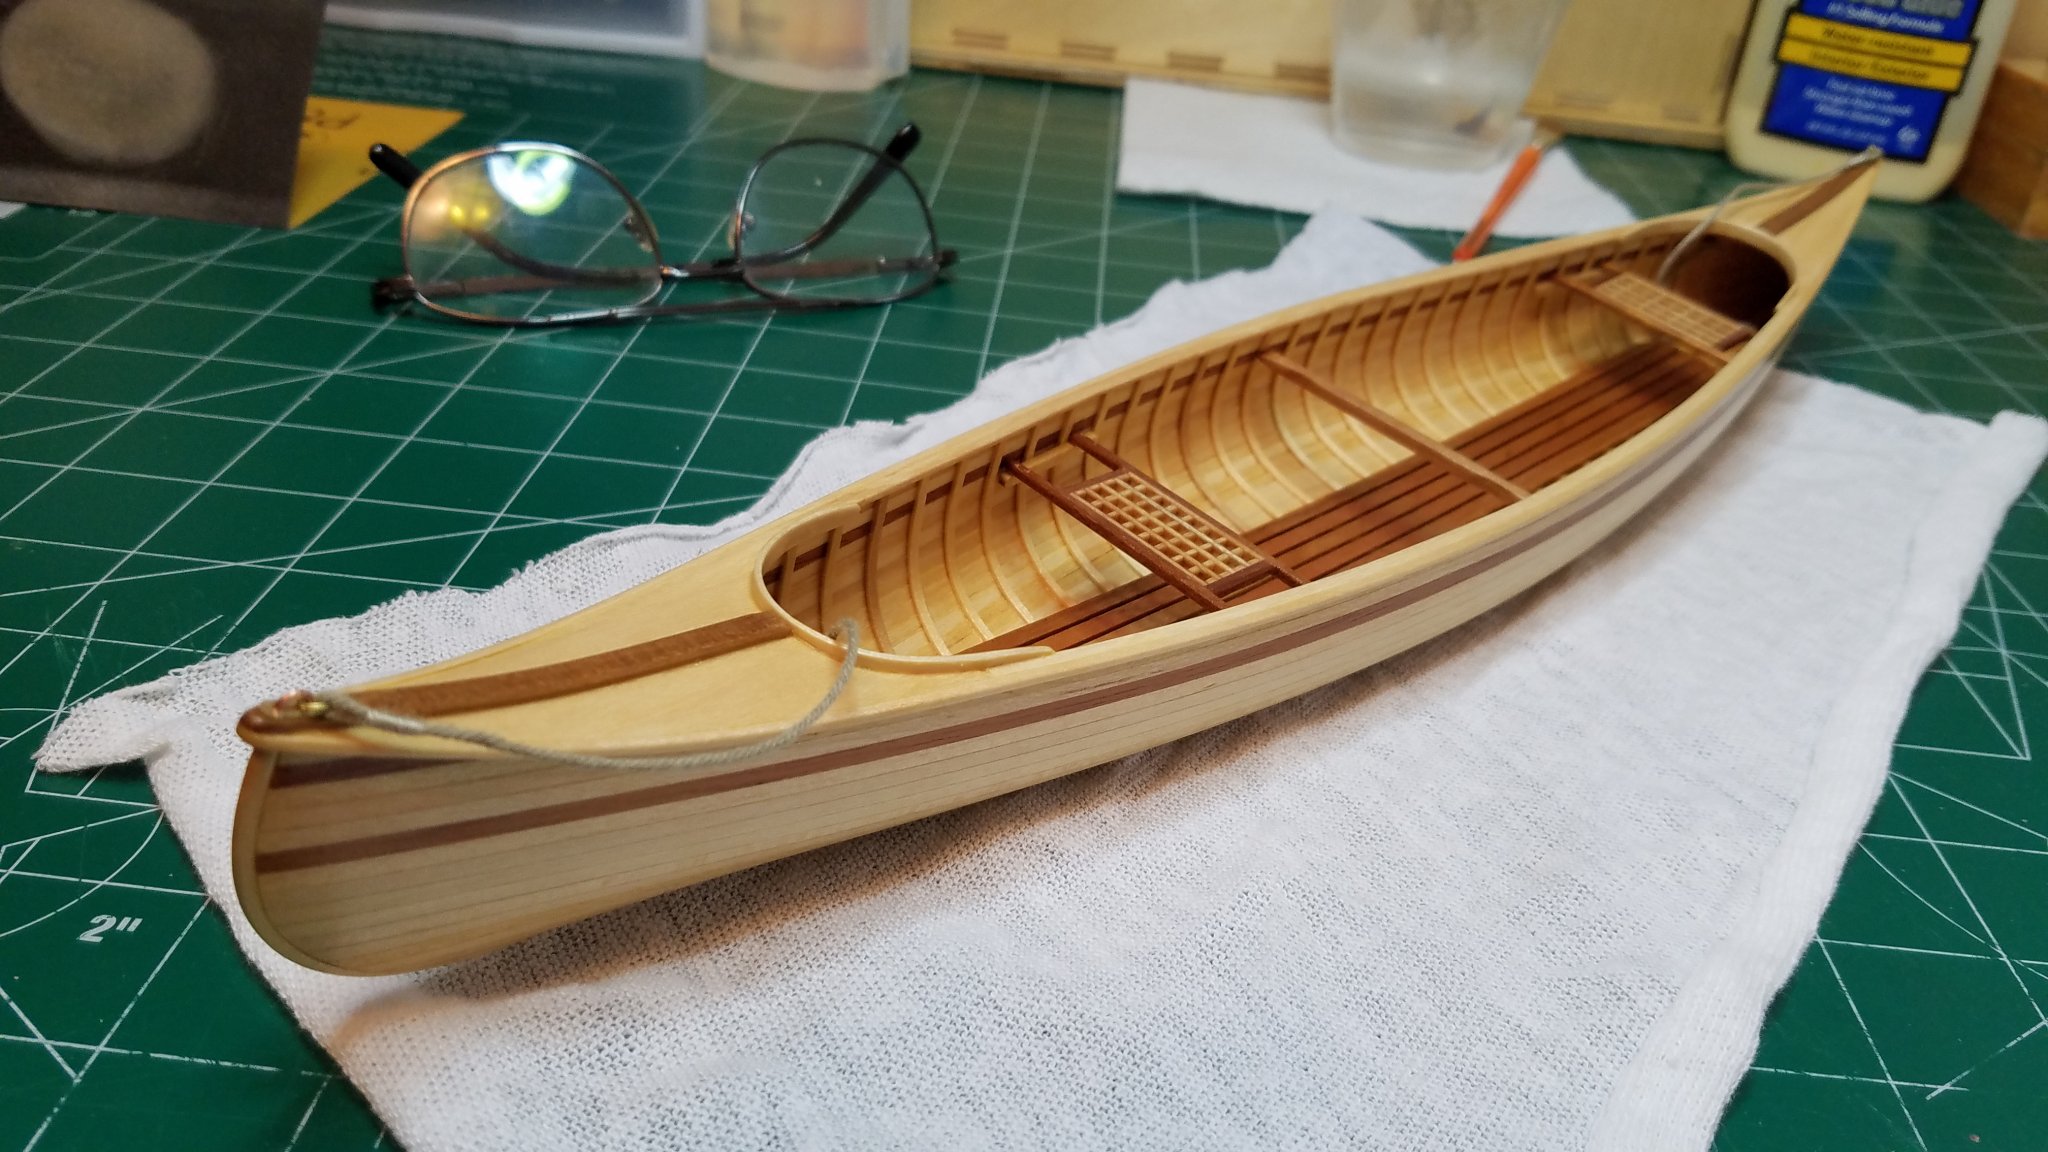
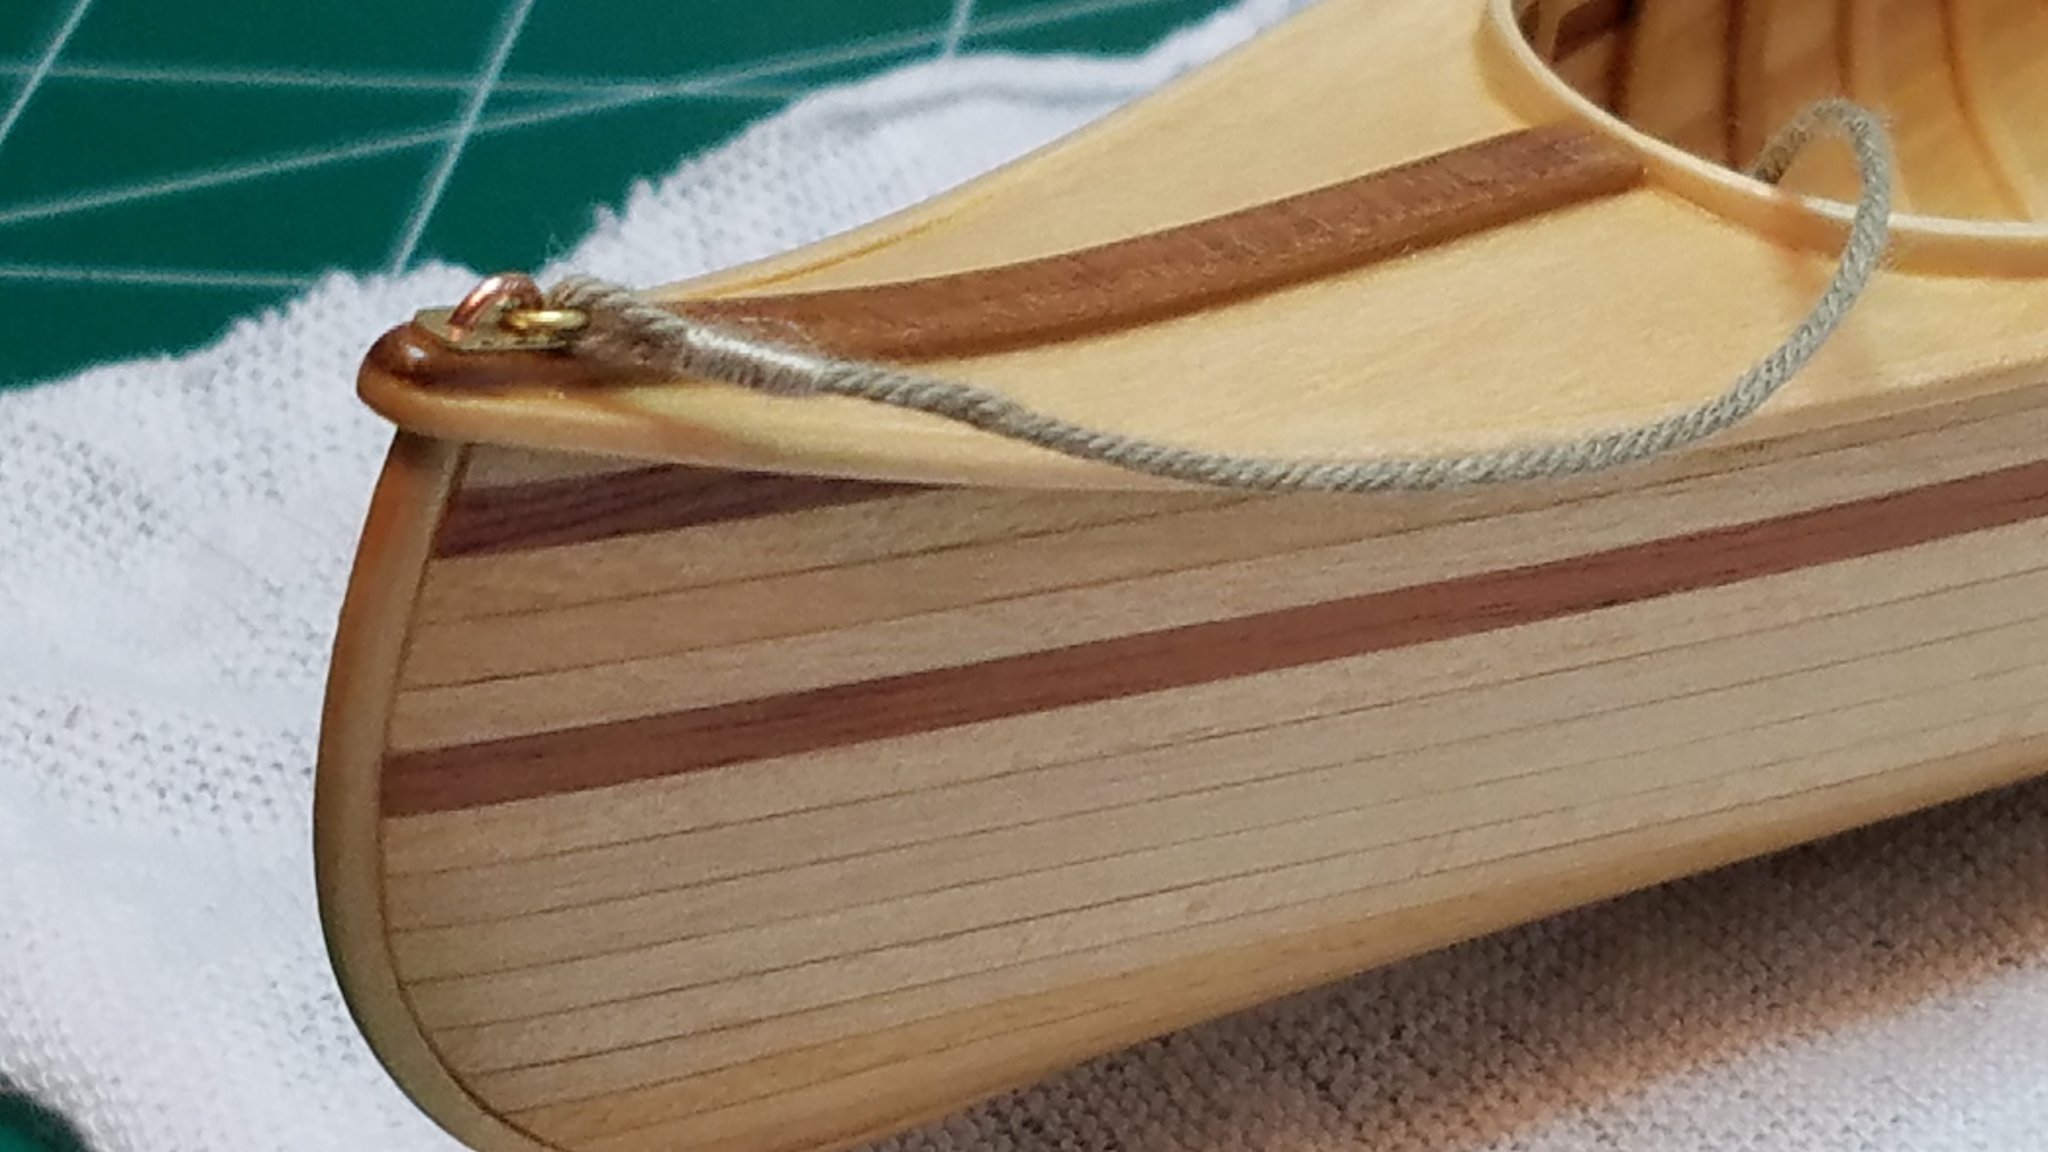
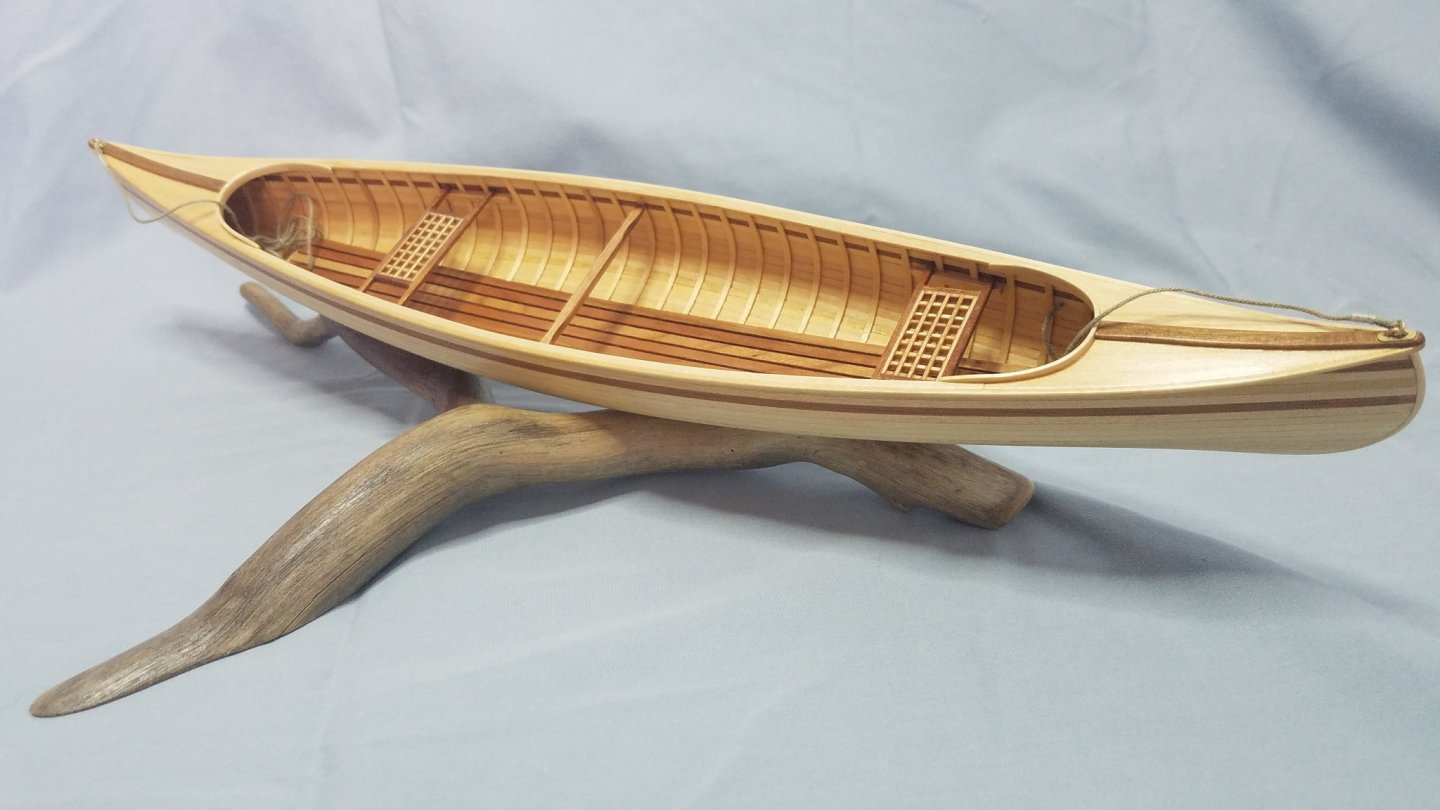
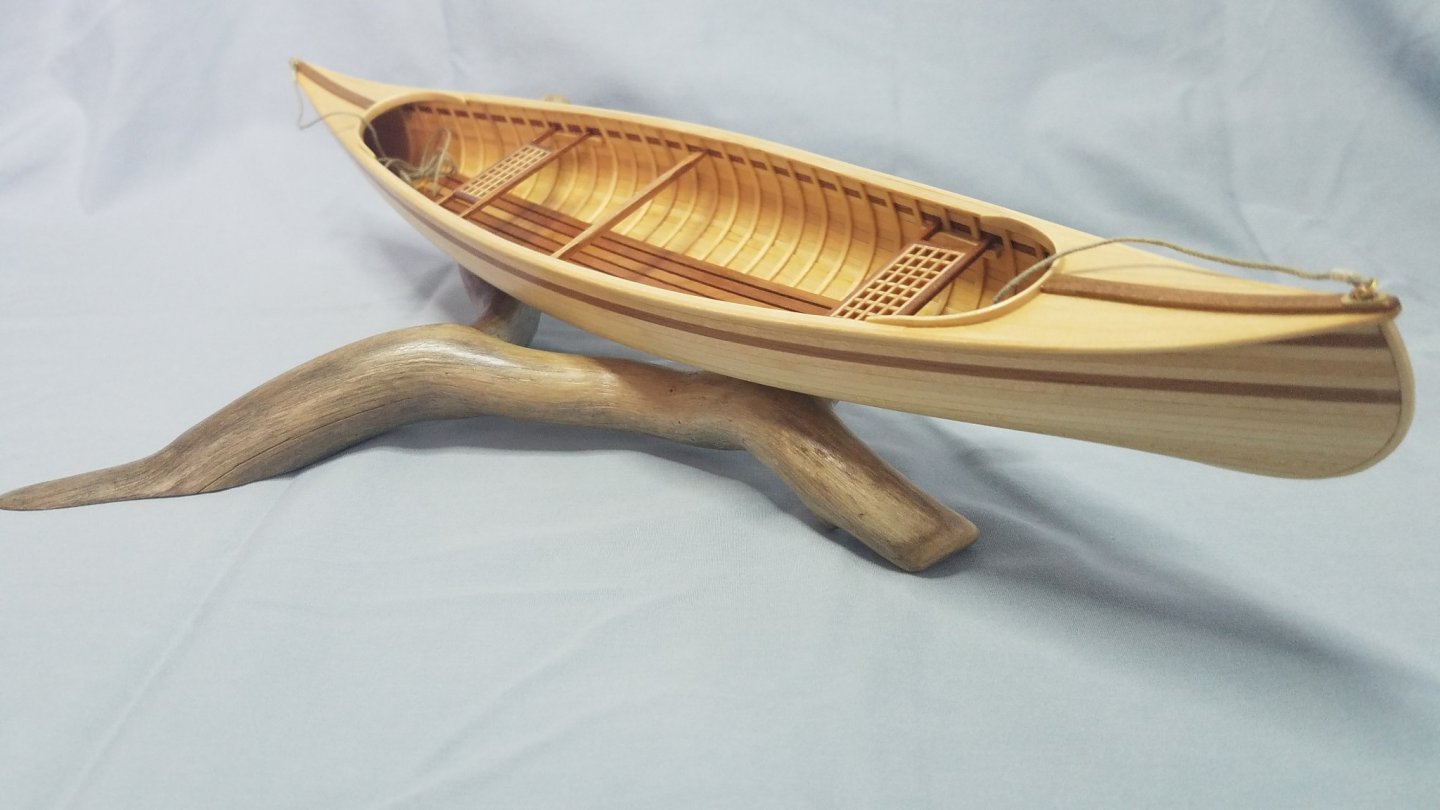
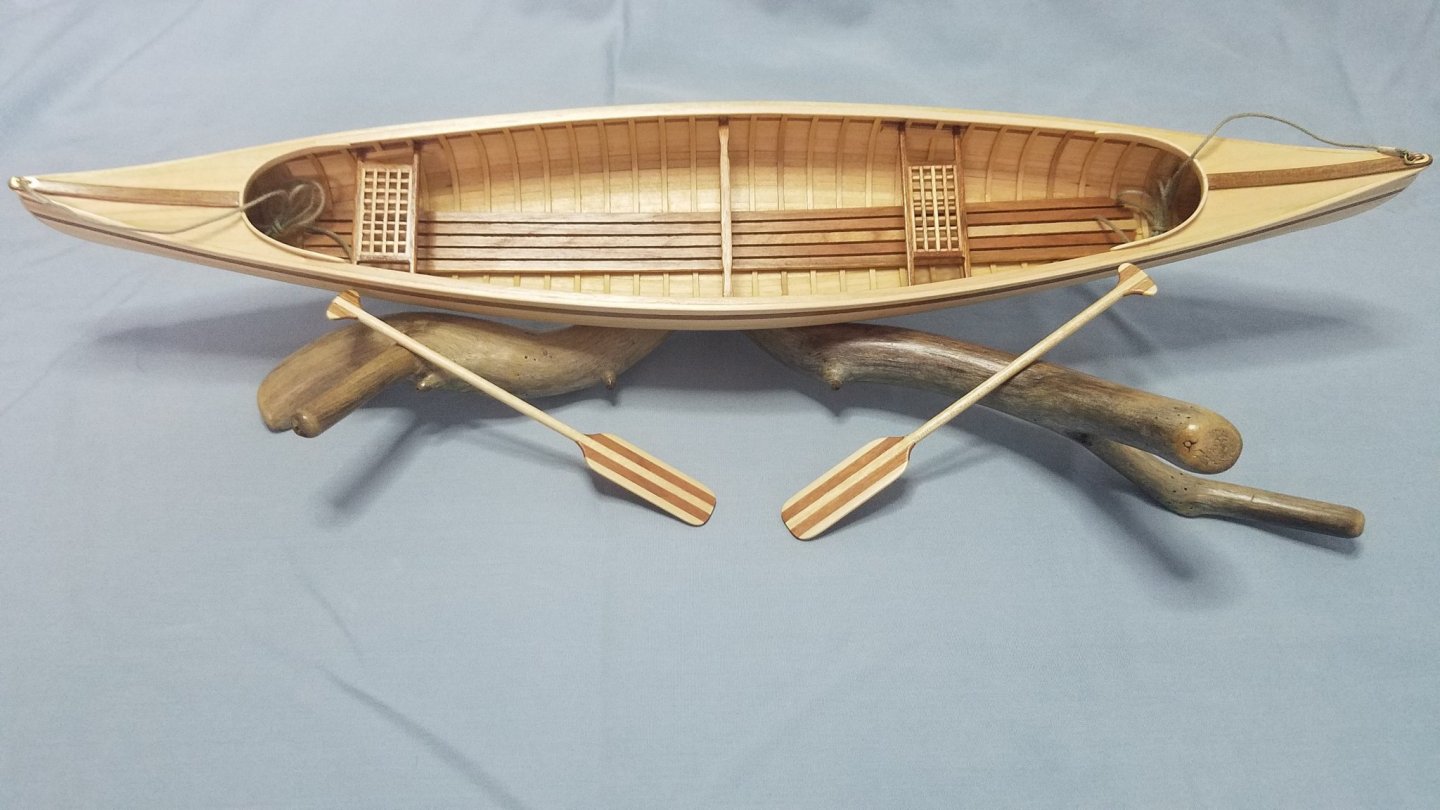
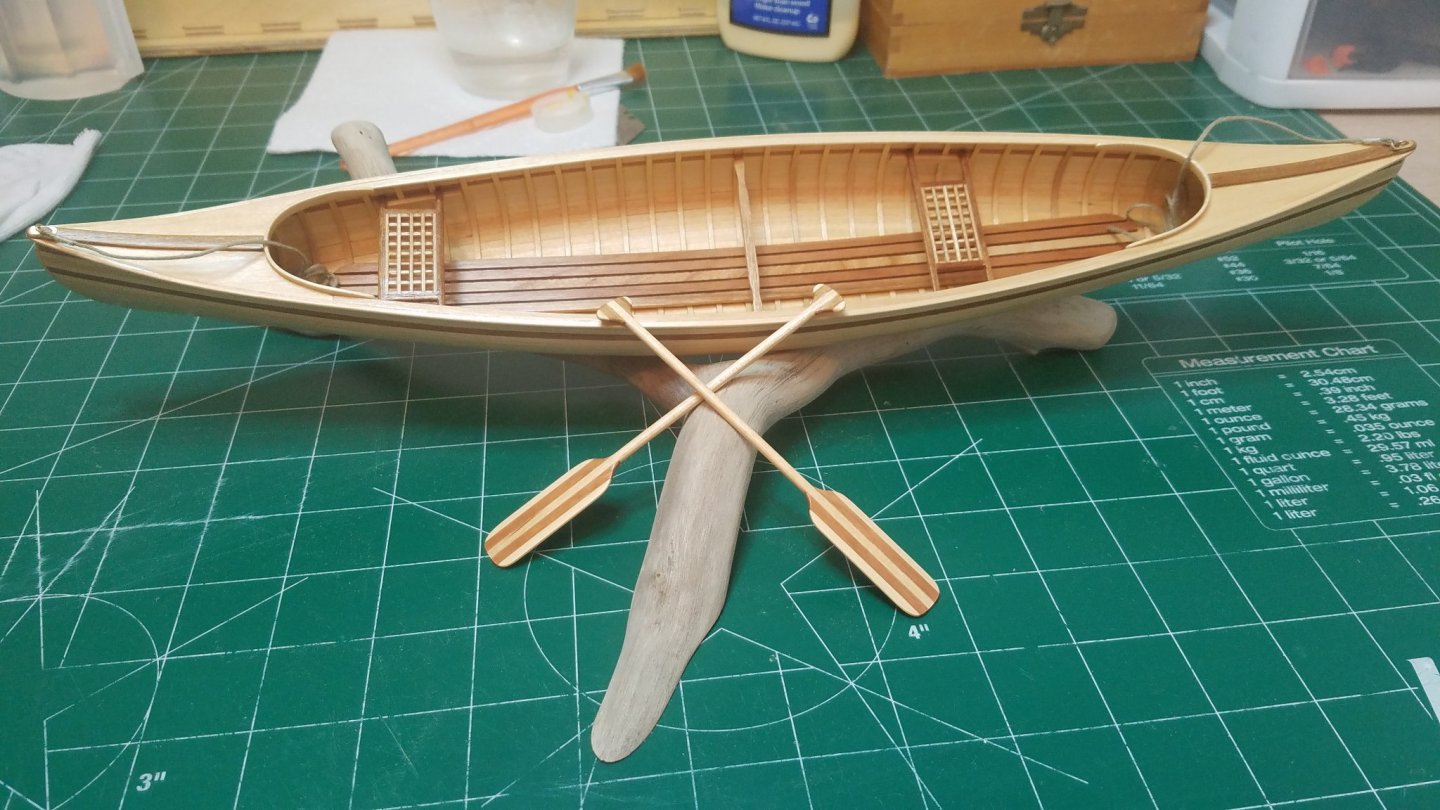
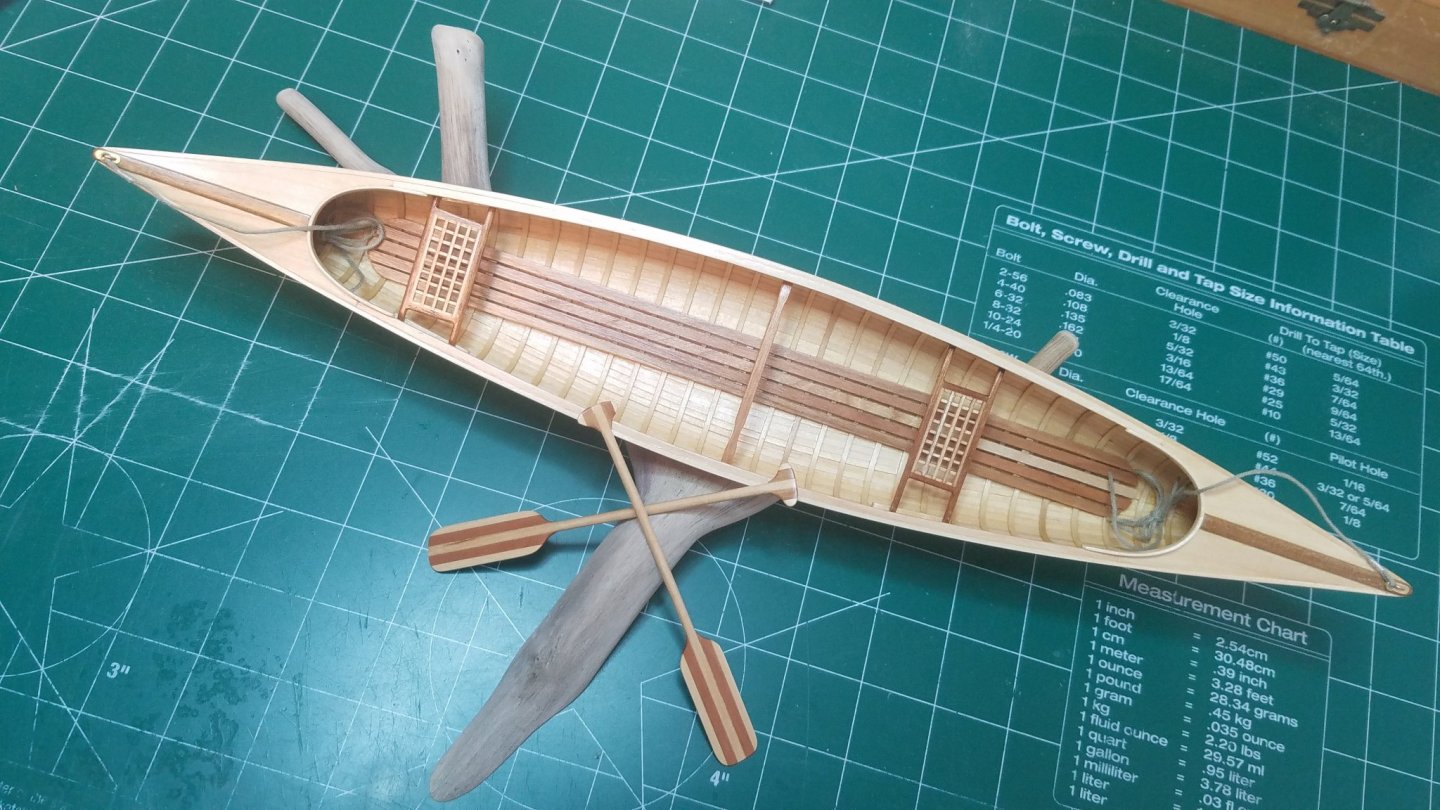
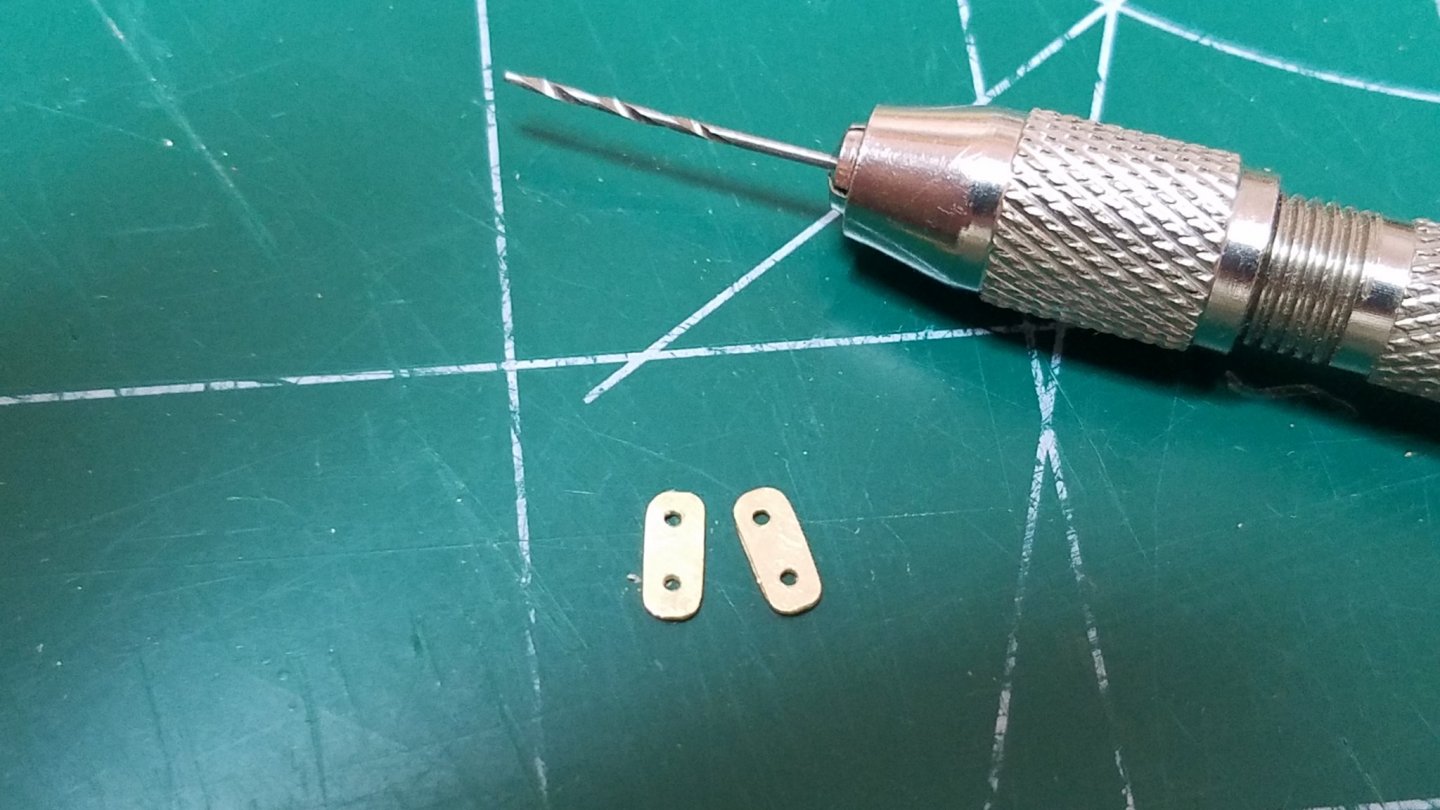
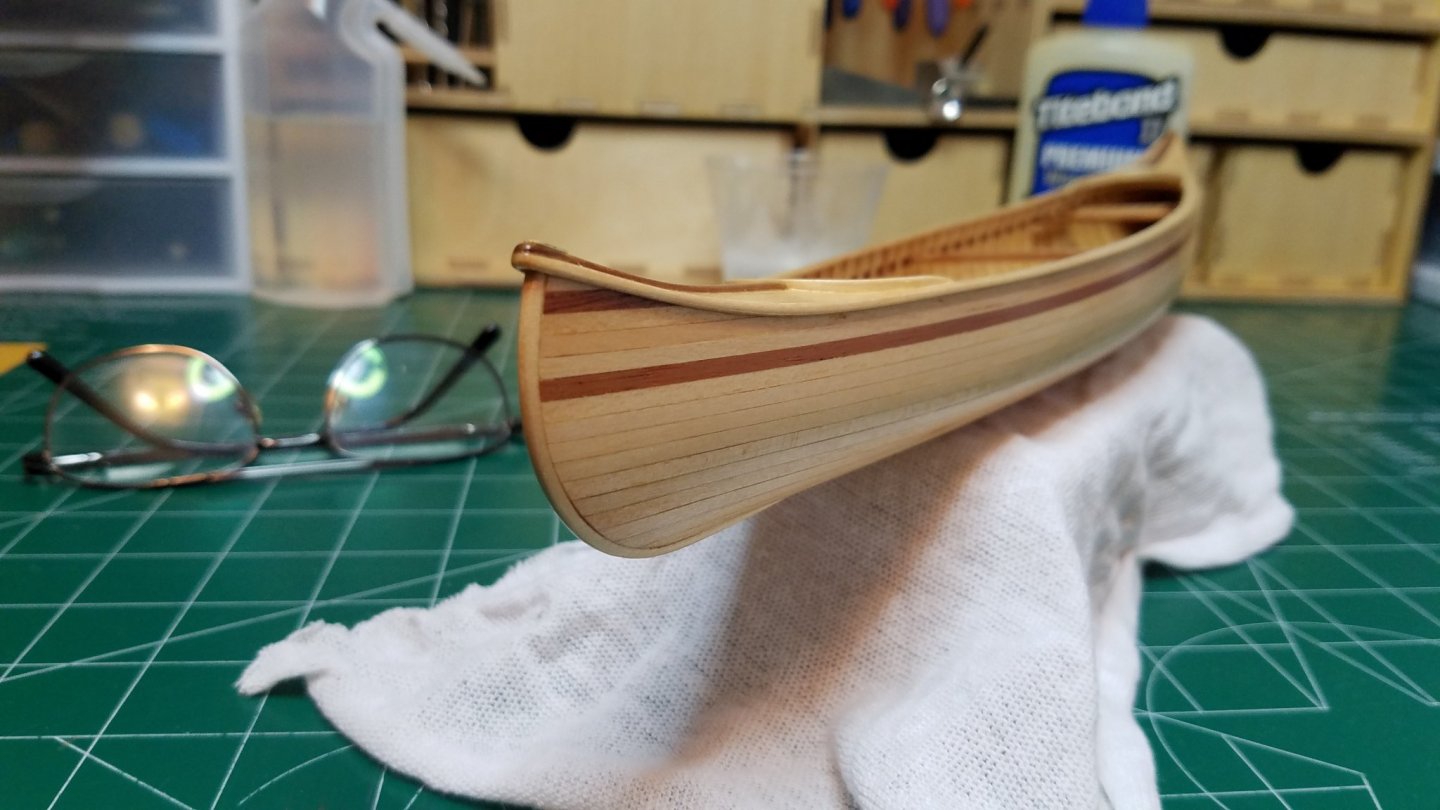
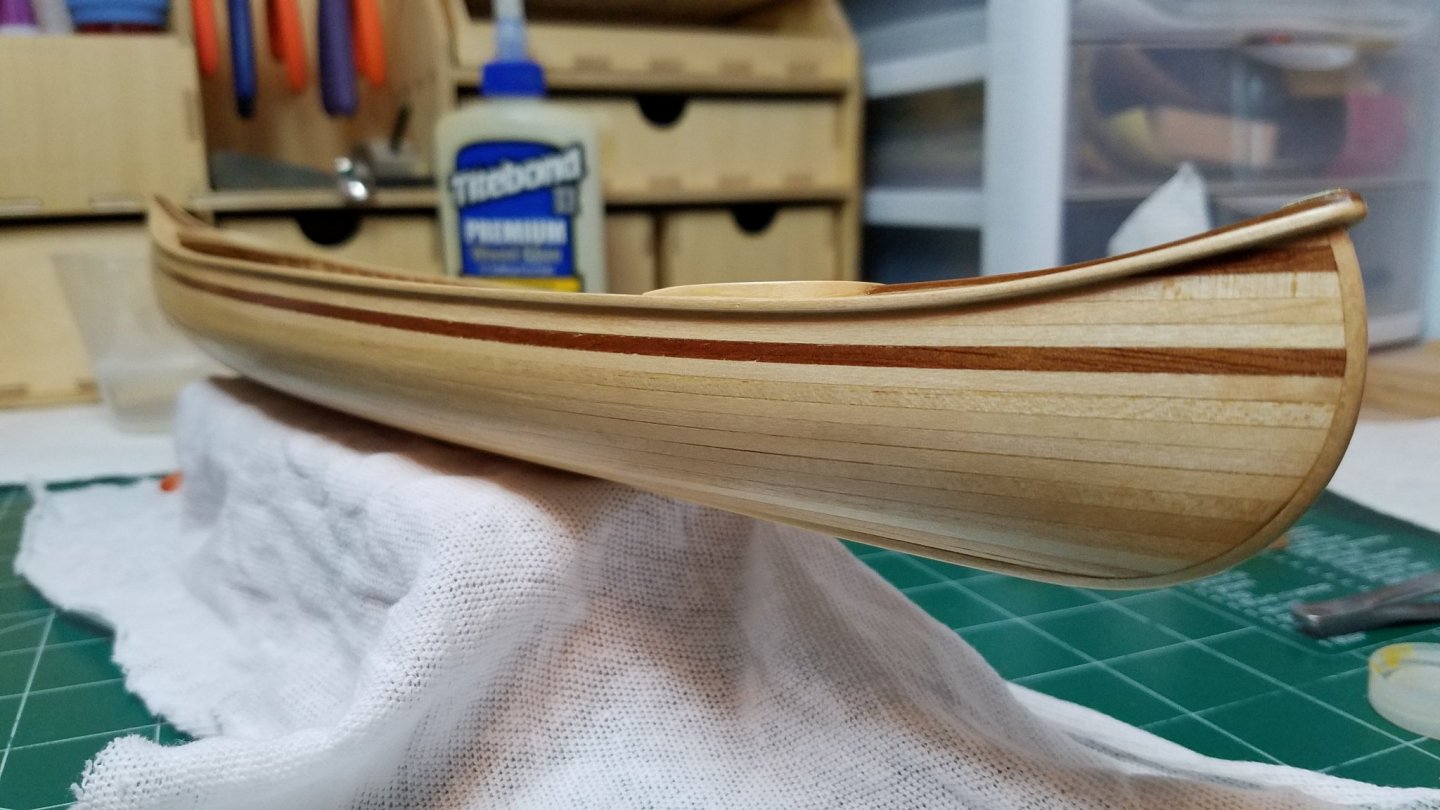
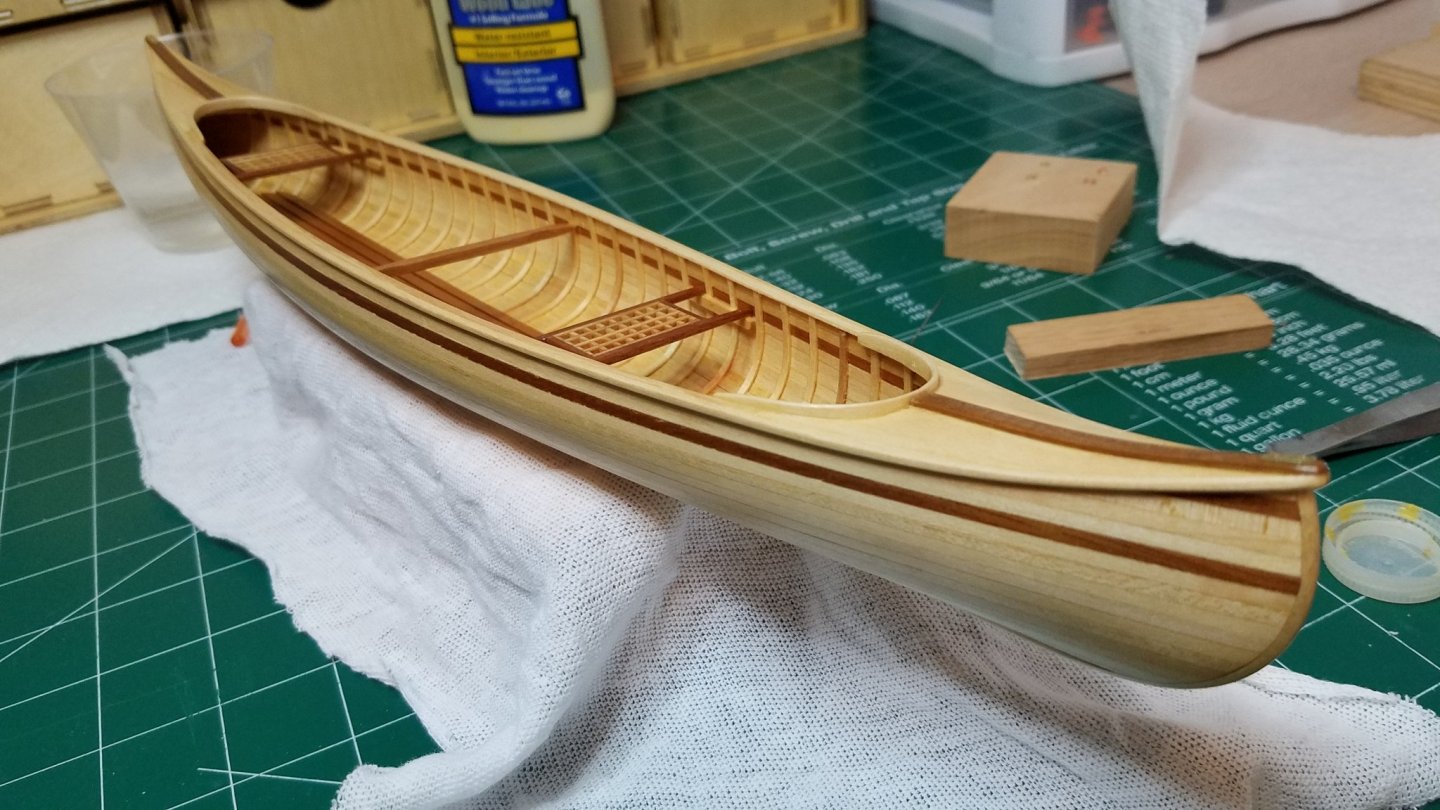
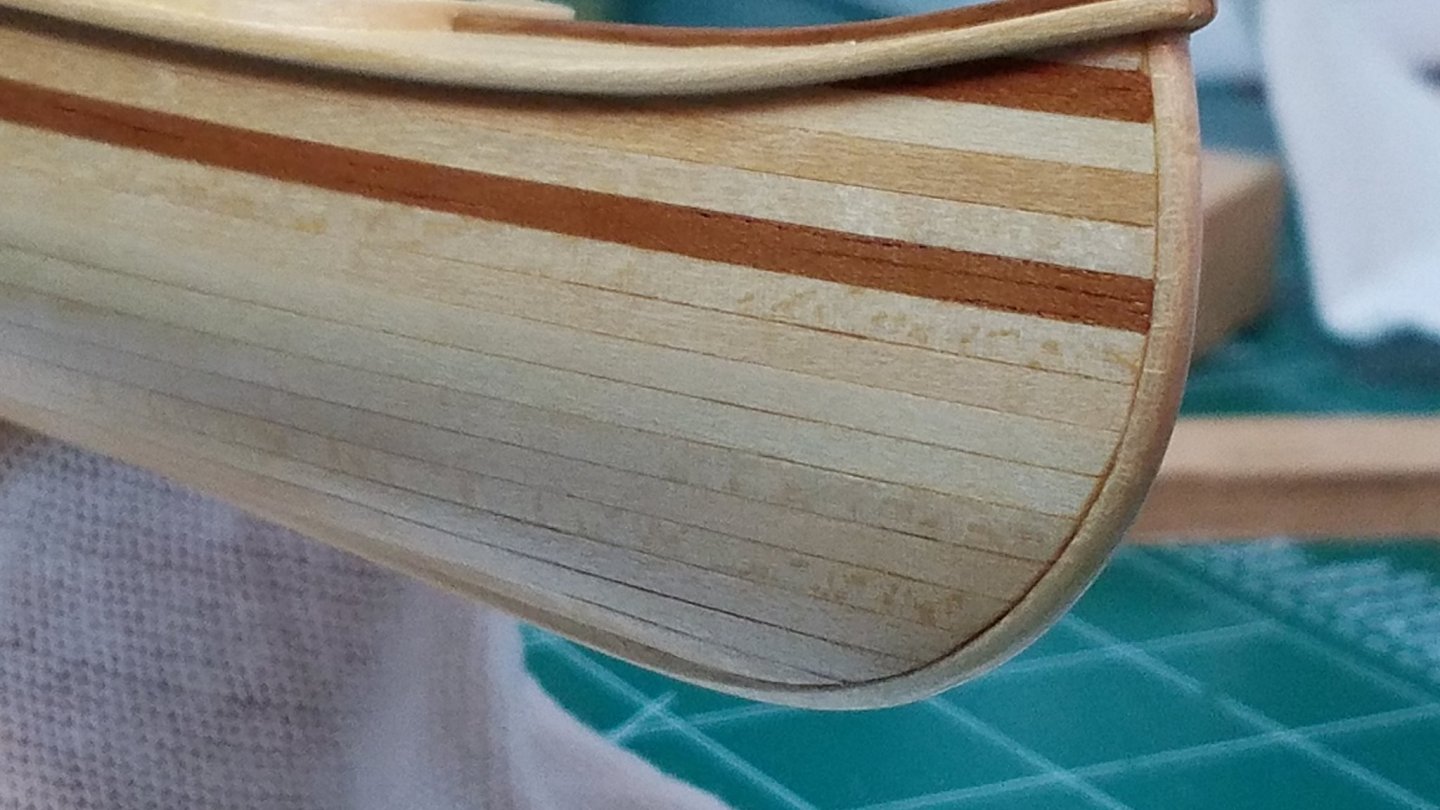
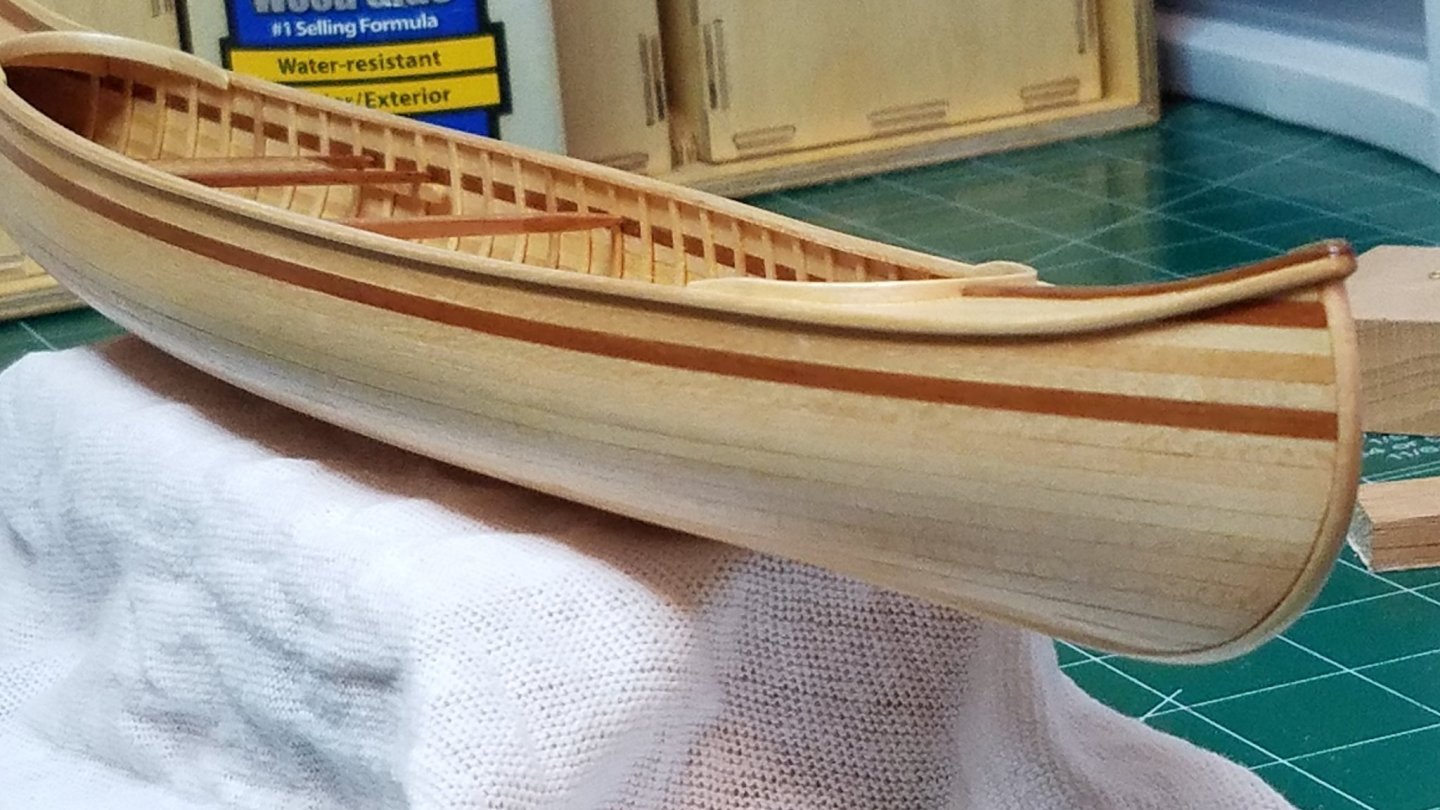
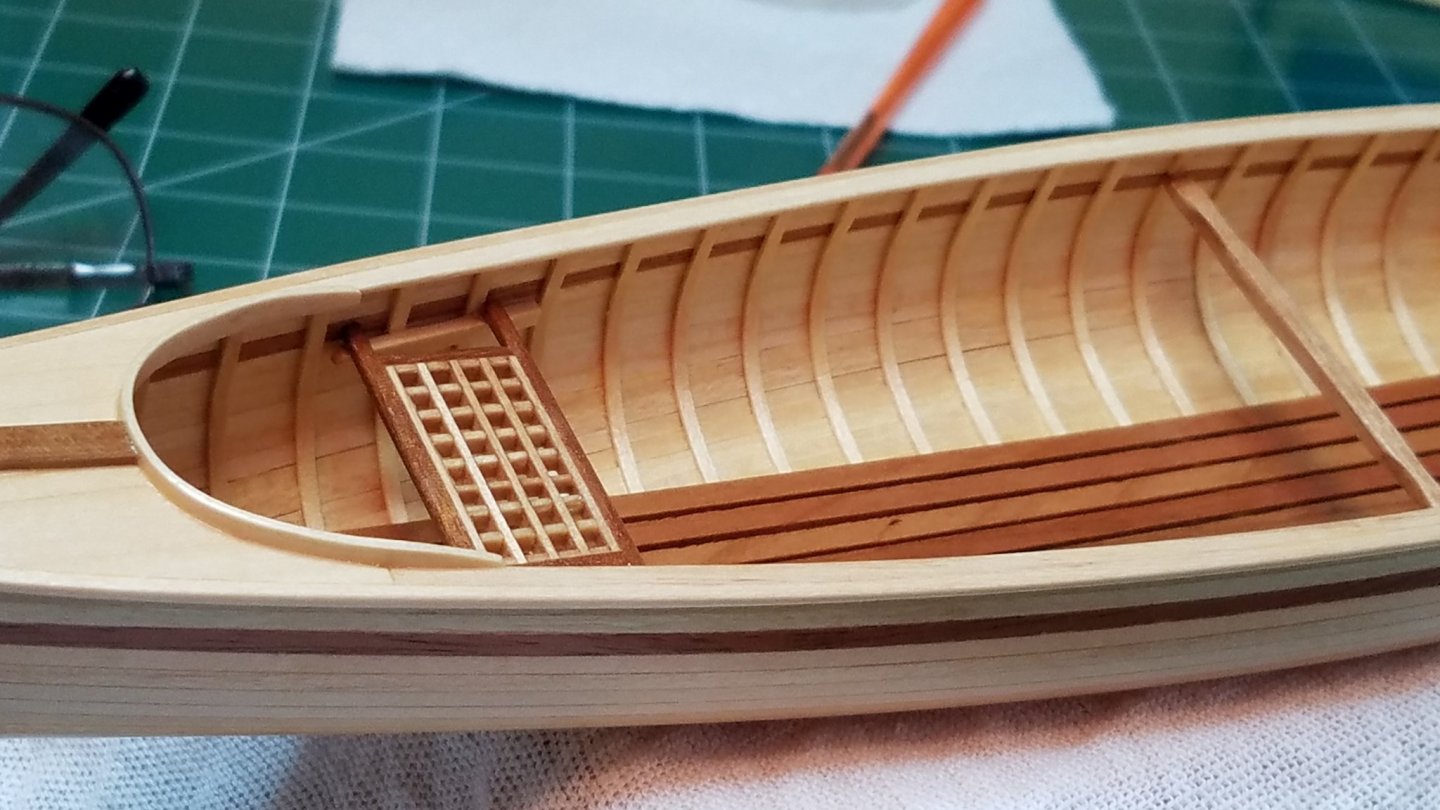
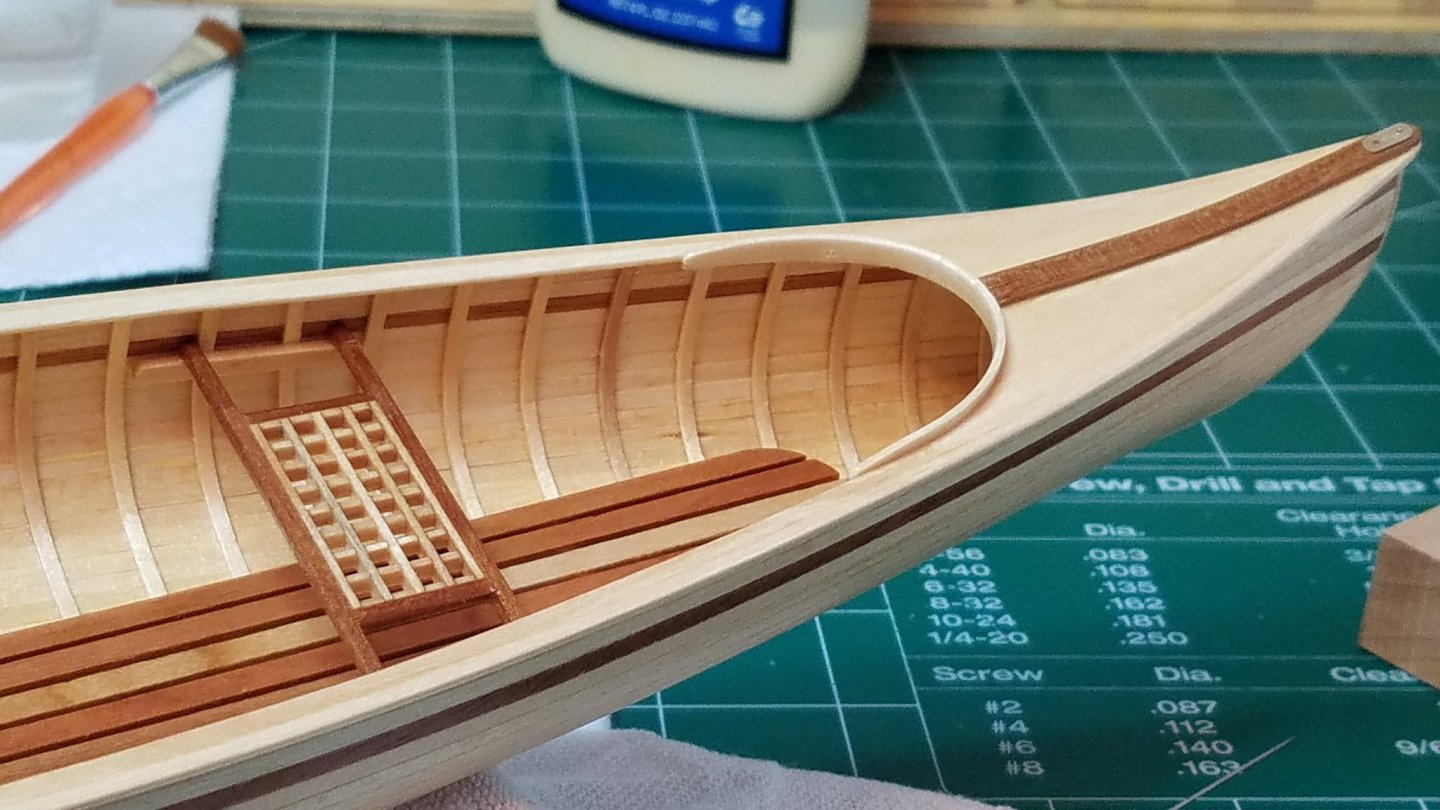
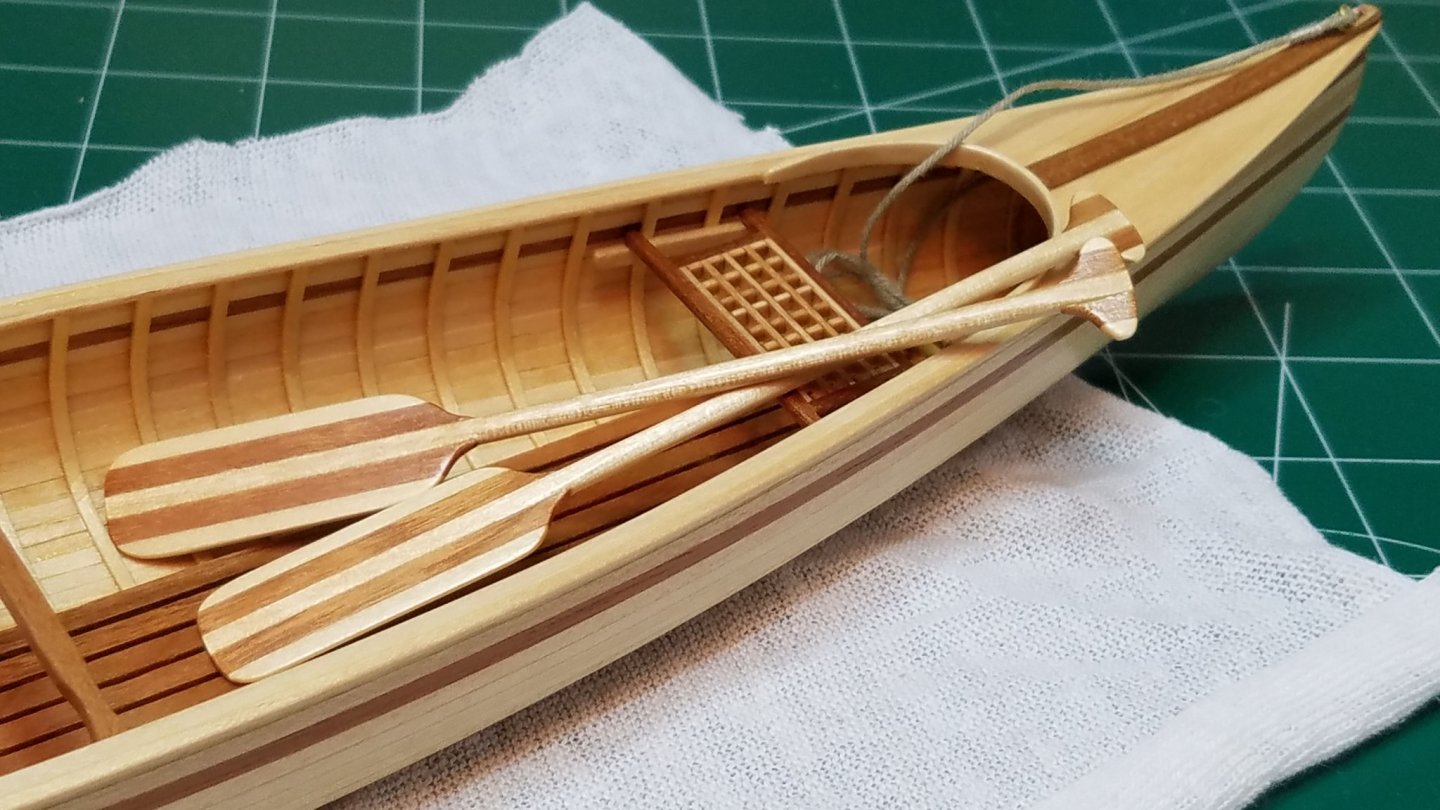
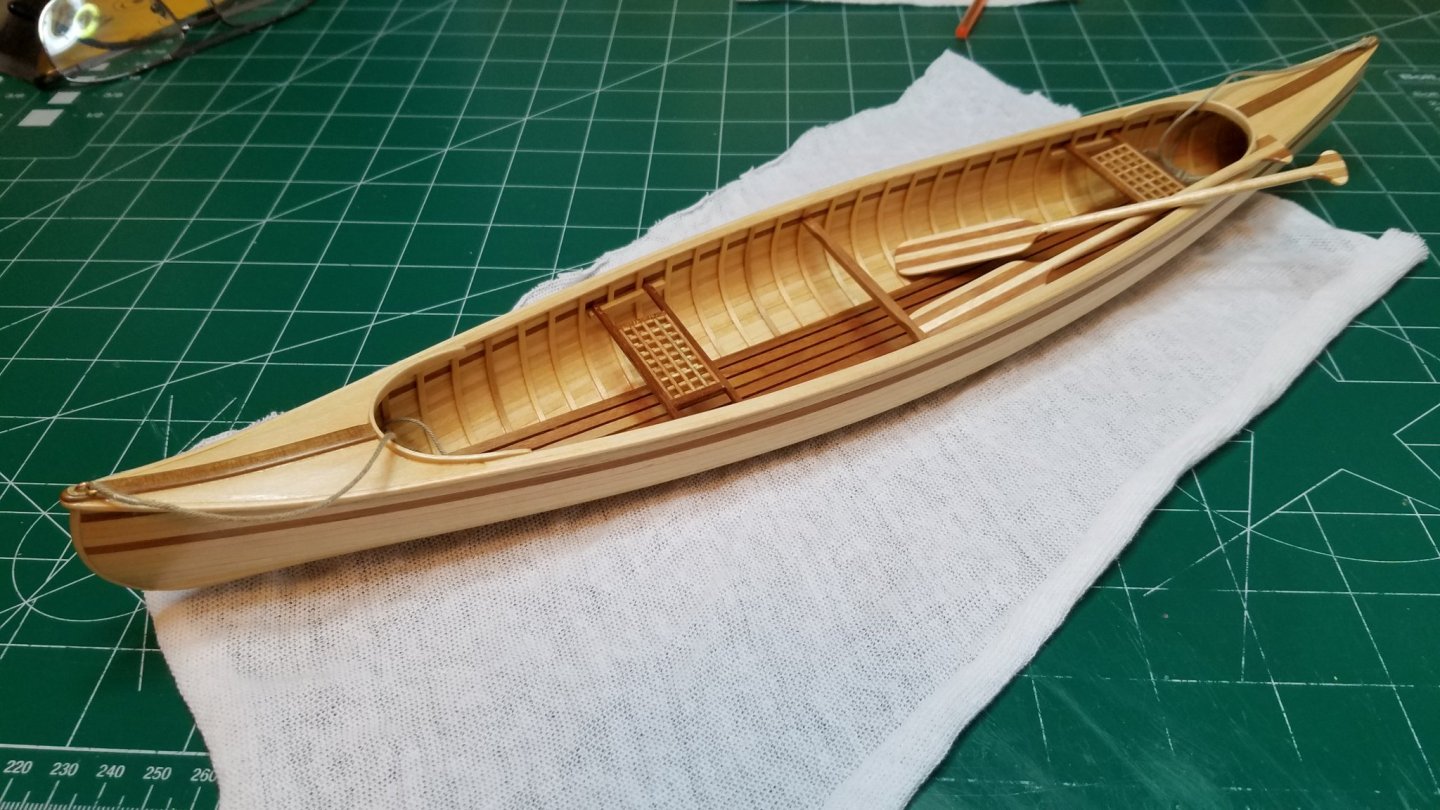
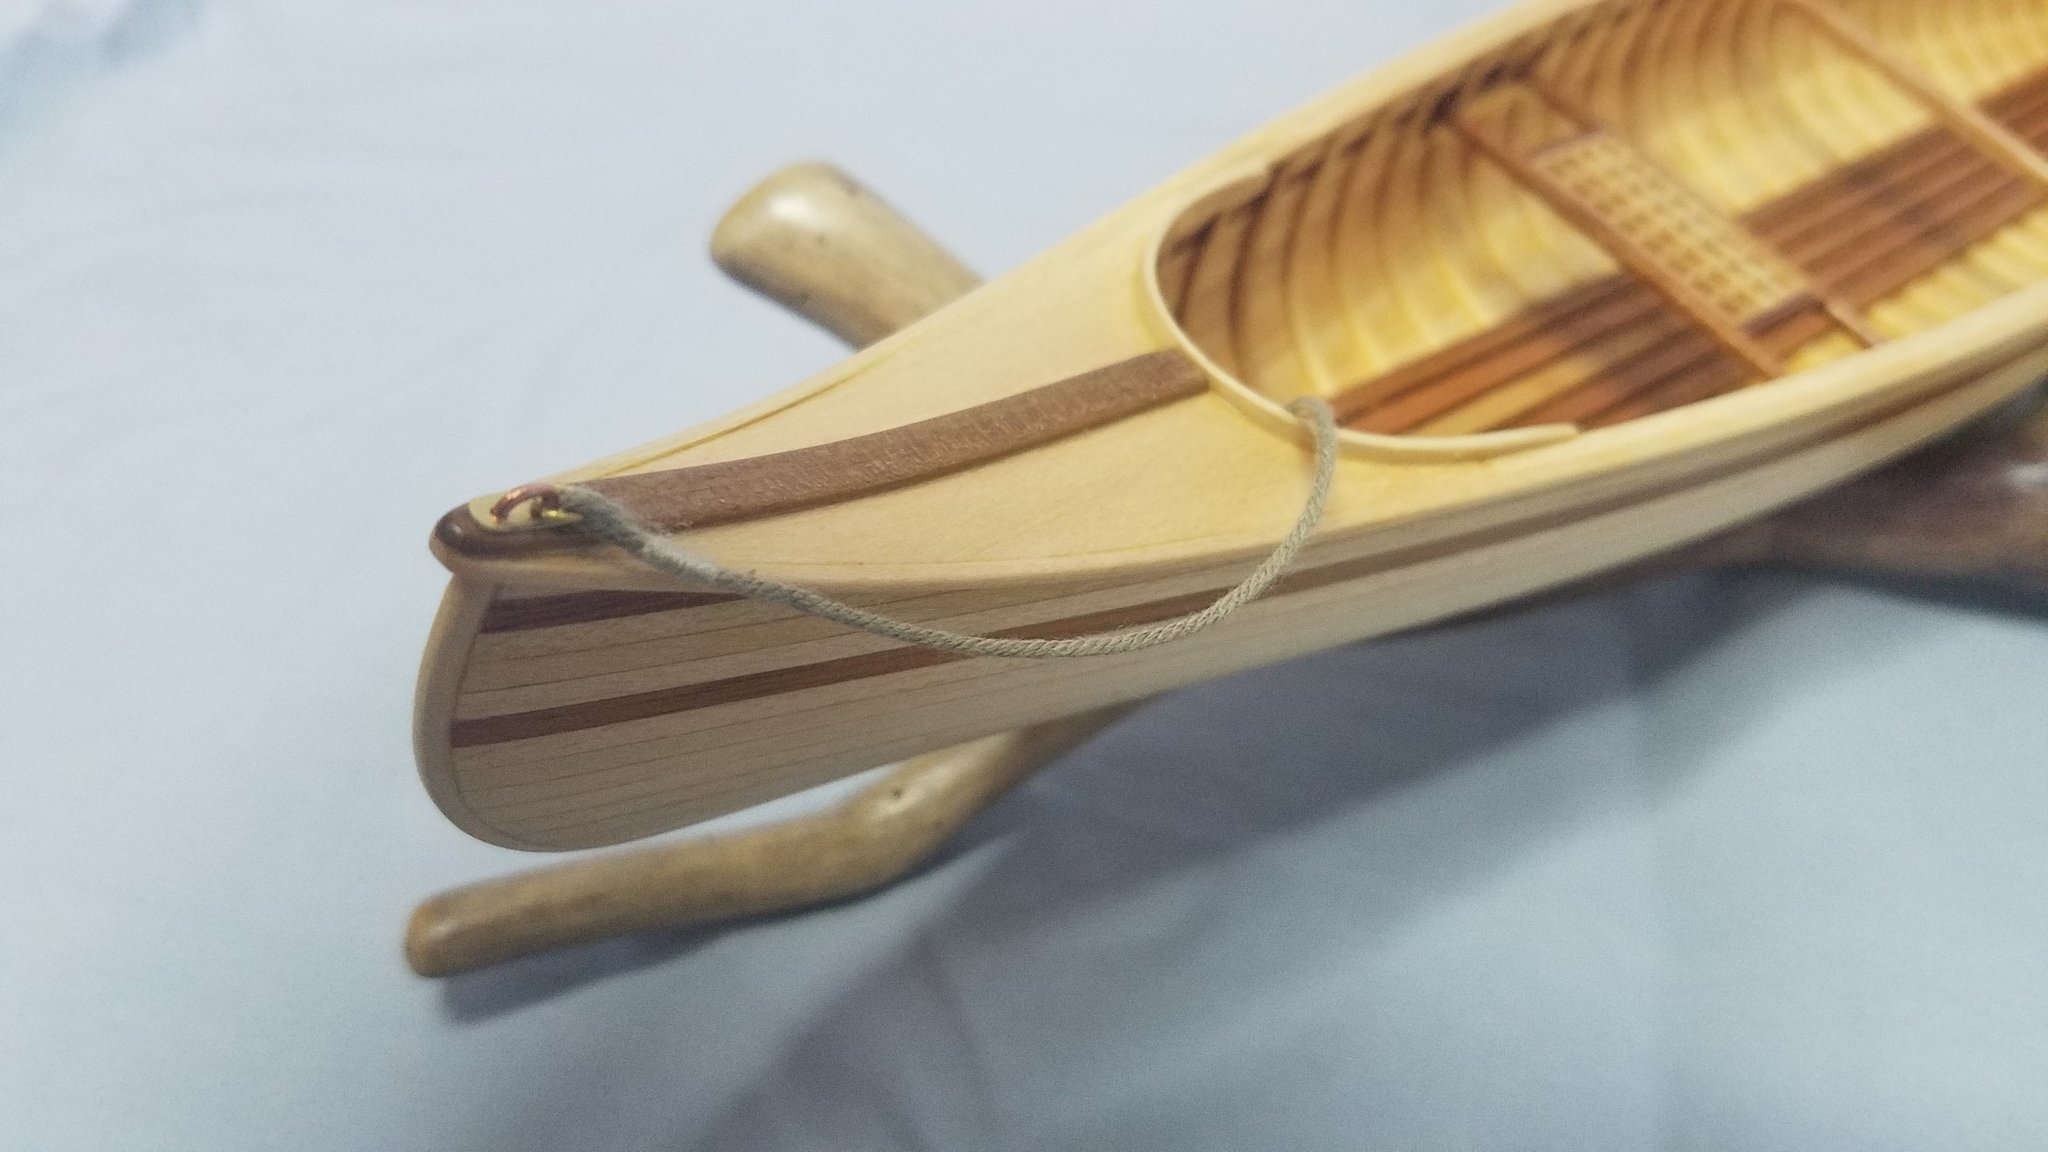
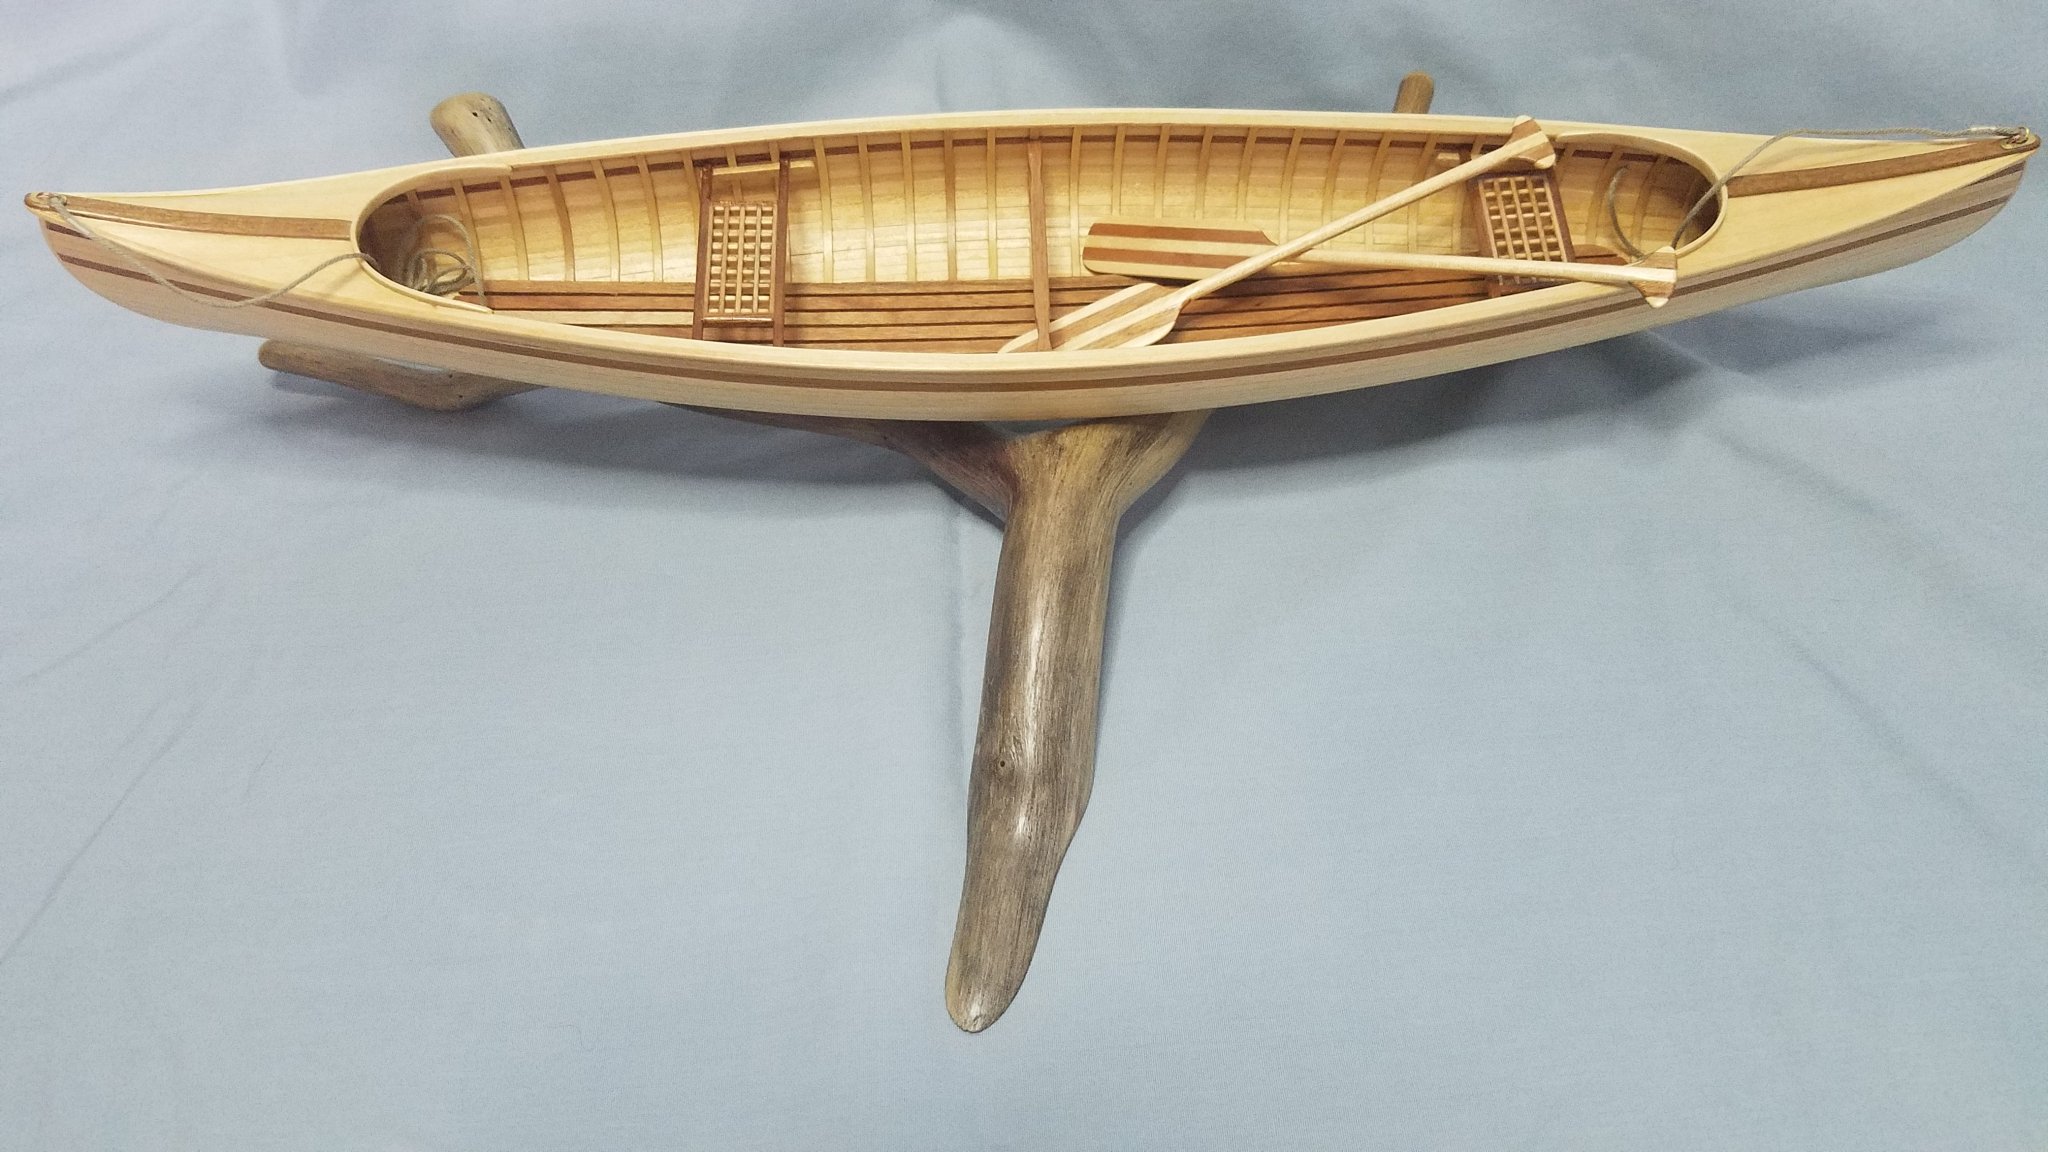
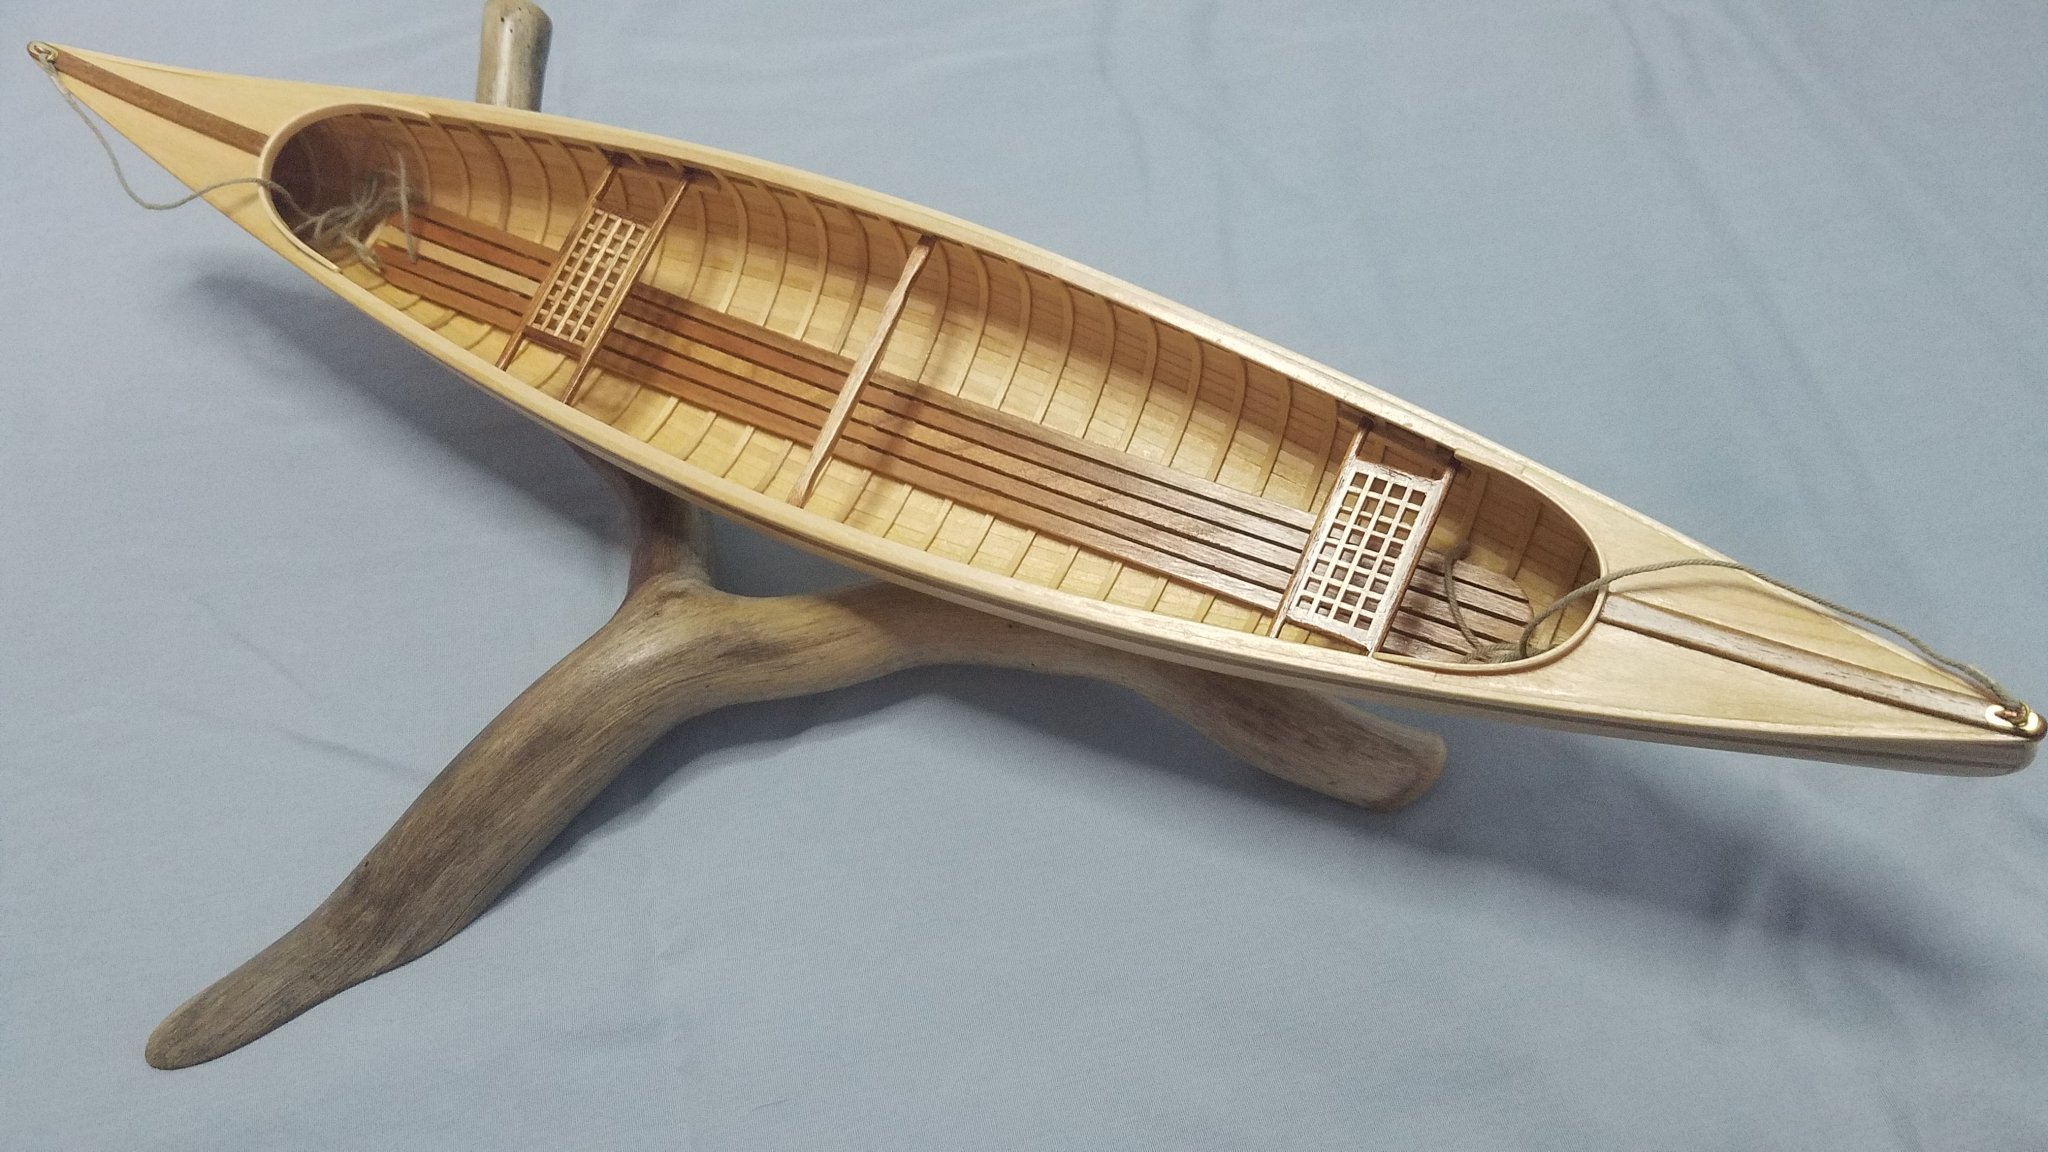
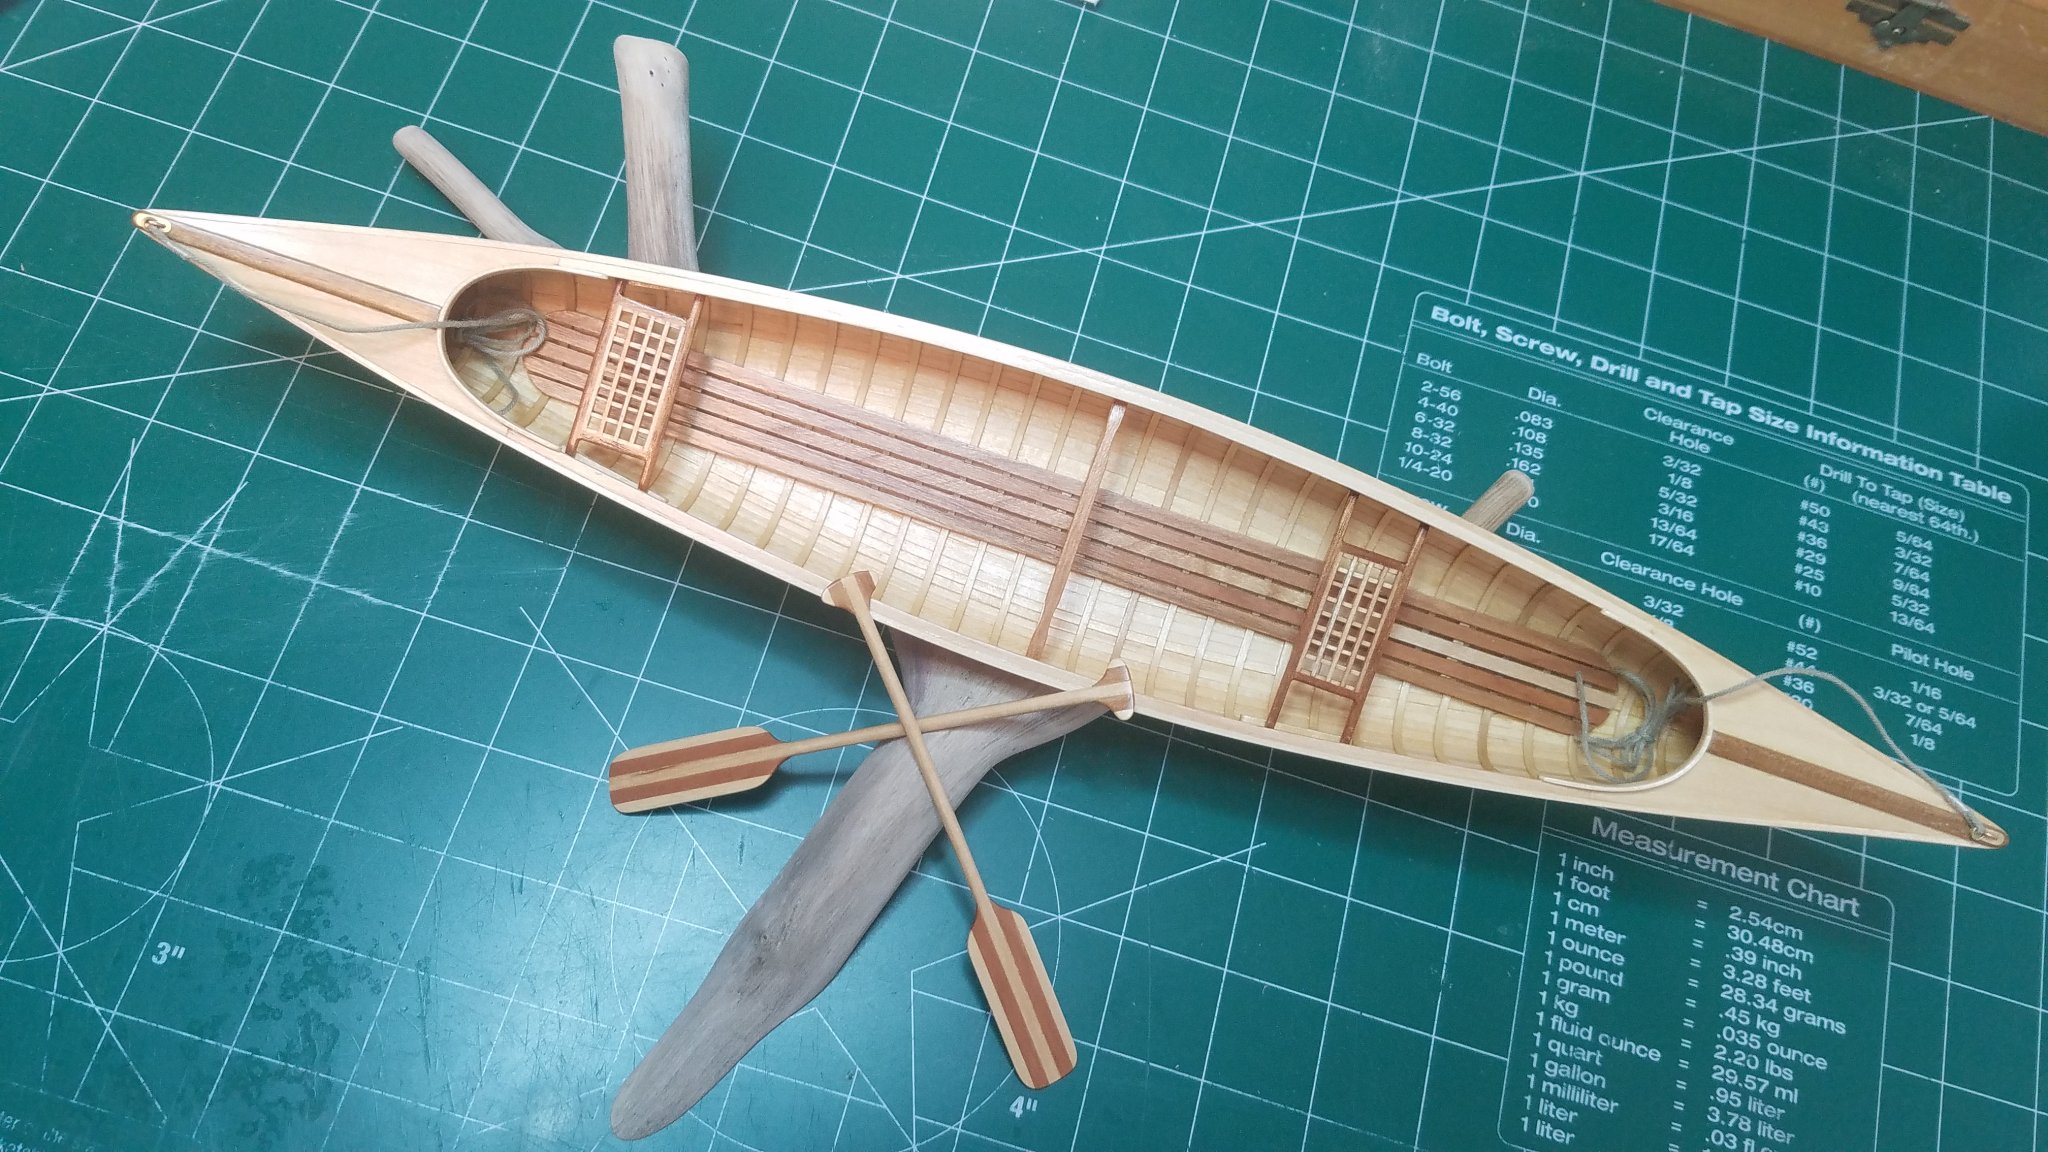
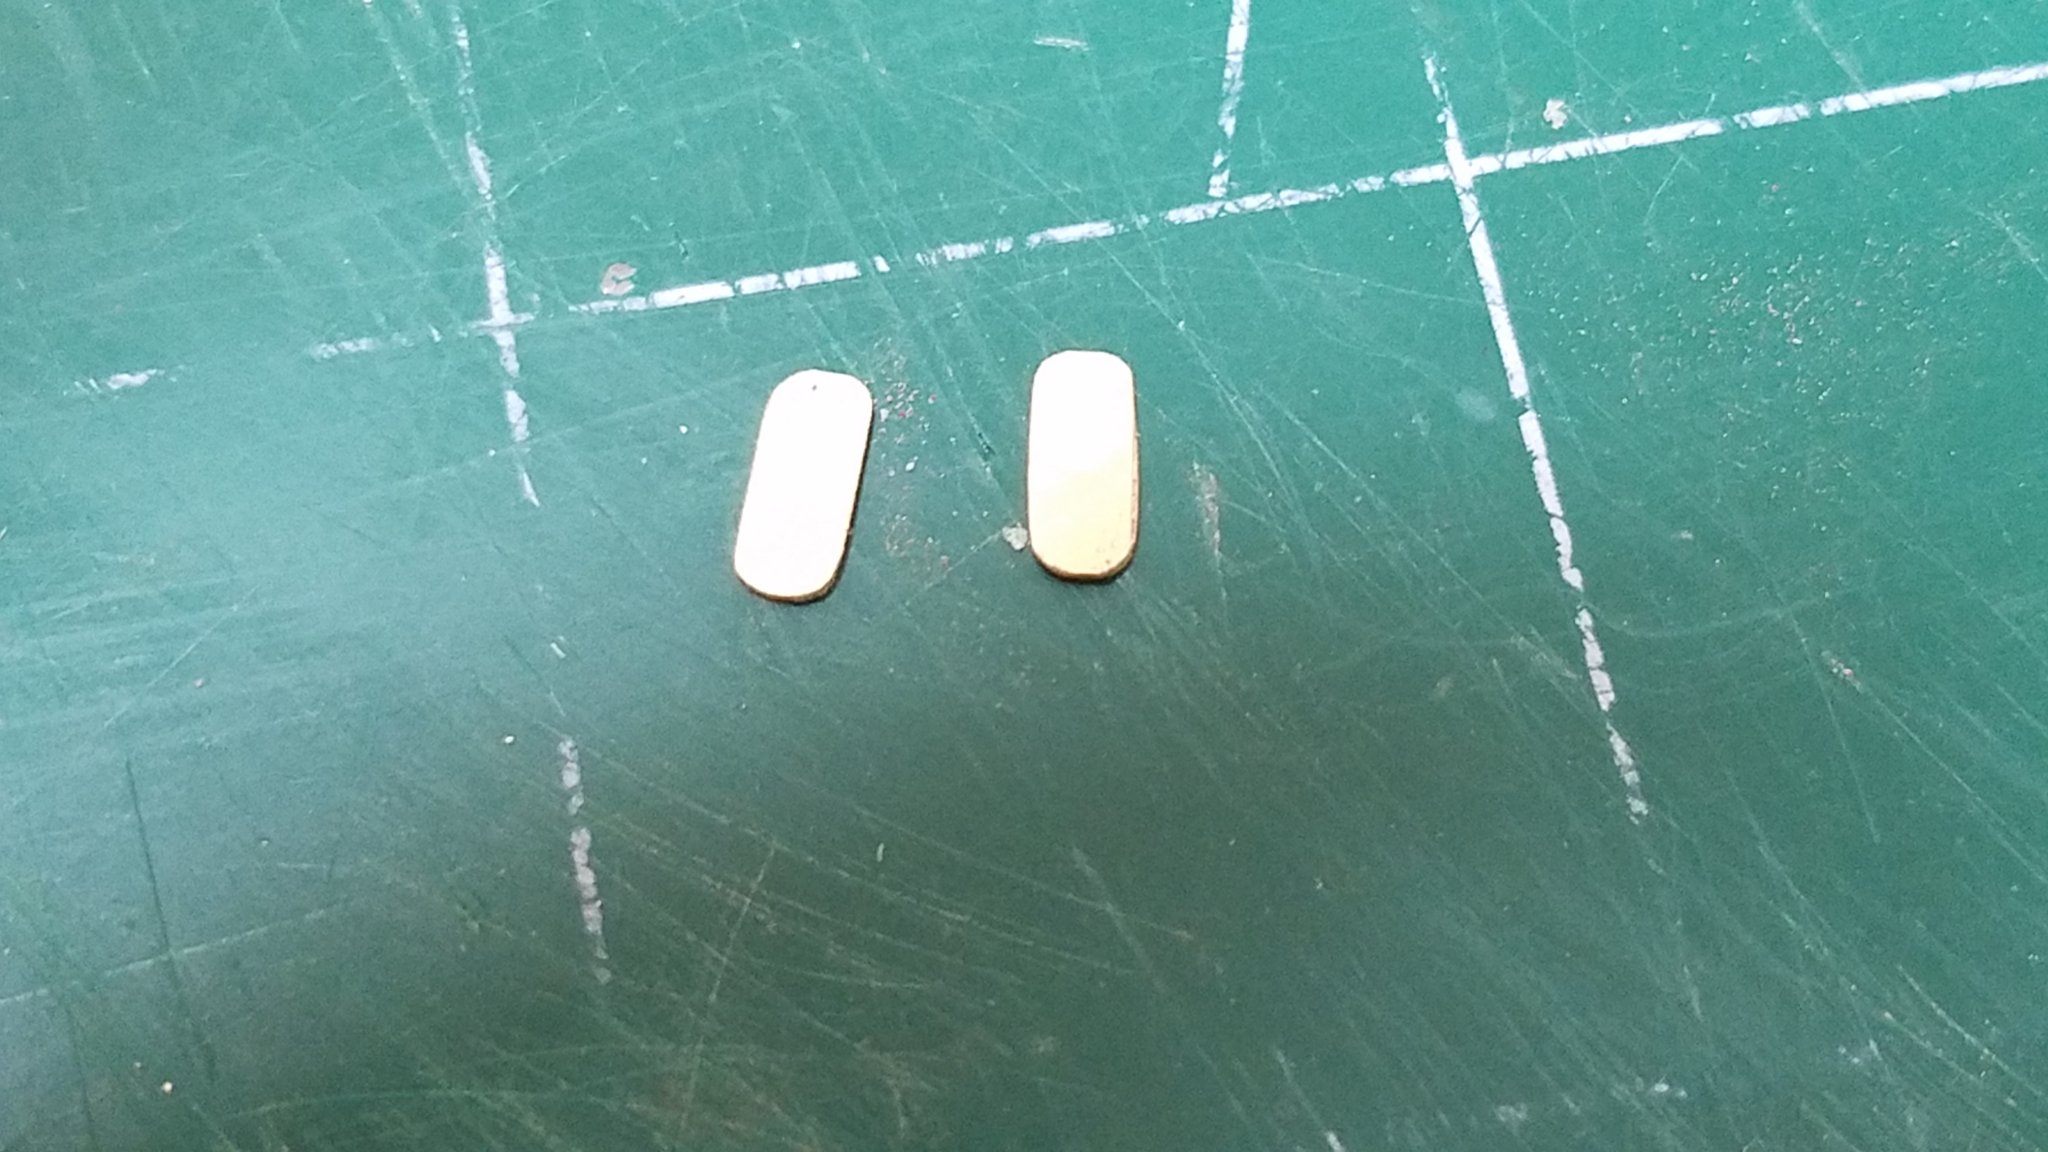
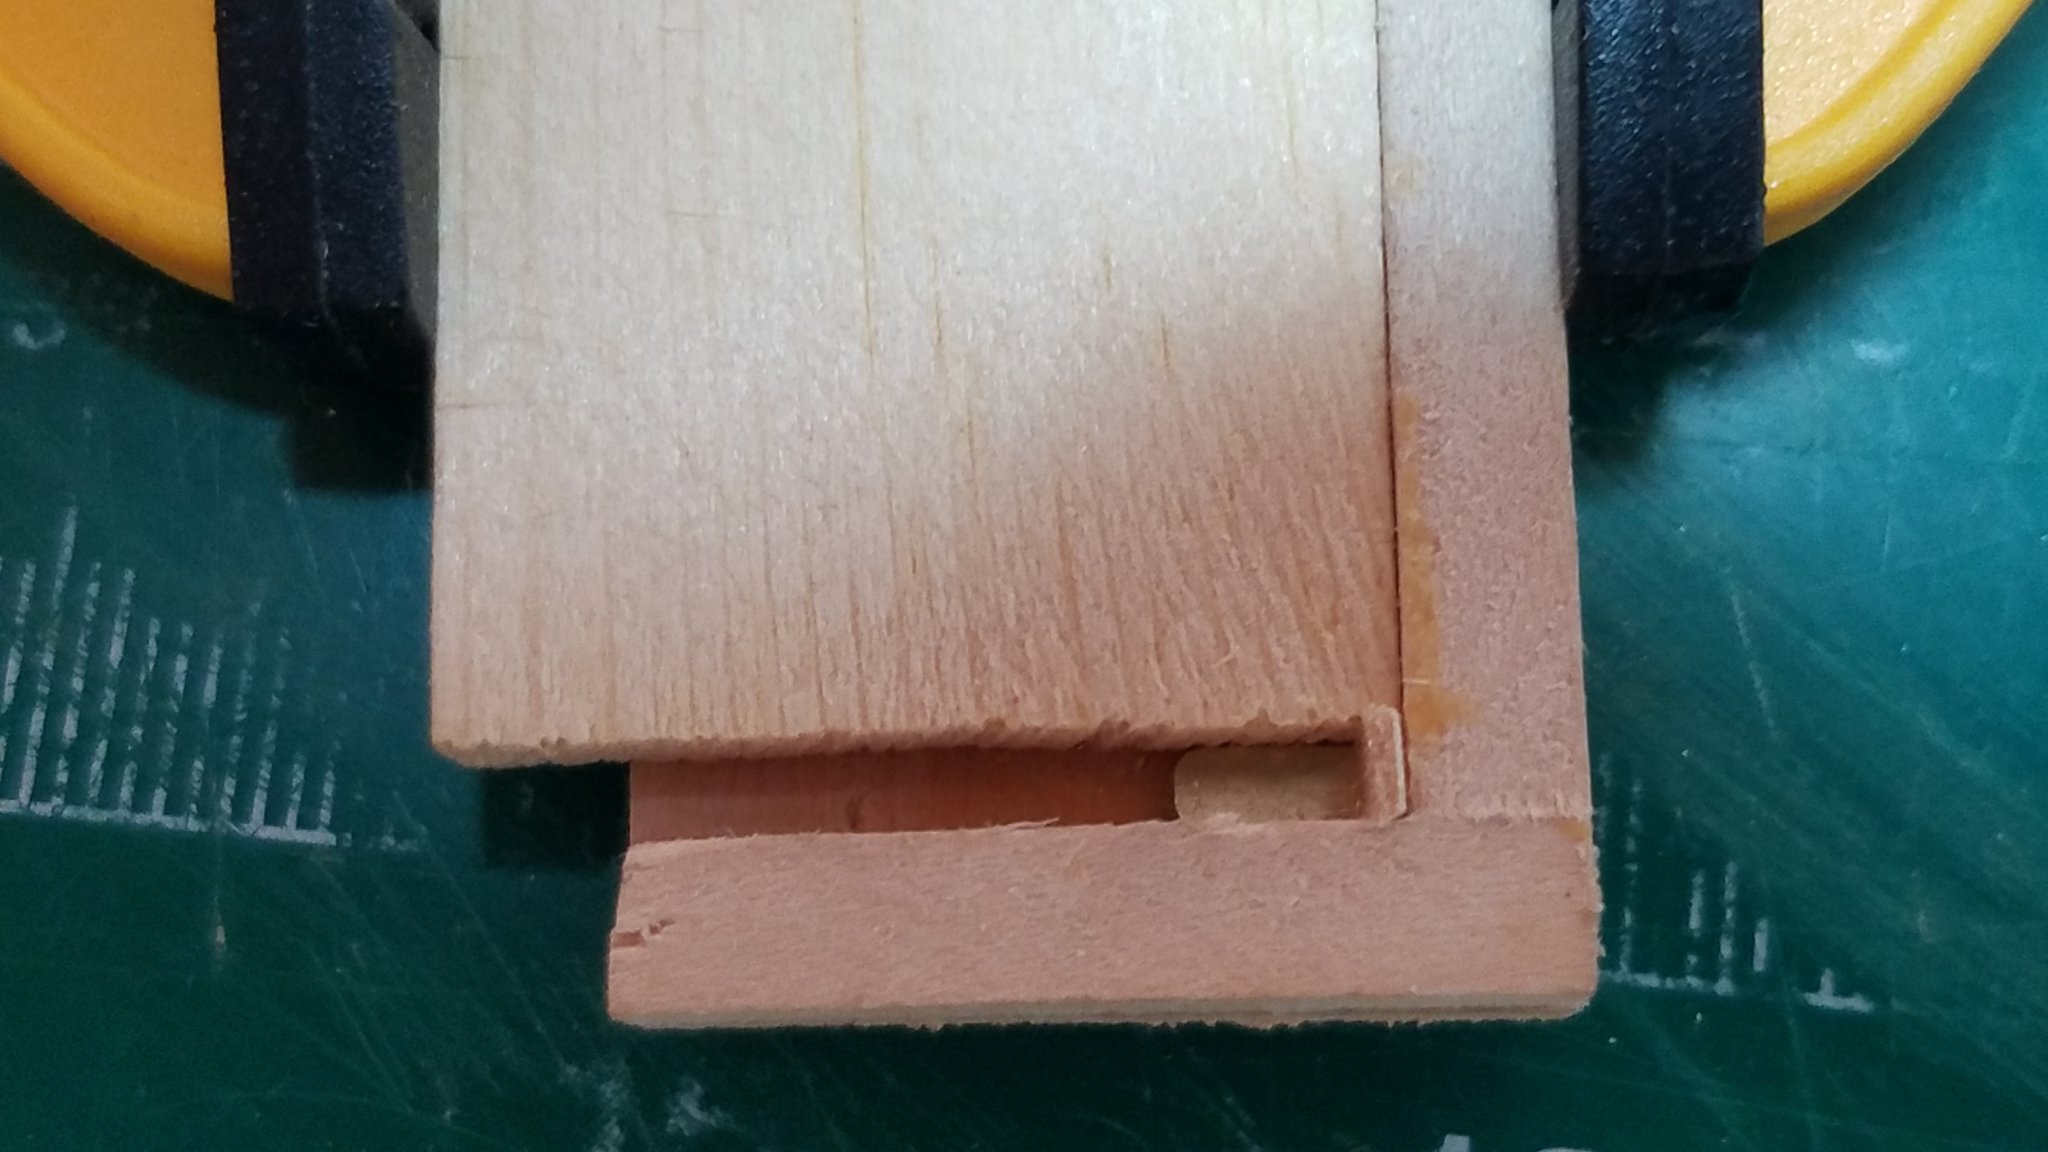
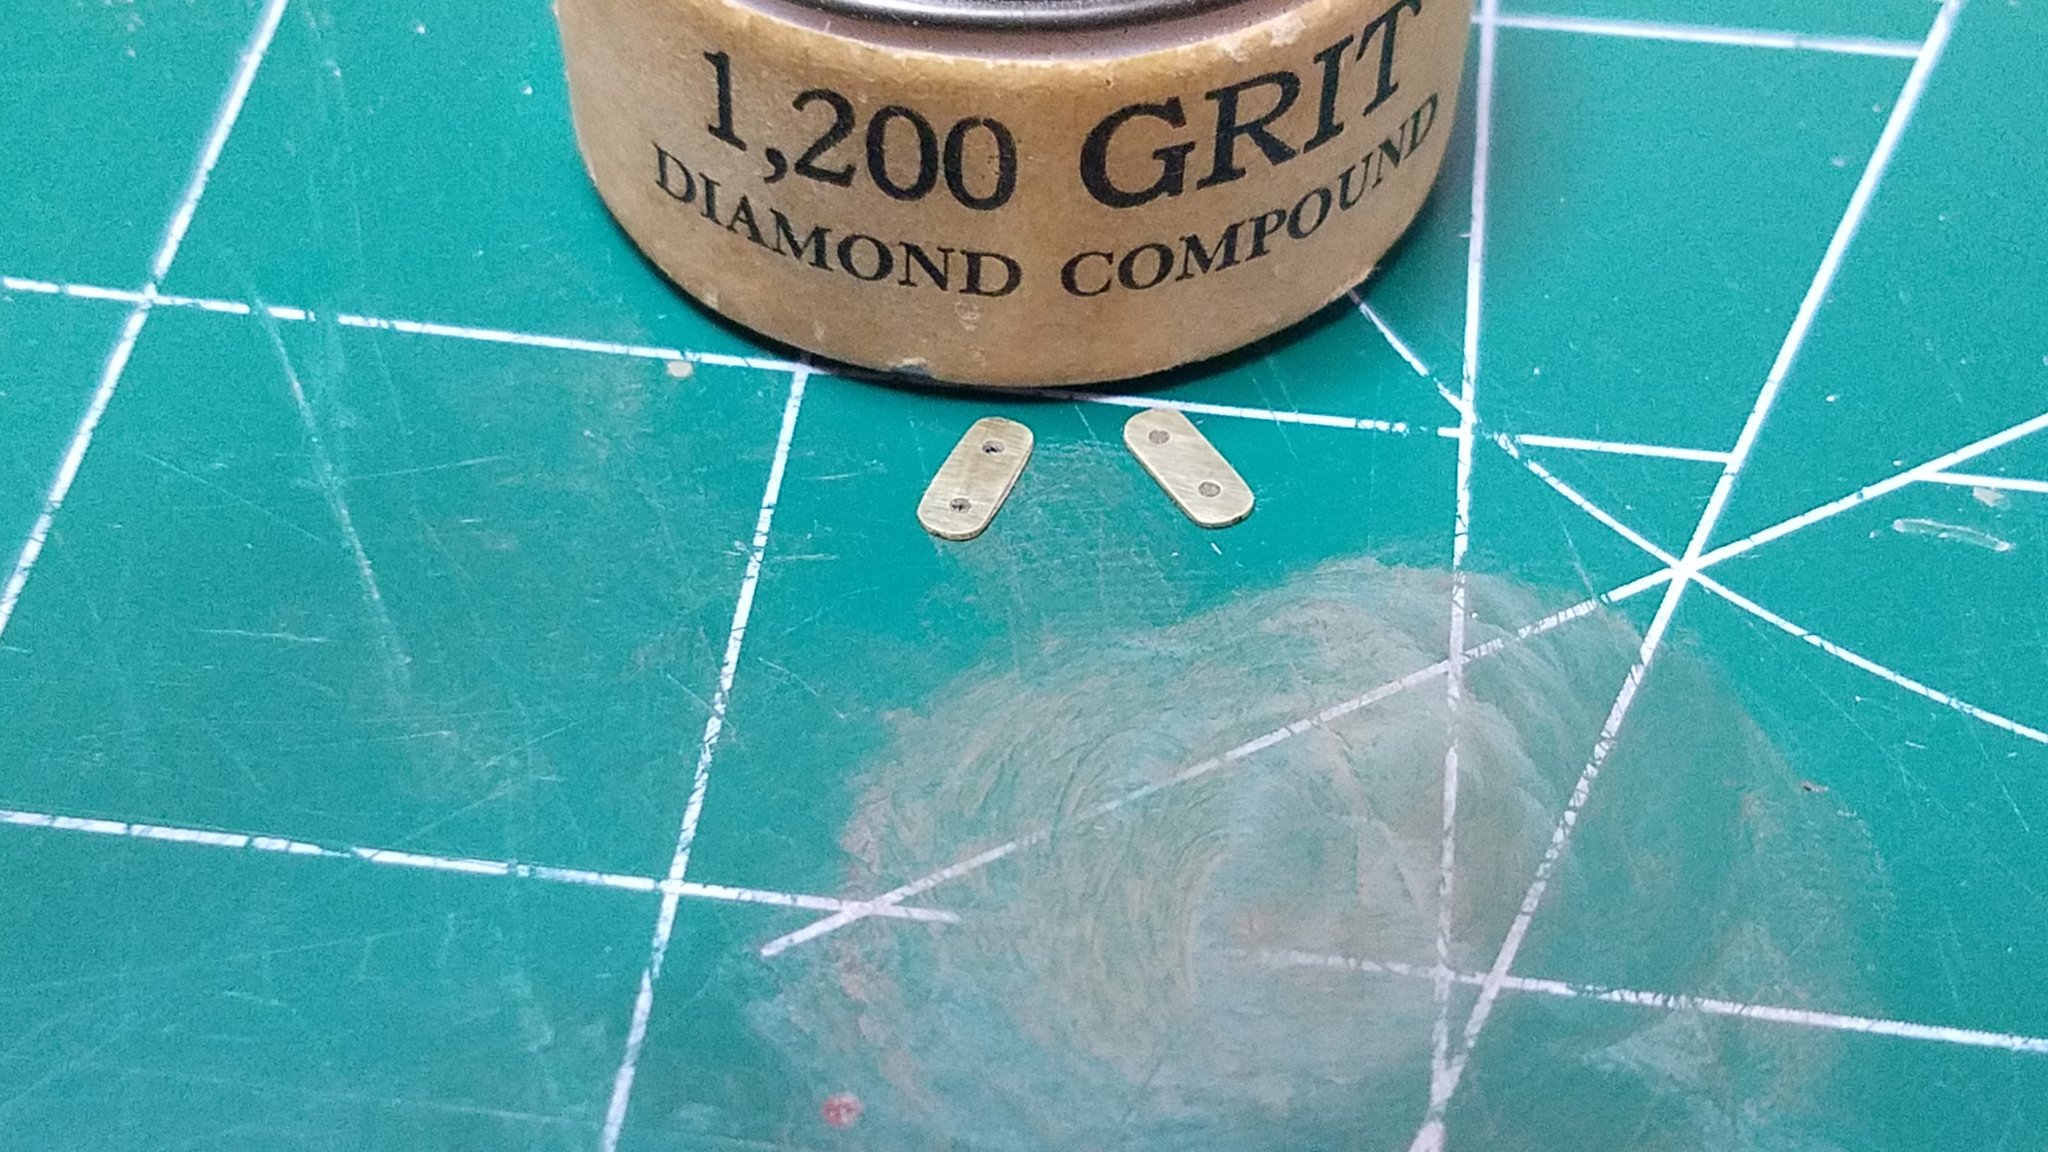
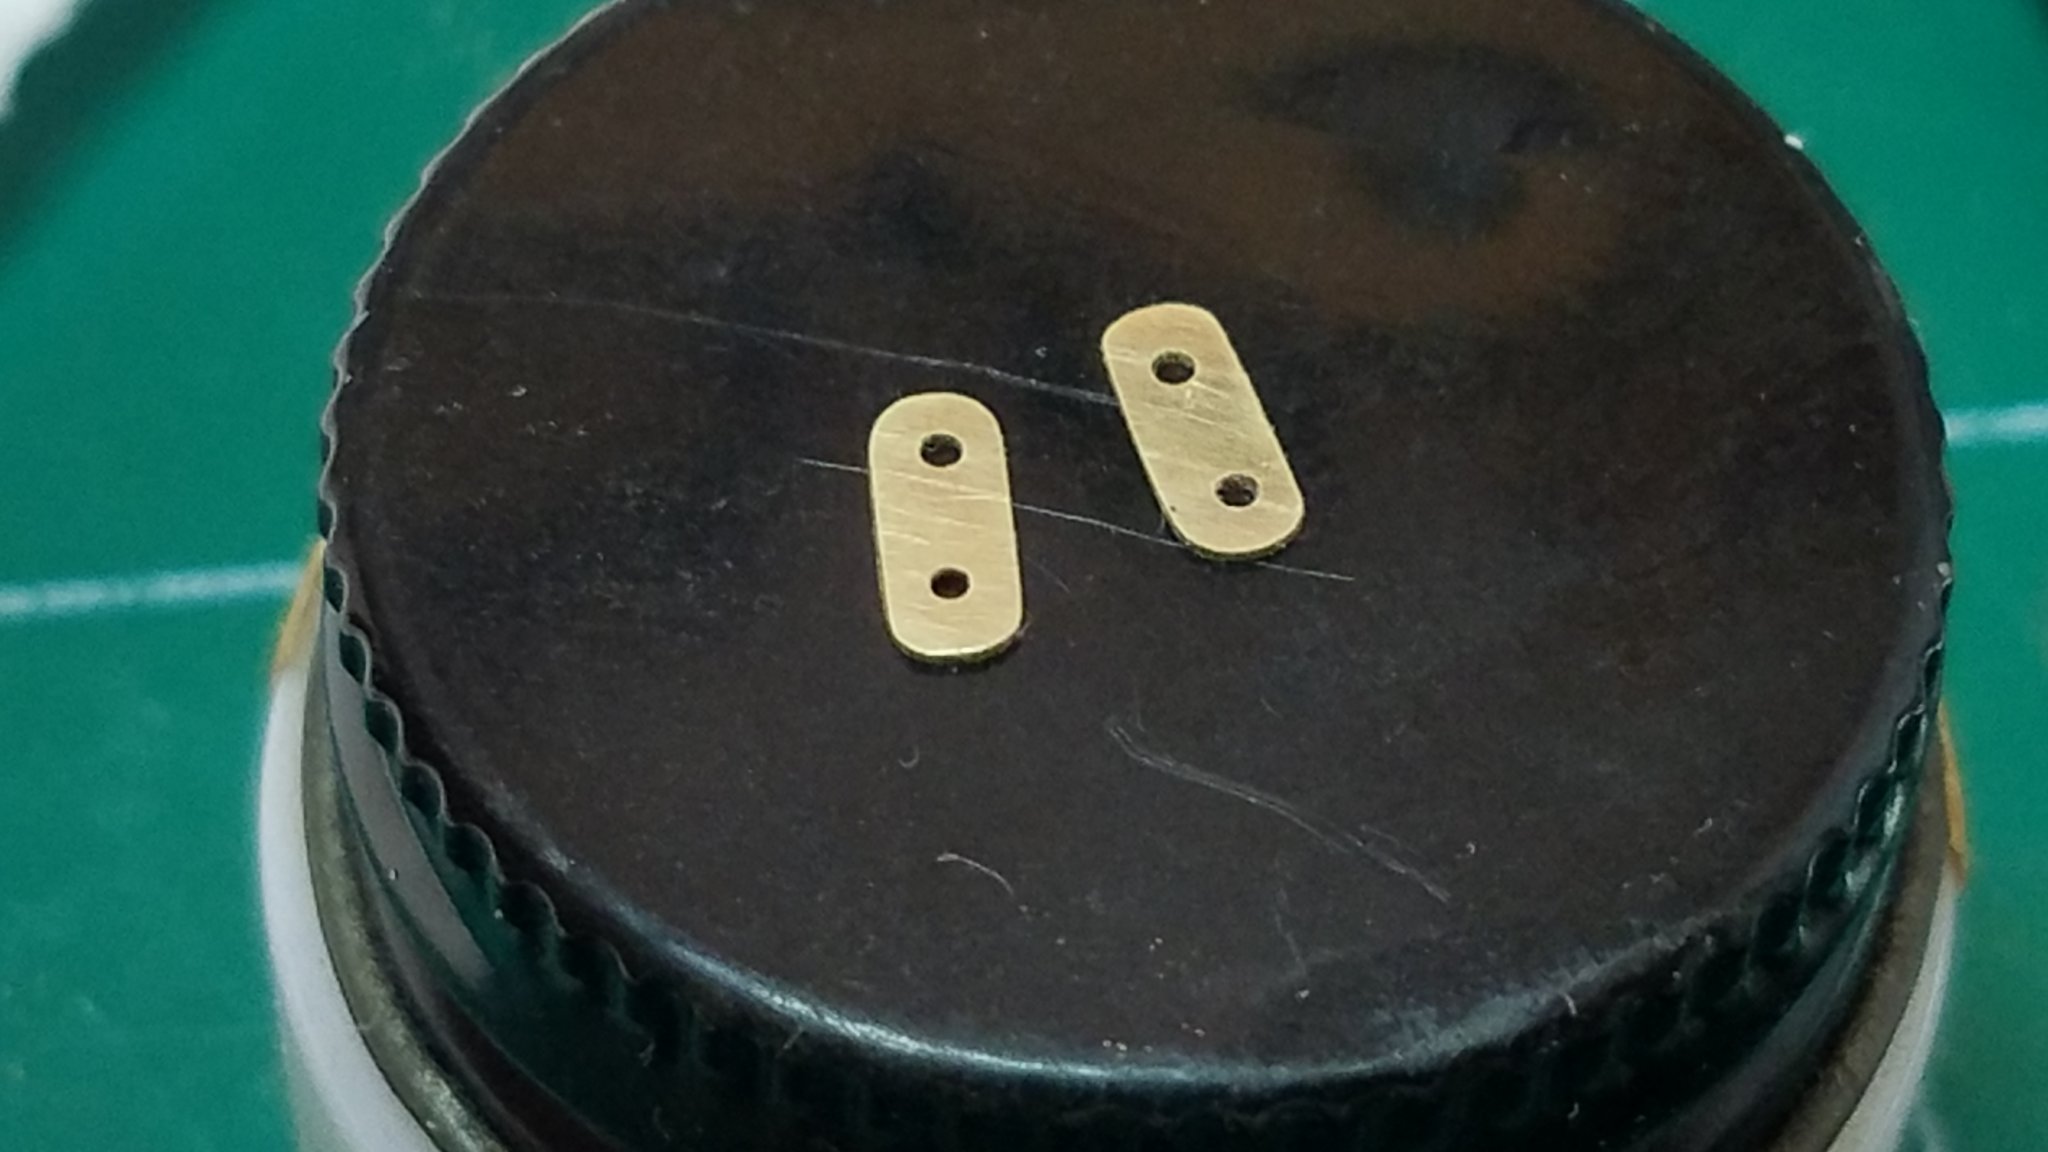
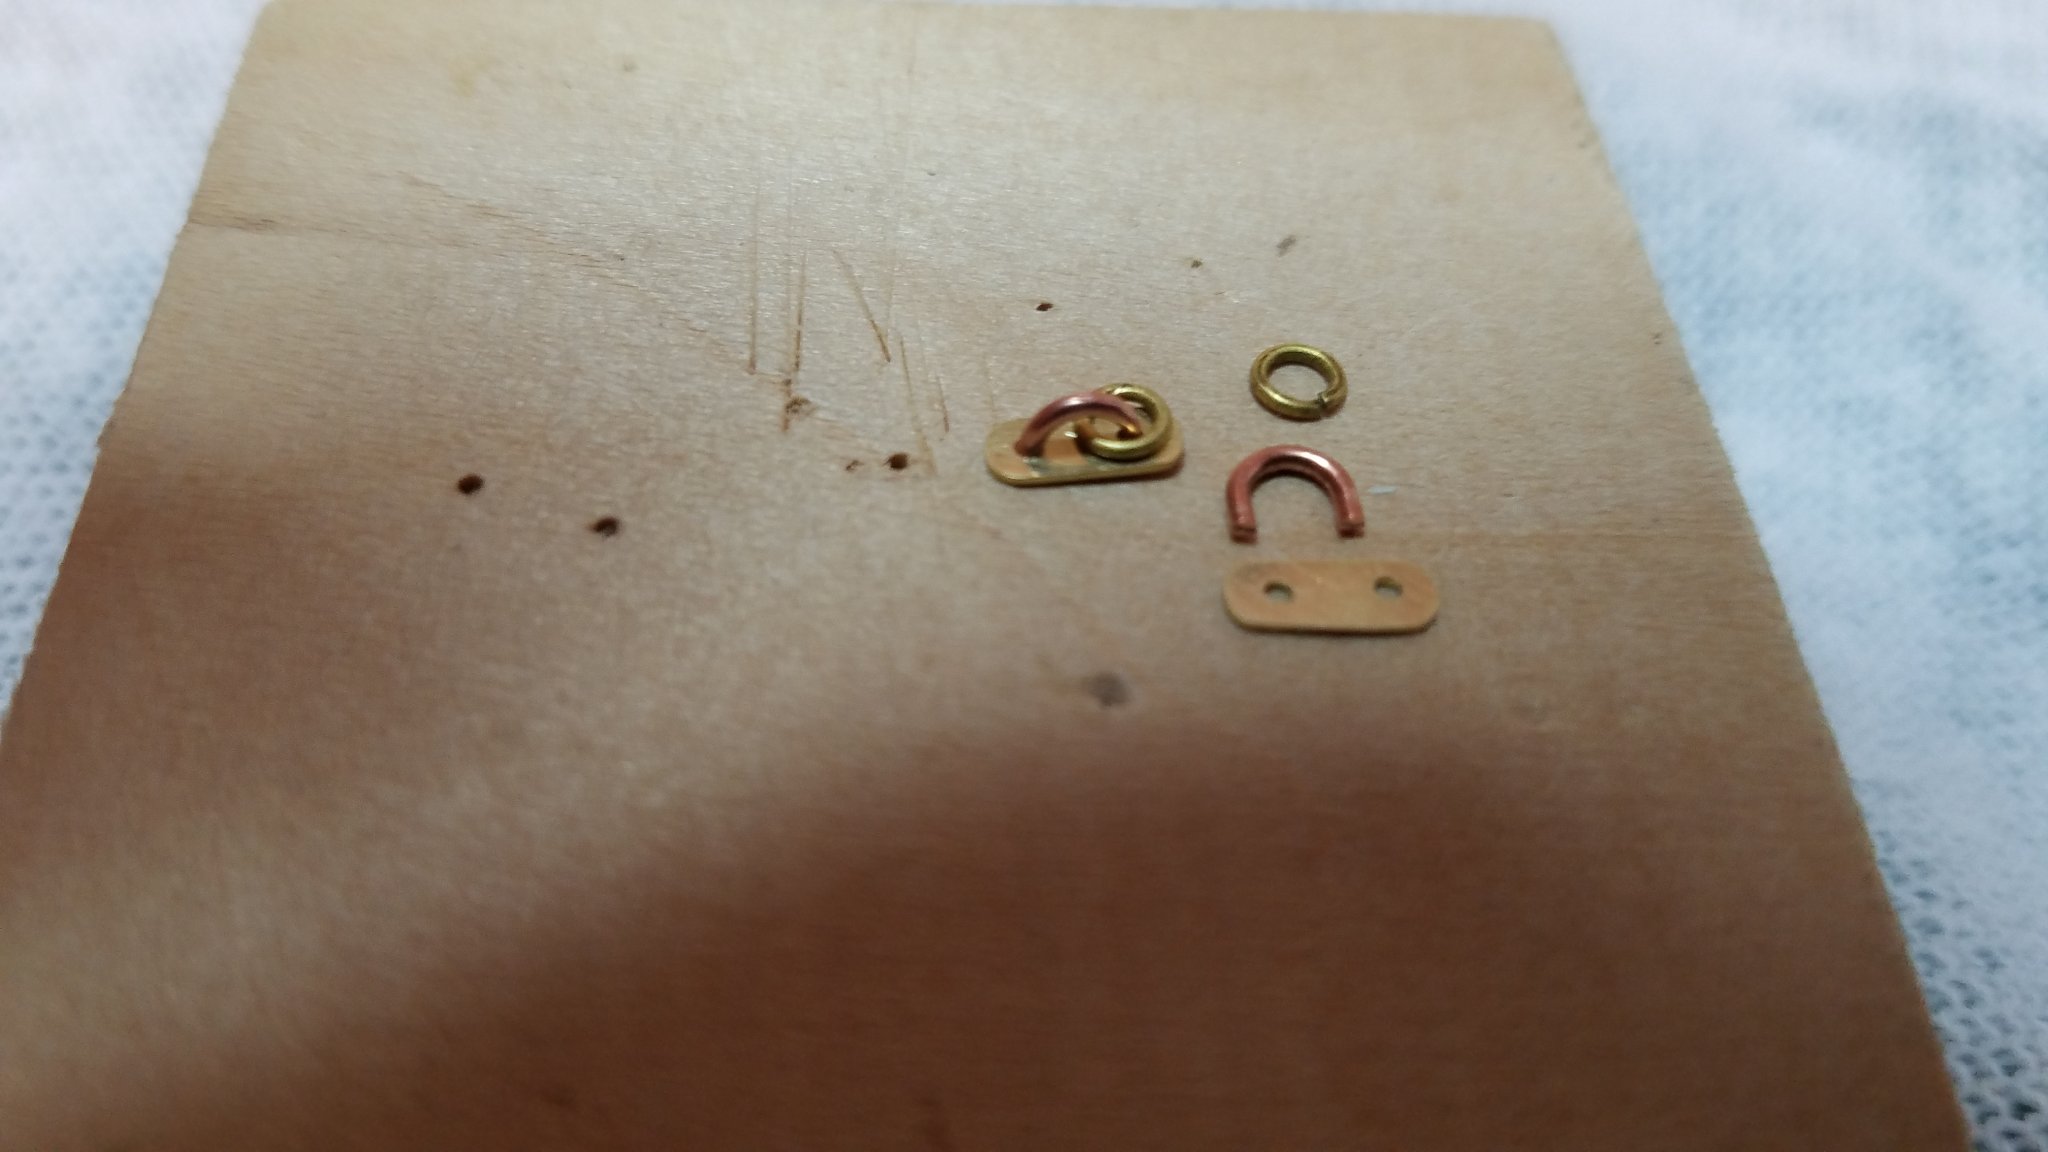
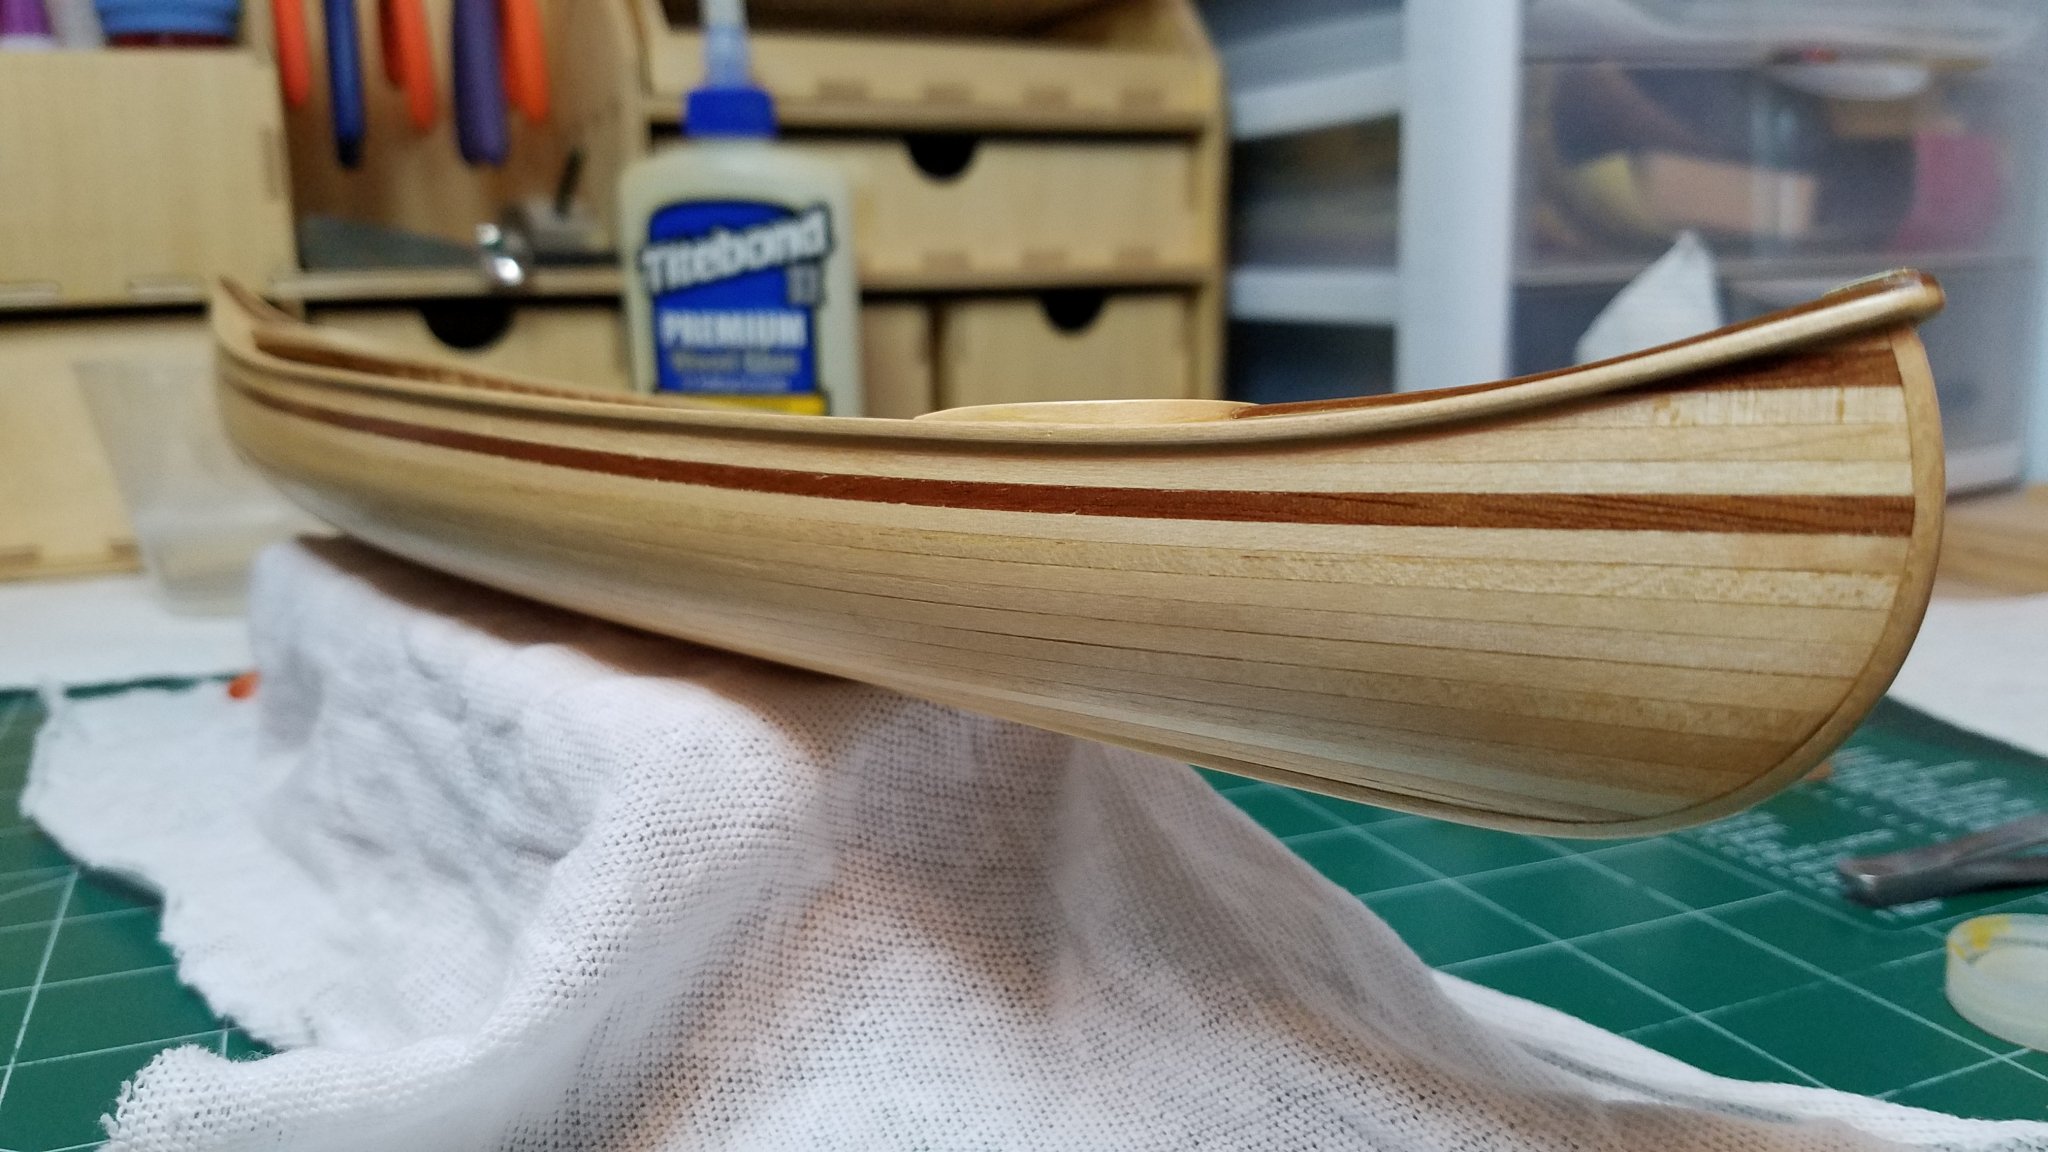
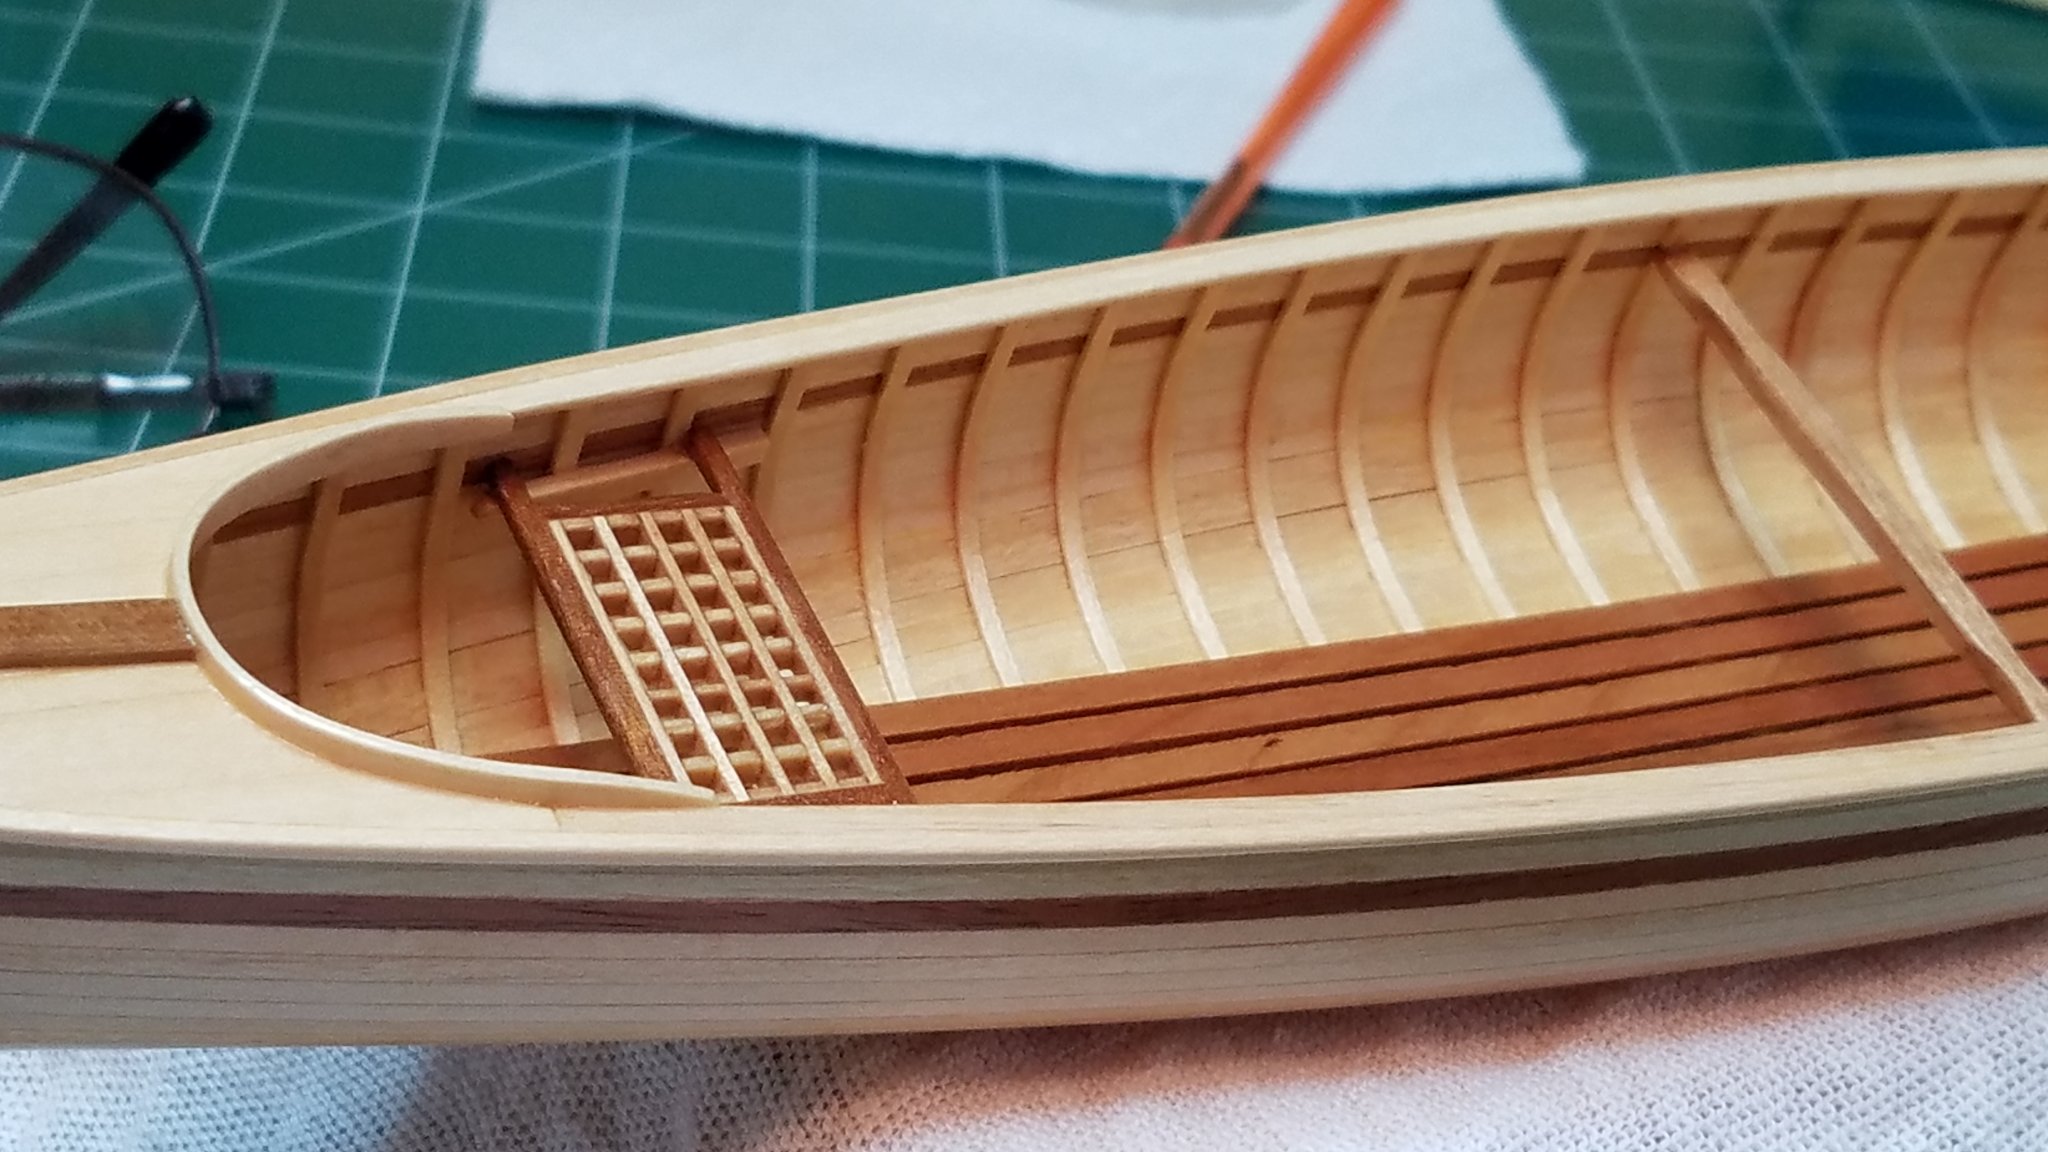
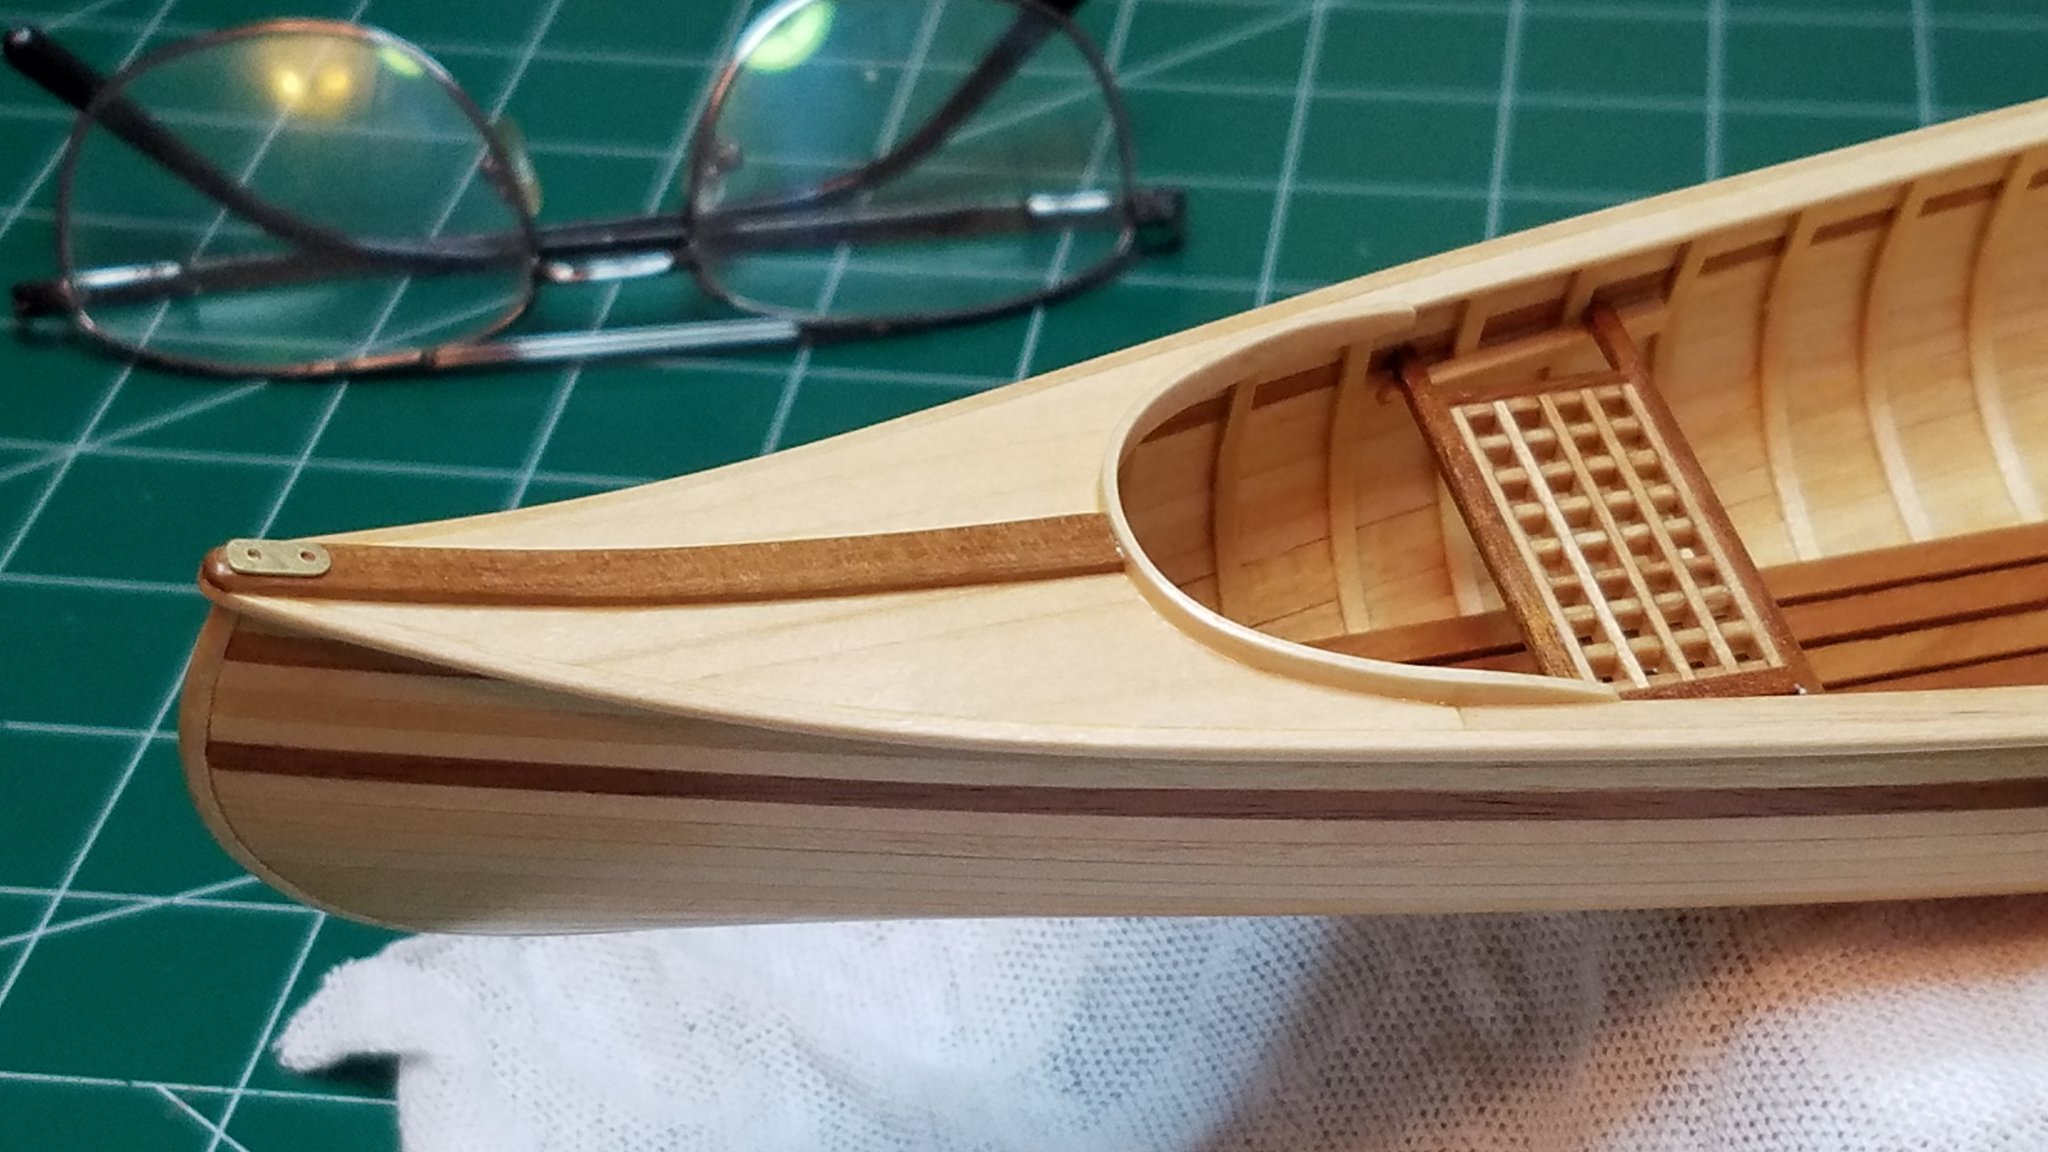
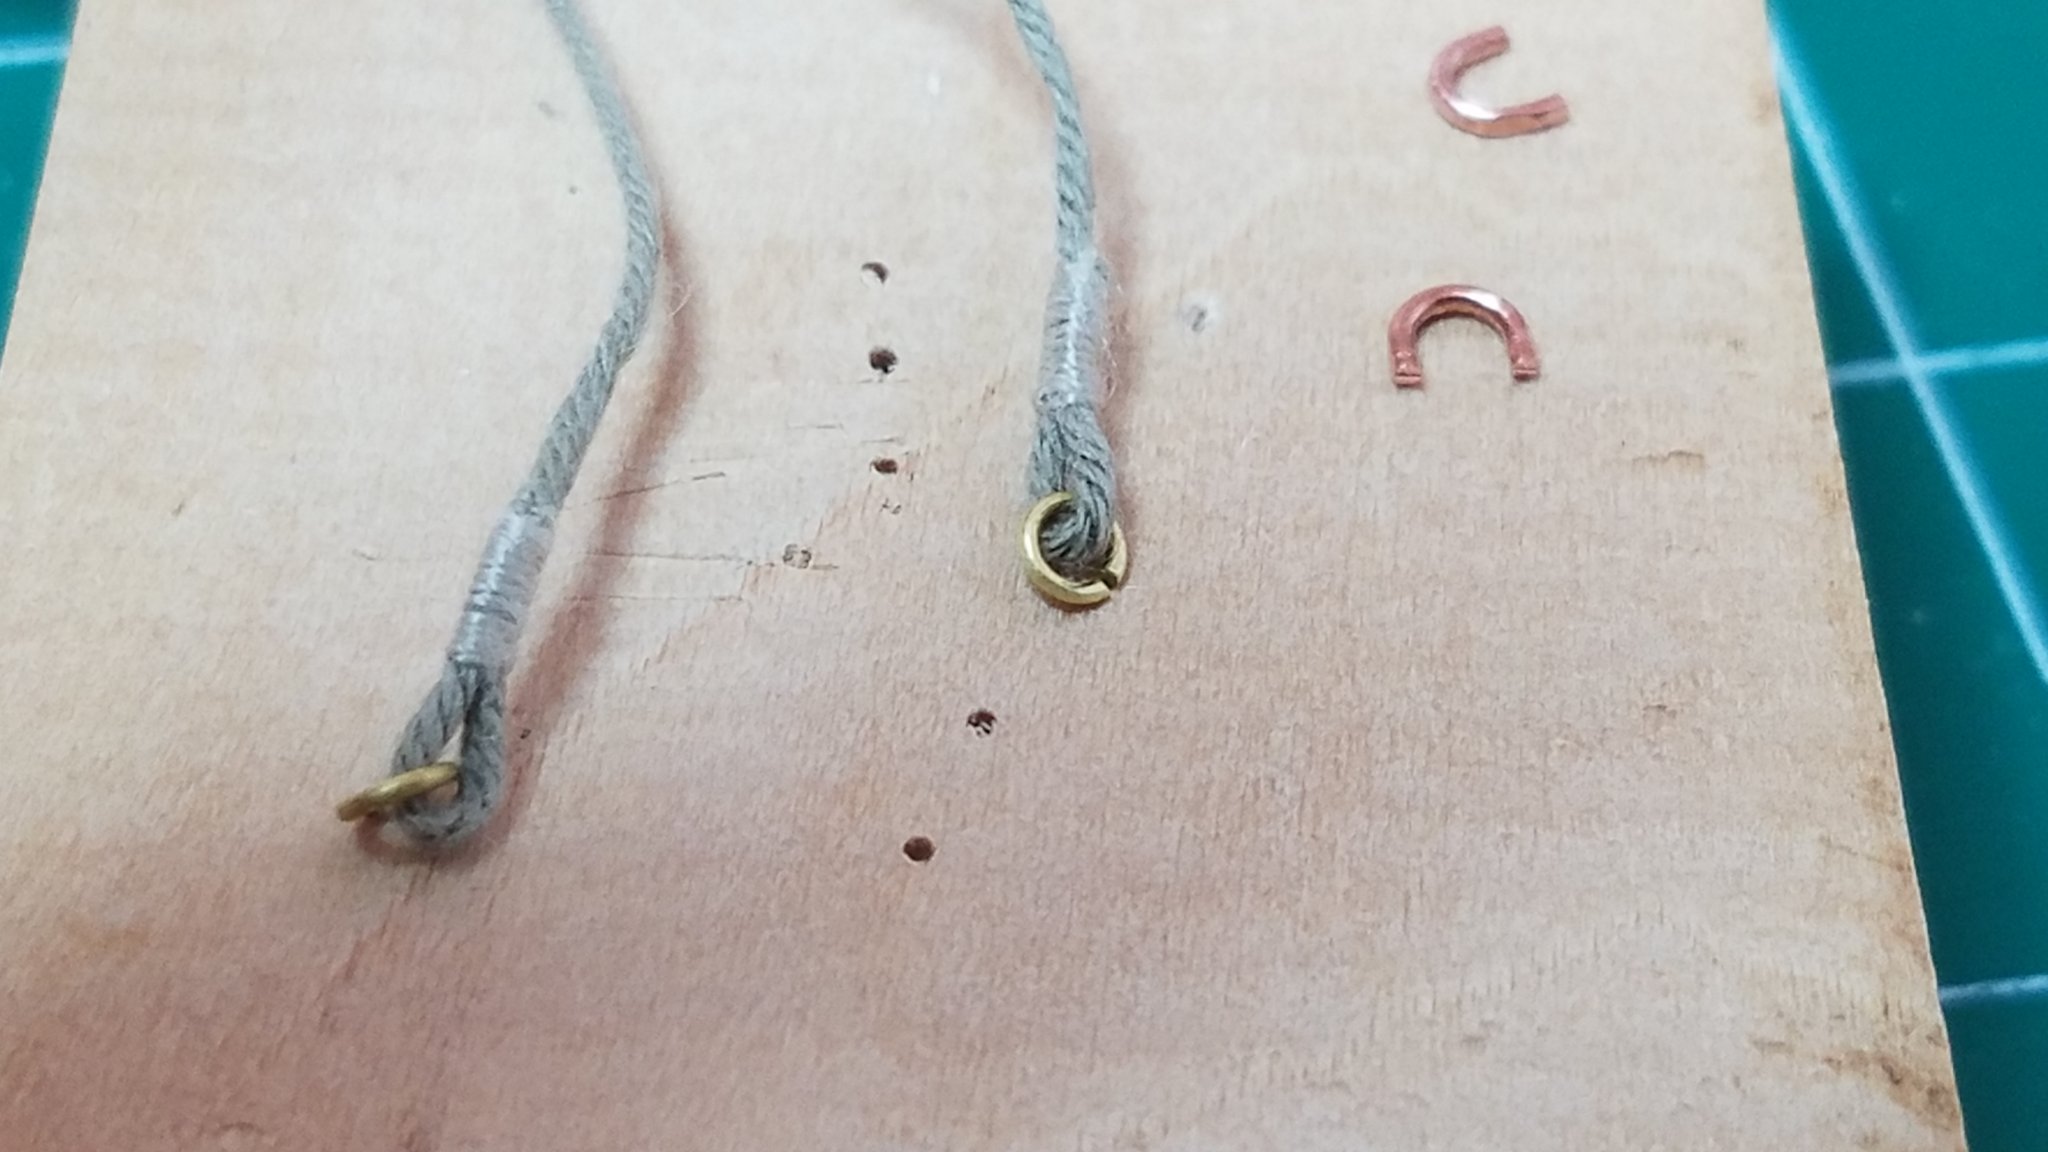
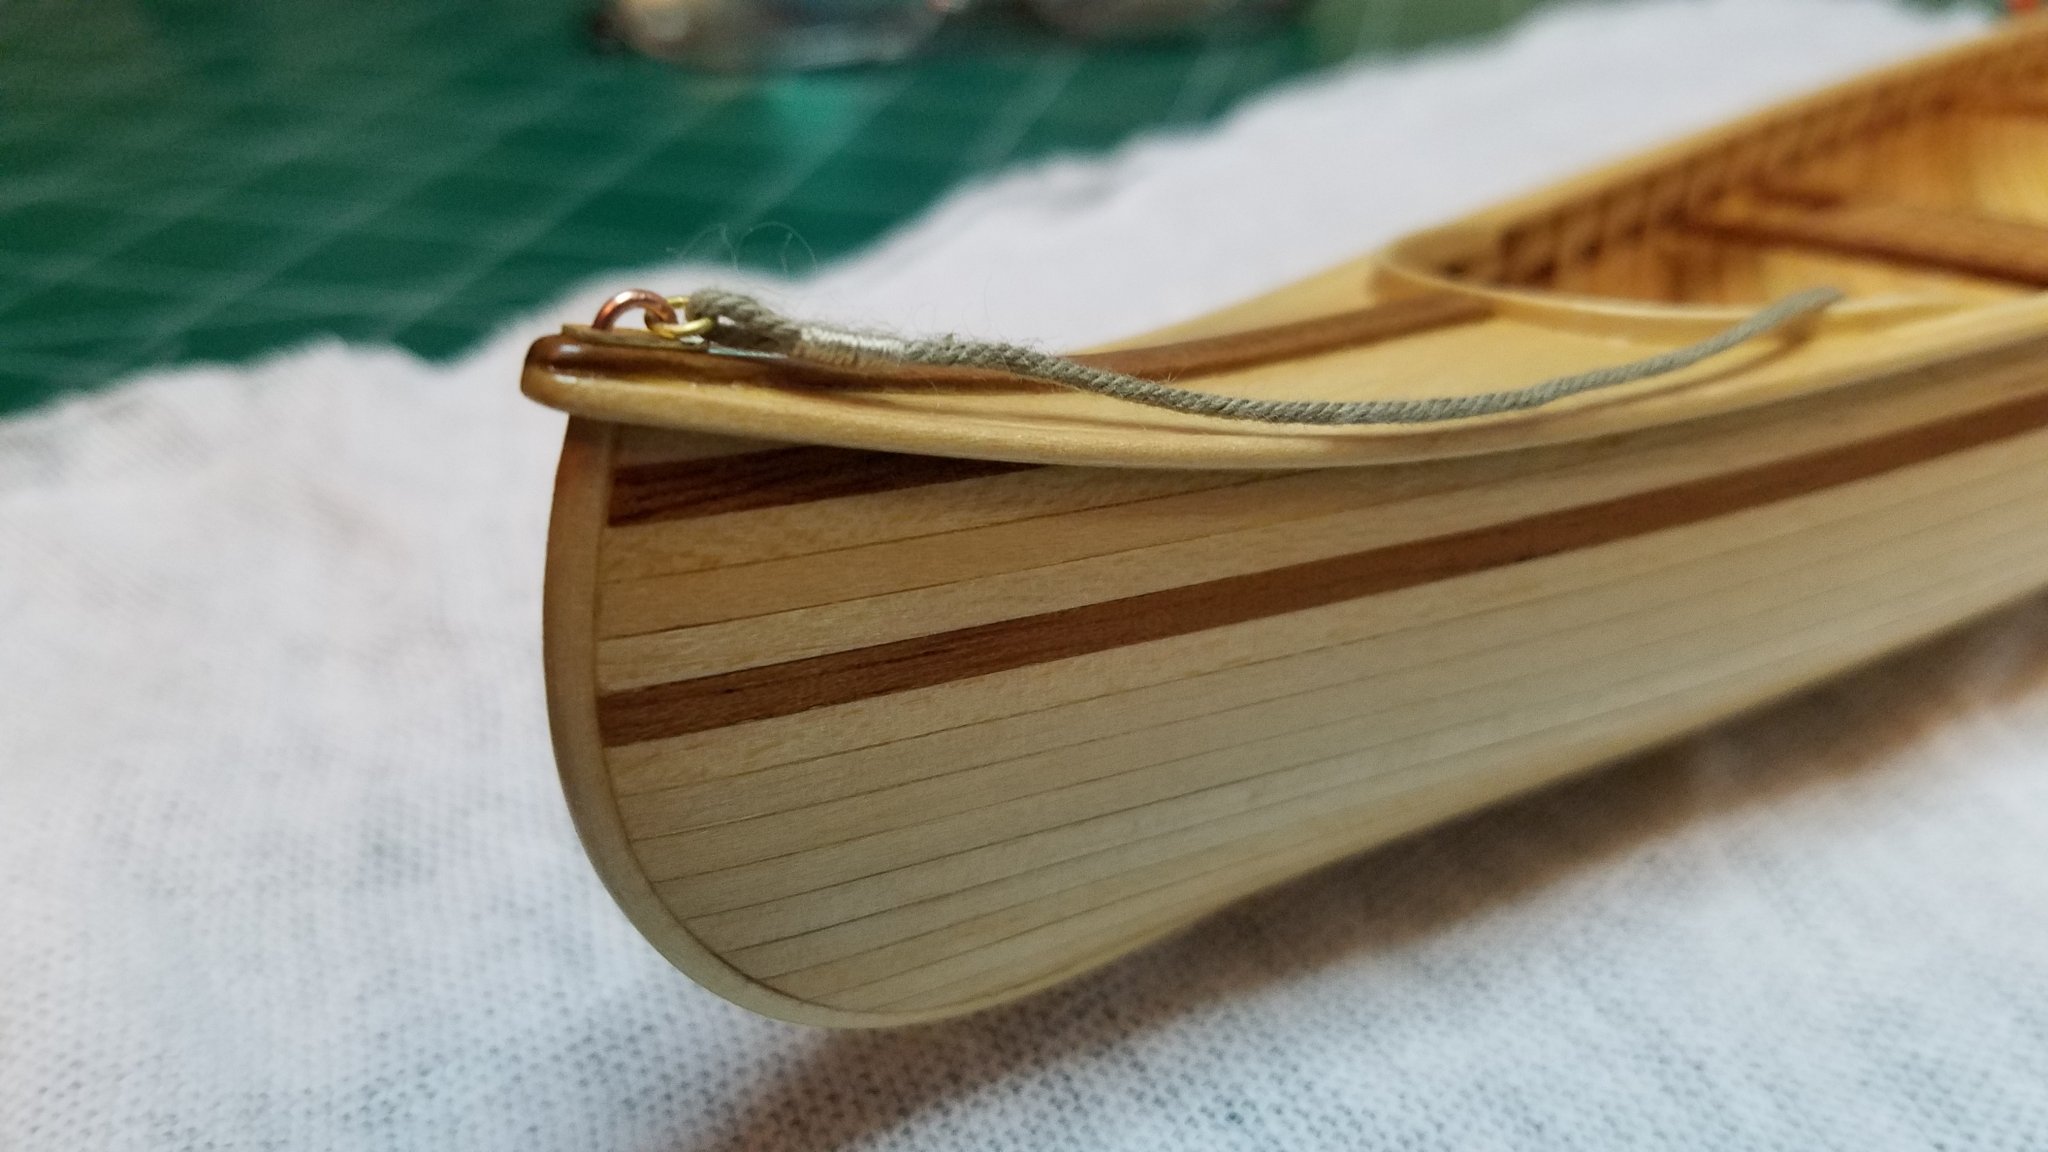
Well it has been a while but finally some progress to report. I have not been Idle since my last update but since I could only manage one coat of poly a day and waiting for paint to dry is boring enough I did not think it was worth an update. I decided I needed some shiny bits and pieces. The kit did not provide any so I had to make them. I stared with come strip brass I had laying around. And cut off a couple of small pieces about an 1/8" or so. Then a little rough shaping with file and sand paper. Then I clamped them both in my handy all purpose jig one on top of the other. and drilled some holes. Then I rubbed them around in some jewelers rouge. And this is what I was left with. Add a little bent wire and rings and ..... I added some rope and whipped some loops onto the rings. I glued the plates in place with a tiny drop of medium CA applied with a sewing needle. Then very carefully drilled through the holes. Once that was done it was simply a matter of pressing the hasps and loops in place. And I think that with the exception of a display base which I have yet to make up my mind on that we can call this one finished. At least 3 coats of poly on everything with a light sanding with 800 grit between coats. All in all this has been a fun and challenging little project. I think the few mods I added give this one a little character and uniqueness that made them worth doing. I will update again when I figure out the base. Until then thanks to everyone that followed, liked and commented on this build. I hope you had as much fun as I did with it. Best regards and stay safe.
.thumb.jpg.94285b1b0c04f08884e44b2939d2aeea.jpg)


.thumb.jpg.6c2b0151dee53c5e4d09c7dca856d645.jpg)


- 84 replies
-
- 13
-
-
- peterboro canoe
- Finished
- (and 1 more)
-
A gorgeous result to what looked like a fun project. Bravo Zulu
- 77 replies
-
- 5
-
-
- morel
- master korabel
- (and 1 more)

.jpg.bc7e09354e52c804f68813ba13a3c146.jpg)


.jpg.a8282af1690a52d4b7cf1b9373e50f5c.jpg)


.jpg.57412d1533db9d15ea0a9a3a41ca802a.jpg)