JpR62
-
Posts
699 -
Joined
-
Last visited
Content Type
Profiles
Forums
Gallery
Events
Everything posted by JpR62
-

HM Cutter Cheerful 1806 by JpR62 - 1:48 scale
JpR62 replied to JpR62's topic in - Build logs for subjects built 1801 - 1850
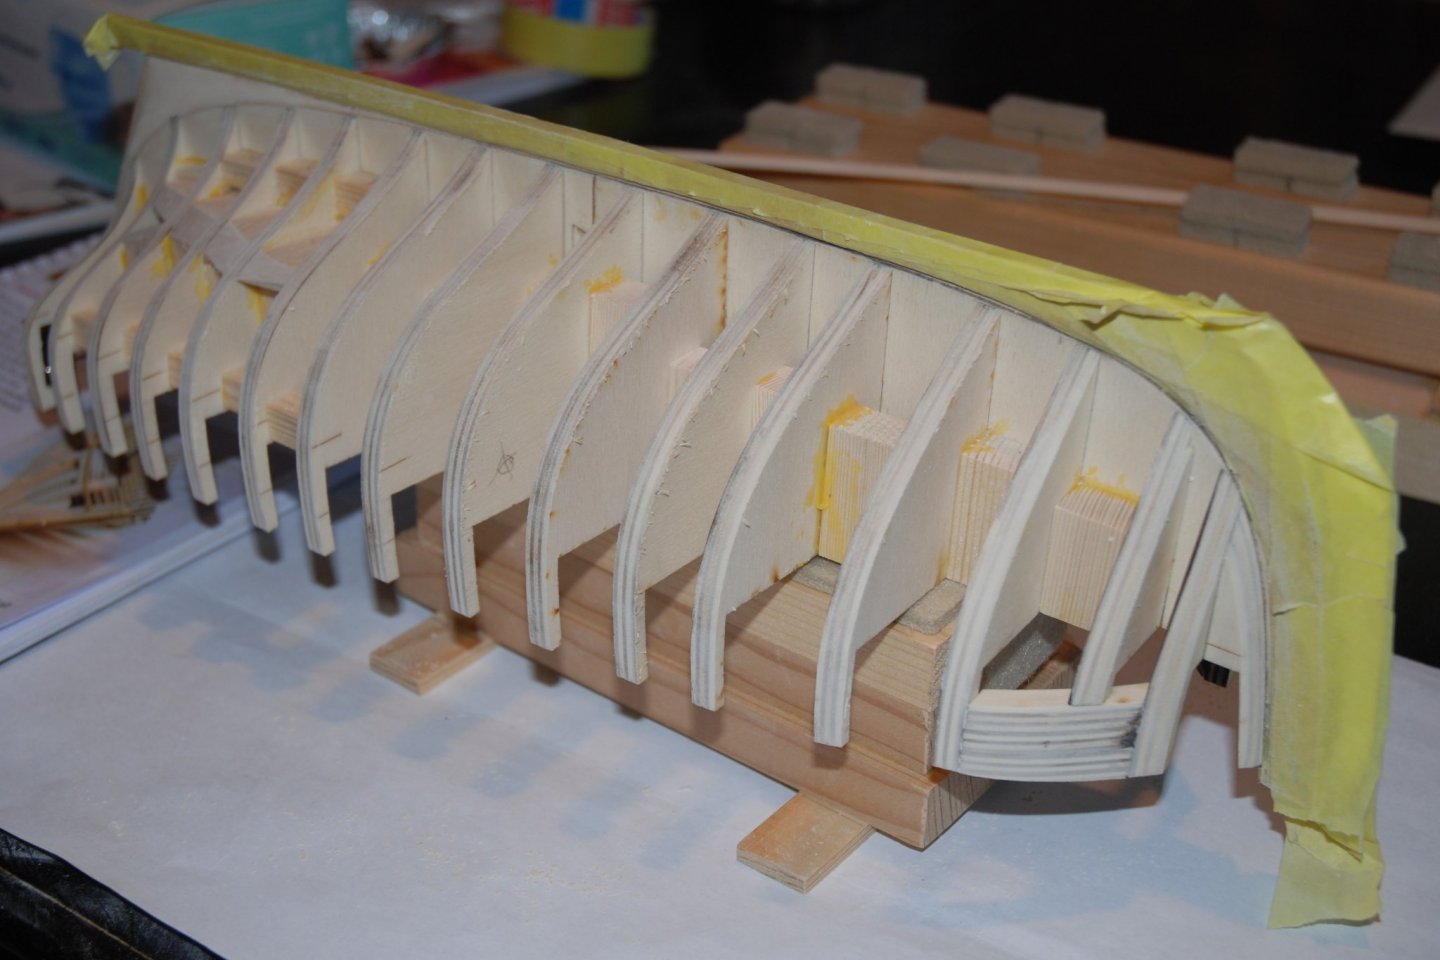
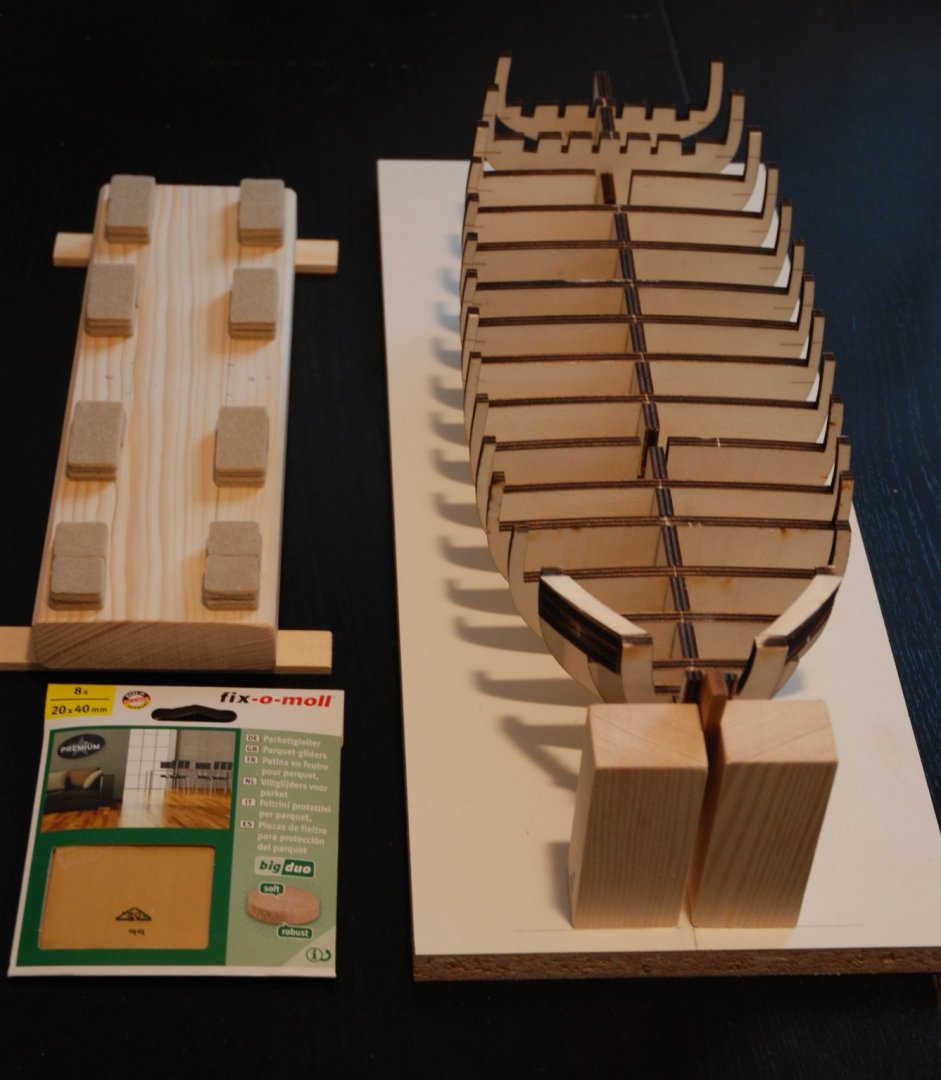
The fairing is over. I protected the keel with masking tape and used different models of 'Soft-Sander' blocks. These blocks are really handy at the bow or stern because they fit the hull shape more easily. I started with an 80 grit and then switched to a 120 grit to finish with a finer grit. I will probably have to make some final adjustments when I sand the port sills. Next step: marking the position of the gunport sills.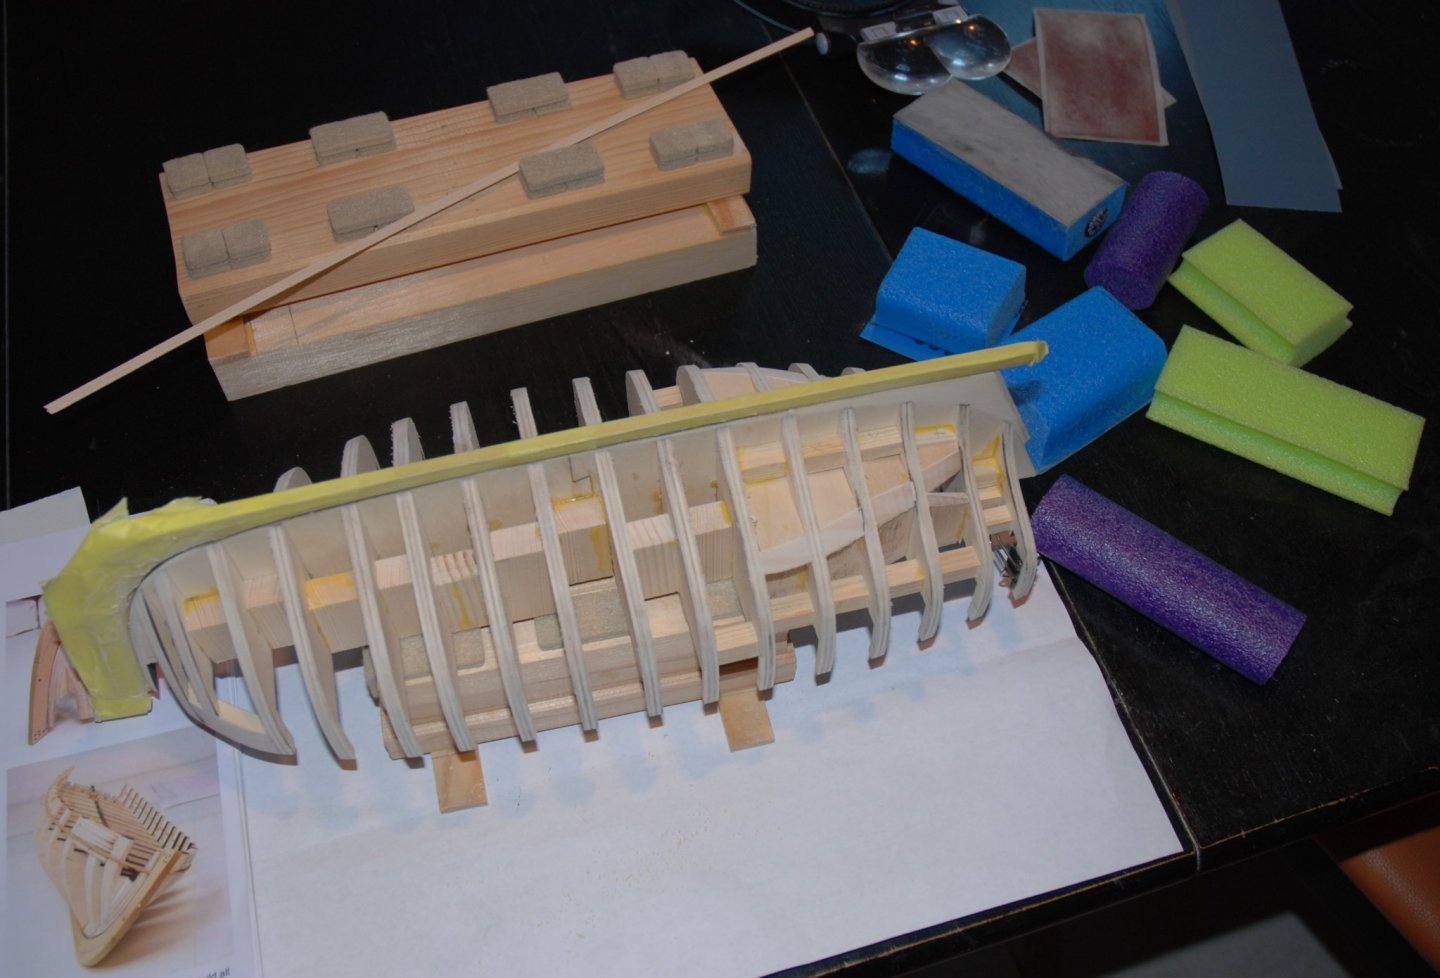


-
A magnificent work and a perfect mastery of the different techniques. It is superb!
- 589 replies
-
- 3
-

-
- le gros ventre
- cargo
- (and 1 more)
-
Great job! The more I am, the more I admire the treatment of the PE elements. You have arrived with this great golden paint to give an impressive 3D effect! It's just beautiful!
- 201 replies
-
- 3
-
-
- Duchess of Kingston
- Vanguard Models
- (and 1 more)
-
Wonderful work as always ! A fantastic help for those who will follow in the construction of this magnificent cutter.
- 778 replies
-
- 1
-
-
- cheerful
- Syren Ship Model Company
- (and 1 more)
-
Superb realization. What a magnificent HMS Snake. Well done.
- 800 replies
-
- 2
-
-
- snake
- caldercraft
- (and 1 more)
-
HM Cutter Cheerful 1806 by JpR62 - 1:48 scale
JpR62 replied to JpR62's topic in - Build logs for subjects built 1801 - 1850
Thank You Christian and Glenn for you interest and thank you to all the 'Likes'. Christian, I will leave the door of the Companionway open and I will mostly add micro lights inside the 2 rooms. The door connecting the 2 rooms will also be left open so that a maximum of light can pass through. I know that only a small part of the 2 rooms will be seen but it is above all the pleasure of adding personal details and the possibility to gain additional experience that motivates me 😉. Thank you Glenn for your advice. I note that the positioning of the gun ports are very important. I will have to read the instruction manual and build logs again in due time. -
HM Cutter Cheerful 1806 by JpR62 - 1:48 scale
JpR62 replied to JpR62's topic in - Build logs for subjects built 1801 - 1850
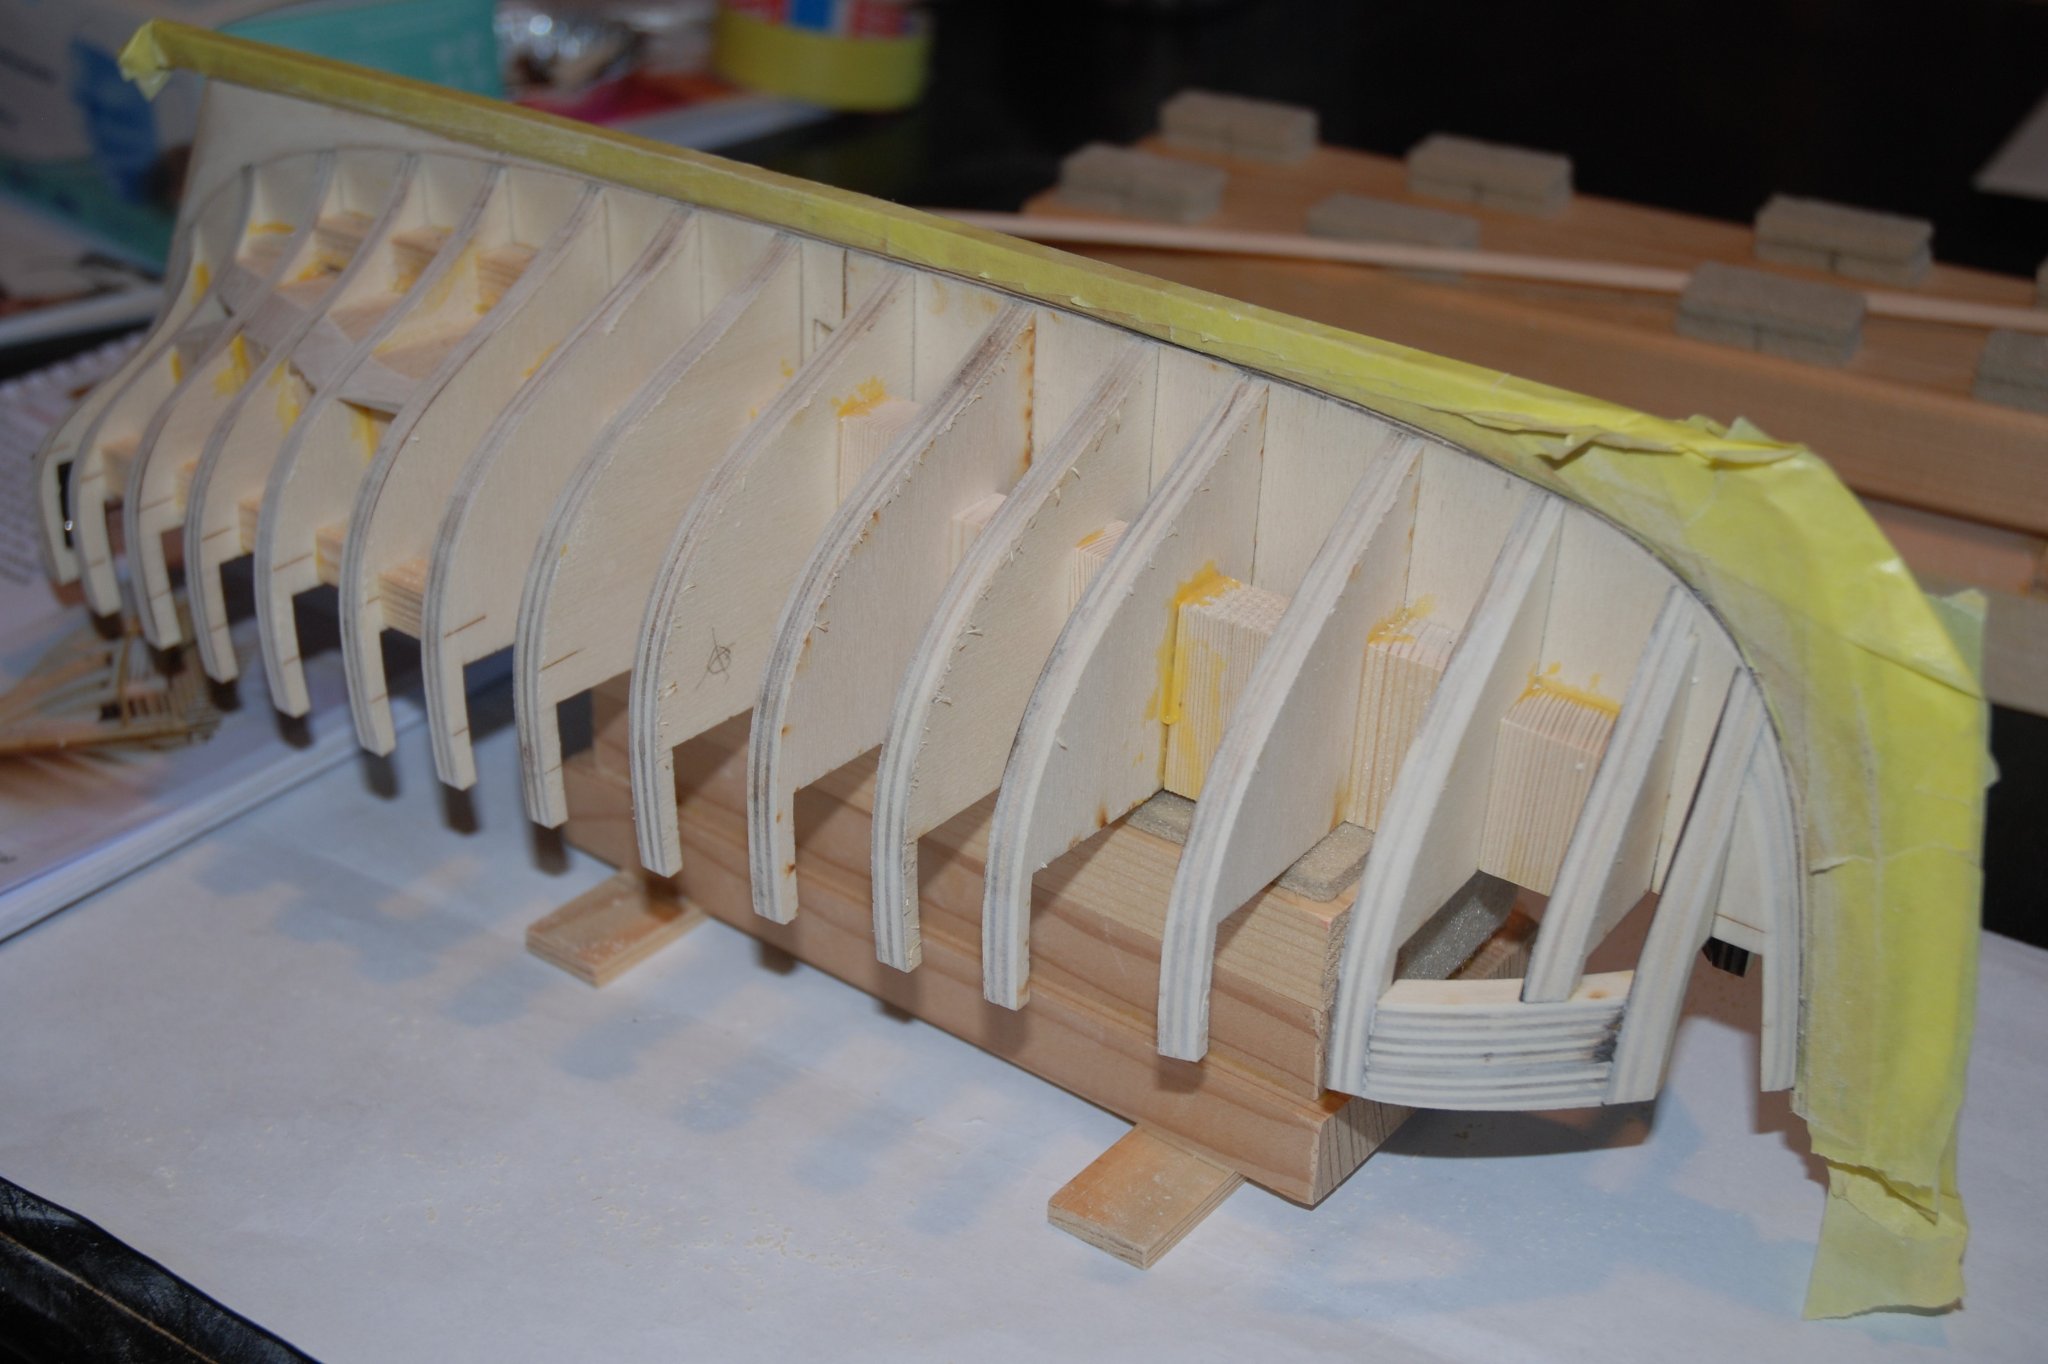
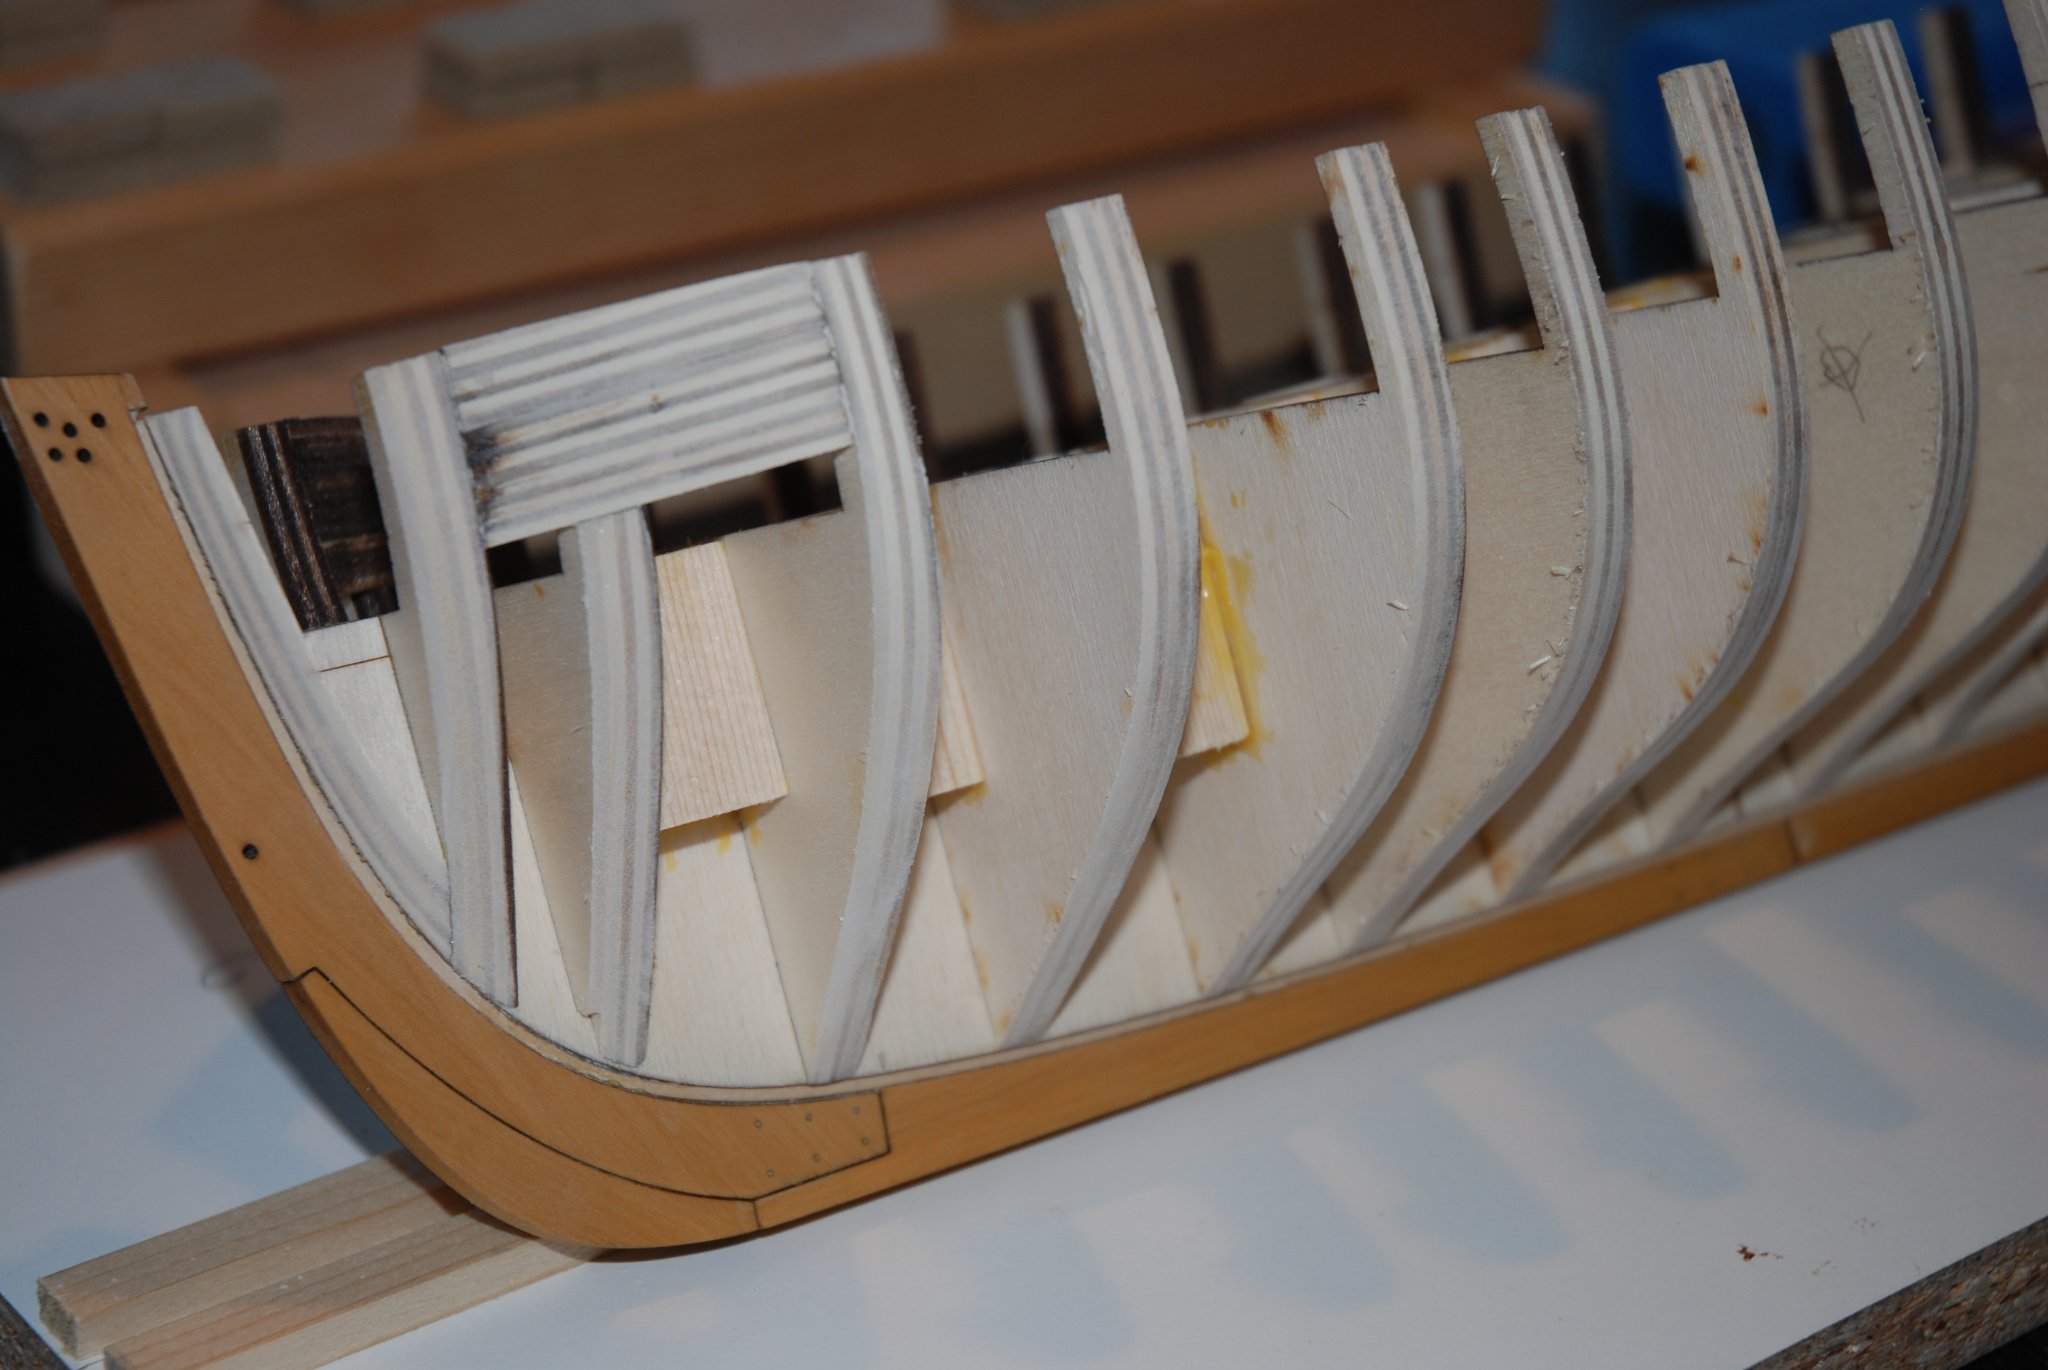
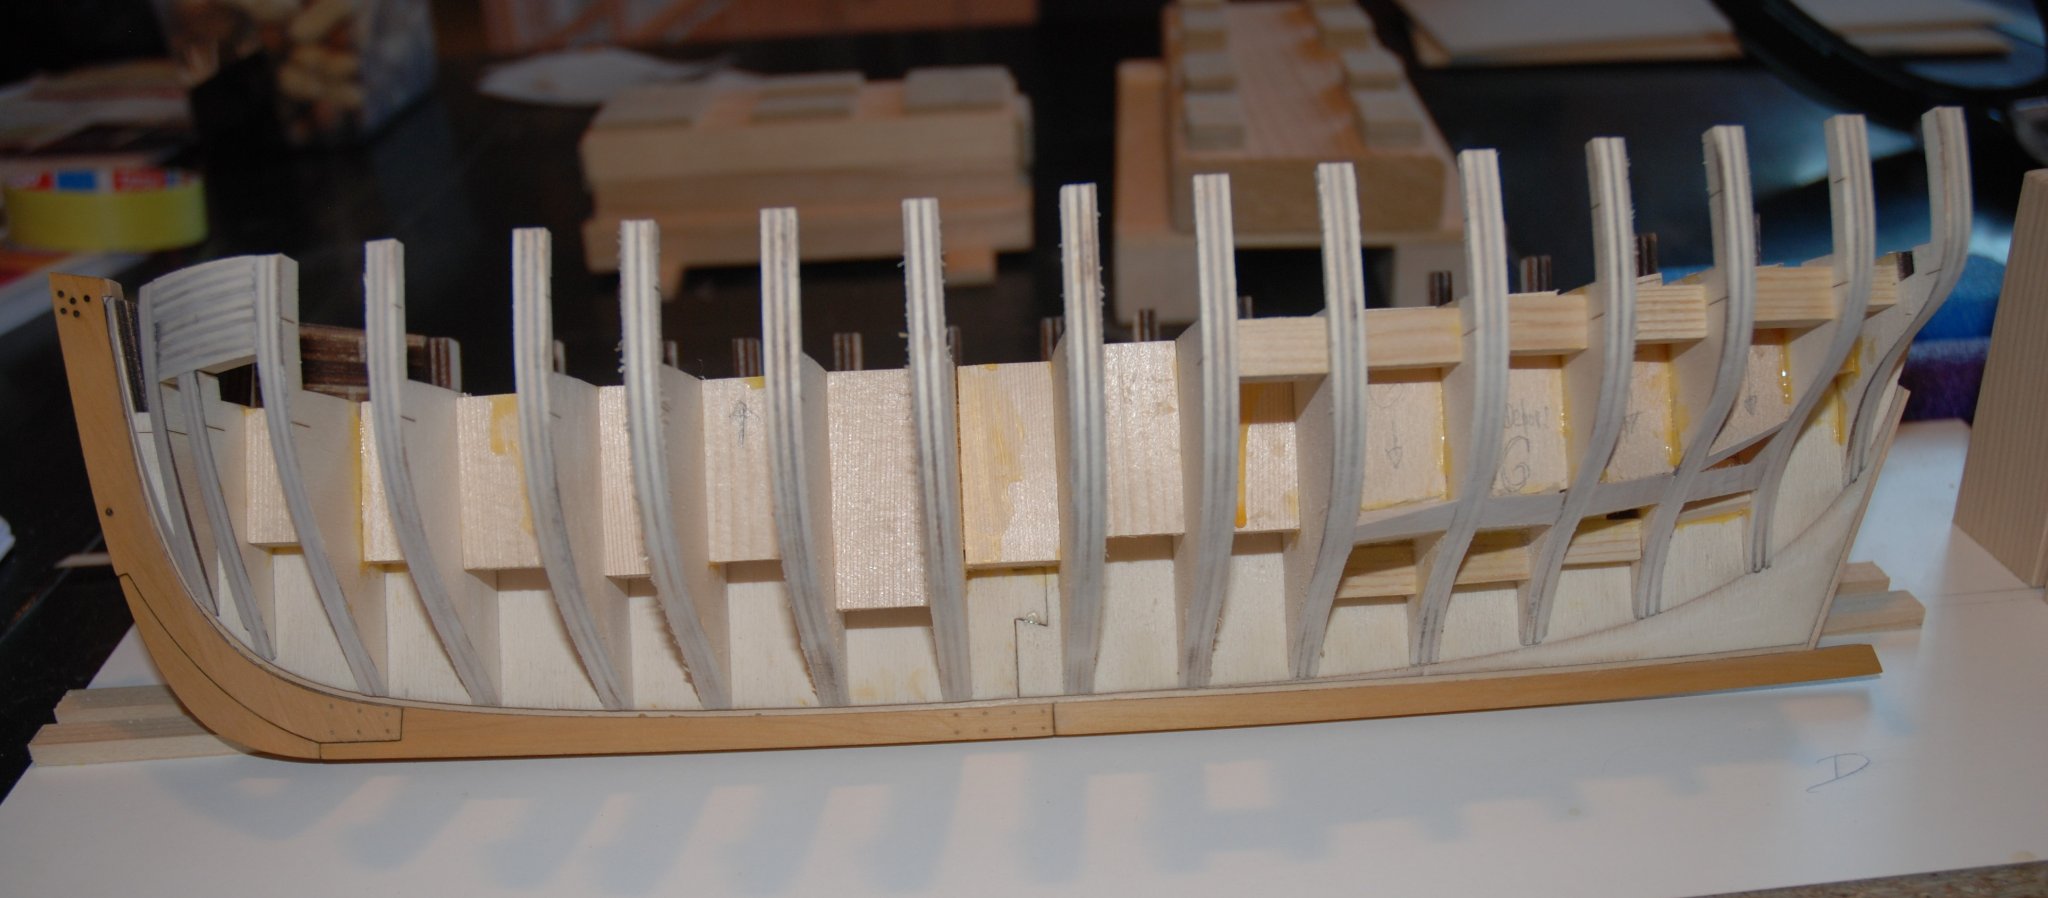
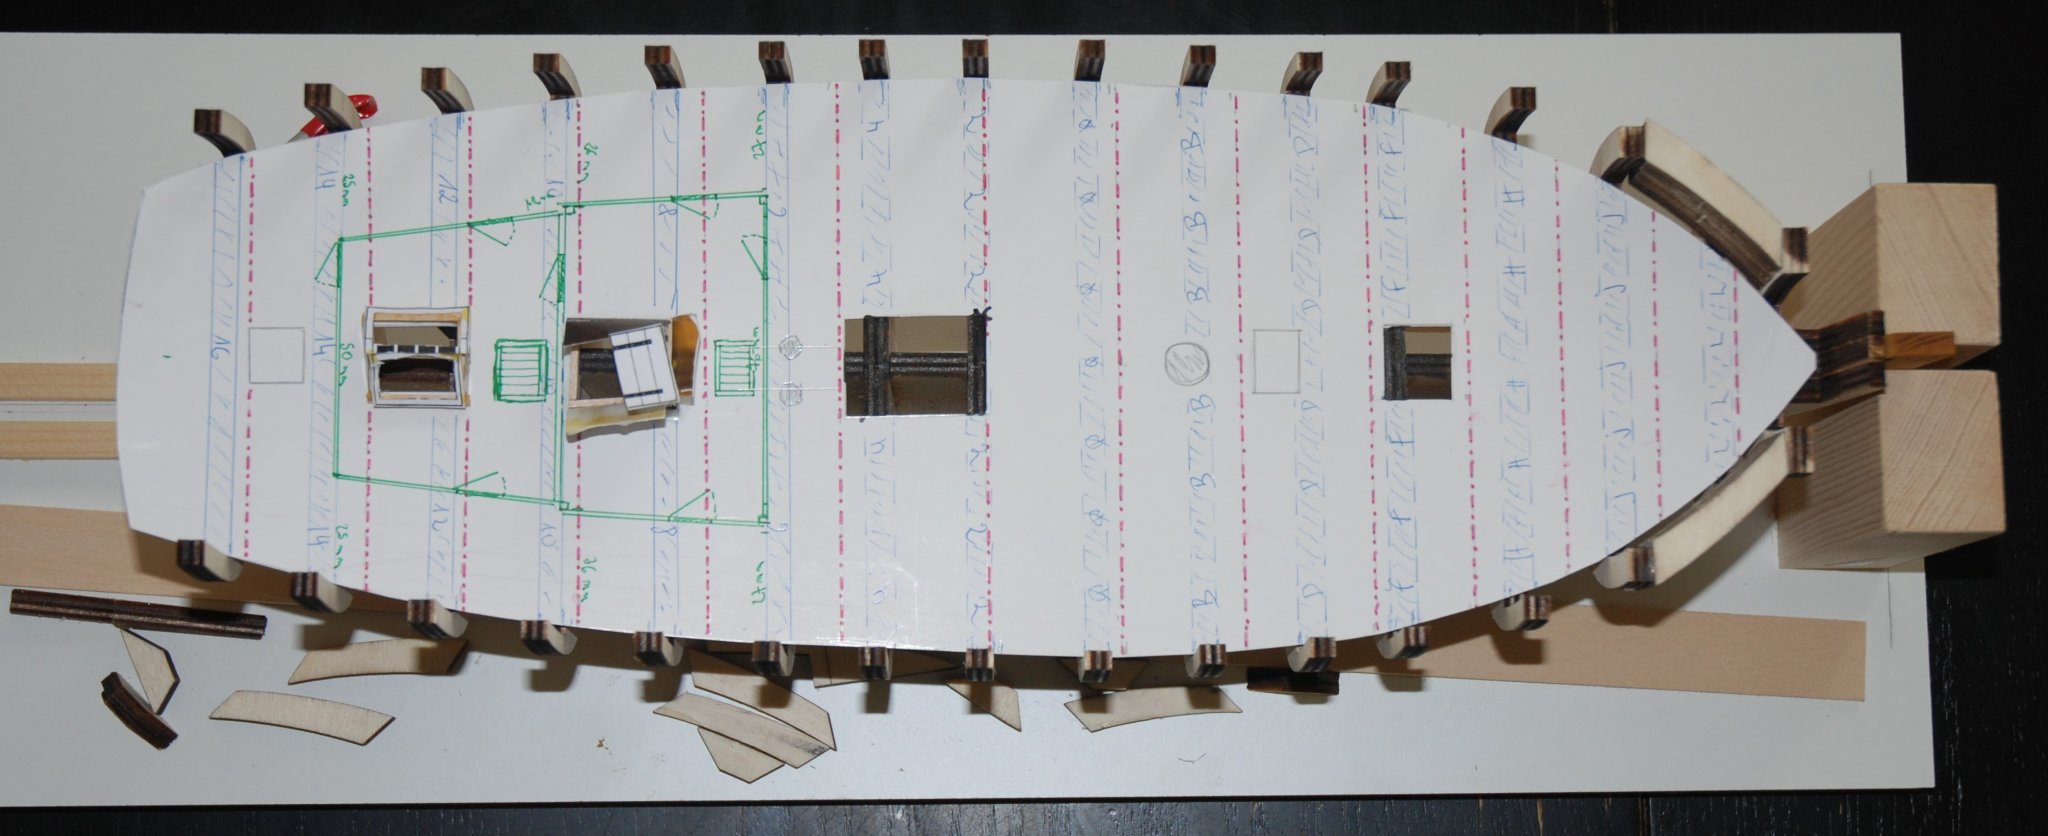
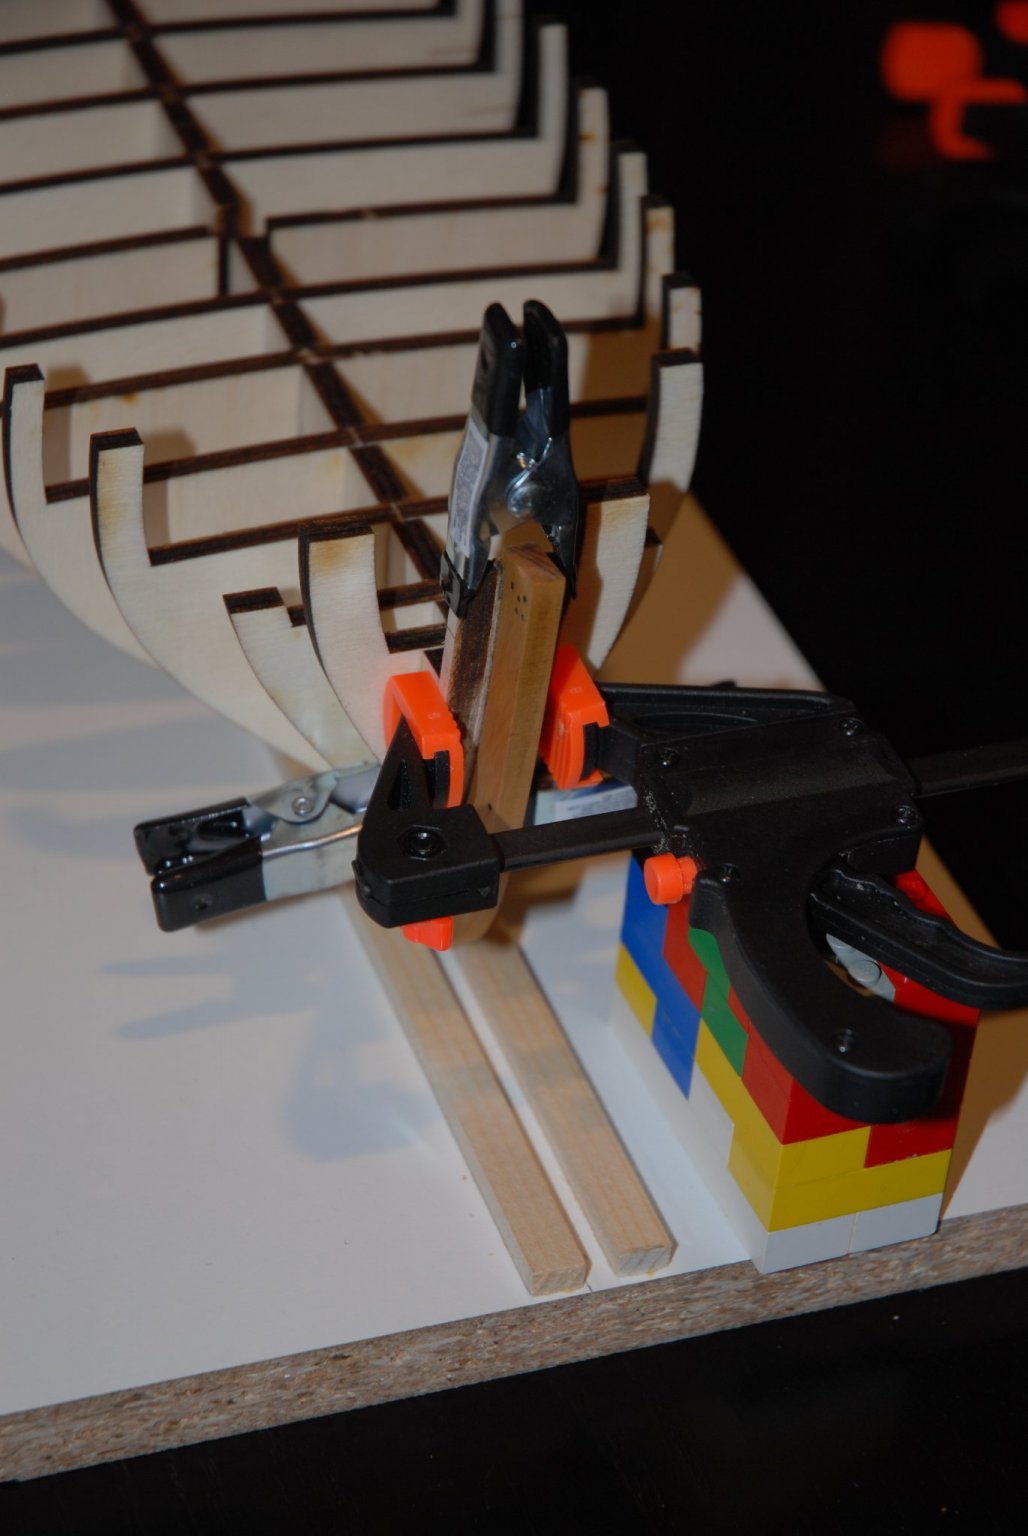
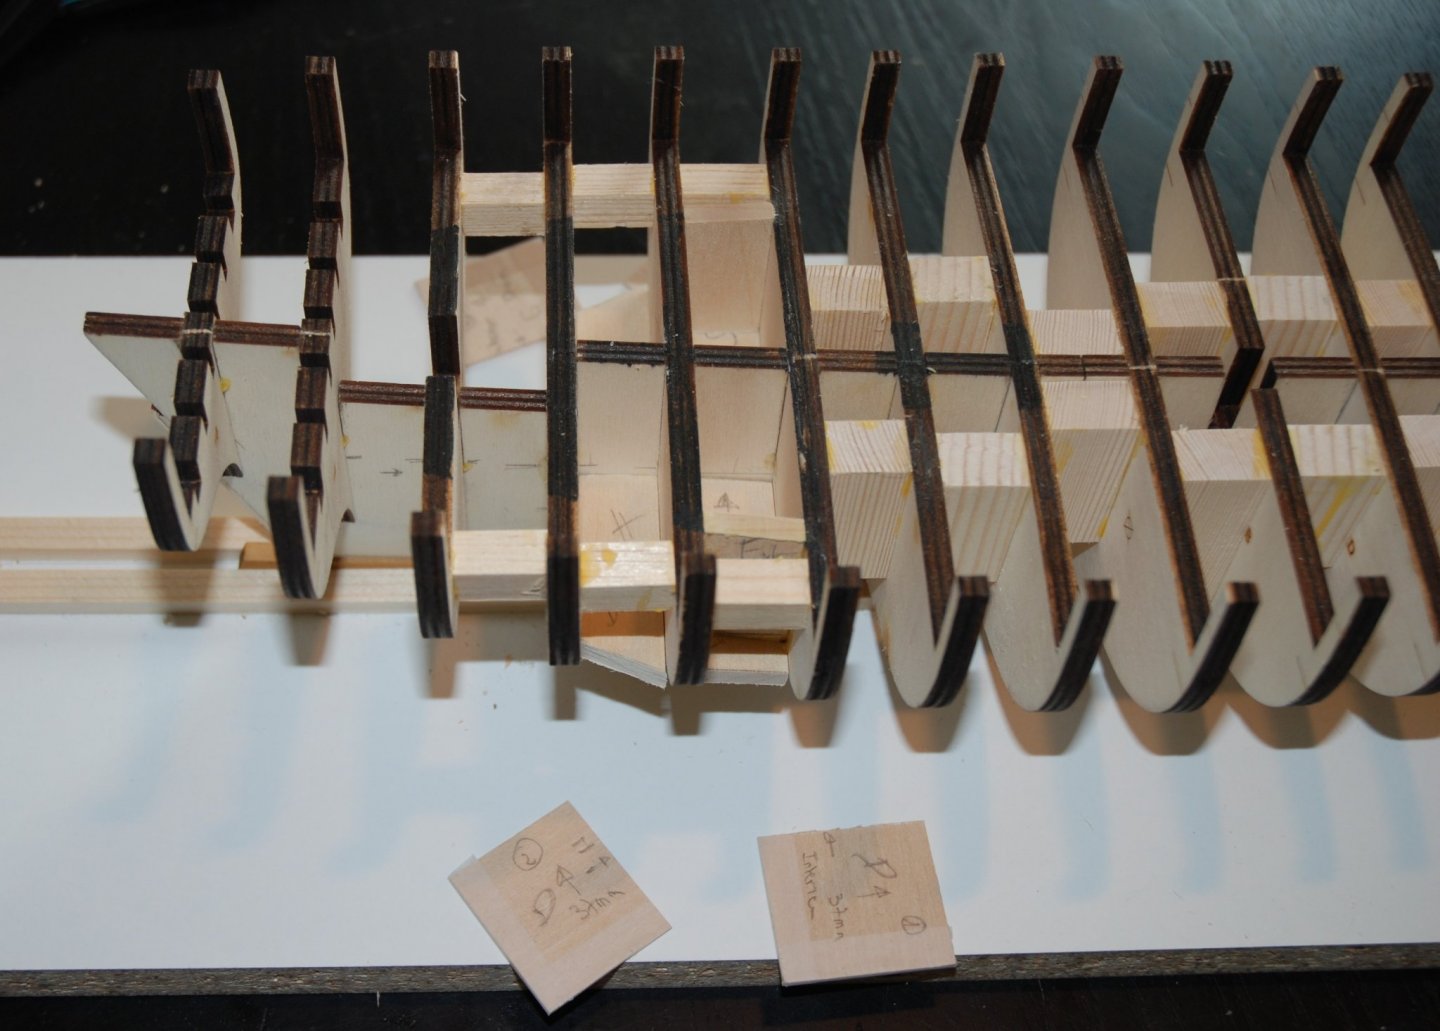
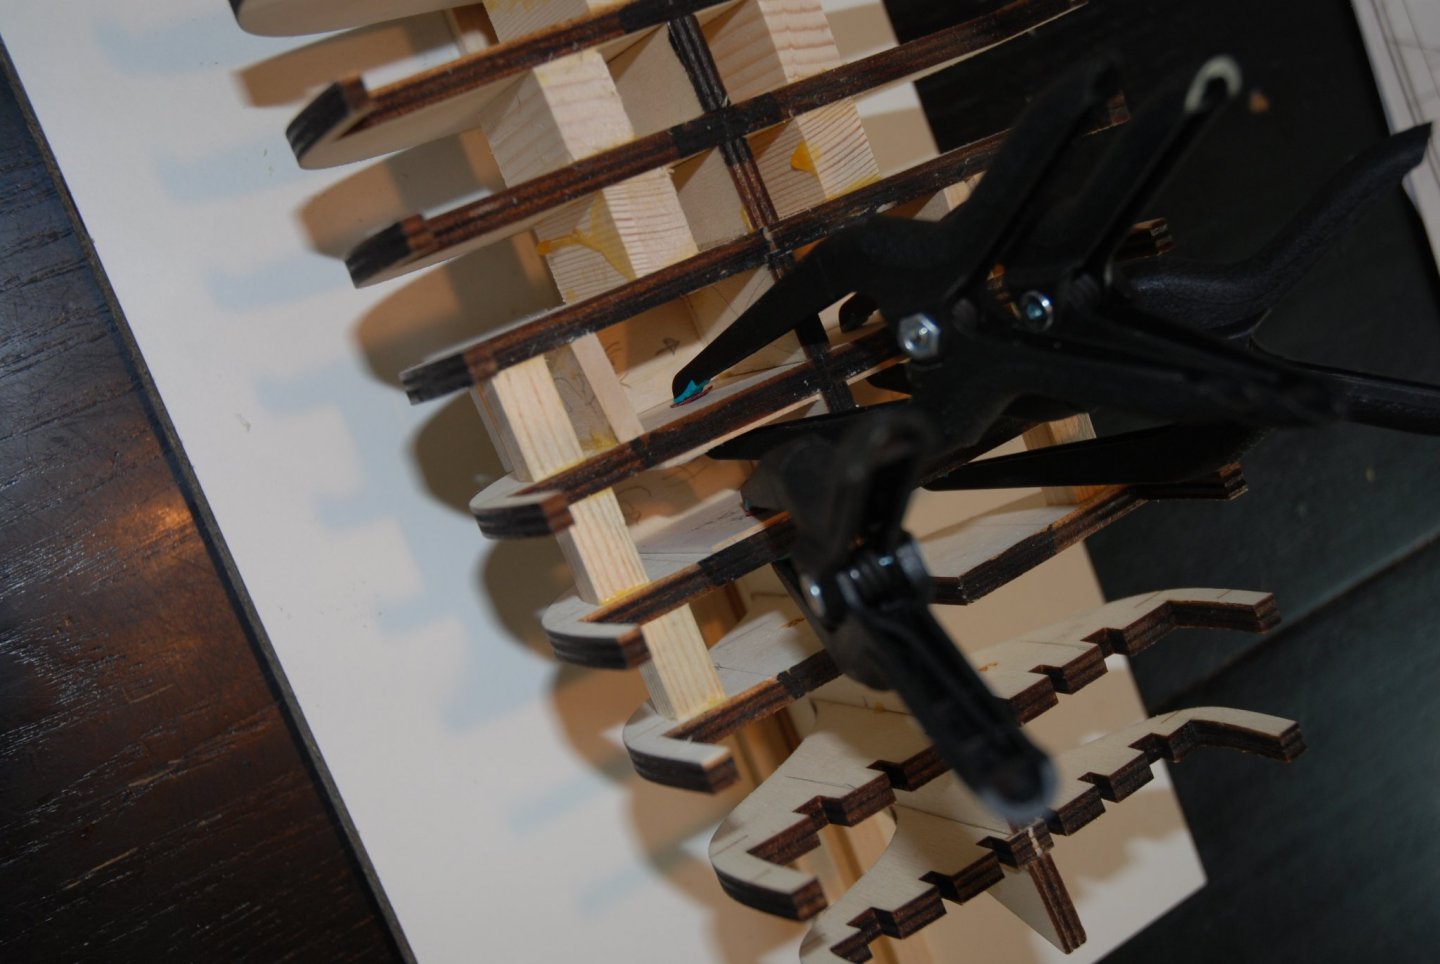
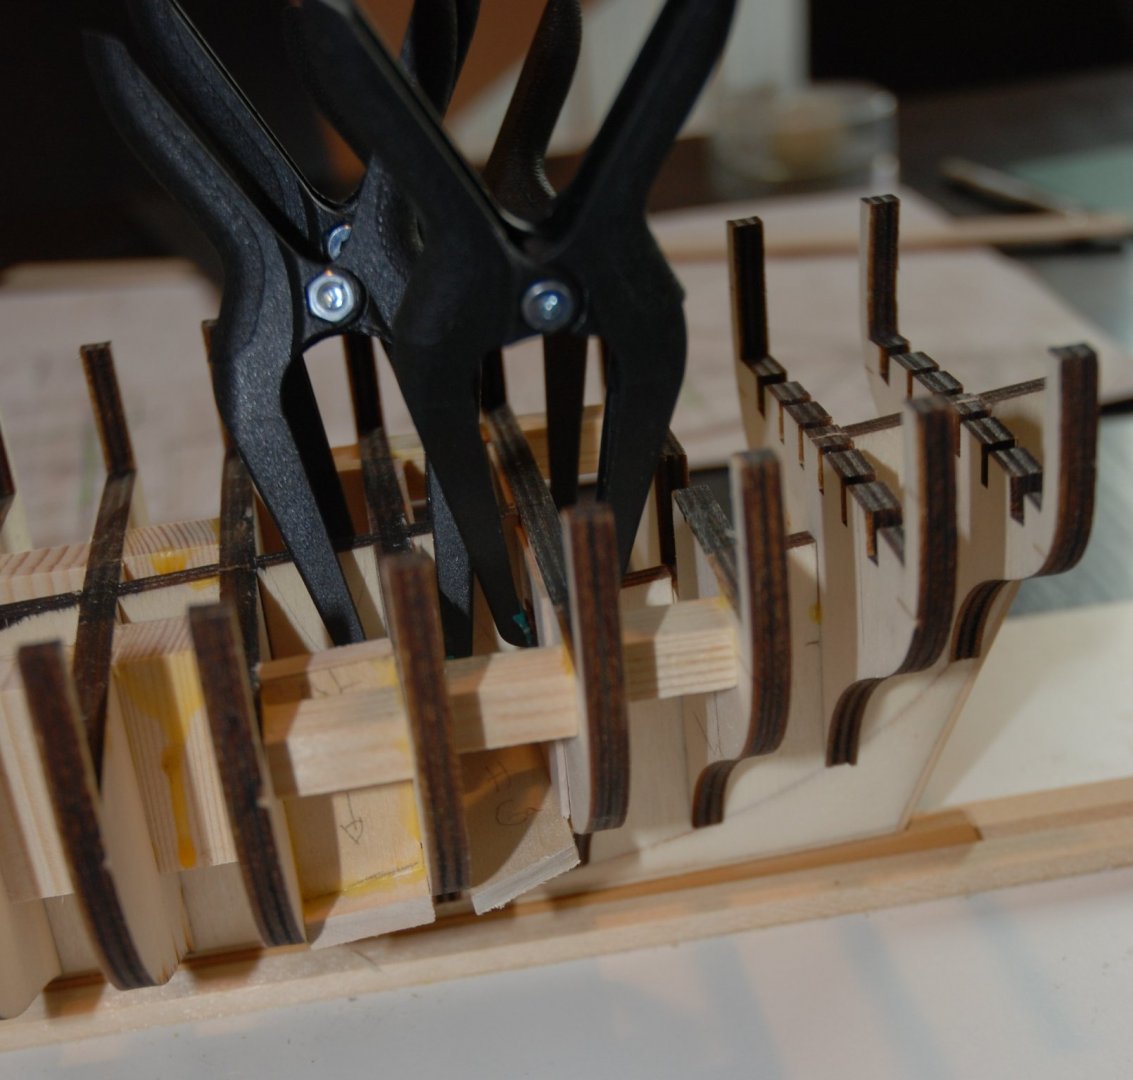
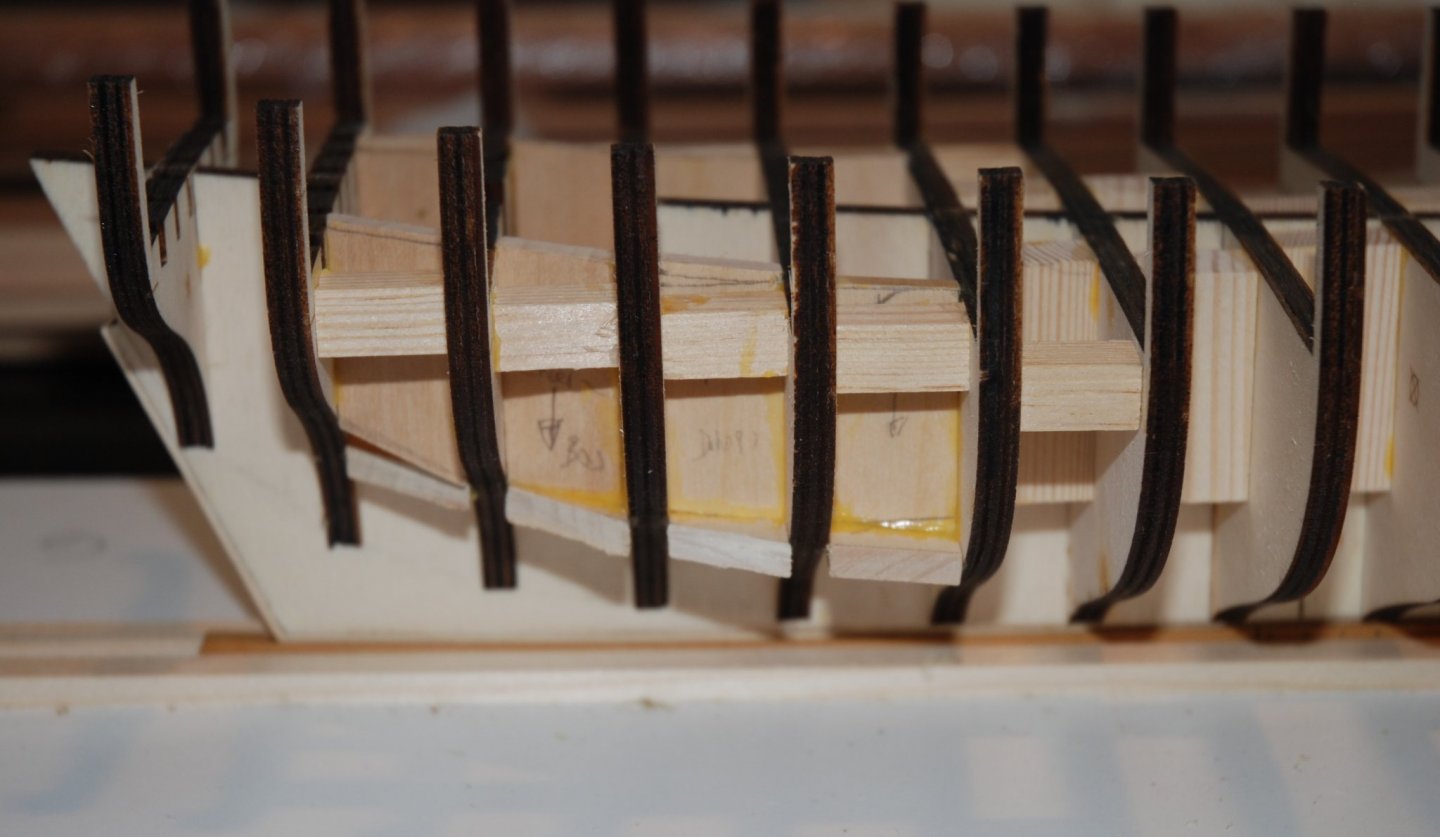
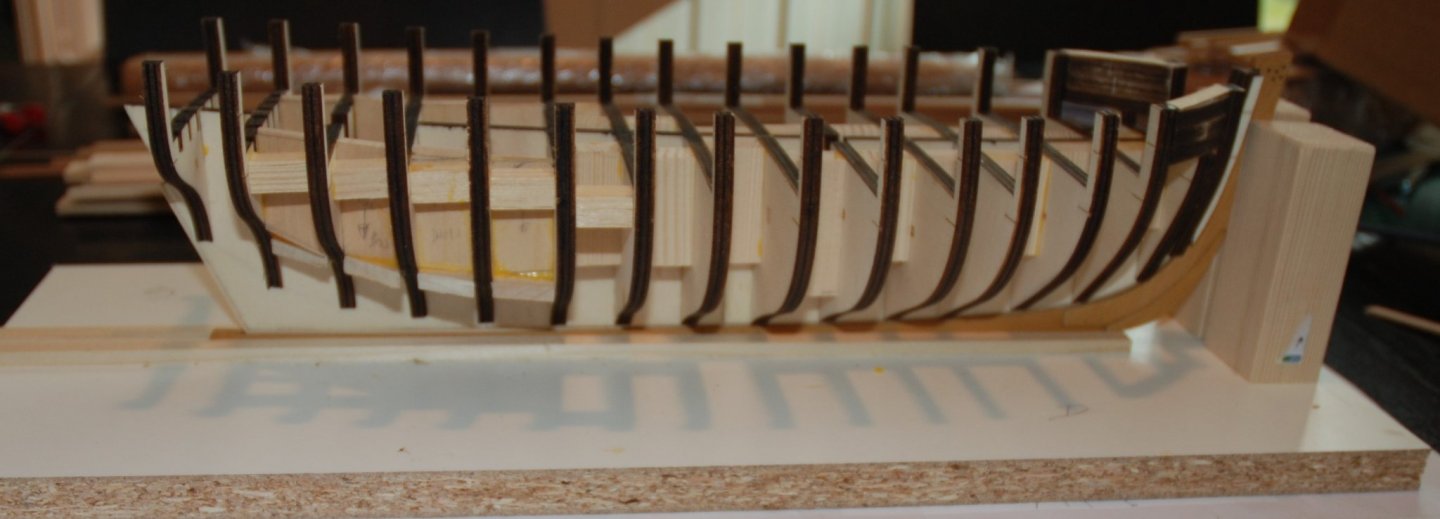
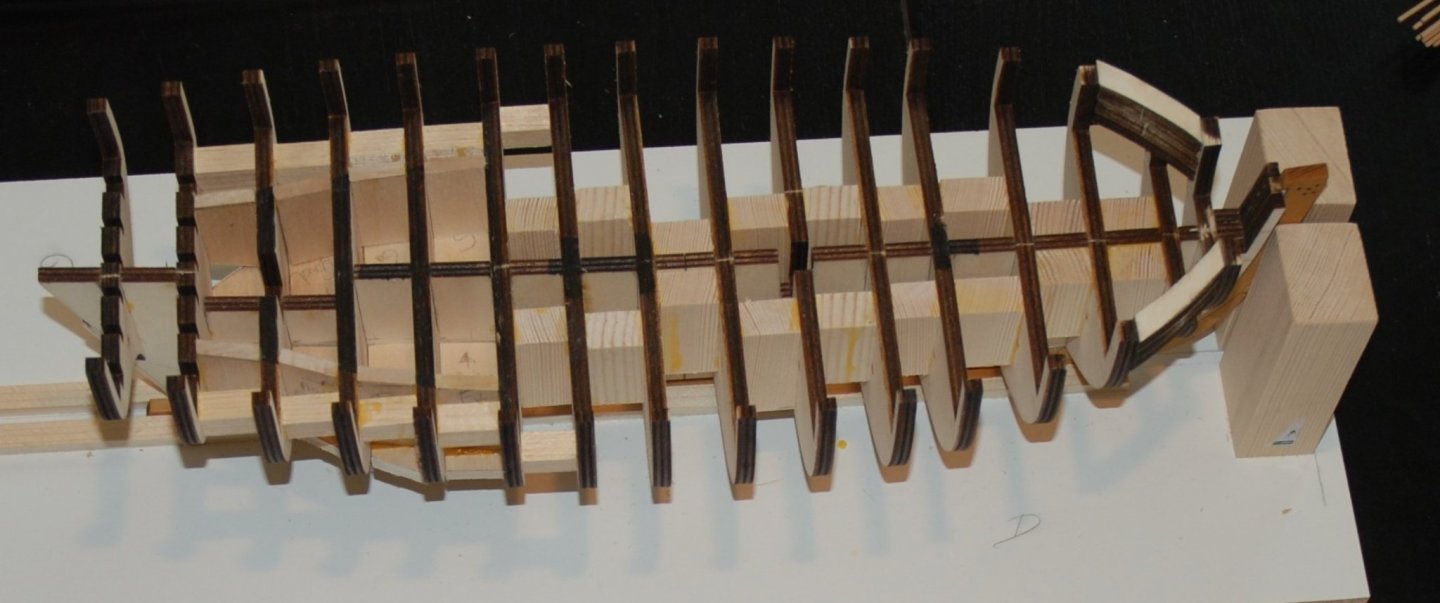
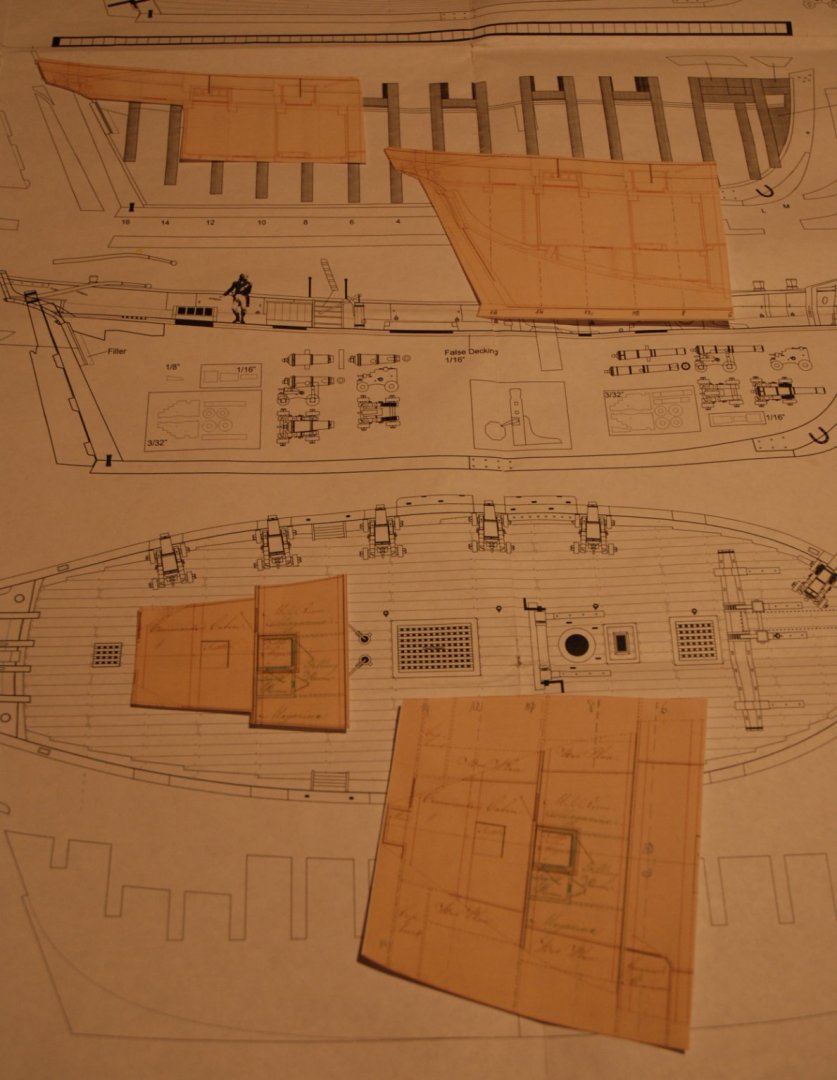
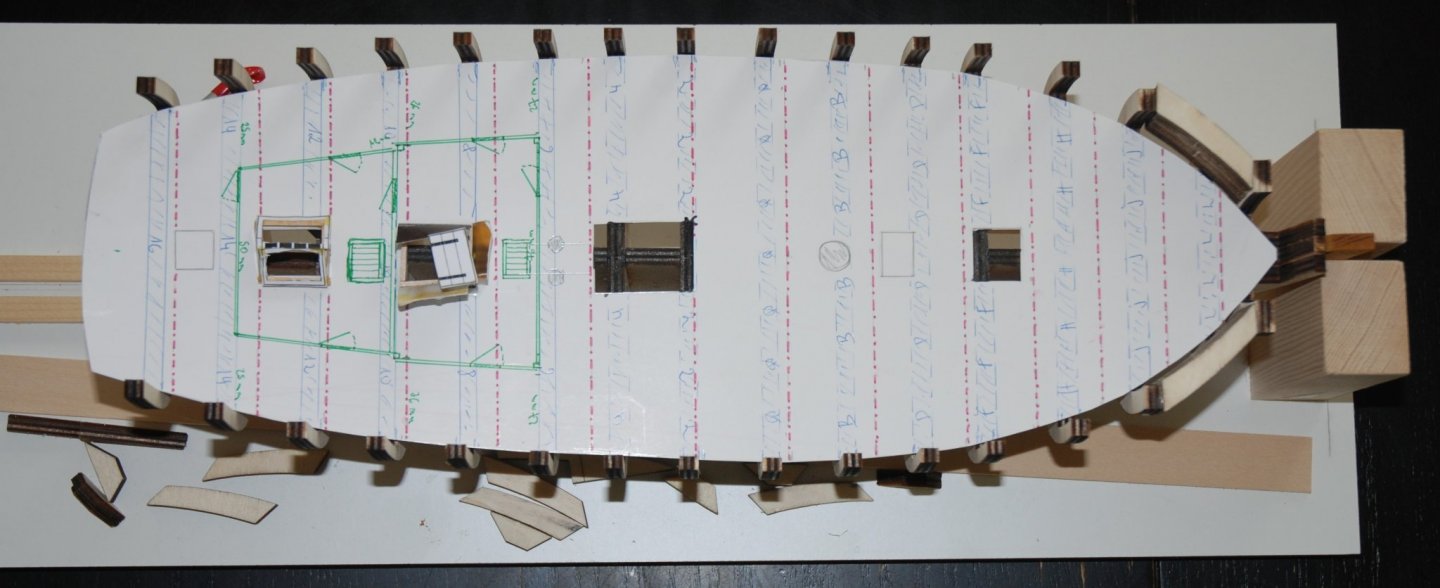
Thank you Glenn and thank you to all the 'Likes'. Reinforcement of the structure I proceed to the reinforcement of the structure in order to prepare the necessary space for the 2 rooms I plan to reproduce. I first sketched on the bulkhead plan the future position of the cabins. This allowed me to determine the position of the reinforcements. These reinforcements will be made of 5 mm thick lime strips. I start by gluing the board that will support the floor of the rooms. I use 4 wood supports (2 per side) cut at the right height. They will be positioned face to face and held in place with clamps. This allows me to glue first the bottom piece at the right height and inclination. These supports also have the right width so that the side reinforcement can be glued in the right place. These supports are adjusted or recreated for each bulkhead separation. I will still have to glue reinforcements between bulkheads 14 and 16. Then I will only have to empty the inner space thus delimited. But before that, I will proceed with the fairing of the hull...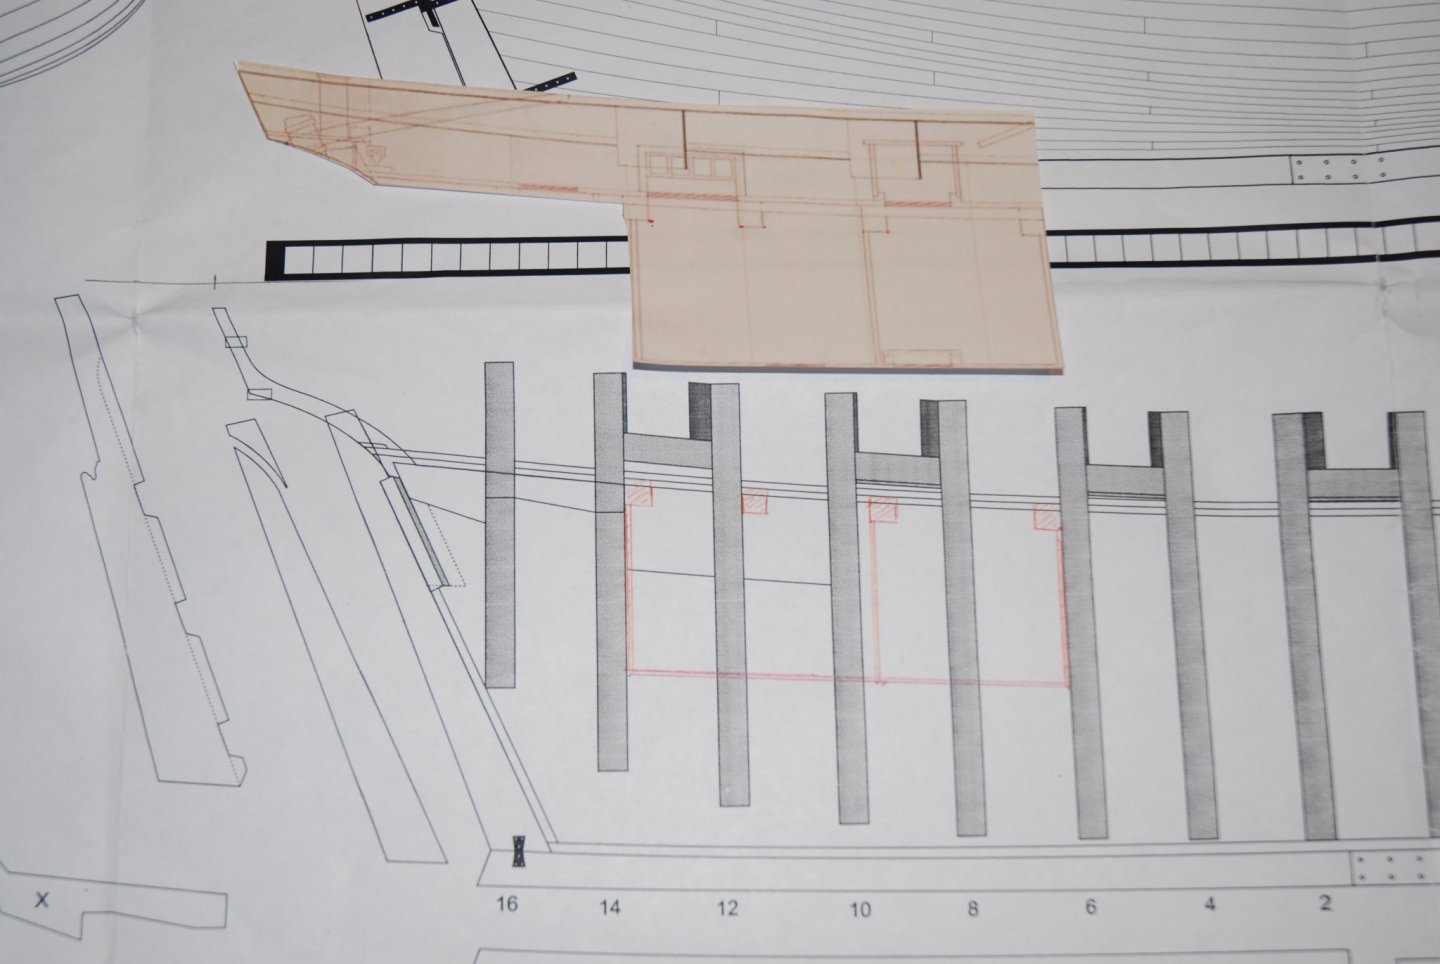
-
HM Cutter Cheerful 1806 by JpR62 - 1:48 scale
JpR62 replied to JpR62's topic in - Build logs for subjects built 1801 - 1850
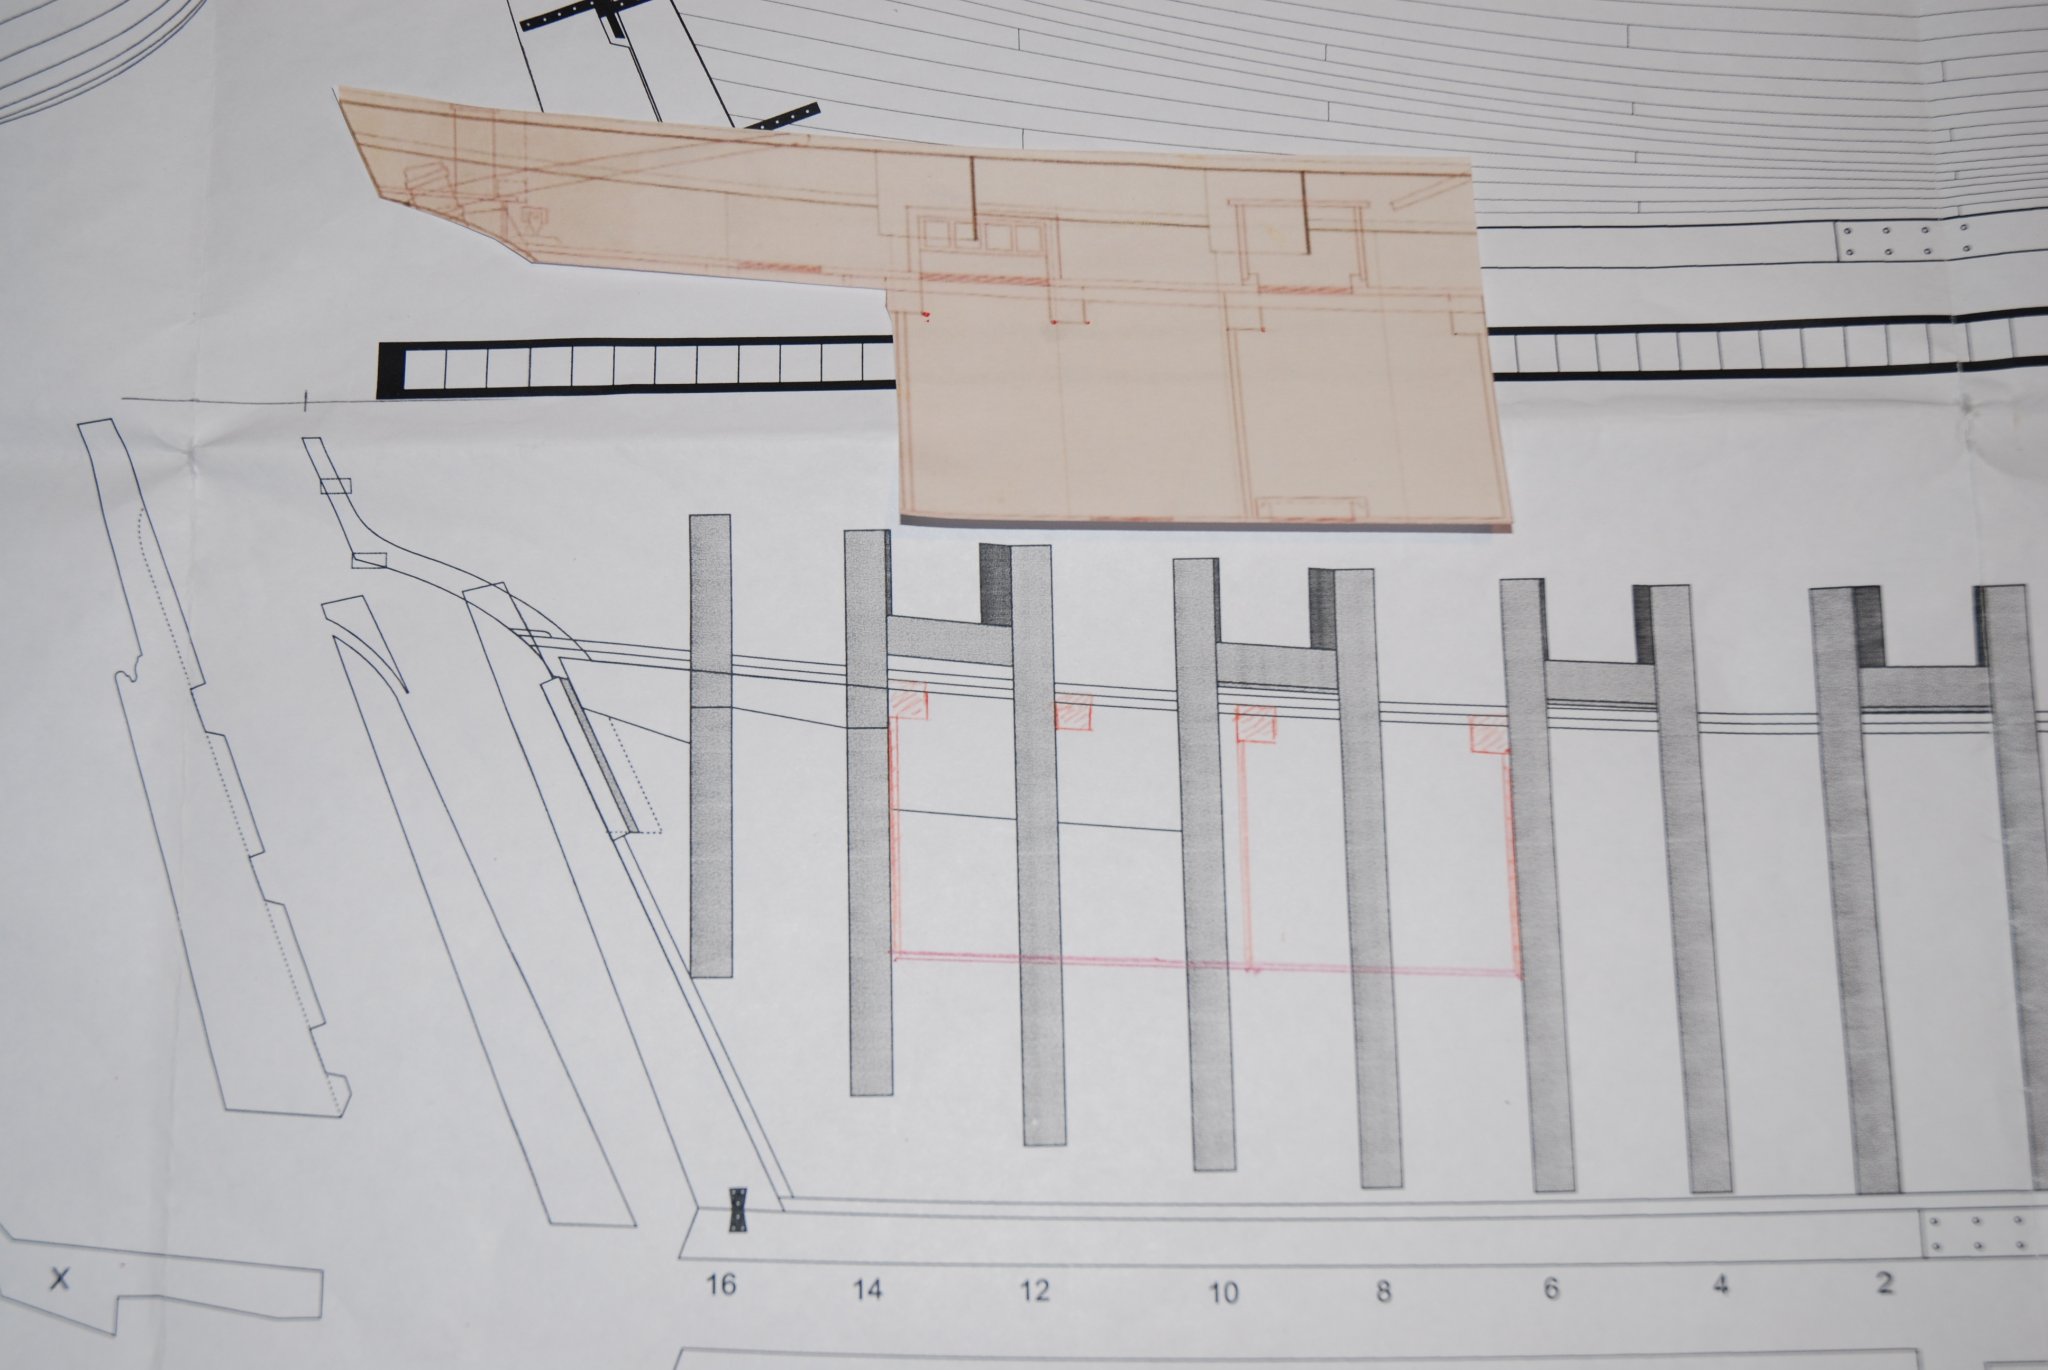
Thank you to all the 'Likes'. I am currently studying the configuration of the 2 rooms that I will reproduce (based on the copy of the NMM plan). I wonder: on this plan, only 2 doors are represented. One that connects the Commander's Cabin and the Bread Room, the second one that connects the two rooms that I am going to reproduce. Now it appears that 6 rooms are located laterally: 4 Bed Places and 2 extensions for the Captain. So we should represent on each side 3 doors? Is it also necessary to provide a door to connect the central spacing of the ship? I would like to have your opinion on this subject... Thank you in advance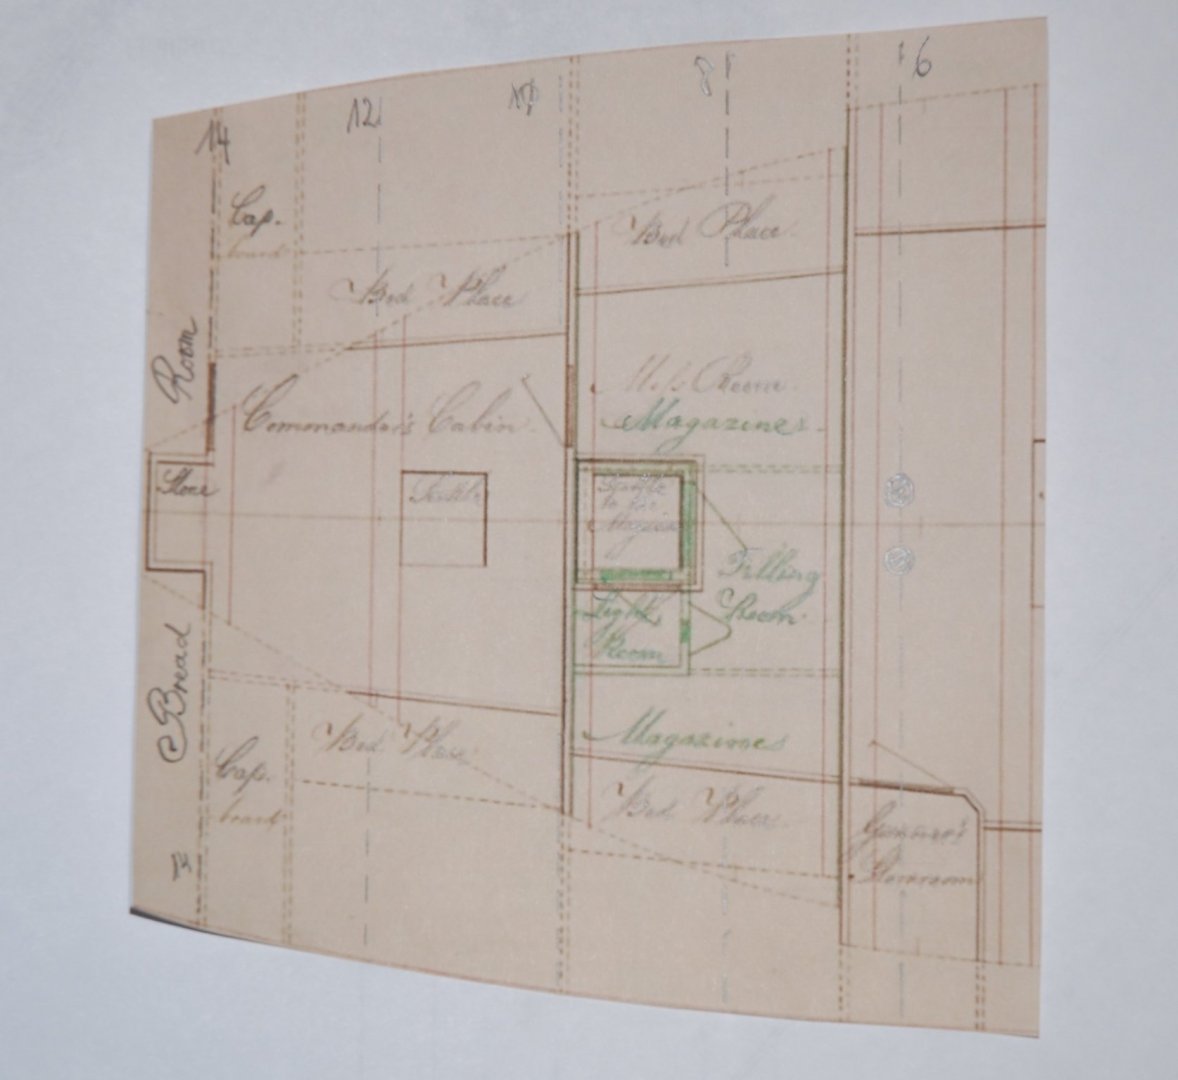
-
What more can I say? It's hard to find the right words to pay tribute to work of this quality. This is truly an exceptional model! And we learn so much! Thank you
- 1,784 replies
-
- 4
-
-
- winchelsea
- Syren Ship Model Company
- (and 1 more)
-
HM Cutter Cheerful 1806 by JpR62 - 1:48 scale
JpR62 replied to JpR62's topic in - Build logs for subjects built 1801 - 1850
Thanks for your help and your feedback. Using the plans of the inside of the Cheerful, I was able to determine the internal positioning of the 2 rooms that I will try to reproduce. It is really a real plus to have a copy of these 2 plans. All I had to do was print them to scale to determine the precise positioning. I will have to work on 3 bulkheads. But first of all I need to reinforce the structure.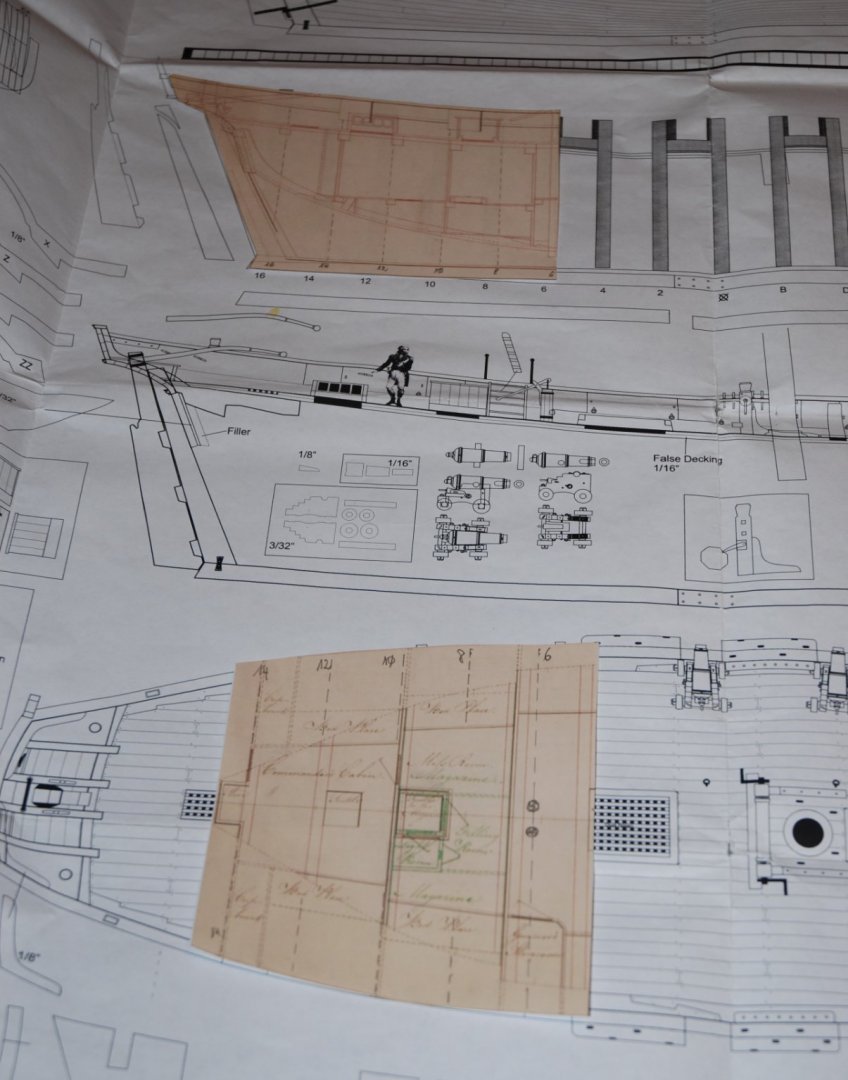
-
Splendid work! And very beautiful golden painting on these PE.
- 201 replies
-
- 4
-
-
- Duchess of Kingston
- Vanguard Models
- (and 1 more)
-
Yes, it's really great work Glenn! And what's more, this log is so detailed and informative! Thanks
- 778 replies
-
- 3
-
-
- cheerful
- Syren Ship Model Company
- (and 1 more)
-
HM Cutter Cheerful 1806 by JpR62 - 1:48 scale
JpR62 replied to JpR62's topic in - Build logs for subjects built 1801 - 1850
Thanks Chuck, It's true that I should have thought about it. 😁 I will adapt my plan accordingly. Luckily, it shouldn't influence the cutting area too much. Many thanks for these two images. -
HM Cutter Cheerful 1806 by JpR62 - 1:48 scale
JpR62 replied to JpR62's topic in - Build logs for subjects built 1801 - 1850
Thank you to all the 'Likes'. Planning As a first step, I studied the possibility of recreating some of the internal elements of the Cheerful. Using the excellent book 'The Naval Cutter Alert' from the 'Anatomy of the ship' series, book written by Peter Goodwin, I enlarged the plates representing the internal configuration of the ship. It soon became apparent that the only part that will be partially visible from the deck is the one located at the back of the cutter. We should be able to partially see the captain's day cabin as well as the wardroom. I trace the location of the bulkheads of the Cheerful in order to determine the cutting to be done. I plan to leave the companionway on the deck door open. I quickly sketch the different elements constituting the 2 rooms. The door separating the 2 rooms will be left open to let a maximum of light pass through. I will probably illuminate the inside of the 2 rooms. I'm looking forward to the next video of the construction of the 'Ragusian Carrack' by Ohla Batchvarov (Shipphotographer.com) which will be about this very subject. My cat had the happy idea to lie down on the plan 😄, but that doesn't prevent me from visualizing the space needed for the implementation of the 2 rooms. Place now for the various reinforcements needed to consolidate the hull before being able to proceed to the cutting.

-
Superb! I really like these customizations! It looks great.
-
HM Cutter Cheerful 1806 by JpR62 - 1:48 scale
JpR62 replied to JpR62's topic in - Build logs for subjects built 1801 - 1850
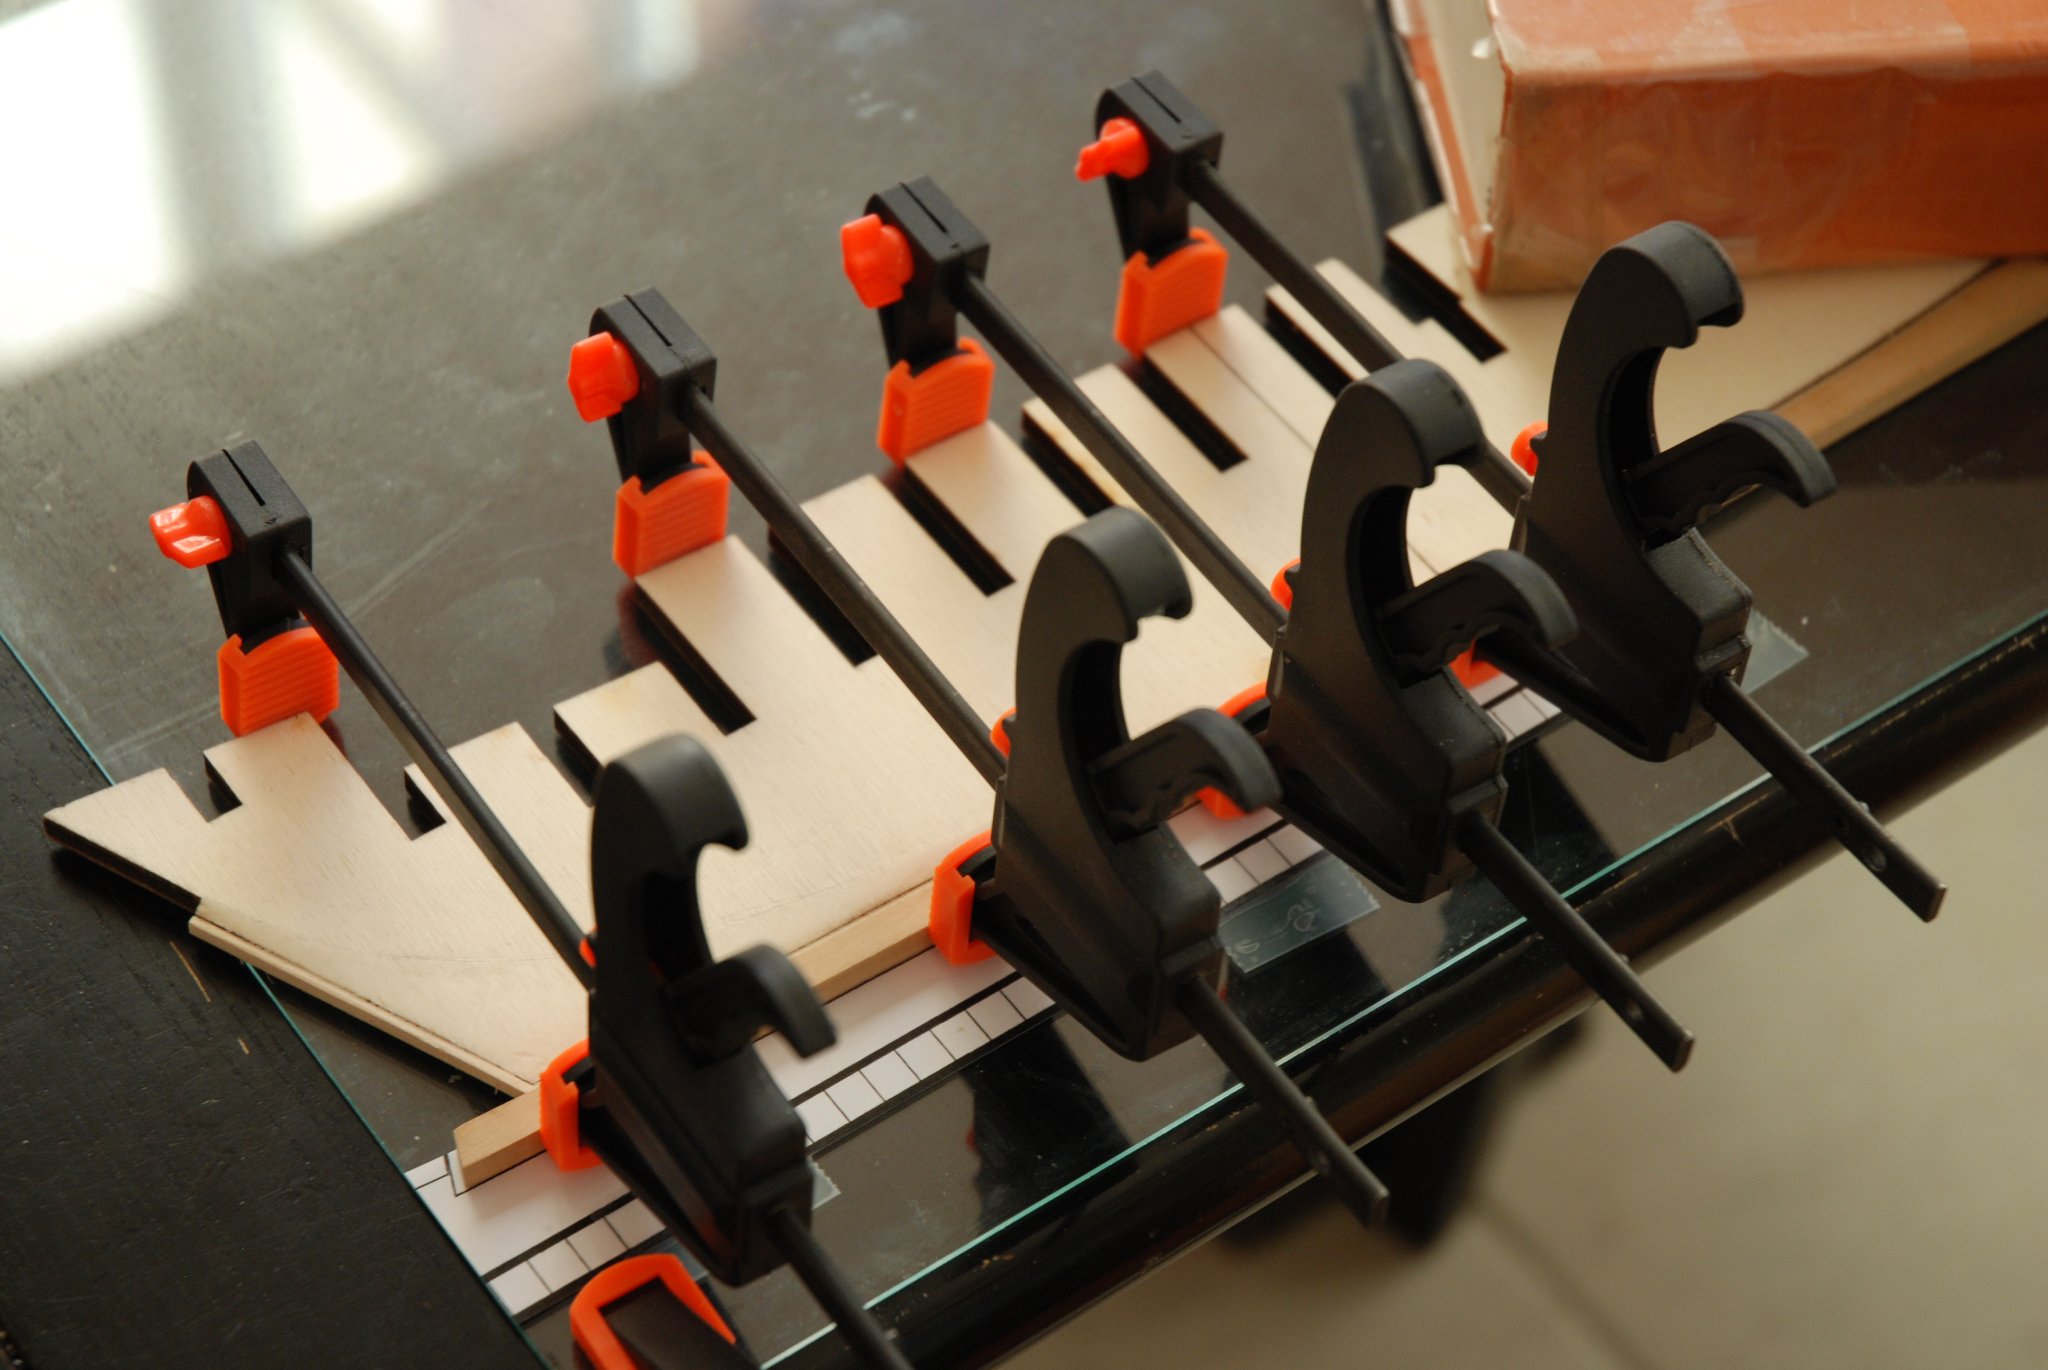
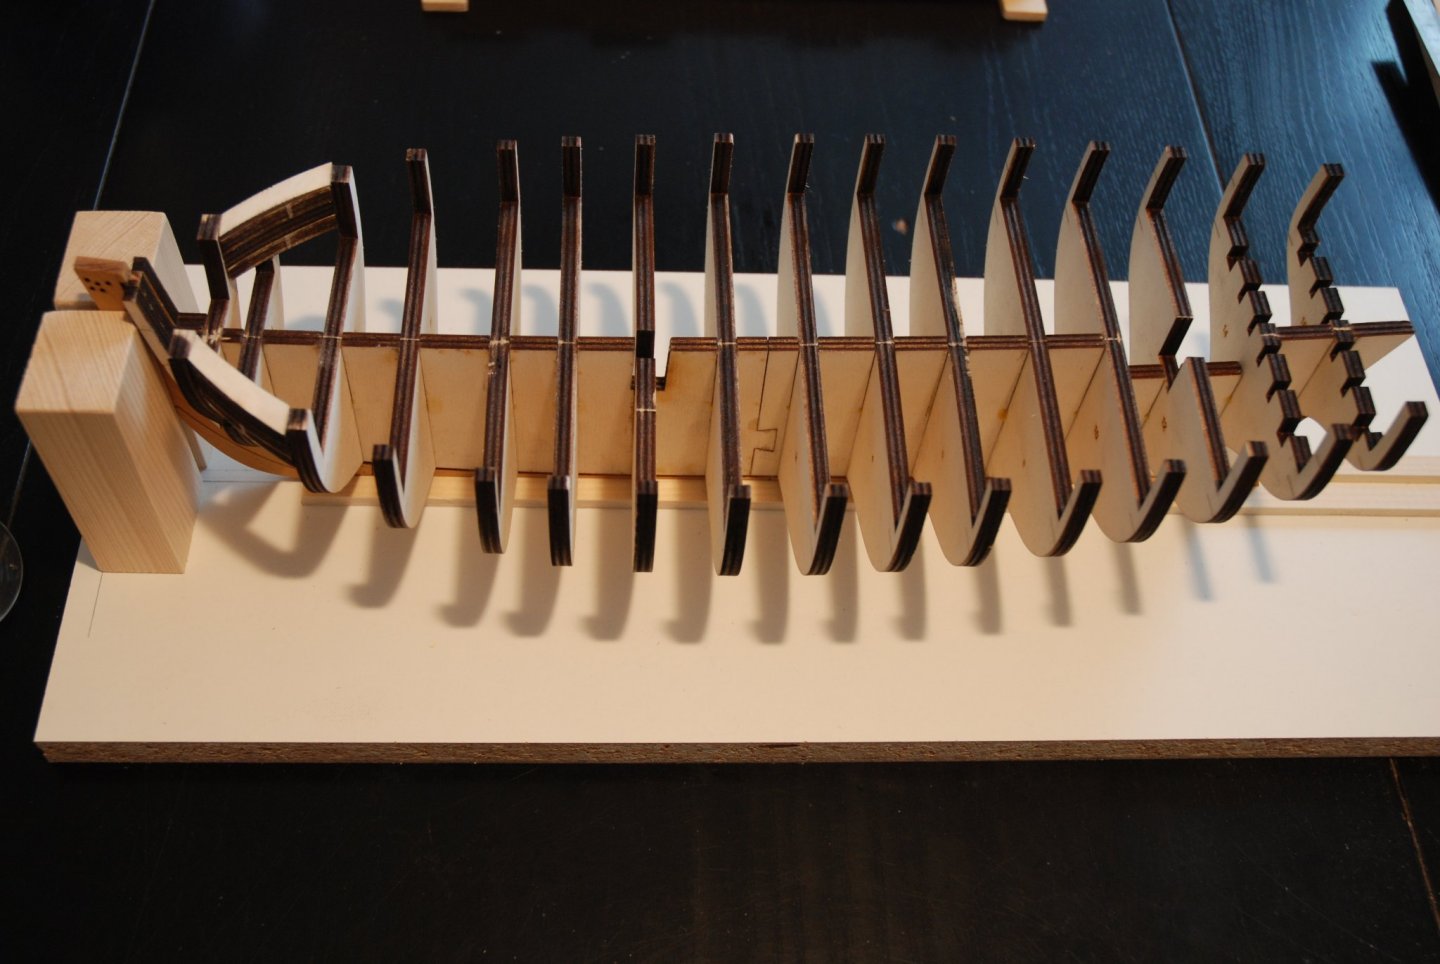
Thank you to the people who follow this build. Installation of bulkheads. And here all the difference in quality and precision of the kits produced by Syren appears. When I remember it took me over a week of work to prepare and test the bulkheads setup on my Armed Virginia Sloop. With the Cheerful, in ten minutes, the bulkheads blank test was done and I was able to start gluing them. I had fun with my children's legos again. 😄 They won't hold it against me. They are now adults and have other interests. Finally, I prepared a working basis to deposit my model. I also planned a second base in anticipation of the fairing. I will probably raise it to make this task easier. But before this phase, I'm going to reinforce the bulkheads and make a first modification to the model. I plan to add the detail of the captain's cabin which will be visible through the skylight.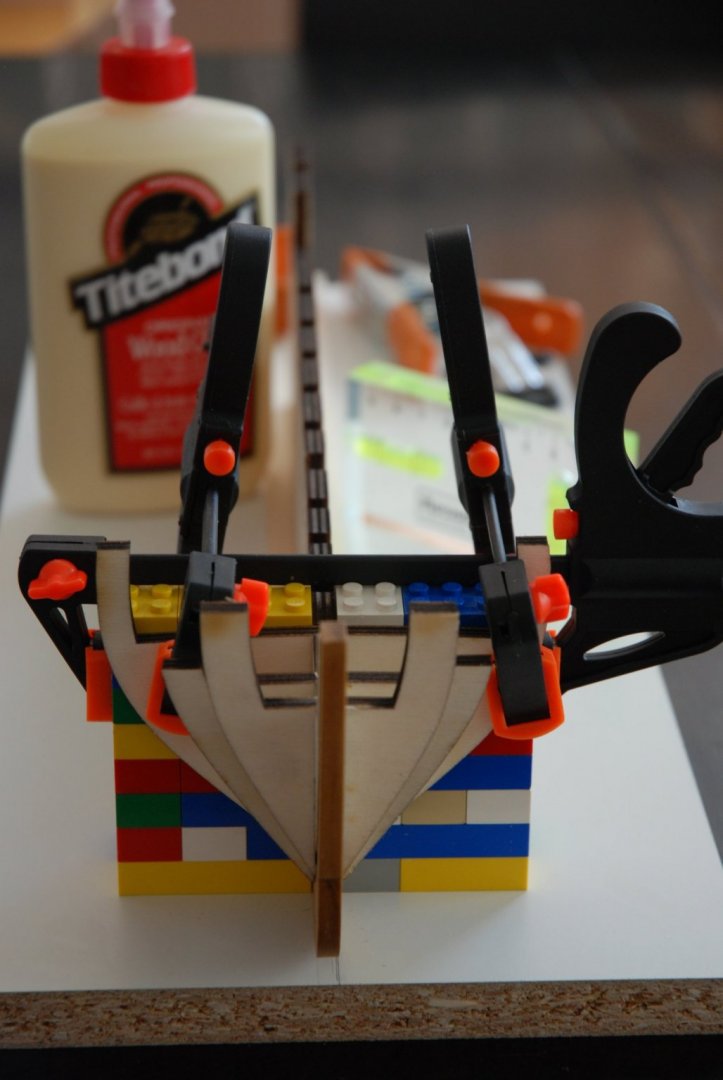

-
HM Cutter Cheerful 1806 by JpR62 - 1:48 scale
JpR62 replied to JpR62's topic in - Build logs for subjects built 1801 - 1850
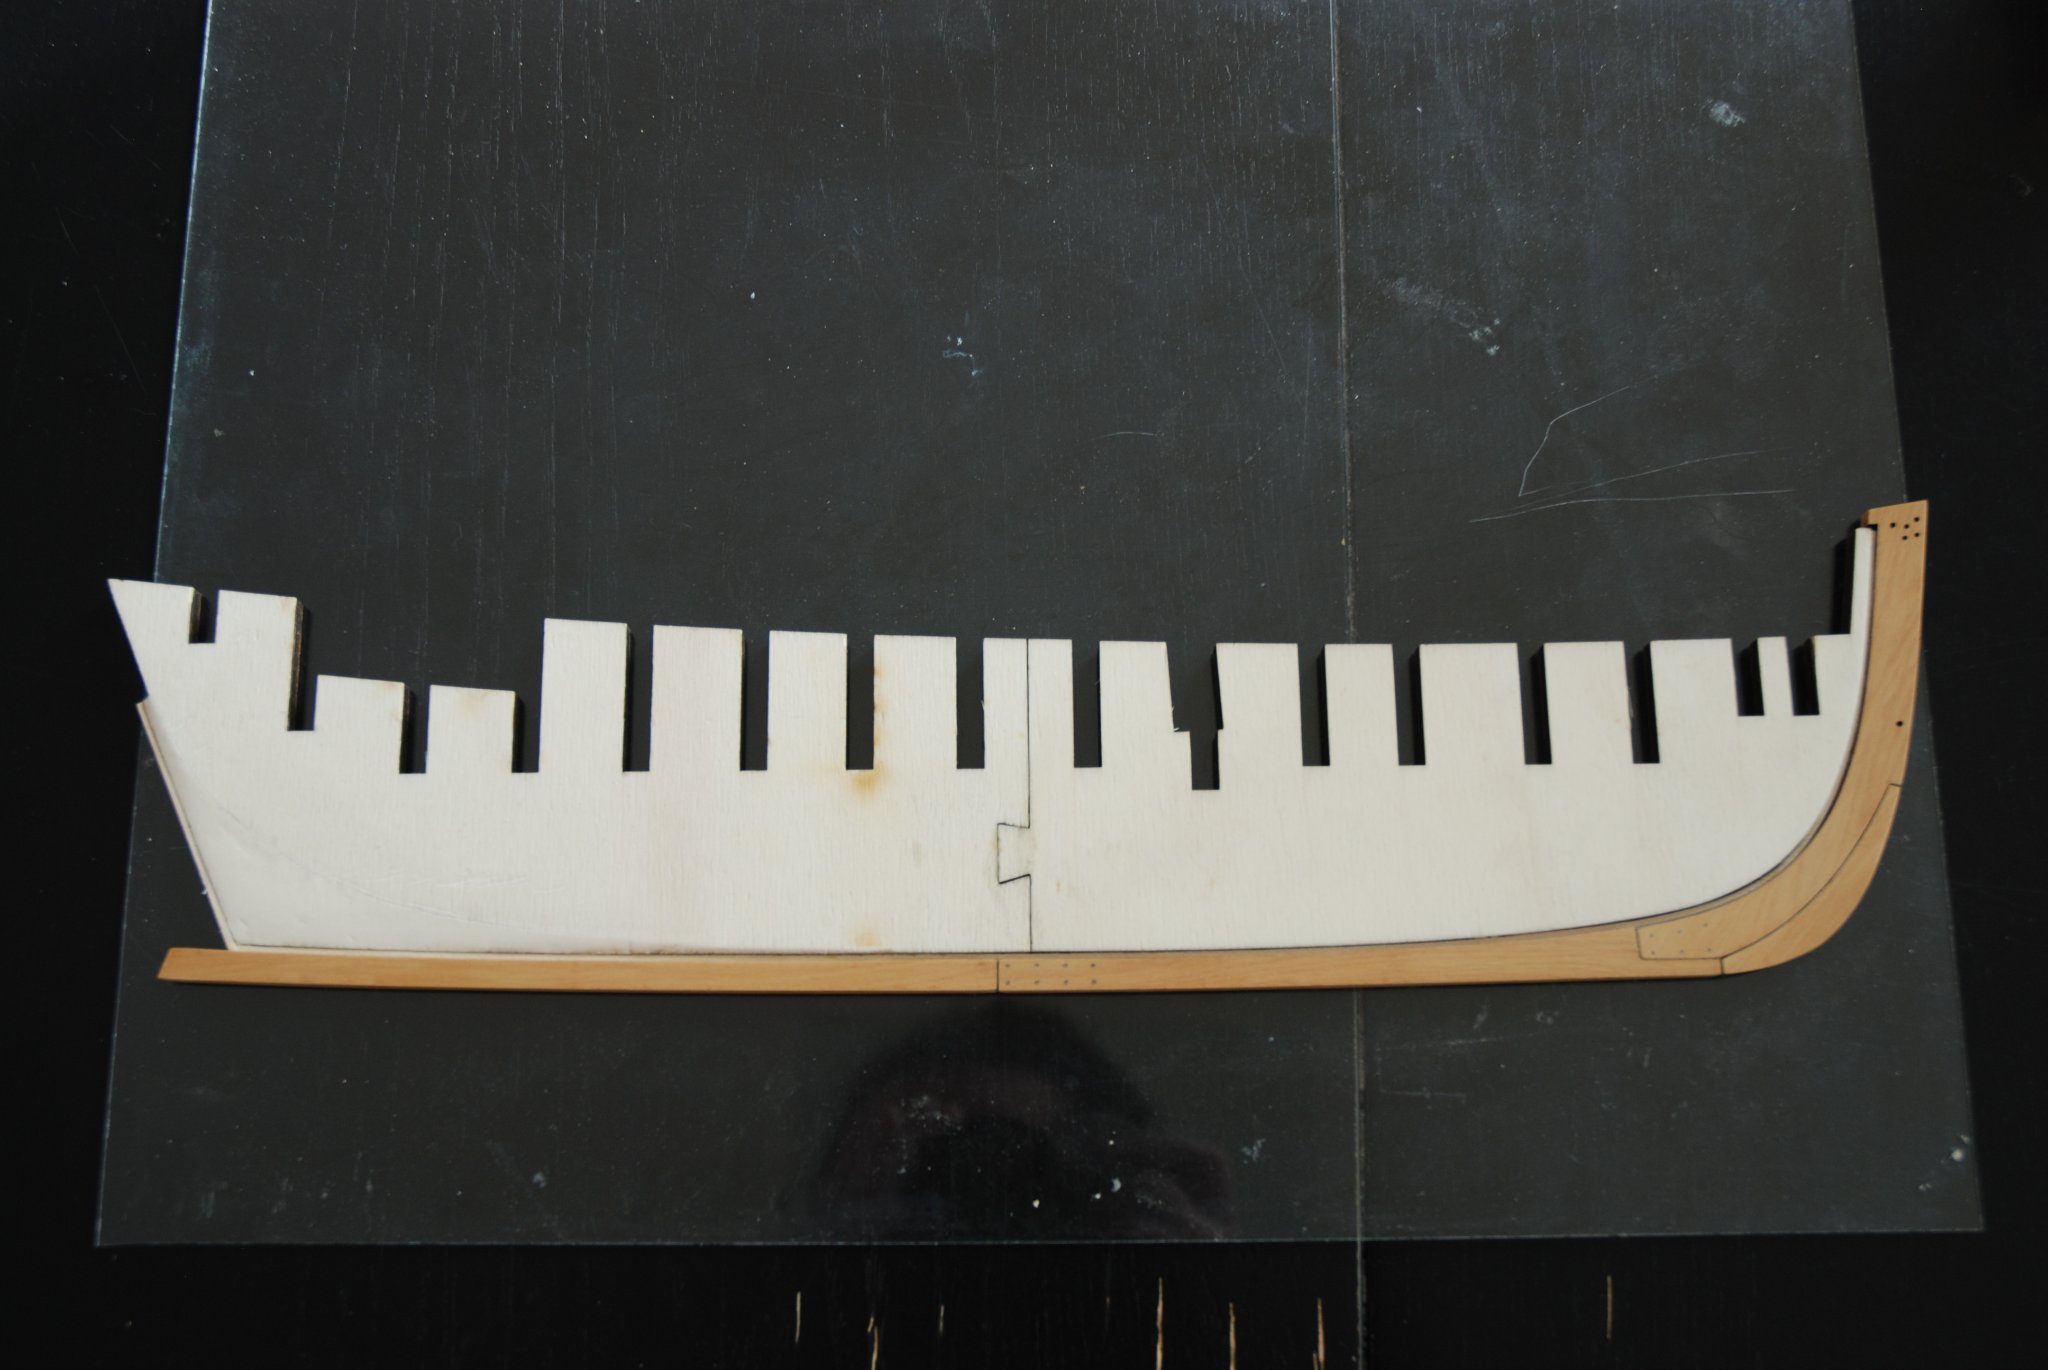
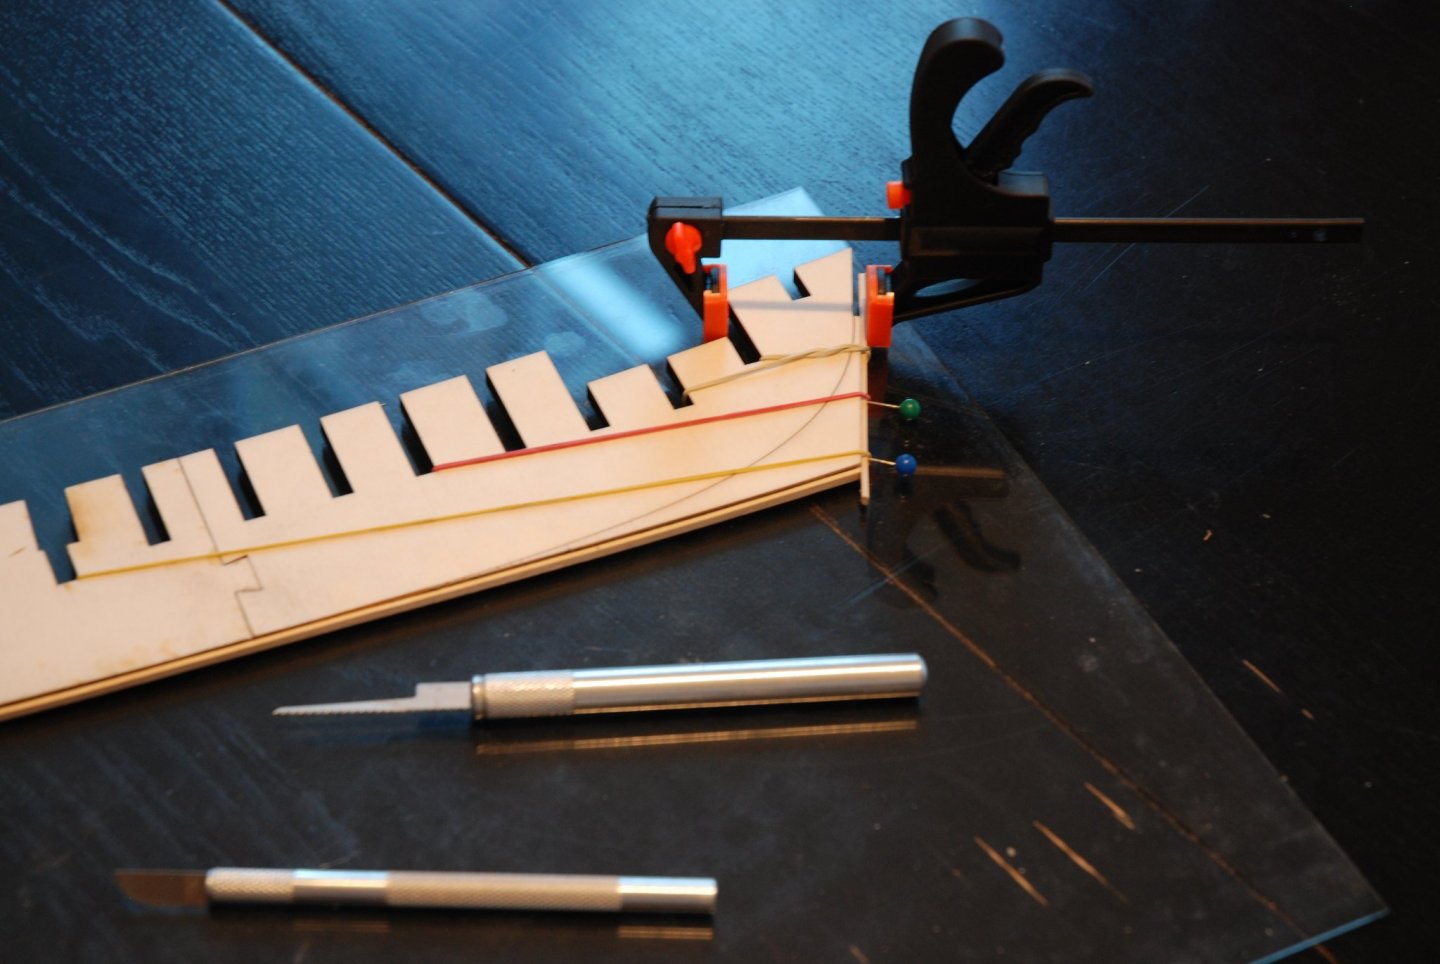
Thank you Glenn and Michael for your support and thank you to all the 'Likes'. I glued the keel on the false keel. I work on a glass plate in order to have a flat surface. Finally I simulated the treenails using Minwax wood putty. Next step : the bulkheads

-
HM Cutter Cheerful 1806 by JpR62 - 1:48 scale
JpR62 replied to JpR62's topic in - Build logs for subjects built 1801 - 1850
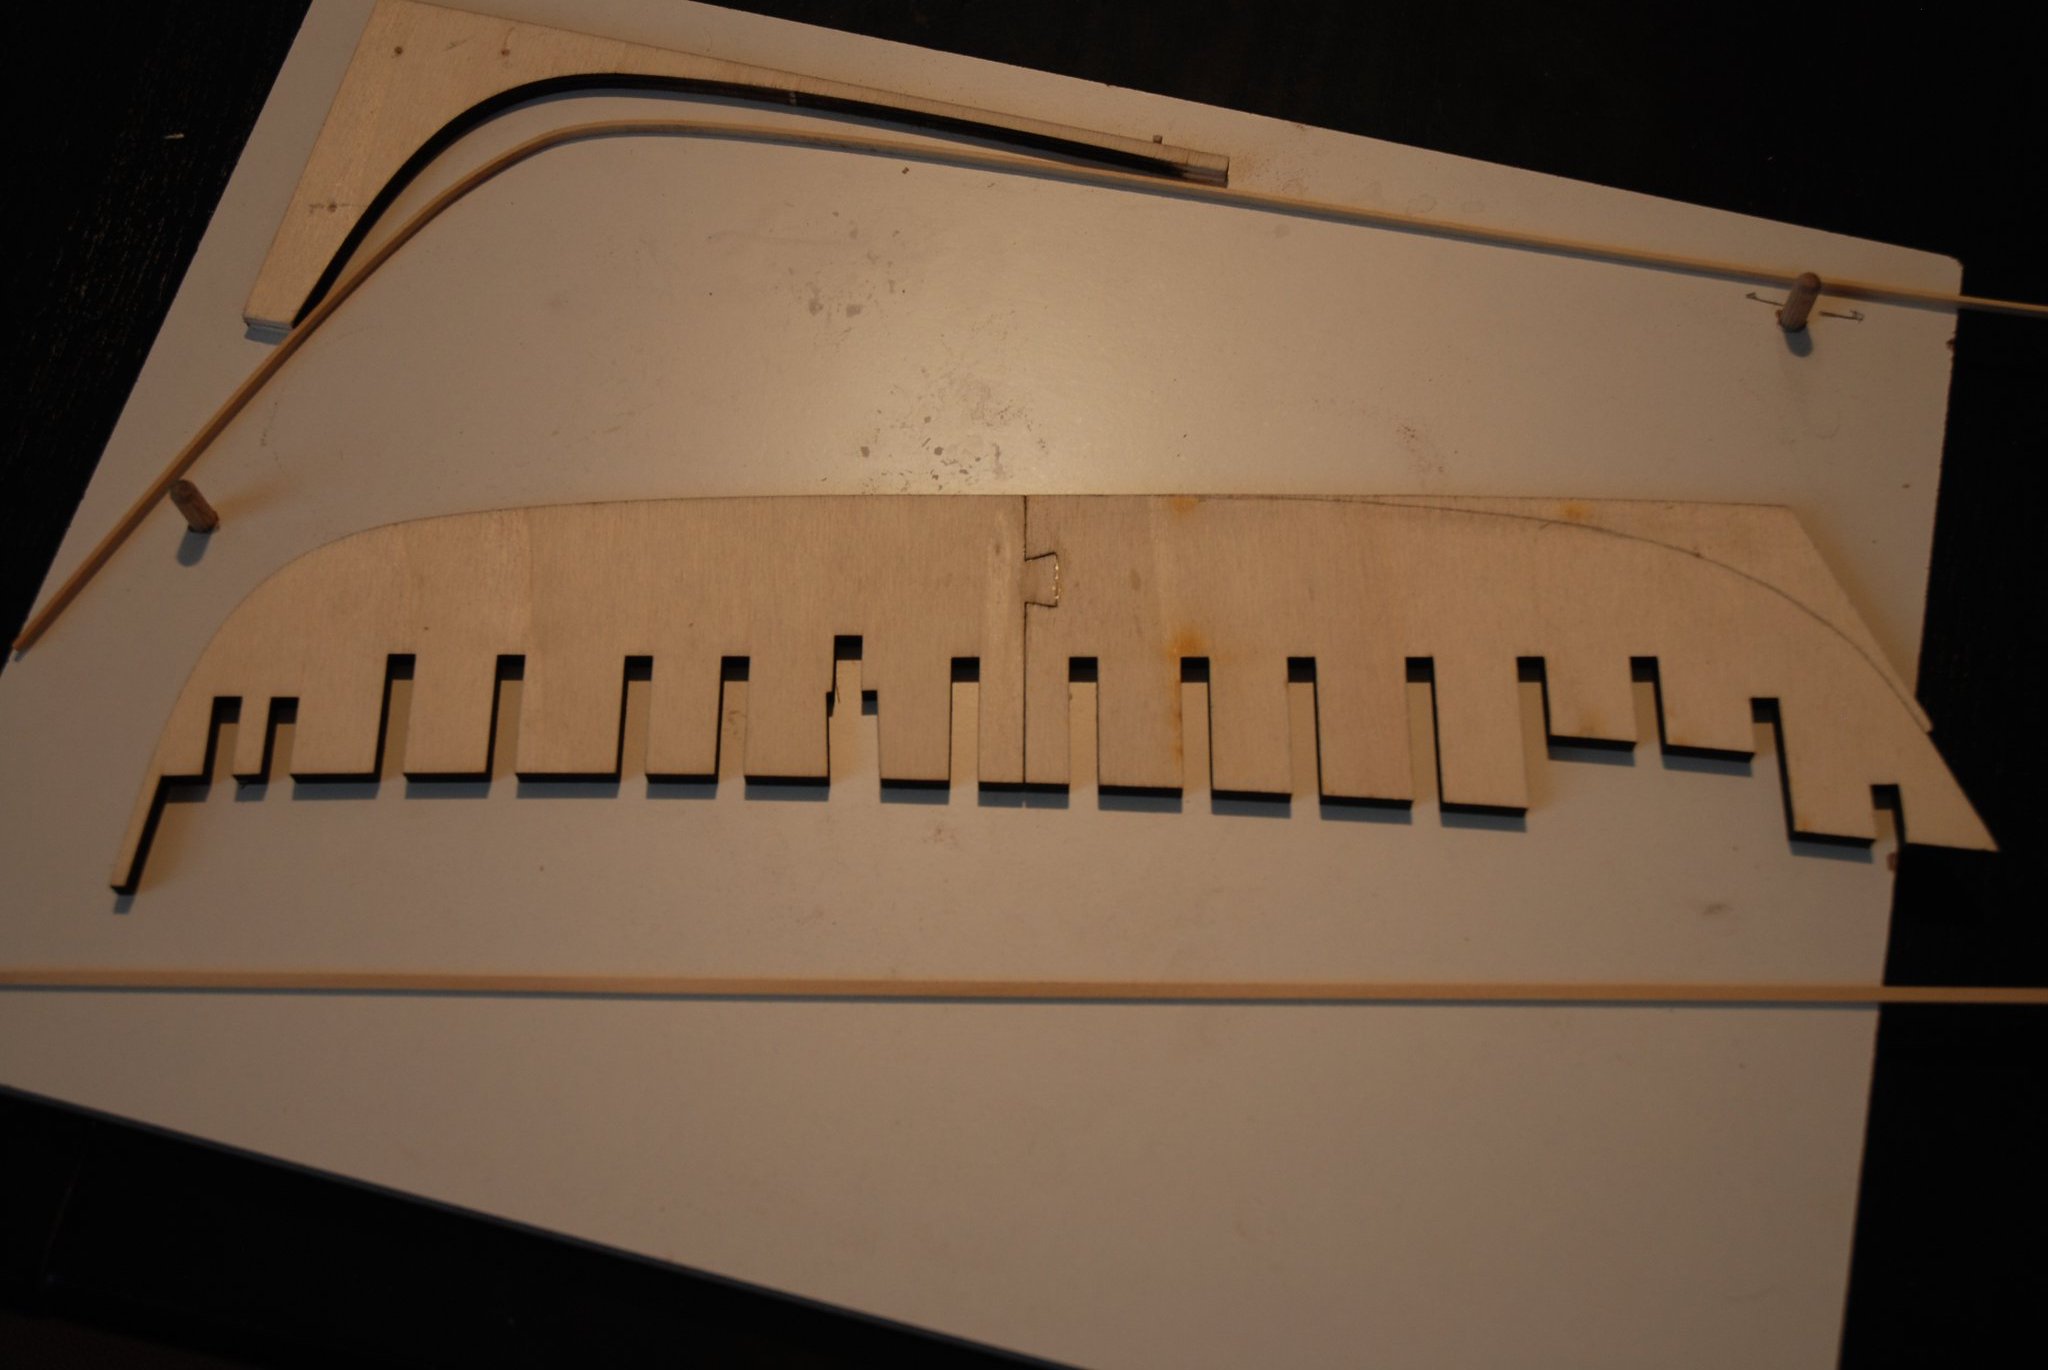
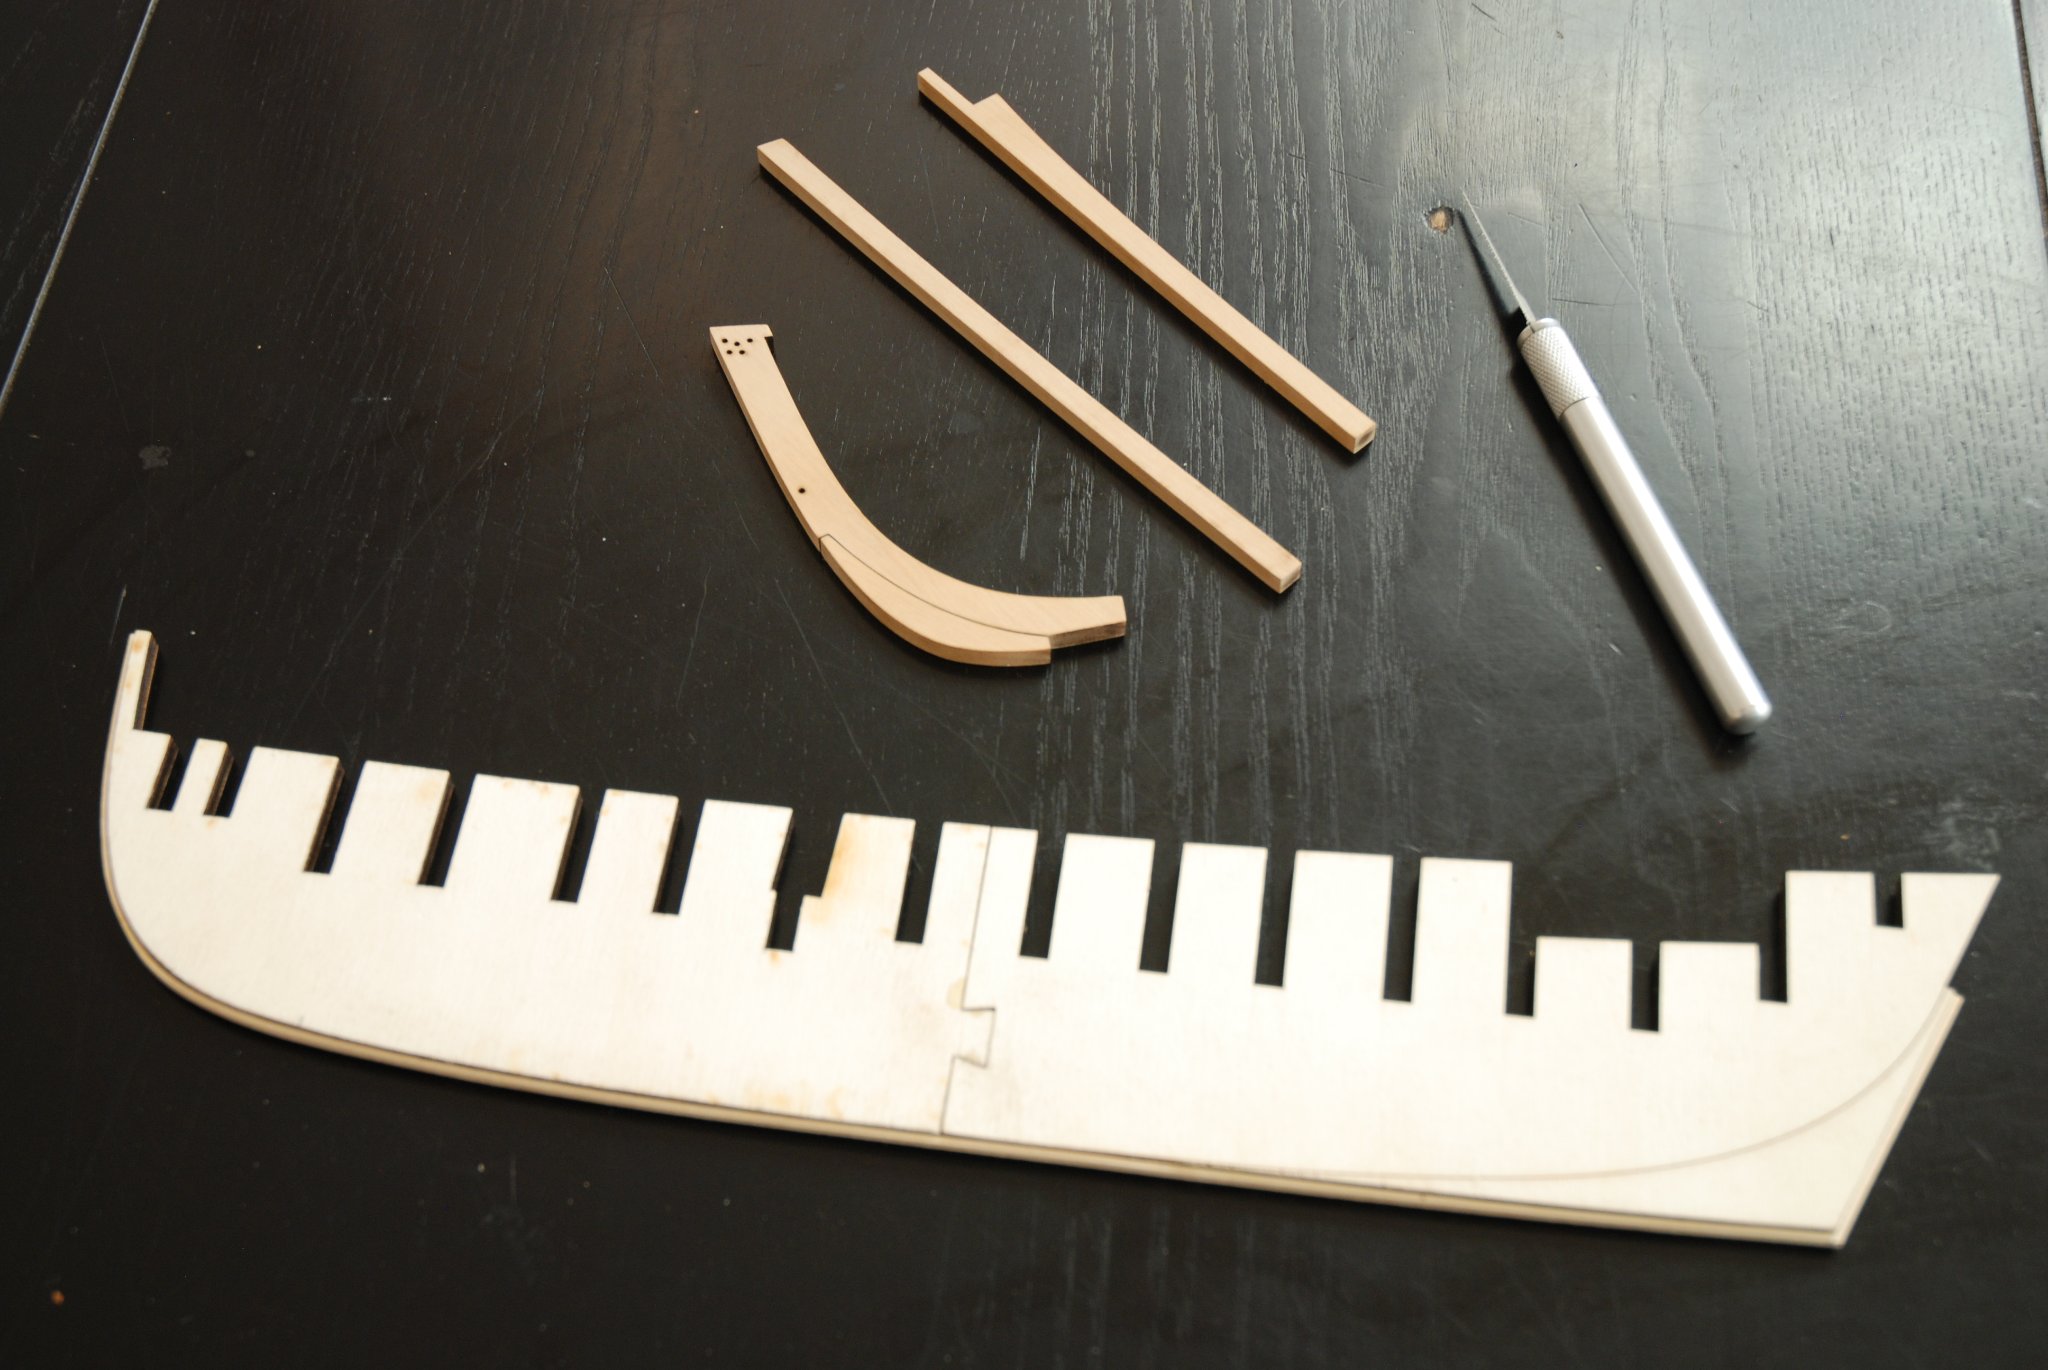
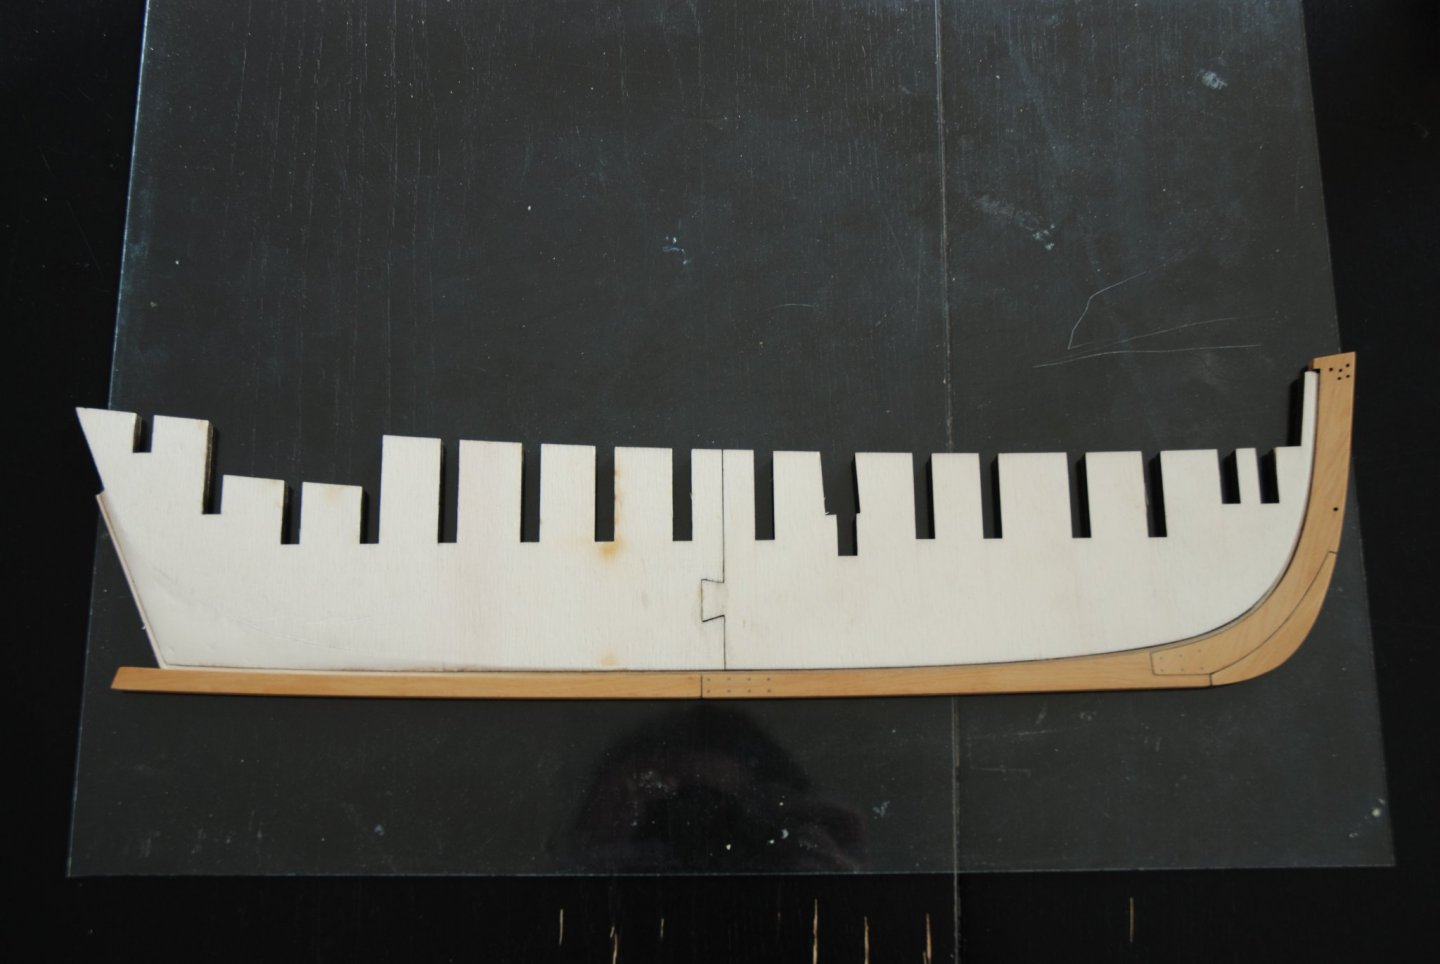
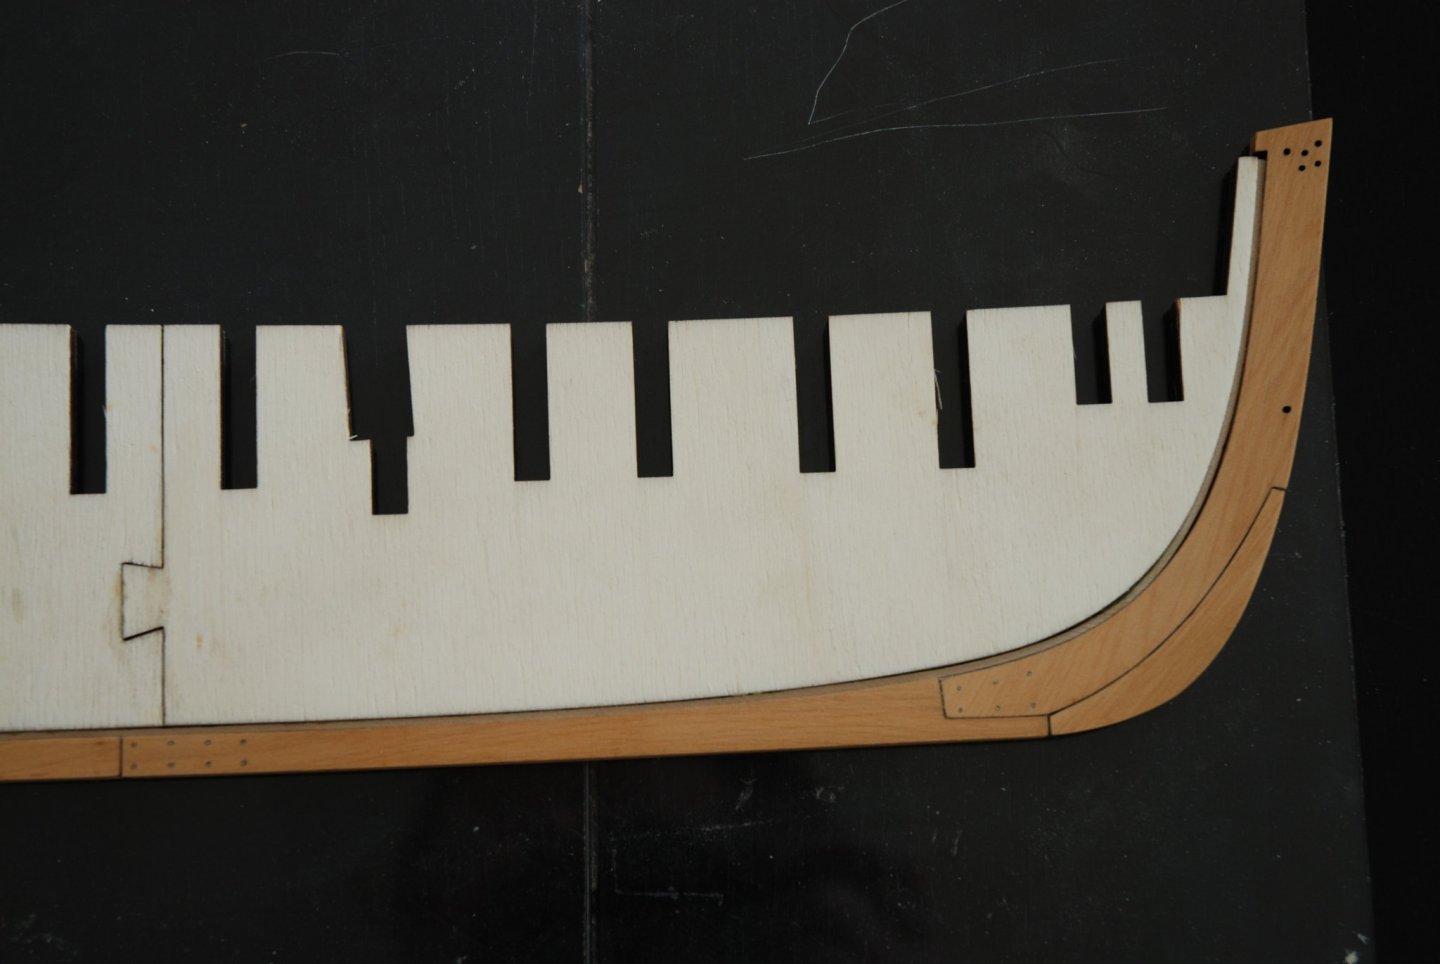
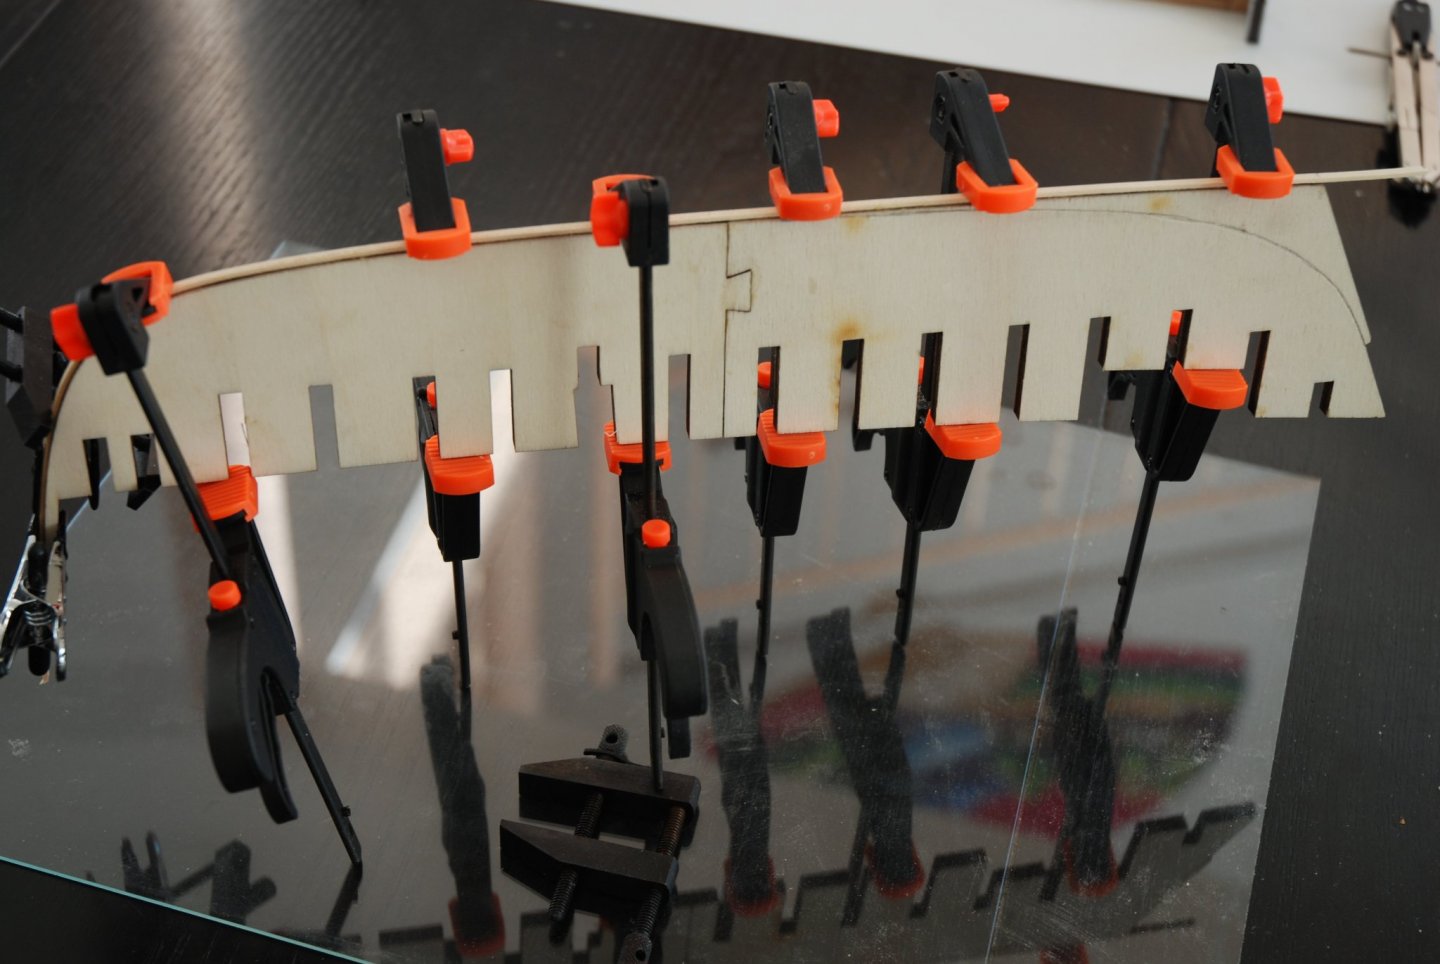
Thank you Chuck and Glenn for your kind comments and thank you to all the 'Likes'. Glenn, this is 'Wood Project Source' in New Jersey, USA. I ordered all the necessary wood as early as January 2018, just a few months before the company unfortunately ceased operations. Installation of the rabbet strip. I shape it using the laser board. Gluing of the 2 segments The keel elements are ready for installation. This will be the next step.

-
Superb Cutter! Your Cheerful is beautiful. I will follow your next build with attention.
- 54 replies
-
- 2
-
-
- cheerful
- Syren Ship Model Company
- (and 1 more)
-
Very nice work! Glad to see that work has resumed on this longboat.
-
Superb! My God it's beautiful! The attention to precise and meticulous detail is absolutely fantastic.
-
Superb work. Always perfectly clean and precise. And I still admire the work on the harmony of the different wood species.
-
Superb work. The winch is really beautiful and looks great on deck. As usual, this log is a pleasure to follow 😀
- 778 replies
-
- 1
-
-
- cheerful
- Syren Ship Model Company
- (and 1 more)