

.jpg.d84ec4dad1d7791e855dca06210ab6f3.jpg.40b7a0ea2cc62bf0a3ec2a716005383a.jpg)
hollowneck
-
Posts
1,349 -
Joined
-
Last visited
Content Type
Profiles
Forums
Gallery
Events
Posts posted by hollowneck
-
-
Welcome Ian C.
You'll get lots of support on this forum, especially if you create a "Build Log" for your ship model- it's easy to set up and you'll need to take decent photos of course. Good Luck!
P.S. I lived in Somerset for two years, close to Taunton. Loved visiting Bristol's waterfront and hopping over the bridge to Cardiff.
Ron
- Keith Black, mtaylor, AJohnson and 1 other
-
 4
4
-
My ship modeling club just had a member demo a "TrueMetal wax paint" (solvent-based) that was very intriguing. After application over a suitable primer the resulting surface is subsequently "burnished" and depending on the amount of burnishing, one can subtly change the hue. A wide range of metal tones, including bronze are available.
No weathering powders required.
This company's products (AK Interactive) are a staple in the plastic modeling community and can also be used on 3D-printed resins - like cannon.
Here's a link: https://ak-interactive.com/product/true-metal-old-bronze/
A tube of the AK paint runs $12 at this link: https://www.amazon.com/True-Metal-Gold-20ml-Tube/dp/B079VM2F22/ref=sr_1_5?crid=1U9ODWK479K4S&keywords=AK+Interactive+wax+paint&qid=1703819306&sprefix=ak+interactive+wax+paint%2Caps%2C108&sr=8-5
Ron
-
Ab,
Can't wait to see your photoshopped final! kool.
I was going to place my latest into a diorama depicting a shipwreck on a jagged outcropping, the result of being at the mercy of a storm that drove her into the rocks: dismasted, sails in the water, ships's boat dashed in pieces, sailors scrambling to grab onto some flotsam... but I changed my mind when I had completed Grecian's hull. I just couldn't do it with this model. The topsail schooner's lines were too beautiful to sacrifice her to the sirens.
Perhaps some other model that's less attractive since I still would like to attempt this portrayal in one of my dioramas.

On The rocks? Not!
-
6 hours ago, Blue Ensign said:
I had intended to apply washes and varnishes, but I’m now thinking I should quit while I’m ahead.
Great job, I like the color choices.
There is no need for washes as you've stated but you may want to consider a satin or semi-gloss protective coat.
- Blue Ensign and mtaylor
-
2
-
1 hour ago, Blue Ensign said:
I fitted the Starboard side first which went on without issue, the pieces held using pva and sectioning clips.
Indeed, B.E. headrails can be an unruly hairy business. Your solutions and skilled efforts are always Indefatigable.
- mtaylor, Ryland Craze, dunnock and 1 other
-
4
-
Welcome, Tyler. You found the best, friendliest and most helpful spot on the internet for ship modeling!
Just Ask - and Ye Shall Receive.
- Keith Black, mtaylor and JeffT
-
3
-
-
8 hours ago, glbarlow said:
Focus stacking is about overcoming depth of field limitations of a single aperture for a deep composition.
Well said, Glenn.
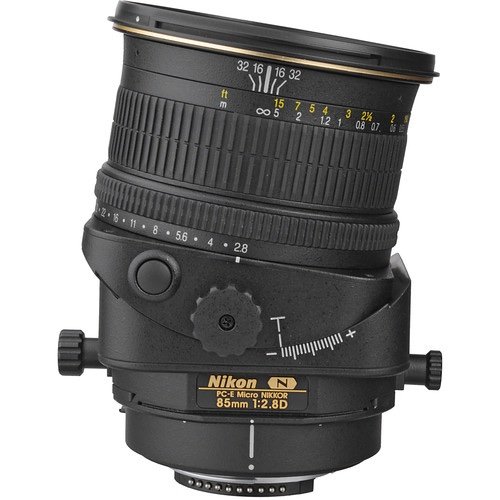
For my ship modeling colleagues who also have access to a DSLR for taking high-quality photos of their models, here's a suggestion:
Consider renting a Tilt-Shift Lens for a week, Nikon or Canon.
Full disclosure: I'm a Nikon shooter.
Rent a "T/S lens" and experiment with it. Most of the available lenses of this type will stop down to f32 (important for broad depth-of-field) and since you're shooting a fixed object (your ship model), you can dial-up long exposures (as long as you've got adequate, controlled lighting, either continuous or strobe). These specialty lenses can give you beautiful photos in a single shot; no fiddly, time-consuming, computer post-production focus-stacking necessary.
In addition to great full ship portraits, the TS lenses will also help you achieve really crisp, interesting macro shots (close-ups), especially on a full-frame sensor DSLR, whether Nikon or Canon.
The lens photo here is one I've used (Nikon PC-E Micro-NIKKOR 85mm f/2.8D Tilt-Shift Lens) - but more full-disclosure: I now shoot many of my ship model pics with an iPhone 14Pro, trading up to a 15.
Here's one lens rental company to check out: www.borrowlenses.com
.
-
Very nice work, Glenn.
I showed your latest posts to a granddaughter who commented that your model is looking like peppermint candy.
Eye candy, for sure! Yummy.
- Dave_E and FrankWouts
-
2
-
1 hour ago, Blue Ensign said:
This is the second hook I am working on, tricky little beggar to get a good fit, and I may well end up with a third.
Good little fettlin’, B.E.
1 hour ago, Blue Ensign said:One potential issue is that the spirketting sits some 3mm above the outer bulwarks towards the fore end, including the top hole for the ring bolts.
I can’t imagine how this has come about, all the other reference points seem to be correct.
I resolved the issue by carefully shaving the bottom edge of the spirketting to bring things into line.
The price us kit hacker/bashers pay...it's part of the pleasure, is it not?🤔
- Ryland Craze, mtaylor, AJohnson and 1 other
-
4
-
She's a thing of beauty, B.E.
"Roll On!"
- mtaylor and Blue Ensign
-
1
-
 1
1
-
7 hours ago, allanyed said:
the larger lower block of the pair, or larger sheave if a fiddle block, as used for the topsail sheet, not a tack.
I stand corrected, the larger portion of the block is, indeed, a sheet block and not for a tack! So perhaps only half my advice may be helpful to Bill (sourcing violin blocks), the other half - not so much.
Thanks for the correction Alan and Henry. I'm obviously still learning the ropes.🤭
I love the photo of the blockmakers workshop sign: there's so much information in that beautifully-carved tableau!
-
Bill,
To my knowledge there are only three (small) sizes of these properly-shaped "violin blocks" (double blocks) available from Syren Ship Models. There may be others available but I have yet to discover other quality sources. Here's a link:
If the scale you need can't be found among these three options, then I believe you'll need to scratch them, which could be a Big Pain with lots of delicate carving involved. In the photo below my arrow points to the Syren Fiddle Blocks I used on a recent model. These accurately fashioned blocks are made from boxwood; I stain them a reddish hue to simulate Chestnut, a typical wood used for rigging blocks for centuries. As you can see, all the other blocks in the photo are the same color (excepting the upper deadeyes).
In this photo, located near the tip of a main course yardarm, the violin block works to lift the yardarm (inner, small part) and the larger part (outer) guides a main topsail's tack control rope.
Hope this helps! (but humbled apologies if you know all this info already).

-
1 hour ago, Chuck said:
So far I like it very much.
Me too. The darker field emphasizes the delicate frieze painting and echoes the black of the unique wales.
- FrankWouts, Ryland Craze, Rustyj and 1 other
-
4
-
On 10/16/2023 at 4:20 AM, Blue Ensign said:
ps; This is the first time I’ve looked the rigging plans, and I have to say Chris has done a fine job, beautifully drawn.👍
In my experience, Chris' provisions for comprehensive rigging plans started with hand drafted ones with Caldercraft kits of decades past and continued on with the Amati/Victory range. Every Vanguard kit I've tackled (three, thus far) have superlative, clearly-delineated, large-scale plans. What a pleasure for those who go the "whole nine yards" (and possibly, then some!).
P.S. I really like the blue/grey hue you created for the Captain's quarters... and, nice move to paint the cabin's beam facia in nicely reflective white too.
- mgatrost, Blue Ensign, rcweir and 3 others
-
6
-
22 hours ago, Blue Ensign said:
At this point I have not looked at the kit rigging plans to see where lines such as the clews, lifts, and bunts are belayed as I am not masting and rigging her.
It is a tricky business trying to interpret what may have been, but for me it just feels wrong in this instance.
I acknowledge the effort and thought you put into the design of these models Chris, I too agonise over details, and we all hope to get things as good as they can be.Always more questions than answers.
B.E.
This is where us model builders need to think like Age of Sail bosuns, a term I think essentially connotes a "ship's onboard engineer." I continue to encounter (and, hopefully, successfully resolve) the problem of where running rigging lines get terminated, particularly working sail lines since I add these to most of my models.
Very few kits provide sail plans; trying to figure out where these additional lines terminated can be a challenge - even after doing research in available references like Lee's, etc. I've typically solved these termination issues with a the addition of a knowledge of physics, plane geometry, and mostly, common sense. I have also sailed a bit and this helps resolve the occasional conundrum.
My approach confirms a truth that in addition to being the captain's of our own modeling decisions; The Devil Remains In the Details.
Good deciphering, B.E. Your Indy is looking good, very good indeed.
May the skylight be moved, the bitts be shifted and The Force Be With You.
- dunnock, mtaylor, Blue Ensign and 3 others
-
6
-
-
On 9/29/2023 at 11:18 AM, Blue Ensign said:
It’s a shame that the pattern was placed on a fold of Plan sheet 2, the line can be discerned, but not so much from directly above.
To my eyes, the crease marks remain quite visible even with all the other elements to look at: tiny touches of flat black acrylic paint applied with a small brush to touch-up the squares will work a treat.
-
Rob,
My procedure is to completely fabricate all the masts, main to topgallants and then start the rigging. Carefully evaluate what rigging hardware needs to be attached to the mast components; for example, all the blocks under the tops, on the crosstrees, the blocks for the stays and preventers to the main & mizzen, etc. Vanguard plans for this phase are excellent and you will have plenty of details to follow. This process can be a complicated one (understatement). I use a red marker to check off each item on the plans once completed.
Nice job on your Hornblower & Pellew. Removing the base on them is a tricky business; a combo of hand cutters and sanding. Proceed very slowly. It's all too easy for either (or both) of them to end up with a prosthetic leg in this process.
To fully rig this model will take you approximately as long as it took for you to build her hull; that's a rule-of-thumb I advise beginning modelers of square rigs.
Great job!
- Keith Black, DocRob and mugje
-
2
-
1
-
17 minutes ago, glbarlow said:
Yay! Enjoy the time off!
Here! Here!
- AJohnson, thibaultron, mtaylor and 2 others
-
5
-
-
-
23 hours ago, Blue Ensign said:
Blimey Ron,
Do you mean the Pony Express no longer runs?
B.E.
Nope, it disappeared in the early 21st century here in the Wild West... We now have Amazon Prime: express, same-day delivery - as long as you order in the AM...
- mtaylor and Blue Ensign
-
 2
2
-
4 hours ago, Blue Ensign said:
These chunky guns do look impressive lined up along the expanse of the Indy gun deck.
I'm also envisioning more than one hundred pressed sailors (not including the "powder monkeys"), scurrying about on that deck to handle the guns! Whilst peering thro' various gunports on close inspection with my high-intensity LED mini flashlight, it will be quite impressive to see all these well-crafted smashers, that I may completely overlook that none have their breeching ropes or tackle...

IJN Asashio and Akashi by Landlubber Mike - Pit Road with Five Star and Flyhawk AM - 1/700 - PLASTIC - DIORAMA
in - Kit build logs for subjects built from 1901 - Present Day
Posted
Whoa. You've become a Master Miniaturist! (but I won't tell your wife).
Impressive work, can't wait to see these models painted. One looks to be a waterline model so I'm assuming I'll see a diorama (or two) in the months to come.
Ron