Check out our new MSW Sponsor Innocraftsman
×

ZyXuz
-
Posts
429 -
Joined
-
Last visited
Content Type
Profiles
Forums
Gallery
Events
Everything posted by ZyXuz
-
 Thanks all for your compliments they really motivate me I'm an earring guy, that's y I can come up with that idea
 -
woah~ impressive first build!! more photos!!
-
sorry to see that.. I once broke my mast too, and I too fixed that using a copper nail to strengthen it.. it looks good after sanding


-
yea, the most exciting part for me about ship modelling is the period between the order is placed until the kit reaches my door.. Well, sorry to hear about that keel crack.. it's kinda torturing to wait for another time Anyway, hope to hear good news from ME and good luck on you build!
-
love the way you handle them, especially on such tiny thing. keep it up!
-
wow! I want your ship in my house!! I really love the 'jed green' color of the gallery, make it looks noble
-
nice start.. hope to see them completed real soon
- 1,279 replies
-
- 1
-

-
- agamemnon
- caldercraft
- (and 1 more)
-
-Cont'- After the poop deck is done, I can finally glue everything on deck in place. Since I took out my bombard shots for photo shooting last time and did not seal them back, they have already rusted. To solve it, I 're-blacken' them using my metal blackener. Surprisingly, it gave a better result! The surface became rougher, instead of shiny looks before! Bombard Shot After Re-blackening To give a darker view, I coated with a layer of tyre shine. Coated with Tyre Shine And when I'm too bored... My 'Bomb-bell-shots Droid'... weirdo name.. LOL 'Bomb-bell-shots Droid' Pin racks are on too. Pin Racks On Leftover shots stacked up. Leftover Shots Stacked Up Well, the manual doesn't design ladders to the poop deck from the quarter, but I think it's better to have. Since I don't have enough pre-cut ladder left, I glued the other side directly on the bulwark. Like this: 2 Ladders Added Now, with all the tritium vials left unused, I really have to come up with more ideas to utilise them! Since I've 2 bigger ones (1.5mm * 12mm), I will use one of them as poop deck lamp. Using back the same technique as I did last time on smaller lamps, I've came up with this. Poop Lamp Design And sprayed it to gold colour. Completed Lamp In position. Here's a good comparison on the brightness of a normal LED light and tritium vial. In light presence condition, you just can't see the tritium light. It's just a luminant body after all. Lamp In Position Stern View Anyway, it looks good at night! And for 25 years!! -End of Day 30-
-
Day 29 to 30 Finally my long waited LEDs have arrived, here it is!!! LED Earrings They are actually LED earrings, and I just love the colour of the light!! I chose to use earrings as my cabin's lighting because they are small, easy to switch on/off, and most importantly I can save a lot of my time on wiring! I think it's really practical on smaller ship or cabin like my Race Horse, and cost effective. They cost me only USD$3.30! Before I even purchase the LED earrings, I've already thought of using barrels to 'hide' the battery. I've also added barrel holder, as shown: Barrel Holder I was sitting on my working place, and staring at my ship, thinking a way to switch on the light from the deck.. and I've finally came up with this.. 'Holder Pin' to Help Switching on from Deck I added a 'holder pin' that will pin through a barrel on the poop deck, so that it can be switched on by just moving the barrel. Like this: Pin Through Poop Deck The barrel holder is not glued to the deck, so that it can move freely to switch on the LED. And a hole is drilled on a barrel to hold the pin. Hole to Hold Pin Push the pin in, and they are a switch. This whole thing can be taken out anytime, so that one day when the battery dries off they are still changeable. Only if the LED gone, then it is gone. Camouflage Switch Meanwhile, the LED is set through the sash of the door in the cabin, and glued to hold its position tight. Big Diamond in the Cabin A secure pin is also added to 'lock' the LED still. Earring Pin Through the Sash of the Door So, it's how it looks like now OK, I know the capstan and the barrels are too close together But there's no way I can put my switch elsewhere. Poop Deck Full Fittings Here's the result when the light is on. Yea, the switch is so sensitive until it seems like the barrels are not even moved! Light On -Cont'-
-
Hi Jasseji, I bought them from ebay, seller is from Singapore. Delivery is in flat rate. Here's the link: http://www.ebay.com.my/itm/Betalight-Isotope-of-various-sizes-/251286882333?pt=LH_DefaultDomain_0&hash=item3a81dd881d&_uhb=1#ht_743wt_1135 Contact the seller for the size and colour you want There are also the other sources from other forum. You can give a shot. http://www.cpfmarketplace.com/mp/showthread.php?170374-For-Sale-Tritium-Vials Anyway, I still chose the one from ebay since he's easier to reach. I did contact those sellers from the forum, but they all turned out to be one way emails. However, the brightness of the tritium vial is real weak compare to the LED one. I'm posting my latest update soon, you can see the comparison from my pic. Hope they help!
-
yup.. anyway, after pulling it overnight it looks better now, although not 100% straight will upload my photos soon Thanks Hypos! Actually those are not LEDs, they are tritium vials.. I've removed them in my cabin, because they are too dim in real look.. Anyway my LEDs have arrived, they are obvious even in day time!! will make up my next post real soon! Oh ya, taking a shot of my Race Horse with Fort Cornwallis is such a great idea!! will really consider it!! haha
-
yea.. it's already glued, and I've just tried moving it but seems like it's holding its position real tight.. i'm afraid it might 'wreck' my deck planking up if more force applied! Anyway, I've tied the bowsprit to my chair foot toward the starboard.. I'll leave it overnight, and hope for magic happens Thanks anyway!
-
Almost two weeks after ordering my LEDs, they haven't arrived... I really have to start working other part without my poop deck on.. Anyway, I've done all the fitting around the hull, including bowsprit! Here they are Port view of my Race Horse currently.. Closer view on the deadeyes and companion ways.. The companion way as instructed in the kit manual is actually 4 at one side, but since I've a tight distance between wales, so I'll need to reduce them to 3.. This also cause the deadeye strops angled almost 90 degree to the hull =.=" you can see the difference between the main channel and mizzen channel.. View from stern My nightmare just doesn't stop.. The bowsprit is not as straight as it should be I was planning to rework on the rigging, but then I think that maybe it can be adjusted by the flying jib stay? Any comment? View from Bow
-
I really like the way you handle the gallery!! bravo!
-
WASA by Dennis Jones - Corel
ZyXuz replied to dennis jones's topic in - Kit build logs for subjects built from 1751 - 1800
I think this is the best WASA build log I've ever seen!! Nice Work! you're truly an artist!! -
wow! what a nice work for first build!! Happy Birthday to you!!
-
very well done planking and gunports.. The Pegasus needs a company, make it quick!
-
I read your build log from the first page, and I must say she is just neat and nice!! especially the cannons and barrels details... BRAVO!! Can't wait to see you to finish this ship!! Cheers!
-
Thanks ALL for you compliment!! the ideas are all come from MSW build logs, and galleries.. i'm just referring cheers!!
-
Thanks!! you really motivated me Indeed.. I still have cannons to add.. They are on their way from the UK
-
what a superb planking job!!! I wish I could do the same!! well done!
- 1,279 replies
-
- 1
-
-
- agamemnon
- caldercraft
- (and 1 more)
-
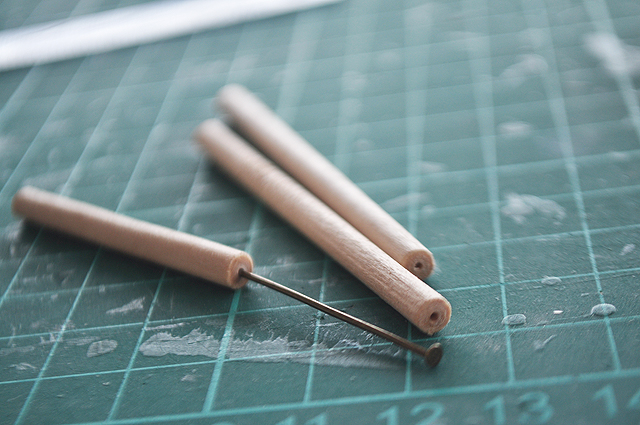
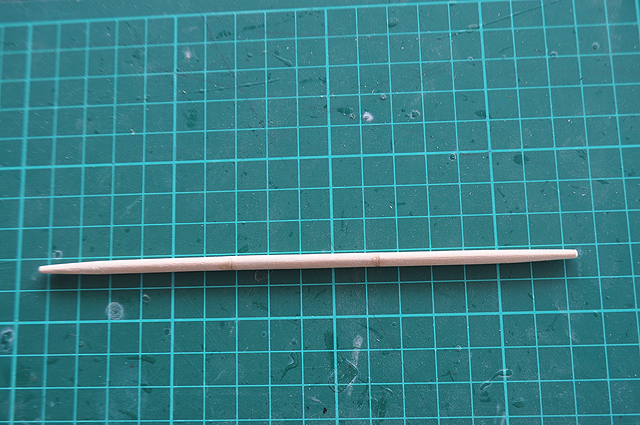
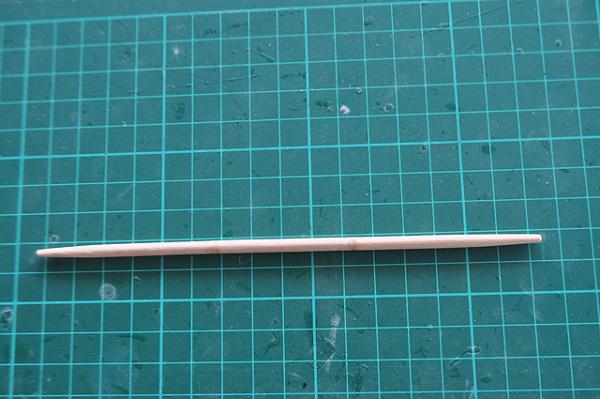
Day 23 I was tidying up all my ship stuffs after working it one night, and when I digged out all stuffs at the bottom of the box of my kit, and OMG!!! I found one thing that I've totally forgotten.. The Bell!! Bell & Belfry So, quickly I searched through the net for examples of belfry as references.. and this is what I've made!! Belfry The columns are those leftovers from my beloved Pearl. Two 1mm thick of maple strips (leftover from 1st layer hull planking) are stacked up, and then another strip as bridge to hold them together. And, the shaft is made from fuse wire.. thin enough to cross through the crown of the bell. Well, the flat head really doesn't look good.. So, I added a 'hat' for it! It is made of 3 * 1mm thick maple strips, and beveled at both ends. And, the shaft is painted to black. Belfry After Staining Now, where should I place it??? Hmm... normally it should be at the main deck, but my main deck is currently tightly occupied.. but putting it on poop or front deck looks weird.. Anyway, here's a shot of how it's look like on deck! Belfry on Deck Err... any comment on the position?? it really looks tight there! Light & Lantern As previously mentioned, I am still waiting for my LEDs to arrive.. however, I actually already bought 'lamps' to light up my cabin but it's just not bright enough.. That's why I'll need to buy LEDs to replace it.. and IT's tritium! The main reason I wanted to use tritium to light up my ship is because of its durability, in which it is able to light up for 25 years!!! You just have no idea whether you'll be able to see it goes off alive!! In case you never heard of tritium: it is quite frequently used in military purposes, for example night vision on weapons; while for household application, watches. Tritium Vials Tritium is costly. I bought 10 of them, and it cost me nearly USD$100!!! I tested it at night with all the lights in my room turned off and taken this shot.. Light From the Cabin 3 vials are placed RIGHT surrounding each window, in this case 6 vials are already used for the side windows, and there won't be enough for the stern ones (3 windows). This shot is taken in long exposure of 30s, and I swiped my phone flash over the ship during the exposure. If I don't do that, you'll be just seeing the light.. OK, the result here looks kinda satisfying but it's really different in real life. The light is already not noticeable from ~3m distance, without any presence of other light source in the same room!! Moreover, 3 vials for each window is just so not worth doing, that's why I changed my mind to replace them with LEDs. So, instead of wasting them, I planned to make them lanterns on deck! Column's Head and Base Cut Off Again, by using the column from my Pearl, I cut off the head and base of the column as the head and base of my lantern. I then drilled a 1.5mm diameter (diameter of the tritium vial) hole on both the head and foot, and pinned 4 more holes at the 4 corners of the foot. These 4 small holes will be where the columns of lantern set, like this: Lantern of Tritium Vial The eye on top is made by the thinnest fuse wire. The first one really took me some times until I came up with this idea, and my patience just allowed me to make another 2 on the same day. The Three Brothers How it's look at night. Lanterns At Night Brightness Comparison Here you can see the brightness comparison of tritium with my laptop's notification lights.. -End of Day 23-
-
Thanks Tim! yea... currently my workload is low.. will make some post in office XD
-
Day 15 to 22 It has been awhile since the last post.. I've been working on all the deck fittings till late night, that's why I didn't have much time to add post here.. Anyway, I haven't glue my poop deck on because I'll need to wait for my LED to arrive before I can start.. Windows Since I've interior for my captain's cabin, so I'll need to cut out holes so that it can be viewed from outside. Side Windows Seeing Through The same steps are carried on on the stern windows. Gratings I purchased extra gratings to fill up the empty space on my main deck between the 2 bombards, and it is set as the same size as the bombard base. Frame is also added with leftover walnut planks. the 'drain racks' at both side will hold the bombard shots!! I've also made another 4 racks to put them besides the 2 bombards! Rudder Rudder with rudder hinges fitted. I did not hammer the nails, instead I used a long nose plier to push them in. Rudder with Hinges Bits & Pin Racks This is the worst part of the week! In the beginning, I thought all the bits will be provided by the kit, carved and done!! Not until I read the instruction of making all these bits... So, what the kit actually provides is just a long 500 *4 *4mm walnut strip... Belaying Pin Racks Parapet Bits Making these really testing my patience... and wearing my blade.. All of 4*4mm Walnut Done! and it's time to change a new blade!! XD Metal Blackening & Bombards This is my first time doing metal blackening, and it was fun!! I used Blacken-it as my solution, and it worked quite well!! I made a mixture of 50:50 solution and water.. hot and boiling water!! Hot water really help quickening the process, you can get an obvious result within a minute!! Before In Progress After!! Yea.. the 2nd picture you're seeing right now is the result after 30 seconds!! Anyway, I still let them there for around an hour or a half. I actually did it twice, because the first attempt did not give a very satisfying result (rusty feel). So, on my second attempt, I made mixture of 40 water, 60 solution, and the 3rd pic is the result I get. Bombard Completed Hatch The hatches at the poop deck.. I added nails as door knobs. Hatches With all these deck fittings done, I can finally put them on my ship.. It's how it looks now!! Deck Fittings Done Bombards with Shots Again, the poop deck is not glued yet, I just put them on for few shots.. still waiting my LEDs to arrive. -End-