
Check out our new MSW Sponsor Innocraftsman
×

ZyXuz
-
Posts
429 -
Joined
-
Last visited
Content Type
Profiles
Forums
Gallery
Events
Everything posted by ZyXuz
-
 Thanks mtaylor for your kind words. yea, silica gel doesn't help at all. I do have a big silica gel bag around the size of my palm (which my friend 'stole' from company production floor )storing with my camera in my camera bag, but still ended up like this.. will need send my camera to service after my race horse is done
 -
wow.. wonderful detail coloring you have there! cheers! good luck on your wales and hope to see them soon!
-
Thanks for your kind words!
-
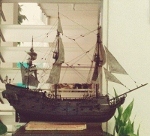
I think I've missed out posting my updates on my masts and yards last time when I was waiting for my LEDs.. Anyway, here's they are! OK, time for all the riggings!! ^^ So far, I've done the shrouds and stays but not the back stays yet. I didn't take many photos during the progress, so I'll be showing only the results. I worked on them every night after dinner, and each pair of shroud took me around an hour to finish. Total of 10 pairs. Channel Deadeyes Riggings Inboard View Then, I continued on the stays. Main Stay Board View I was planning to make a bull's eye block myself for the mizzen stay because the kit isn't providing any. But since I've 2 deadeyes left, I will use them instead. I wonder in a real ship a deadeye is used for mizzen stay? Because what I've seen from most of the pictures, a bull's eye is always used. Anyway, since it gives better detail then it's OK for me. Took Me Sometimes Tying the deadeye on the main mast with all the deck fittings on really took me sometimes. Anyway, here's the result! Mizzen Stay Done and it's how she looks now! Some editing are done here on my photos, caused my dslr has been 'invaded' by fungus High humidity level here in Malaysia helps them grow faster If I don't edit them, you will see a big black 'spider web' at the empty space.. I cleared them off, except those parts closer to my ship. Starboard View I love the shroud riggings on the starboard side over the port. If you see the port side, main shroud riggings closely.. they are not straight enough, going high to low.. something like SO-FA-MI-RE-DO... Port View I accidentally knocked my flagpole off when I was doing the stays =.=" Anyway, just need a little work to glue them back. Finally, just this morning I've made more lanterns for my ship. I put one in between the hatches.. Lantern In Between Hatches and 2 will be set on the crow nests. Lanterns for Crow Nests Seriously, the smaller lantern looks a bit weird to me in this picture.. lol! I think I'll change it upside down like the bigger one, just to make them look standardized. -End-
-
everything is done well! can't wait to see more from u!
-
Excellent work, Sam. I love the way you handle all the fittings, especially the head rails. Thanks for the detail pictures!
-
very well done on your first planking! hope to see more updates coming
-
excellent work!! but seriously.. more pics!!! MSW has plenty of space for u
-
I really need to ask MSW to add a love button for your posts! I always thought making a boat will be easier until I read your build log really like the way you finish the hull, and thanks for sharing out! cheers!
- 515 replies
-
- 1
-

-
- artesania latina
- whaleboat
- (and 1 more)
-
nice detail works on the bowsprit keep it up
-
good to hear your parts got replaced and u started your syren well!
-
wow! she looks great! I really love your hull details.. too sad you lost your previous build log.. if not, they'll be certainly my great reference!
-
nice start! I love your planking job!
-
Thanks for stopping by my build log and my blog. I've just tried to change the setting of the page limit showing on the main page, but it doesn't seem responding... Anyway, there's a 'Blog Archive' oh the right to browse through all the history. You can see my older posts from there Thanks for reminding! As for the cannon shots.. they are bought from caldercraft oh ya, I've just notice that it;s your face on buddha body!! haha
-
Impressive!!! I love every detail on the yards!! you handled them well!!
-
neat riggings work u have there!
-
wow~ impressive build! and thanks for sharing all your detail progress here.. i've learned a lot
-
real good kit for the first build you're starting well! keep it up
-
what a superb planking job! well done!
-
just caught up you build log.. and I must say she looks brilliant! keep it up
-
good to see them restored!!
-
neat n nice well done!
-
wow! another masterpiece.. I agree with Brian C, the hull looks nice with those treenails details