Rik Thistle
-
Posts
792 -
Joined
-
Last visited
Content Type
Profiles
Forums
Gallery
Events
Everything posted by Rik Thistle
-
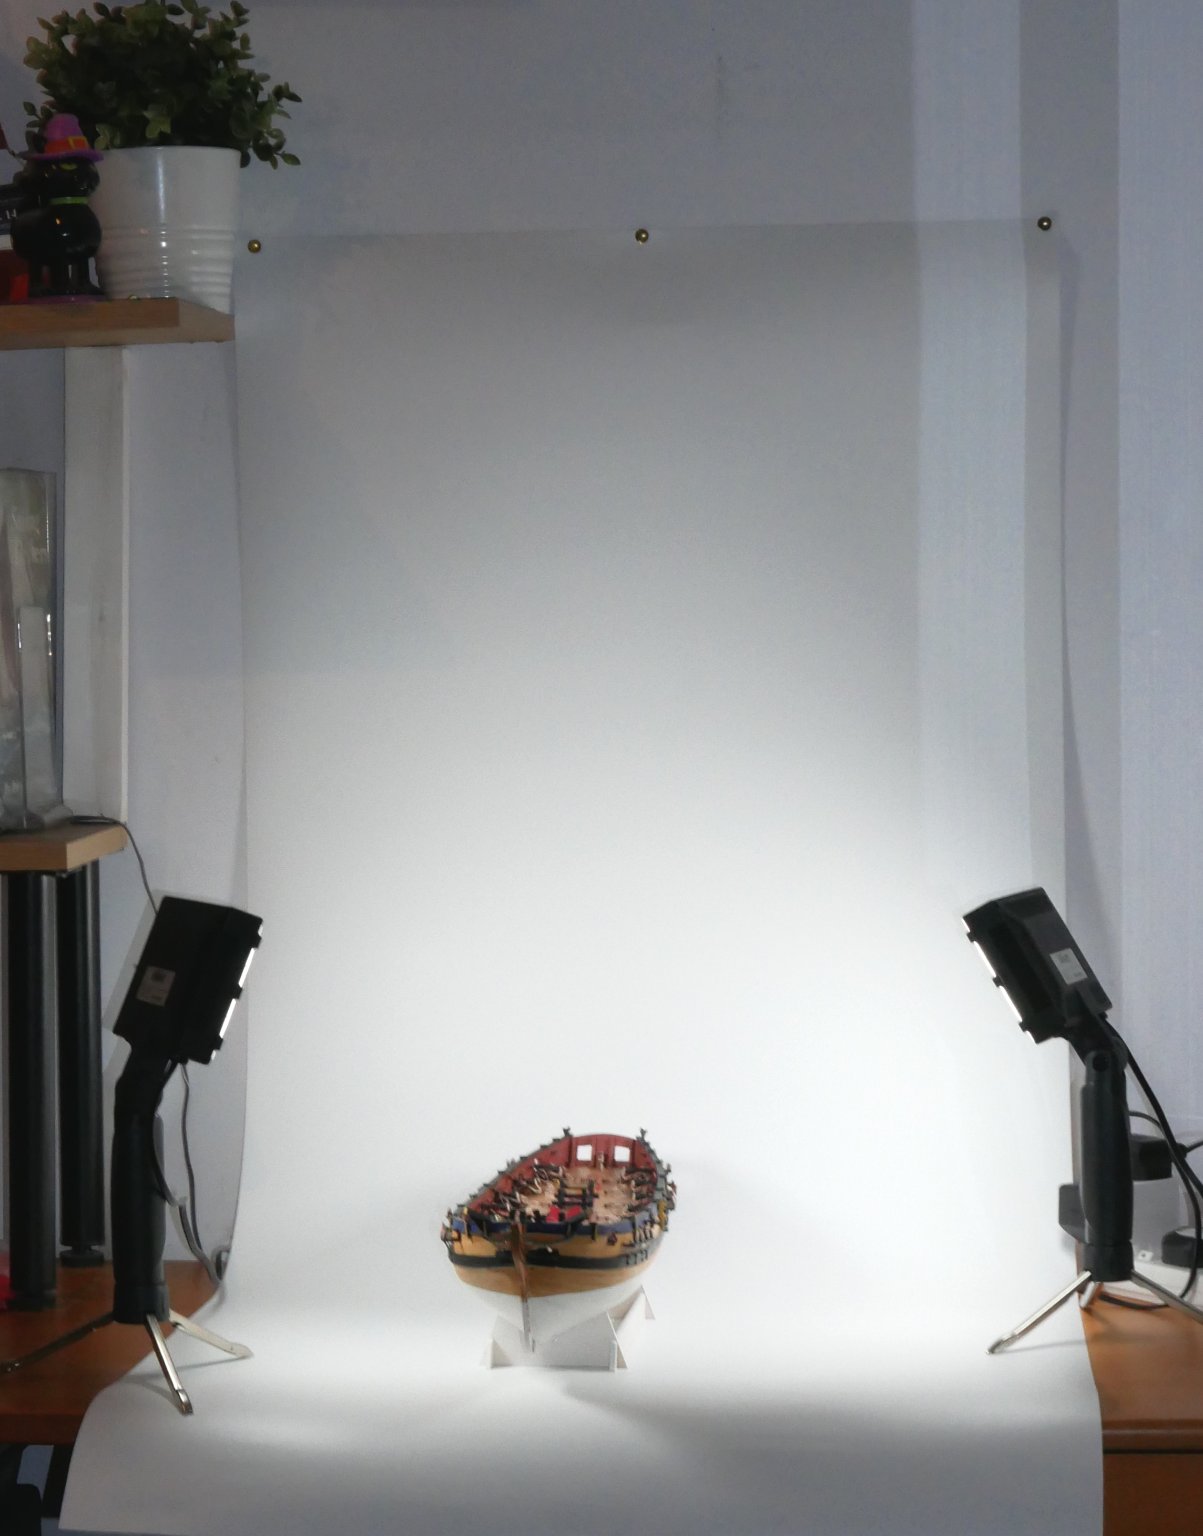
That looks very convincing. Yes, PS is a great tool - I'm very rusty on it and am currently using paint.net for my needs. A quick snap of my 'new' set- up ... Total outlay appx £46. Lights £30 + backdrop £16. I'll need restraints on the tripod feet or they'll be meeting the floor soon. There's some stray light off mirrors but that can be sorted. It's a bit blurry but gives an impression of the light brightness available from the (non-adjustable) 2x LED lamps. They'll never get close to sync'd flash but for current needs good enough. I didn't bother adjusting the camera's settings so will be able to post brighter images in future. Richard

-
Yes, I did try searching for a large enough grey (18% ?) background but couldn't find anything reasonable. And I didn't what to spend too much time in s/w removing the grey. I tend to restrict my camera metering zone to a small box (not spot or wide) so that kinda removes the influence of the white background. But for my basic needs, at the moment, I'll go with what I've got for now. Richard Edit: Just found large grey backdrops on Amazon....I'm sure they weren't there a few weeks ago 😉
-
I do have a light box but it's not quite large enough to accommodate a model ship and it's tall masts. I'm currently rearranging my study to place my white backdrop against the wall and bench top, with my LED lights, one either side of the ship. iPhones are really very good at taking pics. I believe one can use focus stacking to simulate a deeper depth of field - not sure if the iPhone has that s/w built in. I use Android. But for 95% of picture taking mobile phones are now good enough for generally most things. And, as you say, are very convenient and good for tight spots. James H (IIRC) was kind enough to explain in one of his builds how he did his photography for Vanguard Models Instruction books. It was essentailly a white back drop and a couple of lights...at least that how I remember it as being. I'll need to check. Richard
-
 Ras, A little bit of filler, good sanding down and a coat of paint and she'll look like a million dollars. She's progressing very nicely. Richard
 -
Gary, The Luxli Fiddle (at around $200, less diffuser) is 'almost' justifiable for me... maybe one day. Ken Rockwell has favourably reviewed Luxli's products. After I went into semi-retirement I worked part time as a videographer (in the days of DV tape) and we used, IIRC, halogen lights on the cameras. The halogens threw the light further than LED lights which was an advantage when quite a few feet away from the subject(s) in a dark'ish room. But for product photography, LEDs are now likely the better choice due to a more dispersed coverage, longer battery life, and they run cooler, I guess? Richard
-
Simple guide to product photos
Rik Thistle replied to Rik Thistle's topic in Photographing your work. How to do this.
Allan, Yes, he has quite a lot of relevant, useful info on his YT channel. By 'north light' do you mean a bluer light as opposed to a warmer light? Richard -
Hi all, Here's a 9 min video intro to making product pics using everyday items. .... DIY Product Photos - Easy, Cheap and Good-looking He's got a simple, clear way of explaining things. The light he's using seems quite bright and fairly close to natural daylight. But a camera's Auto White Balance should make a reasonable attempt at trying to emulate daylight if a different temperature of light source is used. I don't recall him mentioning camera settings etc I've just noticed he has some other videos that might be usefull eg.... - The "Make Almost Any Product Look Good" Lighting Setup https://www.youtube.com/watch?v=7XuXILkrn5A - "Make Almost Any Product Look Good" - Part 2 https://www.youtube.com/watch?v=SjZl09ntVxI Regards, Richard -
-
start considering rigging prep now Good idea. Rather than tackling all the rigging in one large push, it might be useful to nibble away at it whilst doing other bits, gradually building up the nibble sizes as I go. Richard
-
Matt, Yes, both apply. Pays your money takes your choice ;-). Bright lighting at around 5600K (appx daylight) is ideal. I've been reading Ken Rockwell's website for quite a few years and he has a great take on photography, sometimes tongue in cheek. Richard
-
Tom, Thanks for the nice words. I'm quite happy with the way the cannons eventually turned out, although if I had to do them again (and with the knowledge I've gained) I think I could make them look a little neater. But 20:20 hindsight is a great thing 😉 Tom, YOU may be looking forward to the mast rigging etc but I know someone who isn't! Another steep learning curve ahead for me. I'm sure I can find numerous other things to do on Flirt to delay the start of the rigging....I'm an expert at delaying. Cycling is a wonderful activity. Fortunately I live in a small town surrounded by lovely countryside and great cycle runs. I used to do a lot of mountain biking but my left knee can no longer handle that. One day I'll be getting an eBike but hopefully that's a good few years off. All the best, Richard
-
Hi all, I recently bought some new photography equipment to try to improve my build pictures.... - LED light ... https://www.amazon.co.uk/gp/product/B07V7JRTM6/ref=ppx_yo_dt_b_asin_title_o05_s00?ie=UTF8&psc=1 - White backdrop ... https://www.amazon.co.uk/gp/product/B01CZM177K/ref=ppx_yo_dt_b_asin_title_o05_s01?ie=UTF8&psc=1 The backdrop is fine. It has a smooth surface on one side and a matt surface on the other. It arrives rolled and tries desperately to retain the 'roll' when being laid flat. Time should cure that. The LED lights although cheap work fine. However I feel they are not that bright but possibly just about good enough for model photography. Brighter = larger camera aperture = narrower depth of field (eg only the ship's wheel is in focus). I'll update how I get on with these. Richard
-
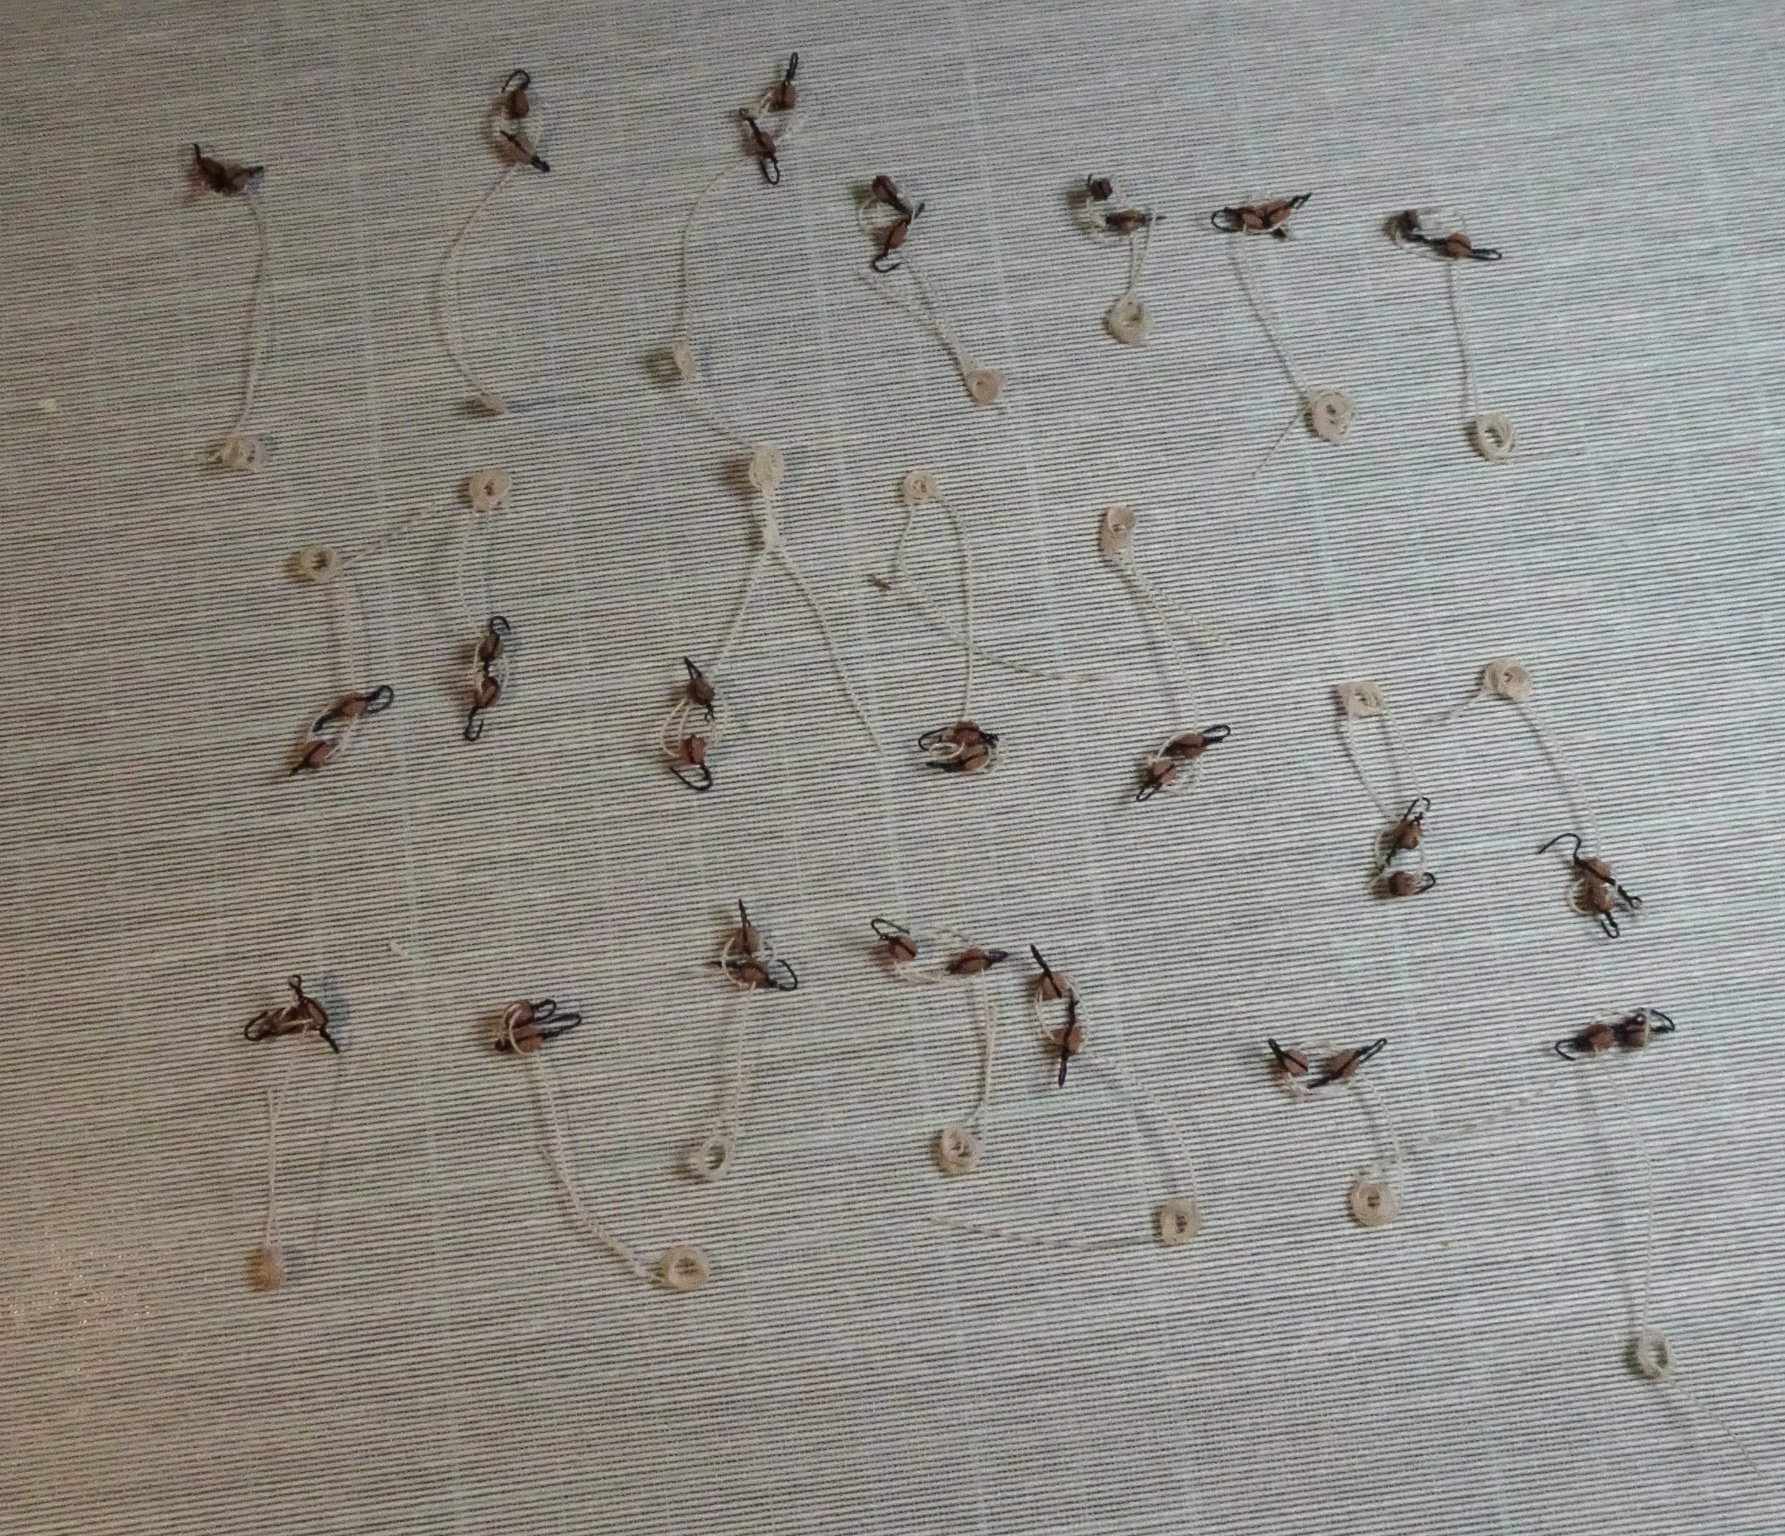
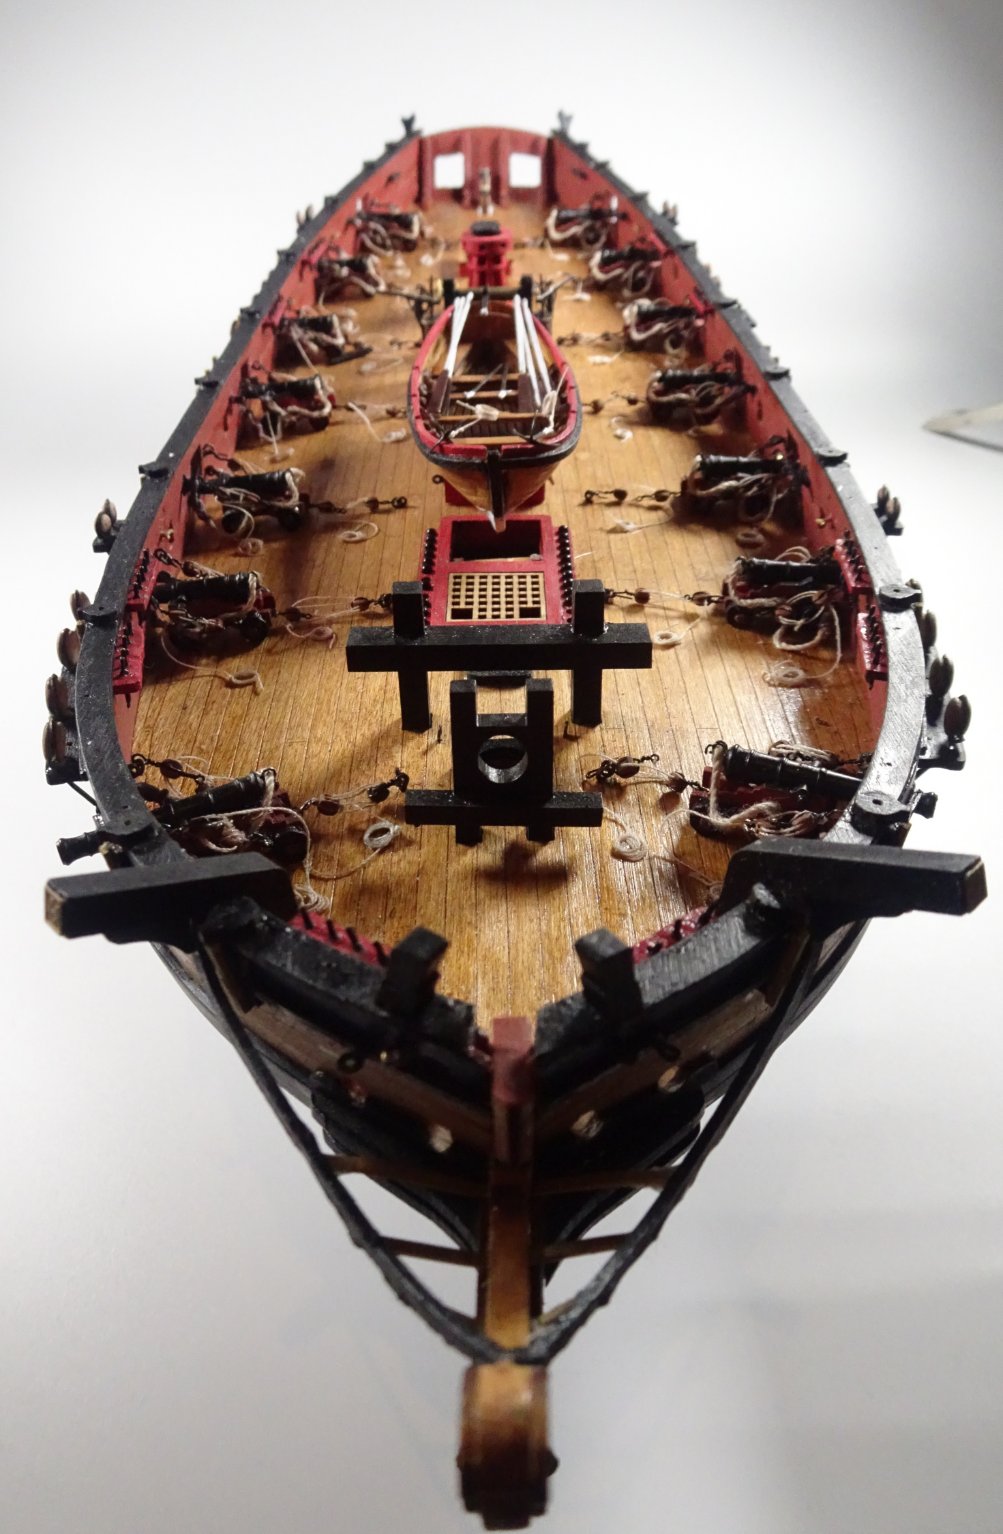
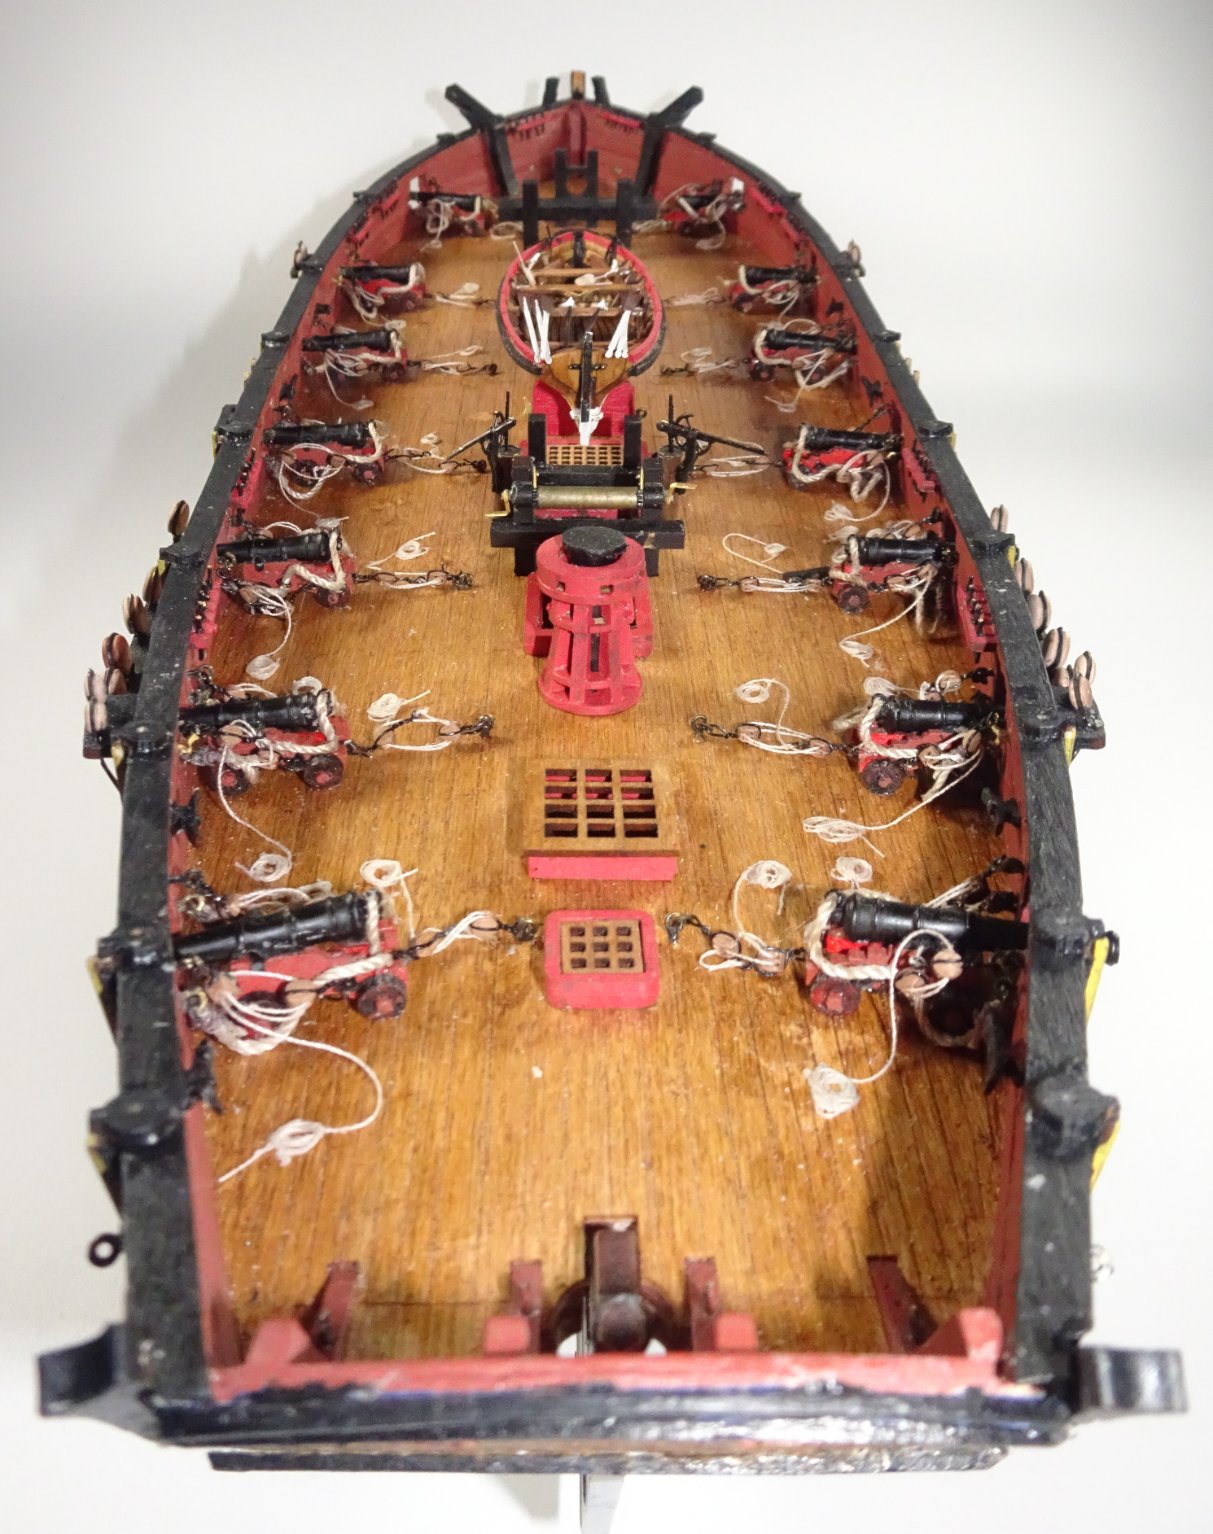
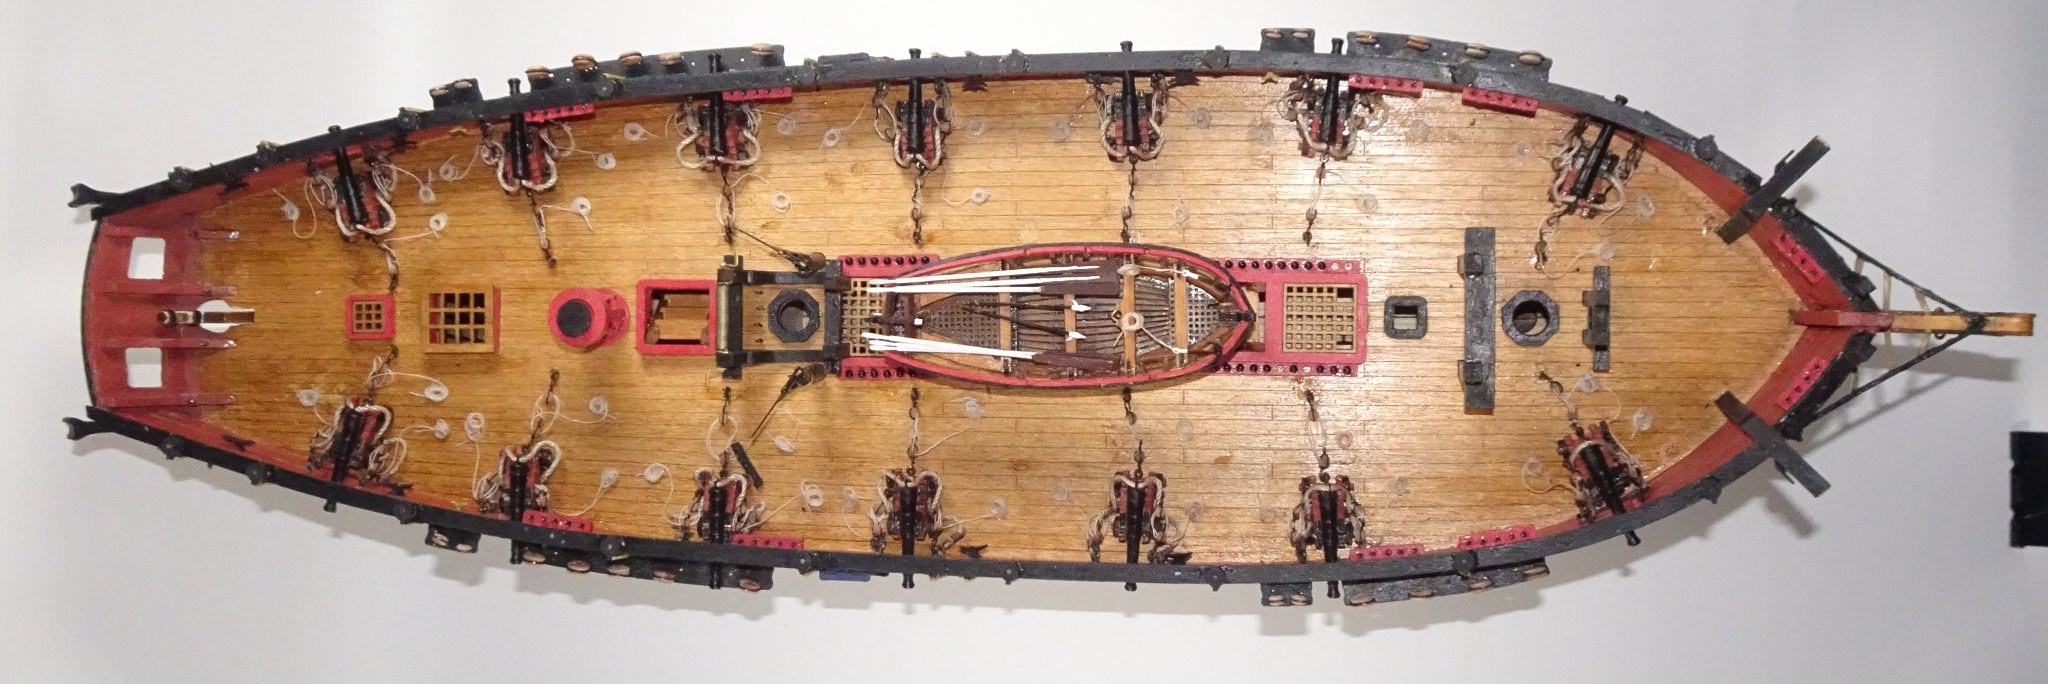
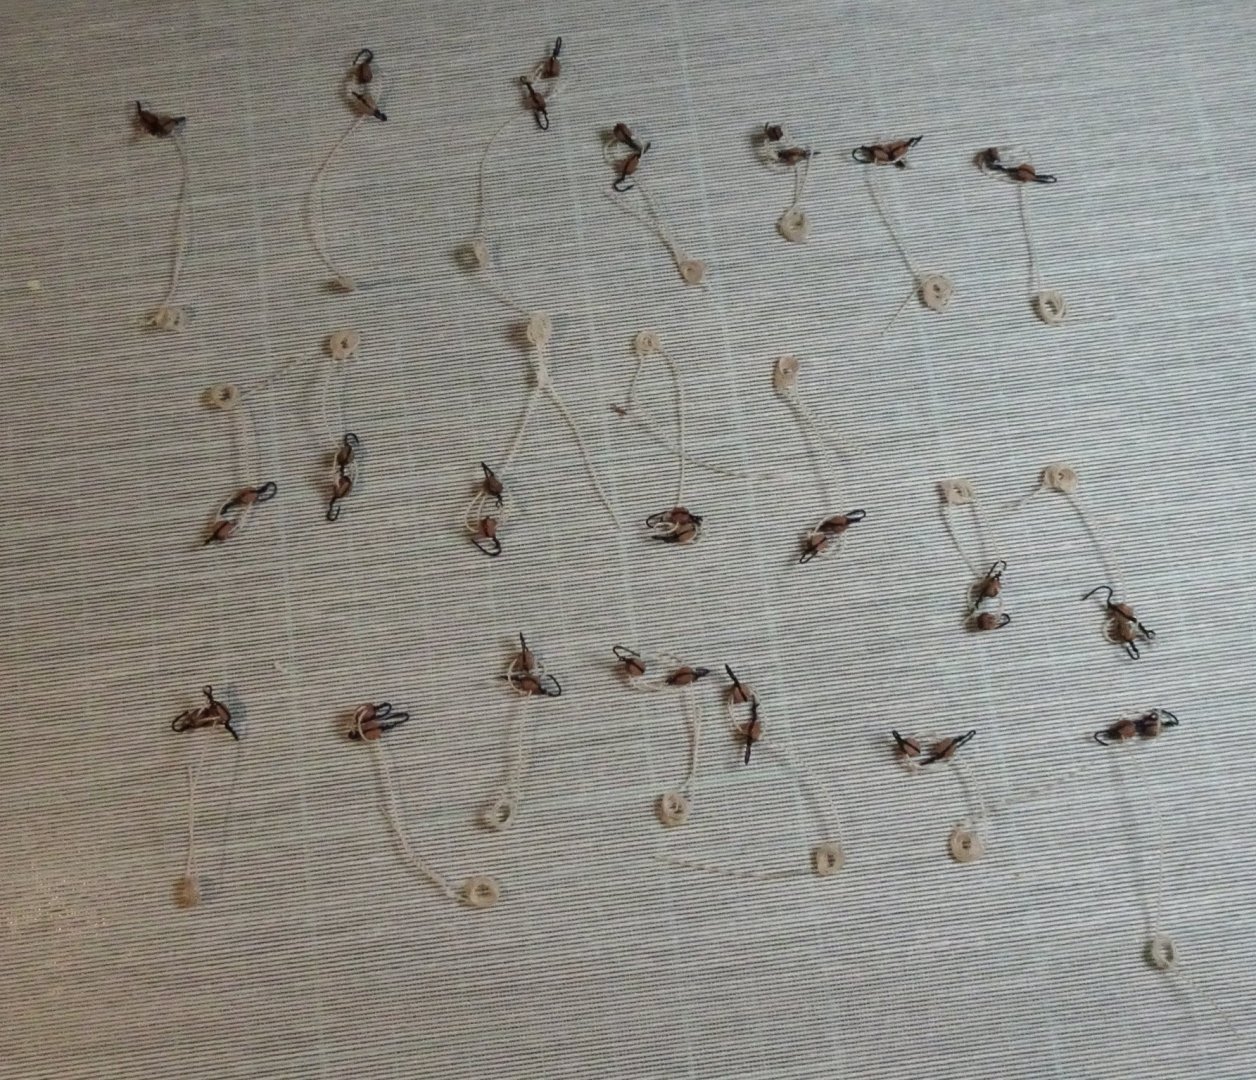
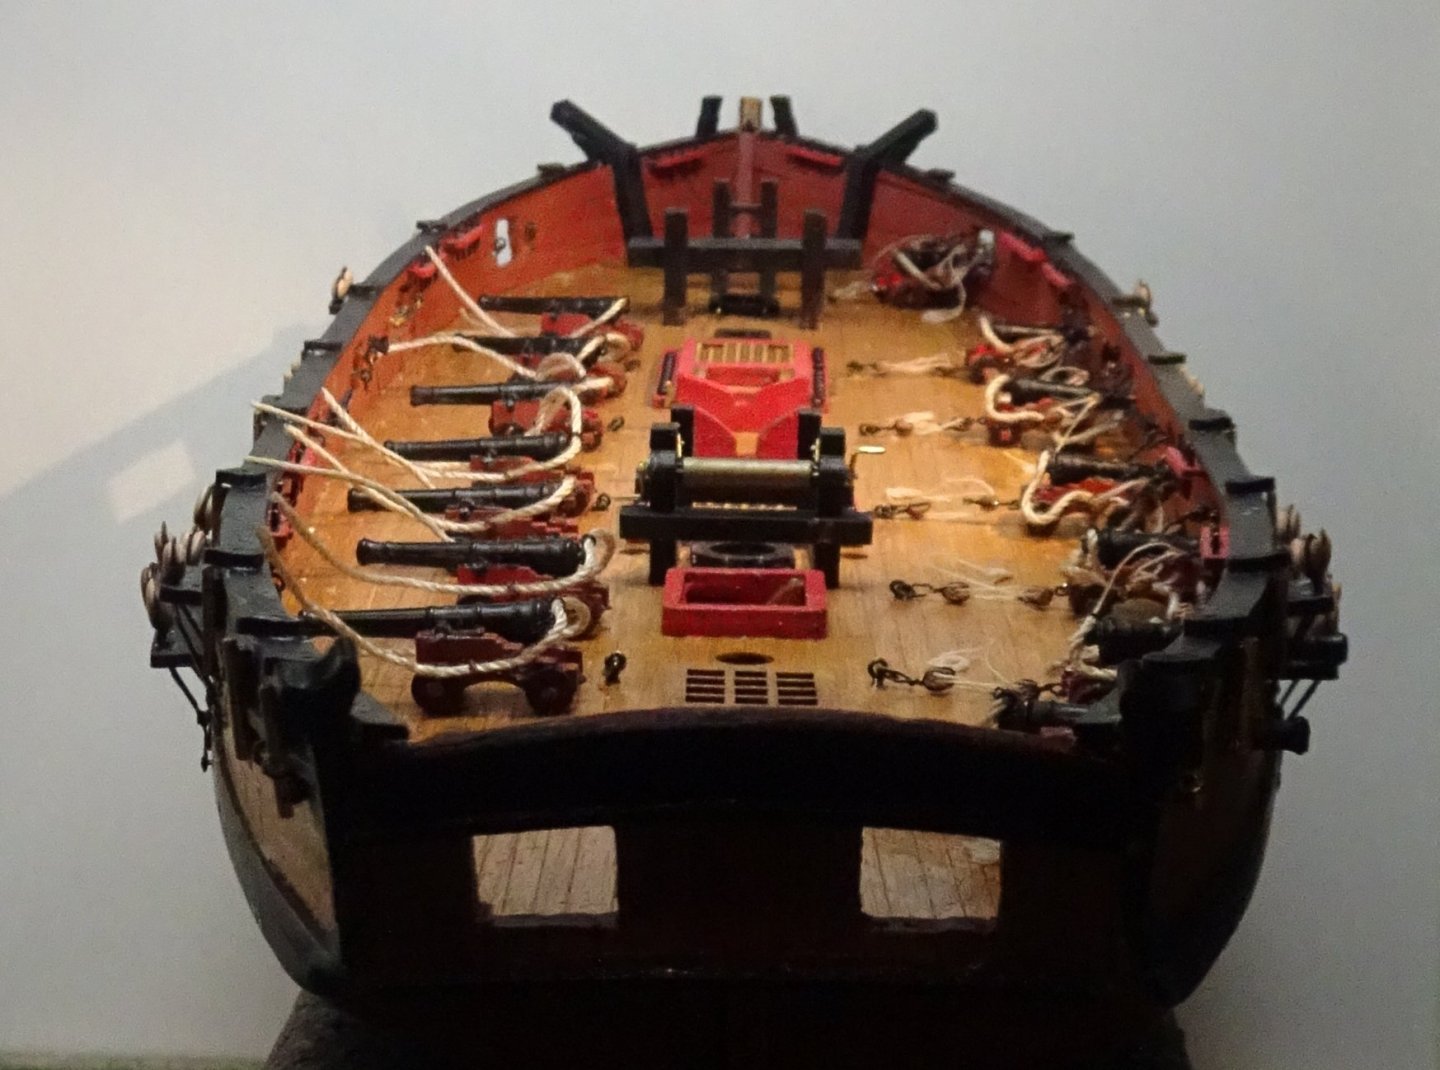
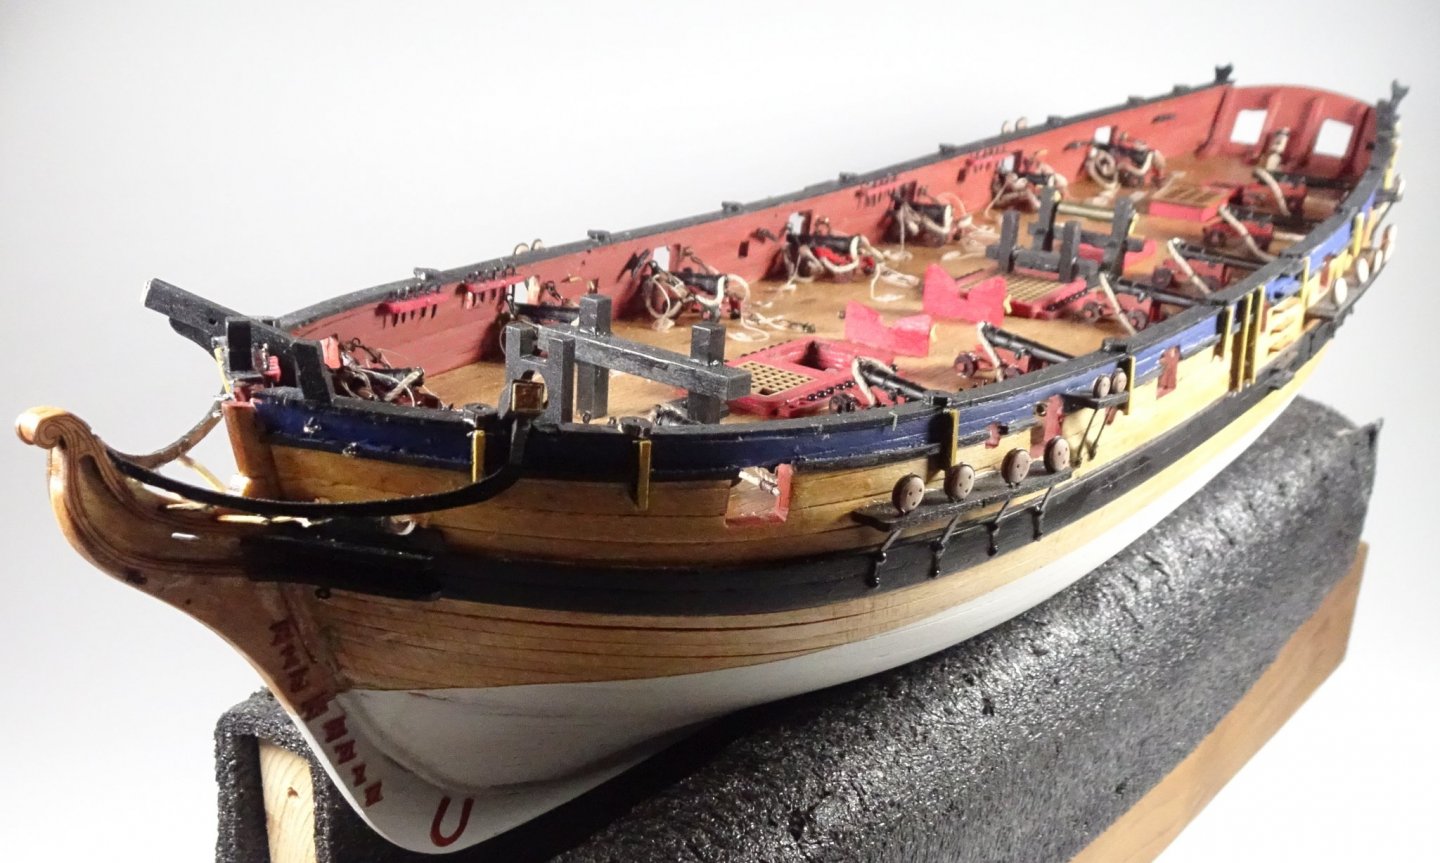
Hi all, After a break of quite a few weeks I have now completed the rope work on the 14x cannons. What I've learned is that - a) no eyelets should be glued in to the hull before work starts on the cannons b) paint cannon parts c) the woodwork + metalwork on the cannons should be completely assembled before any ropework is started d) add all rope work to the cannons whilst they are free to pick up ie not attached in any way to the deck or bulwarks e) add all eyelets and rings to the cannon rope work f) glue into the deck and bulwark holes the five eyelets associated with each cannon rope. g) glue the cannons to the deck I had initially made the mistake of firstly gluing the eyelets into the deck and bulwarks, and aslo glued the unroped cannons on to the deck. That all made it very difficult and fiddly for attaching the rope work to the cannons and eyelets. Others may have different methods for doing all this. As usual, any advice/thoughts are very welcome. Below - Firstly I made up all the 2mm blocks and ropes (x21 off for the 7 unfinished cannons). And then coiled the ropes over a 1/8" screwdriver blade, added a touch of PVA to the coil and then carefully slid the coil off the screwdriver and squeezed the coil flat. I then added the breech ropes to the cannons. I added a ring to the cannon rear for that rope to pass through. Below - a collection of pics of the 14x finished cannons. Aerial view of the deck with completed cannons and launch. Summary - I think I hit a bit of a brick wall with the cannons since I didn't have previous experience of cannon rigging, the thought of doing it 14x times over was a bit daunting and Spring arrived 🙂 Yup, Spring, gardening, cycling, visiting friends (now that Lockdown has been lifted, for the moment), some good health news and goodness knows what else are incoming distractions to model building. I've a hunch my build may slow down for a while but will strive to keep at least some momentum up. I think the masts are next on the agenda and I do like turning (...I've got the mini Proxxon wood lathe) so that might egg me on. Take care, Richard


-
Great kit and parts source
Rik Thistle replied to JohnU's topic in REVIEWS: Model Shipwrighting Tools, Parts and fittings
When I was a youngster I vaguely remember a model/toy shop down Edinburgh's Leith Walk. There was (still is?) one up Lothian Road. Then in later years there was Marionville Models (MM) - a large shop in a perfect location at Edinburgh's Maybury roundabout. You could spend hours in MM roaming amongst the Airfix kits, Balsa a/c kits, wooden ship kits, RC cars, ships, planes and helicopters...it was wonderful. And plenty of spare parts and raw materials. The owner would offer you a cup of coffee and the staff loved a good chat. Then drones arrives...and from my POV the drones + accessories rapidly become the main source of income. MM is no longer at Maybury but has moved slightly further West to smaller premises, is mainly online and carries a different product line. I think most shops/stores of this nature need to do the bulk of their business online to survive...walk in traffic is a thing of the past as everything is more and more delivered to your front door. But there are still clubs, forums and exhibitions to help bind us hobbyists together...possibly more than there ever was in the past. So the hobbyist family may have lost shops/stores as a meeting place but gained other new means of socialising. Richard -
Erik, Congratulations on a top class finish. She really looks the part and the colour scheme is very fitting. The minimalist setting in the last pic draws the eye in to her, and (in my mind) creates a diorama of her sailing out into a wide open sea....quite absorbing and relaxing. Richard
- 222 replies
-
- 2
-

-
- First Build
- Lady Isabella
- (and 2 more)
-
Proud owner of a Dremmel drill stand
Rik Thistle replied to DaveBaxt's topic in Modeling tools and Workshop Equipment
Dave, If you are looking for a cheap, functional bench drill press then a £102 Machine-Mart (MM) one would do eg .... https://www.machinemart.co.uk/p/clarke-cdp102b-bench-drill-press-230v/ With a bit of Googling you might find it elsewhere for £80 or so, but with MM you can actually have a look at the drill in their local store and drive it back if not happy. Always bolt the drill to your bench. The drill looks very similar to the one I've had in my garden shed for 20 odd years. Belt driven, chuck takes 1.5mm - 13mm drills. You might want a basic, £10 vice also... https://www.machinemart.co.uk/p/clarke-3-inch-vice-cdv30c/ This drill is based on a Chinese design that is re-badged the world over. MM also do a very similarl looking £84 bench drill ... https://www.machinemart.co.uk/p/clarke-cdp5eb-5-speed-bench-mounted-pillar-dri/ .... but the On/Off switch is to the rear of the left side of the drill body...idealy it should be up front and centre. Richard -
She's looking very neat indeed Erik...quite classy in fact. I feel that these small working vessels are bursting with personality and your's is no exception. And your ropes look good also. At the moment I'm winding my rope coils on a 1/8" screwdriver shaft, squidging in some PVA to bind the coils and then gingerly coaxing the coils of the end of the blade, and then a squeeze between fingertips to make the coils lie flat'ish. But always looking for new methods 🙂 Richard
- 222 replies
-
- 1
-
-
- First Build
- Lady Isabella
- (and 2 more)
-
Theodosius, Very practical and clever solution to the problem. I see you tried putting packing under some earlier planks but the pic above is the 'no messing about now' solution. And the resultant sanded finish is perfect. And you've still to add the 2nd planking to make it even better 😉 You're on a roll now....well done. Richard
-
Theodosius, That first planking is looking very good, and you've got lot of neatly tapered planks at the bow and stern...impressive. I bet you got a nice buzz from looking at the that hull after all the hard work 🙂 When you are sanding that 1st planking in preparation for the 2nd planking make sure you thin down the stern 1st planking to almost nothing....that way the 2nd planking will blend in to the keel thickness. Richard
-
kit review ENDURANCE by OcCre - 1/70 scale
Rik Thistle replied to ccoyle's topic in REVIEWS: Model kits
That looks gorgeous. I need to stop reading 'previews/unboxings etc'... Richard -
Electric sanding belt file
Rik Thistle replied to Don Case's topic in Modeling tools and Workshop Equipment
Low labour costs have to be matched with a low cost of living, otherwise the business model isn't sustainable. And China and certain other Eastern countries did have low costs of living. Another major, and possibly the crucial factor, was the arrival of the Shipping Container.... this really drove down transport costs and made it financially feasible to transports goods from one side of the world to the other and still return a profit. A great read on the history of the shipping container is The Box: How the Shipping Container Made the World Smaller and the World Economy Bigger https://www.amazon.co.uk/Box-Shipping-Container-Smaller-Economy/dp/0691170819/ref=sr_1_1?dchild=1&keywords=the+box&qid=1617722118&rnid=1642204031&s=books&sr=1-1 In spite of severe resistance from invested interests the shipping container eventually became the standard way to transport goods, by ship, train and road. Another factor is that certain Governments demand the production and sale of certain goods abroad and at a loss, to capture that market. Nasty, but it happens. Also, I think in the 70s, 80s and 90s Western companies were tripping over themselves to do 'technology transfer' deals with foreign powers just to win orders. Once that genie was out of the bottle it was a one way slide downhill for the West. Richard -
Electric sanding belt file
Rik Thistle replied to Don Case's topic in Modeling tools and Workshop Equipment
Bob, #4 Remember reputable brands like "Bell and Howell," (movie cameras,) "Emerson," (radios and TV's), and just about every tool company you've ever heard of? Times have changed. Today, the brand names themselves have become commodities, monetized for their "customer loyalty" and established good reputation. The business model is 1) buy out a brand name with a good reputation, 2) "value re-engineer" the products by reducing the quality, plastic parts replacing metal where possible, etc., 3) close domestic manufacturing operations and move manufacturing to low-labor-cost Third World factories, 4) slap the reputable label on "generic" offshore products, 5) flood the market with advertising touting the brand name without disclosing the change in ownership and manufacturing origins, and 6) reap the profits for as long as possible until the consumers finally, if ever, figure it out. You still get what you pay for, to a large extent, because the higher priced units will generally have better quality control, warranties, and customer service, although, sometimes you get lucky and find a lower-priced brand of the same unit, built in the same factory in China by the People's Patriotic Power Tool Collective which just happened to be assembled "on a good day." Absolutely spot on. A couple of thoughts - 1) I wonder what was the real driver for cheapening down quality...eg was it the rapid growth in the home DIY'ers who weren't as knowledgeable about quality tools? I know a lot of CEOs (not all) like to gouge their customer base but that needs a susceptible market. 2) Does a list exist anywhere of reasonably priced, quality tools/manufacturers? And perhaps a list of tools/manufacturers to avoid? I realise those lists may be moving targets. Richard -
Kit Review Harbor Tug WARATAH 1902 - HMV - 1/250 - CARD
Rik Thistle replied to ccoyle's topic in REVIEWS: Model kits
Ah, thanks Chris....I hadn't spotted that. Still feel the impulse buy urge though 😉 I already have a cardboard model of HMS Alert stashed away that was part of a 'bulk purchase' to see me through the Great Lockdown of 2021/2022. So I really should complete that one first to see how I get on with cardboard models. However the harbor tug may somehow find it's way into the stash when I'm not looking. Richard -
Kit Review Harbor Tug WARATAH 1902 - HMV - 1/250 - CARD
Rik Thistle replied to ccoyle's topic in REVIEWS: Model kits
That looks really neat and for less than Euro13 it's an impulse buy 😉 Richard -
Charlie, thanks for asking the question and Allan thanks for the link ... https://www.youtube.com/watch?v=g_m_VWzk4w8 It was very an interesting video. I'm a long way off from ever making my own sails but at least I now have an idea of what to prepare for 😉 Thoughts - - there was a lot of effort went in to making the wooden sail proforma - Pt 2, with the sail cut to size, jumped to Pt 3 with the sail already fixed to the mast. I'd have liked to have seen how the sail is properly attached to the mast. - IIRC, I've watched his turnbuckle video in the past Tom Lauria - https://www.youtube.com/channel/UC7JA3n2QuMoR2b68BzfxSoA/videos .... has a lot off good videos on his channel....sigh...here goes another day watching videos 😉 Regards, Richard Edit: Tom's website, for more interesting stuff ... Thomas J. Lauria http://tjlauria.com/galleries/
-
Mechanical solar system circa 70BC
Rik Thistle replied to Rik Thistle's topic in Non-ship/categorised builds
Yves, Well, that sounds like the makings of a movie script 😉 One of the elements in the mechanism is not found on Earth, but the NASA rover finds the exact same element on Mars in it's 2021 scientific research.... https://mars.nasa.gov/mer/ Ringing James Cameron now... Richard