
HOLIDAY DONATION DRIVE - SUPPORT MSW - DO YOUR PART TO KEEP THIS GREAT FORUM GOING! (Only 72 donations so far out of 49,000 members - Can we at least get 100? C'mon guys!)
×


BANYAN
-
Posts
5,946 -
Joined
-
Last visited
Content Type
Profiles
Forums
Gallery
Events
Everything posted by BANYAN
-
 Looking forward to it Rob. That base is looking good. cheers Pat
 -
Steven, in some circumstances (depending on through access), I have found that simply dampening the footropes then laying a long dowel (sufficient to go through to both sides) in the rope between the shrouds allows them to dry in a droop (catenary). cheers Pat [added dowel]
- 740 replies
-
- 3
-

-
- Tudor
- restoration
- (and 4 more)
-
That will show-off the models very nicely Greg. cheers Pat
- 200 replies
-
- 3
-
-
- Transport No. 103
- Hasegawa
- (and 4 more)
-
These are some of the best ornamentation (gingerbread) I have seen - very nice Chuck. cheers Pat
-
Hi Allan, an unlikely option, but possibly for a traverse tackle to help point the gun? BUT the eyebolt/rings appear to be a little high for this? cheers pat
-
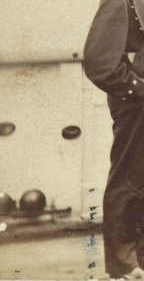
To throw a curve ball - the Contract for HMCSS Victoria (1855) called for shot garlands. The ship was armed with a single 32pdr 56cwt pivot gun and six 32pdr 25cwt guns in broadside. The garlands, for the broadside guns at least, appear to have been fitted as a photo (see crop below) taken between 1858 and 1865 shows the shot garlands, with shot in them, fitted to the bulwarks between the rising timbers. cheers Pat
-
Thanks for the feedback guys, much appreciated. OK it seems the lamp was fitted to a carrier which slid up and down. The rigging of the halliard/downhaul still seems in contention. Rob, I feel the weight alone may not have been sufficient to lower the assembly, especially in heavy spray conditions whereby the guides/jackstays may have become encrusted, or if there were high relative winds? This is one of the reasons that some lighter spars such as gaffs etc are fitted with downhauls. I am not decided on this, but my feeling would be a sort of signal flag halliard whereby one end is connected to the upper lug of the carrier/back plate, rove through a small block on the mast/under the foretop, down to deck, through another small block on deck, then up and shackled to a bottom lug of the plate. the length would be sufficient to allow sufficient slack for it to be belayed to a pin or cleat and forming a sort of continuous loop? Further thoughts/discussion most welcomed. This has been an enjoyable discussion, and sorry again to take up so much of your log with it Keith. cheers Pat
-
Keith, I hope you don't mind me hijacking a little longer? Bob, Eberhard. Do you think a variation/version of the masthead lantern may have had a detachable backplate to which the lantern proper could be attached? The backplate would have the guides and having it detachable would negate the need to remove the guide wires / wire jackstays when needing to service the lamp. Although some guidance suggests the lanterns were stowed, refilled and trimmed daily, what would preclude the lanterns being filled and trimmed on-deck? cheers Pat
-
That looks great Keith; not too many models around with this level of detail - kudos. cheers Pat
-
Thanks for the excellent photos Eberhard. As Bob says, this type of detail is rarely shown and fully explains how they were rigged. Fills in a couple of holes in my research also. Thanks for your patience in allowing this discussion in your build log Keith. Perhaps it might make a very useful separate discussion if these posts were moved into their own topic? Less clutter in your log and more readily search if given the appropriate subject header? cheers Pat
-
Not sure if this is of interest to many, but from what I have determined, the following is the sequence introducing the 'rules' for the use of nav lights: The 1846 statutory enactment of the ‘Trinity House Rules’ and the 1848 regulations prescribed uniformity in navigation lights. The 1851 ‘Steam Navigation Act - The Shipping Laws’ repealed the 1846 Act, but re-enacted it in different terms until it also was repealed by the ‘Merchant Shipping Repeal Act, 1854’. The rules enacted in the 1854 Act, applied the ‘port-to-port’ rule to all ships. The navigation light requirement remained unchanged and required steam sea-going vessels, between sunset and sunrise under all circumstances, to exhibit lights as follows: When under steam, a bright white light at the foremast head, a green light on the starboard side, a red light on the port side. The masthead light, on or in front of the foremast at a height above the hull of not less than 20 feet, was to be visible for at least five miles and the lantern constructed to show a uniform and unbroken light over an arc of the horizon of twenty points (10 points (112.5°) either side of the centreline (ship’s head). The side lights to be visible for at least two miles, and the lantern to be constructed to show a uniform and unbroken light over an arc of the horizon of 10 points either side of the centreline. cheers Pat
-
Eberhardt, to my eye (at least from the more distant photo) those stanchions look great and well balanced; I think touching up the footings would have the opposite effect. Just an opinion though; what matters is what looks right to your eye. cheers Pat
-
That's one heck of a main course - the size is almost the same as that of the hull (if not larger). It took seeing the overall picture to realise it. Nice work Steven and especially on your recovery efforts (new and old). cheers Pat
- 740 replies
-
- 4
-
-
- Tudor
- restoration
- (and 4 more)
-
Not sure if it was from the same company, but I have previously used pre-blackened hooks, dead-eye straps and scale chain. The parts arrived very black (matt finish) but with a powdery (sooty) finish. The sooty/powdery finish I think is a result of leaving the objects in the solution too long OR using a too strong solution. This is probably because they are doing the blackening on a mass production basis or using a very strong solution. A good buff with paper towel sorted that out mostly, but not fully. I now blacken all my own stuff (PE and brass parts) using Birchwood Casey (BC) as I find, that after buffing, I end up with a better gunmetal colour and sheen sort of finish. I have tried Sparex (in a crock pot) also, but it did not work too well for me (probably an issue my end), so I continue with my tried and true method of a scrubing the parts with a 'scratch' brush, wash/soak in acetone, rinse, then dip in a 50/50 or less blackening agent for a while, inspect and repeat as required, rinse then buff. I have also experimented with Carrs and other blackening agents but always return to BC. I found a large bottle of the solution for a very good price at a gunsmith/gun shop a long time ago and I have enough to see me out. cheers Pat
-
Thanks Kevin, that is a great solution. I have entertained doing a similar thing by screwing on extensions as I have experienced the same issue with the feed and outfeed ends of the table being just a little too short, but this is a far more elegant fix. cheers Pat
-
Ditto Eberhard: that looks very effective, and I defy anyone to manually create scale chain that small. cheers Pat
-
Welcome aboard Glen, great to see another modeller from down under come aboard. cheers Pat
-
Wow Steven, what a transformation from that 'tired' older model you started with. Your efforts (and drudgery) are paying dividends. cheers Pat
- 740 replies
-
- 7
-
-

-
- Tudor
- restoration
- (and 4 more)
