BANYAN
-
Posts
5,924 -
Joined
-
Last visited
Content Type
Profiles
Forums
Gallery
Events
Everything posted by BANYAN
-
 Nice finish to the Lion's head Steven, the model is coming along very nicely. cheers Pat
 -
Beautiful hull form that looks absolutely perfect in symmetry and finish - ditto John's comment though (opinion only as this is your model and your choice of finish) - she will look stunning whichever way you go. cheers Pat
-
HMCSS Victoria 1855 by BANYAN - 1:72
BANYAN replied to BANYAN's topic in - Build logs for subjects built 1851 - 1900
Thanks very much all, I am glad to be finally making some progress with this. cheers Pat- 993 replies
-
- 2
-

-
- gun dispatch vessel
- victoria
- (and 2 more)
-
Thanks Eberhard; that is exactly what I am finding; in the meantime I have decided to call it 'Steamer' Rig as it seemed to be fitted to commonly to most steam powered vessels (both screw and paddle driven). I have also found a description of a Barue by 'Desmond' in his book ‘Wooden Ship Building’, (1998), in Chapter 3, page 123 which depicts a Barque rig with some fore-and-aft sails as shown below (note they do not appear to be gaff sails though). He describes a Barque as a three-masted vessel (foremast, mainmast and mizzen mast) the two foremost masts are square rigged, as in a ship, the after or mizzen mast has no yards being fitted with a topmast only and carries a gaff sail (called the spanker) and a gaff-topsail. that said, Victoria did not carry the gaff-topsail. cheers Pat
-
HMCSS Victoria 1855 by BANYAN - 1:72
BANYAN replied to BANYAN's topic in - Build logs for subjects built 1851 - 1900
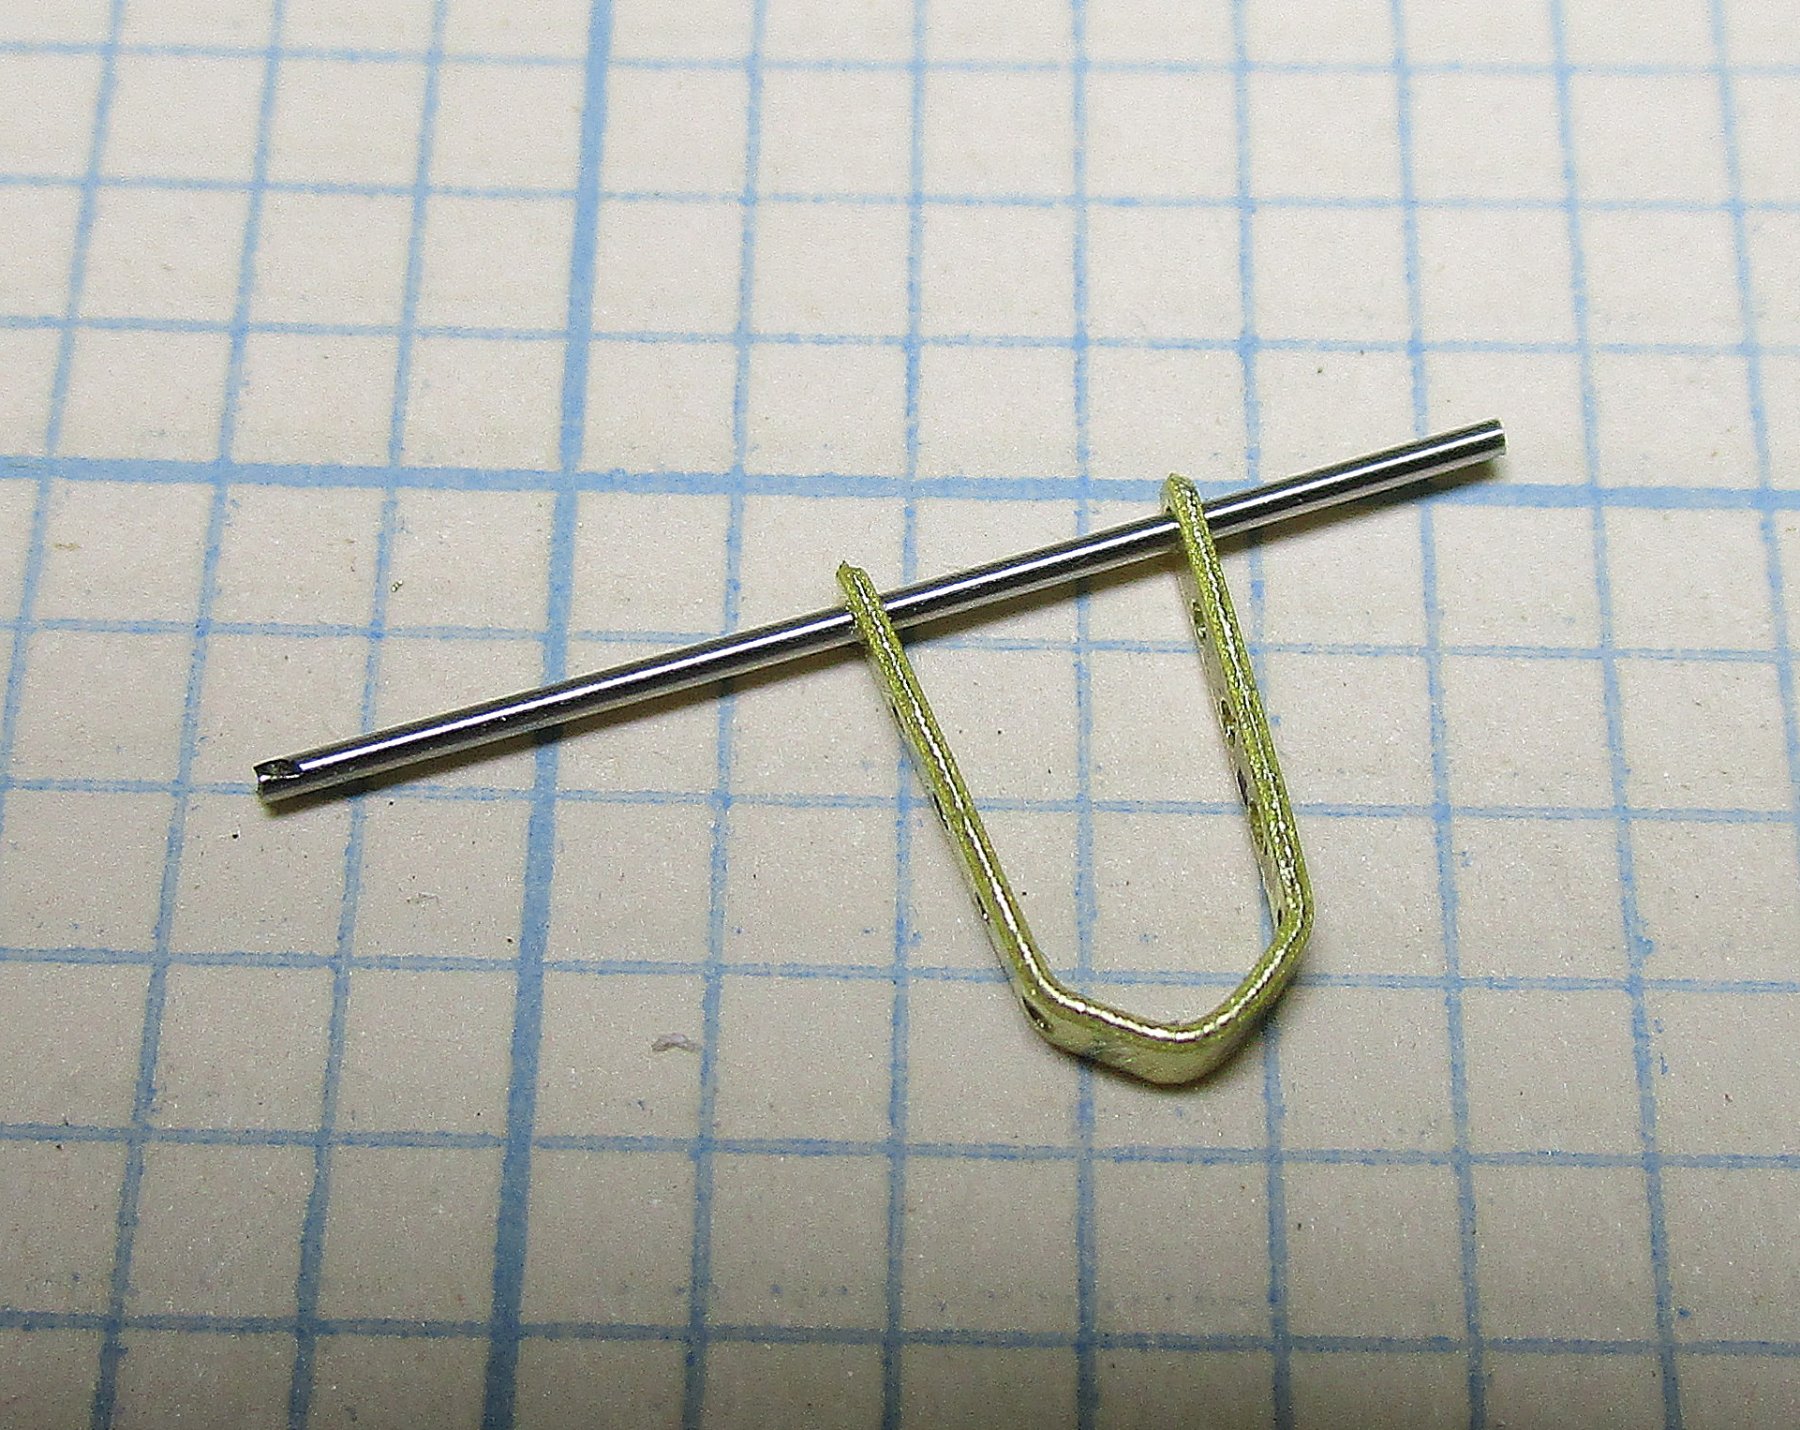
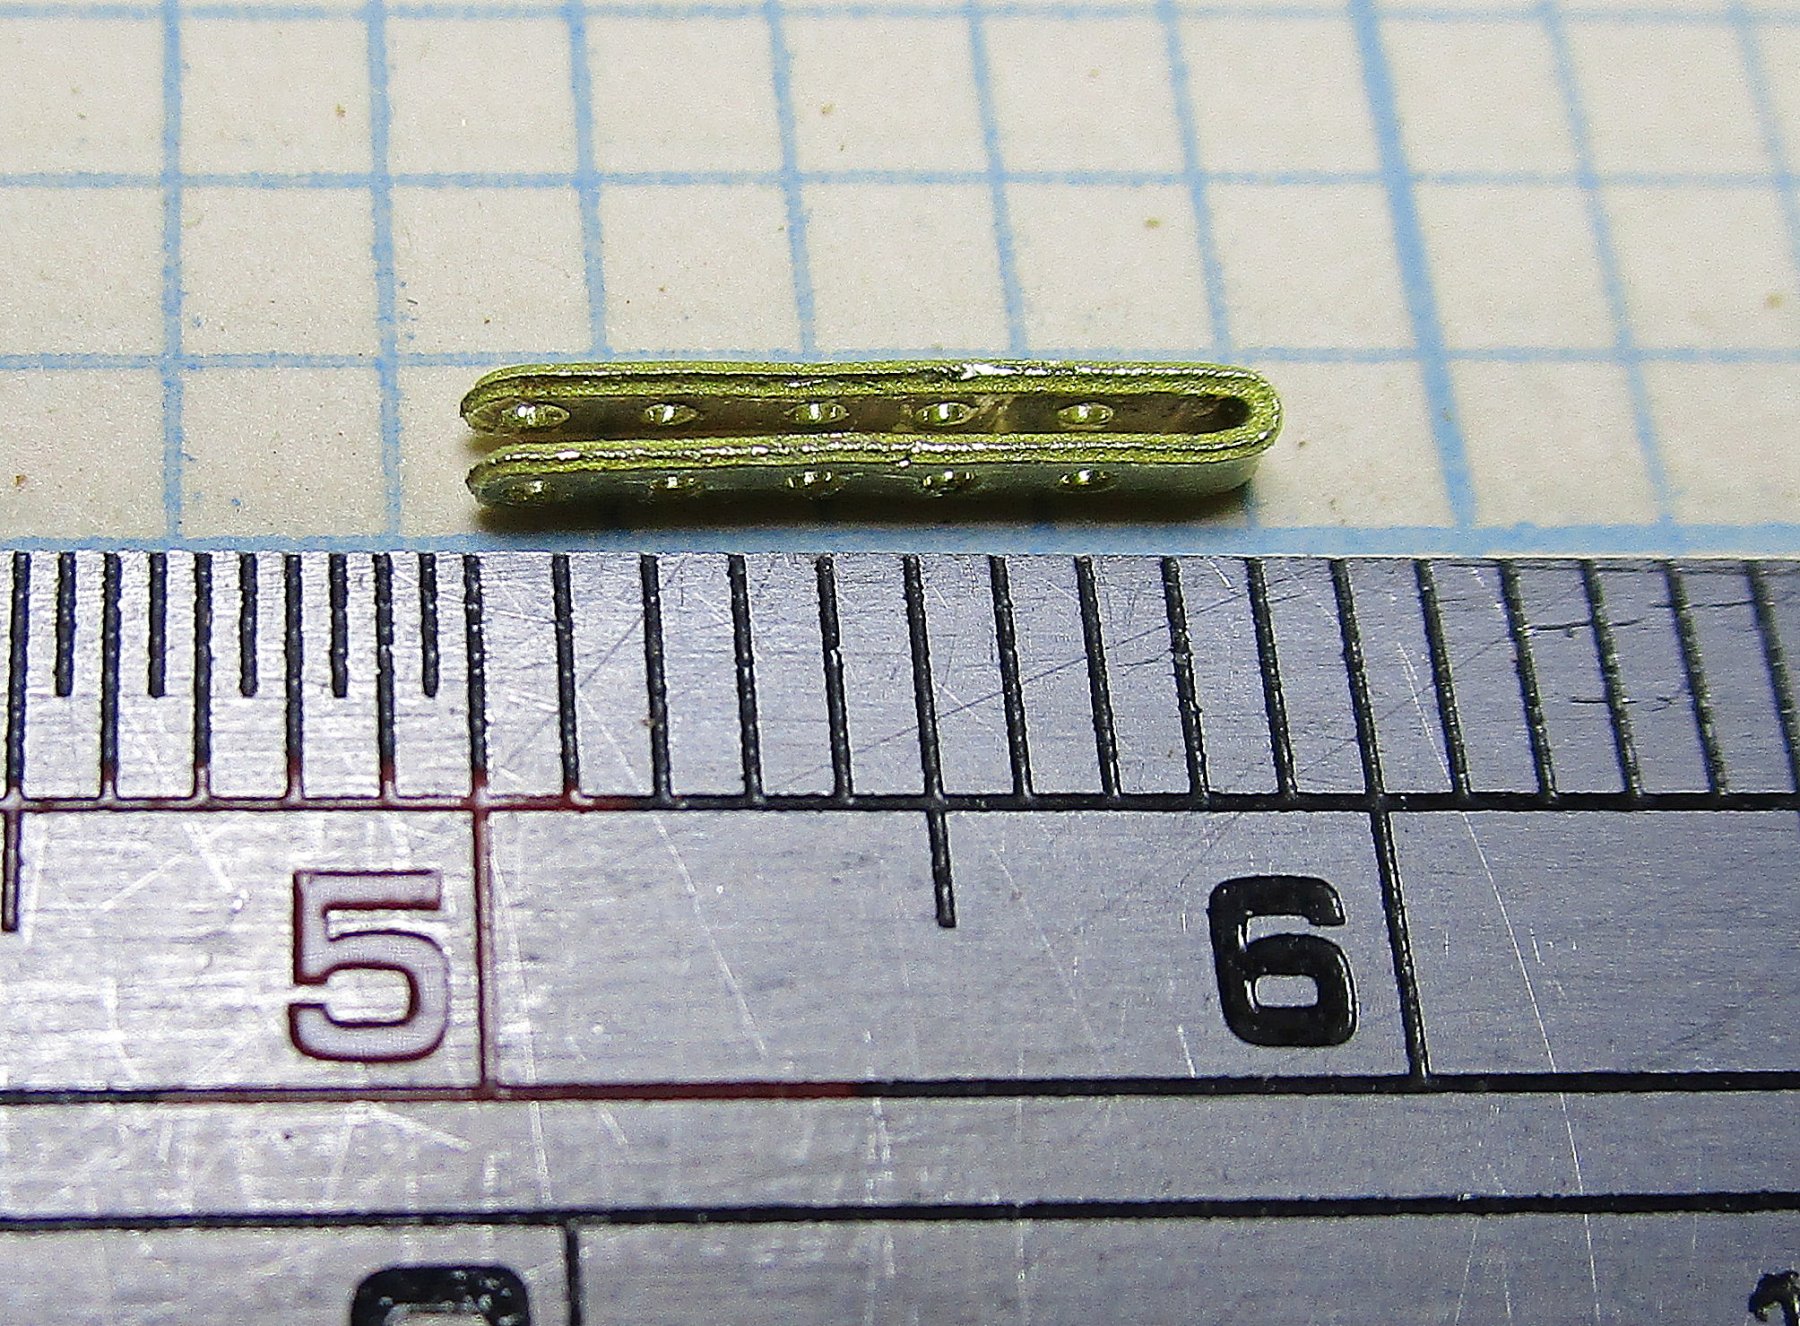
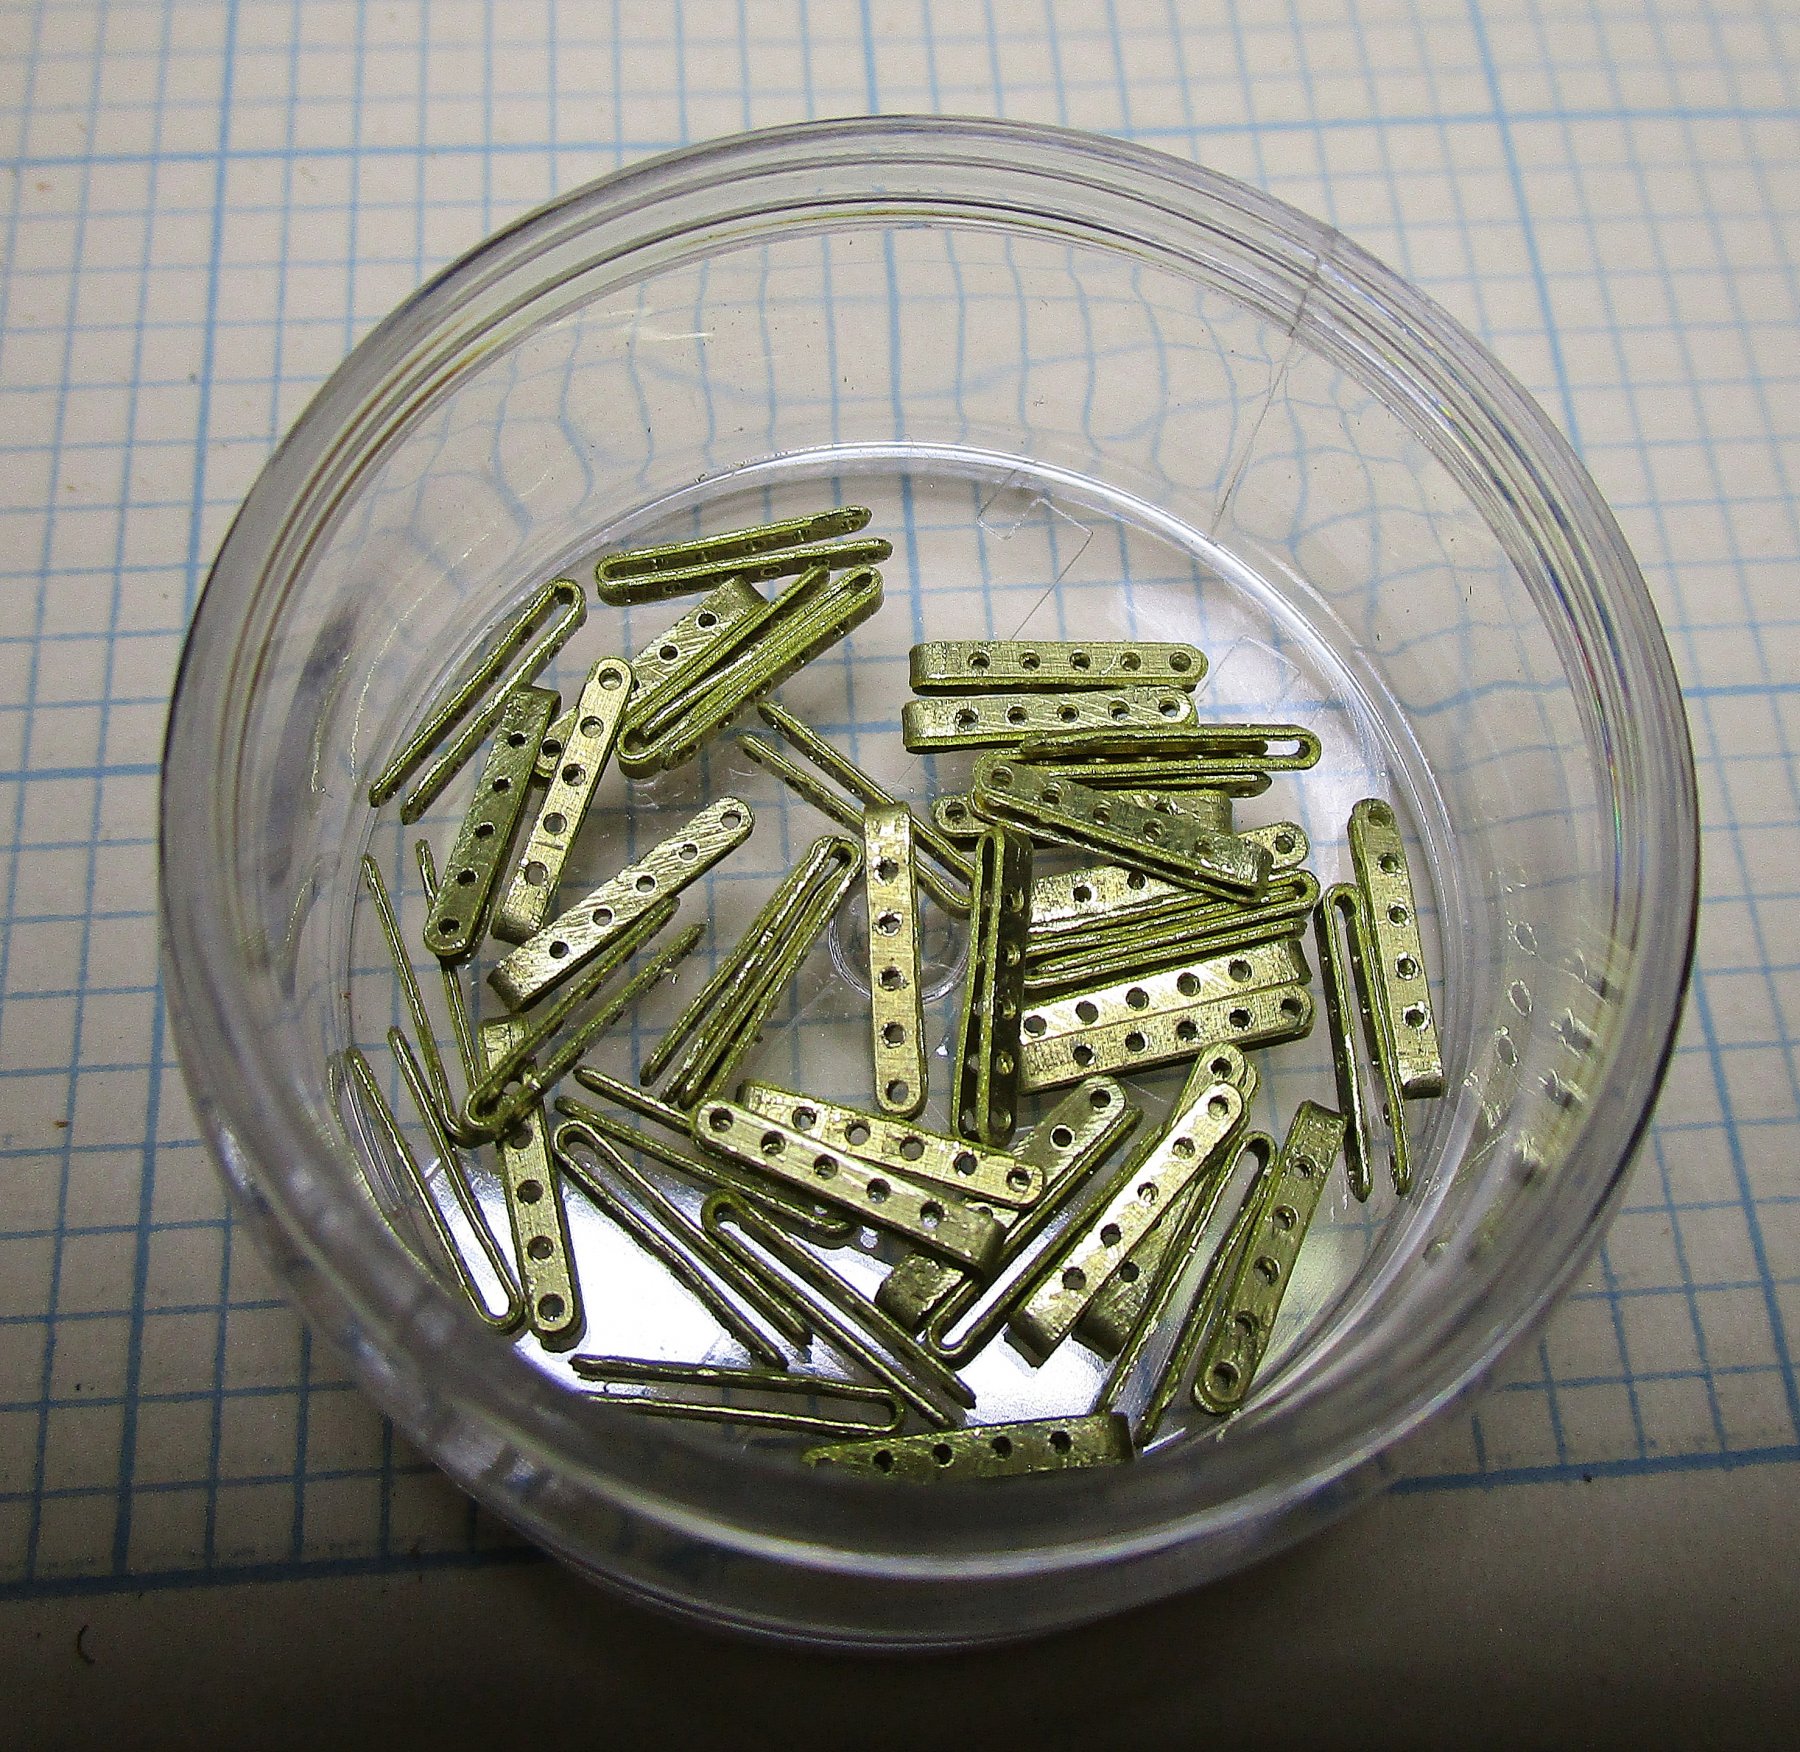
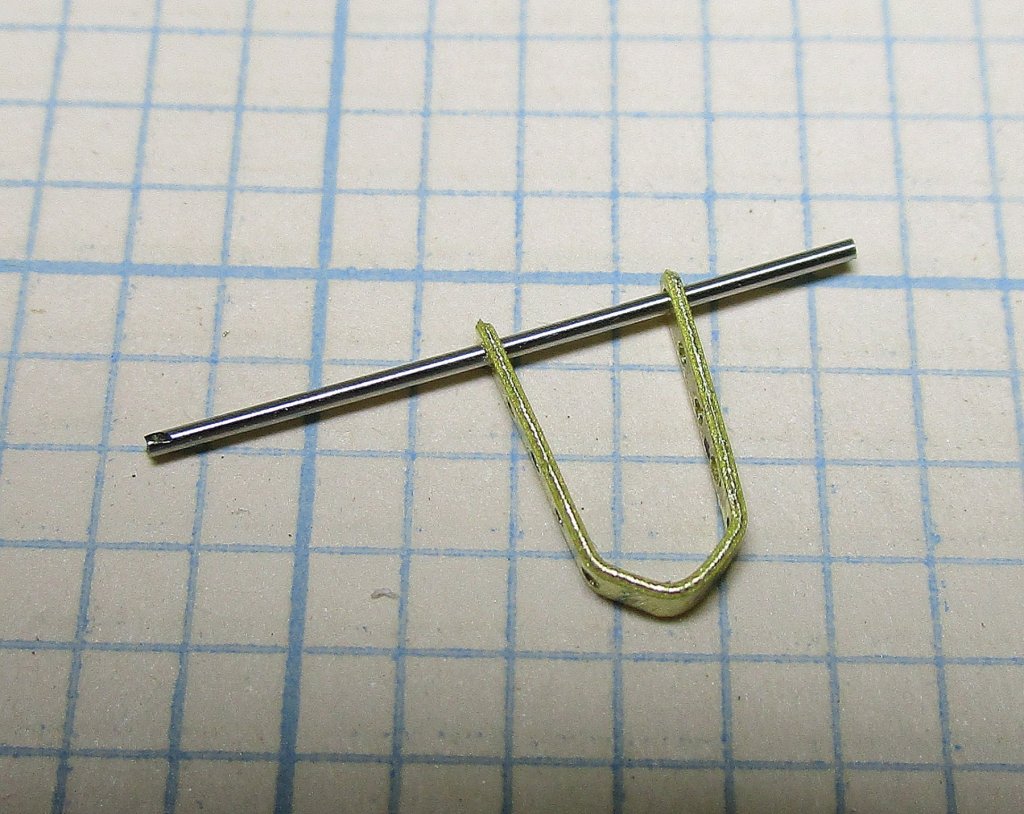
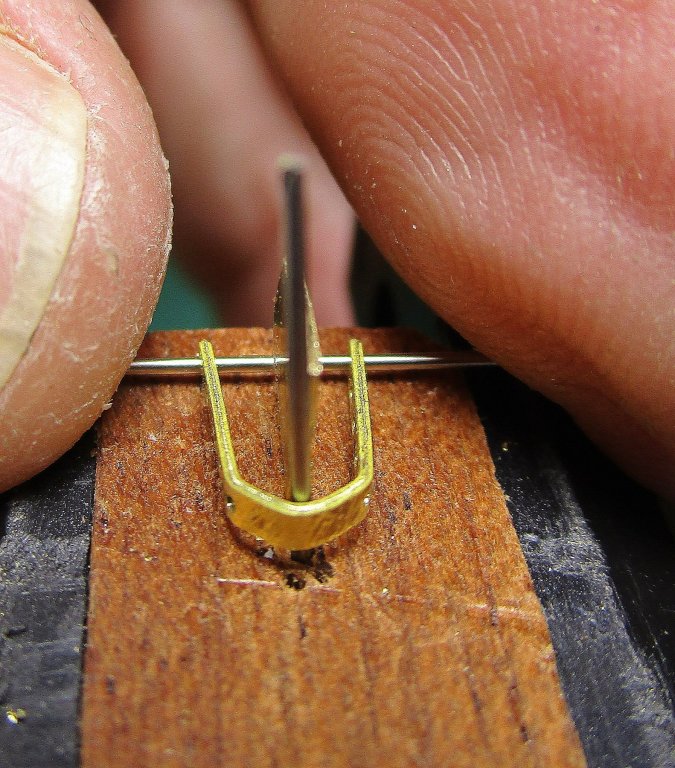
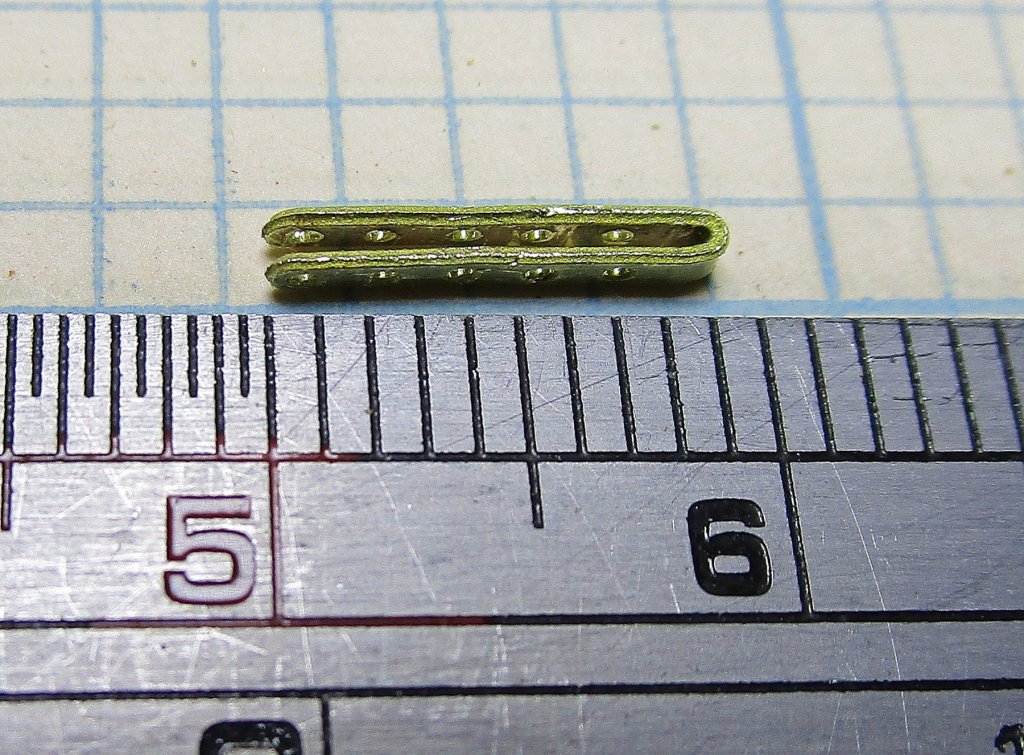
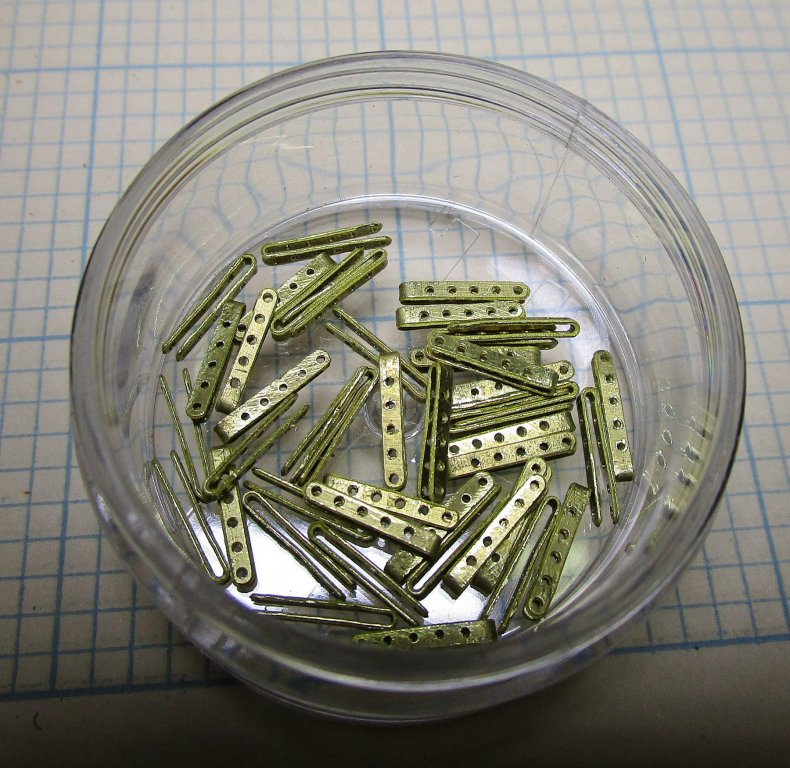
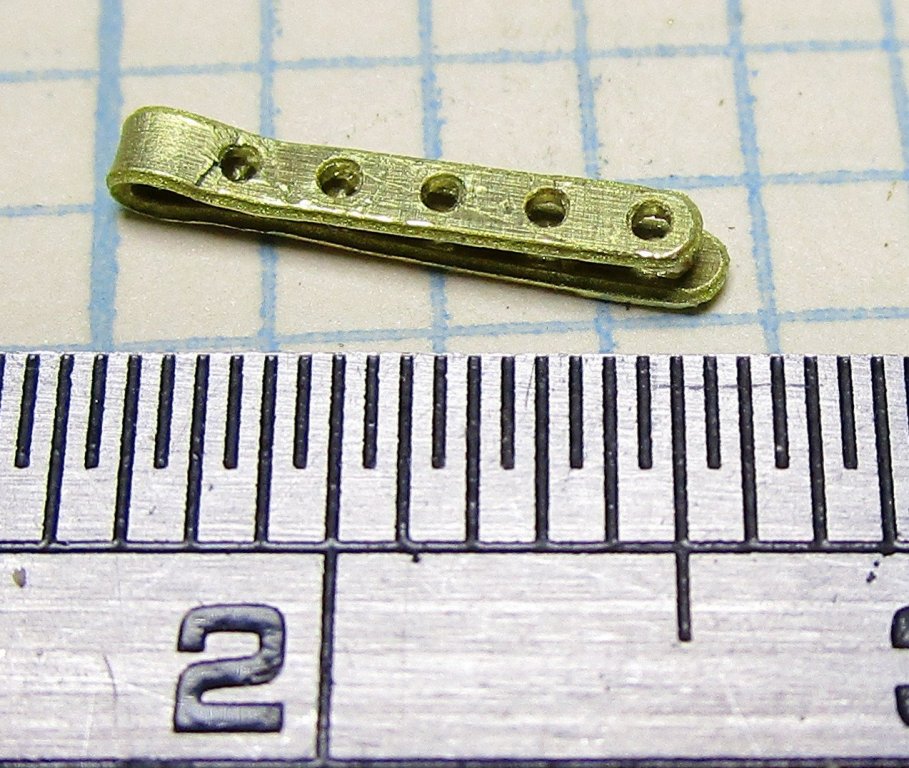
Hi all, bit the bullet after some further experimenting and decided an improved version of what I was doing was the better solution. I made a jig (see photo) which has the spacer piece in the wake of the mandrel (end of 0.6mm drill bit) - this is exactly in line although the photo does not show it too well. The length of the 'blade' allows the legs of the strap to be folded back and roughly aligned with a broken drill bit (agin 0.6mm) used to get the bottom holes roughly in line. The important bit here as I suspected, was to put an initial bend on the centre of the strap for which I used a pair of wire bending pliers (smallest diameter). The drill bit needs to be long enough to provide a good grip on the protruding ends as I found that if I offered the assembled rough bend onto the vertical mandrel them applied pressure by pulling back from the mandrel it was easier to get a consistent bend. The other important part of the technique was to apply pressure to the full length of the straps as starting at the mandrel end resulted in kinking of the legs and overall bend. Bit tough on the fingertips but no blood donated to this part of the build (yet) Once I got on a role it only took 30 minutes to produce 40 of them. the result is not too bad and once filed (cleaned up) should look acceptable. Here is one rigmaiden lanyard I have assembled but not yet attached to the chain plate. Still some cleaning up to do, but to the eye they look pretty good - this is taken at macro range. Next job is to solder a small piece of plate in the throat of the bend above the upper holes which acts both as a spacer and as a preventer (to stop the untensioned lines/shackles for the shrouds sliding down between the straps. I also need to build a jig to hold the chain plate eye steady while I pein the end of a brass nail (cut to length) placed through the split eye of the chain plate and the larger hole in the end of the rigmaiden lanyard. cheers Pat
- 993 replies
-
- 16
-
-
- gun dispatch vessel
- victoria
- (and 2 more)
-
HMCSS Victoria 1855 by BANYAN - 1:72
BANYAN replied to BANYAN's topic in - Build logs for subjects built 1851 - 1900
Hi all, and many thanks for the feedback/suggestions; they are much appreciated. Mark - the straps are already photoetched with the holes. my attempts to drill holes at this size resulted in some very 'ugly' results Carl and Keith (A) - that is the method I am currently using, but overnight I also thought of trying this with the stub of a suitably sized drill bit. the greatest difficulty is getting the bend started nicely and consistently at the right point as any over pressured attempts see the legs bending at the inner most holes unfortunately. Keith (B) - mate, I am not quite sure I could achieve that at this scale The 'notches' would need to be cut only .4mm deep and very accurately placed as these straps are already pre-etched. That said, this is a great suggestion for the future as I would etch those notches as part of the process. Eberhard - I will also try this today (wood version as I don't have a dapping block) and see how it goes. Splitting the block correctly (accurately) will be the challenge I am also thinking of remaking the bending jig with a narrow hardwood wood base (to fit in a vise), then fit a (broken) drill bit of appropriate diameter into one end about the length of the folded strap back from the end. I will insert (upright) an offcut of flat brass plate the same thickness as the lower strap between the drill bit and the end (to maintain the correct separation. If I achieve this, and using the drill bit to align the lower holes of each leg, I may be able to get better (more consistent) results. I am finding that whichever method I use, the critical step is the initial bend point being 'on centre' - that is where I am having the real issues. cheers (and many thanks again) Pat- 993 replies
-
- 3
-
-
- gun dispatch vessel
- victoria
- (and 2 more)
-
Beautiful work mate; the care and attention to detail and fitting is certainly paying dividends. cheers Pat
- 599 replies
-
- 5
-
-
- sidewheeler
- arabia
- (and 4 more)
-
Can I get your Admiral to speak with mine Grant? cheers Pat
-
Great result Vossie - so, don't leave us hanging What was the easier way hold them (to stuff the octopus also!) :)? cheers Pat
- 714 replies
-
- 3
-
-
- lady nelson
- victory models
- (and 1 more)
-
Great adaption - thanks Keith. cheers Pat
-
Very nice - nice crisp work Pat cheers Pat
-
HMCSS Victoria 1855 by BANYAN - 1:72
BANYAN replied to BANYAN's topic in - Build logs for subjects built 1851 - 1900
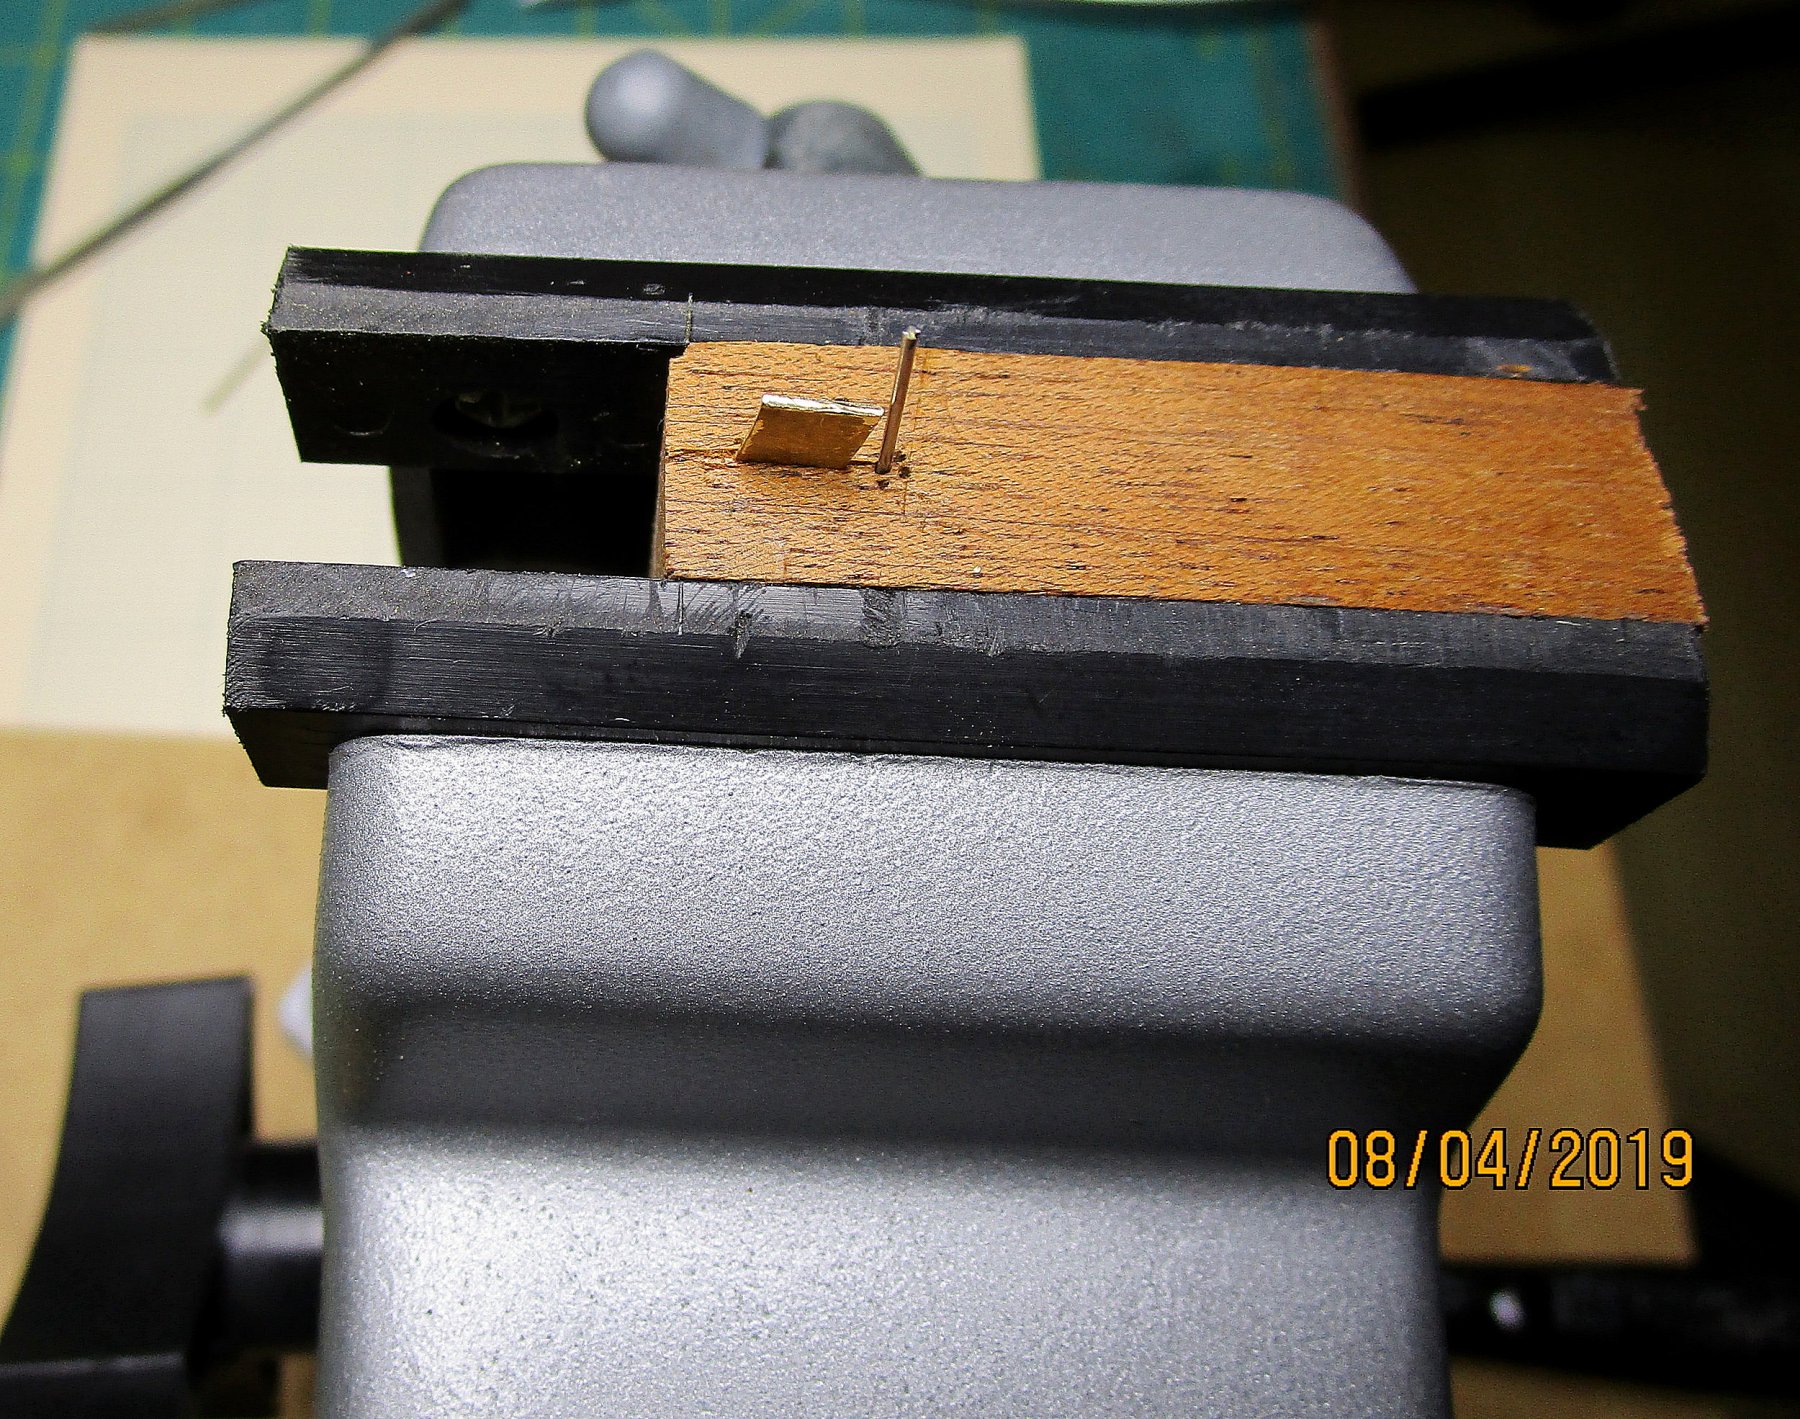
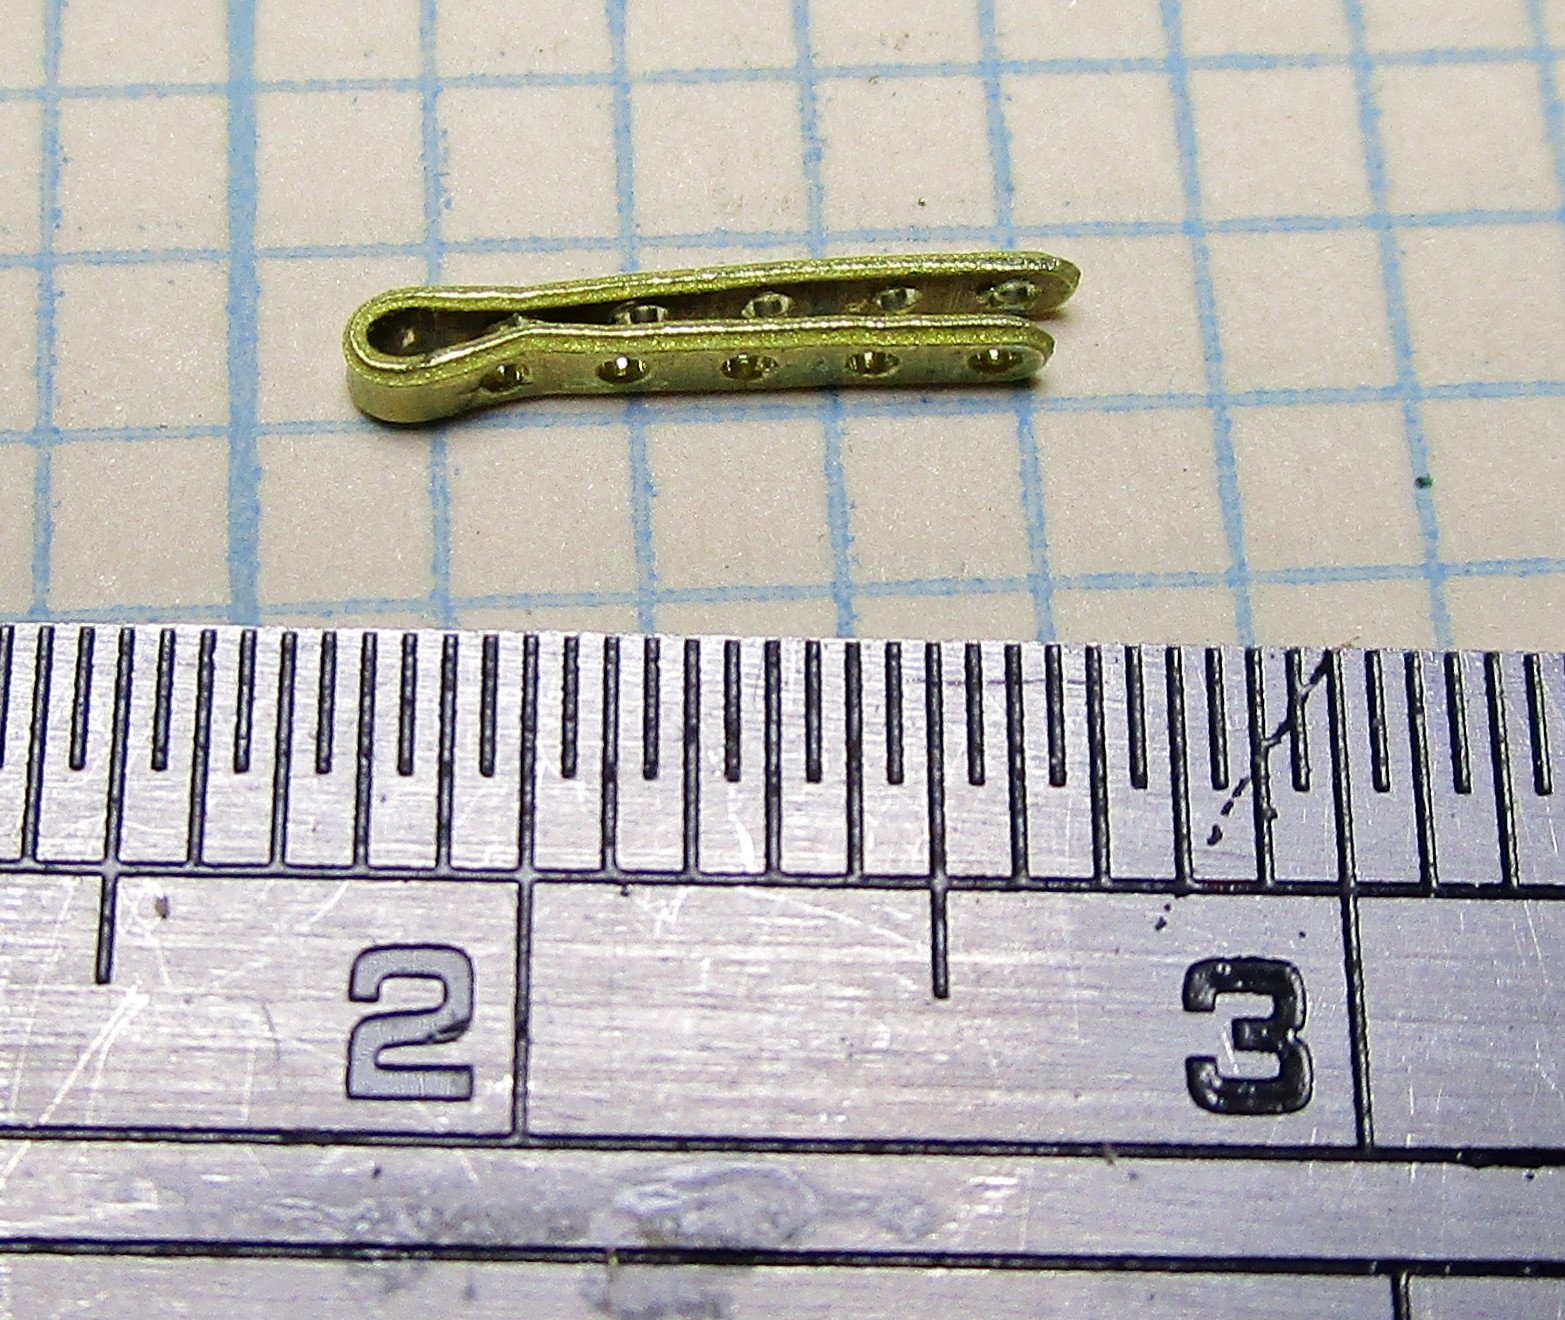
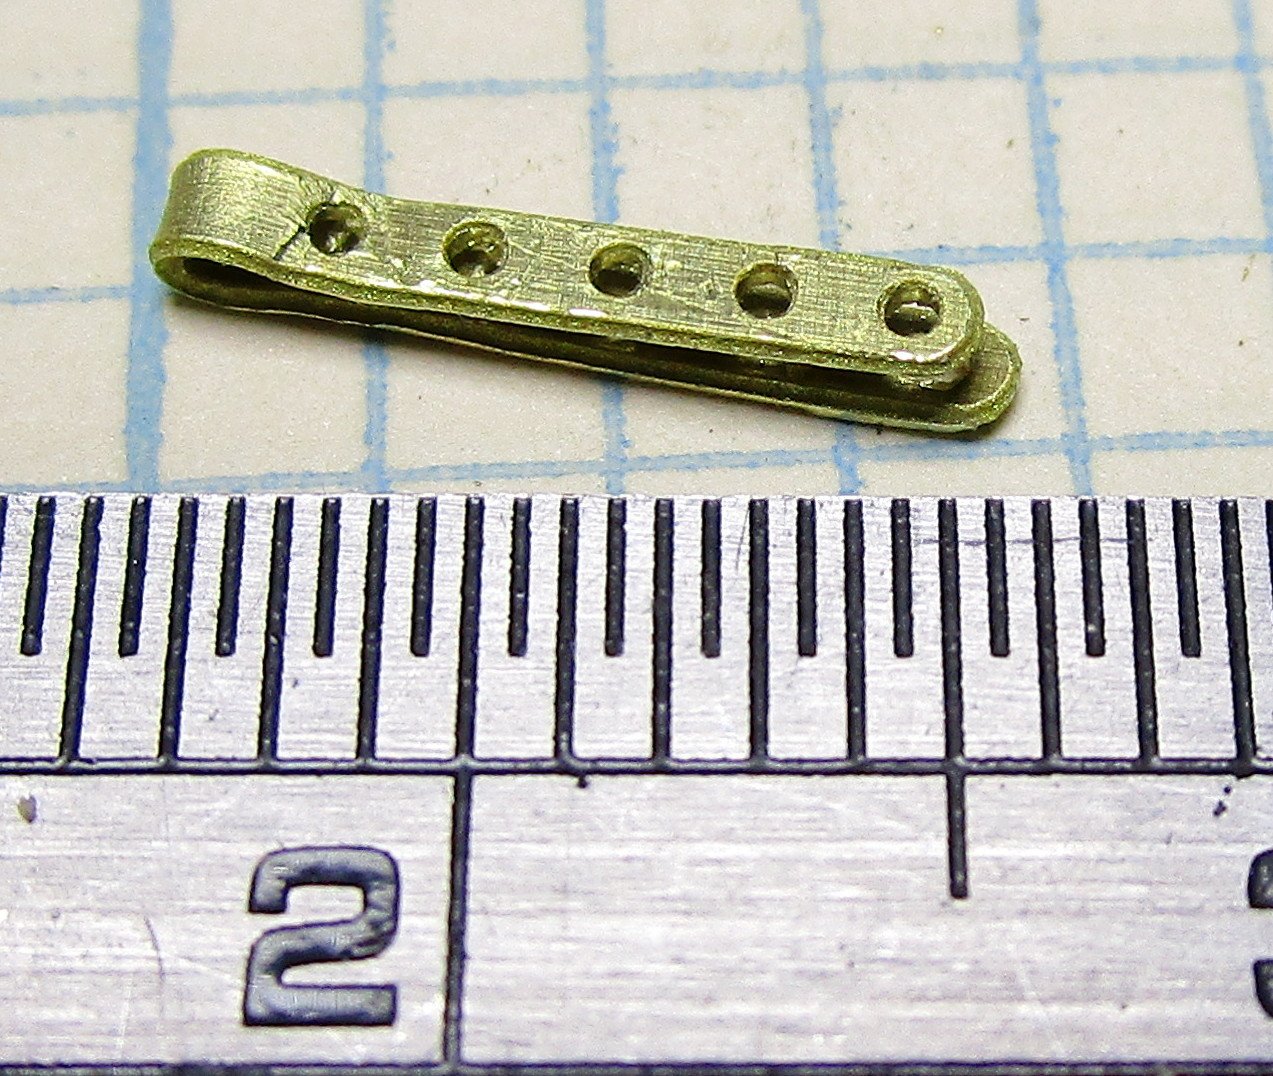
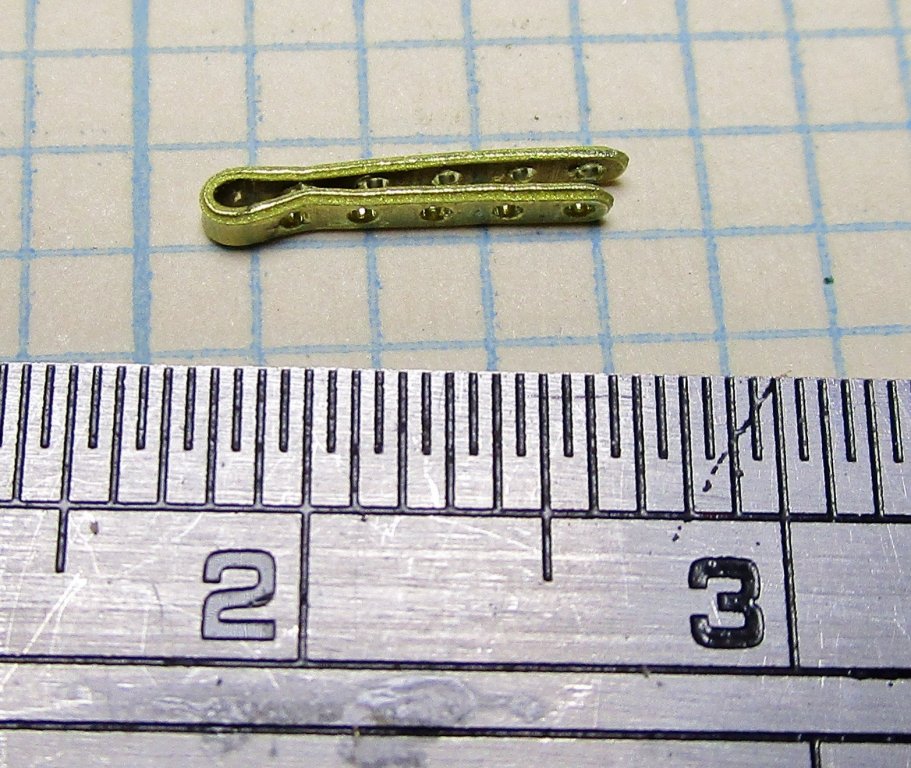
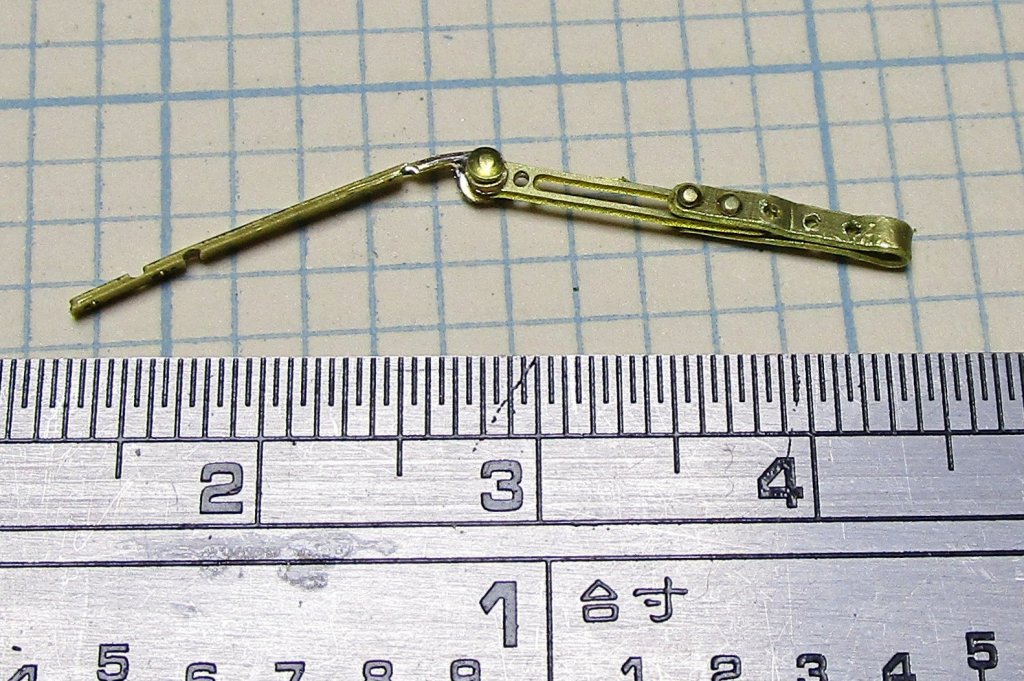
Thanks Keith; you are right it is probably an easy task and just FOMU from me I will give it a go soon. I have one more task to complete before taking a break (overseas holiday) soon and wish to try and finish these 'Rigmaiden' lanyards before I go. The problem I am currently having is bending the top strap through 90 degrees either side of centre (back on itself) such that the pre-etched holes all align and I retain a 'neat' loop at the top though which the wire rigging/shackles were attached. My efforts to date have been inconsistent as can be seen in the two photos of one strap I have tried to bend. I have tired bending the strap around a mandrel (pin in hardwood) then using a pin through the bottom two holes (one either leg) to keep the bottoms aligned, then pressing together with flat-nosed parallel pliers. I have also tried using another pin behind the mandrel to stop the strap moving away from the pin. The problem is that the two legs do not always come together exactly (out by .5mm - which is enough to stop the various pins I need to add from being inserted correctly. I have thought of trying to 'fix' one leg of the strap at a preset length such that the bend will always be at the centre point of the strap but the strap keeps slipping and it is difficult to bend the remaining length. Any ideas/suggestions most welcomed Please note none of these elements have been 'cleaned up' (filed etc) yet and the assembled strap is a crude prototype to show what I am trying to do. The chain plat as you can see has been slotted through the soldered eye. cheers Pat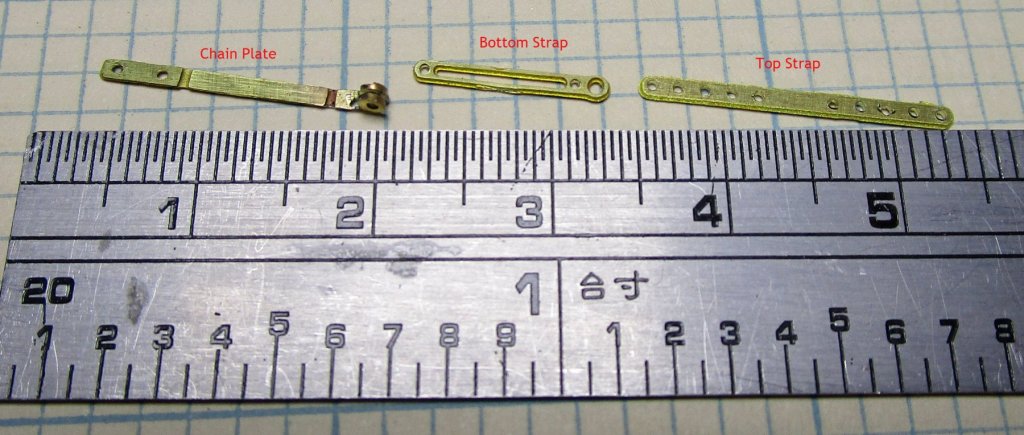
- 993 replies
-
- 5
-
-
- gun dispatch vessel
- victoria
- (and 2 more)
-
Thanks for sharing this technique GL; very useful and they look great. cheers Pat
- 219 replies
-
- 3
-
-
- smack
- cross-section
- (and 2 more)
-
Very nice job on the portholes Keith; they came out very 'smooth' with not a sign of chipping I could see. cheers Pat
-
Good to see you making sawdust (and boats :)) again Mark. A good outcome with the laser cut spiled planks; not easy to do with such small items but everything learned on this can be applied to the others. cheers Pat
-
HMCSS Victoria 1855 by BANYAN - 1:72
BANYAN replied to BANYAN's topic in - Build logs for subjects built 1851 - 1900
Hi Eberhard, some very sage advice as usual - many thanks. The idea of using the toolpost is one I had not thought of; I will stow that suggestion away for future use My mill head does rotate through 90 but I have never tried it with the fear I would need to realign things all over when reverting to the vertical. Call it FOMU (Fear Of Mucking Up) if you like When I did think of that option though, I was wondering how to mount the vise and keep the work at the right level (low enough) - and finding a slitting blade with a suitable diameter that would still clear the cross-slide. cheers Pat- 993 replies
-
- 3
-
-
- gun dispatch vessel
- victoria
- (and 2 more)
-
I can't provide any advice on the drilling as I do not have that level of experience in this area. You have far more experience and you are receiving some great advice from some talented and more experienced (than me) modellers - but I am learning a lot from this discussion. Thank you all. That said, I must declare that I like Dan's idea. Mate, I will stand in the trenches shoulder-to-shoulder with you in defence, should you decide to paint . As you can see from my models, I prefer to paint them as I try to recreate the look and feel of the 'real ship' as she may have looked (and this is my opinion only - everyone has their own ) . I say 'may have looked' as I am a long way off perfecting the 'scale colour' as it is called by more artistically experienced modellers - that is scale the colour tones etc to suit the model scale. There is enough wood remaining in the deck furniture to satisfy my 'love of natural wood' - but each to their own ideas on that. cheers Pat (standing by to receive any incoming )
-
I have been pondering on what to call the rig also Druxey and had been leaning towards 'Steamer rig' as that is the type of vessel (both paddle and screw driven) it seems be exclusively fitted to. I do like the use of 'transitional' also and perhaps I will add that. I am working on a document at the moment (Word) that collated the research I have done to date and I will make it available via PM (for anyone one interested) or, via this thread, in the very near future for those whom may be interested to comment upon etc. At this point, the research is purely to provide the reasoning for the shaping and structure of the masts, and the rigging/sail plans (and eventually a belaying plan) as I have enough information to draw the masts now I think. I know it is a single stick upper mast (combining the top, topgallant and royal masts) to which I will apply the 'rules of thumb' proposed by Kipping and Fincham with a slight adaption to the head of the royal based on a comment by one of these authors. Once drawn in isolation I will overlay it to onto the lithographs and photograph of the ship and adjust to best fit. Hopefully I will be quite close. The next exercise is to determine the spar furniture and here I will run with the proposals of the same authors for the fittings specific to a steamer and adapted for merchant rather than RN (service) ships. Many thanks for your continued interest and suggestions; it is very much appreciated. cheers Pat
-
I hope things improve very soon for you Rob. I can empathise with what you are going through and it isn't any fun at all. Get yourself well first mate; GR can wait (unless you leave that door Druxey found open ) cheers Pat
- 1,208 replies
-
- 2
-
-
- great republic
- clipper
- (and 1 more)
-
HMCSS Victoria 1855 by BANYAN - 1:72
BANYAN replied to BANYAN's topic in - Build logs for subjects built 1851 - 1900
Hi Ed and thanks for your feedback. I had tried inverting it, but I would need to redrill the existing, or get a new, Z-Axis bar to mount the tool to. But even then unfortunately the y-axis table will still strike against the base It was never designed to work in this configuration unfortunately. If I used it more often I would consider doing some modifications but I really only use it for template making and the like now (in a more basic set-up) as I use the Sherline for all my milling etc. I would have used the Sherline if I had a way to turn the work through 90 degrees as I have a slitting saw for that. cheers Pat- 993 replies
-
- 7
-
-
- gun dispatch vessel
- victoria
- (and 2 more)
-
Thanks mate. That is a very similar colour used by the RAN fore while and I also need to do some non-slip (Devron) walk areas on my little 'lugger' so will watch with interest. cheers Pat
-
That serving on your lines for the buoy look great - very nice job. The serving is very tight and even. cheers Pat
- 714 replies
-
- 2
-
-
- lady nelson
- victory models
- (and 1 more)
-
Looks a good solid base of colour Greg. What is the actual colour (and Brand) f paint you used for the decks? cheers Pat
-
Nice progress Pat, the 'inserted' port lids look good. cheers Pat