


Snug Harbor Johnny
-
Posts
1,379 -
Joined
-
Last visited
Content Type
Profiles
Forums
Gallery
Events
Posts posted by Snug Harbor Johnny
-
-
'Just saw this 1922 photo of the Cutty Sark (pre restoration by the new owner to clipper rig) rigged as a barquentine ... 'Wonder if anyone ever modeled her in this configuration. Note that the Revell 1:96 Thermopylae kit has an option to rig as a barque, as she was in the NW timber trade and as a Spanish trainer.
The text below gives additional meaning to an ancient paradox that can apply to our hobby ... So perhaps any thoughtful effort of make a reproduction in miniature of a given vessel might be considered 'real'.
Science does for reality what Plutarch’s thought experiment known as “the Ship of Theseus” does for the self. In the ancient Greek allegory, Theseus — the founder-king of Athens — sailed triumphantly back to the great city after slaying the mythic Minotaur on Crete. For a thousand years, his ship was maintained in the harbor of Athens as a living trophy and was sailed to Crete annually to reenact the victorious voyage. As time began to corrode the vessel, its components were replaced one by one — new planks, new oars, new sails — until no original part remained. Was it then, Plutarch asks, the same ship?
There is no static, solid self. Throughout life, our habits, beliefs, and ideas evolve beyond recognition. Our physical and social environments change. Most of our cells are replaced. Yet we remain, to ourselves, “who” “we” “are.”
-
-
I suppose if one is TOTALLY exasperated with how a build is turning out, or perhaps a pet or toddler has inflicted enough damage that repairs would be impractical or badly show - you could use one of the 'other power tools' ... like tossing the model into the chipper/shredder. 😉
-
44 minutes ago, Scottish Guy said:
Is it just me or are some of the instructions / plans are just more than crap? Taking in account that I noticed in the poll that Billing Boats is quiet... let me be blunt... rubbish about material quality but also about the quality of their instructions.
Its a plus that there are 'some' instructions in the Roar Ege kit (I just peeked into my stashed kit and saw that there is a booklet included ... didn't open the plastic wrapper to check it out) ... the 'vintage' Vasa (sold in the 70s as Wasa) in 1:100 had none, apart from a few sketches on the plan, which was printed on both sides. My Dad gave me the kit (fortunately he also bought the accessories kit that had cannons and fittings ... sold separately in those days), which was started through hull planking - on the 'assumption' that it was accurate (it wasn't then, but has been revised at least a couple times in the interim based on marine archeology).
In recent years I've made some progress (and partial corrections) on the build (now suspended pending learning about rigging). The BEST 'instructions' are the builds available for perusal on MSW - and there are several for the Vasa. There are at least a couple for the Roar Ege, and no doubt if you study those you can avoid some pitfalls and also see what other builders have done to improve on what came in the box.
As for text instructions from Einar Billing back in the day, a sheet (in several languages) was provided in my 'Wasa' kit. It included:
"You are about to begin the exciting task of building a Billing Boat model, and I hope you will have many pleasant hours doing so. The most important point is that this kit is intended to be built, and not merely assembled. In consequence, you must not expect the parts to fit together perfectly - it will be necessary to exercise skill and imagination in the building of this kit. ... But thought and care should be exercised during construction ... after all, any child could put a puzzle together. ... I wish you a lot of success in building your model. Yours sincerely, Einar Billing."
When life gives you a lemon, make lemonade ! Johnny
- Scottish Guy, Ryland Craze, mtaylor and 3 others
-
 6
6
-
15 hours ago, Scottish Guy said:
Thank you Johnny, somehow you are right, I just should post both builds in here. Also might be easier than dealing with two different postsings and LOGs.
Micha
Another reason for my interest ... I have this kit in my stash (as well as the Billings Oseberg), since the early 'Vikingskibbe' version in kit form was far more challenging (although the prow and stern were 'built up' just like the original), since al the parts had to be cut out - and the veneer stock in my inherited kit was so dry, warped/rippled and splitting like crazy, everything would have to be made from scratch. Also, it was 1:20 scale - the Roar Ege AND the Oseberg are both 1:25 - sop can be displayed together. The Roar Ege will be built first to gain experience with this type of ship, and I plan anyway to test-fit the stakes first, modify, then remake in laminated walnut veneer I have in stock.
- Scottish Guy and Keith Black
-
2
-
Why not build them "side-by-side" in one build log? Like Raggedy Ann and Andy dolls (sewn together holding hands), they'll never get separated. That is, future perusers might go through one log yet not see the other.
-
20 hours ago, Louie da fly said:
That sounds almost Australian. I might steal it.
Steven
You're welcome to it, mate. Another one, when I've f...ed something up is that I feel "lower than a snake's belly in a wagon rut."
Speaking of modern 'wagons', there is something I learned today about Outback conveyances like the one pictured below ...

-
22 minutes ago, Scottish Guy said:
Hi Richard, maybe a bit late but just joined the forum a week ago. I would be interested even if the size would be a bit hard to chew for me (would have to build a model of this size in the garage or garden under a gazebo. But in a smaller size like 1:75 I definitely would volunteer for a trial.
I love the Cutty Sark and there is a nice model (with wrong hull design I guess) in 1:75, also the Revell 1:96 is a great size but I don´t really like the plastic kit, but there should be a wooden kit available somewhere though.
Micha
Artisania Latina has a 1:84 scale CS kit - perhaps a good 'compromise' scale to consider.
-
On 4/6/2024 at 2:17 PM, Keith Black said:
Ah, you're not a young man but you've got plenty of years left to you.
I started this crazy ship modeling hobby when I was 69, I wish I had started at a much younger age. There's a certain amount of information and knowledge one needs to absorb to be semi successful in the hobby. If you come late to the party as I did it's very hard to reach a high level of accomplishment, now at 77 I have to be satisfied with the fact that I'll never be much better than I am today. That's why it's so important to get kids interested and involved in ship modeling when they're young so they'll have the chance to become masters and more importantly, teachers.
We each must do what we can to pass the torch no matter how small the flame.
I'm with you, Keith - and am happy to do what I can when I can for as long as I can. With luck and Providence, there'll be some good years left. I'm learning to be 'one with the ship', insofar as old-time sailing ships were hand built machines with many parts. And there are VERY many parts, so sometimes we have to pick and choose what to include in our 'artwork' models.
- Keith Black and Scottish Guy
-
2
-
I thought that flummoxed or discombobulated were similar ... in the U.S. there is "thrown for a loop", "knocked over with a feather", "mind boggling", "hit me like a ton of bricks", awestruck, "stopped me in my tracks", "made speechless", thunderstruck, dumbfounded, "set back on my heels", "took the wind out of my sails", "totally blew me away" ... or a favorite of mine - "turned my head like a one eyed dog in a meat factory".
- mtaylor, GrandpaPhil and Baker
-
3
-
'Finally settling for a uniform method that will look OK in 1:100 scale. In the picture below, there are extra quilting pins not needed ... a third toothpick is just teased under the coil to make it easy to wrap a line three times around the middle (high of center), it stays put but is still fixed with a dab of CA (as is the knot at the top). The short end at that knot is trimmed away (the long end having been used for wrapping the middle & its end is trimmed away after fixing with CA). I can do it now with just a pair of toothpicks on the balsa block protected by waxed paper. The bamboo toothpicks are given a slight twist before removing in case of adhesion, and the coil pops-off the waxed paper.
I'm not seeing any discoloration from the small amount of glue being used (applied with the dental tool), and I like the instant drying that happens when the other end of the dental tool applies a touch of 'accelerator'. I figure on needing about 150 of these coils - each going to a belaying pin somewhere. So far I have ten made - leaving 140 to go !
- Keith Black, davyboy, Rick310 and 1 other
-
4
-
22 minutes ago, David Lester said:
... taper the bulkhead extensions so that they are full width where they meet the deck and narrower where they meet the railing. If it were me, at this point in the process, I think I would opt for this last approach. I think it would give the best overall result and shouldn't be too noticeable to the casual observer.
Your workmanship is really great and the model is looking really nice.
David
Ah yes, its the 'wide bulkhead extension' problem that I ran into myself. Obviously 'seeing ahead' (like in a chess game) might have produced a countermeasure like pre-thinning those extensions early in the build - but that would have make them weaker and easier to break under pressure of planking. Then there is thinning after planking but before decking - a better idea. But then we are dealing with the problem of what to do if the hull was planked and decked with the original bulkhead forms ... like I did.
One might not want to have an overly wide gunwale, then again, the false stanchions (bulwarks?) may look too small - that is, the vertical members should have a similar thickness. David's tapering idea from the bottom up leaves the gunwale as-is, then the puny false verticals could be picked or trimmed out and replaced by tapered ones that would look about the same as the bulkhead extensions that were tapered. The decking would be unaffected via that method.
So what did I do? As pictured below, the bulkhead extensions were cut in straight down (rather than tapered, as perhaps should have been done). It does mess with the decking, yet the additions of cannons may distract from that (so I hope). A waterway plank was placed between the trimmed bulkhead extensions, then false verticals placed over that ... No going back now. Ship modeling is a learning experience and we all have to learn somehow.
-
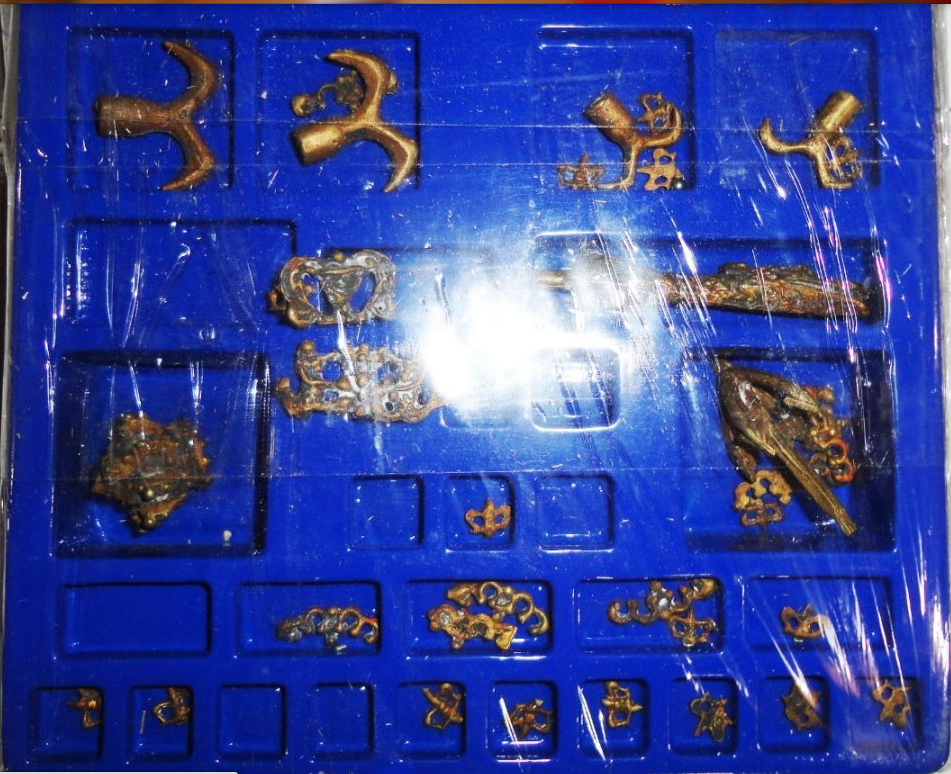
1 hour ago, Keith Black said:
It seems to be more complete than I initially thought.
Indeed, the only items missing may be the 2' x 3' wall poster of the finished model (not needed to build the kit, but perhaps a visual aid) and the castings set (pictured below - sorry for the camera flash in the middle). Most of the bits in there are fleur-de-lis ... which may be available on the secondary market - and are conjectural as decorations. The 3 key castings missing are; 1.) the monster head to go on the prow, 2.) the crown to mount on the bowsprit, and 3.) the grappling anchor suspended from the bowsprit - which might be available somewhere as a part (and some sort of crown may be as well).
There are also the curved knives to mount on the fore and main course yards (supposedly to cut enemy rigging when drawing alongside in battle) - visible on the Anthony Roll, but those shouldn't be too difficult to model in some medium ... or simply left off. The rigging rope in my kit is on spools (and looks like scale rope), thus the lines pictured (if original to the kit) were re-wrapped on holders.
The Sergal Great Harry kit can be built 'out of the box' to make a fine (if large) model 'as-is', but a few modifications to the castles might bring it more in line with present scholarship and marine archeology. My challenge was to translate the hull pieces from about 1:65 (provided) to 1:88 (with some corrections in hull lines based on the Mary Rose that has been preserved), to be compatible with the scale of the brass cannons in the kit - and also to build less of a 'beast' in terms of model size and case ultimately needed. Its all a matter of personal preference, and sometimes a larger presentation fits the scale of the environment in which it will be displayed.
-
1 hour ago, Keith Black said:
After we're gone it'll be wee hands and the family cat presenting the greatest danger to our creations for in the end, it all turns to dust.
All things to nothingness descend,
Grow old and die and meet their end,
Man dies, iron rusts, wood goes decayed,
Flowers fall, walls crumble, roses fade …
Nor long shall any name resound
Beyond the grave, unless 't be found
In some clerk's book, it is the pen
Gives immortality to men. (Author anonymous) -
3 minutes ago, barkeater said:
Just to be clear, I have the Proxxon db250 which online goes for $230-270 with one add for $97, although with that price I would be quite skeptical. I forgot how much I paid but it was well worth it in time spent and the decreased wear on my wrists given the dozen or so yards I did as well as the ornamental balustrades on my current model.
Rich
There have been scams on the internet where known products are pictured, but with a 'lowball' price - sometimes as low as a tenth of what the item normally sells. It is advisable to research the product first, know the value then deal with a reputable source. ... Of course, a modeler selling-off stuff can often offer good condition used equipment or kits at a substantial discount. But other than that, it it seems 'too good to be true' - it likely isn't.
-
21 hours ago, Chuck Seiler said:
Use Renaissance (conservators') wax.
'Always knew you were a 'Renaissance man".
- thibaultron, mtaylor and Canute
-
 3
3
-
I'll watch you build as it progresses - 'guess the kit is of the Gorch Fock 2. I'm slowly restoring an old scratch model of the GF 1, still extant but with a few modifications from its original configuration.
-
I grew up in Maryland and remember the opening of the FSK bridge. Since then (now a Pennsylvanian), I've used it a number of times to avoid the tunnels or heavy traffic on the long western loop of the Baltimore beltway. 'Guess in the 70s, no one did a 'what if' scenario to cover this type of collision. Other bridge designers have considered this and built massive pier guards fore and aft strong enough to withstand a direct hit by a massive ship.
- thibaultron, mtaylor and Canute
-
3
-
'Love the random-joint look of the decking ... likely how many decks were made from deck plank stock from the sawmill, where defects have to be cut out or warpage reduced - yielding planks of various lengths. These are cut, of course, so that the joint between running planks will center on a deck beam for securement - but there may be no detectable 'pattern' to the joints across the deck (at least not intentional).
-
-
Your photo from below shows an open access in the bottom of the 'crows nest' ... so there's no need for a door - which was a guess, really (and that would have been awkward). The 'nest' appears to be an elongated barrel. So the climbing bars go right into the bottom. 'Not sure what there was to stand on, but the simplest arrangement would be that 2/3rds of the bottom was hinged (either there or one further up in the barrel), so that it could be flipped closed once inside. The taper of the barrel would keep the trap door from moving further than horizontal.
Hmmm, gives new meaning to the old phrase, "Your turn in the barrel." 😉
- theoracle09 and clearway
-
2
-
A friend of mine made a scratch African Queen with a working steam engine to power the working model.
- mtaylor, a49kid and Keith Black
-
3
-
I've been making my own scale rope with the Syren Rope Rocket. Some 'ordinary' Gutermann poly thread bought in a sewing shop made good rope without much 'shine'. 'Don't know if it Gutermann "E", as there is no letter designation on the bobbin. The fuzz is minimal. Using Mettler ploy thread had less shine, but more fuzz (still less than cotton) - but 'flashing it off' by QUICKLY passing the line over an alcohol flame in an old fashion glass burner. 'Guess that might work for cotton scale rope.
Poly rope needs 'tempering' 5-7 min. at 350 degrees as part of the manufacture, so you can save yourself trouble with quality scale line form either Ropes of Scale or Syren - both good suppliers.
-
Aha, we were looking at the "kit review", which did not go into any building. I did start a Build log of 'Busting' the Sergal kit, and couldn't find it again ... until I stumbled on "content you've started" the code for the link I copied to paste below:
Now you can see what I started to do with the Sergal kit, and there are more photos of kit contents. Louie was helpful in his comments. Now I have to get the box off the shelf and look at the contents again. Johnny
- mtaylor and Keith Black
-
2


Cutty Sark by David Chapman - FINISHED - Revell -1/96 - PLASTIC - first build
in - Kit build logs for subjects built from 1851 - 1900
Posted
Per the nearly complete log on the Sergal Thermie by Popeye the Sailor, 1:124 is a challenge to work with, and I can see there were some major compromises/shortcuts present in that kit ... ergo many do not recommend it. The 1:78 CS may be another matter, but I can't comment - so check if there are logs on that.
I pondered the AL version at 1:84, but MSW response cautioned about various inaccuracies on that kit . Again, I haven't dug into it. The Billing version might be OK, as not all Billing kits are the same. However, all kits seem to have their plusses and minuses ... strong points and weak points in various aspects of materials and documentation. The most experienced builders will tell you that one does not have to build a kit 'out of the box', but can make some common-sense corrections and improvements. And it does not have to be a major 'bust' either.