

Gregory
-
Posts
3,175 -
Joined
-
Last visited
Content Type
Profiles
Forums
Gallery
Events
Everything posted by Gregory
-
 I was responding to your post that mentioned builds, i.e. kits. I replied: The rest of my post suggested your response was indeed helpful. I apologize if I didn't make that clear.
 -
Most of the builds are bound to kit materials. Deviating from that requires research such as yours and sourcing and preparing other materials.
-
I’m not in a good position to post links right now, but you might look at some logs for the Medway long boat, and the ModelExpo 18th Century long .
-
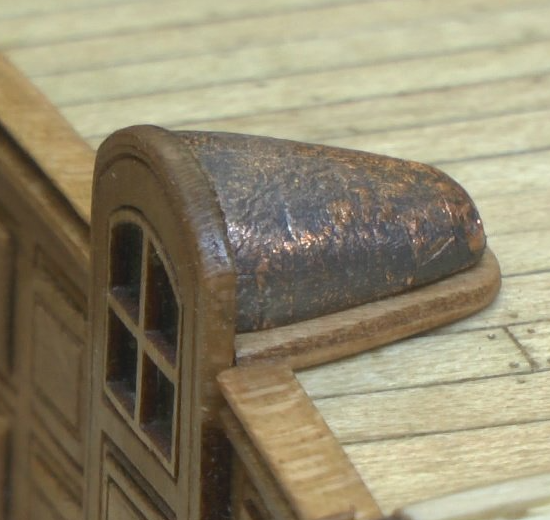
This is the cupola of my Resolution. It is copper leaf. Put it in a sandwich bag with boiled egg over night. (As you said, just the yolks would have worked.) Actually ended up a little darker than I would have liked, so a shorter time than overnight would have resulted in a good effect. It is easy to buff out if it gets too dark. I can't imagine why anyone would go to the trouble of using some kind of brush-on chemical aging process.
- 20 replies
-
- 4
-

-

-
- Indefatigable
- copper plates
- (and 1 more)
-
I would like to se a picture of the bend referred to. I'm trying to imagine a "sharp" bend at the bow of Lady Nelson.
-
Rules are for when someone messes up and gets caught, you can read the rules at their trial.
-
The only item in index regarding hammocks is about storage at night.
-
Any good wood-working glue should qualify as " Best " . Planking method is just as important as the glue you use. If the plank is shaped properly you can get by with relatively short clamping times. Titebond original sets up in about 30 minutes, but still recommends overnight to cure. The different versions of Titebond have different purposes, but they all glue wood together very well. Titebond The most trouble you will have is when you have a straight plank that you have forced on a curved surface. It will have to be clamped for hours. If you look at these planking videos, you will see how to shape the planks so you do not have to force the planks onto the model. Chuck Passaro's planking Videos - In the videos, Chuck is using CA. "Best" is relative to experience and personal preference. I prefer CA ( super glue ) in most situations, just to avoid clamping and having to wait so much to proceed with work. Working effectively with CA takes some practice to get use to working with. For planking you need to use a medium or thick formula, not the thin stuff. Here are some more planking technique resources. Planking Downloads and Tutorials and Videos - Model Ship World™
-
According to Lees it should pass to the right (starboard).
-
You can post a video in a build log. Why would a video in the Gallery be more informative than a few well chosen pictures. I personally don't care for a video, even in a build log. You have to watch the whole thing to find an interesting view, then you have to pause and/or rewind to get a good look at what you are interested in.
-
scissors, shears, cutters for rigging
Gregory replied to palmerit's topic in Modeling tools and Workshop Equipment
I have the same problem (OCD), so my solution is to use polyester thread/line and I use a small pointed soldering iron to make the nibs disappear. -
Hello with first question on my first build
Gregory replied to Ratdude's topic in New member Introductions
What is your first build going to be? -
If you haven’t finished shopping yet, make sure you look towards the bottom of the “specialty block “ listings, and check out the boxwood build yourself deadeyes. There’s nothing else out there to compare.
-
Not as easily obtainable . There may be some on HIS Model. You can look on eBay, but the source will be China from questionable vendors who also deal in pirated kits. Syren also has the best prices.
-
Once you get them laced up, I don’t think it’s that noticeable. It’s really a matter of what makes you happy. Those outside the modeling community would never notice unless you pointed it out. Most kits lack a lot of accurate detail. If you make the deadeyes perfect, what about all the other detail?
-
Having bought a lot of kits over the years, I don’t recall the deadeyes ever being consistent, except for the metal ones from BlueJacket. This was true of blocks also. 3D Printing has really changed the game.
-
What are you calling "backwards"? Facing the ladder or back to the ladder?
-
I’ve seen them on contemporary models without hand rails. I assume they held on to the sides or the back of the rungs as needed. These are men who had no problem scrambling around in the rigging on a rolling ship.
-
Good catch.. I didn't realize he sold those.
-
Joe ( Modelers SawMill ) will not have those dimensions at the WEB site, but send him an email with your needs, and chances are he will do a custom job for you.
-
Does anyone know what this rigging is called?
Gregory replied to RobMann79's topic in Masting, rigging and sails
I have never heard that explanation before. In this discussion: Question on use of crowsfeet on ship rigged vessels - Masting, rigging and sails - Model Ship World™ It is suggested that " ..Crowsfeet were designed to prevent the foot of the fore and main topsails from getting caught under the tops. " That is what I have always understood their purpose to be. This image from another discussion, shows how it was rigged. Here is another post that shows a little more detail of how it was rigged. https://modelshipworld.com/topic/2293-rattlesnake-by-jsgerson-finished-mamoli-164-using-robert-hunt’s-practicum/?do=findComment&comment=333009 -
When all is said and done, I would agree that this is the way to go.
- 53 replies
-
- 3
-
-
- Drill Press
- Milling
- (and 1 more)
-
I think you have a very valid point. For me it’s more of the idea of having it if I need it. I really don’t use it very often. If you can use it for some light milling it’s another plus.
- 53 replies
-
- 2
-
-
- Drill Press
- Milling
- (and 1 more)
-
There is a keyless chuck for the MF70 I have found it to be convenient for the tools it supports. 1/64 - 1/8 Shanks.
- 53 replies
-
- 3
-
-
- Drill Press
- Milling
- (and 1 more)
-
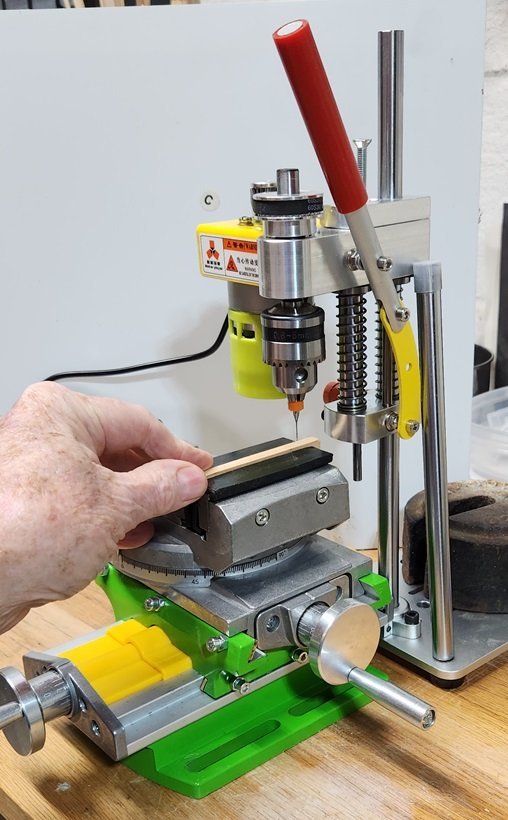
I have the Proxxon MF70, while a great little mill, it is not very efficient as a drill press. I reviewed a press I got on Amazon, which has turned out to be very satisfactory. I cover a lot of concerns and questions in my review. Mini Bench Drill Press - Modeling tools and Workshop Equipment - Model Ship World™ There was a lot of discussion about this and that, and in the end the the major additions/changes I made was replace the post with a longer one to get more clearance for the head, and I'm using it with a little combination rotary table/X-y which is great for milling at a modeling level. You may have to skip through some of the clutter in the topic to see what I am able to do with it, and how nice a little machine it is. I put this all together for about $140... The link for the press in my review is no longer active but this one looks like the same machine. Mini Drill Press, For a few dollars more. I would pretty much ignore the accessories they bundle with these presses, so don't pay more for them, but make sure you get the power supply. If I can provide any more information, please let me know. You can see the foot-print is relatively small for all the work you can do with this. P.S. I just noticed you mentioned using the Proxxon X-Y add-on. I think it would be great with this press. I have one of these: Multifunction Worktable Milling Working Cross Table It is not as well built as the Proxxon but is quite adequate for the work I do with wood. I bought a vise Intended for the MF70 that cost as much as the Proxxon X-Y table. Proxxon 24260 Precision machine vise
- 53 replies
-
- 4
-
-
-
- Drill Press
- Milling
- (and 1 more)