
HOLIDAY DONATION DRIVE - SUPPORT MSW - DO YOUR PART TO KEEP THIS GREAT FORUM GOING! (Only 68 donations so far out of 49,000 members - Can we at least get 100? C'mon guys!)
×


AJohnson
-
Posts
2,034 -
Joined
-
Last visited
Content Type
Profiles
Forums
Gallery
Events
Everything posted by AJohnson
-
 Hi David, Glad you back safely from the ‘wilds’ of Scotland and hope not all your birds were blown to cover and you managed to spot some. Like you I have been puzzling over the rigging of the RMG model and trying to work out what to do, but fortunately I’m a bit behind you in my build, so will shamelessly copy you when the time comes! For instance the RMG model doesn’t have yard braces running to the stern, only the ones running to the bowsprit, though many other cutter models do have these both fitted, is that right, or is it a case of either/or? There are triangular fillets at the stern that in other cutter model have belays for the main sheet, yard braces and flag halliards. What do you think of those David. Very nicely done rigging, looking forward to seeing the “pointy” end done.
- 152 replies
-
- 1
-

-
- Vanguard Models
- Cutter
- (and 2 more)
-
A really interesting build Richard, very delicate and intricate looking.
-
Well done Alan, that looks spectacular, I have really enjoyed following along on this one, what next?!
-
Welcome to MSW John.
-
Thanks Ron, I agree about Vanguard kits, as the basics are so well taken care of for the builder and the instructions/plans so comprehensive, it makes "assembling" the kit straight forward; I won't say "easy" as that could be misinterpreted by the newcomer. This frees up energies often absorbed with rectifying short comings of other kit manufacturers and allows the builder to go off in whatever direction they desire. The fact so many of us modify and even mildly "kit-bash" Chris's kits is a compliment I think to his designs.
-
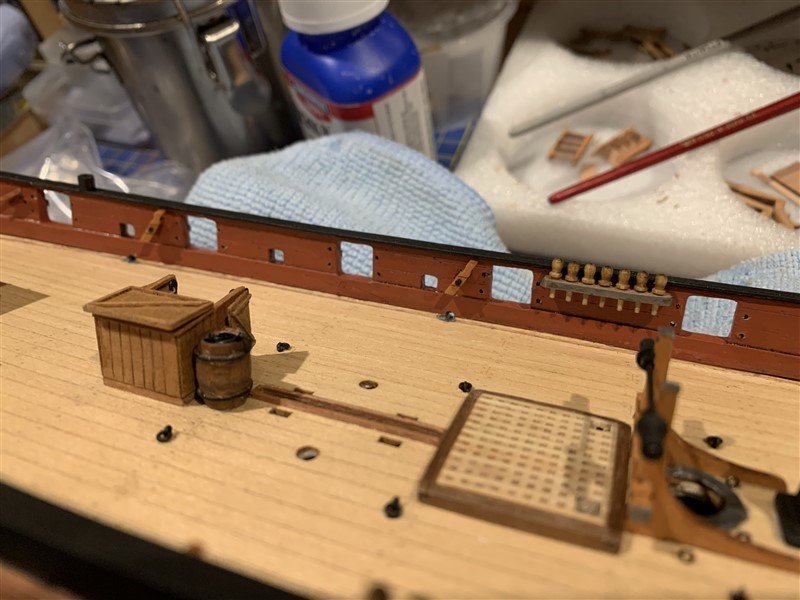
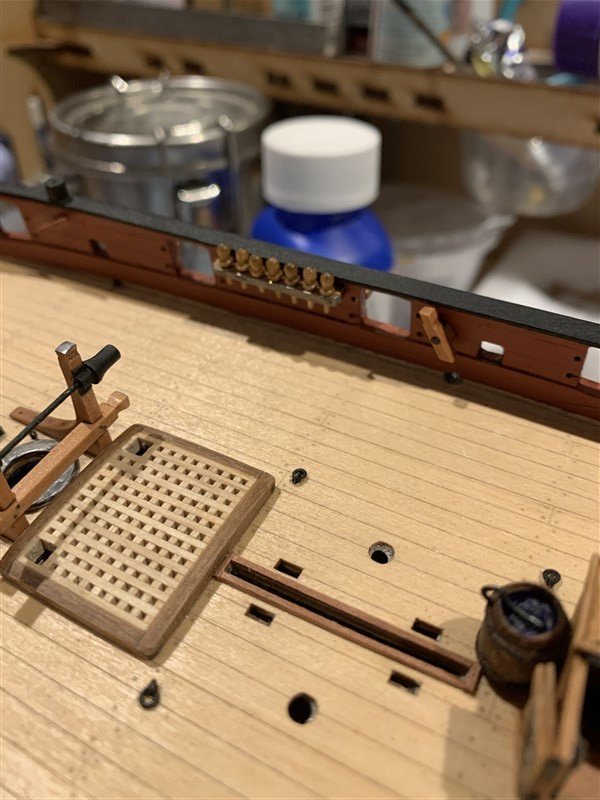
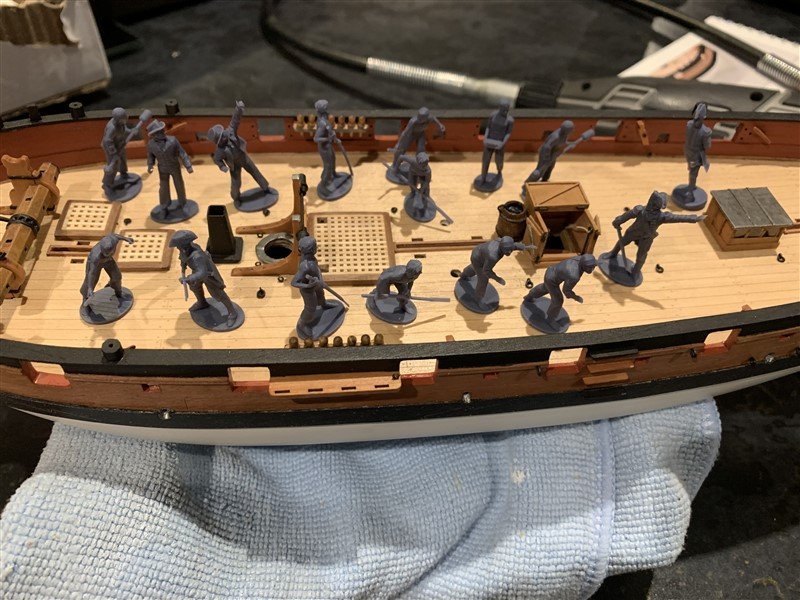
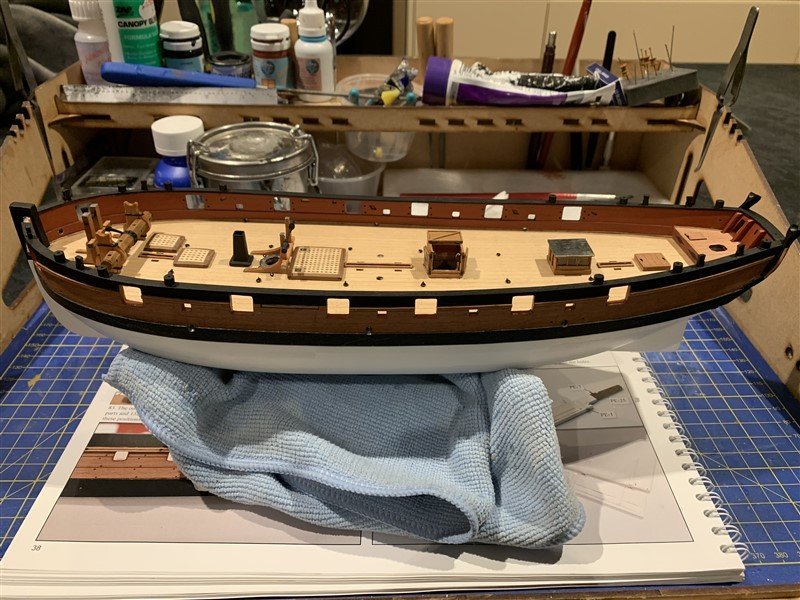
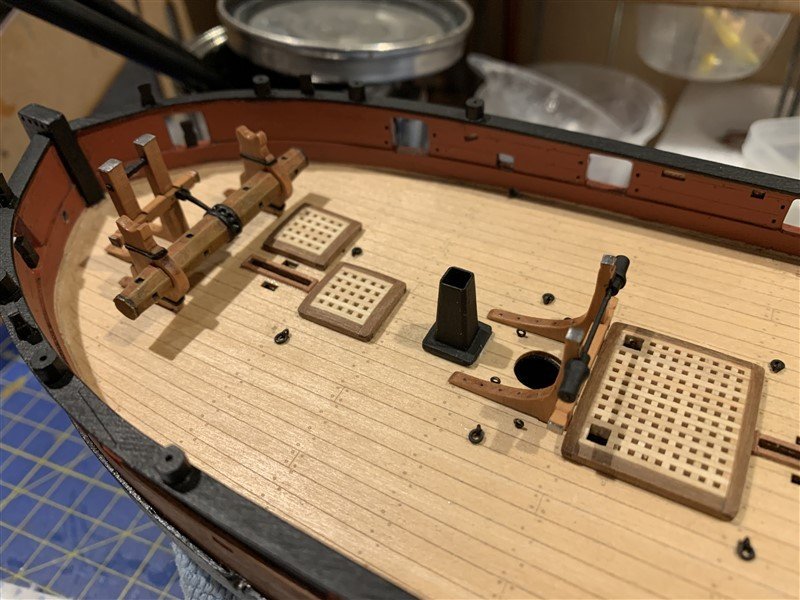
Some progress on smaller items over the weekend. Including belay pin racks, side steps, a scattering of hull eyelets, standard and cavel cleats. Additionally after looking at it a while I decided the lead roof of the cabin skylight I built in post #89 would look better if sectioned with join strips rather than as one big sheet of lead, which may have been made from smaller sheets anyway. Additionally I thought it was high time to give the crew an airing, just so they can get used to their new berth. They look a little too big on their stands at the moment, but they will all be painted and have the bases removed in due course, with the canons aboard it is going to look crowded and that is just under half the actual compliment. Thanks for looking in 👋
- 207 replies
-
- 20
-
-
1966 Buick Riviera by CDW - FINISHED - AMT - 1:25 Scale
AJohnson replied to CDW's topic in Non-ship/categorised builds
Lovely looking finish Craig! -
you are right Craig, a bit too blue, I shall sort that and make more brown/rum looking 🤣
-
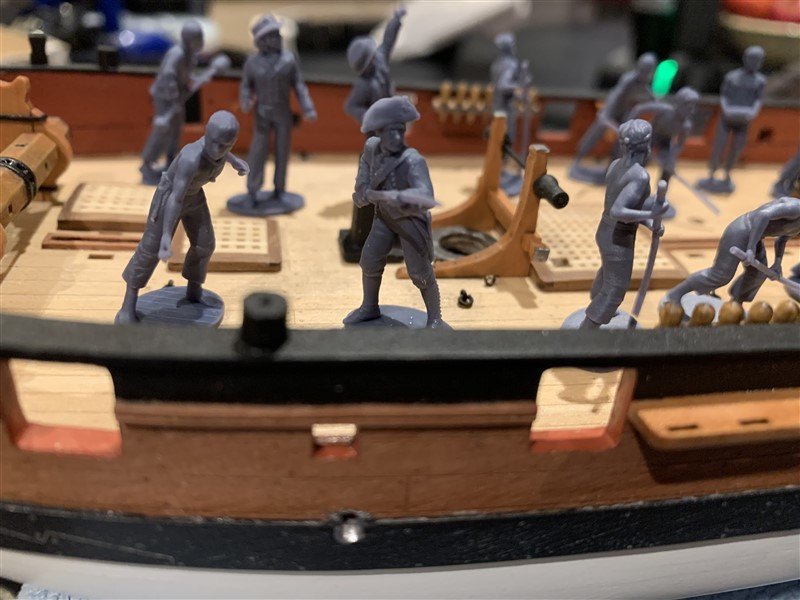
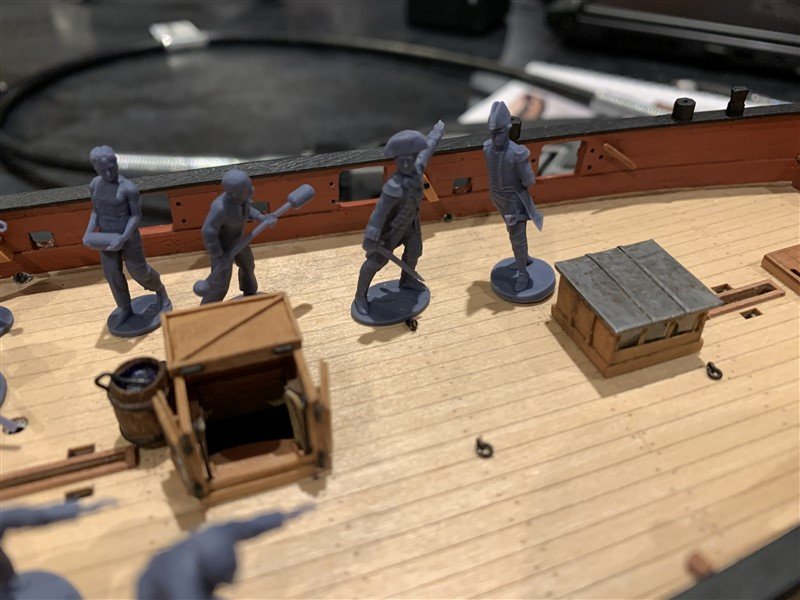
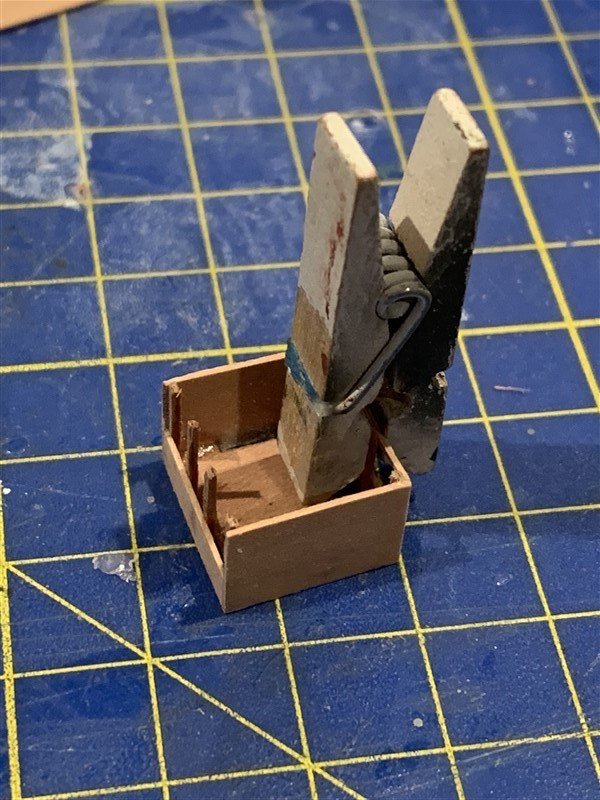
Evening all and thanks for the comments and the likes. This small update, now the stern trauma has been put behind me, is the completion of the small skylight above the Commander's cabin, based on drawing ZAZ6418 dimension. Scratch built as the companionway further forward, from left over 0.7mm wood from the kit, with additions of acetate windows and a lead roof. Finally a whimsical detail of a water butt and ladle was added for the exercising gun crews; when finished the model will show some of the larboard guns being "exercised" I have got a set of crew figures from Chris, including officers, Marines, seaman and a couple of gun crews, so around 20 figures, just under halt the Trial's actual compliment. Thanks for looking in and your continued interest.


- 207 replies
-
- 10
-
-
Welcome to MSW!
-
Welcome to MSW!
-
Hi Chris, if I’m reading @Maciek right he is asking about the square sail/yard. I am also interested in what the answer is, did yards run on the shrouds and is this why the front ones were served?
-
I think that the darker rim is laser cutting char Alan, a manufacturing process by byproduct, not a deliberate addition of metal rims. It’s a pain to sand off and leave a round wheel, I spin trucks on a cocktail stick held in a Dremmel and spin them while lightly sanding with sanding stick.
-
A really nice looking cutter you have built there! I would be very interested to see what people say about yards fouling standing rigging and shrouds! I'm also building a cutter and like you want to add sails but not have the yards/sails perpendicular to the keel, partly for looks and partly for a narrower model so it can fit in a smaller display box and shelf! I have looked at several model, including contemporary ones and the topmast and main shrouds appear to foul the yards if they are rotated by even a small amount. hope one of MSW resident gurus can help.
- 24 replies
-
- 1
-

-
- Lady Nelson
- Amati
- (and 2 more)
-
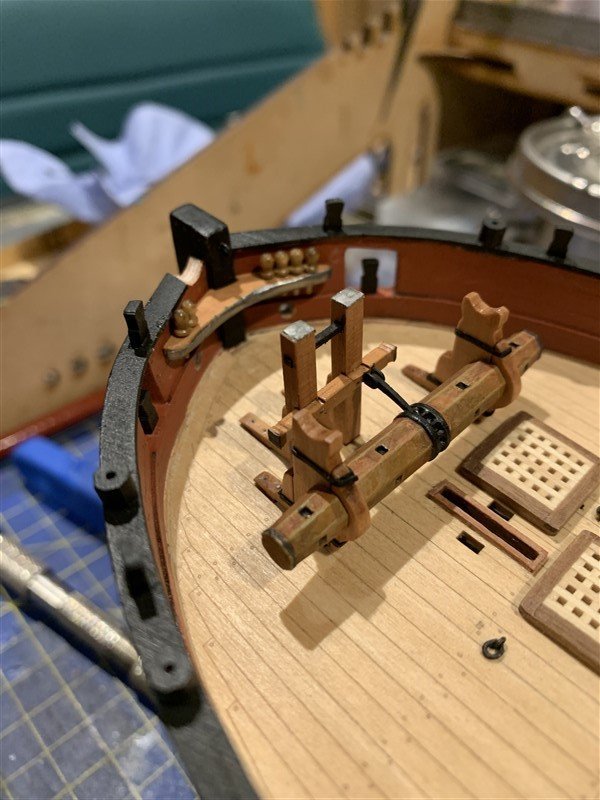
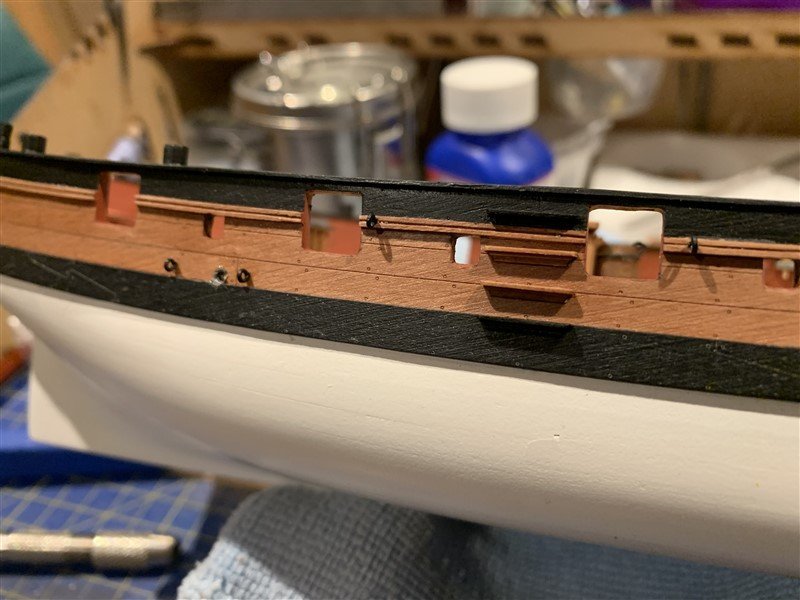
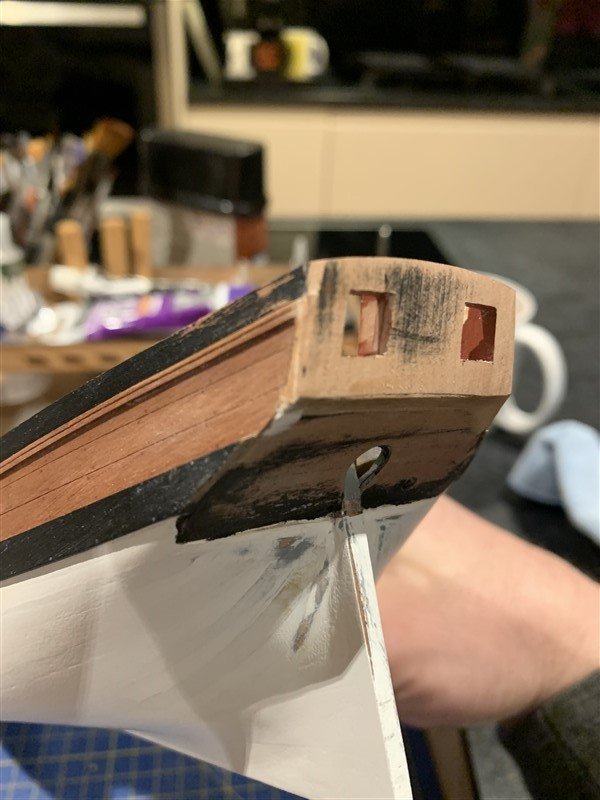
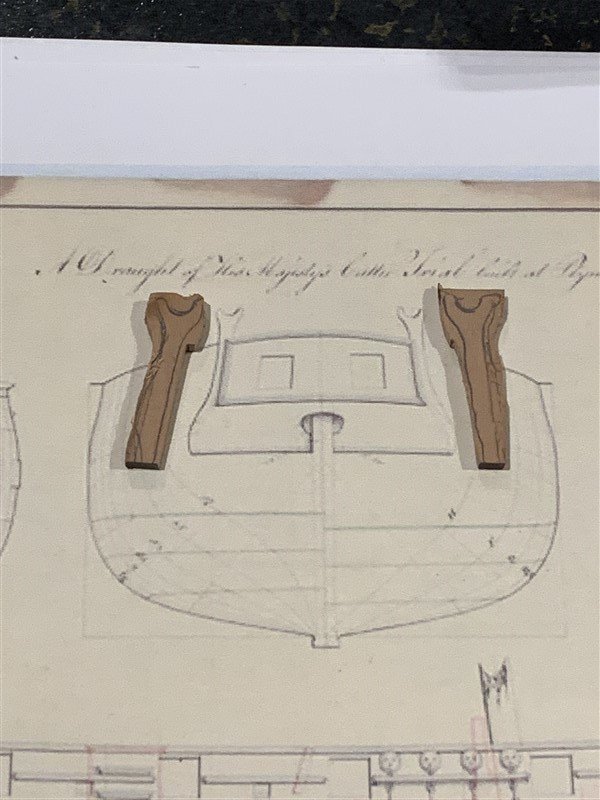
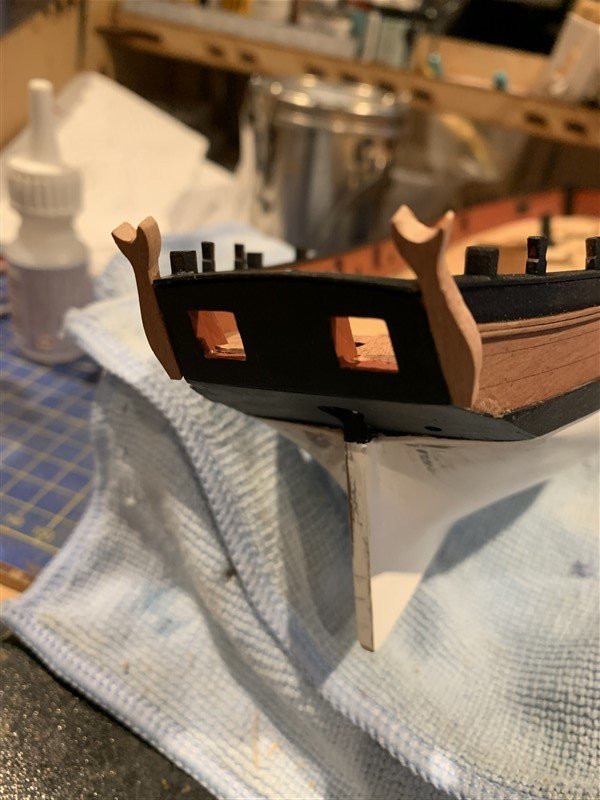
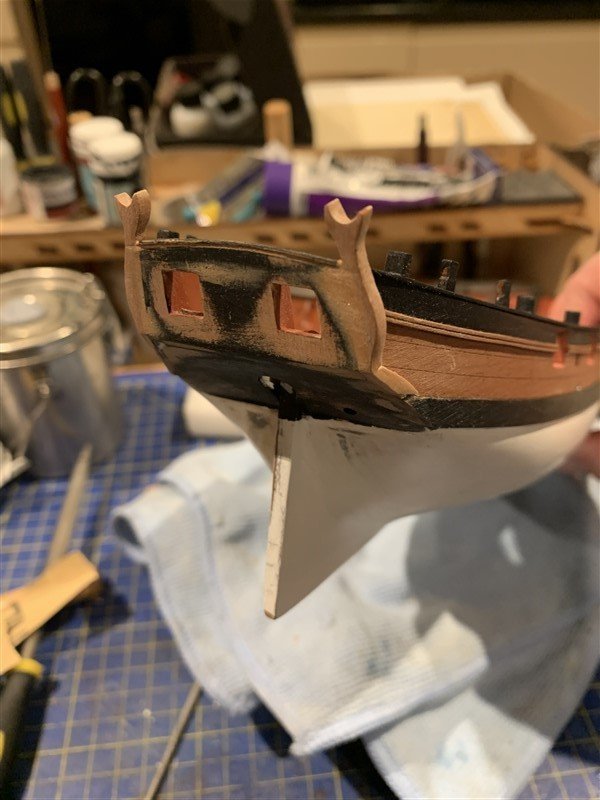
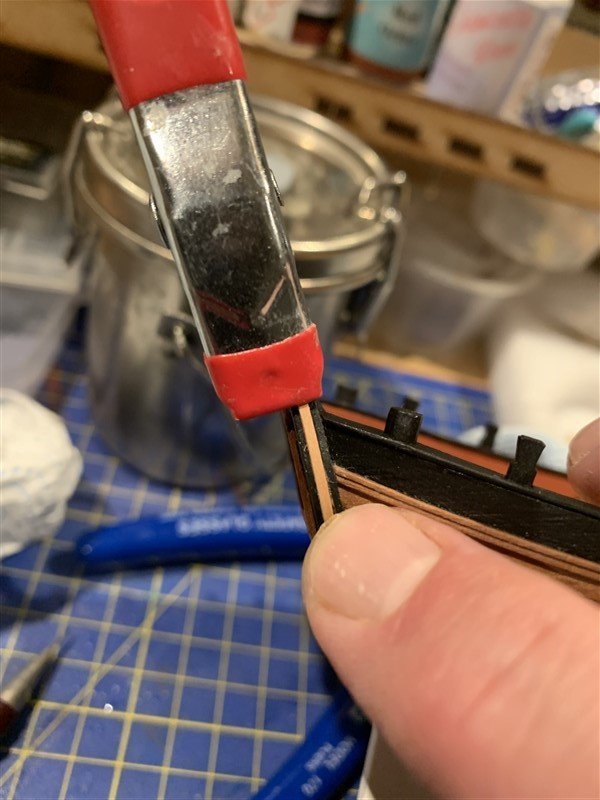
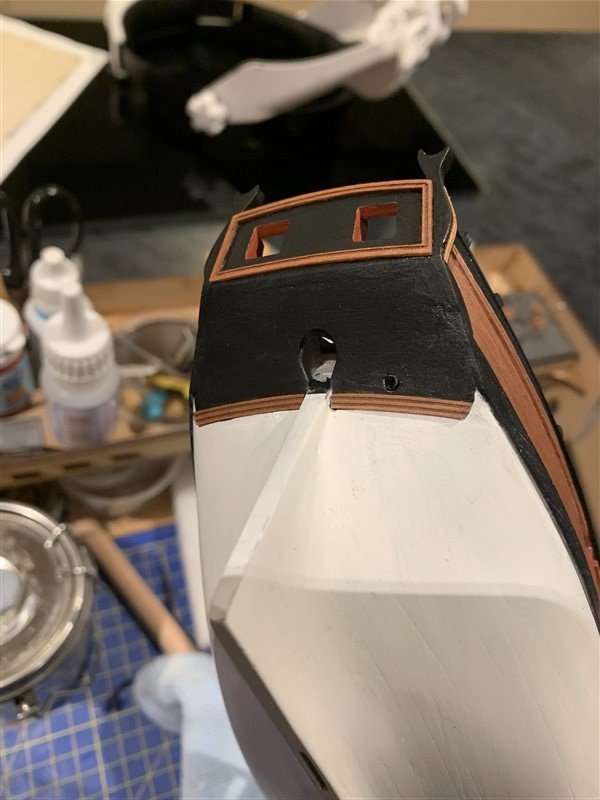
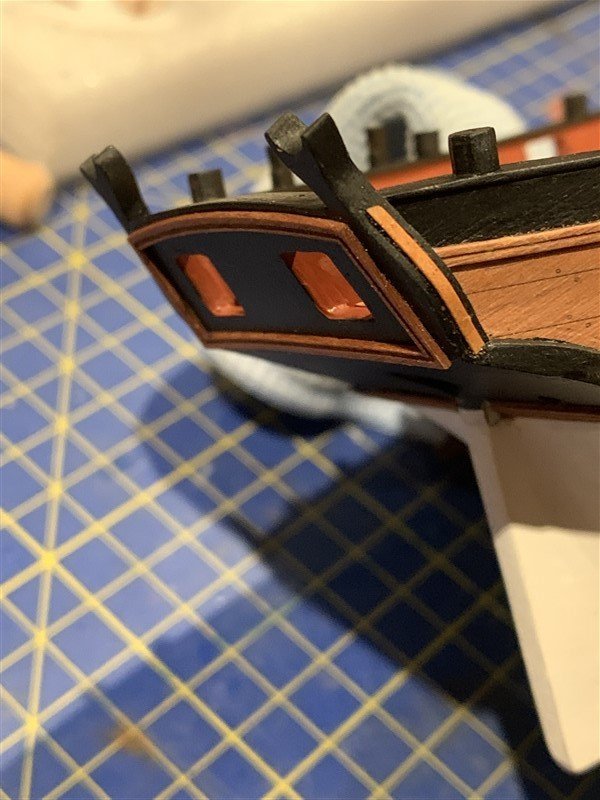
Update on the repairs and modifications I made to the stern after dropping the model a few weeks back. It's taken a while to decide what to do, but in the end for an unplanned detour, it's turned out okay. After breaking the stern transom and counter and then marking the wood in the the process of gluing back together, I knew I was going to have to make the decision of painting the damaged wood and this took me a while to come to terms with as the bulwarks look so nice with just Danish oil applied. Given the boom supports were snapped I decided to fashion some of my own with thicker wood from the kit to try and match NMM drawing ZAZ6418 as best I could, but with a nod to the contemporary model referenced elsewhere on MSW, I shaped them to give a slightly curved profile and added some inlaid pear strip to side profile to mimic the ZAZ6418 details. Having painted the transom and counter, the lower stern counter rails and transom framing did stand out better than I hoped against the black paint. So overall; with the caveat that I'd rather not had to do it, I'm happy with my repair job. Some final touching up and a flat coat needed, but that can wait until the hull is nearly complete and I can do all that stuff in one go. Other little details completed at the weekend was the galley chimney, traversing tackle ring bolts and mast coat from lead foil.


- 207 replies
-
- 17
-
-

-
Snap! love it @chris watton Caldercraft’s Sherborne was my first wood model, still here gathering dust on the shelf of shame. 🤣
-
Quite the armament production line you have going there Dave! I like the quoin details you have added.
-
Hi Nipper, there are currently two very similar kits on the market you could try to "kit-bash" into Irene. Caldercraft's HMS Cruizer & HMS Snake. Irene (ex. HMS Grasshopper) was in fact a Cruiser class brig, so the ideal starting point. However a word of warning (my personal opinion only), Caldercraft kits are much more basic than Vanguard ones. I have HMS Snake and will be bashing it into HMS Scylla, but it will be a labour of love; still in the research phase atm. The difference in quality between Caldercraft and the more modern Vanguard kits is noticeable. Chris Watton design them all, but the CC Cruizer/Snake are over 20 year old designs now. One glimmer of hope, if you are prepared for an undefined/possibly long wait, there was a hint from @chris watton he might one day revisit the subject of RN Brigs, but not sure that would be the ubiquitous Cruizer class, the Cherokee class, or something else... There are many Cruzier/Snake builds on MSW, some including a kit bash into other Cruizer Brigs, some links for you:- Hope this helps.
-
Hi Lyle, Yeah, stuff does happen, too often to my models, but I must be clumsy. 😬 But more importantly I hope your wife and you are doing okay and you can return to finishing your wonderful Bounty when time allows, I'm looking forward to seeing that and hoping it will inspire me to get mine finished after coming up 14 years! 🤭
-
I always paint them Dave and Chris states they should be painted. I use Matt black enamel or Caldercraft “Dull metal” acrylic. Often them apply dry coats and washes to make then “look” a bit more metallic, but that is personal taste. (see my current Trial log if your interested in what I do. ) Sure others have their own ideas on painting realistic looking armament.
-
Hi Graham, glad to see you back in your shipyard. Though I have been following your 1=1 scale project!
-
1966 Buick Riviera by CDW - FINISHED - AMT - 1:25 Scale
AJohnson replied to CDW's topic in Non-ship/categorised builds
Shame this isn’t a beat up aircraft, many modellers would kill to get an “oil can” effect like that on some panels! The finish you have on the rest of the body is outstanding Craig, so appreciate why you looking at replacing the hood. -
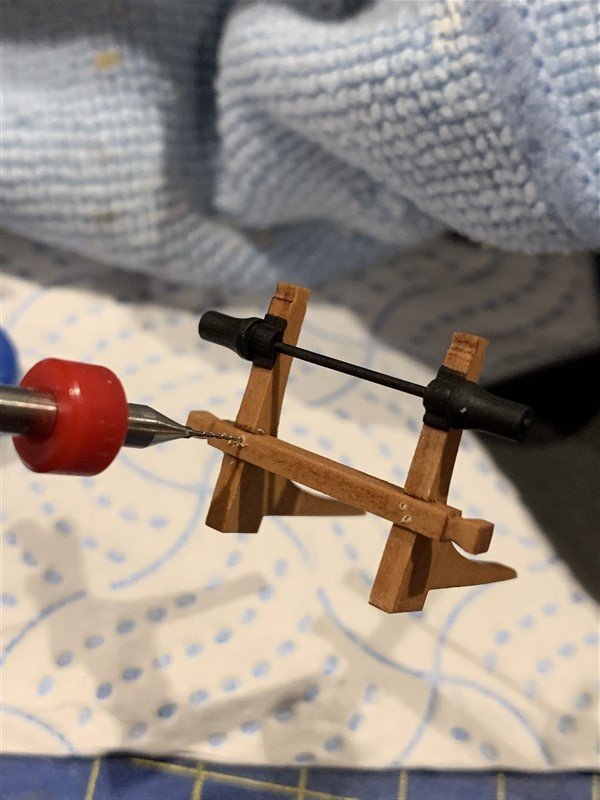
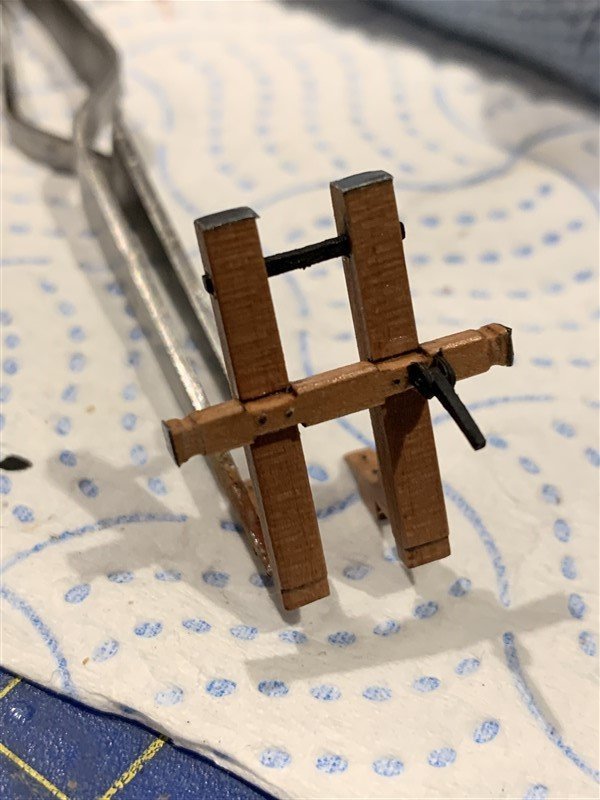
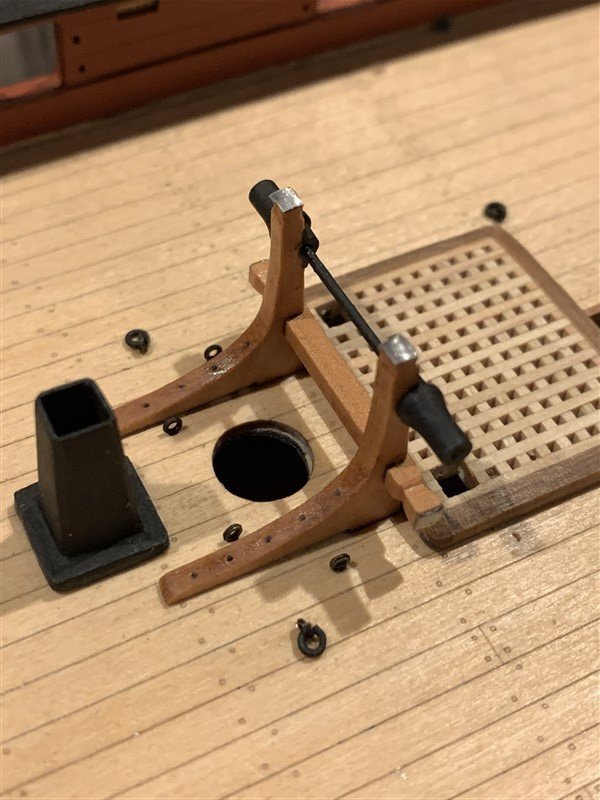
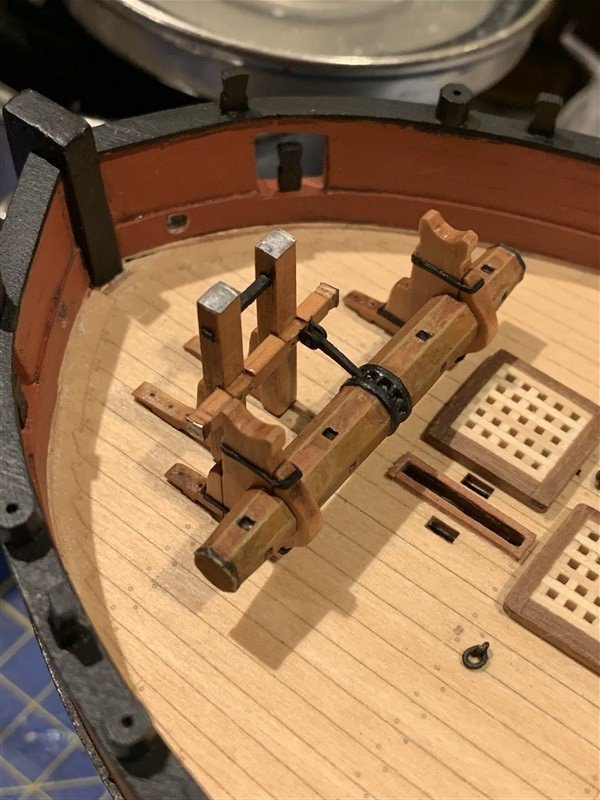
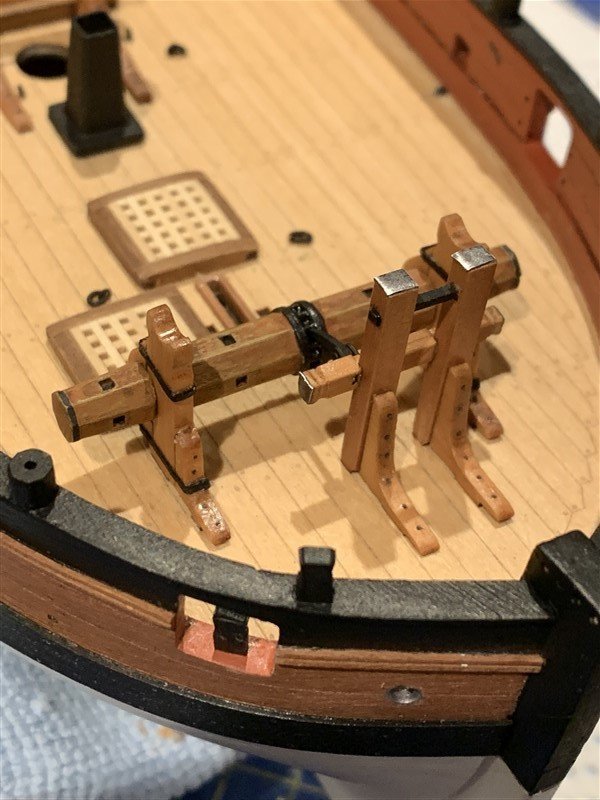
Additions for the last couple of days are the Main winch, Bowsprit bitts and Main Mast bitts. I have been slowly assembling these over a few weeks now as other stages of the build needed to dry and so on. These were all very straight forward to assemble and they fit together very well with only the char removal needed for sanding. The minor changes I have made were to add a little details to simulate bolts, iron bands and referring to Petrejus, leaded bit cap and ends; though I think copper would have been more accurate? Anyway my commander is poor, so he can't afford copper to cap his bitts! The bolts were drilled with reference to the diagrams in Goodwin's AotS book "Alert" and filled simply with blacked stiff brush bristles. Lead bitt ends were covered using the adhesive lead sheet I used for the hawse hole and scupper linings. Iron bands were from the supplied black card. The main winch drum is a resin part, so this took a little bit effort to make it look more like wood. Various layer of browns and then some dry brush highlights and washes to pick out details. These items aren't permanently fixed and have been put aside, as I think they will get in the way when adding the cannons. Thanks you all for the continued support, likes and comments.


- 207 replies
-
- 20
-
-
-
1966 Buick Riviera by CDW - FINISHED - AMT - 1:25 Scale
AJohnson replied to CDW's topic in Non-ship/categorised builds
Really nice looking finish.

