


AJohnson
-
Posts
2,054 -
Joined
-
Last visited
Content Type
Profiles
Forums
Gallery
Events
Everything posted by AJohnson
-

Greeting from Weston-super-Mare
AJohnson replied to JonVonWeston's topic in New member Introductions
Welcome to MSW Jon! Really nice looking model! -
Gloster Meteor F8 by AJohnson - Airfix -1/48- PLASTIC
AJohnson replied to AJohnson's topic in Completed non-ship models
Brilliant, thank you. EG! -
Gloster Meteor F8 by AJohnson - Airfix -1/48- PLASTIC
AJohnson replied to AJohnson's topic in Completed non-ship models
I'm not 100% sure, somewhere in the back of my mind I recall reading they were some kind of visual aid; hence the yellow colour, but not sure why? Certainly not wing fences for reducing turbulence and I don't think anything to do with communication(radio.) My go to on MSW is @Egilman who is the font of all knowledge for things with wings! 😁 -
Very impressive Alan, as OC says it is really coming together well.
-
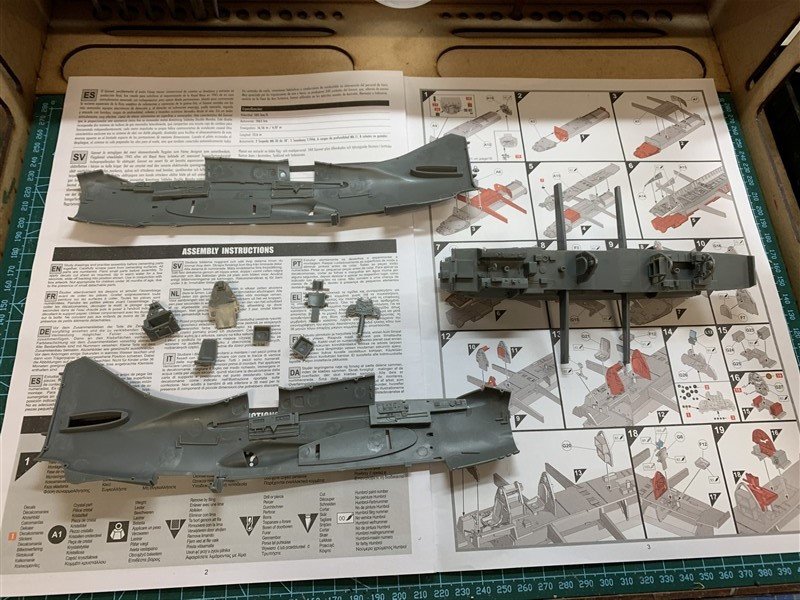
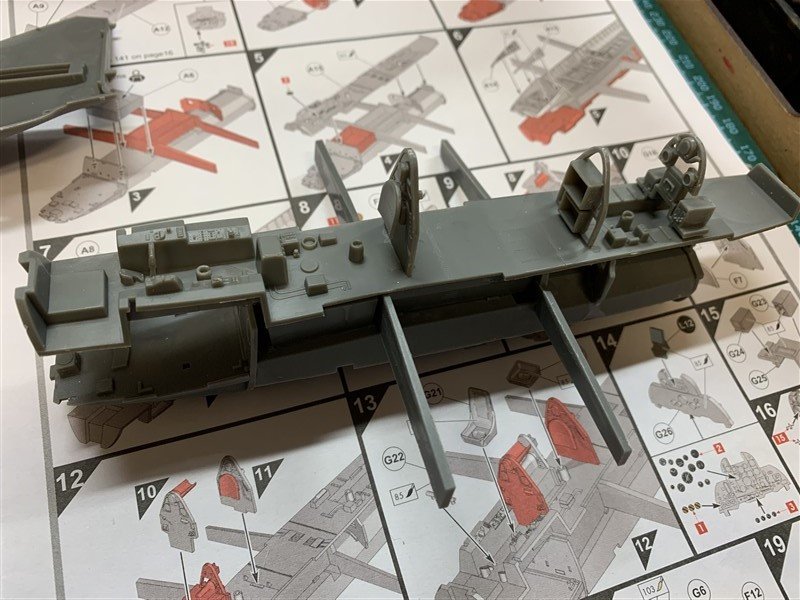
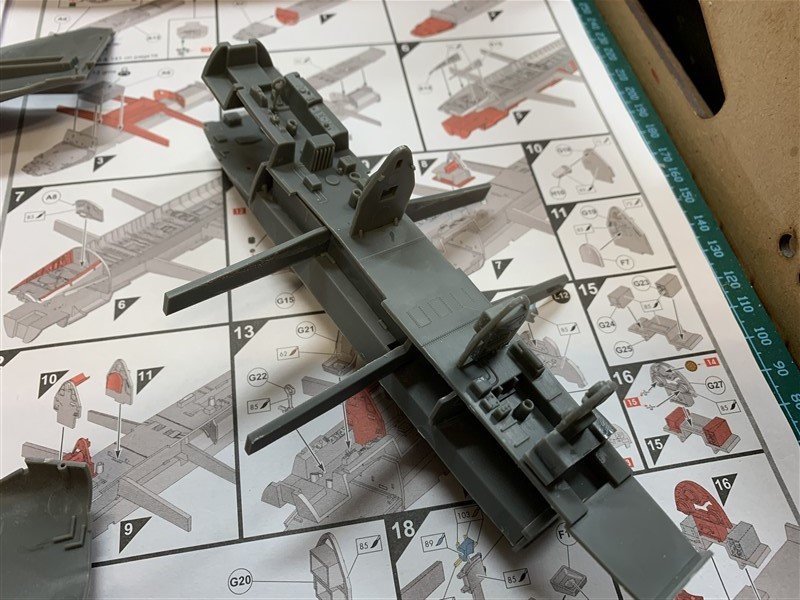
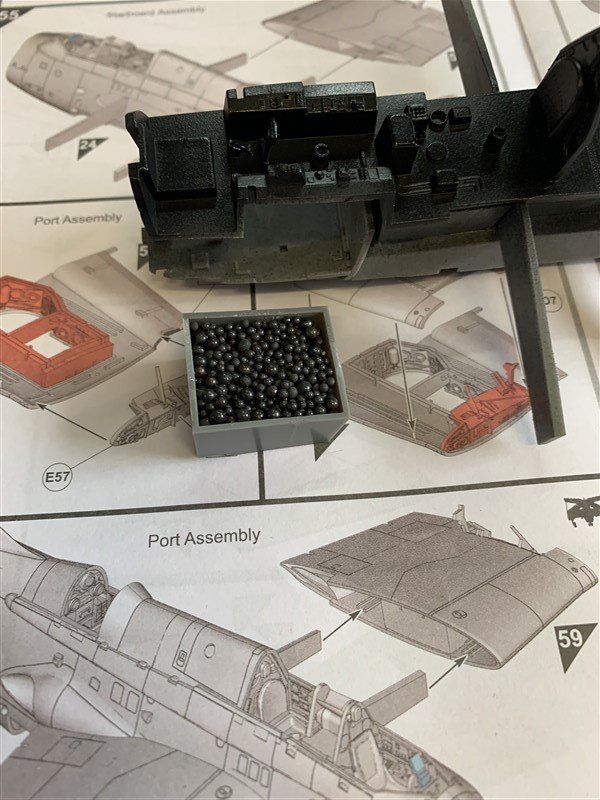
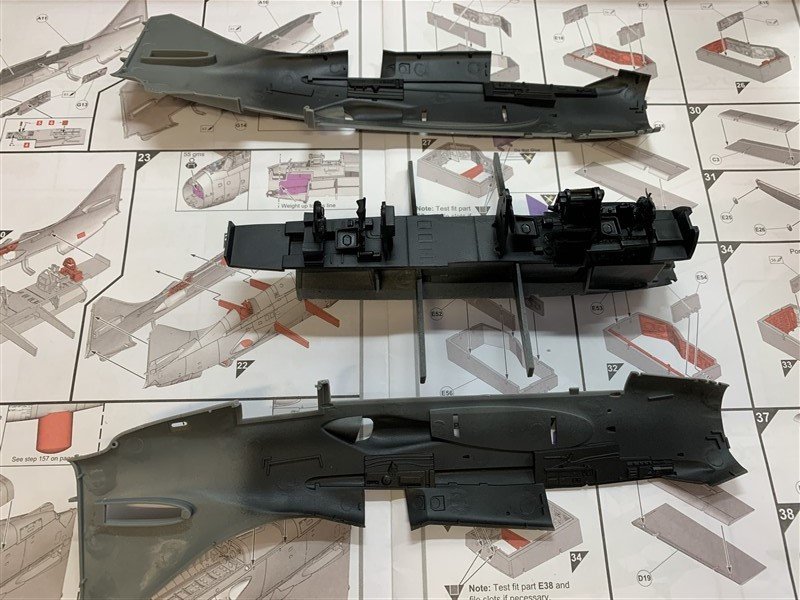
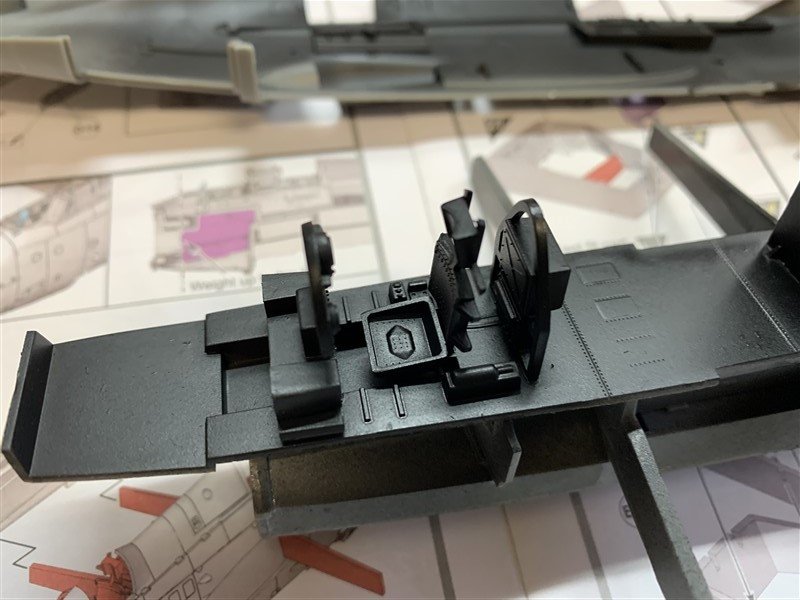
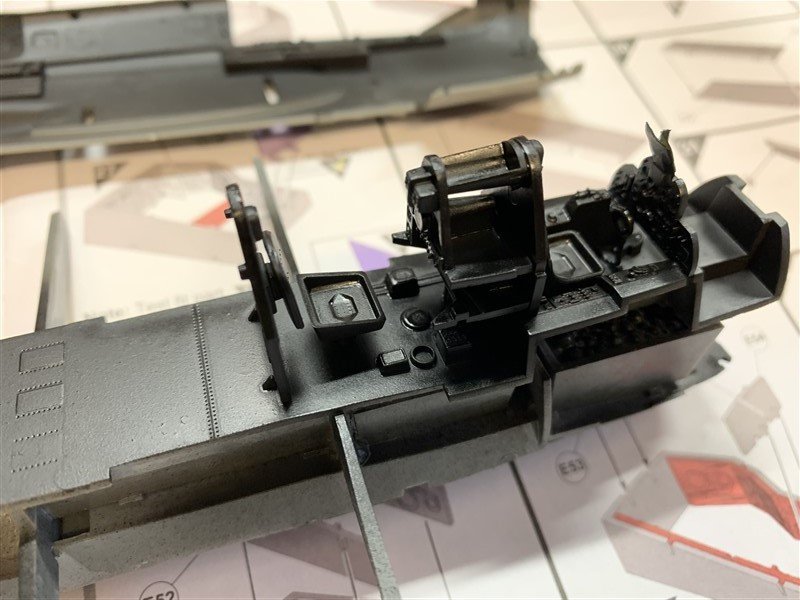
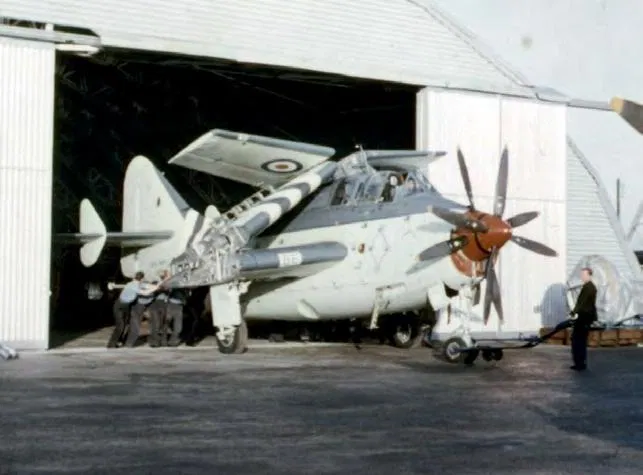
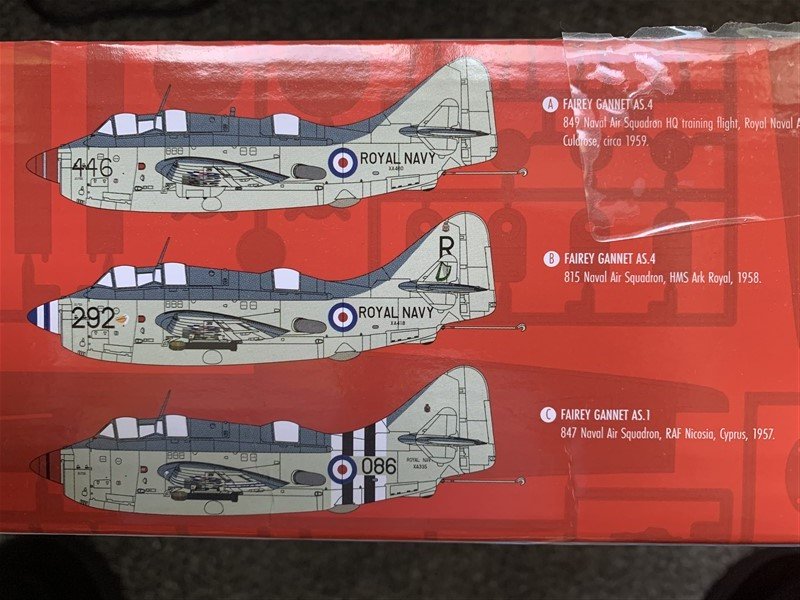
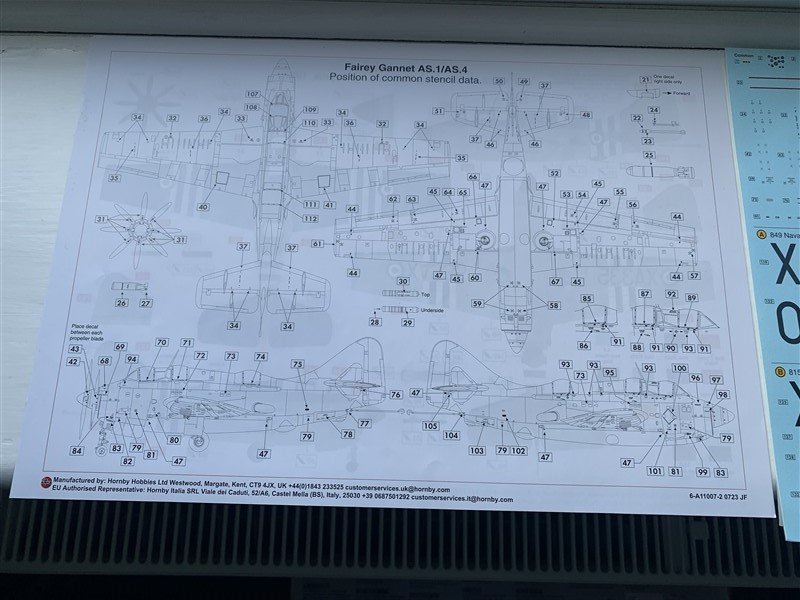
Time for a little update on progress so far and a decision on the version I will do. The first page of instruction is all to do with the cockpit and other stations for the crew. Nothing difficult and most of the parts come from one sprue, so no hunting around the box for parts! One thing you need to allow for is plenty of weight to make the model sit on it's tricycle undercarriage. Airfix provide two little tubs for you to add weights into, one each beneath the first two seats. I might try and add a bit more, just to be sure. Most internal parts are black, so I assembled much of it before spraying. Once this is all dry I will add the few remaining parts, decals and some scratch seatbelts. I'm not going mad as I'm modelling this with the wings folded (for shelf space) and also the black interior will hide much of the detail anyway. A bit of shading, maybe a wash and pick out a few items on the control panels should do. Also I have decided to model XA335, an AS.1 from 847 Naval Squadron based in Cyprus in 1957. This sports some faded "Operation Musketeer" stripes whilst on duty hunting for supply boats on anti-EOKA missions at that time, these being removed on the aircraft's return to the UK. (See the last picture of the actual aircraft in Cyprus). It also means a reduced weapons fit, well actually none, just empty rocket rails and I will probably close-up the bomb bay, especially if I need somewhere to hide additional weight! 😁 Thanks for looking in and the likes.
- 34 replies
-
- 12
-

-
Exceptional finish Dan, meticulous work.
-
Thank you, yes I did experiment with running a fine drafting pencil in the panels lines as I hoped the graphite would still look “metallic”, didn’t think dark washes would be quite right. The metallic finish was “okay” but not entirely happy with it.
-
Is that treatment with the paint pens you got recently?
-
Thanks Rob, a Gannet log has been started! Thanks you, it certainly is and ought to be better known for the work it did. Thanks Alan, I wanted to show of all the "bits and bobs" so glad it came out alright. Complicated looking perhaps, but Airfix done a great job in making the assembly fairly straight forward, the only compromise (for a Mk.1) being the connecting tabs that hold the wings together are visible through the wing-root windows. - easily overlooked, though and later versions those were solid so no problem Thanks Dan, Gannet log has been started!...
-
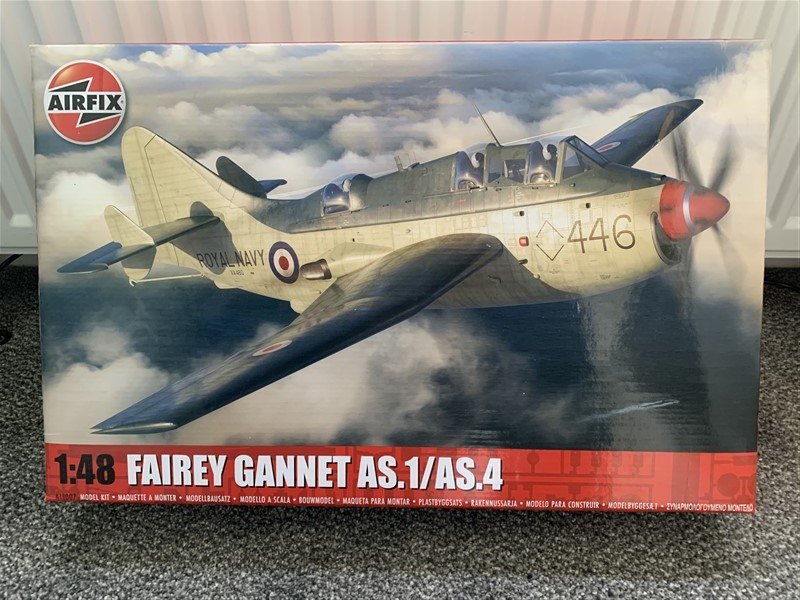
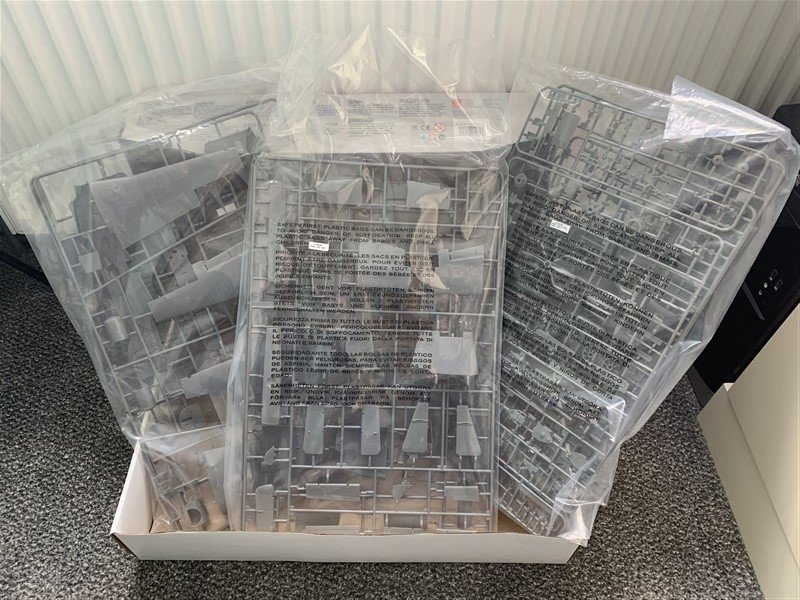
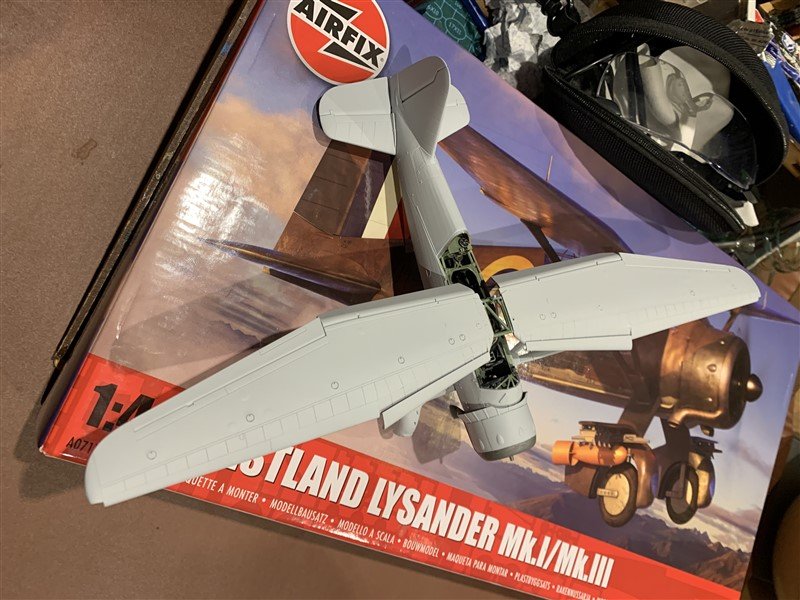
Well I'm on something of a roll building mostly 'out of the box' 1/48 Airfix kits at the moment and enjoying it, so thought a step up from the last couple of models to a big ugly beast was in order - the Fairey Gannet! (although the last two were pretty ugly - Defiant & Lysander, just not as big! 😆) although in many ways I do like the look of this type and I am lucky enough to have one at our local air museum at Elvington, although it is a later AEW version; the last couple of pics. So some pictures of what you get in the box, plenty of plastic, but there are many options (folding wings, open/closed bomb bay etc. and weapons load outs) so not all of that will be needed. Three marking options, the most likely one most people will model being the HMS Ark Royal version, and yes, I might just follow the heard, or maybe the Operation Musketeer one, we shall see! Loads of stencil decals anyway... 😖 Pull up a chair if you are into aircraft that hit every branch as it fell to Earth out of the Ugly Tree! 😆


- 34 replies
-
- 13
-
-
Wonderful build! Well worth the persistence over the years!
-
Well that was quick, the assemblies went together better than I thought. So here are the final round of pictures, calling this one finished! Thanks to everyone who followed along and commented or liked. I think I have the need for another Non-ship build, will start a log soon, a 1/48 Fairey Gannet. 😁

- 31 replies
-
- 14
-
-

-
Agreed, amazing - not sure with my shaking hands I could get the rails and ladders on the correct part at that scale! 😂
-
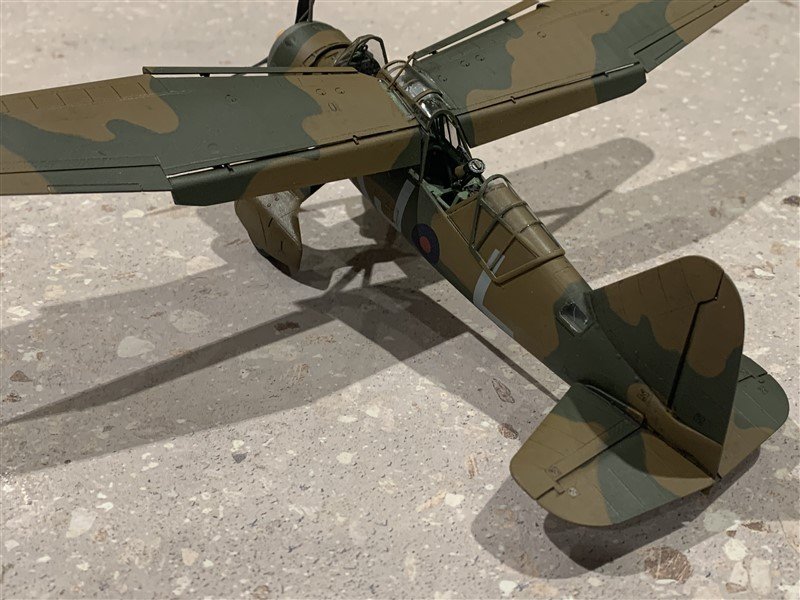
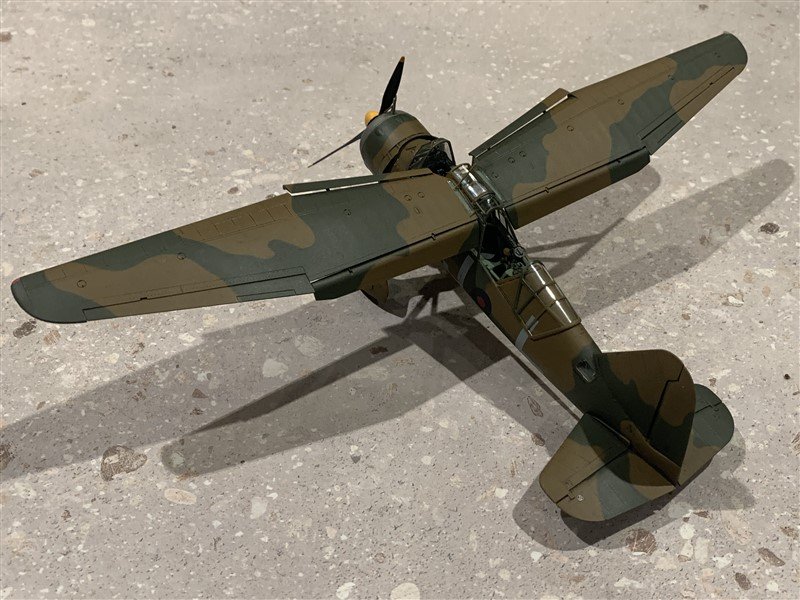
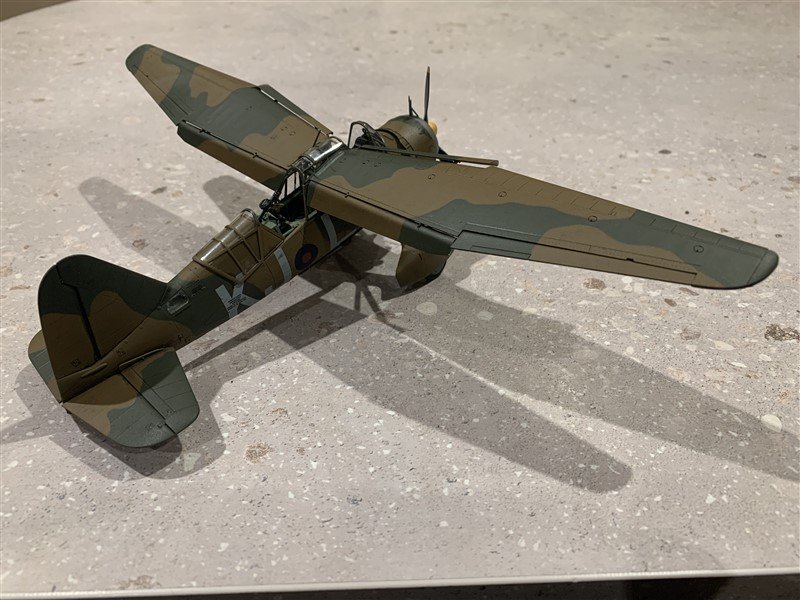
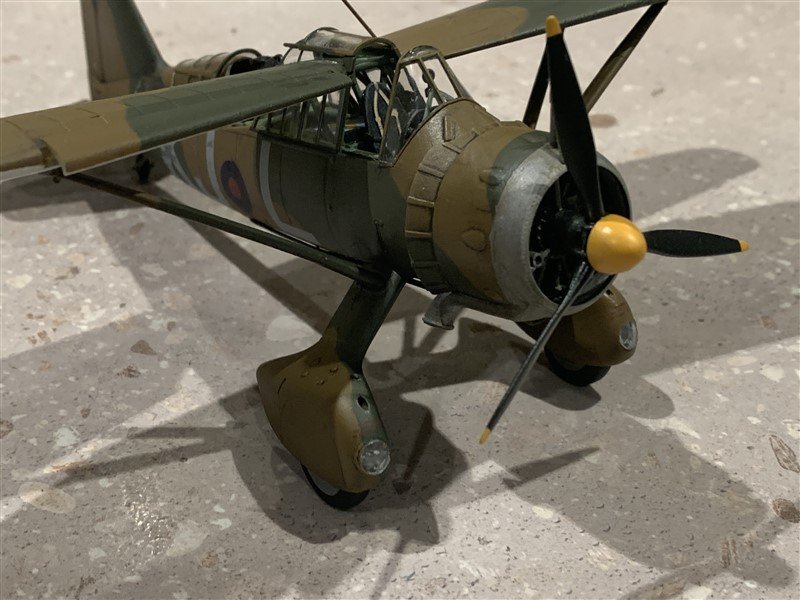
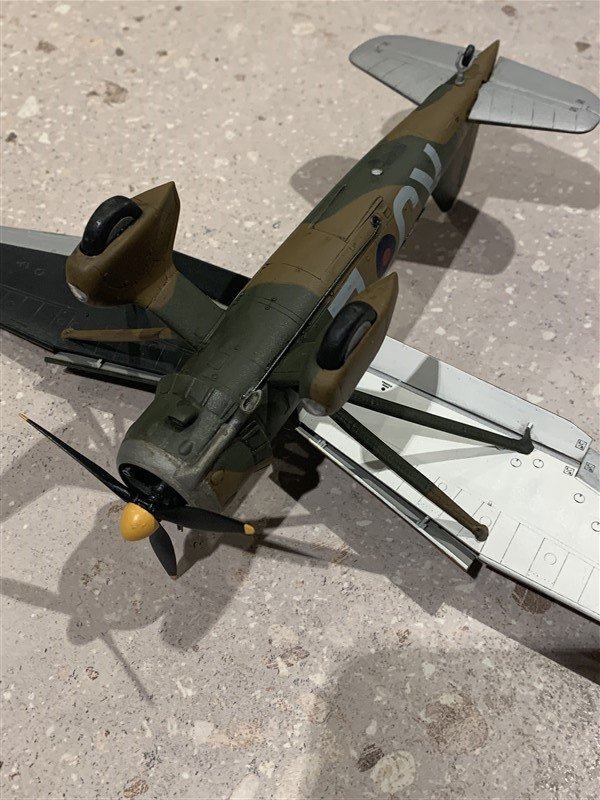
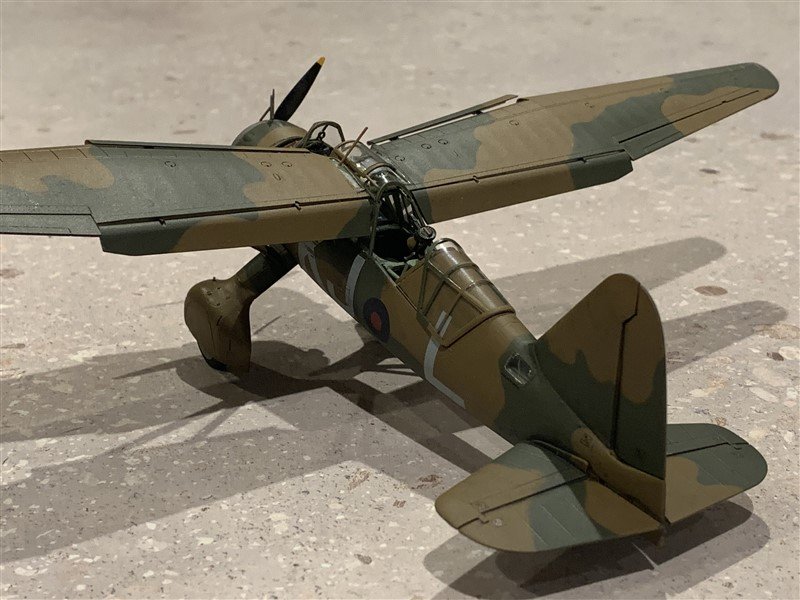
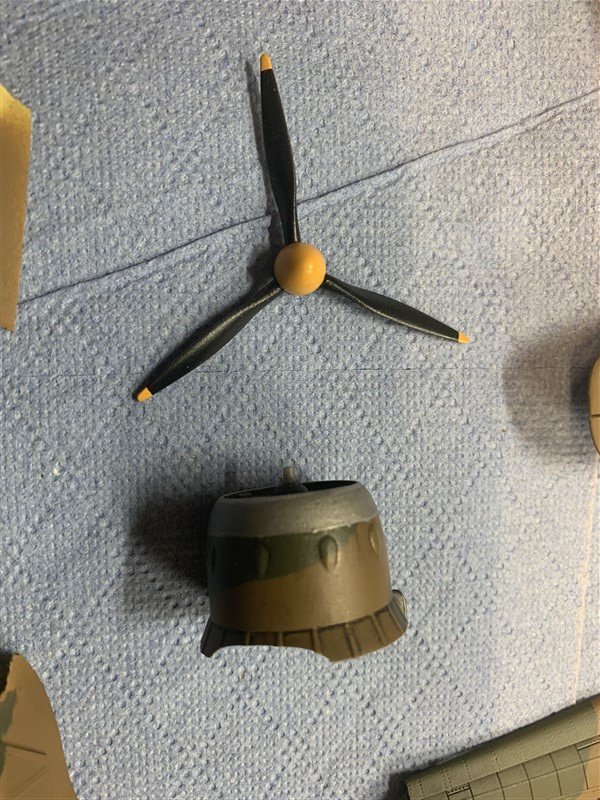
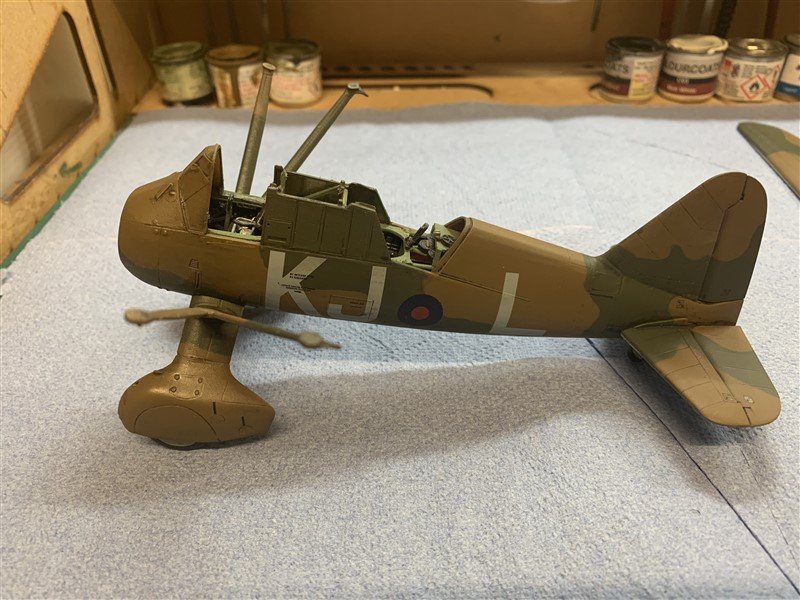
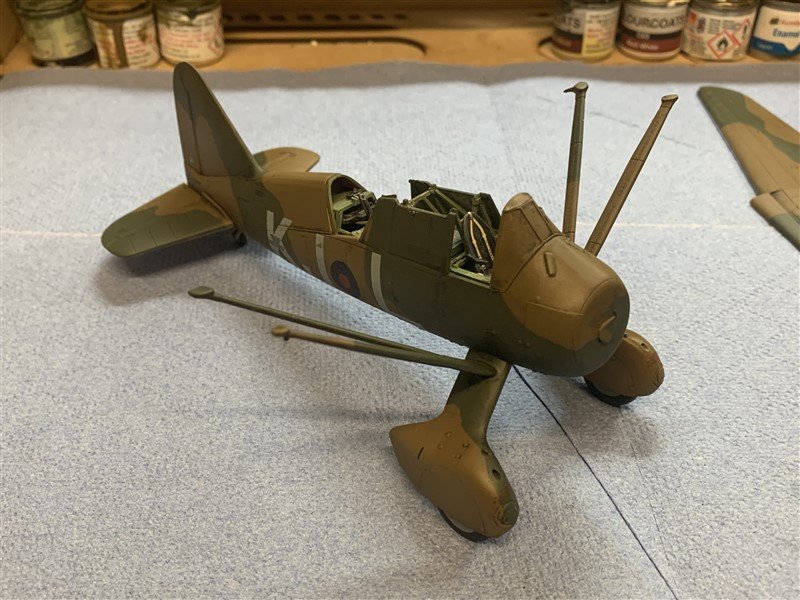
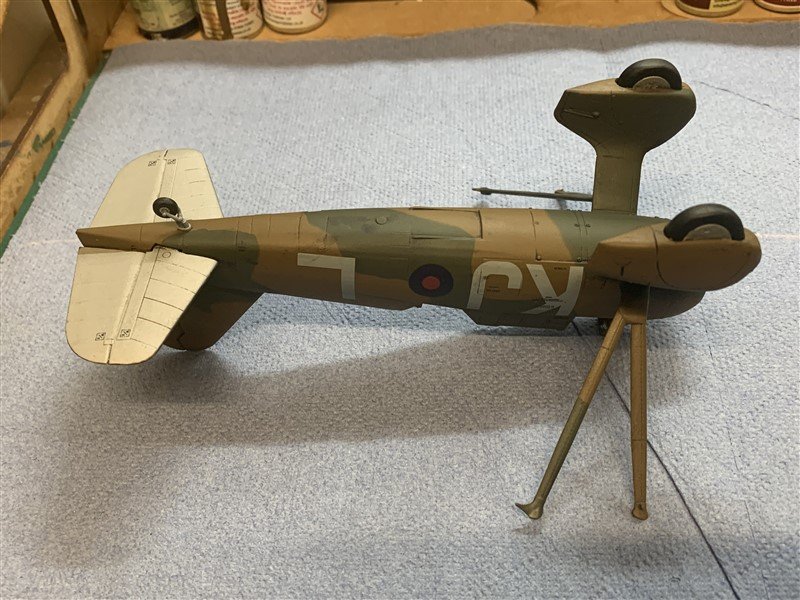
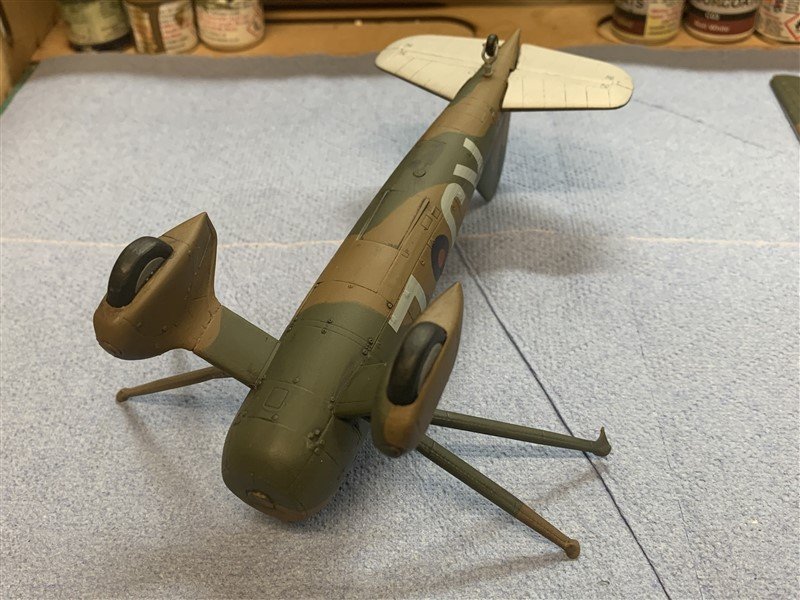
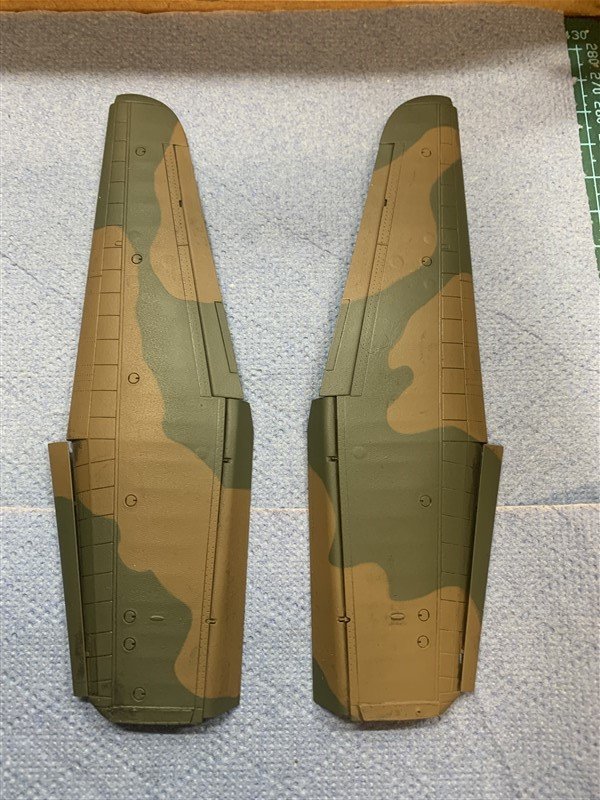
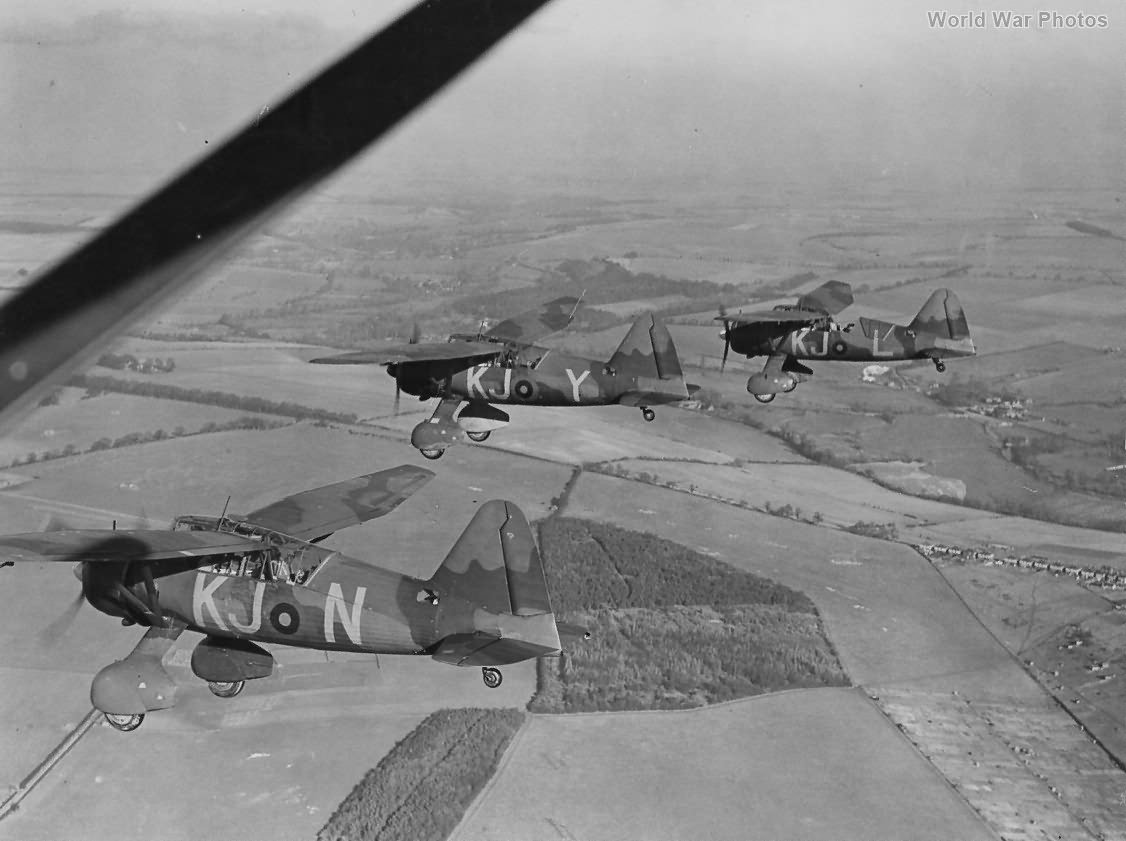
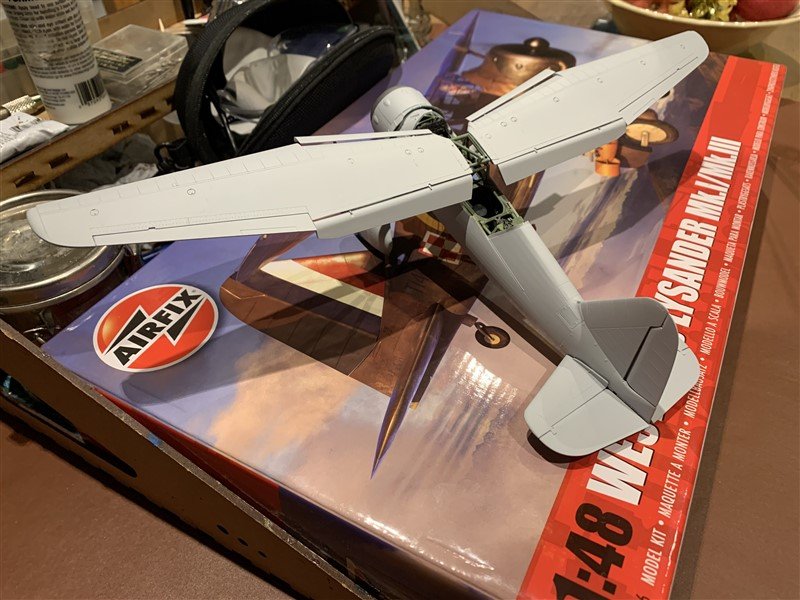
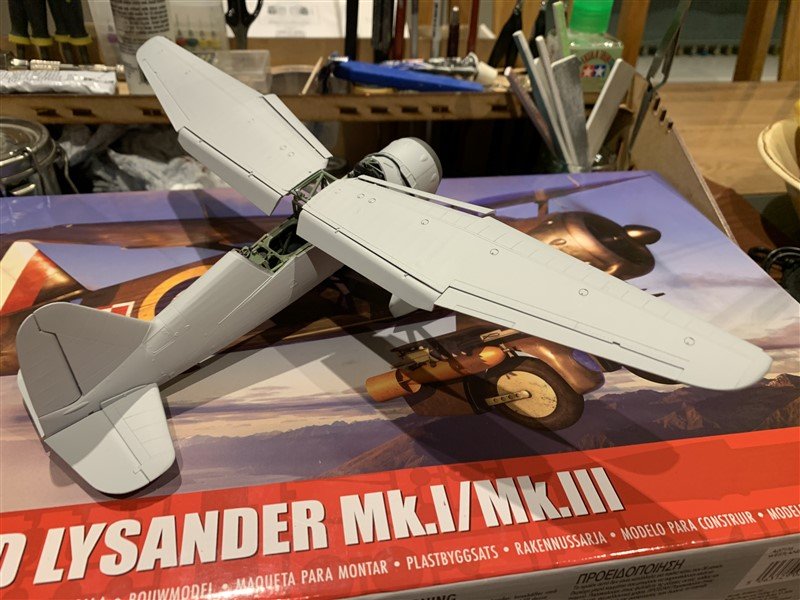
Those flaps and slats caused a bit if fun whilst masking and painting Alan! - Still nearly all done now. 😁 Pictures below of where I have got to over the last week or two, apologies for the lack of updates, work/life getting in the way... I Used Colourcoats Enamels, gloss coat then Flory Models washes and decals, then a few light flat coats. Now the fun bit of final assembly and seeing if all that canopy glass is still clear! I did hunt around for pictures of the actual aircraft and there is a nice sequence of "KJ-L" in formation with other Lysanders of 16 Squadron, which I assume is where Airfix also took their inspiration; note the lack of RAF roundel on the wing upper surfaces. Looks odd without them, but also "different" which is refreshing. A few minor bits still to go on, but they are all a bit fragile, so will go on after those wings are in place. Think the next update will be the big reveal, just hope I can get the wings on straight! 😆 Thanks for the comments and likes.
- 31 replies
-
- 10
-
-
Will also following along, will enjoy seeing your RCAF version.
-
I remember that thread from a year or so back, you already offer a chain pump accessory mini kit, so wouldn’t that cover it like the carronades option? I am really excited to see this project take shape, I’ve already been wandering around the house with a metal tape extended 1.176m wondering where the heck it will go! 🤣
-
That looks a very neat solution Richard
-
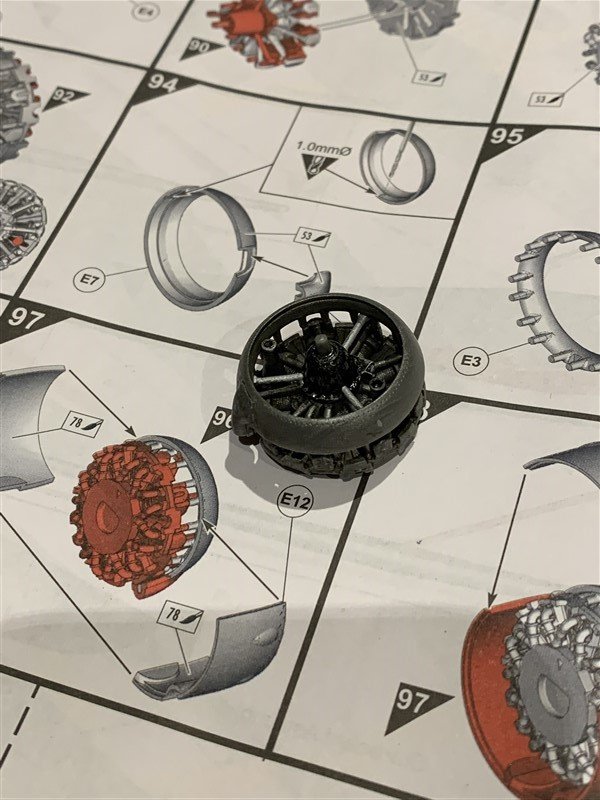
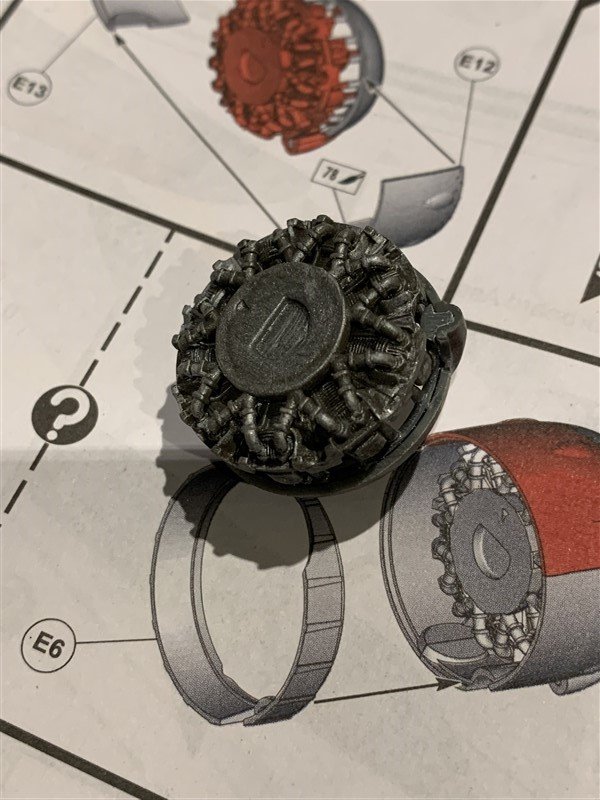
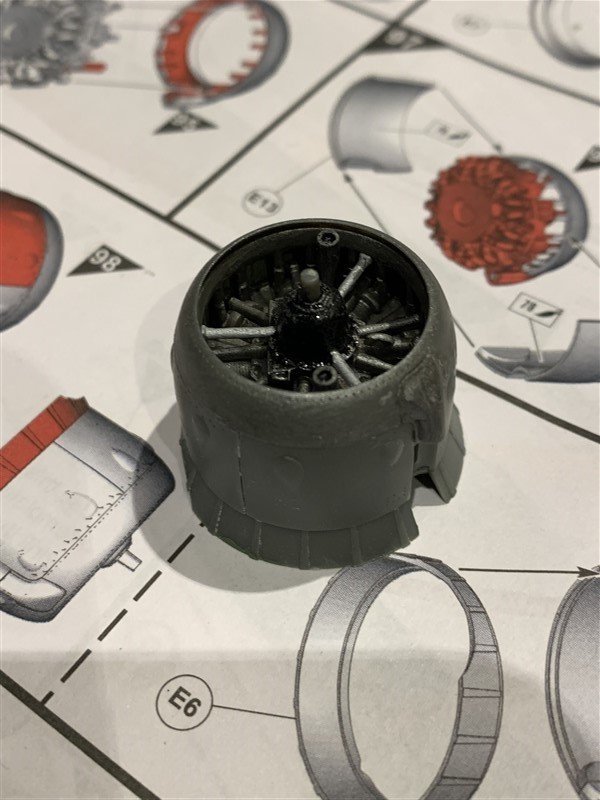
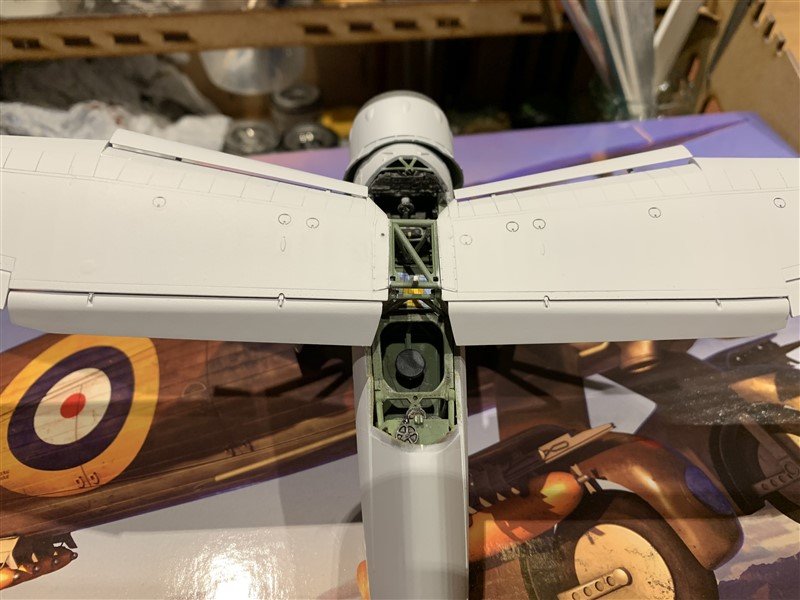
Thanks all for the kind comments and likes. Progress has been quite rapid and I forgot to take many pictures as I went along, so a few here to catch-up where the build is now. 🤭 The engine went together quite well, enough detail if all covered up, but if you want to have a cowling cover off, then after market replacement engine will be needed I think. The wings fit together very well with only the tiniest amount of filler in the seam near the leading edge slats. I have chosen to model the slats out, which means showing the flaps down also, as they were linked, think it adds interest to the overall look in the end. The wheels and covers were more fiddly to assemble, but nothing too bad. They still need some more sanding and filling after the coat of primer (AK rattle can.) seen in the pictures below. The wings and engine are just dry fit for a sneak preview. Painting will be much simpler with those separate, and then a final assembly after revealing a clear "Glasshouse"! 😆 - Much masking coming up! Thanks for looking in.


- 31 replies
-
- 13
-
-
Welcome to MSW Brian!
-
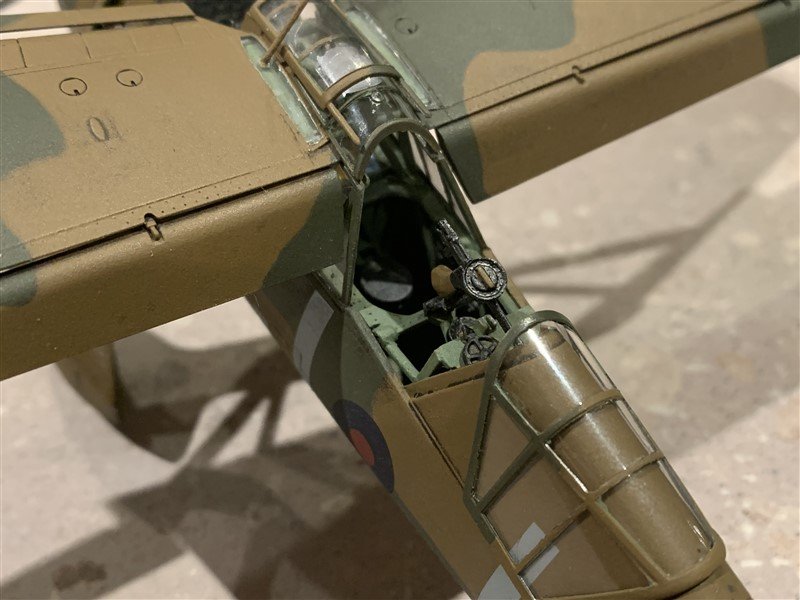
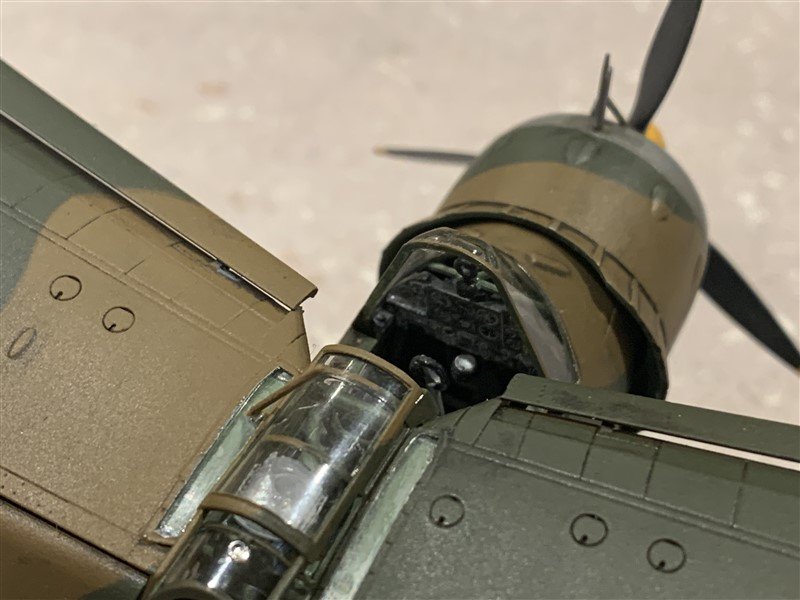
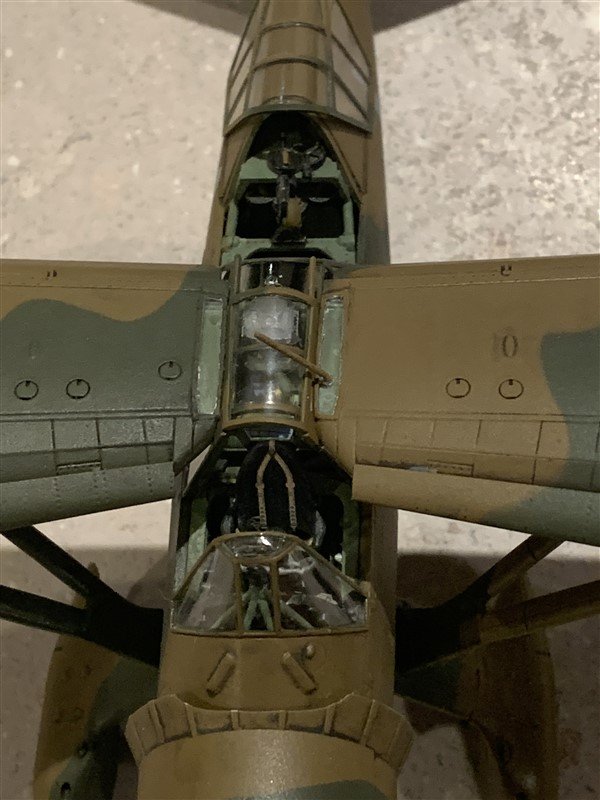
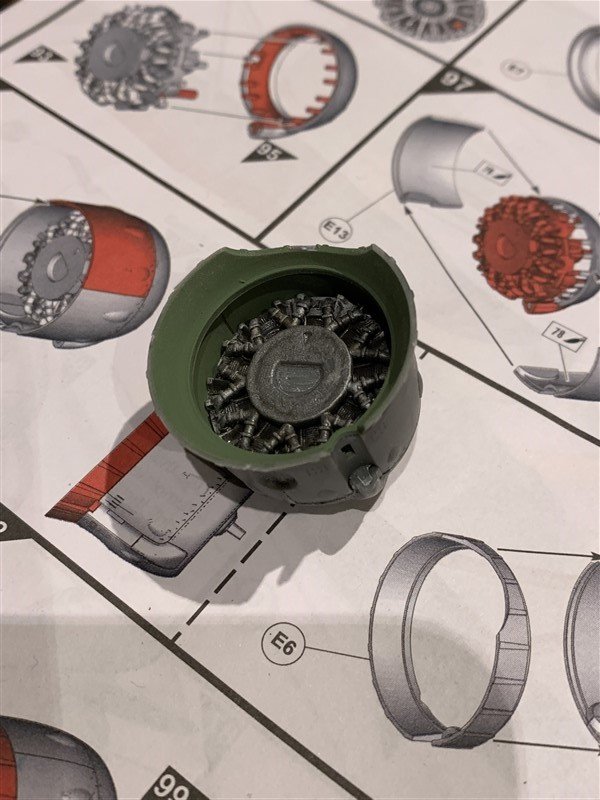
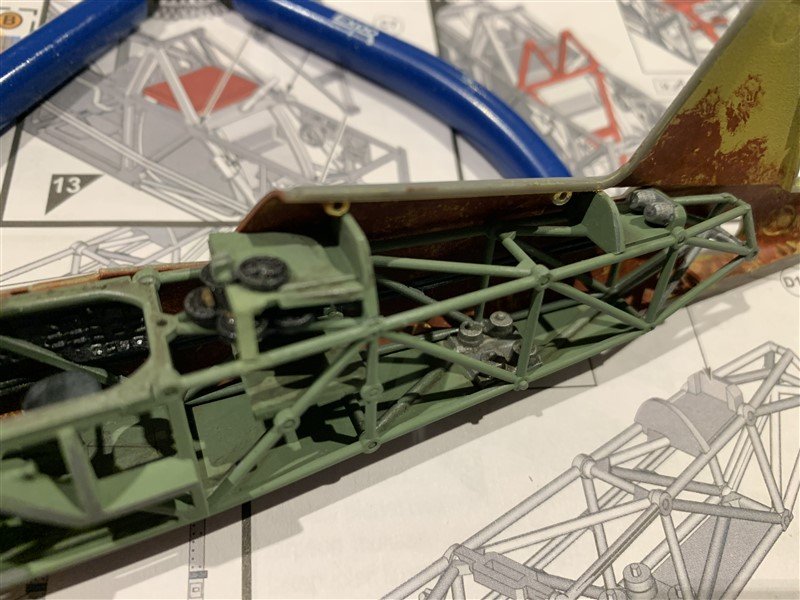
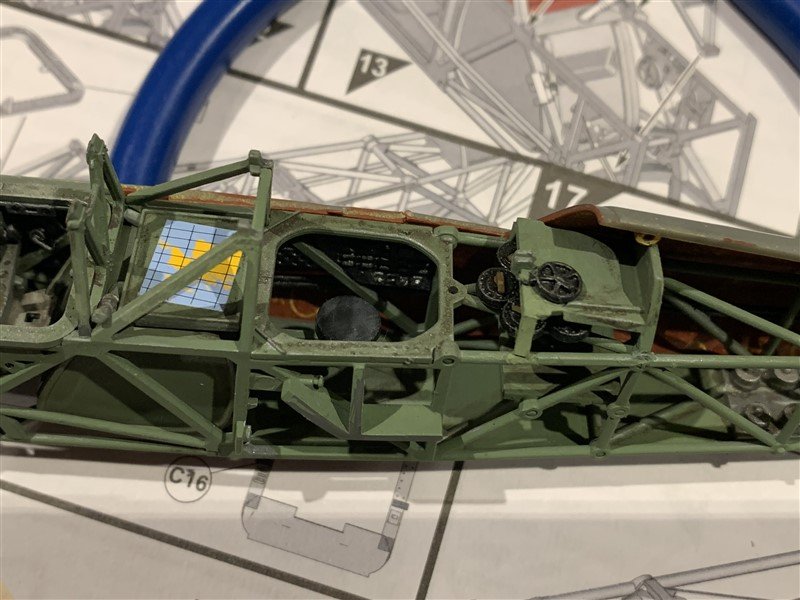
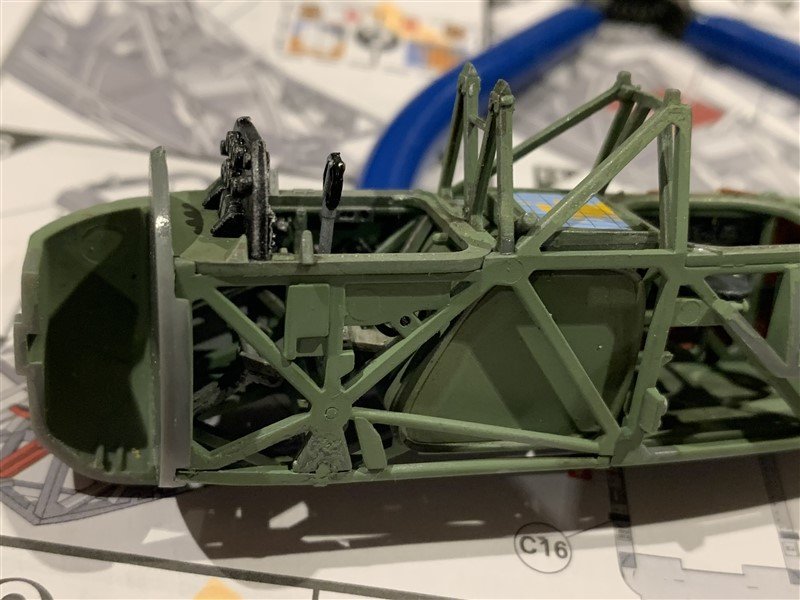
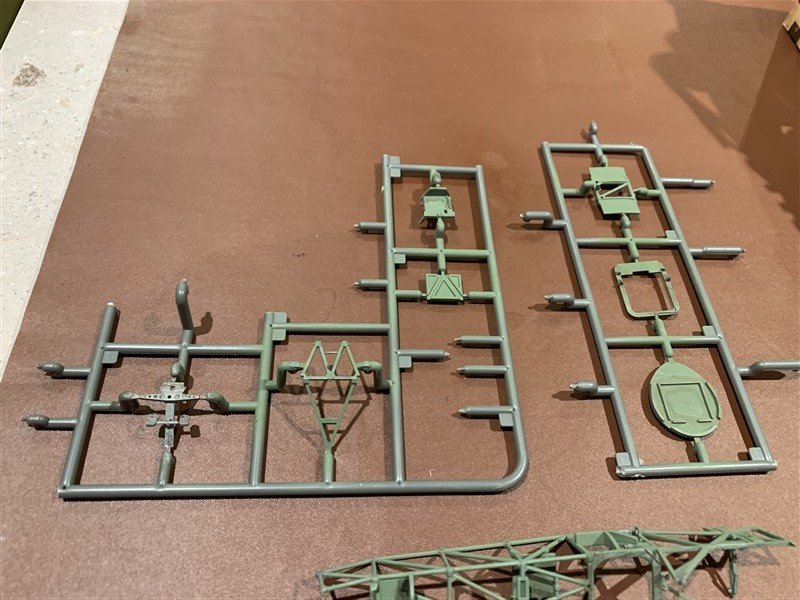
Small update from last time, I have assembled and test fit the fuselage framing. The only item to still finish is the pilot's seat, to which I will add some P.E. belts. I decided to go with the decal instrument panel in the end as it will largely be obscured. The table that covers the rear gunner's ammo carrousel did have a missing leg, on close inspection it appears to have been a 'short shot' of the mould rather than snapped off, but easy enough to fix. Next up is gluing the sides of the fuselage together and hiding most of the details! 😆 For those interested the cluster of four round aluminium coloured blocks and the two higher up and nearer the tail are counter weights. These could be added or removed depending on the loadout of the aircraft for each flight. Thank you all for following along and the like and comments.

- 31 replies
-
- 15
-
-
Hi Mike, I really enjoy following your builds and now understand you not being able to finish some of them. Respect to you. Family before all else. Happy to follow along to whatever time you can steal for yourself and share with us. 😀
- 47 replies
-
- 4
-
-

-
- Annapolis Wherry
- Chesapeake Light Craft
- (and 1 more)
-
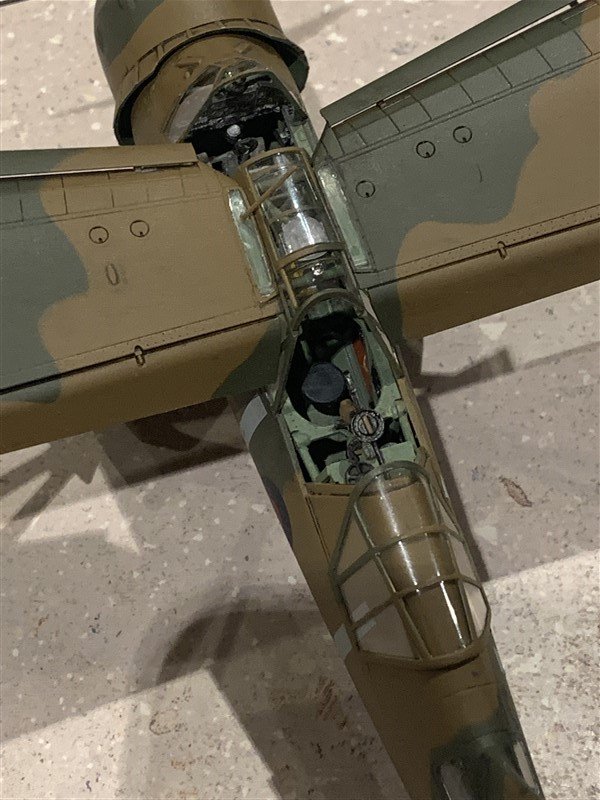
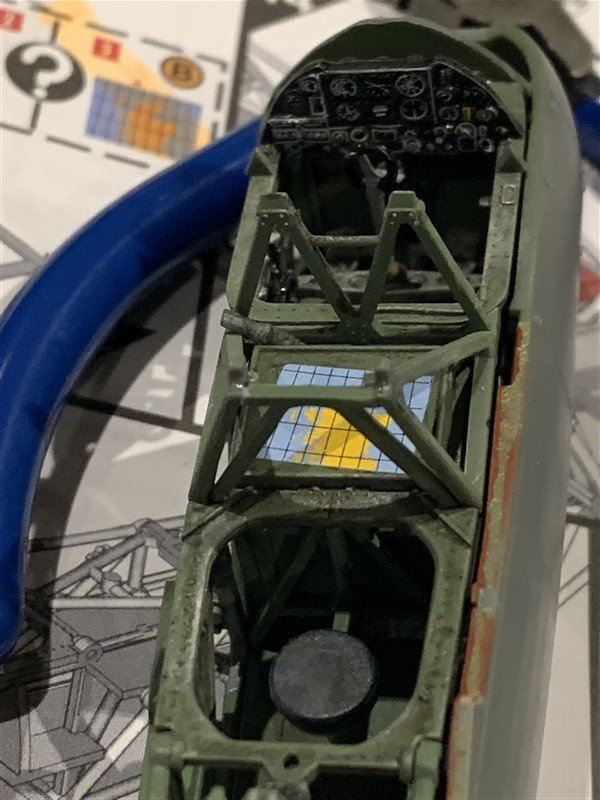
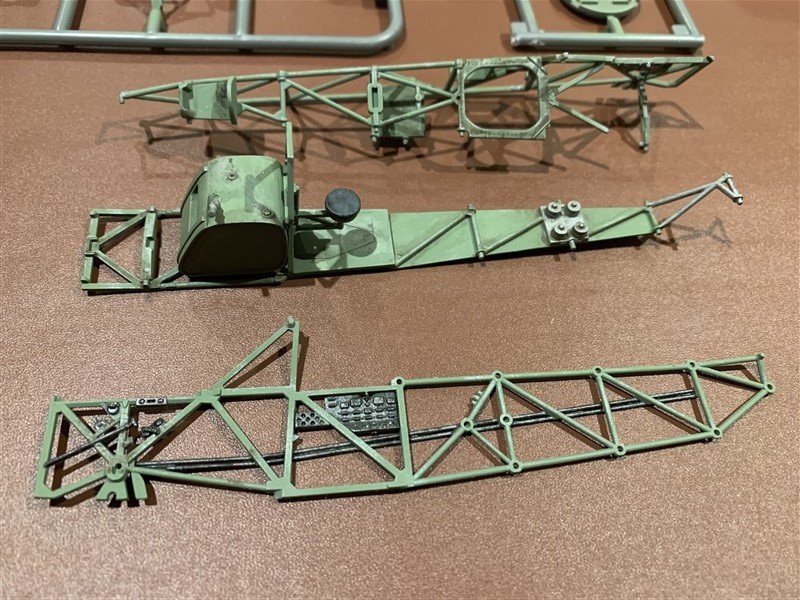
Thank you all for your interest so far in the build. It has gone together very well so far and I thought a few pictures of progress so far were needed before I forget to take any pictures! One of the things I wanted to try and replicate was the linen/red dope interior look. As discussed in post#11 above, on smaller aircraft this could be patchy, I did a base coat in a pale yellow for the linen and then a patch application of dull red for the dope. My source for this look being an unrestored Hurricane that looks this way. It looks a bit bright to me, but once mostly hidden by the fuselage framing and then closed up, not much will be seen anyway. The tubular framing was all pre-airbrushed before assembly, as it is quite a complicated structure. Used a little dry brush and washes to bring out some details, a handful of microscopic decals also applied, but you can hardly see them! Thanks for looking in and the comments and "likes".
- 31 replies
-
- 15
-
-
Thanks Rob, I will need to take care with this "Glasshouse" it will spoil the model I don't get the canopies right, I have bought pre-cut masks and will try out the protection you mentioned, thanks.
-
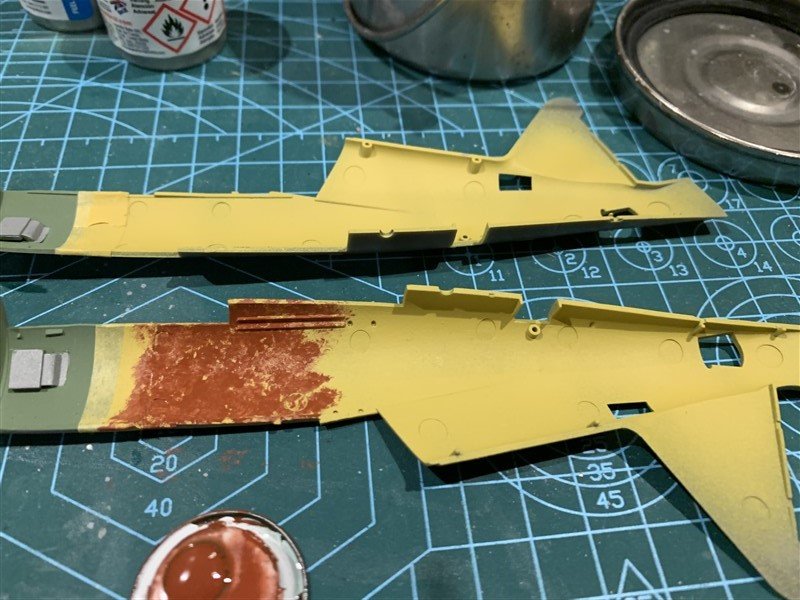
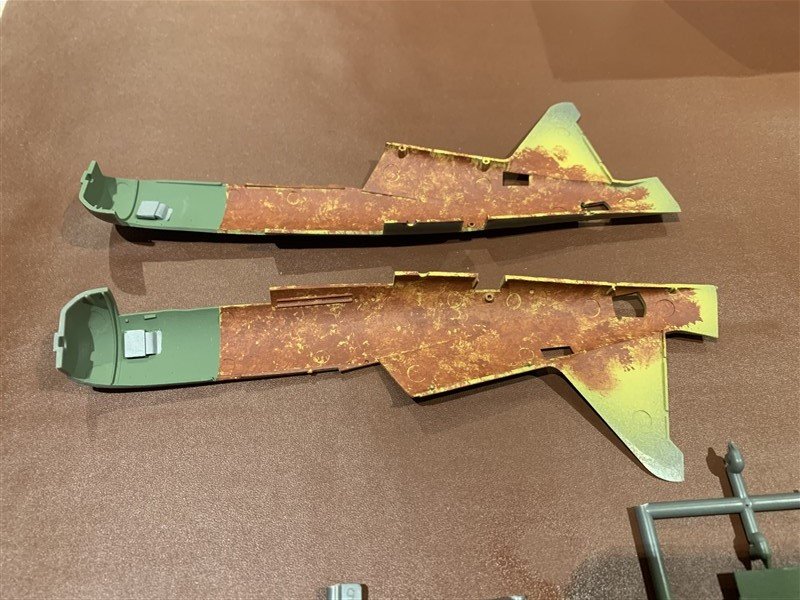
That is a really interesting link Andy, thanks for posting. The issue with the "Frise" ailerons was very interesting and the fact a coat of paint could knock them out of balance is fascinating, always wondered why some aircraft still had silver painted control surfaces. I've also been looking into the red interior doping of the linen "skin." On larger bombers like the Wellington there was a specified eight coats of red dope which completely soaked into the linen turning it red, then two coats of silver for UV protection, then the camouflage colours on top of that, with sanding apparently between each coat! Smaller aircraft were prone to warping of airframes if too much red dope was applied and accordingly they had less coats, but still the two coats of silver protection before the camouflage, so the linen could still look patchy on these. I have tried to replicate that in my build, pictures to follow, using reference picture of an unrestored Finnish Hurricane as my inspiration.
-
Awesome Chris, good luck with the new site.
