shipman
-
Posts
1,267 -
Joined
-
Last visited
Content Type
Profiles
Forums
Gallery
Events
Everything posted by shipman
-
 I've never been a big fan of (naff) thread for the rails, whatever the colour. One cheap alternative (which I've never seen) would be stretched sprue.
 -
I suppose the volume of a hull is directly proportional to the overall weight of a vessel.
- 136 replies
-
- 3
-

-
- strasbourg
- finished
- (and 2 more)
-
Mmm......you've touched on the subject of bone as a modelling material. I've often wondered how the stuff is cleaned and prepared for use. I built up a small collection of old bone spoons, but you don't find them anymore. They do develop interesting patina. Once cured and treated, how does it cut, saw etc? Folk do sell some colosal raw bones on the net. My dog is wagging her tail......I know she likes a bone.
-
HMS Enterprise by AlexBaranov - 1:36
shipman replied to AlexBaranov's topic in - Build logs for subjects built 1751 - 1800
Everything Alex builds just freaks me out. -
Another splendid rendition of this venerable kit; well done. A long debated feature of the ship and the kit is the arrangement of the anchor chain deck layout. I see what you did with yours and appreciate you put some thought into it and made alterations, which I find (at least) convincing.
- 8 replies
-
- 1
-
-
- cutty sark
- revell
- (and 3 more)
-
The feature you mention on the ship as she is today is as depicted on the kit. To the rear of the poop 'monkey deck', just in front of the wheel, is another door/companion way. The kit doesn't include that. Apparently that was an addition during Portugese ownership. I can only assume this was retained to give a one way flow of visitors.
- 399 replies
-
- 5
-
-
- cutty sark
- revell
- (and 2 more)
-
Cutting and shaping masts: tips on how to do it.
shipman replied to Peterhudson's topic in Masting, rigging and sails
I wouldn't let a clumsy person near a screwdriver. But I do appreciate your point of view. -
Cutting and shaping masts: tips on how to do it.
shipman replied to Peterhudson's topic in Masting, rigging and sails
Lathes, milling machines, band saws, bench saws, Proxon this, Proxon that. When did this hobby become a rich man;s preserve? Oh, I forgot, you will never get the affluent to admit to having enough. There's never been a ship model subject that couldn't be entirely built using simple hand tools and a will to do it. -
1930 BENTLEY 4.5 LITRE by MadDogMcQ - AIRFIX 1:12th Scale
shipman replied to MadDogMcQ's topic in Non-ship/categorised builds
My brother built this impressive kit in the 70's. At that time it was sold at a price that a kid could buy for a few weeks (modest) pocket money. It's now £100. No surprise there, then! -
Cutting and shaping masts: tips on how to do it.
shipman replied to Peterhudson's topic in Masting, rigging and sails
A picture is worth a thousand words. Thank you for that. -
Cutting and shaping masts: tips on how to do it.
shipman replied to Peterhudson's topic in Masting, rigging and sails
Hi wefalck. I have Unimat SL and 3. Never seen a filing rest made or adapted for these.....any suggestions, please. -
Welcome to the forum, Genny. I'm a sort of passive member from South Yorkshire. We know about GRIM. Happy times here at MSW.
-
Shame on you.......you've just let down the OCD element here. Sometimes too much is never enough. Me thinks you've made the right decision with the blocks.
-
1930 BENTLEY 4.5 LITRE by MadDogMcQ - AIRFIX 1:12th Scale
shipman replied to MadDogMcQ's topic in Non-ship/categorised builds
It's worth remembering that pre WW2 the lightest covering for all sorts of bodywork was doped linen over an ash framework. Aircraft being the height of technology. If you wanted compound curves then aluminium was the choice. Steel bodies were and still are much heavier, but are cheaper to make. Slap a coat of paint on and 'hey who cares, it looks good'. -
1930 BENTLEY 4.5 LITRE by MadDogMcQ - AIRFIX 1:12th Scale
shipman replied to MadDogMcQ's topic in Non-ship/categorised builds
Question? Was the 'body' of the real car fabric? If it was, gloss isn't an option. -
By 'armistice flags', do you mean the tri-colour stripes on the turrets? I don't know if they were the markings given to neutral warships during the Spanish civil war; RN ships had the same at that time.
- 136 replies
-
- 4
-
-
- strasbourg
- finished
- (and 2 more)
-
Dafi produces his photo etch from his own pocket as far as I can tell. His sheet of hooks, ringbolts dwarfs any other options out there. I forgot the numbers, but you're in the thousands. Makes $0.99 for 20 look pathetic. He does lots of other useful etch..... do yourself a favour and check his site.
-
Don't forget these.......I got some and wasn't disappointed. A no brainer in my opinion. http://www.dafinismus.de/plates_en#anker7
-
Eee, by gum, wefalk. I bow to your assertion. A quick nip over to the Wiki HMS Warrior pages confirms your view. I don't mind being wrong. Still, I'm surprised it was done that way.
- 24 replies
-
- 2
-
-
- pivot gun tracks
- pivot gun
- (and 1 more)
-
I don't think bronze would have been up to the weight of the gun, especially with the added stress on recoil. My guess is those tracks were hot rolled I-beam steel, let into the deck. Similar stuff was commonly used on rail-roads at that time. Iron would have been too brittle for the same reason. Even then there were grades of iron that didn't rust.
- 24 replies
-
- 1
-
-
- pivot gun tracks
- pivot gun
- (and 1 more)
-
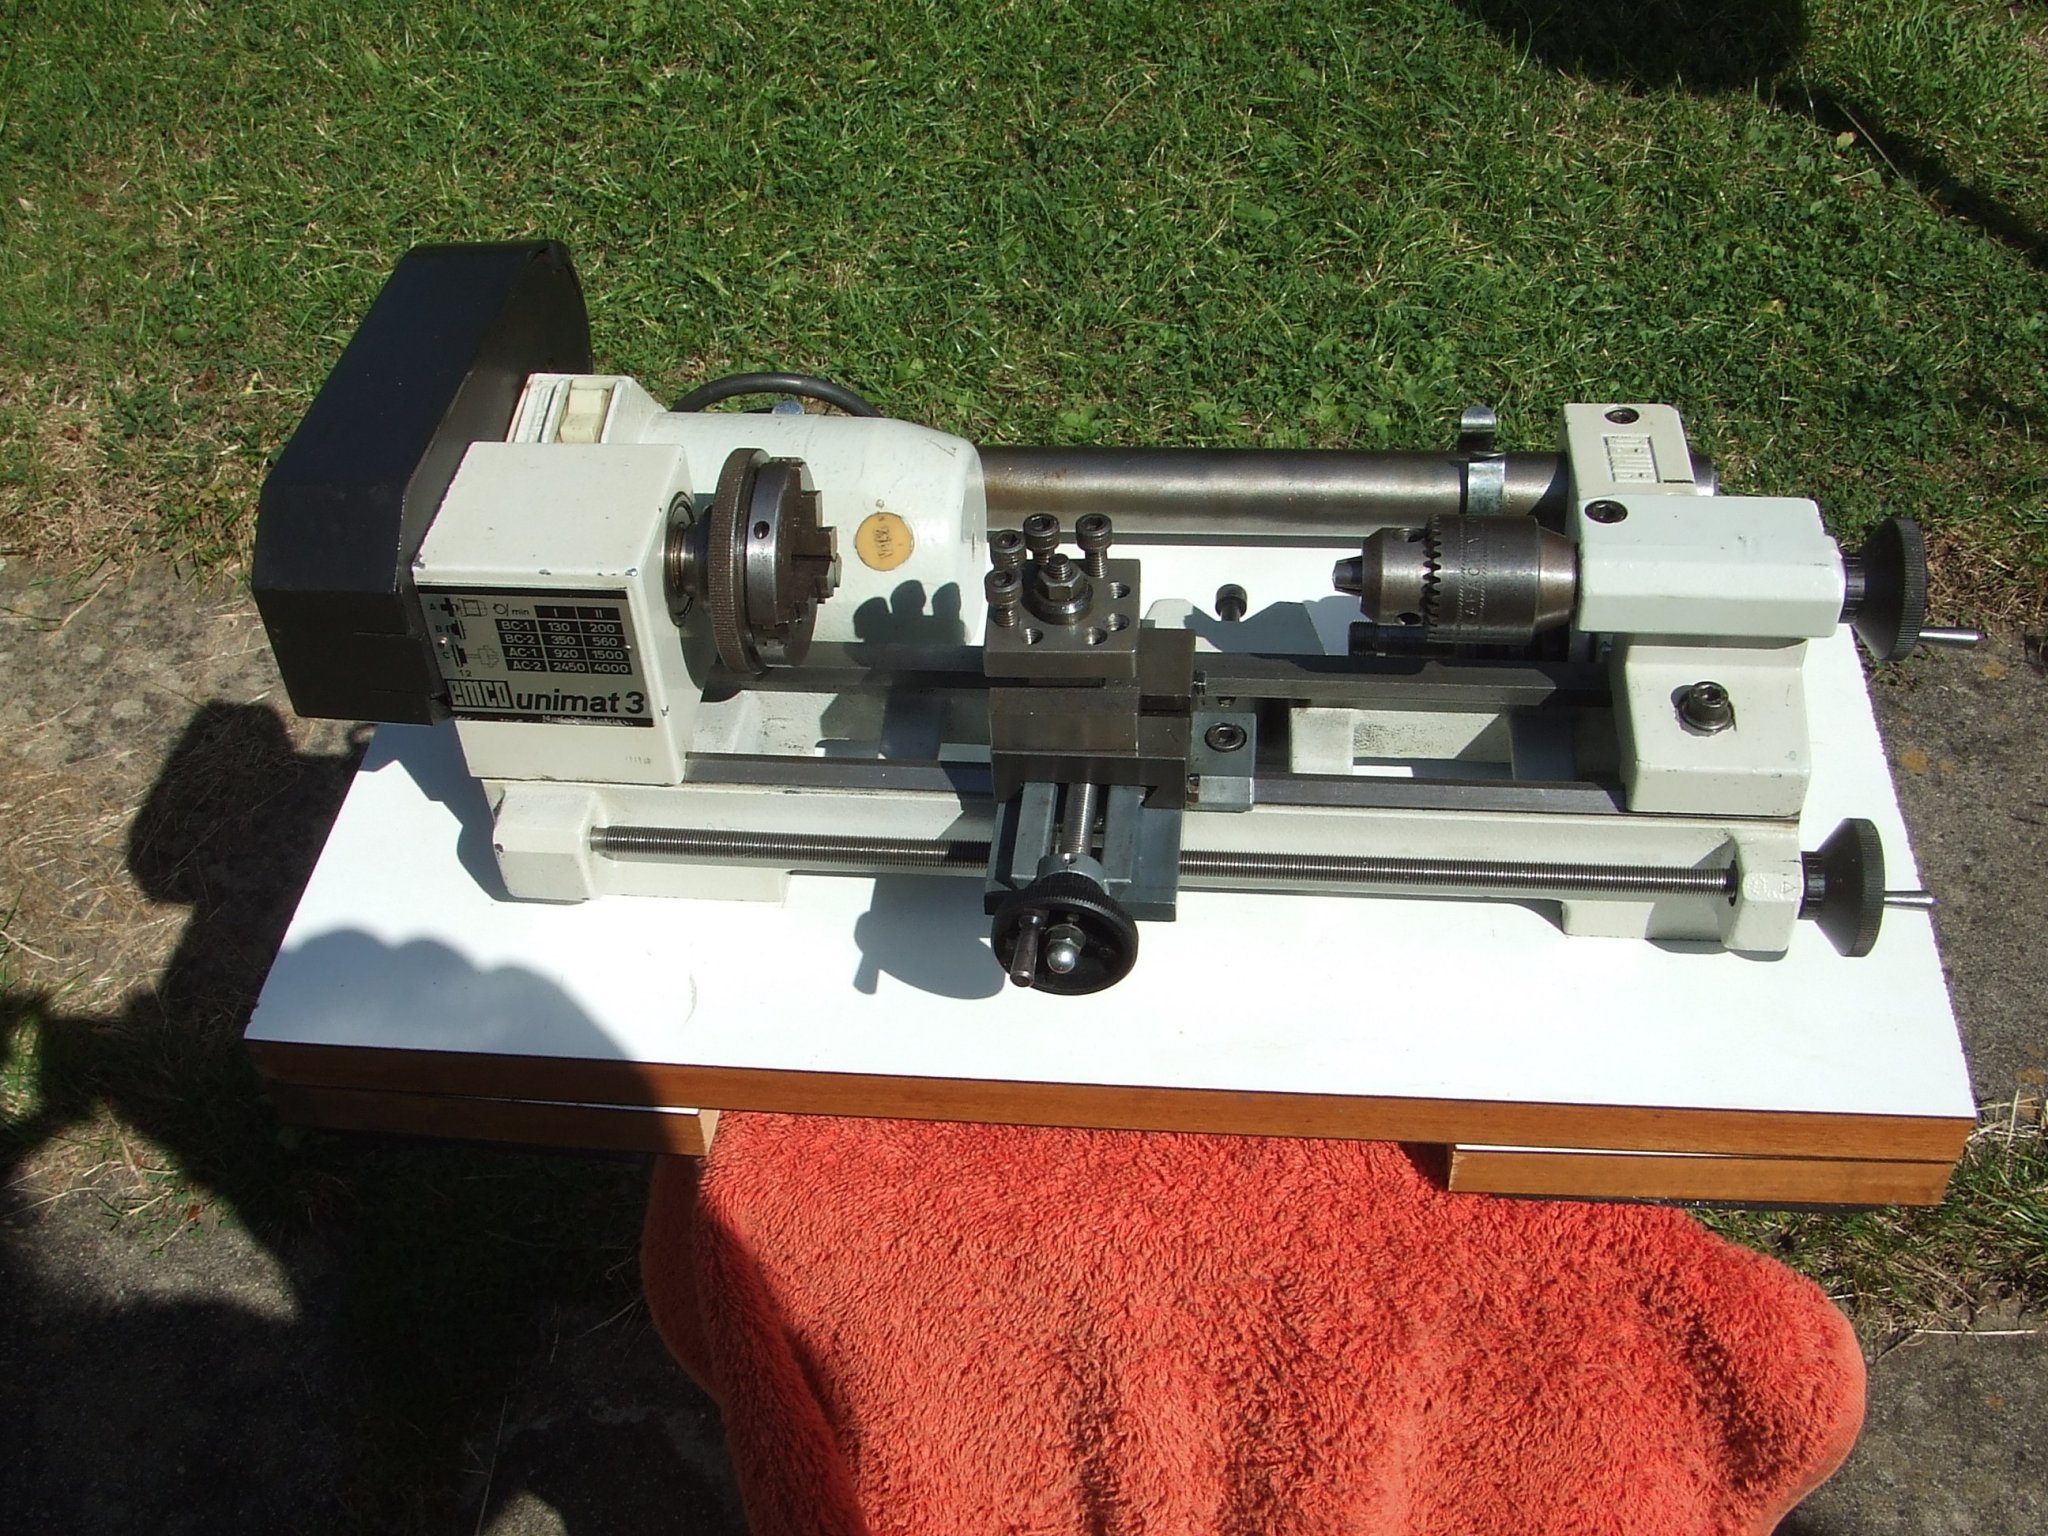
Mini Lathe recommendations?
shipman replied to jfinan's topic in Modeling tools and Workshop Equipment
And finally, here's my stripped, cleaned and freshly lubed Unimat3.
-
Very convincing canvas, especially at that scale. How, please?
- 136 replies
-
- 2
-
-
- strasbourg
- finished
- (and 2 more)
-
Yup, I have the Heller Richelieu in the stash somewhere. As with all the pre-war battleships, when they fired the big guns the shock destroyed their own radar and most radio and electrical equipment. Still, when they got the chance, they could make a decent account of themselves. It wasn't until much later in the war when aircraft had such an overwhelming effect.
- 136 replies
-
- 4
-
-
- strasbourg
- finished
- (and 2 more)