shipman
-
Posts
1,275 -
Joined
-
Last visited
Content Type
Profiles
Forums
Gallery
Events
Everything posted by shipman
-

Bentley 4.5 litre (altered version) by kpnuts 1/12 Airfix
shipman replied to kpnuts's topic in Non-ship/categorised builds
'ixomodels' version of this car; not the best, but you get the idea? (continuous compound curves always look best. Like any hull. -
Bentley 4.5 litre (altered version) by kpnuts 1/12 Airfix
shipman replied to kpnuts's topic in Non-ship/categorised builds
Care of Ixo models: not the best model of this car, but you get the idea?
-
Bentley 4.5 litre (altered version) by kpnuts 1/12 Airfix
shipman replied to kpnuts's topic in Non-ship/categorised builds
KP, your model looks fabulous. You have a bit of Wingrove in you. So, do you have pictures of the real car? Or where can we find it? Have you seen the Youtube video from 'Plazmo'? He wired up a set of these wheels in a jiffy, using monofilament fishing line; worth checking it out. -
I saw the Longridge model just before the museum removed the 'shipping hall' and it was looking sad. 'Cascamite'....yes, it came as a white powder which you mixed water with. In 1969, as a schoolboy, I made a mahogany 'coffee table' entirely put together with it. The top was made of two wide planks glued edge to edge. All these years later it still looks as I made it, despite all the abuse it's had.
-
Bentley 4.5 litre (altered version) by kpnuts 1/12 Airfix
shipman replied to kpnuts's topic in Non-ship/categorised builds
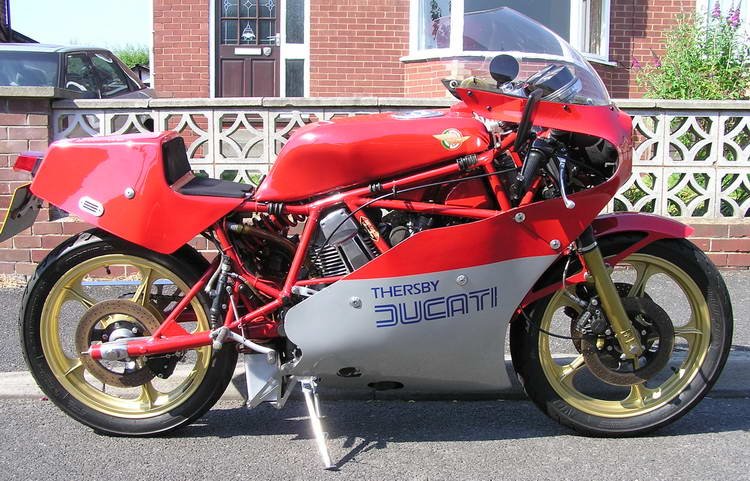
Not Ducati Blue? And now a RED Bentley! I must say you're doing a fine job. Is it a replica of a real car or a little whimsy? The wheel rims would look cool in chrome/nickel with the centres red and black spokes. Wonder what Airfix will want for the re-release?. Here I am, driving a proper car!
-
Er....That's what I was trying to say........thanks 🙂 The wreck of the Blucher was recently surveyed.
- 40 replies
-
- 2
-

-
- aeronaut
- kriegsmarine
- (and 2 more)
-
One of the 'Hipper' class got sunk by a single torpedo in one of the Scandinavian waterways. Several German warships lost their stern section in action; that looks like one of weaker points they had. The Hipper and Bismark were confused by their resemblance during the Hood encounter. Of course the Admiral Hipper wreck still exists (largely intact), even though the Yanks threw an Atom Bomb at it!
- 40 replies
-
- 1
-
-
- aeronaut
- kriegsmarine
- (and 2 more)
-
Like your ratlines issue, the slight miss-alignment of the yard will not be so obvious as things progress. It's a bit like staring at your nose or ear in the mirror, the more you look, the bigger it seems! Your build continues to impress.
-
Phew! Thank you, Hubert.
-
The standard of photography on this site is normally exceptional. I suppose numpty's like me have come to take it for granted. A dedicated camera doesn't have to be expensive; I've been using a Fujifilm Z2 compact for years which I bought second hand and it was ten years old when I got it. Every time I download to my laptop I'm astonished how good it is. Stay safe.
-
Hi, I was hunting around and found your build, which looks like a grand job, I hope you don't mind me saying how disappointed I am with the fuzzy photography. I've trawled through 3 or 4 pages and given up. Such a shame.
-
Hubert, we've swapped PM's. I'm trying to sort out the ebay malarky, to pay you. I've sent a couple of updates to you, but Mailer-Daemon keeps returning them to me. My old brain hurts!
-
Bentley 4.5 litre (altered version) by kpnuts 1/12 Airfix
shipman replied to kpnuts's topic in Non-ship/categorised builds
30 years ago one came past me while heading south on the A1; I followed it for about 10 miles until he took his exit. It was sitting at 80 comfortably, sounding like a quiet version of a Fergie tractor. -
Bentley 4.5 litre (altered version) by kpnuts 1/12 Airfix
shipman replied to kpnuts's topic in Non-ship/categorised builds
Oooo! Just found this log. Love what you're doing. Always fancied a go at this kit since my younger brother knocked one together in the '70's. A car similar to this turns up at local shows, it's quite a beast and is as big as a bus! -
Keith, the applied reflective material on your life rings stand proud. On the real ones they are inset.
-
Not all Ducati are red. Still, I instinctively feel the designer had red in mind. Not all MV Agusta are red, but if they aren't; somehow they don't look the part.
-
Thanks KP, had it hand built to my spec in 1984. Still looks just like that. I'm now an old man!
-
Just had a look at the AOS Victory drawings. Cathairpins: 4 on fore and main lower shrouds NONE further up and None at all on the mizzen. You are doing a fine job, matey.
-
How much did you pay? My first FOUR real bikes cost me less than £300. AND I could ride them away.
-
I wholeheartedly agree with you about the Longridge book. I have the original two volumes which have loose drawing sheets tucked into pockets at the back. The later single combined book contains the same drawings, but within the restricted page size. When Longridge did his research, the ship was still afloat. I did get to see his model at the science museum, which took some finding. Though it's an exquisite model, I felt it was very underwhelming compared to his sadly neglected 'Victory', just round the corner. Don't know where either is now. Some were returned to their owners and many went to Chatham Dockyard. I can find ONLY ONE poor photo of the CS model on the 'net. Can't wait to see your slides; were they taken pre-restoration? I was lucky to see her in the dry dock, many years before the fire. Thankfully, before the fire the iron frames had already been stripped of the 'woodwork' and other consumables, which were preserved and restored. So much of what you do see now is the real deal.
-
A curious thought. The deck rails on the ship; are they what were fitted when she was built? The original owner was very proud of this new flagship, which he insisted included nothing but the best available materials and finishes. My question:- were these rails polished brass? I understand the original bow and stern decorations were lost; indeed the stern had a rather saucy tableau which society at that time regarded as a bit beyond the pale. Any comments, please.
- 200 replies
-
- 1
-
-
- cutty sark
- clipper
- (and 1 more)
-
Drafting instruments
shipman replied to Kurt Johnson's topic in Modeling tools and Workshop Equipment
Yes, but nearly all the finer threaded components will be steel. -
Well worth the visit, thank you. It would be great if the excellent photo's were captioned. This is a site I've not come across before, if this 'page' is what can be expected, I'll be back.
-
Drafting instruments
shipman replied to Kurt Johnson's topic in Modeling tools and Workshop Equipment
For over 40 years I've been using lighter fuel to clean objects such as these. Dampen a lint free rag and just work into the nooks and crannies. Finish with a soft duster.