Thukydides
-
Posts
1,363 -
Joined
-
Last visited
Content Type
Profiles
Forums
Gallery
Events
Everything posted by Thukydides
-
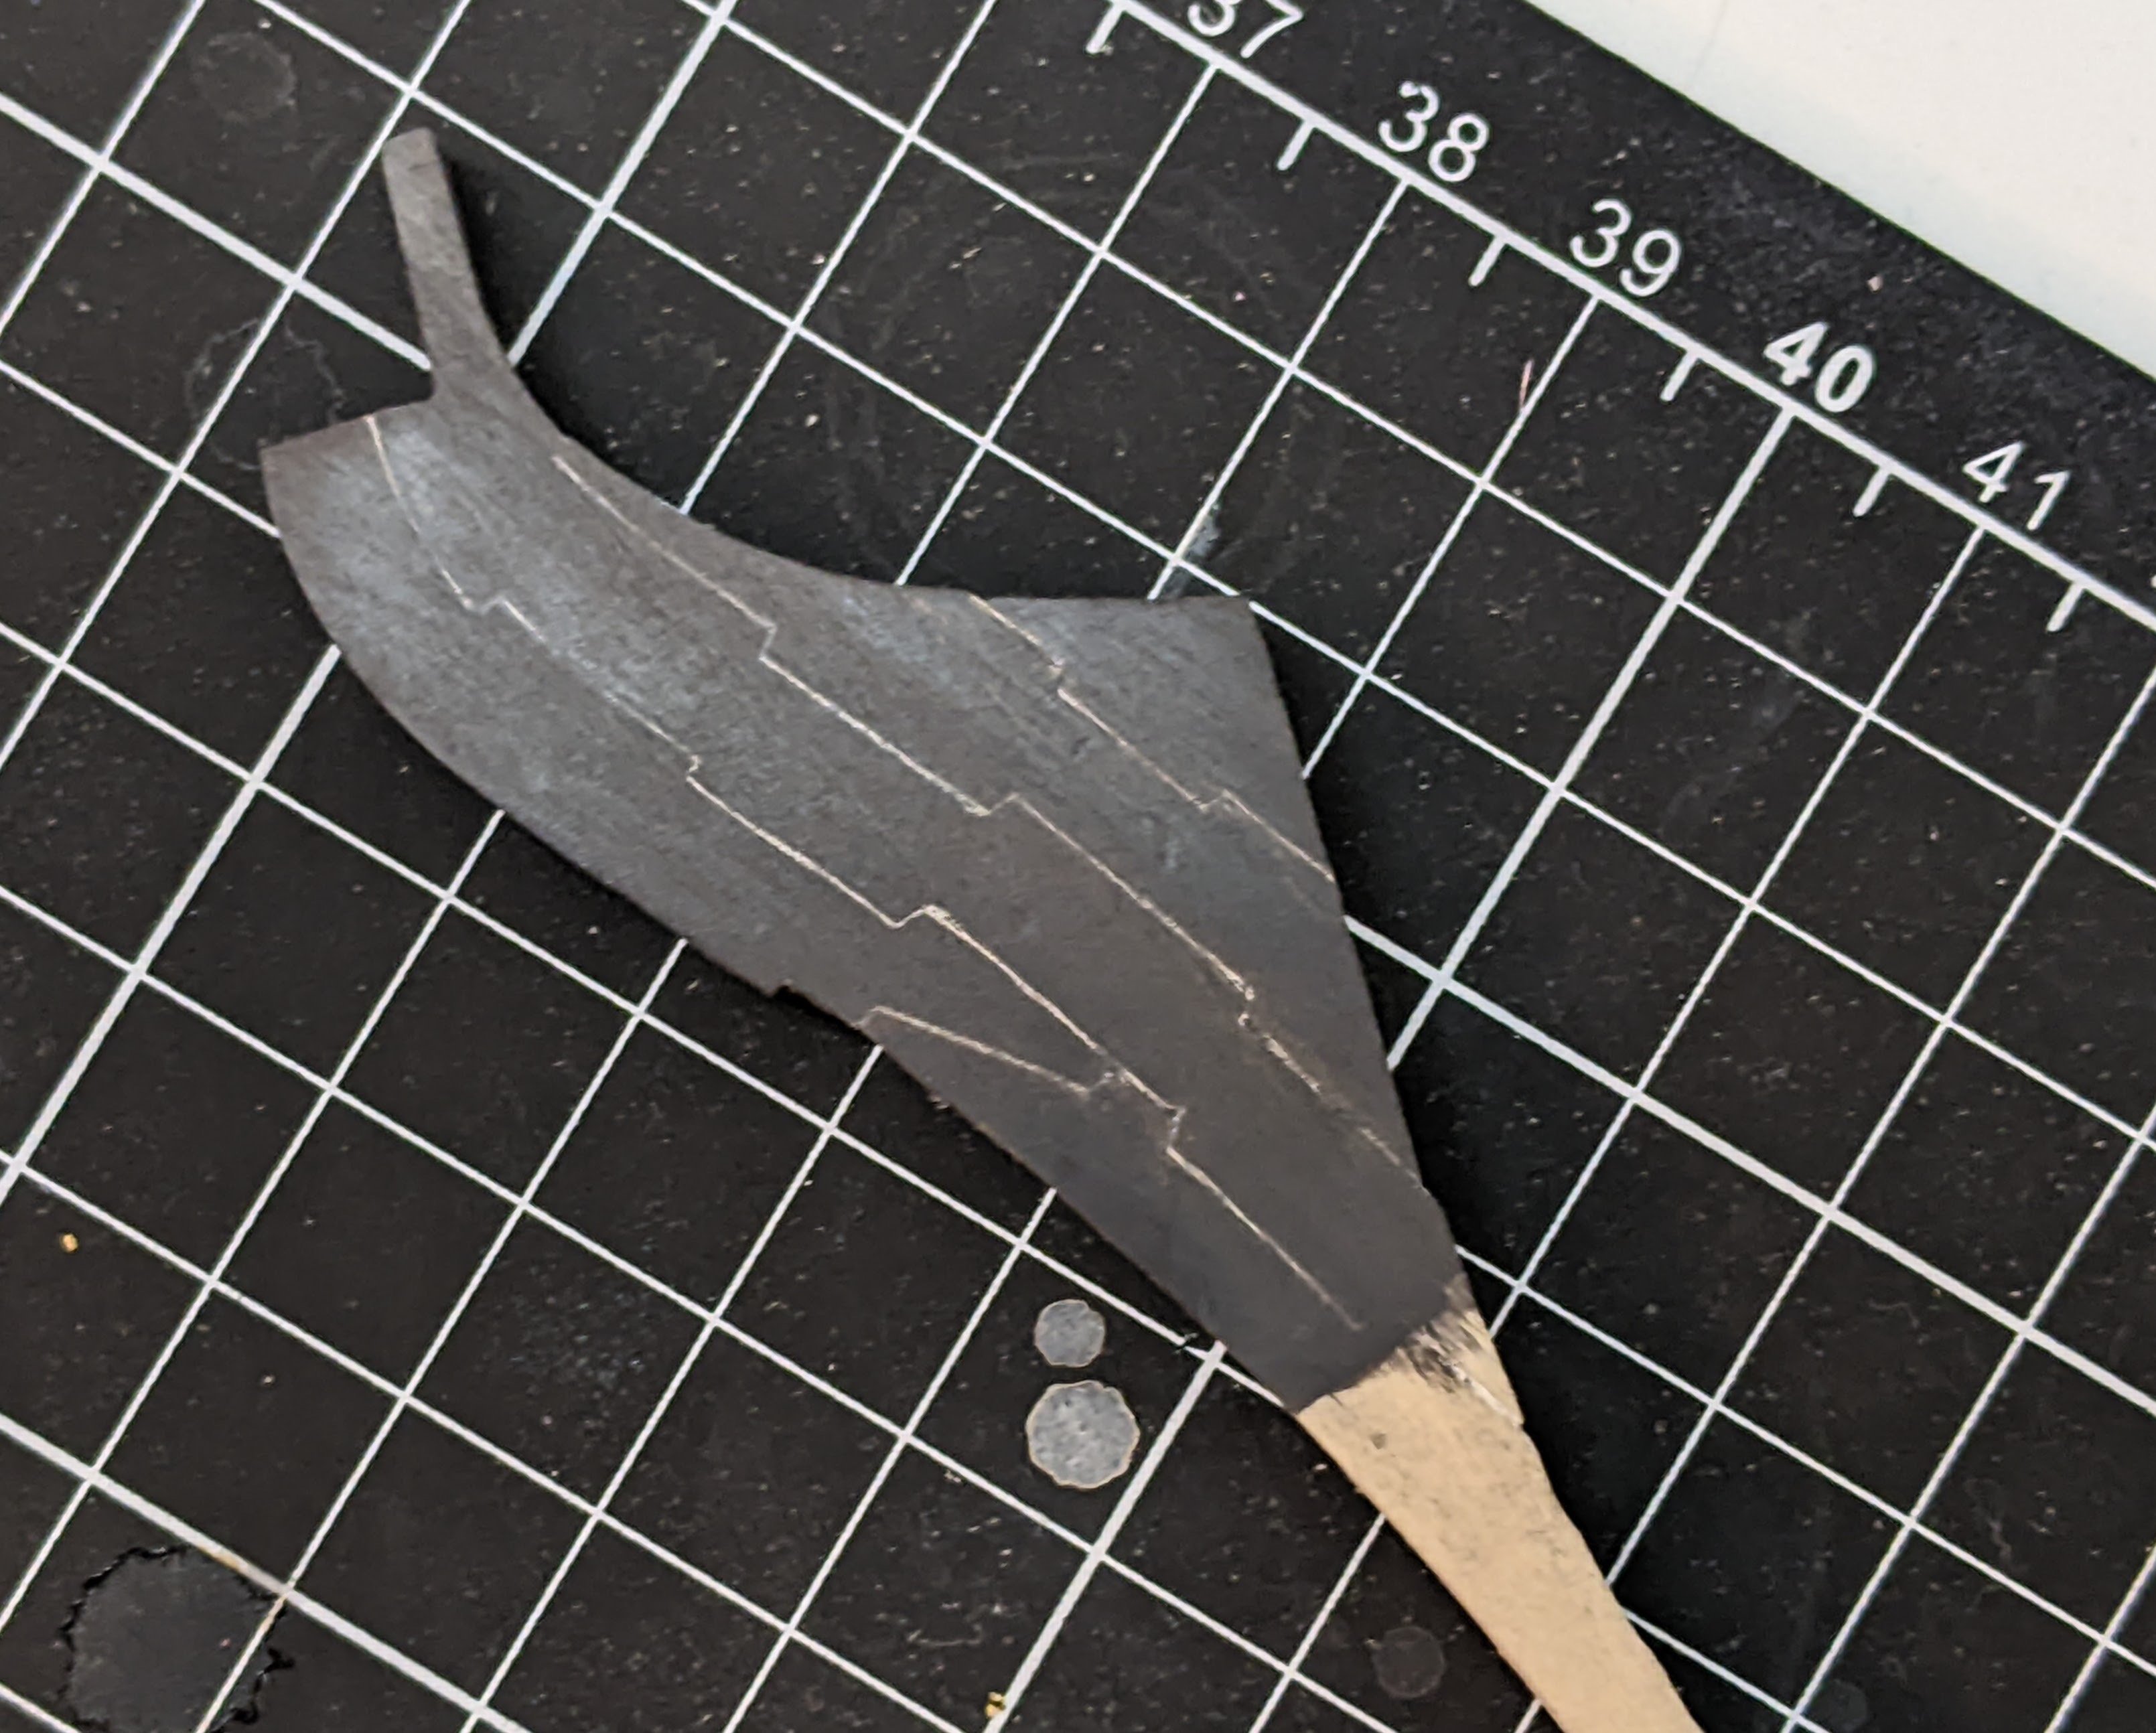
 Another minor update as I actually have some progress to report (or at least in this case a relatively successful test). On the scroll saw front I am getting more comfortable, and about half the time I get my cuts right on the line, but then all of a suddent I find myself wandering. In particular, certain types of curves I always seem to wander first to one side and then the other. I have assembled my first completed iteration of the knee of the head and painted it. I discovered that to some degree firm clamping as you are assembling can mitigate some of my failures on the cutting of the joints. Also as a proof of concept my attempt to try and show the joints through black seems to have worked. I am not entirely happy with the effect, but for a first go I am pretty pleased. I mixed the glue used in the joints with white ink so that when I painted over with thin layers of black, the lighter colour shon through. The effect I am aiming for is more the upper joints (the thin harder to see ones) than the lower joints, but that will be fixed by making sure my joints are tighter. Note I did not bother with the cutwater and the waterline is only the approximate location. This was just a proof of concept test. Now to see if I can do another one, this time with tighter joints.
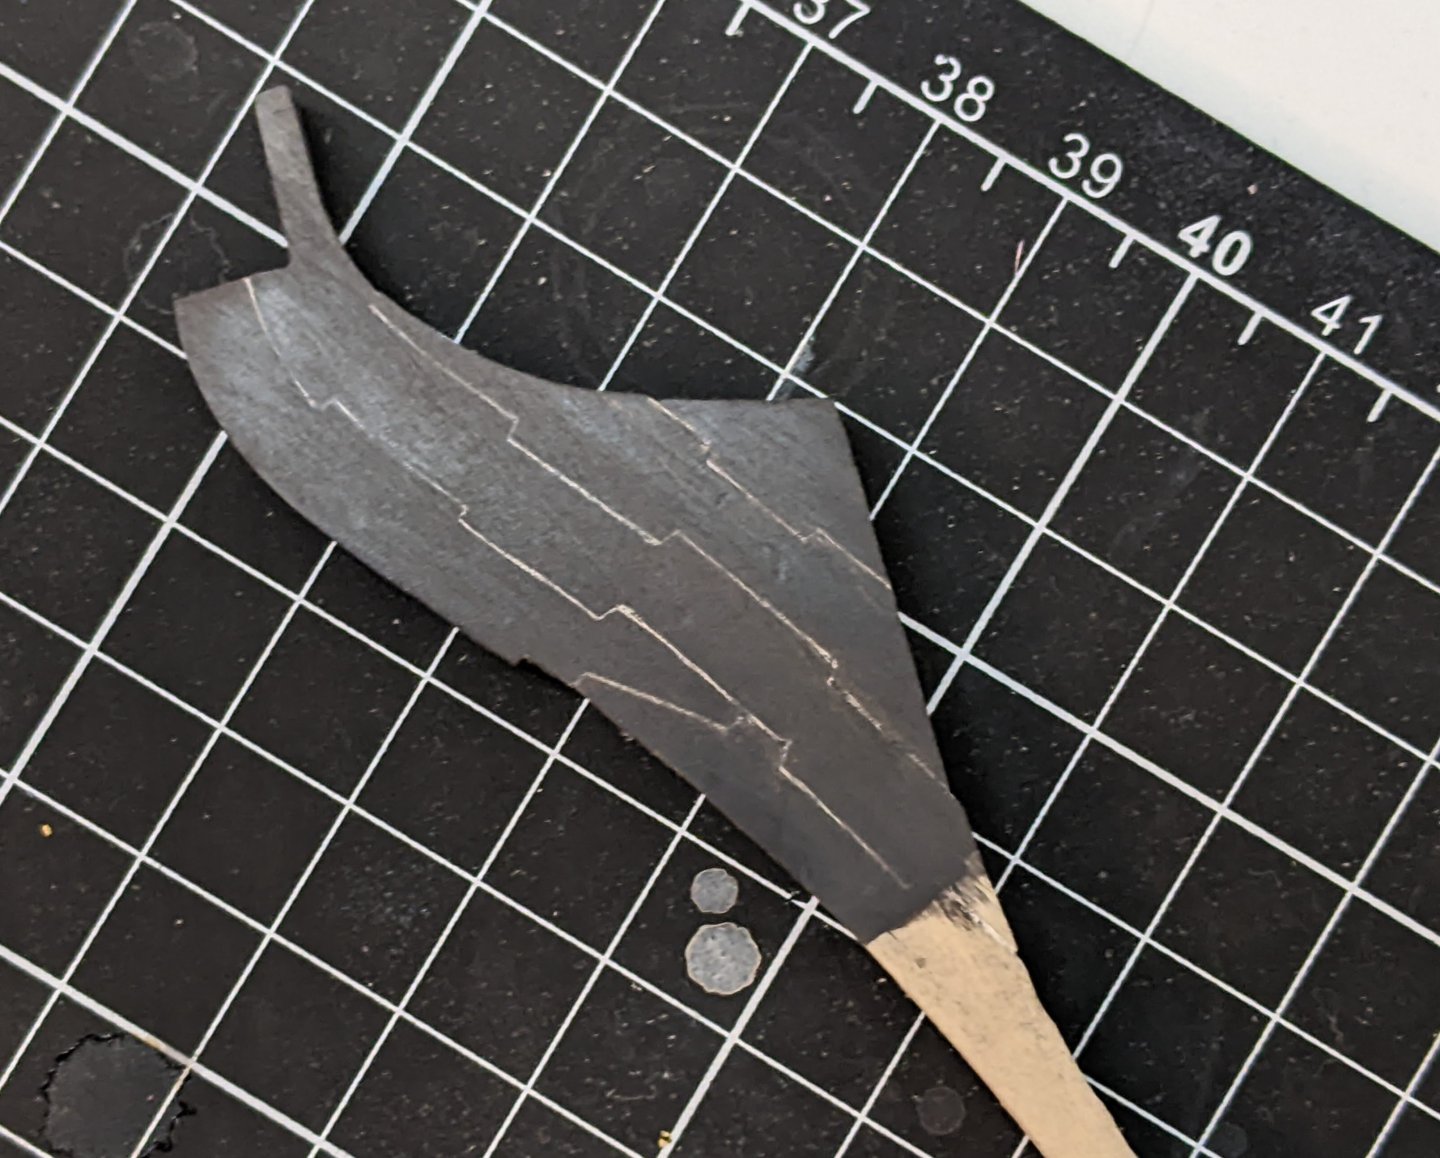
-
If you look back through my log posts I have 2 log posts dedicated to the topic of my research on the knee of the head. Go back to the first post and there is a table of contents.
-
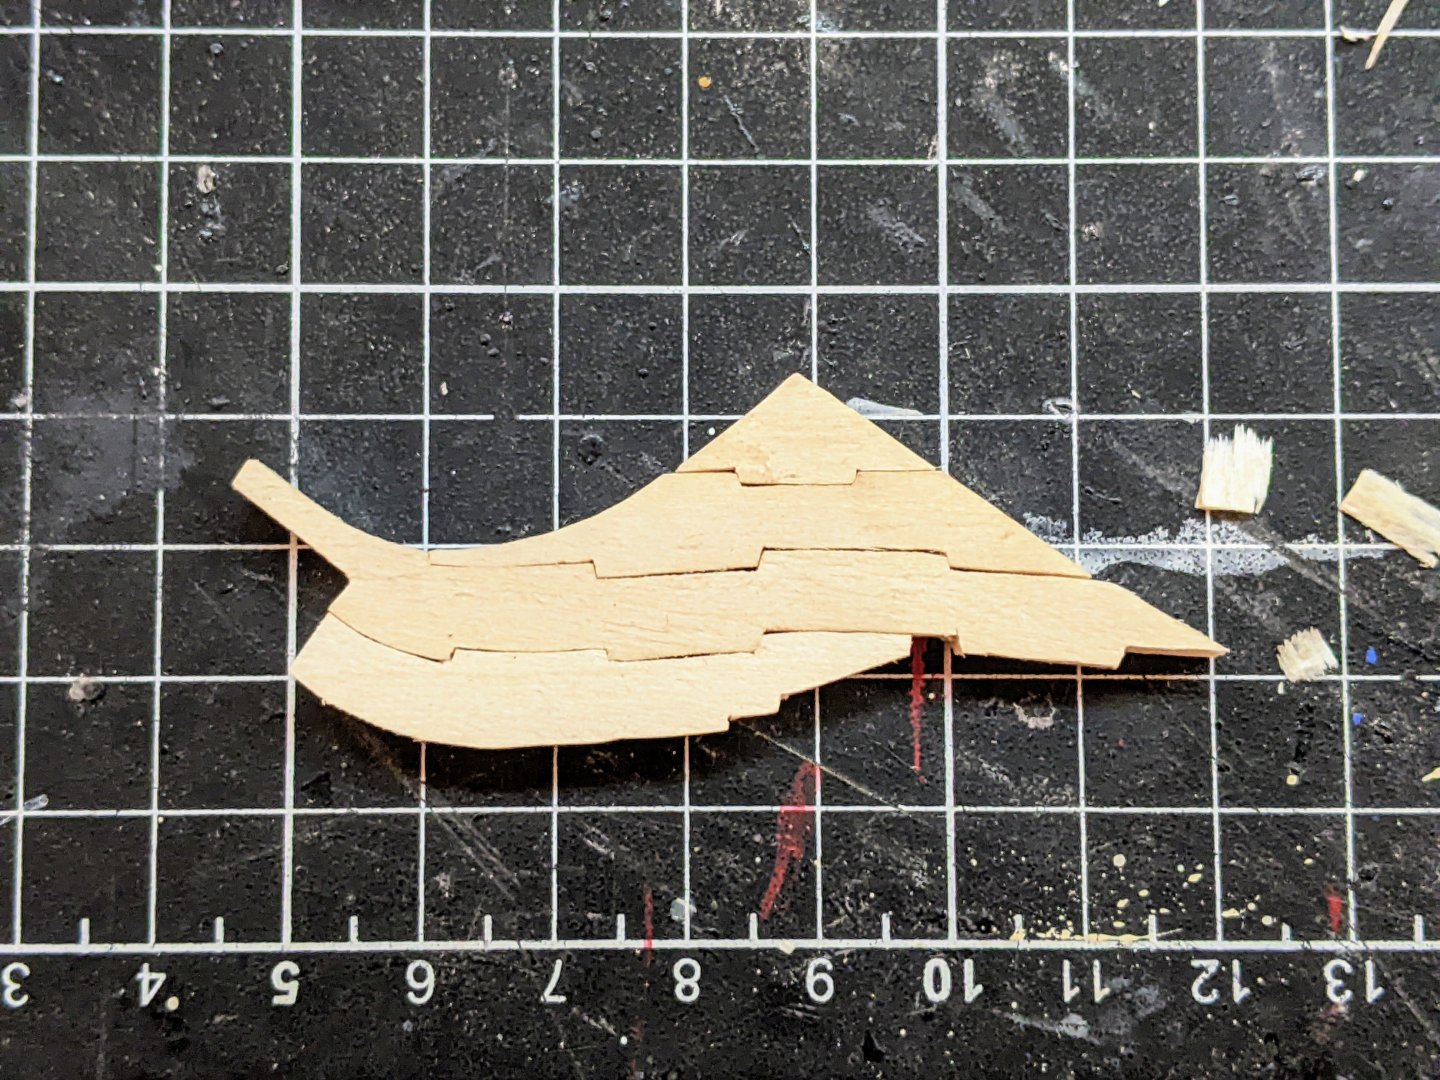
Time for a minor update as it has been quite a while since I last posted on Perseus. Work has been busy so modelling time has been limited and I have been lately distracted by another project. Despite this, work has continued in the background. However I have very little to show for it as the work has mostly focused on practicing future cuts on scrap wood. I have been using the more warped pieces of plywood I have (not suitable for the main build) as tests to practice cutting out the bulkheads on the scroll saw. I have also been cutting out test keel pieces from basswood I got at my local hardware store. While this has been going on I have also been experimenting with trying to cut tight joints for knee of the head. My second test version is much better than my first, but I am still having trouble getting all the joints really tight. Any suggestions anyone has would be much appreciated. I plan to keep practicing with the basswood until I am happy with my results and then I will shift over to attempting the final version with my pearwood.
-
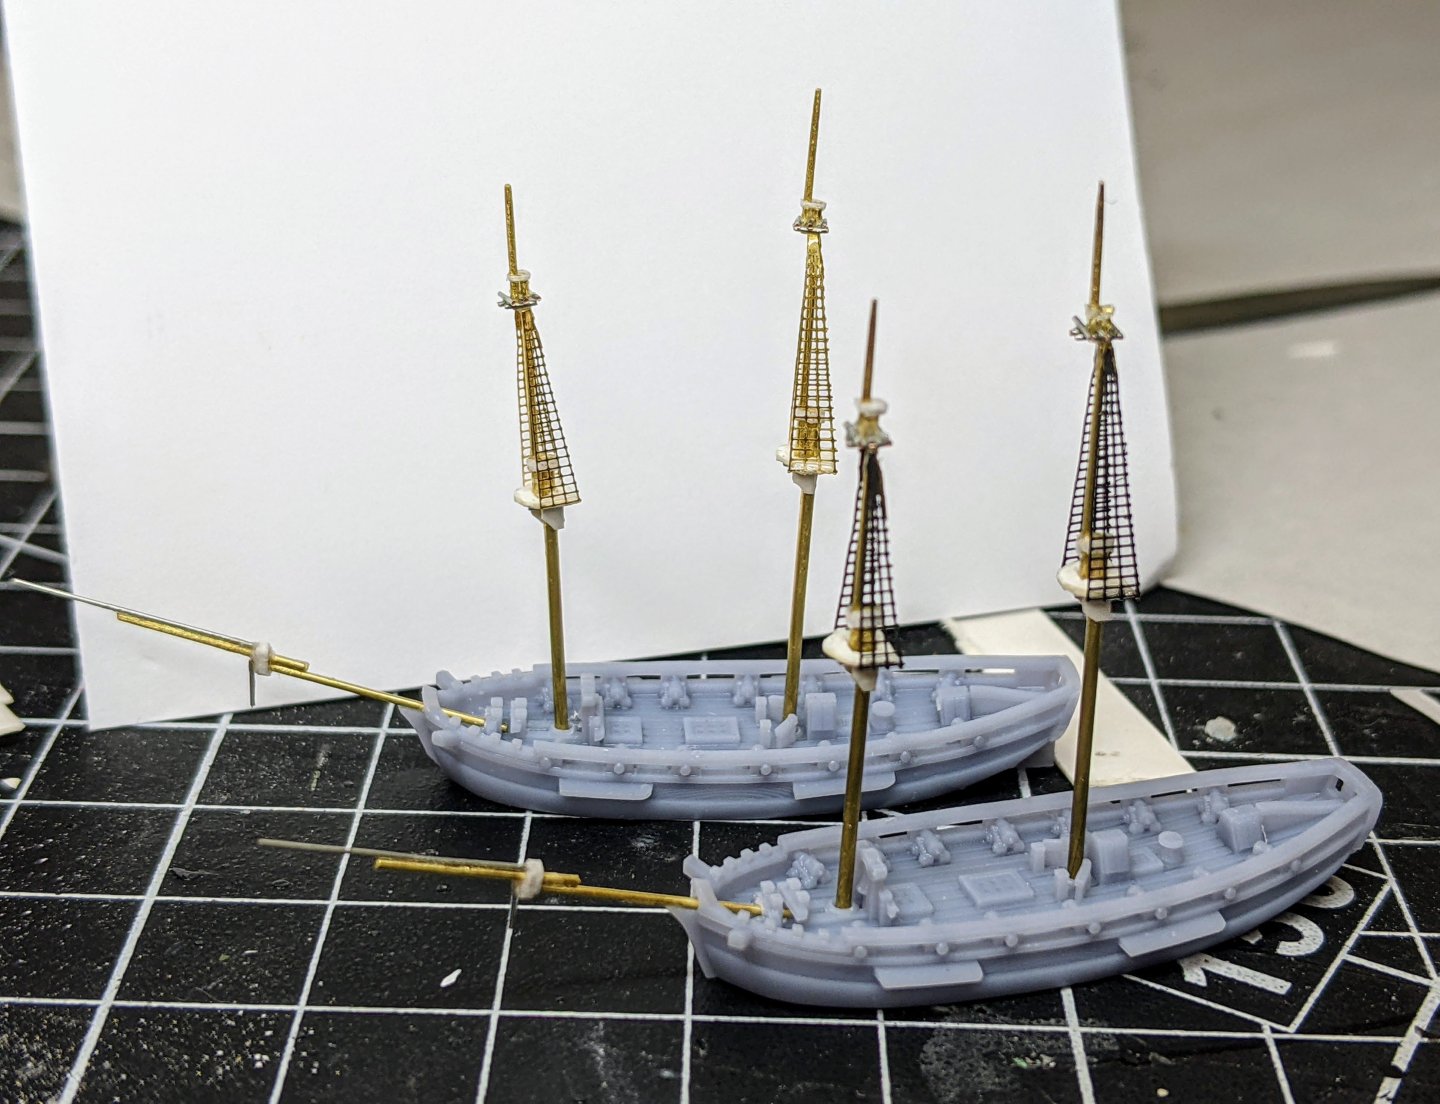
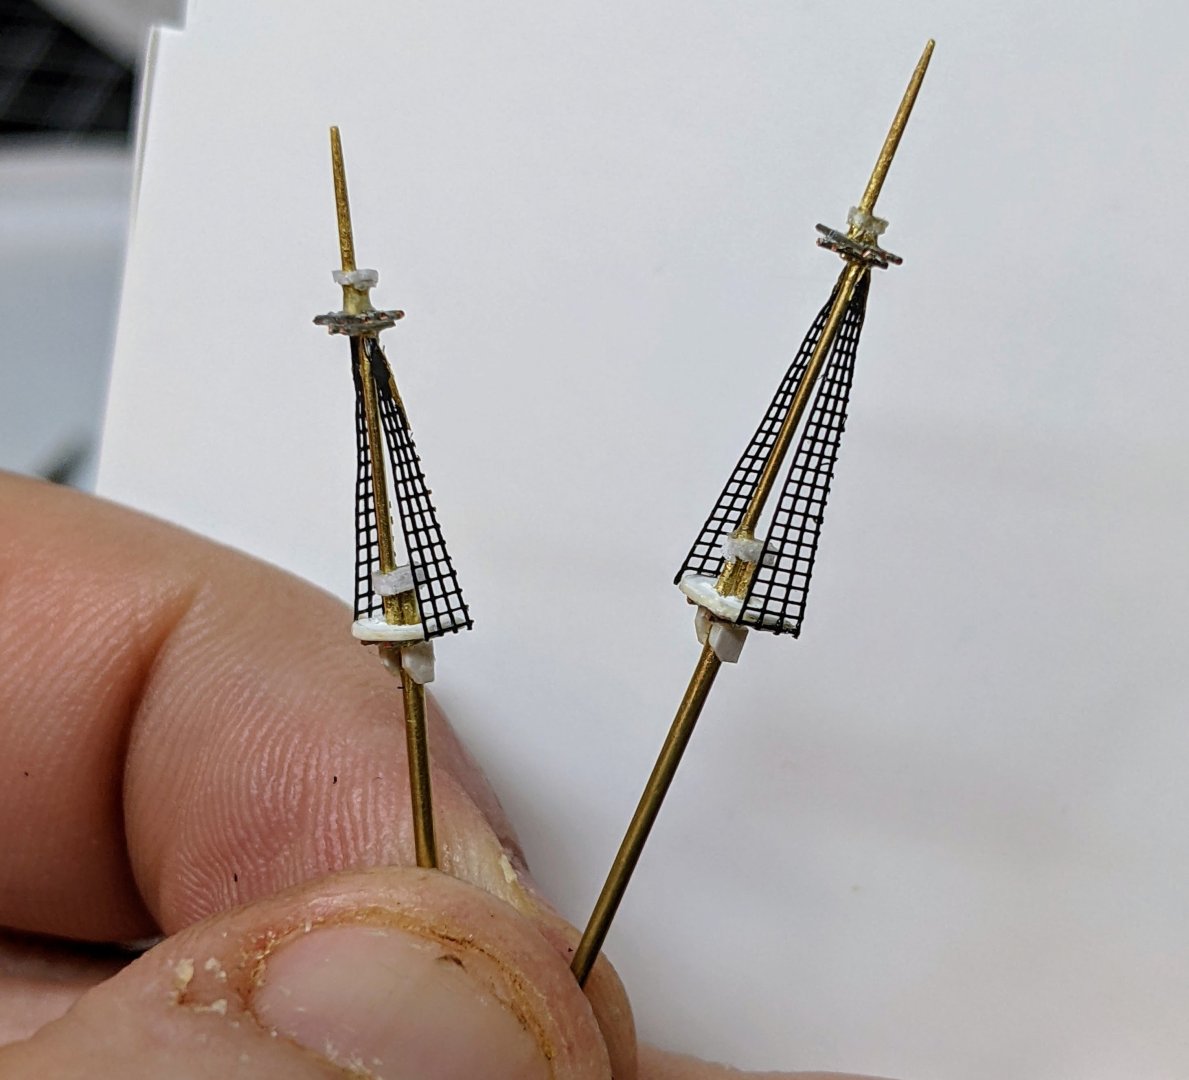
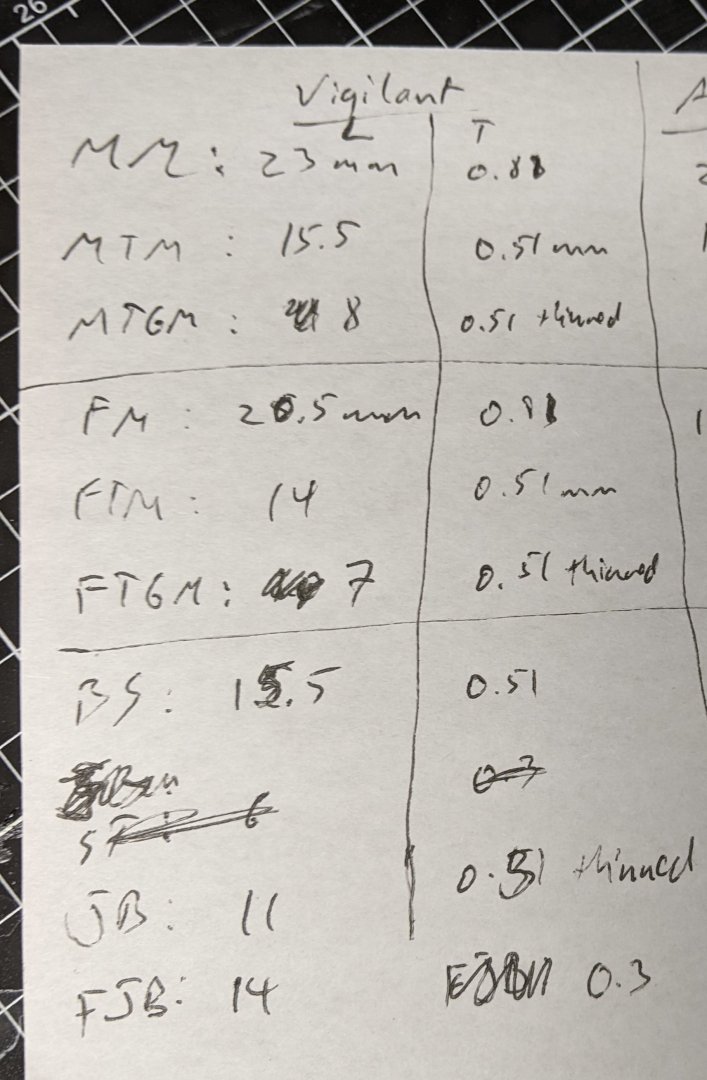
1/700 Vigilant Class Brigs - Masts I have begun work on two French Vigilant class brigs. The hulls are again from Turner Miniatures. To make the masts, I used the ratios from Lees. The lower masts need to be adjusted a bit to account for the fact that they will not extend below the waterline. You can see my calculations for the dimensions at scale below: As far as thicknesses go, some accommodations need to be made for the difficulties of working at this scale. The main requirement is that masts and yards need to look distinct even if the exact proportions are not perfect. I tried a number of different materials for the fighting tops, but in the end found that card was the easiest and once it was covered in super glue it was durable. Paper was again used to simulate the caps for the masts. I have attached the upper shrouds, but the lower ones will have to wait until painting is done. And here you can see the models with the masts temporarily put in place. Next up I need to start work on the yards.
- 39 replies
-
- 7
-

-

-
- Black Seas
- wargaming
- (and 1 more)
-
With brass I have found you need to: Make sure you get all the chemicals from the etching process off of it by cleaning well with acetone rough up the surface a bit to improve adhesion Use a primer (ideally sprayed) Once the painting is done seal it with some sort of varnish If you do all of those things then it seems to turn out relatively durable. Many of the same steps need to be done to stop the blackening from coming off if you go that route. But all of that is a real pain. What I have discovered is in many cases if what you are doing is purely decorative then you can get away with using paper which is painted and sealed with varnish. So eyebolts and the like I used blackening, but any metal banding (such as on the anchors) I just used paper. I also like the rudder with the piece on the end of it :). Looking good.
- 312 replies
-
- 5
-
-

-
- Chile
- Latin America
- (and 6 more)
-
Great job. That is a major milestone.
- 301 replies
-
- 6
-
-
-
- Constitution
- Bluejacket Shipcrafters
- (and 1 more)
-
The 1.5 and 1 inch dimensions are circumferences. Now that is for the swan class sloops. I took a quick look at the steel tables for 20 gun ships and they say pretty much the same, 1.5 in for the main and for mast lower ratlings and 1 in for the topmast shrouds and for the mizzen. This works out to 0.18mm and 0.13mm diameter respectively at 1/64. Edit: Nvmd on the explanation, I just realized I misread your comment. Yes likely a typo. In my head I just read the 0.01mm as 0.1mm. In terms of the colour there is historical precedent for the ratlins being tared and also for them to use natural rope. It depended on the preference of the commander. Personally I prefer the dark look in which case you would just use the same colour as you used for the shrouds. However, it is up to you.
- 422 replies
-
- 3
-
-
- Vanguard Models
- Sphinx
- (and 1 more)
-
As long as you get reasonably close you can then paint over the decal to get the exact right shade. You don't need to get right up to the edge as the colour will mostly read as your painted colour.
-
Great job
-
I really appreciate these tool posts. Gives me so many ideas about how to better do rigging. Looking forward to watching you get through the final stretch.
-
Ultimately the paint colour is really up to you, what do you think captures the look you are going for. If you want to make it look more correct to scale you need to use lighter colours than would have been historically used as at scale everything looks lighter. So a dark grey instead of a black and a paler yellow. Part of your problem with the paint is the colour and part will be the dark undertone of the wood. I would suggest building up in thin layers. Start with yellow ocre as you have done. Then move to a medium yellow such as VMC medium yellow. Finally highlight with a light yellow such as VMC light yellow. You can look around to find colours you like better if you want. The key here is to keep the layers very thin. You can build them up until you get the colour you want. Yellow is a very transparent colour and so much of the previous layers can be seen through. If you are trying to colour match the painting you may need to experiment with adding in a cream colour to get the right consistency such as VMC ivory. The key is lots of thin layers. To check your paint is thin enough you can paint a little on the side of your palm. You should be able to still see the palm lines through the paint.
-
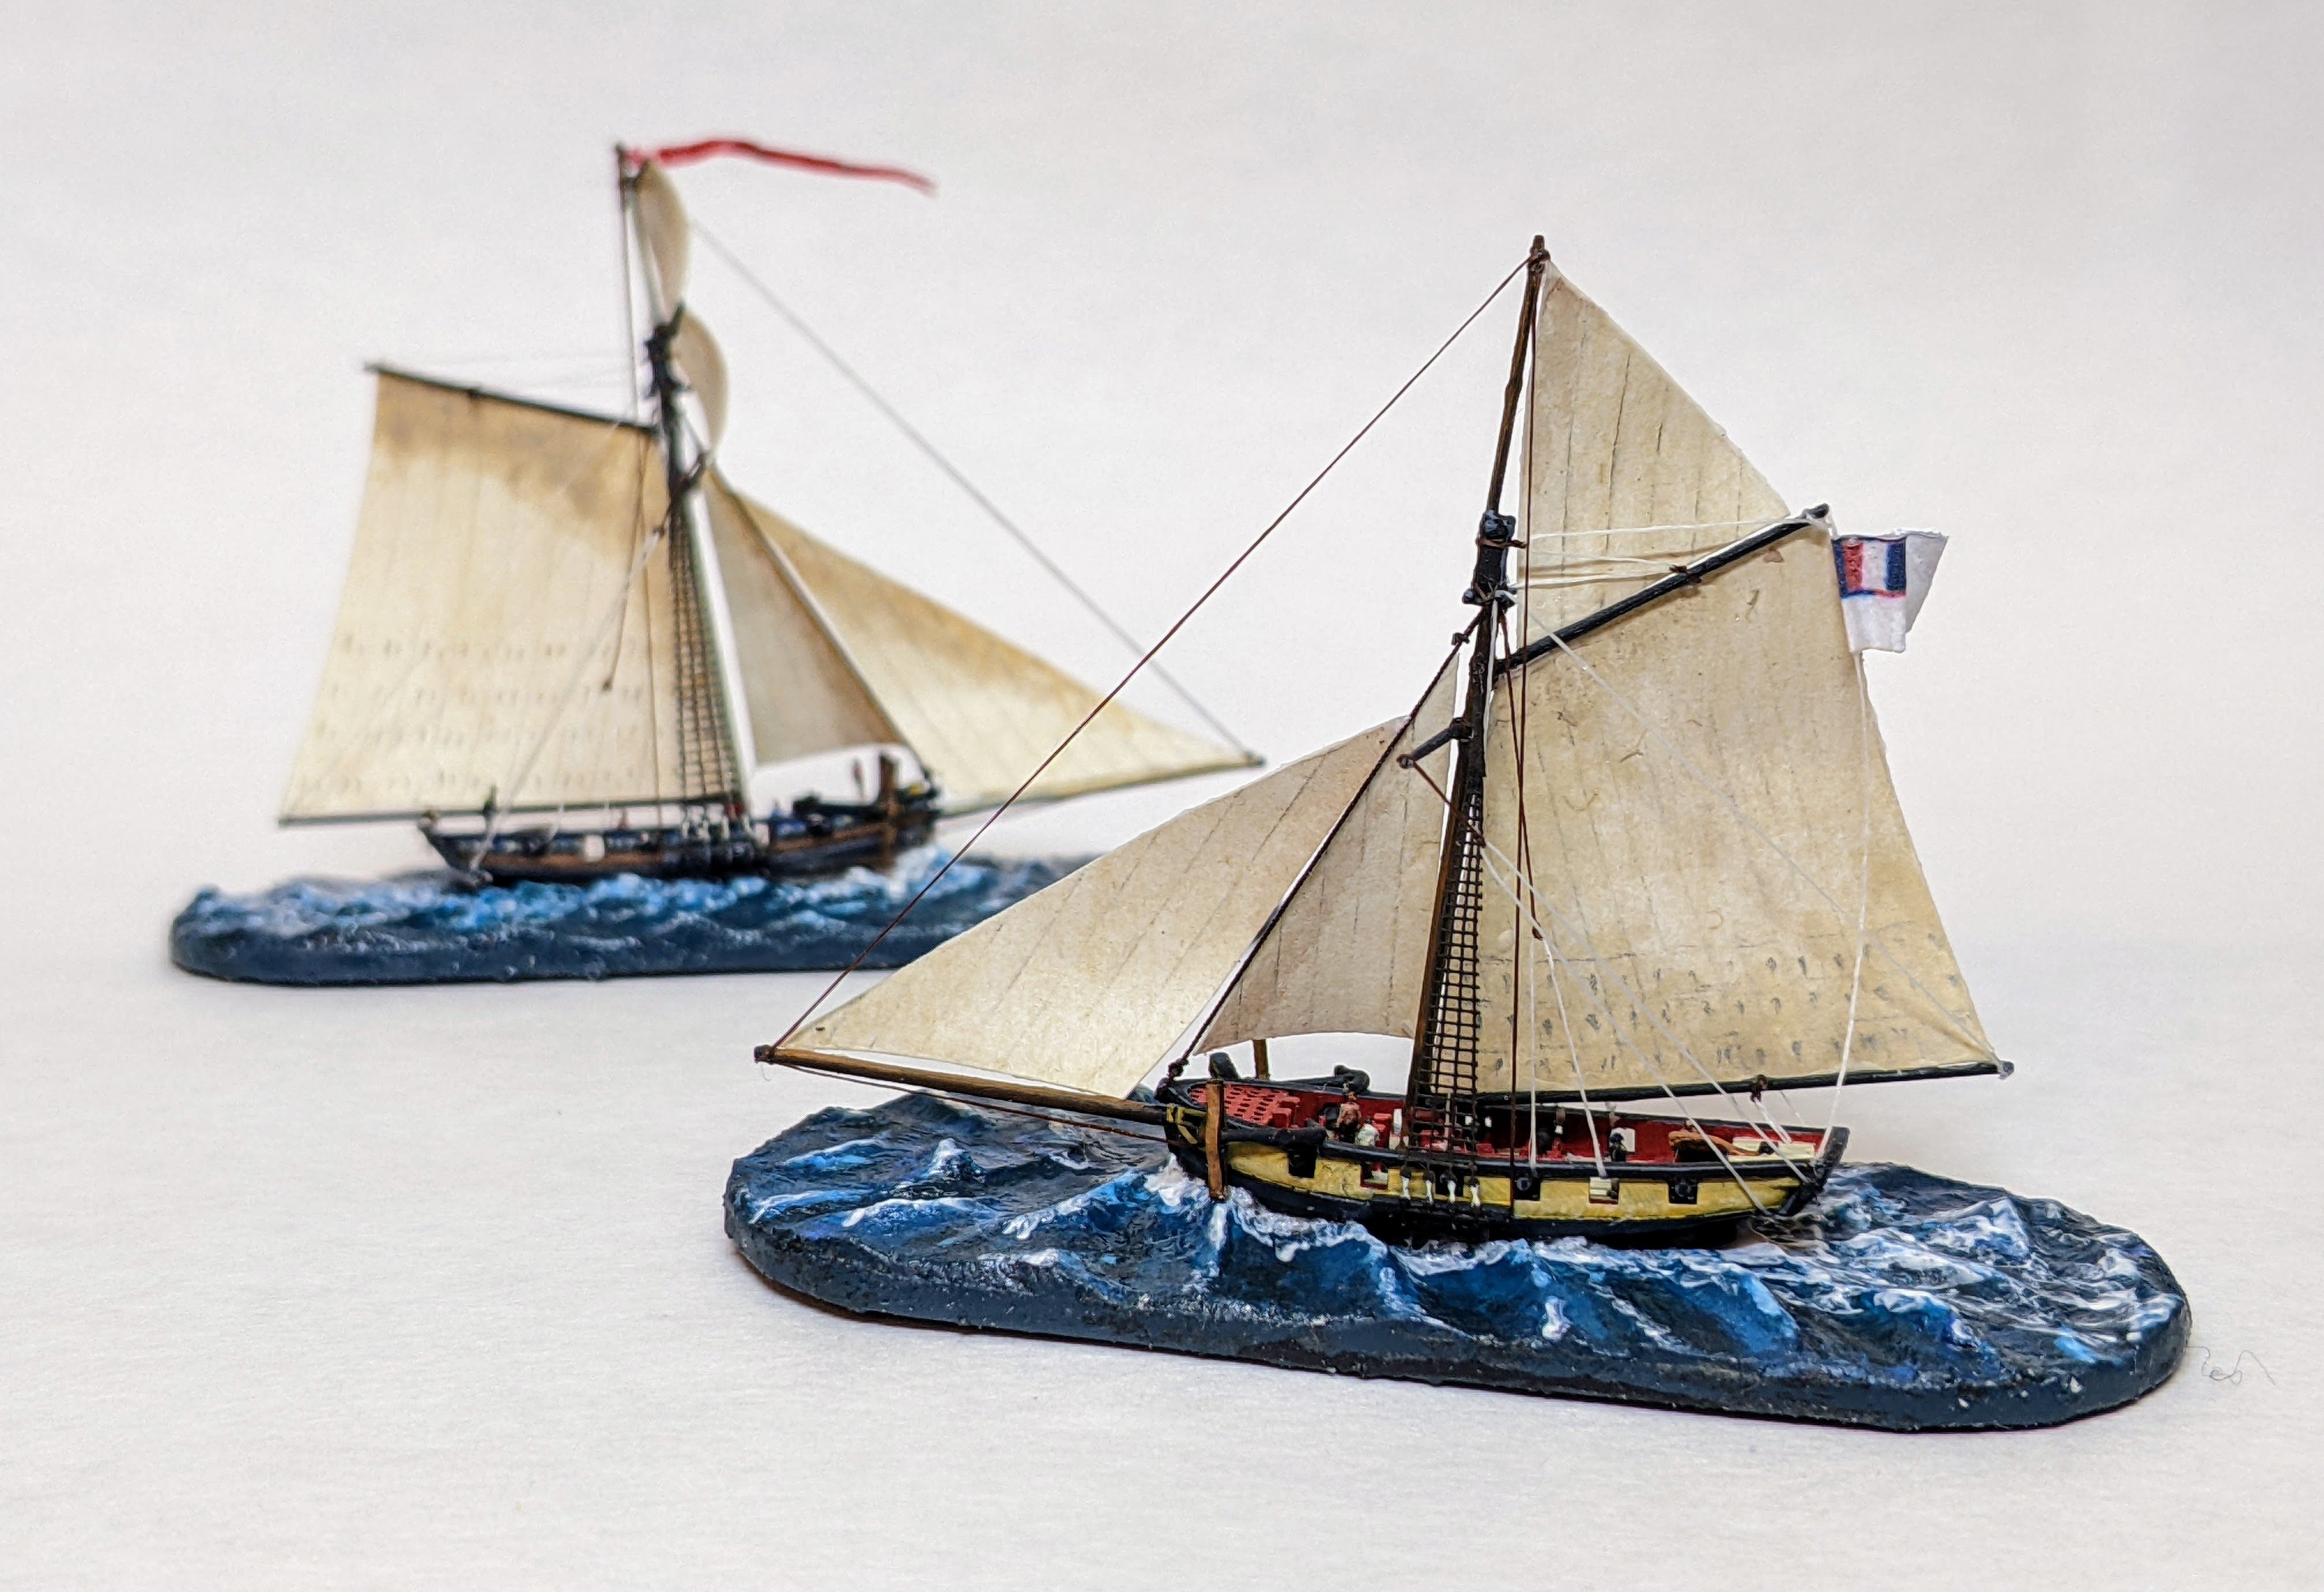
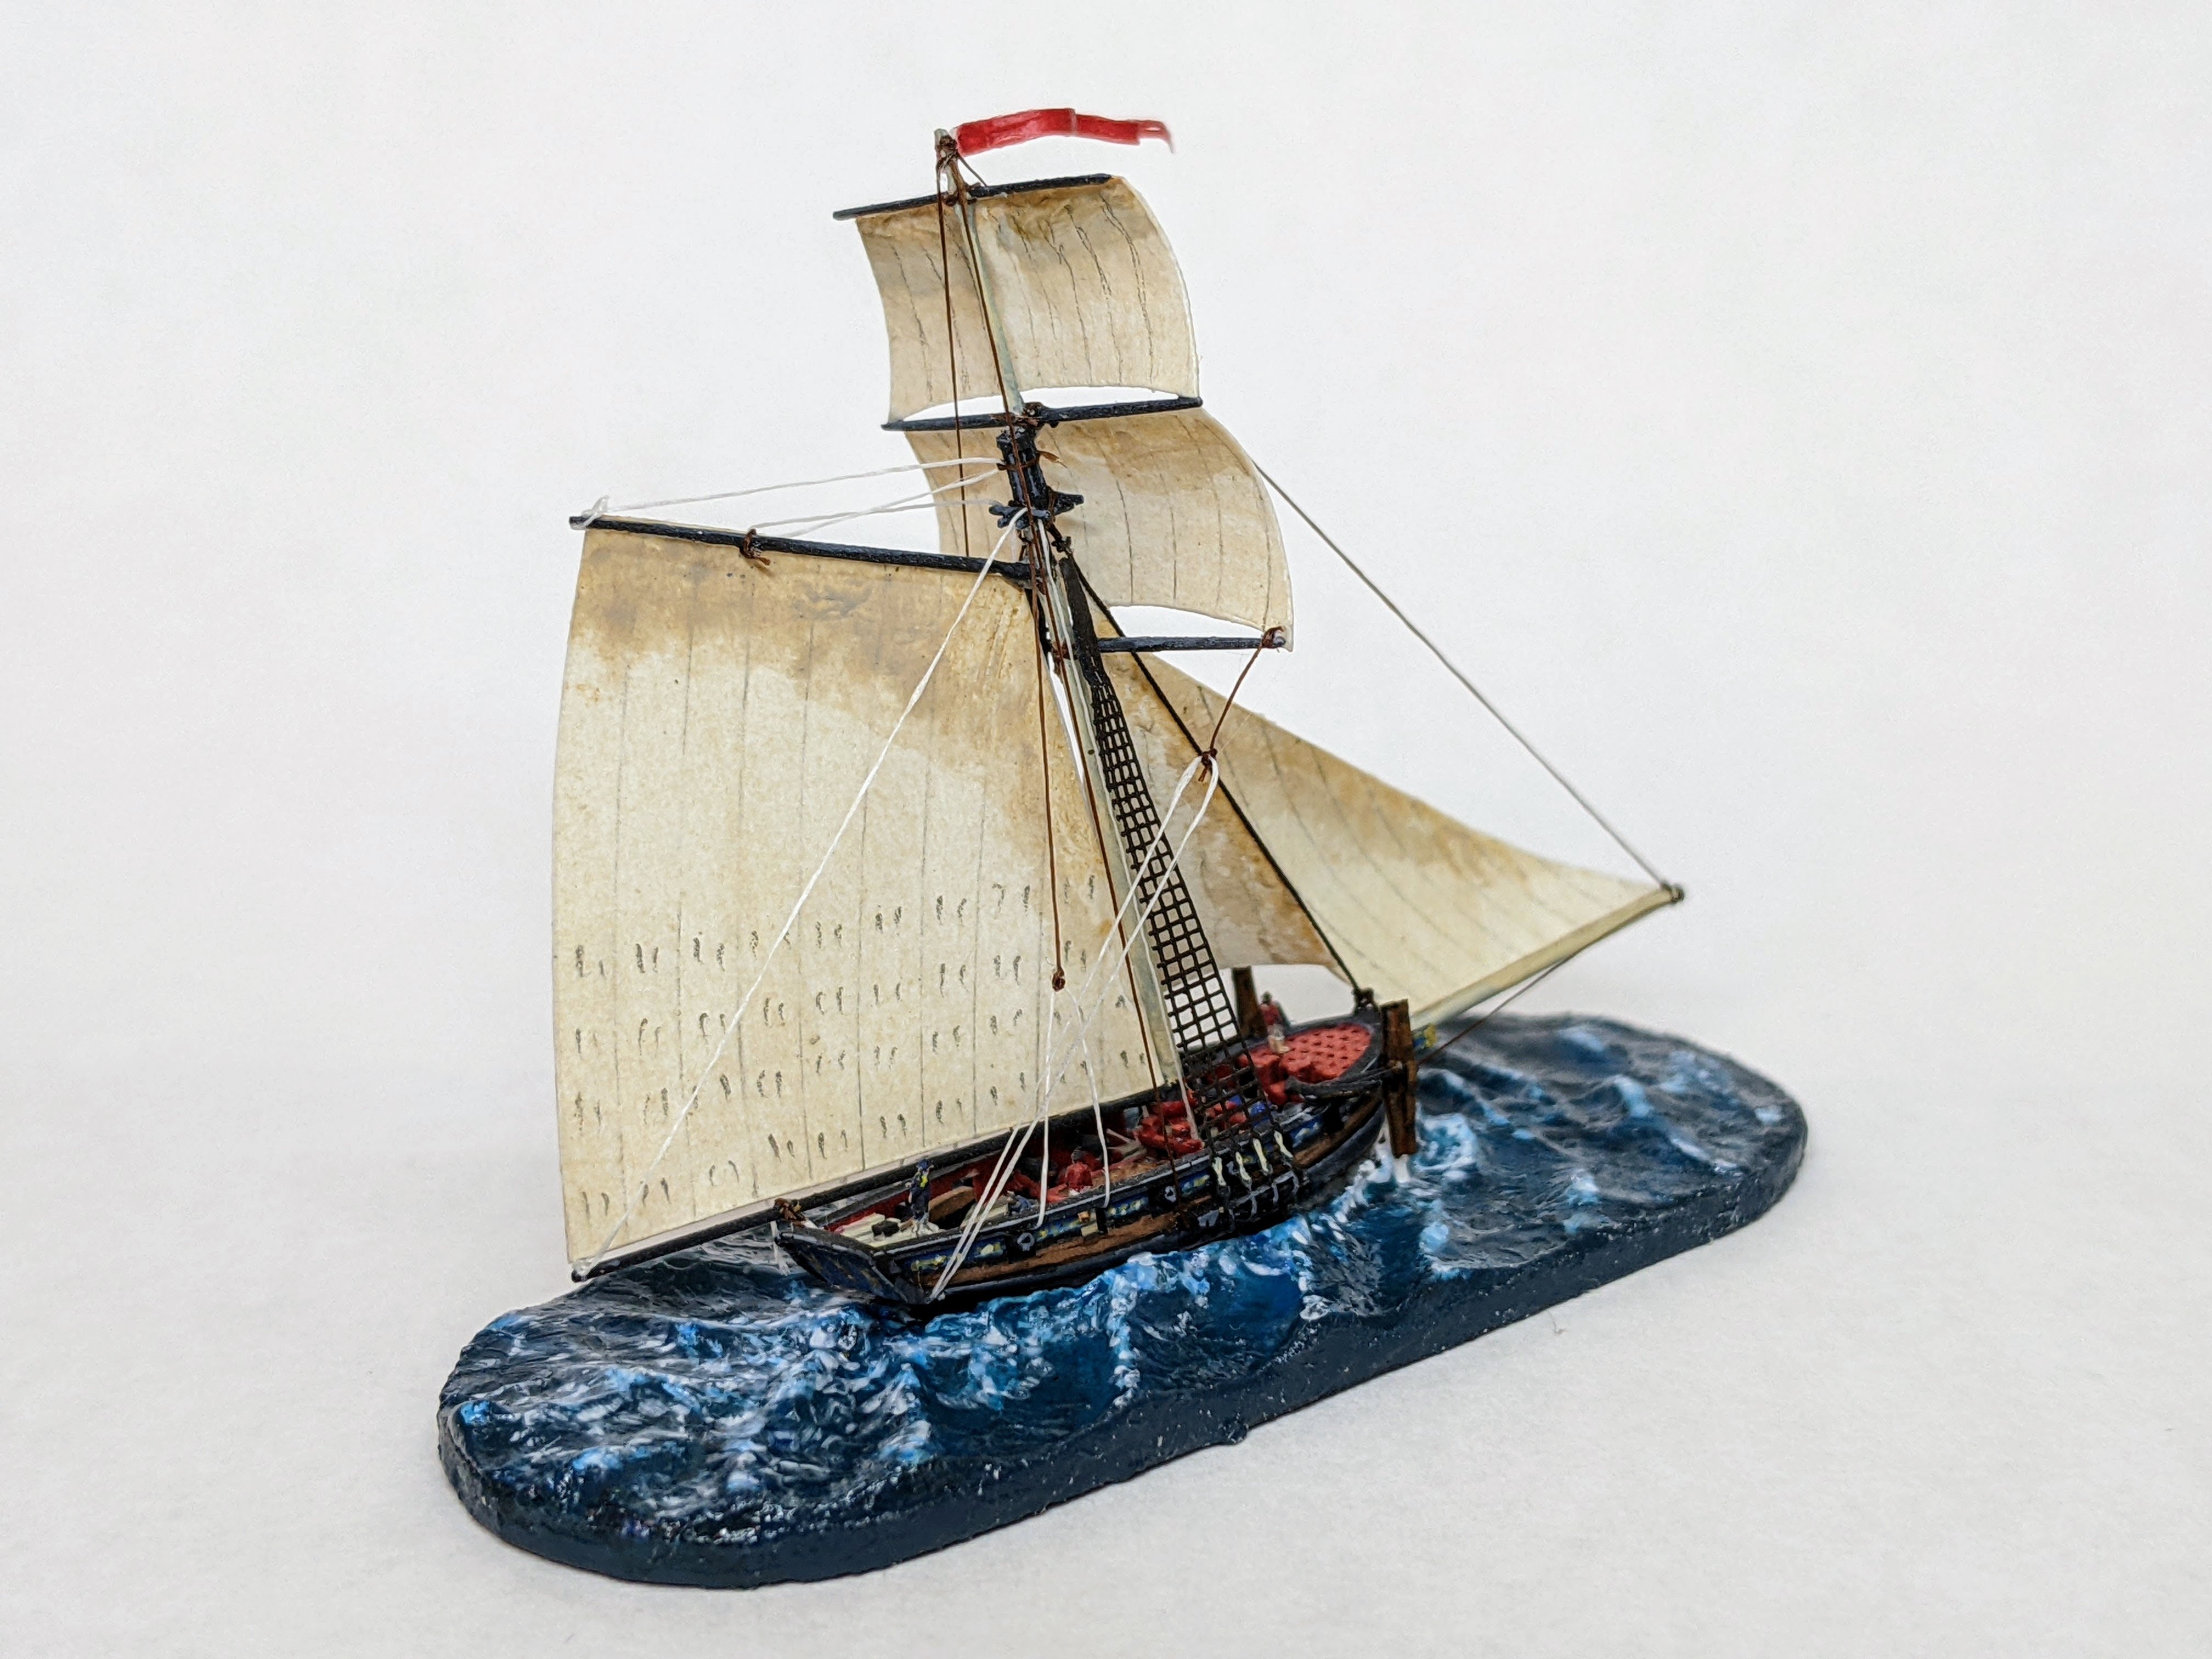
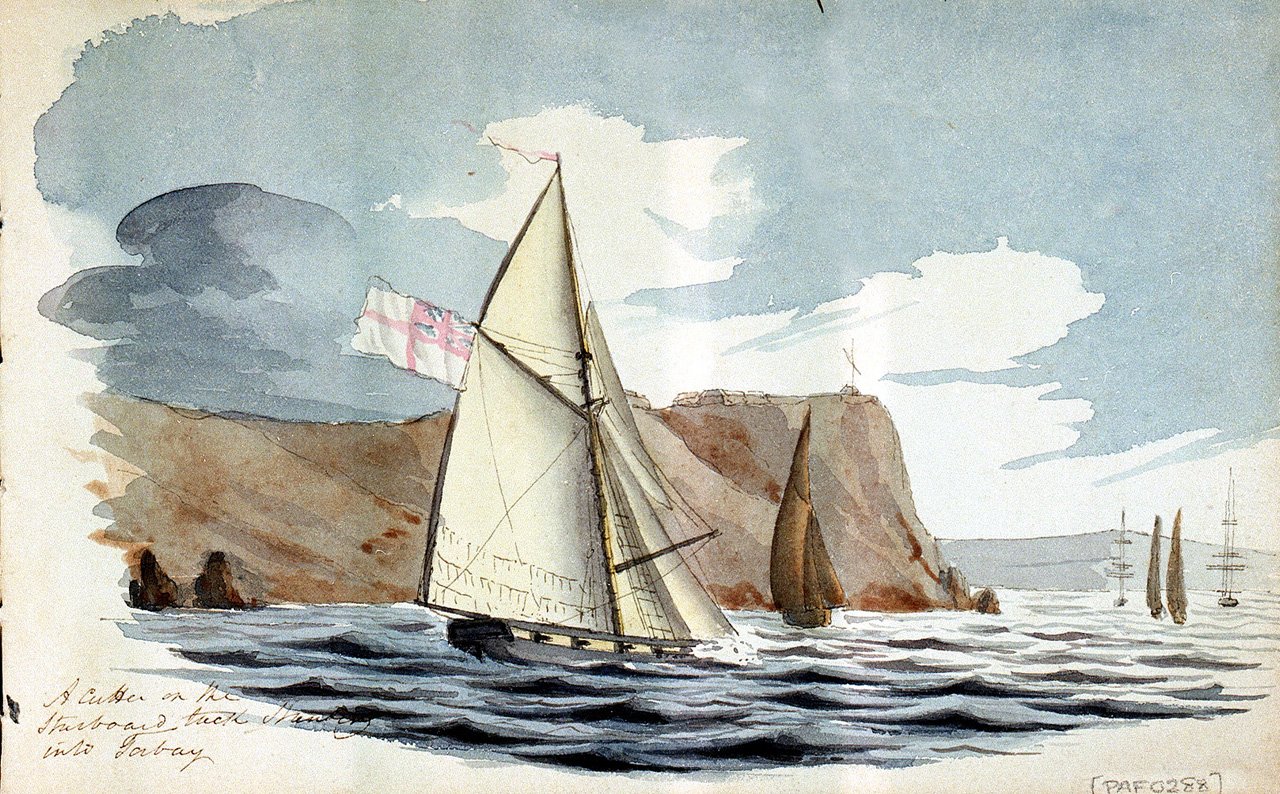
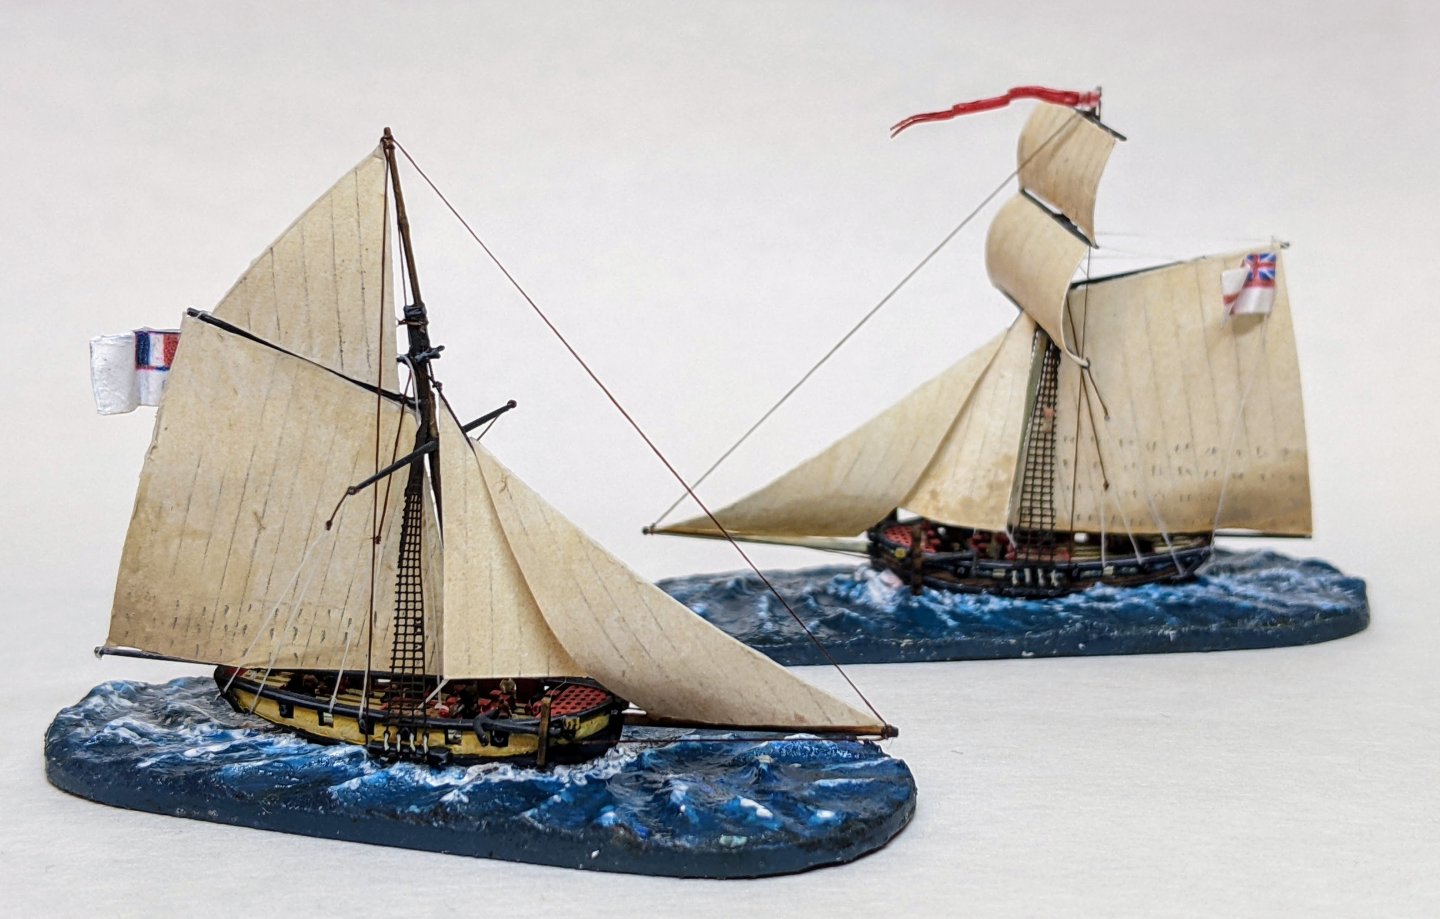
1/700 Cutters - Final Pictures Unfortunately since the last update I noticed a problem with one of the cutters I was working on. You may have spotted it in the photo, but the mast is too high on the brown cutter. I didn’t realize this until the rigging was pretty much complete so I decided to scrap it (in reality I am planning on putting it aside and maybe turning it into a wreck or something like that. For the yellow cutter I wanted to try and depict it with a different rig than I had done for the Alert look alike. I was inspired by this image from the NMM: I thought it would be cool to have the ship tacking and so I took a stab at replicating this image. The sails were constructed in much the same manner as before. The most significant change from the last time was that I waited until last to attach the shrouds and didn’t varnish until everything but the water was done. I decided to go with an early French revolutionary flag for the ensign. The final pictures of both cutters together (the french one in the foreground and Alert in the background) are below:

- 39 replies
-
- 11
-
-
-
- Black Seas
- wargaming
- (and 1 more)
-
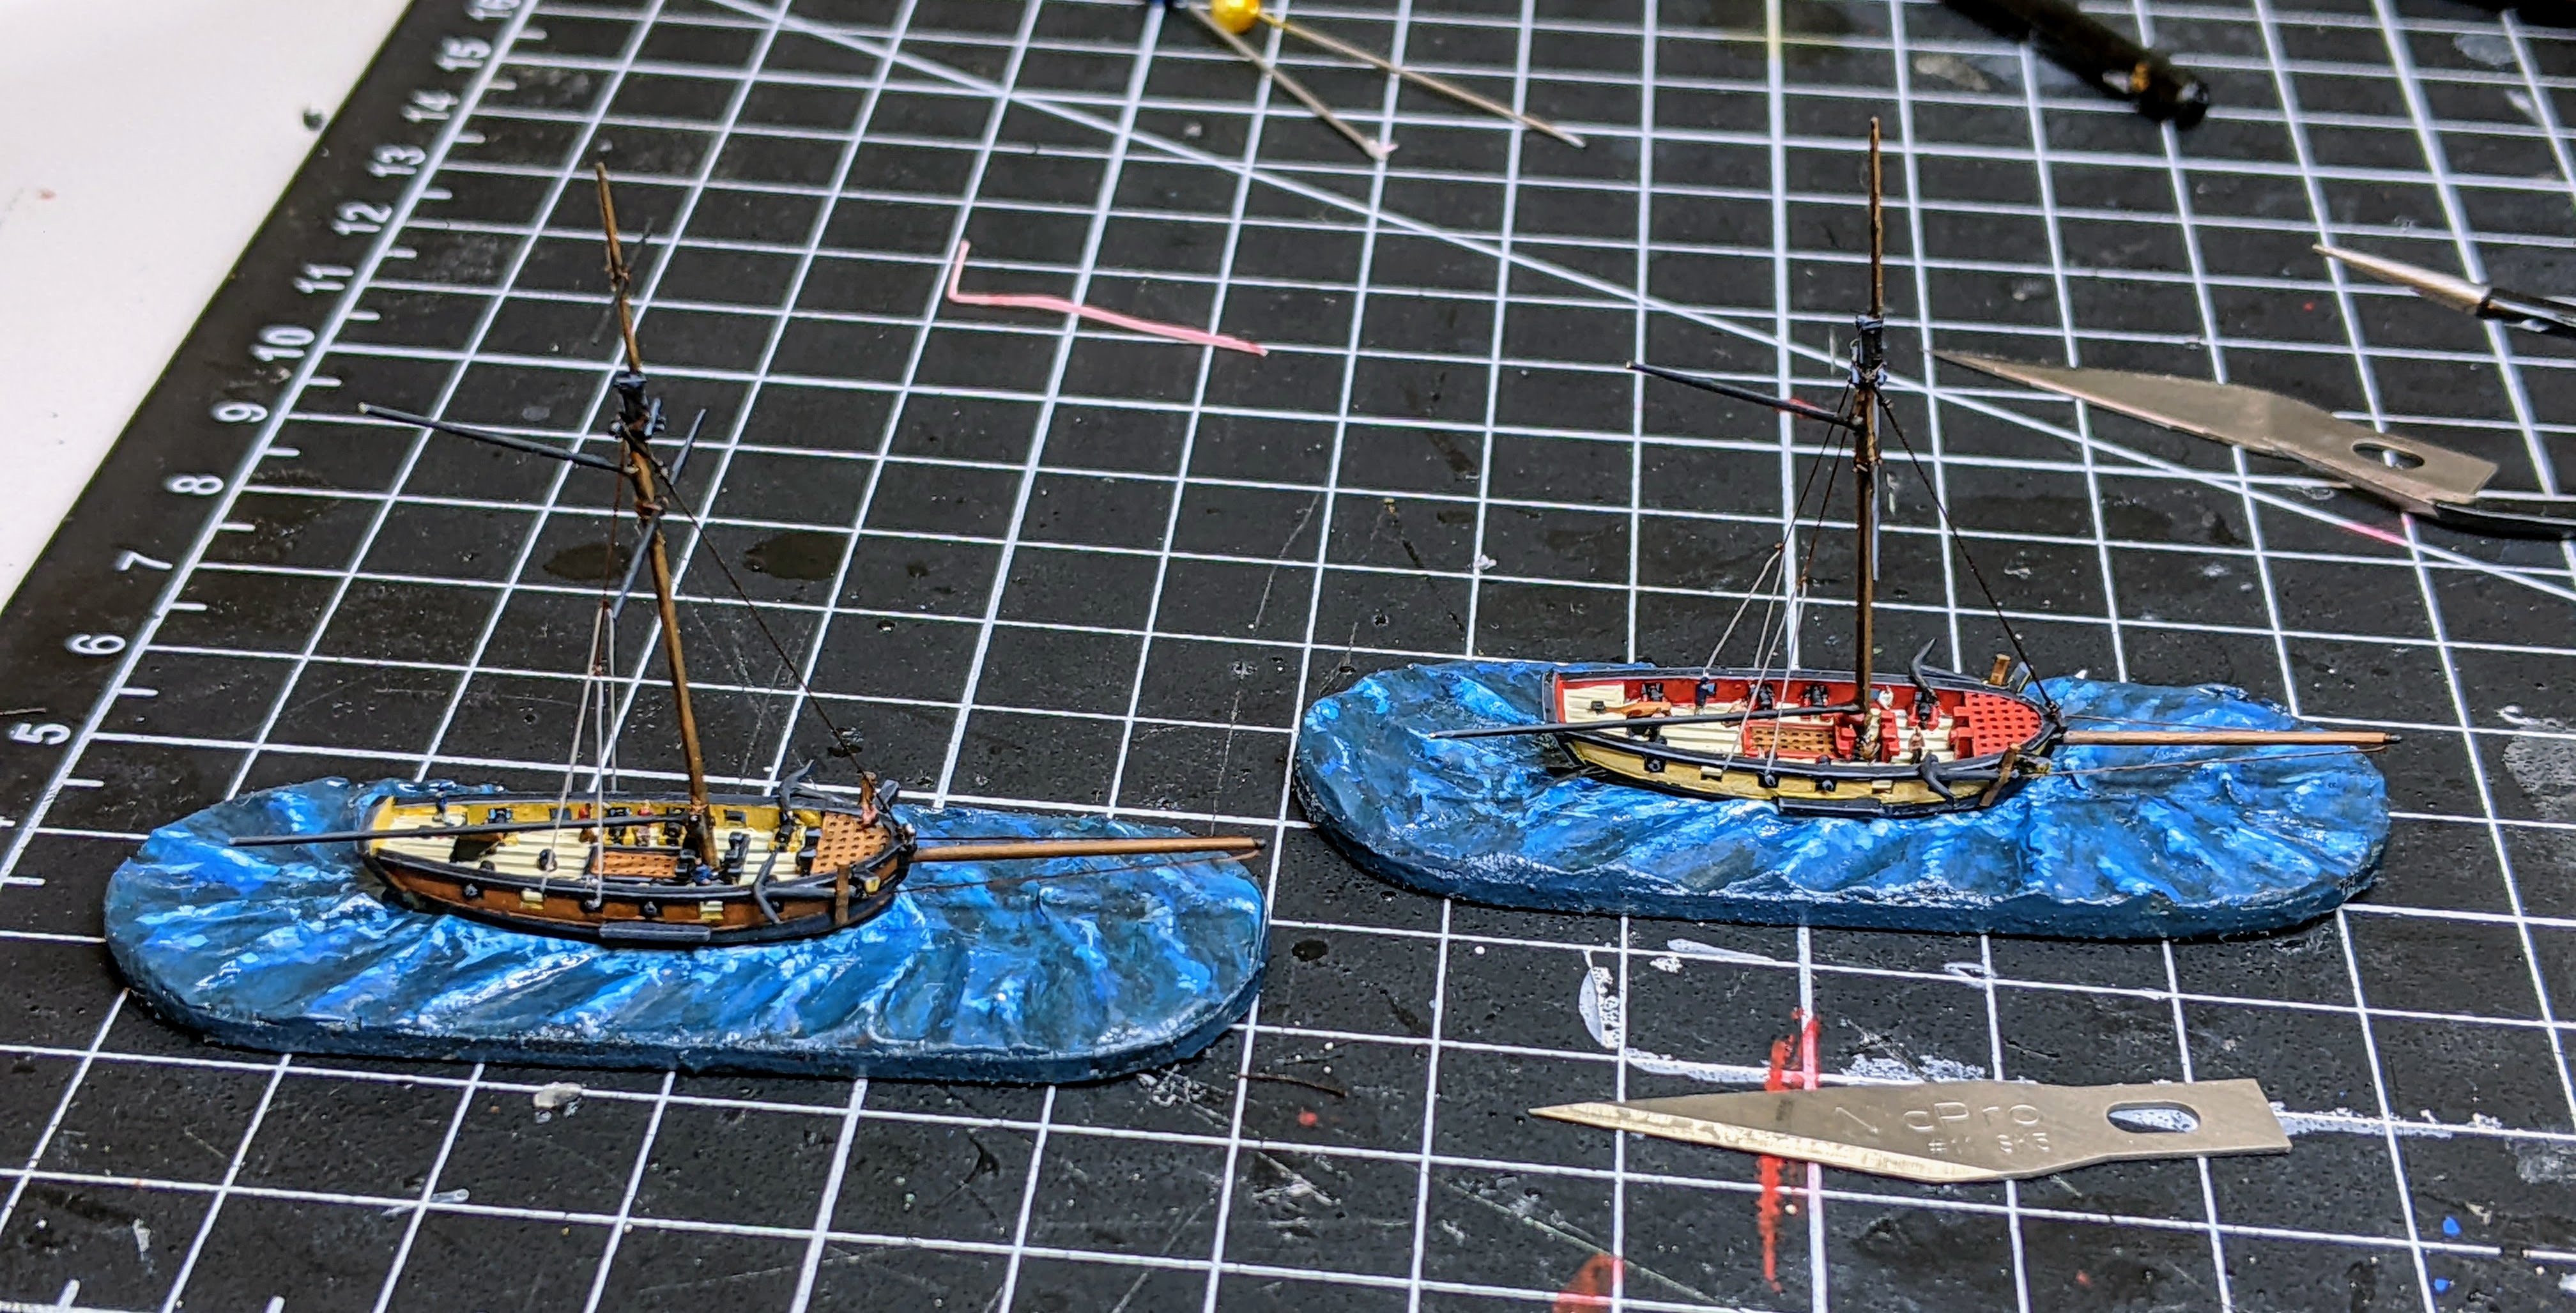
Time for a minor update. I have made a fair bit of progress on the next two cutters. They are moving along much faster since I know what I am doing now. I modified the order of operations a bit based on lessons learned the first time round. The bowsprit shrouds, fore stay and running backstays are in place as well as the crew and anchors. The brown one will be a French cutter and the yellow one another British one.

- 39 replies
-
- 10
-
-
-
- Black Seas
- wargaming
- (and 1 more)
-
Those overhead shots look so cool. It really gives you an appreciation for how many ropes are running in every direction.
- 419 replies
-
- 2
-
-
- Victory Models
- Pegasus
- (and 2 more)
-
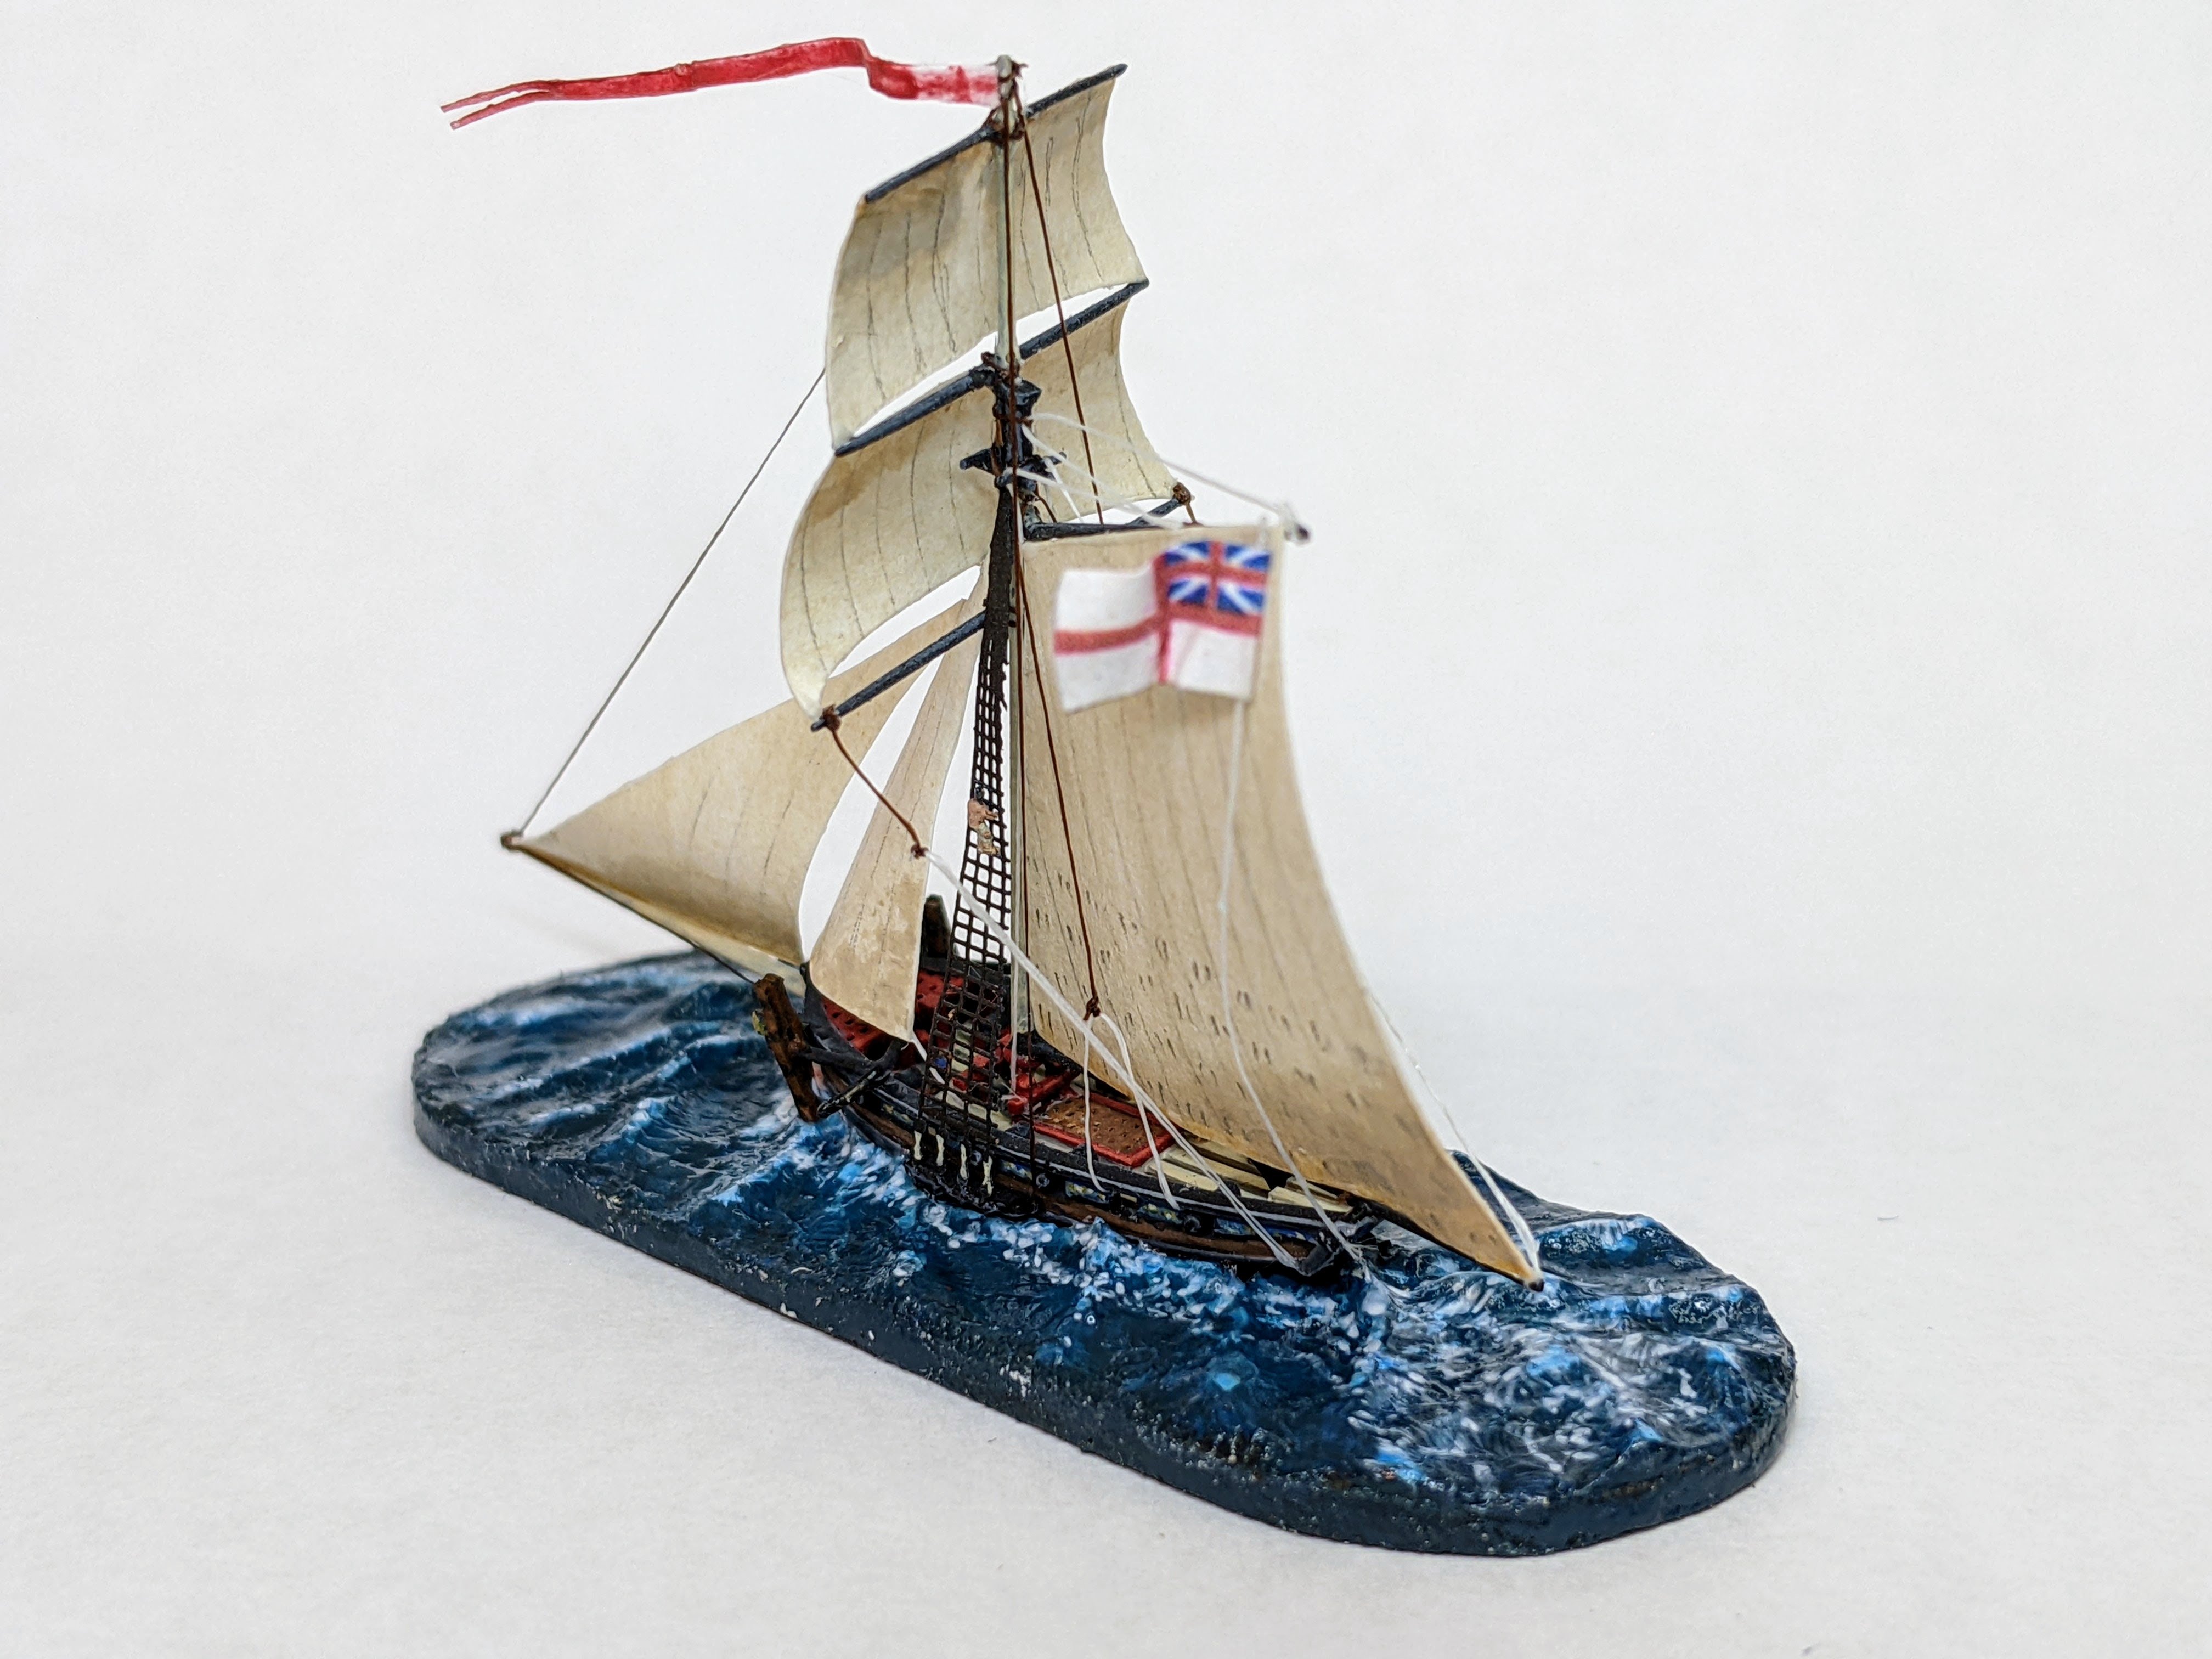
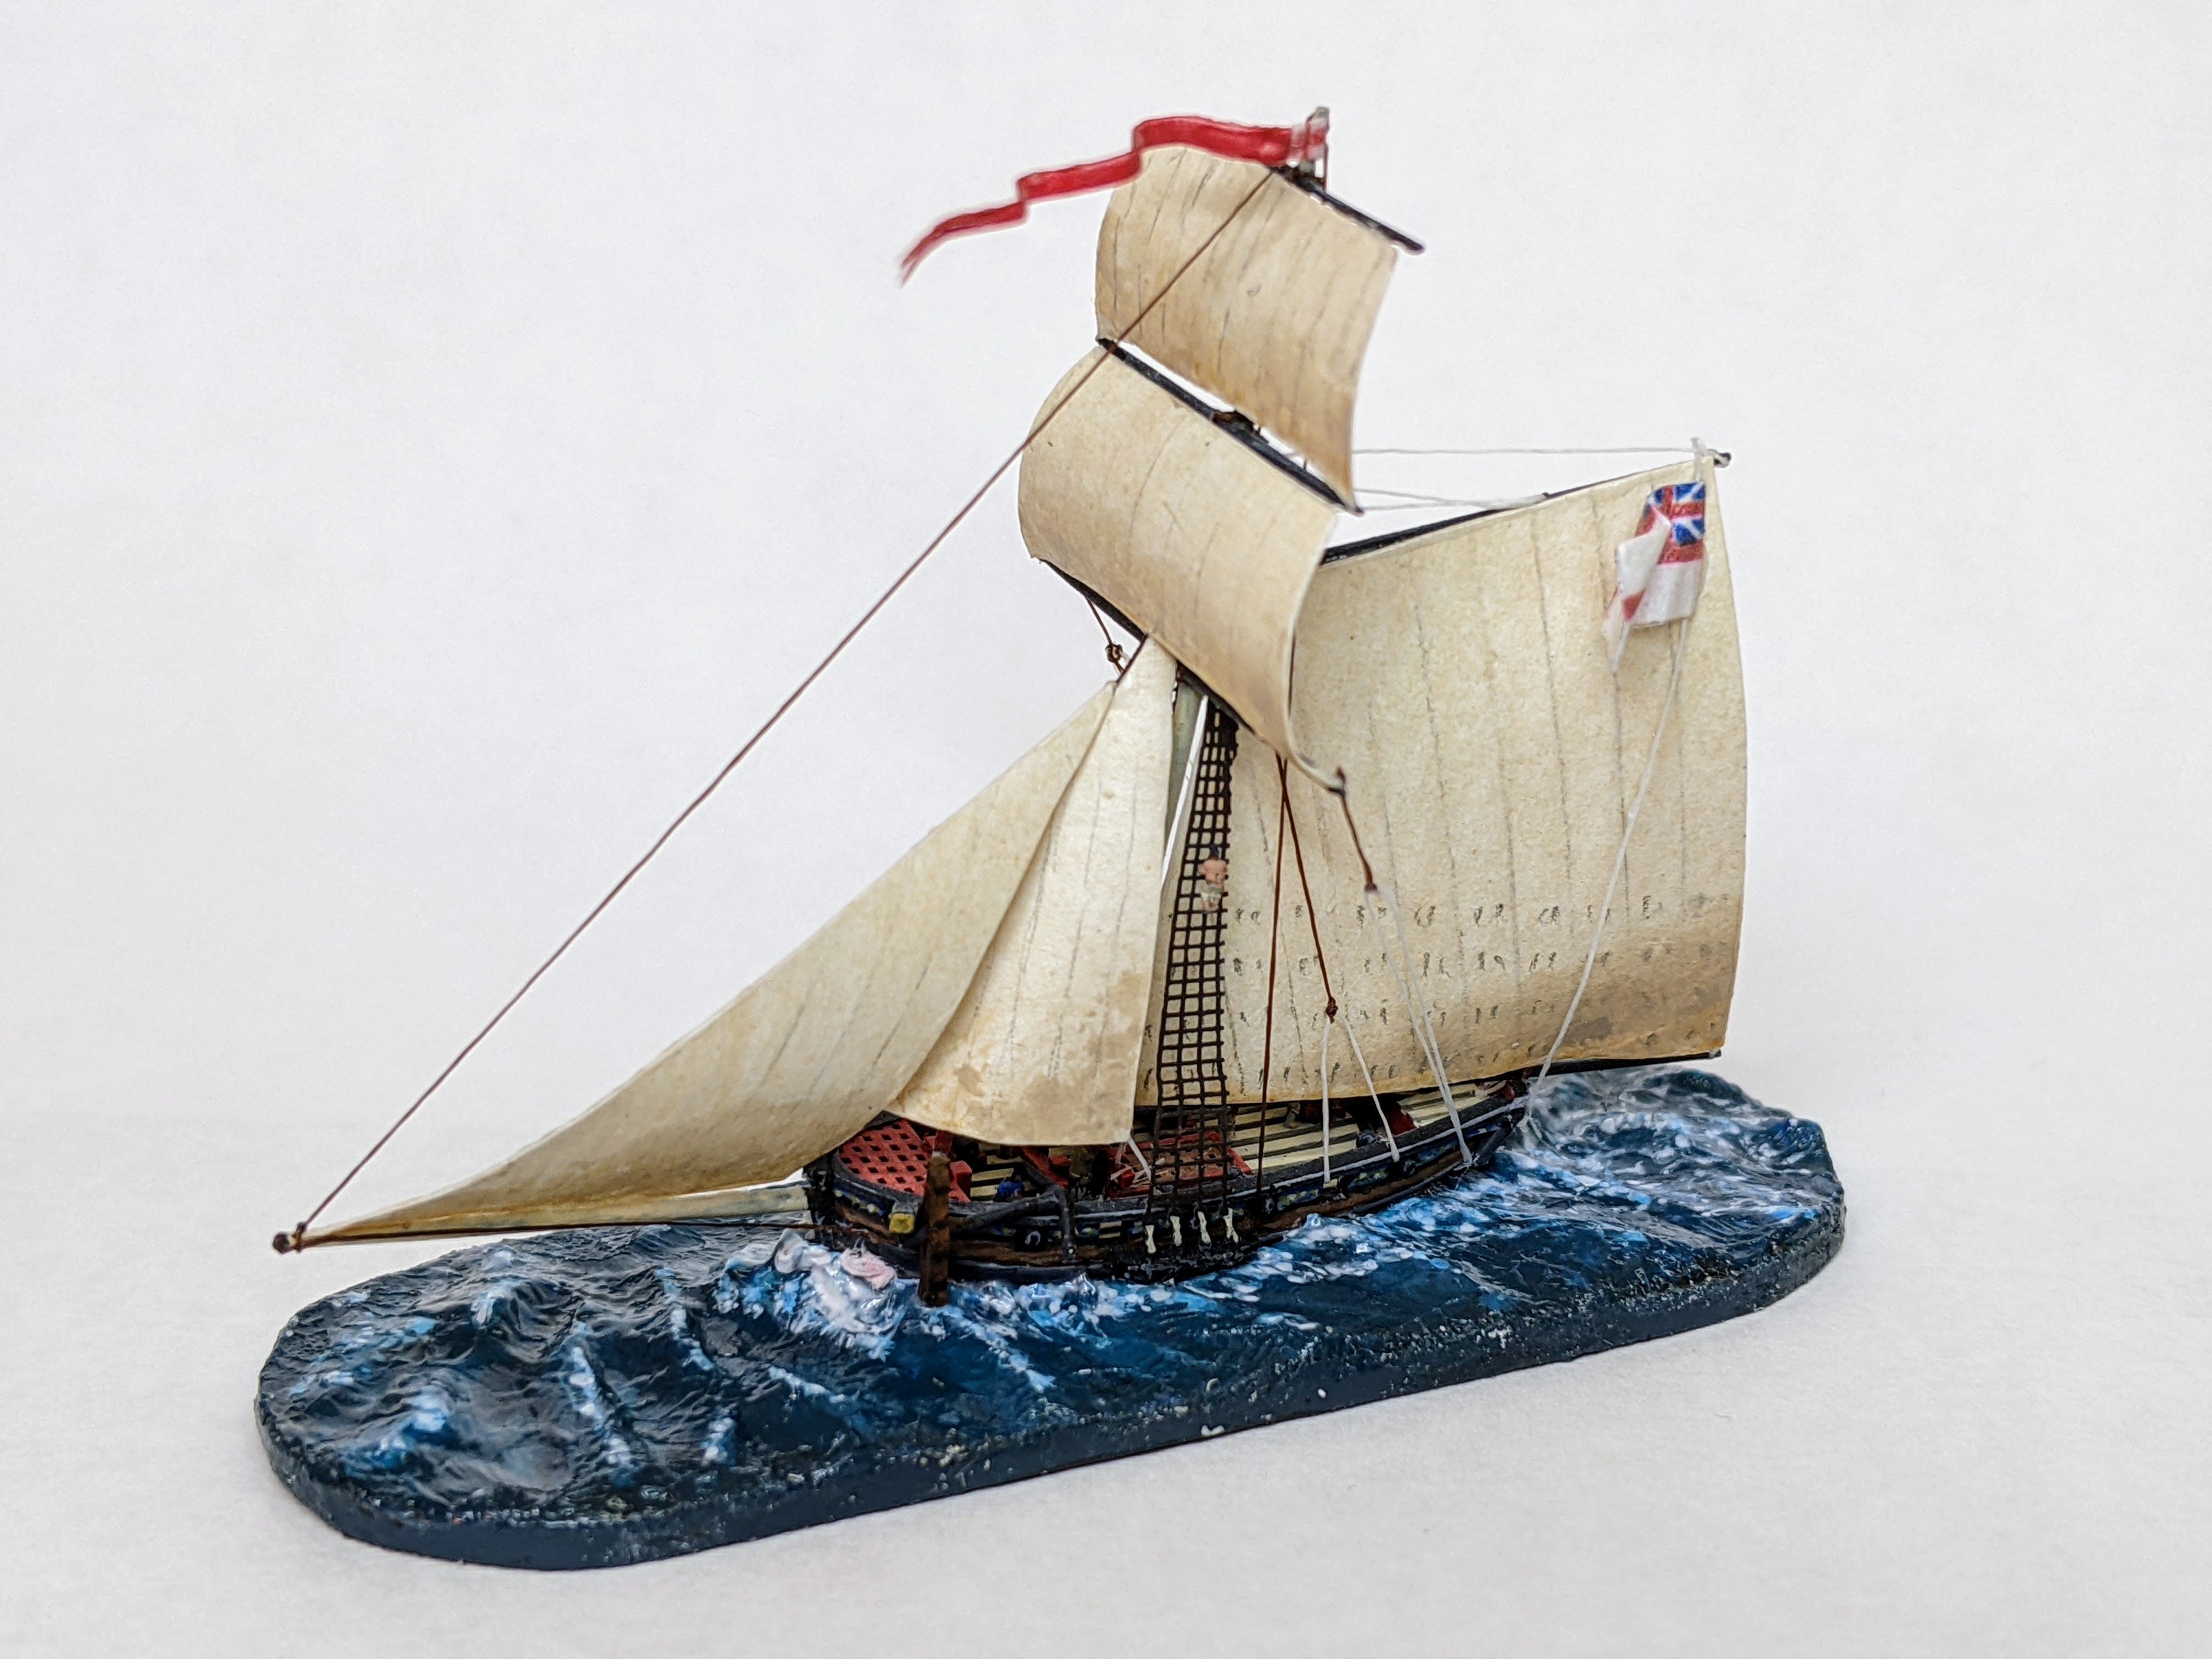
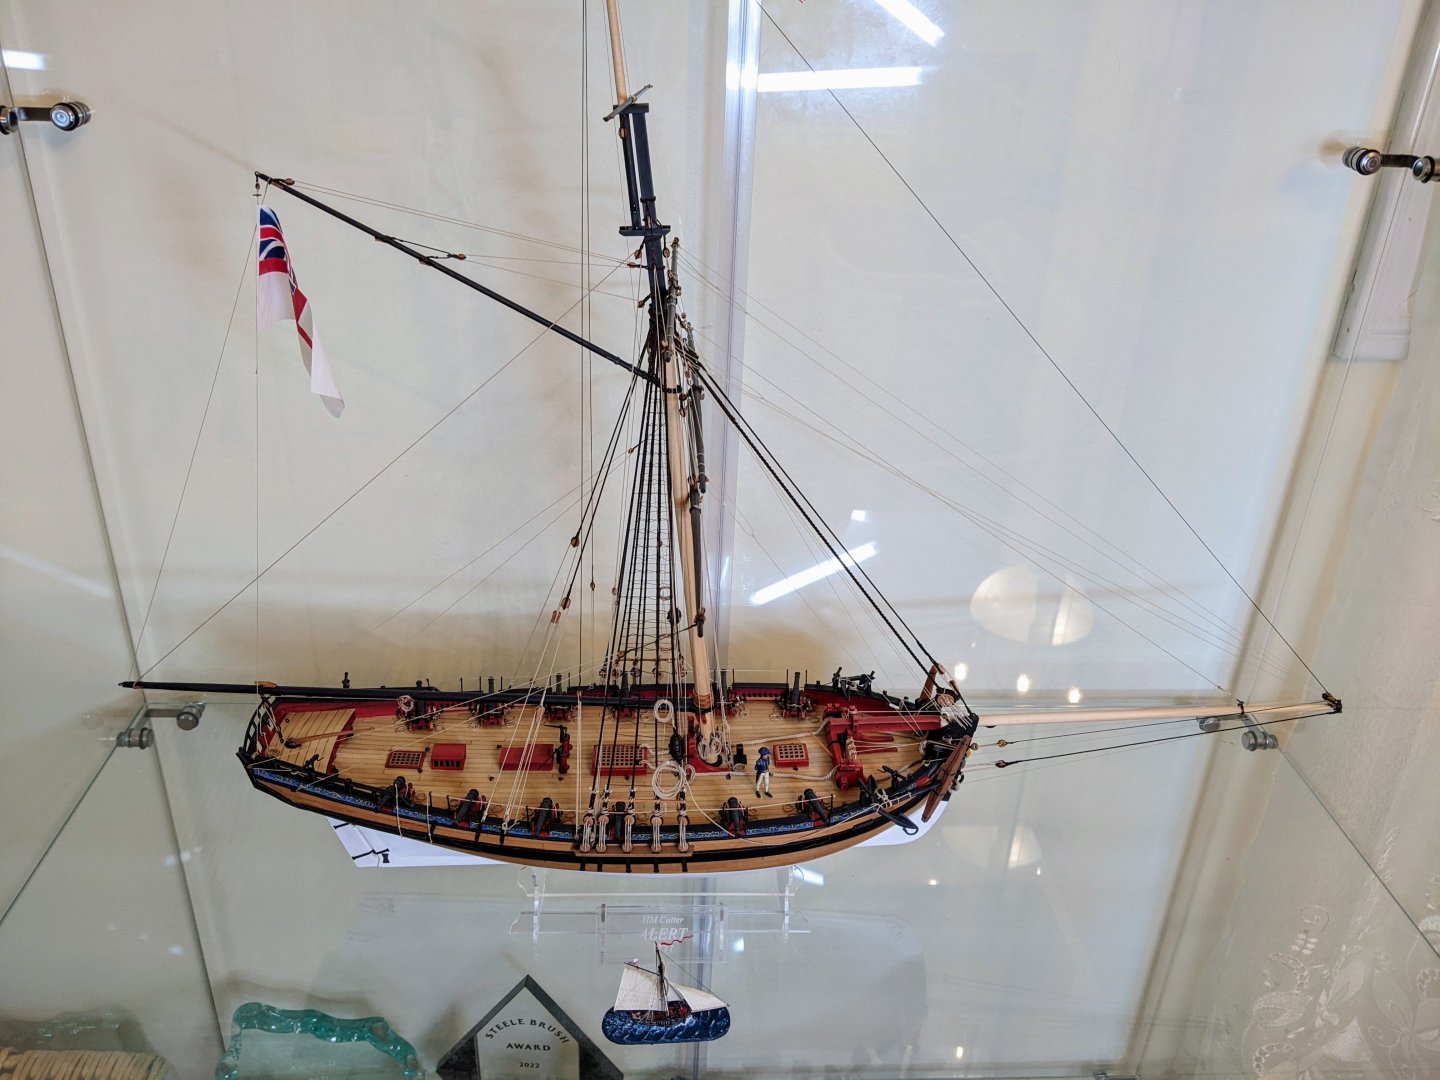
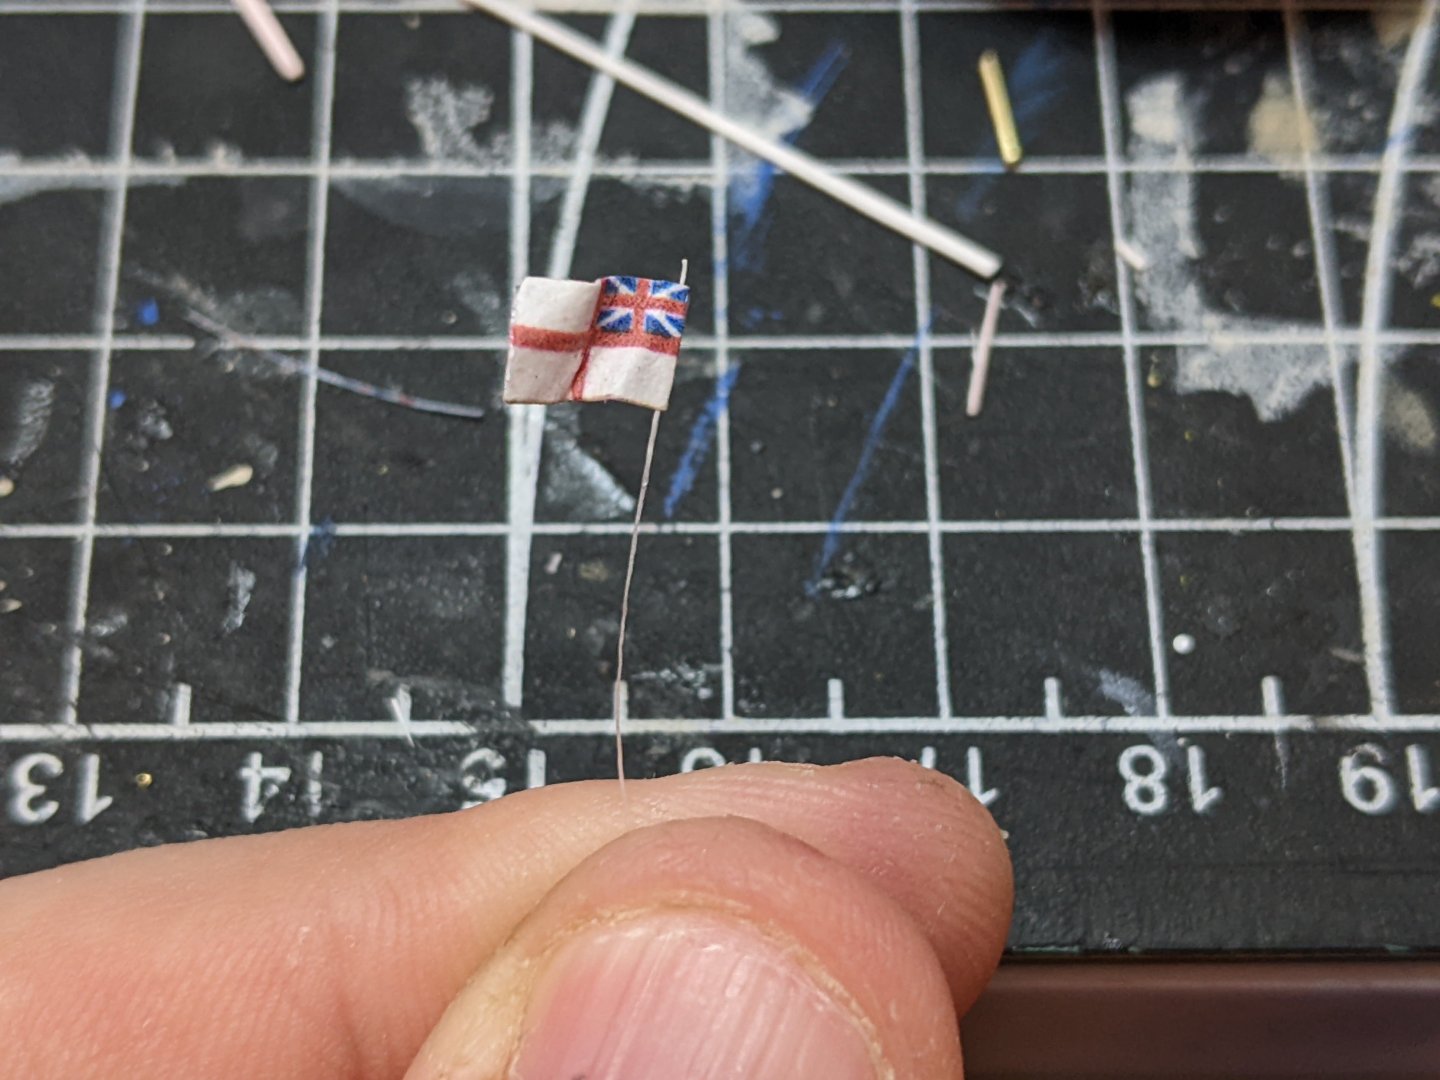
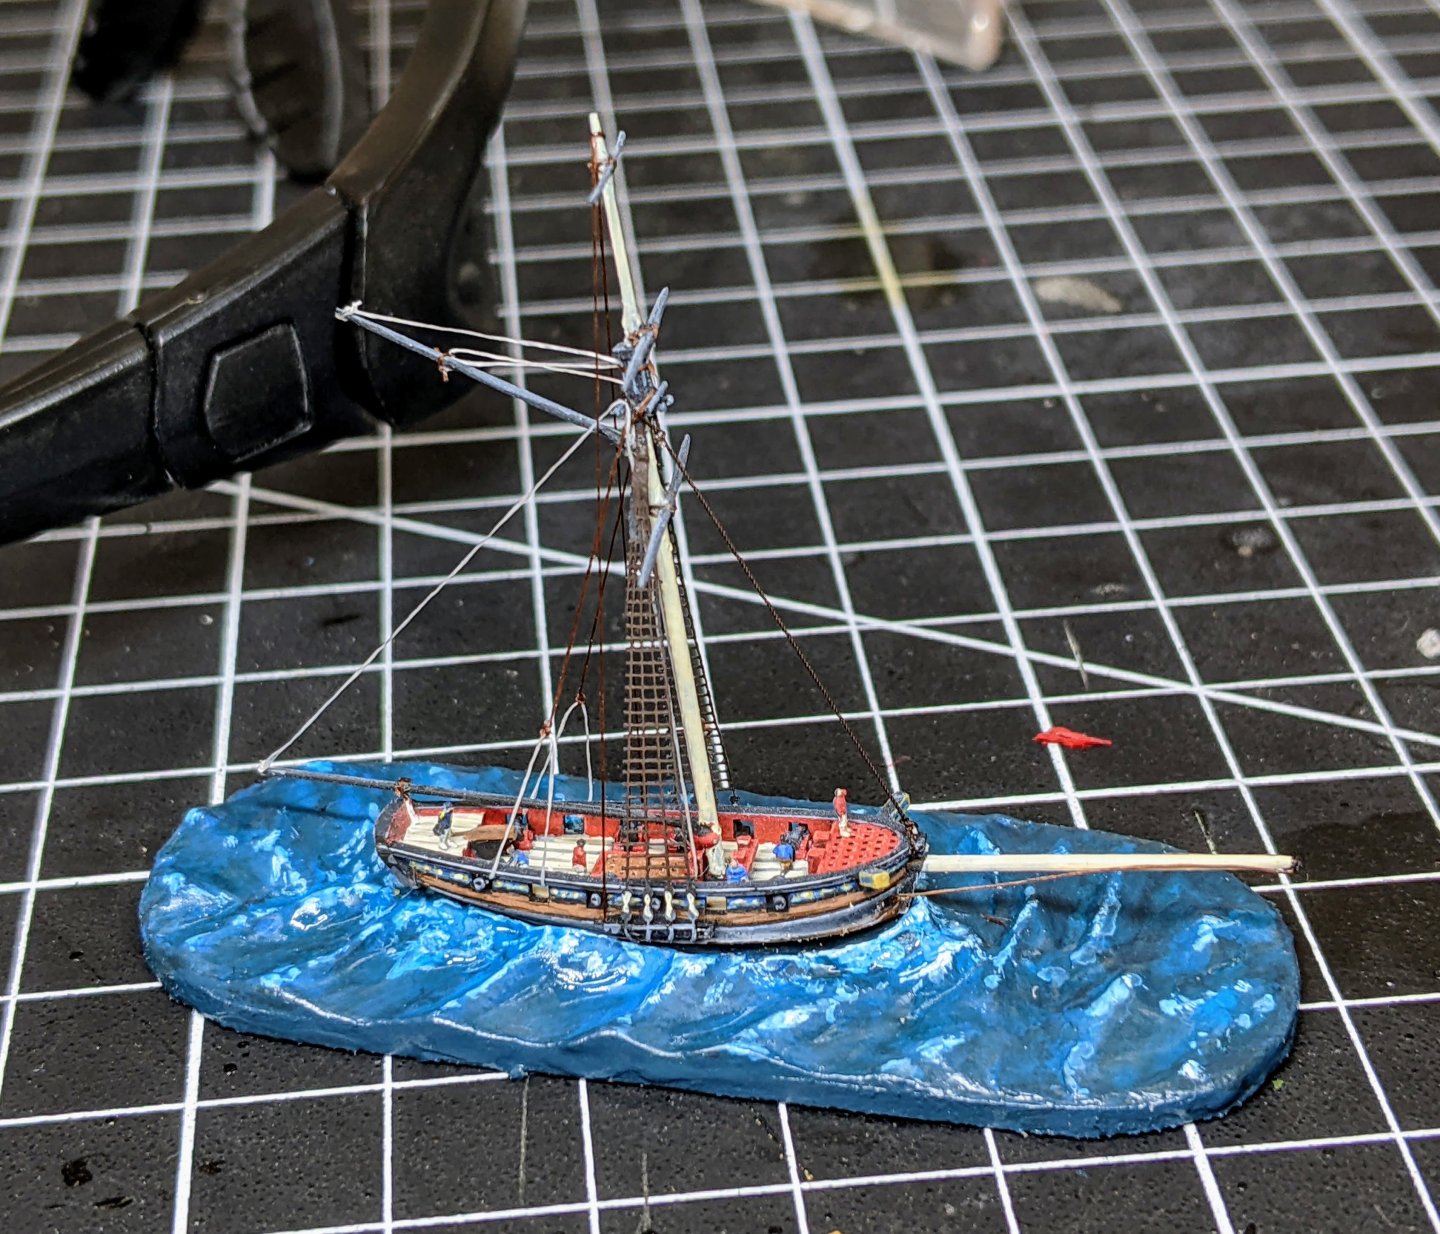
1/700 Cutters - Flags, Anchors & the Sea Thanks for all the encouragement, this post brings the first miniature to completion. First up was the anchors I had neglected to add earlier. To make these I bent some brass wire and flattened the ends. I then used super glue to attach a straight piece and used card to simulate the anchor stock. This would have been easier if I had added them before painting… Then for the flag I printed some off the internet and coated it in mod podge and attached a piece of fly tying thread which I had run through some super glue to stiffen it. Like the sails, I added super glue to the edges of the ensign and pennant to help hold their shape. Then it was just a matter of super gluing them to the model and touching up the water with some water texture and then some water texture mixed with white ink to simulate the foam. You can see the final result below. And here is a picture of little Alert with big Alert for scale.


- 39 replies
-
- 16
-
-
-
- Black Seas
- wargaming
- (and 1 more)
-
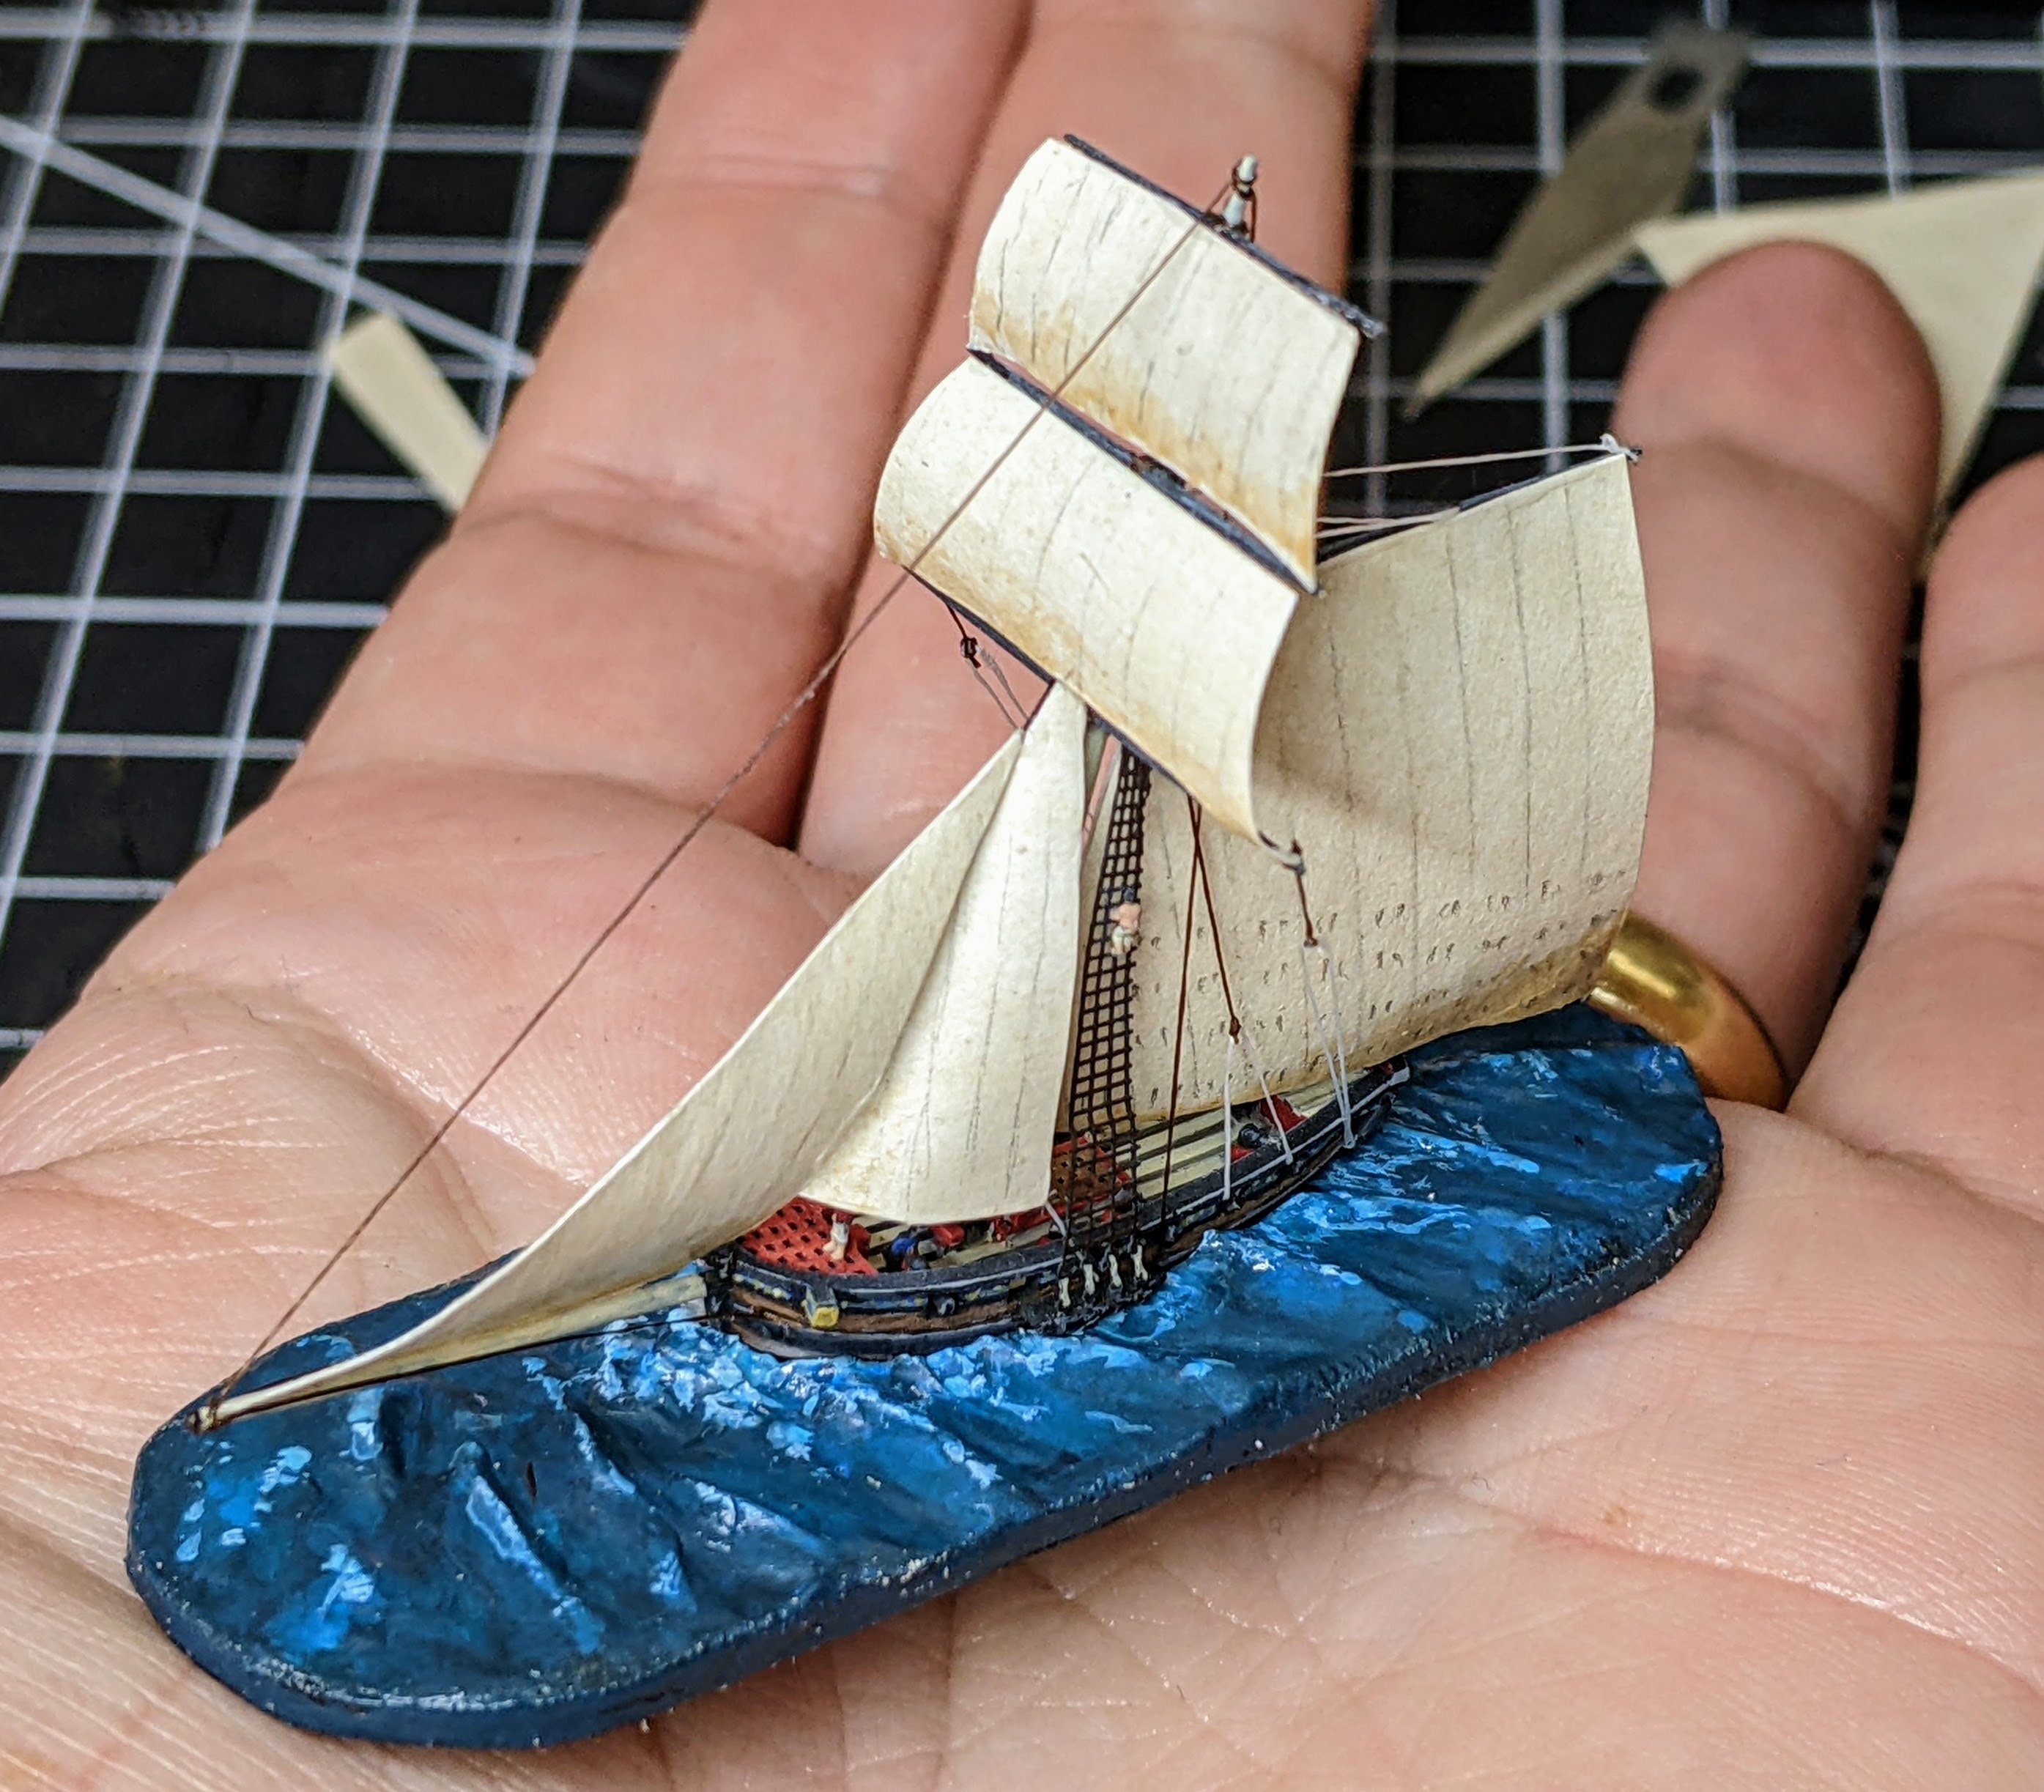
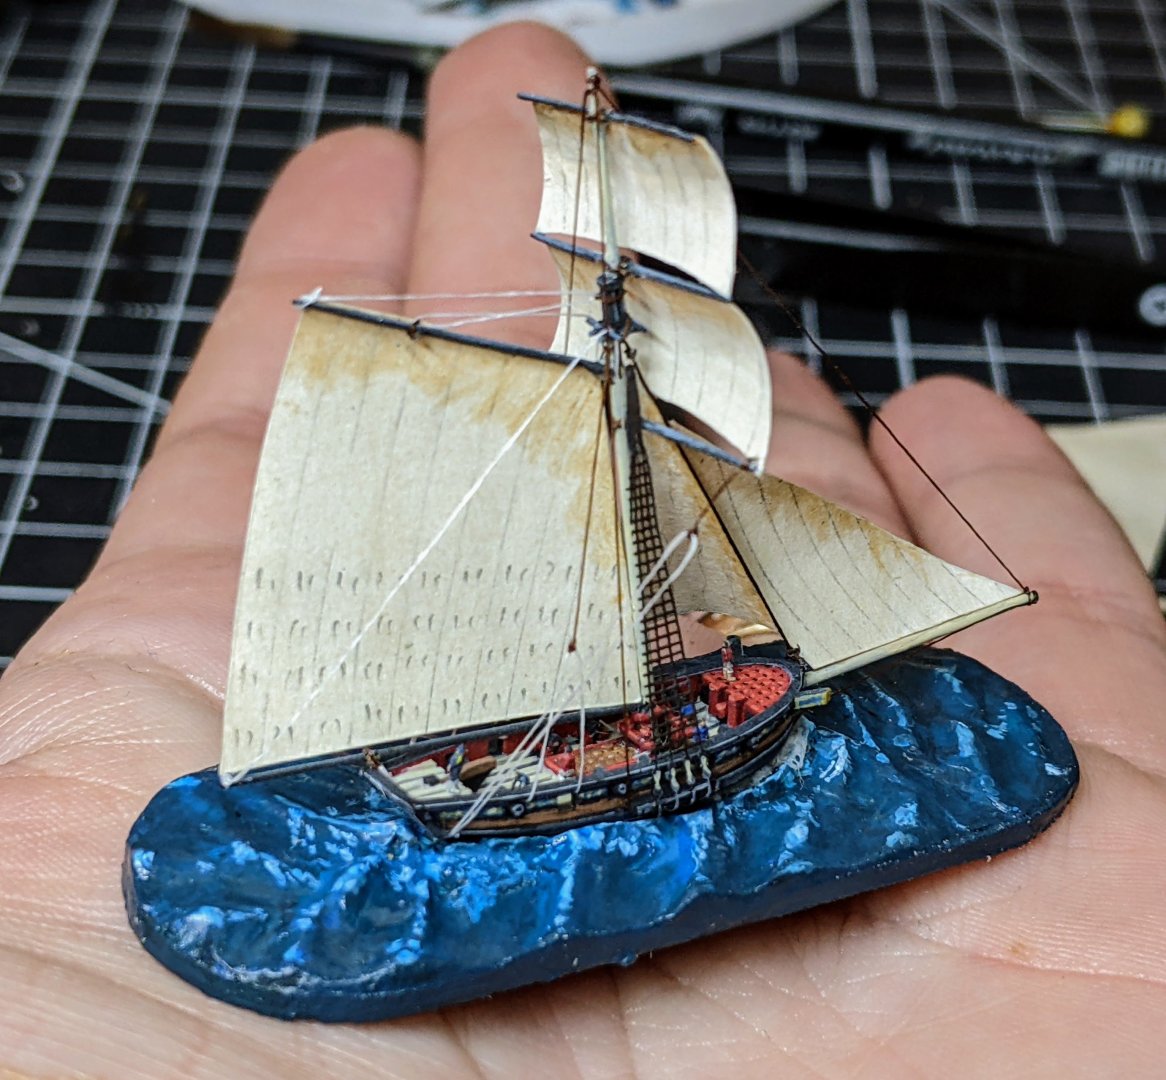
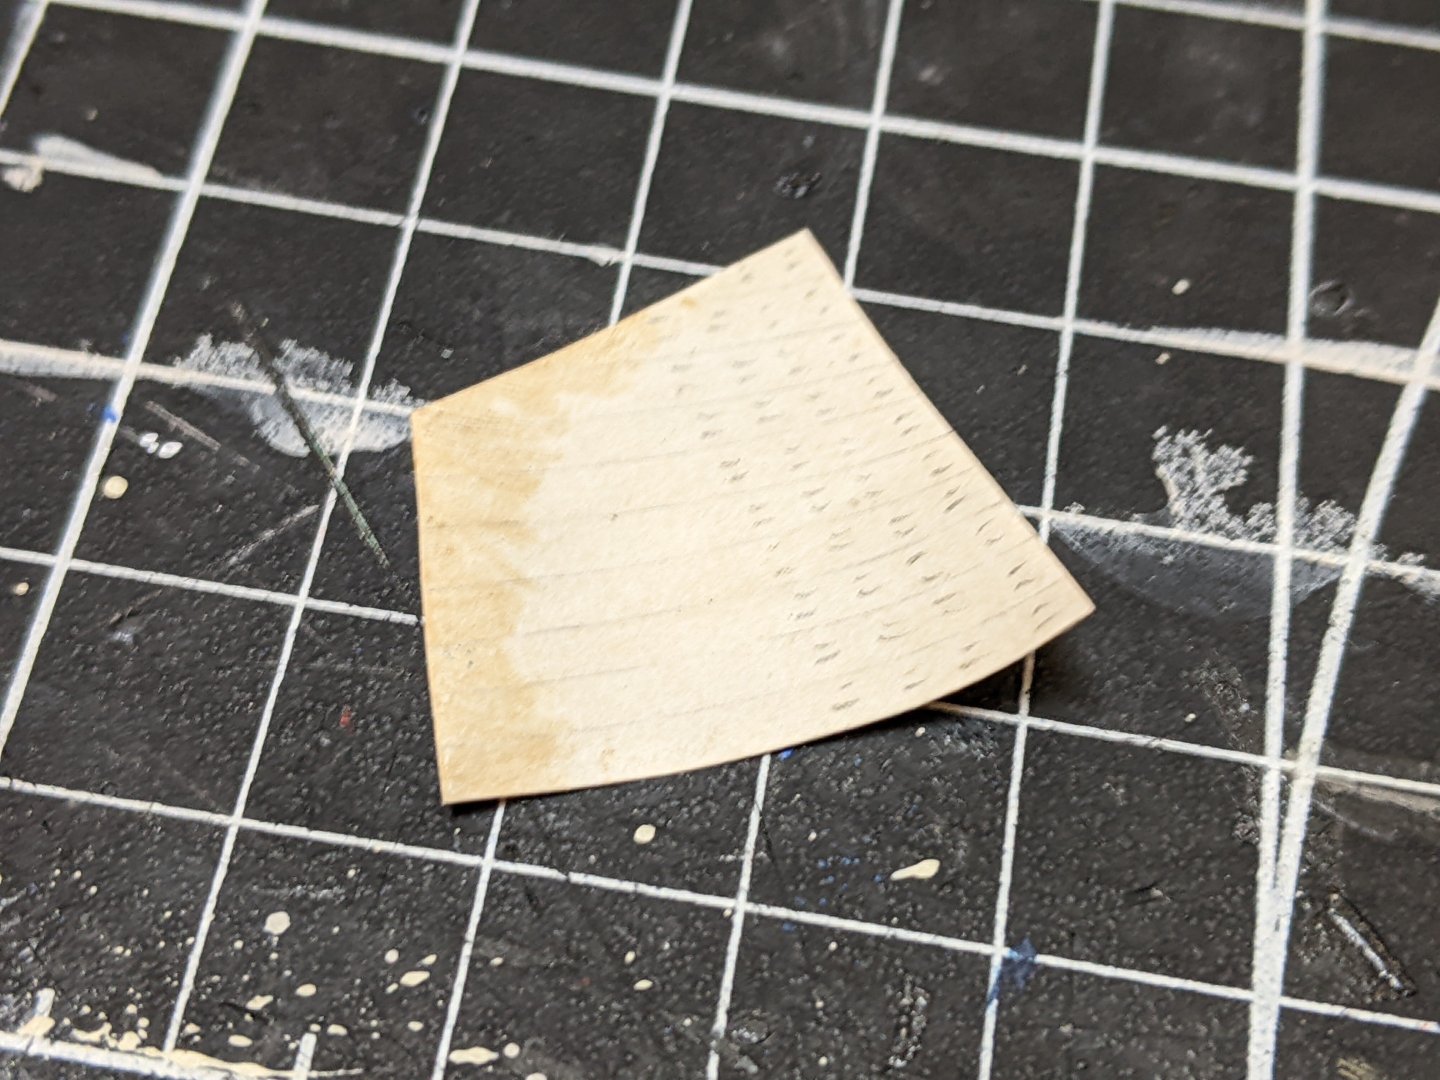
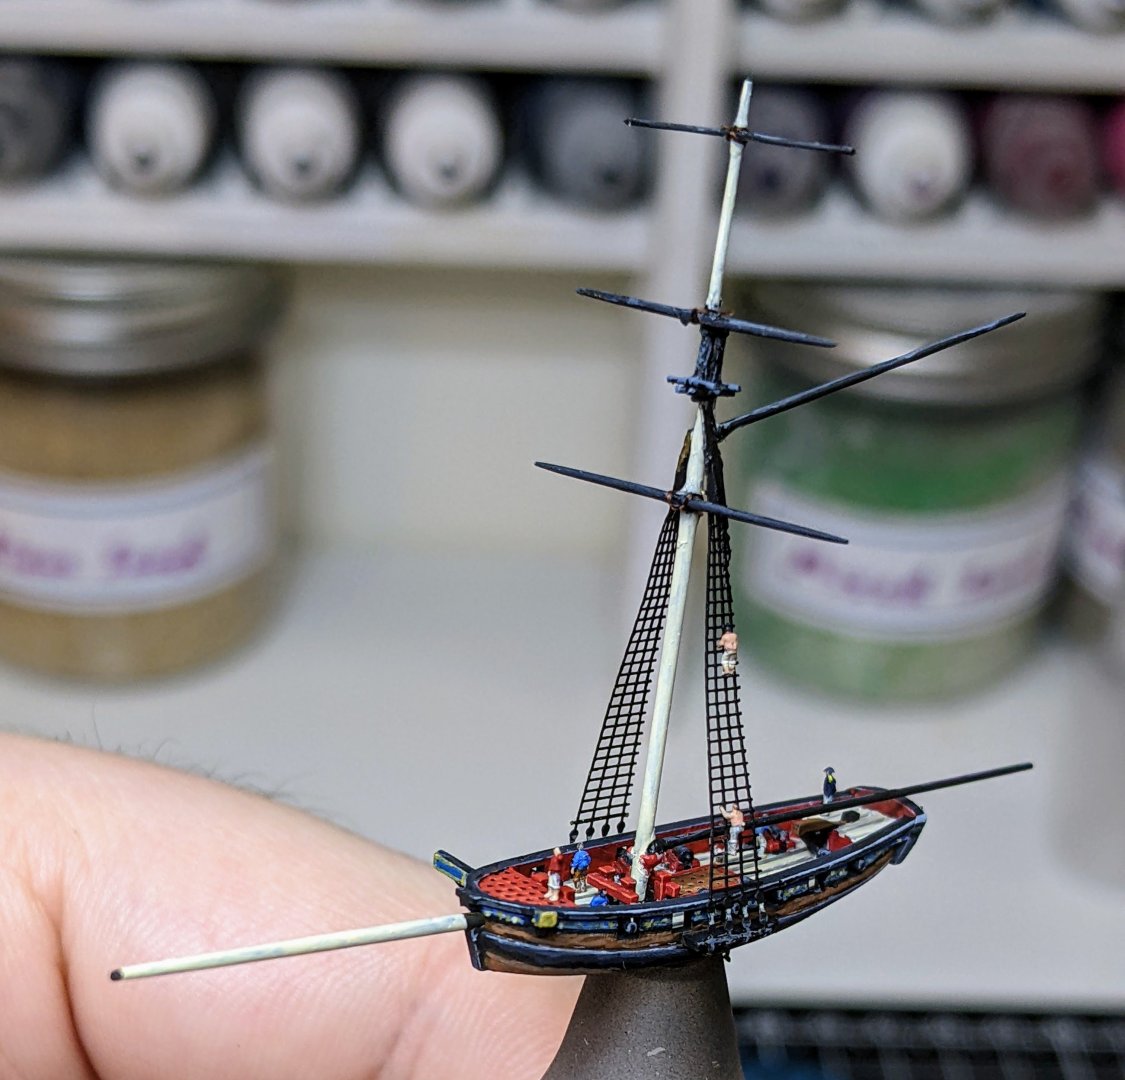
1/700 Cutters - Sails Next up was work on the sails. I considered using a thin paper such as silkspan for this, but in the end I went with regular printer paper. The reason for this is I need the sails to add strength to the model and if I make them out of paper that is too thin, I won’t get the necessary strength. So I coated both sides of the paper with a mix of 2 parts paint, 1 part water and 3 parts mod podge. The idea is to stiffen up the paper with the mod podge and to serve as a varnish. I then cut off piecs in the appropriate shapes and added the pannel lines using pencil and darkened the areas that would be in shadow. There is no need to get smooth gradients for these shadows as though they don’t look the best zoomed it, at normal viewing distances they look fine. I also lightly erased the pannel lines as I found the pencil was too strong. In addition I drew on the bolt ropes with pencil. Once the shape was set I added super glue to the edges that would not be glued to a yard/mast as suggested by @GrandpaPhil. This really stiffened up the whole sail and I can actually pick the model up by the mast now without worrying if I will break it. I then added glue to the edges of the sails and placed them on the model. I didn’t take a lot of pictures of the process, but you can see the final results below. The only other additions I made (which can be seen in the first picture) is a small line from the foresail down to the deck and the topgallant stay. With that the model is mostly done. All that is left is to finish up the water and then add the flags.

- 39 replies
-
- 11
-
-
-
- Black Seas
- wargaming
- (and 1 more)
-
10/0 is just the size. If you go look at fly tying thread it is sized 6/0, 8/0, 10/0 ,12/0. The higher the number the thinner the thread. They don’t have the same colours for every size and the 10/0 veevus brown was the only match for the ropes of scale brown. If you are using black then I believe all the sizes have a black that should work. I used 10/0 white to serve running rigging like the eyes for the bowlines. This was obviously a bit light, but it is fine on really small things like the bowlines which were only 0.25mm rope. To serve with it you need to do two things: Use magnification, it is hard to get it to lay right without it. Add extra twist as you serve. As you said it wants to split apart and lie flat so you need to twist it some more in the direction of the original twist as you serve it on to the rope. This does take a bit of practice to get right, but once I got the hang of it I had no problems.
- 114 replies
-
- 1
-
-
- Vanguard Models
- Speedy
- (and 1 more)
-
Not entirely sure why you would want to do that, but the easiest thing is just to test it out. paint on some scrap and then try putting the shellack over it.
-
The key I found with serving thinner line is that you need to use fly tying thread. I used 10/0 thread from veevus. Their dark brown is just about a match for the ropes of scale dark brown rope. Great job, Speedy is really coming together now. How much running rigging are you planning on adding?
- 114 replies
-
- 1
-
-
- Vanguard Models
- Speedy
- (and 1 more)
-
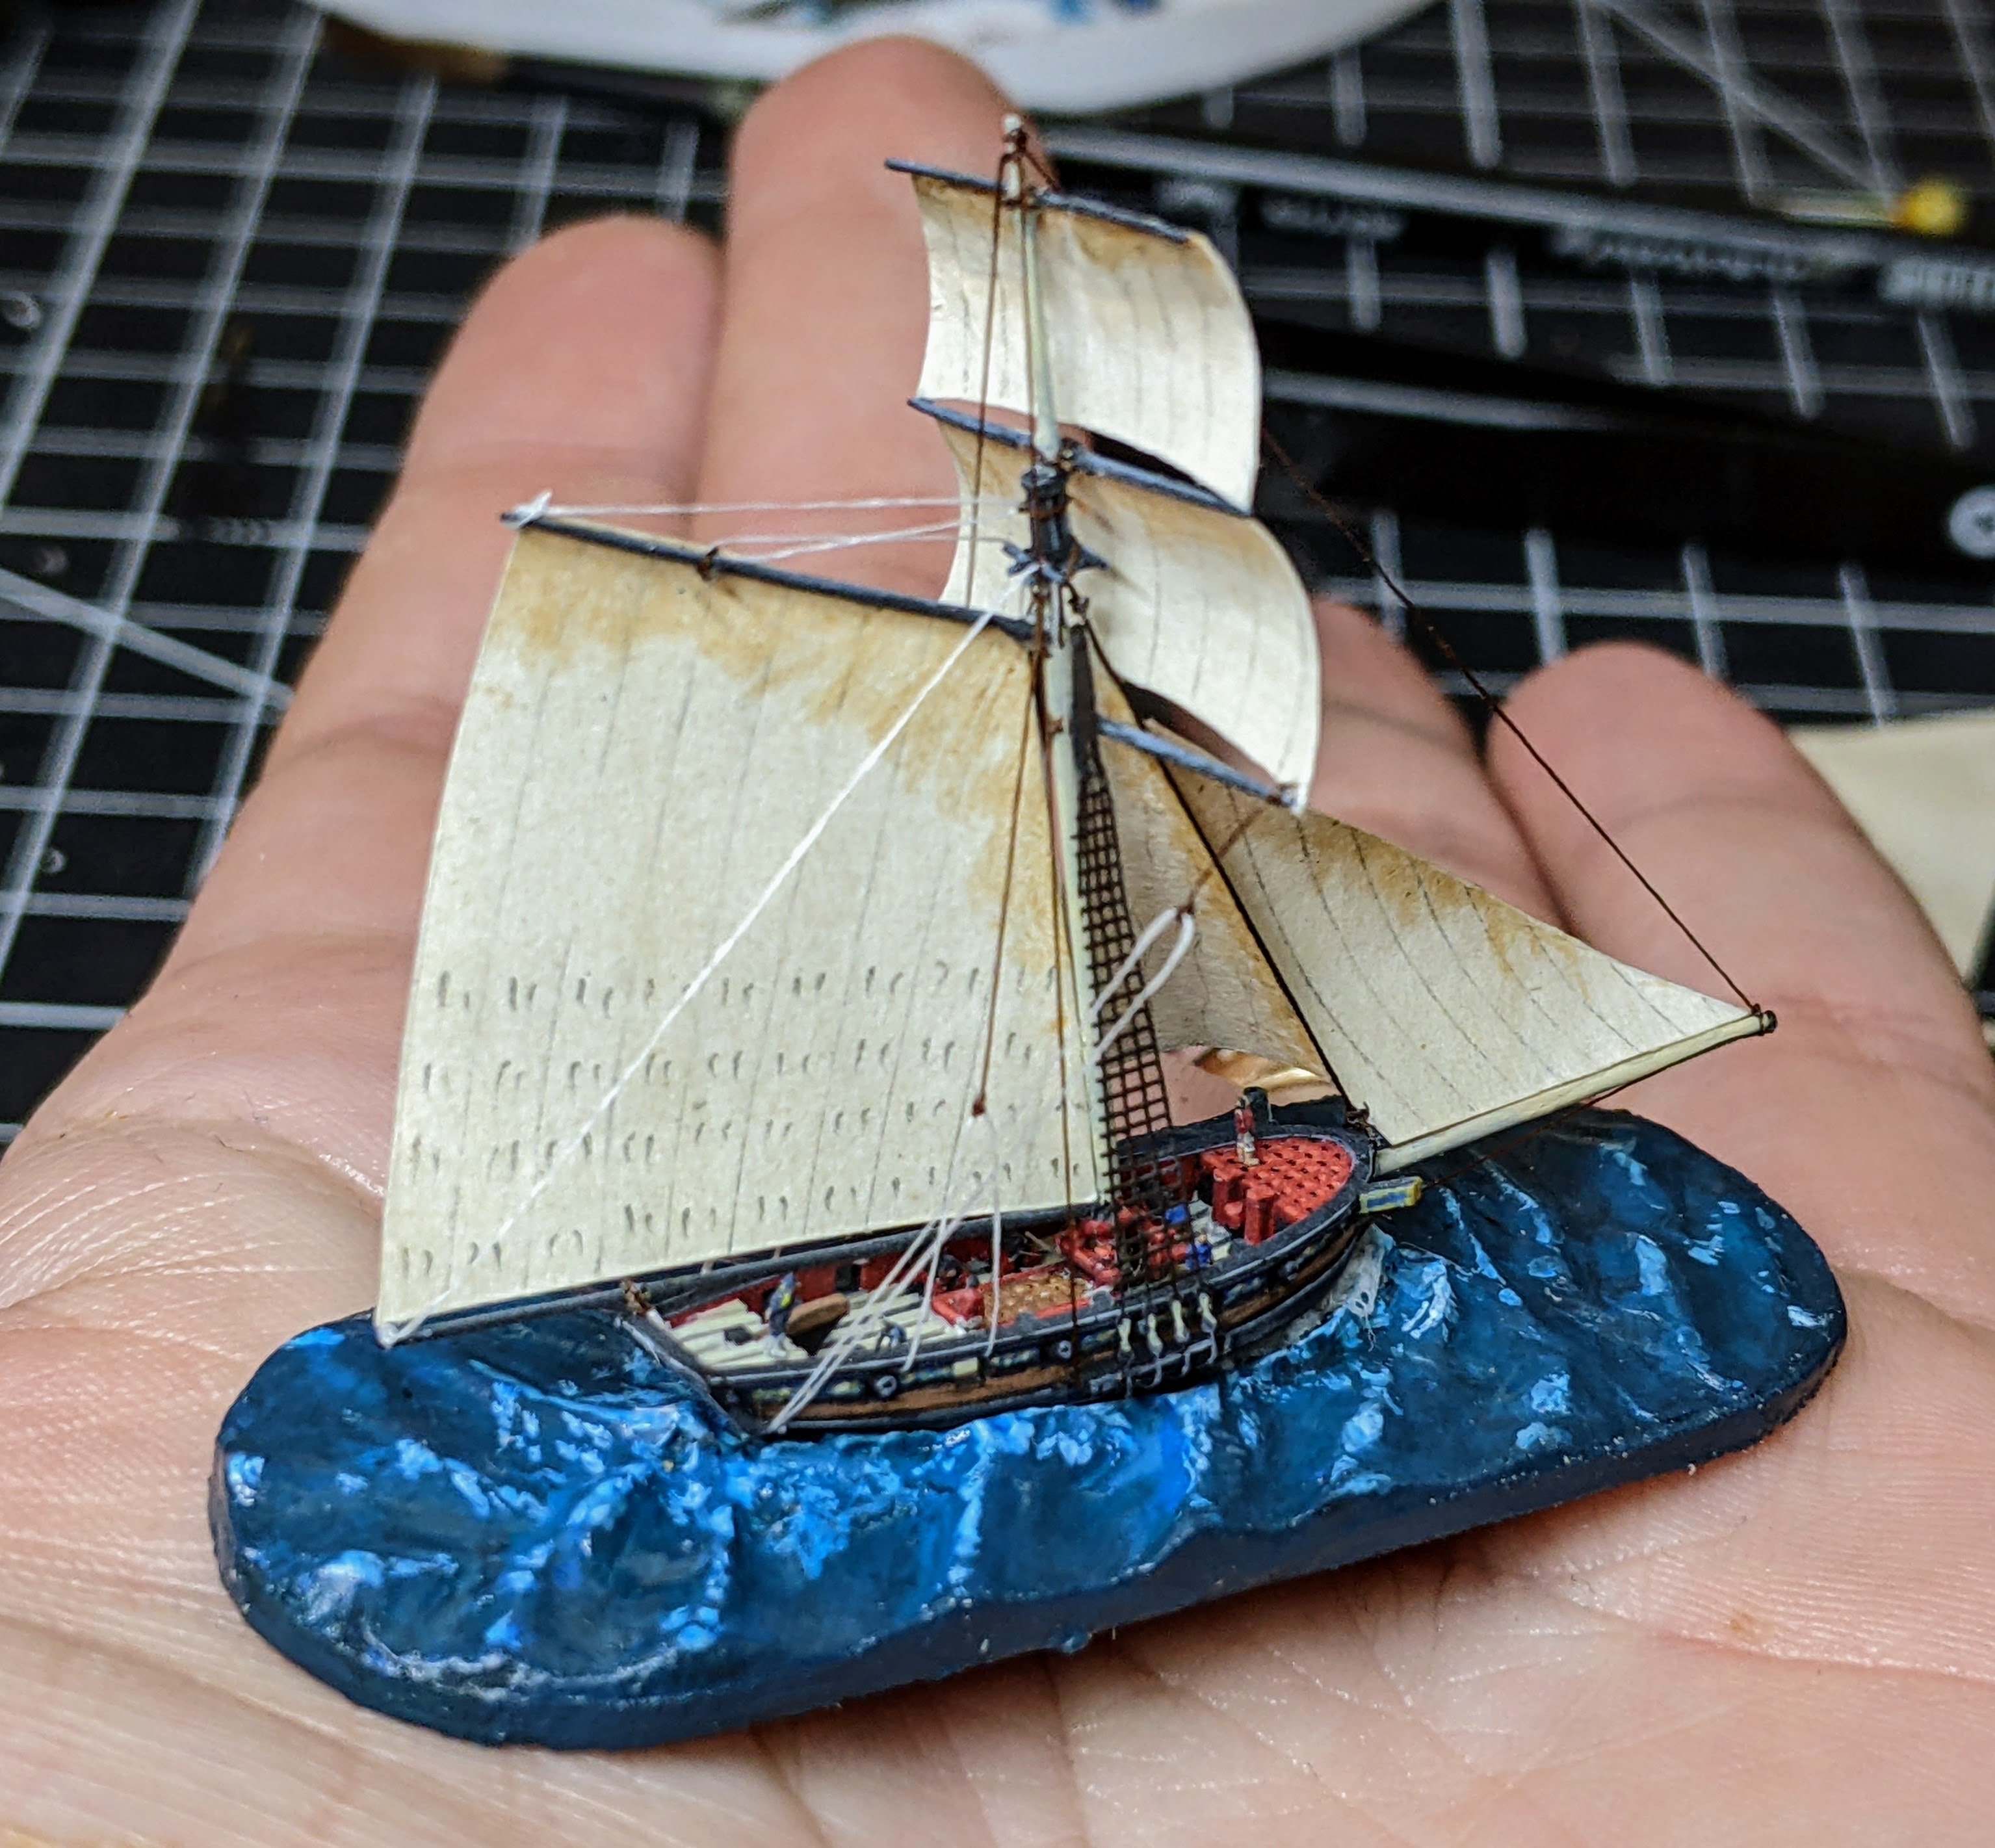
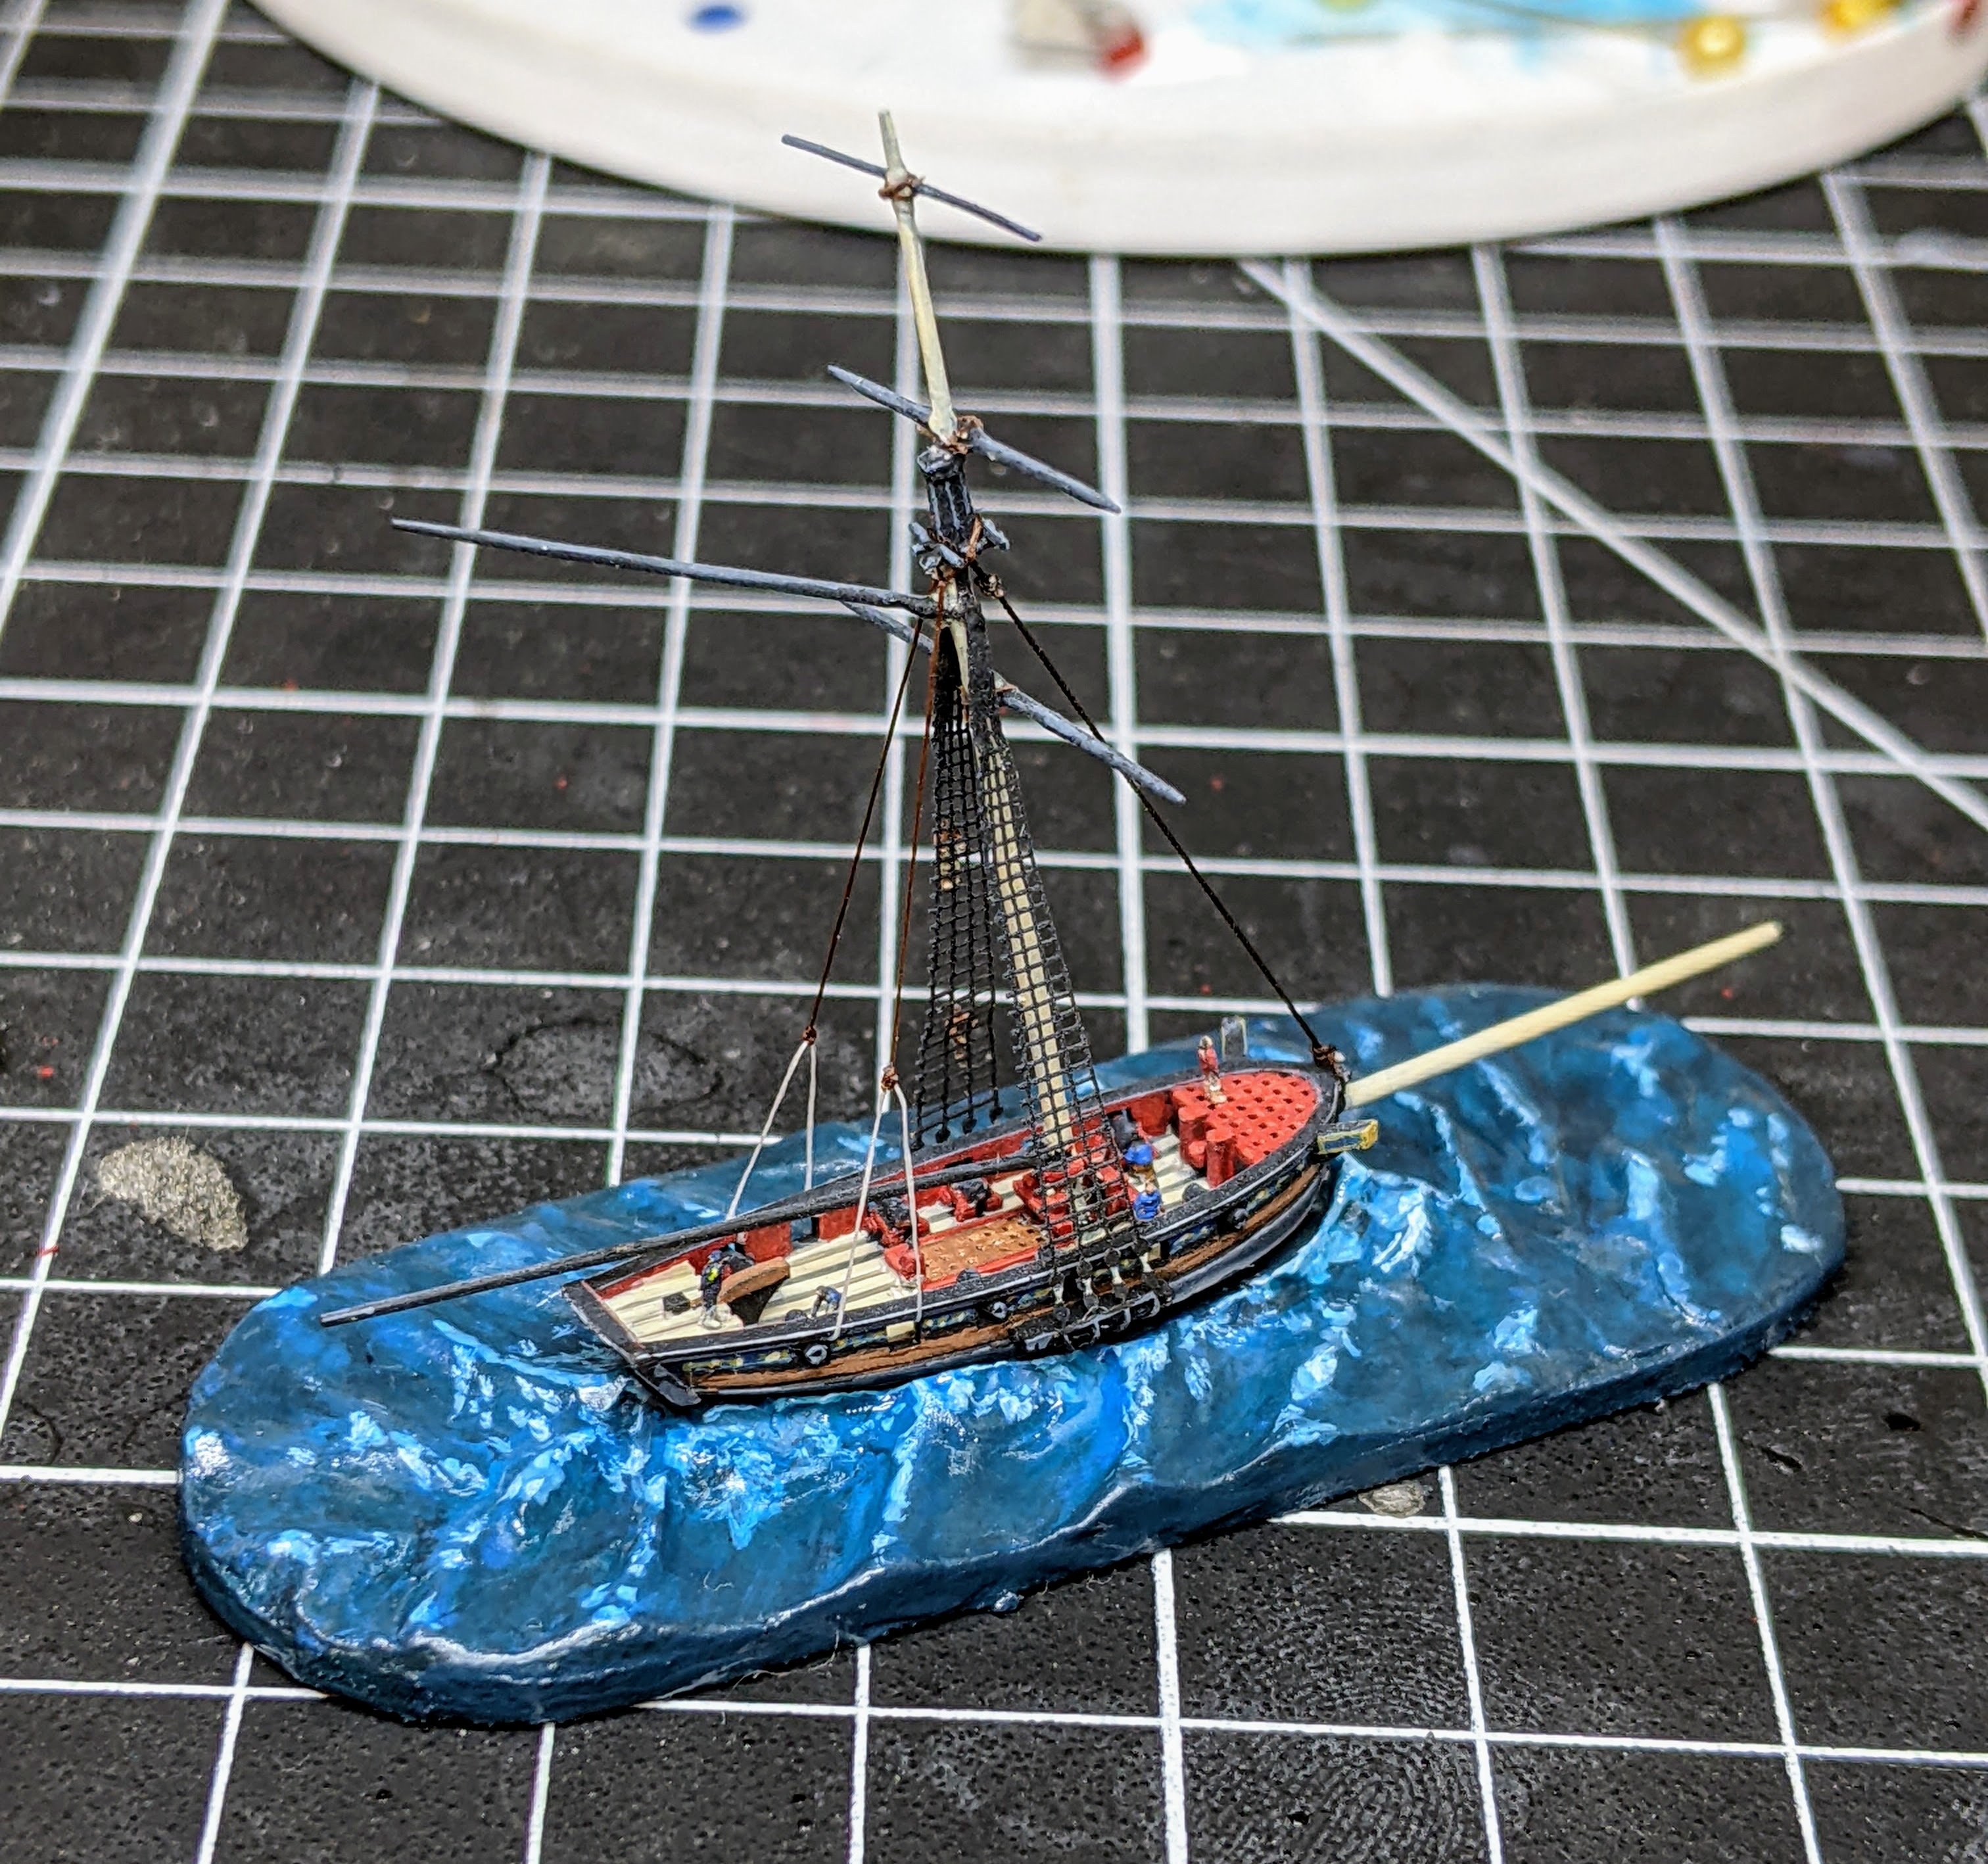
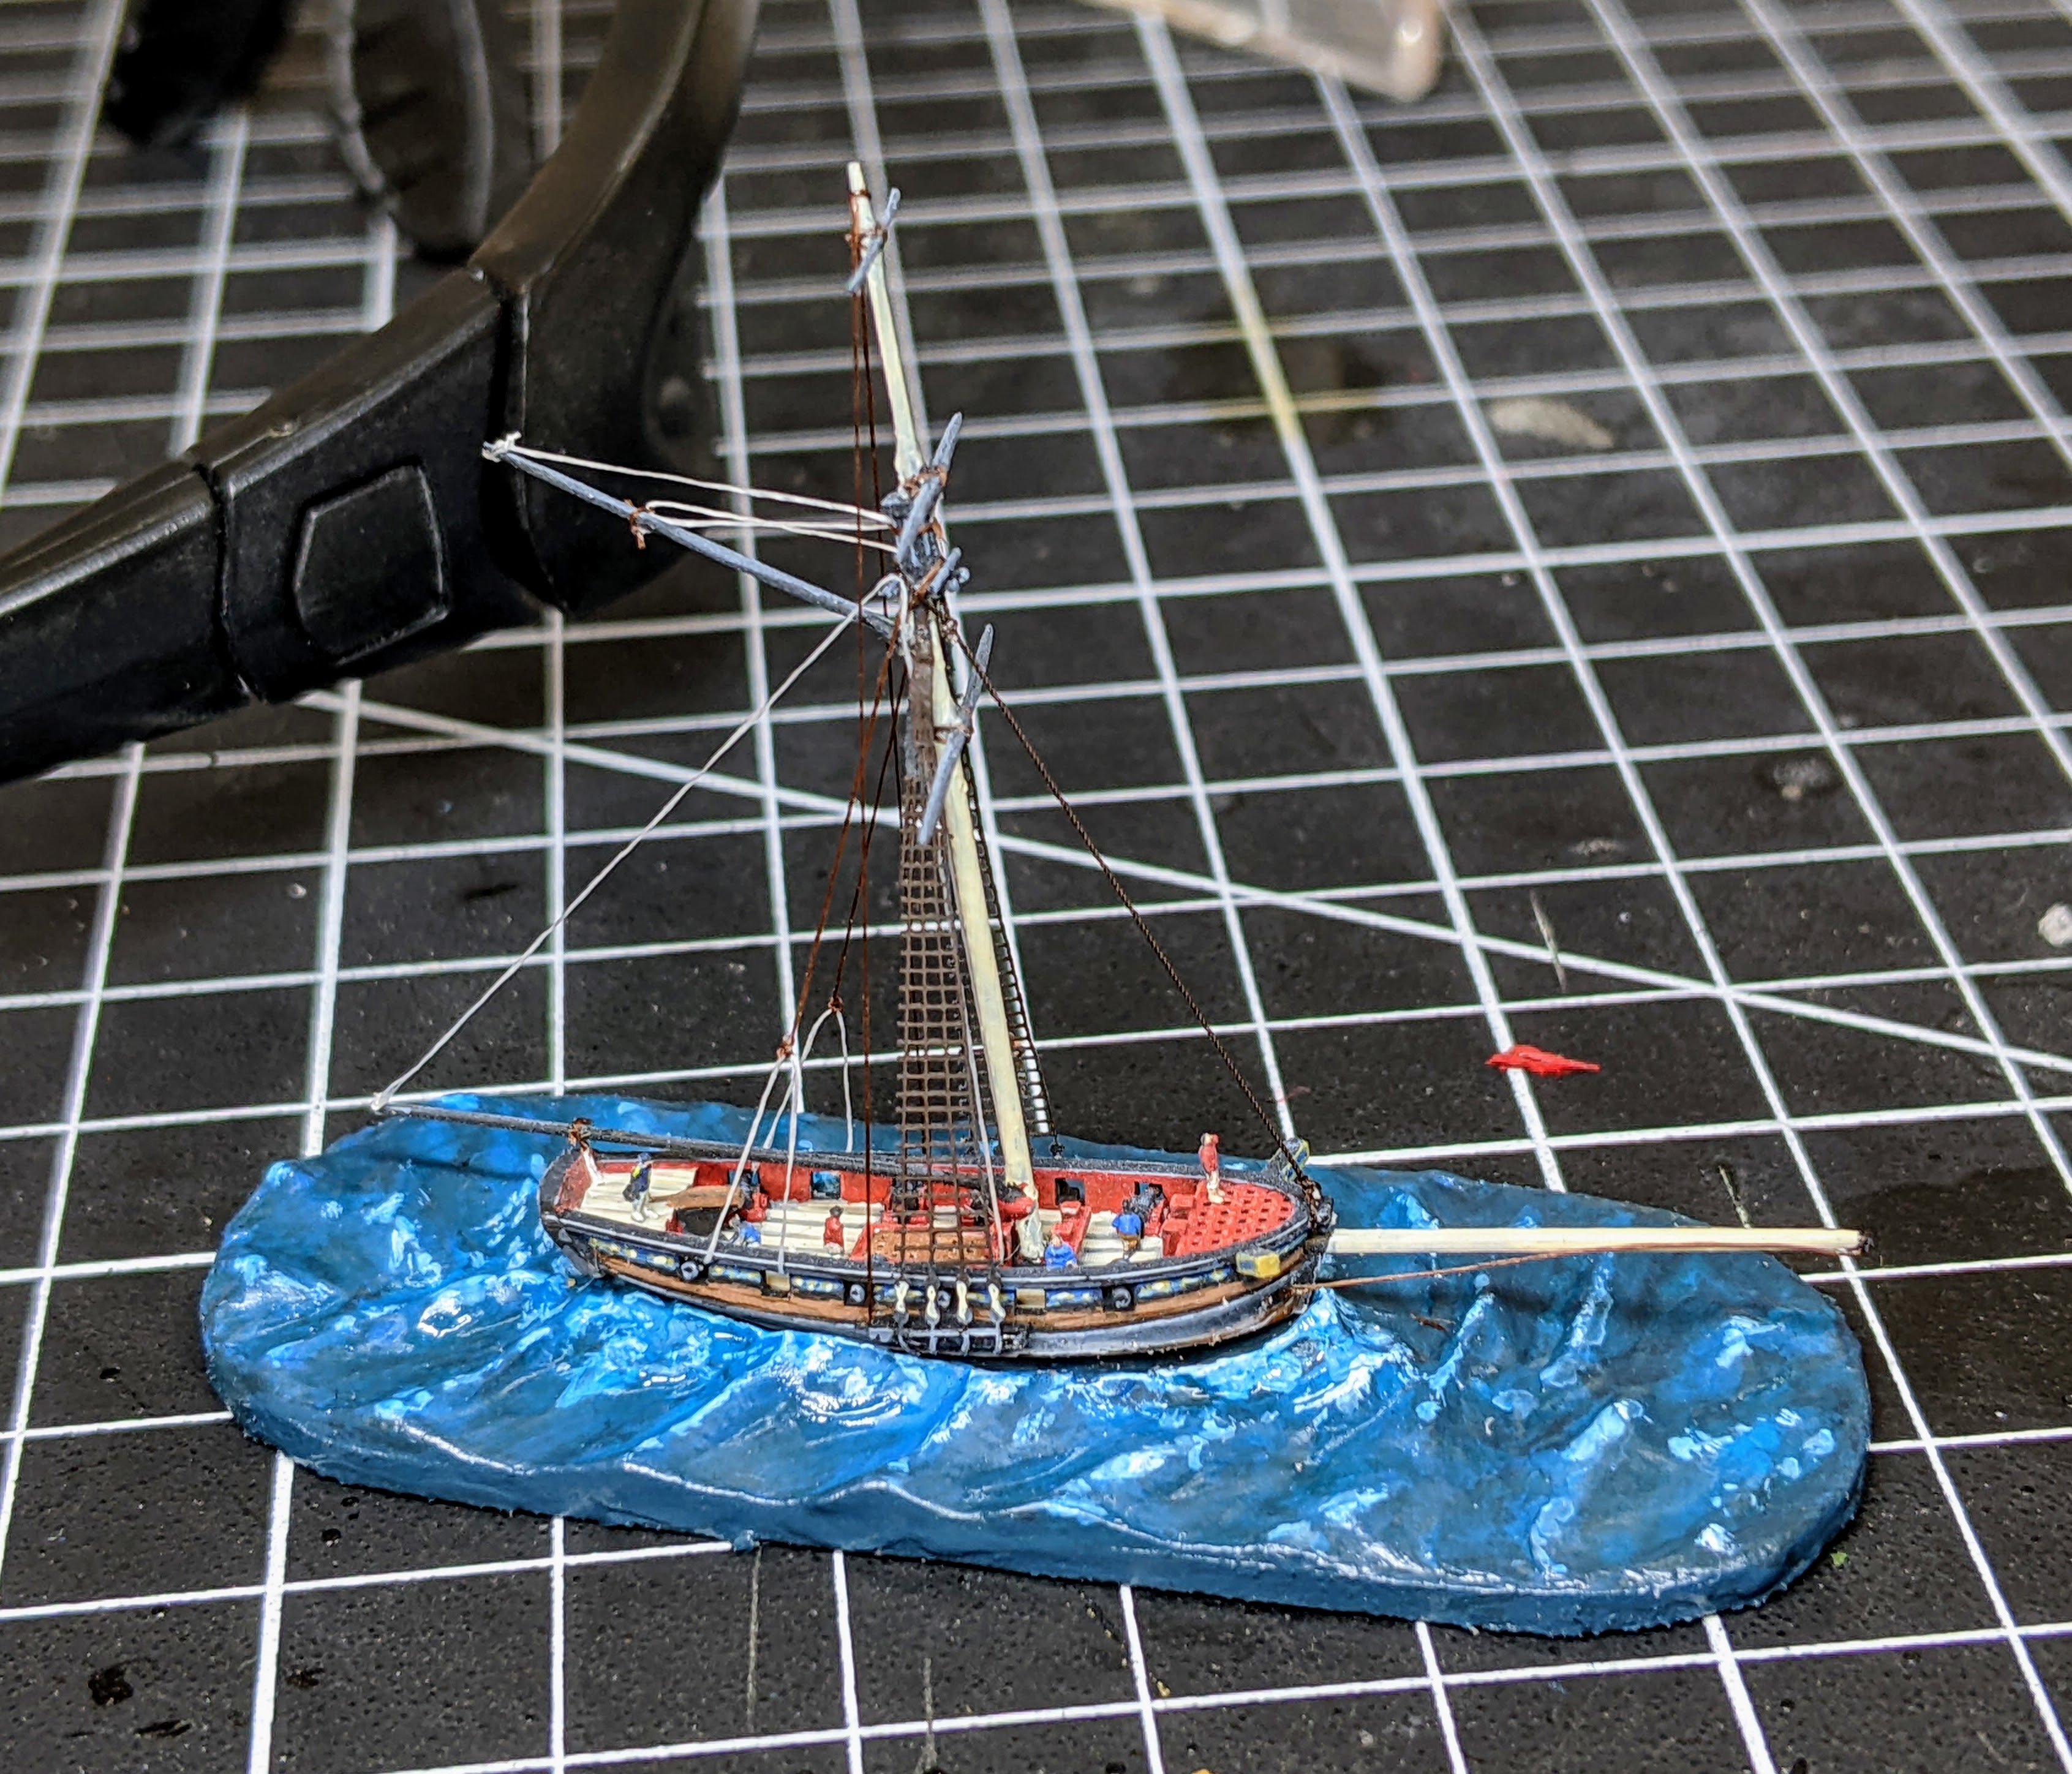
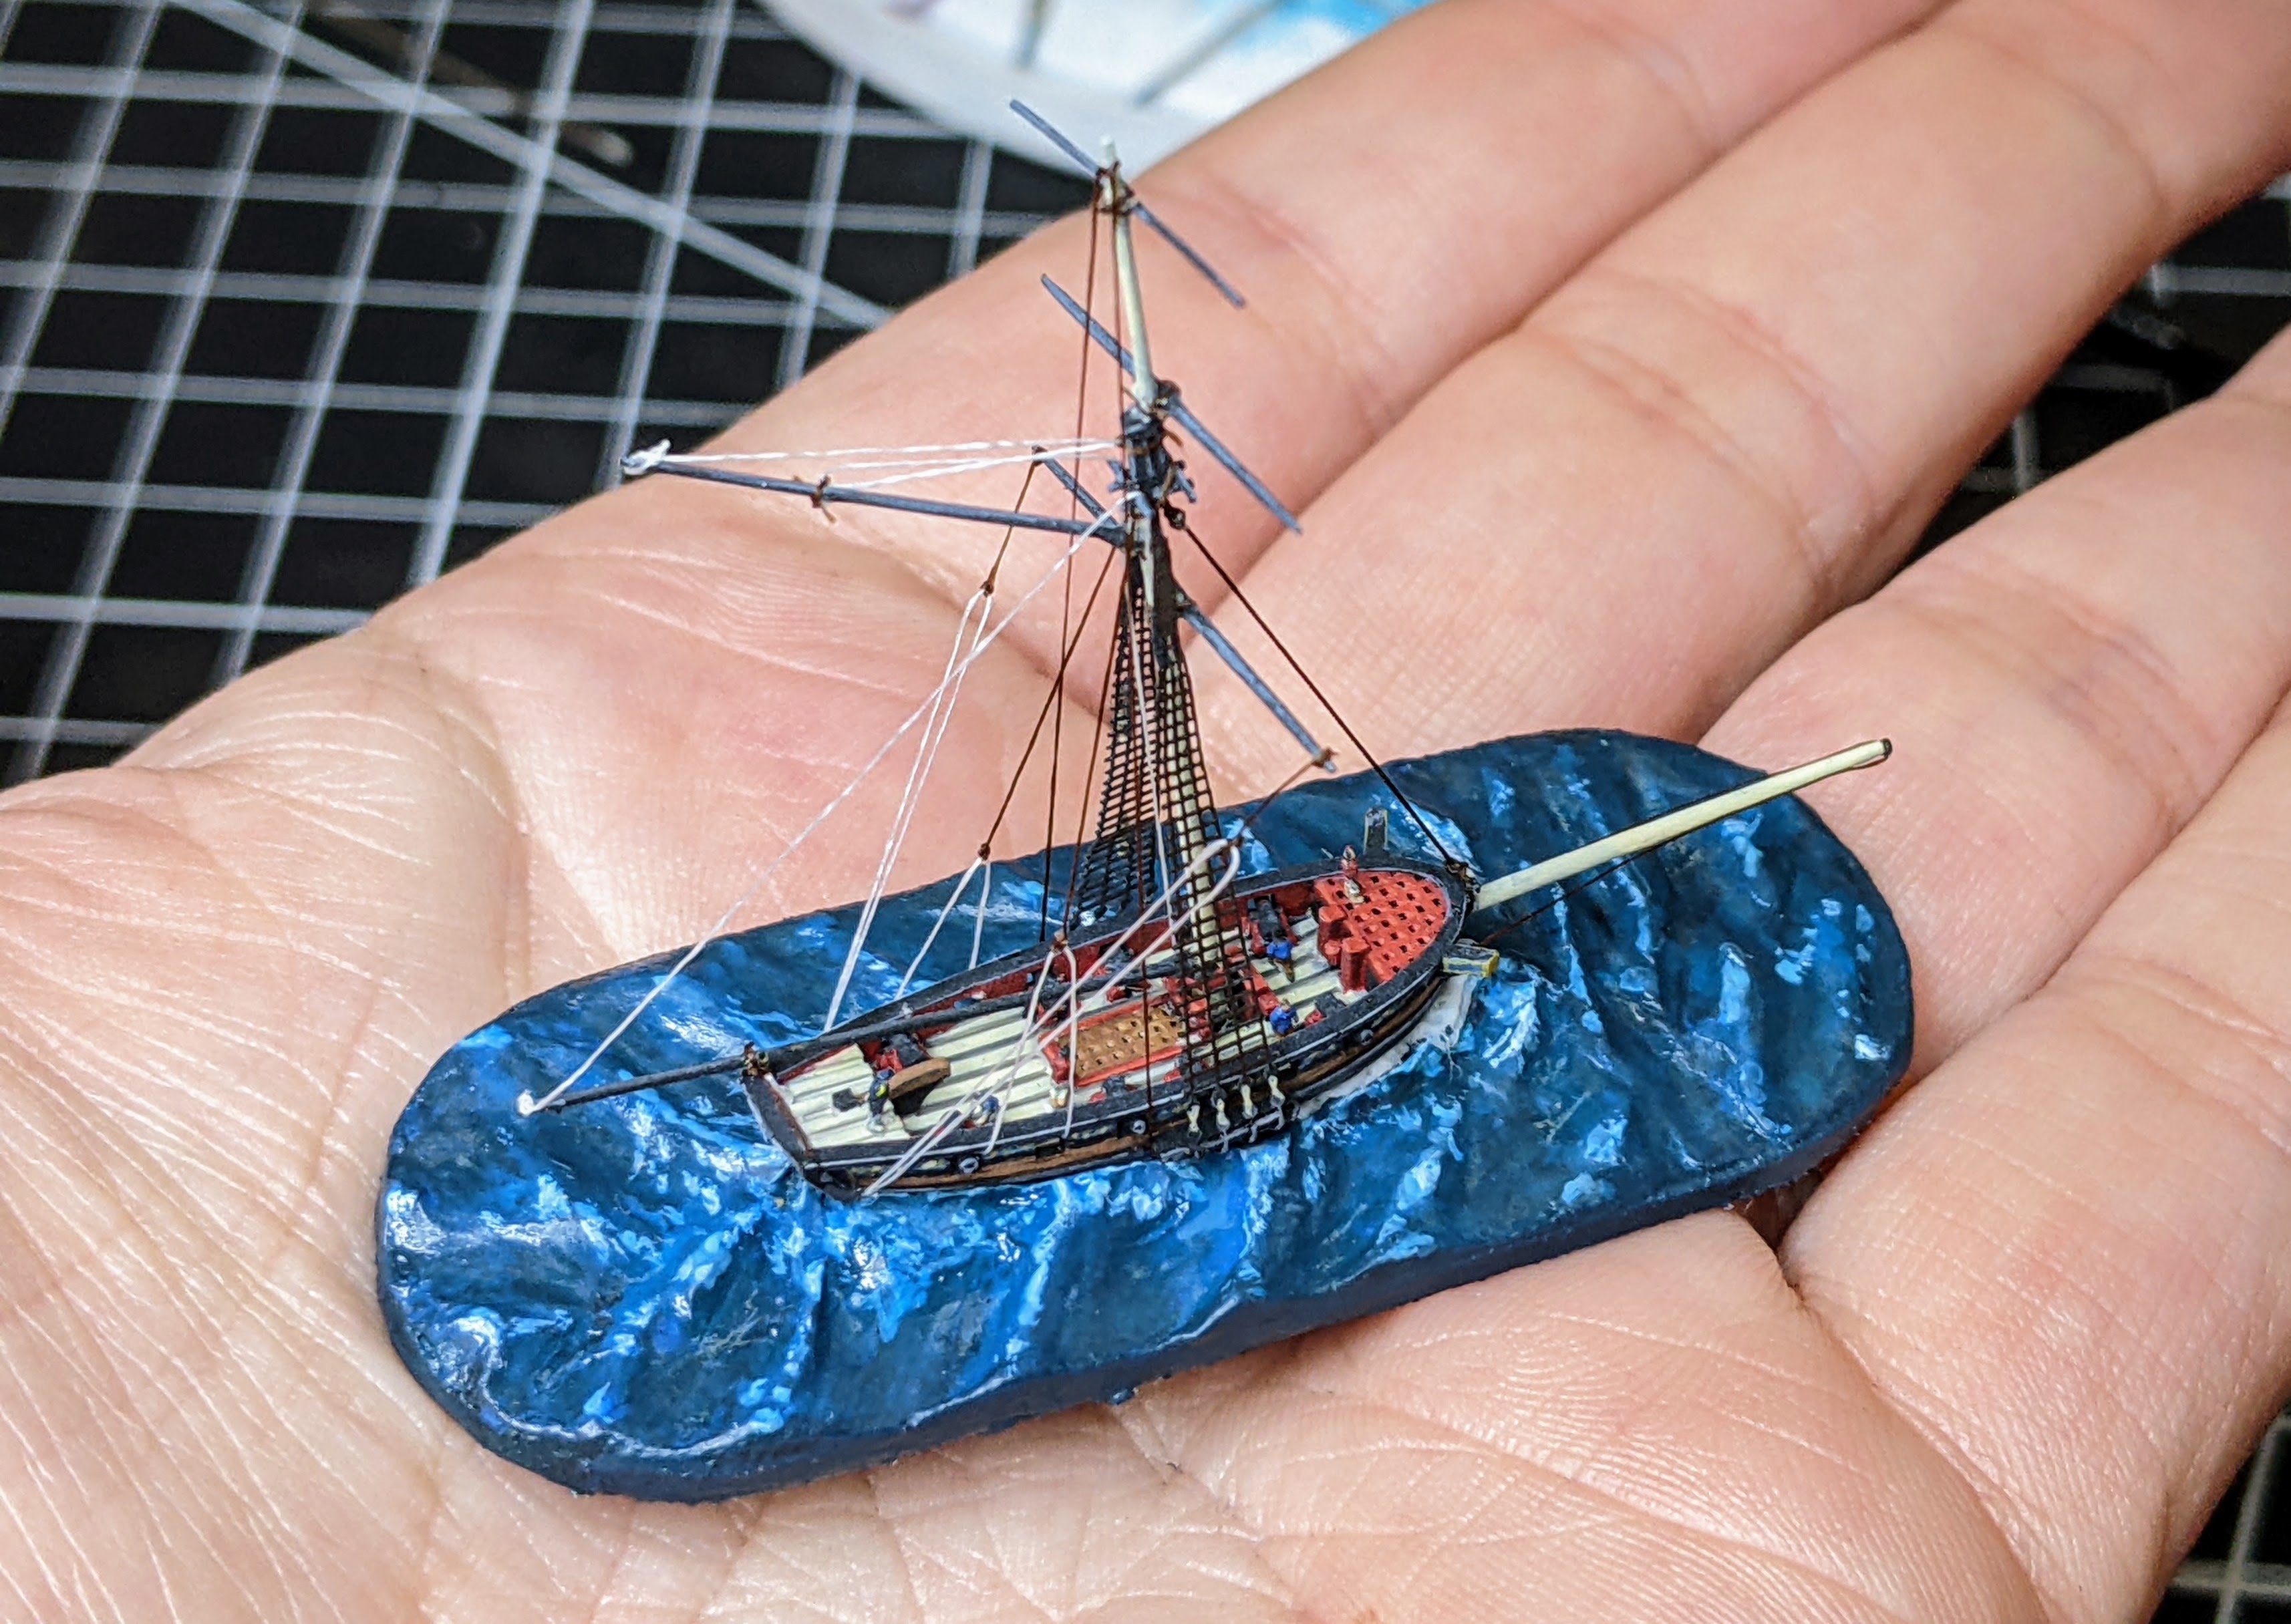
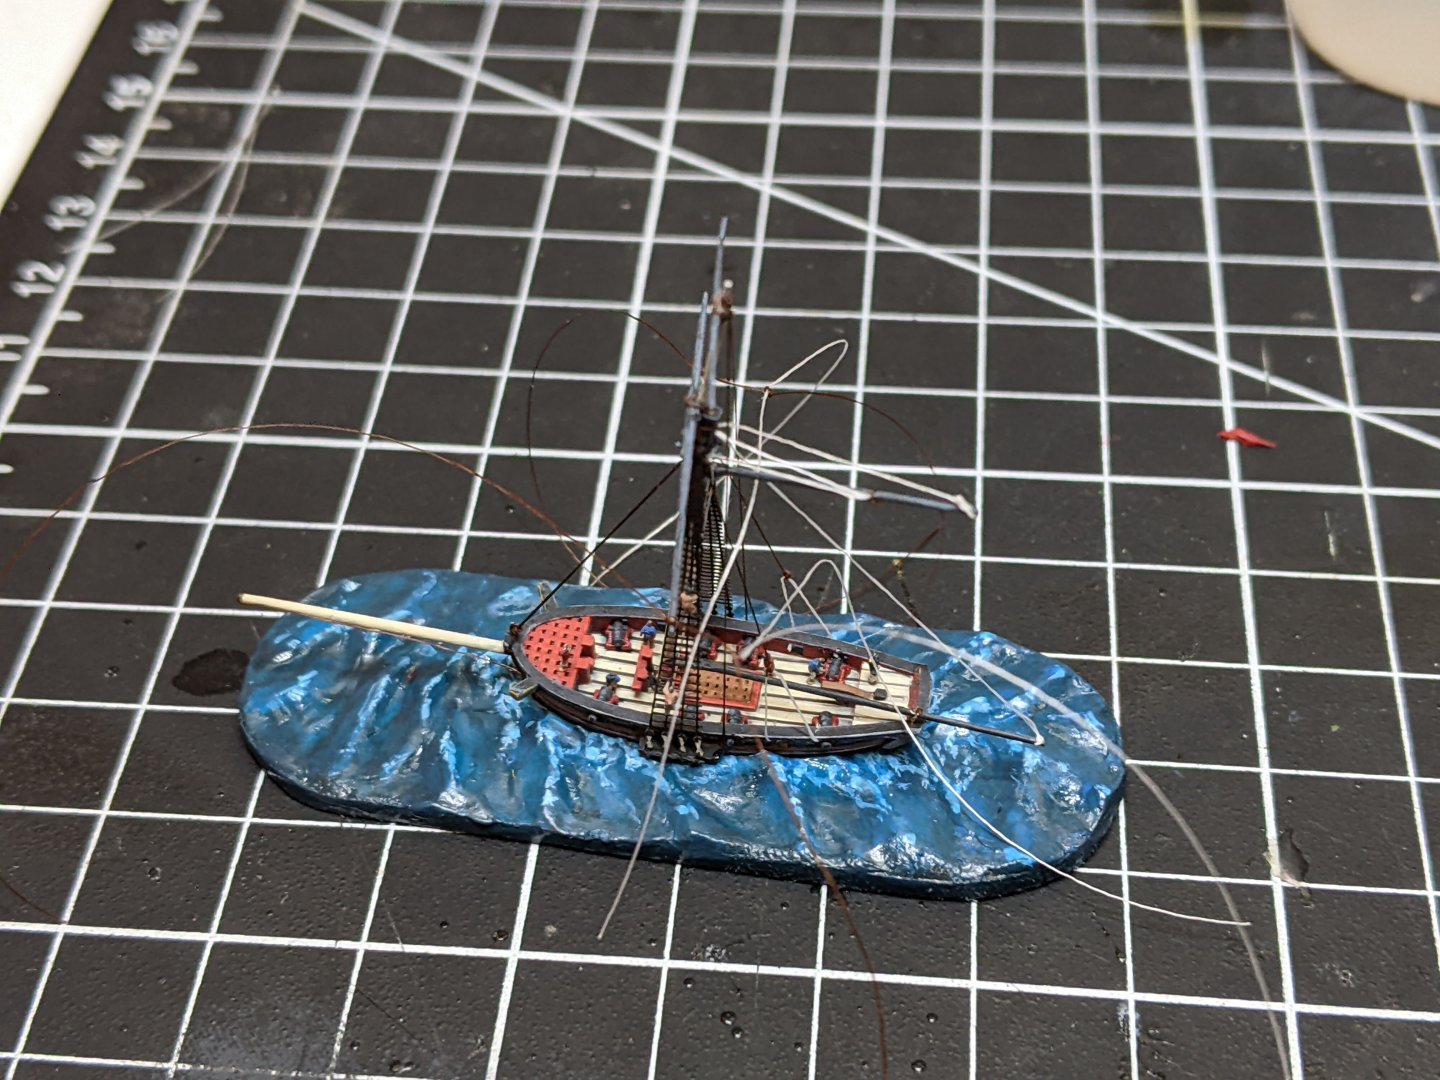
1/700 Cutters - Rigging & Crew Thanks to everyone who has stopped by and @GrandpaPhil for the suggestion. I will have to do some tests before I add the sails. My desire is to make them as thin as I can get away with (for scale reasons), but I also need them to hold everything in place so we will see where I end up with that compromise. Next up on the task list was to add some crew. I found some 1/700 figures on the internet and boy are they tiny. Even with magnification it was hard to pick out which was the one I wanted and don’t even get me started about how careful I needed to be not to drop them. The paint job I could do on them was limited, but I think they look good enough. I only added a scattering of them on the deck. The goal here is just to make the ship feel alive rather than to get the correct historical number of crew. You can see the Master & Commander there at the back watching how things are going. Then it was time to start on the rigging. With a few exceptions (which I will mention in a bit) I wanted to get the rigging in place before adding the sails. This is because once the sails are there access to everything will be seriously limited. On the other hand this means I need to be super careful as everything is still rather fragile. I should note here that before I began I decided to add some reinforcement to the yards in the form of tying them in place. This looks a little like the lifts wrapped around the yards and it helped a lot in making sure everything didn’t fall apart as I was working on the rigging. One question with a gaming piece like this is how far to go? I need to be careful of ropes that might be caught by mistake and also the scale seriously limits what I can depict. On the other hand I want to have enough in place to make it feel authentic. You can judge whether I got the compromise right in the end. Up first was the mainstay. For this I used some 0.2mm rope I had got from @BenD for the ratlins for Alert. It works out to about the right size for the mainstay. In general I am only differentiating between the really big ropes and the not so big ropes. I found that to secure things in place I needed to tie it around the gap in the stem where the bowsprit comes out of the hull. One thing I have learned about this process is I need to think much more carefully in advance about where I am going to secure the lines. They need to ideally wrap around something and I need to make sure that I plan for this in future models. I don’t have a picture with just the mainstay, but you can see it clearly in future pictures. Up next were the running backstays. I decided to simplify these a bit so I am only depicting one “block” for them. I used 10/0 fly tying thread for all of the rest of my rigging in two colours. Dark brown for the standing rigging and white for the running. The below picture is not great, but it shows how I made the running backstays by tying the brown thread at both ends to two pieces of white thread. The knots essentially represent the blocks. I then took this brown thread and knotted it around the mainmast so that the knot was facing to the stern. I dabbed super glue to hold it in place and then ran each end of the white threads around a gun port to secure them. You can also see in this below picture the forestay and the thread used to tie the yards in place. Next up was the lift for the main boom. One of the keys I discovered to avoid breaking the model with also achieving sufficient tension was to make sure I was counterbalancing the forces. So first I used a small bit of thread to secure the boom to the quarterdeck so I could pull up freely without breaking it off. I then tied white thread to the end of the boom (as always securing with super glue) and then ran it up to the trestletree where I looped it over one of the pieces and ran it down to the bits at the base of the mast. This line also serves to illustrate how many lines ran down to the base of the mast. Then came the topgallant backstays. Like the running backstays I tied them to the mast letting each end run down either side. The below picture show the state of affairs after tying them to the mast, but before I ran them down to the channels. You can also see the boom lift and how it runs down to the bits. Around this time I also added the bowsprit shrouds. These were a bit of a pain as there was no obvious place on the bow to secure them. I ended up just gluing them to the side of the wales, but next time round I would like to come up with a better solution. The topgallant forestay I have not yet added. This is for two reasons: (1) It is easily caught and so I don’t want to add it until I have added the flying jib sail and (2) I am not even sure if I want to add it at all as I am worried it might get snagged when playing with it. I will see how things look once the sails are added before making a decision. Then came the lifts for the gaff. These were by far the most challenging lines to add as I need to run them back and forth with tension, but there was no counterbalancing force to stop me from breaking the gaff. I did this by tying two pieces of brown thread to a long piece of white thread. These two pieces of brown thread were then tied around the mainmast and the gaff respectively to represent the blocks through which the line runs. I then tied one end of the white thread to the end of the gaff and carefully tensioned everything. I ran the other end through the trestletree and down to the bits. You can see the result in the below picture along with the bowsprit shrouds and the line holding the boom down to the quarterdeck I previously mentioned. Finally it was time to do the braces for the squaresail yard. These I made in a similar manner as described above by first tying brown thread around white thread off model and then carefully adding it. I ran these to under the counter as that was the only convenient place I could tie them off. This was also a very tricky part of the rigging as it is very easy to add too much tension to one side and break the yard. It was at this point I was very glad I had decided to reinforce the joint between the mast and yard with the brown thread. Below you can see what things looked like in the middle of working on the braces. And finally here is the result once everything was done on my hand for scale. Next up I need to get the sails on and then it will be on to finishing up the water with foam and a gloss coat.


- 39 replies
-
- 16
-
-
-
- Black Seas
- wargaming
- (and 1 more)
-
Hi JJ, great to see you still at it. This is a really cool design and is looking like it will turn out to be a stunning model.
-
Great job. I really appreciate how much detail you are adding with the rigging.
- 419 replies
-
- 2
-
-
- Victory Models
- Pegasus
- (and 2 more)
-
I have found that the scratch built masts are quite fragile (mostly this is a problem with the yards and booms at the point where they are glued to the mast). I am hoping that once I get the sails in place they will be more durable. Do you have any tips or suggestions to make them a little tougher?
-
best SECOND model ship kit recommendations
Thukydides replied to palmerit's topic in Wood ship model kits
I would then suggest picking something that looks cool and do some research on the ship. I have found just reading about the ship and the people who served on it makes the subject far more interesting than it originally was to me. My current project Perseus was picked simply because I wanted to do a small 6th rate and I like Greek mythology so the name sounded cool to me. However, my interest in her has subsequently grown to be much more than "her name sounds cool."