allanyed
-
Posts
8,149 -
Joined
-
Last visited
Content Type
Profiles
Forums
Gallery
Events
Everything posted by allanyed
-

Caulking Deck planks
allanyed replied to Keithbrad80's topic in Building, Framing, Planking and plating a ships hull and deck
Very nice tutorial Keith!! Depending on the ship and era, keep in mind the pattern of the ends of the planks are a bit more complex, usually with a three butt or four butt shift system rather than a single butt shift system as you show which would be extremely weak. I realize with a POB, this may be nonsensical, but it can be done. Thanks for sharing! Allan -
Edge Gluing Planking
allanyed replied to Neil10's topic in Building, Framing, Planking and plating a ships hull and deck
Neil, Why should the first layer of planking be so bad?? There are great tutorials and tons of advice on planking here that should alleviate fear of doing a credible planking job. For that matter, with a little practice and following these lessons here there is no need for double layers of planking given appropriate types and sizes of wood. If you must do a double planking, the first layer could be used as a practice run. Assume you cannot use fillers or cover ups and you will take a little more time, but will be happy in the end. This may be a crazy thought, but here you go----> If doing two layers, for the first one you can go with spiling or bending as shown in Chuck's very informative videos to learn the practice or maybe try one method port side and the other method starboard side on the first layer to see what works best for you. Allan -
AL L'Hermione - How to rig blocks at mast crossings
allanyed replied to Spike1947's topic in Masting, rigging and sails
These last photos show the blocks as mentioned in the previous post. I know that with a kit, it seems impractical to buy a book that shows how the rigging goes, but there are too many lines to describe in detail here. Lees Masting and Rigging would be my first choice as it covers a wide range of years, albeit for British ships. Lennarth Petersson's book Rigging Period Ship Models is a much a cheaper book to buy but only deals with one specific size ship and small time span. Still, it is probably a better guide as to what goes where . I just checked and there are copies for as little as $11.49. Lees book can be found for $75-$120, a much better value in my opinion depending on what your future builds may be. Allan -
AL L'Hermione - How to rig blocks at mast crossings
allanyed replied to Spike1947's topic in Masting, rigging and sails
Hi Richard, Not sure about French ships, but there seems to be a lot of mistakes in their picture. First, there is no room for the shrouds and stays which would go around the mast head first. For any blocks that were rigged to the mast top, there likely were no knots, but rather the individual blocks would have a loop that is seized to itself. I don't think there would be any blocks attached to the foot of the upper (topgallant?) mast is it had to be unshipped and taken down in some conditions. Blocks attached to the cap, for the lifts or example, would have a span clove hitched to the cap itself. There were sometimes eye bolts on the under side of the cross trees and caps to which blocks were seized as well. Can you identify each of the numbers and that may help get more detailed answers from the members. Again, I have no experience with French built ships, but the photos just do not look right, to me at least. Allan -
Please do go with the jpgs. I agree, most folks will not open the attachments. When I attach a jpg here , it takes the same as a pdf, a second or less. Thanks! Allan
-
Clarification of wolding for the Victory Cross Section
allanyed replied to rtropp's topic in Masting, rigging and sails
Glad to help out Richard. The other sections of the book on the rigging, belaying, and more are extremely useful. For sizing, the last portion of the book gives a series of ratios for the masts, spars, and rigging lines. Remember rope sizing is always given in the book in circumference, not diameter!! Allan -
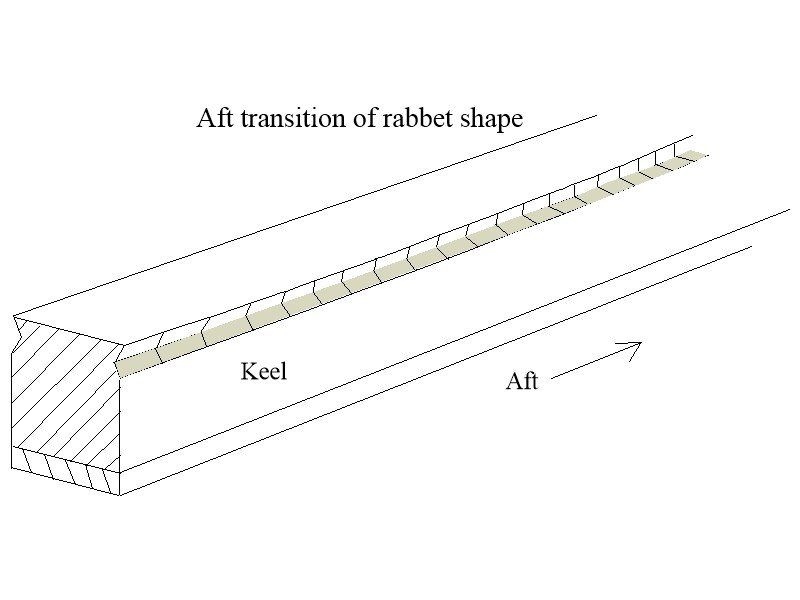
Also keep in mind that the shape of the rabbet is dynamic, never being the same angle along the length of the keel except in the area of the dead flat. The angle should match that of the frames/bulkheads where they end at the keel/rabbet line. There is more to it depending on the era as the keel itself changed over time as well. For a kit, the same basic idea should apply, though. The following was posted in the past but this may help you avoid a search. Allan
-
Gary, Many thanks for your reply on the dry transfer letters. It was not wordy in the least, I appreciate the detail you gave. Allan
-
Thanks everyone. Keith, I laughed out loud when I read your suggestion. It is a good one!!! Druxey, I totally agree that a point of light, be it a bulb or otherwise does work when holding up the item to put the light behind it, but outdoors in bright sun really showed up things quickly and painfully. not painlessly, that were less noticeable indoors. This tells me more light in the shop is probably a good idea 😁 Allan
-
Thank you for your comments everyone, I really appreciate it. Keith, Thank you very much for your comment on the wheel, I really am grateful for you pointing this out. I double checked the wheel dimensions against the drawings and you are correct, the rim is 0.14" wide. The drawings show the rim at 0.12 wide. I have no idea how I missed this. Over all diameter is good, but the rim is too beefy. I will definitely check with the builder to see if this is OK or if I need a redo. In making the model, I have found several potential problems with their drawings and the builders have been very receptive to receiving my notes on these. Please keep in mind this vessel has yet to be built in real life, (they are looking for investors now for the first one) so some things on the drawings may change. One note for now. I took the hull outside in bright sunlight to start spray painting the hull. I have never done this in the past, always doing things under shop lights. Tiny, and I mean tiny, spaces in a few places between strakes showed up that I never noticed under shop lights. As the hull will be painted, it is not a problem to fill this with sawdust and glue then sand it and then paint, but I will be checking all my planking on any model I do in the future, strake by strake, in bright sunlight. No doubt my old eyes have something to do with this, being able to read without readers when outdoors in the sun, but no way when under artificial light. Allan
-
Hi Andre, If I may make a suggestion, consider using copper. It is obviously soft and is so easy to blacken with liver of sulfur compared to blackening brass. Ed Tosti's log on the clipper ship Young America gives a good bit of detail on its use. The best part is that it can be used on the copper prior to installing or in situ because it will not stain the wood. Allan
-
Clarification of wolding for the Victory Cross Section
allanyed replied to rtropp's topic in Masting, rigging and sails
Hi Richard, Based on the written description and detailed lower mast drawings in Lees' Masting and Rigging English Ships of War, pages 3 and 4 here is some information to consider. After 1800 the wooldings consisted of both iron hoops and iron bands. The iron bands go under both the cheeks (#59) and the rubbing paunch (#60) . Alternating with the bands, the iron hoops go over the cheeks and under the rubbing paunch. At the top of the masts there are four battens. The battens go over the hoops. The hoops/bands on the drawing you show are presumably iron bands as prior to 1800, the wooldings were pairs of wooden hoops with rope wound between them which would have gone over the cheeks. You mention a pair of part 60 which is the rubbing paunch. There should only be one on the foreside of each of the three lower masts so it is a little confusing as to why they call for a pair of them. Hope this is a little help for you. Allan -
Andre, the chainwales (obsolete spelling of channels) are made of wood, so I assume you are referring to the strop around the dead eye and links below. If that is the case, try using brass. First heat it with a butane torch (even a cigar torch lighter - not a cigarette lighter- works well) until it is red. It will then be very soft and will have no spring left in it. You can get a good quality torch lighter that is refillable and can actually do silver soldering with it. Allan
-
Richard, you are absolutely correct about seeing if CA holds up. Would be a scary thing to hear cracking and creaking of a model coming "unglued" one night and you wake up to see a pile of wood pieces 😀
-
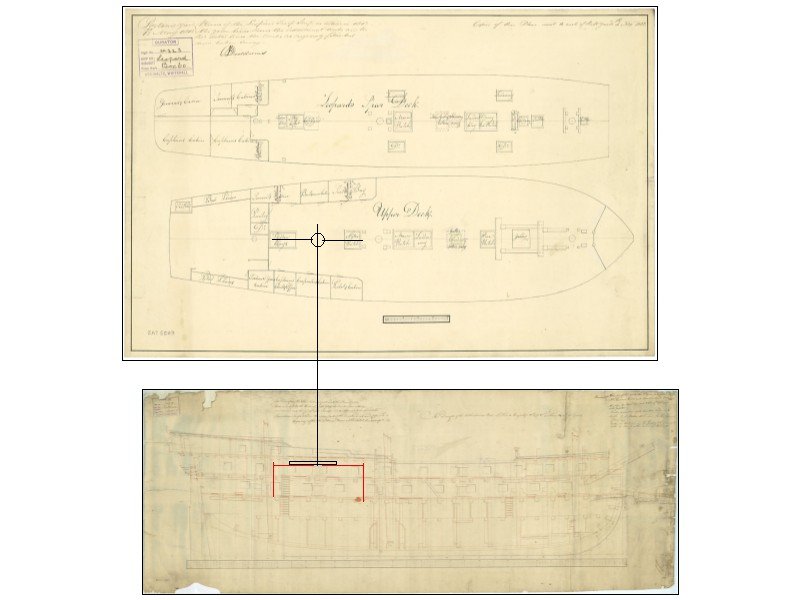
Jim, In looking at deck drawings of other similar ships on the NMM Collections site, the ladders are indeed one hatch over. Even so, if Goodwin is correct for this time period and the length of a single bar was 1/3 the maximum beam, (The Construction and Fitting of English Man of War, page 150) the bars for Leopard 1790 would be 13' 6' long and interfere with ladders anyway. He notes that the bars on Victory are 16 feet long which is actually only 0.31 the beam. Using this in place of the 0.33, the bars are still going to be 12'- 6" long. In this case the bars interfere with the cabins as well, which of course can be taken down. Sorry for the poor resolution in the pics below, took the contemporary drawings from the NMM website. If you go to the site it is a bit more clear. https://collections.rmg.co.uk/collections/objects/81517.html Allan
-
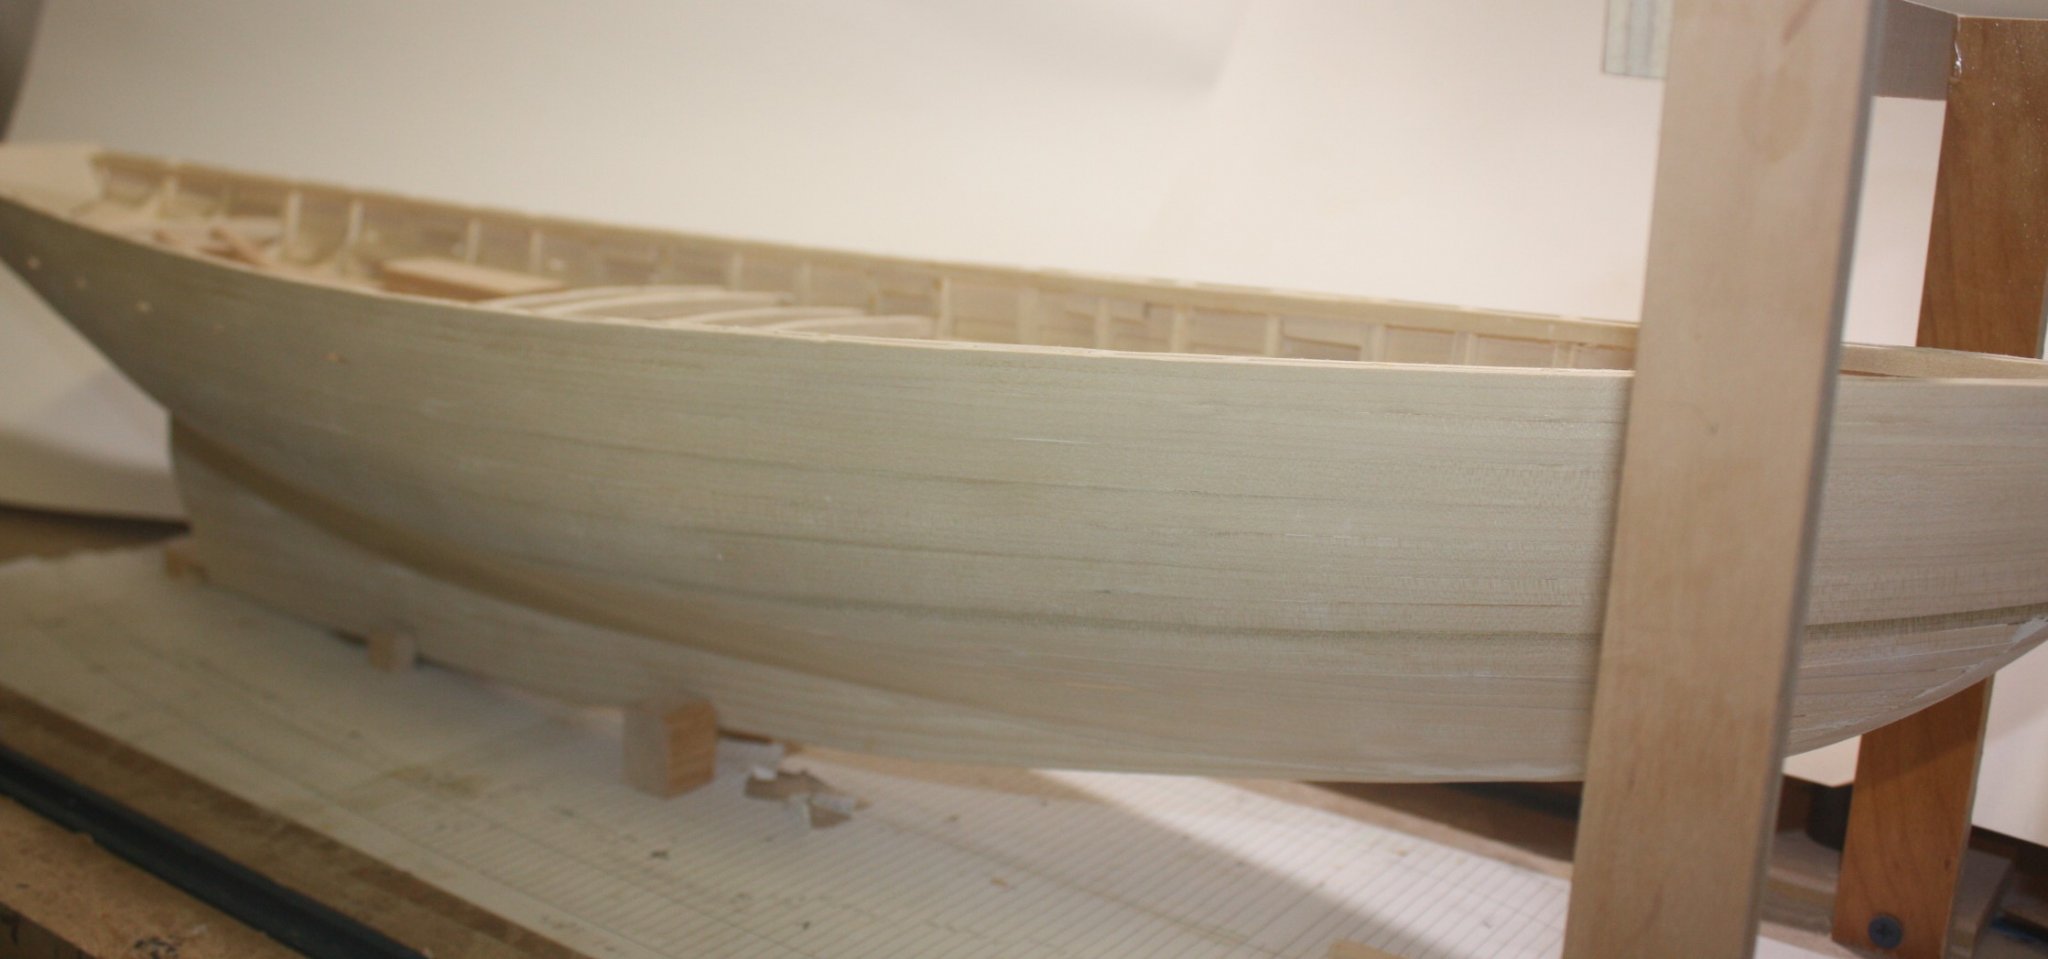
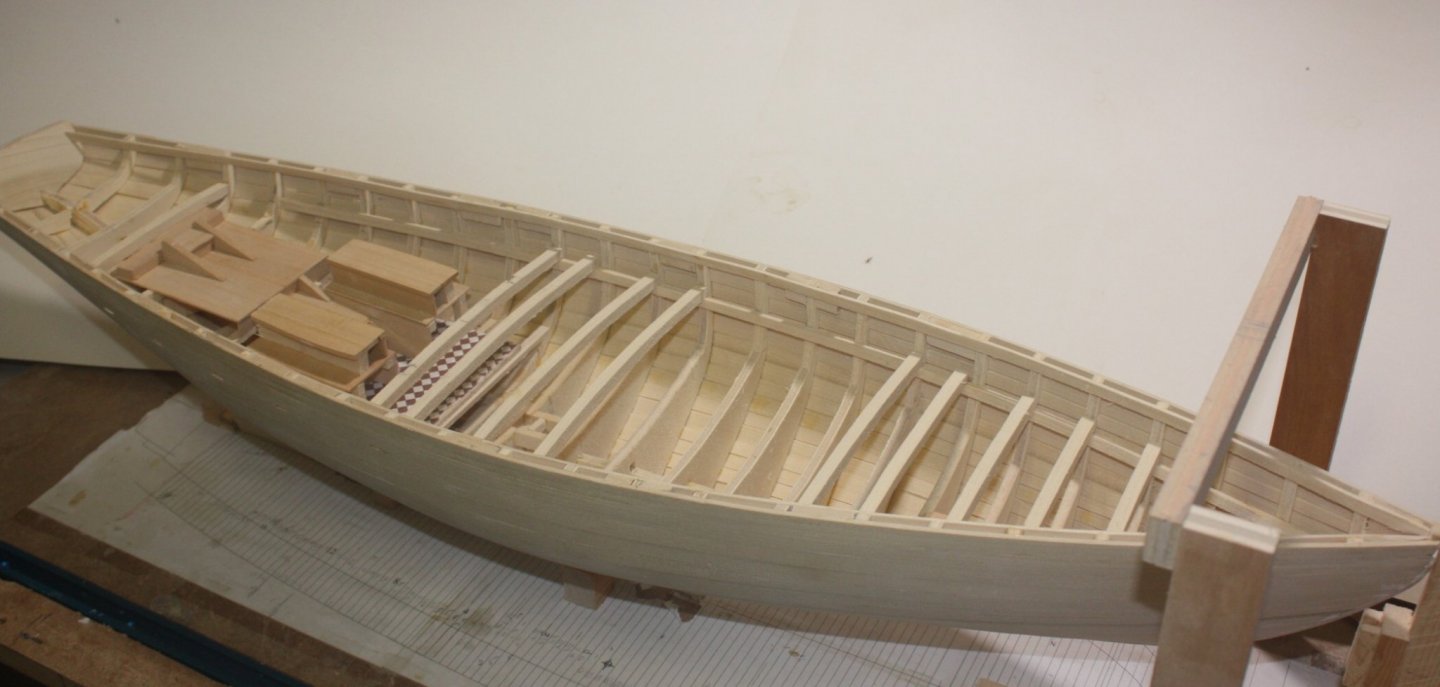
The hull took 17 strakes of planking on each side, so took over a week to complete. Sanding and fairing is 90% complete, with a few high spots to be taken care of. The remainder of the deck beams and carlings are going in followed by the spriketting over the next few days. With the entire hull being painted, I was not as careful as normal in getting the planking done so there were a few tiny gaps between the planks in several spots. Some glue and saw dust that I save from the thickness sander when thicknessing the planks does a great job in filling these and matches the color of the planks. The hull is white above the waterline and red below. I have found it best to paint the entire hull white first. 3 to 4 coats works well with some steel wool or very fine emery paper between coats. Once this is complete, the waterline will be taped and the red below the water line will be painted. If the white is not done for the entire hull, but rather ends below the water line and above the keel, the red does not look exactly the same at the transition where the white ends and bare wood starts. Barely noticeable but noticeable none-the-less. Allan

-
Hi Gary, Are the dry transfer letters peel and stick type decals? Any issues with it peeling off or do you give a clear top coat or some such to avoid any peeling down the road? Thanks! Allan
-
Thistle, how do you dissolve the glue once cured, acetone? In reading up on this, it seems there is need for an accelerator and the cure time is two hours. Is this your experience? Thank you! Allan
-
Hi John, If the sheer is normal and the rounding normal, you should be able to hold the section of plank down with your finger for a minute, or less, and it will hold. I assume you glued the false deck in place first. Both white and yellow (carpenter's or wood glue) are PVAs. The yellow polyvinyl acetate has a higher instant tack and does not like to be moved once the pieces are joined, a plus for us, I think. Don't know what scale you are working with, but keep in mind that the planks should be no more than 25 feet to 30 feet long so about 3 3/4" at 1:98 and 7 1/2" at 1/48. You can always add a few weight pieces, but be sure there is something between the weights and the wood. I got a half dozen chunks of steel of various sizes from a scrap bin at a local machine shop years ago that gave them to me for free as they were going into the scrap bin anyway. Allan
-
Kevin, I am enjoying your project and love your attitude about getting it right and your perseverance! BUT, I still think you could have found a small fruit tree or similar that you could have cut a small vee branch for the vee at the bow 😀 Allan
- 72 replies
-
- 1
-

-
- fishing boat
- artisanal fishing boat
- (and 1 more)
-
If you are going to paint it anyway, consider polystyrene sheeting which is very easy to cut with a stiff razor or scalpel. If you prefer to stay with wood, Vaddoc has good advice, use a close grained wood like castello or boxwood. Allan
-
Woodrat MSW is of course the best site of its type, bar none, and now you have fortified my thoughts on how great this site is with the immensely diverse subject matter we get to see here. Good for you on your choice. Allan
- 186 replies
-
- 3
-
-
- keelless
- reverse clinker
- (and 4 more)
-
Per, I am sure many of us are looking forward to your build log progress Per, especially as you will have limited amounts of information to work with. Are there Danish governmental or private archives that may have more details? I have found that archival facilities in the US and UK have been treasure troves of information so there may be some help in that type of place in Denmark as well. Allan
-
Hi Daniel, Bem-vindo ao nosso grupo Allan
-
Tips for accurate bulk head alignment.
allanyed replied to David W K's topic in New member Introductions
Welcome David, In a few words, a building board to hold the keel secure and perfectly vertical, and at least two decent quality builder squares to be sure the bulkheads are properly aligned horizontally and vertically when gluing to the keel. I print and glue a frame guide and centerline on the building board as well. I am sure if you post in the building and framing forum you will get great advice in response to your question. Again, welcome to MSW Allan