allanyed
-
Posts
8,149 -
Joined
-
Last visited
Content Type
Profiles
Forums
Gallery
Events
Everything posted by allanyed
-
 Somewhere in the past I saw then current photos of the Victory model by Longridge and the planking had a lot of cracks and/or lifting if I remember correctly. Hopefully someone knows where to find the photos and can post them. I seached the net and specifically RMG with no luck. I have not personally seen it on "modern" models going back to 1978, but you may want to check with a museum expert such as Grant Walker at Preble Hall at the USNA in Annapolis to get their input as they have a vast collection. Allan
 -
WELCOME TO MSW The above is absolutely the best advice. The kits are high quality and you will learn skills that will be used on even more advanced models, be it kit or scratch as you move forward. Allan
-
Remington Industries
allanyed replied to Roger Pellett's topic in Metal Work, Soldering and Metal Fittings
No you are not, it is the end result that counts. This is worth a try if I ever make the mistake of doing another 1:96 scale project 😀 Thanks Roger Allan -
Remington Industries
allanyed replied to Roger Pellett's topic in Metal Work, Soldering and Metal Fittings
Thanks Paul, much appreciated. I usually do the same, but to be to scale I needed to use 30 gauge wire and it does not work so neatly. Thanks again!! Allan -
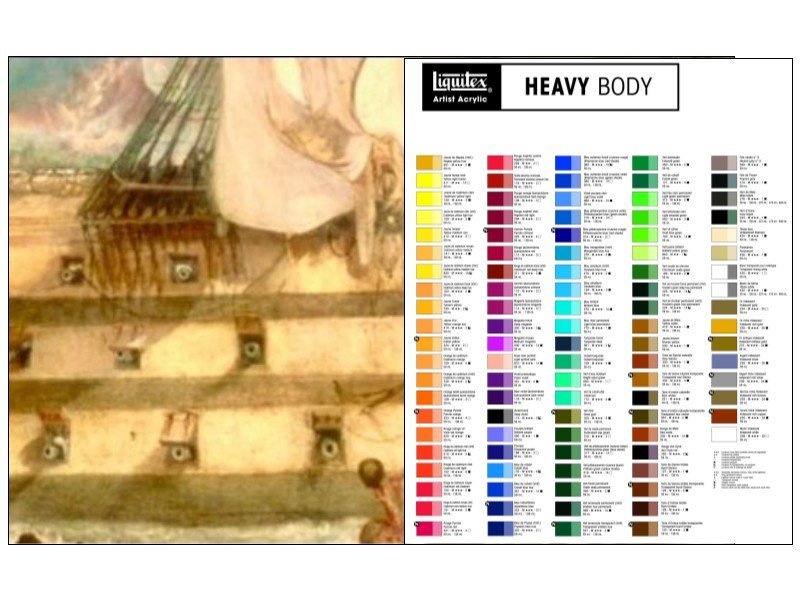
Look at a color chart of a given brand against the painting and you can see what colors are close. If you want an exact match you will most likely need to mix colors to get what you want. The below is how I would start, in this case using Liquitex, my favorite acrylic tubed paint that is easy to find, I also attached a PDF which may be more clear. Allan Liquitex chart against painting.PDF
-
Remington Industries
allanyed replied to Roger Pellett's topic in Metal Work, Soldering and Metal Fittings
That's the truth. I just made a couple using 30 gage and it was tricky. I wrapped the wire around a drill bit of the appropriate diameter then removed the "spring" and clipped the rings. How do you make your rings? Allan -
I wonder how much the colors in the painting have changed over the past 200 years. Has the Turner painting been restored or is it the aged original? You can see a lot of restored paintings on the net to get an idea of how much paint color can change over the years for a variety of reasons. Allan
-
Welcome to MSW David. Obviously there are no color photos of the Victory in the 19th century so color photos we see are modern era colors. They may be a close match, but maybe not. Also, prints are not necessarily the same as the actual color if you saw the ship in person. Go with what makes you happy but whatever you choose, consider going with high quality artist tubed acrylics, not the bottled craft paints. Two of the most important differences between craft paints and artist acrylics have to do with pigment content and lightfastness. Artist acrylics have higher pigment content than craft paints, making the colors of artist acrylics more vibrant and deep. Artist acrylics have a higher viscosity than the bottled paints. The bottled paints are not as lightfast as artist acrylics, which means that they will fade more quickly. By the same token you can protect the bottled paint with a protective varnish, but if you want the colors of your paintings to stay true for many years, go with artist acrylics. Allan
-
Hope to see you again next year (for the Chianti festival in Greve 😀) and see the model in person. It is gorgeous!! Ciao Allan
-
Batavia: Deck beams
allanyed replied to RobbieZ's topic in Building, Framing, Planking and plating a ships hull and deck
Lacking better information, the beams in late 17th century or even very early 18th century ships should be reasonably close regarding size and spacing for warships. For merchant ships, it may be a different situation. -
Batavia: Deck beams
allanyed replied to RobbieZ's topic in Building, Framing, Planking and plating a ships hull and deck
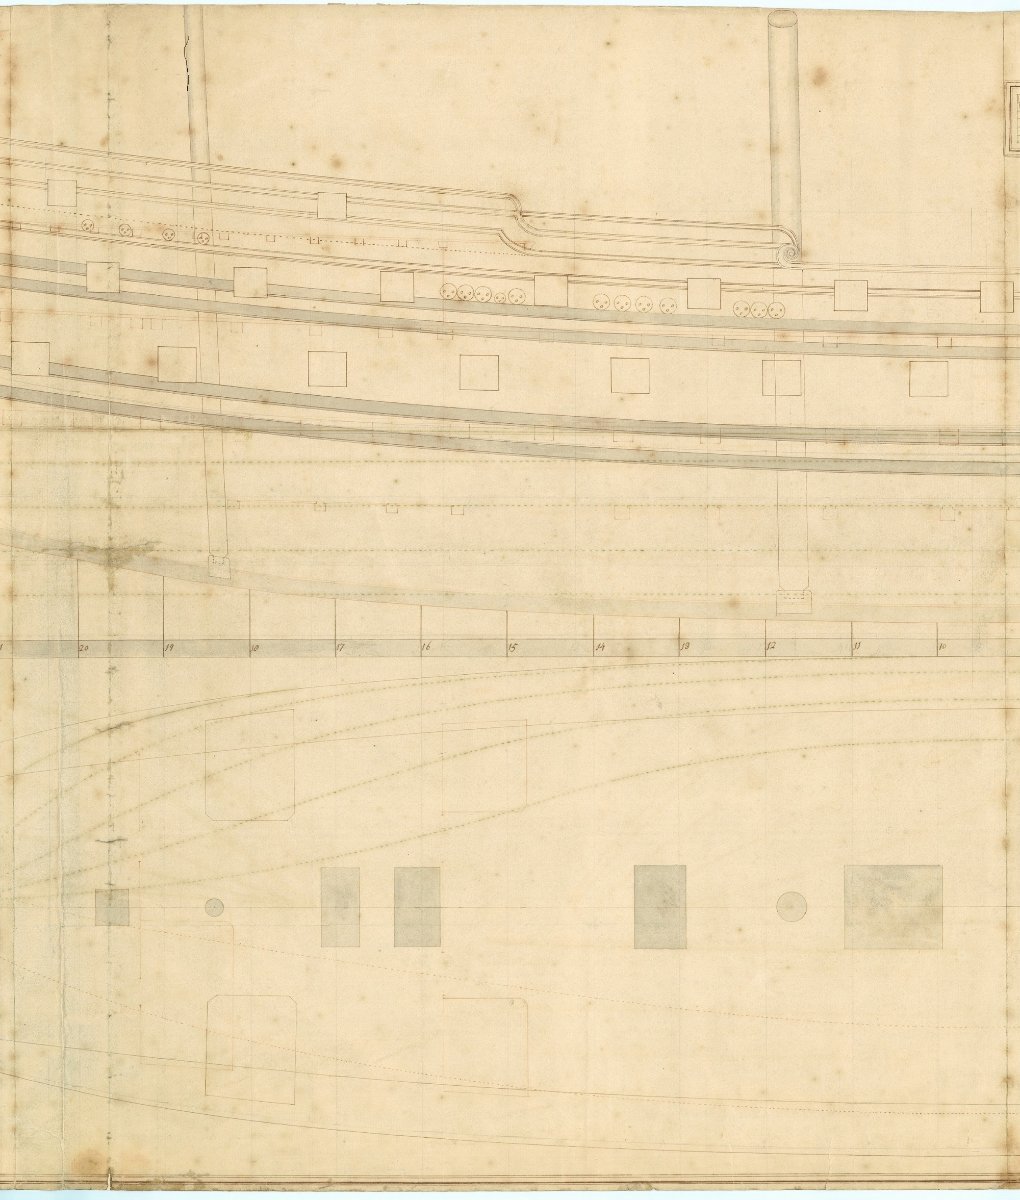
Are you speaking of the Dutch ship from 1628? If that is the ship, there were several decks and each deck would likely have had different beam sizes and different distances between each beam. If there is an inboard profile drawing or deck plans, these would show the beam sizes and spacing on each deck. An example is below. It happens to be Antelope (50) 1703 You can see the beams in cross section so can determine sizes and spacing. Allan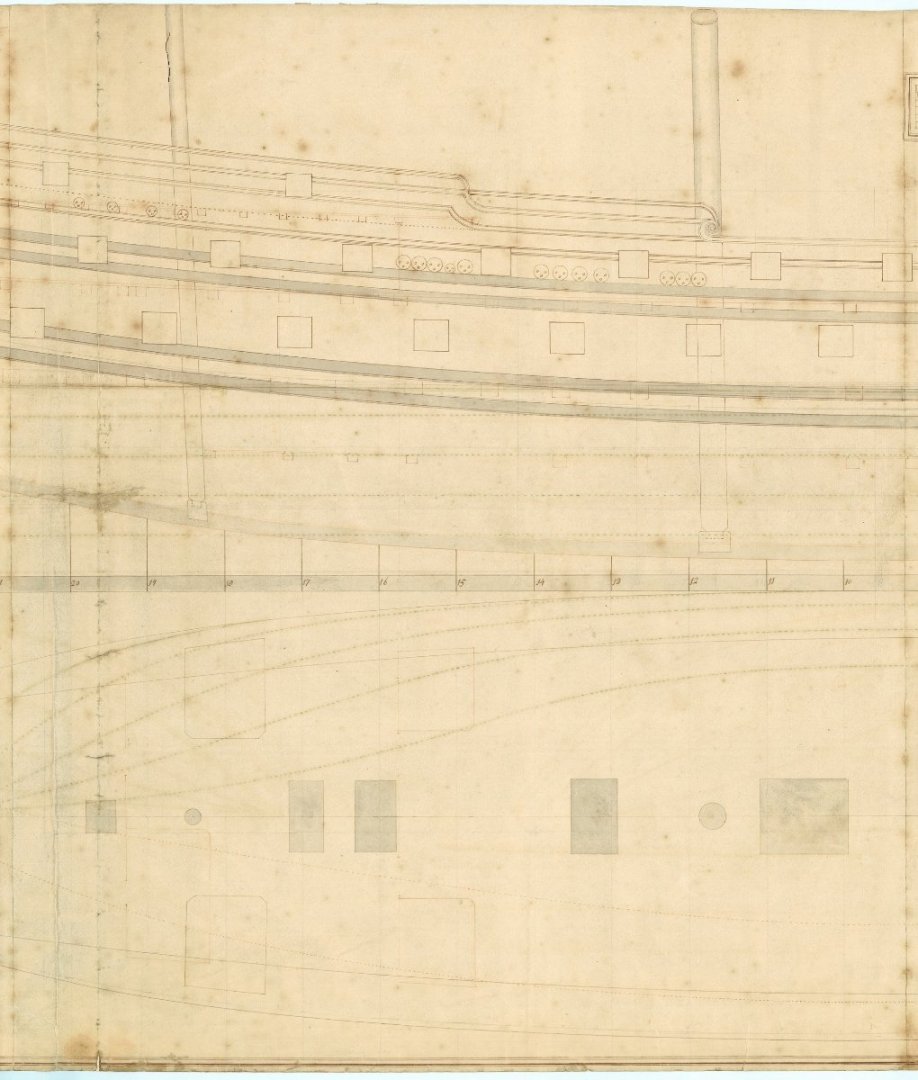
-
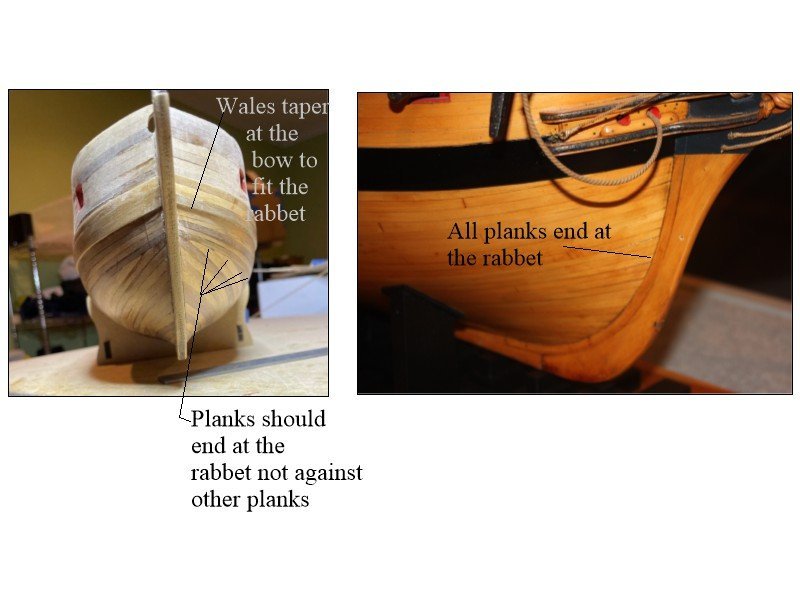
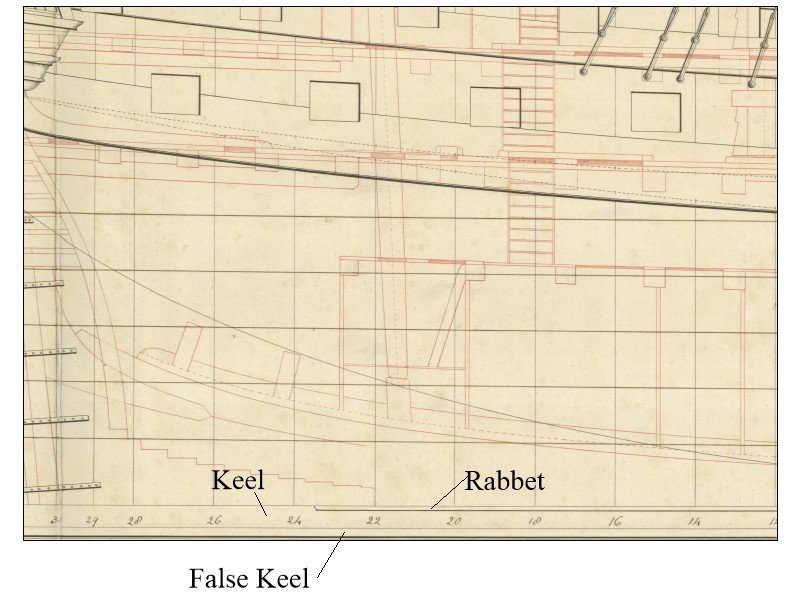
The planking does not look like each strake runs up to the bow, but it is hard to see in the photo. The photos below show how the planking ran in reality and how some kit planking is instructed. It does not matter how the first planks run as they will be covered by the second layer but it is great practice to do the first layer the way the second layer should lay if only to learn how to do it. It seems like the planks in your photo look like they are running as in the pic on the left below rather than the way they were done in actuality as in the photo of a contemporary model on the right. It is probably just a matter of terminology, but there does appear to be a false keel in the photos you posted. See the second pic below of a contemporary plan. In the end do what makes you happy, it is your shipyard after all 😀 Allan
-
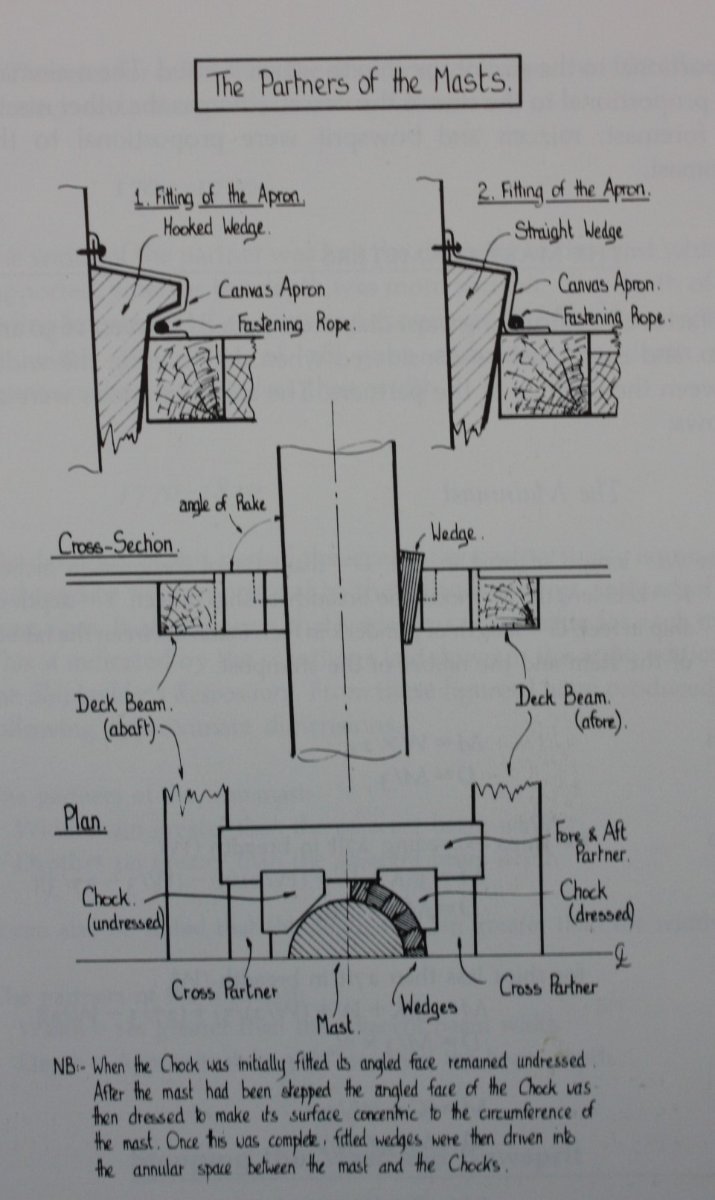
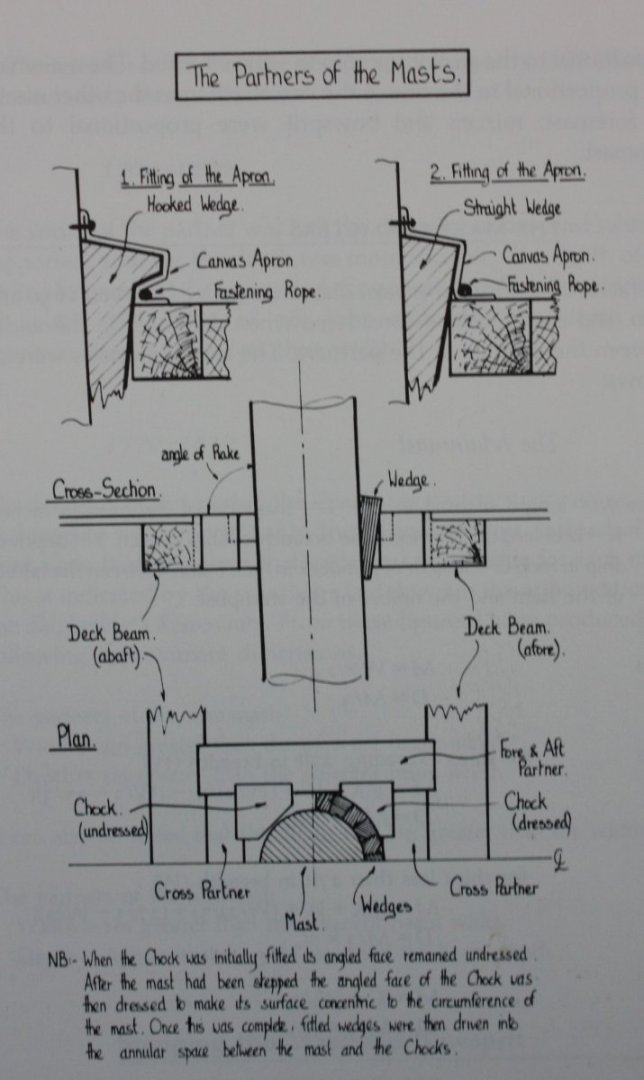
Great questions Tom. As far as I know, the wedges were hammered into place but due to their shape and size of the opening they could not fall through even if they got a little loose. Perhaps they were checked and "reset" on occasion. The drawing below may help. It is from The Construction and Fitting of the English Man of War 1650-1850, page 169 by Peter Goodwin, ISBN0-87021-016-5 Allan
-
Billing boats bluenose ll late father's model
allanyed replied to Simon29's topic in New member Introductions
Welcome to MSW Simon. Wish I could help you but hopefully some members will have built the old Billings kit and be able to offer some help. Allan -
Sorry, I should have posted the below pics in my previous post. You can see the ring of wedges in the sketch below. Allan
-
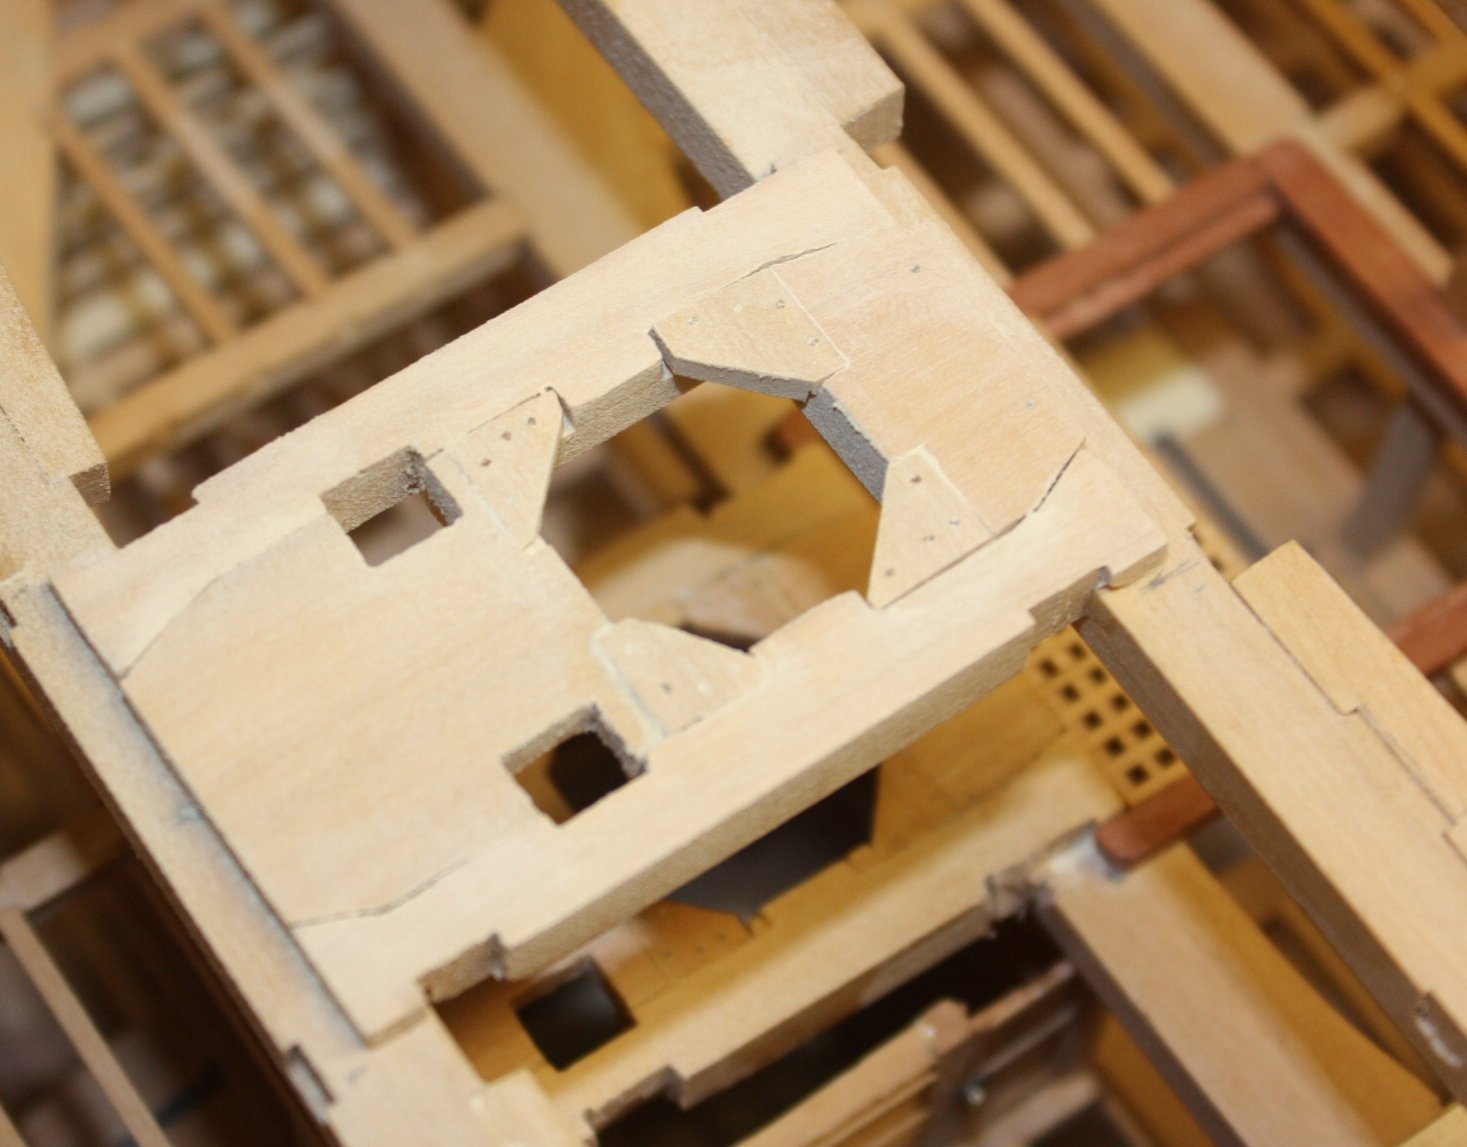
Neatly done! Keep in mind there were wedges used to anchor the mast in the partners. For the future, you might find the following interesting. This one is for the upper deck for a ship smaller than Victory, but the design principals would apply. Allan

-
Hi Richard Strakes on a ship usually consisted of planks about 25 feet to 30 feet long so about 3 1/2" long at your scale. It may be easier to install full length planks and cut butts with a scalpel so it appears they are individual pieces of planking making up a strake. Does the kit show planking where all strakes end at the rabbet (unless a drop strake is needed)? If any amount of realism is of interest, the planking methods in the four part videos by Chuck Passaro are of great help if you are using precut strips. https://www.youtube.com/watch?v=KCWooJ1o3cM You might get some ideas if you take a look at a planking expansion drawing such as ZAZ3918 of the Sphinx on the RMG Collections site for an idea of how the planking was done outboard and inboard. It gives the lengths of the planks on each strake and shapes and tapering as well. Allan
-
Sounds interesting. Can you please give missing information as requested by Chris below when this forum was first put up in 2019 to give book reviews. I did look up Sam Willis and he appears to be a prolific writer with good reviews. In this section of the forum, one finds all things book-and-magazine related: questions, discussions, and of course reviews. Many of the reviews have been tagged by a moderator with the label "book review". Some of the reviews have not been tagged in this manner because, well, they don't really give as much information as one would like to see when reading a review. A good review is more than just, "I read this book and I like it/don't like it." All of us like to find out as much as we can in advance when considering parting with our hard-earned cash, so how can a reviewer make a review more useful? You can get an idea by looking at a few of the tagged reviews. Here are some things you should include: 1. The title of the book. Put this in the title of your post as well. 2. The author's name. 3. The publishing data, i.e. name of publisher and date of publication. If the book you're reviewing is not a first edition, include the publication date for the first edition. Same goes if the book is a reprint. 4. Pertinent specs such as format, number of pages, whether the book has photos (color or B&W), suggested retail price, etc. 5. Modelers are especially keen to know if the book has plans, drawings, color plates, or any other such informative goodies. What kind and how many? Good quality or bad? Anything particularly noteworthy? 6. Summarize the contents of the book. What does it cover? What doesn't it cover? We want to know what's in it! 7. And finally, give your subjective opinion of the book. Did you enjoy it? Why or why not? Are there highlights or shortcomings that you think potential readers would appreciate knowing about? Let them know! We look forward to reading your submissions!
-
One of the best Bluenose models we have seen here at MSW. Kudos!!! Allan
-
The look will be nice, but were oar handles ever really painted? I have no idea, just wondered as I would think the handling would take off the paint rather quickly. There are quite a few photos of contemporary model oars on the RMG Collections site that you may find interesting and helpful. Two examples can be seen at ---> https://www.rmg.co.uk/collections/objects/rmgc-object-558265 & https://www.rmg.co.uk/collections/objects/rmgc-object-548060 Allan
-
Erik There are several topics in the rigging forum on furled sails that you may find helpful. Go the search box and go to the magnifier class and be sure you are in the masting and rigging forum. Then type furled sails and hit enter. Allan
-
Hi Mark, I have the scantlings for the 1719, 1745, and 1750 Establishments for the various timbers. Can you steer me to the scantlings of the 1773 Establishment? MANY thanks! Allan
-
I considered this challenge for a good bit of time as I have not built anything to 1:96 for about 45 years then thought nothing ventured, nothing gained. I have no idea how it will end up, possibly a dismal failure, but I am starting a build log for a 31 foot long boat at 1:96. Thank you for the incentive Iron Hand. Allan https://modelshipworld.com/topic/35331-31-foot-long-boat-1801-by-allanyed-scale-196/
-
You may very well be right Mark, thanks for your post. I only did a cursory look at Lees' drawings and mast, spar, and line sizes and I likely missed things. As Flyer stated, best to check everything against a reliable source such as Lees' book. Allan
-
Depends on whether or not the Victory Models Vanguard plans are correct. You may want to check those plans against contemporary based sources to see if they are accurate. Rigging sizes and configurations did not change a lot from 1719 until 1806 so you can probably use James Lees' Masting and Rigging English Ships of War figures which can also be found here at MSW in the Articles section as done by Danny Vadas for more exact information. Allan