


allanyed
-
Posts
8,149 -
Joined
-
Last visited
Content Type
Profiles
Forums
Gallery
Events
Posts posted by allanyed
-
-
Lovely build! One question/comment, hope that is OK, The davit for working the ship's anchors looks thin. Looking at contemporary launch drawings they were typically 7.5 to 8 inches wide (3mm at your scale), had a roller at the outboard end, and were supported on the sides by the runners so would be nearly touching them. From the photos the one in the model looks closer to 1mm. I hope this is not coming across as picky but it sort of jumped out for me from a functionality point.
Allan
-
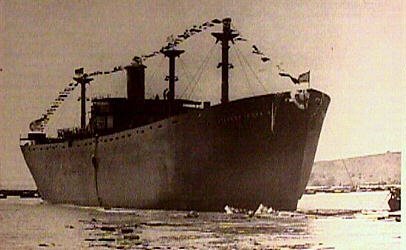
Every time I see a Liberty Ship project it reminds of Edwin O'Hara, one of 142 cadets from the US Merchant Marine Academy killed while sailing as cadets during WWII. They are the only cadets from any US Federal academy that were killed while sailing as cadets during the war. The story of O'Hara is worth reading. https://thewildgeese.irish/profiles/blogs/wwii-hero-edwin-o-hara-the-honor-but-not-the-medal I vividly remember the painting in the article hanging in O'Hara Hall at the USMMA. Photo of O'Hara's ship, the SS Stephen Hopkins is below. Acta Non Verba
Allan
-
Tiziano,
I am very impressed that you only made one extra spoke on each set. I tend to make several knowing I will lose at least one under the work bench and/or break one along the way.😀😀 Are you using a mill or some other unit to mill the grooves? I don't remember if you and I discussed this when we met last year but for those without a mill, a mini table drill press to route out the grooves when making these parts can be used. It is not really a recommended use of a press due to the types of bearings, but it worked out very well.
Allan
Allan
- Keith Black, jansmiss and mtaylor
-
 3
3
-
Let me be the first to offer you a very warm welcome to MSW Herby. (Hope it is OK to call you Herby)
Allan
- mtaylor, Ryland Craze, Keith Black and 2 others
-
5
-
On 6/6/2023 at 2:48 AM, Acker said:
but I hate Wasabi!😆
Funny😀😀 Actually I wish I could enjoy the idea of wabi sabi as much as enjoy fresh wasabi. Hint,,,, if you ever get too much of a hit of wasabi and your brain is going to explode, a quick spoonful of miso soup will kill the hot sting. Learned the hard way from a Japanese master sushi chef in Manhattan many years ago!!!
Allan
-
12 hours ago, popeye2sea said:
BTW, I'm guessing that Kuba is not your real name. We are a fairly friendly bunch here on MSW. We like real names (no pressure).
Going off topic here and you may be right but the symbol looks like a Rasta lion and I THINK Kuba is not an uncommon Rastafarian name.
Allan
-
Bill
You do not mention what ship and era. Do you need internally stropped or externally stropped? There are more options with externally stropped but in either case if you really want beautiful blocks, get them from Syren. They make other after market blocks look totally amateurish not to mention unrealistic which they are.
Allan
- mtaylor and Keith Black
-
2
-
-
By far one of the finest looking ship's boats here at MSW Beautiful work Craig.
Allan
- oakheart, iMustBeCrazy, mtaylor and 1 other
-
4
-
Framing is very well done IR3
How deep are the scores in the clamps? When they were scored (and this was not always done according to Goodwin in The Construction and Fitting of the English Man of War) it was only an inch, so at your scale 0.02" I have found it difficult to do this before installing them and get them to perfectly align port and starboard so if I score them it has been easier for me to do this after they are fixed in place. Using pre-scored clamps, I hope yours are easier to align than I have experienced.
Allan
-
-
20 minutes ago, Dr PR said:
determining the small details
Totally agreed. There is a TON of information from contemporary plans, contracts, and text from the 17th century on and it gets better into the 18th an 19th centuries, but in the words of Gilda Radner, It's Always Something and these little things take longer than many of the bigger things to figure out. I just found discrepancies this morning in the Simm Comfort edition of The Elements and Practices of Naval Architecture scantlings by David Steel that would make for very obvious possible mistakes on deck for some larger vessels regarding the heights of the coamings and head ledges.
Allan
- thibaultron and mtaylor
-
2
-
I imagine it came about sometime not long after the introduction of the centerline rudder. I could not find anything specific but the following article from Johns Hopkins is interesting and may shed some light.
https://muse.jhu.edu/article/33297
Allan
- mtaylor and thibaultron
-
2
-
On 5/14/2023 at 12:04 PM, Steve20 said:
The Elements and Practice of Naval Architecture, 1812 Edition, David Steel.
Further to this information, Steel gives scantlings for the head ledges and coamings for each deck. Examples:
Folios XXXIV and XXXV
Upper deck of a 16 gun
Coamings stood 1' 1" above the deck and were 4 1/2" thick at the underside and 4" at the upper side. The head ledges were 3 1/2" thick and rounded 1"
By contrast for the upper deck on a 44 gun,
Coamings stood 1' 3" inches above the deck and were 6" at the underside and 5" at the upper side. The head ledges were 5" and rounded 1 1/2"
NB I THINK there MAY be an error in the Sim Comfort version of the scantlings that I just spotted. For the dimensions for 50 gun to 110 gun, the height above the deck on the upper deck is from 3 1/2" to 4" I THINK it should be 1' 3 1/2" to 1' 4" to remain consistent with the others.
They did vary with time, but a 1795 Navy Board order stipulated that coamings were to be built well clear of the deck, approximately 15 in to 18in above deck level.
For the gun deck, the opposite large difference exists with the larger ships having a height above the deck of well over 1 foot but for smaller ships, only 3 or 4 inches. I have no idea if these scantlings are correct in all cases or not. If they are correct, I do wonder why the massive variation, especially going from the 50 gun to the 44 gun ships.
Allan
-
Assuming you are speaking about wood, there are choices but the two most popular in our hobby are probably PVA carpenter's glue such as TiteBond and there are a lot of fans of cyanoacrylate. If speed is your need, CA helps as it only takes a few seconds to start the bond, but it is has drawbacks just like anything else. If you have respiratory issues, CA may be a problem and is not forgiving due to the fast cure time. Carpenter's glue takes much longer, up to a minute, to hold parts together if they have been properly fitted together. If parts have tension pulling them apart the parts need to be held to together longer so the PVA needs a lot more time. For metal to wood epoxy is a good choice but the cure time is very long. I am sure you will hear more from other members. Try them all and see what works best for you.
Allan
-
79 years ago today 5000 vessels took part in the largest combat landings ever made. Ships and sailors from MANY countries took part and many made the ultimate sacrifice along with their soldier brothers, Pics below are from our recent visit May 23 -25, 2023


-
Rather than gluing them in the steps inside the hull set them in place and wedge them where they pass through the deck as was done on the actual ship. If that is going too far, a dot of glue where they pass through the hole in the deck should be sufficient and it is located where you can unglue it with IPA or water if necessary. The standing rigging should add more security to this little bit of gluing to keep them in place.
Allan
- BLACK VIKING, RossR, mtaylor and 4 others
-
7
-
Welcome to MSW Tom. Good luck with your build!!
Allan
- mtaylor and Keith Black
-
2
-
On 6/4/2023 at 6:48 AM, Acker said:
It is far from perfect, I made quite a few mistakes
Richard,
Far from perfect does not necessarily matter. Think of the Japanese principle wabi-sabi, the acceptance and love of imperfection in all things. It takes some of the sting out of our own imperfect results. The main thing is that you got started and you finished. Often we learn best by doing, by throwing ourselves into the deep end as the saying goes. In the meantime, to use a sometimes annoying aphorism that showed up in various places in the 1970s: Fake it 'til you make it.
Allan
-
Welcome to MSW Wyatt !!!! It would be nice if you posted a little introduction about yourself in the new member forum.
On 6/4/2023 at 6:58 AM, Wyattj said:I am plating a 9 foot ship
Are you plating a model of the Cutty Sark, a clipper like the Cutty Sark or is it a warship? Have you contacted RMG? They are not always fast, but they do respond. If it is for the Cutty Sark you might want to ask them if the size of the plating today is the same size as when you want her to appear. The original plating was muntz metal. The sheathing today is a different material so maybe the plate sizes are different as well. For British naval vessels full plates were 15" wide by 48" long. They overlapped top and sides 1.5" and were nailed with 0.25" nails spaced about 1.5" to 2.5" apart.
Allan
-
-
10 minutes ago, Blue Ensign said:
The side stops are fitted on the bottom stop, which I find easier to do.
The shipyard must have found the same thing as that is what I have seen explained in books and on contemporary models.😀 Nice work!
Allan
-
17 hours ago, Blue Ensign said:
Fiddly little beggars to fit
B.E. That is an understatement if ever there was one. Kit or scratch, custom fitting is part of the fun for these little pieces.
These are among the very best looking stops I can remember in the kit build forums in a long time. They are not overly thick which seems to be a common error in many other models. Hard to tell from the photos but are the side stops resting on the bottom stop or on what would be the sill?
She is looking super!!
Allan
-


Sources for wood blocks?
in Masting, rigging and sails
Posted
Bill
Did you read the new post from Syren re: blocks that was posted by Chuck Passaro the other day? https://modelshipworld.com/topic/33948-syren-ship-model-company-news-updates-and-infopart-2/page/4/#comments post number 95 on page 4. Look at those blocks and compare to those that you have from MS. Night and day if a realistic looking block is important to you.
Allan