MORE HANDBOOKS ARE ON THEIR WAY! We will let you know when they get here.
×


allanyed
-
Posts
8,149 -
Joined
-
Last visited
Content Type
Profiles
Forums
Gallery
Events
Everything posted by allanyed
-
 So far so good! 😀 Before you add any more strakes are you going to use tick strips to mark the width of all the other runs of planking so they end at the rabbet for and aft and do not end up coming to a point well short of the rabbet? Spiling and/or heat bending via Chuck Passaro's videos works wonders in getting the planking to lay properly. Allan
 -
Welcome to MSW Tanner. Look at all the build logs you can for a start. Are you working from plans for a shrimp boat or your own design? Type the word Shrimp in the search box and a number of builds will come up that may be of some help to you. Allan
-
Hi Trond, Kudos for making the wheel from wood!!! It really looks great. Is there a reason you used 12 spokes instead of the 10 (or 8 on smaller ships) normally found on RN ships. Lavery, Arming and Fitting pages 22 and 23 goes into detail on wheel construction. Allan
-
Hello from Canton Ticino, the Italian Land of Switzerland
allanyed replied to Piero52's topic in New member Introductions
Ciao Piero, WELCOME TO MSW!! I had the good fortune to visit the Canton of Ticino about 20 years ago and drink their local grappa and taste young horse meat. I do not remember the name of the specific town, but my client's family, Camponovo was from there and gave us a very warm welcome. You live in a beautiful part of the Europe! Allan -
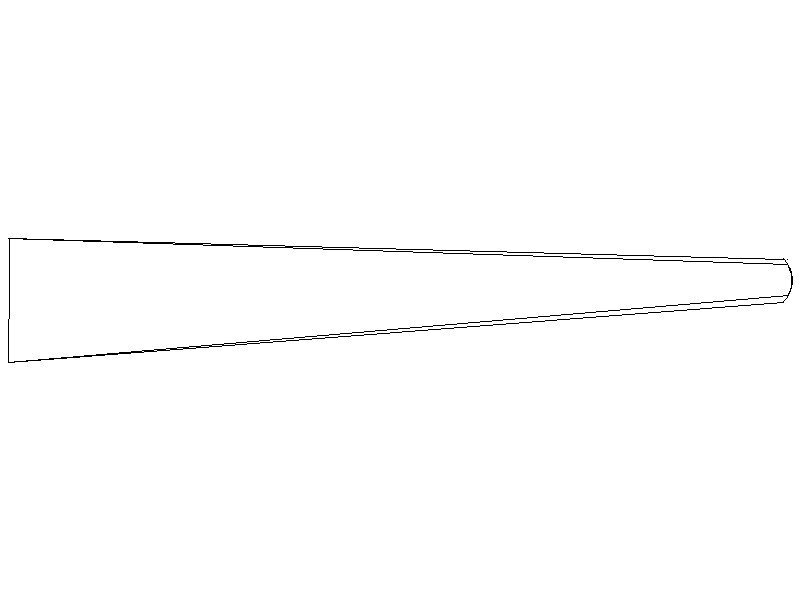
Hi Hamilton Does the kit explain about tapering the knee of the head? Looking at the build logs it seems most kits ignore this basic design feature. From Steel's Elements and Practice of Naval Architecture, a 74 would taper from the stem to the foremost point from about 16" at the stem to about 5 inches, so at 1:100, from 0.16" to 0.05" The Shipbuilder's Repository (1788) does not have the taper for a 74, but the ratio for other rates is the same as given in Steel. The AOS book by Lavery on Bellona shows the taper as well but not quite as severe. Measuring the drawing in that book it appears to taper from 16" to about 8" Without the taper, the figure head will most assuredly be bowlegged😀 The sketch below shows the taper per Steel and from the AOS book. Allan
-
HMS Snake by drtrap - Caldercraft
allanyed replied to drtrap's topic in - Kit build logs for subjects built from 1751 - 1800
Thanks drtrap Looks like it is indeed a crossjack therefore there would be no sail so your sheet blocks can be removed. Looking forward to your next progress posts. As far as stop and go, most of us have done that, many more than once. For me it can be days, weeks. or months, and one time, a couple years when life got in the way. Cheers Allan -
Greeting from Pennsylvania
allanyed replied to New England Captain's topic in New member Introductions
Go Stillers!!! Hope we get some D out of the new guys and find a franchise quarterback this season. Allan -
Welcome to MSW Earl. Maybe post a little intro about yourself in the new member forum. As this is your first project of a wooden ship model, I would start with a good quality kit instead. Pick one that will also teach you proper techniques. Study the various build logs and give serious consideration to what is probably the best starter kits ever designed, the three vessel series from Model Shipways designed by David Antscherl. There are build logs here at MSW on these vessels that will also get you through any hurdles you need to jump as you move along. Allan
-
Baker's planking is realistic looking and looks great!! modelshipworld.com/topic/14188-pelican-later-renamed-as-golden-hind-by-baker-scale-145-galleon-late-16th-century/page/2/ His is a great example to follow whether or not you use filler blocks. The kit design could use double the amount of bulkheads which would make planking far easier and reduce the need for the filler blocks which are a big help. Allan
-
Were their kits any better back then than they are now? If they were just as bad back then as they are now, why pay anything? Allan
-
HMS Snake by drtrap - Caldercraft
allanyed replied to drtrap's topic in - Kit build logs for subjects built from 1751 - 1800
Hi drtrap Your Snake model looks great! I am confused though by one part of the rigging and I hope you can explain. The crossjack would not have carried a sail on the ship rigged Cruizer class vessels Snake and Victor so why do the instructions call for sheet blocks as on your model? Thanks Allan -
Regarding the lantern, was the black silk and gilt tally woven with the ship's name a common practice? Allan
-
Greeting from Pennsylvania
allanyed replied to New England Captain's topic in New member Introductions
Hi Andrew, Welcome aboard. Are you on the Steelers side of PA or the Eagles side? Cheers Allan -
Hi Clementine All the planks would be about 10" wide midships and would be tapered the same rather than some a lot and some not at all. It is is the same procedure as setting up planking on the ship itself (NOT the kit method😀) If not too much trouble, can you say what boats and their sizes are in the kit, be it launch, cutter, pinnace or what have you? THANK YOU! Allan
-
Be sure to make tick strips and mark out every bulkhead. It will prevent a lot of trouble. For a visual rather than read on planking, the four part You Tube videos from Chuck Passaro is great.
-
David, If this is a double planked model, no harm to get the second layer right. For the second layer, look at some plank expansion drawings and study the Primer on Planking tutorial here at MSW in the articles data base. Each plank should be tapered to about half its maximum width at the bow, but for the exact tapering you need to mark off each bulkhead to get the widths of each strake at that spot with tick strips or something similar as explained in the tutorial and in various posts here at MSW. Also note that the strakes usually widen as they approach the stern post. Allan
-
Very neatly done planking! Just as an FYI for the future for ship's boats, launches, etc, W.E. May's book is a treasure trove of details that will help avoid the myriad of kit mistakes. One example from one of his pages of scantlings: A 30 or 32 foot launch would have 10" wide planks. Scaling your photo in a CAD program, the planks look to be about half that size. There are great contemporary plans available for free that allow anyone to scratch build a boat and hand tools are the only thing needed, although a scroll saw is a plus. There are 25 high resolution contemporary plans of gun boats on the Wiki Commons site on page 10 https://commons.wikimedia.org/wiki/Category:Ship_plans_of_the_Royal_Museums_Greenwich Even if building a kit, the drawings could be useful in showing what these boats really looked like. Allan
-
Clever and it obviously works well!!! Alternatively, you can also use the following method, although your device might be easier at our scales.
-
You are quite correct to forgo the figurehead. Many/most British RN ships stopped having figure heads early in the 19th century to save money. If there was anything, busts were substituted about that time. From the 1808 contract for HMS Astrea and Curacoa (The contract was a printed document and the strike-throughs were on the contemporary document.) TRAILBOARD To have a Bust double Trail Board and a Lion or Figure, as shall be directed, Bust handsomely carved; the Rails and Supporters handsomely wrought with Mouldings '' I did a quick search of contemporary models from about 1815 onwards on the RMG site and could not find one model with a figurehead, but rather, those with any decoration were busts. Allan
-
Keith, Save some water and buy a short piece of plastic pipe and a couple caps. Small diameter works better than one that is too large. Cut it to a length that is a little longer than the longest plank you will need, cap one end, fill it with planks then the water. No mess, no fuss and keeps anyone else in the house from complaining about the wood taking up time in the bathtub.😀 At your scale of 1:75, 125 mm long piece of pipe is plenty, but larger is no issue either if you go to larger scales. Even at 1:48, 200mm is plenty long enough for a 25-30 foot plank. Allan
-
Byrnes saw fence advice sought
allanyed replied to geneinmurphy's topic in Modeling tools and Workshop Equipment
You may get more responses if you label your topic with the subject you would like to discuss, not your screen name. Just sayin' Allan -
Welcome aboard Rumbeard. Nice to see a "youngster" joining up!! Allan
-
Storage and transportation
allanyed replied to Mark m's topic in Modeling tools and Workshop Equipment
I have shipped models across the USA and to Europe with only a couple very minor problems. Rather than take a chance, I used professional movers that knew how to handle antiques and such and they were insured. Shop around, some are expensive, some are reasonable. Allan -
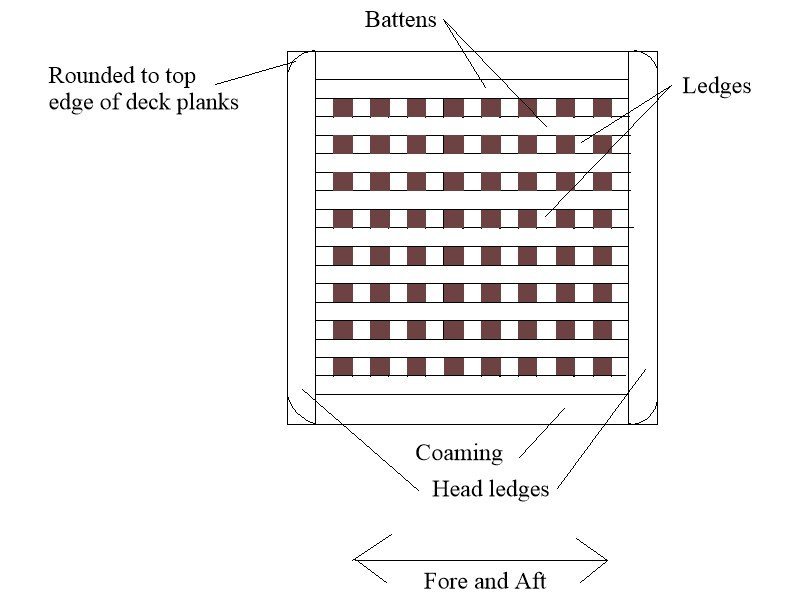
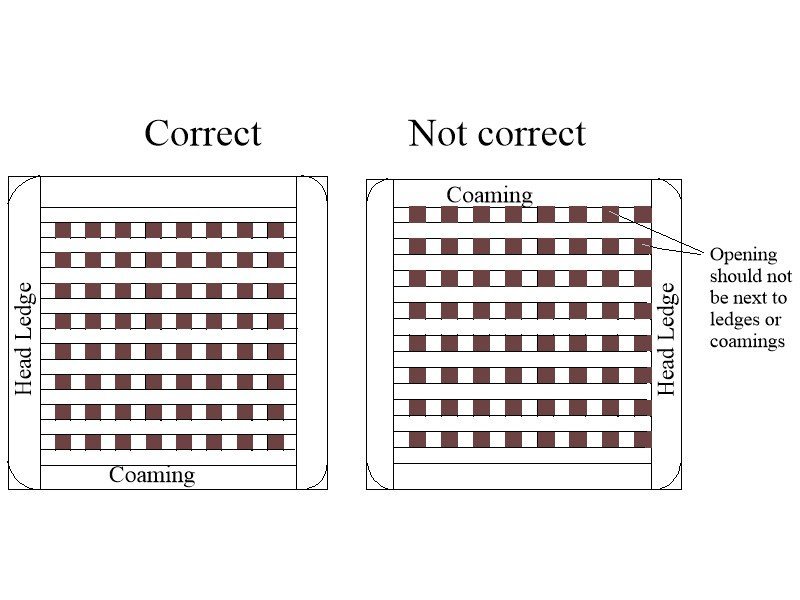
Rock, The big IF, is do you want your gratings to look like real gratings? If you do, you will have to make your own or can get them from Syren but I don't know if the scales offered match your kit. Most kits either laser cut the openings or use interlocking strips rather than using ledges and battens and most of these are totally out of scale. I suspect the construction would have been similar even in the 16th century. If that is the case the below may be of some help to you. Keep in mind the openings should be about 2.5" to 3" square. Do a search on gratings here at MSW on how to make these. Allan