Bryan Woods
-
Posts
564 -
Joined
-
Last visited
Content Type
Profiles
Forums
Gallery
Events
Everything posted by Bryan Woods
-
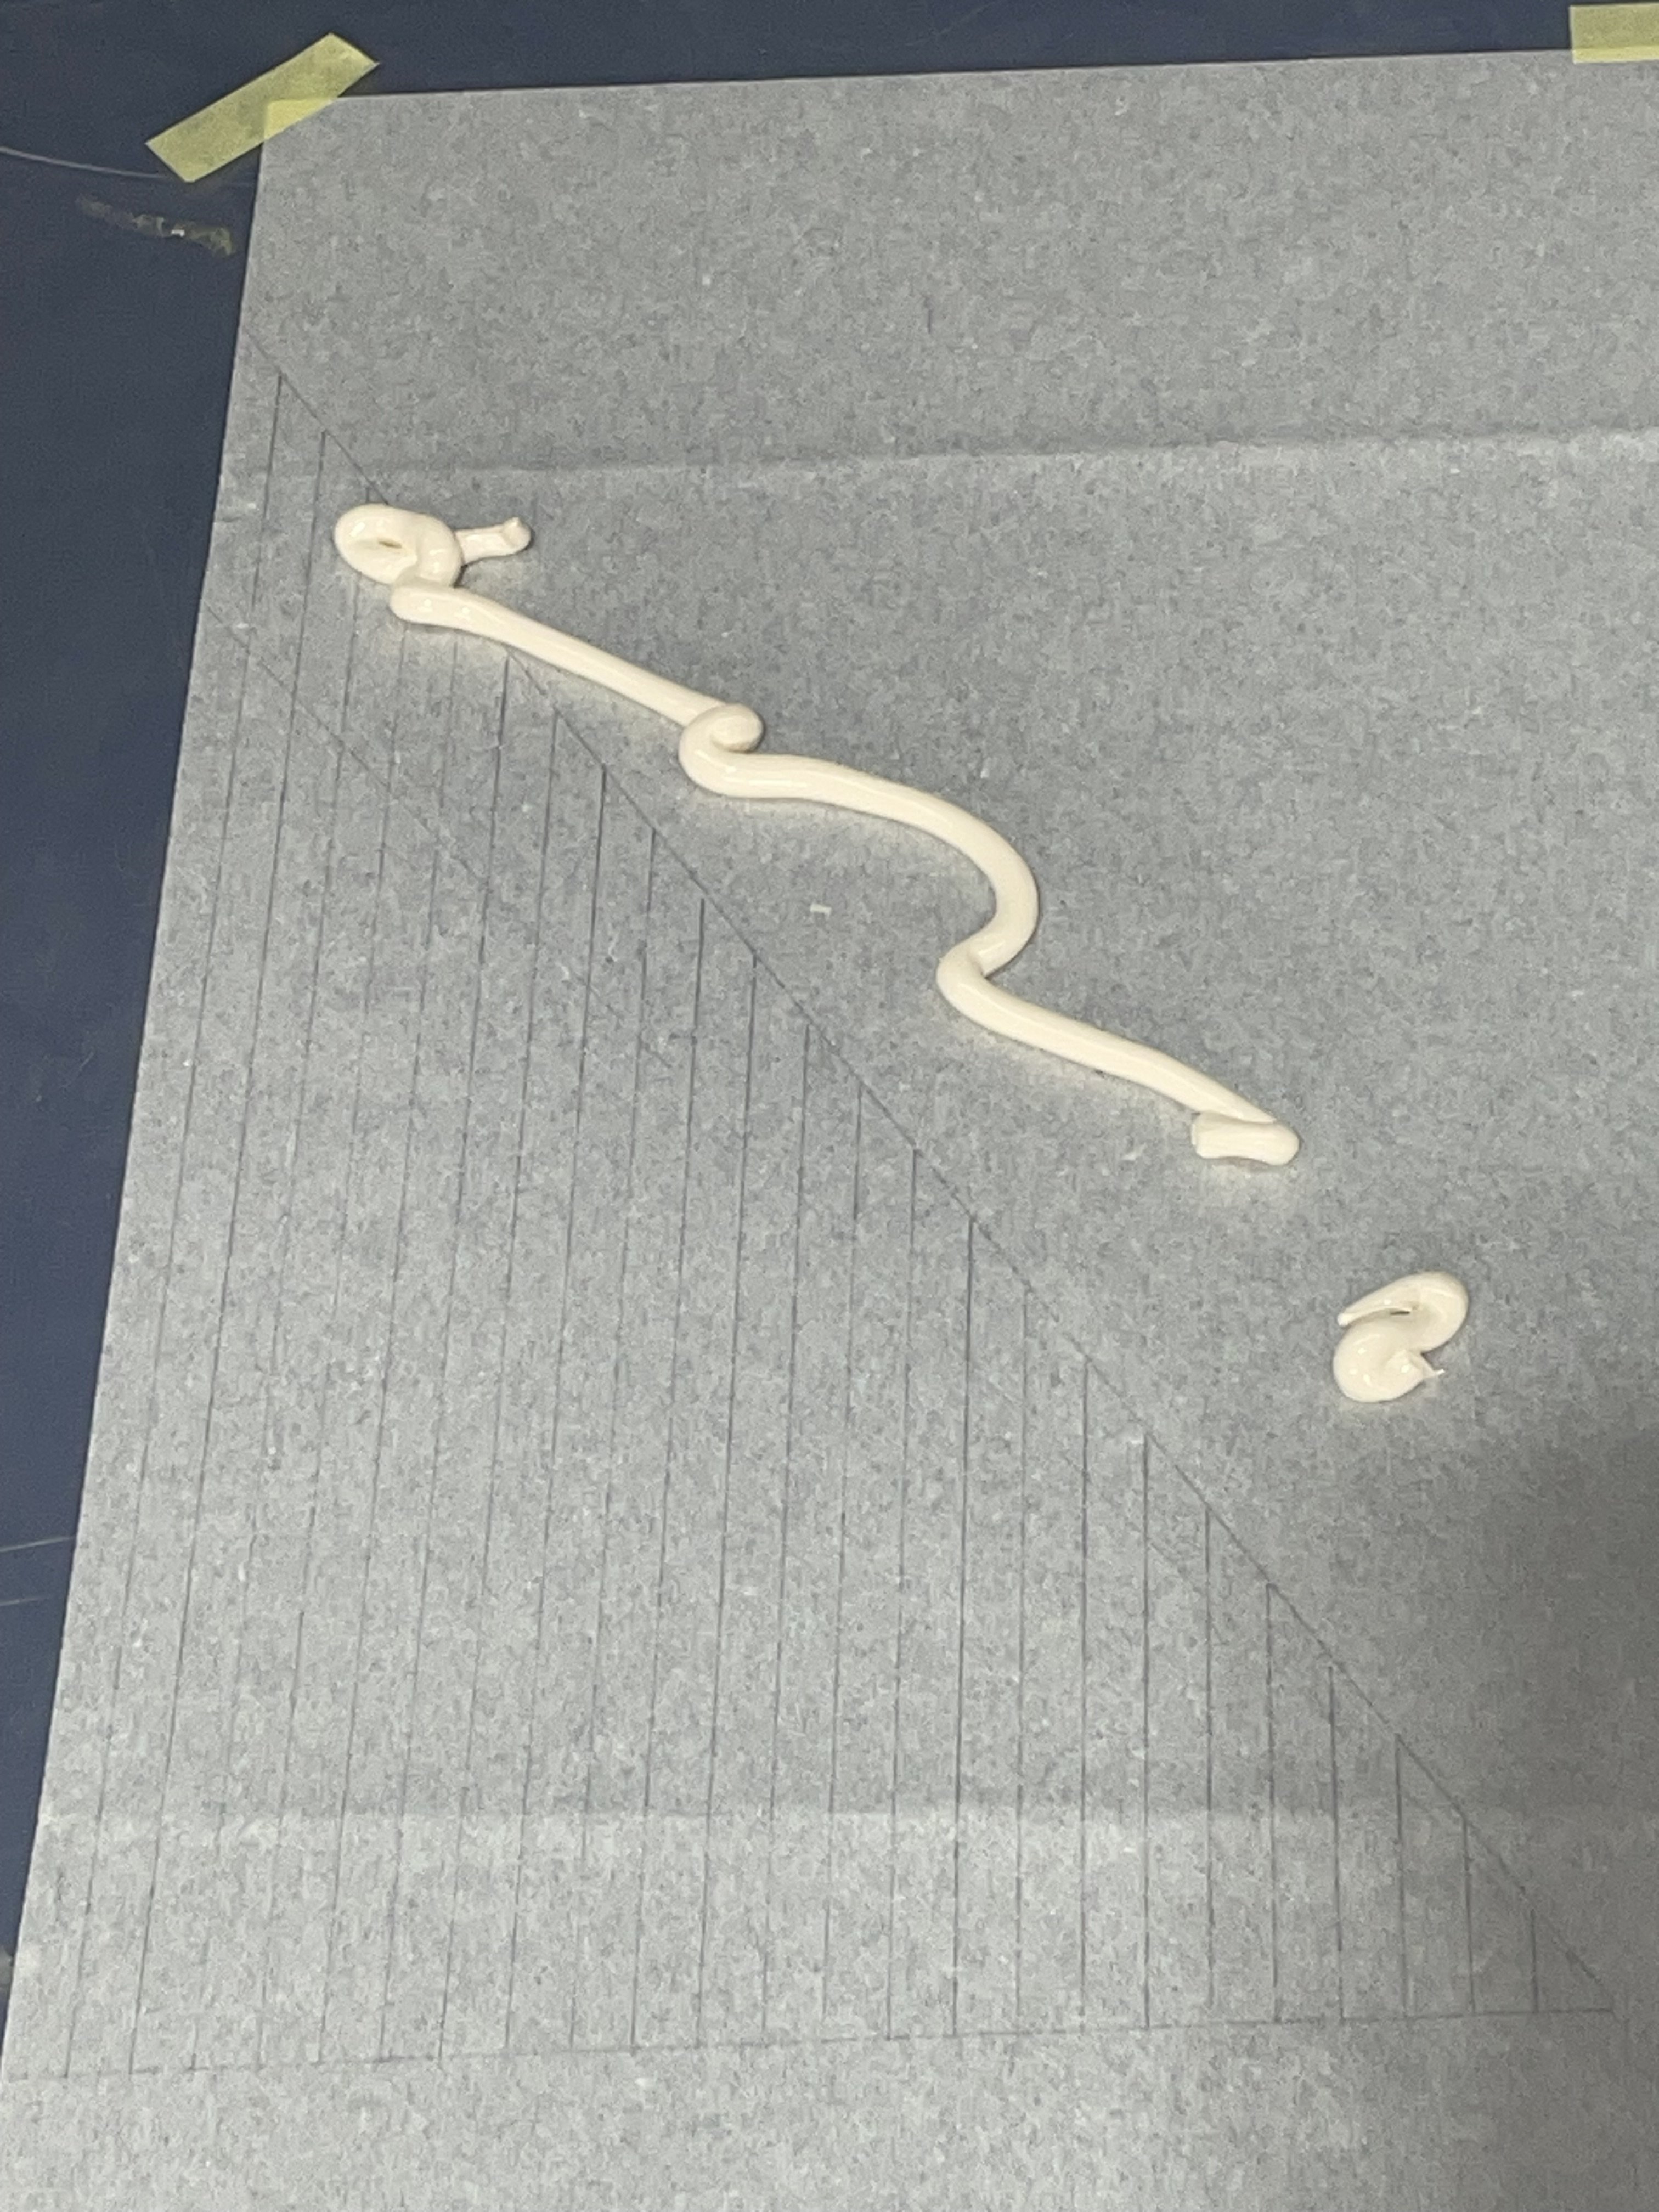
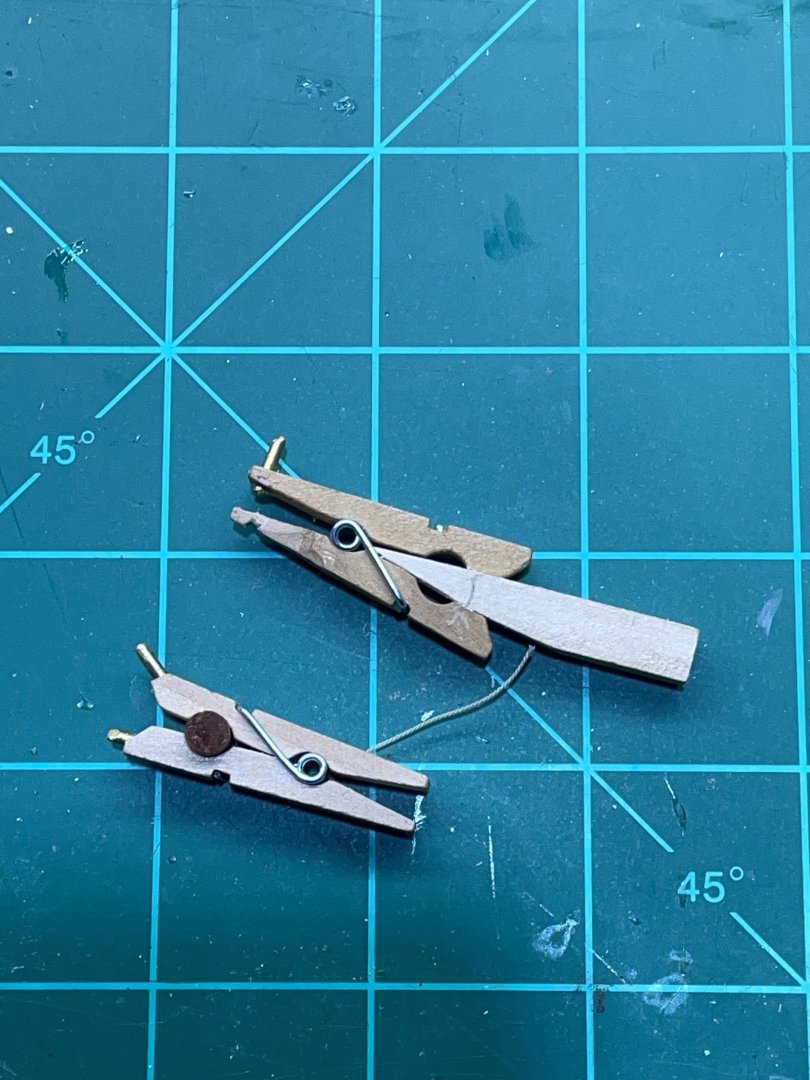
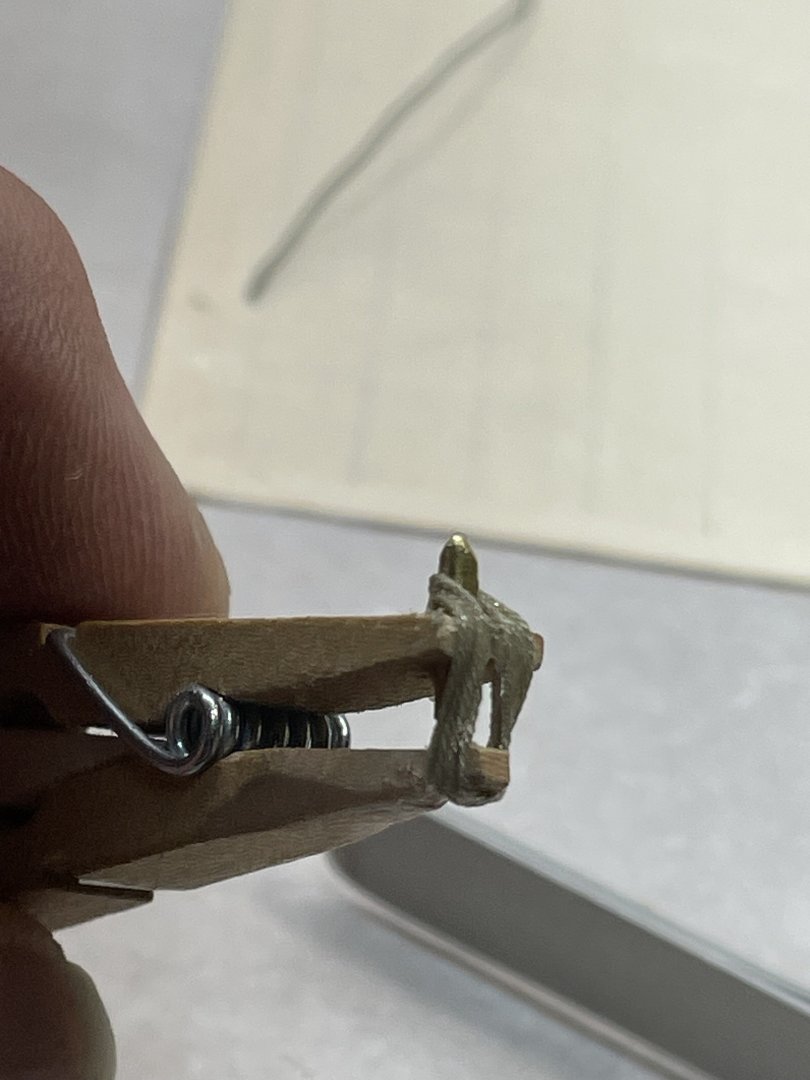
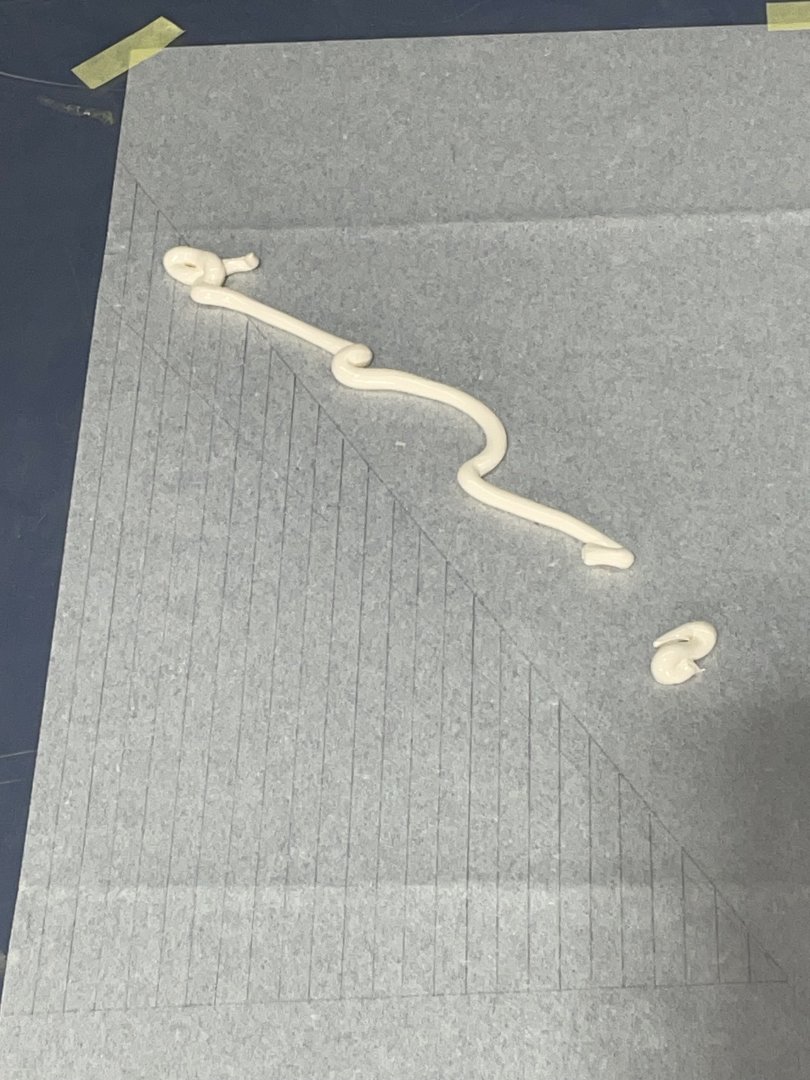
 Thanks Palmerit. I used straight white glue and surgically, apply it with a syringe and a micro tip. You have to leave room to compress the clothes pin, so you can remove them after they dry. Both ends of the rope are pinched off at the other end.
- 55 replies
-
- 5
-

-
- Le Martegaou
- billing boats
- (and 1 more)
-
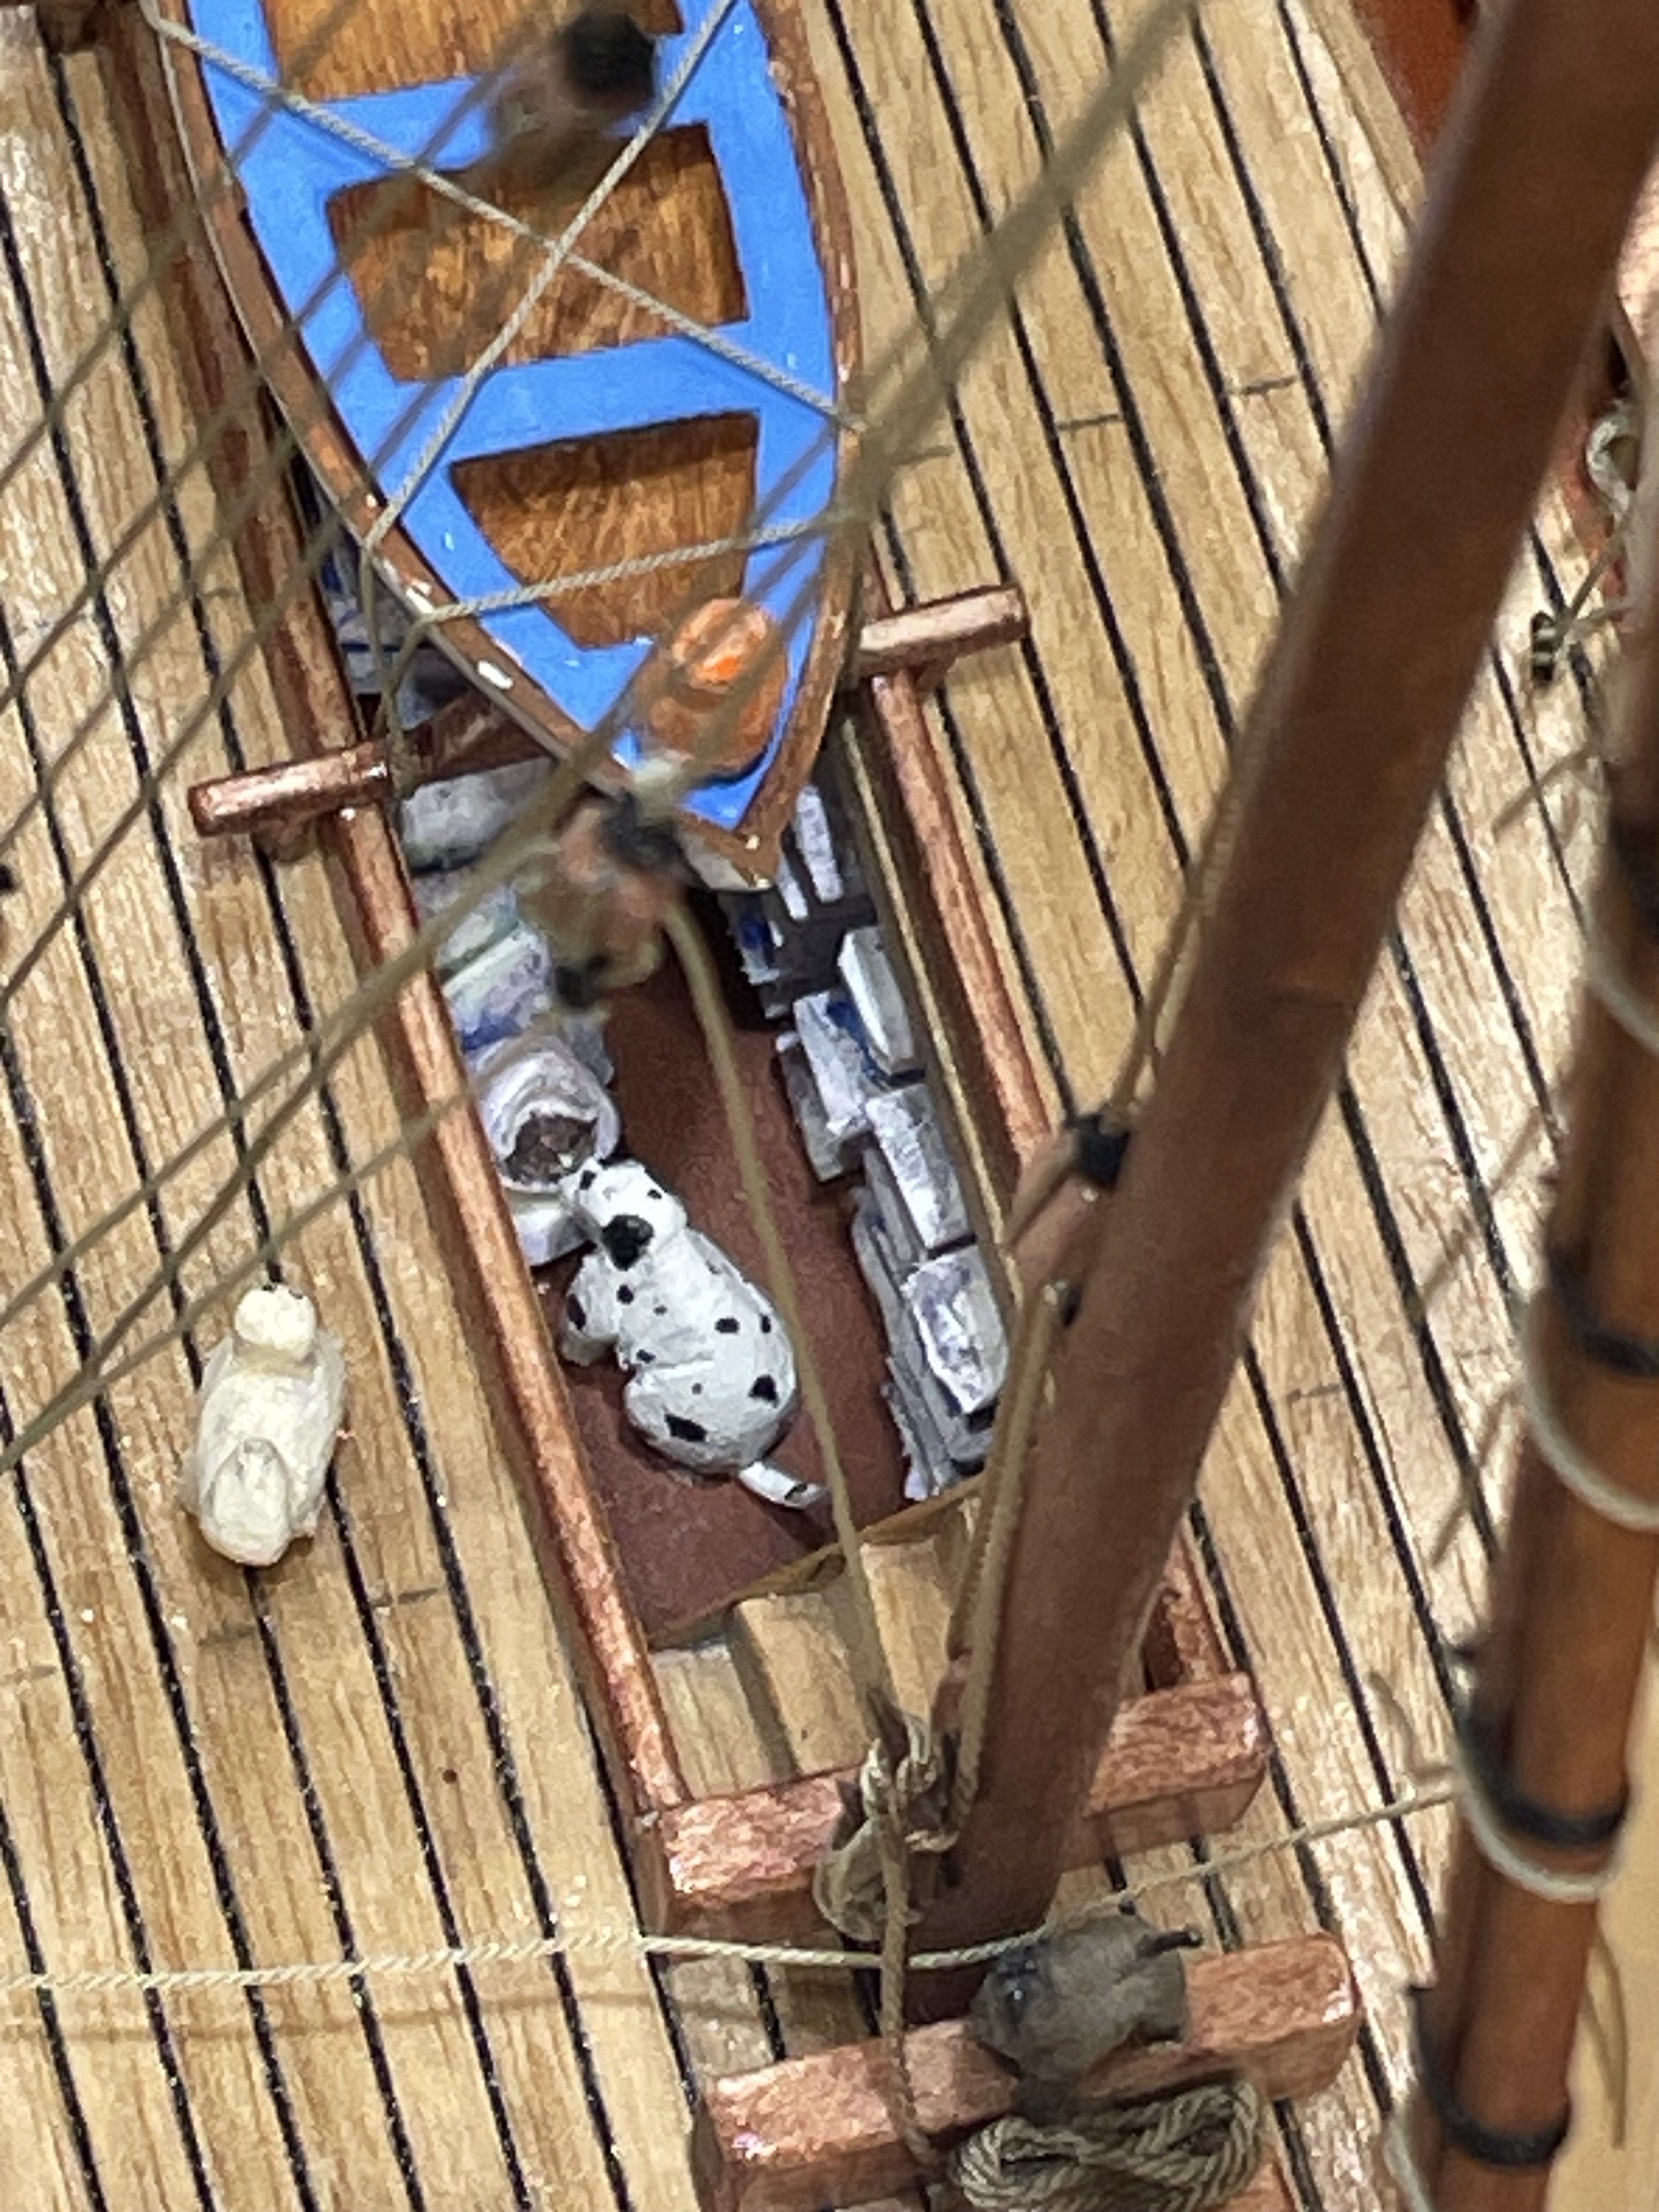
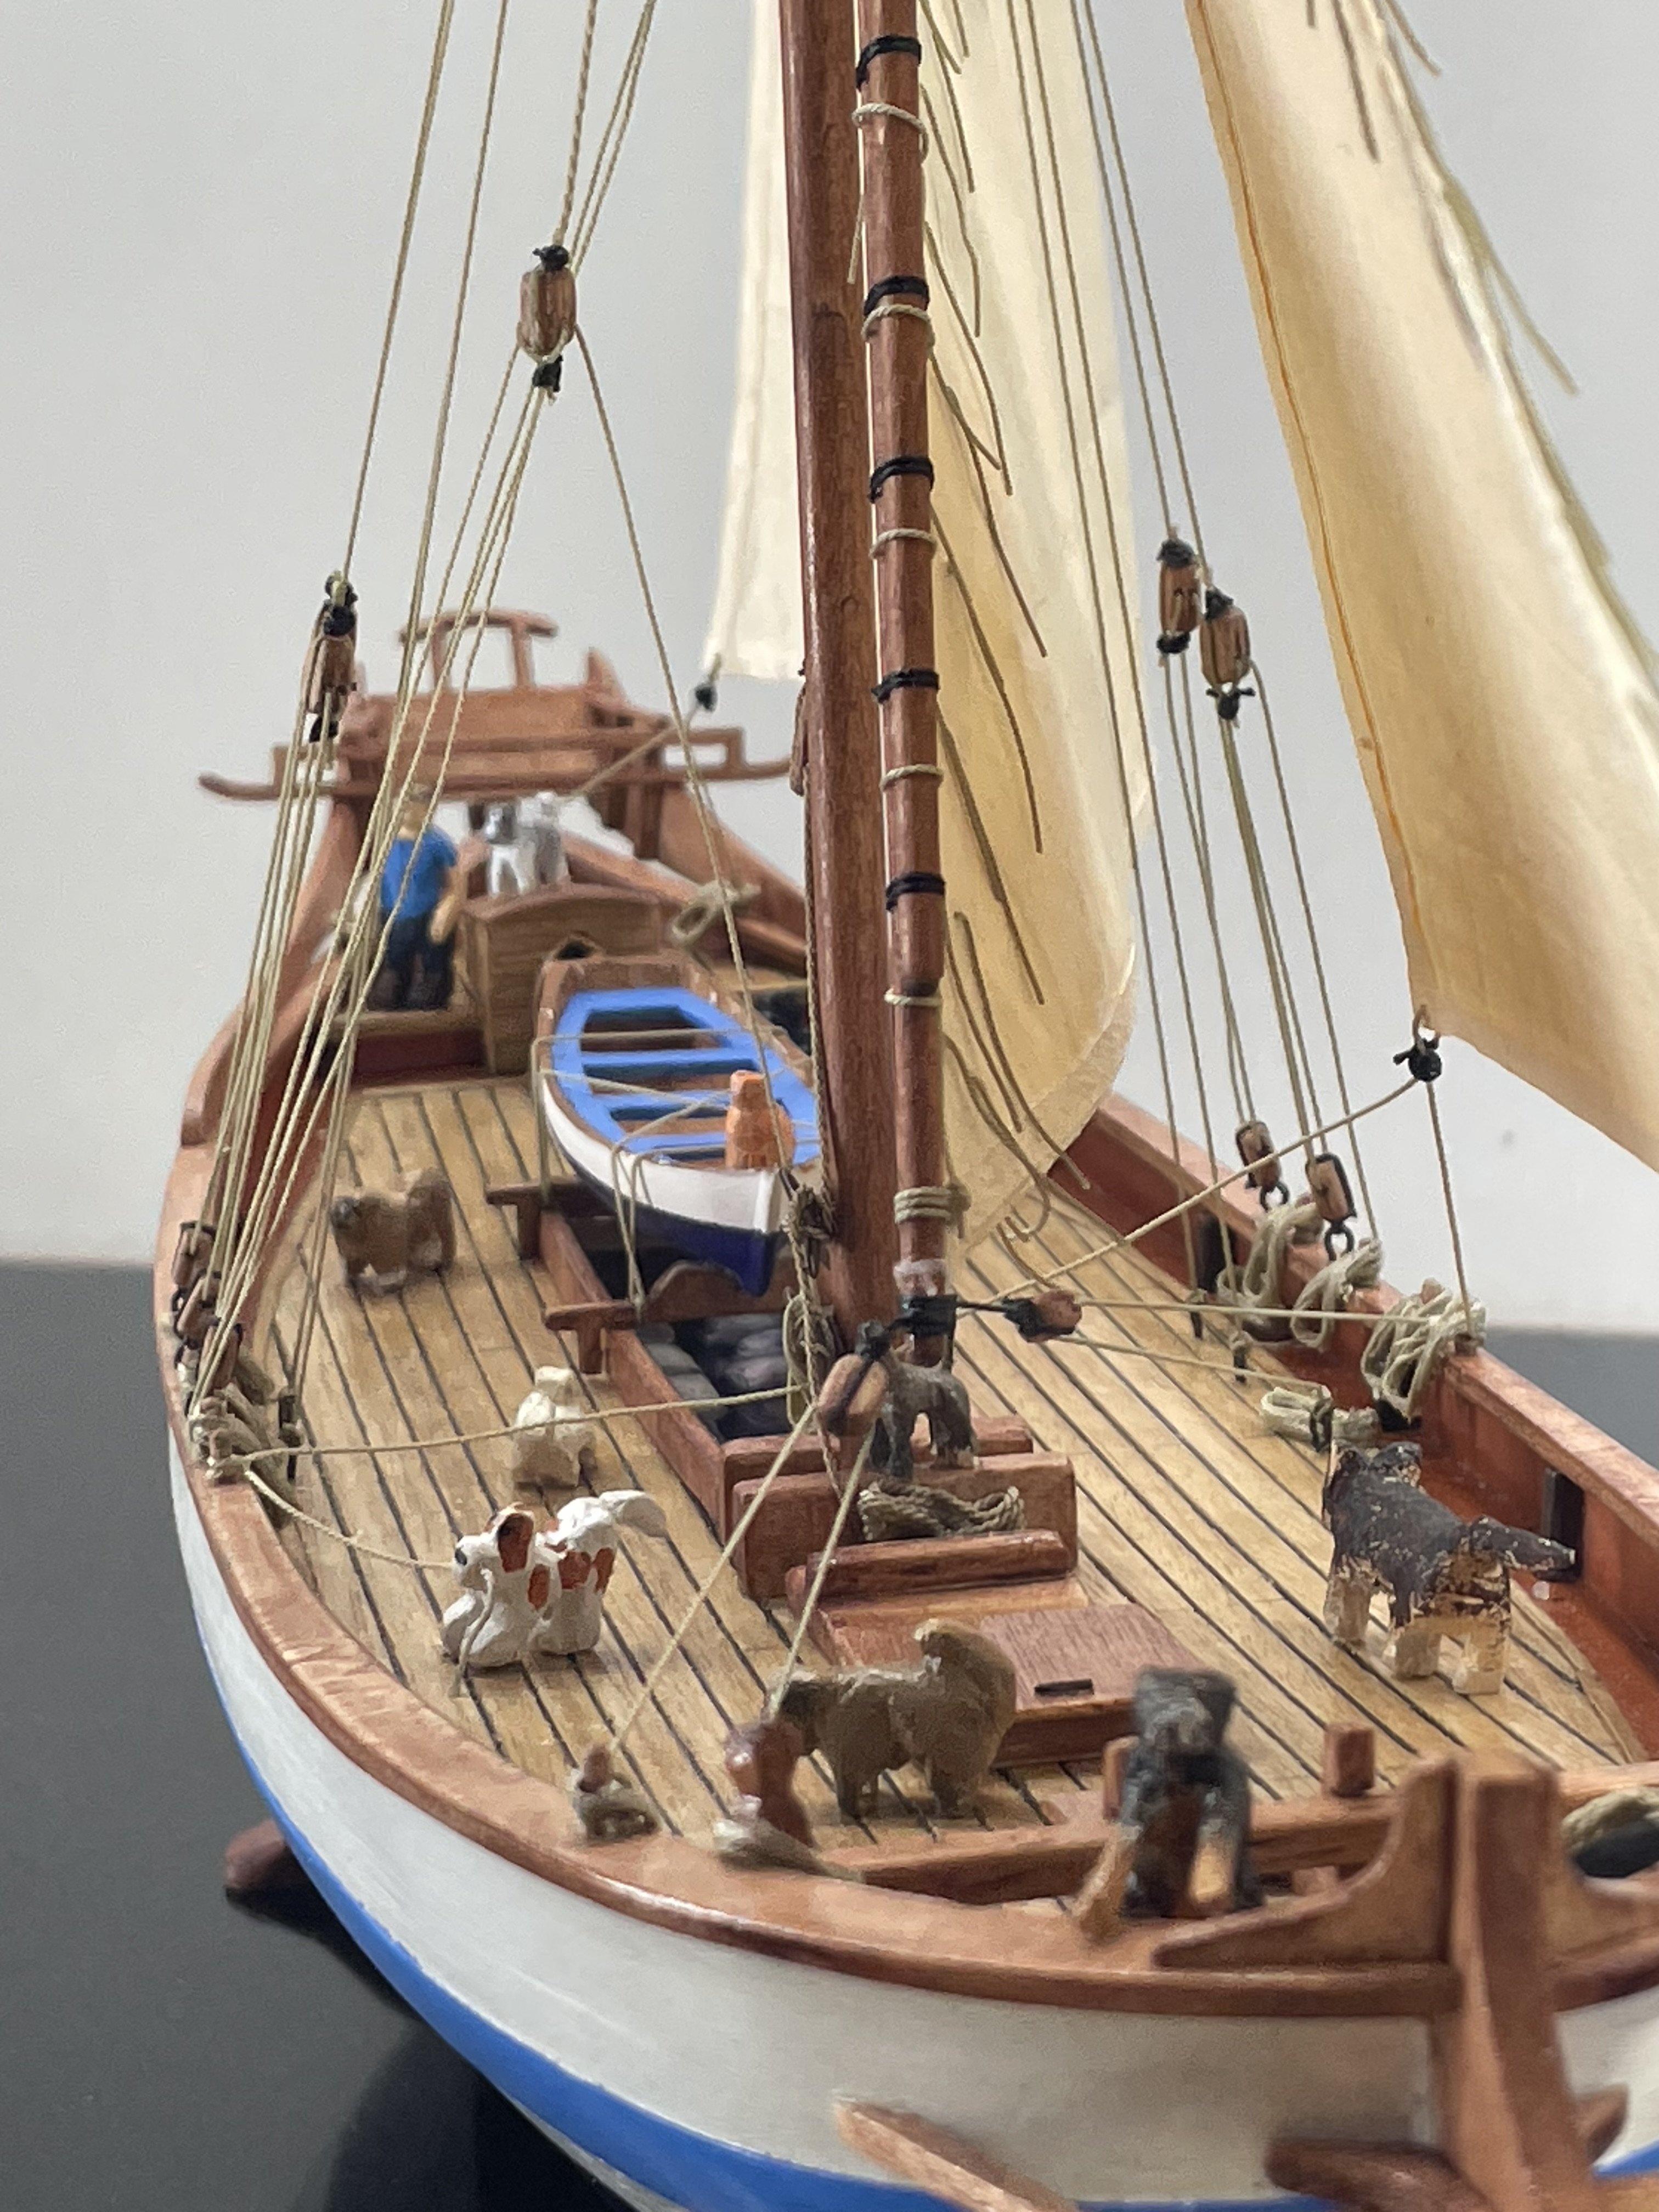
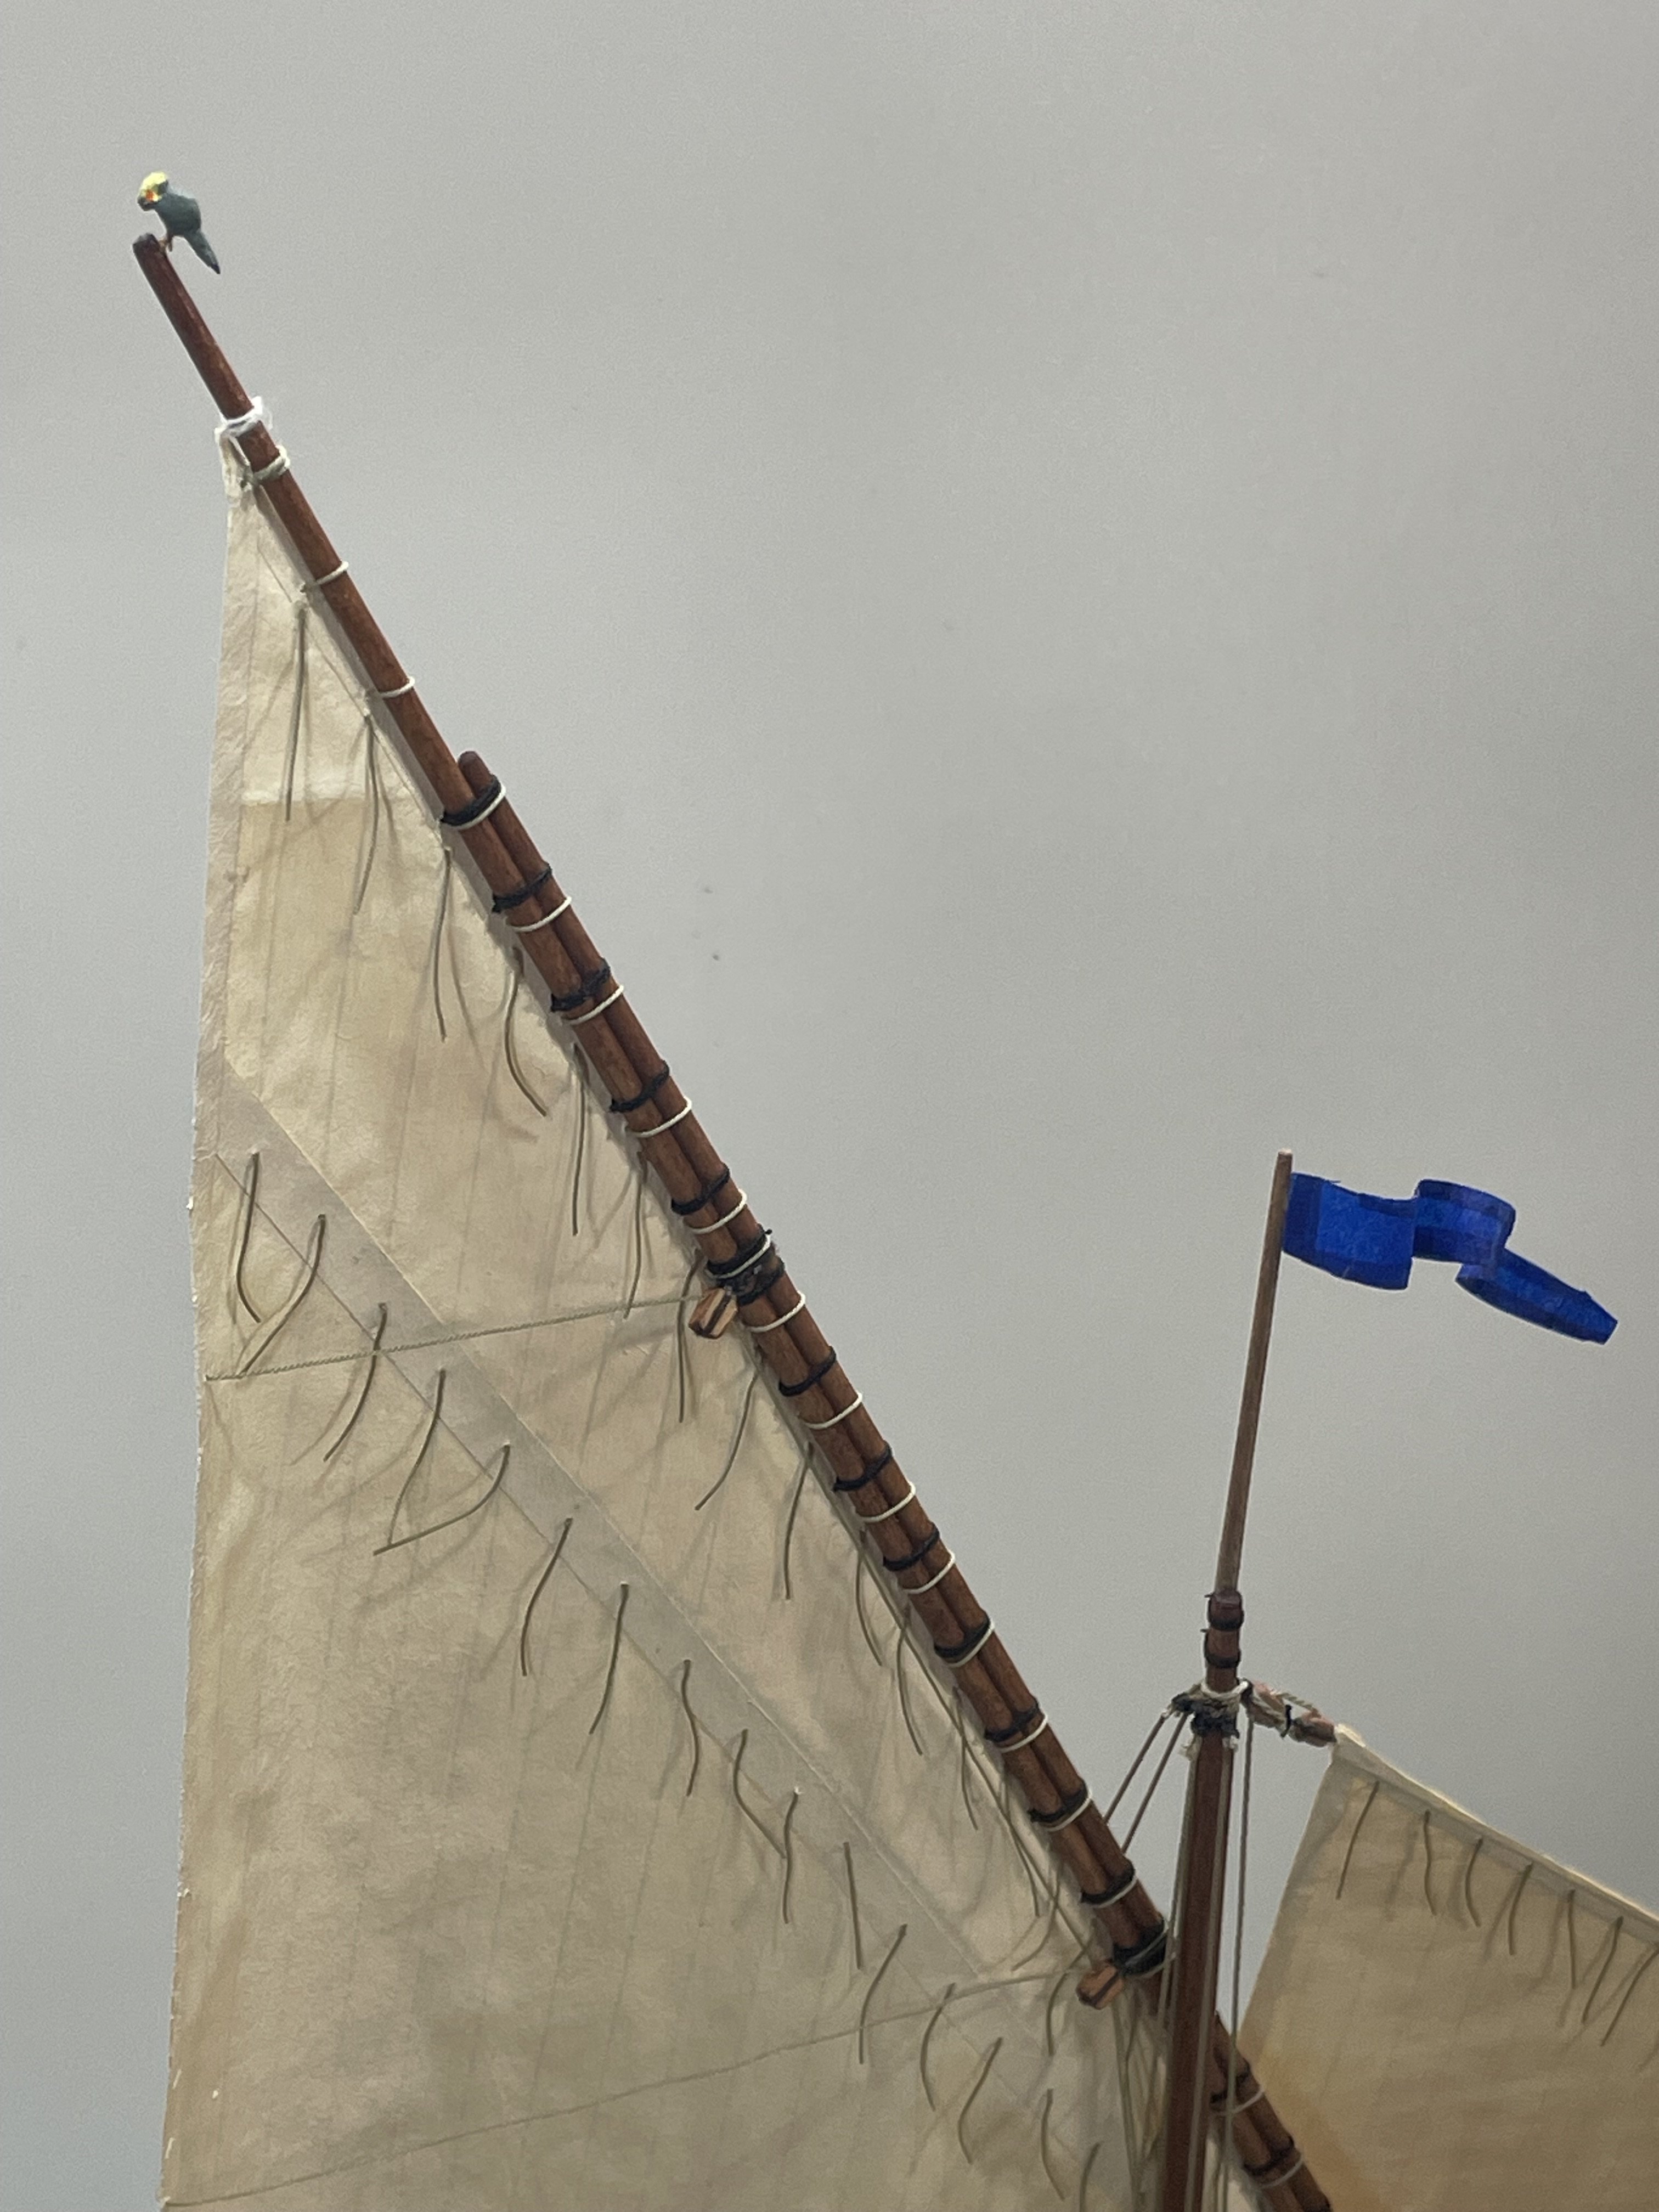
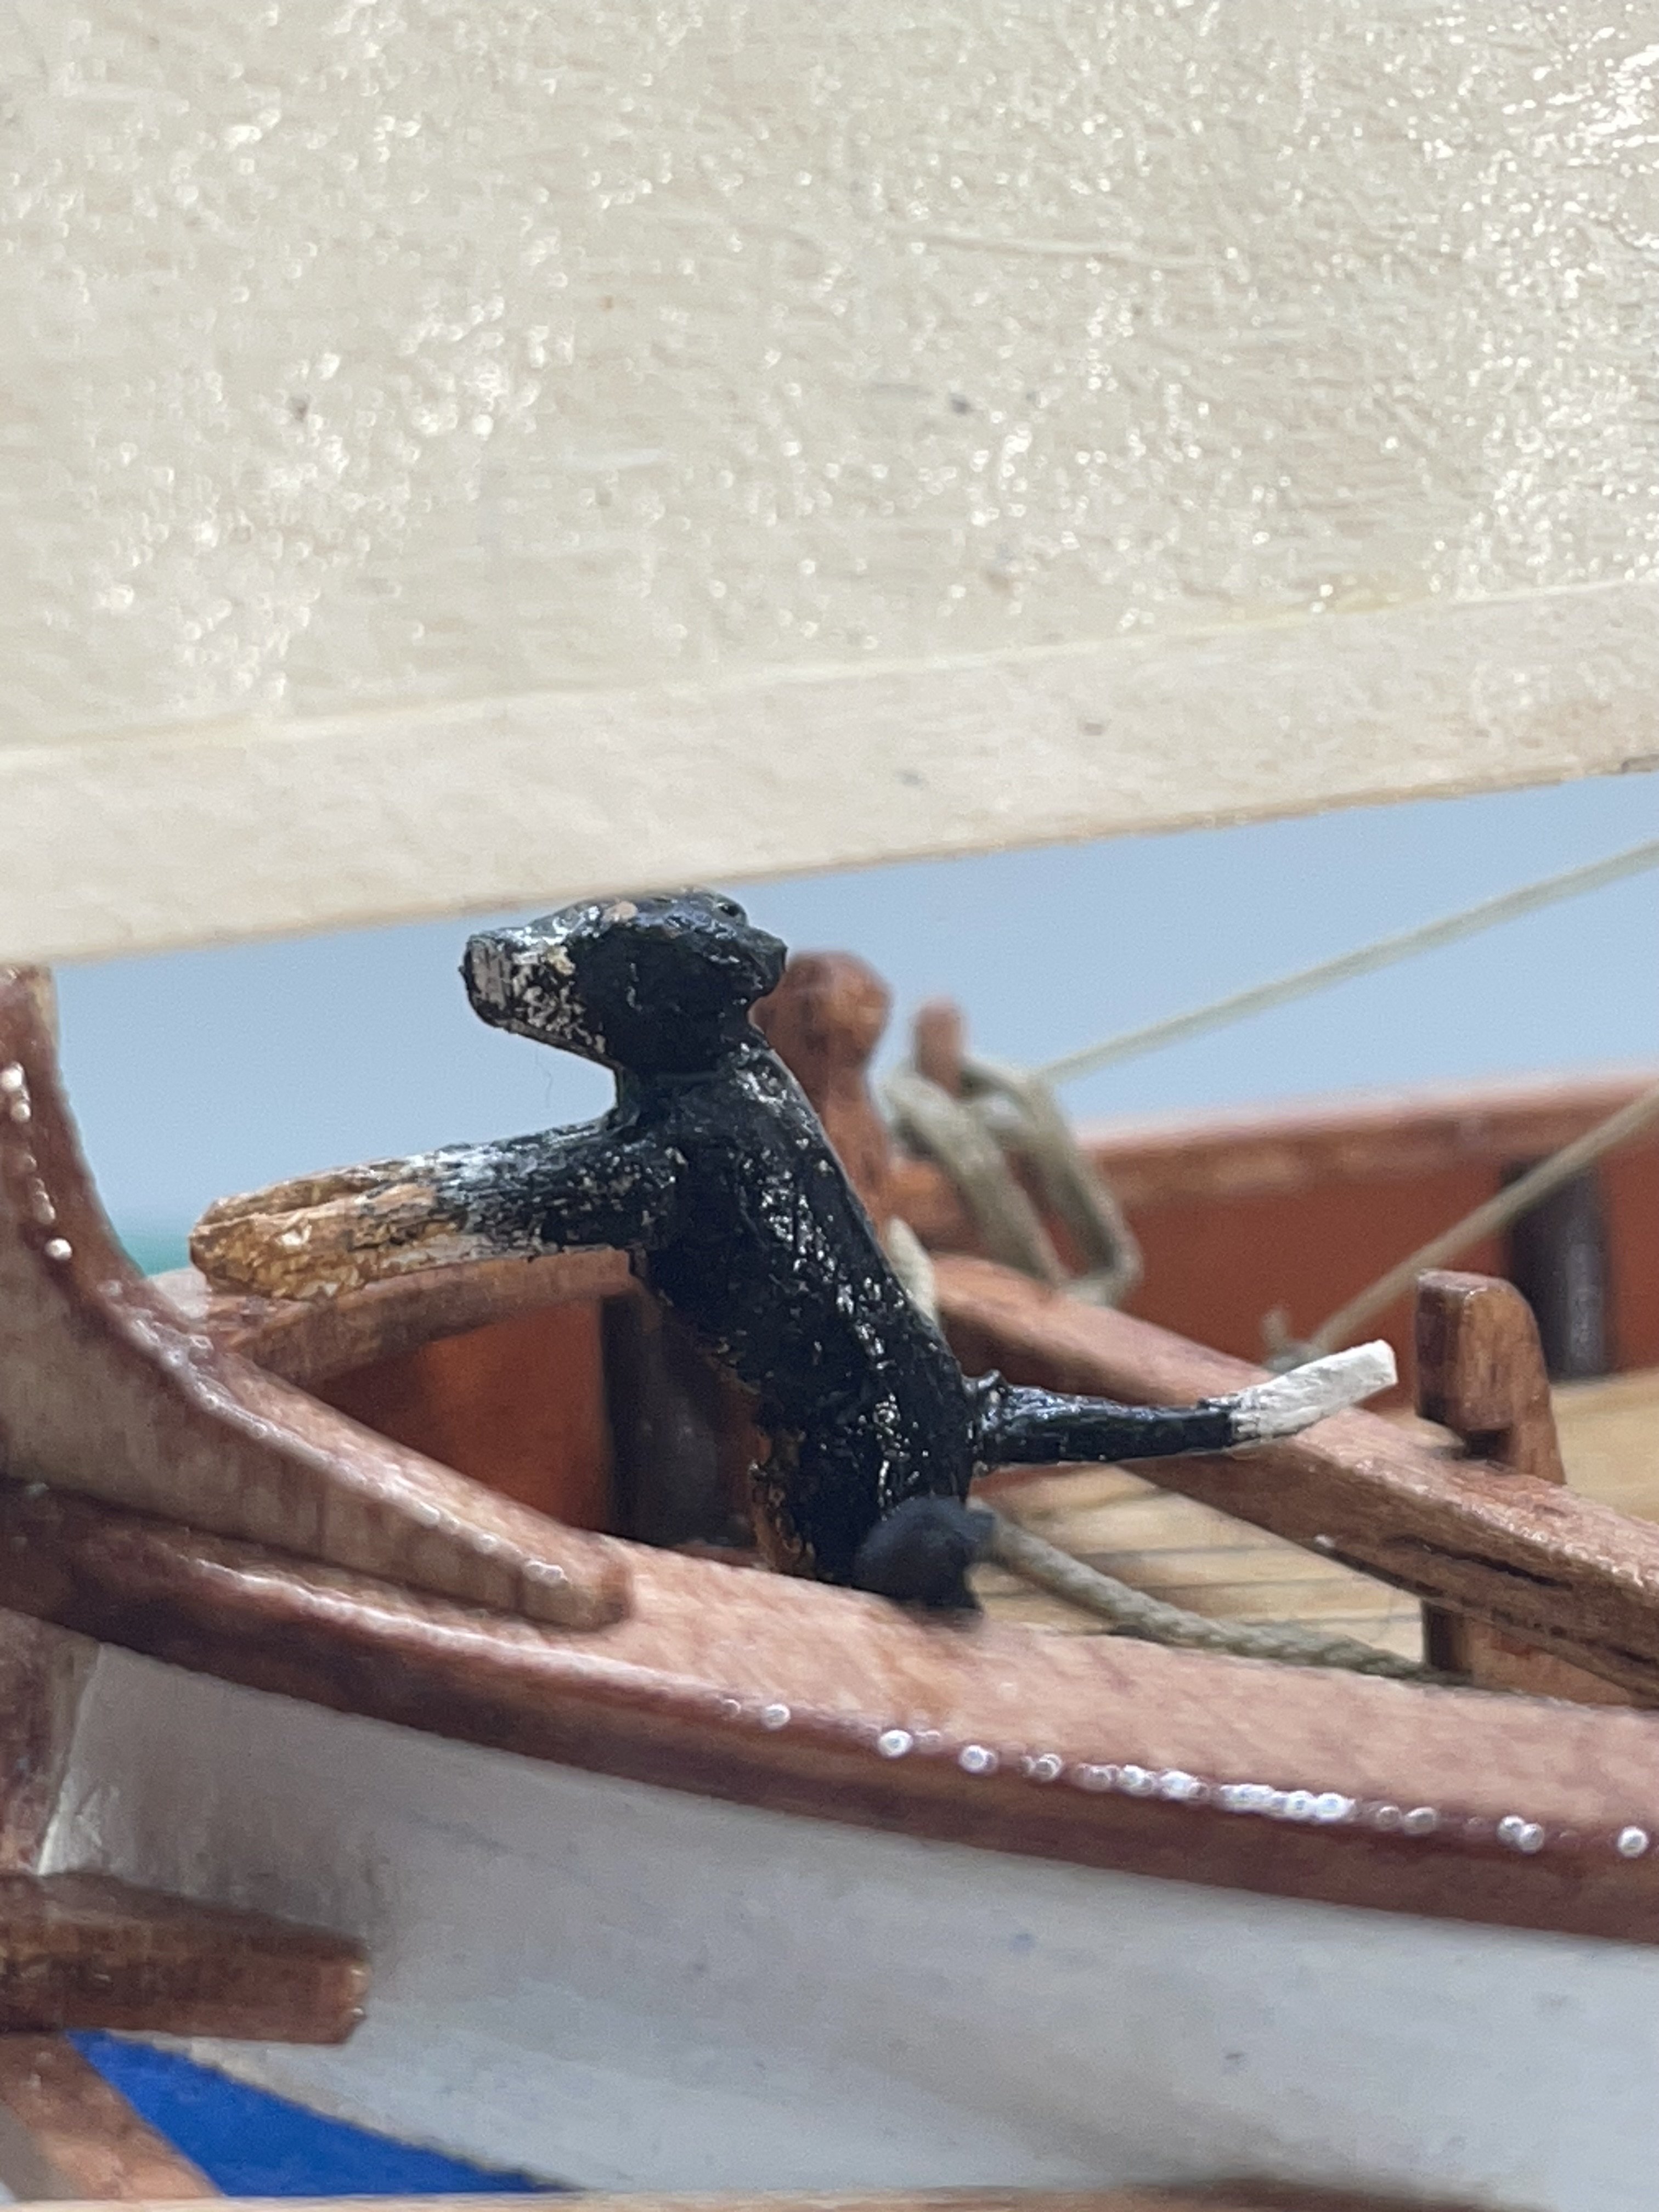
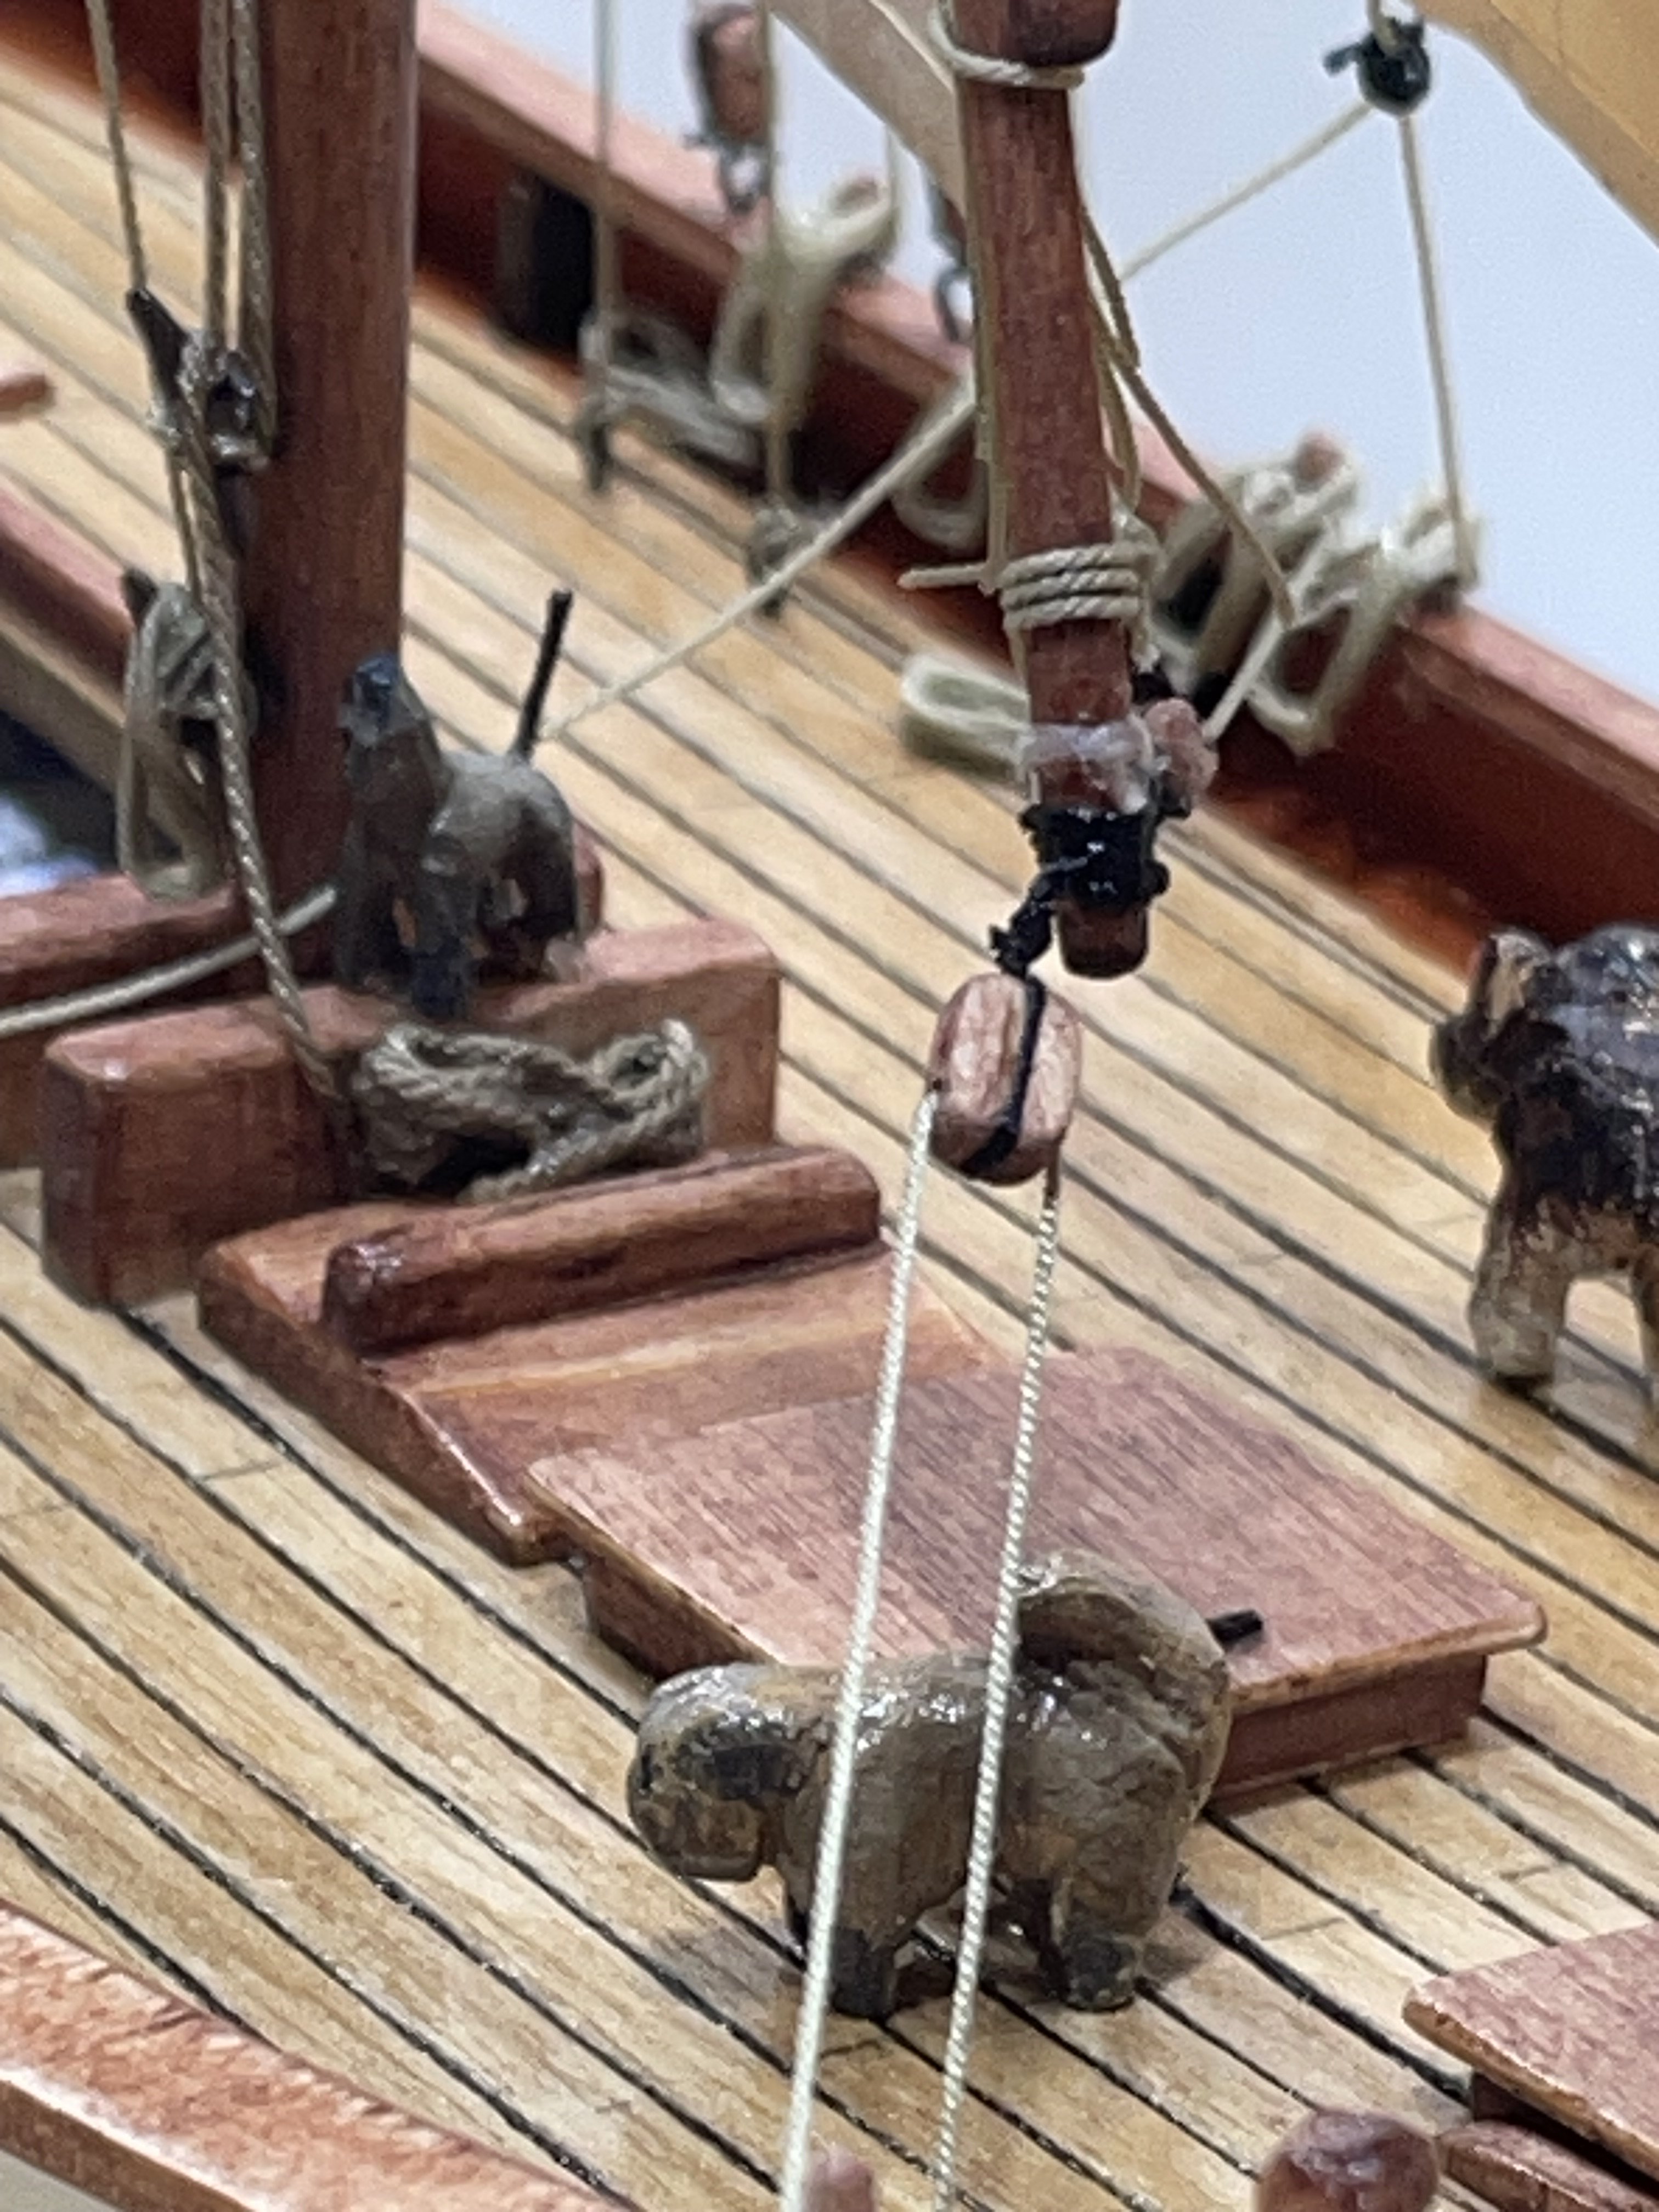
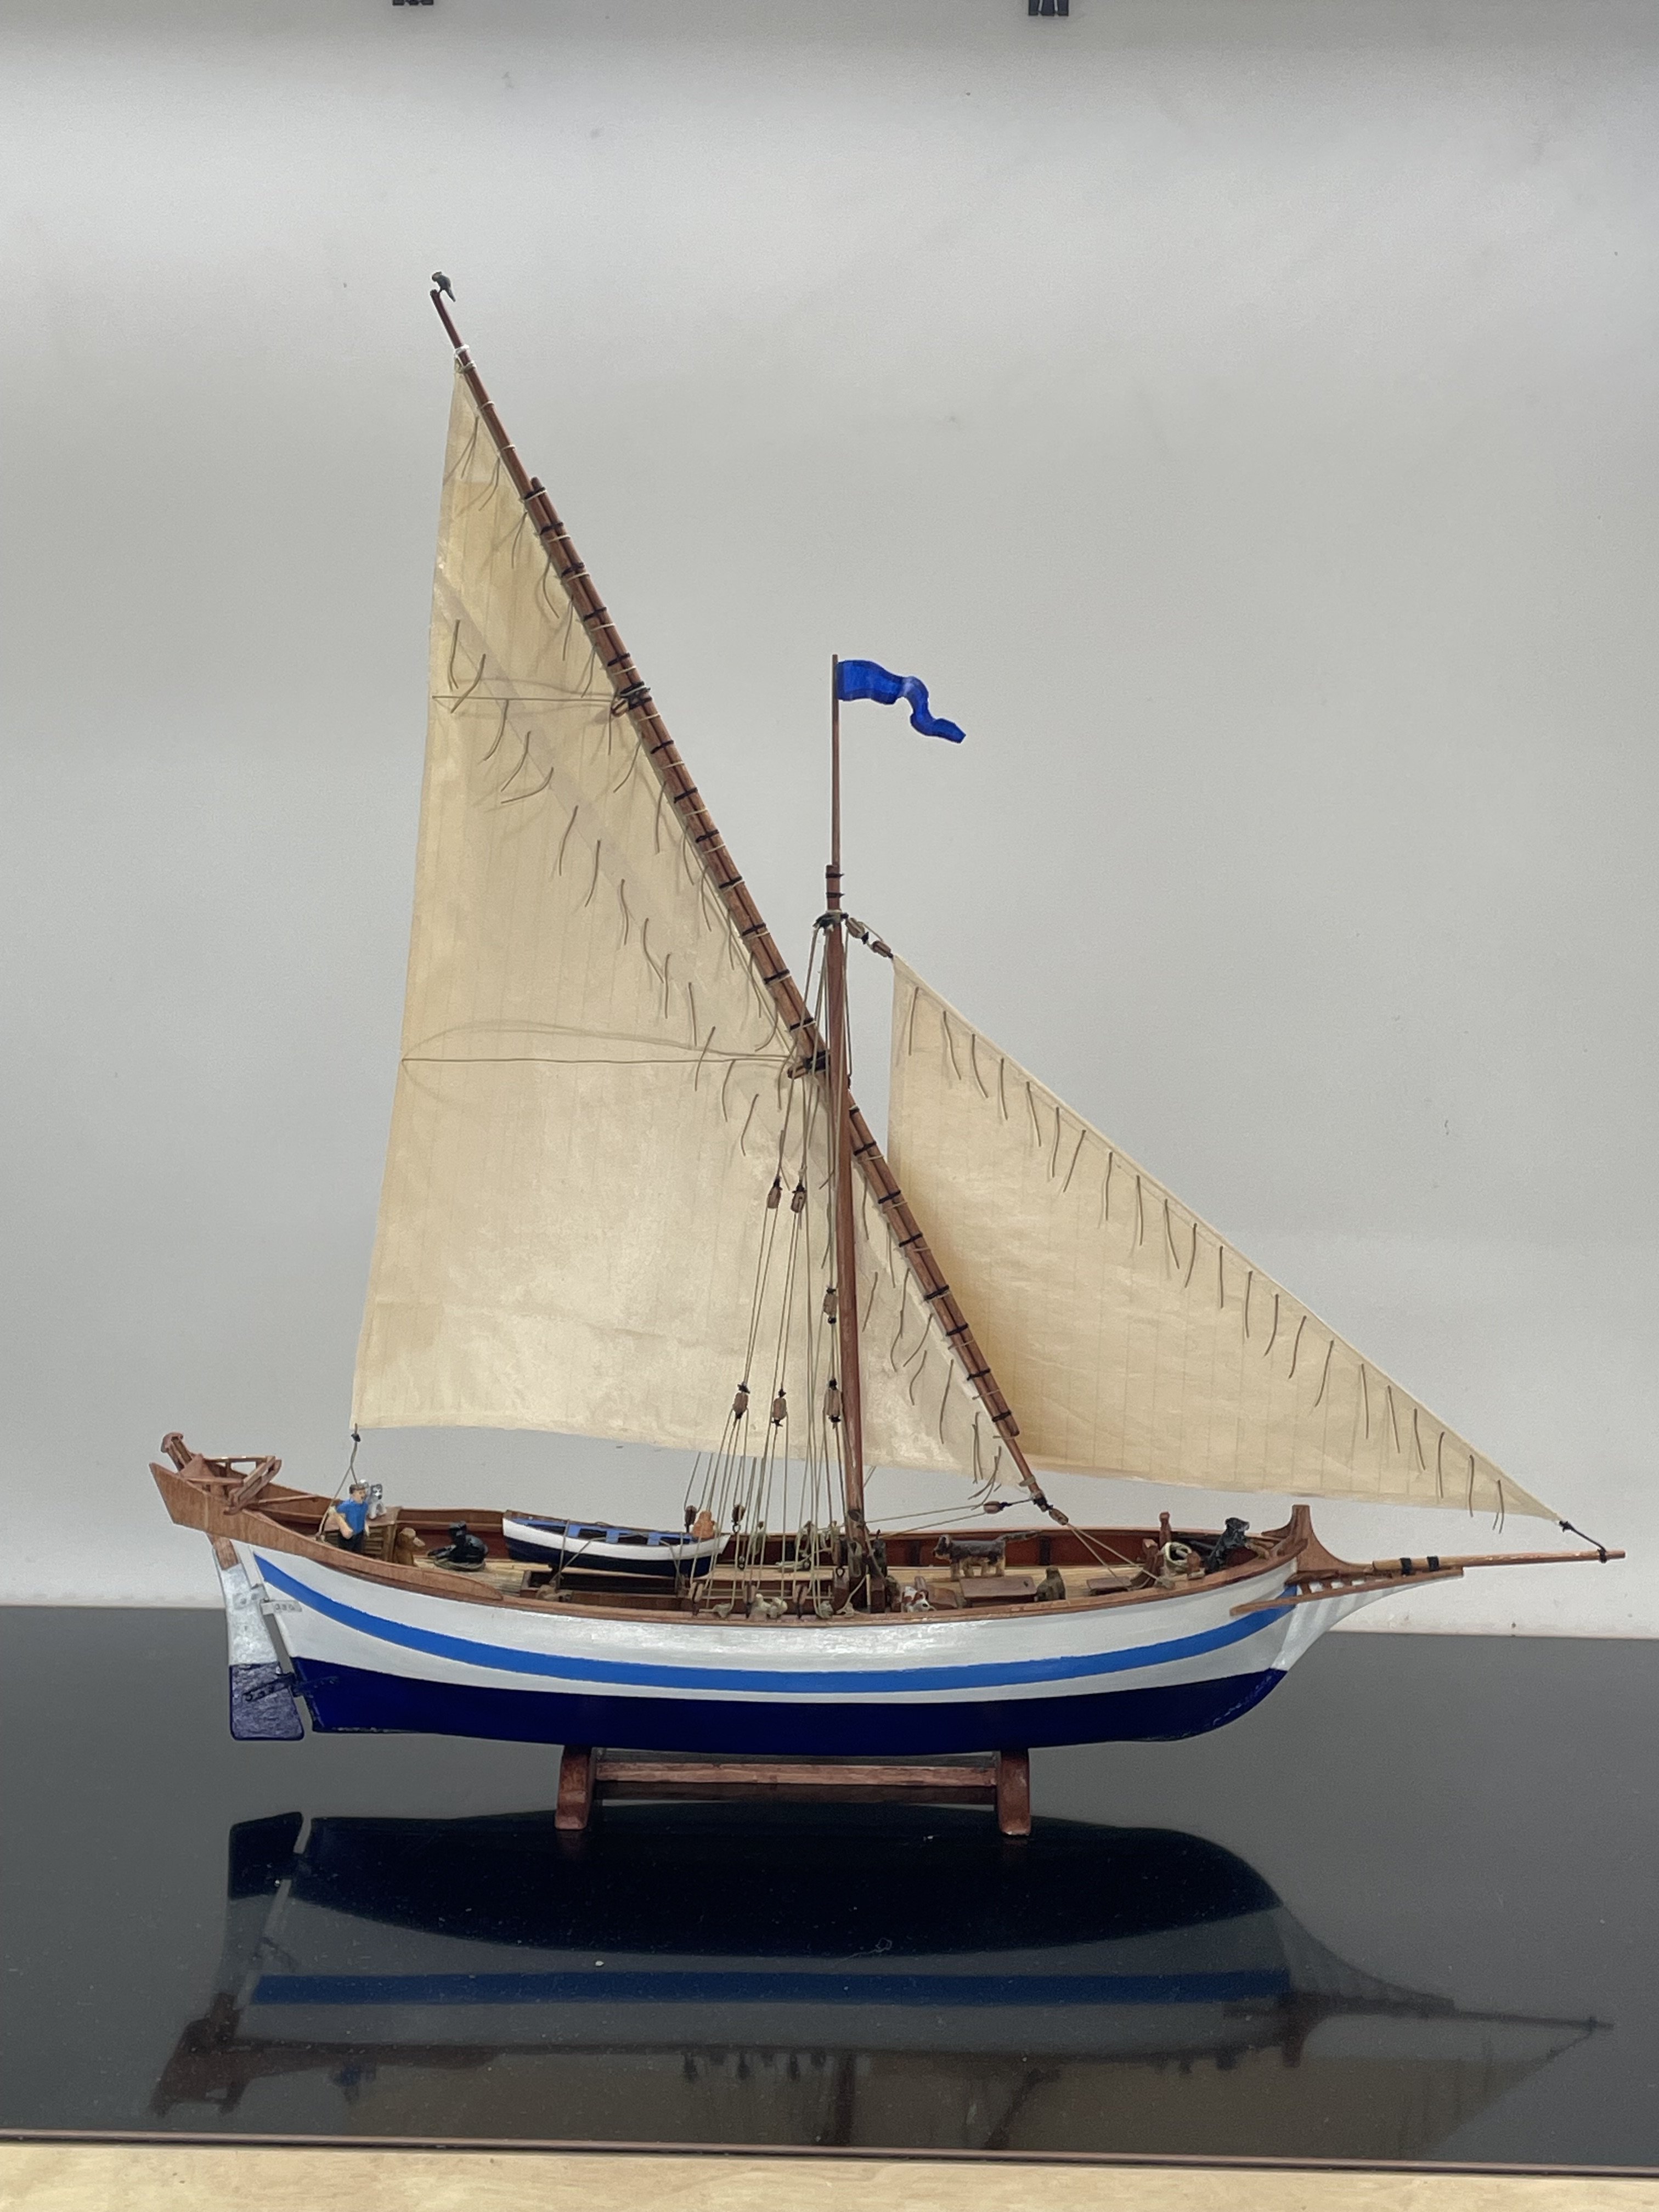
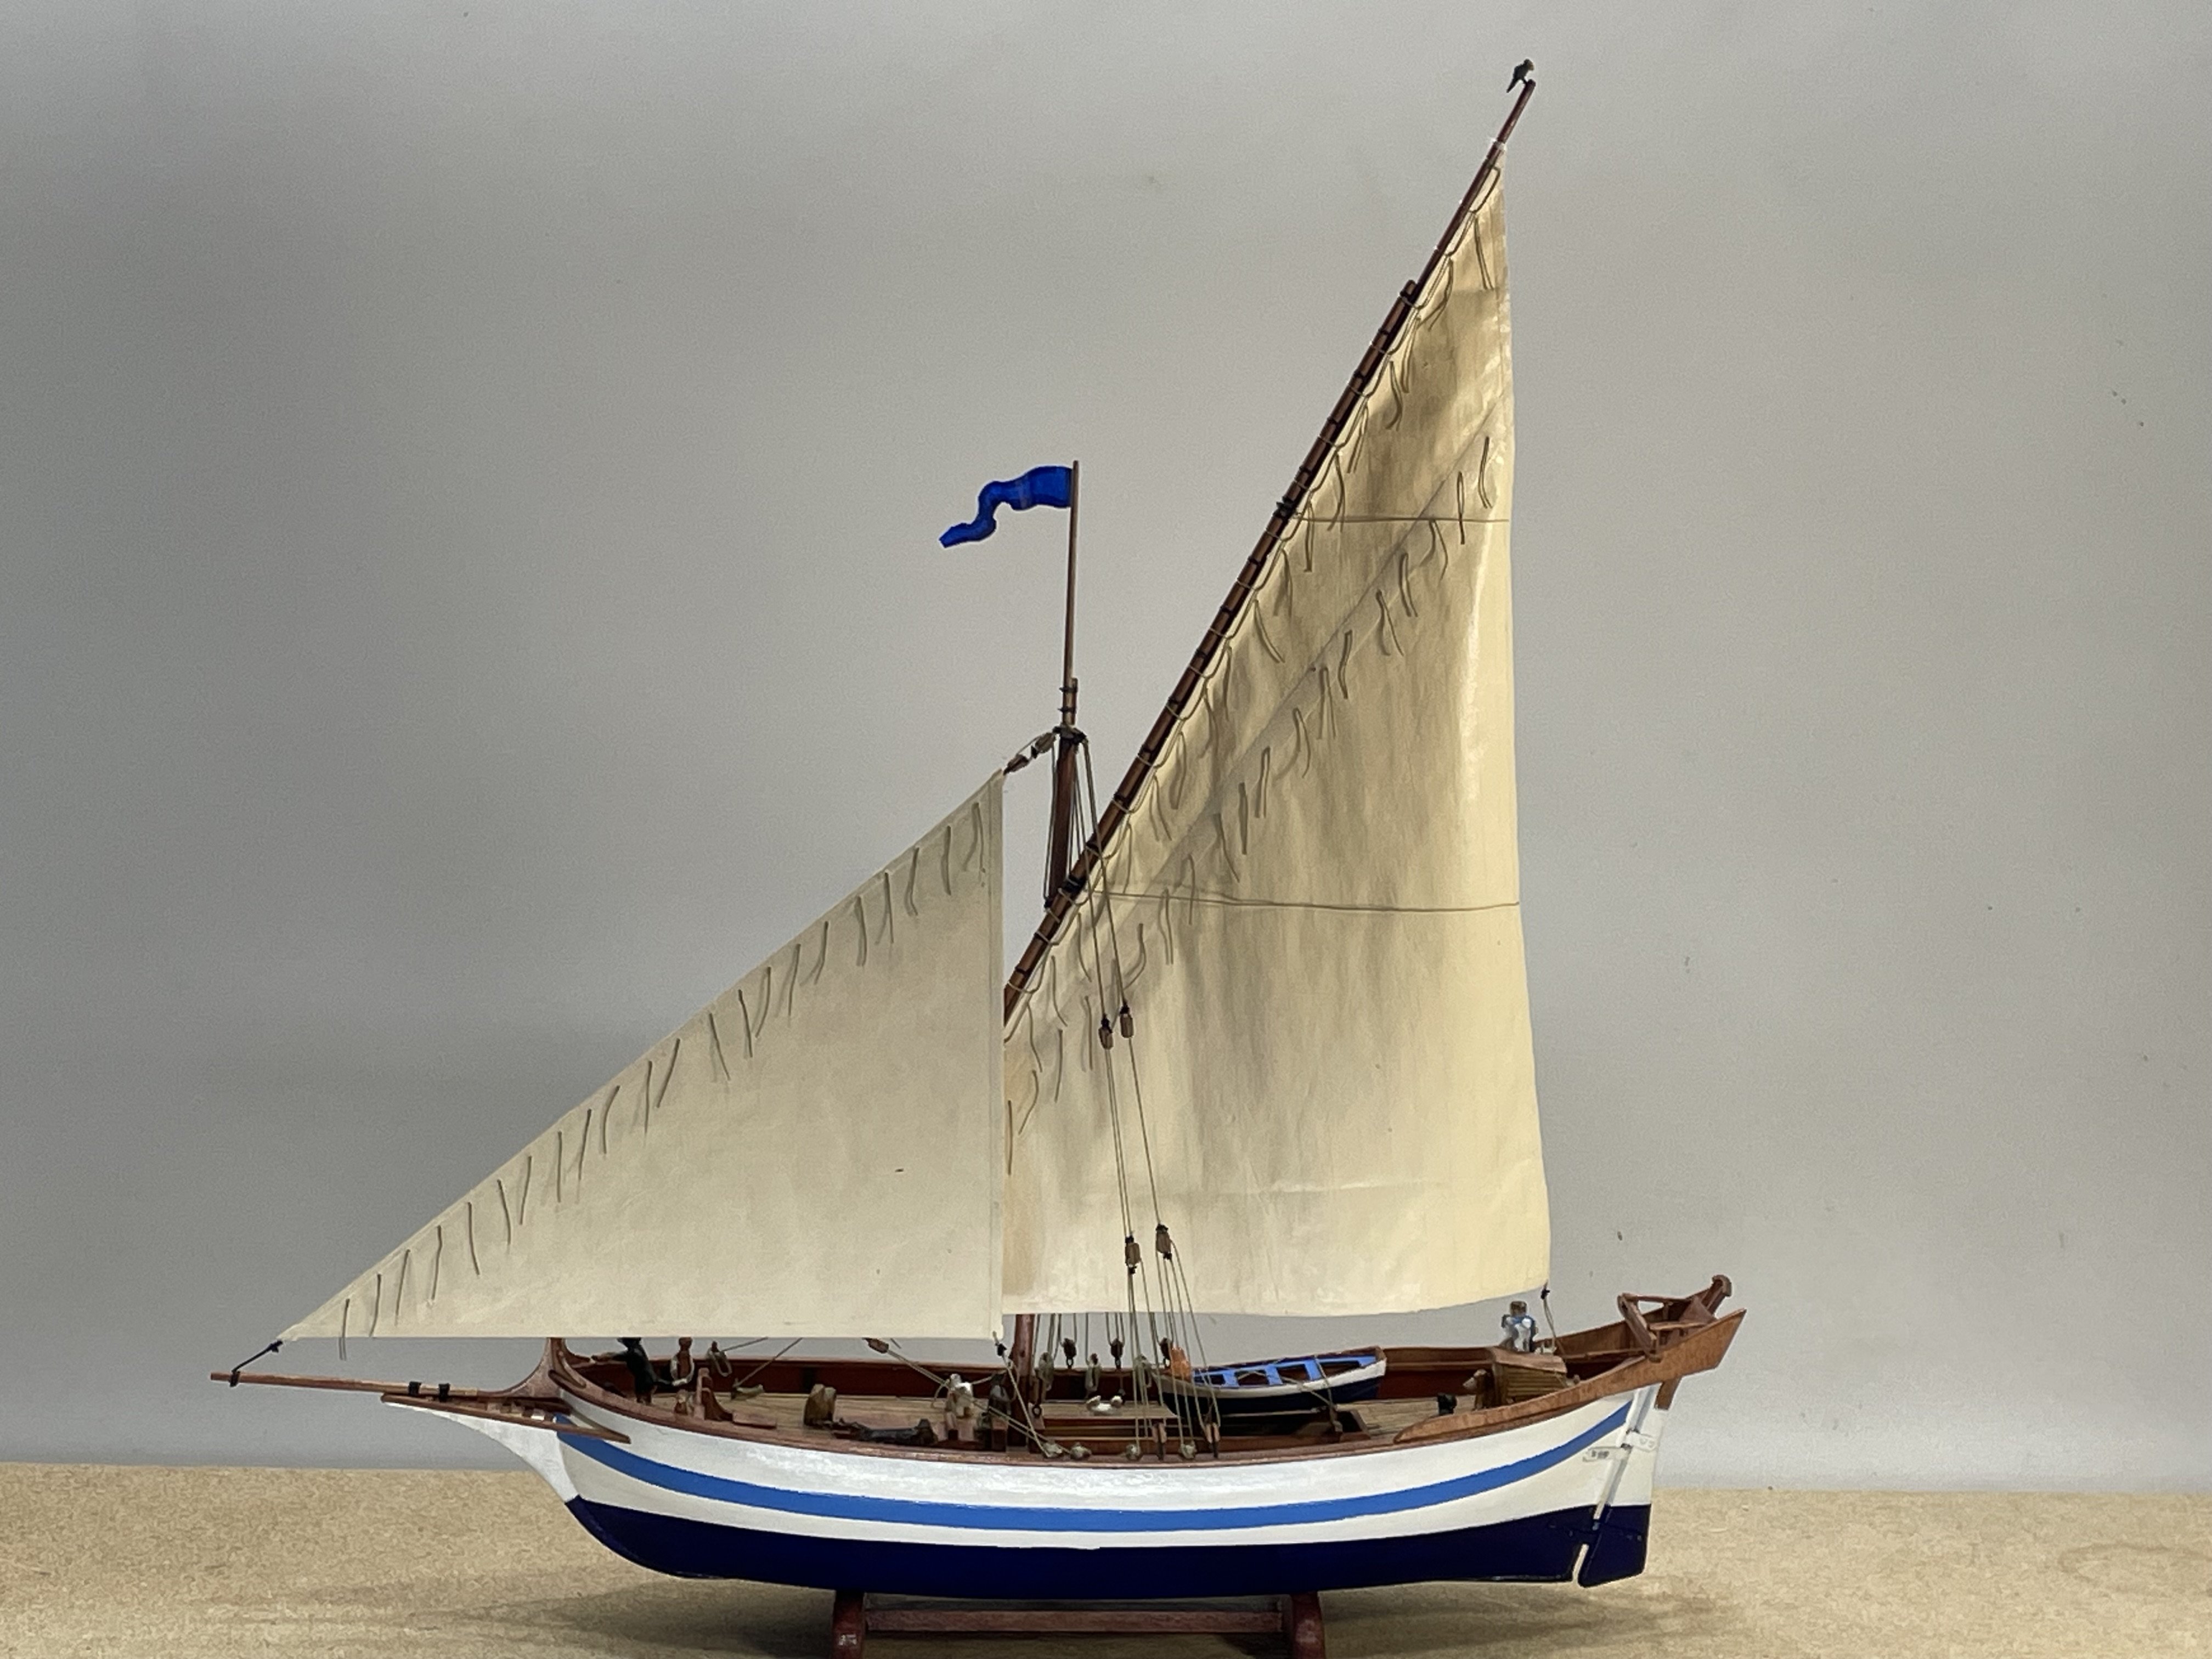
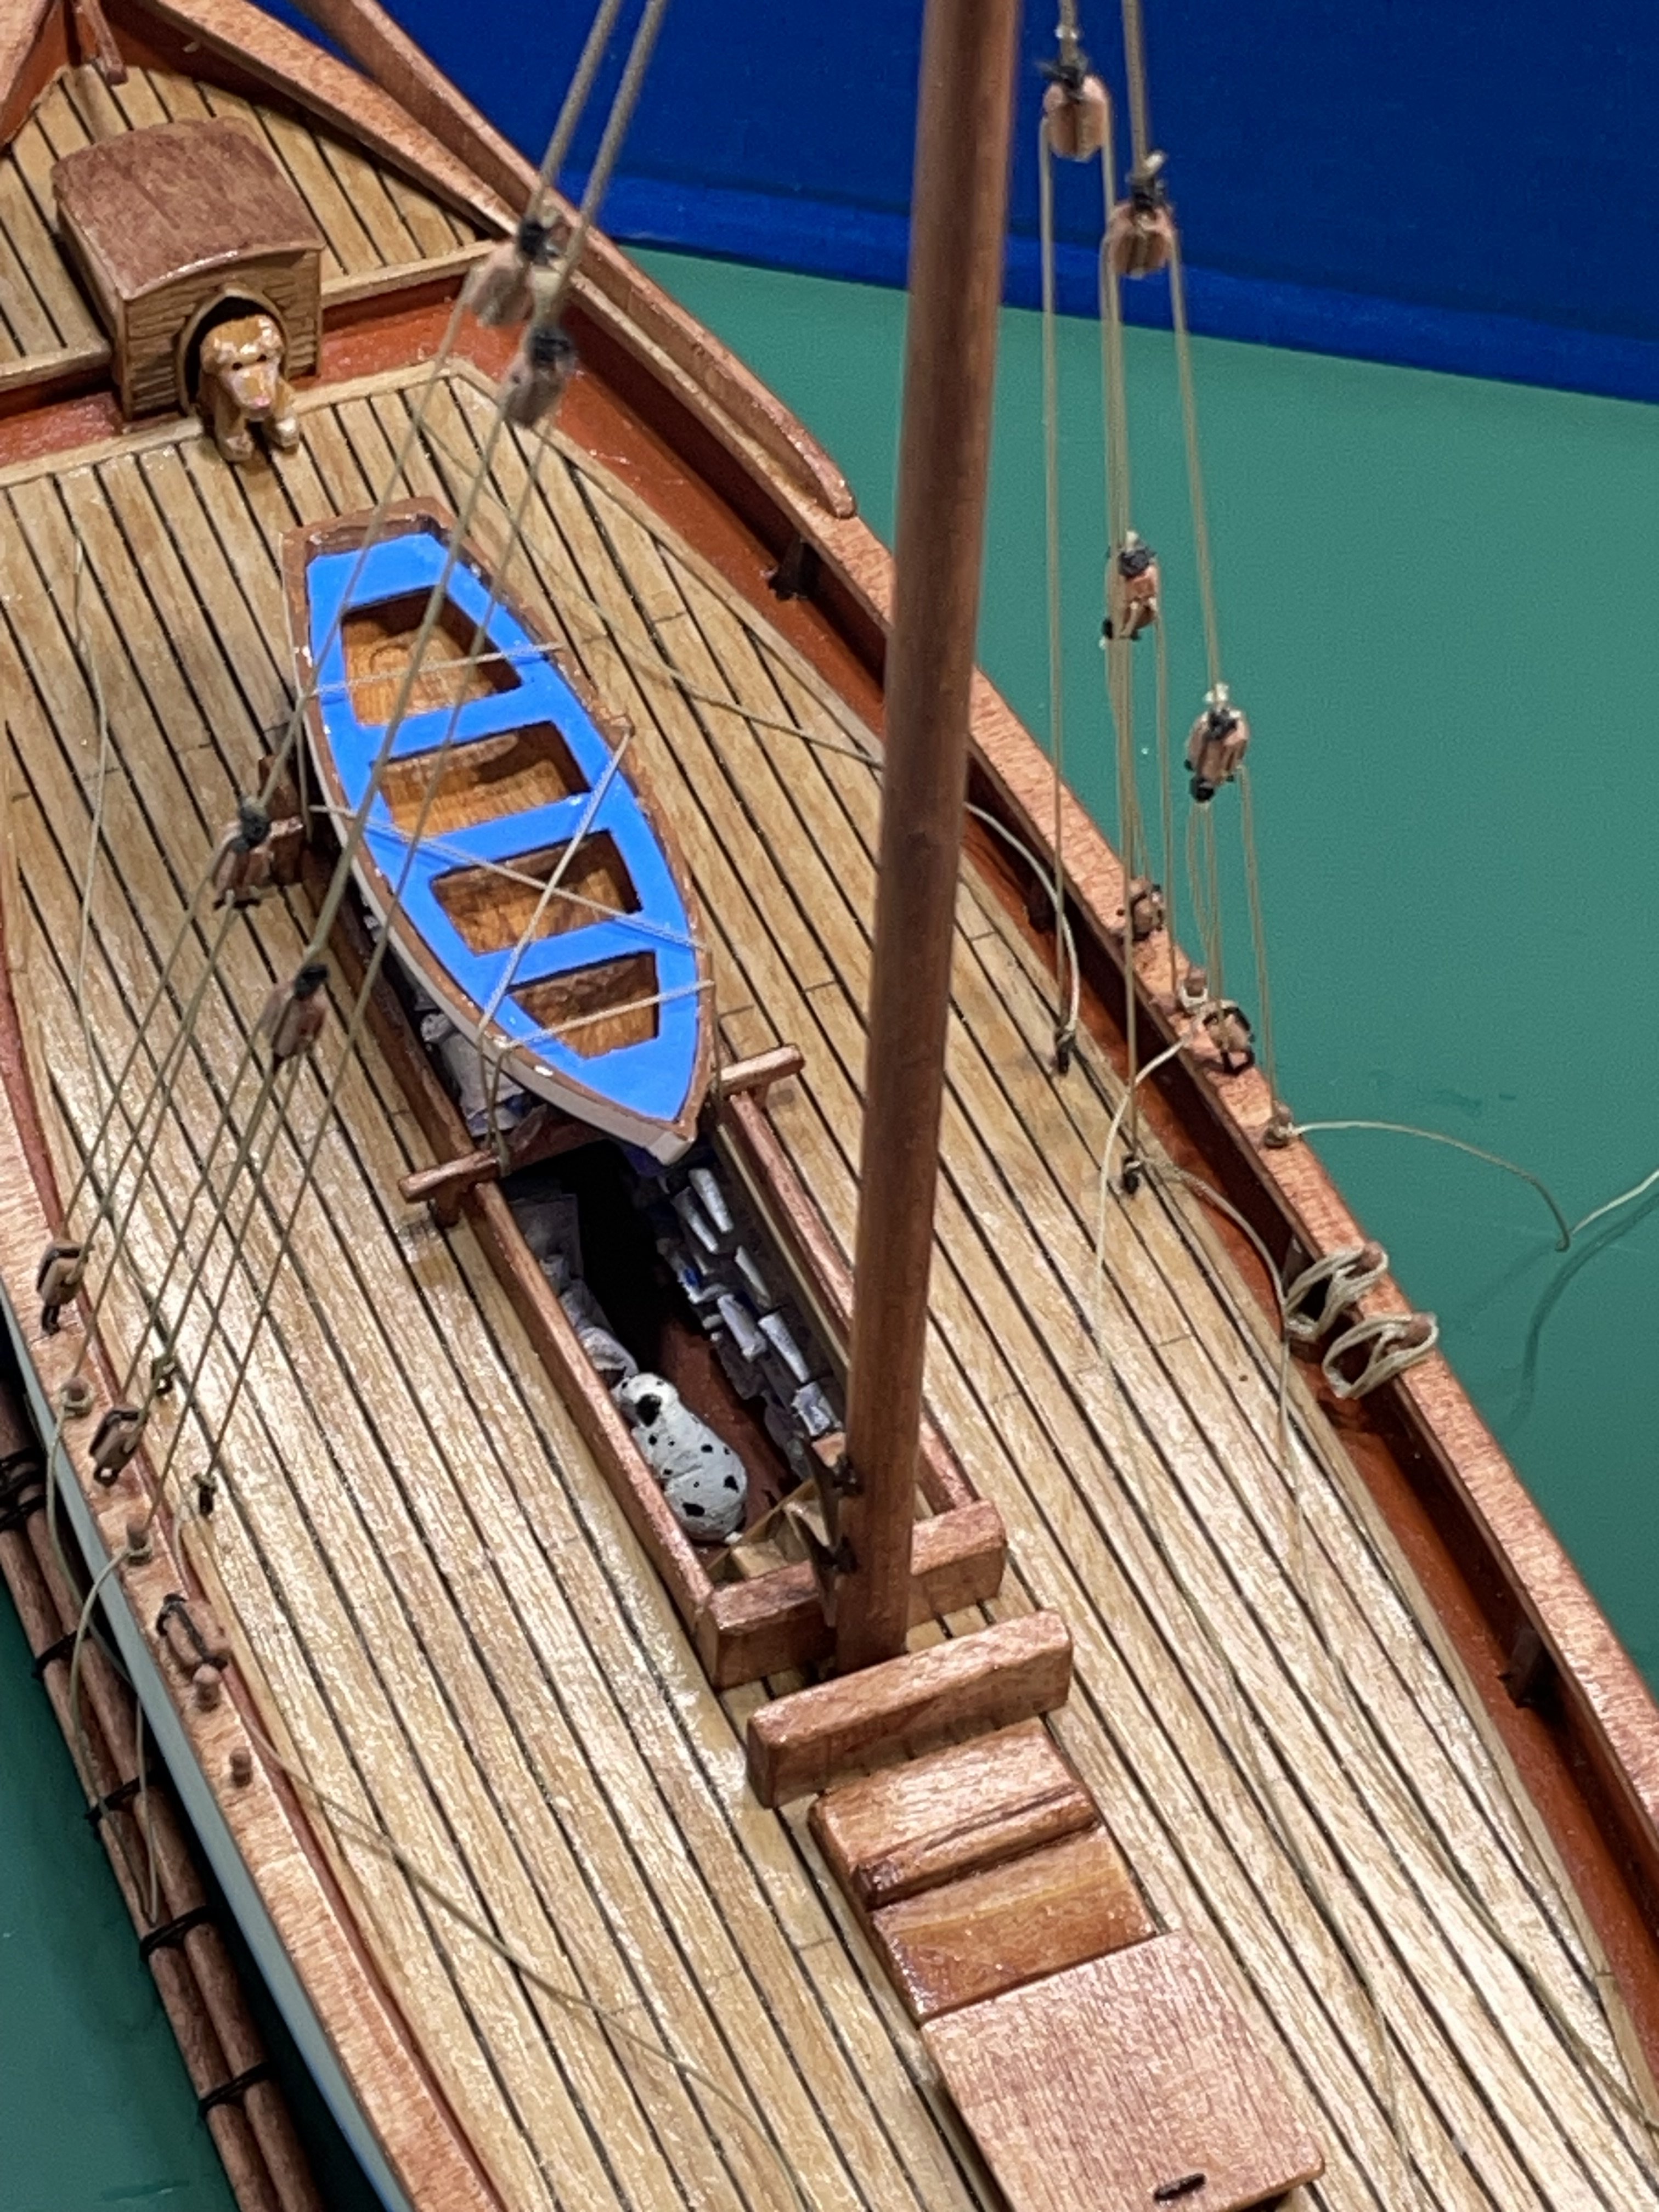
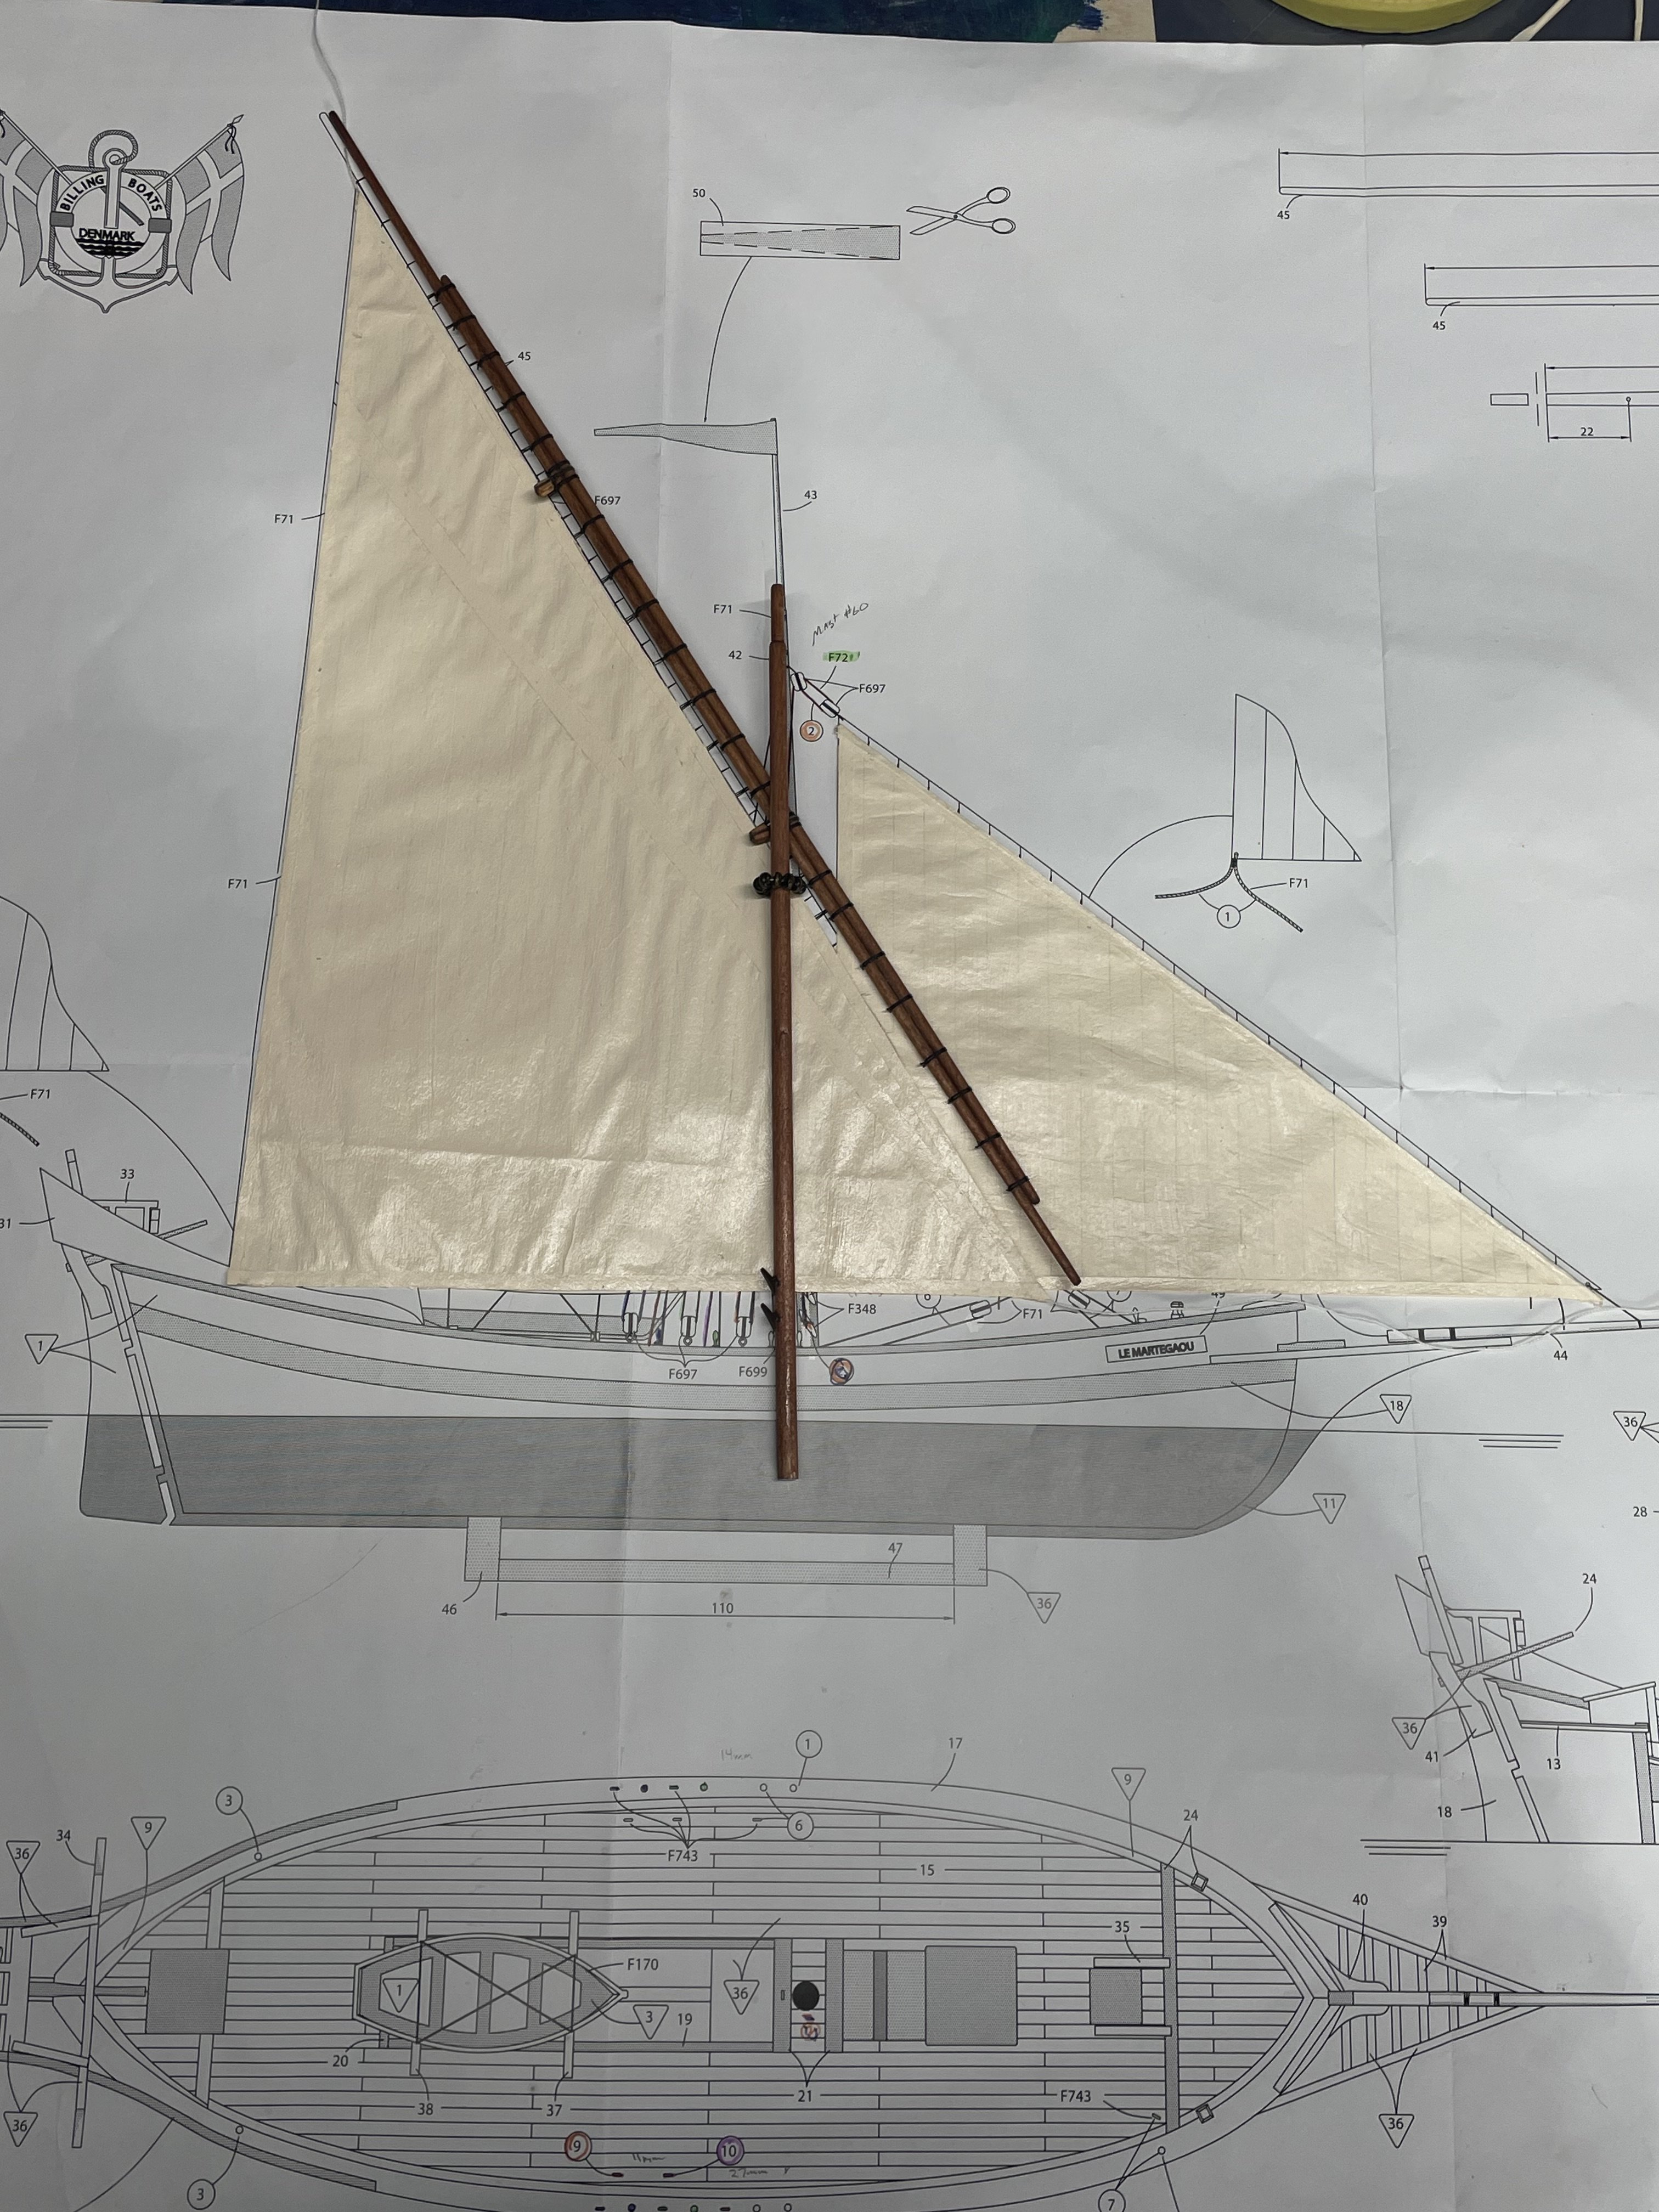
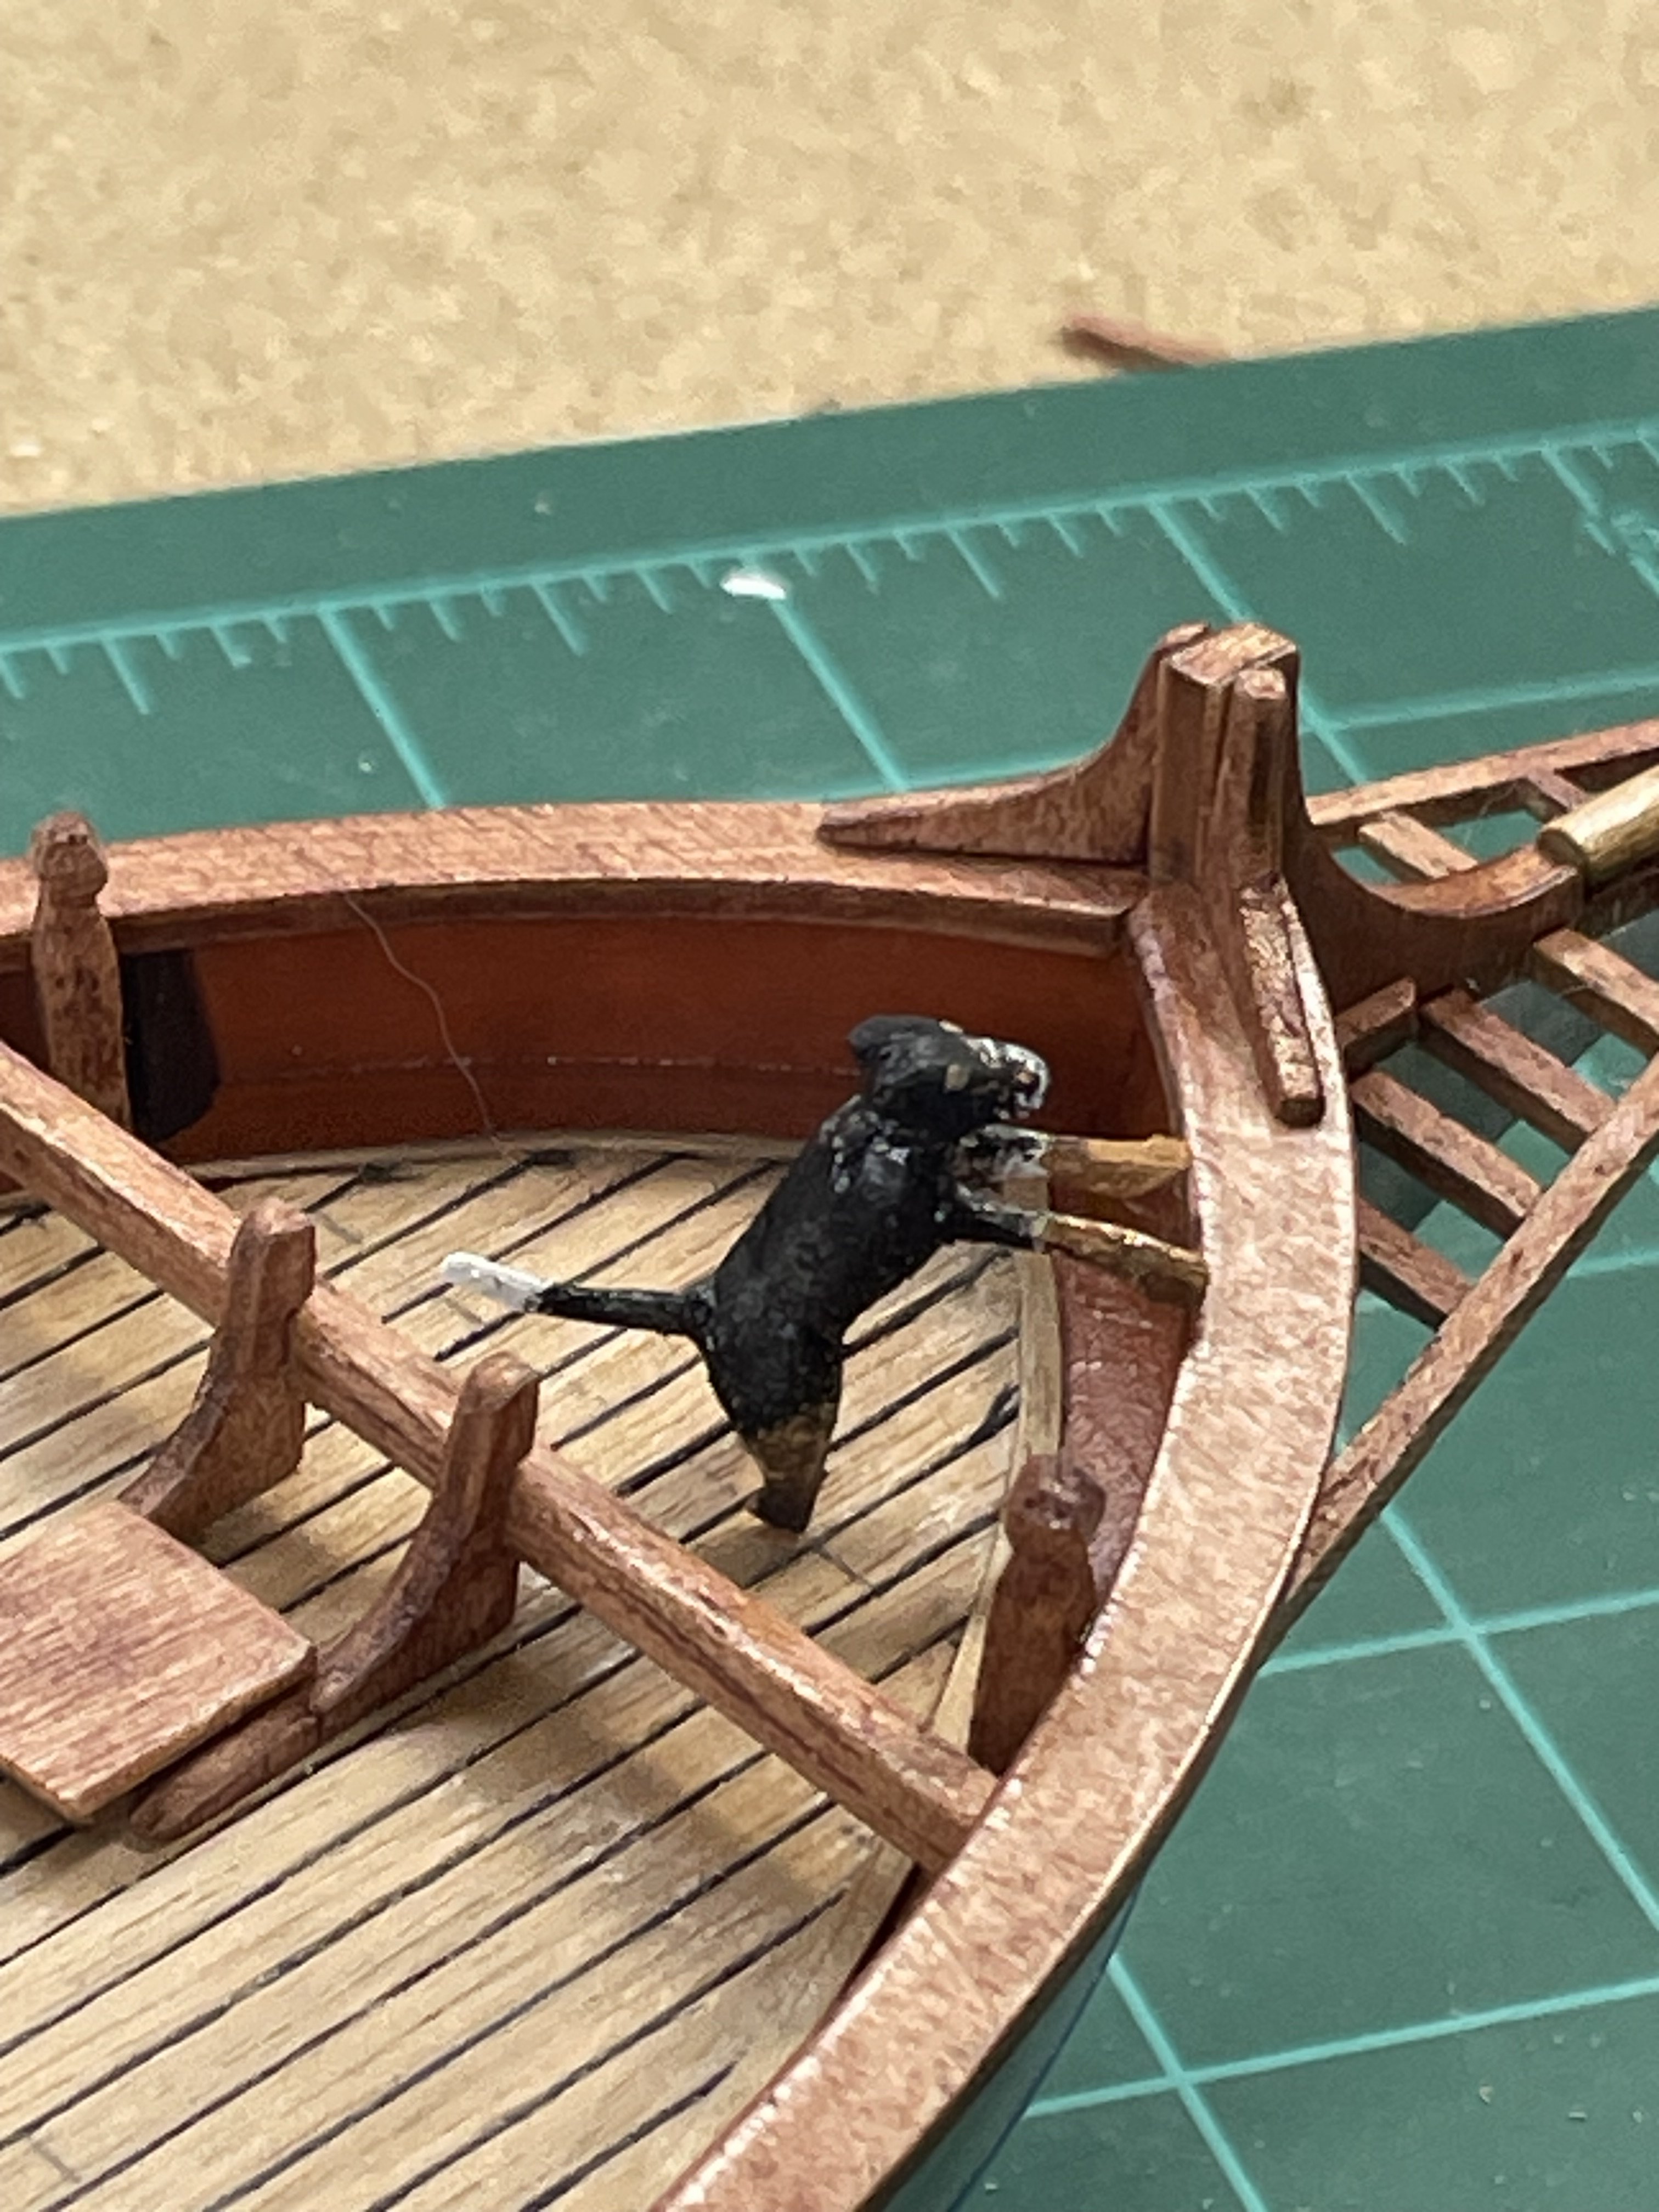
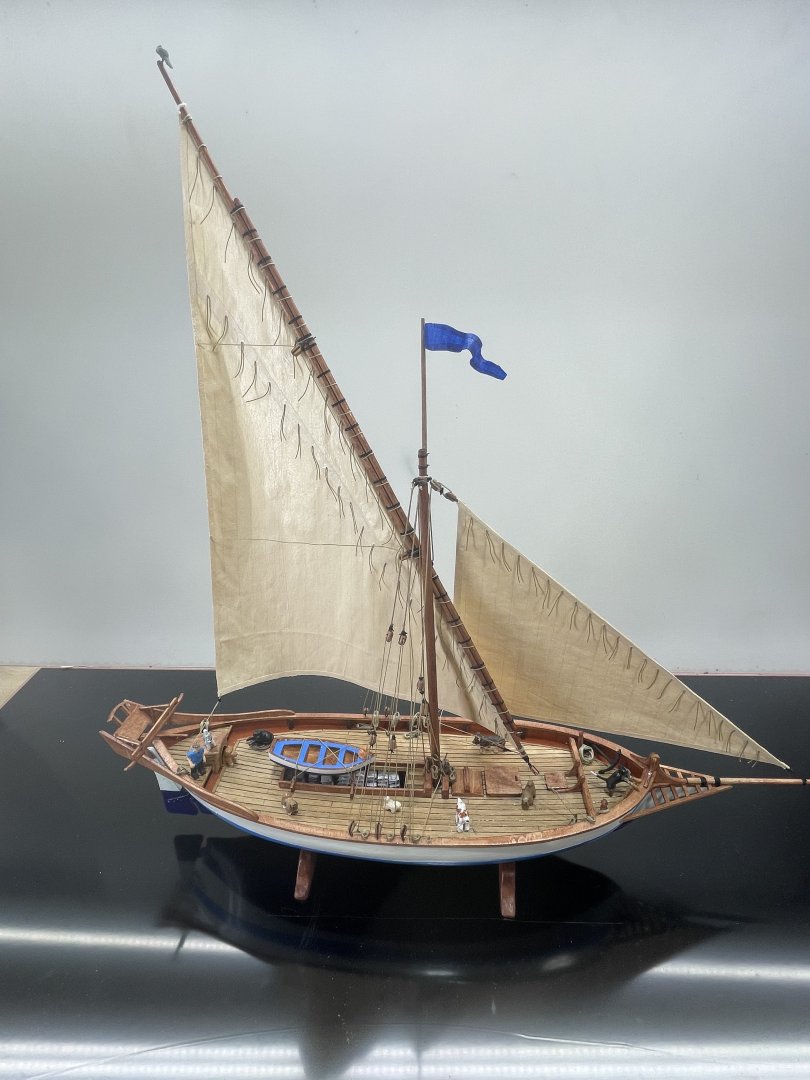
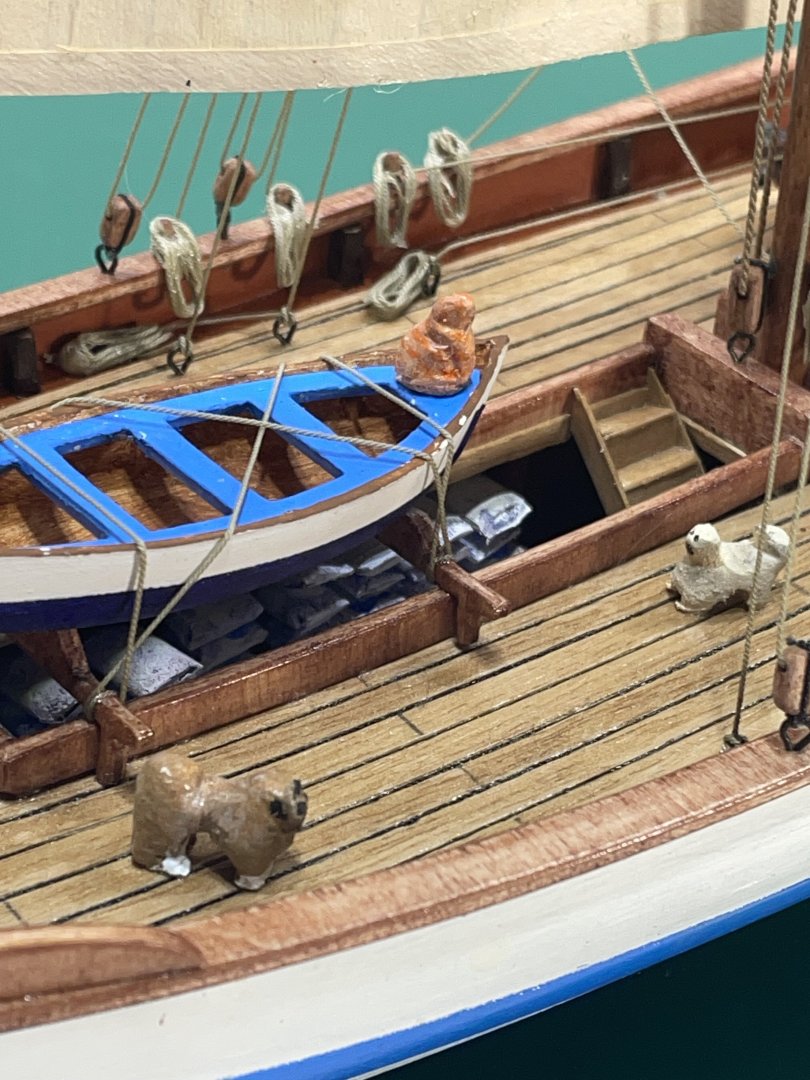
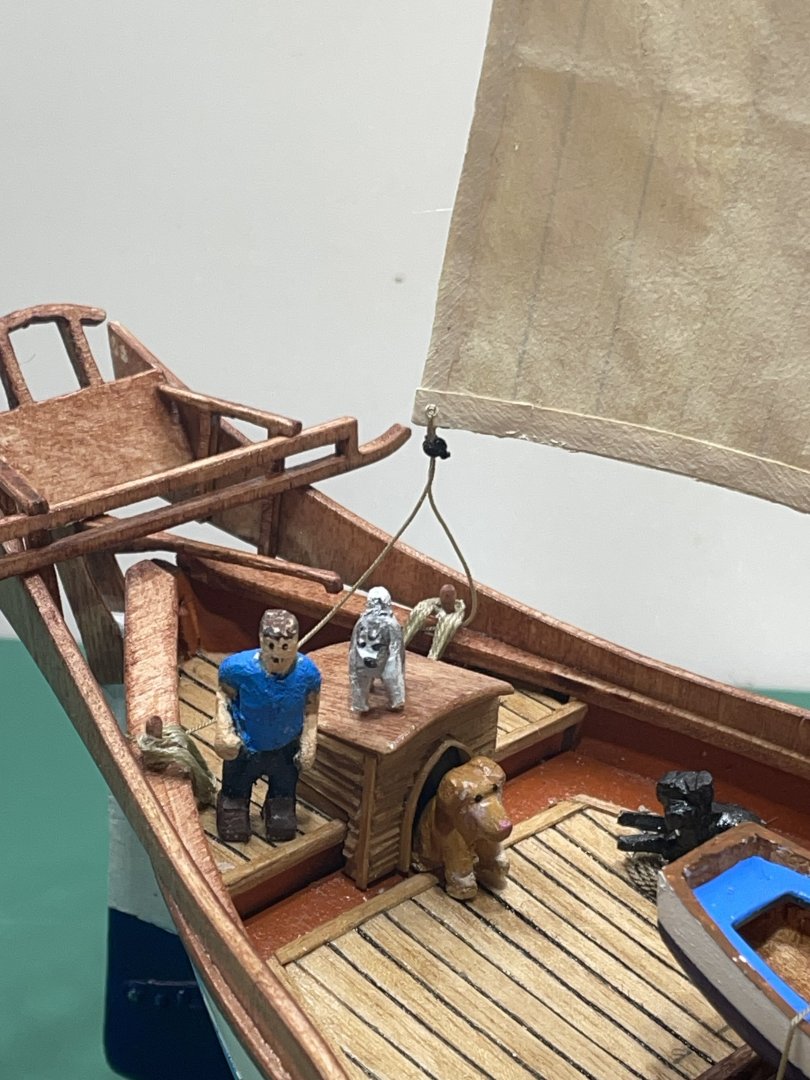
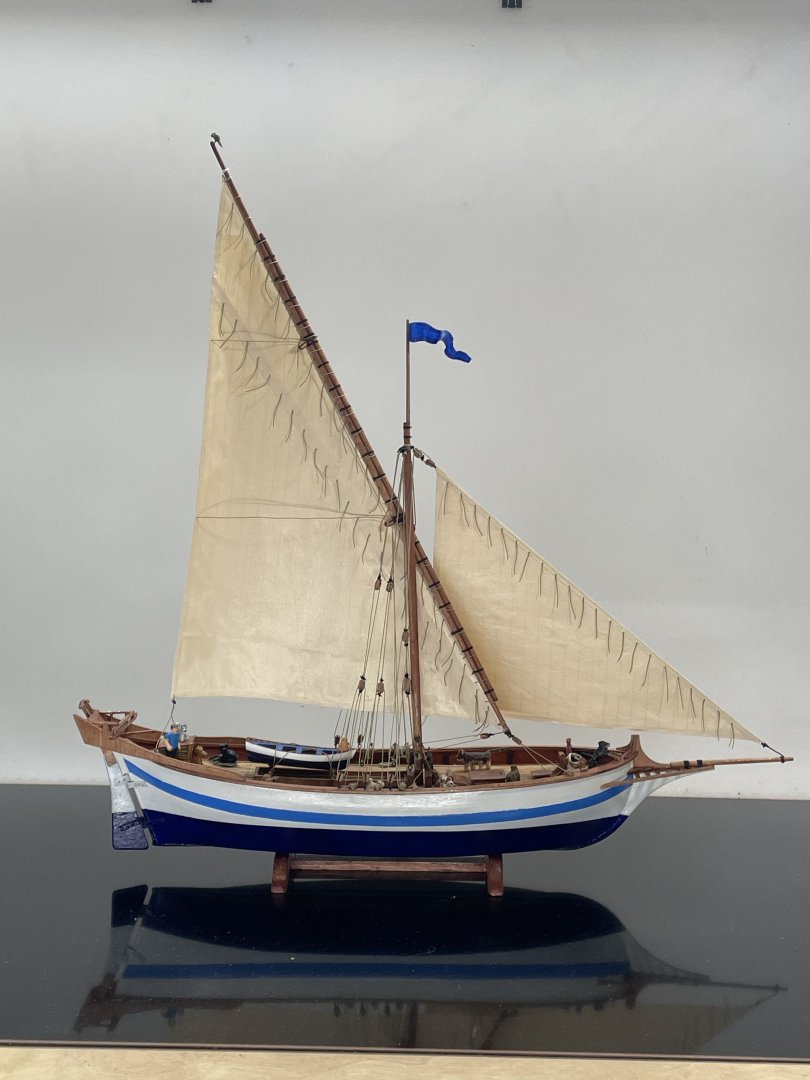
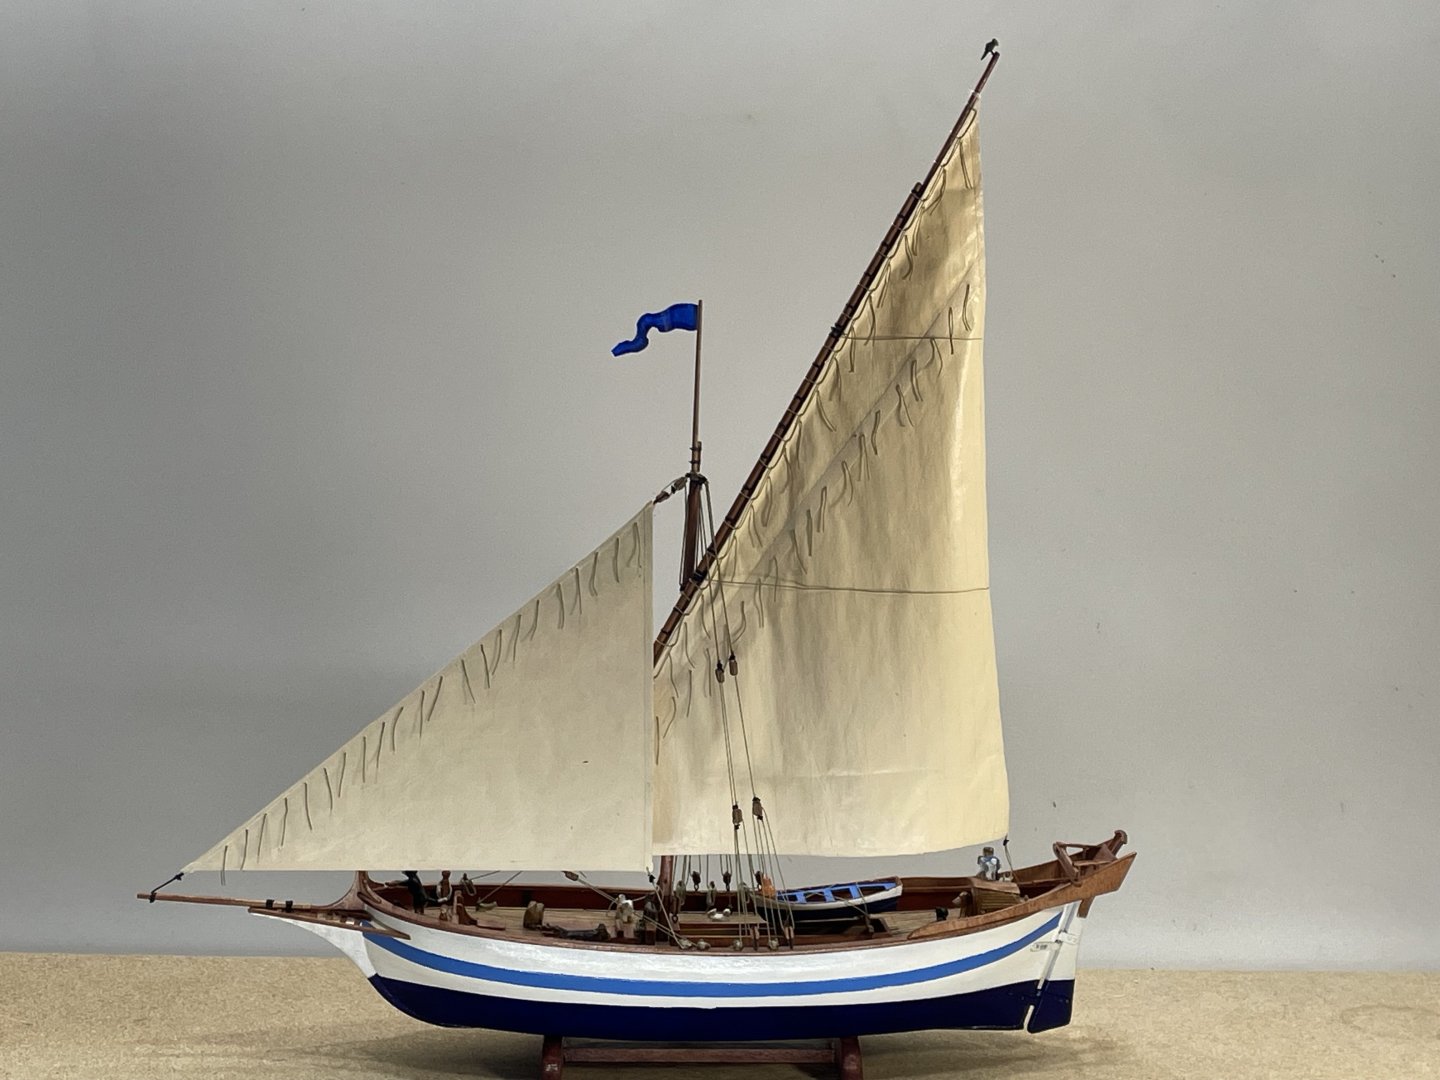
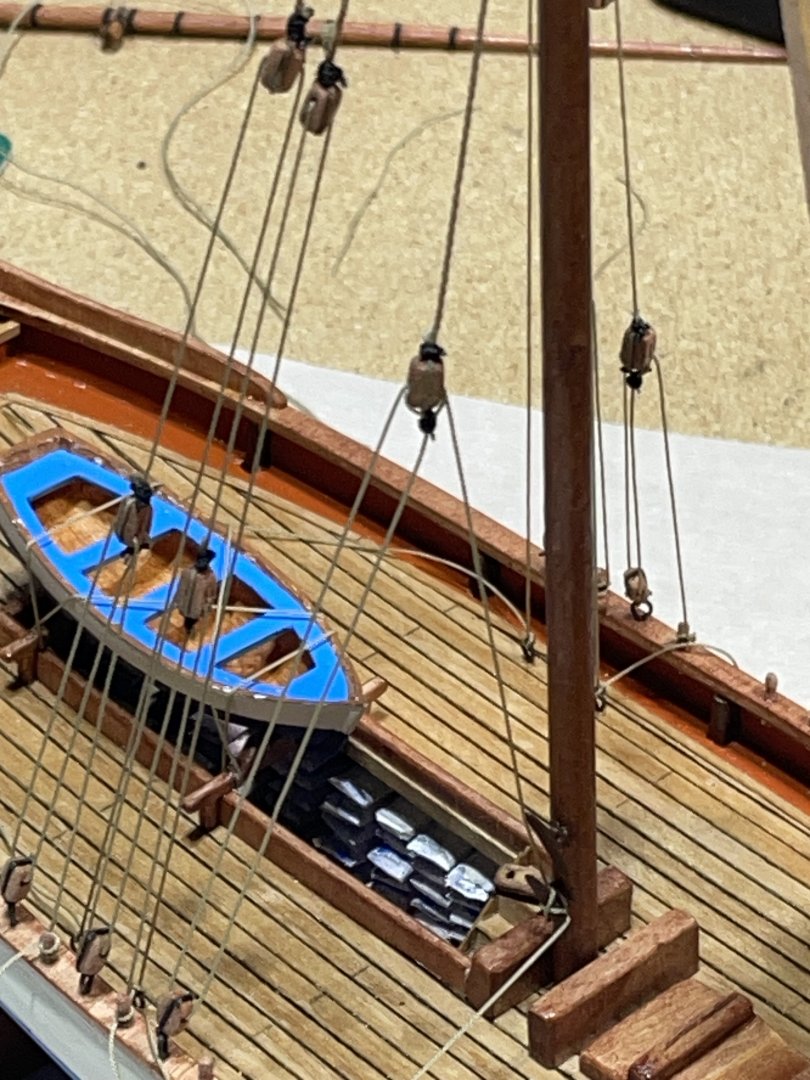
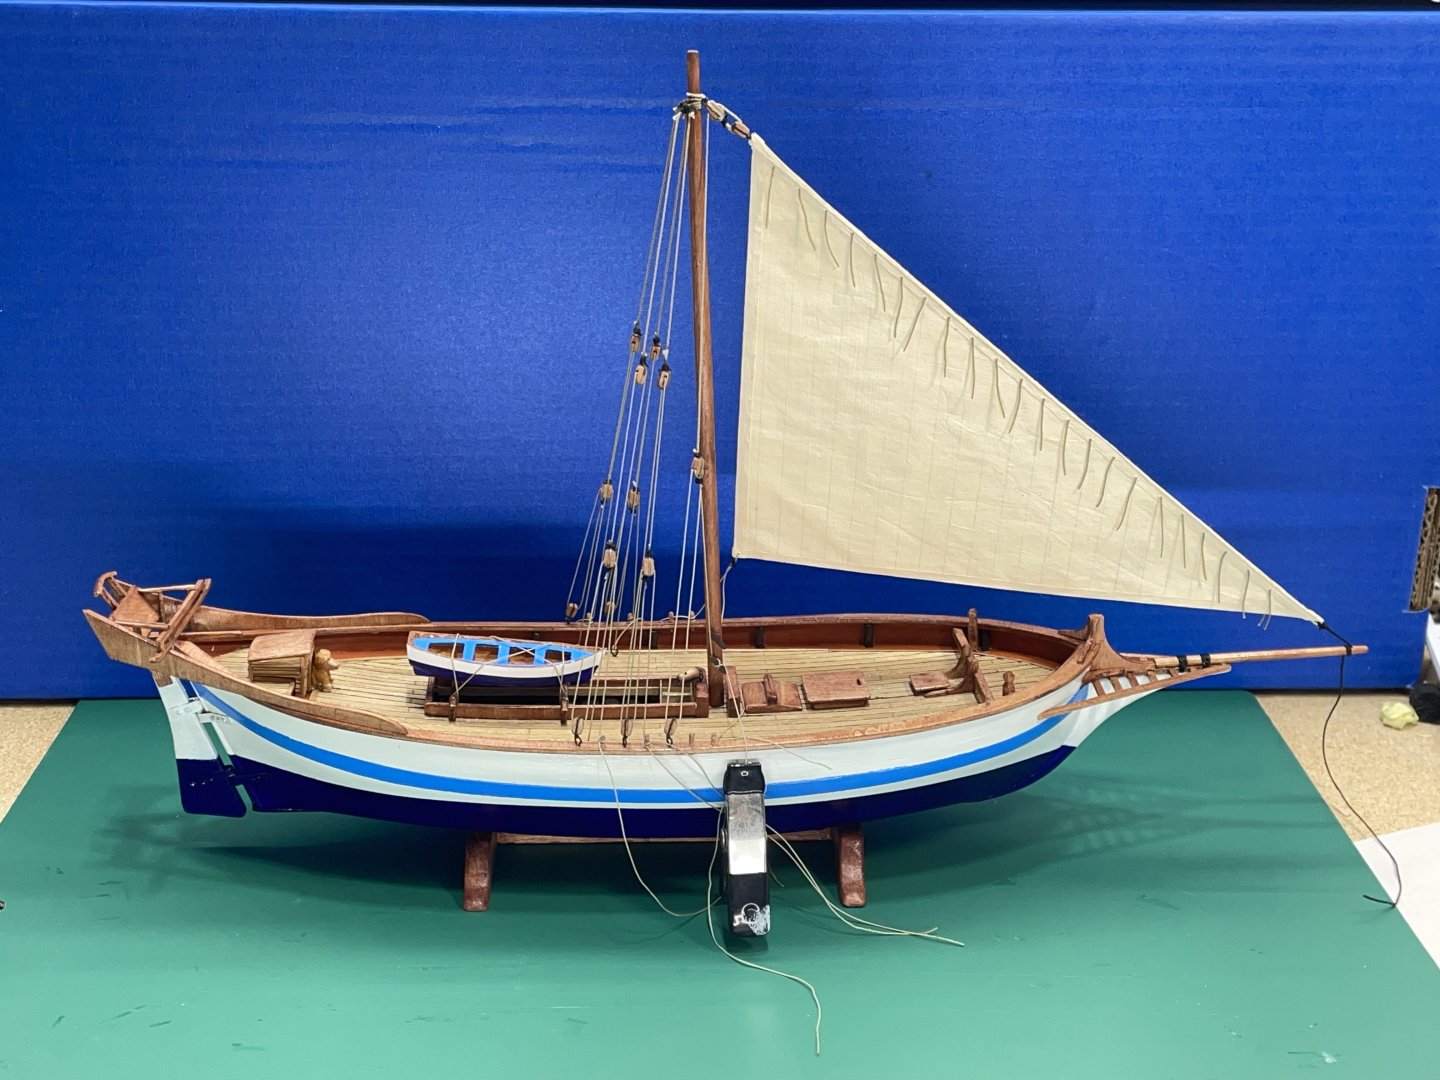
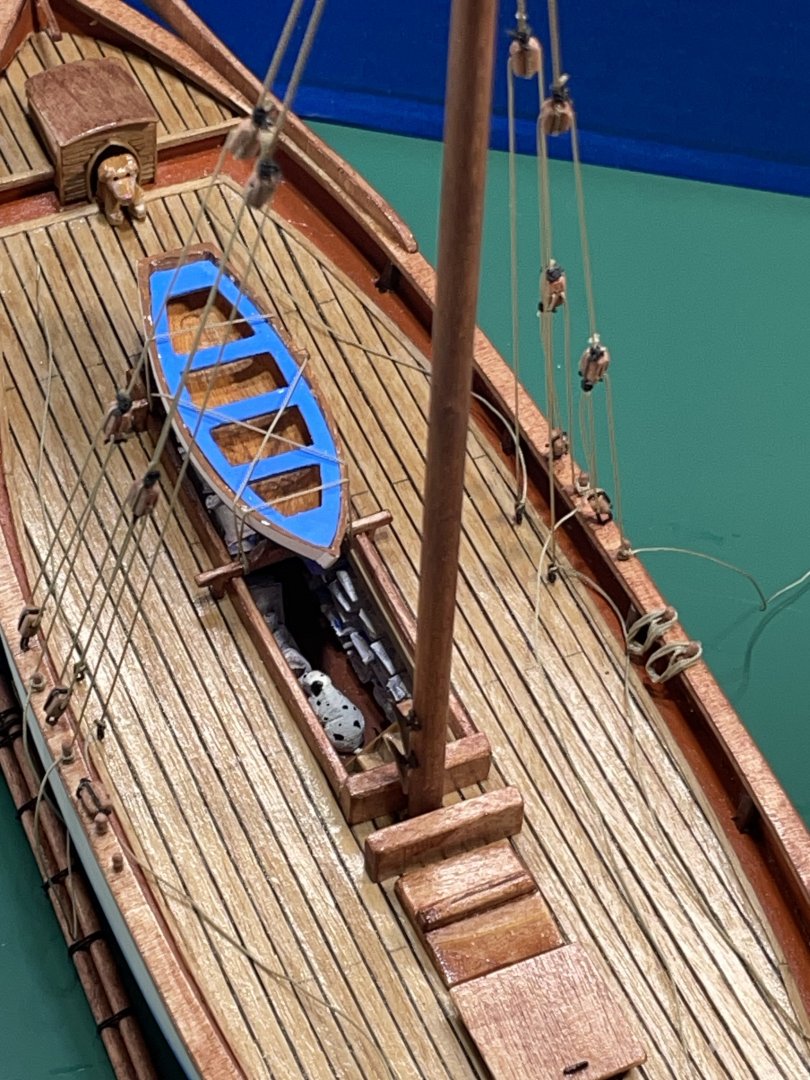
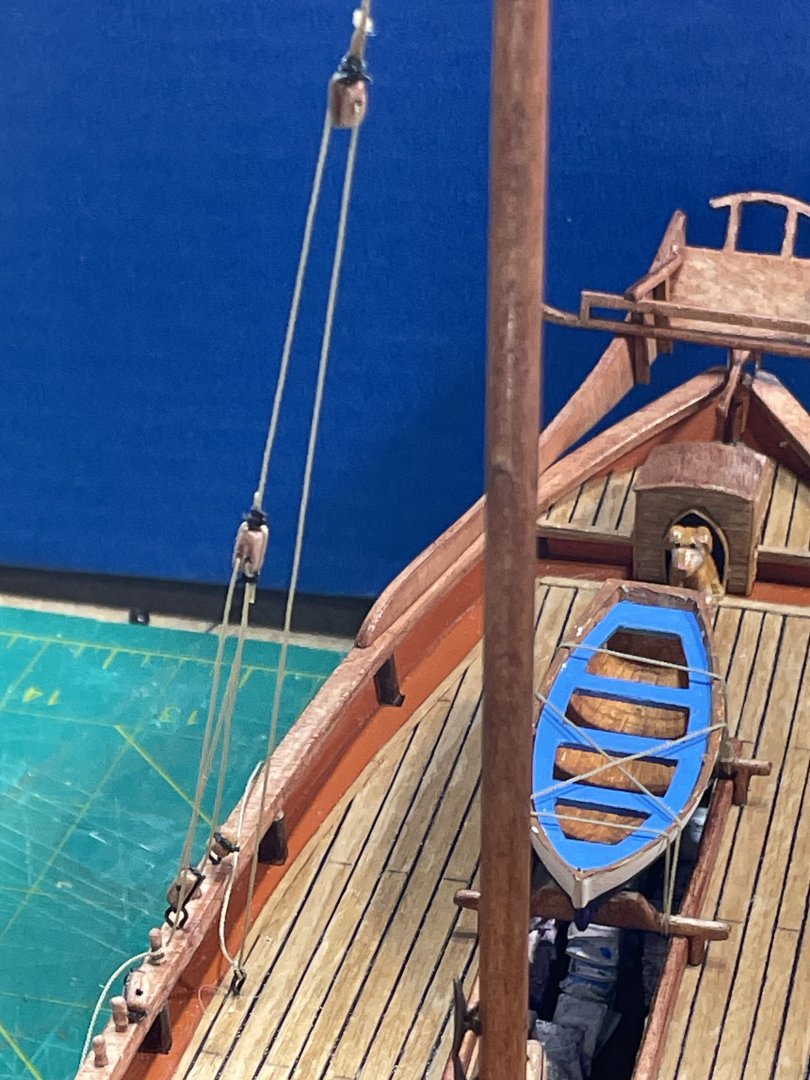
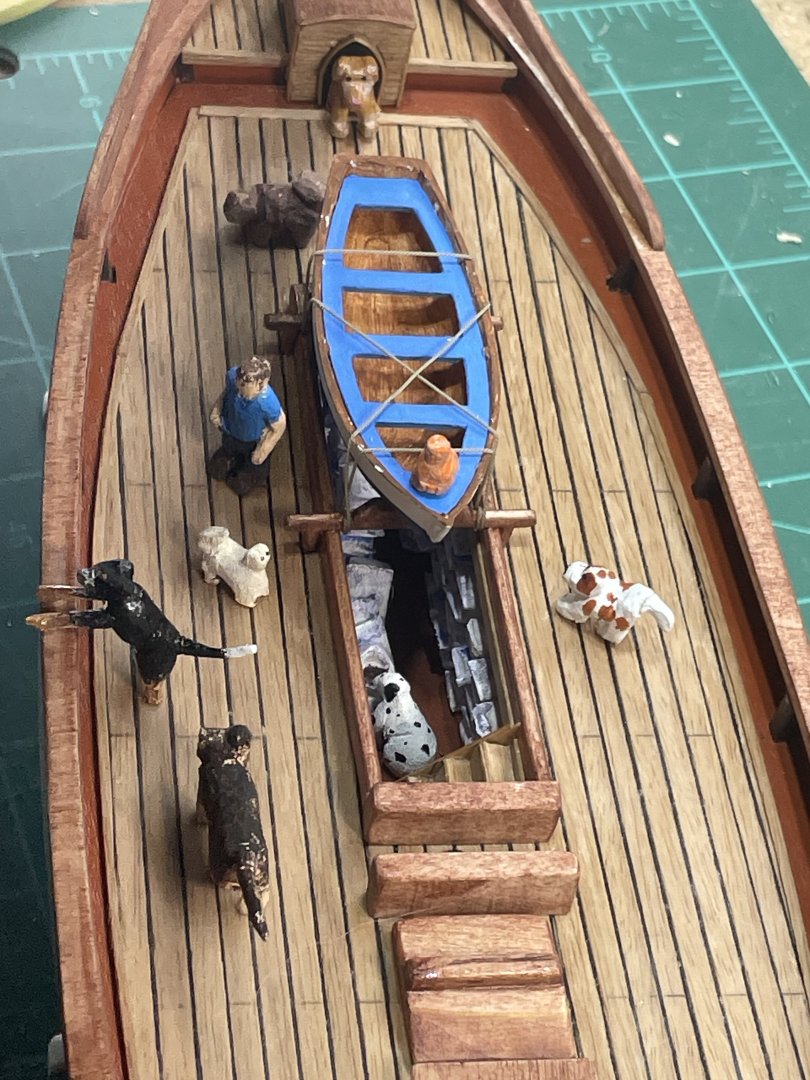
Most of my time spent on Le Martegaou the last 10 days has been cleaning up loose rope ends and making rope coils. The main sail went up pretty easy. Here are some jigs I used to make the rope coils. After that was done I carved a few more pets for the crew. I’d like to introduce the crew:-) From left to right, Captain Kurt, Landon Dogavon (Papillon), Chloe (Lab) and Ellie (Lab) Macy (Pekingese), Garfield (tabby), Maya (Pekingese) Sophia (cavalier, King Charles Spaniel) Top is Rea-Rea (Siamese), bottom Cullen (Shih Tzu) Marley (blue heeler) Top right Chief (German Shepherd), bottom right Spot (dalmatian). And last but not least, Goliath (cockatiel)Top left on picture below 🙂 So here’s the pics of what it’s really about. This was a really fun build. I wish they didn’t use plywood on the parts that showed to be stained. And the kit included some water slide decals (at least I thought they were) but they disintegrated before they even got close. Thanks everyone for the responses and likes.


- 55 replies
-
- 8
-
-

-
- Le Martegaou
- billing boats
- (and 1 more)
-
JC, your work is so clean! I’m anxious to see all the layers of finish you’re going use. I have on my shelf a fishing boat kit from Diorama World that I’d like to weather.
- 312 replies
-
- 5
-
-

-
- Chile
- Latin America
- (and 6 more)
-
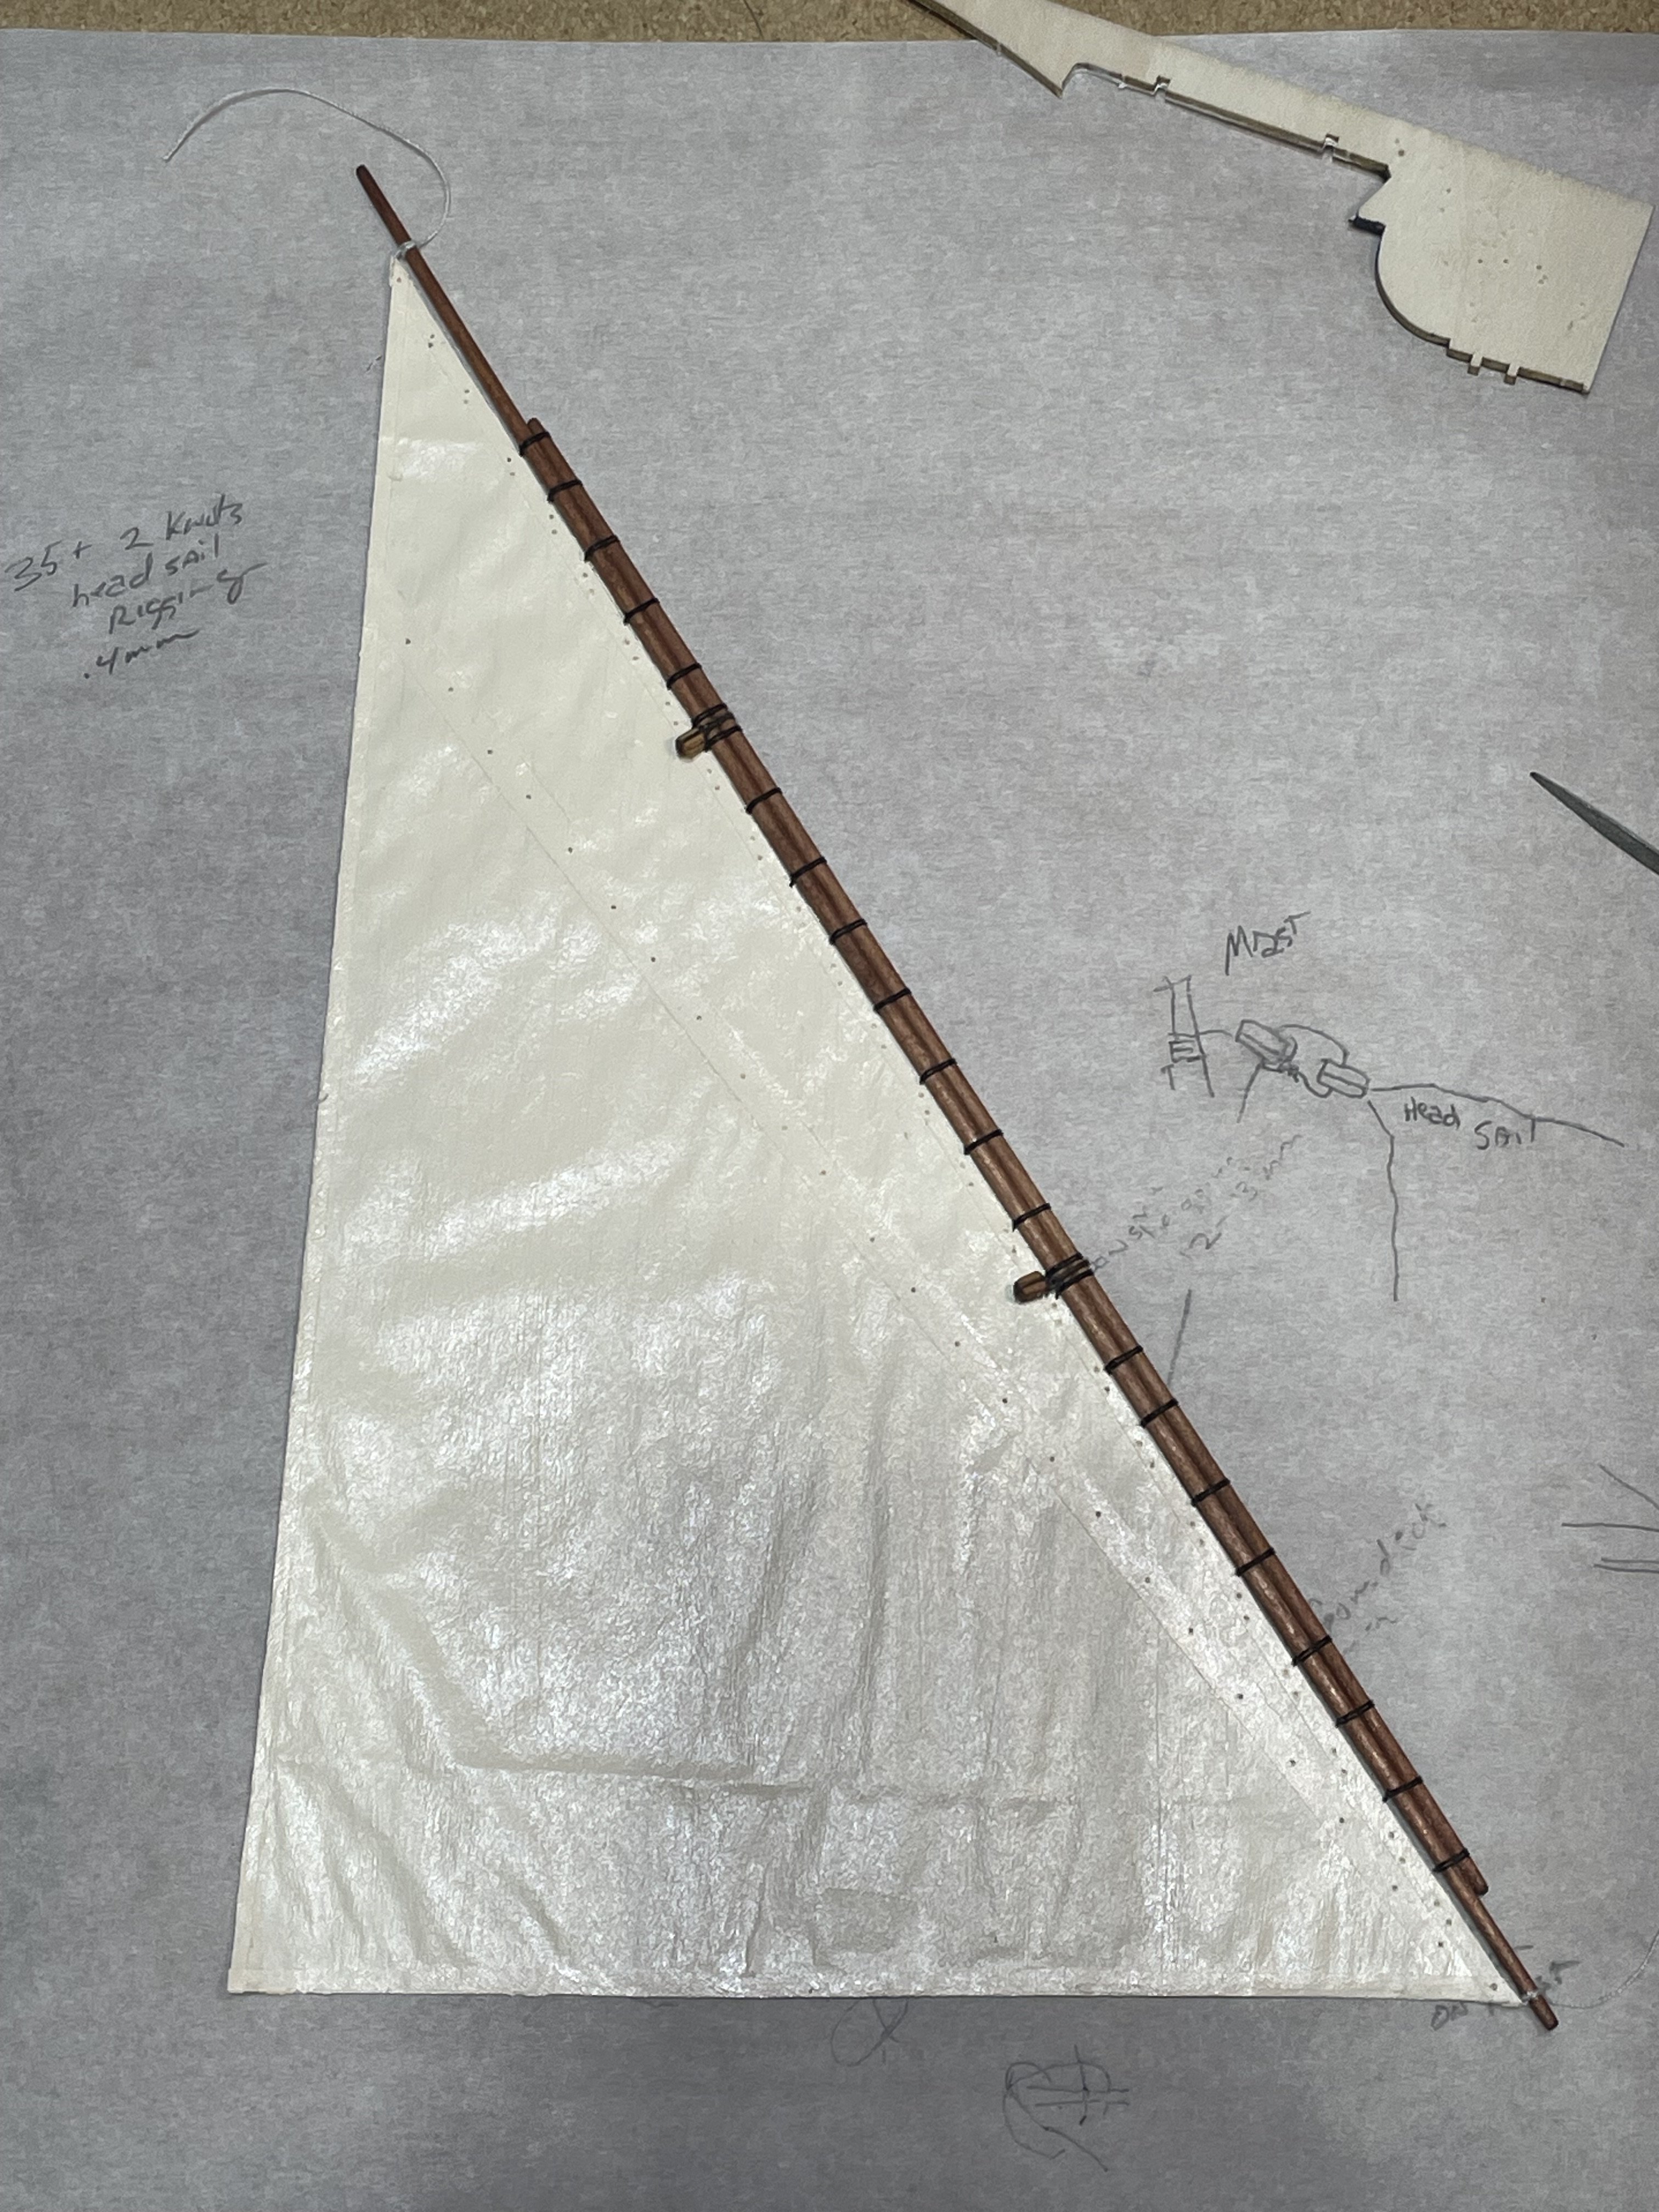
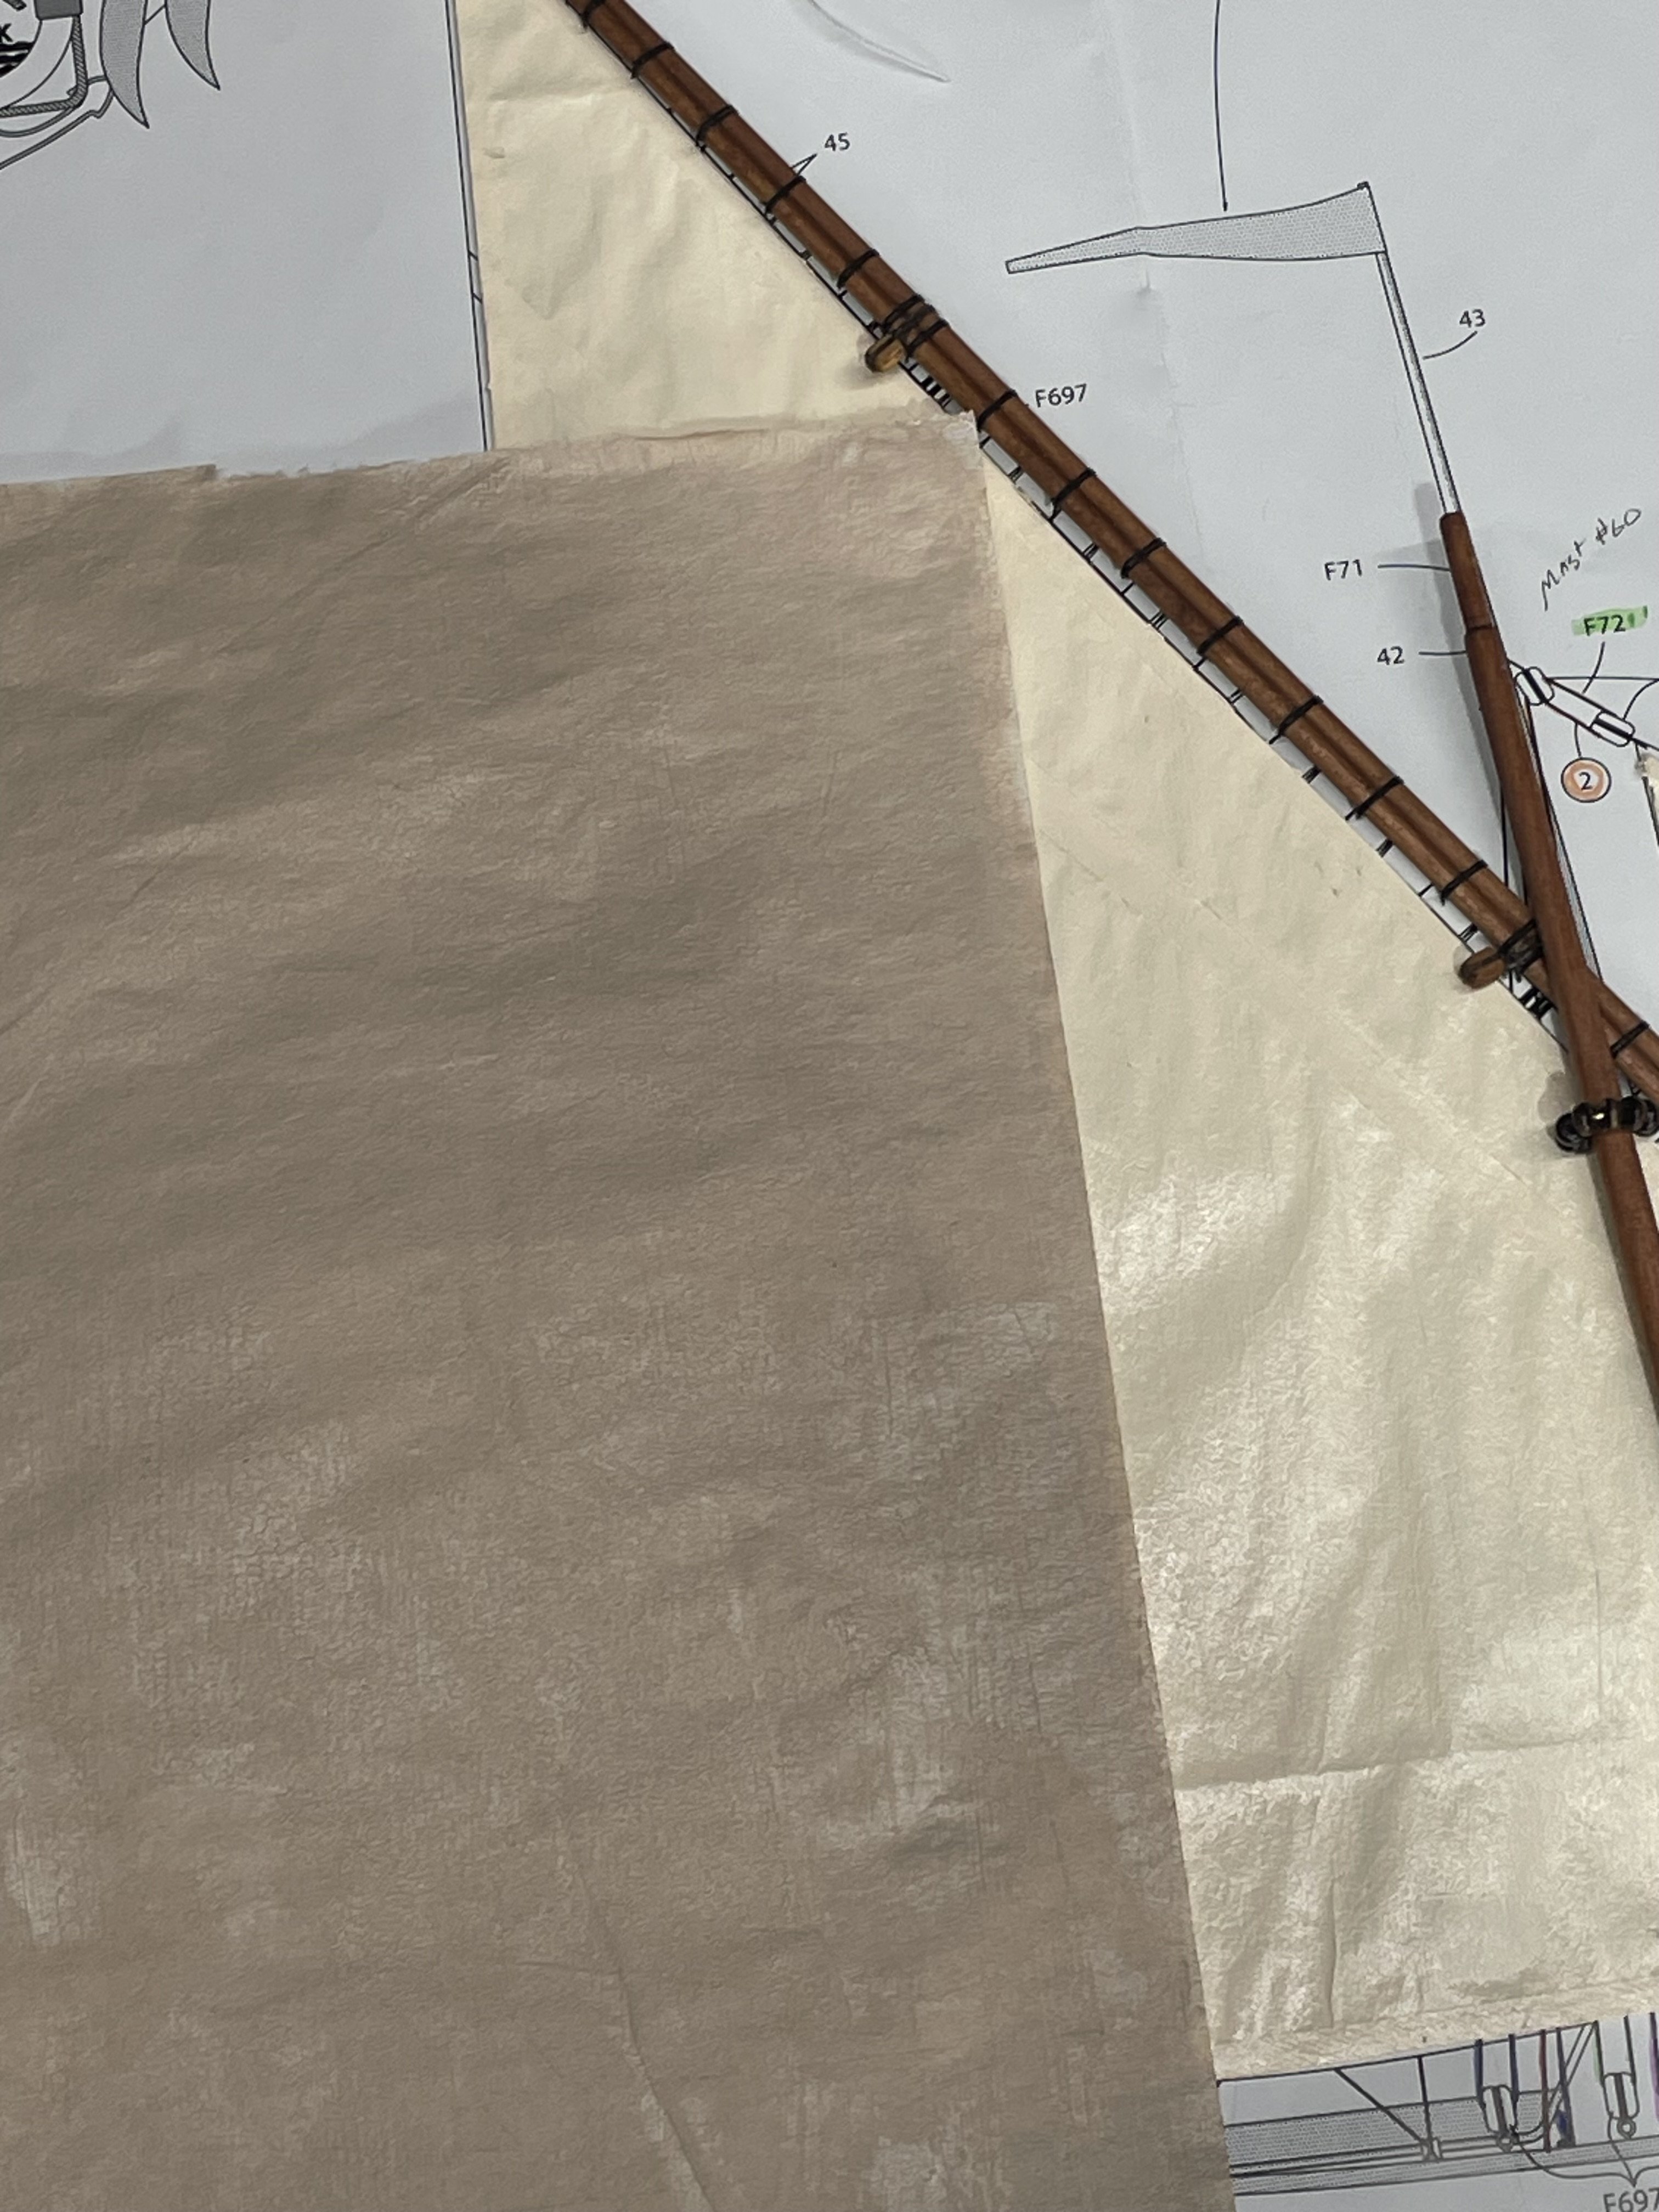
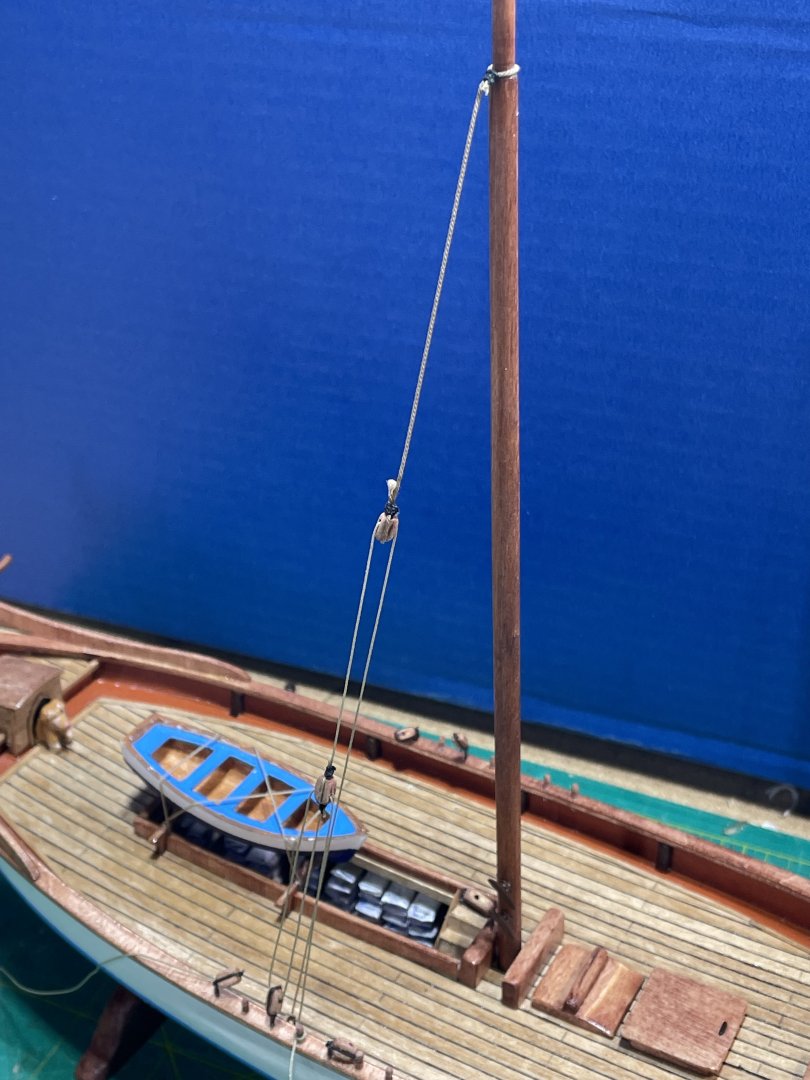
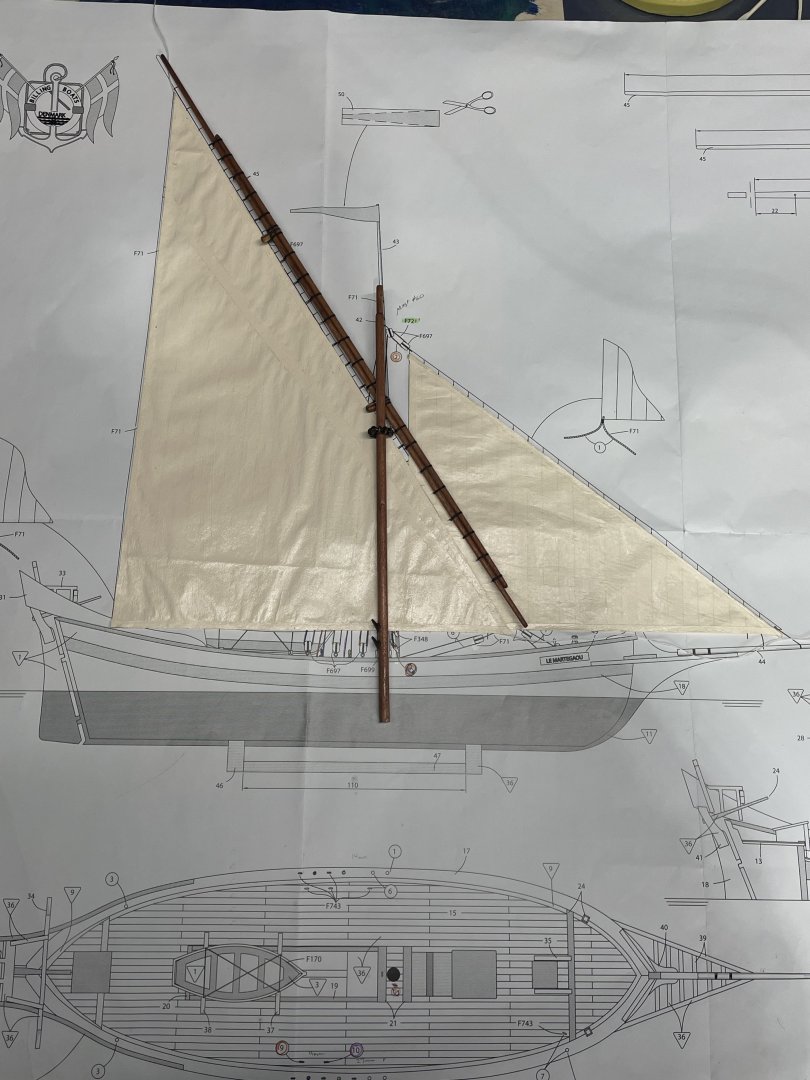
Work on the main sail has progressed. I punched holes for the reef points and for the lacing to the yard. When making the sails I glued a thread between the layers of tea paper, so the sail wouldn’t move up and down on the yard while I was trying to lace it. Then I placed the sail between the two pieces of cardboard to keep me from wrinkling it up, while I was lacing it up. I never can remember how to start and end the rope when doing this. Now I have all the reef points to put on, which half of them are right up against the yard. I thought I would mess these up if put them on before lacing the yard on. There are two ropes that draw the sail in, that run through the two blocks on the yard. Also, the rope that raises the main sail. Then I need to tie on two blocks on the lower end of the yard that will hold the yard down at the bow.
- 55 replies
-
- 3
-
-
- Le Martegaou
- billing boats
- (and 1 more)
-
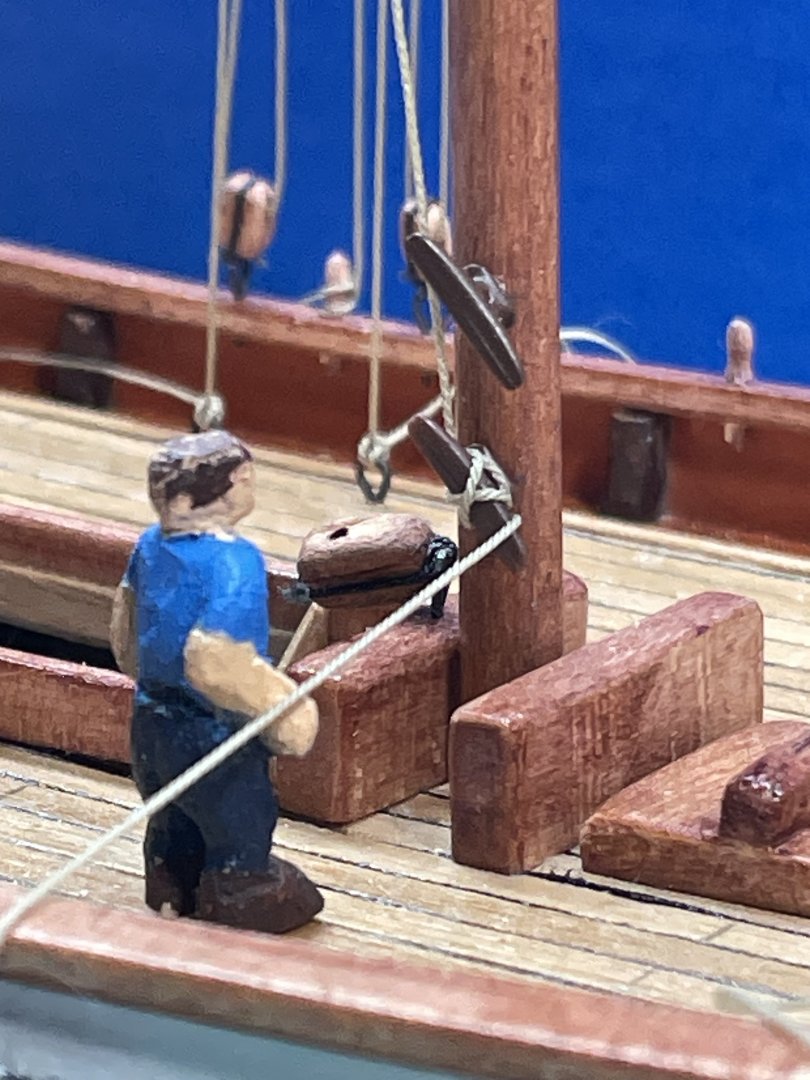
Just setting back after I set Capt. Kurt by the mast. It looks like he is wondering if those cleats are supposed to be so massive. That block for the main sail seems large too. But if they were much smaller I would be wondering how I was going to tie them on:-) Kurt is about 5’9” in 1:80
- 55 replies
-
- 4
-
-
- Le Martegaou
- billing boats
- (and 1 more)
-
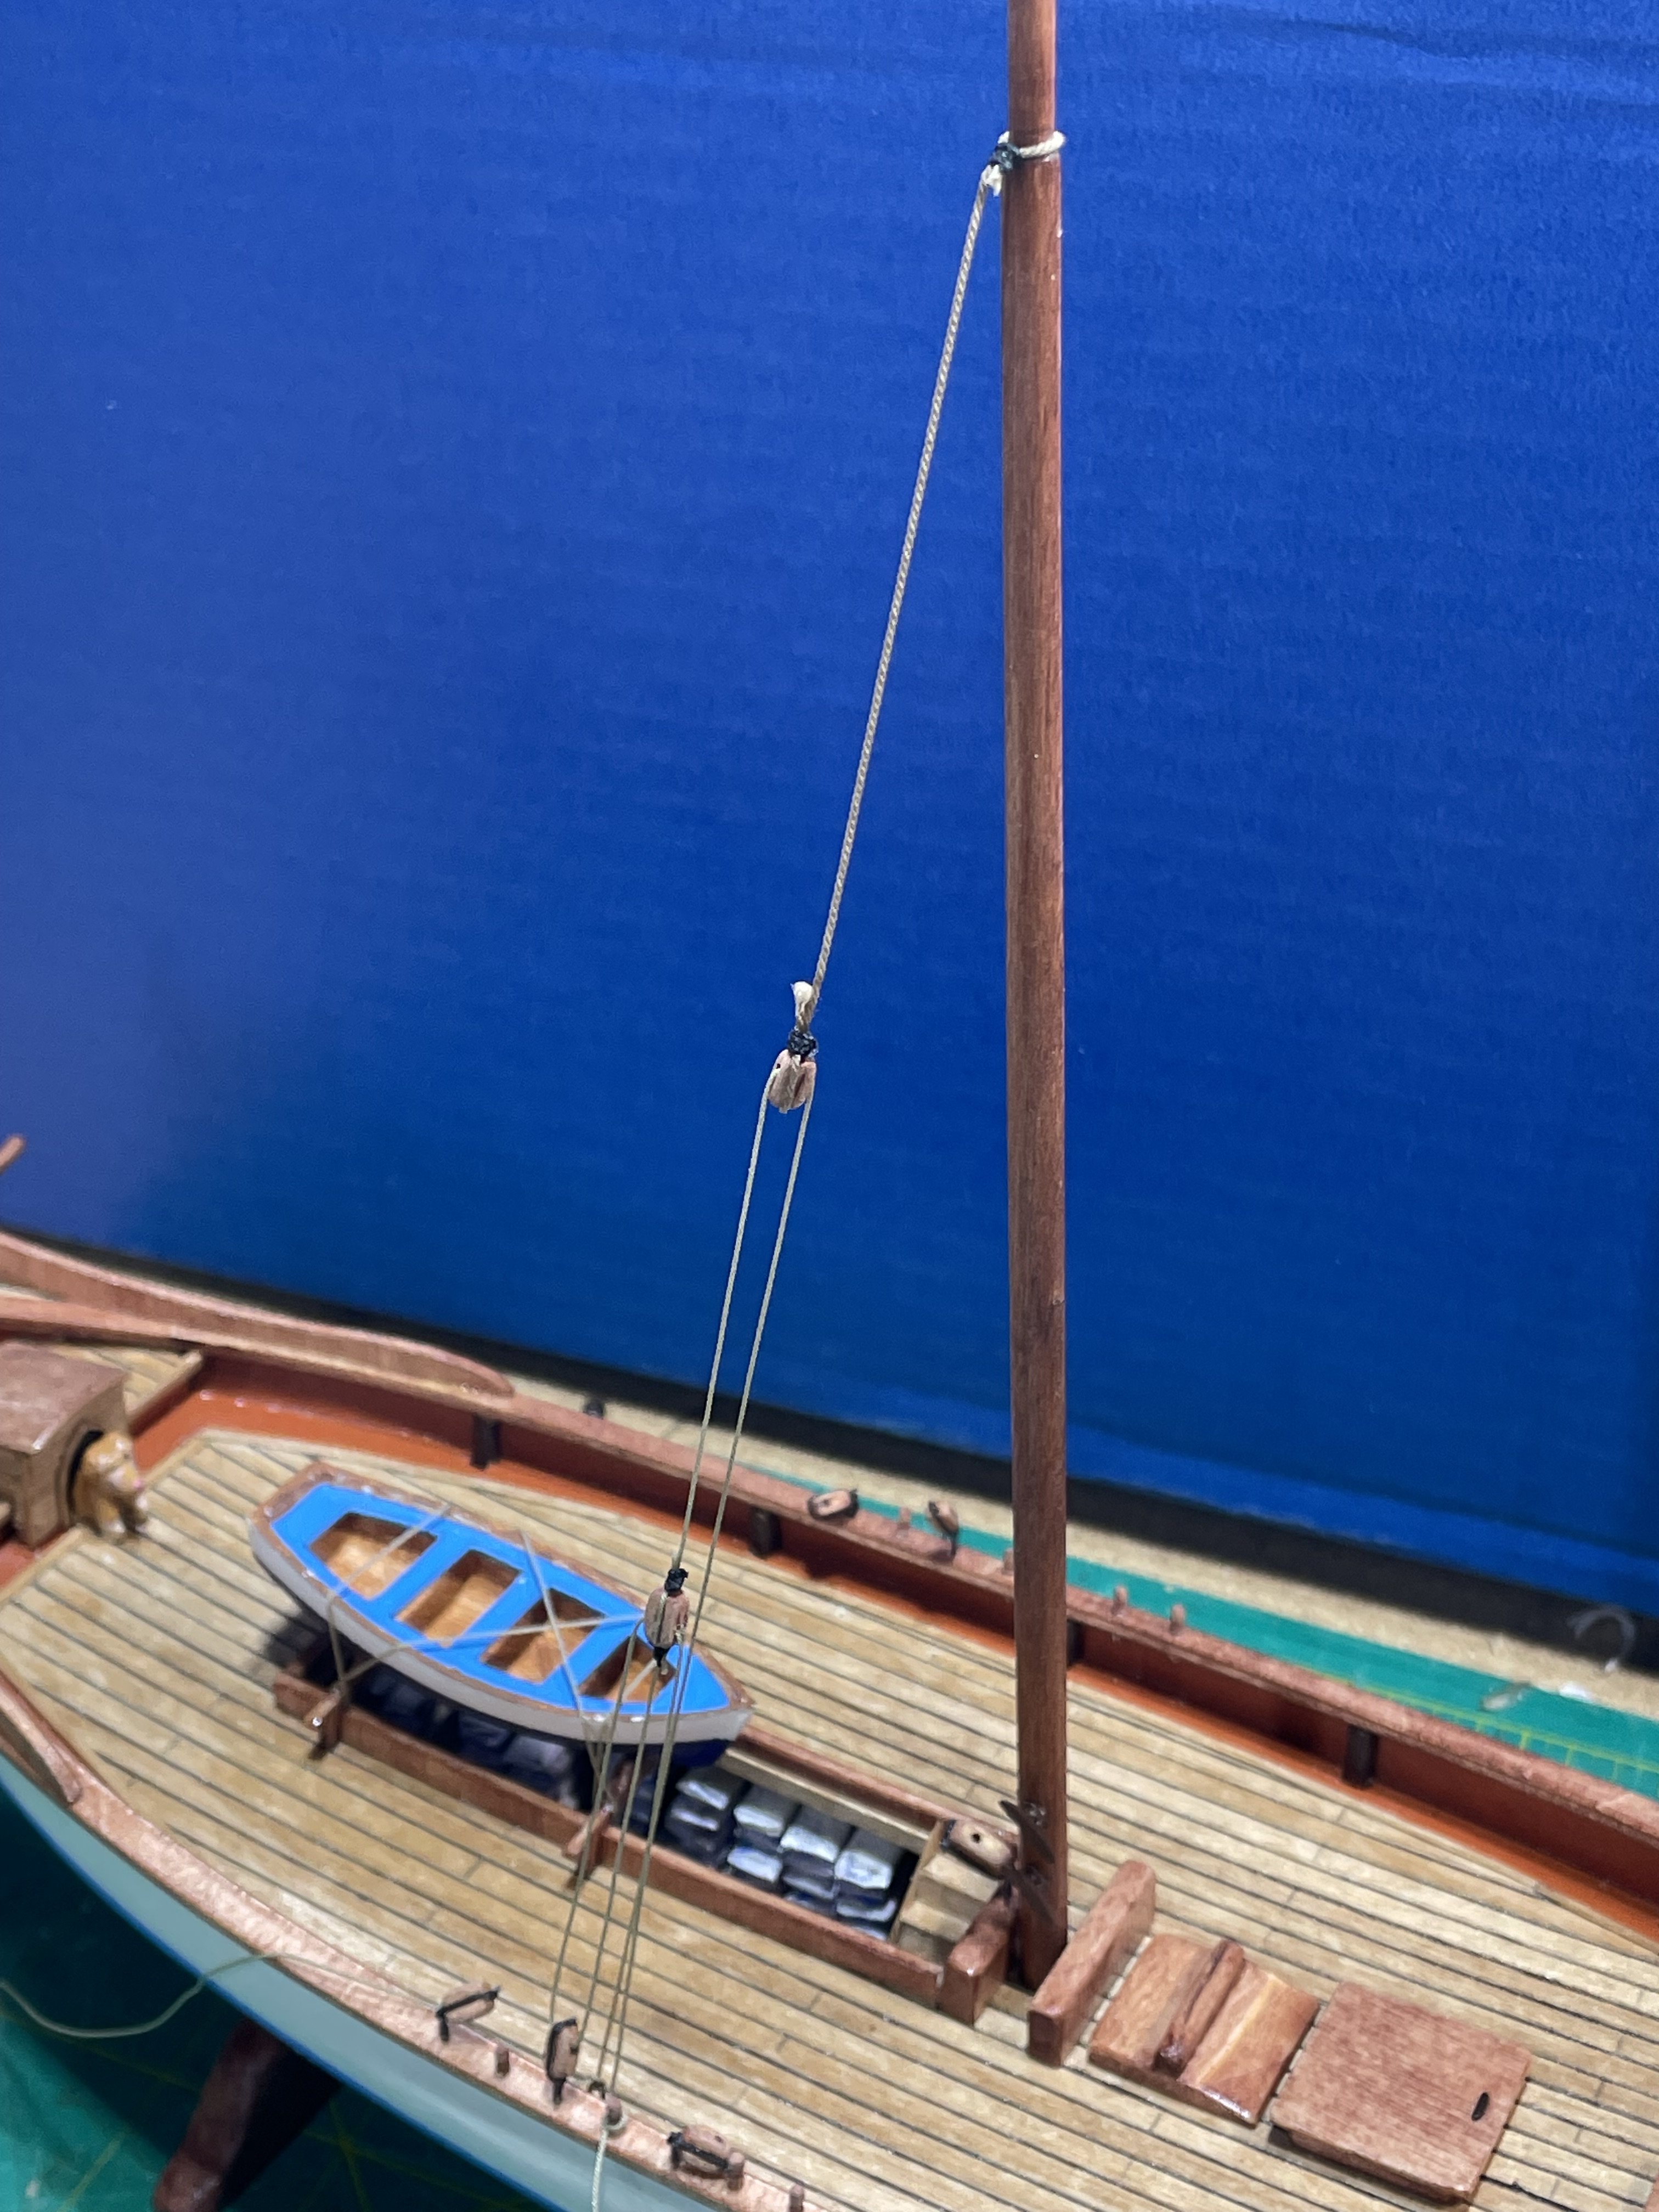
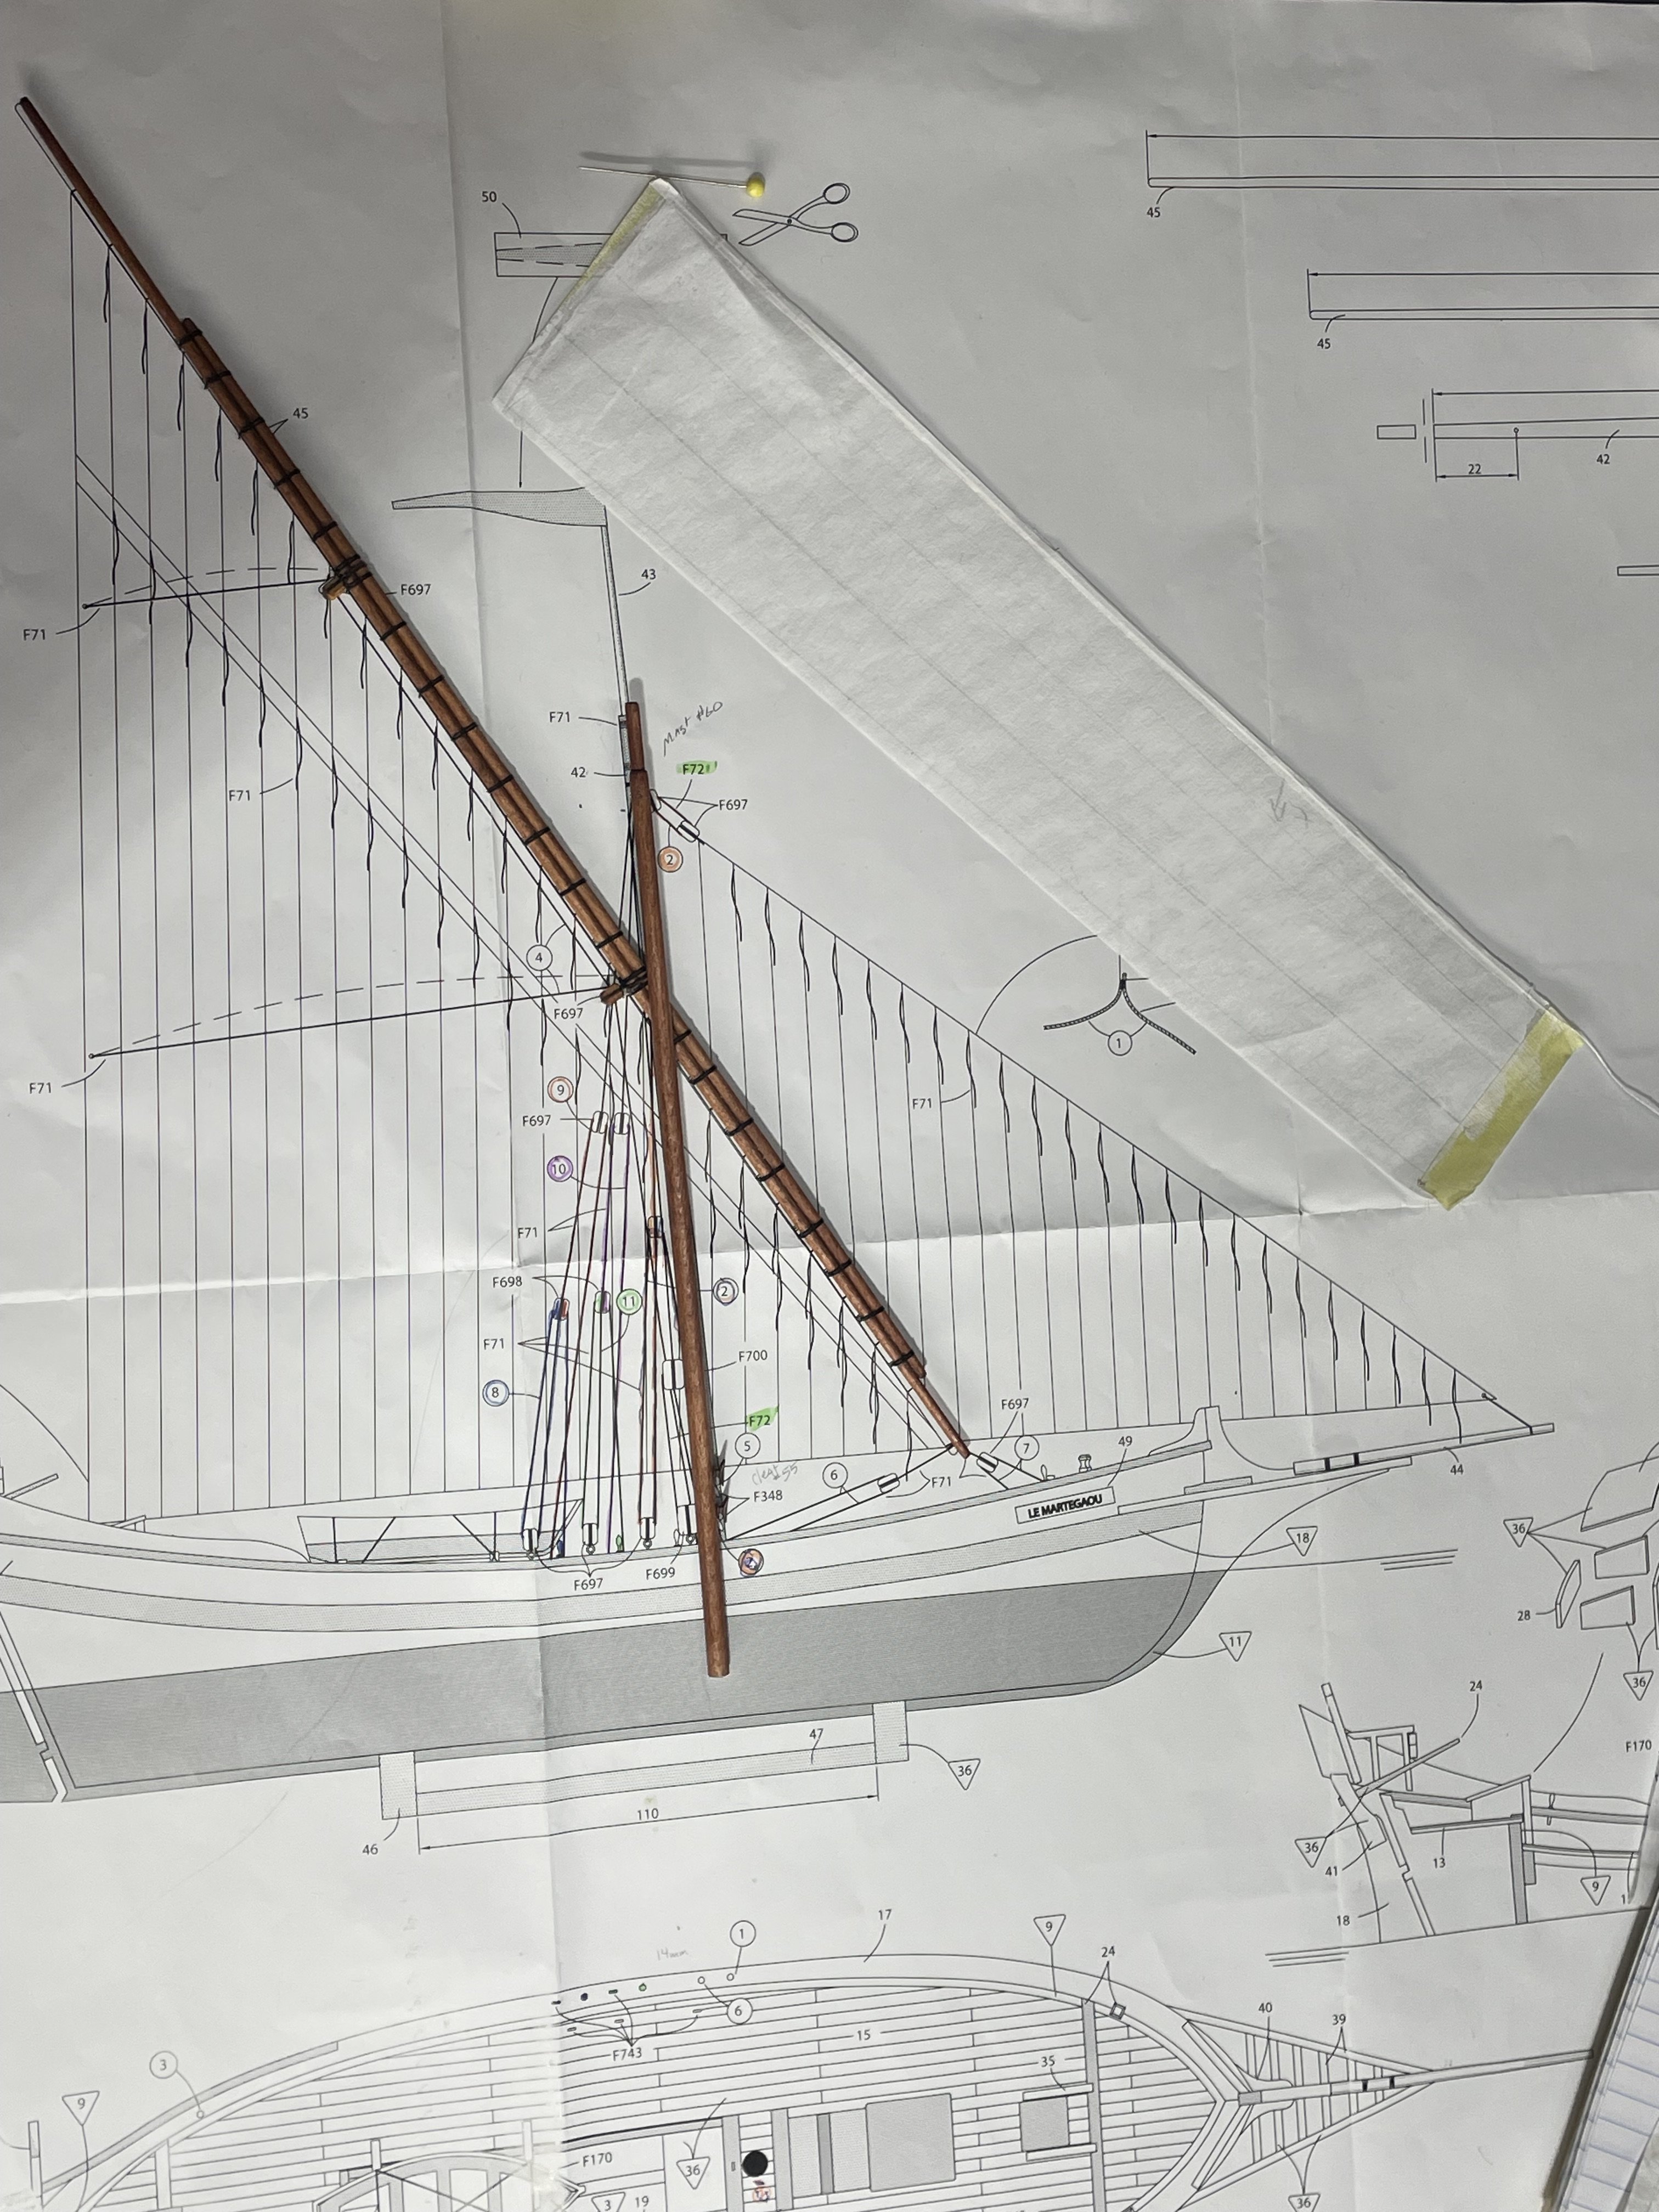
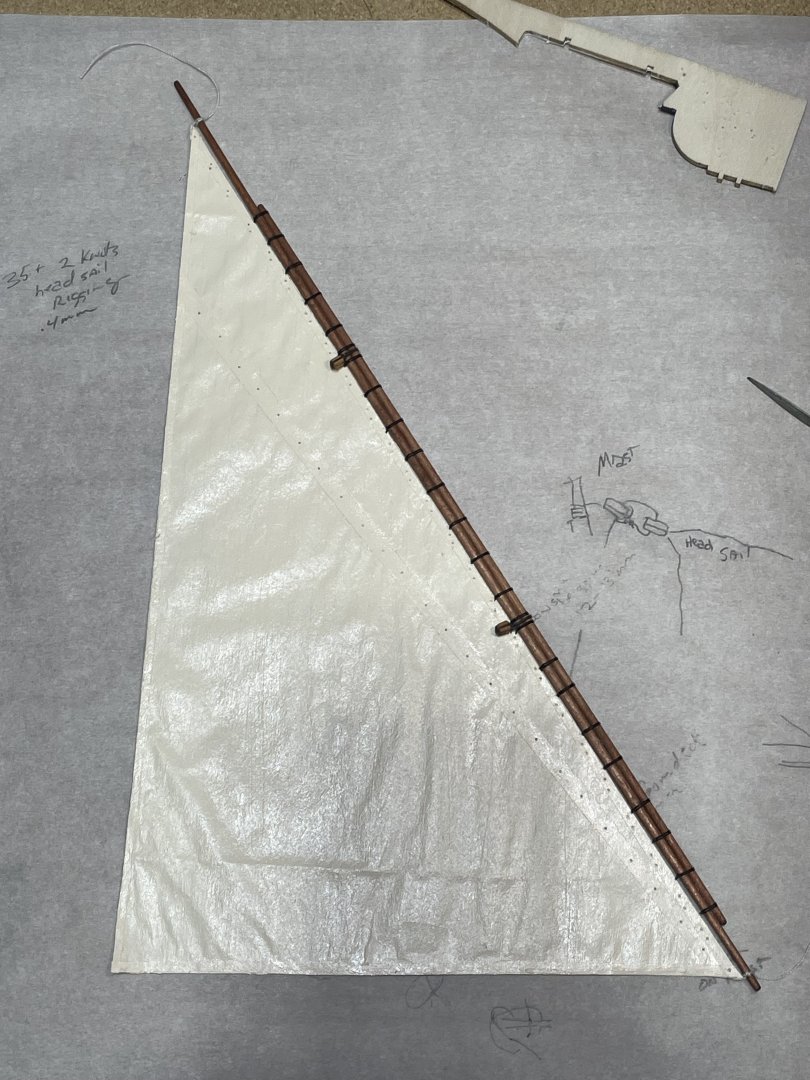
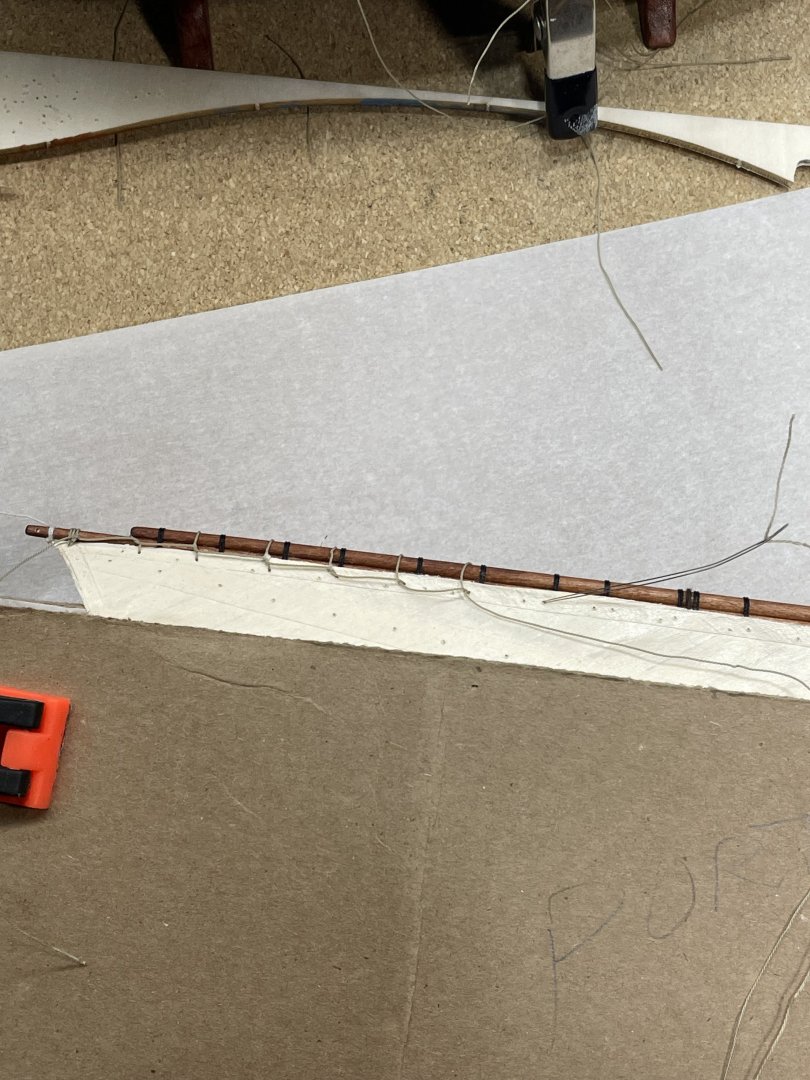
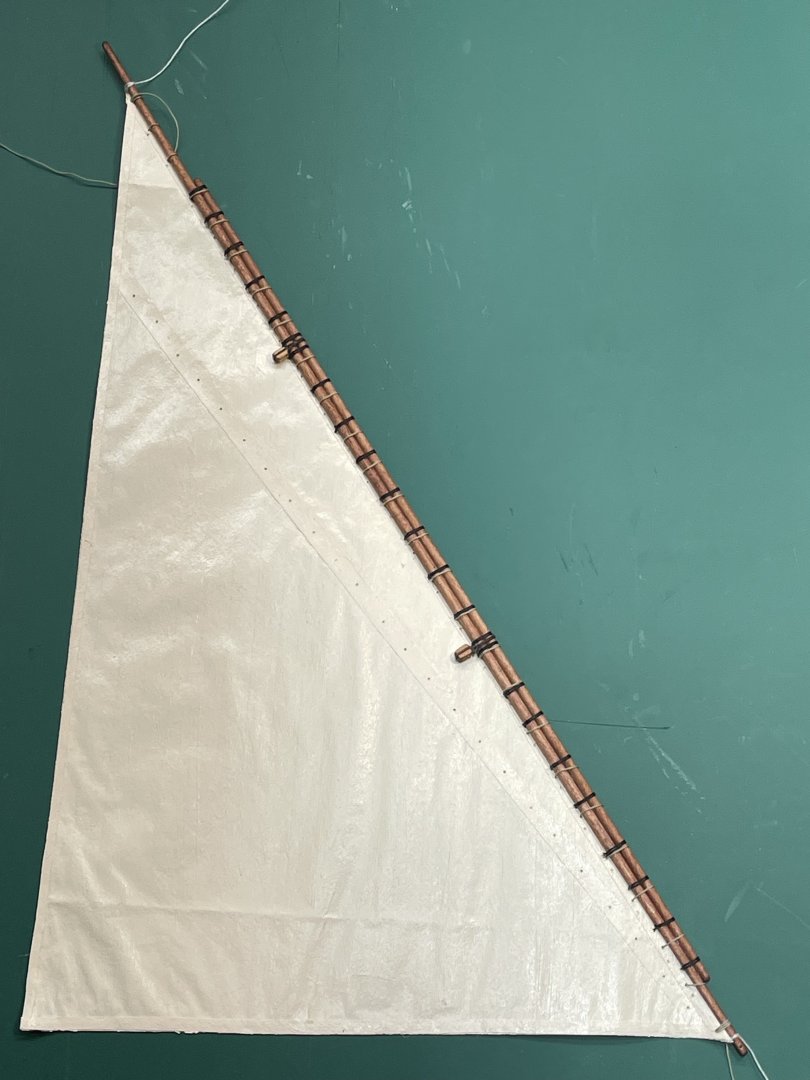
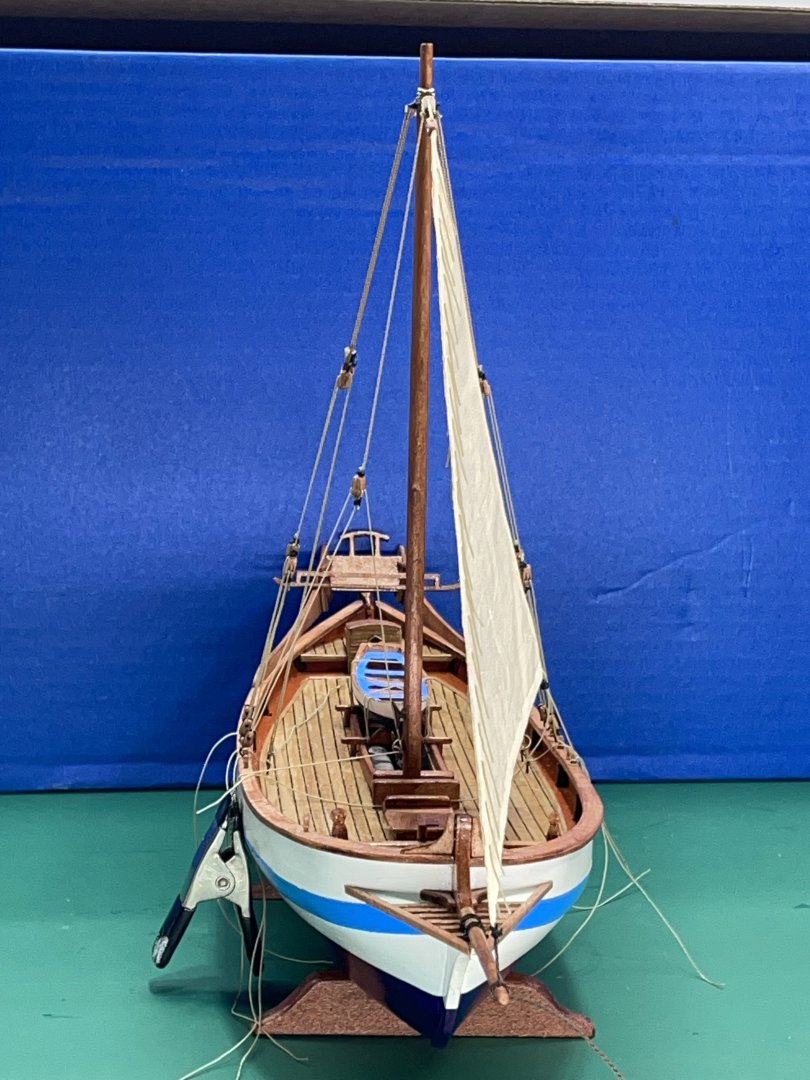
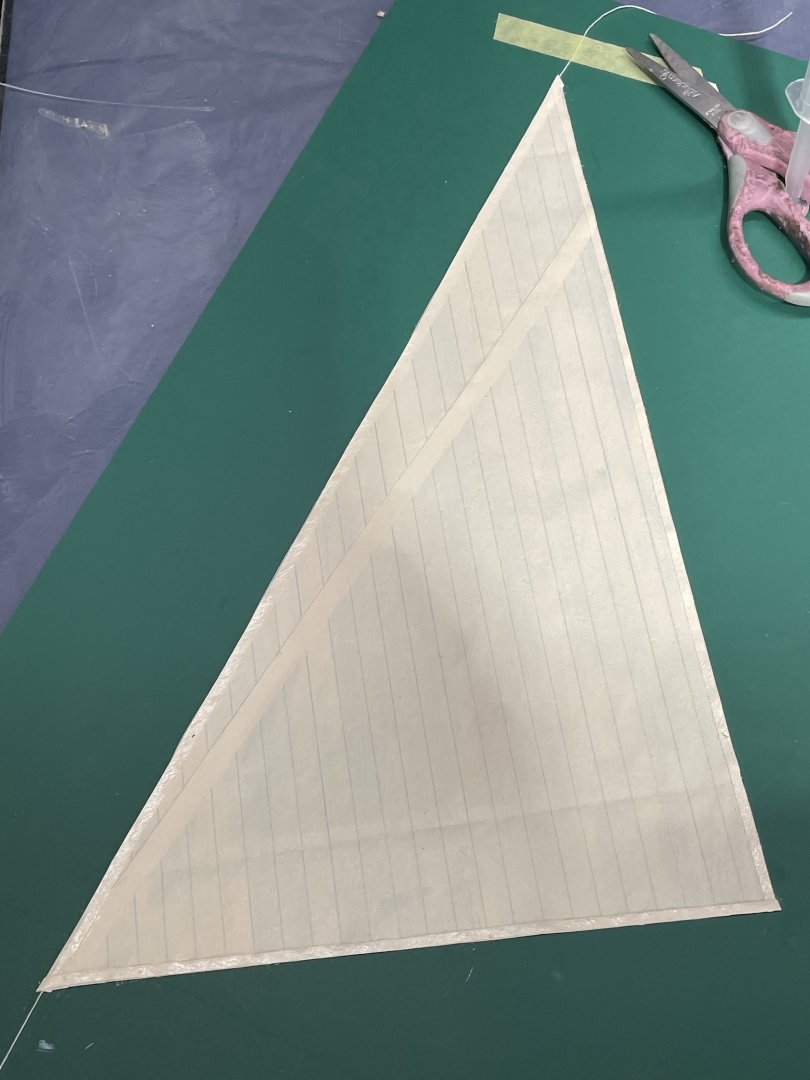
Finished the head sail yesterday. I must say I was anxiously waiting to see if it was going to fit. All went well. It pulled the mast forward a bit. I measured the top of the mast to the bowsprit and it was true to the plan. Now to finish the main sail.

- 55 replies
-
- 6
-
-
- Le Martegaou
- billing boats
- (and 1 more)
-
Setting back studying the model and thinking of my next move, I noticed how the stays had the mast pulled back even though there is very little tension on the stays. I mainly just got them straight. It looks to me like I need to rig the head sail first so I can straighten the mast up a bit before the main sail goes on. Opinions are welcome:-)

- 55 replies
-
- 4
-
-
- Le Martegaou
- billing boats
- (and 1 more)
-
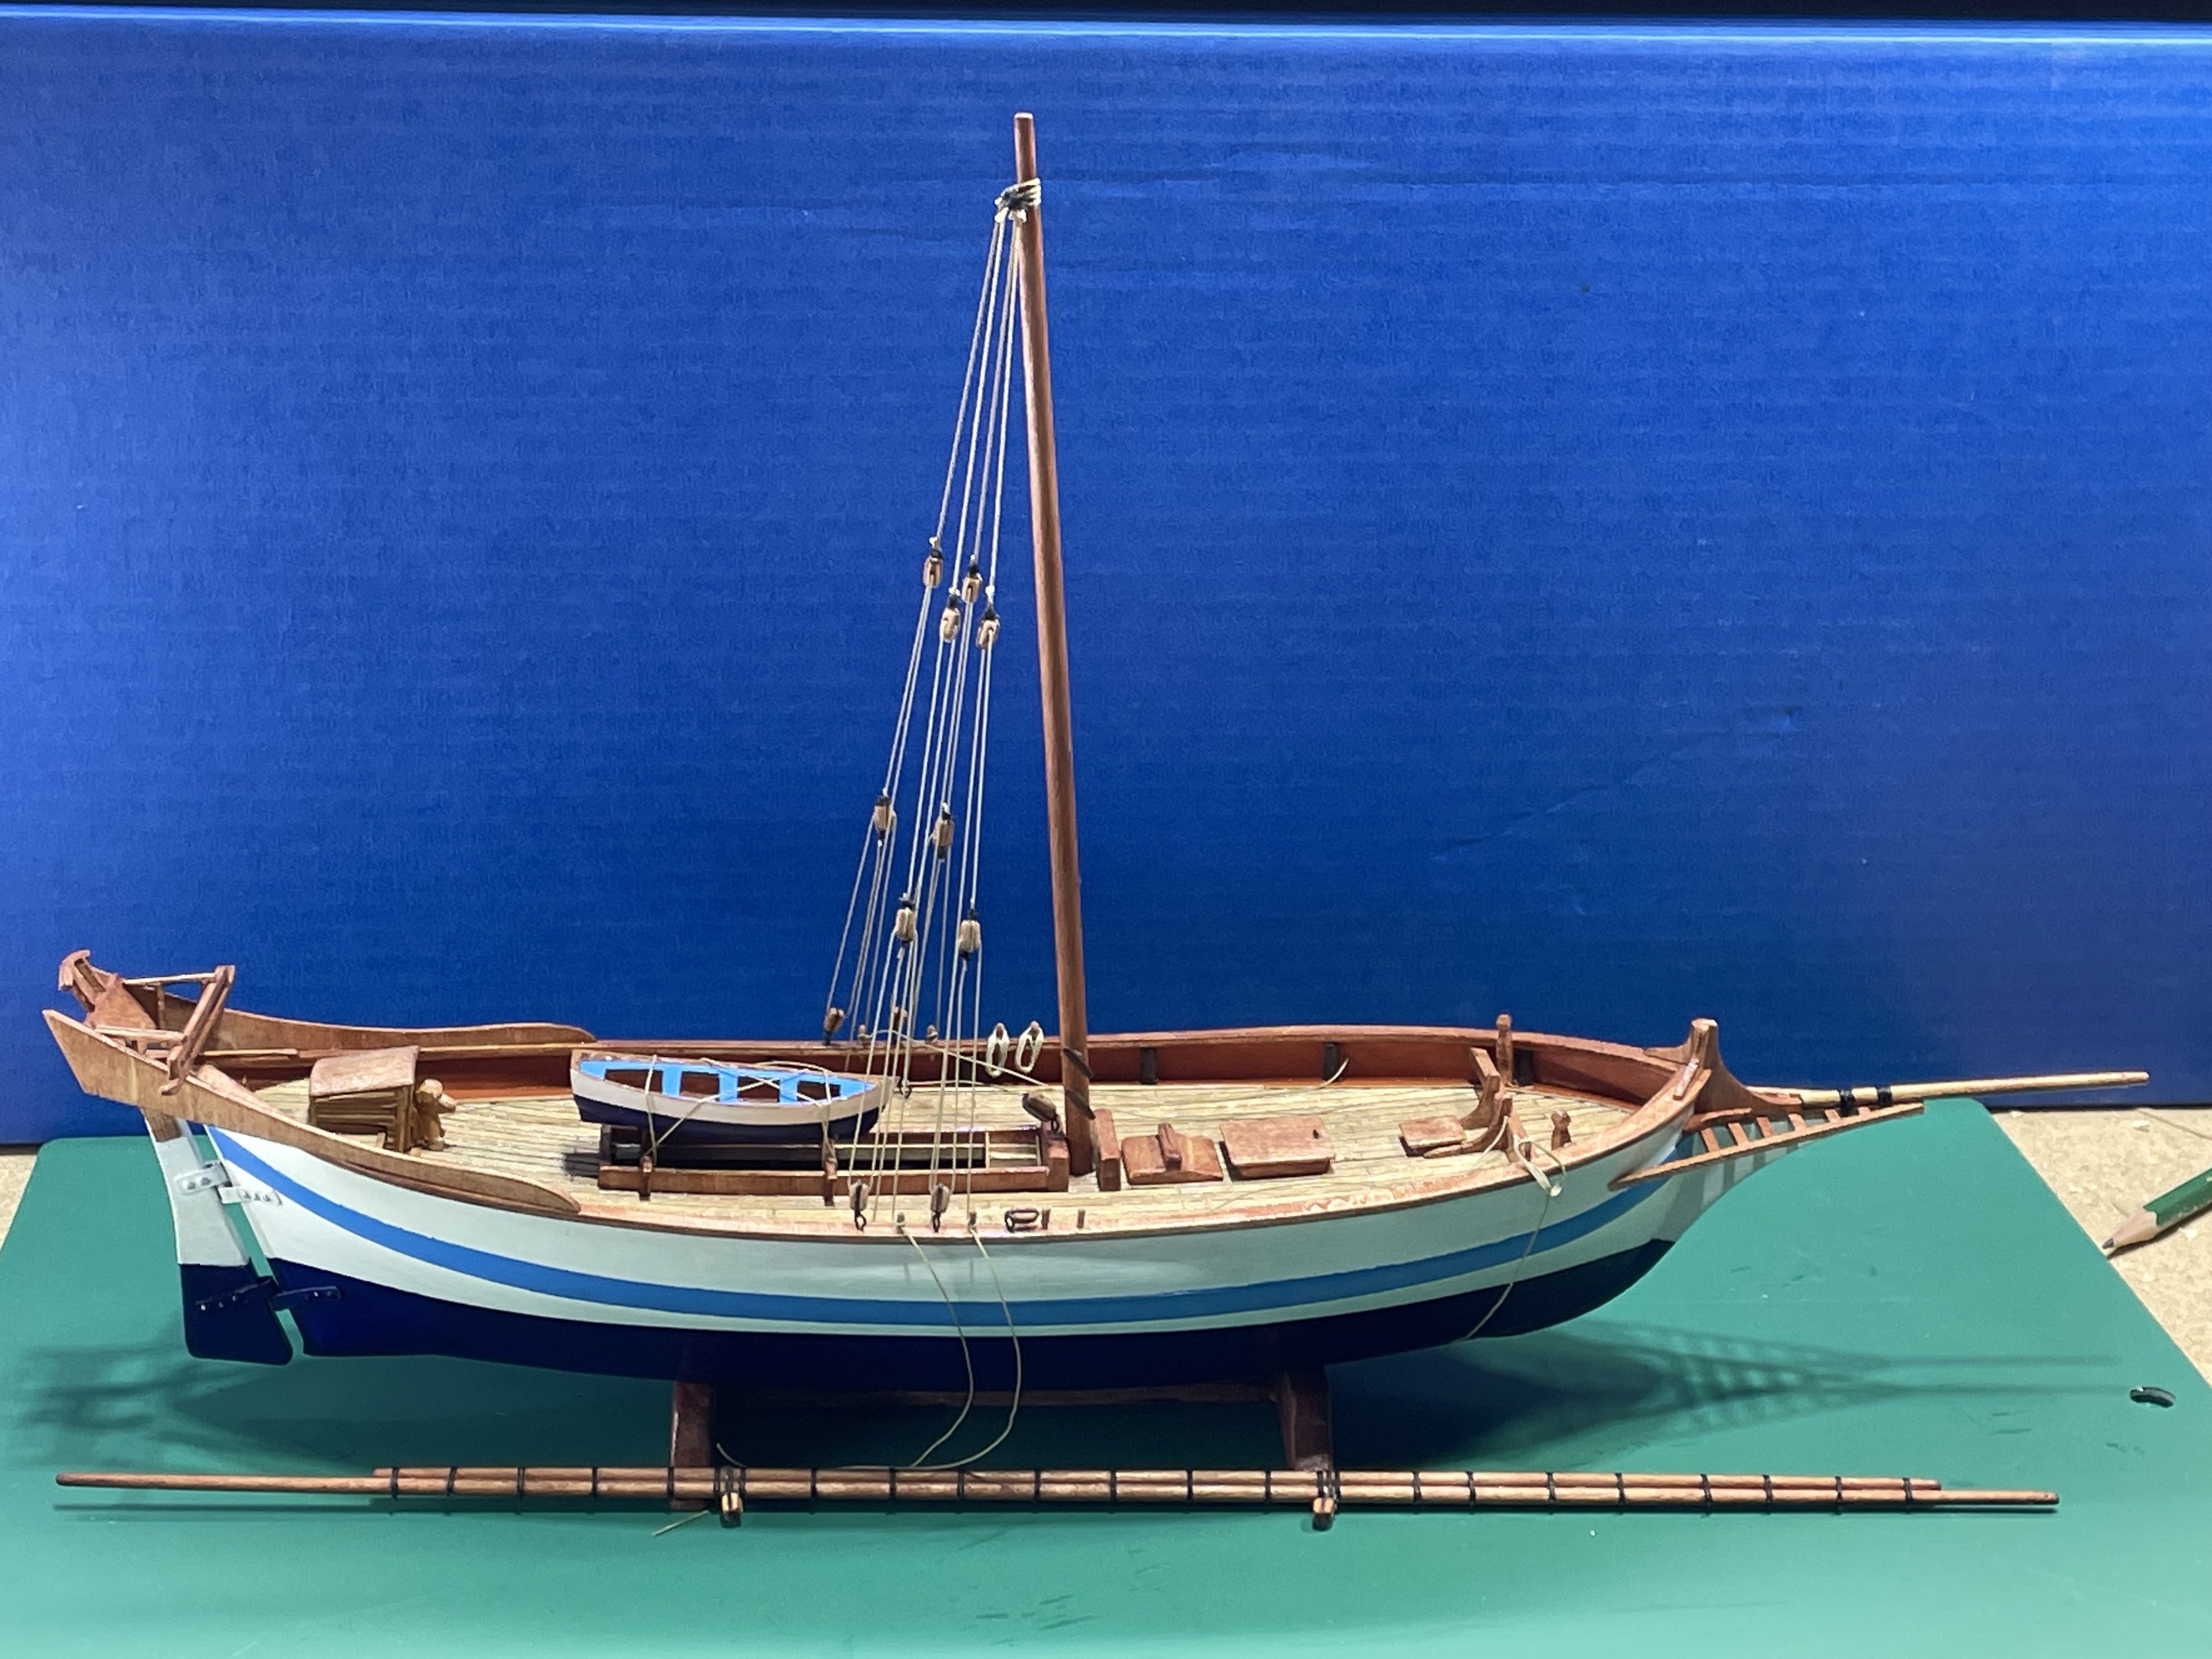
Standing rigging completed, now more work to be done on the sails and the yard.

- 55 replies
-
- 4
-
-
- Le Martegaou
- billing boats
- (and 1 more)
-
Hey J, your pram is looking good. I use a number of different ways to heat the wood depending on what size or how much bend. One thing I picked up for $2 at the thrift store is a ladies hair straightener. It has a temperature dial on it. I just moisten the wood, not soak it then pull it through a few times. most of the time I leave it hanging where it is and move the wood down to it.
- 81 replies
-
- 4
-
-
- Norwegian Sailing Pram
- Model Shipways
- (and 1 more)
-
Thank you both, Ian and Glen for your tips:) after starting them I did order a set of hemostat. I should get them the first of next week. I’m not for sure but I doubt they are smooth:-(
- 55 replies
-
- 2
-
-
- Le Martegaou
- billing boats
- (and 1 more)
-
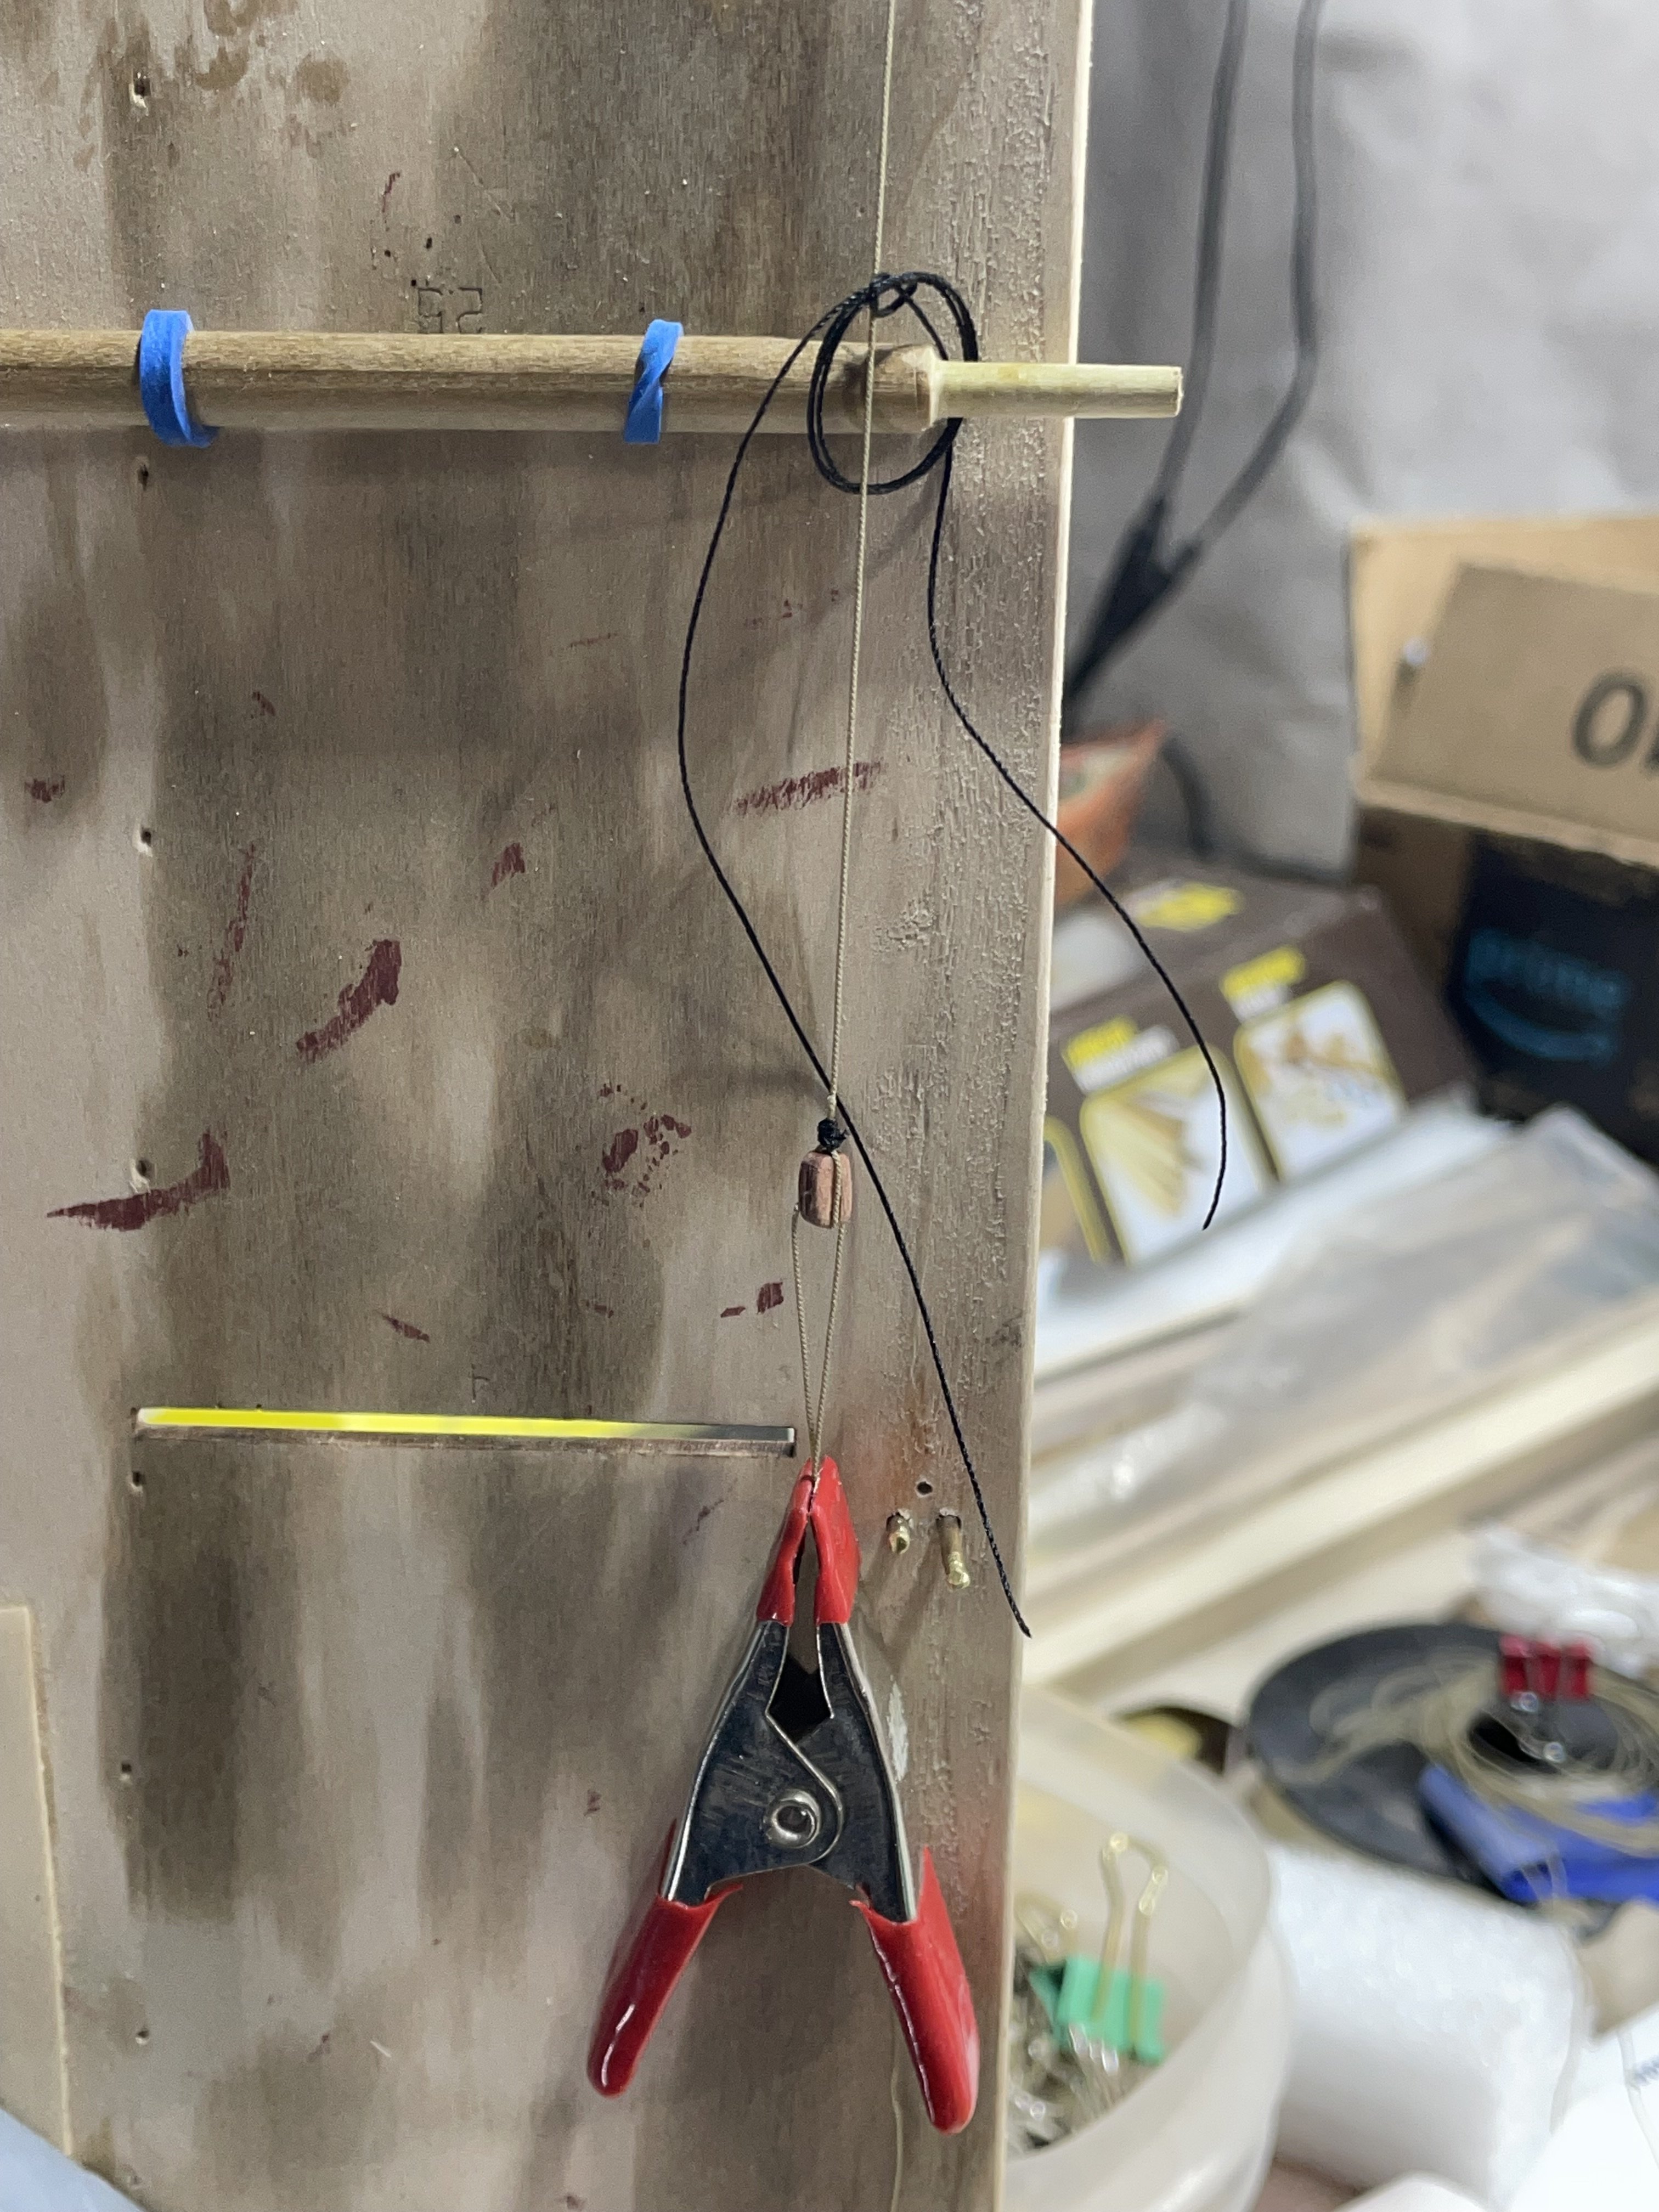
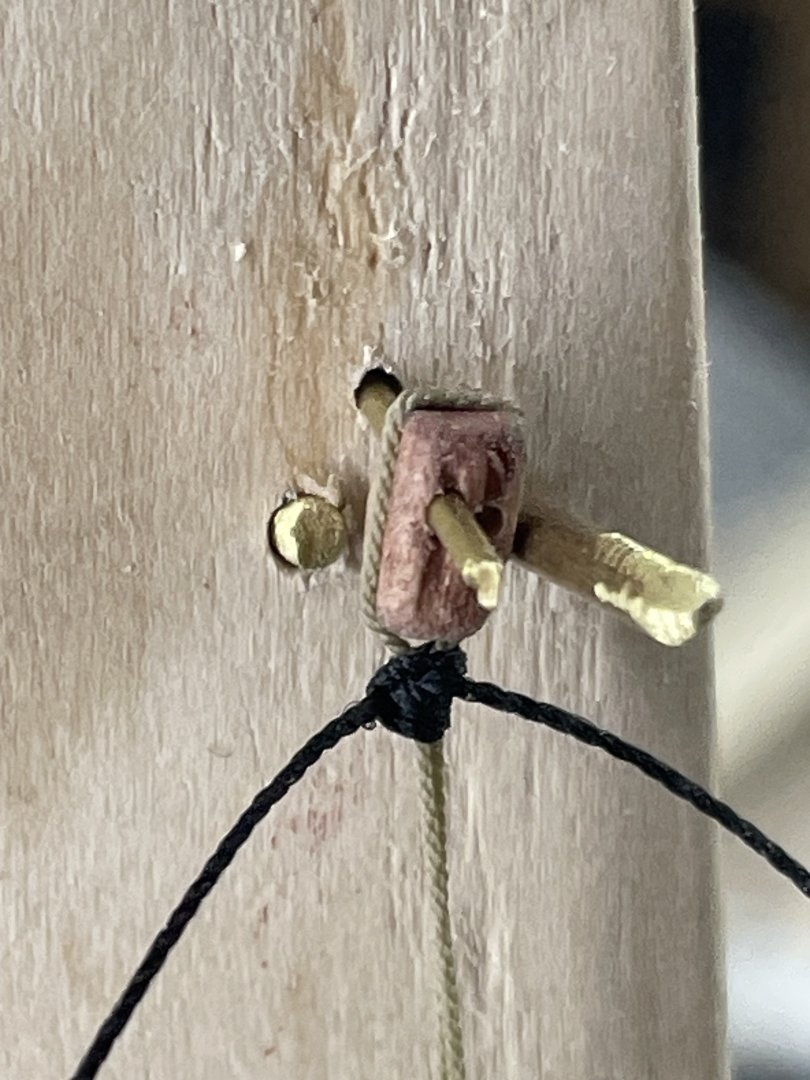
I’ve been studying this rigging since the start of the build. Not seeing any clarity until I actually started working on it. The start was slow due to the fact I was having trouble seizing the lines on the blocks. I spent a day thinking of how to build a jig. Easy and time efficient are definitely not adverbs that describes the use of it. Maybe possible would work. Each stay has 3 ends. One end is tied to an eye bolt on the deck. I tied a clove hitch in this before installing it, which I still haven’t glued the eye bolt. This line passes through the block hanging on the mast and has a double block with another line continuing from it. I used the second hole in the block to tie this line on. That may not be proper but was easier for me. That end looped through the block on the rail and back to its own block. From there it tied to an adjacent pin on the rail. Setting back looking at it now, it’s not that confusing. But looking at those black lines on the plan made me wonder:-) I got 3 more to do plus lots more on the sails before the change to the running rigging. It wasn’t any clearer all hid behind all the standing rigging on the plan.

- 55 replies
-
- 4
-
-
- Le Martegaou
- billing boats
- (and 1 more)
-
Great job Bob, if you are like me, it’s a little sad when the build winds down. But luckily the next one starts it all over again:-)
- 207 replies
-
- 4
-
-
-
- vanguard models
- Duchess of Kingston
- (and 1 more)
-
Nice work Palmerit, I pick up the smallest wooded beads from Hobby Lobby. The ones I got are about 3 mm. Still a little large I think.
- 59 replies
-
- 3
-
-
- muscongus bay lobster smack
- Model Shipways
- (and 2 more)
-
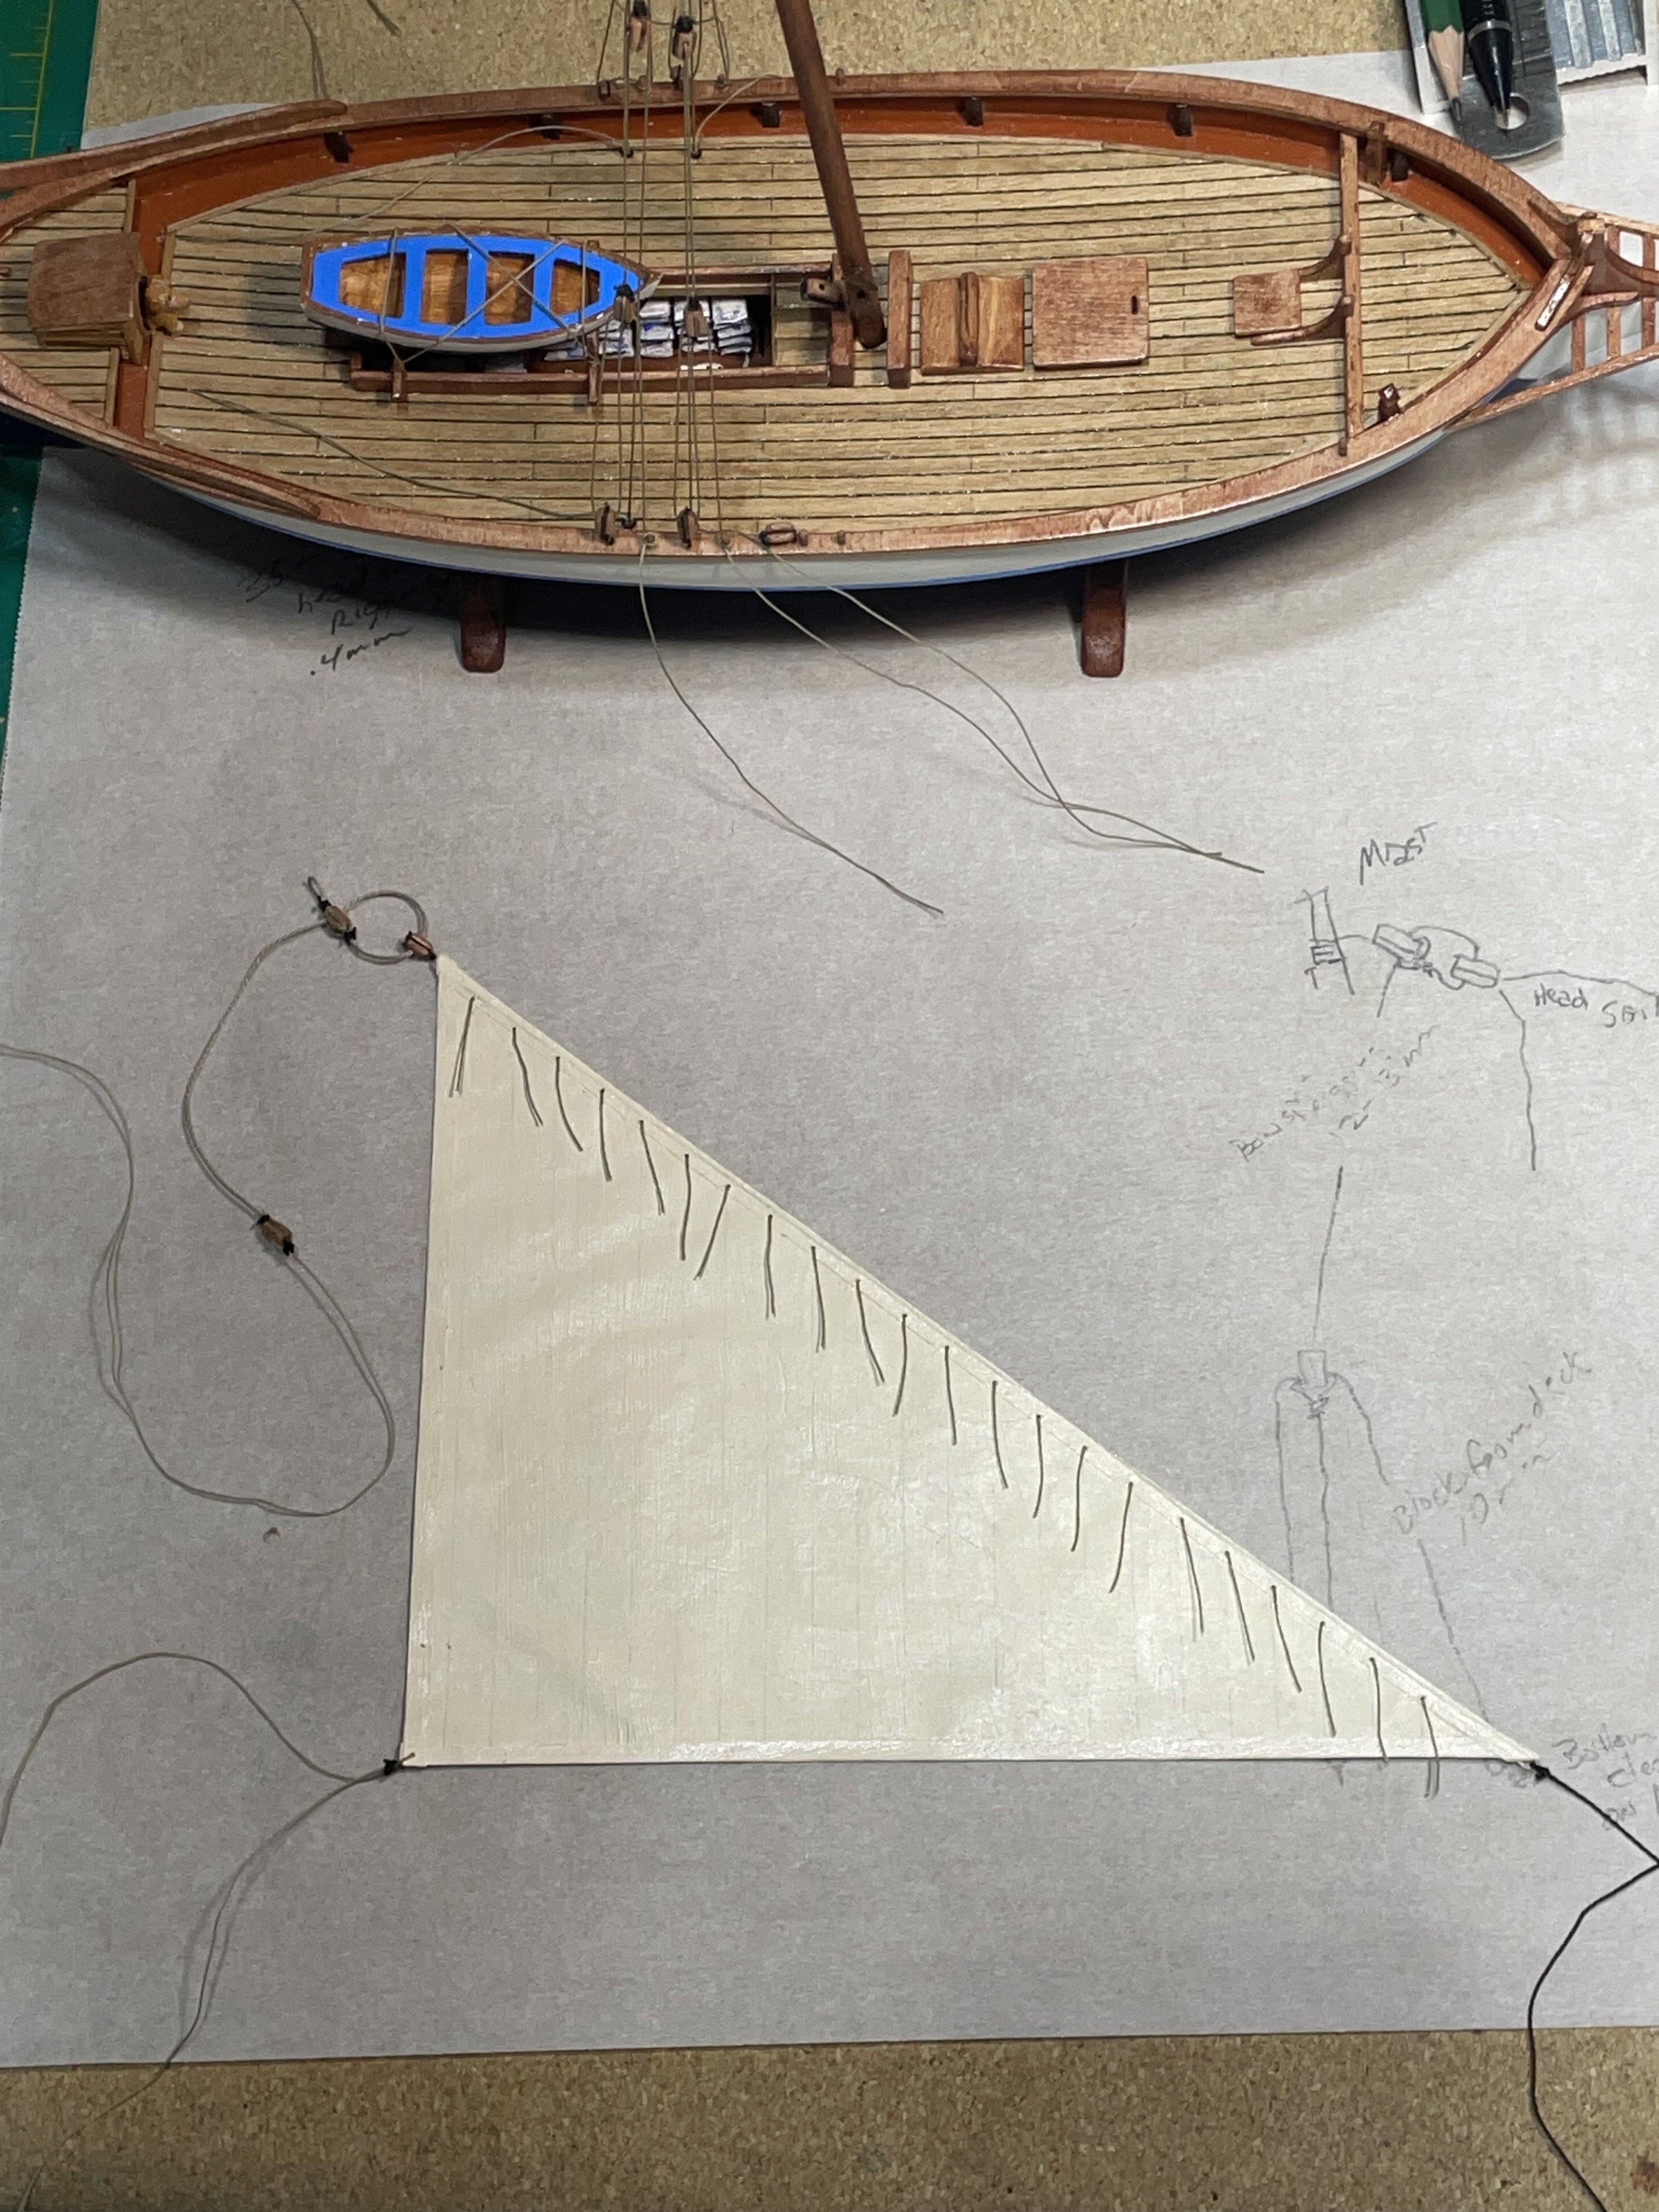
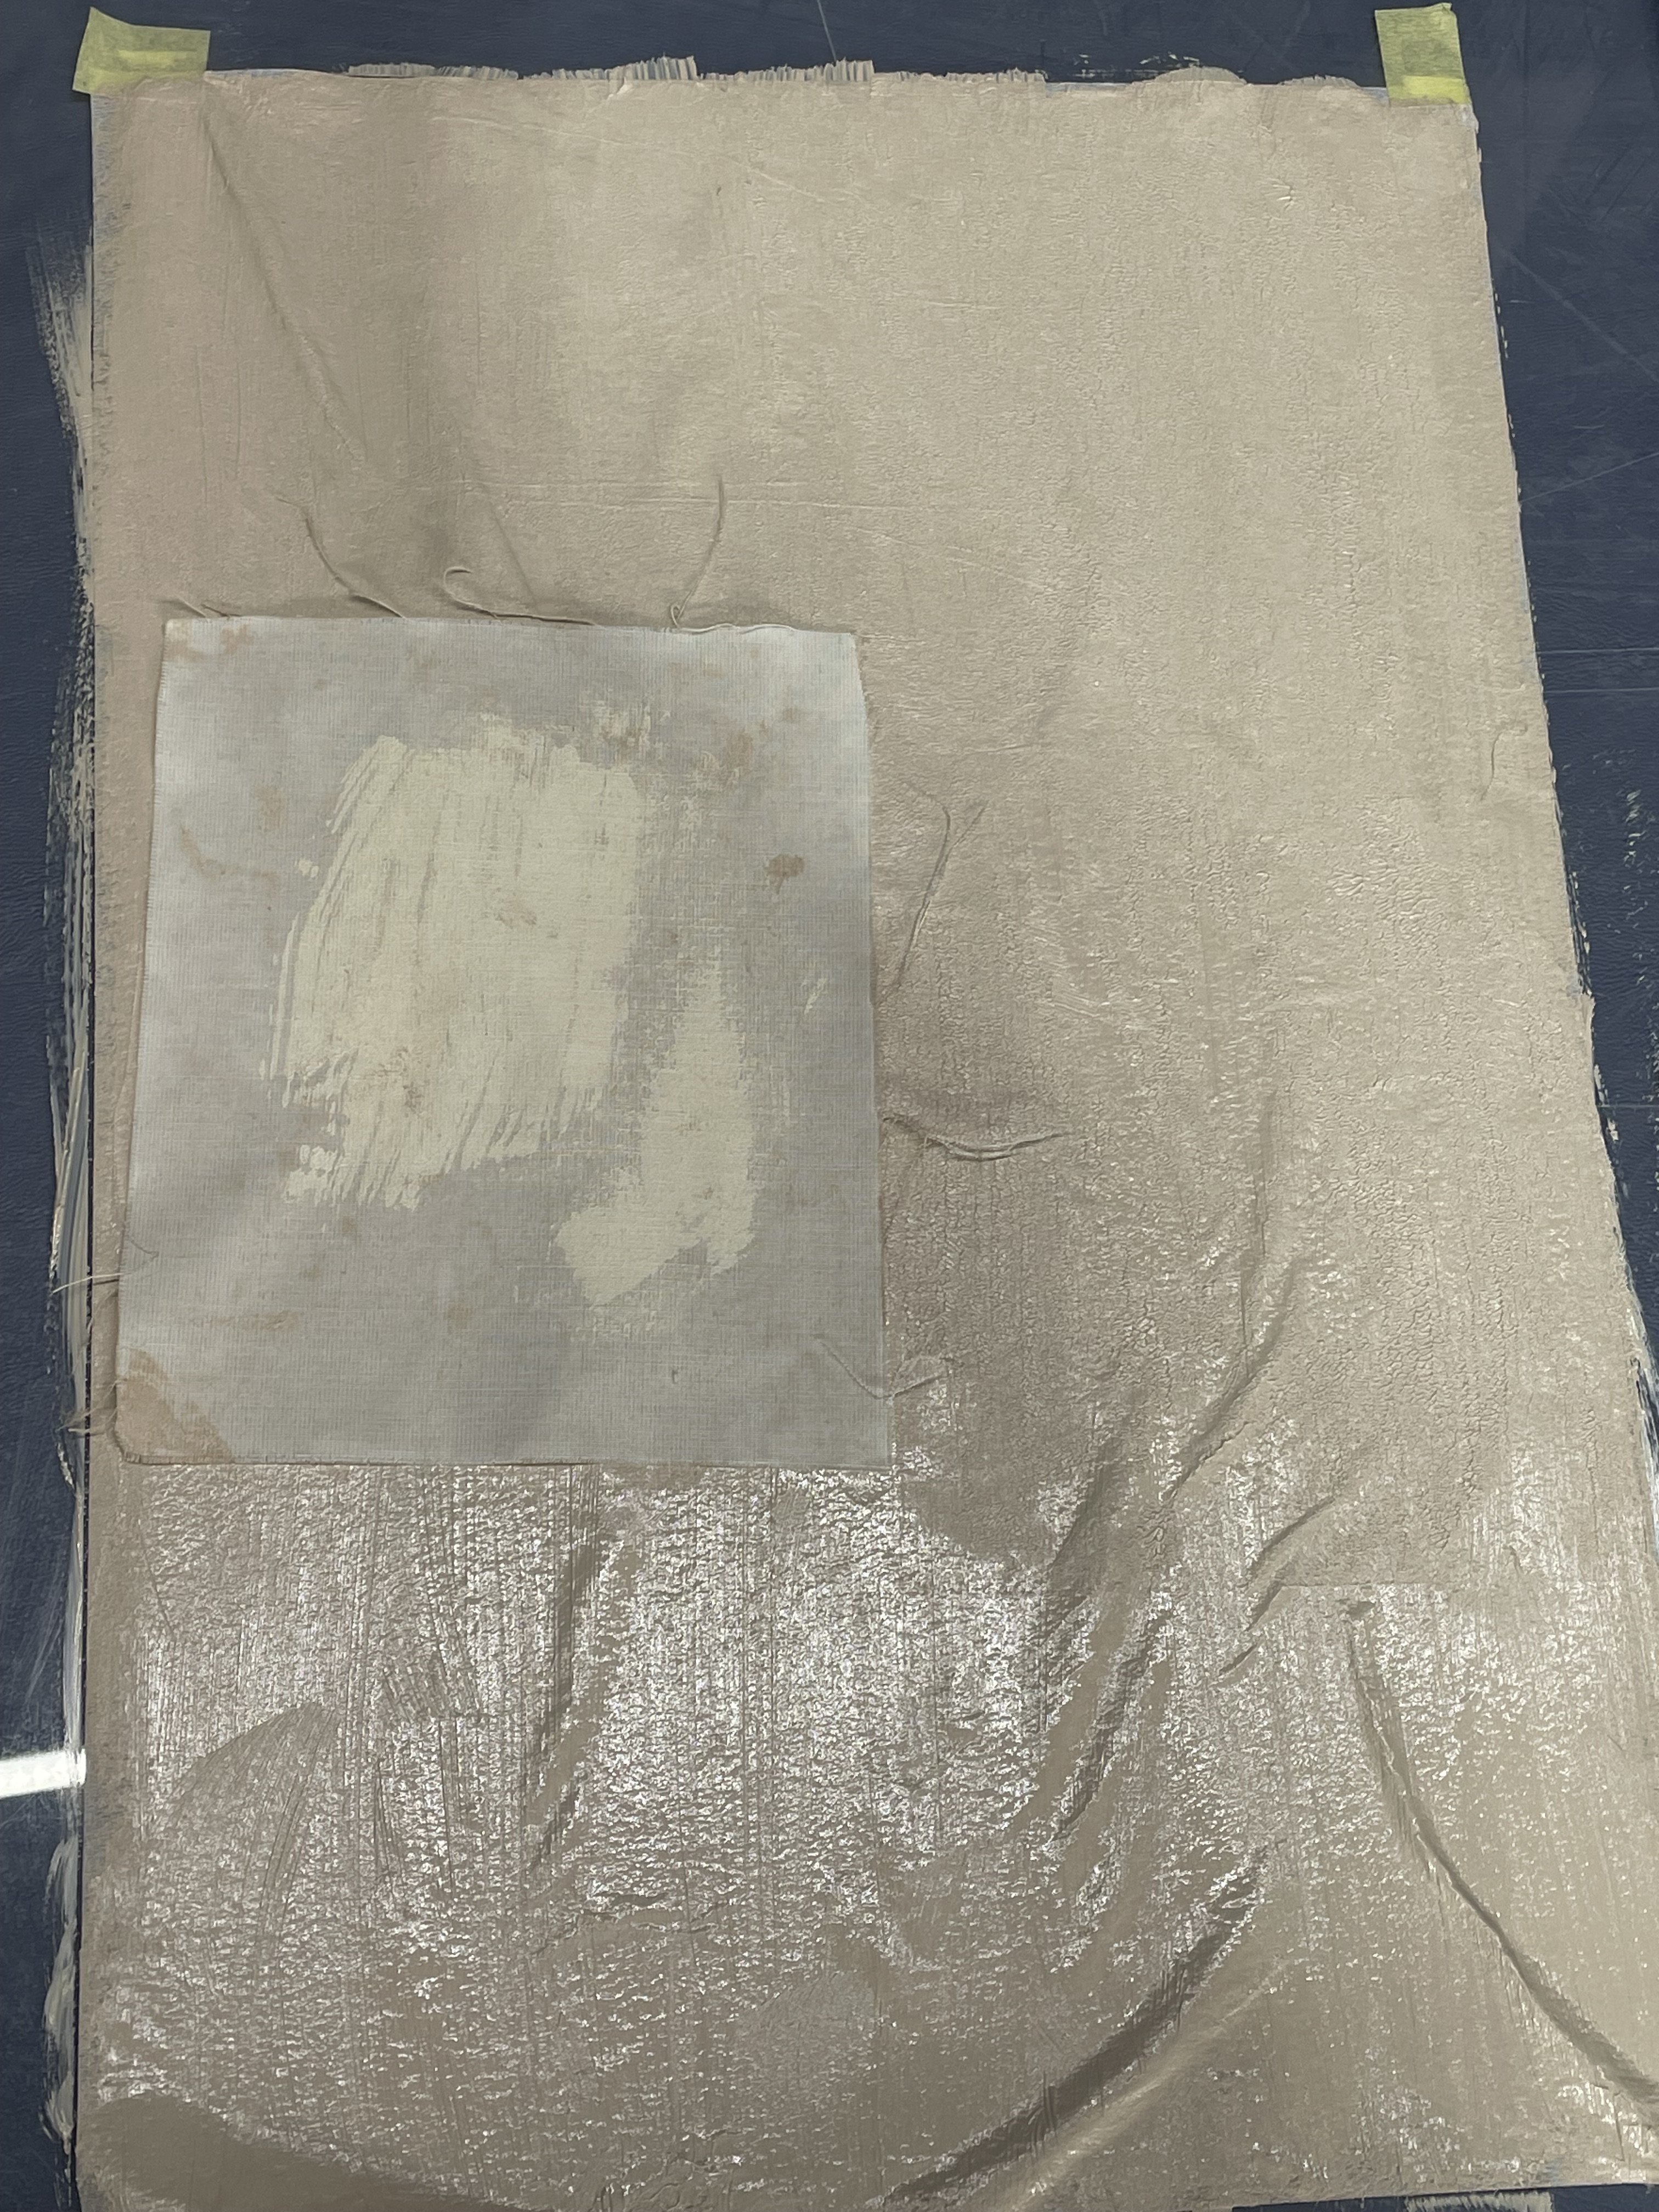
Update on the sails. For starters the fold at the bottom of the main sail still bothers me a bit. I didn’t remember, but when made the sails for the shallop I rolled the paint on with a small foam roller:-/ The thick amount of paint I used along with the brush strokes, I thinks makes it look like. Acrylic? Vinyl? Or maybe microfiber:-) Before I remembered about the roller I tried to think of a way to give it less shine and a different texture. I used a darker paint on this test. I blotted the wet paint with a piece of fabric. I think it looks better. Not fore sure about the darker color. I’ve got about 50 of those ties that hang from the sails. I’m planning on continuing with this set until I mess them up. Then if that happens maybe the next ones, I do better.


- 55 replies
-
- 5
-
-
- Le Martegaou
- billing boats
- (and 1 more)
-
Great Elmir, the wood for the planks is soft and were easy to bend. I wish I had tapered the middle planks in bow symmetrically. I didn’t do the math and played it a plank at a time. Since I was painting the it really didn’t matter except I need to learn to do the math:-) I also think the tapered should have been longer, say 6 - 7 cm.
-
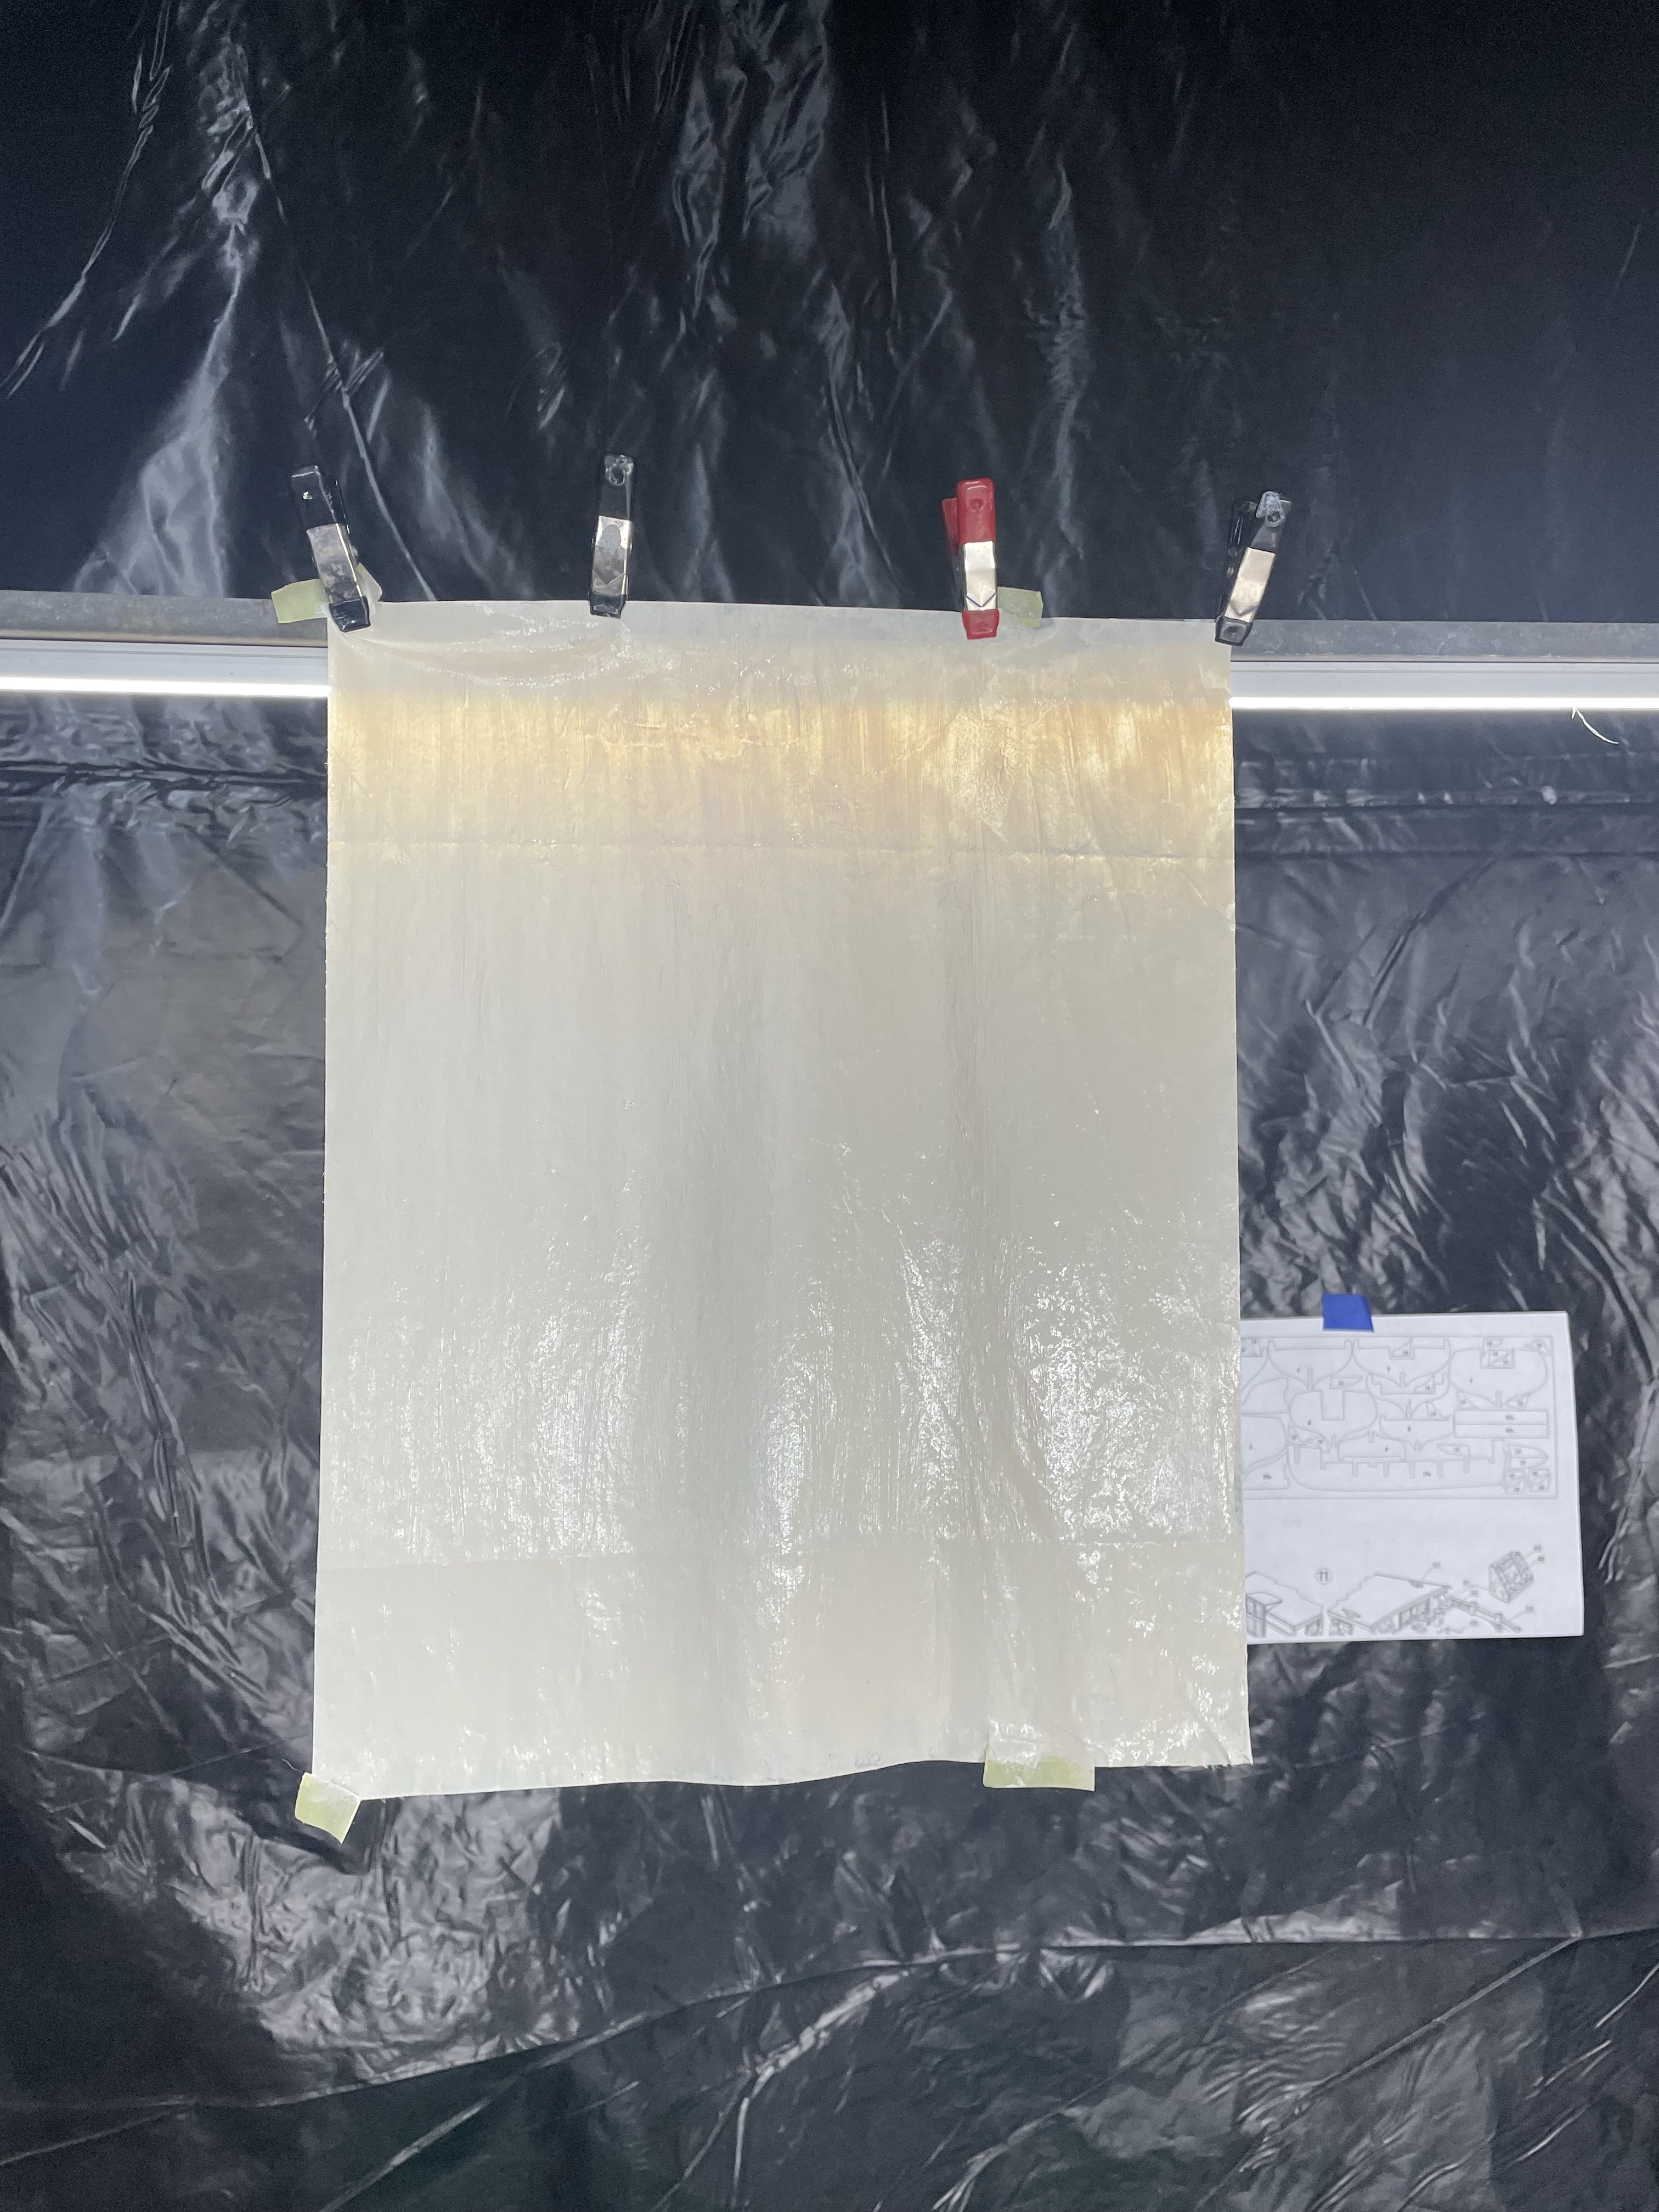
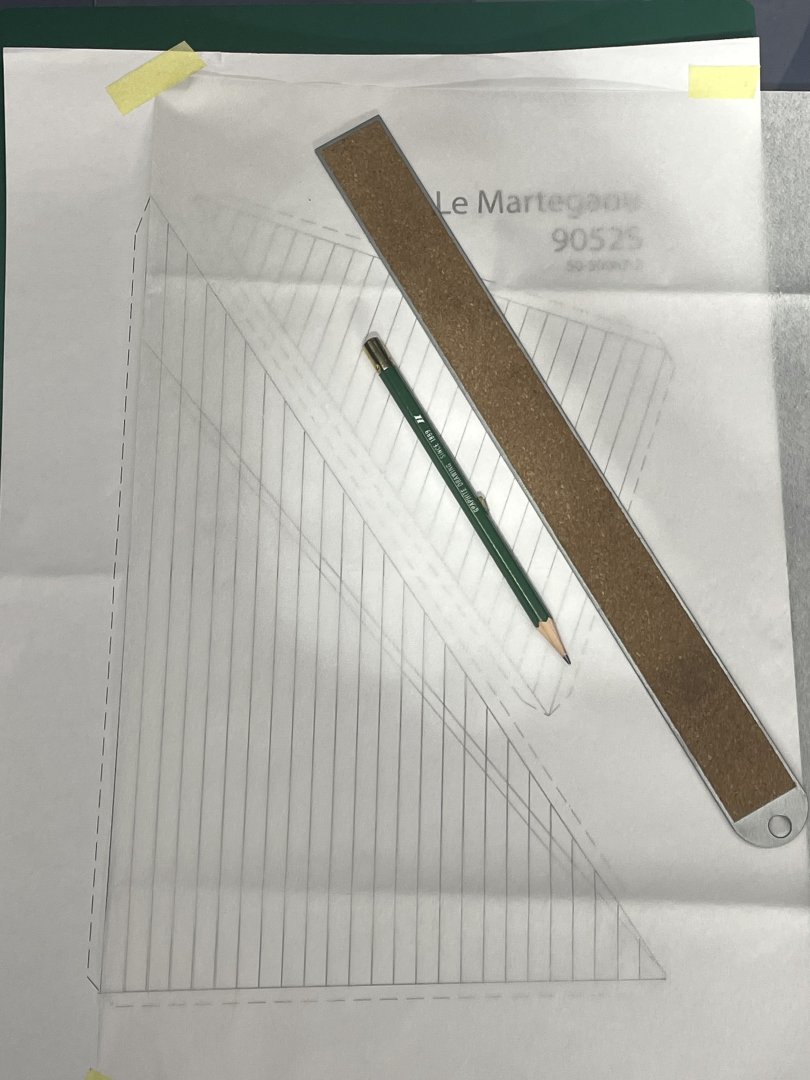
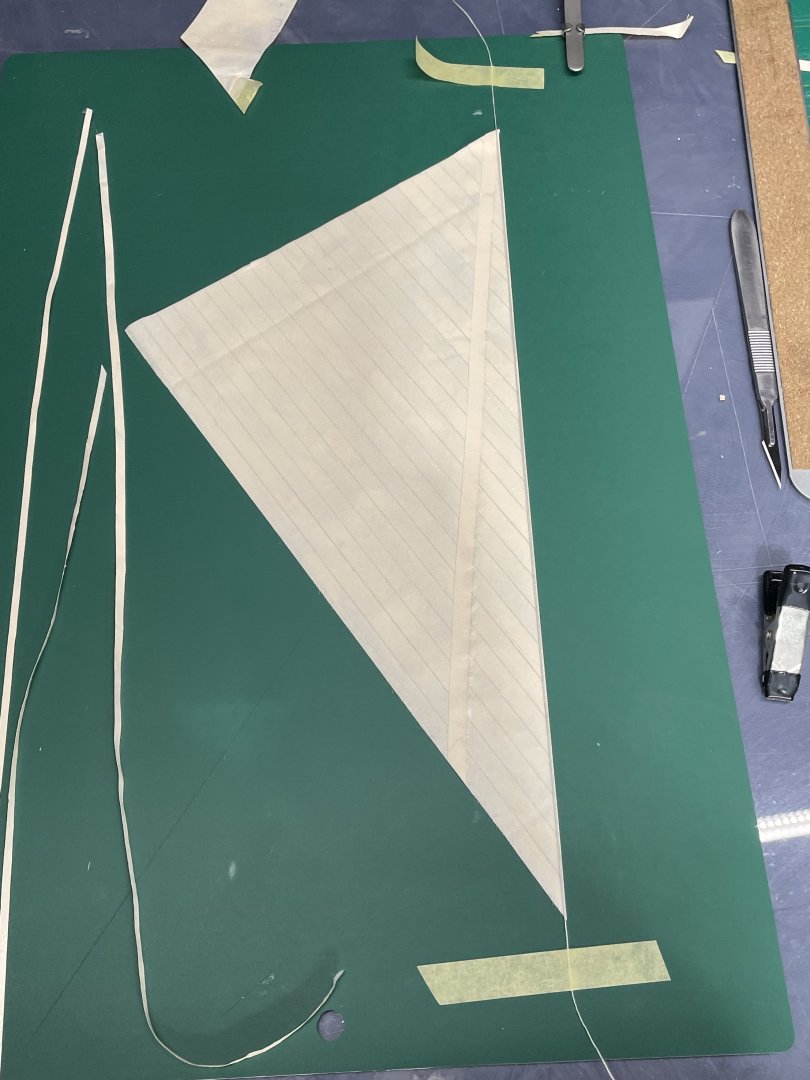
The mast didn’t take too long. It only has one hole for the main sail rigging and two plastic cleats. The yard was two dowels glued together and then tied together with two blocks for pulling in the sail. I started the sail this morning. I traced the main sail on the teabag paper. Then I squeezed a good amount of acrylic paint on it. I was trying to see if I could leave some cloth like texture behind:-) After covering the sheet, it was hung to dry. I’ve made sails for two other ships with this material. Although I think I’ve done each one a little different. They were also smaller sails. I noticed while it was drying I could still see the folds in the paper:-( I’m hoping they won’t be that bad after it’s all done. After it dried a bit I cut the sail out, and some 2 & 4 mm strips for reinforcements and trim. I sandwiched a .1mm thread between the sail and a .2mm strip. After glueing all the strips on the unpainted side, it will dry until tomorrow and I’ll do the same to the painted side.


- 55 replies
-
- 7
-
-
- Le Martegaou
- billing boats
- (and 1 more)
-
I’m no t a seamstress either:-) The last few sails I made I used teabag paper that’s used in paper crafts. It maybe silk span? It’s pretty easy to work with and not very costly. I think it is closer t scale than cloth, but I only tried it because I can’t sew good enough for people to look at:-)
-
Hello Elmir, your river boat is off to a good start. I’m building the same kit. Maybe we can help each other out on the sails and rigging. I’m almost there and let me tell you! It’s not real clear:-)
-
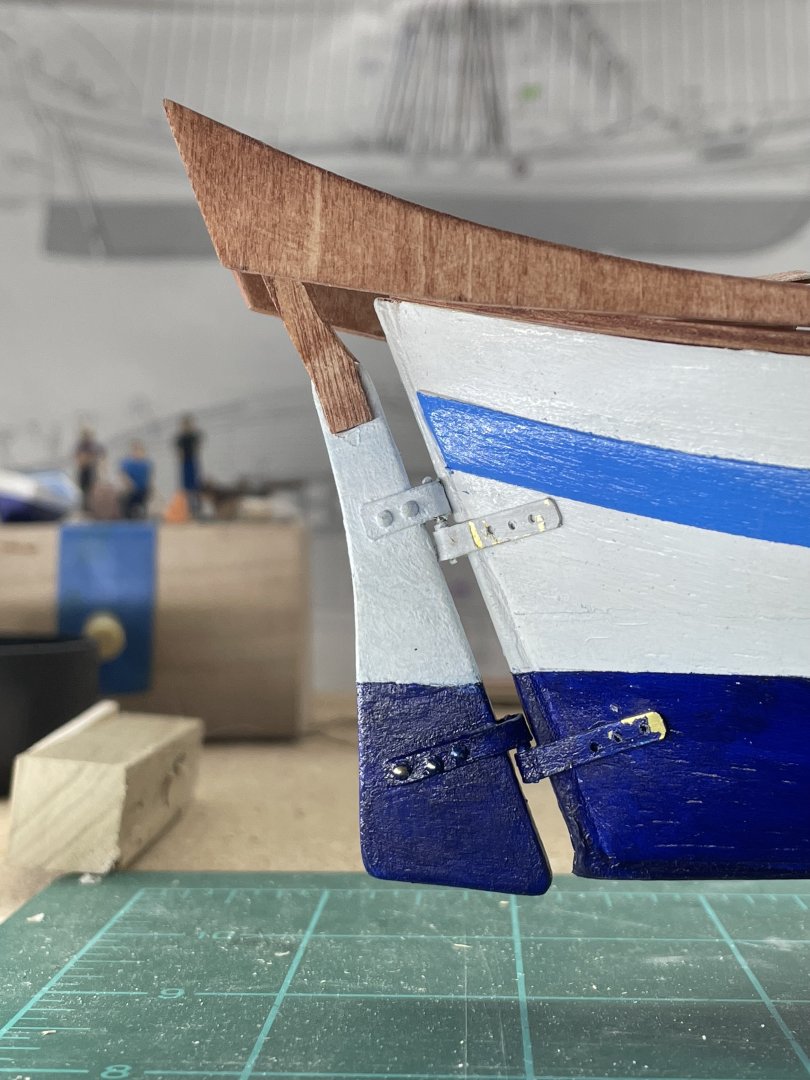
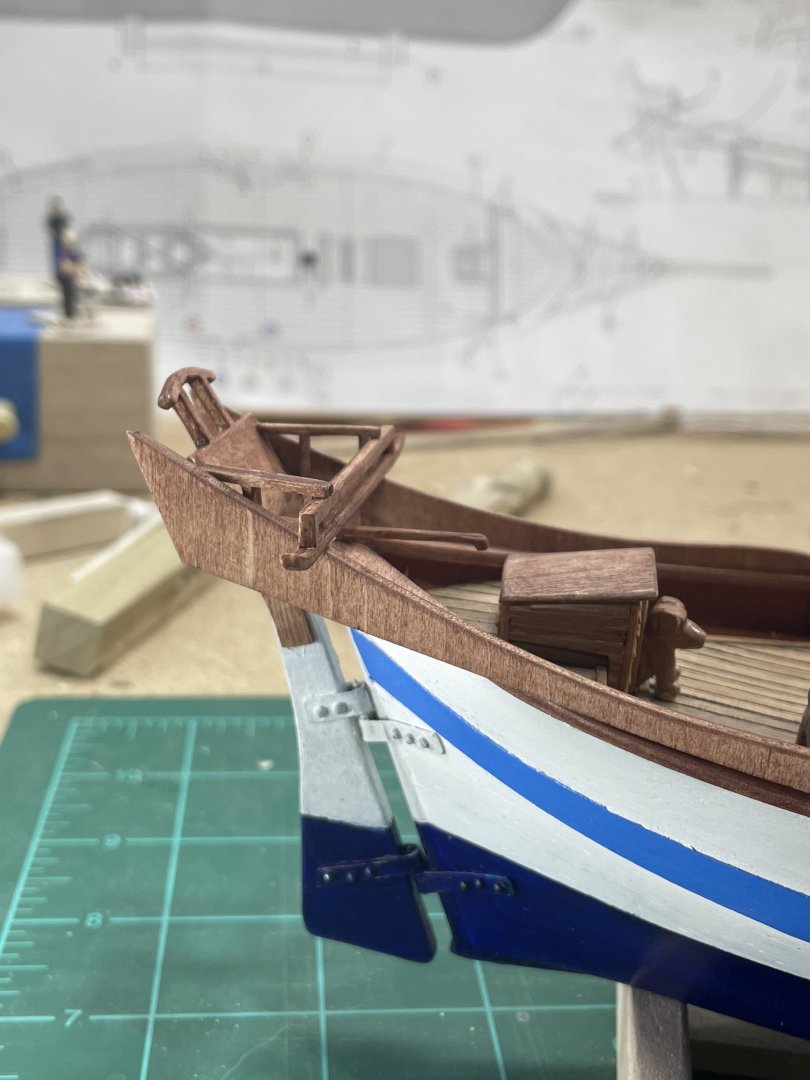
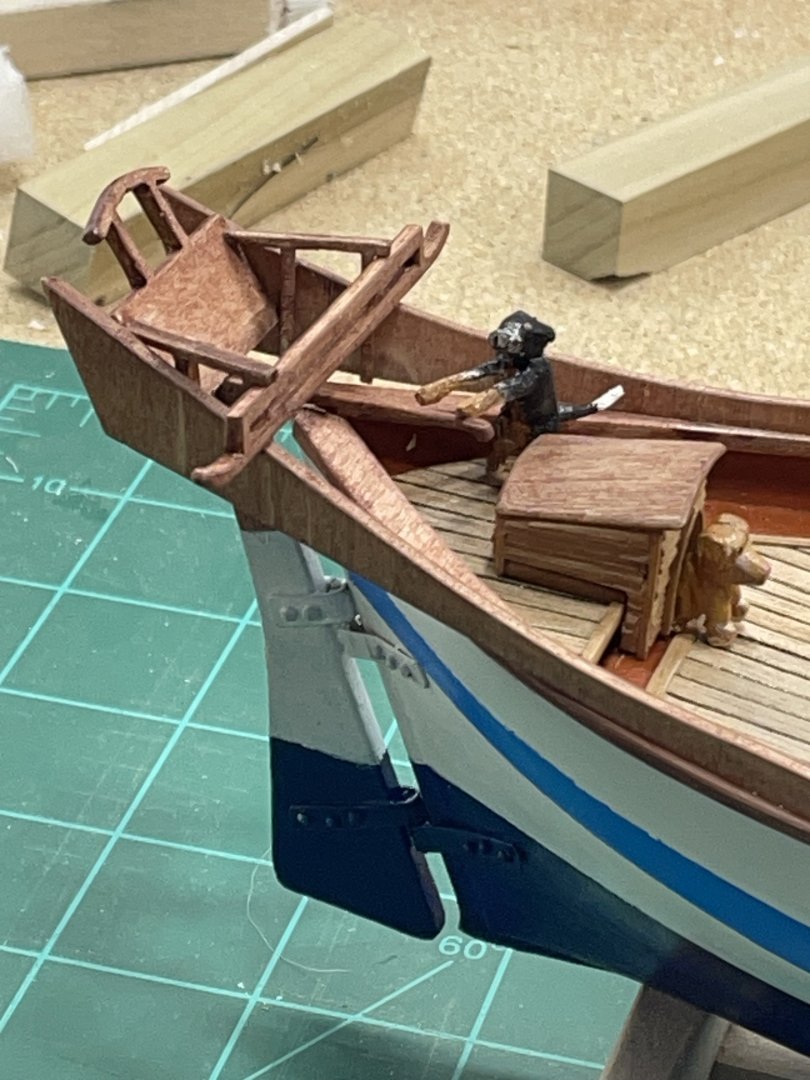
It’s finally warming up to the 30’s:-) So I got the rudder on and the rest of the parts that go on the stern. The kit was designed to just glue wooden tabs together at the rudder. I made hinges and glued them on the rudder. Then I drilled them and put nails in them. i carved another crew member. I wish I knew all the jobs one might have on a boat like this so I could put them at a task. Like steering the rudder:-) or maybe look out:-) Or they could be just like the average, and just stand around:-) Back to the build. Next will be the mast and one long yard made from two dowels tied together with rope. I find that when the build changes from one thing to the other, I’m slow to make that change. Plus I’m working with a contractor to get me moved out of my wife’s she shed and into my own shipyard:-)

- 55 replies
-
- 10
-
-
- Le Martegaou
- billing boats
- (and 1 more)
-
I’ve been watching her lives also. It’s encouraging seeing someone of her skills misplace things, and everything else I experience at my much lower skill level.
- 34 replies
-
- 2
-
-
- muscongus bay lobster smack
- Model Shipways
- (and 1 more)
-
Great job Scott, I love the colors you chose.
-
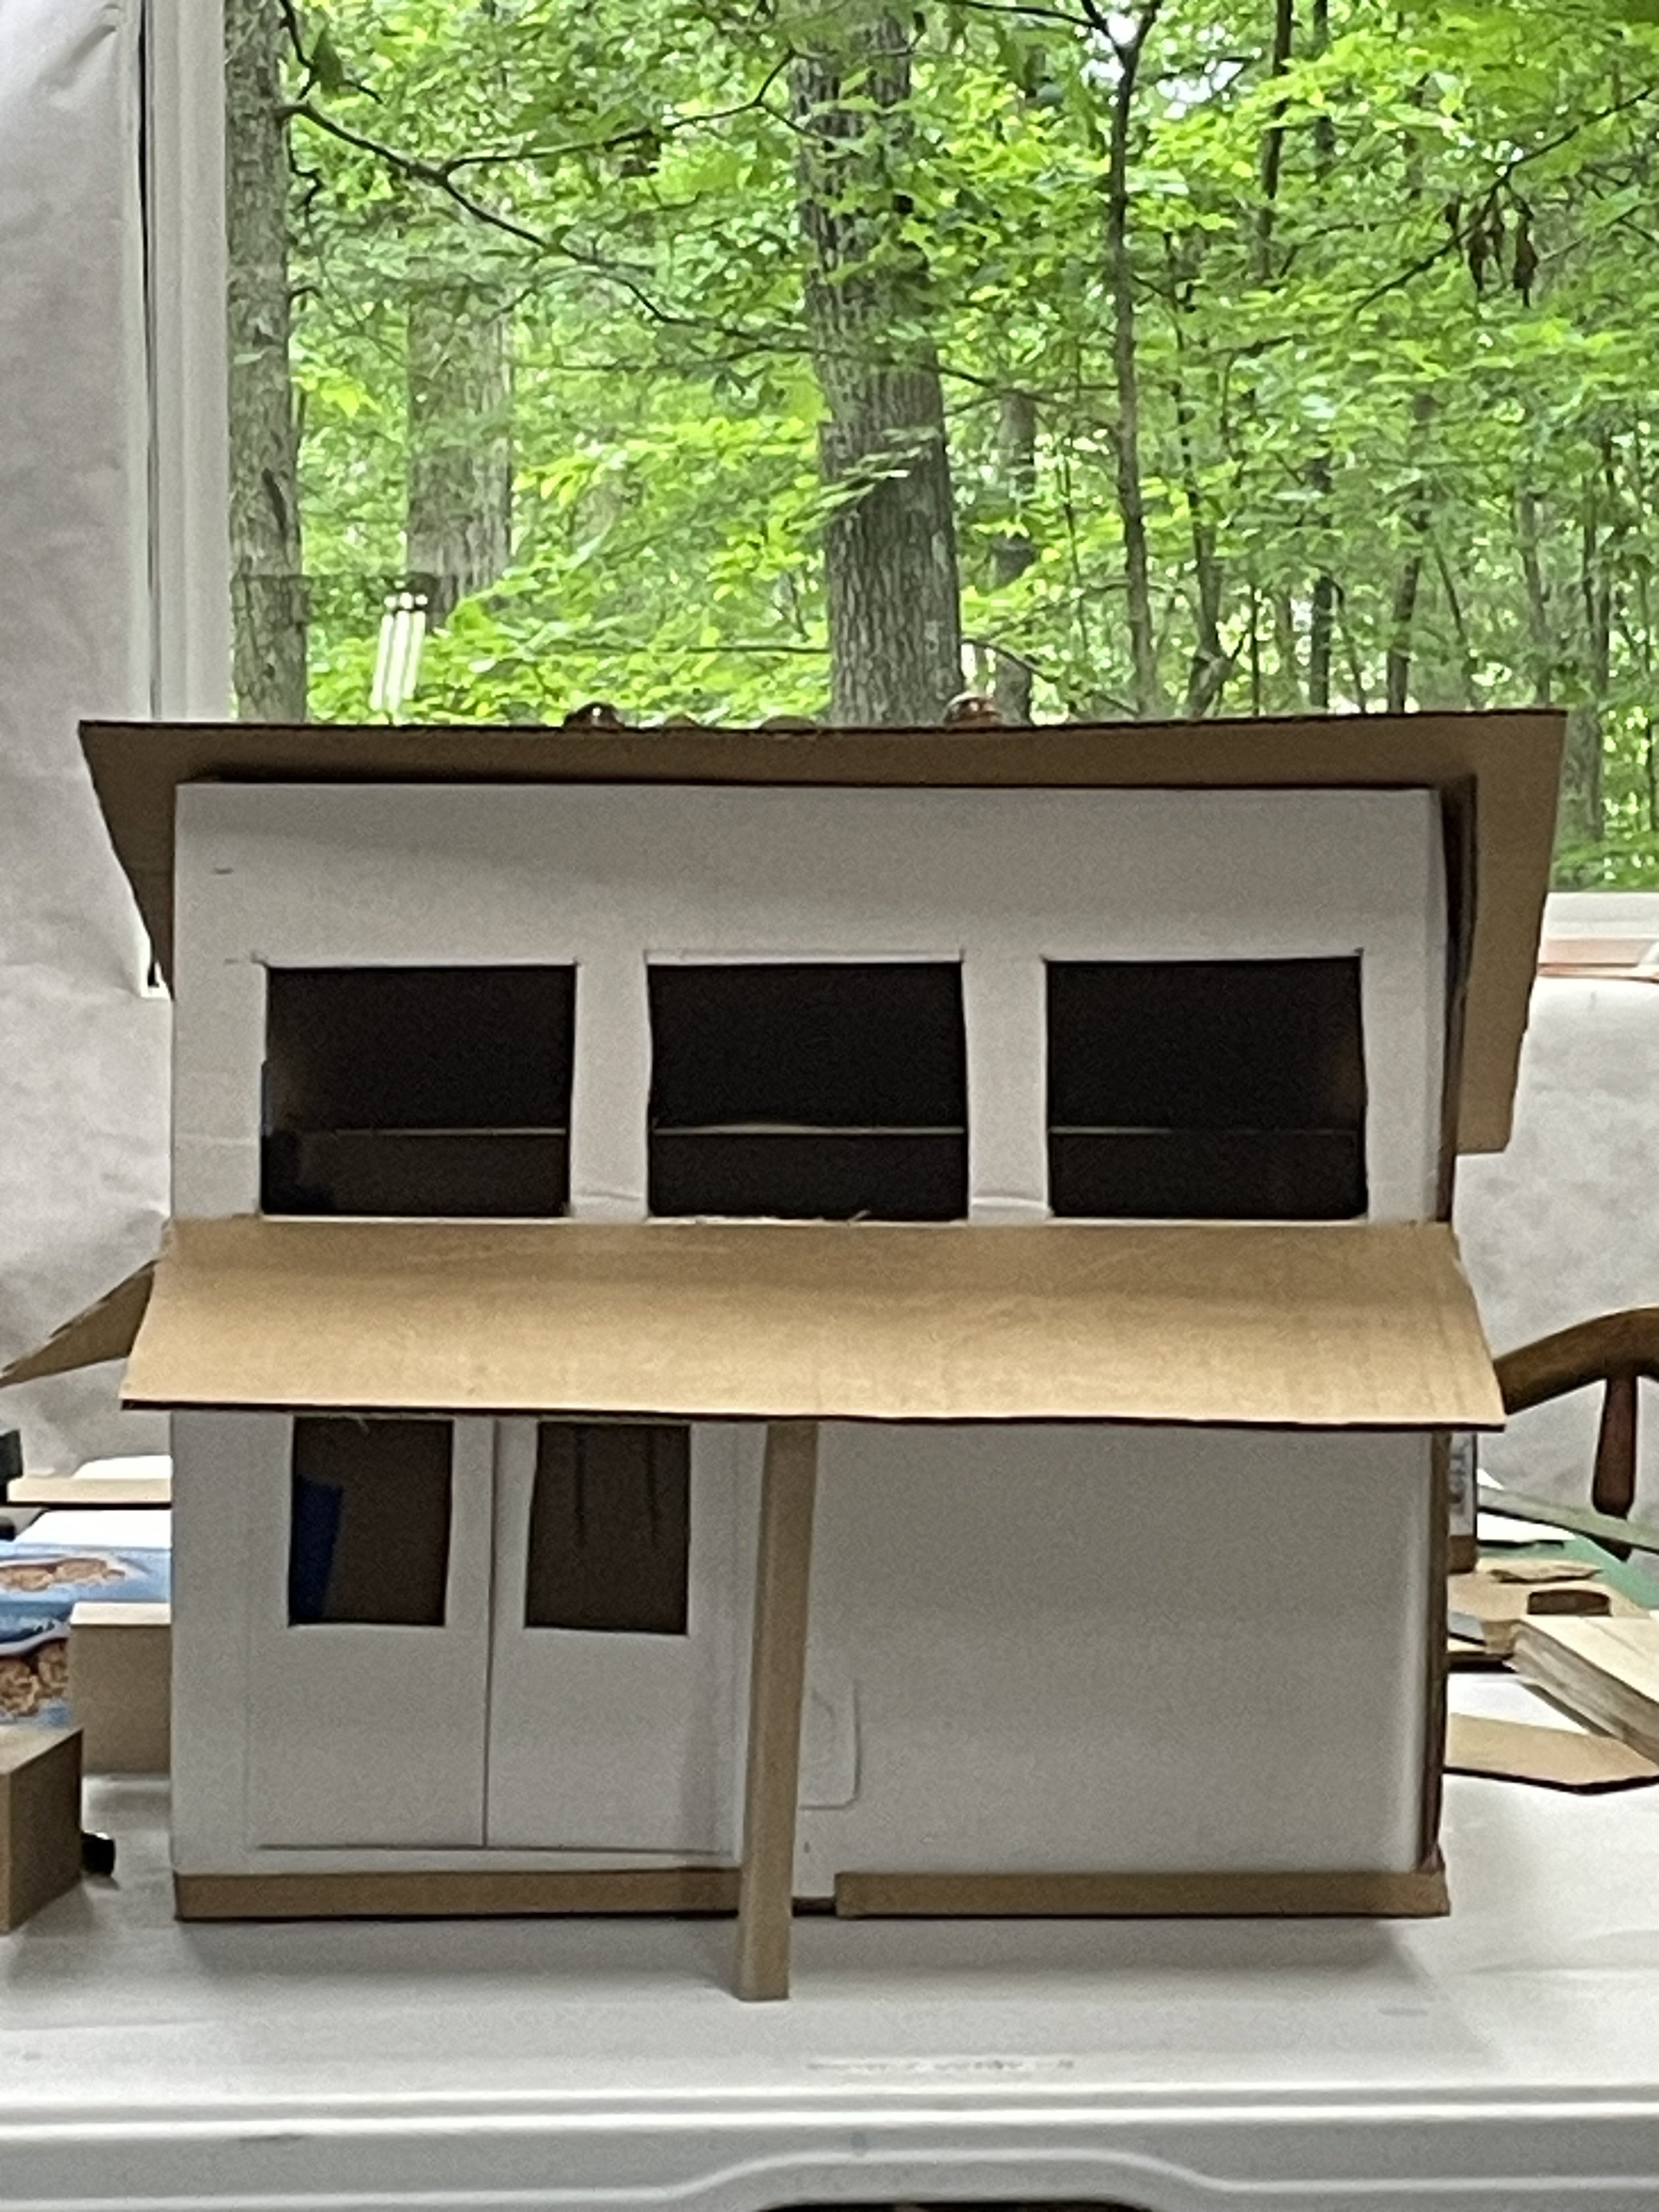
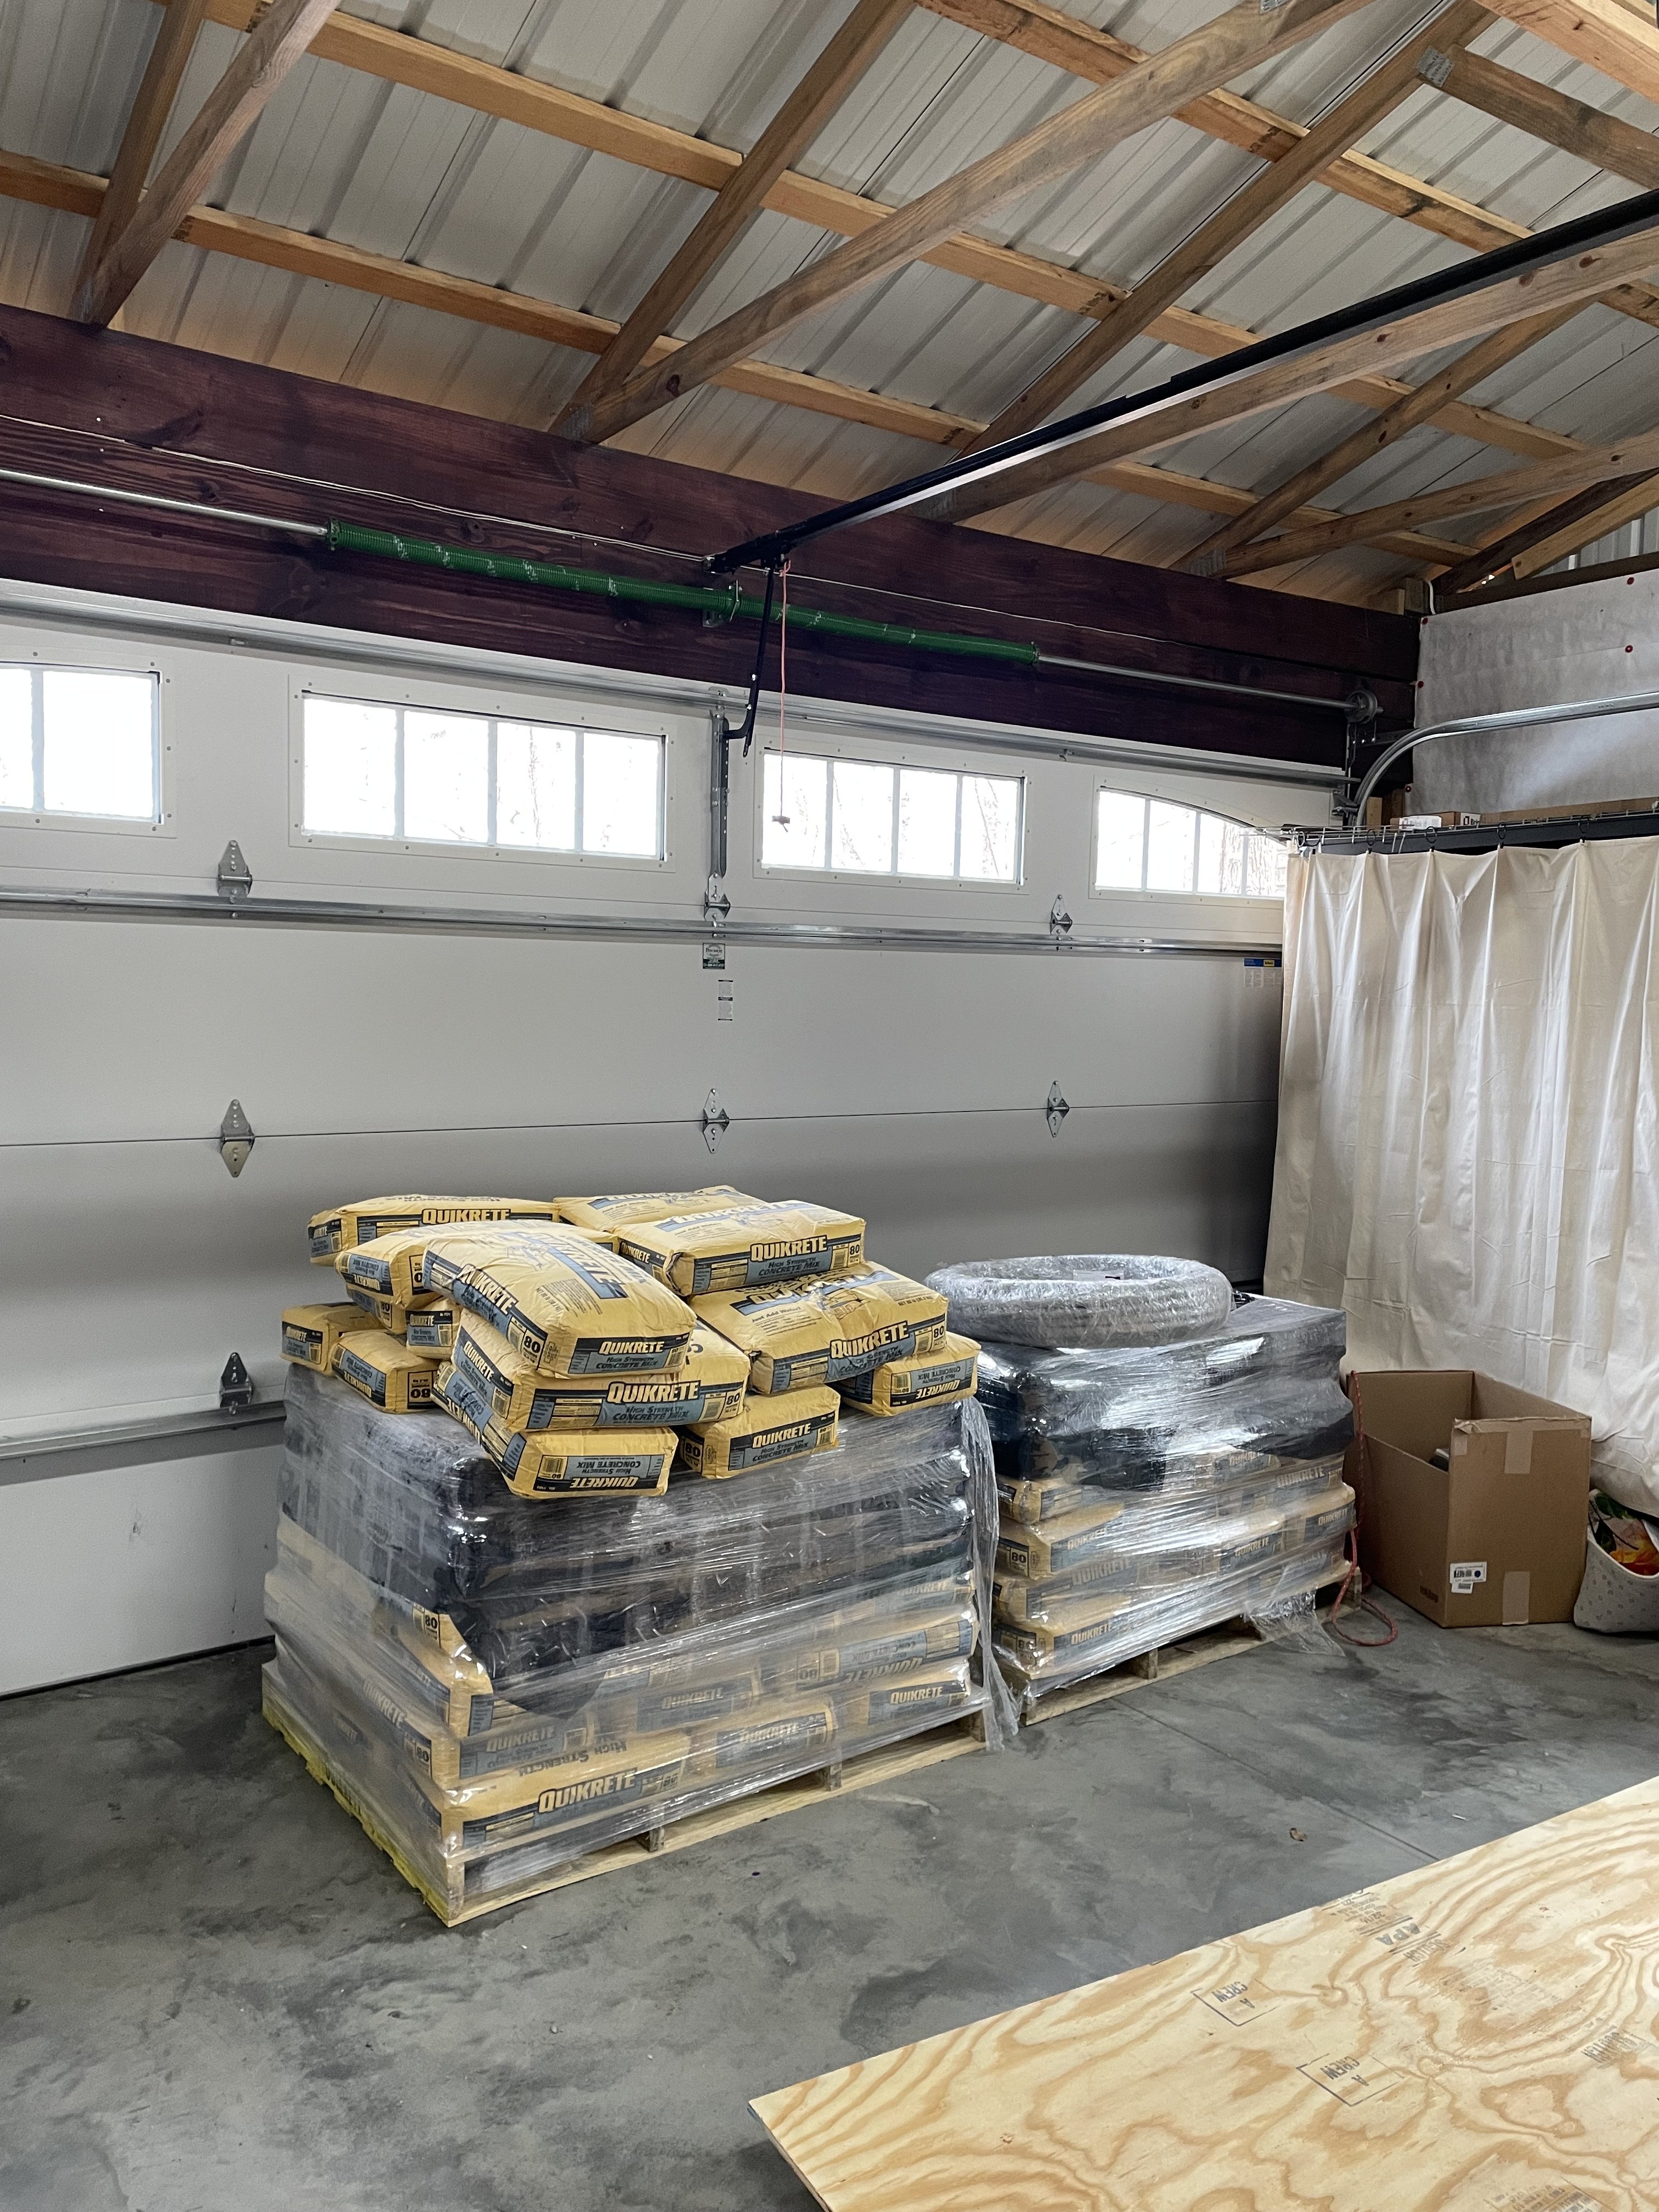
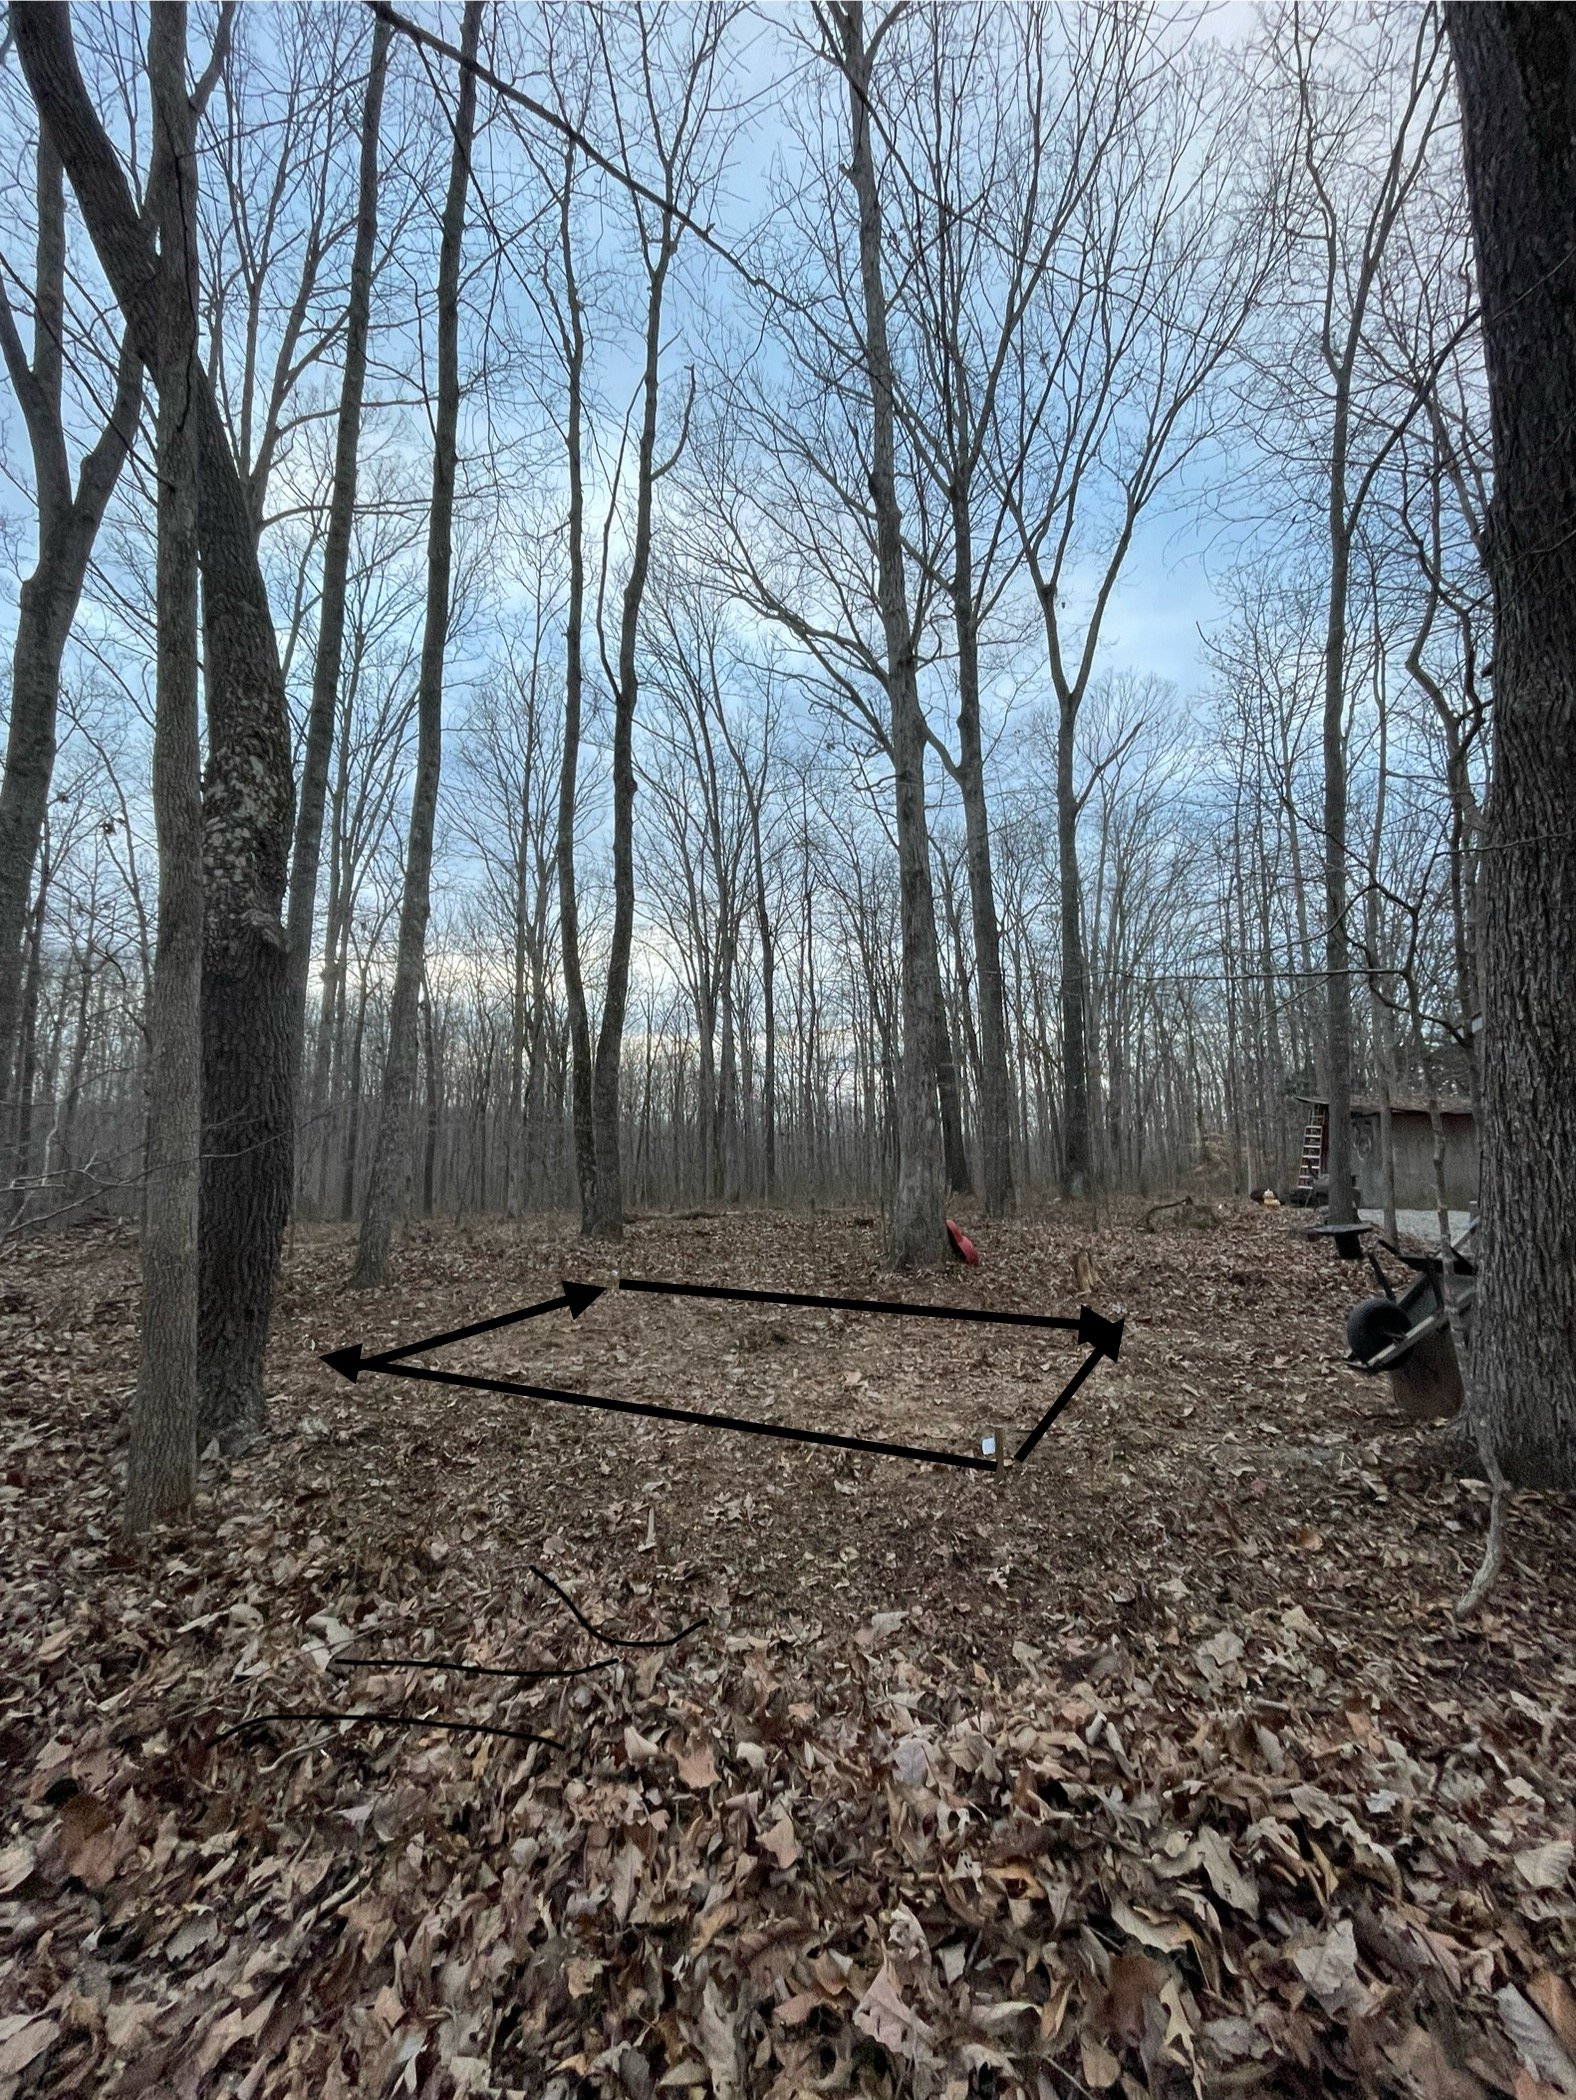
The time is finally here for a permanent Shipyard! I’ve hired a contractor to erect a pole structure by my design. It’s 12’x16’ with a 6/12 pitch salt box style. I didn’t realize at the time, there would be a 6”x6” post in the middle of the right side door. I started thinking if I needed that big of space to get something in. It would probably be heavier than I wanted to lift anyway. So that went away:-) My part of the build is clearing the site, which I’ve worked a couple of days getting it ready. This is a shot from the back side, after it is built. The next things I am responsible for doing, kinda make me feel like I’m going back to work:-) I’ve got to get a 100’ of service cable out of the garage, into the root filled ground and up in side the ship yard. The worst is yet to come. Since it’s being built in the deep woods, no one is willing to pour the concrete pad with out bringing a cement truck up here on our paved drive. So my wife and I are going to mix and pour the concrete with 80lb bags. That’s making my back hurt just looking at it:-)


- 42 replies
-
- 16
-
-
-
Glen, I really appreciate you marking those areas. I haven’t learned the language yet. That will sure help me learn when I can see it, when I see it written. One can’t rely on model boat manufacturers:-)
- 301 replies
-
- 3
-
-
- Constitution
- Bluejacket Shipcrafters
- (and 1 more)