


yvesvidal
-
Posts
3,637 -
Joined
-
Last visited
Content Type
Profiles
Forums
Gallery
Events
Everything posted by yvesvidal
-
 The irony is that the MRC/Trumpeter kit is (was) way cheaper than any Nichimo kit available on Da-Bay for a long time. Now that the Nichimo speculation has ended, the MRC/Trumpeter kit is suddenly "expensive" by comparison. Yves
 -
Peter, thank you for the contact information of the designer. That may come handy one day.... The bow provided in the CAF kit will not match your design and you will have to modify it heavily. CAF uses a cherry wood which is very nice. Yves
-
You have done a great job at replicating the old iron used for these naval appliances. Yves
- 27 replies
-
- 3
-

-
- galley stove
- Syren Ship Model Company
- (and 1 more)
-
Dies will not live forever. Actually, they get damaged relatively fast and this is why manufacturers issue the so called "New Tooling" on a regular basis. The Nichimo kit (50 years old) and the new Trumpeter kit (2022) are two completely different animals and have nothing in common. Yves
-
Will you be preparing a base made of bricks, to display it? Yves
- 27 replies
-
- 2
-
-
- galley stove
- Syren Ship Model Company
- (and 1 more)
-
F4U-1A Corsair by DocRob - FINISHED - Tamiya - 1/32
yvesvidal replied to DocRob's topic in Non-ship/categorised builds
Superb. -
I really like that distressed look on the wood. Makes it so much more realistic. Yves
- 238 replies
-
- 2
-

-
-
- Robert E Lee
- steamboat
- (and 3 more)
-
The Session #1 is a good start, but you should consider getting Session #2 as well, as it will provide all the woods and special parts to cover the hull above the flotation line. I have described my impression of this kit in another thread HMS Bellona 1/48. By the way, the length is more like 1.2 meters or close to 5 feet with a reduced bowsprit. Yves
-
CAF Model also sells a 1/48th stove kit. All made of brass sheets. I am not sure if it is more detailed than the SYREN kit, or not. You can find pictures on my Build Log of the HMS Bellona. Maybe you could build both.... Yves
- 27 replies
-
- 2
-
-
- galley stove
- Syren Ship Model Company
- (and 1 more)
-
NONSUCH 30 - 1:24 SCALE - By Model Shipways
yvesvidal replied to kurtvd19's topic in REVIEWS: Model kits
Seems like a very nice kit. The finished model is gorgeous. Yves- 1 reply
-
- 2
-
-
Well, we know for sure that Vanguard Models releases their kit infinitely faster than Amati.... Time to start saving !! Yves
- 488 replies
-
- 7
-
-
- Indefatigable
- Vanguard Models
- (and 1 more)
-
Rob, The ladder are provided in the kit. Quite easy to assemble (you almost do not need glue). Then I stained them with some oak stain. The treenails are simply done with a mechanical (0.7 mm) pencil. They are sealed with multiple coats of Wipe on Poly. Yves
-
1/200 Trumpeter IJN YAMATO - issued by MRC/Gallery Models
yvesvidal replied to yvesvidal's topic in REVIEWS: Model kits
Mike, Yes that 1/10th scale model is located in the Japanese museum, commemorating the Yamato, if I am not mistaken. That model is incredible. Yves- 104 replies
-
- 3
-
-
- MRC/Gallery
- Yamato
- (and 1 more)
-
Rod, this model is absolutely superb. Like you, I love the wood contrast with the beautifully painted hull and the brass pieces. It makes for a very traditional model and a museum piece, at the same time. Thank you for realizing this unusual and often left aside model, of a beautiful tugboat. Yves
-
1/200 Trumpeter IJN YAMATO - issued by MRC/Gallery Models
yvesvidal replied to yvesvidal's topic in REVIEWS: Model kits
A few pictures from a French Forum, showing the YAMATO in 1/100 scale, basically 8 times bigger than the Trumpeter model: The gentleman who built the Yamato, also built a few other battleships, all in 1/100 scale: Yves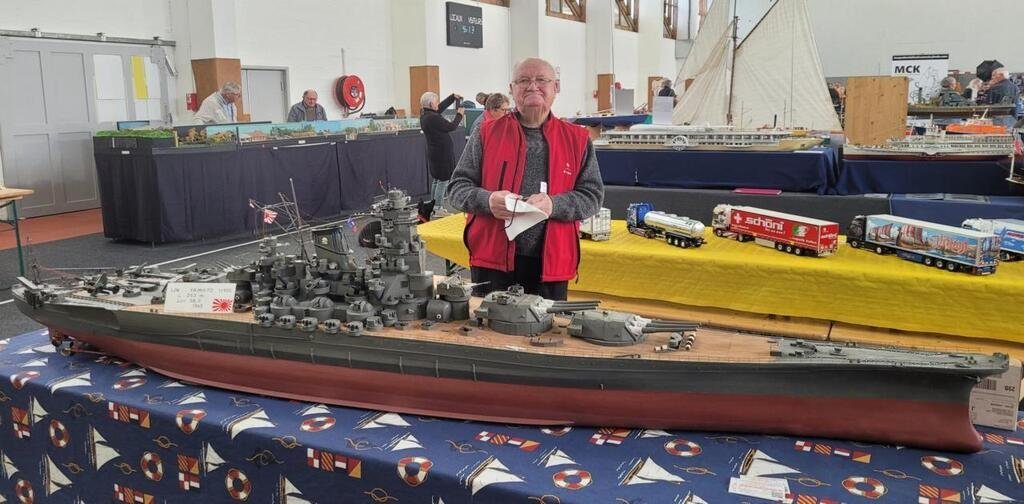
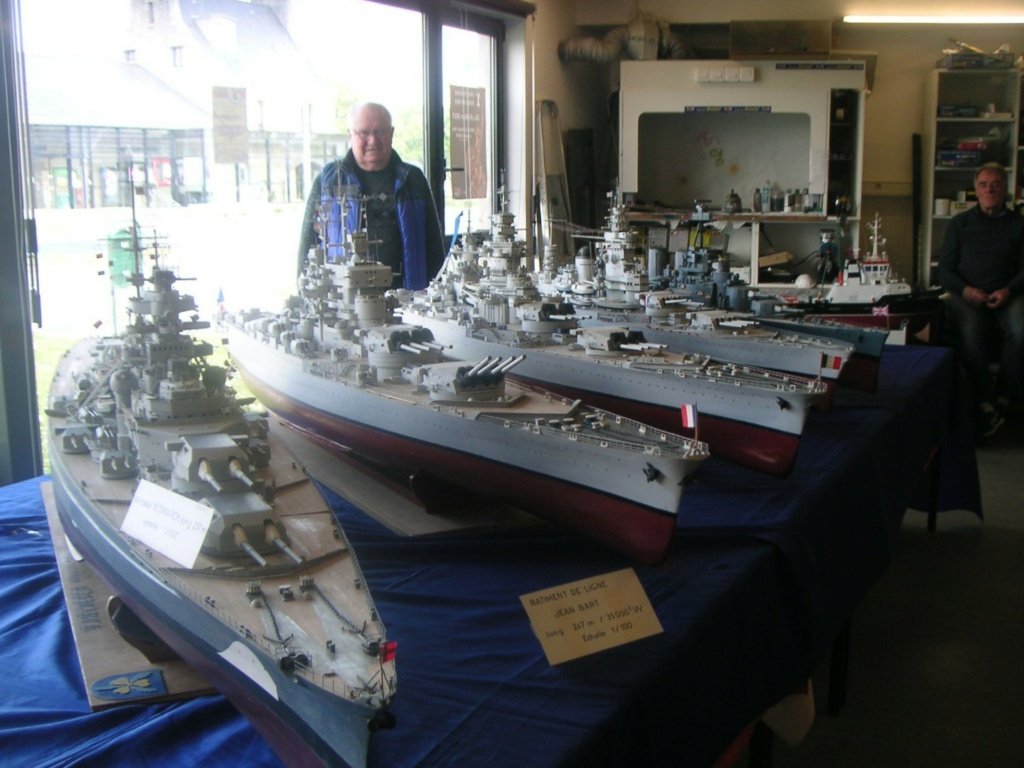
- 104 replies
-
- 10
-

-
-
-
- MRC/Gallery
- Yamato
- (and 1 more)
-
It looks like your friend will have his finished model, in a short time. Great beginnings so far... Yves
- 31 replies
-
- 2
-
-
- Shamrock V
- Amati
- (and 2 more)
-
Camel by RGL - FINISHED - Machinen Krieger - 1/20
yvesvidal replied to RGL's topic in Non-ship/categorised builds
I like that series of kit, especially their half hull submarine. They are great for dioramas or simply to display. I believe you can find figures of humans/girls that will fit inside certain machines. Yves -
Great idea to display the double capstan: it is always an interesting piece to start a technical conversation. Yves
- 857 replies
-
- 8
-
-
-
- Sphinx
- Vanguard Models
- (and 1 more)
-
Very interesting project of restoration for a dear person that steered you and motivated you into the path of scale model ships. I am so glad you can do that for her. Yves
- 44 replies
-
- 2
-
-
- Thermopylae
- Revell
- (and 3 more)
-
To get a sense of what the Harrier can do (Hollywood style), you need to watch (or re-watch) the movie True Lies with Arnold S. The end sequence is a blast to watch. Yves
-
What a beautiful sailboat. At times, I thought you had taken pictures of the real thing. Yves
-
Humpfrey, If you manage to paint and finish these crude Revell kits from the 70's, then a modern kit will be a piece of cake in comparison. Yves
-
I see that you have your modeling future, all planned. Yves
-
Beautiful work Tim. I like your approach to models, there is something different and special coming out of them. The weathering is very subtle and the overall effect is sublime, in my humble opinion. Yves