


wefalck
-
Posts
6,651 -
Joined
-
Last visited
Content Type
Profiles
Forums
Gallery
Events
Everything posted by wefalck
-

Iron Mast Cap Orientations in Steam/Sailing Ships
wefalck replied to BANYAN's topic in Masting, rigging and sails
Finally, I had time to check my German early 20th century textbook: MIDDENDORF, F.L. (1903): Bemastung und Takelung der Schiffe.- 401 p., Kassel (reprint 1977 by Horst Hamecher). On p. 268 he states explicitly that "Mast-caps are perpendicular to the masts and spars (unlike the tops that are either parallel do the sheer or the waterline) ..." However, STEINHAUS, C.F. (1869): Die Construction und Bemastung der Segelschiffe.- 137 p., Hamburg (L. Friedrichsen & Co., reprint 1977 Horst Hamecher, Kassel). draws both variants, wooden and iron caps that are either perpendicular to the mast or very slightly inclinded, while tops are always at an angle to the mast. I think at the bottom line, perpendicular caps are the most likely variant and the easiest to fabricate by forging, but inclined ones would not be a problem either. -
Didn't pop in here for quite a while ... I am always impressed by your cutting/carving of styrene! How did you cut out and carve those corbels? Using a fret-saw? On the use of asphalt solutions etc.: I appreciate that the antique effect on wooden models is quite nice, because it penetrates well, but in the case of plastic models I think there are other ways to achieve a similar effect. I have used washes of very dilute burnt umber acrylics to good effect. Other people use oil paints, brushed on and then wiped off, so that it only stays in depressions. If the base is matt acrylics, this also partially penetrates into the acrylics, leaving a similar effect as on wood. Personally, I not so fond of oils because of their long setting times (which on the other hand facilitates their working - as long as you keep the model in the dark, you can continue working). In general, the fewer paint systems one mixes, the better ...
- 2,699 replies
-
- 6
-

-

-
- heller
- soleil royal
- (and 9 more)
-
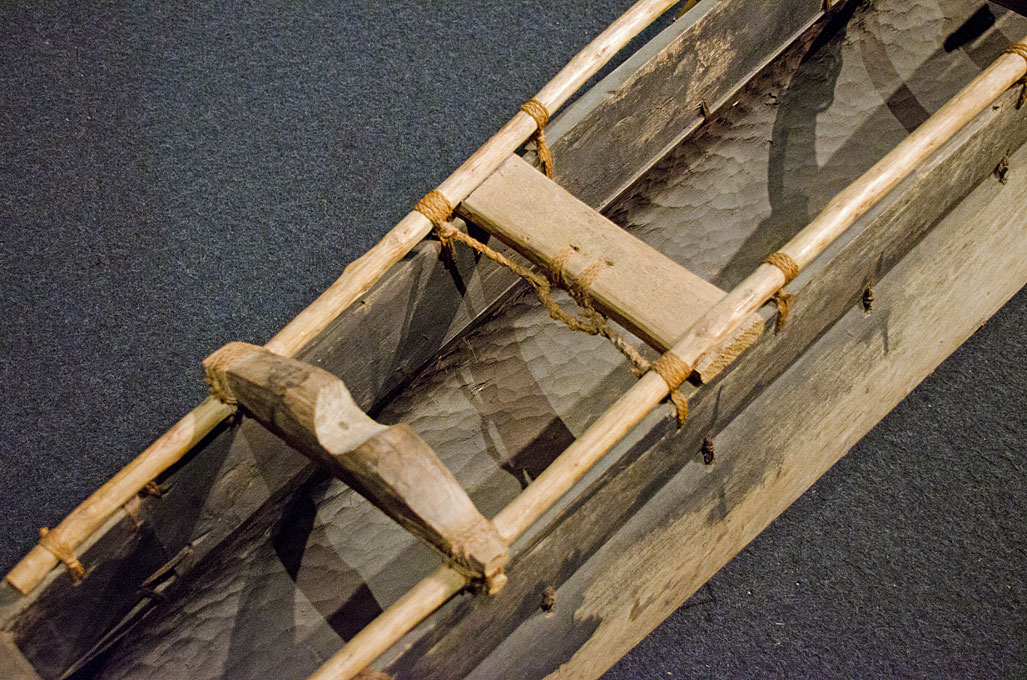
I wouldn't have asked, as I am quite familiar with this techniqe from indigenous craft in Arabia, East Africa, the Pazific and various other regions around the world. It often apears in regions, where good pieces of wood are scarce. Here a boat from Niutao (Ellice Islands) built around 1960 and now preserved in the Ethnological Museum in Berlin: One could also talk about skin-boats and I don't mean the kajaks of Greenland and Canada or the curraghs and corracles of the British isles. On some naval craft, such as torpedoboats, (deck-)space was at prime and hence foldable dinghies were used.
- 24 replies
-
- 1
-
-
- Small boats
- cutter
- (and 2 more)
-
Well, we all seem to suffer from more or less from the same problem: the narrative I hear from time to time goes "why don't you do something useful with your fancy tools, such as making jewellery?" While I am quite capable of repairing things around the house (and do it, given enough urgency and inconvenience ), I prefer the creative aspect of 'making' things over 'fixing' things ...
-
Somehow this e-book had escaped my attention so far - unexcusable ! I really love those pictures that combine models with a digital seascape and atmospheric effects.
-
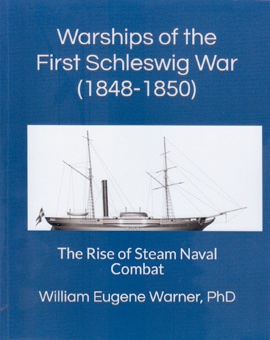
WARNER, W.E. (2022): Warships of the First Schleswig War (1848-1850): The Rise of Steam Naval Combat.- 209 p. (independently published through Amazon), ca. 32€. Since 1460 the Danish Kings ruled in personal union as dukes in Schleswig (as a fief of the Danish Crown) and Holstein (as a fief of the German Confederation). This constitutionally complicated situation was exacerbated by the fact that German and Danish populations were mixed in the north of Schleswig. The efforts of the government in Copenhagen to tie both duchies more directly to the crown in the mid-19th century led to counter-movements by the German population, which culminated in the first of three wars in 1848, the 1st Schleswig-Holstein War (known in Denmark as the ‘Three Years' War`). Since there are only a few works on the subject and these are usually kept rather short, such a 200-page book seemed a desirable addition. But even at first glance one can see that it was cobbled together rather hastily. There is at least one, if not several, typos on every page that should have been easy to spot when proof-reading, if not already with the spelling-checker in the word processor. A striking example is the legend on p. 13, in which Flensburg appears in Danish spelling once as Frensborg, twice as Flenborg and once each as Flesborg and Felsborg, sometimes in the same sentence ... In addition, there are incomplete and incoherent sentences on practically every page. Some paragraphs and whole chapters look like automatic translations from Danish or German. For significant stretches the text actually reads like German or Danish with English words. Speaking of 'Flensborg': it is not entirely understandable why the Danish spelling of the place names was predominantly used, even for Holstein areas, where this may have only appeared in official documents in Copenhagen. A Danish-German-English comparison table on page 202 indicates that for place names in the text predominantly the German version was used, which is de facto incorrect. It is also frustrating that the text and action maps do not always match, i.e. the text mentions places that are not marked on the maps, so you have to constantly consult an atlas to understand the text. Such a lack of formal care usually undermines any confidence in the reliability of content. The historical overview then indeed suggests that the author only deals very cursorily with the complex history of Schleswig-Holstein and has not developed a deeper understanding of the mixture of conflicting interests. However, I did not check the factual accuracy of the historical outline against the literature available to me. As a curiosity, Appendix 4 could be mentioned, in which the Danish Espignol is described, but a quick Internet search reveals that the author did not bother to really understand the function and arrangement of this volley gun. The title of the book suggests that it is about the warships used in this conflict and we are lucky that the Danish archives are quite rich on virtually every ship named in it, including various of those used by the German forces, as they were either of Danish origin or ended up in Danish hands. I would have expected to see this source material mentioned and perhaps referenced for easy look-up. Instead, the ships are only illustrated by way of drawings that presumably are based on an interpretation of this archival material and reproductions of some historical works of art that were often made decades after the event. Similarly, the armament of the ships used is discussed only briefly, with the exception of the espignols mentioned above, which also appear to have been used abord of Danish ships. Interesting is an appendix that discusses the housing in Copenhagen of PoWs and civilian detainees, including the seamen from German merchant ships taken as prizes or seized in harbours. Hulks of old navy ships were used for the purpose, as in the days of e.g. the Napoleonic Wars. The list of references in such works is always interesting to peruse, as it shows how thoroughly the author has consulted the contemporary and secondary literature. It is quite striking that little German literature was used. For example, there is a sub-heading for ‘official Danish sources’, but noting corresponding for German sources (which admittedly are more scanty due to war losses). One can easily see from that that the book was obviously hastily pieced together from various contributions in a Facebook forum (mentioned in the foreword) without having undergone a thorough editorial processing (NB, the author put proudly his PhD onto the front cover, but if it were his thesis, the supervisor would have turned it back to him after reading a couple of pages …). The final question: “Is it worth buying the book?” can be answered with a pretty clear ‘no’. The book has a lot of potential, but would need to be revised very thoroughly in terms of content and form.
-
Whether plastics melt during mechanically working them depends on how much energy you put into them over what interface - or in simple terms: when you run the cutting tool too fast, you are putting too much energy into the cut ...
-
It all boils down to period and nation ... from around the middle of the 19th century on it seems that navies pretty much standardised their boats and the terminology. In each class of boats there may have been two or three different sizes, i.e. lengths. The standardisation made it easier to contract out their building and getting exactly what was required to fit onto the ships e.g. with respect to the distance of davits. Between the last quarter of the 19th century and the end of WWI both, the German and the Austrian navies used all three types of construction: clinker, carvel and diagonal-carvel. All three building methods have their respective merits. Larger boats typically were either carvel or diagonal-carvel. Clinker building makes for a heavier, but more sturdy boat. I gather one can discuss for weeks the etymology and use of the different terminologies ...
- 24 replies
-
- 3
-
-
- Small boats
- cutter
- (and 2 more)
-
Tuning Copper sheathing
wefalck replied to allanyed's topic in Building, Framing, Planking and plating a ships hull and deck
Before reading all the others' comments, I thought immediately the idea was to ensure that both, keel and false-keel were properly wrapped in copper. The false-keel was a sort of expendable item, meant to protect the actual keel from damage. In case it was (partially) ripped off by grounding etc., the keel still needed to be properly protected from this nasty digging animal. -
A hand-held electrical drill with an abrasive cutting wheel might be another option.
-
Somehow it is a pity that all the brilliant wood-work gets buried in more and more brilliant wood-work ...
-
Iron Mast Cap Orientations in Steam/Sailing Ships
wefalck replied to BANYAN's topic in Masting, rigging and sails
A general problem is that a lot of the mid-19th century books are re-editions of older issues and typally re-use the same plates for decades, that have been drawn based on earlier 19th century practices. There is a conspicuos absence of books that show iron fittings as became more common from the middle of the century on. I looked through some French and German sources, but when there are plates, they show the old-style wooden caps and upright masts, where the question does not arise (see comment above). I still have a Dutch, an Austrian and a German source to consult, when I have access to them again next week. The latter may not be so helpful, as it mainly deals with iron masts. Overall it seems that caps were perpendicular to their masts, while tops are +/- parallel to the sheer or the waterline. Pat, are you sure the caps were cast and not forged? I would have thought that wrought iron at that time would have been stronger than cast iron. As to the design, I would have thought that the outside walls, also for cast-iron pieces, would be parallel to the inside walls, i.e. of equal thickness. Mechanically it does not make sense to have a prismatic cap and put oblique holes through them, though it would be technically not a problem to cast such pieces. The extra material does not add strength, only weight a-top. A similar discussion arose a few days ago in a German, whether ratlines would be 'horizontal', i.e. parallel to the waterline, or parallel to e.g. the sheer. My response was also that 'horizontal' is relative and irrelevant, once the ship is at sea ... -
SMS Karlsruhe by Wreck1919 - 1/100
wefalck replied to Wreck1919's topic in - Build logs for subjects built 1901 - Present Day
Yes, it's these stanchions we are talking about. They seem to be of really good quality, etched from both sides with exactly aligned masks. They look almost like turned ones. Saemann is known for good quality and they have been in the market for many years. Unfortunately they don't do anything in 'my' scale (1:160). -
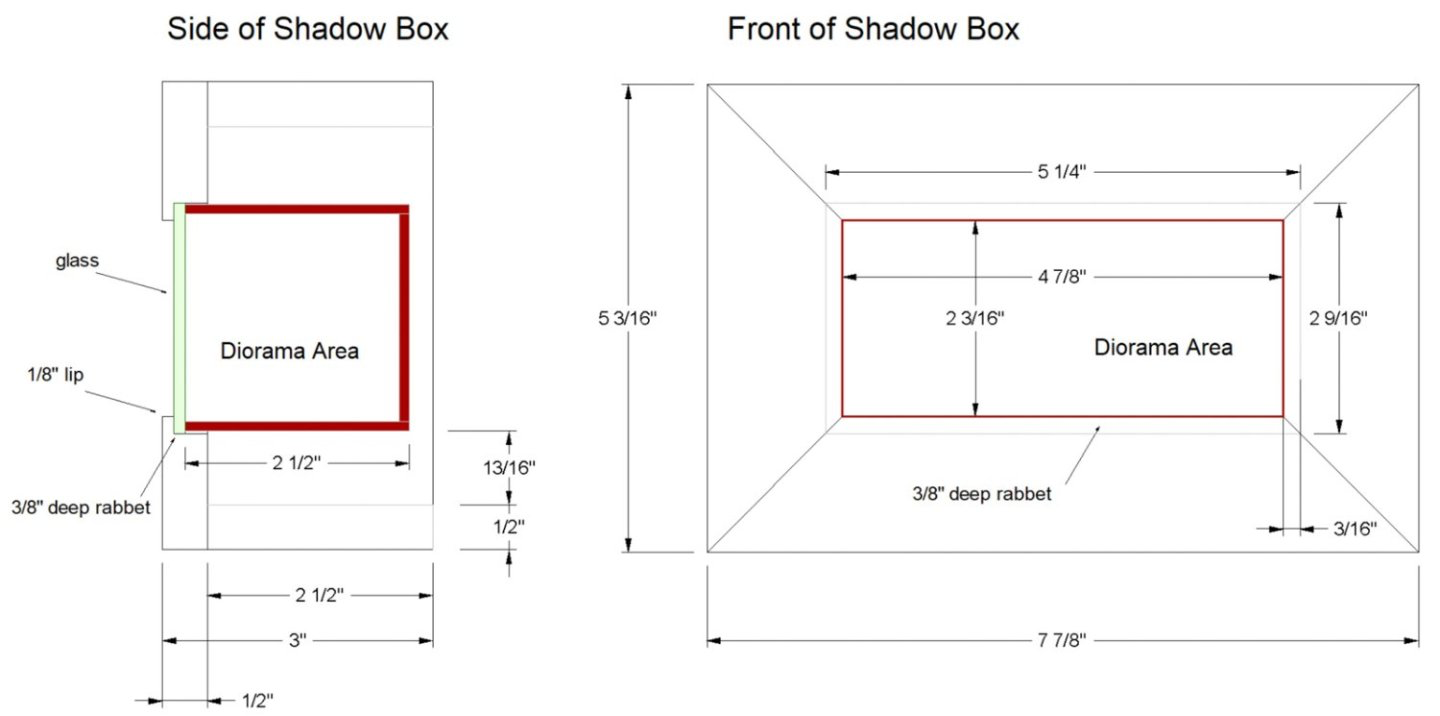
Indeed, also looking forward to your new project ! I have a conceptual question: my understanding of 'shadow boxes' or 'real' dioramas (as opposed to just a base plate with something on it) is that a frame sort of hides the left, right and top margin of the scene. However looking at your drawing below it appears that margins of the 'diorama area' are the same size as the opening of the frame. So, you don't actually get the real diorama effect. Is my interpretation correct ?
-
SMS Karlsruhe by Wreck1919 - 1/100
wefalck replied to Wreck1919's topic in - Build logs for subjects built 1901 - Present Day
Nice, crisp work indeed. Are the rail stanchions around the platform commercial pieces or did you turn/drill them yourself ? -
Looking for correctly scaled lines and rope
wefalck replied to Michael Smith's topic in Masting, rigging and sails
I am working in 1:160 scale (= railway model N-scale in Europe), so very close to your 1:155 scale. My materials of choice are fly-tying threads, e.g. the Danish Veevus and others. They are available in a variety of colours and down to 18/0 for two-ply threads. This implies that you have to make your own 'rope' from these threads, which is not really difficult. Not sure, however, whether the commercially available kits for rope-walks (e.g. the 'rope-rocket' mentioned above) would be suitable for such fine 'ropes', but I have not tried them myself, as I built my own rope-walk from bits and pieces. As Allan mentioned above, the real challenge is not so much making ropes, but rather the correct sized blocks. I know what I am talking about, as I spent considerable time on trying out different methods. However, modern technology eventually will come to our rescue in form of 3D-printed blocks. For the moment sizes below two millimetres are not commercially available yet, but I am sure they will come in the near future, if there is sufficient demand (and there should be). Incidentally, Donald McNarry didn't go too much into detail on rigging in his books, but Lloyd McCaffery does. However, he works on scales 1/300 and smaller in general and uses NiCr-wire twisted in two strands throughout. He kind of 'fakes' blocks by punching out oval paper disks (with homemade punches) and attaches them to preformed wire tackles etc. To be honest, I don't think this is results in very realistic rigging in 1:160 scale, so I dropped this idea. -
You cannot technically make ethanol at more than 96% at normal atmospheric conditions because it becomes hygroscopic and dilutes itself when left standing open. Many countries levvy a heavy tax on alcohol fit for human consumption, which is why such ethanol is expensive, though the production is very cheap. Methanol is another alcohol, but it is not fit for human consumption, it is rather detrimental to the health and can result e.g. in blindness or even death. For this reason ethanol is 'denatured' with methanol or other substances to make it unfit for human consumption and to give it an unpleasant taste and smell. It is added to a level of a few percent. This, however, does not change its technical nature and it remains a good solvent for shellac. If you live in a country without a heavy alcohol tax, it may be more pleasant to use the 96% ethanol, rather than methylated spirit. Blindness used to be an occupational hazard among 'french polishers' as cheap alcohols were used, where the distillation process was not carefully controlled to separate ethanol from methanol - the guys would take a sip from the bottle between using it to make their shellac solutions ... P.S. Jaager was a bit faster with his post ...
-
Yes, methylated spirit is denatured alcohol as useg e.g. in rechauds, camping stoves etc. and can be used to make shellac solutions.
-
I am not sure, what you mean by 'oxidised' shellac? Schellac does not oxidise to my knowledge ... Pure (96%) alcohol is the normal solvent for shellac (flakes). You can make any mixtures you want. For instance, I keep a small quantity of shellac with a thick honey-like consistency as glue. Otherwise you can dilute it to any consistency you like/need with alcohol.
-
I made several pieces of furniture with a simplified version of French Polish, using modern materials. Traditional French Polish would consist of rubbing a mixture of very dilute shellac solution and pumice into the pores of the wood in several sessions. I replaced this with organic solvent-based sanding filler, rubbing down the surface with steel-wool. For the actual polish I used a commercial german brand of shellac solution (Clou which is equivalent to Liberon, but somewhat cheaper). The application pad ('tampon') was made from a worn-out flannel pyjama that was stuffed with cotton wool. The trick is to have the pad well-soaked in the middle, but not trickling and then to apply parallel strokes in a jet landing and take-off movement (as noted above). Do not stop, or the pad will stick to the surface and leave fibres in the coating. If this happens, let it dry and and go over it with fine steel-wool. Also, if one works too wet and stays too long with the pad on the surface, the already applied coats will soften, resulting in an uneven surface. If something goes wrong, you can always rub down the surface with steel-wool and begin again. Having said that, on models I would not use French Polish, unless it was a model of a yacht. I would rather use a commercial solvent-based sanding filler or shellac and rub the surface down with fine steel-wool. Real French Polish just gleams too much for models. I reserve this for display cases.
-
'Unpainted' wood would have been treated with line-seed oil and perhaps grease in certain places. On a model probably the most apropriate treatment would be with a wood-sealer and then to rub it down with very fine steel-wool. This closes the pores of the wood and gives it a satin surface, very much like such masts and spars would have appeared in real life.
-
It seems, indeed, that the main effect comes from the heat, rather than the soaking. However, in full-scale practice and model practice it is difficult to apply sufficient heat without burning the wood. Planks were bend over open fires in the older days and doused with water, to keep the temperature sufficiently low due to the evaporating water. Later steam-boxes where used or boiling water (particularly in model building). Today, we have steady and high capacity heat sources in form of temperature controlled hot-air guns of varying sizes. I have, for instance, an electrical hot-air soldering gun, where the temperature of the air flow can be regulated down to around 100°C. With such an implement heat could be applied locally, while the planks is progressively bent onto a former without burning the plank or formers made from e.g. wood.
-
The problem is that such measure are typically taken in isolation, not based on a systemic assessment of all the consequences and impacts. The life-cycle impact of an entirely new plate may well be higher than using some not so environmentally friendly paint (whereby the main impact comes from inadequate handling and application, rather than production). We see this over and over again in political decisions that aim to solve one problem, but then create a host of other problems down the road.
-
The apartment I grew up in for the first eight years of my life had a large tiled stove in the living- and the dining-room respectively. Both were stoked from the corridor. The other rooms had individually stoked cast-iron stoves. These stoves had a lid on top that revealed a cooker-like plate on which one could put a kettle. The tiled stoves had a heating compartment which was useful for baking apples in winter 😋 While we had moved to centrally heated apartments in the mid-1960s, the early 1900s apartment house in which my maternal grandparents lived still had stoves when they died in the early 1980s. These stoves were oil-fired and one had to get the fuel from a large tank in the cellar, from where it was hand-pumped into cans (looked liked garden watering-cans, but with closed lids) and carried upstairs. I don't remember having ever burnt myself on any of those stoves ... rather I remember cold, unheated parts of the apartments. OK these are not 'dodgy' solutions as per the title of the thread, but were standard fittings throughout the 20th century and still are in many parts of the world.
-
Picture(s) ? 'Siglo xix' is Spanish and just means 19th century ... it's not the name of the ship ...