
HOLIDAY DONATION DRIVE - SUPPORT MSW - DO YOUR PART TO KEEP THIS GREAT FORUM GOING! (89 donations so far out of 49,000 members - C'mon guys!)
×


clloyd
-
Posts
153 -
Joined
-
Last visited
Content Type
Profiles
Forums
Gallery
Events
Everything posted by clloyd
-
 Overlay your interior profile drawing over the false keel. Use the masts on that drawing to set your slots. Colin
 -
casting metal parts including cannon
clloyd replied to rtropp's topic in Metal Work, Soldering and Metal Fittings
Richard, This is the answer to your earlier question. The amount of detail you get is entirely dependant on the quality of the master. You can capture huge amounts of detail in most of the materials available to the hobbyist. Each type of material has it's pros and cons. Resin produces great crisp casts with little fuss, but is intolerant of mistakes (the only thing to do with a miscast is bin it), and there is some waste of material. Metal takes a bit more care with casting but miscasts and "sprue" can be remelted. I've used both and like both for different things. I've posted this elsewhere but it's relevant to your question - my cannon in whitemetal. In brutal closeup and roughly to scale for the standard resolution for most LCD screens. Colin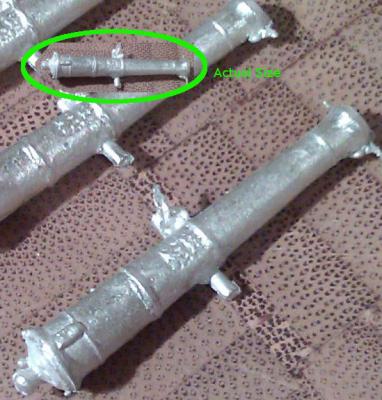
-
If you are building the fictional ship then the armament differs from the historical ship... From the So you have a choice in how you arm her. If you are going historical it's all carronades and a normal mainmast, if from the books then you're looking for long 12's, 2 long nines and a few 24pounder carronades and the larger mainmast. Colin
-
David, Thanks. You are starting down a very similar path to me, and Surprise will end up being quite similar in some ways to Pandora. I'll be watching, and feel free to ask questions if you need to! Colin
-
casting metal parts including cannon
clloyd replied to rtropp's topic in Metal Work, Soldering and Metal Fittings
At the level most of us work in - white metal is the only real option for casting in metal - which is tin, with a couple of alloys for flow and hardness. As mentioned brass is just too hot to do safely at home (900 - 1000°c) unless you invest seriously in equipment. Iron 1200 - 1500°c is well beyond the hobbyist. White metal melts around 260°c and casts just above 300, which is pushing the temp limit on RTV rubbers. Mold max 60 is a high temp tolerant silicone. These guys sell metals, and their 5 Star is lead free. (lead lowers the melting point, increases flow, and adds issues of toxicity and questionable longevity). They also have some useful tutorials on the site. http://shop.princeaugust.ie/ Colin -
David, There is a couple of ways to deal with the thickness of the planks. The first is to use scale thickness planks - I did this on Pandora. The wale planks were about 3" scale (from memory) and I just took each next strake through the ticknesser and thinned them down until they reached the 1.5" scale that the rest of the planks on the hull were. The alternative is to widen the bulkhead by a proportionate amount which will allow you to use equal thickness planks. If your budget allows pick up Goodwins "Construction and fitting of the Sailing Man of War". This will take you through a lot of these things at a level that suits what you seem to want to do - for example the formula for determining the thickness of the planks based on the keel is in there. You could use Steels ship builders vade mecuum (?spelling) (free pdf downloads available), but he is hard to read. Lees "Masting and Rigging of the English Ship of War" is your rigging reference. Peterson is great for visualizing the rigging and what it does, Lees will tell you exactly how things were done for the time frame you intend to build. Lees will also help with things like mast tops. Again Steel (masting) is available free, but takes more work. If you plan on staying in the scratch build community these are all worthwhile investments, or things to put on birthday and christmas wishlists. Colin
-
Gary - your memory is right - this is the Surprise, ex Unité. That puts her as French built 1794. David - that pattern of planking was typical for English ships (my knowledge of French techniques is scanty), where the planking immediately below the wale was nearly as thick as the wale and would decrease in thickness over about 9 strakes to the thickness of the planks at the bottom of the ship. These IIRC were known as the diminishing strakes. Colin
-
Positioning Cathead
clloyd replied to robnbill's topic in Building, Framing, Planking and plating a ships hull and deck
Which you won't do if you bring out the rotary tool. This is an operation to which the rotary tool is not suited. It can take too much off too easily. Colin -
No no no... one doesn't need a lathe to make masts. The masts I've made using just a a chisel and sandpaper are better looking than the turned ones. Space issues though - I'll give you that one Colin
-
Damn - I forgot that you'd done that, and it wasn't obvious in the more horizontal photos. At least Grant has full info to make his decision from. Colin
-
1:64 is a comfortable scale, but still produces ships that are big enough to worry the admiral. Be glad you aren't committed to 1/48! Just to throw a thought your way.... 1/75 is nice and metric. 1/72 is a multiple of 12 so may make scaling from the original a little neater. Depends if you work in metric or imperial. Colin
-
Wot 'e said. Beautiful. Colin
-
When I did bounty I did one way one side, the other on the other side - to show potentially that one side of the ship was being worked. Danny's idea is useful too. (though possibly if they were going to lift boats the yards may have been braced around a bit to clear the shrouds better and produce better angles of force). Colin
-
John, thanks - your recollection is correct - it is quite dim and absolutely pushing the limits of my camera. Druxley, Marc - I figured the general interest in any contemporary evidence amongst the members of this site would make things like that (which are quite different) interesting and hopefully useful. Mark - I got stuck in a "lots of pics" = "gallery" mindset. I checked with chuck and he was ok, but you are absolutely right - that forum is probably a better place. Will shift things around when I get more than 5 mins to myself. Colin
-
Hardest decision to make. Not as hard a trying to push on with something you aren't happy with anymore. I'll look forward to version 2 as well. Colin
-
Hi All just uploaded a gallery of photos of the Batavia original timbers that are on display in the Shipwreck museum in Fremantle. I took these about 18mo ago while out there, and figured they would be a useful resource for anyone interested in VOC ships. Batavia dates from 1628. There are some interesting features and a couple of the cannon she was carrying as well. http://modelshipworld.com/index.php?/gallery/album/648-batavia-shipwreck-wa-museum-shipwreck-galleries-fremantle/ Imgages are HD size - which kept them well inside the upload size limit. If anyone wants full size (18M pixel) of any pic PM and I'll forward it to you. Colin
-
Shouldn't be an issue over primer. Any acrylic paint will sit over primer well enough. They will take some experimenting with thinning, as I'm not sure they were designed to be airbrushed, and I've no idea what particle size in the pigment would be. Colin
-
Brilliant! It looks just like you think it should. Colin
- 1,215 replies
-
- 1
-

-
- sloop
- kingfisher
- (and 1 more)
-
A beautiful job of stern framing Ed. Colin
-
Lovely ratlines. A big job done really nicely. Colin
- 1,279 replies
-
- 1
-
-
- agamemnon
- caldercraft
- (and 1 more)
-
Absolutely sterling work rusty.! Colin
-
The table is a work of craftmanship and suits the model perfectly! Colin
-
stain vs varnish
clloyd replied to tmf's topic in Painting, finishing and weathering products and techniques
Stain if you want to change the colour of the wood. Then Oil/Varnish for protection. I use both oil and varnish depending on the wood and finish (varnish to protect paint, oil to enhance and protect wood) My experience with coloured varnishes at full scale would make me shy of doing that to a ship, but others may have different experience. Colin -
Compressor every time, unless you only plan on using it once a year. In regular use the cans add up. The tank smooths out the airflow. This is important if you are doing something like painting a miniature where even a small variation in airflow could change the final outcome. Over larger areas this may be unnecessary. Again look at what you might want to do in the future. Buying a second compressor hurts. Colin
-
Lovely work as always danny. The trenail holes in the sheer strake either side of the chestree - empty? or a photo artifact? Colin
