keelhauled
-
Posts
788 -
Joined
-
Last visited
Content Type
Profiles
Forums
Gallery
Events
Everything posted by keelhauled
-
 Beautiful ship, Greg! Nice repairs! It's amazing any of our ships survive the build. I had just finished rigging the Constitution and was attaching the stern flag, when my roommate flew into the to grab his keys off the table I was working on and snapped the bowsprit clean off! Took me days before I could even look at it. A few weeks of work and she was fine. Congratulations! Marc
 -
Looking good! Lot's of care going into that build and it shows!
-
Hi Omar, Ship is looking great!! There are many of us that have done drastic rebuilds to parts of our ship. Make sure that your stem and its connection to the frames is strong. As Nenad said, the standing rigging will all tie back to these structural pieces. Stay away from basa for ship models; it doesn't have the strength. Marc
-
Very creative solutions to finding parts! looking good!
-
Looking good. It's always a challenge when different plans don't agree with one another. Sometimes you have to just make command decisons Marc
-
Truly a work of art! You walk among modeling gods.
-
Very Beautiful build! She looks incredible! Thank you for sharing your build with us. I've really enjoyed it. Marc
-
So your hanging Cutty............... You my friend have nerves of steel to say the least I wouldn't even trust my ceiling if I was convinced of my rails strength. Wow! I look forward to your build this summer!
-
Thanks George, Daniel, and Turk Sailor. I appreciate your posts! They drive me forward!
- 525 replies
-
- 1
-

-
- cutty sark
- mantua
- (and 2 more)
-
Cutty Sark by NenadM
keelhauled replied to NenadM's topic in - Build logs for subjects built 1851 - 1900
Nenad, my deepest sympathies! I cannot express how sorry I am. You, hot head and the princess are in my prayers. Take care my friend, Marc- 4,152 replies
-
- 9
-
-
- cutty sark
- tehnodidakta
- (and 1 more)
-
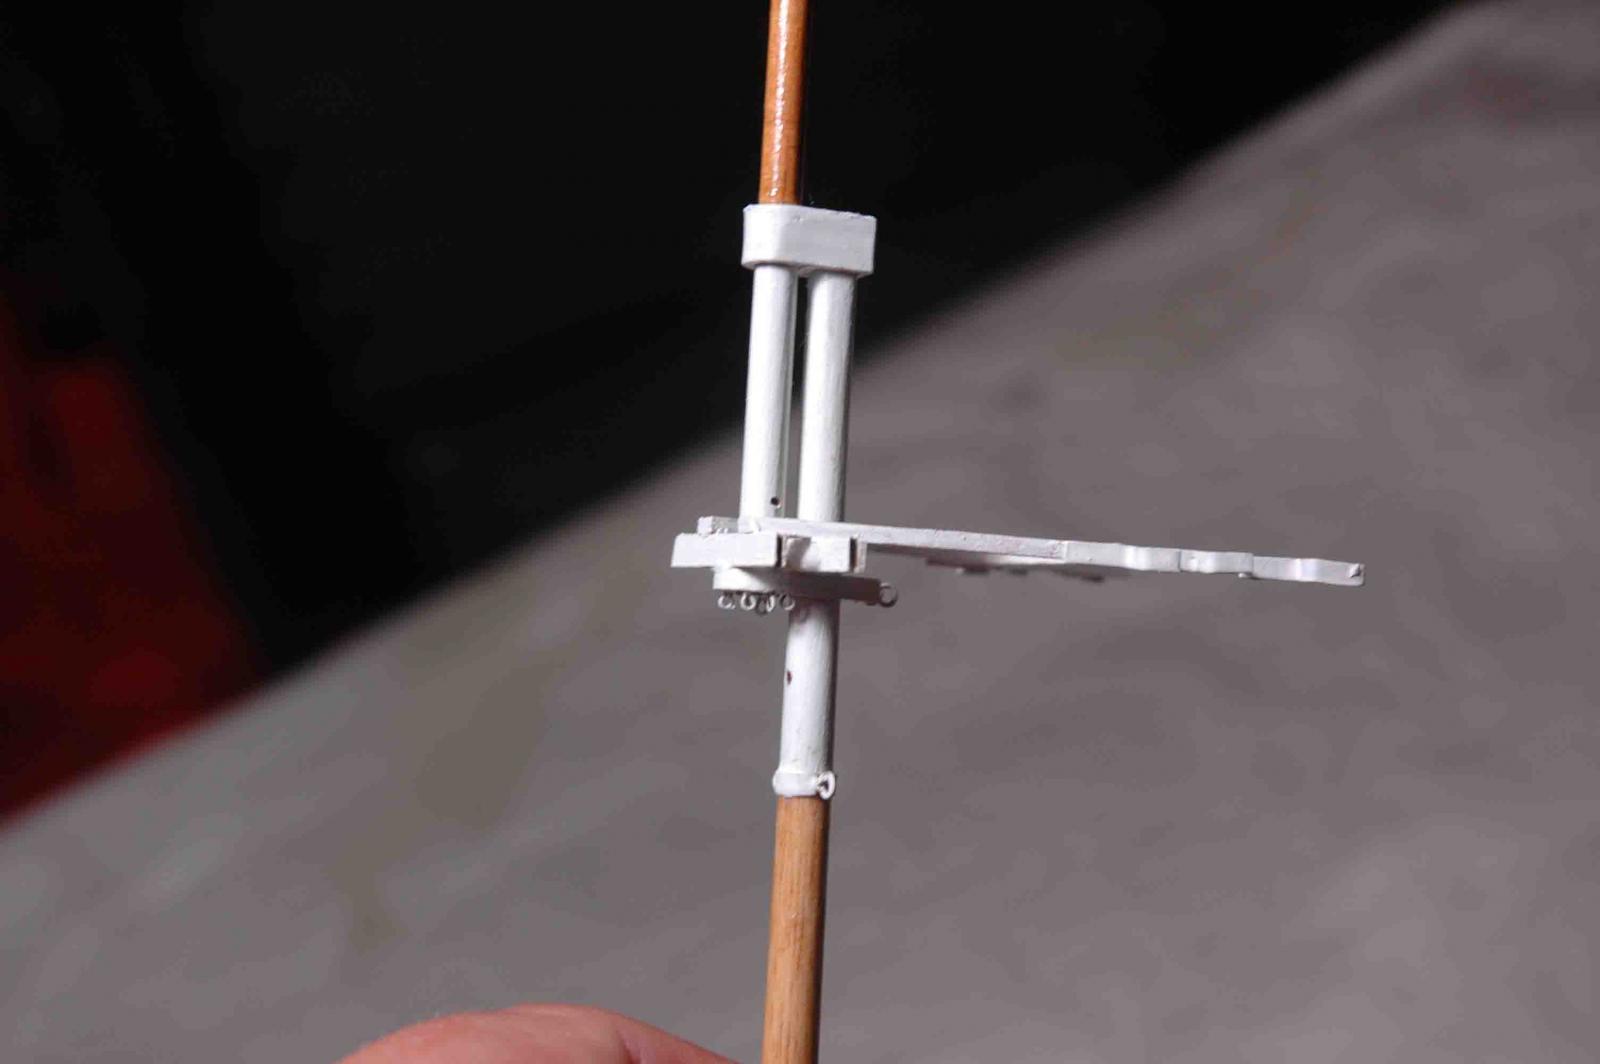
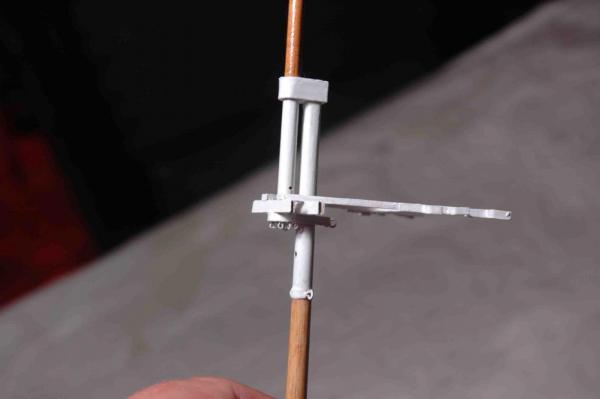
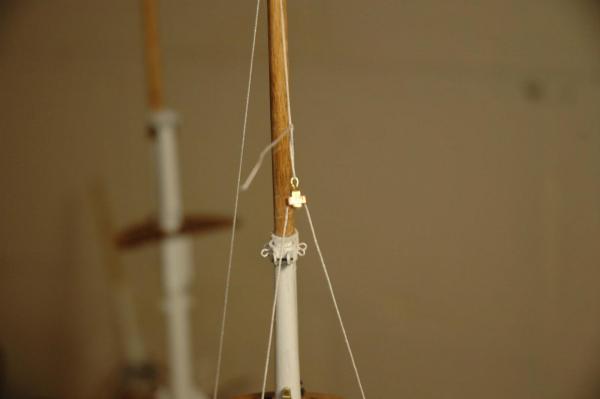
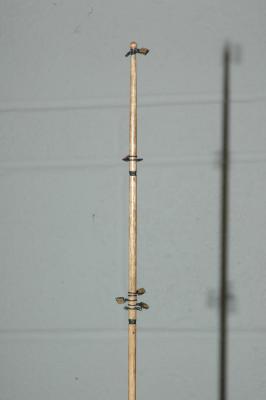
Thanks Popeye and George!! I'm traveling a lot right now for work, so I'm not getting much done. So, here's a quiz. What's wrong with this picture? Answer: The cross members are in the wrong locations! They are in front of the masts instead of behind the mast. The stays will be in the wrong location. All three masts are the same! Next Quiz: who is the dumbest builder on the site? Answer: ME!! How did I miss this as much as I've been working on the masts? So the good news is that the mast weren't glued into position. The bad news was that the cross trees had to be torn apart.. AND the main mast has eyes that wont allow the top mast to lift out of position to step it down. I guess that they must remove the eyes on the actual ship if the had to un-step the mast. unfortunately for me, mine are epoxied in place. Therefore, I'm having to take the cross tree apart with the mast fully stepped. Ahhhh! The other good thing is that iso-propyl alcohol did a great job dissolving the wood glue. I guess I should be really happy that I noticed it before I start putting sails on yards and yards into place. I've been temporarily stepping the masts and dry running standing rigging looking for other issues. found that I'm missing some blocks and eyes. oh and that the cross trees were wrong. Two steps forward, two steps back. Oh well Fair winds my friends
- 525 replies
-
- 1
-
-
- cutty sark
- mantua
- (and 2 more)
-
Cutty Sark by NenadM
keelhauled replied to NenadM's topic in - Build logs for subjects built 1851 - 1900
Looking mighty fine! Sorry for the lack of posts. I've been on the road since February. Too much work!! I see you are keeping the pigs and paint safe! Making chain!! So creative! Love seeing your progress!- 4,152 replies
-
- 4
-
-
- cutty sark
- tehnodidakta
- (and 1 more)
-
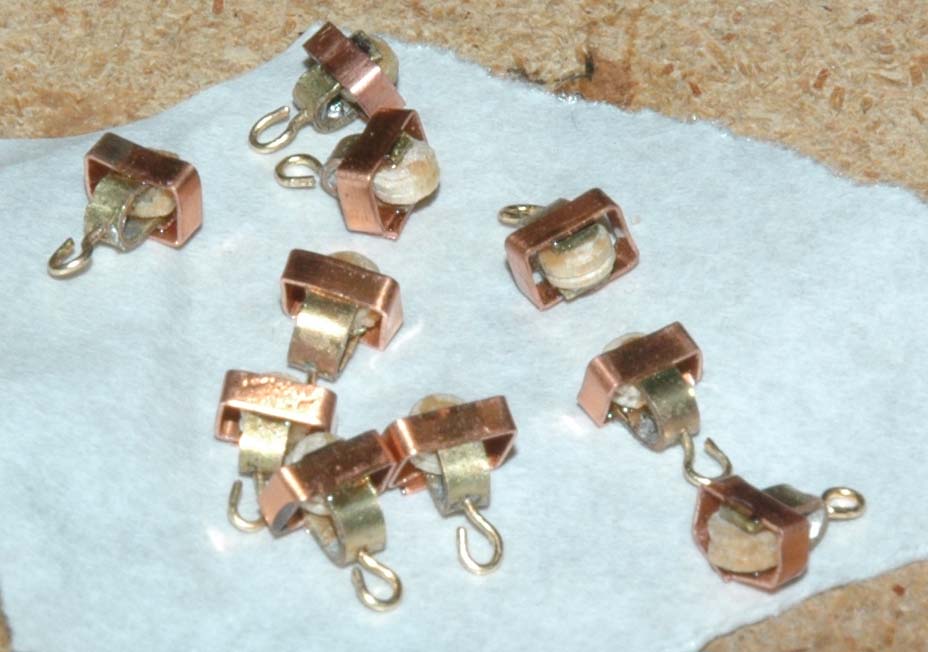
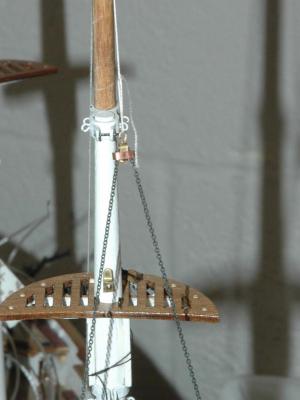
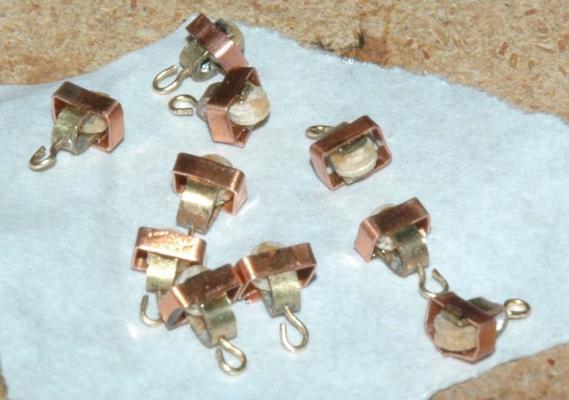
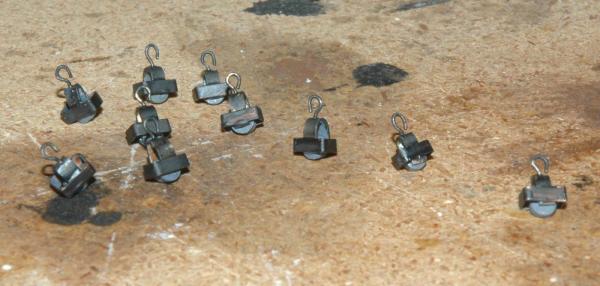
I decided to make the gin blocks. Gin blocks are used to raise the yards. A chain goes from the yard through a sheave in the masts then connects to the eye of the gin block. another chain goes from one side of the hull up and through the block and back down to the other side of the ship where it is connected to a line which then is heaved (sometimes through a block on the deck). When the line is heaved on deck it pulls down on the gin block which pulls the chain attached to the yard and the yard travels up as the gin block travels down. So here is how I made them I put a dowel into my drill, using it as a lathe and cut the wheels for the blocks. No photos for that step. Took them and lost them somehow. Anyway, I found that the best way to do this was to measure the widths needed and cut grooves into the dowel - this is where the wheels will be separated with a saw. After cutting these grooves, I then shaped the groove to hold the chains into each wheel. I then separated each wheel using a hand micro saw. I made many extra wheels which I lost all over my garage some how. I made the frame out of copper and brass. I made eye bolts bending brass wire and then soldered it to a straight piece of brass. I then bent the brass piece into the front and back vertical sections and then bent and soldered the copper into the horizontal section. Originally the prototypes had an axel and moving wheel. They took a lot of work for no real benefit over a fixed wheel version. Since they didn't need to function, I decided to make the wheels fixed. So this is the prototype tests Here are the gin blocks before painting Then after painting

- 525 replies
-
- 6
-
-
- cutty sark
- mantua
- (and 2 more)
-
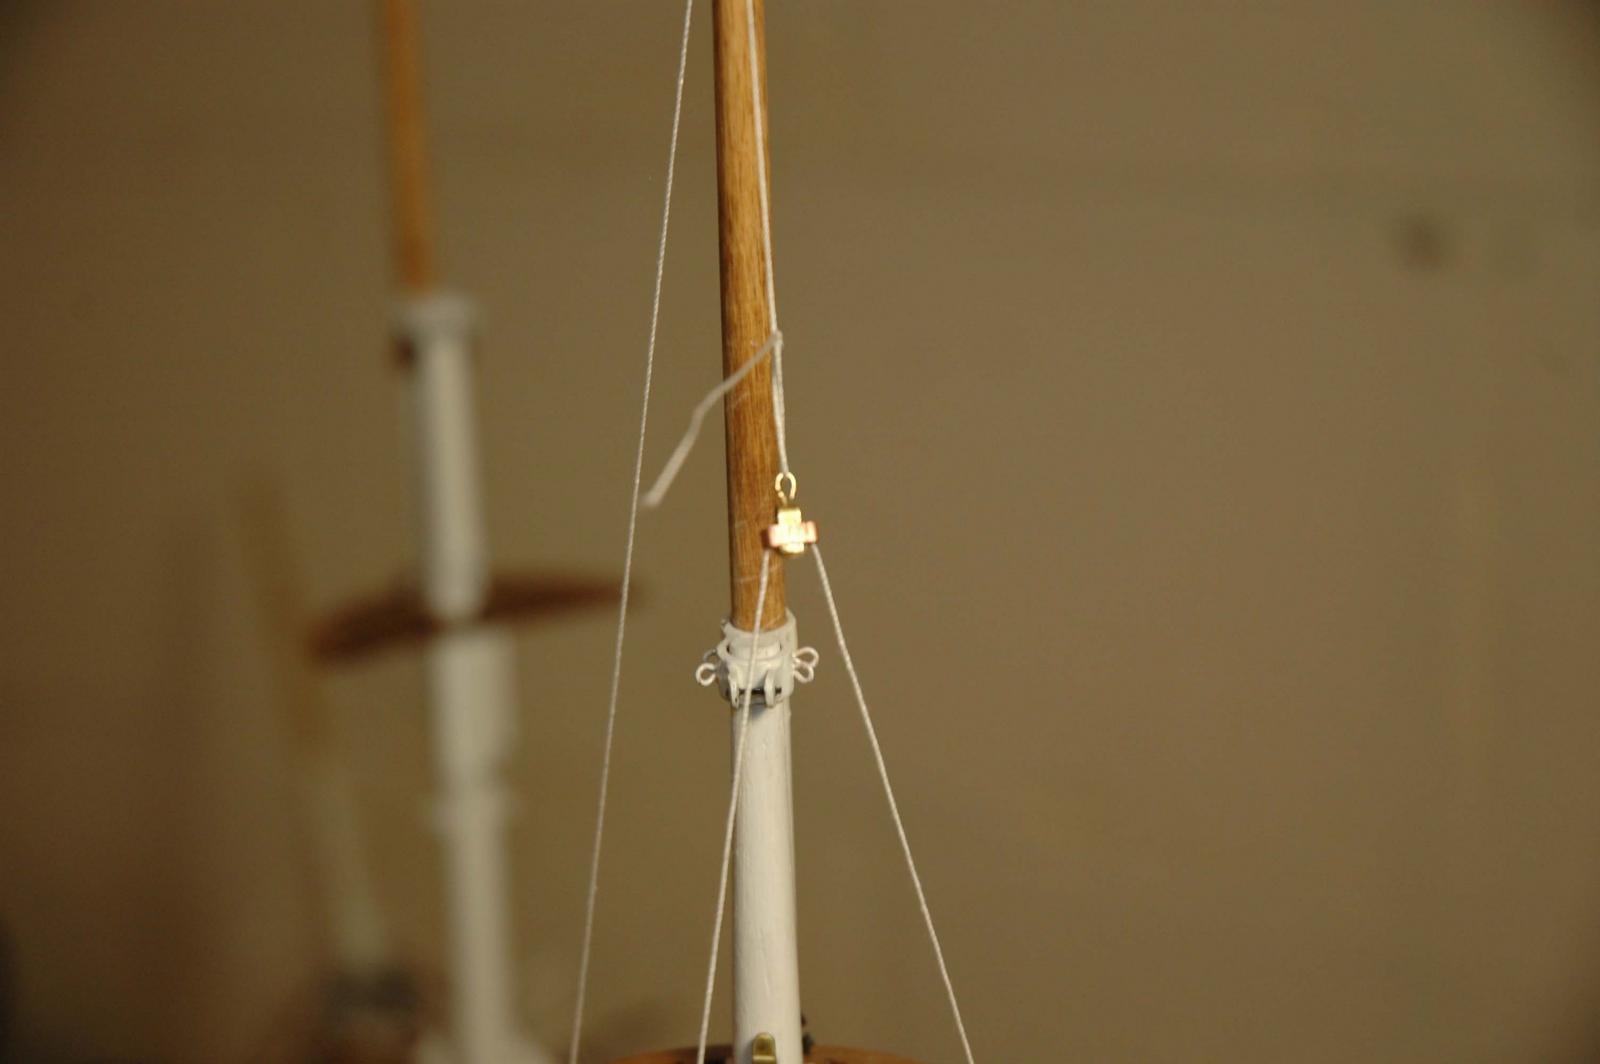
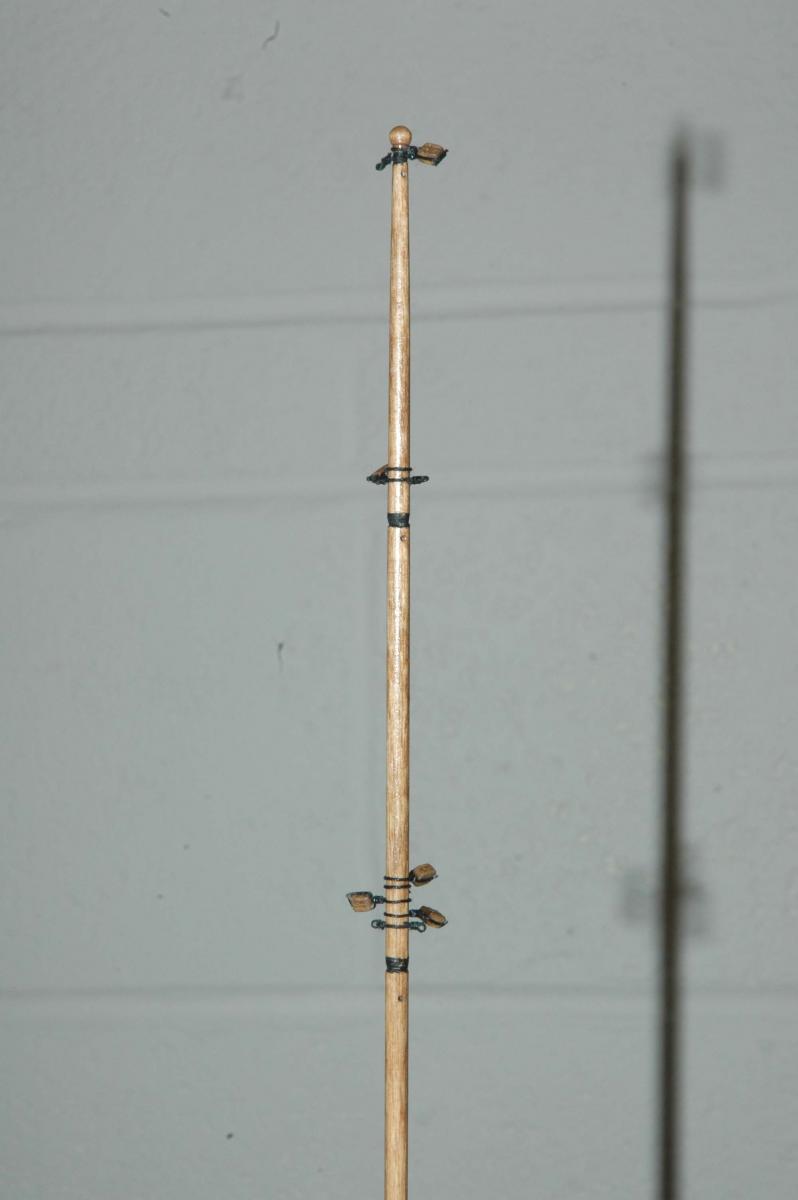
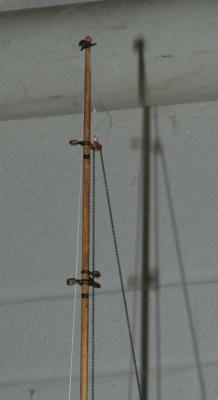
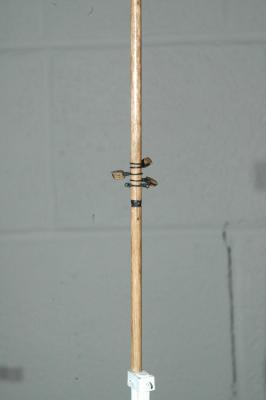
Sorry that I haven't posted. I've been on travel for work for the past few months. right before I left I made the make shift hounds discussed above. So I took a file to the masts and cut some make shift hounds. I made the funnel taper which would have been on the hounds had it actually stepped. I thought that just this would create the shoulder that I need without weakening the mast too much. The test shrouds bit perfectly onto the new hounds. With all of the stays and blocks attached I don't think that you will notice that the mast isn't actually stepped in its tapper. Here is a couple of photos. I just cut into the mast all of the way around with a file with a funnel shaped taper. then I painted it black.
- 525 replies
-
- 2
-
-
- cutty sark
- mantua
- (and 2 more)
-
Cutty Sark by NenadM
keelhauled replied to NenadM's topic in - Build logs for subjects built 1851 - 1900
Yes the spice must flow! But watch for worm sign. Don't want anything happening to that ship! Now that you have that bowsprit mounted you need to take care and make sure it is always clear. I've whacked mine a couple of times while it was dry fitted! Looking good! I'm glad you remembered to put in those eyebolts. good idea about running those lines through the eyes, but I think that the lines terminate to those eyebolts. You might want to check the plans. There are also eyebolts on the sides between some of the side boards that are set up with hearts and lanyards. They'll be a pain if you don't do them before mounting the boards (I made this mistake). See my earlier posts a few pages back in your build where we were discussing it. You've inspired me with those name plates on the billboards. Very nice work! Marc- 4,152 replies
-
- 2
-
-
- cutty sark
- tehnodidakta
- (and 1 more)
-
Cutty Sark by NenadM
keelhauled replied to NenadM's topic in - Build logs for subjects built 1851 - 1900
Nenad, Beautiful work. your tests look good enough to go on the ship! You are doing awesome!- 4,152 replies
-
- 2
-
-
- cutty sark
- tehnodidakta
- (and 1 more)
-
Cutty Sark by NenadM
keelhauled replied to NenadM's topic in - Build logs for subjects built 1851 - 1900
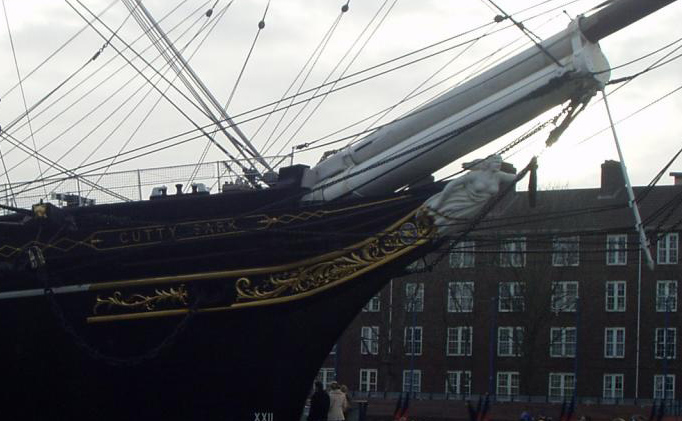
Hi Nenad, the ship is looking great. The bow and stern decorations have been re=carved numerous times if you look through the photos. I've come across three different stern carvings. a photo from 1954 has her stern completely different than today and the photos of her with the temporary rudder , but consistent with a model from 1868. In some photos it looks like her gold is white. I've also seen four different versions of the stars on her trail board. I think that I read somewhere that she has had 4 figureheads, although the last three all look the same and still exists, while the original is lost. The original was supposed to be a beautiful figure carved by a famous marine artists. Her trail board and stern had topless witches originally, but if I remember correctly was changed before launch. Keep up the great work!! marc Check that stern out!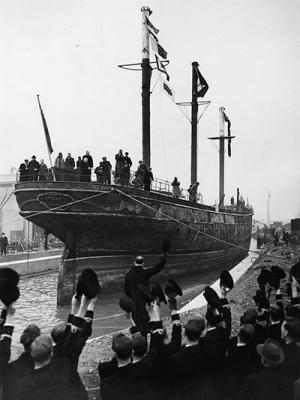
- 4,152 replies
-
- 5
-
-
- cutty sark
- tehnodidakta
- (and 1 more)
-
Cutty Sark by NenadM
keelhauled replied to NenadM's topic in - Build logs for subjects built 1851 - 1900
Looking good!!!- 4,152 replies
-
- 1
-
-
- cutty sark
- tehnodidakta
- (and 1 more)
-
words escape me to express how beautiful the model is. I can't believe the skill and quality as well as the beauty. Thank you for sharing it with us!
-
Cutty Sark by NenadM
keelhauled replied to NenadM's topic in - Build logs for subjects built 1851 - 1900
Interesting. I'm trying to find it in old photos. I did notice that the restored cutty in your photos has the foot rope attached to eyes on the jib boom ring. Those eyes are not in old photos, so they must have added it. Was it originally there instead of beside the bowsprit as it was for the past 50 years? who knows. The fun of history. This photo isn't great but you can see that the eyes aren't there. The support doesn't look like it is there (could be painted black in the photo). It isn't on Campells plans or in Longridge's book. I also noticed that the photo you posted show the jib boom guys set up with what look like deadeyes. Old photos have them set up as hearts and lanyards as does Campbell's plans. Interesting to see the differences. No telling what she was actually like back in 1870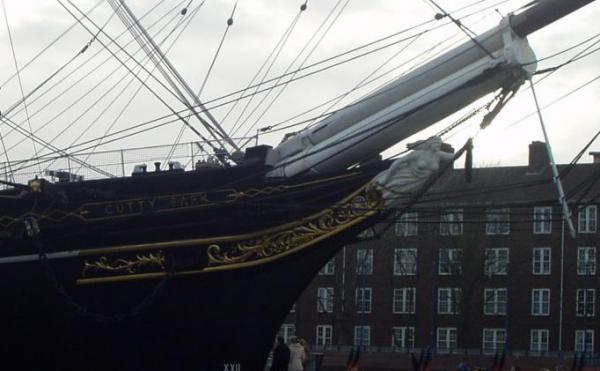
- 4,152 replies
-
- 5
-
-
- cutty sark
- tehnodidakta
- (and 1 more)
-
Cutty Sark by NenadM
keelhauled replied to NenadM's topic in - Build logs for subjects built 1851 - 1900
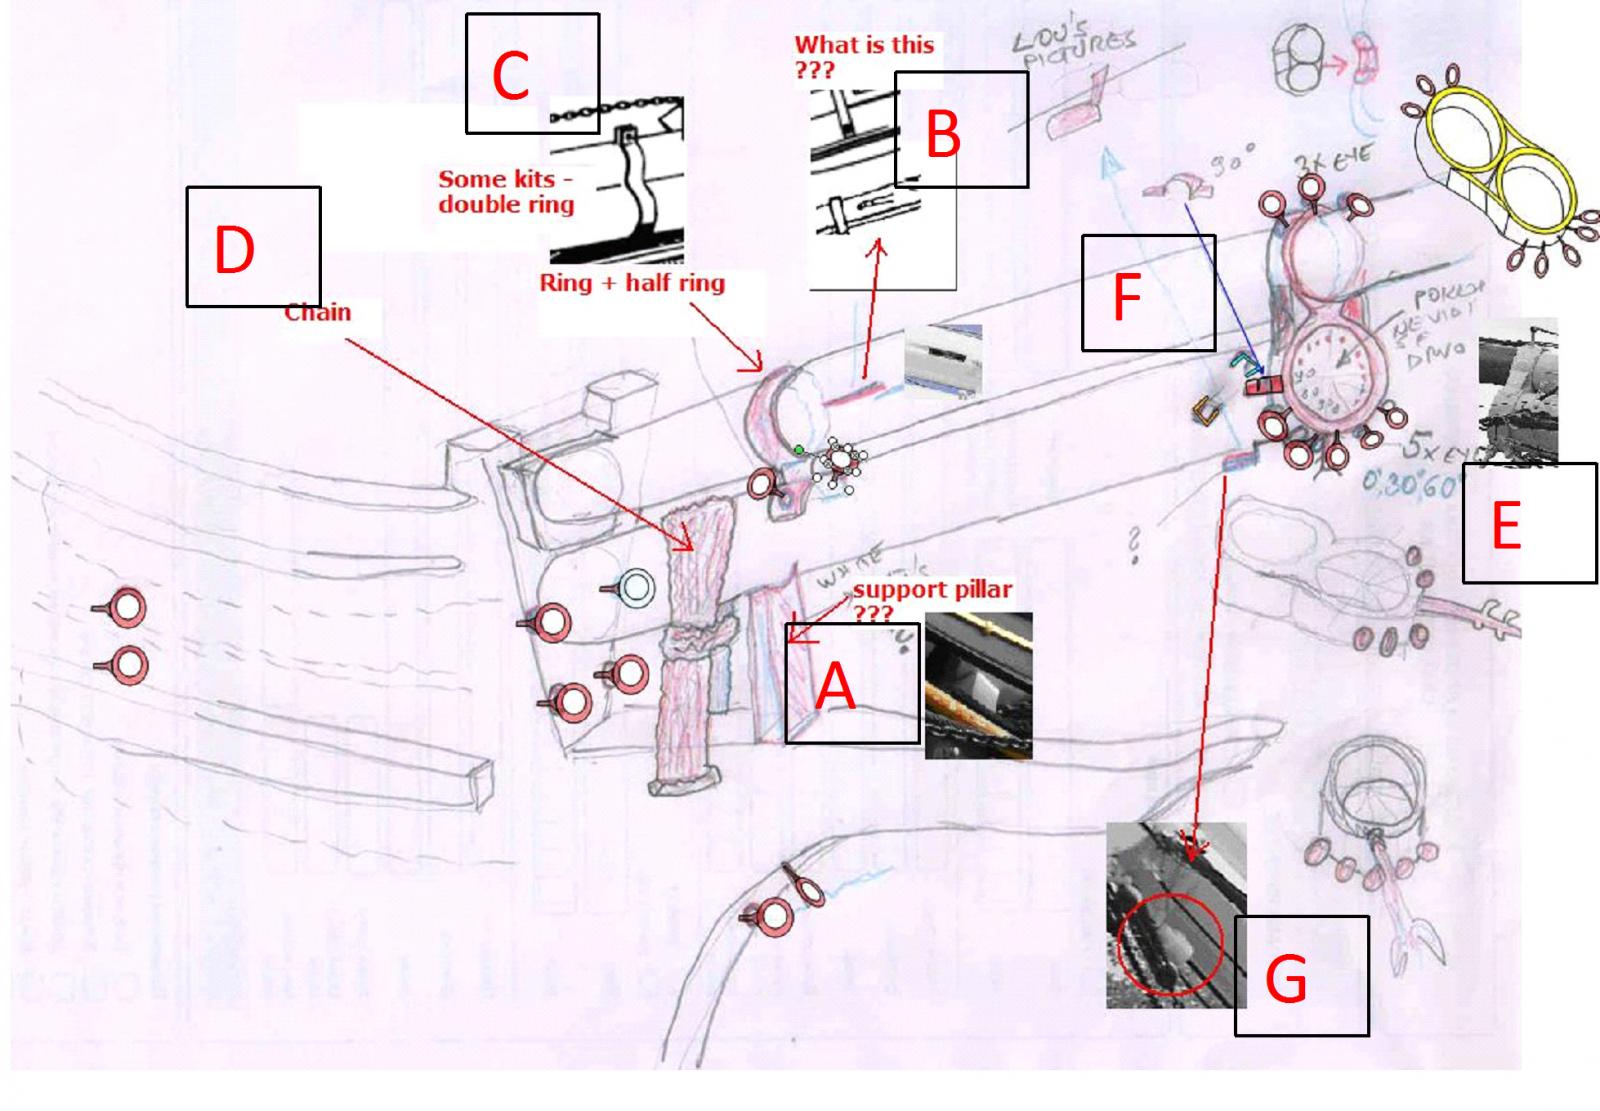
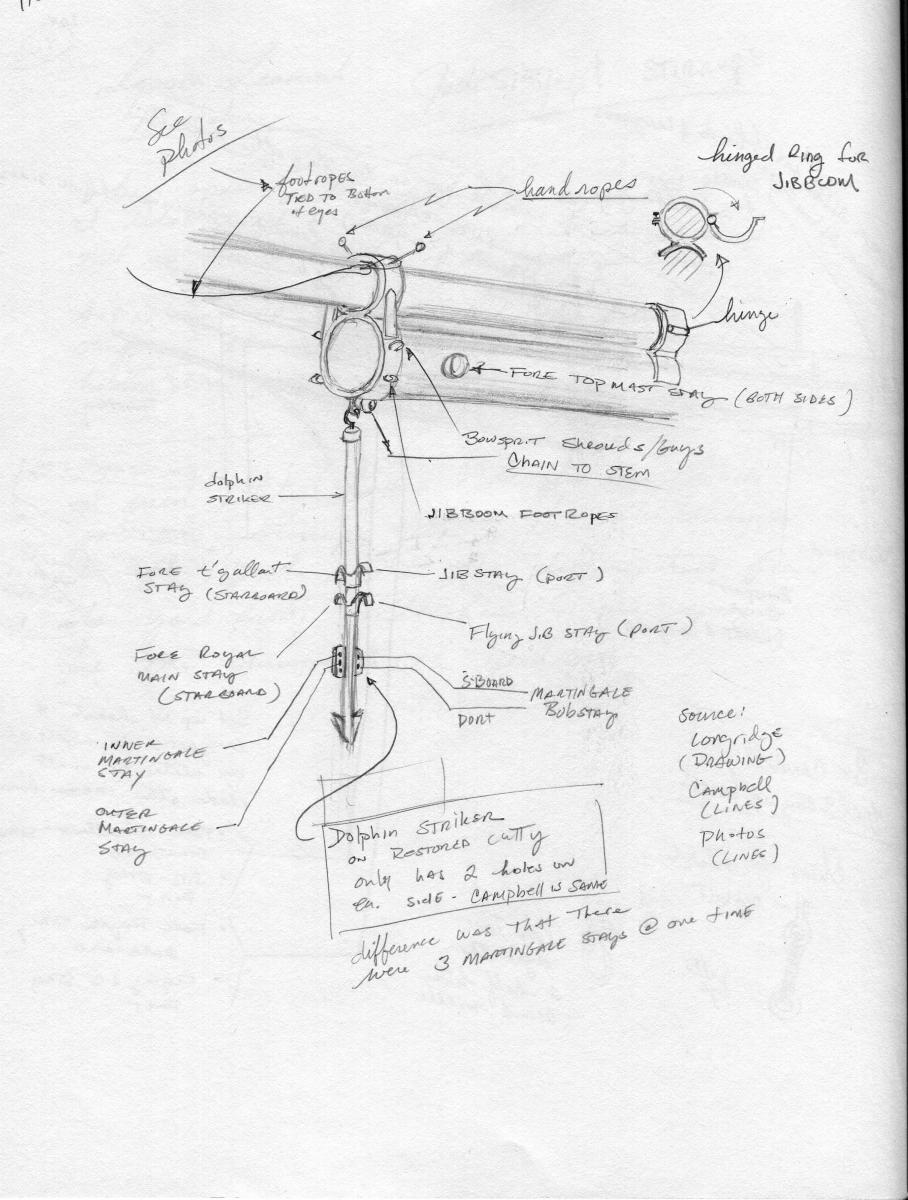
hi Nenad, To answer your questions about the bowsprit As to any upward pull and weakness of the bowsprit. i think that if you rig the gammoning as it is on the actual ship you'll be fine. The downward pull of the gammoning should counter the upward pull of the fore mast stays. I did this on the plastic bowsprit of the large constitution model in 1988 and the bowsprit has held and has no warping. Now to your drawing - I've added letters to help discuss the parts A: I haven't seen this support before on the Cutty. Have you seen it in other photos? Can you post an enlargement? Maybe it was used to help deal with the pressure of the gammoning if the stays weren't rigged yet. I've noticed in some of the photos taken shortly after the restoration, the rigging is sometimes wonky, missing, or not on the plans or older photos and appears to be temporarily supporting yards or other structures. B: That is a sheave used to haul out the Jib boom. Not sure what they call it on the jib boom. For top mast this is called the top mast rope. You can find it in the Cutty's upper masts. It is used to raise the mast or haul out the jib boom. When the Cutty was in port, they shipped (moved) they opened the hinged jibboom ring © and moved the jib boom back to past the knight heads. I think that they used the fish tackle attached to the fore mast top. you can see this in old photos of the cutty at dock. When they headed to sea they crew pulled the jibbom forward with blocks and tackle attached to the bowsprit cap. C: This is the Jib boom ring. It is hinged so that it can open to allow the jib boom to be stepped down or up. (see my drawing). It has a hing on the port side and a clasp/bolt on the starboard side. On the Cutty, only the top is enclosed. I think the double rings are used when the bowsprit is also wood. The Cutty's bowsprit is Iron. D: Gammoning Chain. this chain counters the pull on the bowsprit by the stays. If you are going to use it to actually counter the stays make sure that it is tight - Don't break your bowsprit or the stem. - don't go crazy. F: Dolphin striker. Some photos of the cutty have this as a hook attached to a eyebolt in the cap. G. I couldn't make out what this was. It looks like a light. Do you have a better photo? What are you missing? I didn't see the sheaves for the top mast stays. These are external unlike the other sheaves (see my drawing and your photo beside E) Not sure about the middle eye on the top of the bowsprit cap. Where did you see this? So you'll need to rig the fore top mast stay to the bolts beside the bowsprit before putting on the rails, etc. Otherwise you wont' be able do it later. Same is true for the bowsprit foot ropes where they connect beside the bowsprit The jib boom guys and bowsprit guys are much easier to rig the lines to the eyes off ship and then just slide the eyes into place on the ship, especially if you are using lanyards. Also do this before the rails are put into place - at least for the bowsprit guys. Bottom line is make sure that you have all of the lines that either originate or terminate around the base of the bowsprit in place before you put the rails and billboards in place. See my comments on the dolphin striker and the number of stays. Hope this helps Marc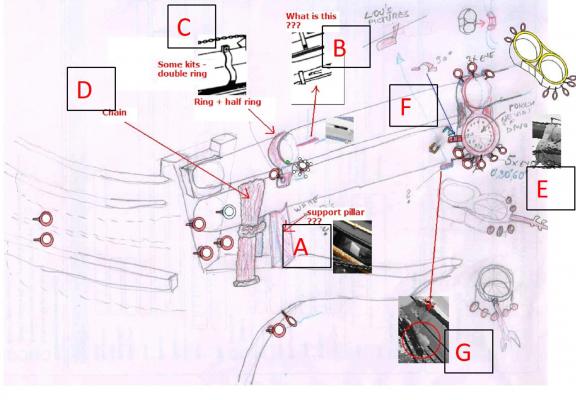

- 4,152 replies
-
- 4
-
-
- cutty sark
- tehnodidakta
- (and 1 more)
-
Cutty Sark by NenadM
keelhauled replied to NenadM's topic in - Build logs for subjects built 1851 - 1900
I like the fake bowsprit going into the deck. As you said when the black knights heads are in place, no one will know. As for the rigging, I'd be happy to share any of the research that I've done with you. I drew the belaying plan to the scale of my ship (1:78). I can't scan it, but I could take photos for you whenever you need them. I've also drawn detailed drafts of the masts based primarily on Campbell with some comments from Longridge. Longride and Campbell disagree when it comes location of the blocks and the types of blocks on the yards. I went with Campbell for the blocks and Longridge for the actual construction of the yards. I noticed some differences in the way that the Cutty is currently rigged verses the other two sources. I figure it has to do with the period of the ship as well as rigging the ship for display. You should try sculpting the new figure head. You have nothing to loose. If you don't like it you always have the original to go back to. However, based on your work so far, I'm sure your sculpture will be better than what the kit supplied. Keep up the great work! marc- 4,152 replies
-
- 2
-
-
- cutty sark
- tehnodidakta
- (and 1 more)
-
Cutty Sark by NenadM
keelhauled replied to NenadM's topic in - Build logs for subjects built 1851 - 1900
looking fantastic! Don't forget to put the knights heads back on either side of the bowsprit. Also the eyes for the stays. Don't put the rails and stuff in place before those eyes. Also you might consider rigging the stays to those eye bolts before continuing to build up the head area. I wished that I had thought about it. It's going to be a challenge to rig them if the rails and stuff are in place.- 4,152 replies
-
- 2
-
-
- cutty sark
- tehnodidakta
- (and 1 more)
-
just a safety reminder. If you are tearing apart electronics be careful of capacitors; some store power for a very long time. I was shocked pretty good, not paying attention while disassembling an old television. Marc
- 396 replies
-
- 2
-
-
- Idea
- Bright Idea
- (and 1 more)