SkerryAmp
-
Posts
809 -
Joined
-
Last visited
Content Type
Profiles
Forums
Gallery
Events
Everything posted by SkerryAmp
-
 Great job so far Wayne and your plans sound like they will be one amazing project once done! Can't wait to see more... more... more (omg I think I have been possessed by Sjors)
 -
Rich, overcoming and adapting - one of the best parts of this hobby eh? Great job so far! Hammocks, bowsprit, all of it - nice!!
- 1,756 replies
-
- 2
-

-
- constitution
- constructo
- (and 1 more)
-
Mike, that longboat is fantastic!! Very well done and a log I will be sure to reference when I pull mine off the shelf!
-
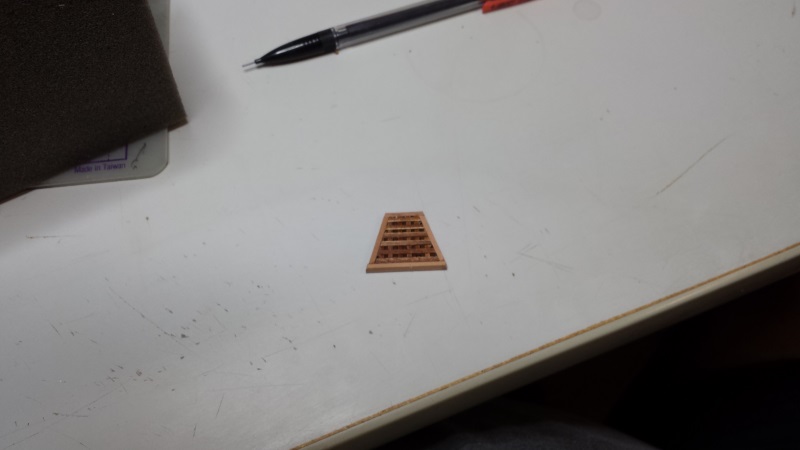
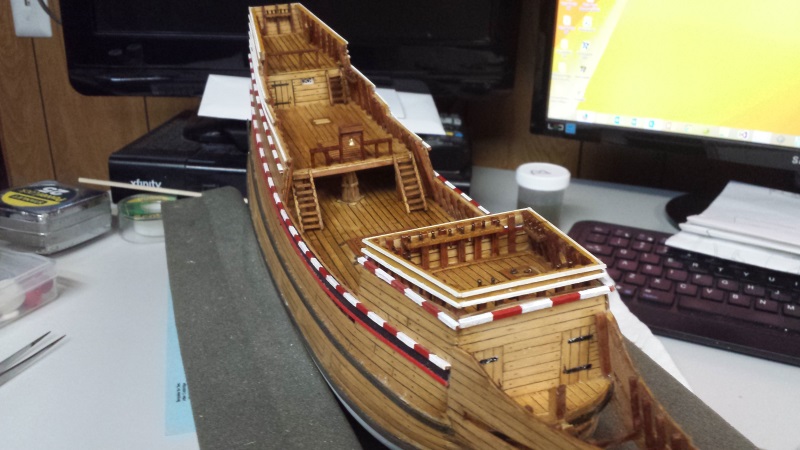
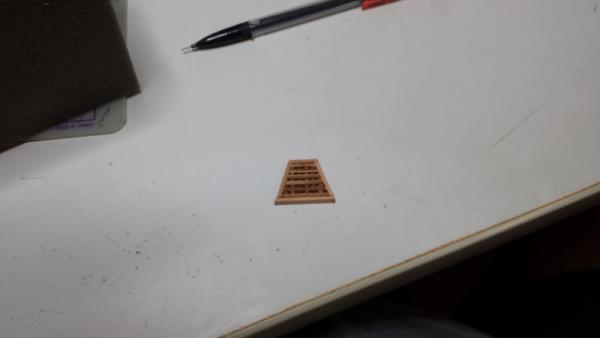
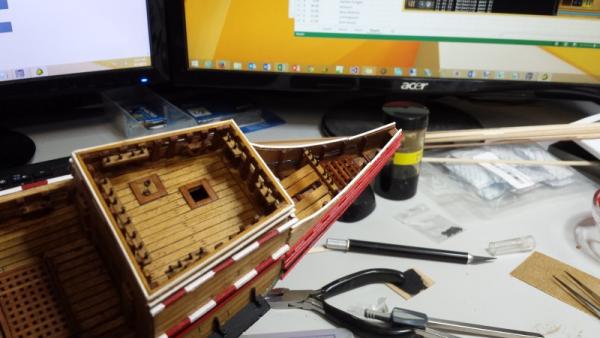
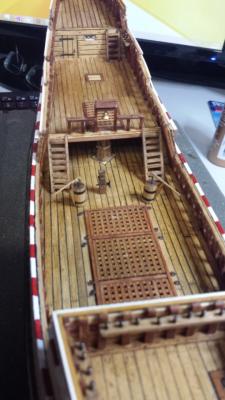
Another good weekend at the bench! My goal was to get in a spot to start the masts and rigging this coming week and I am just about there. I did get into a bit of a groove again, between football and building, time just moved along and I didn't get pics along the way as much as I wanted. I do have to get better at that, am trying to at least. This weekends updates are all around rounding out the ship. First the channels were painted, installed and knees added. These, once in, really made the nearing of the end real to me - very exciting. Odd how just a small thing can do that, but very cool! Using some pear in order to continue the scheme of using peaer for accents and trim work I created the frame for the beakhead grating and some replacement grating I had to order from MS to finish up the kit. And then very simply glued that in to place, added the walkway planks and pin rail with belaying pins and wallah! The interior of the beakhead is complete!! Then finished up the trim on the outside of the beakhead! Again just went with the kit scheme to keep it simple. ON the fence about the beakhead yellow decorations, may just leave them off - still undecided. And here we have her, the mayflower - 99% ready to begin the masts and rigging. I still have some minor bits and pieces to finish up before then, a couple of pin rails to add now that I have the extra belaying pins as well as replacing the railing on the poop deck (it snapped off ). Once I get those all in place I am going to give it a once over with a nice semi gloss spray. All I have is testors lacquer, which typically is not good to use over acrylics. I think I need to go find some acrylic based tomorrow in anticipation! Anyway, once it is sprayed with a couple of coats to even out the colors and sheen, I will be on to the masts and rigging!!! (even the ratlines ... ) So here she sits currently - ready for her touchups, dotting of the I's crossing of the T's and a nice shiny coat! Until later... enjoy!

-
Well thank you very much Chuck, I am not sure if I had read that and forgot I had read that, or if I just plain missed it - I did NOT realize they could just be lined up, stacked up, glued up and done. That sure does make it a heck of a lot easier. Is there anything you did not think of! Now even MORE impressed!!! I will do that from here on out. (They really are nice!)
-
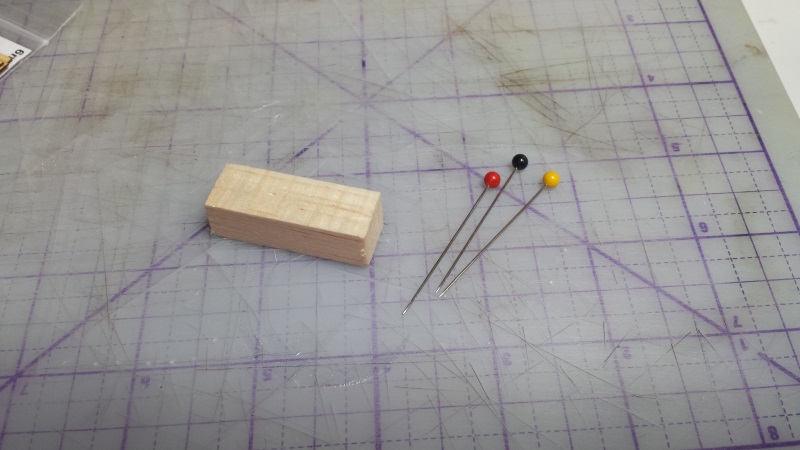
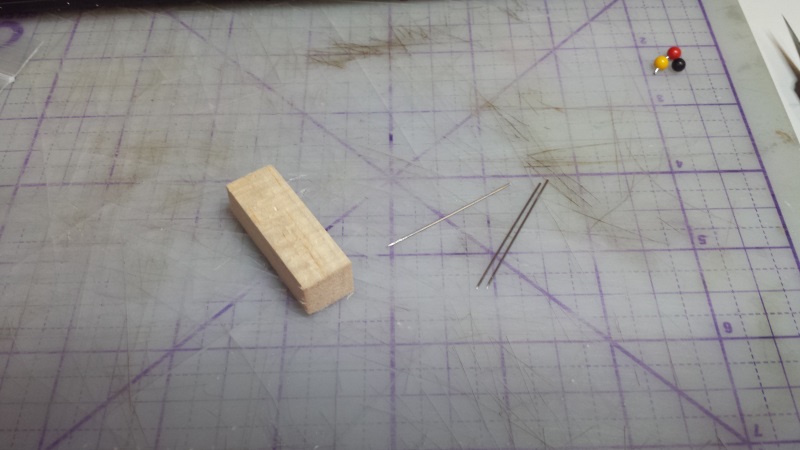
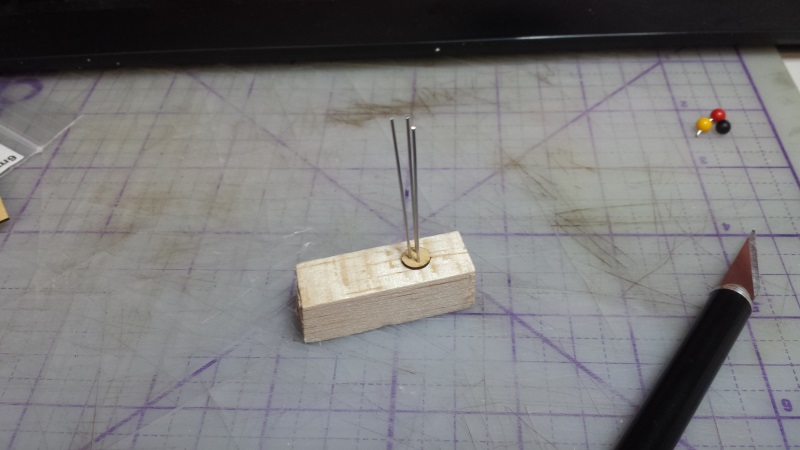
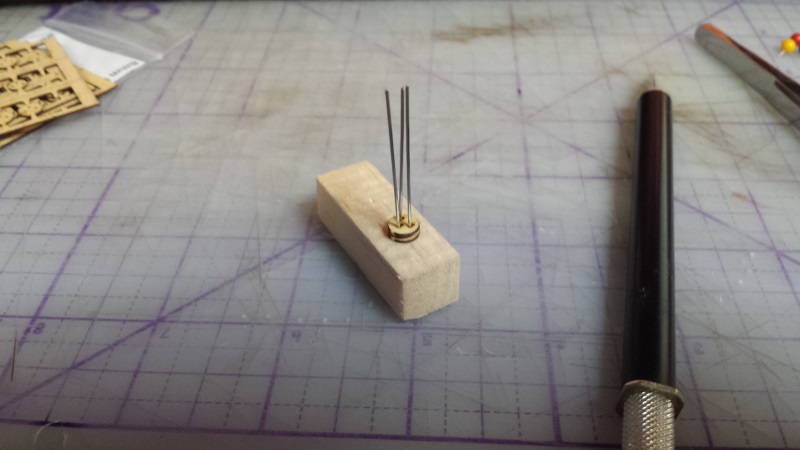
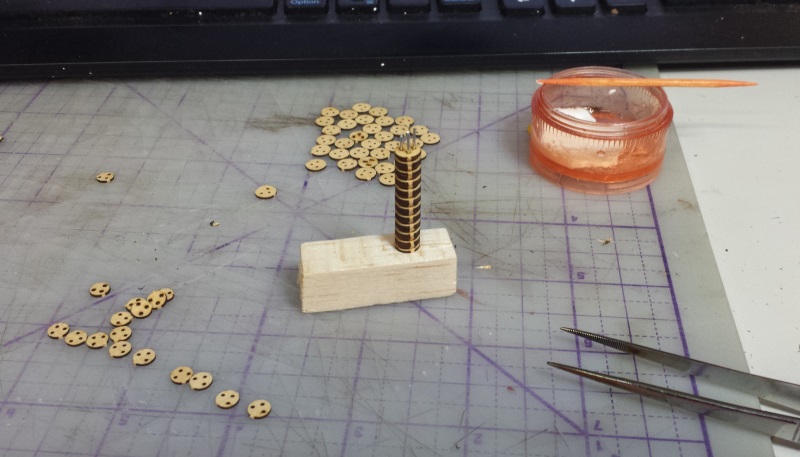
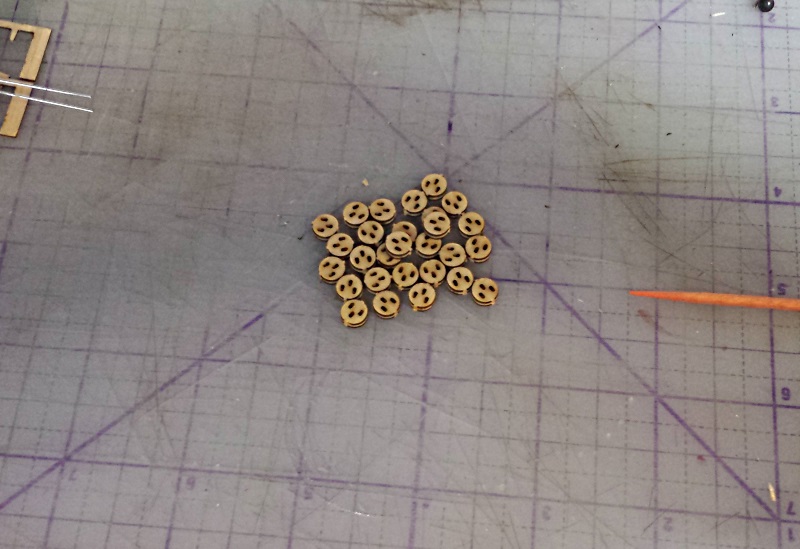
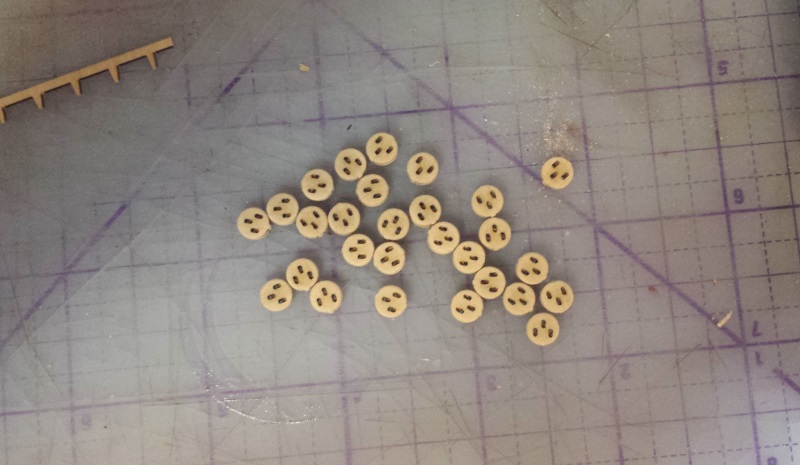
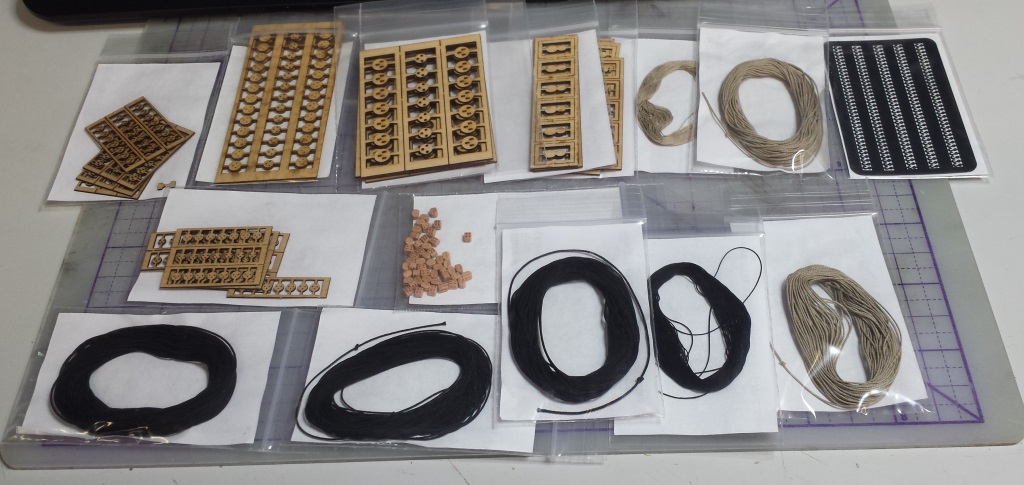
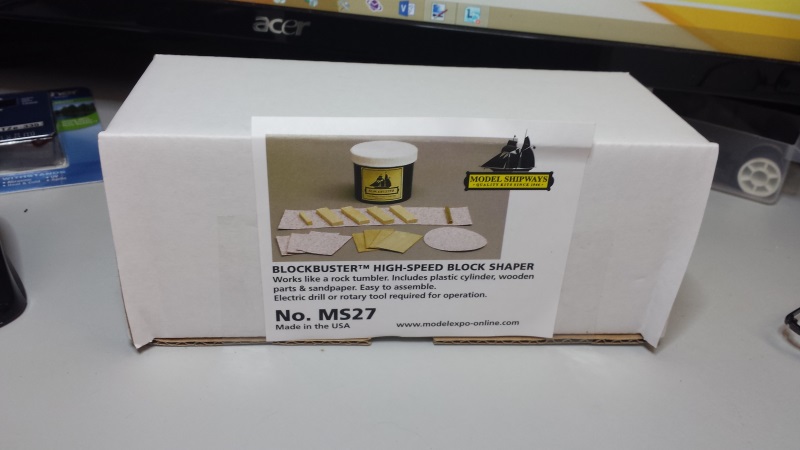
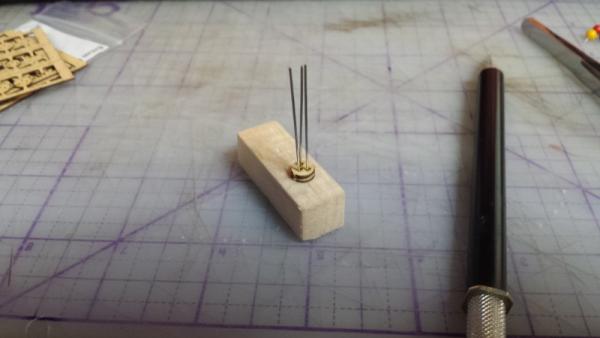
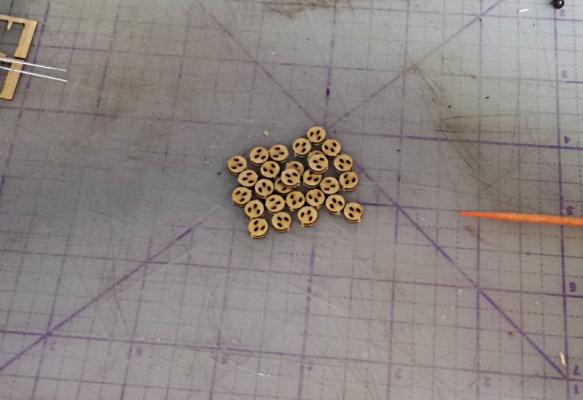
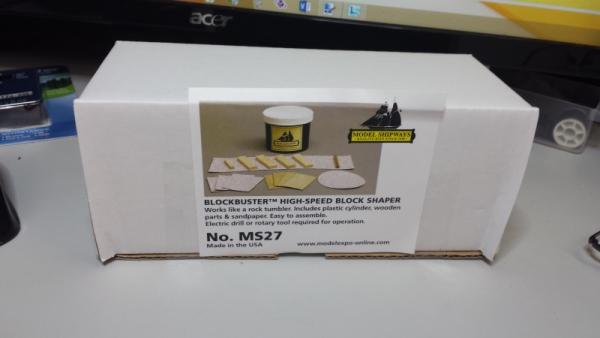
Okee Dokee my friends, had to do it - just had to.... spent the night working out how to assemble the deadeyes to see how they were going to come out.... I dunno about you guys, but I am really really happy with these things - THANK you Chuck, spectacular job! I am sure you guys will as well. So, first the problem. These things are small - as to be expected right? So, how to assemble them. They are laser cut, very nicely and easy to cut from the wood spars. However gluing them together and 1) Keeping the holes aligned 2) Keeping glue out of the holes 3) Keeping them sandwhiched properly so as not to slip. I put on the thinking cap....and here is what I came up with. I decided to start with the largest ones, 6mm, as test subjects to my "process" FIrst we need 3 pins and a block of wood. (The pins should fit through the deadeye holes ) We then cut the tops off the pins so we just have the metal shafts We then cut the deadeye parts from the wooden spar and place one of the outer parts on the block (face down as it will be the outside) and insert the pins in the holes We now have our "jig". we take an inner part, add a VERY Small amount of glue and slide it over the pins, then take the second outer part of the deadeye, face up. Add a small dot of glue and slide it down. There we have it, an assembled deadeye . The pins act as an alignment guide, not only are they spaced correctly but due to the pattern on the eyes if you attempt to put a part on out of alignment it will be very obvious as the pins bend out of wack. So we now have an alignment jig for our assembly of the deadeyes. This process then can be repated. * Outer section face down * dot of glue on middle section slid into place * dot of glue on outer section face up slid into place I did this unti I had a small tower of deadeyes, all perfectly aligned and held in place to dry. Once they are dried you can pull the assembly off of the block. Most likely it will come off like a shishkebob of deadeyes, that is okay. Just pull the pins out one at a time and walla, a pile of dead-eyes. Repeat untl all are complete. I was now just one step away from the finish The first thing I had done before any of this was assemble the Model Shipways BlockBuster, in anticipation. So grabbed the handful of 6mm assembled and unbusted dead eyes, through them into the blockbuster and went to town. I would say I had it running about 5 or 6 minutes and sadly the drill started to peter out.. so had to stop. However, the result is pretty darn nice! I am goig to run it through again tomorrow after the batter has a chance to charge up a bit and even out teh edge color some and get rid of the little tabs where I had cut it from the sprue. Some of them already have been sanded off by the buster so I know it will finish them off nicely. Once those are cleaned up these will be some nice little dead eyes and at least in my opinion an upgrade from the kit supplied ones. So, that was tonights adventure. My first adventure into assembling Syren Ship Model Company's dead eyes. I am hoping the same process will work for the smaller ones I just need to find pins or some sturdy cheap wire small enough to fit. Until next time all! Enjoy!


-
Bash, smash, crash and mash and it all is looking fantastic!!!
-
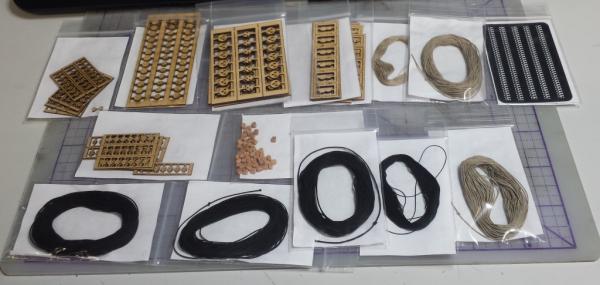
Good early evening folks! So, spent the day going over what I was going to tackle tonight, maybe the grating on the beakhead, finish dressing up the beakhead, tackle the lifeboat, the channels etc.... Came home to a delivery and the night just got turned upside down... Yessiree Bob my order from Chuck's Syren Ship Modeling Company is here... Also my MS order came in as well, so my pins are in, boy oh boy what to do what to do!! I have to tell you, these really are some awesome looking parts. I do believe my night will now switch figuring out how to make up some of these deadeyes and see how they turn out... I did go with the suggestion and had one of these ordered as well, which also came - must be a sign!!! Well, off to do some quick classwork (gotta tell you, getting a degree at 43 is not what it is cracked up to be ), I shall then put on a show and see where the night takes me!! Until later tonight, ENJOY!!
-
Thanks Randy, I actually believe I said that when it looked like they were going to work
-
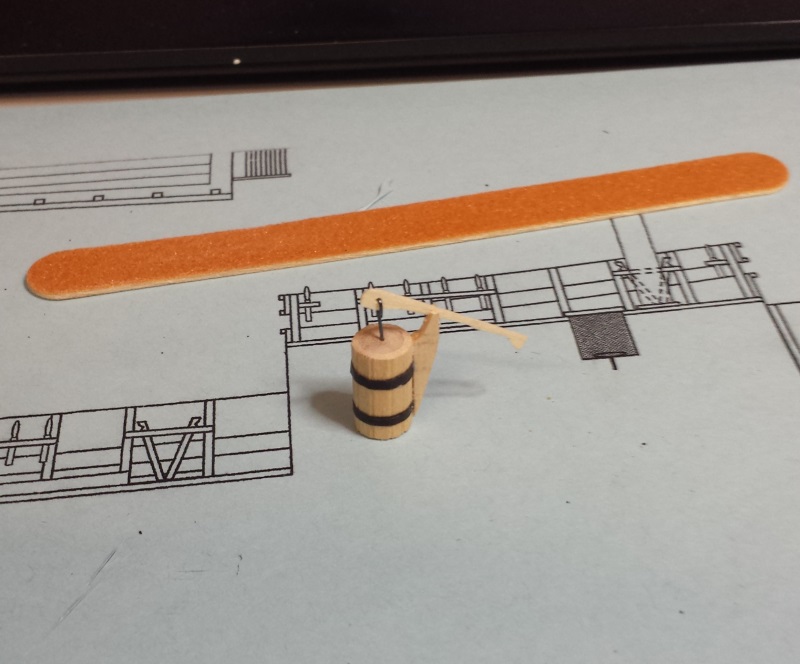
If you are thirsty you don't want the pump water, you want what is in the special barrels
-
Thank you Russ, wasn't sure how it was going to turn out as I went along, a lot of operating on hope, faith and theory but it turned out well (Thankfully)! Thanks Brian, appreciate that! Anytime my friend- I come up with a decent idea every once in a while often times surprising myself since most of my ideas are pure theory and "This SHOULD work" ... sometimes, it does! Ya know, I didn't even think of buckets - but yeah, buckets!! Excellent!! Thank you Wayne! YES therapeutic is the word, real nice to unwind at the end of the evening with some wood and hand held tools! Thanks Dave, I was determined... and yep you get the prize, the spouts were what I had forgotten I figured someone would see it I will have to touch those up shortly. Thanks Augie, I have a set of standards I am trying to achieve - set by many of you incredibly talented builders, so I appreciate the good word! Heat shrink tubing? Cut them into rings and stretch them over the part? Interesting. Thanks Denis, I am all about streamlining when possible. I tucked the remainder of that aside just in case I need something - especially after Sjors mentioned buckets, it may come in handy!
-
Just awesome to look at my friend, really easy on the eyes. Loving watch this all come together.
- 2,191 replies
-
- 1
-
-
- confederacy
- Model Shipways
- (and 1 more)
-
Wow that is a lot of copper! And very nicely laid - I love the look of the copper hull am sure the starboard side will get a fine treatment as well!
- 1,616 replies
-
- 1
-
-
- caldercraft
- agamemnon
- (and 1 more)
-
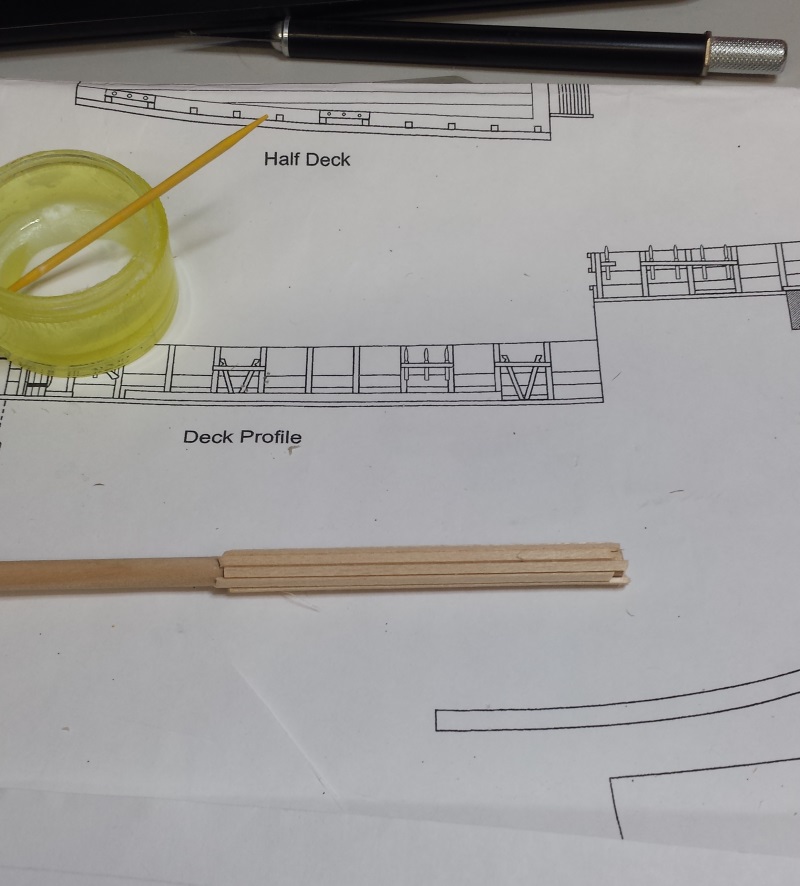
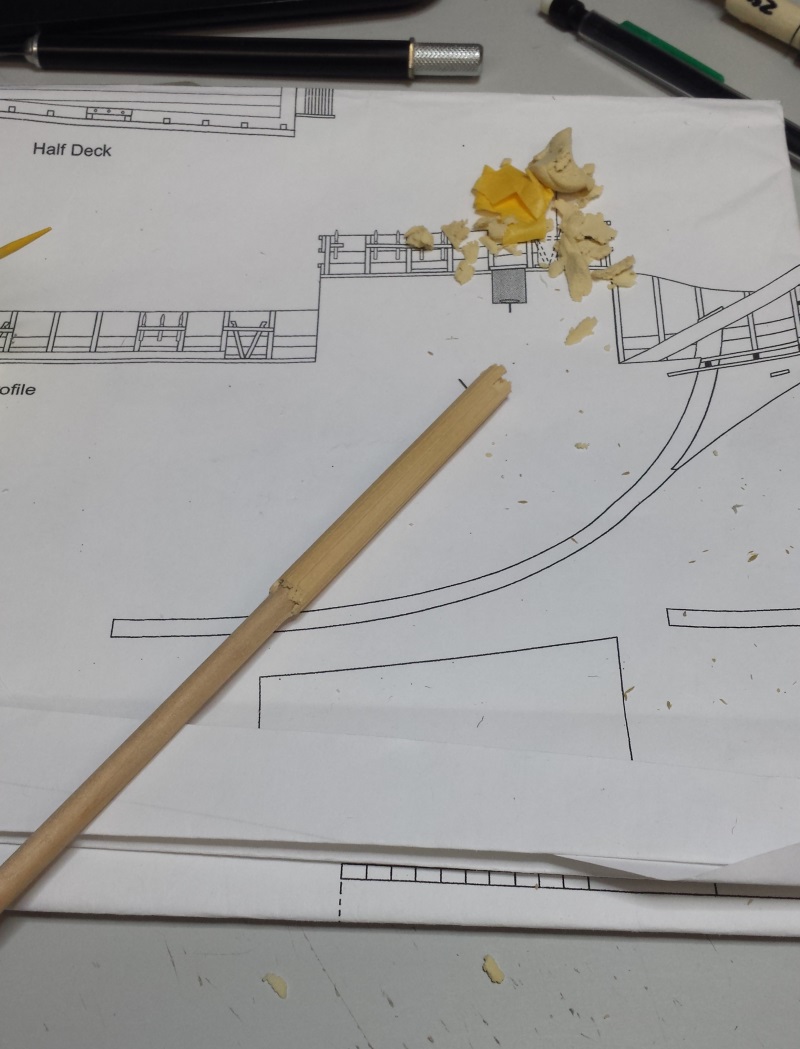
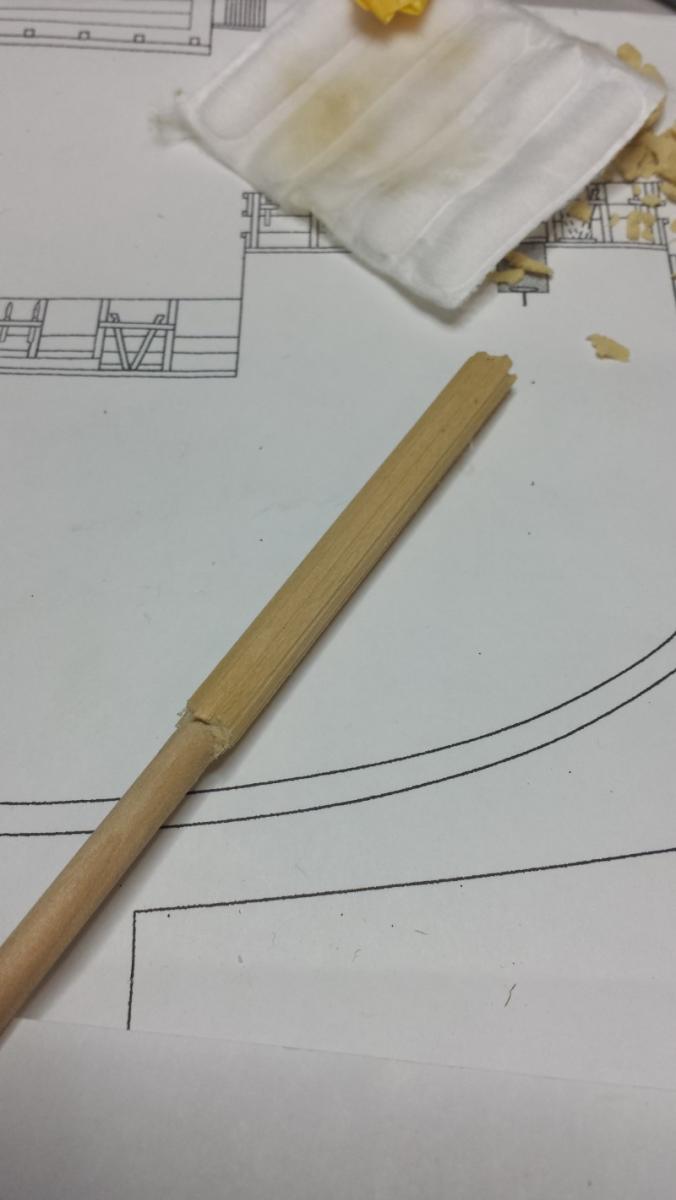
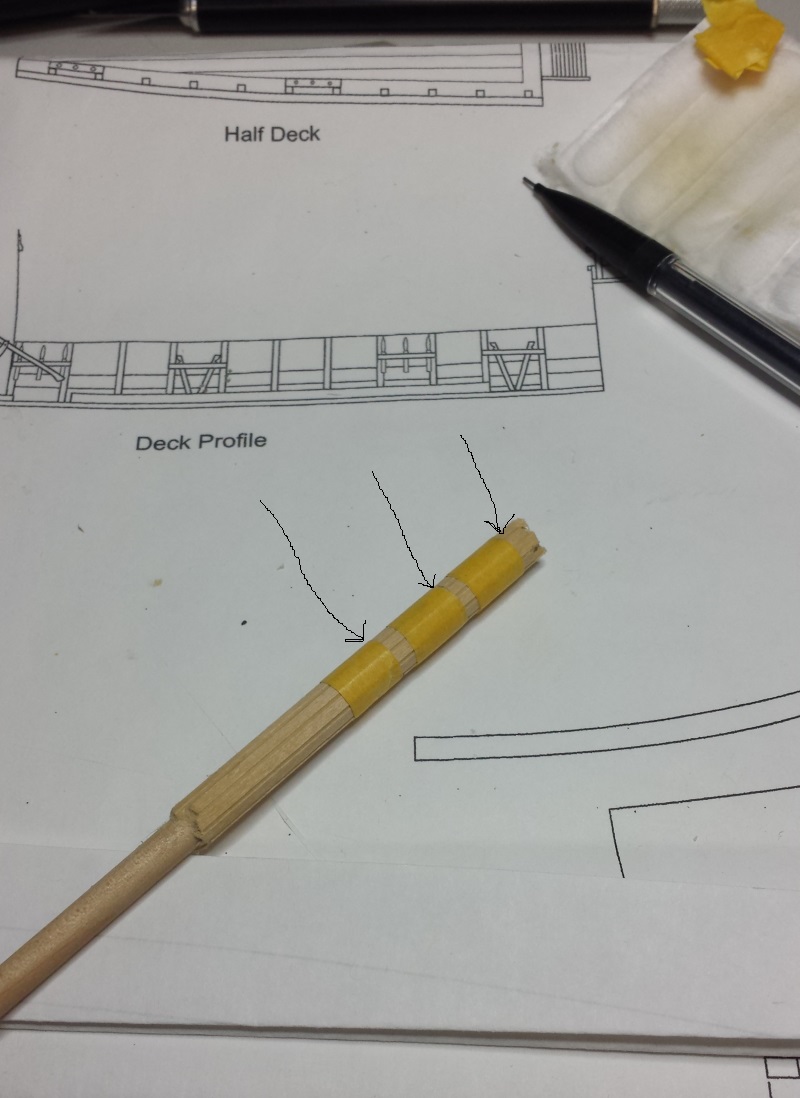
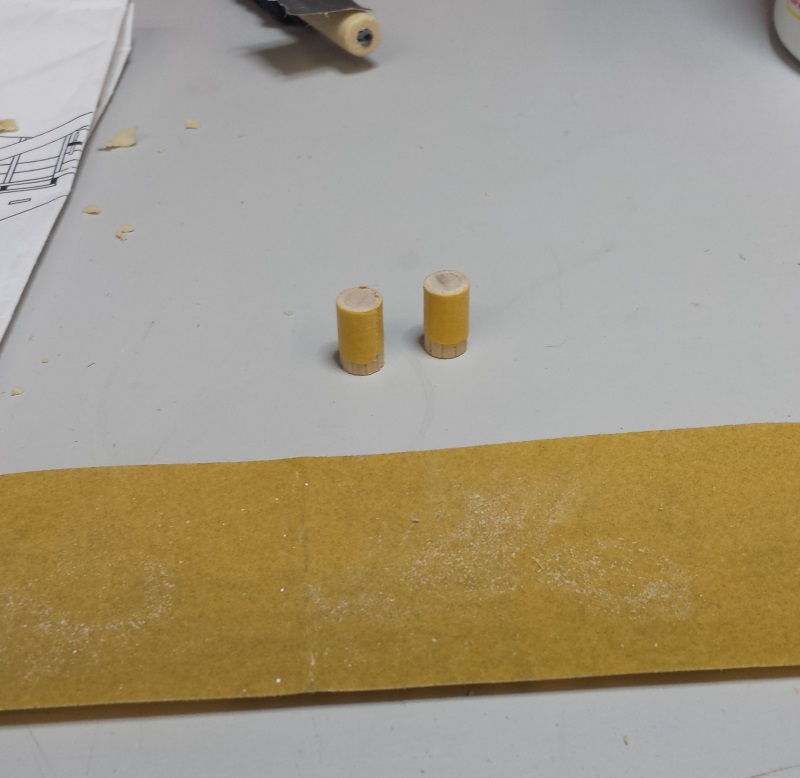
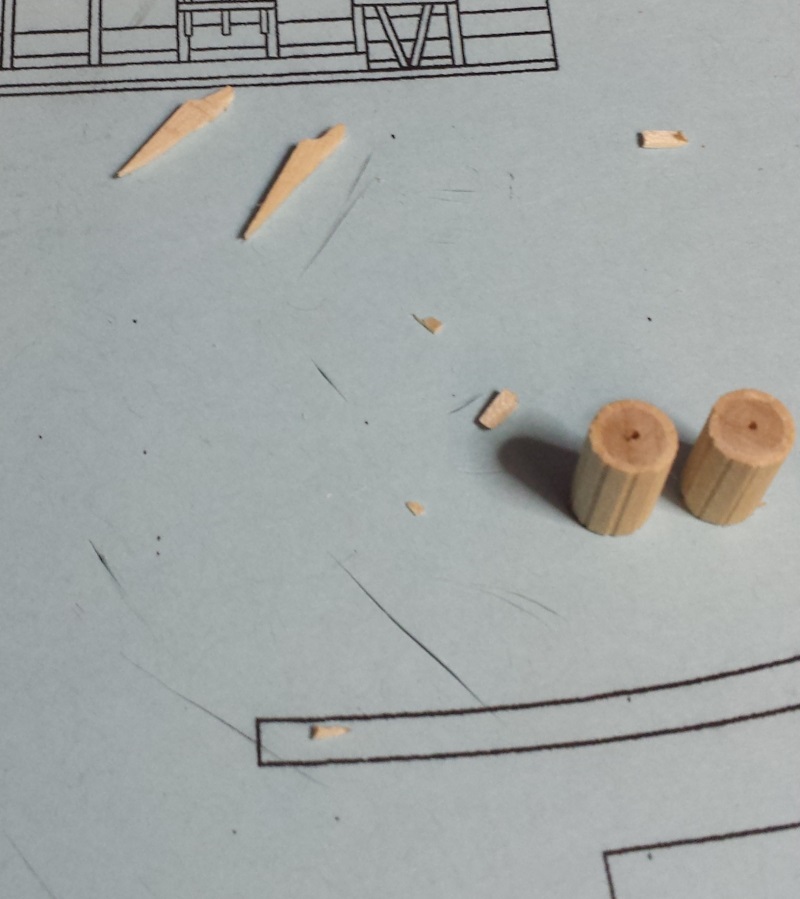
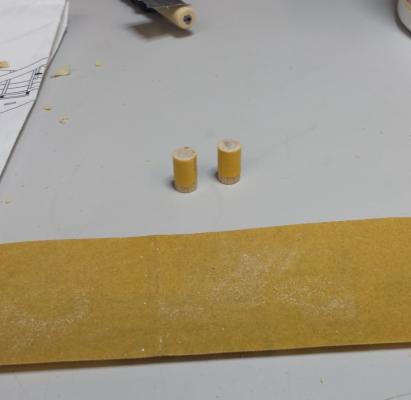
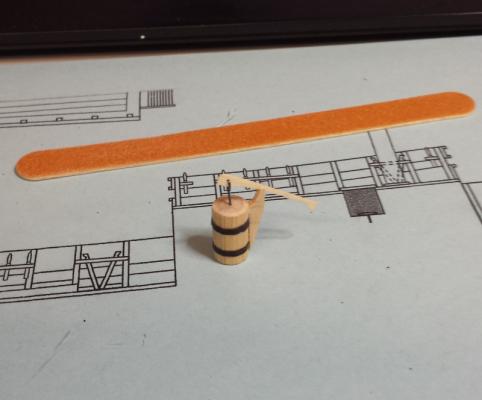
Okay Folks, back for some more fun and excitement in the land of mayflower construction! Tonight, the goal was to continue deck items in order to be ready for rigging adventures this weekend/next week, so tonight was knights and pumps. In reviewing this all I can see I forgot something - but if nobody notices I will just sneak it in there and none will be the wiser =). Anyway, to make up the pumps here is the route I took for those who may be intersted. First, I am really not adept and handling and working with the small parts and pieces yet, so trying to cut the cylynders and wall them up was really giving me pain. So, I tried a different approach. It took a dowel and cut it down some , about 5 inches or so I then took some narrow strips and cut them to about 3 inches and wrapped the dowel in them. This is what would be the cylynder blank. The idea is to cut the section I need for the cylynder and if something happesn I have more material already done up to try again. This time around I didn't need it however. Anywho =) The Blank was then taped up to allow for drying. Once that was dried I had some gaps between the planked wall so using some hobby light i filled it all in, this would smooth out the transitions as well as stain a hair darker than the wood and look like caulking/sealing material (i hoped). Cleaned up the blank, removing filler material from the faces of the planks and cleaning up any errant glue that may be on there. I just used a small cotton pad and some alchohol and wiped it all down. Works like a champ! Then I went ahead and measured the lenght of the cylinders I needed for the pumps. I taped them up at the cut marks in order to hold the unit together when the saw hit it and didn't vibrate loose or splinter. There are three cut marks, the first is to trim the end flush, the second two are the breakpoints for the cylinders. Using my handy dandy Microlux cut off saw I cut them cylinders nice and neat! Going by CHucks instructions I grabbed the proper wood in accordance with the booklet and cut, shaped and carved the handles and drilled holes into the cylinders. I took some Tamiya masking tape (yellow), sharpied it black and trimmed it to size to use as the bands on the pumps. Assembled them all up and whalla - finally I have some pumps!! I got them installed on the deck and all is good with the world!! (also got a knight on there as well) My HUGE apologies for any grevious spelling or grammar mistakes throughout this, it is a little late - been at this most of the evening and wanted to get this update in before i retired for the evening. Am very much on a mission here so I am sensing some late nights in my future =) Thanks all for stopping in!


-
Thank you Russ, I did indeed. It doesn't happen often, in fact it hardly ever happens that I get large chunks of time to do anything lately, so taking that much time to just work on making sawdust and filling the room with the smell of stain and paint was a very nice time! Thank you Dave, that means a bunch and is appreciated! It is funny with the Mayflower how many artiles and paintings and variations there are to draw inspiration from .. quite overwhelming it seems. Yes it does, at first I thought it looked wierd. Here is all this oak and wood and browns and then BOOM shiny gold bell, looked very out of place.. It has grown on me though =) OH don't I konw it Wayne... woke up this moring and the darn leaves are changing already, what is up with that?!?!??!?!? It is DC, it is - and trying ot keep it going =)
-
Mayflower by SawdustDave - Finished
SkerryAmp replied to SawdustDave's topic in - Build logs for subjects built 1751 - 1800
Dave the pumps look great! That is what I am trying to build now, started last night and stopped somewhere around attempt 15 trying to get them to look right, will continue this evening with your pics as inspiration! -
Announcing the Model Ship World Ship Kit Database Project
SkerryAmp replied to SkerryAmp's topic in Wood ship model kits
Thanks Wayne, I think you are reinforcing my belief I need to think a bit more on the Plans idea, between pirates and it is very uncharted water for (no pun intended) and there seems to be a LOT I will have to mull it over a bit more before implementing. Thanks Danny, I will poke through the gallery and see what I can pull out Brian, love the additions. will get them in when I get around to my next round of updates, thank you! Pops, will figure out how to work it as we have been talking about and will get back to you! -
Good Evening all! Put the programming and gaming and what not aside for the last two days (today and yesterday) and spent a nice relaxing quiet time in the hobby room with the admiral. She spent it working on her beads and looming and I with my ship. Good times. I will apologize however, kind of got in a groove and just started going at it and didn't realize until it was far too late that I hadn't snagged pictures along the way So, a breif written description of what was done. My goal is to be rigging end of this week / beginning of next week. So I have to keep moving on the deck fixtures/fittings etc and get that all wrapped up. The last two days were spent building ladders and railings and belaying pin racks and rudders OH MY!! Everything has been pretty much by the book. I used basswood for the belaying pin racks so they would match the overall color of the ship and the kevels. Those were straightforward. Cut them all up with "the chopper", drilled the right number of holes and placed the pins. The only bit of drama with this came when I realize I was shorted on pins . That was okay, needed some more blacken it anyway for future projects so ordered more pins and blacken it and will return to the missing pin racks when they show up. The rudder was also straight from the plans, the laser cut part was fantastic and after a bit of fidgeting with the brass for the pintel and gudgeons (? Still learning my Terminology) I got that part all hooked up, painted up and purty like! The ladders were a bit of a fight. Got them cut to shape and again using the chopper got the steps all the same size, just getting them all lined up, straight but at the right pitch, glued to both risers... ugh. Finally it was the railings and the bell housing. I used the bell that came with the kit, gave it a base coat of dark gray metallic and then painted over it lightly with acrylic gold. The railings were all Pear to go with the other accented wood parts. Epoxied into place to give them some strength then stained all over with the same 2:1 Golden Oak to blend it all together. All in all I think it was a pretty good couple of days. Now to work on the knightheads (?), and the pumps and await the incomming pins. Once those are all set just need to finish off the beakhead (a grate and a pin rack and the outer fixings) and I will be ready to start the fun fun fun stuff (I think). Here is where she sits at the moment, drying and awaiting the next round! Enjoy and thanks for stopping in!!

-
Announcing the Model Ship World Ship Kit Database Project
SkerryAmp replied to SkerryAmp's topic in Wood ship model kits
Thanks Mark, that was my biggest hesitation on including plans. Folks have asked so I figured what the heck - but I kind of guessed if there were unsavory folks willing to spend the time to pirate kits, plans would be easier -
Announcing the Model Ship World Ship Kit Database Project
SkerryAmp replied to SkerryAmp's topic in Wood ship model kits
Thanks Pops, it is a fair amount of work - but as long as it is useful to folks, I don't mind too much. Just a little slow going sometimes as it is a side project. A price filter along with some other aspects were on my initial list but I cut them as I wasn't sure how best to do it. Using the listed prices isn't good as those can change quite a bit and sometimes often. So i had thought ranges (<100, 100-200, etc etc..) problem I ran into there was regional conversions, or if those were even necessary. As far as helping, I am not against help in any form just not sure how to go about it. This is my own hosting account so has stuff on there for other projects, work etc so I have a personal solo access policy (nothing against anyone just for security reasons). I guess a spreadsheet or something and I can import it, OR I can make some entry forms available and they can be edited etc.... open to ideas. -
Announcing the Model Ship World Ship Kit Database Project
SkerryAmp replied to SkerryAmp's topic in Wood ship model kits
Good Evening All. Just a quick update (yup, been plugging away at it) 1) Added A.J Fisher KITS to the database. Only problems is I can't snatch the pictures so those kits at the moment are pictureless 2) Will be adding Plans as a seperate list, not sure how to present it at the moment but the information is alittle different so will have it's own table. 3) Time has been being spent on some backend architecture work in order ot support Build Logs, Reviews and Profiles (So those are in the works). Will talk about those later to get feedback on the "plan". 4) Prototypes made and being tested for the "detail" screen which should be live in short time 5) Added Modelers Shipyard to the list of vendors 6) Back end DB work to normalize the data and apply better design principles to it to make it more reliable and efficient. That will switch over once all is done. To you all, it should be invisible - should be Thanks all for the ideas thus far, traffic is still good - so good to see people are checking it out. My many thanks for the patience and understanding in the time frame, it is muchly appreciated (although am still sorry for being a bit behind updates ) Here is the current list of KIT Vendors Aeronaut: Data Entered (incomplete due to source data issues ) A.J Fisher: KIT Data Complete Amati: Data Not Started Artesania Latina: Data Complete Billings: Data Complete Bluejacket Ship Crafters Inc.: Data Complete Caldercraft:Data not started Constructo:Data Complete Corel:Data not started Dumas: Data not started Dusek: Data Complete Euromodel: Data not started Krick: Data not started Graupner: Data not started Mamoli:Data started, test entries only Mantua Models UK:Data not started MarisStella.hr: Data not started Midwest Prouducts:Data Complete Modeller's Shipyard: Data not started Model Shipways:Data Complete New Maquettes: Data not started OcCre: Data started, test entries only. Panart: Data not started Robbe: Data not started Sergal: Data not started Soclaine: Data not started Victory Models: Data not started Am beginning to put together a list of PLANS vendors/ sources, please feel free to toss any you know about and I can add them to the list for when that part gets put together. I know NOTHING About plans, building from plans, shopping for plans etc, so this one I am going to just go by what I am told . I understand that plans can be purchased seperately for kits (You can buy Corel Plans, Model Shipways plans etc). Do we want to include those in the "plans" list, or only those specifically meant to be scratchbuild plans? You guys tell me - I am but a humble servant . List of PLANS Vendors A.J Fisher: PLAN Data not started As always folks, thank you for the interest and will continue to plod along -
Cannons look great! each one will get easier and if you are like most people by the last one you will have found the most efficient way to make them just about the time you are done . (Happens to me all the time) Keep up the great work!
- 1,756 replies
-
- 3
-
-
- constitution
- constructo
- (and 1 more)
-
Evening Bob, Sorry for being a little late to the party but I am incredibly enjoying your work. I have this kit on my To Do Shelf and getting some great ideas and inspirations from your build. Such great work!
- 277 replies
-
- 1
-
-
- model shipways
- 18th century longboat
- (and 1 more)
-
Nicely done so far from what I can see. I have this one on the shelf waiting it's turn so will enjoy watching yours progress!
-
Hey Gerty! Glad to see you, and thank you for the good word - much appreciated!