SkerryAmp
-
Posts
809 -
Joined
-
Last visited
Content Type
Profiles
Forums
Gallery
Events
Everything posted by SkerryAmp
-
 Hey there Randy, yes...yes I do indeed have many balls in the air, drives the Admiral crazy! =) Right now the latest one I am working on is the Mayflower, I kind of move through them when frustration puts me against a wall. If I get a trouble spot or a monotonous spot I have another one to move to for a "break" while continuing to build. The only exception is the Willie which has not gotten much attention for some time. I am not sure what it is about that one but I am very intimidated by it - strange, I know and not something I am particuarly proud of, something about it; the plans, the build I don't know. However, am mustering up the gusto to at least tackle something on it. In some occasioins I will do a bit to each build and post updates on all builds at once - just to be a bit cheeky and shake things up a bit =)
 -
This is one of the best parts of the hobby in my opinion! Looking Good Sir, lookin good!!
-
Augie... the floor (as others have said) is masterful!! And love the swiss pear, I got some to try on the mayflower, am using it as accent wood, trimmings etc... personally I really like the look and feel of it.
- 2,191 replies
-
- 1
-

-
- confederacy
- Model Shipways
- (and 1 more)
-
Isn't it great when all the little bits and pieces start going on and really fleshing out the ship.... Great phase and great job!!
-
Nicely done! I look forward to and dread the fiddly bits part of the ship. Dread because they are tiny and usually a lot of them! Look forward to because it starts to bring the ship together. Liking it!
-
Sjors! Fantastic - love those pics, nice and clean and tight. Something I am still striving for with mine (which is why I don't dare close ups on mine quite yet. I am still at the 3 foot rule - Looks great from 3 feet away!! =) ). Yours though, inches looks fantastic.

- 1,873 replies
-
- 2
-
-
- occre
- san ildefonso
- (and 1 more)
-
Model Shipways Willie L. Bennett Questions
SkerryAmp replied to FlounderFillet5's topic in Wood ship model kits
Max, seeing your work on the Phantom you should have no problem at all with the willie. Personally I found the instructions a bit overwhelming, but then again the phantom plans were really for someone with little to no experience and the willie I found a bit more complex. Which is part of the reason mine stalled quite some time ago and I picked up on other projects. The willie intimidates me for some reason =) Again though, the work you do - I would expect a mighty fine model!! Good luck! Can't wait to see it. -
Announcing the Model Ship World Ship Kit Database Project
SkerryAmp replied to SkerryAmp's topic in Wood ship model kits
Thanks MC! Will add em on =) -
The patience you have - I can only dream of having that level of patience. Pays off though!
-
Randy my friend - outstanding!! Decided today to pop on and get caught up on my well over 500 updates on various threads and decided to start with yours and boy am I glad I did.. what a way to kick off. That vessel looks fantastic! And am jealous - I love the feeling of finishing a project, you must feel great! So awesome!
- 384 replies
-
- 4
-
-
- san francisco ii
- artesania latina
- (and 1 more)
-
Announcing the Model Ship World Ship Kit Database Project
SkerryAmp replied to SkerryAmp's topic in Wood ship model kits
Steve, I think that is a fantastic idea! Not exactly sure how I would do that off the top of my head, but will certainly add that to the wish list and see what can be done =) Thanks for the suggestion! (While I am obligated to dislike the jets, I do have to admit that Rex Ryan is fascinating to watch and listen to. I sometimes can't help but wonder if Rex was the D Coach and you guys had a different Head Coach if you guys may not fair a bit better =). Of course, I am looking at the golden years of Brady and Belicheck so - /cry. ). -
Announcing the Model Ship World Ship Kit Database Project
SkerryAmp replied to SkerryAmp's topic in Wood ship model kits
Just added what I could find for Aeronaut. The only thing with this one is that while the titles and VERY basic information is in there, that is about it (oh and a picture). Their site really didn't have a whole lot about the ships. I noticed they pop up from several didnt vendors so will do some digging on some related sites to dig up the missing information. But, at least they are represented now. Also, updated Mayflower ship types as well as Nina, PInta and Santa Maria thanks to Danny! Here is the list as of tonight.. Aeronaut: Data In - however needs fleshing out due to incomplete information from site A.J Fisher: Data not started Amati: Data Not Started Artesania Latina: Data Complete Billings: Data Complete Bluejacket Ship Crafters Inc.: Data Complete Caldercraft:Data not started Constructo:Data Complete Corel:Data not started Dumas: Data not started Dusek:Data not started Euromodel: Data not started Krick: Data not started Graupner: Data not started Mamoli:Data started, test entries only Mantua Models UK:Data not started MarisStella.hr: Data not started Midwest Prouducts:Data Complete Model Shipways:Data Complete New Maquettes: Data not started OcCre: Data started, test entries only. Panart: Data not started Robbe: Data not started Sergal: Data not started Soclaine: Data not started Victory Models: Data not started The other suggestions have not been forgotten, just not gotten to yet =) Happy Modeling!! -
Announcing the Model Ship World Ship Kit Database Project
SkerryAmp replied to SkerryAmp's topic in Wood ship model kits
Hey all, Still alive! =) I will be having some more updates to the database VERY soon! I have a light week this week so have some time to squeeze in some DB and Ship work! So, just wanted all to know I have not dropped of the edge of the world! (WOW 400+ updates up there on my post announcements. I best get cracking) Happy Modeling all!!! -
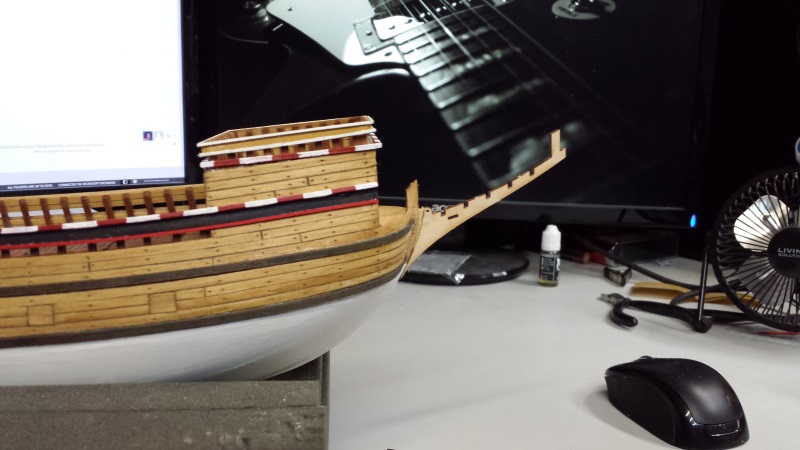
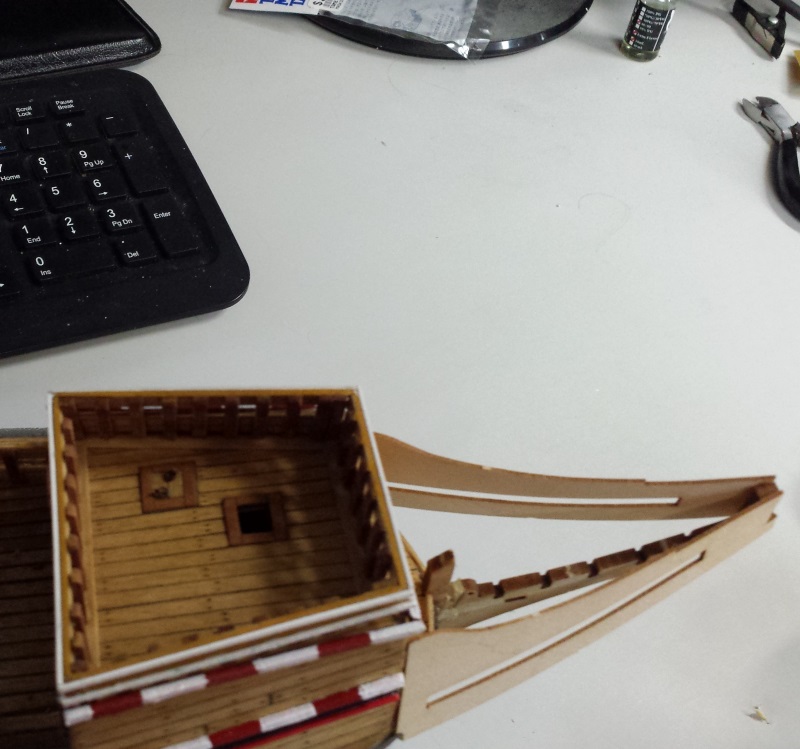
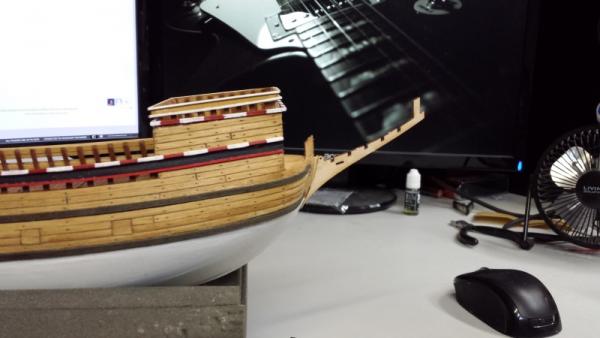
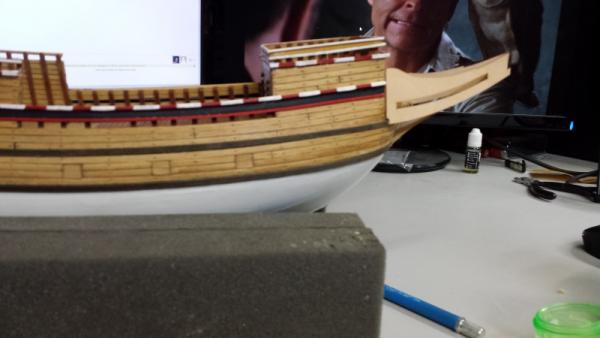
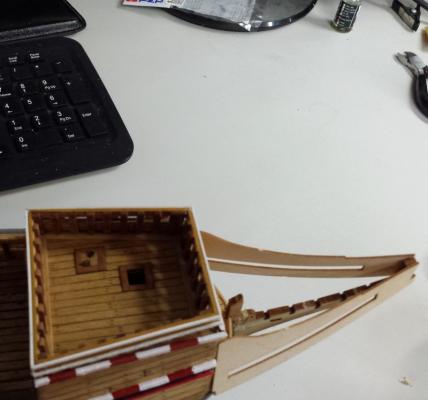
On to the beakhead! Kind of nice to get off of the hull itself and add a new "feature" to the ship. Although through the adding and fitting and photo's I am spotting all kinds of little blemishes and "neatness" issues which are reall embarassing and driving me crazy. Not sure how to clean those up quite yet, but am mulling that over. As to the task at hand! The beakhead has begun, the Mayflower has been without a face for far too long. The stem knee was a super pain. Apparently with all the sanding, shaping etc of the hull I drastically messed up the contour so when lining up the stem knee it was way off. Pointing to the moon!! So, carefully positioning it where was supposed to be and gluing the bottom in place and letting it set allowed me to get it basically into position. Some creative filling with hobbylite made it look like it was right where it was supposed to be.... The laser cuts beakhead sides were VERY NICE!!! Notched the base to go over the upper wale and set them into place. The stem knee wasn't QUITE as centered as I thought, however luckily getting the sides into place and lined up with the forward part of the stem knee forced everything in place... (that was rude, my wireless keyboard died right in the middle of typing fear not replaced the batteries and back in action. Of course none of you really knew that so I didn't have to share but it was in the flow of thought so decided to bring you all in for the moment ) So, as that dries I now plan and plot my next move.... moving on moving on.. Thanks all for stopping by .. Enjoy!!
-
Thank you all for the likes!! For a struggling novice like me those mean a great deal!! Thanks Dennis and you are right...well, sort of yes,, maybe? I dunno anymore hehe. I checked around and founds several pictures of the Mayflower and found stripes, triangles plain colors, different colors, painted hull, natural hull.. then found it depended on whether I was looking at the Mayflower or Mayflower II. So, after my head was spinning I decided I would just stick with Chuck's scheme and go with it - I certainly wasn't finding anything to latch on to!! And it works! Thank you very much Sherry! Much appreciated! Thanks Russ. It actually looks much better in person - the photos look very clean while on the bench it looks a tad worn. But overall I am gald with how the colors came out. Now if I can do something about the glue marks.. am hoping when I give it an overall dull cote it will flatten and hide much of them, but not sure.
-
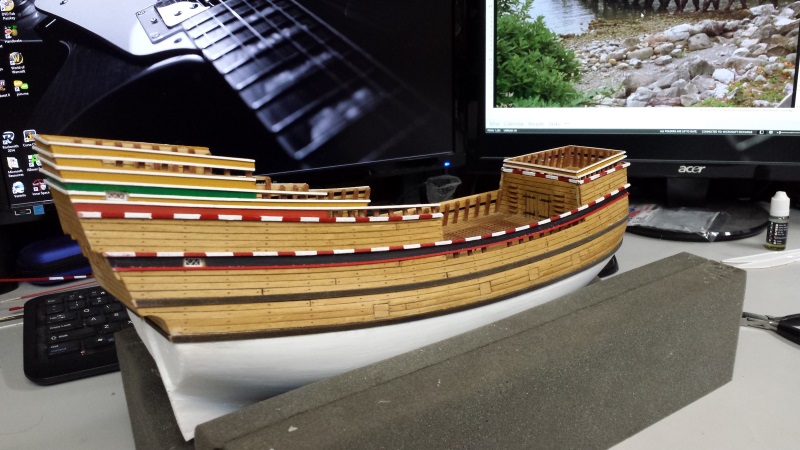
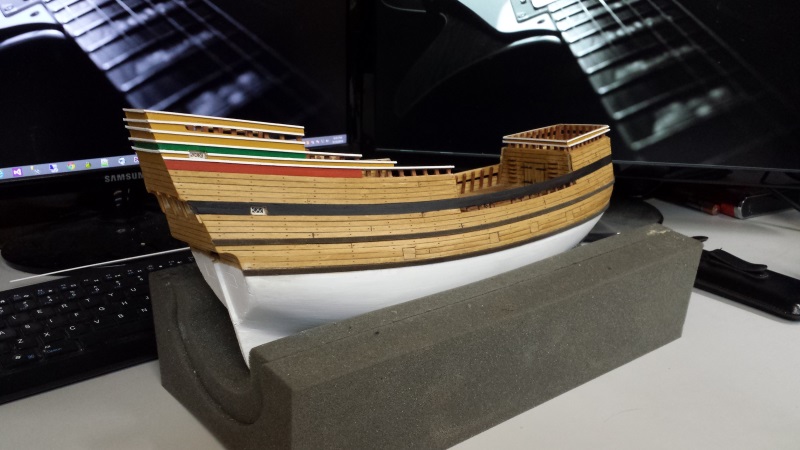
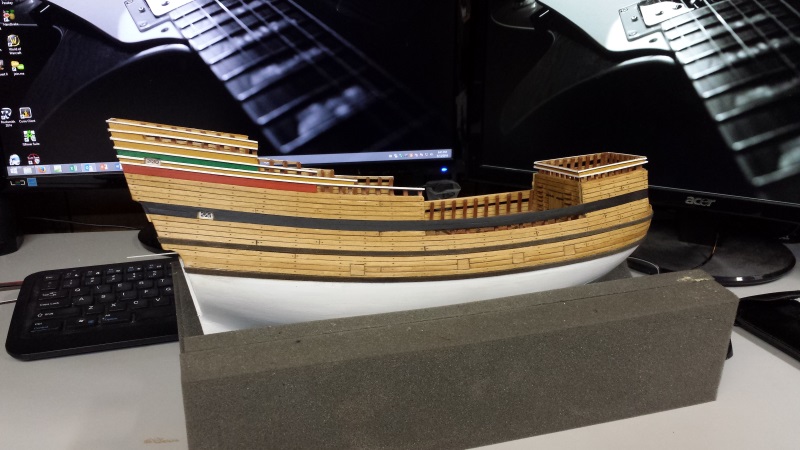
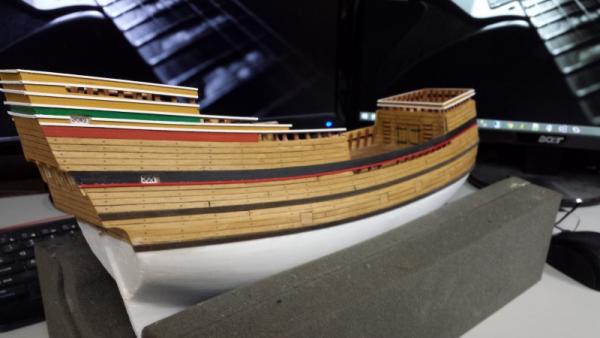
Well I have spent a bit of time over the last couple of nights to get more of the trim up. I think I am finally finished with the trim and can start to look towards the bow and get that beakhead going on!! Finished up the red and white striped strips I had originally painted them nice and bright but once I lined them up on the ship they looked off. Took a bit but realized that the overall look of the ship is taking on a bit of a used look. I wish I could say it was intentional but the colors are such that it isn't quite a brand new ship so the first red and white trimmed look a bit out of wack. Decided to go ahead and try to tone it back some. Not quite pristine bright white and red but a bit worn and a tiny bit rough around the edges. WHICH given my lack of painting prowess turned out easier to do than the crispy clean versions ALthough the pictuers doesn't quite show what I am talking about..hmmmm..... /shrug. I hope I pulled it off and continue to do through the rest of the build Thanks for stopping in and as always ENJOY!!

-
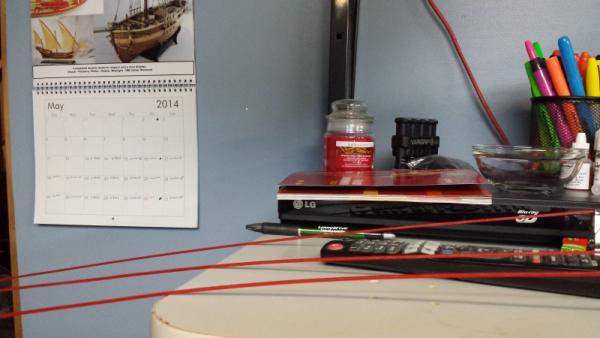
Thank you thank you all I definately am aiming for a bit subdued, also a bit "worn" not TOO worn, but the way the hull came out doesn't strike me as fresh of the slip so am trying to make the colors a little tiny bit worse for wear. Which is sort of easy since I am not the best at painting these things quite yet Thanks patrick! The mayflower is most assuredly feeling better with some attention. The admiral too since she has been staring at half built ships now for months! Thanks Augie! Yep that is the official calendar hanging proudly in the workshop/office. For years it has been butterfly's and kittens of the admirals choice, this year SHIPS! THANKS MSW Thank you much frank, a little inspiried by your super weathering so as I mentioned above trying to slightly weather things a little. Not quite weathered weathered but a little less than brand spanky new Thank you wayne! Glad they are working! I'll take it Sjors! Thank you sir! Thanks Popeye! I am thinking so as well so far - nice getting that urge going again!!!
-
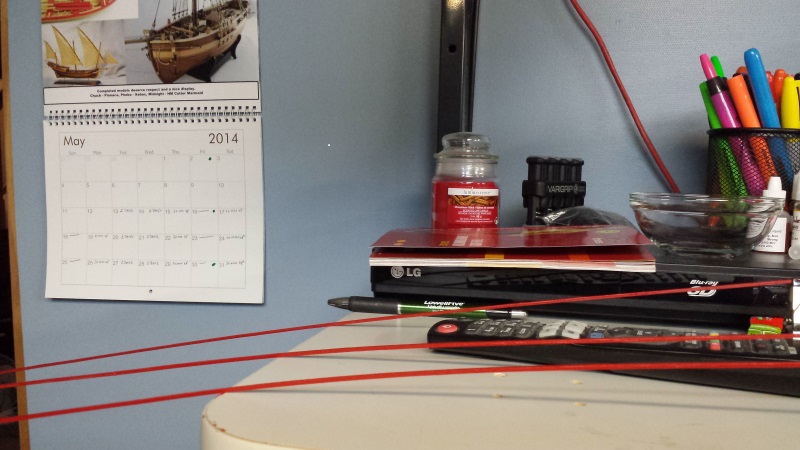
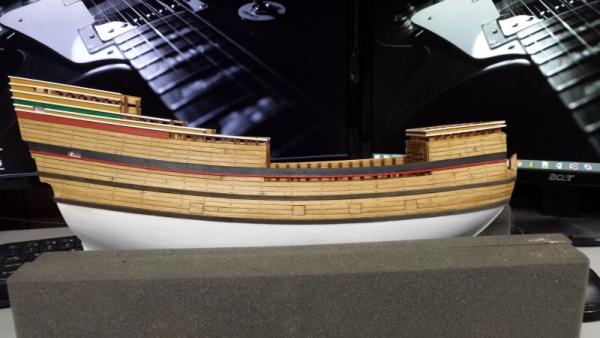
Well in continuing my newly building resolve to get to the bench regularly I took some time and painted up some of the finish as well as attached the red trim beneath the railing black. I was hoping to put some more on however I discovered I painted the wrong size lumber so had to redo it So now we are waiting for the new strips to dry and those will go on tomorrow =) Here are the strips drying away on my high tech drying rack (i.e the middle shelf of my workbench/desk/computer table. There is also a little cameo appearance in the back there of the MSW Calendar Here we have the stripes painted on the sides and the red accent trim along the bottom of the upper black stripe. Stepping back, it is coming together nicely. The colors bringing it slowly to life Tomorrow once the new strips are dryed they will be mounted and then the stripes will be added and then I do believe it will be on to the bow! Thanks all!


-
Thanks Dennis, liking how it turned out and it FEELS like I didn't skip a beat... although still not sure why I bought the window maker stuff... but am sure I will remember at some point. On the screens? That is a desktop image of a guitar. My two biggest "hobbies" are the ships and guitar (well now that summer is here a bit of gardening out back, get some nice fresh vegetables going). I wanted a non intrusive background for my pictures and found that one and figured it worked out pretty well!
-
Wow, gone for a while and so much progress on so many logs - and here you went and finished her off. Finished off VERY NICELY!! Love the pics and the finished product is absolutely fantastic. Very Impressed!!! Congratulations!!!
-
Finally caught up on this one - ship time is good time and it is doing very well for your schooner. The pictures are great reference and doing a nice job honoring the detail! Would love to have that level of skill and patience,.. maybe someday
-
Thank you sjors, you are right - it is about time The mayflower is happy now, giving it proper attention
-
Continuing on quite nicely! Detail is wonderful!
-
Hooray!! Progress is good - just getting back to things myself and boy did I miss it. So if it took "coffee" to keep ya going - then all hail the starbucks!!!