SkerryAmp
-
Posts
809 -
Joined
-
Last visited
Content Type
Profiles
Forums
Gallery
Events
Everything posted by SkerryAmp
-
 That is the fun part, you don't wade through it - you dive right in and immerse yourself in the vast depths of knowledge around here
 -
Augie, wonderful - wonderful! Love the contrasting finish, and the natural look. And that planking - I know what you have said, but I still do not believe you!! It is faaaantabulous!!!
- 2,191 replies
-
- 2
-

-
- confederacy
- Model Shipways
- (and 1 more)
-
Patrick, that is one fine looking vessel you have going on there. Caught up once again and the rigging is FANTASTIC!! Looks quite majestic all dolled up like that!! WONDERFUL job!
-
Anja, that is terrific to hear! It is always great to get a chance to open up and learn new things and find a new challenge in life. GOOD FOR YOU!!! I am sure you will be very successful!
-
Sjors! TERRIFIC!! Lines are good, colors are good - ship looks just fantastic!! MORE MORE MORE
- 1,873 replies
-
- 2
-
-
- occre
- san ildefonso
- (and 1 more)
-
Well, nothing HUGE... but a quick update. My plan as mentioned before was to get the other trim up over the weekend, well - when I went to do that I noticed a tiny tiny flaw in my ship which I had to rectify ASAP. One of the railings wasn't trimmed and sanded properly and was thicker than the other so had to work on that a bit before anything else could happen. Then, of course tonight I realized I couldn't just lay the trim down either as it would be easier to take care of some of the painting first. So - tonights up date, the yellow painting along the exterior of the forward and rear decks. This of course has to dry and then tomorrow will be masking it off and doing the green stripes. THEN adding the trim! Whew! So, here it is, the mayflower + yellow paint! I searched around for a yellow that I thought looked real good, and one of the threads here had mentioned using artist acrylics. So, poked around: the goal was to look for the right colors but more subdued and less vibrant than a lot of the model acrylics tend to come in. Whalla! Yellow Ochre. I used Winsor and Newton Galeria artist acrylics, and while straight from the tube they worked well I did use a little liquitex flow aid to help even out the finish a bit. Here is the result I wasn't overly concerned with "neatness" at this point (I mean I didn't just slap the paint on but wasn't dialed into final lines etc) as there will be trim over the edges as well as masked and repainted secondary edges which is where I will start to hone in and focus on the lines. Until next time!! Enjoy!

-
Well, aside from feeling silly (and rightfully so) that I for some reason kept reading over that and not clicking what it meant - mystery solved! Tis a good day! Thanks Jack! Looking forward to see yours take shape!
-
Ah, thanks Chuck! Will check that out when I get home.
-
Hi Jack, glad I could help - I think you will enjoy it, it has been an absolute pleasure to build so far, I just wish I had a lot more time to devote to it. Regarding the eyebolt, I wish I had clarification on that one, I did install it, just as the instructions say but having read through the book a couple times I still havn't found where it comes into play. I am sure I am missing it or just not reading something right, but figure when I get to it, I will know . From the pictures it looks like several lines from the foremast go down to it, but again not 100% sure. I know that doesn't help you any, except to say we are in the same boat..or ship .
-
Thanks Augie, Russ; yeah that veneer is wierd. Ruined many pieces before I figured it out! And Augie, fear not - those "weights" should last a long time, sadly my vice is Smoking (working on it though - like most I guess). Those guys there have been around for quite some time, don't use em very much
-
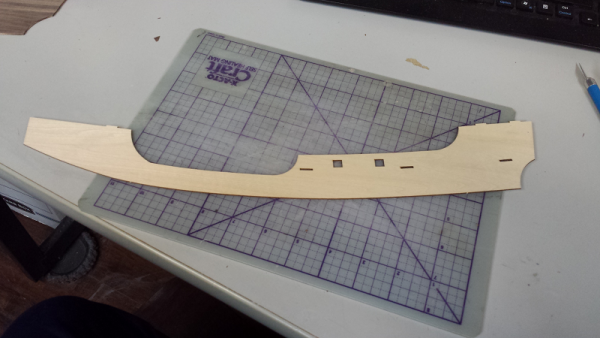
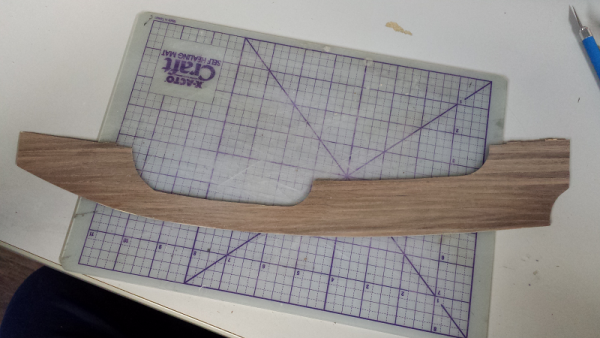
Thanks all for the likes - they are greatly appreciated! Just a little bit more of an update. Decided to tackle the bulwarks tonight on this one while the parts fo they mayflower sit ever so patiently (that is tomorrows event). The kit comes with very well done laser cut bulwarks, they were clean and uniform (quite nice). Decided to go at it what I think was the simplest way, again going by the kits instructions and trying not to add too much "extra", spread a VERY thin layer of white glue on the bulwark. Then just lay the african walnut strips and let dry. One of the problems with the strips is because they are so thin of the edges are VERY narrow (like a sliver) it was difficult to get the to alll lay flat. So, flipped it over once they were all laid on and looked around my work bench for heavy objects to flatten it down. This is when it occured to me with all my tools, gadgets and gizmos I don't have a good selection of flat weights. So, had to get a little creative Worked PERFECT! whew. Now, once all was dry and I was sure they wouldn't slip around, I then flipped it back over and carefully trimmed the edges. One thing to note with the walnut, it is VERY dry and VERY brittle as it turns out. So I had to use a brand spanky new sharp sharp sharp knife and score it. DO NOT try to cut it in one shot, it seems suseptable to tearing Luckily the tearing was just along the hull edge and a couple inside spots which will be covered up once assembled. WHEW again!! Then it was just a matter of lining them up and installing them onto the ships hull. Easy peasy! (not really, Had to go at the formers a bit more to get the curves a bit better, but eventually it went on relativly easy. Letting that setup and dry solid and will install the second one tomorrow then move onto the additional decks. So far, AL seems to make a fairly decent kit (still really digging the color build steps companion, very nice - very nice) Until later... Enjoy and happy building!!!


-
Back at it David and good to see. About the 1 board a day... it happens, but just remember that is 1 less board you have to do and 1 board closer to done
-
Fantastic Popeye - they have nice shape and all looks well!! ::applause::
-
Everything is looking great Sjors! Fonzie - LOVE IT! =)
- 1,873 replies
-
- 1
-
-
- occre
- san ildefonso
- (and 1 more)
-
Very nice decking - looks nice and tight and clean.
-
Announcing the Model Ship World Ship Kit Database Project
SkerryAmp replied to SkerryAmp's topic in Wood ship model kits
Thanks Al, glad you like it! -
Announcing the Model Ship World Ship Kit Database Project
SkerryAmp replied to SkerryAmp's topic in Wood ship model kits
When I made the original list it was from what I am familiar with, from there the list has grown as people suggested them. Those two are on the list now as well as several others which folks have brought to my attention (boy there are a lot of em! ) -
Thank you gentlemen! Russ - I was happy the deck came out as planned, was a bit worried with that gap, now hopefully when I attach the sides I can trim the stern as nicely to make it all fit in! Edmay - this weather is great!! Keeps me inside and at the bench . And yes I am indeed Popeyes neighbor, but had the pleasure of meeting him in person - great guy!! I am sure he won't mind a few extra ships on the table, he inspired us!
-
Thanks guys - much appreciated!! I am really happy how it is looking so far and yes, quite proud of myself , I had to make sure I had a batch of that stain mixture sitting somewhere safe and air tight so I don't have to guess later on! It is amazing to me how something seemingly as simple as two strips of wood (the wales) can bring it together so much. I have the other trim painted and drying now, will be putting those on sometime between now and sunday.
-
Announcing the Model Ship World Ship Kit Database Project
SkerryAmp replied to SkerryAmp's topic in Wood ship model kits
Thank you much Marc! Noted them down on my stickies here and will add those to the list on the next update! And yeah, Mr Friskington is getting a little ornery - may need to give him a raise or a sardine or something -
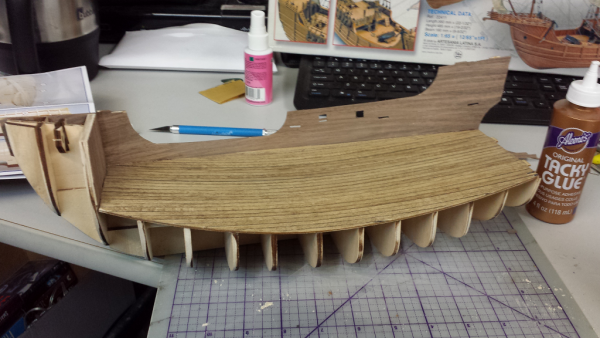
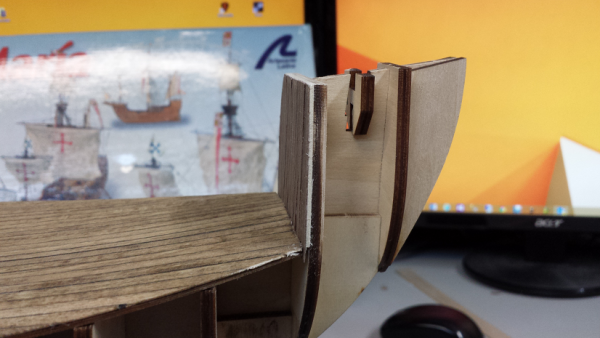
Spent some time tonight wrapping up that last step, part of which was getting the deck on (which was done) and then the forward... uhm, hmm. not sure what it is called.. bulkhead I guess? Planked. The problem was that gap. Needed to figure out what to do with that darn gap. (The Gap) So, decided to take a crack at something. The gap isn't TOO too huge, (smaller than my panicky mind made it out at first it seems) so I took some 1/32 balsa and cut traced the shape and cut a piece to thicken it just a little bit. My plan was to thicken it a tad and then the planks would even it out and cover the gap. Looking ahead the deck that sits on it isn't such that a 1/32 extension was going to throw things off too much and most likely had I not just mentioned it - it may very well go unnoticed. So, first traced out the shape I needed. I did two JUST in case I needed back up Then, I rough cut them out - I stayed close to the line, but purposely made them a little over sized with the intent of shaving and sanding down to the final shape once installed on the ship. Glued them on, shaved, shaped and attached the finish planks... and woohoo! Looks good, not too thick and I think it will work out okay. WHEW that one was averted (hopefully, always nervous it is going to sneak up on me later, but will see) Just need to let it dry solid then go through and sand it out, clean it up and wipe it down with some finish and I think it will be good to go. Thanks all, until next time.. HAPPY BUILDING


-
Hehe thanks Augie - it was a nice surprise, I think she is just trying to make sure I have things to do so I never leave the house (J/K she is just super supportive of the hobbies etc). I did not get official clearance for 5 (yeah, that is right, there are actually 5 on the bench at the moment) BUT I figured nobody would complain too too much, although I really need to get moving on these otherwise It will look like the place ships go to retire rather than get build
-
i have used a couple different ways. I have used a pencil, an archive pen, an artists marker and ebony wood putty. I liked the putty - but it is a major pain to work with and the returns on the work invested wasn't that spectacular. The pencil worked okay, but I really liked the archive pen!