


popeye the sailor
-
Posts
16,007 -
Joined
-
Last visited
Content Type
Profiles
Forums
Gallery
Events
Everything posted by popeye the sailor
-
 looks 'move in' ready!!! looks great.......nice 'n tidy. are you going to lay a carpet?
 -
thanks for the fine comments and the likes! thanks Rob for clearing that up. I hear ya John and Pat........I've been trying to discern what note it sounds like. I had no choice but to install them this early.......they lay under the cap rails. I'm being careful I had it figured out.........bend the rounded end on those bars, and I'd be good......right? but the problem still persists......in fact, it got a little bigger. I'll let ya know when I find the solution
- 453 replies
-
- 6
-

-
- thermopylae
- sergal
- (and 1 more)
-
she's look'in great jim those lines that are attached to the martingale......dolphin striker {it has a few names}, on the bow spirit. from what I've seen on other types of ships, they are usually non adjustable, and wouldn't have any belaying lines. in some cases they are terminated with a dead eye assembly, but they don't have belaying lines either.....they are tied off the same way as the chain plate dead eye assemblies. one thing I do notice is that they are away from the bow stays......that would give the bow spirit a weak point, I would think. they might be best terminated where the bow stays are located, to eliminate the weak spot.
-
wait ........I might have one! oh darn..........it's not in your scale look'in really neat there bud! quite livable!
-
the whisker lines are basically stays for the bow spirit, from what I've come to know of them. they are terminated with dead eye assemblies, so they are adjustable.......but I know of no belaying line for them. that a lot of line for a ship that doesn't have a yard associated with the bow spirit, or I might guess that they would be clew lines, if a sail was used. you'd be safe to go with the three on each side. to me, it looks like the diagrams are portraying the bow spirit, rather than lines associated with it. I did a little looking online......but I didn't find out much
- 1,020 replies
-
- 4
-
-
- gun dispatch vessel
- victoria
- (and 2 more)
-
that's very kind to say TB I think we ALL evolve........every new obstacle that we run into and solve, gives us more insight as to what's possible. this old dog is still learning new tricks thanks for the likes everyone !
-
I ran across this when I went online this morning. http://my.xfinity.com/articles/entertainment-movies/20170412/US--Perfect.Storm-Ship.Reef/?cid=featuredmovies_media_perfectstorm the Coast Guard ship Tamaroa is being sunk. not much news to the article, but there is a link to another news article. perhaps there is more. here's a picture I use as a desktop wallpaper.......

- 956 replies
-
- 13
-
-
- andrea gail
- trawler
- (and 1 more)
-
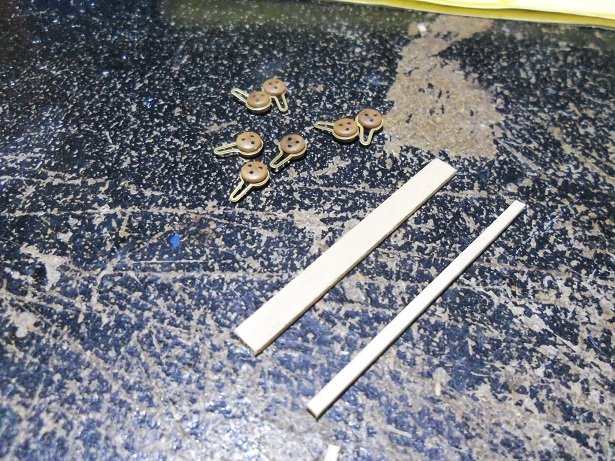
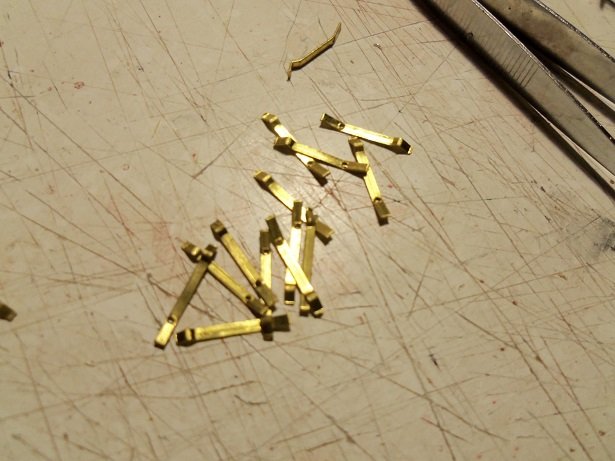
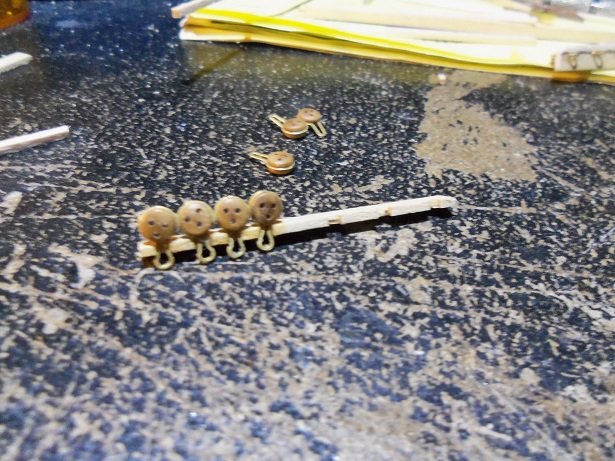
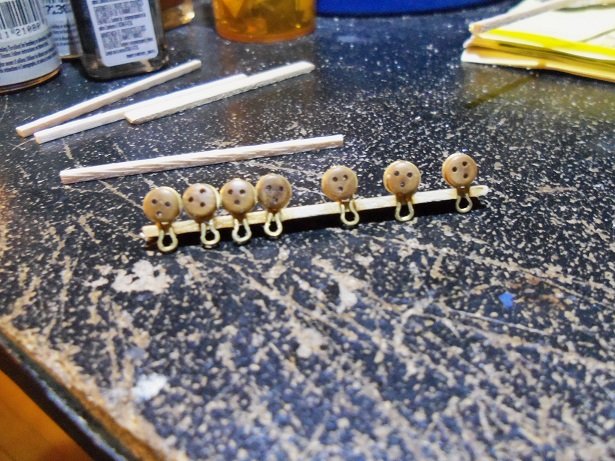
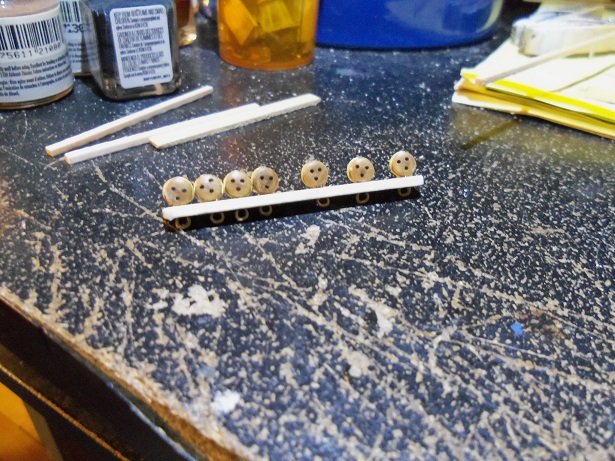
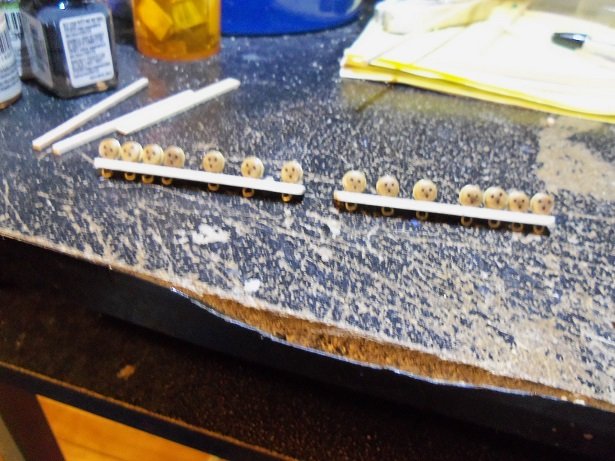
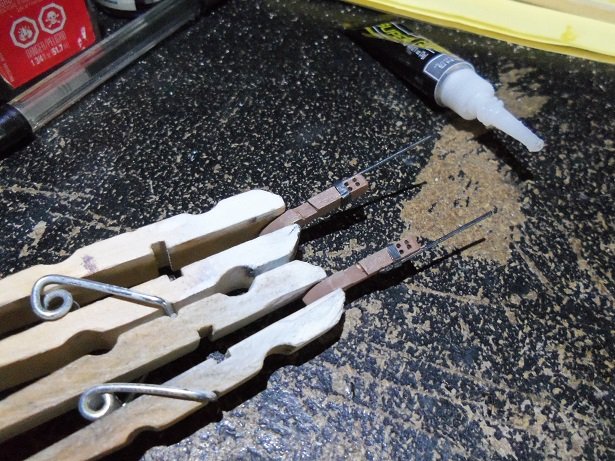
there's a pink one.......there's a green one.......there's a blue one.......and a yellow one. and they're all......made out of ticky tacky, and they all look just the same {Pete Seeger} I had to figure out how to do the chain plates and dead eyes, since the bracket parts {can't recall the name of them} for the dead eyes were useless. lucky for me, I had those Amati dead eye brackets......they got me out of a jam. but it, as doing something like this usually does, lead me to a new problem. how am I going to assemble them? it really didn't take too long before I figured out what to do. to begin......we start with the chain plate. I had no measurements......the diagrams are not 1:1 with the model, and very little in the instructions. I kinda put all the dead eyes in a row, as they would look on the model and got my measurement from there. the plate and the cap to lock in the dead eyes....... I counted the bars that connect the dead eyes to the hull. the kit gives 14 to a pair......that's all I got too. unless I want to try and scratch make these brass parts, I can't do what I would like to do. 14 per pair of shrouds.....X 3.........42 of these little buggers. one end has a brad hole......the other end is what will be attached to the dead eye. I used a pick to create a loop at the exposed loop of the dead eye bracket......from there, I used a pair of needle nose pliers to crimp the wire around the pick and the dead eye. removing the pick, the jaw of the needle nose pliers was wedged in the loop, twisted it, and then flattened the end in the jaws. the bars are flat......they need to fit in there. I might be confusing you.......it will be clear when you see what the end loop looks like. getting the arrangement from the diagram, the plate was slotted to fit the wire of the dead eye. this is the port side.......the rest are cemented in place. you can see how the loops at the bottom are oval.......the bar must fit in there. I will bend that end into a hook, to make it easier to attach them. the cap is cemented on and the outer corners are rounded.....and sanded. it will be ready for paint. it didn't take long to make the starboard side. the one thing that was a pain, was making the first slot. I had to be careful not to accidentally cut off the tab, that would be left on the end. the reason why I mentioned this........is because it happened a few times. a couple I could fix.......but the rest were tossed out and other plates were cut {I still have four 'just in case'}. ....and hey.......what the heck! since I enjoy driving myself nutz, I made the main mast chain plates too kinda reminds me of your carolers.......aye, Jack according to the instructions......the fore and main pairs look alike. I disagree, but I only have so many parts....I'm not going to scratch make these parts. the only ones left now, are the mizzen plates.......and I still have to cut out the transom rail. thanks for look'in in.......more tomorrow.

- 453 replies
-
- 13
-
-
- thermopylae
- sergal
- (and 1 more)
-
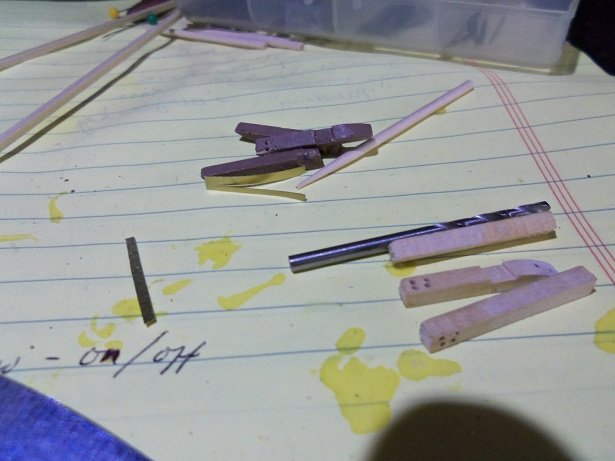
little boxes.......on the hillside............little boxes... made of ticky tacky.......and they all look just the same. that was my day........I can't even tell you how many cat heads I made. but yes....once I tried the CA trick, it worked like a charm. now I just had to get the holes spaced evenly........yea......sure! then I got a fairly decent pair........ and I noticed that one of them, the holes were a little off. so, I decide to make another. after a few more tries, I had one......fast forward to get up to speed with the other one, and it was paint and banding. I had to make the top slot a bit deeper for the cap rail, but one side went on........and then the other side. the first section of the cap rails is complete. I still need to add stanchion railings. this leads me into another repetitious task. one that I'm still figuring out how to go about it. I have an idea though.

- 453 replies
-
- 17
-
-
- thermopylae
- sergal
- (and 1 more)
-
if my mother was alive, she'd enjoy seeing this she was also into owls and Christmas villages. we do the village thing.......the admiral used to paint the houses from kits.
- 250 replies
-
- 5
-
-
- willie l bennett
- model shipways
- (and 1 more)
-
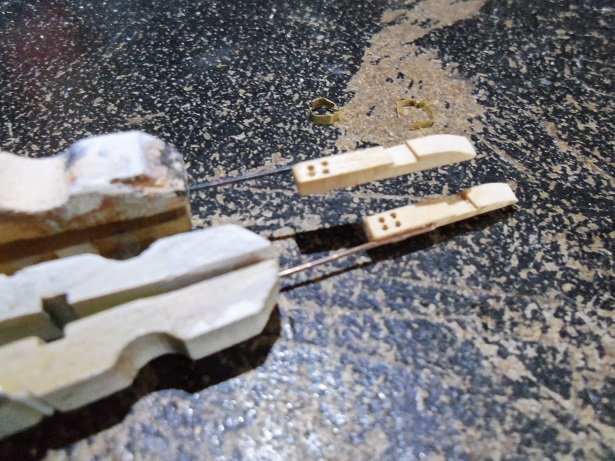
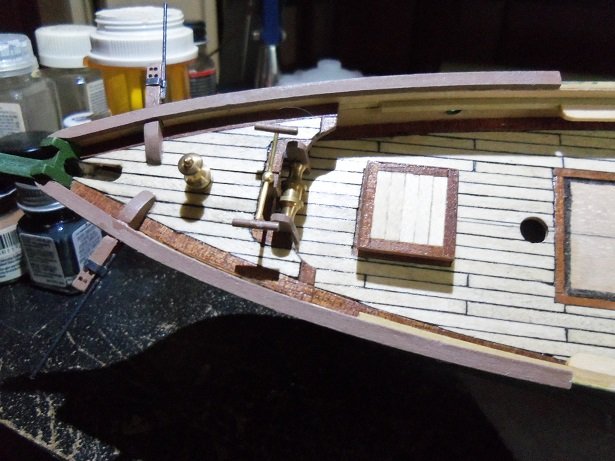
thanks for the tip gents........the only Lowes close by closed a couple years ago. big store...empty....really nice layout. I went by it last week to go to the dealer {auto} and they tore it all down! they are building a strip mall. what a waste! I have a strip of what I believe is walnut.......but it's a little wider {not square} and might look out of scale. I even looked in my parts panel box {I hated to} to see if there was anything I could scalp out of there.......cut a couple of 1/8 strips of 3/16 plywood. then it dawned on me........I would try coating the tips of the basswood with CA. I was about to give up and put an eye bolt on them, so I could tie a double block on.......but on the Cyril Humes model, slots can be seen......meaning that he must have drilled holes and slotted between them for rigging the anchor block assemblies. I have the two outer holes drilled already......seemed to work......now I'll drill the two inner holes
- 453 replies
-
- 7
-
-
- thermopylae
- sergal
- (and 1 more)
-
started back on this first thing........I'm beginning to believe that working with basswood at this size....1/8 square stock......is going to be a bust. I ruined a few more. perhaps a harder wood might do the trick
- 453 replies
-
- 5
-
-
- thermopylae
- sergal
- (and 1 more)
-
.......and the little fellow sitting to the left, in the Freddy Kreuger shirt the skipjack makes a great center piece though.....no doubt about that!
- 250 replies
-
- 3
-
-
- willie l bennett
- model shipways
- (and 1 more)
-
thank you for the kind comments and hitting the like button I really appreciate it........my pleasure for adding the extra photos. I'll do my best to get an update going on her I dunno Patrick.......I yain't the bess modeler, but I does me bess! AK-k-k-k-k-k! I've done a few 'fashion shows' in the past with the Boulogne Etaples and her siblings.....her family has grown if there's a thread on this subject in shore leave or something......perhaps. if not, I'll PM you
-
thanks for look'in in and the good word. I didn't do much today.......most of the day was devoted to updating both logs on the blog site I belong to. I did however make the main body of the cat head I ruined. I will get something done tomorrow thanks to those who hit the like button. thanks Lawrence.......now I gotta see if I have a drill that small thanks Patrick........I should go and finish looking through that project.........I'm assuming you finished it
- 453 replies
-
- 5
-
-
- thermopylae
- sergal
- (and 1 more)
-
insanity at it's best............it's a good thing it looks good in the end I admire you tenacity!
-
it's what they call Annegre.......Billing Boats and a few other manufacturers supply it in their kits. I'm told it's a light colored mahogany, although I've never bothered to research it. for deck planking, I might suggest using crayon. you will need to do some scraping before you lay it down {to get the major crayon crumbs off}, but when you lightly sand it, the crayon will work it's way into the wood, and give it a nice hue. semi gloss lacquer is what I use as a sealer.
-
awesome display Jack.........I think the two gents in the back are stunned!
- 250 replies
-
- 4
-
-
- willie l bennett
- model shipways
- (and 1 more)
-
I recall you had started this one........just came in and noticed it in the right hand side of the forum page. I see you've been working on her for a while now.....very nice progress with the earlier MSW {before the upgrade, I would have seen your log in my watch list.......the upgrade has changed all that. I still get to see all the wonderful build I was following.......and now I can certainly add yours to my list I love these types of boats.
-
thanks Tom I hope to get more done on her this week. still thinking of what to do with the stern...once I get mess'in 'round with it, I'm sure it will come to me the camera is fat and happy now.......the pictures I posted in the Thermopylae log is proof. I took them this evening. I took a couple more of the Syborn for you to enjoy......I am pleased how they came out. can't wait to tackle that roof
- 747 replies
-
- 14
-
-
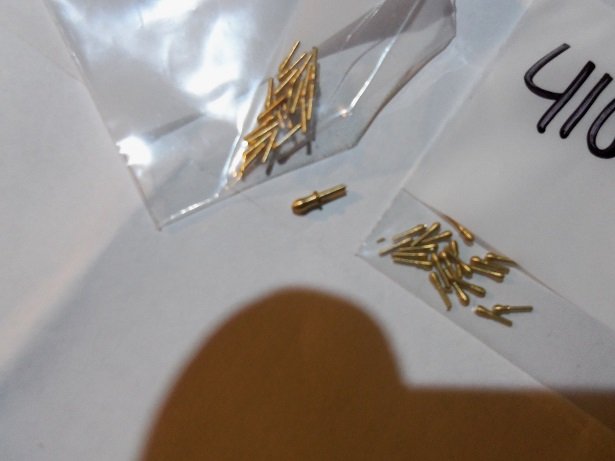
thanks John.........I appreciate your input the other cat head may fair better when I drill the holes......the one I messed up on, I think I had the banding too close. not enough room to successfully drill the holes......the drill walked into the original hole and chunked it out all is not lost....or sad......I'll just make another one. it the name of the game I got my order over the weekend! man, are the belaying pins tiny! but they fit the scale nicely. I got forty of them........instead of a dime, I got one of the belaying pins, you would normally see in a kit, to show how small they are. I also got a package of the metal reel blocks for my fishing vessels.......the Boulogne Etaples will not go without I do have to assemble them though. so I won't have to use those wooden ones that came in the kit...as mentioned, I can put them to good use I got them from Ages of Sails.

- 453 replies
-
- 11
-
-
- thermopylae
- sergal
- (and 1 more)
-
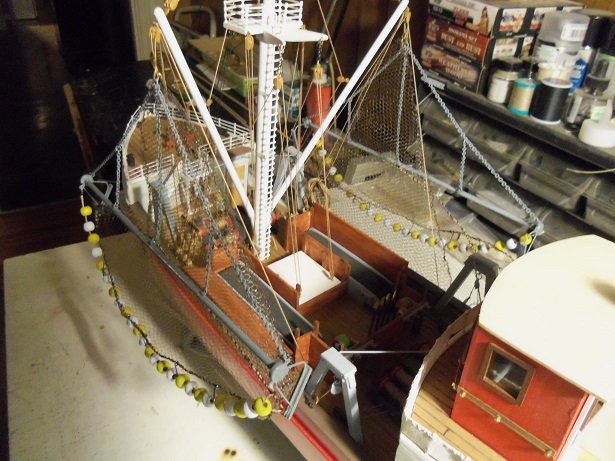
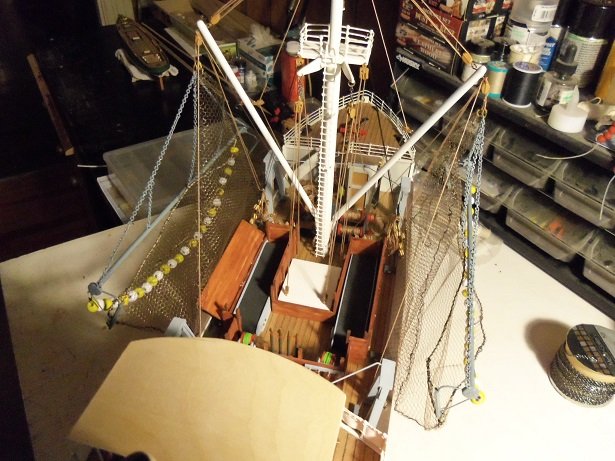
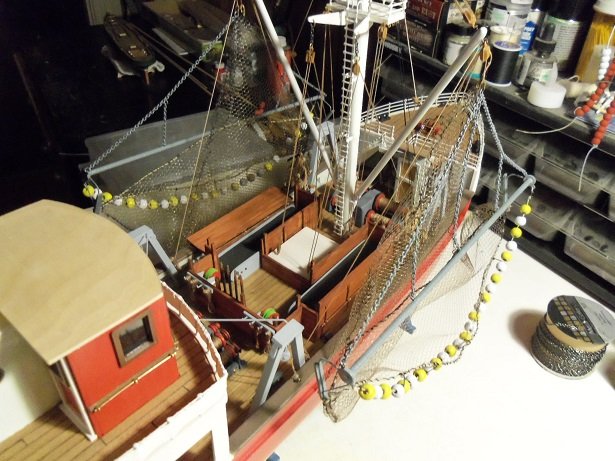
I don't know about that Patrick .........I wanted to keep the progress going with the trawler, but it seems I got sucked into the Thermopylae. I just recently got the port side net on her...that was supposed to be done a couple of weeks ago. but, it's on there now, and that's what counts.........but the allure of the Thermopylae is still strong. I'm determined to get the cap rail on the getting things done is simple.........you run into a problem..........some folks take other routes, but I prefer to use what I have available, and scratch build what I need. to be able to figure out a remedy quickly and 'just do it' {without hesitation}, has benefited me greatly. I find over thinking a problem, doesn't do me any favors. the other thing is my ability to bounce from one project to another...although lately, I've been poor at doing it. thanks for the good word Patrick. I don't know what happened........I clicked on a spelling correction, and I ended up at your Pandora build very interesting build there, my friend
- 453 replies
-
- 7
-
-
- thermopylae
- sergal
- (and 1 more)
-
thanks for the good word and the likes.....I'm glad your all enjoying the build I wanted to take a few more pictures, but the camera got hungry, so I had to feed it {sorry Pat}. that's what the hoses are for Patrick catch fish.......rinse.......repeat