


popeye the sailor
-
Posts
16,007 -
Joined
-
Last visited
Content Type
Profiles
Forums
Gallery
Events
Everything posted by popeye the sailor
-
 thanks for the kind word and the likes all......get through my bout with work, and I'll be back at it I did do a little bit more after the update........that cute little cat head I made, well I have to make another. after putting it together, I went to drill the holes for the anchor rigging, and I messed it up. at least I have something to look forward to thanks again for your interest........welcome to the log KP! hope you follow along
- 453 replies
-
- 8
-

-
- thermopylae
- sergal
- (and 1 more)
-
Cutty Sark by NenadM
popeye the sailor replied to NenadM's topic in - Build logs for subjects built 1851 - 1900
sorry to hear of your set back........I hope you can get in there quick and get patched up fingers crossed for a quick recovery.- 4,152 replies
-
- 6
-
-
- cutty sark
- tehnodidakta
- (and 1 more)
-
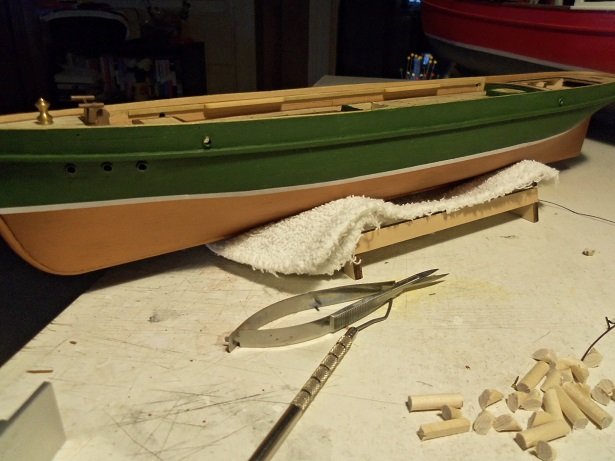
here's a little bit more progress on the 'ole girl. along with starting on the cap rails, the cat heads need to be made and installed. the main body of the cat head is a little less than an inch long, so it's darn small to work with. each one needs a whisker and I want to add banding to it, to help hold the whisker in place. the starboard side bow section of the cap rail was fitted and painted with earth brown.......the entire cap rail will be this color. slots need to be cut into the fore deck bulwarks, to allow for the cat heads. they are a bit larger than the slot, so I had to slot the cat head, to allow the cap rail to ride over it. while I was at it, I made a couple tracings of the transom on a piece of 1/8 flat stock. good to have a second......even in a duel after all......what is dual........two! clever lad! not wanting to mince words {cut to ribbons}, I used the half round piece of mahogany to trace the inner cut. I do have one of the cat heads assembled...touch up is all that's needed. I'd put the dime up next to it, but I think I spent it on my son's car. well......I must say......this has been a fun filled week. my thanks to mother nature, who kept it nice 'n wet outside for most of the week.

- 453 replies
-
- 13
-
-
- thermopylae
- sergal
- (and 1 more)
-
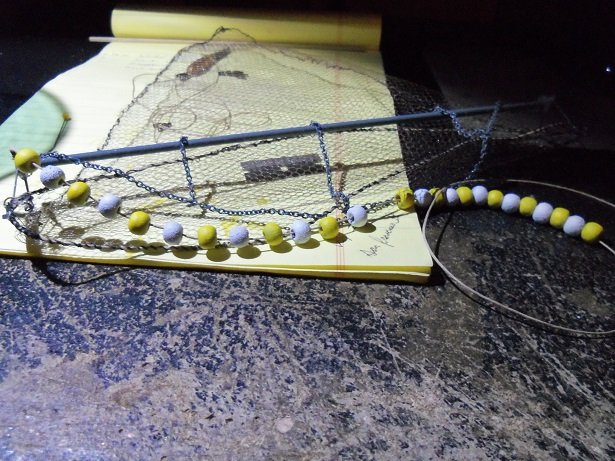
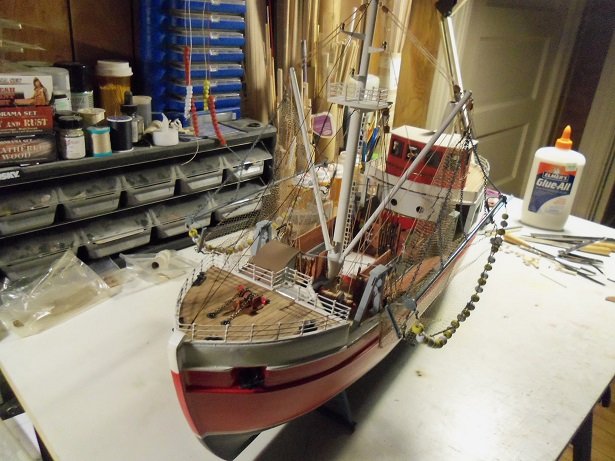
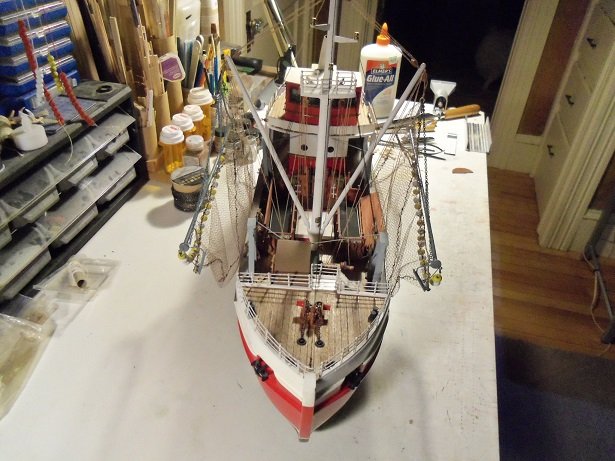
today I devoted a bit of time on the trawler. the port side net is on finally........you may have seen a trace of the net on my desk, in viewing the progress on the Thermopylae. as mentioned, I did start cutting the parts for the vents. I was going to use the horn type vents, but they didn't look right on her. these are the bits I have to piece together. the net and the buoy beads were on my desk, cluttering things up. taking the trawl rig down from my crane lamp, I began to put it together. gluing the beads on the line is time consuming........do a few......wait for them to dry........do a few. either that, or they move around on me, and I have to keep fixing them. it was assembled onto the boom and rigged. the process is finished. next will be the vents, and then onto the stern
- 747 replies
-
- 15
-
-
kees........I don't know pal.......I think you out did yourself! I thought your last project was awesome........but these three topped it. the lighting pictures are super.....and boy, you got nerves of steel to photo them so close to the surf........one good one, and GOODBYE!!!!!!!! awesome job Kees.....I'll be sure to look in to your next project. WOW!!!
- 434 replies
-
- 4
-
-
- pelikaan
- beamtrawler
- (and 2 more)
-
it always nice to have a bow rabbit to secure the planking to. looks to me that you have all the bulkheads in the right place. how major are the problems with this kit? you can do one of two things, you can either trim the bow rabbit to fit the contour, or you can mark out the keel and create a groove for the planks to fit into. when in doubt........modify or scratch.
-
wasn't aware that Target had super stores.......Wal-Mart does Market Basket is a Mass based chain......not too sure how far they stretch out. I'm sure it's not a new idea.....someone may have done this in the past.......I've used them in earlier models. too bad this one is a smaller scale....would have looked cool. the admiral wanted to see it.......she was curious, seeing it was so urgent that I find them. a few mins ago, she asked me, what made me think of using them. she should know me by now thanks Zoltan.......yes, they are wood. might look good on your model.......it's a good scale sad to see that 'current build' sig empty like that Jack........hope it's not for too long
- 453 replies
-
- 6
-
-
- thermopylae
- sergal
- (and 1 more)
-
not a problem Jack........and the best part, you can still use what's left to spread the glue we have two large grocery chains up here....Market Basket and Hanaford's. you would think that both of them would carry them, but only Market Basket does. didn't think that department stores would carry them.......right back at you with the tip thanks
- 453 replies
-
- 9
-
-
- thermopylae
- sergal
- (and 1 more)
-
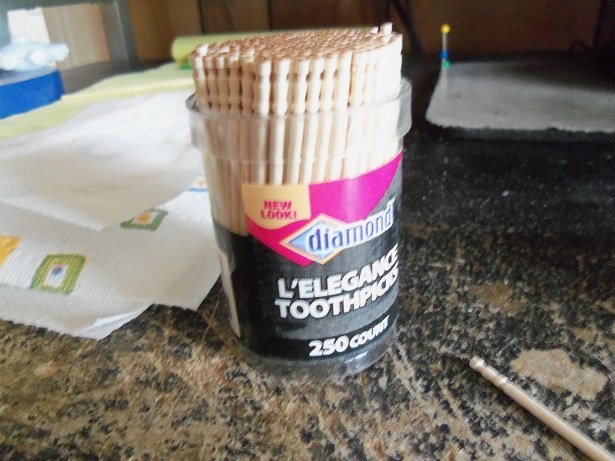
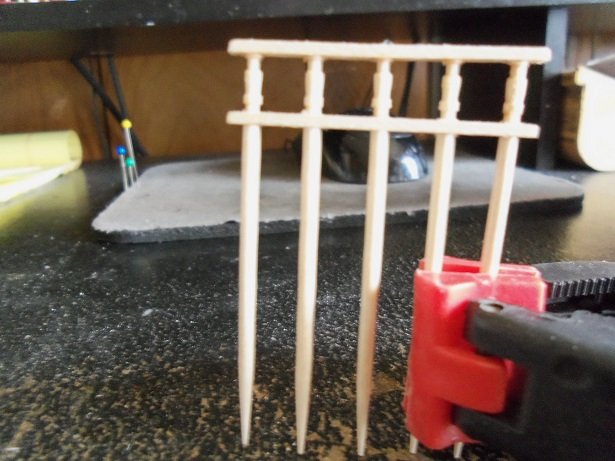
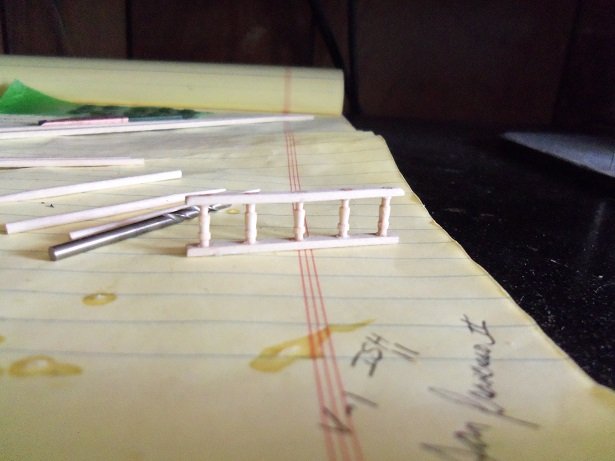
thanks Pat and John......I believe there are a few more holes to drill. one of got a little messy, but it was an easy fix and clean up. there are gun port lids to go on her as well.....when I situate the chain plates, I can space them out at the same time. the big thing now is to get the cap rails on, and get everything that goes with it assembled. thanks for the kind comments and thanks for the likes from all who hit the button one thing I forgot to mention when I did the update.......I got lucky. I was looking for those decorative tooth picks......out of every store I looked in, only one had 'em. it didn't take long to get a section of railing together. the sad part is.......I think they are too big and out of scale. this is the shortest height I can get them at.......7 mm. these would be great for larger models, but not for this one, I'm afraid. I didn't bother putting on the decorative part I wanted to try.......don't want to waste them. I found the smaller dowel........I will try making one using it......may come out better.

- 453 replies
-
- 14
-
-
- thermopylae
- sergal
- (and 1 more)
-
painted or coppered.......the filler is no problem. she's a big beautiful girl planking looks great!
-
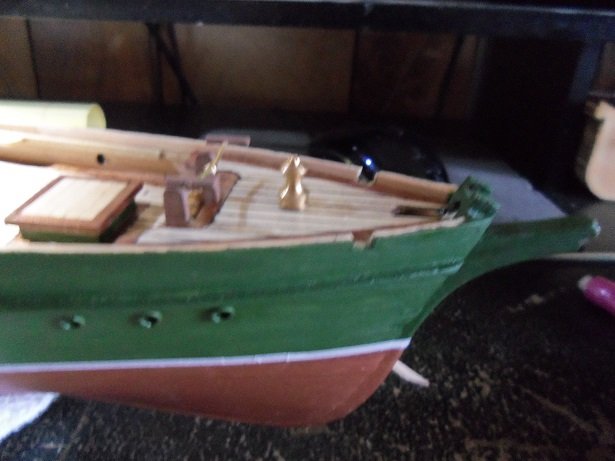
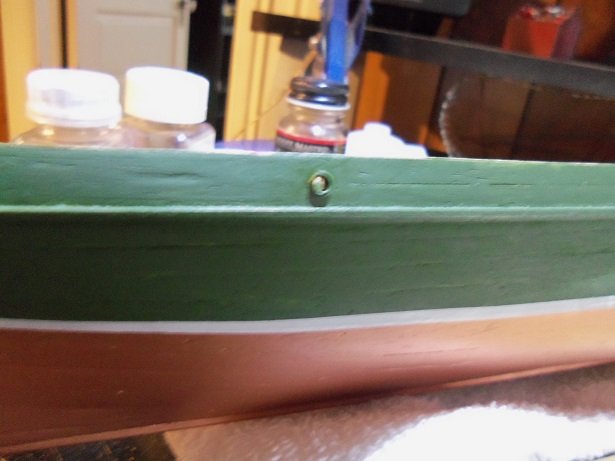
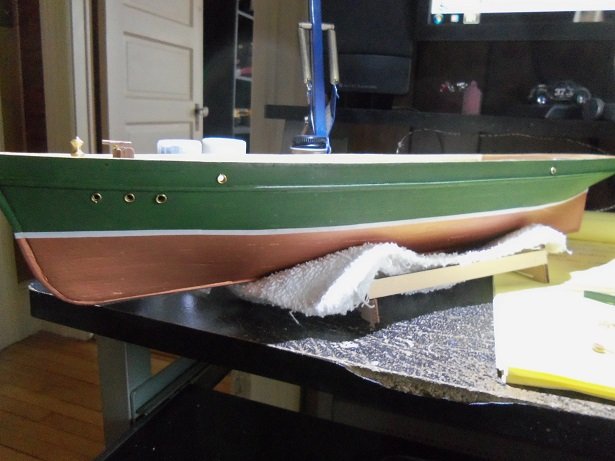
darn.......I didn't take shots of the starboard side. all I got is the one aft near the poop deck......all touched up. a bollard will be located near this hole.....hence, the reason why it's there. the kit comes supplied with small brass rings it cement around the holes. then they get touched up with the med green. not sure if the three under the rub rail are portholes.......if they are, I can fill them with the window maker. if anyone can tell me, I'd appreciate it. I also got the dead eye problem squared away........as mentioned, to move on to the next part of the assembly. I'll have to check other info, but the instructions show four dead eye assemblies per shroud......from fore to mizzen. I may add one or two extra to the fore and main shrouds......looks like too many back stays. still think'in 'bout this. the rudder's painted and ready for the gungeons.......and I have the first two sections of the cap rails, cut and bending as we speak {they are likely dry by now}. again, I will have to get creative with the transom. once the cap rail are done, I can add everything to the deck..........that will be a really big day thanks for look'in in!
- 453 replies
-
- 13
-
-
- thermopylae
- sergal
- (and 1 more)
-
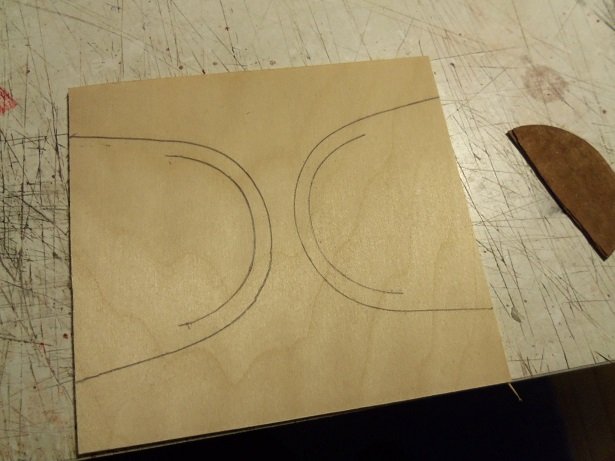
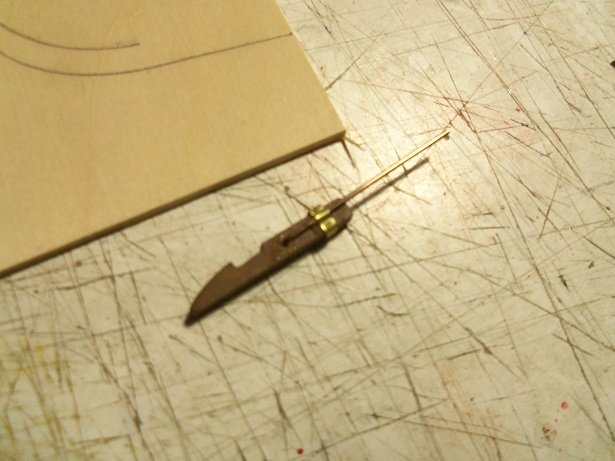
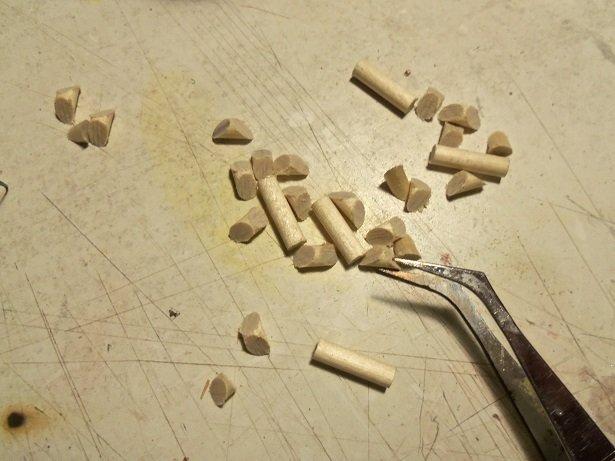
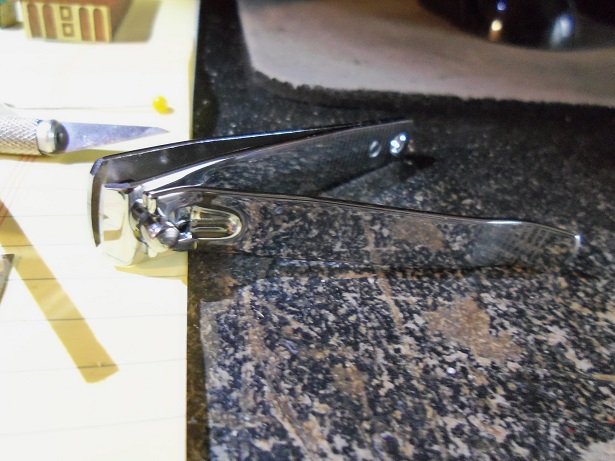
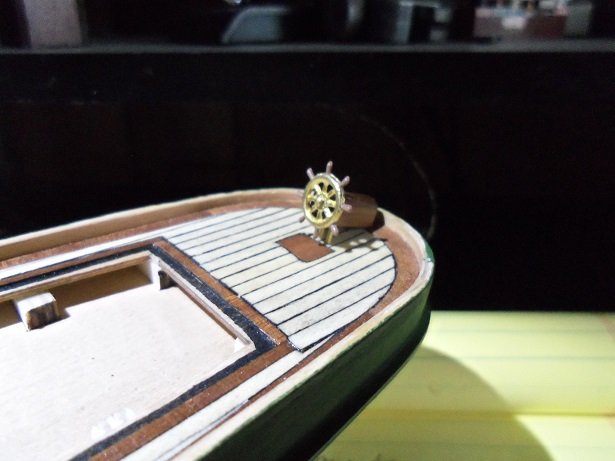
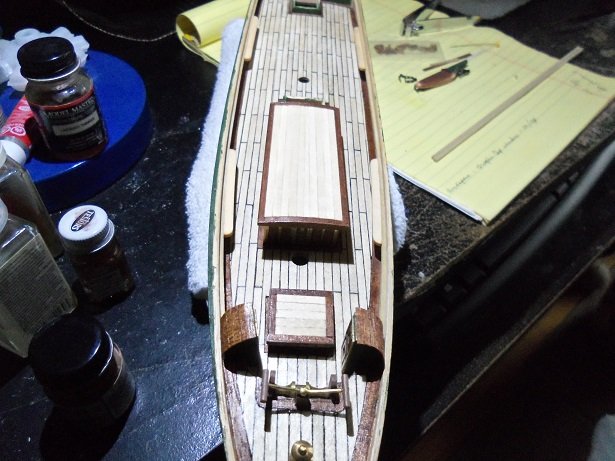
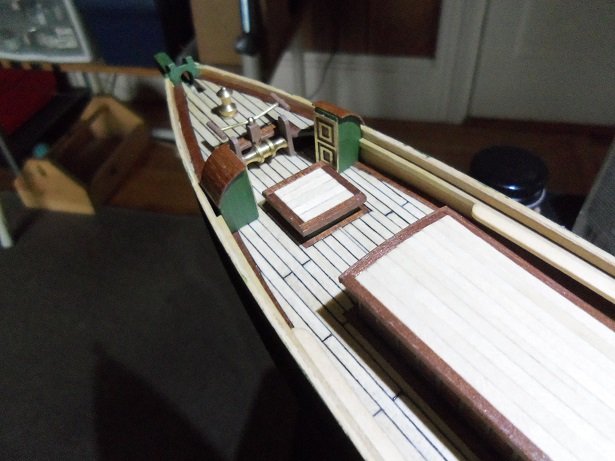
well........I didn't get all of my to do list done, but what I got done instead was just as good. I started back at it, by getting the other lavatory ship shape and ready to go. the roof is short strips of mahogany, trimmed by a little tool I am never without.........my nail clippers this is my convex clipper......I have a concave one as well. I also use the smaller ones as well. they do a great job with the thin stuff....just like a pair of nippers. they do work well on smaller diameter brass wire, but I do have to be careful.......some kit manufacturers supply the brass plated stuff {light steel}. the belaying pin trays were cut and shaped......later cemented in place on the pin rail strip. These were later stained with the light walnut, to bring them in hue with the rest of the decking, and sealed. I probably should have drilled the holes, but I still need to figure out how many to do. the kit only shows four per tray. the size of the drill is another consideration. next was to assemble the ship's wheel.....the little cabin box needed to be shaped, legs put on the front, and of course, the ship's wheel. this is the kit design......not Cyril Hume's........I looked at the pictures again later and said........oh crap! it's made now.......might as well use it. the lavatories are both done.......dry fit in place to see how they look. I want to get the cap rails going before I cement them in place. ......and then........something I was dreading to do........drill holes in the hull itself. there are holes that need to be drilled in the bulwark and three additional holes along the bow, under the rub rail. I made up a drill template for them.......nothing fancy, just three holes drilled in a piece of planking in a straight line and evenly spaced {I marked them out on the planking}. oh dear........now look what I've done. this is not good, you know! I showed it to the admiral to scare her. I got some continuation pictures in the camera still. I'll go get'em and show you this process. stay tuned!


- 453 replies
-
- 11
-
-
- thermopylae
- sergal
- (and 1 more)
-
looks really good J.......coming along great!
- 258 replies
-
- 1
-
-
- harriet lane
- model shipways
- (and 1 more)
-
exceptional work Danny........there'll be a place for you, if we ever have to go back to 'em {sure beats knuckle bust'in huh!} the nuts and bolts, do they come in the kit, or did you have to outsource them? looks really sweet!
-
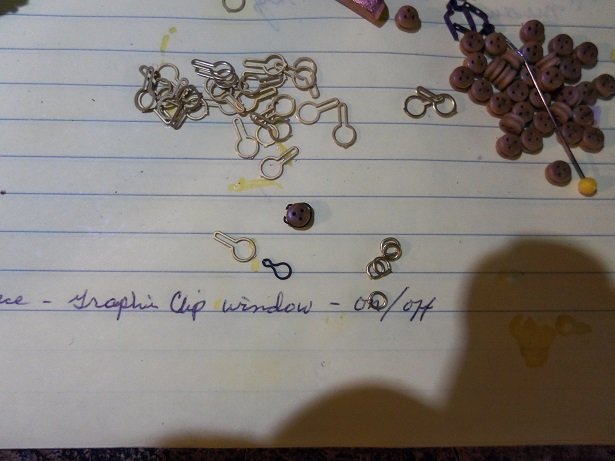
....another development in the "I can't believe this is a kit" dept. I'm in the process of doing something I didn't mention.......one of the plus things I was talking about. the kit comes with the metal strops for the dead eyes.......they supplied 5 mm, judging by eye. I decided to set up the dead eyes for the bottom set of shrouds. I know it's early, but if I do the chain plates, I should have these ready as well. they don't fit the dead eyes.......too small! they might be good for 3.5 mm dead eyes, but not for the 5 mm! luckily, I have the Amati strops that I got for the Half Moon......I'll try and use them. here is a picture of the problem. smaller than the amati strops, they don't even make it around the dead eye. I just tried one of the Amati strops.......worked fine! all I need do now, is set them up to work with the supplied anchors. I'm going back into the hall of insanity now..........should have an update soon
- 453 replies
-
- 13
-
-
- thermopylae
- sergal
- (and 1 more)
-
superb progress since I last looked in Nils........your attention to detail is impeccable!
- 2,625 replies
-
- 5
-
-
- kaiser wilhelm der grosse
- passenger steamer
- (and 1 more)
-
is it self sticking? super job with it.......came out really well so, you did along the bulwarks first, and went from the keel up......is that how I'm reading the layering?
-
OMG....the movers came in! more super small furniture........fleshing out the room nicely, I see looking really good
-
really nice progress Bob........taking shape quite well
- 682 replies
-
- 4
-
-
- halifax
- lumberyard
- (and 1 more)
-
I've only build one old kit.......I started with an early Billing's Nordkap. I enjoyed it quite a bit. most of the kits I've done have been Billings.......some of my scratch builds were done by tracing the hull parts from billing's kits. I saved the parts panels. I've not seen this kit before.......I have a few vintage model site I like to visit. nice to see someone else who likes to dabble in these older kits
-
thanks for the kind comments and the likes. I'm in the process of finishing the other crew toilet, the cap rails {the chain plates are combined with them}, and completing the pin rails. anything else will be a plus. the cap rail alone will be quite a task in itself.......not sure I like how they want me to do it. we'll see what happens. thanks John.......that's where they're going. since the instructions have been wrong so many times, why follow them. they give the size of the wood used, but no lengths or increments......go figure. I'll use Cyril's model as my guide thanks Piet.......glad to see your following along. I may need a tip or two in regards to metal it's been so long.......guess I forgot you used to go by that name. the way the site works has changed, but the profile is basically the same......I've already made a small change myself. the flying Dutchman was also the name of a train, if I'm not mistaken thanks Pat........I'm not using the belaying pins I've shown above. they are wood and do not resemble belaying pins, as I view them. the ones I ordered will be a lot more slender, and hopefully smaller. I will use these pins for railing tops........I think they'd be perfect for decorations of that nature. sorry if I confused you......I didn't mention that these were the ones that came with the kit. the ones I'm getting will be brass.........a bit more bling
- 453 replies
-
- 5
-
-
- thermopylae
- sergal
- (and 1 more)
-
can't get over your style of paint........I could never weather that good I do it.........look at it the next day....and then fix it, because I didn't like it. I'm hopeless with it. so much jumping out at you with the P.E. really nice work