popeye the sailor
-
Posts
16,007 -
Joined
-
Last visited
Content Type
Profiles
Forums
Gallery
Events
Everything posted by popeye the sailor
-
 if you used 1/16 x 1/16 strip stock to box them in, and you use 1/16 for the roof, then you would do well to place them on top. but, if you used 1/32 flat stock for the roof, you could make the openings larger, and place them in flush mount, leaving them raised slightly. if you use 1/32 for the roof though, you may want to frame it a little.......it will be a bit flimsy this would be a good idea for helm floor grates too.......or even additional vents.
- 258 replies
-
- 2
-

-
- harriet lane
- model shipways
- (and 1 more)
-
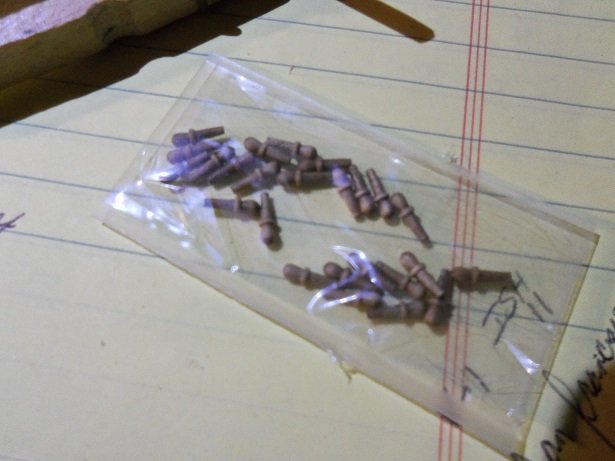
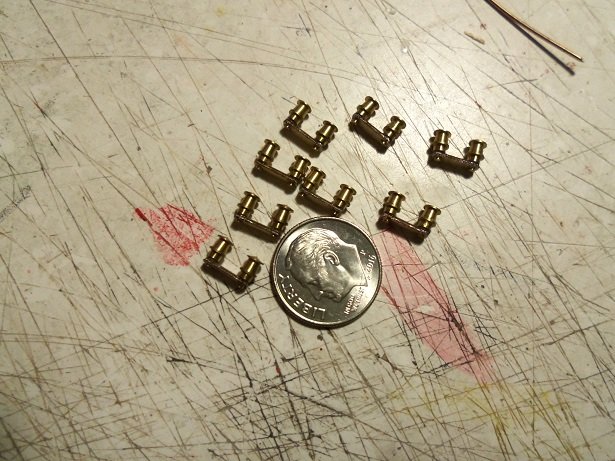
thanks Sjors...you fun lov'in ball'o fur you! you ought to read the log I have going on Weebly. thanks Lawrence.......the coppering, it's too bad this model is small, or I would do it. I thought about how small the tiles would be, and thought better of it. speaking of the crew's toilets, I have one of them finished. as I suspected......they will be out of scale {what else is new with this model}. it wouldn't matter which etch I used.....metal or wood, the outcome would be the same. the placement is varied as well. the instructions say to put them here: ....while the Cyril Hume model shows them here. apparently there are no ladders at the fore deck. either way, I will need to remove part of that inner rail........the pin rail that was installed when I did the inner bulwark planking. I also ordered belaying pins for this model......I ordered some 5 mm pins. I'm not sure what size these are, but I think they will dress up the poop railing and fife railings just fine this is all of them........not too many termination points. I ordered 40 belaying pins.......that should handle the extra I plan to add. thanks for the kind comments and the likes.......I hope to have more tomorrow
- 453 replies
-
- 10
-
-
- thermopylae
- sergal
- (and 1 more)
-
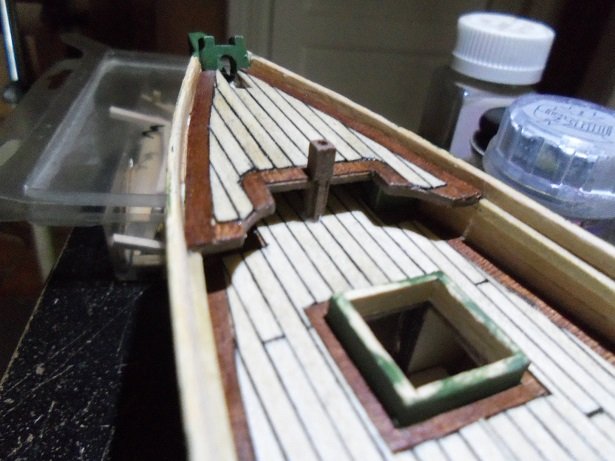
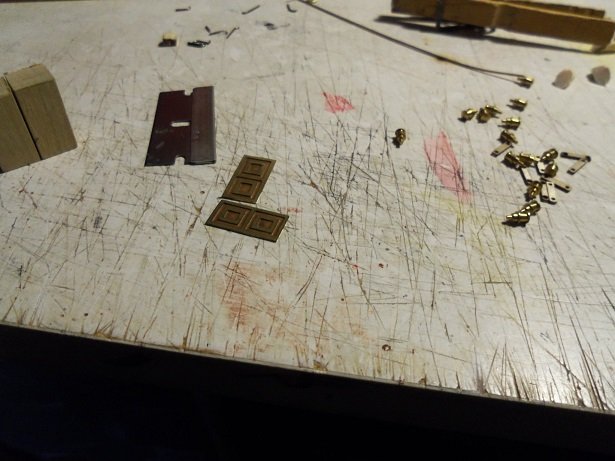
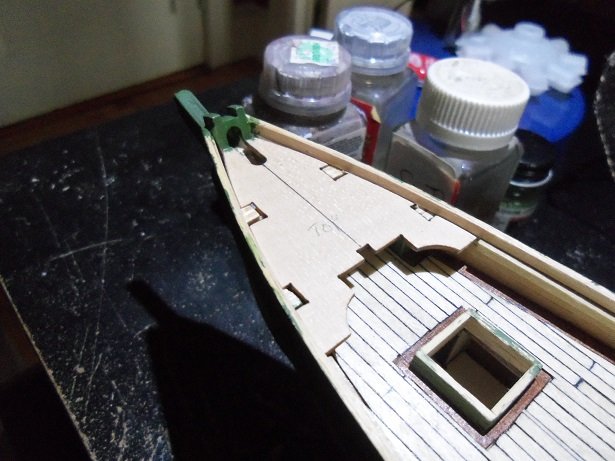
pretty cool idea J are you going to cement them over the opening, or cement them in flush?
- 258 replies
-
- 2
-
-
- harriet lane
- model shipways
- (and 1 more)
-
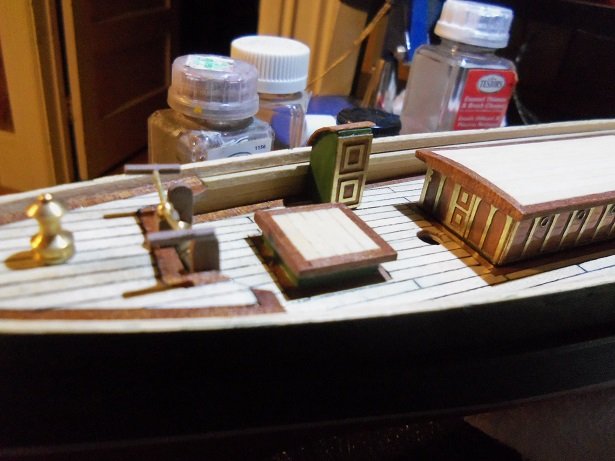
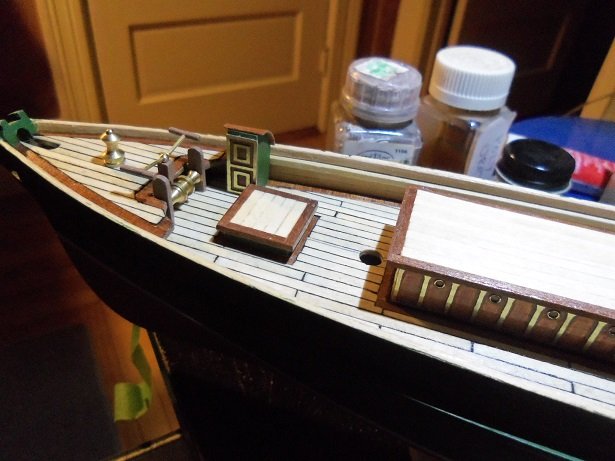
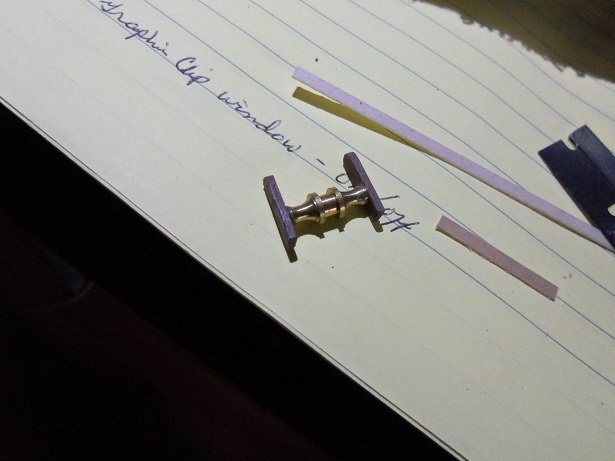
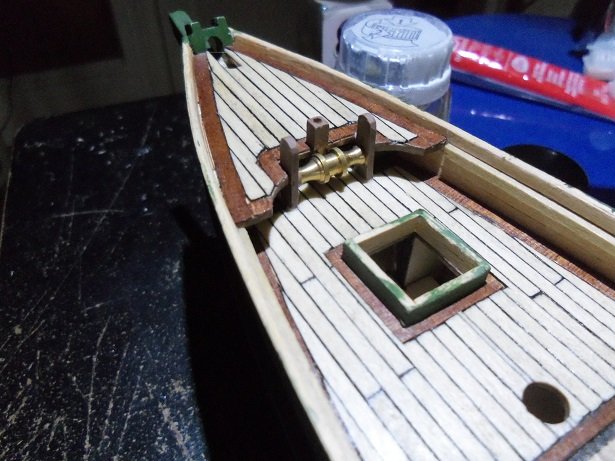
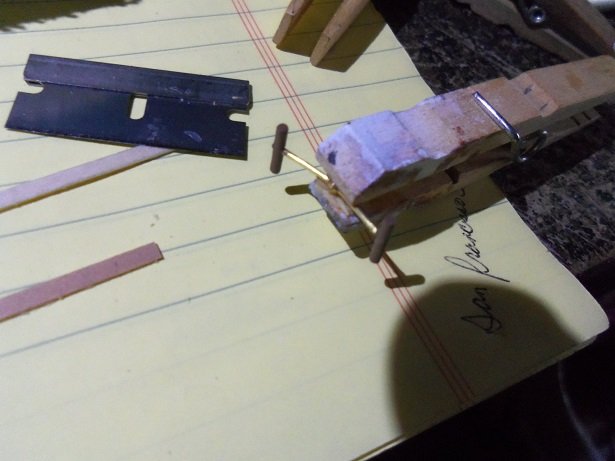
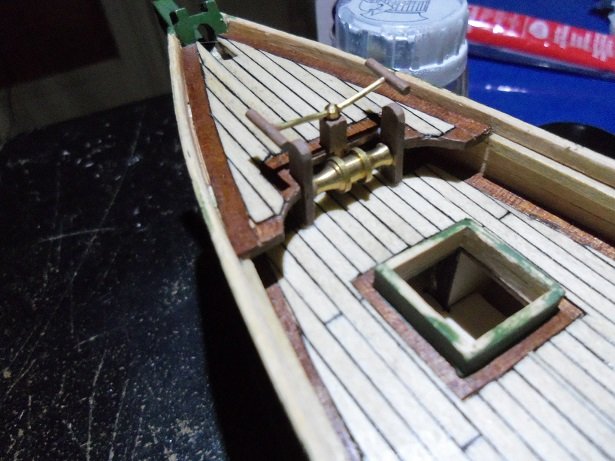
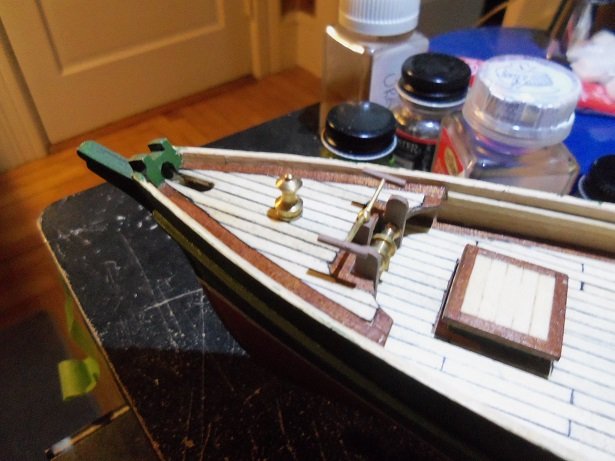
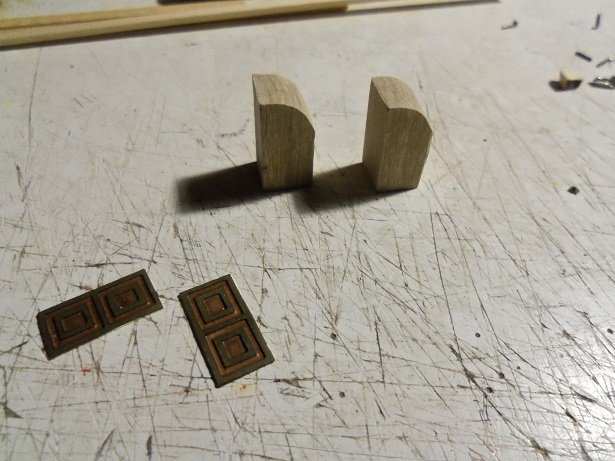
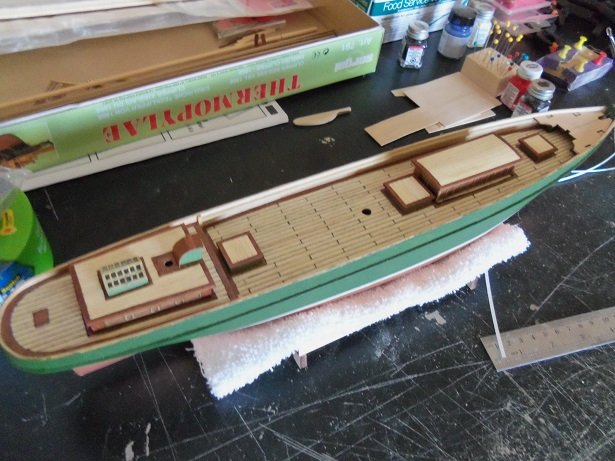
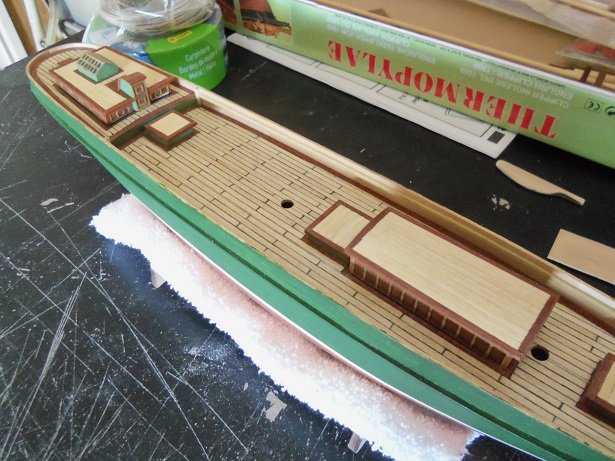
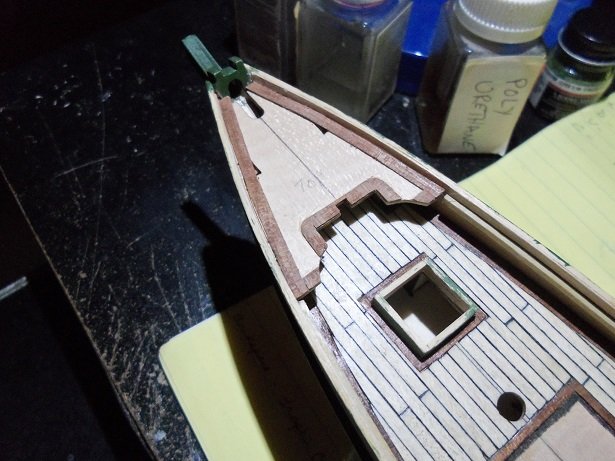
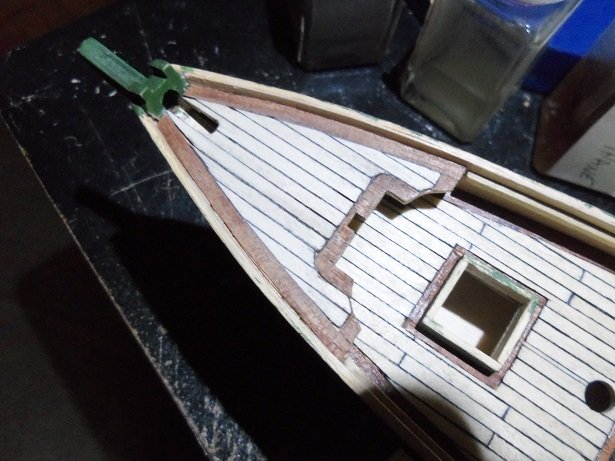
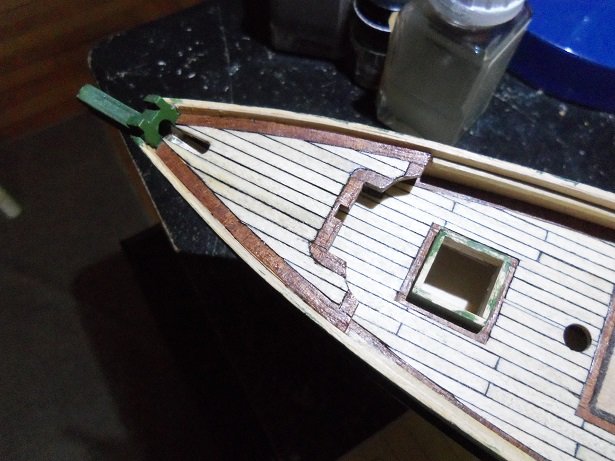
OK.......I altered the title. thanks for reminding me Gary ......and thanks again Jack. I tried to figure it out earlier.......I had read about the process in other posts, but that was a while ago. I guess I'd better update the thought process instead but hey........while I'm here, I may as well show you the recent update for the log. now that the fore deck is done, the windlass and pump can be added. I went through the wood, and found nothing that resembled the sizes I needed........even for the cap rails. I bagged all the wood up........I'll use what I have in my inventory.....I'll category it later. finding suitable square stock that will fit in the slot for the pump body, and finding strip stock that will work in conjunction with the windlass, I found that the two would not fit together. the windlass has a center separating the two drums, and the width of the pump body would not go between them. so I cut slots in both sides of the pump body, so they would join together, as they both share this opening, in the center of the fore deck platform. the pump body was cemented in place first...... It's painted in earth brown, as is the side posts for the windlass. the slots I made are visible here. you can also see the center spacing I'm talking about with the windlass. at first, I thought I should have made the slots deeper in the pump body, but closer inspection showed that this wouldn't have mattered.......they are deep enough. the hole was pre drilled for the pump handle. the instructions were no help in trying to make the handle. they show small pieces of dowel for the grips.....but I have something smaller than the dowel provided in the kit. I couldn't find it, so I used a tooth pick, sanding it down even smaller after I had drilled the holes for the shaft. there was breakage, which meant multiple tries, but I managed to come up with a pair. it wasn't till after it was assembled, that I found the dowel that I was looking for {go figure}. ...it was added to complete the pump. next, I thought to create the bollards and the heads. already, I saw a problem with the heads........with the size of the wood blanks, they will be out of scale. I'll show you in a moment......the parts were gather together..... the roof curvature needs to be shaped into the heads........during the process, the capstan {or sampson post} and the fore hold cover was cemented in place. when I assembled the bollards, I had the impression that they were too far apart. I took a look at the Cyril Hume model, and his were pretty much the same spacing. So, I'll go with these, after sanding the bottoms and painting them. I have the metal etch doors that go on the heads........I had allowed about 2 mm on the blanks for the threshold and the roof line. I sanded them down more after this picture was taken. I could go further, but going too far will prevent me from using the metal etch doors. the size of them looks wrong too, as well as their position in the instruction diagrams. even with the wood doors provided on the thin panels are too large I saw something else strange about the Cyril Hume model........looking at the braces, you see the pendents and block assemblies that make up the braces, but there are no ropes from them, terminating to the deck. the model, in my opinion, doesn't have a complete rigging diagram. there are not too many belaying points along the deck. I need to change the pins as well......I'll show you those in my next update. I have other uses for them darling...............
- 453 replies
-
- 11
-
-
- thermopylae
- sergal
- (and 1 more)
-
thanks Jack........that never occurred to me. I'm on it!
- 453 replies
-
- 3
-
-
- thermopylae
- sergal
- (and 1 more)
-
she coming along great Doug..........the deck and pilot house are very well done
-
thanks for the kind comments and all the likes. yea, it's good to be back at the table...........errrrr, my desk I cleaned it off before the big calamity.......you wouldn't know it now. I've done a bit more........hope to have an update soon. stay tuned! thanks John........rather be modeling.....I don't get as greasy I should go back to working on cars......I miss it sometimes. I'm not sure Michael.........if I was a doughnut maker, I'd most likely get sick of the whole thing ya caught me........I'm a closet chef! haven't figured out how to bake a ship yet though.....I'm working on it yea Gary........I know......realized that after I started the log. I'm in the process of finding out how to change it......if anyone knows, please let me know
- 453 replies
-
- 4
-
-
- thermopylae
- sergal
- (and 1 more)
-
hello there good buddy.........I see it's your birthday, and I want to wish you the very best. haven't seen you on the site lately.........I hope all is well, and your still dabbling in the hobby.
Have a great day,
Denis >Popeye<
-
why Greg! were you holding out on us? OMG pal........you've made some really decent progress.........and quite nicely, I might add! flaunt it good buddy.......your do'in an awesome job
-
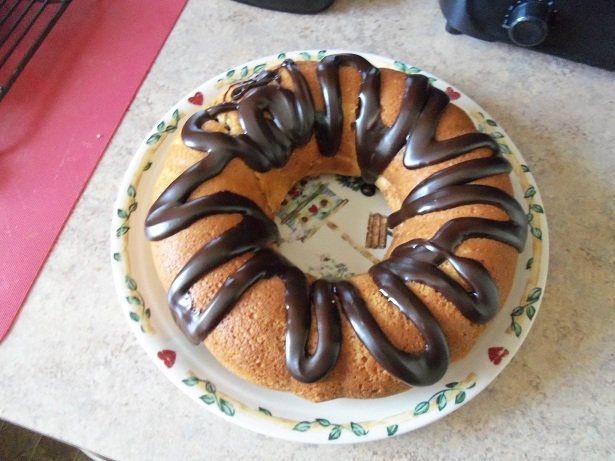
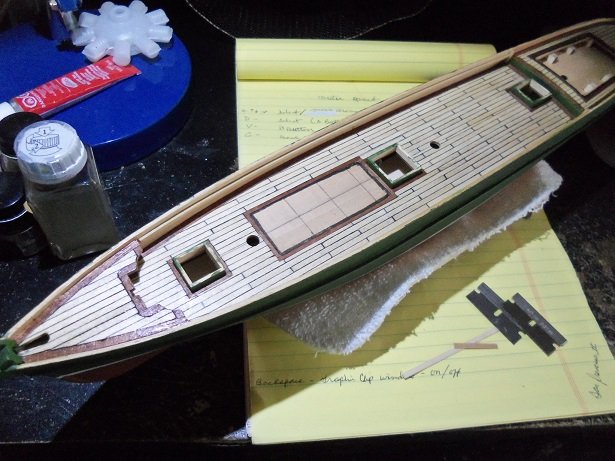
hi there! last week was a lost cause as far as getting any modeling done. I got sidetracked with my younger son's car.......it had a few things to do for inspection, along with replacing a radiator, and curing a nasty oil leak. the leak led me to replace the timing belt as well, but I'm happy to say that the car is back up and running, and the son is happier than a clam! it does my wallet good to see him smile again. anyway........as I left off, I had cemented the fore deck on the model......that was the last thing I would do to her until now. as the week past, I was becoming increasingly aloof, due to the lack of wood-urgy. to appease the inner spirit, I did a dry fit I did note that I need to finish the bottom area on the aft cabin. I also turned the hold covers so that the planks are running side to side......not fore and aft. I'm glad I don't have to remake them. I had shaped the rudder before the auto fiasco hit...it lays in wait for paint. the week ended with the model, the same way I had left it. the work week took over, loathsome as it is......in retaliation to it, I took Monday off........to be able to watch the finale of the Walking Dead.......and then into the badlands >late night<. there was a second reason, but in my mindset, I had forgotten about it.........the admiral's birthday. everything went off as it should though........I even made her a cake! she picked out the mix.........this is from a company called Krispy Kremes. they are a bakery that specializes in doughnuts...and that's exactly how it tastes........and looks! looking at the fore deck, a plan was thought up on how to run the waterways and trim. I wasn't feeling creative enough to do the outer edge, so I left it open on each side......I'll let the planking fill the open areas in. rounding off the trim for the windlass slot made planking a little weird, but it filled in alright. it was then stained and two coats of flat lacquer. it looked really dull....a little too dull for my liking, so I gave it a coat of poly urethane. I had done the main deck and the aft deck......I should give the main deck another coat. the outer edges of the fore deck was painted with a flat earth brown.....fairly close to the mahogany color. the decks are complete now. more done today, if all goes right
- 453 replies
-
- 17
-
-
- thermopylae
- sergal
- (and 1 more)
-
congratz! she looks absolutely stunning! the diorama effect really shows her off nicely! very well done
- 250 replies
-
- 2
-
-
- willie l bennett
- model shipways
- (and 1 more)
-
no sweat...........your doing fine. don't be afraid to experiment......ideas are born that way one thing I can say about using wider planking, is that it's safer to use planking that is double the width of the supplied planking. anything wider than that, would throw the task off........the supplied planking has been pre measured to achieve full coverage. be sure that the fit at the stem is good......and be sure to cement between the planks {that was one of MY big mistakes}. in the event that you forgot to do that, there is a solution. after the hull is planked and sanded to your satisfaction {you can do any filler work as well}, mix up a batch of white glue and water {not too thin}, and paint the hull with it, using a 1 inch brush {small brushes would take forever}. give it a couple of coats......and when fully dry, lightly sand the hull to remove any wood "hairs" that may have risen up during the treatment. this is somewhat critical for this vessel.....only, since it's not confirmed, I believe this to be a metal hulled boat, and plank lines might show in the paint. when I did my scratch build, I took both of the Billing's instructions and used them as reference. reading my log on her, you'll find that the Billing kit is not the actual Andrea Gail, but another boat called the Lady Grace. I have only a few pictures of the actual Andrea Gail......but one of these days, I'll have enough visual stimulus to attempt the real project here are a couple of articles that you might enjoy reading........one is the search log for her. http://www.downtosea.com/1976-2000/angail.htm http://www.offsoundings.com/WEB PDF/PERFECT_STORM_20TH_ANNIVERSARY.pdf http://www.gloucestertimes.com/archives/lady-grace-also-gets-harbor-berth/article_a983191f-3d1e-5b5f-9013-98b2bcd4faa1.html note the elongation of the port side bulwark and the added length to the stern.........there is a structure there to shield the reels. I didn't add them to my model......I stuck with the instructions. on the starboard side, a section of the bulwark was removable....it shows in another picture I have of her.
-
that's quite a bit of progress! the armament looks great, as well as the super structure really nice job with the paint work...........awesome job!
-
great progress...........she looks really good !
-
there are some things to consider when planking. at the bow stem, it is slanted.....so you may want to trim the end to fit the slant. I usually bevel the end on an angle too {the thickness at the end}, so when the plank meets the edge of the bow stem, it will meet flat. not doing this will result in a thick looking bow stem. start at the very top of the bulkheads....usually it a good way to denote the height of the bulwarks. when you get to the turn {the chine.....the turn of the bilge}, wider planking may not conform very well. it might be wise to go to the narrower planking when negotiating the turn, in order to get better results.
-
congratz on the finish of your project! she looks amazing.....rigging looks great!
- 214 replies
-
- 3
-
-
- agamemnon
- caldercraft
- (and 1 more)
-
good luck with your meeting, Mr. Ambassador I think your on to something with your planking plans.
- 714 replies
-
- 3
-
-
- lady nelson
- victory models
- (and 1 more)
-
you did a super job of blending in that repair! I use white glue and sand while it's still wet {tacky}. the over lay looks very nice.......are you going to fill it in with blonde planking? one source for mahogany stain is Billing.......the paint line they sell is pretty good, and I was lucky to have gotten a few bottles of the stain. I used it on my Half Moon build......I still have another bottle of so. I like the design.......gonna be a sweet sheer deck! the project looks great so far.........your tempting me
- 60 replies
-
- 2
-
-
- dragon class
- billing boats
- (and 2 more)
-
I was wondering why.........even asked where you had gone to. no reply though glad to know your back and things are looking up for you. I've always liked these wagon kits.....form what I've seen so far, I might even get one glad to follow you on your first project back on the site! interested to see what mods and changes you make with this kit.
-
love those shots of your deck! lots of character shows there sorry to hear your not recovering as you would have hoped. take care and do what you can.......there is no speed limit here. may your good days outweigh the bad......we are all thinking and pray'in for your improvement.
- 1,306 replies
-
- 9
-
-
- syren
- model shipways
- (and 1 more)
-
the way you added the sail is veery nice there is a deadline..........so there must be another project on the horizon.....any thought? gonna be one great looking model to show
- 250 replies
-
- 3
-
-
- willie l bennett
- model shipways
- (and 1 more)
-
looking great so far Bob.........looks like the only faring you'll need to do will be the critical contour areas....the bow ans so on very nice!
- 682 replies
-
- 4
-
-
- halifax
- lumberyard
- (and 1 more)
-
not sure on the spelling, but I think they are called rigols.. probably some design of frieze molding.