


popeye the sailor
-
Posts
16,007 -
Joined
-
Last visited
Content Type
Profiles
Forums
Gallery
Events
Everything posted by popeye the sailor
-
 thanks Michael......talk about getting blind sided! I have to add a bit more to the other winch now. perhaps I'll do that tomorrow. thanks for look'in in and the good word. love what your doing with your reno job!
 -
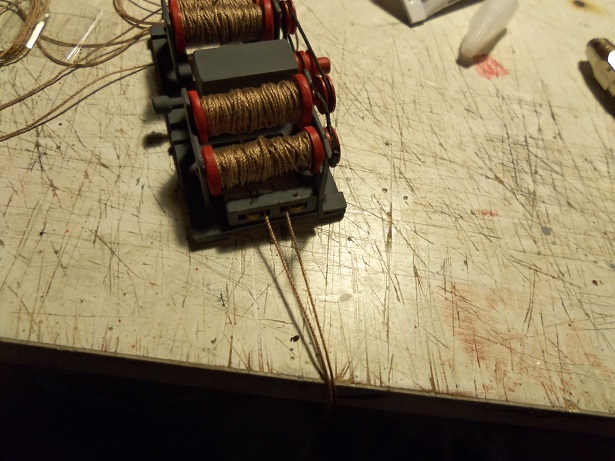
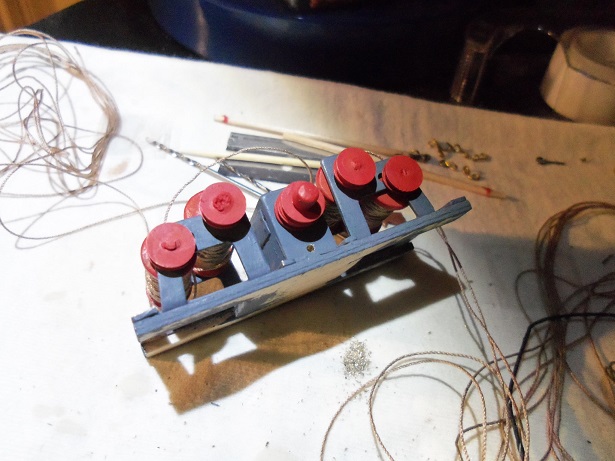
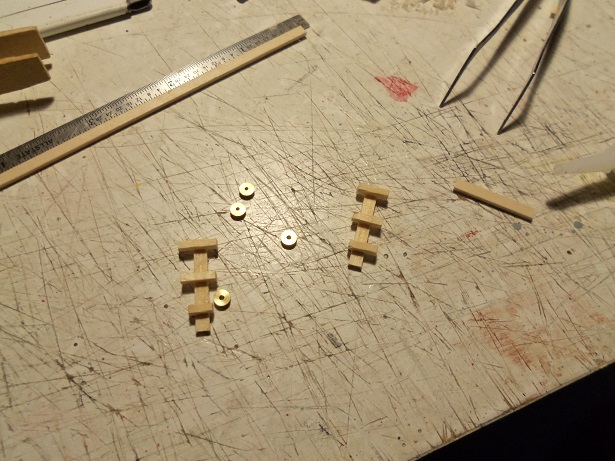
I feel much better today. for some reason I was still under quarantine though......couldn't cut any wood, can't go out to the garage.........so fine! I'll work on my boat! {reverse psychology works every time} let me at that drudgery! as mentioned......I know I'm gonna need a couple more of those double block pulleys, so I started with those. I made four of them. looking and thinking about it a bit further, I think I can get away with just a pair of them. so they were drilled, fitted, and painted. then they were reassembled. these will be located near the aft gallows. the winch was ready to be cemented in place on the deck. two pairs of single block pulleys were cemented along the bulwarks to the fore gallows. I made the double block pulleys the same size as the first pair I made.......after cementing each one next to the aft gallows, the rigging was done. the hook were added to the cables and to each of the eye bolts...I still need to tie them off. the first part is almost done. the second part tomorrow.........I have to make a few parts still enjoy!
- 747 replies
-
- 18
-

-
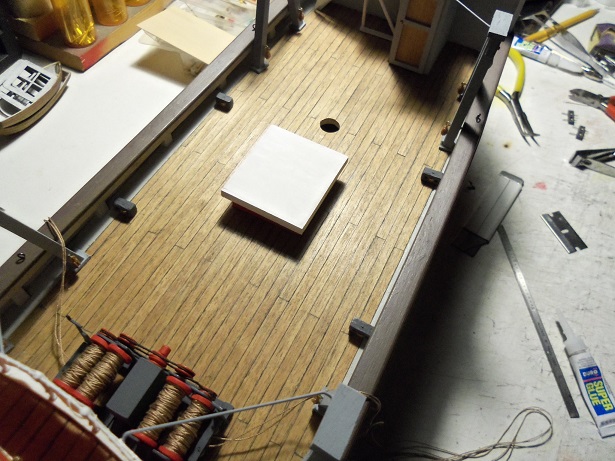
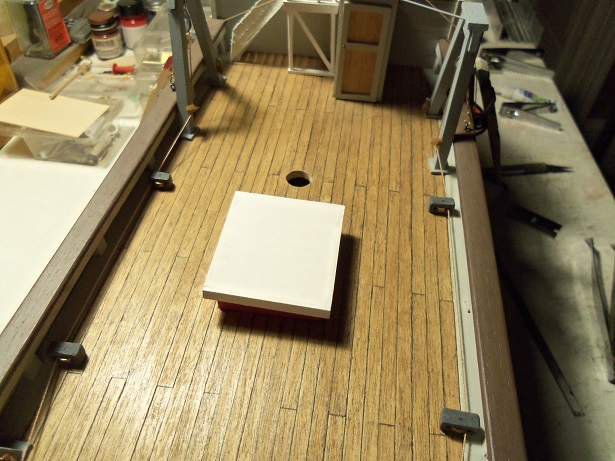
I took Monday off.......I was planning on getting a head start on the mid ship reno. what do I end up doing.....an oil change for my son, and looking for phantoms, and then sick by the afternoon whoa........did I see that coming or what?!?!?! so I ended the day, romancing the porcelain god and being a drone on the couch. I did get a little time at the table in though. to start off with.......I had to reduce the deck to pre-October..... first order of business........cement an eye bolt at each gallow. I cemented the other double block pulley I made to the other side of the gallows winch. then pull all the cords {cables} under the reels and route them through the block pulleys ...that was as far as I got......it was off to go tinker with my son Kevin's car. kinda felt like crap then.......it got worse as I went along. don't know what it was........but I guess it was good that I took the day off from work.
- 747 replies
-
- 12
-
-
it's always been sail that the thickness is the main problem. Midwest tries to compensate.....I have the Flattie kit, and the material is like hankie cloth. your customer is going to love this vessel
-
you could also mask it off in sections. I've seen this method used in plastic modeling, but using tape, removing while the paint is still wet, may give you a cleaner line. I've used scotch tape with good result {transparent tape}. it's very thin and won't leave such a visible line.
- 749 replies
-
- 4
-
-
- albertic
- ocean liner
- (and 2 more)
-
I agree with the others Russ....I think she looks great sails look awesome too.
-
very well done! very impressive really like the stay heart........better to have done it now, than with the bow spirit in place! awesome!
-
she looks awesome! skip the carrots........make it spinach to add extra detail is good, as long as it doesn't predate the subject. crates would be good too...sure....barrels......coiled rope and tackle......weapons may look good if a rack of sorts would normally be present on deck. shields could be hung along the outer bulwarks, if it's within the dating. she's a really sweet ship....you've done a fantastic job!
- 84 replies
-
- 2
-
-
- hanse kogge
- dusek
- (and 1 more)
-
wow.......don't know how this one eluded my radar! super looking build Sam! you had a few problems......but that's normal. you've also been bashing and scratch build'in as well......you'll find that this is normal too read through your log.......enjoyed what you've done. wish I would have caught you earlier...you coulda kept those woolings. all you have needed to do, is slot a strip of wood to line up with them, and ran it down the front of the mast. I see you've got a pair down the sides......so I wouldn't do it now {you would've needed to slot them as well}. they look good as they are I missed out on the better half of your build.........at least I can watch you rig her super job my friend!
-
thanks Pat........I think your skills are so much more though. coming from you, it's quite a compliment
-
looks great Michael! the crack is virtually gone! there are a couple small chunks missing.......how are you going to fill them? this is such a huge undertaking........the interest in this alone is enormous!
- 749 replies
-
- 4
-
-
- albertic
- ocean liner
- (and 2 more)
-
thanks Mark for the kind word.....and thank you all for the likes. I shortened my work week by taking Monday off........it will give me more time can't wait to get back to her glad you like the progress so far
-
perhaps a paint stripper might be better than sanding.
- 749 replies
-
- 6
-
-
- albertic
- ocean liner
- (and 2 more)
-
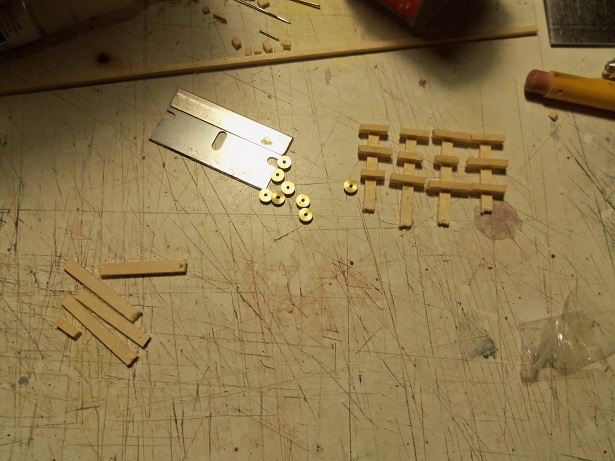
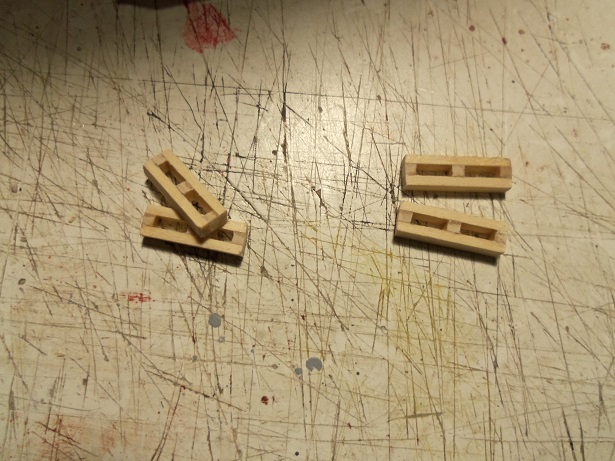
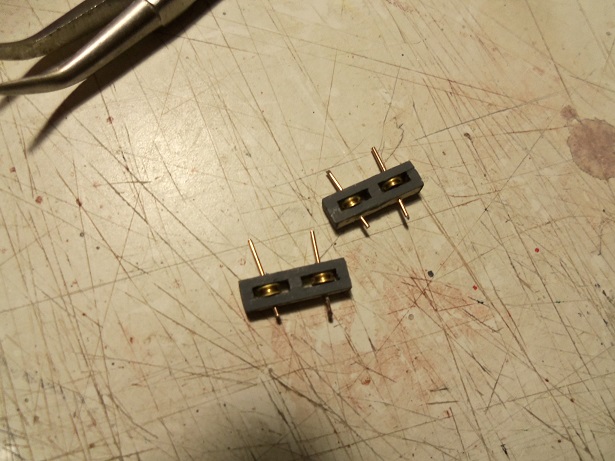
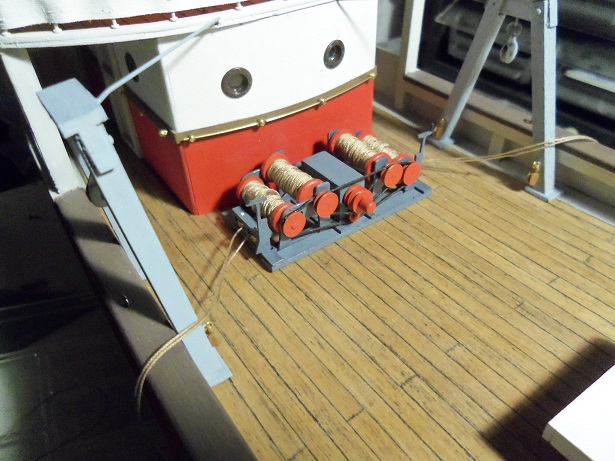
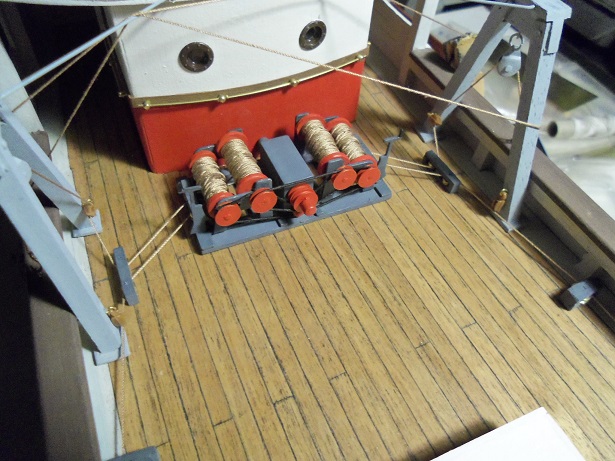
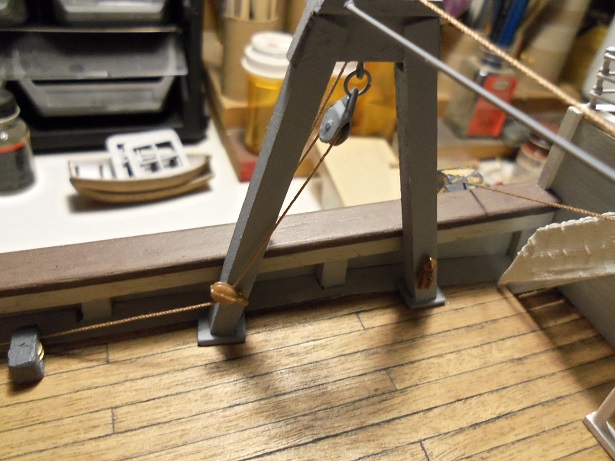
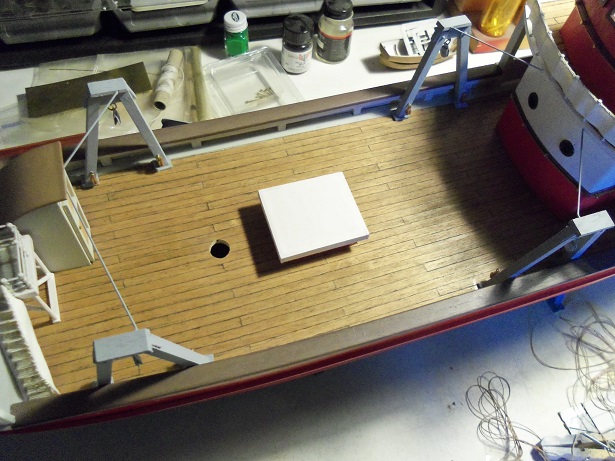
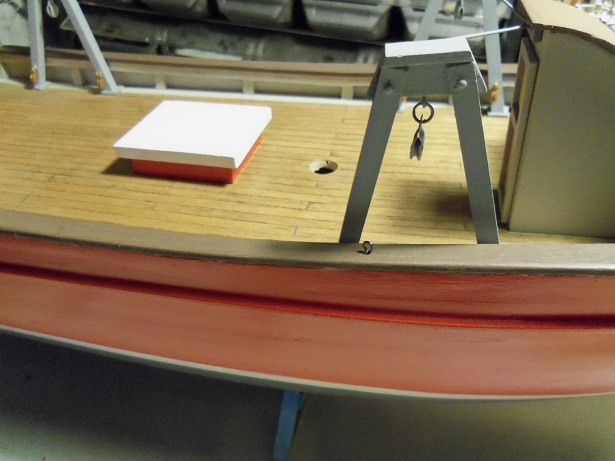
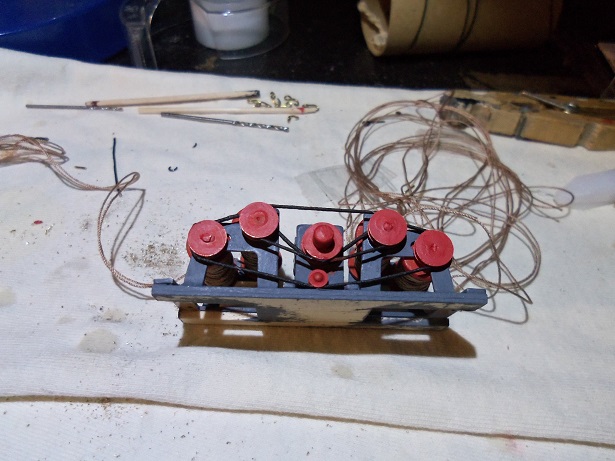
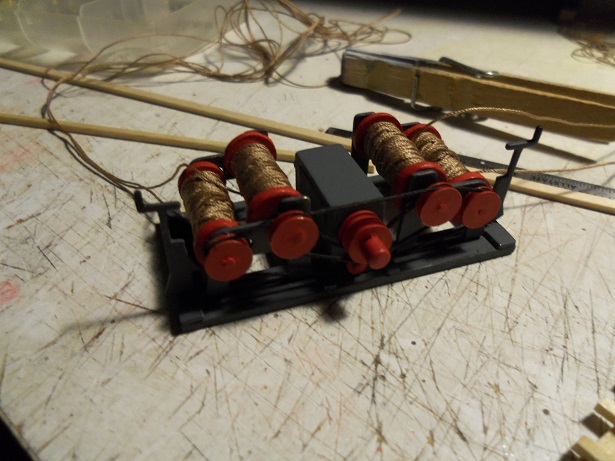
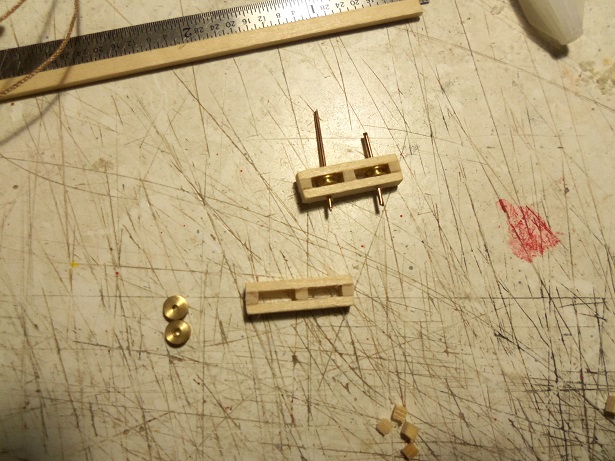
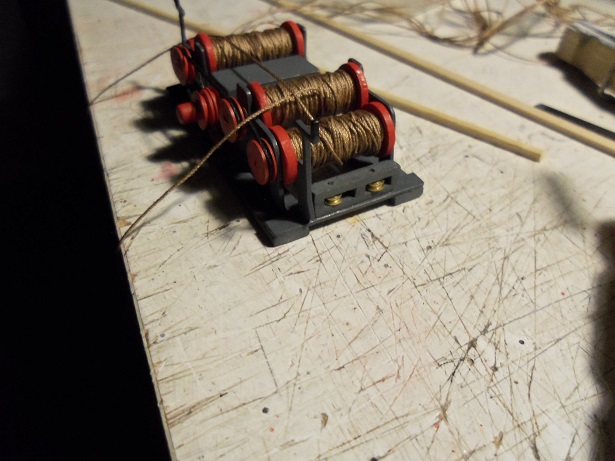
I wanted to get this in to you before bed time.........back to work I'm afraid playtime's over.......blaaaaaaaa! I worked on the gallows winch for a while this evening. of course, in doing the belts, I ran across a problem....right from the get-go. the routing was going to be fouled, since the belt for the inner pulley run, had to start under the crank pulley. how ever I ran it, it was going to interfere with the crank pulley. the only alternative, was to install an idler pulley and redirect the belt so it would crossover to the other side without being in the line of the crank pulley. this was not going to be easy........the only possible spot for a hole to be drilled, was under the crank pulley........and that is solid brass. it wasn't all that bad though.......I used my cordless drill, with a brad size drill {it's like a toothpick in a giant's hand......if you saw my black & decker cordless......the thing is huge}....and managed to drill the hole. with a 10 mm brad, and a 4 mm brass pulley, the idler pulley was installed. this was for the belt routing for the outer pulleys {reels}. a second belt routes around the inner pulleys {reels}. here is how it looks. another thing I saw with it, was that the cables {cord} needs to be routed from the deck level......from under, not over like the boom winch. I will need to make a pair of double block pulleys, which will be located at the base of the winch frame. I began to make them, as I did with the single ones. while these were drying, the brake levers were added to the winch. ...not too elaborate, but they give the look I need to add some to the boom winch......that will be back on the table soon. the block pulley frames were sanded and drilled for the pair of 4 mm brass pulleys that will be inserted in them. I have plenty of wire stubbles......I may need to make another pair......we'll see. these were then painted.........and when the first one was dry, it was fitted with the pulleys, the wire ends trimmed, and cemented in place on the winch frame. by now....the other one should be dry enough to assemble and cement into place. then I can route the cord {cable} through them. once I find out if another pair of double block pulleys are needed.....the game can begin! I can start to populate the deck with all this stuff I been making a few extra bit will be thrown in for interest.....I hope

- 747 replies
-
- 20
-
-
something I had heard about...don't remember all the particulars. fill the gap {scratch} with clear nail polish using a fine tip brush...not sure about the rest of it, but I'm sure there is some buffing involved. thought you may have have known about it >shrug<
- 517 replies
-
- 2
-
-
- Endeavour
- Artesania Latina
- (and 1 more)
-
very interesting picture.......deploying the ship's boat to tow for added speed...and under full sail to boot!
-
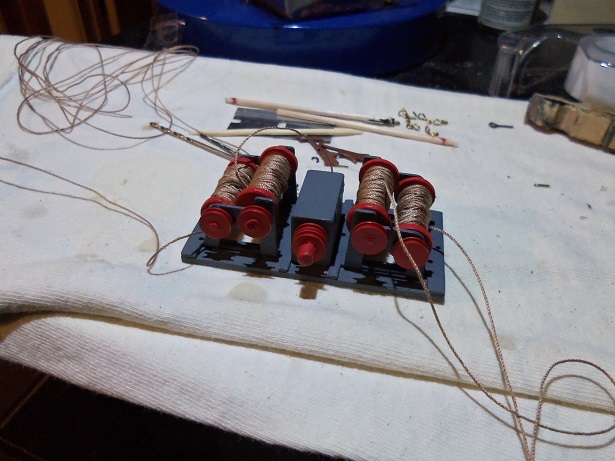
oh my! thanks so much for the overwhelmingly fine comments and likes! as I mentioned....I'd be surprised if there was a trawler out there set up like this........but it has turned out to be fun, throwing automation and function into the build. I plan to portray it as ready, heading out to the fishing area, since with weathering and a full box, is something I've never done before. I'd be too worried that I'd make a mess of it. the catch is another dilemma, as to whether the catch is prepped in any way or harvested live.......some do and some don't. I was going to have smaller conveyors on wheels in front of the hold, but to keep it simple, I shot it down. I enjoy all the suggestions though....please keep them coming. I have a few things I want to add, as extra detail, some in which were suggested to me........even site links would be a big help. I have found some, but I still have gray areas concerning the process of trawl fishing. I'm glad to see the interest, you folks have shown......even after tabling it for so long. I brought it back out, to put a quick finish to it....but to those who know me........I'm sure you figured that wasn't going to happen true to form......I've added extra ideas I've come up with, and your suggestions are giving me more I haven't done too much today.........too busy watching the sad affairs that are going on. I have begun to add the belts to the gallows winch....add a bit more, and then the mid ship can start coming together. I have one picture though, that seemed to land in one of the other folders... the right side is loaded and all the pulleys are in place. I did run into one more small problem with this, but I was able to remedy it with little trouble. I should have more soon thanks again for look'in in.......there's still more to go!
- 747 replies
-
- 16
-
-
it will even hold the 'twist' better .............definitely a super idea
- 749 replies
-
- 3
-
-
- albertic
- ocean liner
- (and 2 more)
-
one would thing there would be a railing around it...........agree also on the ladder, since there is no access even from inside the structure. good idea on the covering........I cover all my projects I'm not working on. it definitely does cut down on the dust factor considering where you have the ladder, in photos it might not be seen, unless they paid attention to it very nice!
- 2,625 replies
-
- 7
-
-
- kaiser wilhelm der grosse
- passenger steamer
- (and 1 more)
-
thanks Pat and Nenad I think that by the time I get done with this winch........I'll have to rework the other one! thanks for the good word all!
-
Cutty Sark by NenadM
popeye the sailor replied to NenadM's topic in - Build logs for subjects built 1851 - 1900
nice work with the hatch! the deck layout looks really good..........- 4,152 replies
-
- 2
-
-
- cutty sark
- tehnodidakta
- (and 1 more)
-
she looks awesome Pat..........so well done, and the rigging is flawless! she looks great in her case did you fix the scratch.......nail polish perhaps?
- 517 replies
-
- 1
-
-
- Endeavour
- Artesania Latina
- (and 1 more)